

Page 1

Setup Guide
For your own safety,
Please read carefully.
Compact Speaker System for iPod
iCUBIC
Product name: ADS-01
Imation Asia Pacic Pte Ltd.
23, New Industrial Road,
#03-01 Century Industrial Building,
Singapore 536209
ww w.td k-me dia. com. sg
AP001059-A
* Imation is a registered trademark of Imation Corp.
* The TDK Life on Record logo is a tr ademark of TDK Corporation and
is used under a trademark license from TDK Corporation.
* iCUBIC is a registered trademark of Imation Corp.
* iPod is a trademark of Apple Computers Inc. registered in the US and
other countries.
* NXT and SurfaceSound are trademarks of New Transducers Limited
of the U.K.
Printed in China
Thank you for purchasing the TDK Life on Record iCUBIC speaker.
• Please read the “Setup Guide” and “Safety and Care Instructions”
carefully and thoroughly before connecting or operating this product for
optimum performance and safety.
• After reading, store the manual in a convenient place for future reference.
Page 2
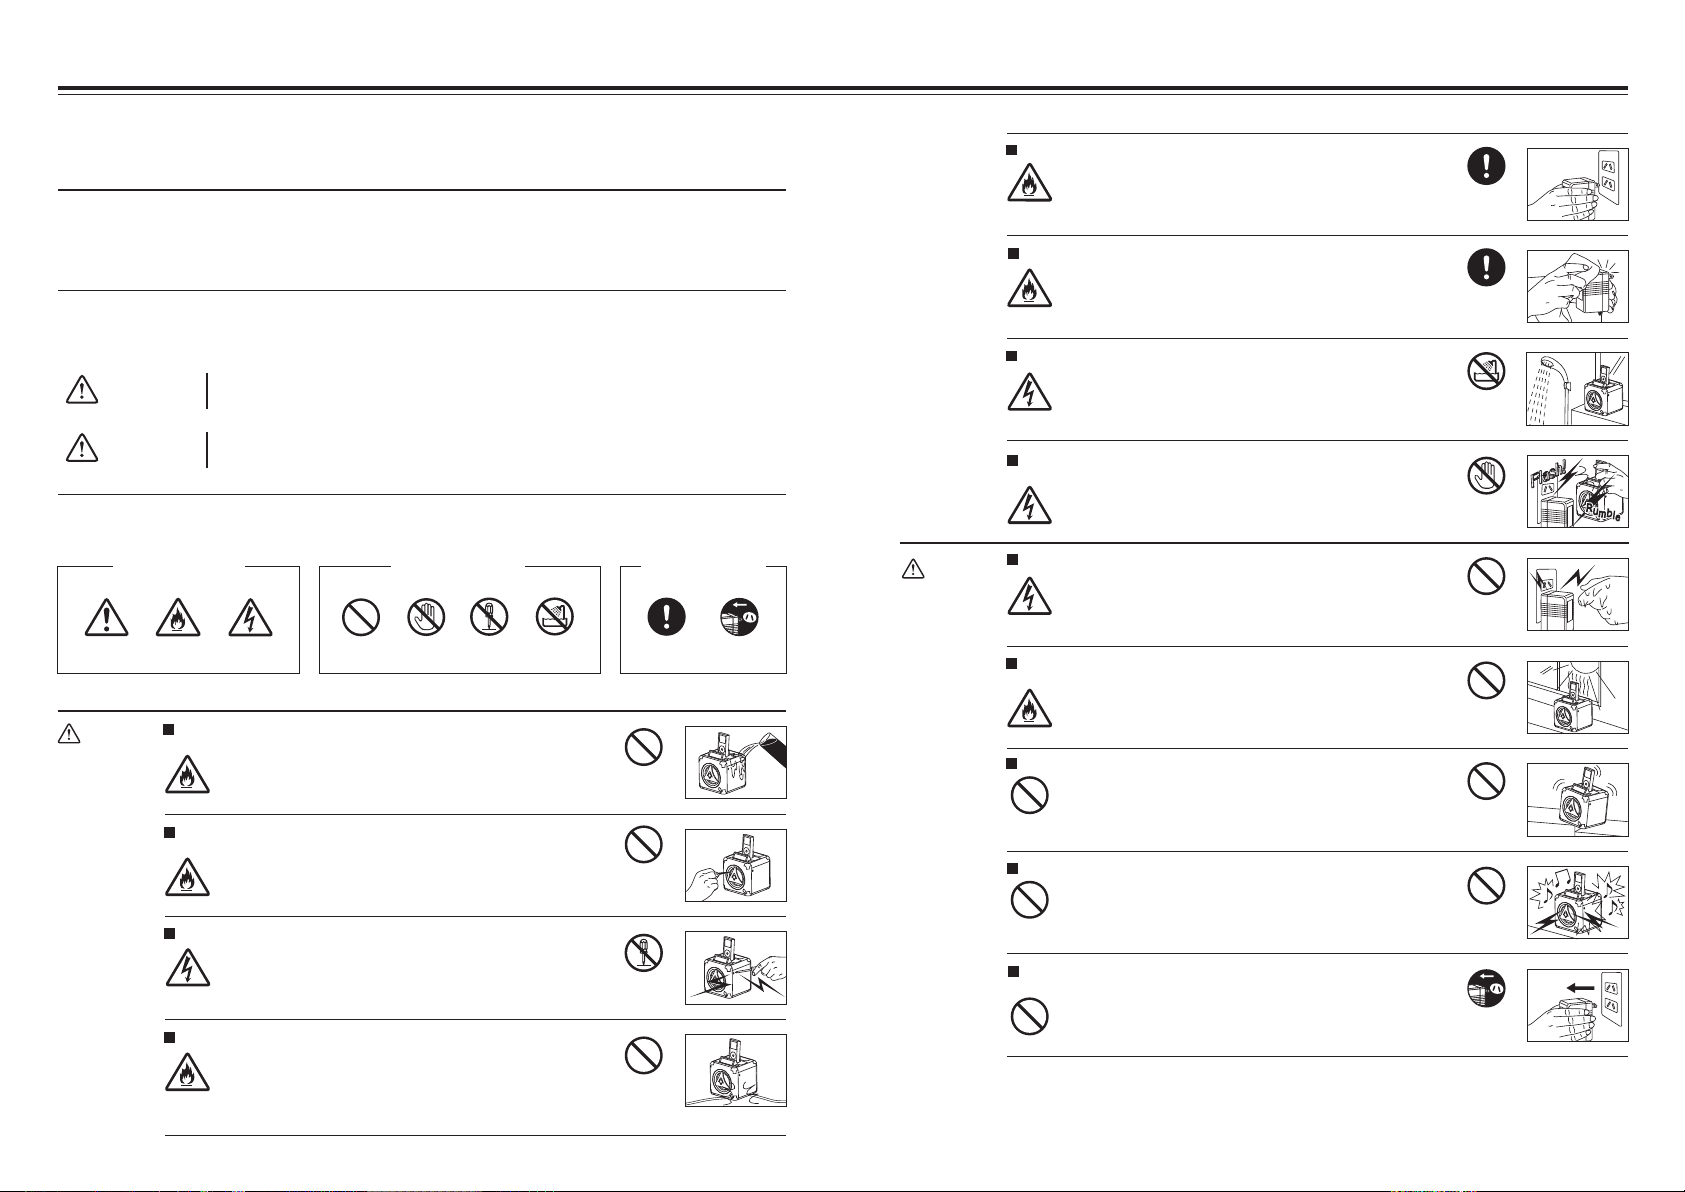
Safety and Care Instructions
(Be sure to read before using this product)
• The cautions listed here include important matters to prevent injury to users or other persons as well
Do not use the equipment other than with 240 volts AC.
Using the equipment with different voltages abroad could cause
fire or electrical shock.
Fire
240V AC
Enforced
as any property damage, in addition to insuring correct and safe use of the product.
• Be sure you understand the meaning of the displays and symbols before reading the main text. Be
sure to observe the cautions at all times.
The level of injury and damage resulting from mistaken use of the equipment is classified and
described according to the following displays. The items to be observed are classified and described
as follows.
Warning
Caution
Indicates matters for which failure to observe the display and mistaken use of
the equipment could lead to fatal or serious injury.
Indicates matters for which failure to observe the display and mistaken use of
the equipment could result in injury or property damage.
The matters to be observed have been classified and described as follows.
Matters for which
caution is required
Caution
Warning
Electrical shock
1 2
Electrical shock
Fire
Do not place water or drinks on the satellite speaker, sub-woofer
or remote sensor.
Water in the interior could cause fire or electric shock.
Fire
Do not insert foreign objects in the satellite speaker, sub-woofer
or remote sensor.
Metal or easily burnable objects inside the system could cause fire
or electric shock.
Fire
Disassembly or remodelling.
This could cause fire or electric shock.
Always ask your dealer or Imation office in your country for repairs
or inspection.
Do not damage the power cord.
Damage to the power cord could cause fire or electric shock.
Never attempt to fix the power cord. Do not place heavy objects on
it or pull it with excessive force.
Fire
If the power cord should become damaged for some reason,
contact your dealer or Imation office in your country.
Forbidden matters Enforced matters
Forbidden
Contact
forbidden
Disassembly
forbidden
Water leakage
forbidden
Forbidden
Forbidden
Disassembly
forbidden
Forbidden
Enforced Remove adapter
from socket
Caution
Clean the power plug at regular intervals.
If the power plug is left in the socket for long periods, dust and dirt
could collect on it, resulting in fire.
Remove the power plug at regular intervals from the socket to clean
Fire
off dirt and dust.
Do not use in wet places or in high humidity.
Using this equipment in the bathroom or outside could cause fire or
electrical shock.
Electrical shock
Do not touch the electrical cord or main unit in case of an
electrical storm.
This could result in electrical shock.
Electrical shock
Do not touch the power plug with wet hands.
Inserting or removing the power plug with wet hands could cause
electrical shock.
Electrical shock
Do not locate in areas with direct sunlight or near thermal
appliances.
This could cause fire or electrical shock.
Fire
Locate in a stable location.
Placing the equipment in an unstable location or on a slant could
cause the equipment to fall and result in injury. Also be careful about
the strength of the installation and attachment location.
Forbidden
Do not listen to the equipment over long periods at high volume.
Listening for long periods at high volume could have a negative effect
on the hearing. Set to a volume roughly equal to the volume of
someone calling you from across the room.
Forbidden
Remove the power adapter during extended absences or
vacations.
For safety purposes, be sure to remove the power adapter from
the socket in such cases.
Forbidden
Enforced
Water leakage
forbidden
Contact
forbidden
Forbidden
Forbidden
Forbidden
Forbidden
Remove adapter
from socket
Page 3

Safety Cautions Regarding Batteries
Warning
Do not touch the fluid with your bare hands if fluid has leaked from the battery.
Battery fluid in the eyes can cause blindness or injury. Fluid on body parts or clothing can cause
injury or skin inflammations.
• In case of fluid in the eyes, immediately rinse with tap water or other clean water and call a
Contact
forbidden
Forbidden
Forbidden
physician immediately.
• In case of fluid on body parts or clothing, immediately rinse with clean water. In case of
symptoms such as skin inflammation, consult with a physician.
Keep batteries out of the reach of infants and children.
Swallowed batteries could cause asphyxiation or damage to the stomach or other organs.
• In case of accidental swallowing immediately call a physician.
Do not expose batteries to fire or heat.
The batteries could rupture or the fluid could leak out, causing injuries and burning.
Operating Instructions for Optimum
Performance and Safety
Placement of the system
Please avoid the following locations:
• Places with high humidity and poor ventilation.
• Places exposed to direct sunlight and places near heating devices.
• Places exposed to extreme cold and dust.
• High places where there is danger of falling.
Cleaning of the system
Clean with a soft dry cloth. If the unit is extremely soiled, wipe with a soft cloth slightly moistened with a
small amount of mild detergent, and subsequently dry with a fresh soft cloth. Please avoid using paint
thinner, benzene, or alcohol, which may damage the surface of the devices.
Caution
Do not attempt to take apart, remodel or recharge batteries. Do not get batteries wet.
The batteries could rupture or the fluid could leak out, causing injuries and burning.
Disassembly
forbidden
Do not use batteries other than designated batteries. Do not use different types of batteries
together.
Differences in the properties of the batteries could cause them to break or the fluid to leak out,
resulting in injuries and burns.
• Confirm the product number of the batteries prior to use.
Forbidden
Insert batteries with the positive and negative polarity in the right direction.
If batteries are inserted in the reverse direction, it could result in heating or rupture of batteries,
causing fluid to leak out and leading to injuries or burns.
• Correctly insert the batteries according to the display on the equipment.
Enforced
Remove batteries from the equipment when not using batteries for a long time or when the
batteries are worn out.
If the batteries are left in the equipment, the fluid could leak out, causing injuries or burns.
Enforced
Connecting cables
When you connect other devices to the system with an accessory connecting cable, please read the
setup guide of the device prior to connection. If you purchase a connecting cable, please ensure it is
the correct stereo mini-plug / stereo mini-plug (3.5mm stereo jack cable). If you use a mono cable or a
resistance cable, the sound may only be emitted from only one speaker.
3 4
Page 4

TDK Life on Record Compact Speaker System for iPodWhat’s in the Package?
Main unit x 1
Power adapter x 1
Remote controller x 1 Docking adapters x 7
No.1
No.2
Dual alarm and snooze function which plays your iPod or favourite FM
station when activated.
Recharges iPod battery while connected.
5 pre-selectable equaliser settings - Flat, Rock, Pop, Classic, Jazz.
Blue back lit LCD screen shows time and speaker functions.
FM radio with 20 presets.
Includes 7 docking adapters to suit a wide range of iPods.
Audio-in 3.5 mm jack for connecting external sources including mp3
player and TV.
No.3
No.4 No.5
(CR2032 battery included)
No.7
Setup guide x 1 Warranty card x 1
5 6
No.6
Page 5

Parts Names
Main unit LCD display window
Clock button
Sleep button
Function button
Standby indicator
Volume up button
Volume down button
Standby button
iCUBIC
Top
iPod dock
Play/pause button
Memory button
Skip/tuner up button
Skip/tuner down button
Snooze button
Alarm 1 button
symbol indicator
Display window
Front
Remote control
Speaker
Standby button
IR sensor
Back
Function button
Menu button
Select button
EQ button
Mute button
Stereo indicator
Track/number/time indicator
Alarm 2 button
symbol indicator
Repeat/mono/st. button
Play/pause button
Skip/search down button
Skip/search up button
Preset/arrow down button
Preset/arrow up button
Alarm 1 button
Alarm 2 button
Volume down
button
DC jack
AUX in jack
7 8
FM antenna
Volume up
button
Page 6

Preparing to Use
Setting a dock adapter
1. Use in C-display
-40GB/60GB-iPod
5. Use in iPod-Video
-30GB
2. Use in iPod -40GB 3. Use in iPod-Video
-60GB
6. Use in iPod-Nano
1GB/2GB/4GB
Select
4. Use in iPod-20GB
-U2
7. Use in Mini 4GB
/6GB iPod
Connector dock
Power cord connection
Before using, connect the DC power cord to the DC outlet.
DC cord
Setting your iPod
Putting the battery into the remote control unit
Press down of the compartment cover, and slide the cover off
open the compartment. Place the one accessory CR2032
battery in the remote control according to the polarity markings
(“+” and “–”) inside the compartment and on the battery. Place
the cover into the compartment, press down lightly, and push it
inside until it snaps on.
Note: If the remote control is not in use for a long periods, the
battery will become weak, and the remote control will be not
function, please replace with new one if above happens.
CR2032
9 10
Page 7

Operating the Unit iPod Operation
When you first plug the unit into the AC outlet, the unit will be in standby mode. You can press the
standby button on the unit (or on the remote control) to switch the unit ON or OFF. Pull the AC plug out
of the wall socket if you want to switch off completely.
Power/Standby
• Press the standby button on the unit (or remote control) to switch the unit on.
• Select the sound (iPod, AUX, or Tuner) by pressing the function button.
• Adjust the volume with the volume (up or down) button.
• Set the present equalizer (classic, rock, jazz, pop or flat) with the EQ button on the remote control.
• Press the standby button again to turn off the unit.
Clock Setting
During the unit in standby mode:
• Press the clock button until the time displays 12-hour or 24-hour digit flashing.
• Press and hold the clock button until the time displays hour digit flashing.
• Press the skip/search (down or up) button to adjust hour digit.
Press the clock button once again, the time display minute digit flashes, press the tuning/scan (
or ) button to adjust minute digit.
• Press the clock button once again to confirm the time.
Note: Each enable state as shown above will be cleared if the key is not pushed in 10 seconds.
Function Select
During standby mode
• Insert the iPod players in the iPod connector dock securely.
• Power on the unit, and then press the function button to the iPod mode. The iPod indicator will
appear on the unit display.
During iPod mode
• Press the play/pause button once to start the iPod playing.
Adjust the volume control by pressing the volume (up or down) button.
• Press the play/pause button once to pause the current track. To resume the playback, press the
play/pause button once again.
• To skip forwards or backwards, press the skip/search ( or ) button to select the desired track.
• Press the repeat/mono/st. button to make the iPod playing repeatedly.
How to select the iPod menu mode
• While the unit is in iPod mode, press the menu button once on the remote control and then the unit
will enter the iPod menu function.
• Press the preset/arrow (up or down) button to skip the current menu on the remote control only as
below:
Music > Extras > Photo Import (excluding the iPod Mini) > Settings > Shuffle
Songs > Backlight > Now Playing will show on the iPod player display.
• Press the select button once to select the desired menu folder on the remote control only.
• Press the preset/arrow (up or down) button again to search the current content in the each desired
menu folder.
• If you want return to the iPod menu, press the menu button again.
Press the function button to select the desired mode. Display changes as below:
iPod
11 12
AUX Tuner
Charging the iPod player battery through the main unit
• If the iPod player has an internal non-removable battery, the battery may need to be charged if it
hasn’t been used for a while.
• You can charge the iPod player through the main unit automatically under the standby or power on
mode.
Note: The iPod player battery is 80-percent charged in about an hour, and fully charged in a few
hours. If you charge it while playing music, it may take longer.
Note:
• At any time when the unit is in “iPod” or “iPod menu” mode, you may control the iPod player via the
main unit, remote control or iPod player.
• At all times, the iPod player must be docked propely to avoid damage to either the unit or iPod player.
Page 8

Radio Operation
AUX Input
• Press the function button to select the tuner mode on the unit (or remote control) to select the radio
FM operation.
• Select the desired frequency with the skip/search (up or down) button continuously until you read the
correct frequency or the reception is at its best.
Mono/stereo select
This unit can receive FM mode only.
• When you want to select FM stereo station, press the repeat/mono/st. button.
When you receive a FM stereo station the “ ” indicator will appear on the display, you can
receive FM stereo transmission.
• When you press the repeat/mono/st. button again, the FM stereo indicator will turn off and switch to
mono FM status.
Automatic tuning
• Press the skip/search (up or down) button for a few seconds, then release the button. The tuner will
automatically search the first station of sufficient signal strength.
• Repeat above procedure if you wish to select another station.
Programming preset stations
You can also preset stations of your choice and store up 20 FM stations in its memory. To store your
selected broadcasting stations.
• During the unit in tuner mode, press the skip/search (up or down) button to search the required
station.
• Press the memory button.
• Press the preset/arrow ( or ) button for your desired station number.
• Press the memory button once again to confirm your selection.
• To program more stations into memory, repeat the above steps 1 to 4.
• To change the stored preset stations, repeat the above steps 1 to 4.
The AUX input is located at the rear of the unit. Use a 3.5 mm stereo jack cable to connect audio
equipment through the line in jack.
• To select the AUX input function, repeatedly press the function button on the unit (or remote control)
until the AUX is indicated on the display.
• Press the volume (up or down) button to adjust the sound output level.
EQ Control (on the remote control)
EQ shows the present sound tone.
When you press the EQ button on the remote control, the sound tone changes as below.
Classic
RockFlat Jazz Pop
To Set Sleep Function
• If you want to fall asleep to music, press the sleep button on the unit only.
• You may adjust the iPod, AUX or tuner sleep function to play from 90, 60, 45, 30 up to 15 minutes of
music before shutting itself off automatically.
60
4590 30 15 00
Normal
Note:
• Storing a new station into a preset location will erase the previously stored station in that location.
• Power off/failure or power cord disconnection will clear the memory of all preset stations.
Perform the stations presetting procedures again to store the stations.
Selecting the preset stations
• Press the preset/arrow (up or down) button to select the desired preset station number.
• The numeric location of that preset station is displayed along with the corresponding frequency.
FM antenna
Make sure the FM wire antenna is unwound and extended to its full length. It may be necessary to vary
the direction of this antenna until you find the position that provides the best reception for your favorite
FM stations.
13 14
Mute Setting Space (on the remote control)
• When you press the mute button once on the remote control, the mute and the current audio mode
indicators will flash, the audio output will be temporarily terminated.
Mute on FM 88.50MHz
• Press the mute button again, the volume level and the audio output will return to normal.
FM 88.50
MHz
Page 9

Alarm Clock Operation
During the unit in standby mode.
To set the correct “Alarm 1”
• Press the “Alarm 1” button once on the remote control only. The “AL 1 bell symbol” indicator will light
on and the “Hour” indicator will flash too. Adjust the correct “Hour” by pressing the “Skip/search” (up
or down) button.
• Press the “Alarm 1” button twice. The “AL 1 bell symbol” indicator will light on and the “Minute”
indicator will flash too. Adjust the correct “Minute” by pressing the “Skip/search” (up or down) button.
• Press the “Alarm 1” button again to select to tuner, iPod, buzzer to set the desire alarm mode status.
• Press the “Alarm 1” button repeatedly to confirm the “Alarm 1” function, the “Hour/minute” indicator
will become to “Clock” and the “AL 1 bell symbol” indicator will light on the LCD display.
To set the correct “Alarm 2”
• Press the “Alarm 2” button once on the remote control only. The “AL 2 bell symbol” indicator will light
on and the “Hour” indicator will flash too. Adjust the correct “Hour” by pressing the “Skip/search” (up
or down) button.
• Press the “Alarm 2” button twice. The “AL 2 bell symbol” indicator will light on and the “Minute”
indicator will flash too. Adjust the correct “Minute” by pressing the “Skip/search” (up or down) button.
• Press the “Alarm 2” button again to select to tuner, iPod, buzzer to set the desire alarm mode status.
• Press the “Alarm 2” button repeatedly to confirm the “Alarm 2” function, the “Hour/minute” indicator
will become to “Clock” and the “AL 2 bell symbol” indicator will light on the LCD display.
Snooze Function
When the alarm sounds, press the snooze button. The alarm will go off and come on again in
approximately 5 minutes. You may repeat this cycle several times during the 1 hour alarm cycle.
Note:
• In any time, you can press the “standby” button once on the unit or remote control to stop the “Alarm
1 or 2” function. The “AL 1 or 2 bell symbol” indicator will still light on the LCD display. (It may keep
the “Alarm 1 or 2” function in next day)
• In any time, if you want to stop the “Alarm 1 or 2” function fully, you can press the “Alarm 1 or 2”
button once on the remote control only. The “AL 1 or 2 bell symbol” indicator will turn off on the
display. The function of the “Alarm 1 or 2” will cancel at once.
Troubleshooting
Symptom Possible Cause Remedy
Screechy,
abrasive,
unclean
sound.
Distorted
sound.
No sound.
Volume
level is
too low.
The sound volume level of the main
system is too high.
Input signal is too strong.
(in case of headphone terminals)
The bass boost function of the player
is turned on while connected to the
headphone terminal.
The adapter is not plugged into an
AC power outlet.
The POWER switch of the main
system is in the OFF position.
The connection (input) cable is not
properly connected.
� Line output terminal connection
� Headphone terminal connection
The volume on the system is set to
minimum.
The volume of the connected device is
set too low. (headphone terminal)
A commercially available resistance
cable is used for the connecting cable.
Turn the Volume control to decrease the volume.
Adjust to a level lower than medium level using
volume of connection device as a reference.
Switch off the bass boost function of the player.
Plug the adapter into a proper AC power outlet.
Turn the POWER switch ON.
Check that the cable is connected to the line output
terminal on the connecting device and the INPUT
terminal on the main system.
Check that the cable is connected to the
headphone terminal on the connecting device and
the INPUT terminal on the main system.
Turn the VOLUME control on the main system to
increase the volume.
Adjust to a level higher than medium level using
volume of connection device as a reference.
Use a connecting cable without resistance.
15 16
Page 10

Main Specifications
Main unit
Power supply: AC/DC adaptor input 230V-50Hz
output DC 12V 1.0A
Output power: 5W
Unit dimensions: 135 x 143.7 x 135 (width/height/depth)
Weight: 1.25kg
Radio section
Frequency range: FM 87.5 - 108 MHz
∗The specifications and appearance of this product are subject to change for improvement without prior notice.
17 18
 Loading...