

Page 1
Wireless 360
Speaker
Please read these instructions completely
User Guide
before operating this product
TDKperformance.eu
A360
Coluna sem
fios 360
Leia as seguintes instruções na sua totalidade
Manual do utilizador
antes de usar este produto
TDKperformance.eu
A360
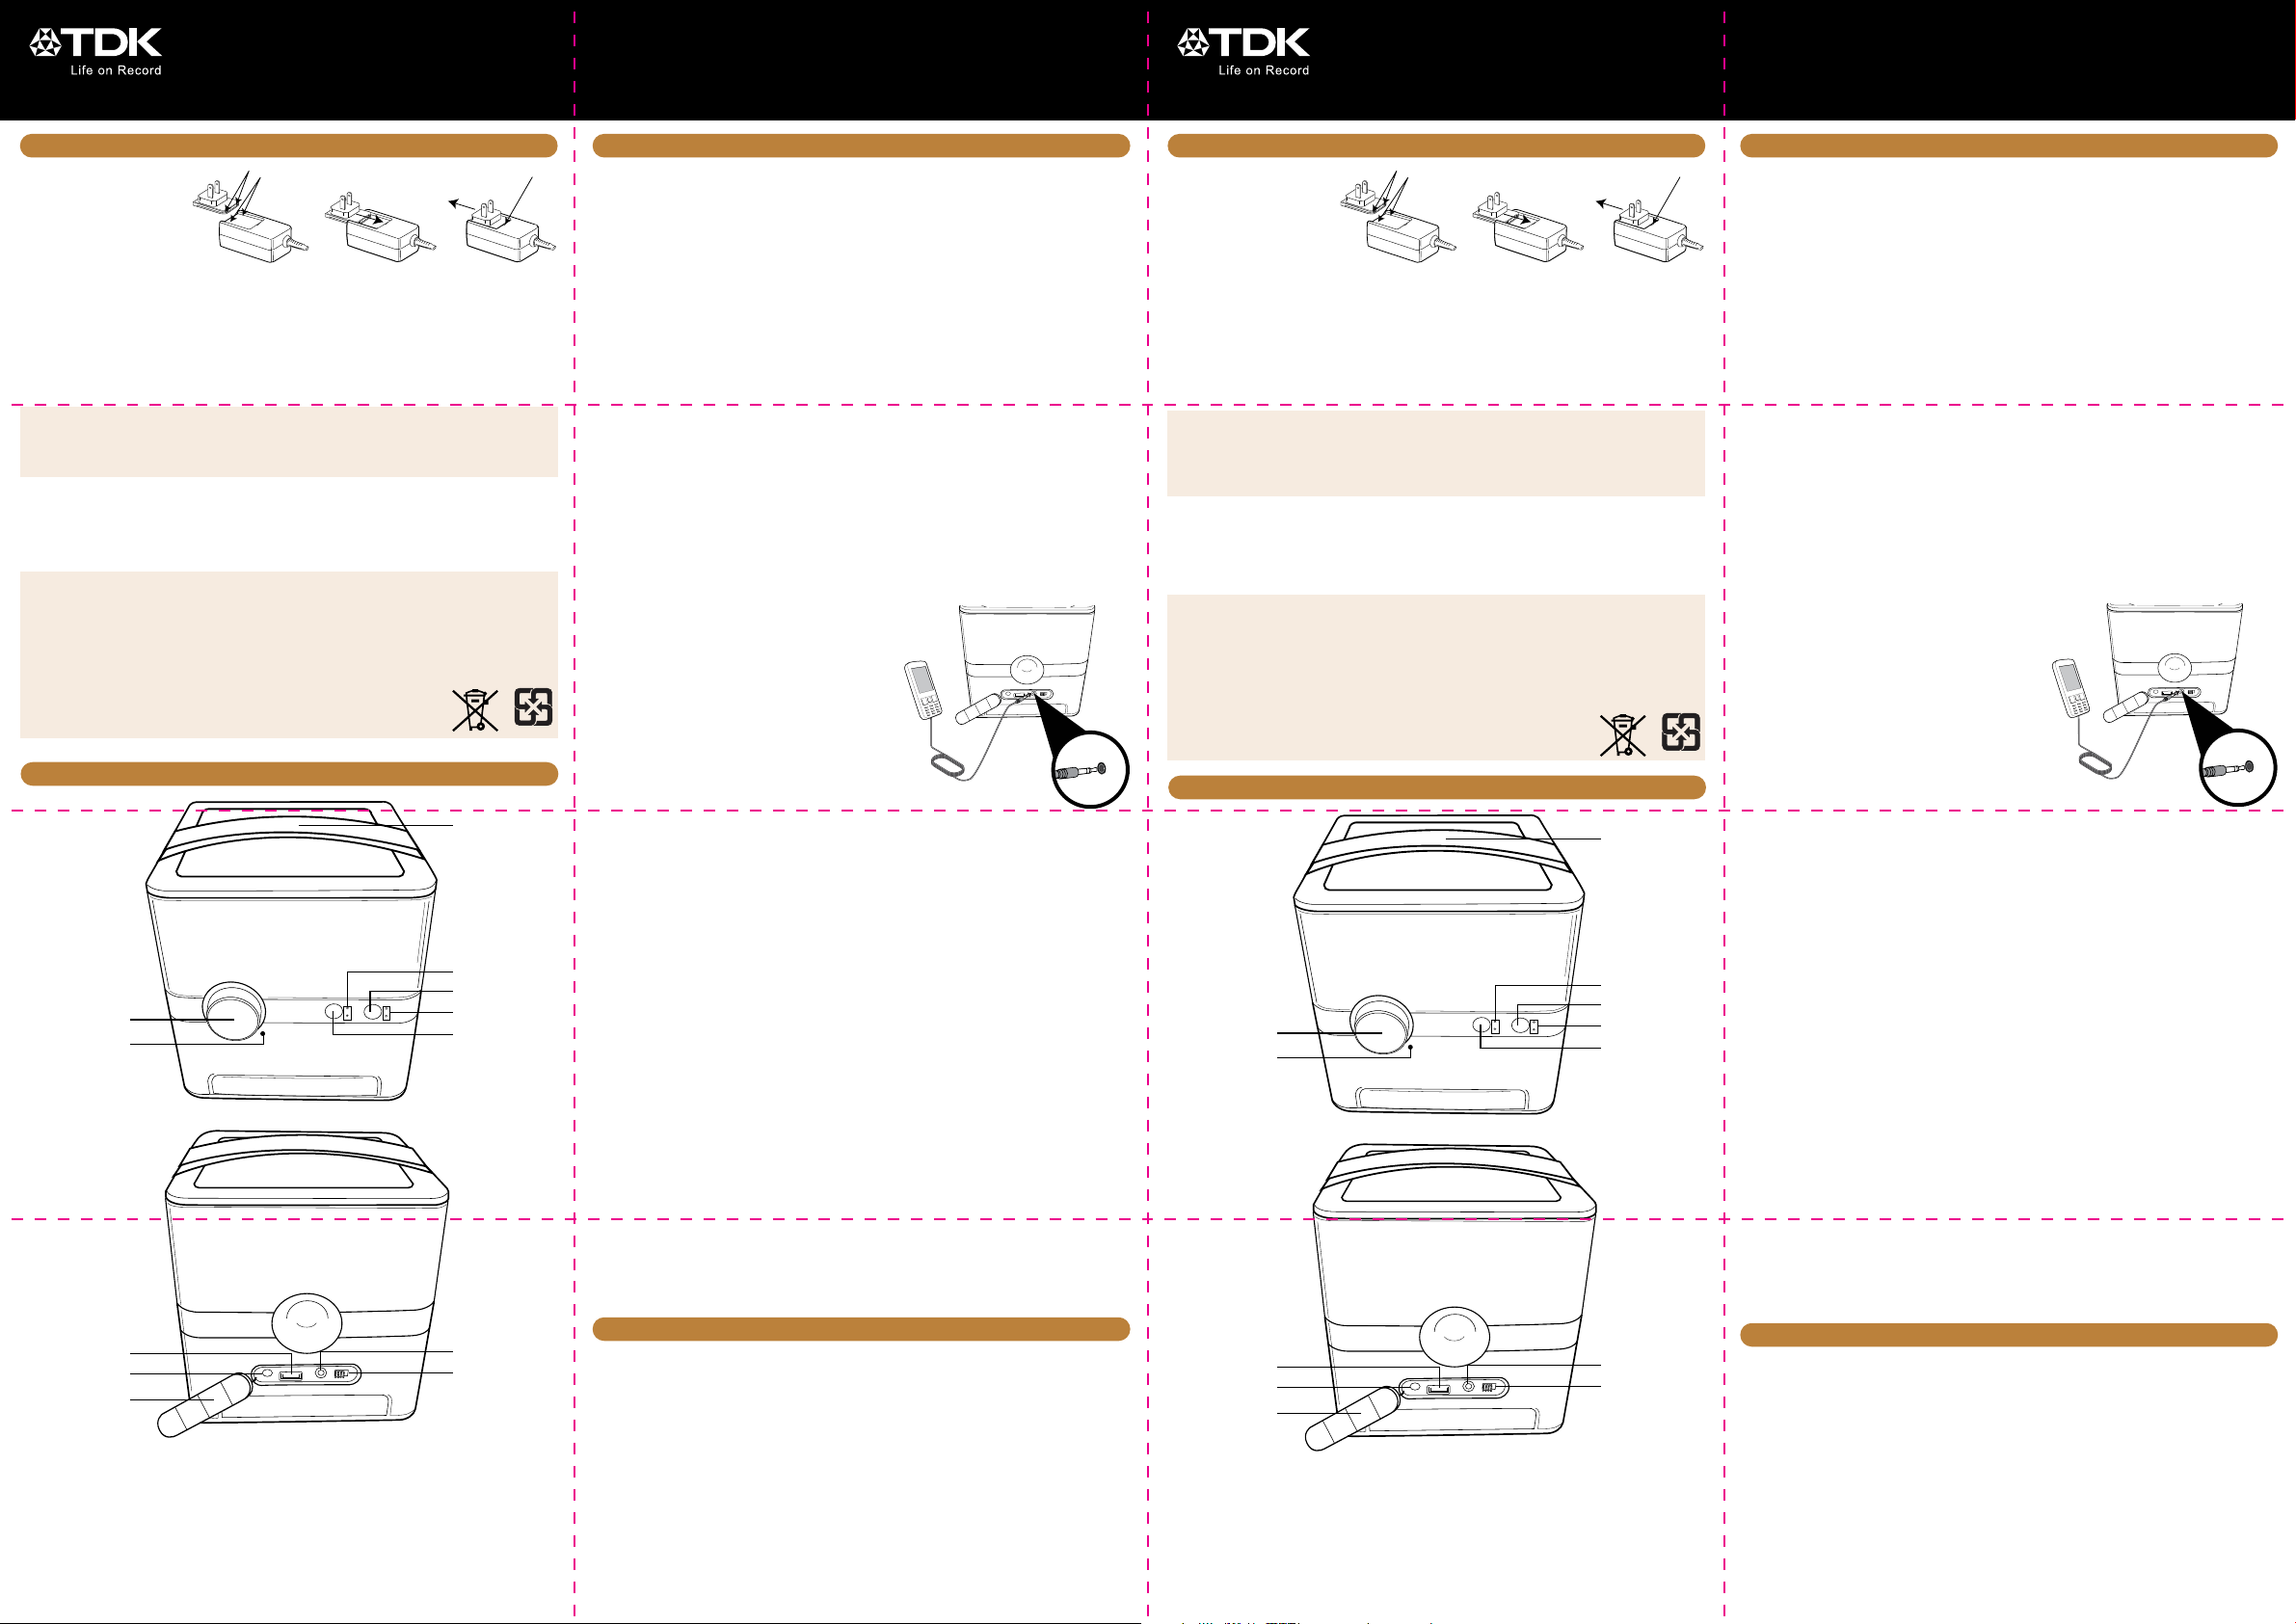
AC CONNECTION / RECHARGING THE BATTERY
1. Select the appropriate
plug for your country
and connect it to the AC
power adapter.
2. Connect the AC power adapter jack to the DC IN jack X on the rear of the unit and then connect
the plug to a 100V-240V wall outlet.
This unit has a built-in rechargeable battery that will automatically be charged as long as the unit is
plugged in. If the battery is low, the Battery indicator v will turn on. The Battery indicator will blink red
when low. It will be solid red when charging.
Note: The battery will provide approximately 6 hours of operation at normal listening level.
Notes:
• Only use the supplied AC adapter.
• Remove both the DC plug and AC-IN plug to disconnect AC adapter when not in use.
• Disconnect the AC cord to use with DC power (rechargeable battery).
Replacing the Rechargeable Battery:
If the battery does not supply enough power (see Rechargeable Battery Notes below), order a replacement
battery at www.tdkperformance.com and remove the four screws on the left side of the unit. Disconnect the
connector and remove the battery. Then connect the new battery and reinsert the four screws.
Rechargeable Battery Notes:
• Each time you charge and discharge the battery (charge cycles), battery capacity slightly diminishes.
Rechargeable batteries have a limited number of charge cycles and need to be replaced eventually.
• You may wish to replace your battery when, or before, the battery does not supply enough power
to function your device. Also, proper disposal is essential from environmental and safety point of
view. Putting any battery directly in the trash will harm the environment.
• Do not incinerate.
LOCATION OF CONTROLS
3
4
5
1
2
8
9
6
7
11
12
10
1. Power/Volume Control
2. Low Battery Indicator
3. Carrying Handle
4. Bluetooth® and Aux Source Indicators
5. Treble/Bass Button
6. Treble/Bass Indicators
7. Source/Select Button
8. USB Charge Jack
9. DC IN Jack
10. Rubber Flap
11. AUX Jack
12. Battery OFF/ON Switch
OPERATION
Turning the A360 On and Off:
1. For AC operation: Press the Power/Volume control u on the main unit to turn the power on.
2. For DC operation: Slide the Battery switch al to the ON position. Press the Power/Volume control
u; the unit will turn on the previous source and volume.
3. To turn the power off, press the Power/Volume control u.
Pairing a Bluetooth Device
1. Turn the A360 on; the LED(s) around the Power/Volume control will light and the previously
listened to source and volume will be selected.
2. Press and hold the Source/Select button V until the Bluetooth indicator blinks rapidly to make the
A360 “discoverable.”
3. On the Bluetooth device, enable Bluetooth and select “A360” from the Device List. If the Bluetooth
device asks for a passkey, use “0000”. Some Bluetooth devices will ask you to accept the
connection. If the units are paired properly, the speaker will beep and the Bluetooth indicator will
light solid blue. If it failed, the Bluetooth indicator will blink slowly.
IMPORTANT: After step 3, you have two minutes to pair the units.
Note: After you pair a device, the A360 will remember it for future use.
Using a Bluetooth Device
1. Turn the A360 on; the LED(s) around the Power/Volume control will light and the previously
listened to source and volume will be selected.
2. With a unit paired (see previous section), press the Source/Select button V so the Bluetooth
indicator lights.
3. Operate your Bluetooth device and its sound will be heard through the A360’s speakers.
4. Adjust the volume by rotating the Power/Volume control u on the A360, or the Volume control on
the Bluetooth device, and adjust the Bass and Treble as described later in this guide.
AUX Jack (Rear of A360)
1. Insert one end of an audio cable (not included) into
the LINE OUT or Headphone jack on your external
audio unit and the other end into the AUX jack ak on
the rear of the A360, under the flap.
2. To listen to the external audio unit, turn the A360 on
and press the Source/Select button V once so the
AUX indicator lights to select the Line In mode.
3. Start playback of the external unit and the external
audio unit’s output sound will be heard through the
A360’s speakers.
4. Adjust the volume using the Power/Volume control u
on the A360, or the Volume control on the Bluetooth
device, and adjust the Bass and Treble as described later in this guide.
Charging a USB Device with the A360’s USB Jack
Connect your device via USB to the USB jack W on the A360. Your device will charge when the A360 is
connected to AC power and power ON u. Your device will also charge during operation in DC mode if
Battery OFF/ON switch al is ON and the speaker is power ON u. See the owner’s manual that comes
with the external equipment on charging specifications. Some devices may require a special USB adaptor
cable.
Note: USB charging will significantly reduce battery life in DC mode.
Setting the Treble and Bass
1. TREBLE: Press the Treble/Bass button y until the Treble Indicator lights. Adjust the setting using the
Power/Volume control u.
2. BASS: Press the Treble/Bass button y until the Bass Indicator lights. Adjust the setting using the
Power/Volume control u.
Note: After five seconds, the unit will save the Bass/Treble settings and revert to Volume selection mode.
Auto Power Off
If the unit has no audio signal or a USB device is not charging, for 20 minutes, the unit will turn itself
off. To “wake” the unit up, simply press the Power/Volume control u.
Splash Resistant
The A360 is splash resistant (IPX3 rating under international standard IEC 60529), but cannot be
submerged in water or be subject to constant flow of water. In order to ensure the product is splash
resistant, close the rubber flap at on the rear of the A360. To properly close flap, fully insert center
rubber dongle (on inside of flap) into the DC IN jack X until flap center is flush. Insert the other dongle
into USB jack W, then smooth out entire flap until flap is flush with the sides of the A360.
Troubleshooting
If the A360 is not producing sound, adjust the volume level on your digital music device to high.
SPECIFICATIONS AND COMPATIBILITY
GENERAL:
Power Source (AC) ............. Input: 100-240V AC, 50/60Hz,
........................................ 1.2 A max, Output: 19 V DC, 2A
Dimensions ........................... 6 (W) x 6 (H) x 6 (D) inches
................................... 15.2 (W) x 15.2 (H) x 15.2 (D) cm
Weight ...................................................... 4.4 lbs / 2.0 kg
Speakers ............................... 4 x 1 inch full-range drivers,
..............................................................4 inch subwoofer
Specifications are subject to change without notice.
The TDK Life on Record Logo is a trademark of TDK Corporation and is used under license.
All other trademarks and logos are property of their respective owners.
The Bluetooth
use of such marks by Imation Corp is under license.
®
word mark and logos are registered trademarks owned by Bluetooth SIG, Inc. and any
Speaker Power Output .......... 2 W x 4 + 15 W (subwoofer)
Wireless Audio .............................. Bluetooth version 2.1,
.................................................. A2DP profile, AAC Codec
Line-input Audio .........................3.5 mm stereo jack up to
....................................................... 2.5 Vrms input signal
USB Port. ................................. 5.0 V @ 0.5 A charge only
63953002B
LIGAÇÃO AC / RECARGA DA BATERIA
1. Seleccione a ficha
apropriada ao seu país e
ligue-a ao transformador
AC.
2. Ligue a entrada do transformador AC à entrada DC IN X na traseira da unidade e de seguida ligue
a ficha a uma tomada de parede de 100V-240V.
Esta unidade possui uma bateria recarregável incorporada que será automaticamente carregada quando
a unidade se encontrar ligada à corrente. Se a bateria estiver fraca, o indicador de bateria v acenderá.
Quando a bateria estiver fraca, o indicador de bateria acenderá uma luz vermelha intermitente. A luz
vermelha deixará de estar intermitente quando se encontrar em carga.
Observação: A bateria fornecerá cerca de 6 horas de funcionamento a um nível de audição normal.
Observações:
• Use apenas o transformador AC fornecido.
• Remova ambas as fichas DC e AC-IN para desligar o transformador AC quando o mesmo não se
encontrar em utilização.
• Desligue o cabo de alimentação AC para utilização com alimentação DC (bateria recarregável).
Substituição da bateria recarregável:
Se a bateria não fornecer energia suficiente (consulte as observações abaixo sobre a bateria recarregável),
encomende uma bateria de substituição em www.tdkperformance.com e remova os quatro parafusos no
lado esquerdo da unidade. Desligue o conector e remova a bateria. De seguida ligue a nova bateria e
reintroduza os quatro parafusos.
Observações sobre a bateria recarregável:
• Sempre que carrega e descarrega a bateria (ciclos de carga), a capacidade da bateria diminui
ligeiramente. As baterias recarregáveis têm um número limitado de ciclos de carga e necessitarão
eventualmente de ser substituídas.
• É aconselhável que substitua a bateria quando, ou antes de, a bateria não fornecer energia
suficiente para alimentar o dispositivo. Além disso, é essencial uma eliminação adequada do ponto
de vista ambiental e de segurança. Colocar qualquer bateria directamente no lixo prejudicará o
meio ambiente.
• Não incinerar.
LOCALIZAÇÃO DOS CONTROLOS
3
4
5
1
2
8
9
6
7
11
12
10
1. Controlo de Alimentação/Volume
2. Indicador de bateria fraca
3. Alça de transporte
4. Indicadores de fonte por Bluetooth®
e Aux
5. Botão de Agudos/Graves
6. Indicadores de Agudos/Graves
7. Botão de Fonte/Selecção
8. Cabo USB de carregamento
9. Entrada DC IN
10. Tampa de borracha
11. Entrada AUX
12. Interruptor OFF/ON da bateria
FUNCIONAMENTO
Ligar e desligar a coluna A360:
1. Para o funcionamento AC: Pressione o controlo de Alimentação/Volume u na unidade principal para
a ligar.
2. Para o funcionamento DC: Deslize o interruptor da bateria al para a posição de ON. Pressione
o controlo de Alimentação/Volume u; a unidade será ligada com a fonte e volume definidos
anteriormente.
3. Para a desligar pressione o controlo de Alimentação/Volume u.
Emparelhar um dispositivo Bluetooth
1. Ligue a coluna A360; o(s) LED(s) ao redor do controlo de Alimentação/Volume acenderão e a fonte e
volume anteriormente definidos serão seleccionados.
2. Mantenha pressionado o botão Fonte/Selecção V até que o LED do indicador Bluetooth apresente
uma intermitência rápida, para que a coluna A360 seja “detectável”.
3. No dispositivo Bluetooth, active o Bluetooth e seleccione “A360” na lista de dispositivos. Se o
dispositivo Bluetooth solicitar uma chave de acesso, utilize “0000”. Alguns dispositivos Bluetooth
poderão solicitar-lhe que aceite a ligação. Se as unidades estiverem emparelhadas correctamente, a
coluna emitirá um sinal sonoro e o indicador Bluetooth apresentará uma luz azul. Caso contrário, o
LED do indicador Bluetooth apresentará uma intermitência lenta.
IMPORTANTE: Após o 3º passo terá dois minutos para emparelhar as unidades.
Observação: A coluna A360 guarda na memória os dispositivos emparelhados para utilizações futuras.
Usar um dispositivo Bluetooth
1. Ligue a coluna A360; o(s) LED(s) ao redor do controlo de Alimentação/Volume acenderão e a fonte e
volume anteriormente definidos serão seleccionados.
2. Com a unidade emparelhada (consulte a secção anterior), pressione o botão de Fonte/Selecção V
para que o indicador Bluetooth se acenda.
3. Opere o dispositivo Bluetooth e o seu som será ouvido através da coluna A360.
4. Ajuste o volume rodando o controlo de Alimentação/Volume u na coluna A360 ou o controlo de
volume do dispositivo Bluetooth, e ajuste o nível de graves e agudos conforme descrito mais adiante
neste manual.
Entrada AUX (na traseira da coluna A360)
1. Introduza a extremidade de um cabo de áudio (não
incluído) ao LINE OUT ou a uma entrada de auriculares
da sua unidade de áudio externa e a outra extremidade
à entrada AUX ak na parte traseira da coluna A360, sob
a tampa.
2. Para ouvir a unidade de áudio externa ligue a coluna
A360 e pressione o botão de Fonte/Selecção V
uma vez, para que o indicador AUX se acenda para
seleccionar o modo de entrada de linha.
3. Inicie a reprodução da unidade externa e o som de
saída da unidade de áudio externa será ouvido através
da coluna A360.
4. Ajuste o volume utilizando o controlo de Alimentação/
Volume u na coluna A360 ou o controlo de volume do
dispositivo Bluetooth, e ajuste o nível de graves e agudos conforme descrito mais adiante neste manual.
Carregamento de um dispositivo USB com o cabo USB da coluna A360
Ligue o seu dispositivo através de USB ao cabo USB W da coluna A360. O dispositivo carrega quando o
A360 está ligado à corrente CA e na posição de ligação ON u. O dispositivo também carrega durante
o funcionamento no modo DC se o interruptor al de OFF/ON estiver na posição ON e a coluna estiver
na posição de ligação ON u. Consulte o manual do proprietário que é fornecido com o equipamento
externo sobre as especificações de carga. Alguns dispositivos podem necessitar de um cabo adaptador
USB específico.
Observação: O carregamento através de USB em modo DC reduzirá significativamente a vida útil da bateria.
Ajustar os agudos e graves
1. AGUDOS: Pressione o botão de Agudos/Graves y até o indicador de agudos se acender. Ajuste a
definição usando o controlo de Alimentação/Volume u.
2. GRAVES: Pressione o botão de Agudos/Graves y até o indicador de graves se acender. Ajuste a
definição usando o controlo de Alimentação/Volume u.
Observação: Após cinco segundos, a unidade irá guardar as suas definições de Graves/Agudos e
reverterá para o modo de selecção do volume.
Desligar automático
Se durante 20 minutos a unidade não tiver nenhum sinal de áudio ou um dispositivo USB não se
encontrar em carga, a unidade desliga-se automaticamente. Para “acordar” a unidade, pressione
simplesmente o controlo de Alimentação/Volume u.
Resistente a respingos
A coluna A360 é resistente a respingos (classificação IPX3 conforme a norma internacional CEI 60529),
mas não pode ser submersa em água ou sujeita ao fluxo constante de água. Para garantir que o produto
é resistente a respingos feche a tampa de borracha at na parte traseira da coluna A360. Para fechar
correctamente a tampa, insira totalmente o dongle de borracha central (no interior da tampa) na entrada
DC IN X até que o centro da tampa esteja nivelado. Insira o outro dongle na entrada USB W, e de
seguida alise completamente a tampa até que fique nivelada com as laterais da coluna A360.
Resolução de problemas
Se a coluna A360 não reproduzir qualquer som aumente o nível do volume no seu dispositivo de música
digital.
ESPECIFICAÇÕES E COMPATIBILIDADE
GERAL:
Fonte de alimentação (AC) ....Entrada: 100 - 240 V AC, 50/60 Hz
........................................... 1,2 A máx., Saída: 19 V DC, 2A
Dimensões ......................... 6 (W) x 6 (H) x 6 (D) polegadas
.......................................15,2 (W) x 15,2 (H) x 15,2 (D) cm
Peso ........................................................... 4,4 lbs / 2,0 kg
Altifalantes de ampla resposta ............. de 4 x 1 polegadas,
.................................................. subwoofer de 4 polegadas
As especificações estão sujeitas a alterações sem aviso prévio.
O logótipo da TDK Life on Record é uma marca registada da TDK Corporation e é utilizado sob licença.
Todas as outras marcas registadas e logótipos pertencem aos seus respectivos proprietários.
A marca e logótipo da palavra Bluetooth
e qualquer uso de tais marcas pela Imation Corp encontra-se sob licença.
Potência de saída dos altifalantes ............... 2 W x 4 + 15 W
........................................................................(subwoofer)
Áudio sem fios...............................Versão de Bluetooth 2.1,
....................................................... perfil A2DP, codec AAC
Entrada de linha de áudio .....entrada de jack de 3,5 mm até
...............................................sinal de entrada de 2,5 Vrms
Porta USB ............................ 5,0 V @ 0,5 A apenas de carga
®
são marcas registadas da propriedade da Bluetooth SIG, Inc.
Page 2

Haut parleur
sans fil 360°
Veuillez lire ces instructions dans leur intégralité
Guide d’utilisation
avant d’utiliser ce produit
TDKperformance.eu
A360
Altoparlante
wireless a 360°
Prima di usare questo prodotto leggere
Guida per l’utente
attentamente le istruzioni
TDKperformance.eu
A360
CONNECTION RESEAU / CHARGEMENT DE LA BATTERIE
1. Sélectionnez la fiche
qui correspond à votre
pays et connectez-la à
l’adaptateur secteur.
2. Branchez la prise adaptateur secteur à la prise DC IN X (courant continu) à l’arrière de l’appareil,
puis branchez la fiche dans une prise murale 100V-240V.
Cet appareil possède une batterie intégrée rechargeable qui sera automatiquement chargée tant que
l’appareil sera branché. Si la batterie est faible, l’indicateur de batterie v s’allume. L’indicateur de batterie
clignote en rouge lorsqu’elle est faible. Il est allumé en rouge pendant la charge.
Remarque : La batterie fournira environ 6 heures d’autonomie de fonctionnement au niveau d’écoute
normal.
Remarques :
• Utilisez uniquement l’adaptateur secteur fourni.
• Retirez à la fois les prises DC (courant continu) et AC (courant alternatif) pour débrancher
l’adaptateur secteur lorsqu’il n’est pas utilisé.
• Débranchez le cordon d’alimentation à utiliser avec un courant continu (batterie rechargeable).
Remplacement de la batterie rechargeable :
Si la batterie ne fournit pas assez de puissance (voir rubrique ‘remarques relatives à la batterie rechargeable’ ci-dessous), commandez une batterie de remplacement à www.tdkperformance.com et enlevez les
quatre vis situées sur le côté gauche de l’appareil. Débranchez le connecteur et retirez la batterie. Ensuite,
connectez la nouvelle batterie et réinsérez les quatre vis.
Remarques relatives à la batterie rechargeable :
• Chaque fois que vous chargez et déchargez la batterie (cycles de charge), la capacité de la batterie
diminue légèrement. Les batteries rechargeables disposent d’un nombre limité de cycles de charge
et doivent être remplacées à terme.
• Vous pouvez remplacer votre batterie lorsque, ou avant, que la batterie ne fournisse plus assez de
puissance pour faire fonctionner votre appareil. En outre, une élimination correcte est essentielle
du point de vue de l’environnement et de la sécurité. Mettre une batterie directement à la poubelle
nuira à l’environnement.
• Ne pas incinérer.
EMPLACEMENT DES COMMANDES
3
4
5
1
2
6
7
FONCTIONNEMENT
Allumer ou éteindre le A360 :
1. Pour un fonctionnement sur courant alternatif : Appuyez sur le bouton u Power/Volume situé sur
l’appareil principal pour mettre l’appareil sous tension.
2. Pour un fonctionnement sur courant continu : Faites glisser le commutateur al de la batterie en
position ON. Appuyez sur le bouton u; Power/Volume, l’appareil se met sur la source et le volume
précédemment sélectionnés.
3. Pour éteindre l’appareil, appuyez sur le bouton u Power/Volume.
Jumelage d’un appareil Bluetooth
1. Allumez le A360 ; la LED située à proximité du bouton Power/Volume s’allume et l’appareil
fonctionnera sur la source et le volume déjà sélectionnés.
2. Appuyez et maintenez la touche V Source/Sélection jusqu’à ce que le voyant Bluetooth clignote
rapidement afin que l’A360 soit “détectable”.
3. Sur le périphérique Bluetooth, activez la fonction Bluetooth et sélectionnez “A360” à partir de la liste
des périphériques. Si le périphérique Bluetooth demande un mot de passe, entrez «0000». Certains
appareils Bluetooth vous demanderont d’accepter la connexion. Si les appareils sont jumelées
correctement, le haut-parleur émet un bip et le voyant Bluetooth s’allume en bleu. Si la connexion a
échoué, le voyant Bluetooth clignote lentement.
IMPORTANT : Après l’étape 3, vous avez deux minutes pour coupler les appareils.
Remarque : Après avoir jumelé un appareil, l’A360 le mémorisera pour une utilisation future.
Utilisation d’un périphérique Bluetooth
1. Allumez le A360 ; la LED située à proximité du bouton Power/Volume s’allume et l’appareil
fonctionnera sur la source et le volume déjà sélectionnés.
2. Avec un appareil couplé (voir chapitre précédent), appuyez sur la touche V Source/Sélection et les
voyants Bluetooth s’allument.
3. Utilisez votre appareil Bluetooth et le son est émis par les enceintes de l’A360.
4. Réglez le volume en tournant le bouton u Power/Volume sur l’A360 ou le bouton du volume sur le
périphérique Bluetooth, et ajustez les graves et les aigus comme décrit plus loin dans ce guide.
Prise Jack AUX (Arrière du A360)
1. Insérez la fiche d’un câble audio (non fourni) dans la
prise LINE OUT ou la prise casque de votre appareil
audio externe et l’autre extrémité dans la prise ak AUX
située à l’arrière de l’A360, sous le rabat.
2. Pour écouter l’appareil audio externe, allumez l’A360
et appuyez sur la touche V Source/Sélection pour
sélectionner le mode LINE IN.
3. Lancez la lecture de l’unité externe et le son de sortie
de l’appareil externe audio est émis par les enceintes
de l’A360.
4. Ajustez le volume en utilisant le bouton u Power/
Volume sur l’A360 ou le bouton du volume sur le
périphérique Bluetooth, et réglez les graves et les aigus
comme décrit plus loin dans ce guide.
Connectez votre appareil via USB à la prise W USB sur l’A360. Votre appareil chargera lorsque l’A360 sera
connecté à une source de courant alternatif et que la position ON u sera sélectionnée. Votre appareil
chargera également lors du fonctionnement en mode courant continu si l’interrupteur Batterie OFF/ON al
est placé sur ON et le haut-parleur sur ON u. Consultez le manuel du propriétaire fourni avec l’appareil
externe sur les spécifications de charge. Certains appareils peuvent nécessiter un câble spécifique USB.
Remarque : La charge par USB réduira considérablement l’autonomie de la batterie en mode DC (courant
continu).
Réglage des aigus et des graves
1. AIGUS : Appuyez sur le bouton y Aigus/Graves jusqu’à ce que le voyant lumineux Treble s’allume.
Ajustez le réglage à l’aide du bouton u Power/Volume.
2. GRAVES : Appuyez sur le bouton y Aigus/Graves jusqu’à ce que le voyant lumineux Bass s’allume.
Ajustez le réglage à l’aide du bouton u Power/Volume.
Remarque : Après cinq secondes, l’appareil enregistre le réglage des graves/ aigus et retourne au mode
de sélection du volume.
Mise en veille automatique
Si l’appareil n’a pas de signal audio ou qu’un dispositif USB n’est pas en charge, pendant 20 minutes,
l’appareil s’éteint automatiquement. Pour «réveiller» l’appareil, appuyez simplement sur le bouton u
Power/Volume.
Résistant aux éclaboussures
L’A360 est résistant aux éclaboussures (norme IPX3 de la norme internationale IEC 60529), mais ne peut
pas être immergé dans l’eau ou être soumis à un flux constant d’eau. Afin de s’assurer que le produit
soit résistant aux éclaboussures, fermez le rabat de caoutchouc at à l’arrière de l’A360. Pour fermer
correctement le rabat, insérez complètement le dongle central en caoutchouc (à l’intérieur du rabat) dans
la prise DC IN X (courant continu) jusqu’à ce que le centre du rabat soit encastré. Insérez l’autre dongle
dans la prise W USB, puis appuyez bien sur tout le rabat jusqu’à ce que le rabat soit aligné avec les côtés
de l’A360.
Dépannage
Si l’A360 ne produit pas de son, réglez le niveau de volume de votre lecteur de musique numérique au
plus fort.
COLLEGAMENTO CA / RICARICARE LA BATTERIA
1. Scegliere la spina
appropriata per il proprio
Paese e collegarla
all’adattatore di corrente CA.
2. Collegare il jack dell’adattatore di corrente CA al jack IN CC X sulla parte posteriore dell’unità e
collegare la spina a una presa a muro da 100 V-240 V.
Questa unità ha una batteria ricaricabile integrata che verrà caricata automaticamente non appena
l’unità viene collegata all’alimentazione. Se la batteria è quasi scarica si accenderà l’indicatore Batteria
v che diventerà rosso e lampeggerà. Quando è in carica la luce rossa non lampeggerà più.
Nota: la batteria fornirà circa 6 ore di funzionamento a un livello di ascolto normale.
Note:
• Utilizzare solamente l’adattatore CA fornito in dotazione.
• Rimuovere sia la spina CC che la spina IN CC per scollegare l’adattatore CA quando non viene
utilizzato.
• Disconnettere il cavo CA per utilizzarlo con l’alimentazione CC (batteria ricaricabile).
Sostituzione della batteria ricaricabile:
Qualora la batteria non fornisca energia sufficiente (consultare Note sulla batteria ricaricabile qui di seguito), ordinare una batteria di ricambio su www.tdkperformance.com e rimuovere le quattro viti sul lato
sinistro dell’unità. Scollegare il connettore e rimuovere la batteria, quindi collegare la batteria e reinserire
le quattro viti.
Note sulla batteria ricaricabile:
• Tutte le volte che la batteria viene caricata e scaricata (cicli della batteria), la capacità della batteria
si riduce leggermente. Le batterie ricaricabili hanno un numero limitato di cicli di carica, dopodiché
devono essere sostituite.
• La sostituzione della batteria viene presa in considerazione quando la batteria non fornisce energia
sufficiente per far funzionare il dispositivo o prima. Inoltre, lo smaltimento è essenziale dal punto di
vista ambientale e della sicurezza. Gettare qualsiasi batteria direttamente nel cestino danneggerà
l’ambiente.
• Non incenerire.
POSIZIONE DEI COMANDI
3
4
5
1
2
6
7
FUNZIONAMENTO
Accendere e spegnere A360:
1. Per il funzionamento in CA: premere il comando Alimentazione/Volume (Power/Volume) u sull’unità
principale per accenderla.
2. Per il funzionamento in CC: far scorrere l’interruttore Batteria al in posizione ON. Premere il comando
Alimentazione/Volume (Power/Volume) u; l’unità si accenderà sulla fonte e il volume precedenti.
3. Per spegnerla, premere il comando Alimentazione/Volume (Power/Volume) u.
Accoppiare un dispositivo Bluetooth
1. Accendere A360. I LED intorno al comando Alimentazione/Volume (Power/Volume) lampeggeranno e
verranno selezionati la fonte e il volume riprodotti in precedenza.
2. Tenere premuto il pulsante Fonte/Seleziona (Source/Select) V finché l’indicatore Bluetooth
lampeggia rapidamente per permettere il rilevamento di A360.
3. Sul dispositivo Bluetooth consentire Bluetooth e selezionare “A360” dall’Elenco dispositivi (Device
List). Qualora il dispositivo Bluetooth richieda una chiave, utilizzare “0000”. Alcuni dispositivi
Bluetooth chiederanno di accettare la connessione. Se le unità sono accoppiate correttamente,
l’altoparlante lampeggerà e l’indicatore Bluetooth diventerà blu. Se l’accoppiamento non è andato a
buon fine, l’indicatore Bluetooth lampeggerà lentamente.
IMPORTANTE: Dopo la fase 3 si hanno a disposizione due minuti per accoppiare le unità.
Nota: Dopo aver accoppiato un dispositivo, A360 lo ricorderà per un uso futuro.
Utilizzare un dispositivo Bluetooth
1. Accendere A360. I LED intorno al comando Alimentazione/Volume (Power/Volume) lampeggeranno e
verranno selezionati la fonte e il volume riprodotti in precedenza.
2. Con un’unità accoppiata (consultare la sezione precedente), premere il pulsante Fonte/Seleziona
(Source/Select) V così l’indicatore Bluetooth si accende.
3. Mettere in funzione dispositivo Bluetooth e il suono verrà udito dagli altoparlanti di A360.
4. Regolare il volume ruotando il comando Alimentazione/Volume (Power/Volume) u su A360 o il
comando Volume sul dispositivo Bluetooth e regolare i Bassi (Bass) e gli Alti (Treble) come descritto
successivamente in questa guida.
Jack AUX (Parte posteriore di A360)
1. Inserire un’estremità del cavo audio (non incluso) nel
jack LINEA IN USCITA (LINE OUT) o Cuffie (Headphone)
dell’unità audio esterna e l’altra estremità nel jack AUX
ak sulla parte posteriore di A360, sotto l’aletta.
2. Per ascoltare l’unità audio esterna, accendere A360
e premere una sola volta il pulsante Fonte/Seleziona
(Source/Select) V, così l’indicatore AUX si accende per
selezionare la modalità Linea in ingresso (Line In).
3. Avviare la riproduzione dell’unità esterna e il suono
in uscita dell’unità audio esterna verrà udito dagli
altoparlanti di A360.
4. Regolare il volume utilizzando il comando
Alimentazione/Volume (Power/Volume) u su A360
o il comando Volume sul dispositivo Bluetooth e
regolare i Bassi (Bass) e gli Alti (Treble) come descritto
successivamente in questa guida.
Caricare un dispositivo USB con il jack USB di A360
Connettere il dispositivo via USB al jack USB W su A360. Quando A360 è collegato all’alimentatore CA ed è
su ON u, il dispositivo si caricherà. Inoltre, il dispositivo si caricherà durante il funzionamento in modalità
CC, se l’interruttore OFF/ON al della batteria è su ON e l’altoparlante è su ON u. Consultare le specifiche
della carica sul manuale del “proprietario” fornito con l’impianto esterno. Alcuni dispositivi potrebbero
richiedere un cavo adattatore USB speciale.
Nota: La carica USB ridurrà significativamente la durata della batteria in modalità CC.
Impostazioni di alti e bassi
1. ALTI: premere il pulsante Alti/Bassi (Treble/Bass) y finché non lampeggia l’indicatore degli alti.
Regolare le impostazioni utilizzando il comando Alimentazione/Volume (Power/Volume) u.
2. BASSI: premere il pulsante Alti/Bassi (Treble/Bass) y finché non lampeggia l’indicatore dei bassi.
Regolare le impostazioni utilizzando il comando Alimentazione/Volume (Power/Volume) u.
Nota: Dopo cinque secondi l’unità salverà le impostazioni Bassi/Alti (Bass/Treble) e torna alla modalità di
selezione Volume.
Spegnimento automatico
Se per 20 minuti l’unità non ha un segnale audio o non sta caricando un dispositivo USB, si spegnerà da
sola. Per riattivare l’unità, premere semplicemente il comando Alimentazione/Volume (Power/Volume) u.
Resistenza agli spruzzi
A360 è resistente agli spruzzi (grado IPX3 secondo lo standard internazionale CEI), ma non può essere
immersa in acqua o essere soggetta a un costante flusso d’acqua. Per assicurarsi che il prodotto sia
resistente agli spruzzi, chiudere l’aletta di gomma at sulla parte posteriore di A360. Per chiudere
adeguatamente l’aletta, inserire completamente la chiave di sicurezza centrale di gomma (all’interno
dell’aletta) nel jack IN CC X finché il centro dell’aletta è a filo. Inserire l’altra chiave di sicurezza nel jack
USB W, quindi distendere l’aletta finché non è a filo con i lati di A360.
Risoluzione dei problemi
Se A360 non emette suoni, regolare il livello del volume sul dispositivo di musica digitale su alto.
8
9
10
1. Bouton Power/Volume
2. Indicateur de batterie faible
3. Poignée de transport
4. Indicateurs Bluetooth® et Aux
5. Bouton Aigus/Graves
6. Indicateurs Aigus/Graves
7. Bouton Source/Sélection
8. Prise pour charge USB
9. Prise DC IN
10. Rabat en caoutchouc
11. Prise AUX
12. Bouton batterie OFF/ON
11
12
CARACTERISTIQUES TECHNIQUES ET COMPATIBILITE
GENERAL:
Source d’alimentation (AC) . Entrée : 100-240V AC, 50/60Hz,
............................................1.2 A max, Sortie : 19 V DC, 2A
Dimensions ............................. 6 (W) x 6 (H) x 6 (D) pouces
....................................... 15.2 (L) x 15.2 (H) x 15.2 (P) cm
Poids ........................................................... 4,4 lbs / 2.0 kg
Haut parleurs.......... 4 x 1 pouces haut-parleurs large bande,
..................................................................4 pouces basses
Les spécifications sont sujettes à des modifications sans préavis.
Le logo de TDK Life on Record est une marque commerciale de TDK Corporation et est utilisé sous
licence. Toutes les autres marques et logos sont la propriété de leurs propriétaires respectifs.
La marque Bluetooth
toute utilisation de ces marques par Imation Corp est sous licence.
®
et les logos sont des marques déposées appartenant à Bluetooth SIG, Inc. et
Puissance de sortie ....................... 2 W x 4 + 15 W (basses)
Audio sans fil.................................... Bluetooth version 2.1,
..................................................... Profile A2DP, AAC Codec
Ligne d’entrée audio ............................. 3.5 mm prise jack à
..................................................... 2.5 Vrms signal d’entrée
Port USB. ................... 5.0 V @ 0.5 A seulement pour charge
8
9
10
1. Comando Alimentazione/Volume
(Power/Volume)
2. Indicatore di batteria quasi scarica
3. Maniglia per il trasporto
4. Bluetooth® e indicatori della fonte Aux
5. Pulsante Alti/Bassi (Treble/Bass)
6. Indicatori degli alti/bassi
11
12
7. Pulsante Fonte/Seleziona
8. Jack carica USB
9. Jack IN CC
10. Aletta di gomma
11. Jack AUX
12. Interruttore Batteria OFF/ON
SPECIFICHE E COMPATIBILITÀ
GENERALE:
Fonte di alimentazione (CC) .. Ingresso: 100-240 V CA, 50/60 Hz
...........................................1,2 A max, Uscita: 19 V CC, 2 A
Dimensioni .................................. 6 (L) x 6 (A) x 6 (P) pollici
.........................................15,2 (L) x 15,2 (A) x 15,2 (P) cm
Peso ........................................................... 4,4 lbs / 2,0 kg
Altoparlanti.......................... 4 driver full-range da 1 pollice,
.........................................................subwoofer da 4 pollici
Le specifiche sono soggette a modifica senza preavviso.
TDK Life on Record Logo è un marchio di fabbrica di TDK Corporation e viene utilizzato in licenza. Tutti
gli altri marchi di fabbrica e loghi sono proprietà dei rispettivi proprietari.
I loghi e il wordmark Bluetooth
ne possiede la licenza d’uso.
®
sono marchi di fabbrica registrati di Bluetooth SIG, Inc. e Imation Corp
Uscita alimentazione altoparlante .................. 2 L x 4 + 15 L
........................................................................(subwoofer)
Audio wireless ................................. Bluetooth versione 2.1,
.................................................... profilo A2DP, Codec AAC
Audio linea in ingresso ............jack stereo da 3,5 mm fino a
...........................................segnale d’ingresso da 2,5 Vrms
Porta USB ..................................... 5,0 V @ 0,5 A solo carica
Page 3

Drahtloser Lautsprecher
mit 360-Grad-Klang
Bitte lesen Sie diese Anleitung vor Inbetriebnahme
Benutzerhandbuch
des Produkts sorgfältig durch.
TDKperformance.eu
A360
Altavoz inalámbrico
de 360°
Guía del usuario
Por favor, lea las instrucciones antes
de utilizar este producto
TDKperformance.eu
A360
NETZANSCHLUSS / AUFLADEN DES AKKUS
1. Wählen Sie den
passenden Stecker für Ihr
Land, und verbinden Sie
ihn mit dem Netzteil.
2. Verbinden Sie den Gerätestecker des Netzteils mit dem Anschluss „DC IN“ X auf der Rückseite des
Geräts und schließen Sie den Netzstecker anschließend an eine Steckdose mit 100–240 V an.
Dieses Gerät verfügt über einen eingebauten Akku, der automatisch geladen wird, wenn das Gerät
angeschlossen ist. Bei einem niedrigen Ladestand des Akkus leuchtet die Ladeanzeige v auf. Bei
niedrigem Ladestand blinkt die Ladeanzeige rot. Während des Aufladens leuchtet die Ladeanzeige
dauerhaft rot.
Hinweis: Der Akku bietet bei normaler Zimmerlautstärke eine Betriebsdauer von etwa 6 Stunden.
Hinweise:
• Verwenden Sie ausschließlich das mitgelieferte Netzteil.
• Ziehen Sie sowohl den Geräte- als auch den Netzstecker, wenn Sie das Gerät nicht verwenden.
• Ziehen Sie nur den Netzstecker, wenn das Gerät im Akkubetrieb verwendet wird.
Austausch des Akkus:
Wenn die Batterie nicht mehr genug Leistung liefert (siehe Hinweise zum Akku weiter unten), bestellen Sie
einen Ersatzakku unter www.tdkperformance.com und entfernen Sie die vier Schrauben auf der linken Seite
des Geräts. Trennen Sie den Anschluss und entfernen Sie den Akku. Schließen Sie anschließend den neuen
Akku an und ziehen Sie die vier Schrauben wieder fest.
Hinweise zum Akku:
• Bei jedem Laden und Entladen des Akkus (Ladezyklen), wird die Akkukapazität leicht verringert.
Wiederaufladbare Akkus haben eine begrenzte Anzahl von Ladezyklen und müssen irgendwann
ersetzt werden.
• Der Akku sollte ausgetauscht werden, wenn oder noch bevor der Akku nicht mehr genügend Strom
für den Betrieb Ihres Geräts liefert. Achten Sie dabei aus wichtigen Umwelt- und Sicherheitsgründen
auf eine ordnungsgemäße Entsorgung. Eine Entsorgung des Akkus im Hausmüll hat schädliche
Folgen für die Umwelt.
• Nicht verbrennen.
ÜBERSICHT DER STEUERELEMENTE
3
4
5
1
2
8
9
6
7
11
12
10
1. Regler „Power/Volume“
2. Ladeanzeige
3. Tragegriff
4. Bluetooth® - und AUX-Anzeigen
5. Taste „Treble/Bass“
6. Anzeigen „Treble/Bass“
7. Taste „Source/Select“
8. USB-Ladeanschluss
9. Anschluss „DC IN“
10. Gummiklappe
11. AUX-Anschluss
12. Schalter „Battery ON/OFF“
BETRIEB
Ein- und Ausschalten des A360:
1. Bei Netzbetrieb: Drücken Sie den Regler „Power/Volume“ u auf dem Gerät, um das Gerät einzuschalten.
2. Bei Akkubetrieb: Schieben Sie den Akkuschalter al auf die Position ON. Drücken Sie den Regler „Power/
Volume“ u; das Gerät schaltet sich ein und spielt die zuletzt verwendete Quelle in der zuletzt gewählten
Lautstärke ab.
3. Um das Gerät auszuschalten, drücken Sie den Regler „Power/Volume“ u.
Verbindung mit einem Bluetooth-Gerät
1. Schalten Sie den A360 ein; die LED-Leuchten am Regler „Power/Volume“ leuchten auf und die zuletzt
verwendete Quelle und die zuletzt ausgewählte Lautstärke wird automatisch ausgewählt.
2. Drücken und halten Sie die Taste „Source/Select“ V bis die Bluetooth-Anzeige schnell blinkt, um den
A360 für andere Geräte „sichtbar“ zu machen.
3. Aktivieren Sie Bluetooth auf dem Bluetooth-Gerät, und wählen Sie aus der Liste der Geräte „A360“. Wenn
Sie auf dem Bluetooth-Gerät aufgefordert werden, ein Kennwort einzugeben, verwenden Sie „0000“.
Einige Bluetooth-Geräte fordern Sie anschließend dazu auf, die Verbindung zu akzeptieren. Wenn die
Geräte ordnungsgemäß verbunden sind, ertönt aus dem Lautsprecher ein Signalton und die BluetoothAnzeige leuchtet dauerhaft blau. Wenn die Verbindung fehlgeschlagen ist, blinkt die Bluetooth-Anzeige
langsam.
WICHTIG: Nach Schritt 3 haben Sie 2 Minuten Zeit, um die Geräte miteinander zu verbinden.
Hinweis: Nachdem Sie ein Gerät verbunden haben, werden die entsprechenden Informationen vom A360 zur
zukünftigen Verwendung gespeichert.
Verwendung eines Bluetooth-Geräts
1. Schalten Sie den A360 ein; die LED-Leuchten am Regler „Power/Volume“ leuchten auf und die zuletzt
verwendete Quelle sowie die zuletzt ausgewählte Lautstärke wird ausgewählt.
2. Wenn bereits zuvor eine Verbindung mit diesem Gerät hergestellt wurde (siehe voriger Abschnitt), drücken
Sie die Taste „Source/Select“ V, bis die Bluetooth-Anzeige aufleuchtet.
3. Bedienen Sie nun Ihr Bluetooth-Gerät und die abgespielten Inhalte ertönen aus den Lautsprechern des
A360.
4. Stellen Sie die gewünschte Lautstärke entweder durch Drehen des Reglers „Power/Volume“ u am A360
oder mithilfe der Lautstärkeregelung Ihres Bluetooth-Geräts ein. Nehmen Sie die gewünschten Höhen- und
Tiefeneinstellungen vor, wie weiter unten in dieser Anleitung beschrieben.
AUX-Anschluss (an der Rückseite des A360)
1. Verbinden Sie das eine Ende eines Audiokabels (nicht im
Lieferumfang enthalten) mit dem Anschluss „LINE OUT“
oder der Kopfhörerbuchse Ihres externen Audiogeräts,
und das andere Ende mit dem AUX-Anschluss ak an der
Rückseite des A360, unter der Klappe.
2. Um das externe Audiogerät abzuspielen, schalten Sie
den A360 an und drücken Sie einmal die Taste „Source/
Select“ V, bis die AUX-Anzeige aufleuchtet und der LineIn-Modus aktiviert wird.
3. Starten Sie die Wiedergabe des externen Gerätes, und
dessen Tonausgabe wird aus den Lautsprechern des A360
ertönen.
4. Stellen Sie die gewünschte Lautstärke entweder
anhand des Reglers „Power/Volume“ u am A360
oder mithilfe der Lautstärkeregelung Ihres BluetoothGeräts ein. Nehmen Sie die gewünschten Höhen- und
Tiefeneinstellungen vor, wie weiter unten in dieser Anleitung beschrieben.
Aufladen eines USB-Geräts über den USB-Anschluss des A360
Schließen Sie Ihr USB-Gerät über USB an den USB-Anschluss W des A360 an. Ihr Gerät wird aufgeladen, wenn
der A360 an das Stromnetz angeschlossen und der Hauptschalter u auf die Position „ON“ gestellt ist. Ihr Gerät
wird auch im Akkubetrieb aufgeladen, wenn sich der Schalter „Battery OFF/ON“
und der Hauptschalter u auf die Position „ON“ gestellt ist. Lesen Sie dazu auch die Hinweise zum Aufladen
Ihres externen Gerätes in der Anleitung des Herstellers. Für einige Geräte benötigen Sie unter Umständen ein
spezielles USB-Adapterkabel.
Hinweis: Das Aufladen eines Gerätes über den USB-Anschluss im Akkubetrieb verringert deutlich die
Betriebsdauer des Akkus.
Höhen- und Tiefeneinstellungen
1. HÖHEN: Drücken Sie die Taste „Treble/Bass“ y, bis die Anzeige „Treble“ aufleuchtet. Nehmen Sie die
gewünschte Einstellung mithilfe des Reglers „Power/Volume“ u vor.
2. TIEFEN: Drücken Sie die Taste „Treble/Bass“ y, bis die Anzeige „Bass“ aufleuchtet. Nehmen Sie die
gewünschte Einstellung mithilfe des Reglers „Power/Volume“ u vor.
Hinweis: Nach 5 Sekunden speichert das Gerät die Höhen-/Tiefeneinstellungen und kehrt in den
Lautstärkemodus zurück.
Abschaltautomatik
Wenn das Gerät kein Audiosignal empfängt und kein USB-Gerät aufgeladen wird, schaltet sich das Gerät nach
20 Minuten automatisch ab. Um das Gerät wieder einzuschalten, drücken Sie den Regler „Power/Volume“ u.
Spritzwasserfest
Der A360 ist spritzwasserfest (IPX3-Bewertung gemäß der internationalen Norm IEC 60529), kann jedoch
nicht in Wasser getaucht oder einem konstanten Wasserfluss ausgesetzt werden. Um sicherzustellen, dass
das Produkt spritzwassergeschützt ist, schließen Sie die Gummiklappe at an der Rückseite des A360. Um
die Klappe richtig zu schließen, stecken Sie die Gumminoppe in der Mitte (an der Innenseite der Klappe)
vollständig in den Anschluss „DC IN“ X, bis die Wölbung in der Mitte der Klappe verschwindet. Stecken Sie die
andere Noppe in den USB-Anschluss W, und glätten Sie anschließend die gesamte Klappe, bis sie bündig mit
dem Rand des A360 geschlossen ist.
Problembehebung
Wenn der A360 keinen Ton wiedergibt, erhöhen Sie die Lautstärke Ihres digitalen Musik-Players.
al in der Position „ON“ befindet
TECHNISCHE DATEN UND KOMPATIBILITÄT
ALLGEMEIN:
Stromversorgung (AC) ... Eingang: 100–240 V AC, 50/60 Hz,
.......................1,2 A max. Ausgangsleistung: 19 V DC, 2 A
Abmessungen ........................... 6 (W) x 6 (H) x 6 (D) zoll
.................................... 15.2 (B) x 15.2 (H) x 15.2 (D) cm
Gewicht .................................................... 4,4 lbs / 2.0 kg
Lautsprecher .................. 4 x 1 zoll Breitbandlautsprecher,
............................................................... 4 zoll subwoofer
Die technischen Daten können sich ohne vorherige Ankündigung ändern.
Das Logo „TDK Life on Record“ ist ein Warenzeichen der TDK Corporation und kann mit Lizenz
verwendet werden. Alle anderen Warenzeichen und Logos sind Eigentum ihrer jeweiligen Inhaber.
Die Bluetooth
jegliche Verwendung dieser Warenzeichen durch Imation Corp erfolgt unter Lizenz.
®
-Wortmarke und -Logos sind eingetragene Warenzeichen von Bluetooth SIG, Inc. und
Ausgangsleistung der Lautsprecher ............. 2 W x 4 + 15 W
......................................................................(subwoofer)
Drahtlose Audioübertragung .......... Bluetooth version 2.1,
................................................... A2DP-Profil, AAC Codec
Line-In-Audio ........................ 3,5 mm Stereoanschluss für
................................................. 2,5 Vrms Eingangssignal
USB-Anschluss................ 5,0 V bei nur 0,5 A Ladeleistung
CONEXIÓN DE CA / RECARGAR LA BATERIA
1. Seleccione el enchufe
adecuado para su país
y conéctelo al adaptador
de alimentación de CA.
2. Conecte el adaptador de alimentación de CA a la toma de entrada CC X en la parte posterior de la
unidad, y luego conecte el enchufe a una toma de corriente de 100V-240V.
Esta unidad cuenta con una batería recargable incorporada que se recargará automáticamente cuando
la unidad esté enchufada. Si la batería está poco cargada, se encenderá el indicador v de la batería.
El indicador de la batería parpadeará con luz roja cuando esté poco cargada. Permanecerá roja sin
parpadear cuando esté recargando.
Aviso: La batería ofrece unas 6 horas de funcionamiento a un nivel de audición normal.
Avisos:
• Utilice sólo el adaptador de CA que viene incluido.
• Retire la clavija de CC y la de entrada de CA para desconectar el adaptador de CA cuando no esté
siendo utilizado.
• Desconecte el cable de CA para utilizar con corriente continua (batería recargable).
Para sustituir la batería recargable:
Si la batería no suministra suficiente energía (vea a continuación los avisos sobre baterías recargables),
pida una batería de repuesto en www.tdkperformance.com y retire los cuatro tornillos en el lado izquierdo
de la unidad. Desconecte el conector y retire la batería. A continuación, conecte la nueva batería y vuelva
a insertar los cuatro tornillos.
Avisos sobre la batería recargable:
• Cada vez que cargue y descargue la batería (ciclos de carga), la capacidad de la batería se reduce
ligeramente. Las baterías recargables tienen un número limitado de ciclos de carga y deben ser
reemplazadas después de algún tiempo.
• Es posible que desee cambiar la batería antes o después de que falte energía para que funcione
el dispositivo. También es muy importante eliminarlas de forma adecuada en relación al medio
ambiente y a la seguridad. Arrojar cualquier batería directamente a la basura provoca daños en el
medio ambiente.
• No las incinere.
UBICACIÓN DE LOS CONTROLES
3
4
5
1
2
8
9
6
7
11
12
10
1. Control de Volumen/Encendido
2. Indicador de nivel bajo de batería
3. Asa de transporte
4. Indicadores de Bluetooth
auxiliar
5. Botón de Agudos/Graves
6. Indicadores de Agudos/Graves
®
y de fuente
7. Botón de Fuente/Seleccionar
8. Clavija de carga USB
9. Clavija de entrada CC
10. Pestaña de caucho
11. Clavija auxiliar
12. Interruptor de batería OFF/ON (apagado/
encendido)
FUNCIONAMIENTO
Para conectar y desconectar el A360:
1. Para el funcionamiento con CA: Pulse el botón u de Encendido/Volumen de la unidad principal para
encenderlo.
2. Para el funcionamiento con CC: Deslice el interruptor de la batería al hasta la posición ON
(encendido). Pulse el control u; de Encendido/Volumen; en la unidad se encenderá la fuente
anterior y el volumen.
3. Para apagarlo, pulse el control u de Encendido/Volumen.
Emparejar un dispositivo Bluetooth
1. Encienda el A360; se iluminará el piloto del control de Encendido/Volumen y se seleccionará lo
escuchado previamente para la fuente y el volumen.
2. Mantenga pulsado el botón V Fuente/Seleccionar hasta que parpadee con rapidez el indicador de
Bluetooth para poder detectar el A360.
3. En el dispositivo Bluetooth, active Bluetooth y seleccione “A360” de la lista de dispositivos. Si el
dispositivo Bluetooth solicita una clave, utilice “0000”. Algunos dispositivos Bluetooth le pedirán que
acepte la conexión. Si las unidades están emparejadas correctamente, el altavoz emitirá un pitido
y el indicador de Bluetooth se iluminará en color azul. Si hay algún fallo, el indicador de Bluetooth
parpadeará lentamente.
IMPORTANTE: Después del paso 3, tendrá dos minutos para emparejar las unidades.
Aviso: Después de emparejar un dispositivo, el A360 lo recordará para utilizarlo en el futuro.
Utilizando un dispositivo Bluetooth
1. Encienda el A360; se iluminará el piloto del control de encendido/volumen, y se seleccionará lo
escuchado previamente para la fuente y el volumen.
2. Cuando una unidad esté emparejada (ver apartado anterior), pulse el botón V de Fuente/
Seleccionar para que se ilumine el indicador de Bluetooth.
3. Ponga en marcha el dispositivo Bluetooth y se escuchará su sonido a través de los altavoces A360.
4. Ajuste el volumen girando el control u de Encendido/Volumen en el A360, o el control de volumen
en el dispositivo Bluetooth, y ajuste los graves y agudos como se indica más adelante en esta guía.
Clavija auxiliar (parte posterior del A360)
1. Inserte un extremo de un cable de audio (no está
incluido) en la toma LINE OUT (salida exterior) o clavija
de auriculares en la unidad de audio externa, y el otro
extremo en la clavija AUXILIAR ak en la parte trasera del
A360, bajo la pestaña.
2. Para escuchar la unidad de audio externa, encienda el
A360 y pulse una vez el botón V Fuente/Seleccionar
y se iluminará el indicador auxiliar para seleccionar el
modo de Entrada de línea.
3. Inicie la reproducción de la unidad externa y se
escuchará el sonido de salida de la unidad externa de
audio a través de los altavoces A360.
4. Ajuste el volumen usando el control u de Encendido/
Volumen en el A360, o el control de volumen en el
dispositivo Bluetooth, y ajuste los graves y agudos como se indica más adelante en esta guía.
Para recargar un dispositivo USB con la clavija USB del A360
Conecte el dispositivo con USB a la clavija USB W en el A360. Su dispositivo se cargará cuando el A360 se
encuentre conectado a la alimentación de CA y en la posición de encendido (ON) u. También se cargará
durante el funcionamiento en modo de CC si el interruptor al de ENCENDIDO/APAGADO (OFF/ON) de la pila
se encuentra en la posición ENCENDIDO (ON) y el altavoz en ENCENDIDO (ON) u. Consulte el manual de
instrucciones que viene con el equipo externo para más información sobre la recarga. Algunos dispositivos
pueden necesitar un cable especial adaptador para USB.
Aviso: La recarga USB reducirá considerablemente la duración de la batería en modo CC.
Ajuste de graves y agudos
1. AGUDOS: Pulse el botón y Agudos/Graves hasta que se ilumine el indicador de agudos. Configure
los ajustes mediante el control u de Encendido/Volumen.
2. GRAVES: Pulse el botón y de Agudos/Graves hasta que se ilumine el indicador de graves. Configure
los ajustes mediante el control u de Encendido/Volumen.
Aviso: Después de cinco segundos, la unidad guardará los ajustes de Graves/Agudos y volverá al modo de
selección de volumen.
Apagado automático
Si la unidad no tiene señal de audio o no hay un dispositivo USB recargándose, por un espacio de 20
minutos, la unidad se apagará automáticamente. Para volver a poner en marcha la unidad, tan sólo pulse
el control u de Encendido/Volumen.
Resistente a salpicaduras
El A360 es resistente a salpicaduras (calificación IPX según las normas internacionales IEC 60529), pero
no debe sumergirse en agua ni someterse a un constante flujo de agua. Para poder confirmar que el
producto es resistente a salpicaduras, cierre la pestaña de caucho at en la parte posterior del A360. Para
cerrar correctamente la pestaña, introduzca de forma completa el centro de la llave electrónica de caucho
(en el interior de la pestaña) en la toma de entrada CC X until flap center is flush. Insert the other dongle
into USB jack W, y luego alise toda la pestaña hasta que esté nivelada con los laterales del A360.
Solución de problemas
Si el A360 no produce sonido, suba el nivel de volumen al máximo en su reproductor de música digital.
ESPECIFICACIONES Y COMPATIBILIDAD
INFORMACION GENERAL:
Fuente de alimentación (AC)
...................................... Entrada: 100-240V AC, 50/60Hz,
........................................ 1.2 A máx., Salida: 19 V CC, 2A
Dimensiones ..... 6 (largo) x 6 (ancho) x 6 (alto) pulgadas
................... 15,2 (largo) x 15,2 (ancho) x 15,2 (alto) cm
Peso ......................................................... 4,4 lbs / 2.0 kg
Altavoces .. Controladores de tamaño complete de 4 x 1 pulg.,
........................................................subwoofer de 4 pulg.
Las especificaciones están sujetas a cambios sin previo aviso.
El logotipo TDK Life on Record es una marca registrada de TDK Corporation y se utiliza con autorización.
Todas las demás marcas registradas y logotipos son propiedad de sus respectivos dueños.
La marca Bluetooth
cualquier uso de dichas marcas por parte de Imation Corp se utilizará con autorización.
®
y sus logotipos son marcas registradas, propiedad de Bluetooth SIG, Inc., y
Potencia de salida del altavoz .................. 2 W x 4 + 15 W
......................................................................(subwoofer)
Audio inalámbrico ......................... Bluetooth versión 2.1,
.................................................... Perfil A2DP, Códec AAC
Línea de audio de entrada ........clavija estéreo de 3,5 mm
................................. señal de entrada de hasta 2,5 Vrms
USB Puerto. ........................ 5.0 V a 0.5 A sólo para carga
Page 4

Беспроводная
аудиосистема 360
Руководство по эксплуатации
Перед использованием данного прибора просим вас
ознакомиться с полным текстом инструкции
TDKperformance.eu
A360
Draadloze 360
luidspreker
Gebruikershandleiding
Lees deze instructies volledig door voordat
u met dit product gaat werken
TDKperformance.eu
A360
ПОДКЛЮЧЕНИЕ К СЕТИ ПЕРЕМЕННОГО ТОКА / ЗАРЯДКА АККУМУЛЯТОРА
1. Выберите подходящую
для вашей страны вилку
питания и подсоедините ее
к внешнему блоку питания
переменного тока (АС).
2. Вставьте разъем внешнего блока питания переменного тока (АС) в гнездо для подключения внешнего источника
постоянного тока (DC IN) X на задней панели прибора, а затем вставьте вилку в настенную розетку с напряжением
100В/240В.
Устройство имеет встроенную аккумуляторную батарейку, которая будет автоматически заряжаться все время, пока
устройство подключено к розетке. При низком заряде аккумулятора включится Индикатор батареи v При разряженном
аккумуляторе Индикатор батареи будет мигать красным светодиодом. Во время зарядки устройства красный светодиод
будет гореть постоянно.
Примечание: Заряд аккумуляторной батареи обеспечивает около 6 часов автономной работы устройства в стандартном
режиме прослушивания.
Примечание:
• Используйте только прилагающийся сетевой адаптер.
• Отсоедините оба разъема - постоянного и переменного тока, чтобы отключить внешний блок питания, если он не
используется.
• Отсоедините кабель для работы на переменном токе (АС), чтобы использовать питание постоянного тока (DC)
(аккумуляторную батарею).
Замена аккумуляторной батареи:
Если аккумуляторная батарея не обеспечивает необходимой мощности (см. Примечания к использованию аккумуляторной
батареи), закажите аккумулятор для замены на сайте www.tdkperformance.com. Открутите четыре шурупа с левой стороны
устройства. Отсоедините контакты и выньте аккумуляторную батарею. Затем установите новый аккумулятор и снова закрутите
четыре шурупа.
Примечания к использованию аккумуляторной батареи:
• Каждый раз при зарядке и разрядке аккумуляторной батареи (цикл зарядки), ее мощность немного снижается.
Аккумуляторные батареи рассчитаны на определенное количество циклов зарядки и требуют периодической замены.
• Вы можете заменить аккумуляторную батарею досрочно или сразу, как только она перестает обеспечивать устройству
необходимый для работы заряд. Важно помнить, что правильная утилизация аккумуляторных батарей является
чрезвычайно важной для защиты окружающей среды и обеспечения безопасности. Выбрасывание любых батарей
непосредственно в мусорный ящик наносит ущерб окружающей среде.
• Не сжигать.
РАСПОЛОЖЕНИЕ ЭЛЕМЕНТОВ УПРАВЛЕНИЯ
3
4
5
1
2
8
9
6
7
11
12
10
1. Выключатель/Регулятор громкости
2. Индикатор низкого заряда аккумулятора
3. Ручка для переноски
4. Индикаторы Bluetooth® и внешнего источника
5. Кнопка Treble/Bass
6. Индикаторы Treble/Bass
7. Кнопка Источник/Выбрать
8. Разъем USB для зарядки
9. Разъем для подключения внешнего источника
постоянного тока (DC IN)
10. Резиновый щиток
11. Гнездо для подключения внешнего устройства к
усилителю
12. Выключатель батареи ВЫКЛ/ВКЛ (OFF/ON)
СХЕМА ДЕЙСТВИЙ
Включение и выключение A360:
1. Для работы на переменном токе: Для включения нажмите Выключатель/Регулятор громкости u на основном
приборе.
2. Для работы на постоянном токе: Передвиньте Выключатель аккумуляторной батареи al в положение ВКЛ (ON).
Нажмите Выключатель/Регулятор громкости u; устройство начнет воспроизведение предыдущего источника на
предыдущей громкости.
3. Чтобы выключить устройство, нажмите Выключатель/Регулятор громкости u.
Подключение к устройству Bluetooth
1. Включите A360; вокруг Выключателя/Регулятора громкости зажгутся светодиоидные индикаторы, и будет выбран
предыдущий источник воспроизведения с предыдущей громкостью.
2. Нажмите и удерживайте кнопку Источник/Выбрать V до тех пор, пока индикатор Bluetooth не начнет быстро мигать,
а затем сделайте A360 “видимым”.
3. На устройстве Bluetooth включите Bluetooth и выберите “A360” из списка устройств. Если устройство Bluetooth запросит
пароль, введите “0000”. Некоторые устройства Bluetooth потребуют от вас принять соединение. При правильном
подключении двух устройств аудиосистема выдаст звуковой сигнал, а на индикаторе Bluetooth зажжется немигающий
голубой светодиод. В случае, если установить подключение не удалось, индикатор Bluetooth будет медленно мигать.
ВНИМАНИЕ: После завершения шага 3 у вас будет две минуты на то, чтобы подключить устройства друг к другу.
Примечание: После подключения данного устройства A360 “запомнит” его для последующего использования.
Использование устройства Bluetooth
1. Включите A360; вокруг Выключателя/Регулятора громкости зажгутся светодиоидные индикаторы, и будет выбран
предыдущий источник воспроизведения с предыдущей громкостью.
2. После подключения устройства (см. предыдущий раздел) нажмите кнопку Источник/Выбрать V индикатор Bluetooth
загорится.
3. Начните воспроизведение звуковой дорожки на вашем устройстве Bluetooth, и звук будет выводиться через колонки
А360.
4. Настройте громкость поворотным Выключателем/Регулятором громкости u на A360 или через Регулятор громкости
на устройстве Bluetooth, и настройте Bass (уровень низких частот) и Treble (уровень высоких частот), как это описано
далее в настоящем руководстве.
Гнездо для подключения устройства к усилителю (на задней панели А360)
1. Вставьте один конец звукового кабеля (не прилагается к
устройству) в линейный выход или гнездо для подключения
головных телефонов на внешнем аудиоустройстве, а другой
конец ‐ в гнездо для подключения устройства к усилителю ak
расположенное на задней панели A360 под щитком.
2. Для прослушивания звуковой дорожки через внешнее
аудиоустройство включите A360 и нажмите кнопку Источник/
Выбрать V чтобы загорелся индикатор дополнительного
устройства; затем выберите Линейный режим (Line In).
3. Начните воспроизведение звуковой дорожки на внешнем
устройстве, и звук будет выводиться через колонки А360.
4. Настройте громкость поворотным Выключателем/Регулятором
громкости u на A360 или через Регулятор громкости на
устройстве Bluetooth и настройте Bass (уровень низких частот)
и Treble (уровень высоких частот), как это описано далее в
настоящем руководстве.
Зарядка USBустройства от разъема USB на A360
Подключите ваше устройство посредством USB к разъему USB W на A360. Ваше устройство будет заряжаться при
подключении A360 к сети переменного тока и нажатии кнопки питания (ВКЛ.) u. Кроме того, ваше устройство будет
заряжаться при работе на постоянном напряжении, если переключатель аккумулятора (ВЫКЛ./ВКЛ.) al будет в положении
ВКЛ., а на колонке будет нажата кнопка питания (ВКЛ.) u. Технические характеристики зарядки можно найти в руководстве
для пользователя, прилагающемся к внешнему оборудованию. Для некоторых устройств может потребоваться специальный
адаптерный USB‐кабель.
Примечание: Зарядка через порт USB существенно сокращает время работы батареи в режиме работы от постоянного тока.
Настройка Treble и Bass
1. TREBLE (уровень высоких частот): Удерживайте кнопку Treble/Bass y до тех пор, пока не загорится Индикатор Treble.
Установите настройки с помощью кнопки Включение/Регулятор громкости u.
2. BASS (уровень низких частот): Удерживайте кнопку Treble/Bass y до тех пор, пока не загорится Индикатор Bass.
Установите настройки с помощью кнопки Включение/Регулятор громкости u.
Примечание: Через пять секунд устройство сохранит настройки Bass/Treble и вернется к режиму выбора громкости.
Автоматическое выключение
Если в течение 20 минут в устройство не поступает аудиосигнала и от него не заряжается другое устройство через USB‐порт,
то аудиосистема автоматически выключится. Чтобы включить устройство, просто нажмите Выключатель/Регулятор
громкости u.
Защита от брызг
Аудиосистема A360 имеет защиту от брызг (уровень IPX3 в соответствии с международным стандартом IEC 60529),
однако ее нельзя погружать в воду или держать под постоянной струей воды. Чтобы обеспечить защиту устройства от
брызг, закройте резиновый щиток at на задней панели A360. Чтобы правильно закрыть щиток, вставьте защитный
ключ‐заглушку (с внутренней стороны щитка) в гнездо для подключения внешнего источника постоянного тока (DC IN)
X, полностью утопив центр щитка. Вставьте другой защитный ключ‐заглушку в разъем USB W, затем разгладьте щиток
так, чтобы он был на одном уровне с краями A360.
Выявление и устранение неисправностей
Если A360 не издает звука, настройте (увеличьте) уровень громкости на вашем цифровом музыкальном устройстве.
ТЕХНИЧЕСКИЕ ХАРАКТЕРИСТИКИ И СОВМЕСТИМОСТЬ
ОБЩИЕ:
Источник питания (переменный ток) .................................................................
.................................................... Вход: 100В/240В переменного тока, 50/60Гц,
......................................................1.2 A макс, Выход: 19В постоянного тока, 2A
Размеры ..................................... 6 (длина) x 6 (ширина) x 6 (высота) дюймов
............................................... 15.2 (длина) x 15.2 (ширина) x 15.2 (высота) см
Вес ............................................................................................ 4.4 фунта / 2.0 кг
Колонки.......................... драйверы с полным набором функций 4 x 1 дюйма,
................................................................................................ сабвуфер 4 дюйма
Технические характеристики могут меняться без предварительного уведомления.
Логотип TDK Life on Record является торговым знаком корпорации TDK и используется по лицензии. Все остальные
торговые знаки и логотипы являются собственностью своих владельцев.
Текстовый символ и логотип Bluetooth® являются зарегистрированными торговыми знаками, принадлежащими
Bluetooth SIG, Inc., и любые их использования корпорацией Imation осуществляются исключительно по лицензии.
Мощность колонок на выходе................................ 2 Вт x 4 + 15 Вт (сабвуфер)
Беспроводная передача аудиосигнала....................................... Bluetooth 2.1,
................................................................................... Профиль A2DP, AAC Codec
Линейный режим ввода аудиосигнала ....................3.5 мм стерео разъем до
.................................. 2.5 Vrms действующее напряжение входящего сигнала
USB ‐ порт ............................................................ 5.0 В @ зарядка только 0.5 A
WISSELSTROOMAANSLUITING / DE BATTERIJ OPLADEN
1. Selecteer de juiste
stekker voor uw land
en sluit deze aan op de
wisselstroomadapter.
2. Sluit de wisselstroomadapteraansluiting aan op de DC-IN-aansluiting X aan de achterkant van het
apparaat en sluit de stekker vervolgens aan op een 100V-240V stopcontact.
Dit apparaat heeft een ingebouwde oplaadbare batterij die automatisch wordt opgeladen zolang het apparaat
is aangesloten. Als het batterijniveau laag is, zal de batterij-indicator v oplichten. De batterij-indicator zal rood
knipperen wanneer het batterijniveau laag is. De indicator is constant rood tijdens het opladen.
Let op: De batterij werkt ongeveer zes uur bij een normaal luisterniveau.
Opmerkingen:
• Gebruik alleen de meegeleverde wisselstroomadapter.
• Verwijder zowel de gelijkstroomstekker als de AC-IN-stekker om de wissselstroomadapter te
ontkoppelen wanneer deze niet in gebruik is.
• Ontkoppel het wisselstroomsnoer om te gebruiken met gelijkstroomvoeding (oplaadbare batterij).
De oplaadbare batterij vervangen:
Als de batterij niet voldoende vermogen levert (zie de opmerkingen voor de oplaadbare batterij hieronder),
bestel dan een vervangende batterij op www.tdkperformance.com en verwijder de vier schroeven aan de
linkerkant van het apparaat. Ontkoppel de aansluiting en verwijder de batterij. Sluit dan de nieuwe batterij
aan en plaats de vier schroeven terug.
Opmerkingen voor de oplaadbare batterij:
• Telkens wanneer u de batterij oplaadt en ontlaadt (laadcycli), neemt de batterijcapaciteit licht af.
Oplaadbare batterijen kunnen een beperkt aantal keren worden opgeladen en moeten uiteindelijk
worden vervangen.
• Misschien wilt u de batterij vervangen op het moment dat, of voordat, de batterij niet genoeg voeding
meer levert om u apparaat goed te laten werken. Het weggooien van de batterij op de juiste manier
is van essentieel belang uit milieu- en veiligheidsoogpunt. Als u de batterij direct weggooit in de
prullenbak zal dit schade opleveren voor het milieu.
• Niet verbranden.
LOCATIE VAN BEDIENINGSELEMENTEN
3
4
5
1
2
8
9
6
7
11
12
10
1. Aan/uit- en volumeknop
2. Indicator laag batterijniveau
3. Draaghengsel
4. Indicatoren voor Bluetooth® en aux-bron
5. Knop voor hoge tonen/bas
6. Indicatoren voor hoge tonen/bas
7. Knop bron/selecteren
8. USB-oplaadaansluiting
9. Gelijkstroom-IN-aansluiting
10. Rubberen flap
11. AUX-aansluiting
12. Batterij AAN/UIT-schakelaar
GEBRUIK
De A360 aan- en uitzetten:
1. Voor wisselstroomgebruik: druk op de aan/uit- en volumeknop u op het hoofdapparaat om het
apparaat aan te zetten.
2. Voor gelijkstroomgebruik: schuif de batterijschakelaar al naar de AAN-positie. Druk op de aan/uit- en
volumeknop u; het apparaat zal de vorige bron en het volume aanzetten.
3. Om de stroom uit te schakelen drukt u op de aan/uit- en volumeknop u.
Een Bluetooth-apparaat koppelen
1. Zet de A360 aan. De ledlampjes rond de aan/uit- en volumeknop zullen oplichten en de eerder
beluisterde bron en het volume zullen worden geselecteerd.
2. Houd de knop bron/selecteren ingedrukt V totdat de Bluetooth-indicator snel begint te knipperen om
de A360 ‘vindbaar’ te maken.
3. Schakel Bluetooth in op het Bluetoothapparaat en selecteer ‘A360’ in de lijst van apparaten. Als het
Bluetooth-apparaat vraagt om een wachtwoord, voer dan ‘0000’ in. Sommige Bluetooth-apparaten
zullen u vragen om de verbinding te accepteren. Als de apparaten op de juiste manier zijn gekoppeld
zal de luidspreker piepen en de Bluetooth-indicator zal constant blauw oplichten. Als de koppeling is
mislukt, zal de Bluetooth-indicator langzaam knipperen.
BELANGRIJK: Na stap 3 heeft u twee minuten om de apparaten te koppelen.
Let op: Nadat u een apparaat hebt gekoppeld, zal de A360 deze onthouden voor toekomstig gebruik.
Een Bluetooth-apparaat gebruiken
1. Zet de A360 aan. De ledlampjes rond de aan/uit- en volumeknop zullen oplichten en de eerder
beluisterde bron en het volume zullen worden geselecteerd.
2. Met een gekoppeld apparaat (zie de vorige sectie) drukt u op de knop bron/selecteren V zodat de
Bluetooth-indicator oplicht.
3. Bedien uw Bluetooth-apparaat en het geluid ervan wordt afgespeeld door de luidsprekers van de A360.
4. Pas het volume aan door te draaien aan de aan/uit- en volumeknop u op de A360 of aan de
volumeknop op het Bluetooth-apparaat, en pas de bas en hoge tonen aan zoals verderop in deze
handleiding beschreven.
AUX-aansluiting (achterkant van 360)
1. Steek het ene uiteinde van een audiokabel
(niet meegeleverd) in de LINE OUT of
hoofdtelefoonaansluiting op uw externe audio-apparaat
en het andere uiteinde in de AUX-aansluiting ak aan de
achterkant van de A360, onder de flap.
2. Om te luisteren naar het externe audio-apparaat zet u
de A360 aan en drukt u op de knop bron/selecteren V
zodra de AUX-indicator oplicht, om de line in-modus te
selecteren.
3. Start het afspelen van het externe apparaat en het
geluid van het externe audio-apparaat zal worden
afgespeeld door de luidsprekers van de A360.
4. Pas het volume aan met behulp van de aan/uit- en
volumeknop u op de A360 of de volumeknop op het
Bluetooth-apparaat, en pas de bas en hoge tonen aan
zoals verderop in deze handleiding beschreven.
Een USB-apparaat opladen met de USB-aansluiting van de A360
Sluit uw apparaat aan via USB aan de USB-aansluiting W op de A360. Uw apparaat wordt opgeladen als
de A360 is aangesloten op AC-netvoeding en op power ON u staat (ingeschakeld). Uw apparaat wordt
ook opgeladen tijdens het gebruik in DC-modus als de Batterij AAN/UIT-schakelaar al AAN staat en de
luidspreker op power ON u staat (ingeschakeld). Zie de handleiding die wordt meegeleverd met de externe
apparatuur voor specificaties voor het opladen. Sommige apparaten kunnen een speciale USB-adapterkabel
nodig hebben.
Let op: Opladen via USB zal de levensduur van de batterij in gelijkstroommodus aanzienlijk verminderen.
De bas en hoge tonen instellen
1. HOGE TONEN: druk op de knop voor hoge tonen/bas y totdat de indicator voor hoge tonen oplicht.
Pas de instelling aan met de aan/uit- en volumeknop u.
2. BAS: druk op de knop hoge tonen/bas y totdat de indicator voor bas oplicht. Pas de instelling aan
met behulp van de aan/uit- en volumeknop u.
Let op: Na vijf seconden zal het apparaat de instellingen voor bas/hoge tonen opslaan en terugkeren naar
de volume-selectiemodus.
Automatisch uitschakelen
Als het apparaat geen audiosignaal heeft of een USB-apparaat niet wordt opgeladen gedurende 20
minuten, zal het apparaat zichzelf uitschakelen. Om het apparaat te ‘ontwaken’ drukt u op de aan/uitvolumeknop u.
Spatwaterdicht
De A360 is spatwaterdicht (IPX3 waardering onder internationale norm IEC 60529), maar kan niet worden
ondergedompeld in water of onderworpen worden aan een constante waterstroom. Om ervoor te zorgen
dat het product spatwaterdicht is, sluit u de rubberen flap at aan de achterkant van de A360. Om de flap
goed te sluiten, steekt u de rubberen dongle (in de flap) in de DC IN-aansluiting X tot het midden van de
flap recht loopt. Steek de andere dongle in de USB-aansluiting W en strijk dan de hele flap glad totdat
deze gelijk is aan de zijkanten van de A360.
Problemen oplossen
Als de A360 geen geluid produceert, past u het volume van uw digitale muziekapparaat aan naar ‘hoog’.
SPECIFICATIES EN COMPATIBILITEIT
ALGEMEEN:
Voeding (wisselstroom) ... Ingang: 100-240V AC, 50/60Hz,
.......................................1,2 A max, Uitgang: 19 V DC, 2A
Afmetingen ............................ 6 (B) x 6 (H) x 6 (D) inches
.................................... 15.2 (B) x 15.2 (H) x 15.2 (D) cm
Gewicht .................................................... 4,4 lbs / 2.0 kg
Luidsprekers .......................... 4 x 1 inch full-range drivers,
..............................................................4 inch subwoofer
Specificaties zijn onderhevig aan verandering zonder kennisgeving.
Het TDK Life on Record- logo is een handelsmerk van TDK Corporation en wordt onder licentie gebruikt.
Alle andere handelsmerken en logo’s zijn eigendom van hun respectievelijke eigenaars.
Het Bluetooth
elk gebruik van zulke merken door Imation Corp is onder licentie.
®
woordmerk en de logo’s zijn gedeponeerde handelsmerken van Bluetooth SIG, Inc. en
Voedingsuitvoer van luidspreker ............... 2 W x 4 + 15 W
......................................................................(subwoofer)
Draadloze audio .............................. Bluetooth versie 2.1,
.................................................. A2DP profiel, AAC Codec
Line-ingang audio............... 3,5 mm stereo-aansluiting tot
................................................. 2,5 Vrms ingangssignaal
USB-poort. .......................... 5,0 V @ 0,5 A alleen opladen
Page 5

Bezprzewodowy
głośnik 360
Przed rozpoczęciem używania tego produktu
Instrukcja obsługi
prosimy przeczytać całą niniejszą instrukcję
TDKperformance.eu
A360
Bezdrátový
reproduktor 360
Příručka pro uživatele
Před obsluhou tohoto výrobku si prosím
přečtěte tento návod
TDKperformance.eu
A360
PODŁĄCZENIE ZASILANIA / ŁADOWANIE AKUMULATORA
1. Wybierz odpowiednią wtyczkę i
podłącz ją do zasilacza.
2. Podłącz wtyk zasilacza do gniazda DC IN X z tyłu urządzenia, a następnie podłącz wtyczkę do gniazdka ściennego 100 V‐240 V.
Urządzenie ma wbudowany akumulator, który jest automatycznie ładowany, gdy jest podłączone zasilanie. Gdy poziom naładowania
jest niski, kontrolka akumulatora v miga w kolorze czerwonym. Kontrolka świeci światłem ciągłym podczas ładowania.
Uwaga: Akumulator zapewnia około 6 godzin odtwarzania przy normalnym poziomie głośności.
Uwagi:
• Można używać tylko zasilacza dostarczonego w komplecie z urządzeniem.
• Gdy urządzenie nie jest używane, należy wyjąć wtyk DC i wtyczkę sieciową, aby odłączyć zasilacz.
• Aby używać urządzenia na zasilaniu akumulatorowym, należy odłączyć kabel zasilający.
Wymiana akumulatora:
Gdy akumulator nie zapewnia wystarczająco dużo energii (patrz Uwagi dotyczące akumulatora poniżej), należy zamówić zamienny akumulator na stronie www.tdkperformance.com, wykręcić cztery wkręty po lewej stronie urządzenia i odłączyć złącze, by wyjąć akumulator. Następnie należy podłączyć nowy akumulator i wkręcić cztery wkręty.
Uwagi dotyczące akumulatora:
• Przy każdym cyklu ładowania i rozładowania akumulatora nieznacznie zmniejsza się jego pojemność. Akumulatory
charakteryzują się ograniczoną liczbą cykli ładowania, dlatego po jakimś czasie konieczna jest ich wymiana.
• Akumulator można wymienić, gdy nie zapewnia dostatecznej ilości energii do funkcjonowania urządzenia. Kluczowe
znaczenie ze względu na dobro środowiska i bezpieczeństwo ma odpowiednie pozbycie się akumulatora. Wyrzucenie
akumulatora do śmietnika jest groźne dla środowiska.
• Nie spalać.
POŁOŻENIE ELEMENTÓW STERUJĄCYCH
3
4
5
1
2
8
9
6
7
11
12
10
1. Pokrętło zasilania/głośności
2. Kontrolka niskiego poziomu naładowania
akumulatora
3. Uchwyt do przenoszenia
4. Kontrolka Bluetooth® i źródła Aux
5. Przycisk wysokich/niskich tonów
6. Kontrolka tonów wysokich/niskich
7. Przycisk źródła/wyboru
8. Gniazdo ładowania USB
9. Gniazdo zasilania DC IN
10. Gumowa klapka
11. Gniazdo AUX
12. Przełącznik OFF/ON akumulatora
OBSŁUGA
Włączanie i wyłączanie urządzenia A360:
1. Zasilanie sieciowe: Naciśnij pokrętło zasilania/głośności u, aby włączyć urządzenie.
2. Zasilanie akumulatorowe: Przesuń przełącznik akumulatora al do pozycji ON. Naciśnij pokrętło zasilania/głośności u.
Urządzenie włączy wcześniej wybrane źródło i poziom głośności.
3. Aby wyłączyć urządzenie, naciśnij pokrętło zasilania/głośności u.
Parowanie urządzenia Bluetooth
1. Włącz głośnik A360; diody LED wokół pokrętła zasilania/głośności zaczną świecić i zostanie wybrane poprzednie źródło i
poziom głośności.
2. By głośnik A360 był możliwy do wykrycia, naciśnij i przytrzymaj przycisk źródła/wyboru V aż kontrolka Bluetooth zacznie
szybko migać.
3. Na urządzeniu Bluetooth włącz komunikację Bluetooth i wybierz z listy urządzeń głośnik A360. Jeśli urządzenie Bluetooth
poprosi o podanie klucza dostępu, wpisz „0000”. Niektóre urządzenia Bluetooth poproszą o zaakceptowanie połączenia. Po
prawidłowym sparowaniu urządzeń głośnik wyda dźwięk, a kontrolka Bluetooth zacznie świecić w kolorze niebieskim. Jeśli
parowanie się nie powiedzie, kontrolka Bluetooth będzie powoli migać.
WAŻNE: Po wykonaniu kroku 3 masz dwie minuty, aby sparować urządzenia.
Uwaga: Głośnik A360 zapamięta sparowane urządzenie na przyszłość.
Używanie urządzenia Bluetooth
1. Włącz głośnik A360; diody LED wokół pokrętła zasilania/głośności zaczną świecić i zostanie wybrane poprzednie źródło i
poziom głośności.
2. Po sparowaniu urządzenia (patrz poprzednia sekcja) naciśnij przycisk źródła/wyboru V tak aby zaświeciła kontrolka
Bluetooth.
3. Możesz używać urządzenia Bluetooth, a jego dźwięk będzie odtwarzany przez głośniki urządzenia A360.
4. Możesz zmienić głośność, obracając pokrętło zasilania/głośności u na głośniku A360 lub korzystając z regulatora głośności
urządzenia Bluetooth. Możesz także dostosować poziom tonów niskich i wysokich, jak opisano w dalszej części przewodnika.
Gniazdo AUX (z tyłu głośnika A360)
1. Możesz włożyć końcówkę kabla audio (sprzedawany oddzielnie)
do gniazda LINE OUT lub gniazda słuchawkowego zestawu audio,
a drugą końcówkę do gniazda AUX ak znajdującego się z tyłu
głośnika A360, pod klapką.
2. Aby słuchać zewnętrznego zestawu audio, włącz głośnik A360 i
jednokrotnie naciśnij przycisk źródła/wyboru V, tak aby zaświeciła
kontrolka AUX i został wybrany tryb Line In.
3. Rozpocznij odtwarzanie z zewnętrznego zestawu. Dźwięk będzie
tworzony przez głośniki urządzenia A360.
4. Możesz zmienić głośność za pomocą pokrętła zasilania/głośności u
na głośniku A360, lub korzystając z regulatora głośności urządzenia
Bluetooth. Możesz także dostosować poziom tonów niskich i
wysokich, jak opisano w dalszej części przewodnika.
Ładowanie urządzenia USB za pomocą gniazda USB głośnika A360
Podłącz urządzenie za pomocą kabla USB do gniazda USB W na głośniku A360. Głośnik A360 jest ładowany, gdy jest podłączony
do gniazda sieciowego, a zasilanie jest włączone u. Urządzenie jest również ładowane w trybie DC, gdy przełącznik OFF/ON (WŁ./
WYŁ.) akumulatora al jest w pozycji ON (WŁ.), a głośnik jest włączony u. W celu zapoznania się z parametrami ładowania
należy zajrzeć do instrukcji obsługi dołączonej do ładowanego urządzenia. Niektóre urządzenia mogą wymagać specjalnego kabla
z adapterem USB.
Uwaga: Ładowanie za pośrednictwem gniazda USB zdecydowanie skraca czas działania na zasilaniu akumulatorowym.
Ustawianie poziomu tonów wysokich i niskich
1. TONY WYSOKIE: Naciśnij przycisk tonów wysokich/niskich y aż zacznie świecić kontrolka tonów wysokich. Dostosuj poziom,
korzystając z pokrętła zasilania/głośności u.
2. TONY NISKIE: Naciśnij przycisk tonów wysokich/niskich y aż zacznie świecić kontrolka tonów niskich. Dostosuj poziom,
korzystając z pokrętła zasilania/głośności u.
Uwaga: Po pięciu sekundach głośnik zapisze poziom niskich i wysokich tonów i powróci do trybu regulacji głośności.
Automatyczne wyłączenie
Jeśli głośnik nie odbiera sygnału audio lub urządzenie USB nie jest ładowane przez 20 minut, głośnik się wyłączy. Aby go
wybudzić, wystarczy nacisnąć pokrętło zasilania/głośności u.
Odporność na rozpryski
Głośnik A360 jest odporny na rozpryski (klasa IPX3 zgodnie z międzynarodową normą IEC 60529), ale nie można go zanurzać w
wodzie ani nie może być umieszczany w strumieniu wody. Aby głośnik A360 był odporny na rozpryski, należy zamknąć gumową
klapkę at z tyłu. Aby prawidłowo zamknąć klapkę, wciśnij do końca środkowy gumowy trzpień (po wewnętrznej stronie klapki) w
gniazdo DC IN X, aż środek klapki będzie ułożony płasko. Włóż drugi trzpień do gniazda USB W, następnie wyrównaj całą klapkę
względem boków głośnika A360.
Usuwanie problemów
Jeśli głośnik A360 nie generuje dźwięku, zwiększ poziom głośności na cyfrowym urządzeniu audio.
DANE TECHNICZNE
INFORMACJE OGÓLNE:
Zasilanie sieciowe ............Wejście: 100‐240 V, prąd przemienny, 50/60 Hz,
................................................... maks. 1,2 A, Wyjście: 19 V, prąd stały, 2 A
Wymiary .....................................................6 (szer.) x 6 (wys.) x 6 (dł.) cali
..................................................... 15,2 (szer.) x 15,2 (wys.) x 15,2 (dł.) cm
Waga ................................................................................... 4,4 lbs / 2,0 kg
Głośniki ............................................................ 4 głośniki pełnozakresowe,
..........................................................................subwoofer o średnicy 4 cali
Dane techniczne mogą ulec zmianie bez uprzedniego powiadomienia.
Logo TDK Life on Record jest znakiem towarowym TDK Corporation. Logo to zostało użyte na podstawie licencji. Wszystkie inne
znaki towarowe i logo stanowią własność odpowiednich firm.
Znak słowny i logo Bluetooth® jest zastrzeżonym znakiem towarowym własności Bluetooth SIG, Inc. i znaki te są używane przez
Imation Corp na licencji.
Moc głośnika .................................................. 2 W x 4 + 15 W (subwoofer)
Dźwięk bezprzewodowy ....................................... Bluetooth w wersji 2.1,
............................................................................... profil A2DP, kodek AAC
Wejście dźwięku Line‐in ......................Gniazdo stereofoniczne 3,5 mm do
...................................................................2,5 Vrms sygnału wejściowego
Port USB. ................................................ 5,0 V przy 0,5 A, tylko ładowanie
AC PŘÍPOJENÍ / NABÍJENÍ BATERIE
1. Zvolte příslušnou zástrčku
používanou ve vaší zemi a
připojte ji k adaptéru na
střídavý proud.
2. Zapojte konektor adaptéru na střídavý proud do konektoru DC IN X na zadní straně jednotky a potom zapojte zástrčku do
zásuvky s napětím 100V‐240V.
Tato jednotka má vestavěnou dobíjecí baterii, která se automaticky dobijí, když je jednotka zapojená a baterie je vybitá. Ukazatel na
baterii v se zapne. Když je baterie málo nabitá, ukazatel bliká červeně. Když se baterie nabíjí, svítí červeně.
Poznámka: Při běžných podmínkách poslechu vydrží baterie přibližně 6 hodin provozu.
Poznámky:
• Používejte pouze AC adaptér, který je součástí balení.
• Pokud přístroj nepoužíváte, odpojte DC konektor a AC‐IN konektor a odpojte AC adaptér.
• Odpojte AC kabel pro připojení k DC (dobíjecí baterie).
Výměna dobíjecích baterií:
Pokud baterie nedodává dostatek elektrické energie (viz níže uvedené poznámky k dobíjecím bateriím), objednejte si náhradní baterie
na stránkách www.tdkperformance.com a odstraňte čtyři šrouby na levé straně jednotky. Odpojte konektor a odstraňte baterie. Poté
zapojte novou baterii a znovu zasuňte šrouby.
Poznámky k dobíjecím bateriím:
• Vždy, když se baterie nabíjejí a vybíjejí (nabíjecí cyklus), kapacita baterie se mírně snižuje. Dobíjecí baterie mají omezený počet
nabíjecích cyklů a nakonec se musí vyměnit.
• Když nebo dříve než baterie přestane dodávat dostatek elektrické energie pro provoz zařízení, můžete baterii vyměnit.
Kvůli ochraně životního prostředí a bezpečnosti je také důležitá řádná likvidace baterie. Vyhození baterie přímo do odpadu
poškozuje životní prostředí.
• Nespalujte.
UMÍSTĚNÍ OVLADAČŮ
3
4
5
1
2
8
9
6
7
11
12
10
1. Ovladač hlasitosti Power/Volume
2. Ukazatel nízkého stavu nabití baterie
3. Držadlo pro přenášení
4. Bluetooth® a indikátory zdroje Aux
5. Tlačítko pro nastavení sopránu/basu Treble/Bass
6. Ukazatele sopránu/basu
7. Tlačítko pro volbu zdroje Source/Select
8. Konektor USB pro nabíjení
9. Konektor DC IN
10. Gumový kryt
11. Konektor AUX
12. Spínač baterie OFF/ION
PROVOZ
Vypnutí a zapnutí reproduktoru A360:
1. Provoz při střídavém proudu: Pro zapnutí stiskněte tlačítko pro ovládání hlasitosti Power/Volume u na hlavní jednotce.
2. Provoz při stejnosměrném proudu: Posuňte spínač baterie al do pozice zapnuto (ON). Stisknutím tlačítka pro ovládání
hlasitosti Power/Volume u; se jednotka vrátí k předchozímu zdroji a hlasitosti.
3. Pro vypnutí napájení stiskněte tlačítko pro ovládání hlasitosti Power/Volume u.
Připojení zařízení Bluetooth
1. Zapněte reproduktor A360; kontrolka/kontrolky LED kolem ovladače hlasitosti se rozsvítí a zvolí se předchozí poslouchaný
zdroj a hlasitost.
2. Stiskněte a držte tlačítko Source/Select V dokud nezačne rychle blikat indikátor Bluetooth a dokud nebude přístroj A360
“viditelný”.
3. Na zařízení Bluetooth povolte Bluetooth a ze seznamu zařízení zvolte “A360”. Pokud zařízení Bluetooth vyžaduje heslo,
použijte “0000”. Některá zařízení Bluetooth vás požádají o přijetí spojení. Jestliže jsou jednotky správně propojeny,
reproduktor začne pípat a indikátor zařízení Bluetooth se rozsvítí modře. Pokud nedošlo k propojení, indikátor Bluetooth
bude pomalu blikat.
DŮLEŽITÉ: Po kroku 3 máte na propojení jednotek dvě minuty.
Poznámka: Jakmile zařízení propojíte, A360 si propojení zapamatuje pro budoucí použití.
Používání zařízení Bluetooth
1. Zapněte A360; indikátor/indikátory LED kolem ovladače hlasitosti Power/Volume se rozsvítí a zvolí se předchozí poslouchaný
zdroj a hlasitost.
2. Když je jednotka propojená (viz předchozí oddíl) stiskněte ovladač hlasitosti Source/Select V, takže kontrolka Bluetooth svítí.
3. Nastavte zařízení Bluetooth a zvuk se bude šířit prostřednictvím reproduktorů A360.
4. Nastavte hlasitost otáčením ovladače Power/Volume u na A360 nebo ovladače hlasitosti na zařízení Bluetooth a upravte
bas a soprán, jak je popsáno níže v této příručce.
AUX Jack (zadní strana A360)
1. Zasuňte jeden konec audio kabelu (není součástí balení) do výstupu
LINE OUT nebo do konektoru sluchátek na externí audio jednotce a
druhý konec zasuňte do konektoru AUX ak na zadní straně A360
pod krytem.
2. Pro poslech externí audio jednotky zapněte A360 a jednou stiskněte
tlačítko Source/Select V tak, aby svítila kontrolka AUX a byl zvolen
režim Lne In.
3. Začněte přehrávat externí jednotku a zvuk externí audio jednotky
bude procházet přes reproduktory A360.
4. Pomocí ovladače hlasitosti Power/Volume nastavte hlasitost u
A360 nebo to můžete provést ovladačem hlasitosti na zařízení
Bluetooth a poté nastavte bas a soprán, jak je popsáno níže v této
příručce.
Nabíjení zařízení USB pomocí konektoru USB zařízení A360 USB
Spojte zařízení prostřednictvím USB s konektorem USB W na zařízení A360. Vaše zařízení se nabíjí, když je A360 připojeno k AC zrdoji
a zdroj je v poloze ON u. Vaše zařízení se bude také nabíjet za provozu v režimu DC, jestliže je spínač baterie OFF/ON al je v poloze
ON a zdroj reproduktoru je v poloze ON u. Pokud jde o specifikace týkající se nabíjení, nahlédněte do příručky pro uživatele, která
se dodává s externím zařízením. Některá zařízení mohou vyžadovat speciální kabel USB adaptéru.
Poznámka: Nabíjení USB významně sníží životnost baterie v režimu DC.
Nastavení sopránu a basu
1. SOPRÁN: Podržte tlačítko pro soprán/bas y dokud se nerozsvítí kontrolka pro soprán. Upravte nastavení pomocí ovladače
hlasitosti Power/Volume u.
2. BAS: Podržte tlačítko soprán/bas y dokud se nerozsvítí kontrolka pro bas. Upravte nastavení pomocí ovladače hlasitosti
Power/Volume u.
Poznámka: Po pěti sekundách jednotka uloží nastavení sopránu/basu a vrátí se do režimu volby hlasitosti.
Automatické vypínání
Pokud jednotka nemá audio signál nebo se nenabíjí USB zařízení, po dobu 20 minut, jednotka se sama vypne. Pokud chcete
jednotku “probudit”, jednoduše stiskněte tlačítko ovladače hlasitosti Power/Volume u.
Odolnost proti postříkání vodou
Zařízení A360 je odolné proti postříkání vodou (třída IPX3 podle mezinárodní normy IEC 60529), ale nesmí se ponořit do vody nebo
vystavovat nepřetržitě tekoucí vodě. Aby byla zajištěna odolnost proti postříkání vodou, zavřete gumový kryt at na zadní straně
zařízení A360. Aby byl kryt dobře uzavřený, zasuňte zcela střední gumový klíč (na vnitřní straně krytu) do konektoru DC IN X až
bude střed klíče v jedné rovině. Zasuňte další klíč do konektoru SUB W, potom urovnejte celý kryt tak, aby byl v jedné rovině s
bočními stranami zařízení A360.
Řešení problémů
Pokud zařízení A360 nevydává zvuk, upravte hlasitost pomocí digitálního hudebního zařízení na vyšší stupeň.
SPECIFIKACE A KOMPATIBILITA
OBECNĚ:
Zdroj energie (AC) .......................................Příkon: 100-240V AC, 50/60Hz,
.....................................................................1.2 A max, výstup: 19 V DC, 2A
Rozměry ............................................................... 6 (š) x 6 (v) x 6 (d) palců
.................................................................. 15.2 (š) x 15.2 (v) x 15.2 (h) cm
Váha...................................................................................4.4 liber / 2.0 kg
Reproduktory .................................................... 4 x 1 palce širokopásmové,
........................................................................................4 palce subwoofer
Specifikace se mohou změnit bez předchozího upozornění.
Logo TDK Life on Record je obchodní známka TDK Corporation a používá se v rámci licence. Všechny ostatní obchodní známky a
loga jsou majetkem příslušných vlastníků.
Bluetooth® název a loga jsou zapsané obchodní známky, jejichž majitelem je Bluetooth SIG, Inc. a jakékoliv použití takových
známek společností Imation Corp podléhá licenci.
Výkon reproduktoru ....................................... 2 W x 4 + 15 W (subwoofer)
Bezdrátové audio .................................................... Verze s Bluetooth 2.1,
............................................................................... A2DP profil, AAC Codec
Audio s linkovou úrovní ....................................3,5 mm stereo konektor na
................................................................................ 2,5 Vrm vstupní signál
USB Port. ....................................................... 5.0 V @ 0.5 A pouze nabíjení
Page 6

CE Declaration of Conformity Declaración de Conformidad de CE
We, Imation Corp.,
1 Imation Way, Oakdale, MN 55125 USA,
declare that the product(s):
Product Name: Wireless 360 Speaker
Product Model(s): A360
in accordance with EMC Directive 2004/108/EC,
per the following norm(s) or document(s):
Regulations
EN 55013: 2001 + A1:2003 + A2:2006
EN 55020: 2007 + A11:2011
EN 61000-3-2:2006 + A2:2009
EN 61000-3-3:2008
in accordance with the R&TTE Directive 1999/5/EC,
per the following norm(s) or document(s):
Regulations
EN 300 328 v1.8.1:2012
EN 301-489-1 v1.9.2:2011
EN 301-489-17 v2.2.1:2012
EN 62479:2010
in accordance with the Low Voltage
Directive 2006/95/EC, per the following
norm(s) or document(s):
Regulations
EN 60065, IEC 60065
in accordance with the Ecodesign Requirements
for Energy Related Products Directive 2009/125/EC,
per the following norm(s) or document(s):
Regulations
EC No. 1275/2008, EN62301
in accordance with the Restriction of Certain
Hazardous Substances Directive 2011/65/EU, per
the following norm(s) or document(s):
Regulations
EN 62321:2008
CK Wong
Quality Engineering Manager, Compliance
Engineering
Imation Corp., Oakdale, MN 55128 USA
15 July 2013
Imation Enterprises Corp.
1 Imation Way, Oakdale, MN 55128-3414 USA
www.tdkperformance.com
Imation Europe B.V.
2132 HZ Hoofddorp
www.tdkperformance.eu
Imation Singapore Pte. Ltd.
Unit 02-02 New Tech Park 151 Lorong Chuan
Unit 2, 1 Coronation Avenue Kings Park, NSW 2148
Singapore 556741
www.tdkperformance.com
Imation ANZ Pty Ltd
www.tdkperformance.com.au
Por la presente, Imation Corp., 1 Imation Way,
Oakdale, MN 55125 EE.UU., certifica que el/los
producto/s:
Nombre del producto: Altavoz inalámbrico 360°,
Modelo/s del product: A360
de acuerdo con las directrices EMC 2004/108/EC,
mediante la/las siguiente/s norma/s o documento/s:
Reglamentos
EN 55013: 2001 + A1:2003 + A2:2006
EN 55020: 2007 + A11:2011
EN 61000-3-2:2006 + A2:2009
EN 61000-3-3:2008
de acuerdo con las directrices R&TTE 1999/5/EC,
mediante la/las siguiente/s norma/s o documento/s:
Reglamentos
EN 300 328 v1.8.1:2012
EN 301-489-1 v1.9.2:2011
EN 301-489-17 v2.2.1:2012
EN 62479:2010
de acuerdo con las directrices sobre baja tensión
2006/95/EC, mediante la/las siguiente/s norma/s o
documento/s:
Reglamentos
EN 60065, IEC 60065
de acuerdo con los requisitos de diseño ecológico
para productos relacionados con la energía
Directrices 2009/125/CE,2009/125/EC,
mediante la/las siguiente/s norma/s o documento/s:
Reglamentos
EC No. 1275/2008, EN62301
de acuerdo con las regulaciones para la Restricción
de ciertas sustancias peligrosas, directrices
2011/65/EC, mediante la/las siguiente/s norma/s o
documento/s:
Reglamentos
EN 62321:2008
CK Wong
Director de Ingeniería de Calidad, Ingeniería de
control de cumplimiento
Imation Corp., Oakdale, MN 55128 EE.UU.
15 de julio de 2013
Planeetbaan 4
The Netherlands
中国上海徐汇区淮海中路1325号爱美高大厦1202室
怡敏信(上海)有限公司
www.tdk-media.com.cn
怡敏信香港有限公司
九龍觀塘開源道64號源成中心27樓
www.tdk-media.com.hk
Technical Assistance / Assistance technique / Technische Hilfe / Technische assistentie /
Assistenza tecnica / Asistencia técnica / Assistência técnica / Техническая помощь /
Pomoc techniczna / Technická pomoc /
お客様相談室 / / 技術支援/
技术协助:
US ......................................................................................................................800-285-2783
DE/AT/CH .....................................................................................................+49 2131 226 311
IT ................................................................................................................. +39 022 1043 818
ES/PT ............................................................................................................. +34 900 993 166
UK/IE ....................................................................................................... +44 (0) 1344 402201
NL/Other EU ............................................................................................. +31 (0) 23 521 2605
SG ......................................................................................................................65-6499-7199
AU/NZ ...................................................................................................................800-225-013
JP .......................................................................................................................0120-81-0544
CN ..................................................................................................................8621-6121-2122
..............................................................................................................02-2012-9999
HK .....................................................................................................................852-2161-2888
 Loading...