


6 Piece Wicker
Conversation Set
Steel Frame with Powder Coating
INSTRUCTIONS
Single Chair Parts 3
Single Chair Assembly 4-7
Right Chair Parts 8
Right Chair Assembly 9-12
Center Chair Parts 13
Center Chair Assembly 14-15
Left Chair Parts 16
Left Chair Assembly 17-20
Ottoman Parts & Assembly 21
Warranty 22-23
Customer Service
1-800-599-8898

6 Piece Wicker Conversation Set
Getting Started
6 Piece Wicker Conversation Set
Single Chair Parts
Getting Started
Identify all parts packaged in carton against the parts list. Remove
all protective materials and place parts on a non-abrasive surface
to avoid scratching. If any parts are missing or damaged, DO NOT
attempt to assemble. Please contact our customer service center
(Monday-Friday 9:00am – 5:00pm EST) at 1-800-599 -8898 or email:
support@tdcusainc.com.
Caution: Read all the instructions before assembly. Failure
to do so may result in faulty assembly and potential injury!
Assemble product on a soft, non-abrasive surface such as a
carpet or cardboard to avoid damaging the item. Seek assistance
sure all bolts and nuts are securely tightened with screw covers
pressed in place.
A
B
C
D
E
F
G
H
Back 1
Arm 1
Seat 1
Arm 1
Adjustable Screw 4
M6x35 Screw 10
Washer 10
Hex Key 1
2 Item #21957
Customer Service 1-800-599-8898 Customer Service 1-800-599-8898
Item #21957 3

6 Piece Wicker Conversation Set
Single Chair Assembly Instructions
6 Piece Wicker Conversation Set
Single Chair Assembly Instructions
Step 1:
G
B
F
A
F
G
Step 2:
F
G
C
F
G
B
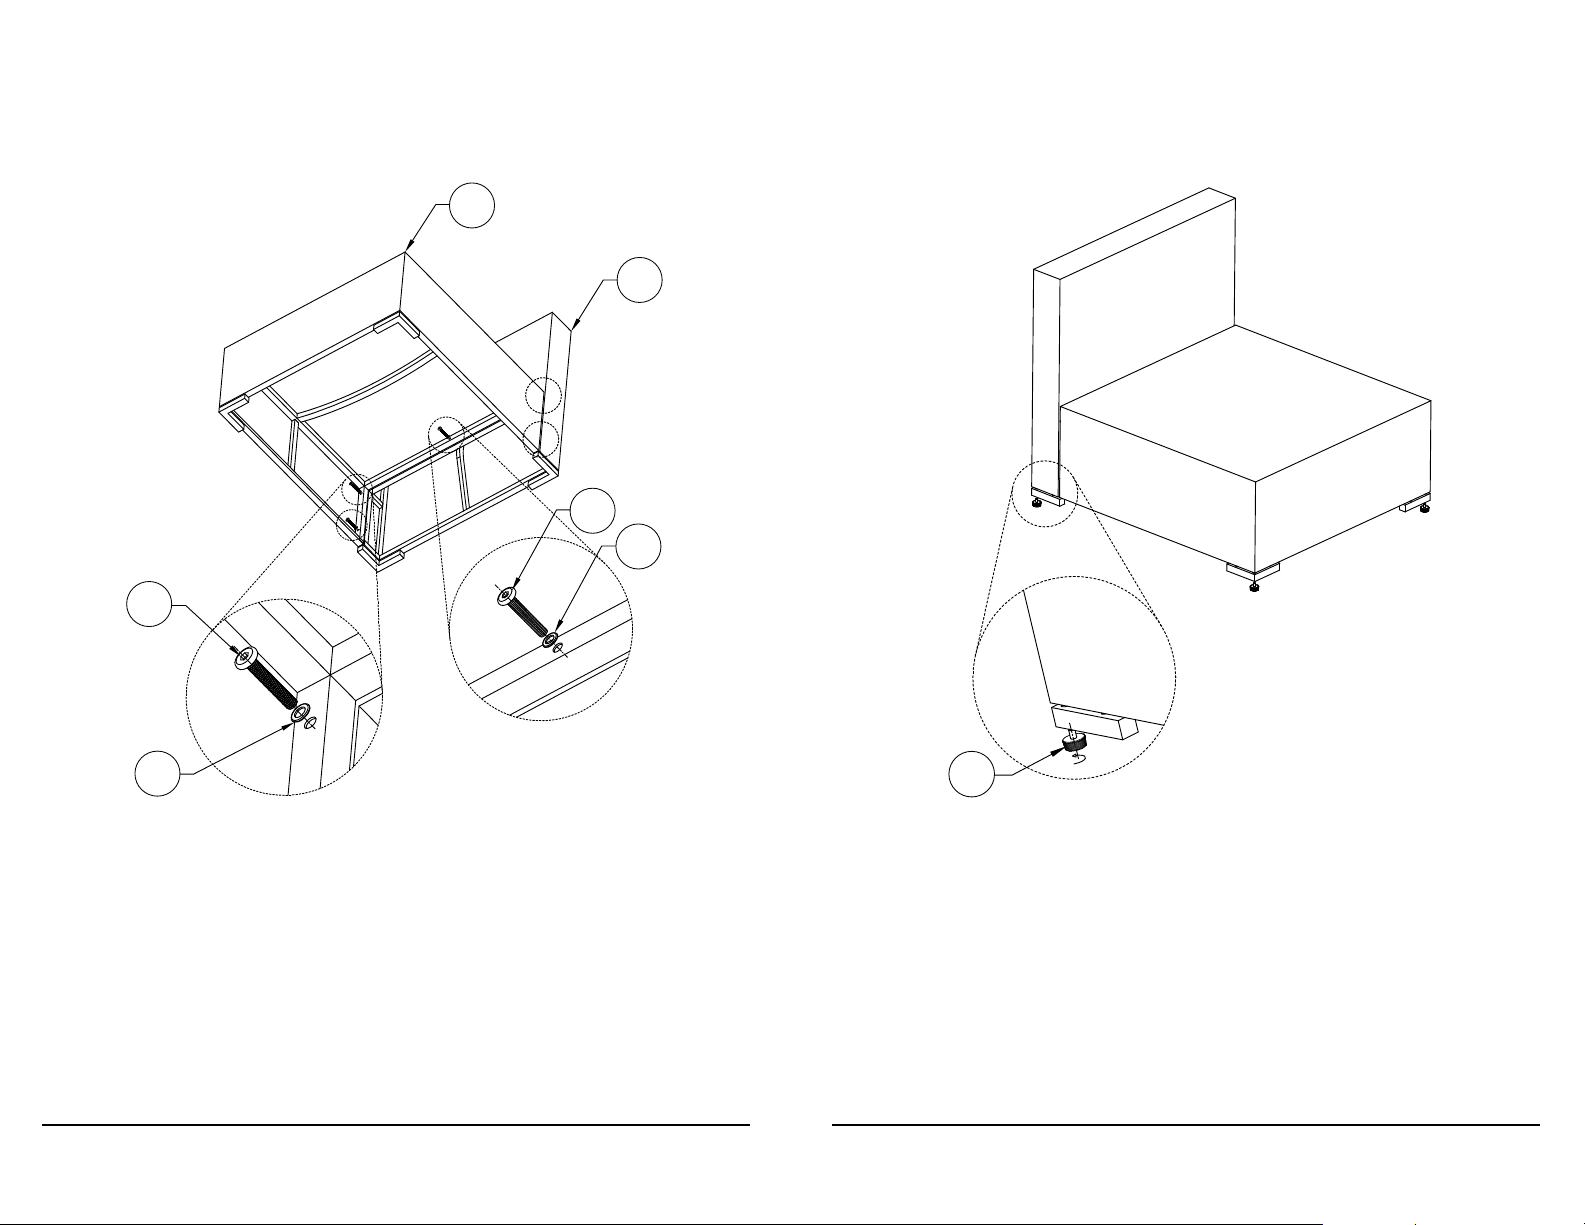
Place Back (A) together with Arm (B) so that they form an “L” shape.
Insert Screw M6X35 (F) with Washer (G) through the center screw
hole of Back (A) and into the corresponding screw threading of Arm
(B). Follow this step to insert a second Screw M6x35 (F) with Washers
(G) into the screw holes on either side of the center.
4 Item #21957
Customer Service 1-800-599-8898 Customer Service 1-800-599-8898
Place Arm (B) on the right side of the chair.
Insert Screw M6X35 (F) with Washer (G) through the screw hole of
Seat (C) and into the corresponding screw threading of Arm (B). Follow
this step to insert two additional Screws M6x35 (F) with Washers (G)
into the remaining screw holes to bring these two parts together.
Item #21957 5

6 Piece Wicker Conversation Set
Single Chair Assembly Instructions Single Chair Assembly Instructions
6 Piece Wicker Conversation Set
Step 3:
B
Step 4:
F
G
D
F
G
E
Place Arm (D) on the left side of the chair.
Insert Screw M6X35 (F) with Washer (G) through the screw hole of
Seat (C) and into the corresponding screw threading of Arm (D). Follow
this step to insert four additional Screws M6x35 (F) with Washers (G)
into the remaining screw holes to bring these two parts together.
6 Item #21957
Customer Service 1-800-599-8898 Customer Service 1-800-599-8898
Insert four Adjustable Screws (E) into the bottom corners of assembled
chair. Flip back over when finished.
Item #21957 7

6 Piece Wicker Conversation Set
Right Corner Chair Parts
6 Piece Wicker Conversation Set
Right Corner Chair Assembly Instructions
L
M
B
Seat 1
Arm 1
Arm 1
Step 1:
M
L
E
F
G
Adjustable Screw 4
M6x35 Screw 7
Washer 7
G
F
Place Seat (L) on the ground right side up with the exposed sides to
your left and direct opposite of where you are standing. Place Arm (M)
against exposed side of Seat (L) that is direct opposite of you.
Insert Screw M6x35 (F) with Washer (G) through one of the screw
holes beneath Seat (L) and into the corresponding screw threading
of Arm (M). Follow this step to insert a second Screw M6x35 (F) with
Washer (G) into the remaining screw hole to bring these two parts
together.
8 Item #21957
Customer Service 1-800-599-8898 Customer Service 1-800-599-8898
Item #21957 9

6 Piece Wicker Conversation Set
6 Piece Wicker Conversation Set
Right Corner Chair Assembly InstructionsRight Corner Chair Assembly Instructions
Step 2:
F
G
F
G
Step 3:
B
M
B
F
G
F
G
Place Arm (B) against exposed side of Seat (L) that is to the left of you.
Insert Screw M6x35 (F) with Washer (G) through one of the screw
holes beneath Seat (L) and into the corresponding screw threading of
Arm (B). Follow this step to insert two additional Screws M6x35 (F)
with Washers (G) into the remaining screw holes to bring these two
parts together.
10 Item #21957
Customer Service 1-800-599-8898 Customer Service 1-800-599-8898
Insert two Screws M6x35 (F) with Washer (G) through remaining
screw holes beneath Seat (L), through Arm (M) and into screw
threading of Arm (B).
Item #21957 11

6 Piece Wicker Conversation Set
Right Corner Chair Assembly Instructions
6 Piece Wicker Conversation Set
Center Chair Parts
Step 4:
E
N
O
E
F
G
H
Seat 1
Back 1
Adjustable Screw 4
M6x35 Screw 5
Washer 5
Hex Key 1
Insert four Adjustable Screws (E) into the bottom corners of assembled
chair. Flip back over when finished.
12 Item #21957
Customer Service 1-800-599-8898 Customer Service 1-800-599-8898
Item #21957 13
6 Piece Wicker Conversation Set
Center Chair Assembly Instructions
6 Piece Wicker Conversation Set
Center Chair Assembly Instructions
Step 1:
F
Step 2:
N
O
F
G
G
Insert Screw M6x35 (F) with Washer (G) through one of the screw
holes beneath Seat (N) and into the corresponding screw threading of
Back (O). Follow this step to the insert four remaining Screws M6x35
(F) with Washers (G) to connect and tighten these two parts together.
14 Item #21957
Customer Service 1-800-599-8898 Customer Service 1-800-599-8898
Insert four Adjustable Screws (E) into the bottom corners of assembled
chair. Flip back over when finished.
Item #21957 15
E

6 Piece Wicker Conversation Set
Left Corner Chair Parts
6 Piece Wicker Conversation Set
Left Corner Chair Assembly Instructions
J
K
Seat 1
Arm 1
Step 1:
G
D
Arm 1
F
K
J
E
F
G
H
Adjustable Screw 4
M6x35 Screw 7
Washer 7
Hex Key 1
Place Seat (J) on the ground right side up with the exposed sides to
your right and direct opposite of where you are standing. Place Arm
(K) against exposed side of Seat (J) that is direct opposite of you.
Insert Screw M6x35 (F) with Washer (G) through one of the screw
holes beneath Seat (J) and into the corresponding screw threading of
Arm (K). Follow this step to insert a second Screw M6x35 (F) with
Washer (G) into the remaining screw hole to bring these two parts
together.
16 Item #21957
Customer Service 1-800-599-8898 Customer Service 1-800-599-8898
Item #21957 17

6 Piece Wicker Conversation Set
6 Piece Wicker Conversation Set
Left Corner Chair Assembly InstructionsLeft Corner Chair Assembly Instructions
Step 2:
K
D
Step 3:
F
J
G
F
F
G
G
K
G
D
F
Place Arm (D) against exposed side of Seat (J) that is to the right of
you.
Insert Screw M6x35 (F) with Washer (G) through one of the screw
holes beneath Seat (J) and into the corresponding screw threading of
Arm (D). Follow this step to insert two additional Screws M6x35 (F)
with Washers (G) into the remaining screw holes to bring these two
parts together.
18 Item #21957
Customer Service 1-800-599-8898 Customer Service 1-800-599-8898
Insert two Screws M6x35 (F) with Washer (G) through remaining
screw holes beneath Seat (J), through Arm (K) and into screw
threading of Arm (D).
Item #21957 19

6 Piece Wicker Conversation Set
Left Chair Assembly Instructions
6 Piece Wicker Conversation Set
Ottoman Parts & Assembly
Step 4:
E
P
E
Ottoman 1
Adjustable Screw 4
P
Insert four Adjustable Screws (E) into the bottom corners of assembled
E
chair. Flip back over when finished.
Insert four Adjustable Screws (E) into the bottom corners of Ottoman
(P). Flip back over when finished.
20 Item #21957
Customer Service 1-800-599-8898 Customer Service 1-800-599-8898
Item #21957 21

6 Piece Wicker Conversation Set
LIMITED WARRANTY
Limited Warranty
6 Piece Wicker Conversation Set
Limited Warranty
Please contact our service hotline by phone, email or fax before
sending the device. This allows us to provide support in the event
of possible operator errors.
All furniture manufactured and sold by TDC USA, Inc. is warranted to the original
purchaser against defects in workmanship and materials. If a product manufactured by
TDC fails during the rst year from date of purchase under the terms of our limited
warranty, TDC will replace the item at no charge. After one year, it will be the original
purchasers’ responsibility to pay for freight and packing. TDC reserves the right, in the
case of discontinued or out of production models, to replace with an item of similar
quality. (Glass breakage is not warranted.)
Note: You must retain original receipt to obtain warranty!
Frames:
Frames are warranted against defects in materials and workmanship from the date of
original purchase. Damage to frames or welds due to commercial use, improper assembly,
exposure to water and sub-freezing temperatures, and/or abuse are not covered.
Fabric:
Fabric on cushions, slings, and umbrellas is warranted against separation at the seams.
Fading, mildew, and/or discoloration due to exposure to elements, chemicals, and spills
are not covered.
Powder coat and/or Paint:
The nish is warranted against blistering, peeling, or cracking. Fading resulting from
exposure to elements, chemicals, and spills are not covered. Scratches and chips due to
normal wear and use are not covered
Care & Maintenance:
Be careful to never allow water build up in frames as this will cause corrosion and freeze
damage in cold climates. Wash all frames with a solution of mild soap and water. Rinse
with clean water and dry with a soft absorbent cloth towel. Frames can be treated with
a liquid wax for maximum protection against UV rays and/or salty damp air. If your
set includes cushions, slings, and/or an umbrella, they may be cleaned by hand with a
solution of soap and water with a clean water rinse.
EXCLUSION:
• Damage caused by acts of nature
• Wind damage
• Failure caused by unreasonable, unanticipated or abusive use
• Failure caused by a lack of reasonable and necessary care and maintenance
• Normal fade of fabrics, upholstery or woven materials
• Glass table tops
• Bursting or cracking of tubing due to exposure to water and freezing
temperatures
• Changes in wood color due to the natural aging of the wood
Lack of original receipt will void warranty.
Customer Service: Monday-Friday 9:00am-5:00pm EST
By Phone: 800-599-8898
By E-mail: support@tdcusainc.com
Freight & Packing:
TDC will be responsible for shipping, handling, and packaging charges for all valid
warranty claims.
22 Item #21957
Customer Service 1-800-599-8898 Customer Service 1-800-599-8898
Item #21957 23

Distributed By T.D.C. USA INC.
Fairfield, NJ 07004
©2017 All Rights Reserved. Made in China
?/Comments: 1-800-599-8898 9am-5pm EST
www.tdcusainc.com
 Loading...