

Page 1
TR-73U
(603) 746-5524
www.MicroDAQ.com
Distributed by MicroDAQ.com, Ltd.
Users Manual
Thank you for purchasing our product.
Carefully read this instruction manual
before using this unit.
© Copyright T&D Corporation. All rights reserved.
2013.01 16504480003 5th Edition
Page 2

Notices about this User's Manual
Distributed by MicroDAQ.com, Ltd. www.MicroDAQ.com (603) 746-5524
In order to properly use this product, please carefully read this manual before
using. T&D Corporation accepts no responsibility for any malfunction of and/
or trouble with this produc t or with your computer that is caused by the
improper handling of this product and will deem such trouble or malfunction
as fa lling outside the cond itions for free repair outl ined in
warranty.
- All rights of this User's Manual belong to T&D Corporation. It is prohibited to
use, duplicate and/or arrange a part or whole of this User's Manual without
the permission of T&D Corporation.
®
- Microsoft
USA and are binding in the USA and all other countries.
Windows Vista ™ is a registered trademark of Microsof
- Company names and product names are trademarks or registered
trademarks of each company.
- Specifications, design and other contents outlined in this manual are subject
to change without notice.
- On screen messages in this manual may vary slightly from the actual
messages.
- Please notify the shop where you purchased this product or T&D
Corporation of any mistakes, errors or uncl
T&D Corporation accepts no responsibility for any damage or loss of income
caused by the use of our product.
- This product has been designed for private or industrial use only. It is not for
use in situations where strict safety precautions are necessary such as in
connection with medical equipment, whether directly or indirectly.
- We are not responsible for any malfunction or trouble caused by the use of
our product or by any problem caused by the use of measurement results of
our unit. Please be fully aware of this before using our product.
- Some of our products, which come under the category of strategic goods in
foreign trade law, need the permission of the Japanese government to be
exported outside of Japan.
- Please read the warranty and provisions for
and Windows® are registered trademarks of Microsoft Corporation
ear explanations in this manual.
free repair carefully.
the at tached
t Corporation USA .
i
Page 3

Compliance Information
Distributed by MicroDAQ.com, Ltd. www.MicroDAQ.com (603) 746-5524
Radio, EMC and Safety Regulations
This device complies with Part 15 of the Federal Communications Commission
(FCC) rules. Ope ration is subject to the following two conditi ons: (1)This
device may not cause harmful interference, and (2)this device must accept
any interference received, including interference that may cause undesired
operation.
FCC Statement
This equipment has been tested and found to comply with the limits for a
Class A digital device, pursuant to part 15 of the FCC Rules. These limits are
designed to provide reasonable protection against harmful interference when
the equipmen t is operated in a commercial environment. This equipment
generates, uses, and can radiate radio frequency energy and, if not installed
and used in accordance with the instruction
int erference to radio commu nicat ions. Op era tion of t his eq uipme nt in a
residential area is likely to cause harmful interference in which case the user
will be required to correct the interference at his own expense.
Caution
Changes or modifications not expressly approved by the party responsible for
compliance could void the users authority to operate the equipment.
manual, may cause har mful
ii
Page 4
Safety Precautions and Instructions
Distributed by MicroDAQ.com, Ltd. www.MicroDAQ.com (603) 746-5524
■To ensure safety obey all of the following warnings
The following items should be strictly obeyed for the safe usage of this unit,
and for protecting yourself and other people from bodily harm and/or damage
to proper ty. Before using make sure to carefully read, understand and follow
the safety rules and precautions for our products as outlined below.
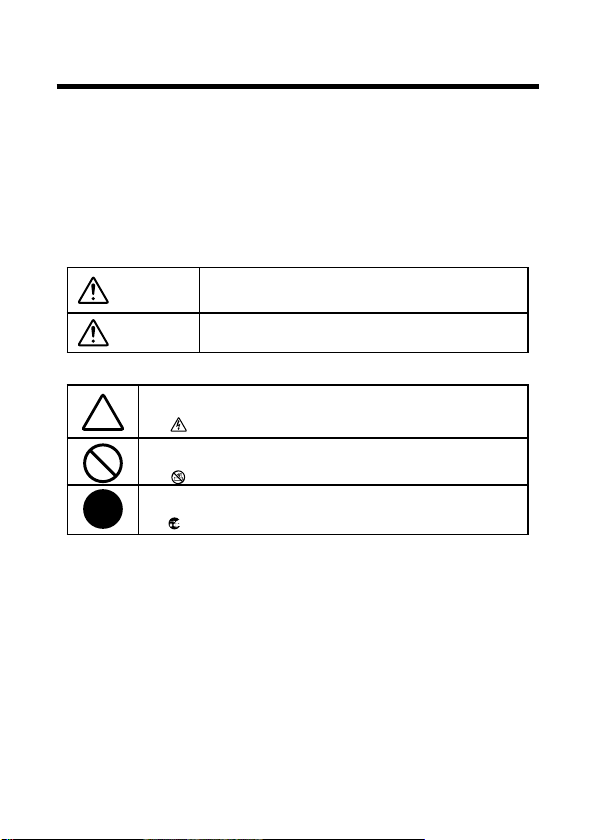
■ Explanation of Symbols
Explanation of Warning Symbols
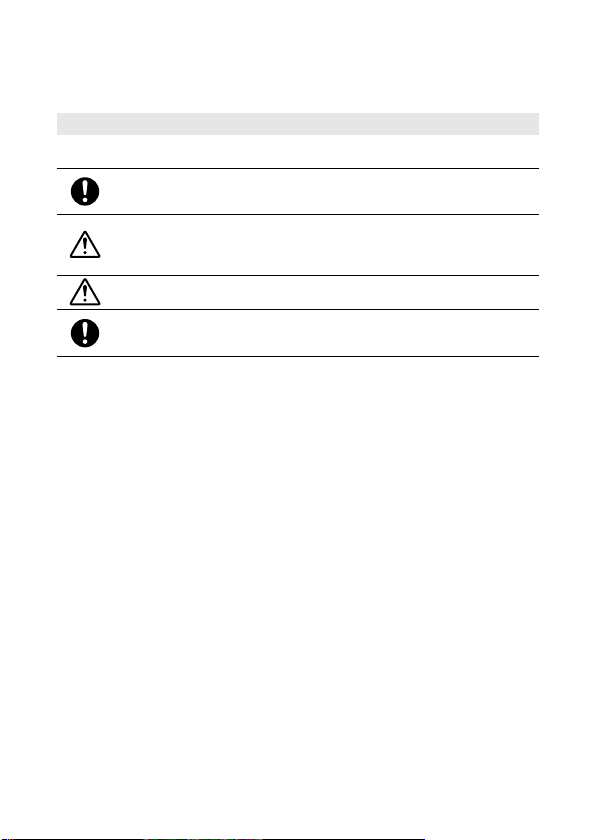
These entries are actions that absolutely under no circumstance should
WARNING
CAUTION
Explanation of Picture Symbols
Denotes an important warning or caution. Inside or near the symbol
may appear another symbol giving details.
( EX: Be careful of electrocution)
Denotes a forbidden action. Inside or near the symbol may appear
another symbol giving details.
( EX: Do not use in wet areas.)
Denotes an action that you must take. Inside or near the symbol may
appear another symbol giving details.
( EX: Unplug power plug from outlet)
be taken. The taking of such an action may cause serious personal
physical damage or death.
These entries are actions that if taken may lead to physical injury or
damage to persons or things.
iii
Page 5
WARNING
Distributed by MicroDAQ.com, Ltd. www.MicroDAQ.com (603) 746-5524
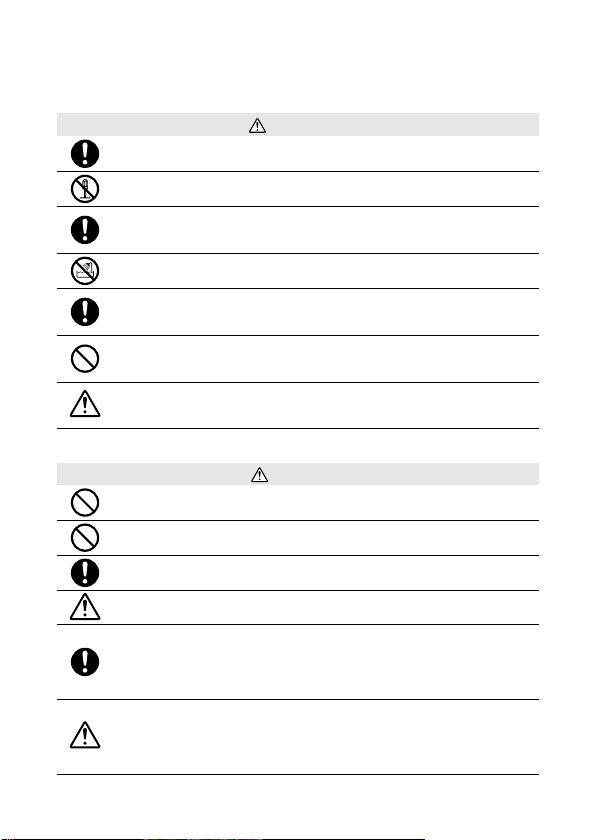
When installing and using this product, make sure to follow all warnings and
directions from your computer manufacturer.
Do not take apart, repair or modify the main unit.
Doing so may cause fire or electrocution.
If water or a foreign body enters into this unit, immediately remove the batteries
and stop using.
Continued use may cause fire or electrocution.
Do not use this unit in wet or humid places, such as a bathroom.
It may cause a fire or other trouble including malfunction.
Store main units, sensors, batteries and communication cables out of the reach
of children.
It is dangerous to touch or swallow batteries.
If any smoke or strage smells are emitted from the unit, immediately remove
the batteries and stop using.
Continued use may cause fire or electrocution.
This device is designed to measure and record temperature and humidity. Do
not use it for any other purpose than to measure and record temperature and
humidity.
This unit is not water-resistant.
CAUTION
If the unit gets dirty, wipe it with a clean cloth and a mild detergent.
Do not expose the unit to harmful gases or chemicals. It may cause corrosion
and / or other danger to the unit and to people handling the unit.
Do not use batteries other than specifies. Doing so may cause fire or damage.
Battery terminals may provide insufficient contact due to age or vibration.
This may lead to data loss.
Condensation may occur if the units is moved from one environment to another
where the difference in temperature is great.
Use the unit in an environment where the ambient temperature is great.
Use the unit in an environment where the ambient temperature is from -10 to
60℃ and the humidity is 90%RH (no condensation) or less.
To prevent damage to the unit from static electricity, remove static electricity
from your body by touching metal aroung you (door knob, window frame)
before touching the unit.
Static electricity may cause not only damage to the unit, but may cause breaks
in or a loss of data.
iv
Page 6
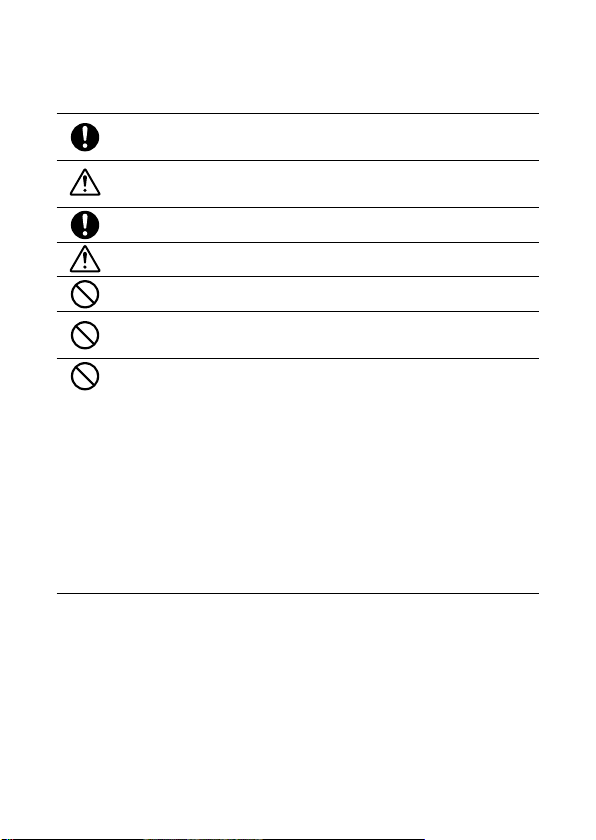
If the unit will not be used for period of time, for safety reasons please remove
Distributed by MicroDAQ.com, Ltd. www.MicroDAQ.com (603) 746-5524
the battery.
If left in the unit, it may leak and lead to malfunctioning.
Please take extra caution when plugging in and pulling out the USB plug while
another USB device such as CD-RW/HDD is in operation.
It may cause problems to your CD-RW or other device.
We shall not guarantee the operation of our device if you have connected it to
your computer using a USB hub or a USB extension cable.
Batteries used under low pressure conditions may leak and cause a
malfunction.
Please do not insert your fingers or any foreign objects into any of the devices'
jacks.
Do not use any other batteries than those that are specified in this User's
Manual.
It may cause a fire or other trouble including malfunction.
Do not use or store the Thermo Recorder in any of the following places. Doing
so may cause electrocution, fire and / or other adverse effects to the device
and / or your computer.
-Areas exposed to direct sunlight
This will cause the inside of the device to become overheated and may cause
fire, deformation, and / or other damage including malfunction.
-Areas prone to strong magnetic fields
This may cause
-Areas exposed to water leakage
This may cause electrocution or other damage incluing malfunction.
-Areas exposed to excessive vibration
This may cause injury, malfunction, damage or loss of proper electrical contact.
-Areas near fire or exposed to excessive heat
This may cause damage including malfunction and deformation.
-Areas prone to smoke, duct and dirt
This may cause d
damage including malfunction.
amage including malfunction.
v
Page 7
Cautions about using the Sensors
Distributed by MicroDAQ.com, Ltd. www.MicroDAQ.com (603) 746-5524
■ Cautions about using the temperature/humidity sensor TR-3100
The sensor can measure temperature within the range of 0 to 50℃ and
humidity within the range of 10 to 95%RH.
Only use the sensor within these ranges.
If extremely severe temperature changes occur, the humidity measurements
may appear abnormal.
Once the sensor's temperature becomes stable, the measurements will return
to normal.
This sensor is not waterproof. Do not get wet.
When measuring with the temperature/humidity sensor in an environment of 0
to 50℃ and less than 30%RH, the measurements may sometimes fluctuate.
This is not abnormal.
vi
Page 8
Cautions about using the Sensors
Distributed by MicroDAQ.com, Ltd. www.MicroDAQ.com (603) 746-5524
[Handling the temperature/humidity sensor]
- The service life of humidity sensors can vary greatly depending on operating
environment.Periodic calibration may be required.
During use the temperature/humidity sensor will accumulate impurities (dirt)
on the surface of the sensor is being used in a bad environment (smoky or
dusty places) it may be necessary to change th
- When the temperature/humidity sensor is not being used, please place it in
the attached vinyl bag with the drying agent included and store it in a cool
dark place with a temperature of between 5 to 25℃ and a humidity of below
30%RH.
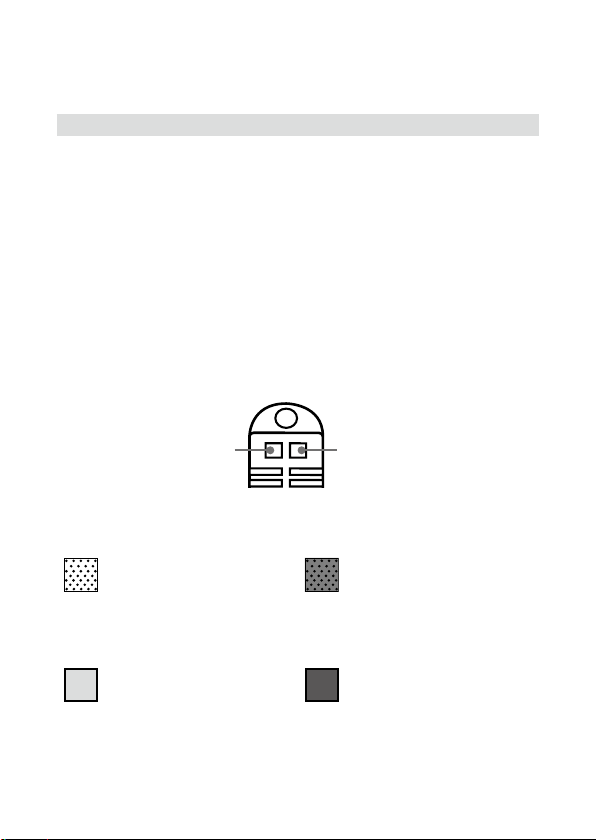
- Attached to the temperature/humidity sensor are two stickers: a wetness
detection sticker and a temperature detection sticker. If either of the stickers
shows abnormality, you should change the old sensor to a new one
immediately.
e sensor sooner.
Wetness Detection Sticker
Temperature Detection Sticker
-Wetness Detection Sticker
Informs you that the sensor has been wet.
Normal Abnormal
Under normal conditions, black dots
will appear on a white
Under abnormal conditions, it will
turn to red.
-Temperature Detection Sticker
Informs you that the sensor measured a temperature measurement over 60℃ .
Normal
Under normal conditions, the
60
number 60 will lightly appear on a
pinkish white background.
Abnormal
Under abnormal conditions, the
60
number 60 will clearly appear on a
red background.
vii
Page 9

Table of Contents
Distributed by MicroDAQ.com, Ltd. www.MicroDAQ.com (603) 746-5524
Notices about this User's Manual ...................................................................i
Compliance Information ................................................................................ii
Safety Precautions and Instructions .........................................................iii
■To ensure safety obey all of the following warnings ..................................iii
■ Explanation of Symbols ...........................................................................iii
About Thermo Recorder TR-73U .............................................................. 1
■ Outline ..................................................................................................... 1
■ Basic Functions .....................................................................
Package Contents ..................................................................................... 3
Before Using… .......................................................................................... 4
Part Names and Functions ....................................................................... 5
■ Part Names and Functions ...................................................................... 5
■ LCD Display .............................................................................................6
Installing the Battery ................................................................................. 7
Turning ON the Power ............................................................................... 8
Connecting the Sensors ...........................................
■ Connect the Sensor ................................................................................. 9
Starting Recording from Main Unit Button .............................................. 10
■ Star t Recording ...................................................................................... 10
■ Stop Recording ......................................................
Setting Recording Interval from Main Unit Button ................................... 11
Changing the LCD Display Mode from Main Unit Button ........................ 12
Specifications .......................................................................................... 13
Optional Accessories ...........................................................................
Thermo Recorder TR-73U Warranty ......................................................... 15
................................. 9
................................ 10
.................. 1
... 14
viii
Page 10

About Thermo Recorder TR-73U
Distributed by MicroDAQ.com, Ltd. www.MicroDAQ.com (603) 746-5524
■ Outline
TR-73U Thermo Recorder is a data logger capable of measuring,
displaying and recording temperature, humidity, and barometric
pressure data. TR-73U h a s a t o t a l of three channels: o n e
temperature, one humidity, and one barometric pressure channel.
The data recorded into the TR-73U units can then be downloaded
quickly via USB cable to your computer whereby with our exclusive
software you can easily process the data into graphs, tables, save to
files and/or print it out.
Moreover, it is possible to connect more than one unit at the same
time.
■ Basic Functions
-Barometric Pressure Measuring Range:750 〜 1100hPa
The TR-73U with the internal barometric pressure sensor can measure and record in a
range of 750 to 1100 hPa.
-Temperature Measuring Range:-40 〜 110℃
The TR-73U with the sensor included in this package can measure and record in a range
of 0 to 50℃ , but by purchasing one of our optional sensors it is possible to measure and
record in the wider range of -40 to 110℃ .
Please take a look at our full range of optional sensors to find one to match your
application.
-Humidity Measuring Range:10 〜 95%RH
The TR-73U with the sensor included in this package can simultaneously measure and
record temperature in a range of 0 to 50℃ and humidity in a range of 10 to 95% RH.
-Amount of Recorded Data:8000 readings x 3 channels
One channel can record and hold up to 8000 measurement readings.
At the longest recording interval of 60 minutes, recording can continue consecutively for
1 year.
-10 Months of Operation with just 1 AA Alkaline Battery
Our low energy consumption design gives you ten months of continuous operation with
only one AA alkaline battery.
This gives you the freedom to use the data loggers in places where they can be left
alone for long periods of time, such as, in transportation or warehouse.
1
Page 11

NOTE:
Distributed by MicroDAQ.com, Ltd. www.MicroDAQ.com (603) 746-5524
- Battery life varies depending upon the type of battery, the measuring environment,
the frequency of communication, and the ambient temperature in which it is used.
Specifications and explanations used in this User's Manual are based on operations
carried out with a new battery and are in no way a guarantee of your actual battery life.
Also, if the recording interval is less than 10 seconds,
shorter.
battery life will be much
-Battery Life Warning Display
When the battery power becomes low, a battery life warning signal will appear in the
unit's LCD display.
If the battery power becomes even lower the unit will automatically go into sleep mode in
order to protect the data.
-15 Recording Intervals
Select from 15 recording intervals (from 1 second to 1 hour) to meet your needs.
Select from 2
One-time Mode:When the number of recorded readings reaches 8000, [FULL] will
appear in the unit's LCD display and recording will automatically stop.
Endless Mode :When the number of recorded readings reaches 8000, the oldest data
readings will be overwritten and recording will continue.
Recording Modes
-Current Readings Monitoring Display
With our exclusive software, you cannot only monitor the current measurements at a set
interval, but can view those measurements in a continually changing graph.
You can simultaneously display the current measurements and corresponding graphs for
the number of units you have connected.
-Adjustment Function
By entering the adjustment values beforehand with the provided software, it is possible
to view and record the adjusted measurement values.
There are two meth
Adjustment for differences will be based upon the following simple equation Y=aX+b.
X equals the measured value and Y equals the value after adjustment.
ods of adjustment: adjusting by one point or adjusting by two points.
2
Page 12
Package Contents
Distributed by MicroDAQ.com, Ltd. www.MicroDAQ.com (603) 746-5524
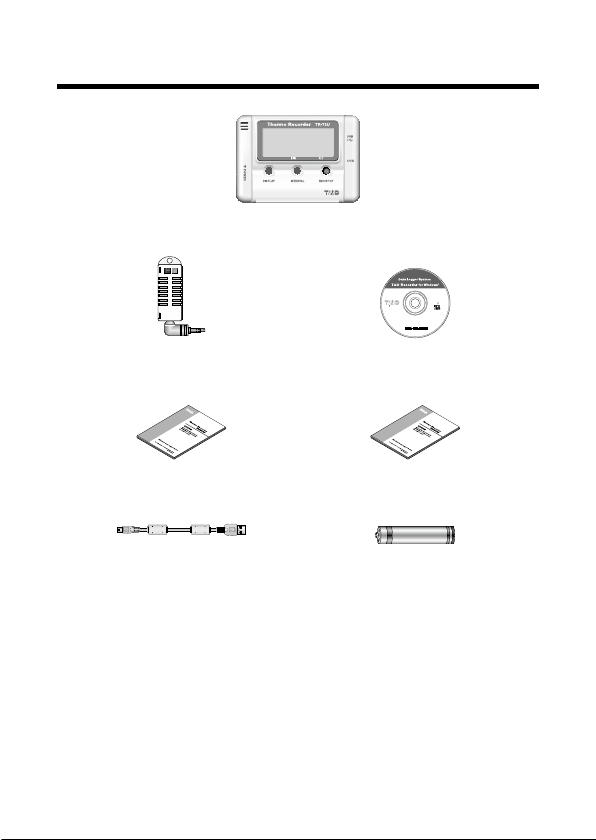
Thermo Recorder TR-73U x 1
Copyright 1995-2006 TandD
Corporation. All rights r eser ved.
for TR-7U,RTR-5,RVR- 52,RTR -57C/5 7U
TR-5, TR-7,T R-57C /57U
MS-Windows 2000/Xp
MS-Windows 98SE/Me
Temperature/Humidity Sensor
TR-3100 x 1
T&D Recorder for Windows
Software CD-ROM x 1
User's Manual (Warranty) x 1 Software User's Manual x 1
USB Communication Cable
US-15C x 1
AA Alkaline battery x 1
3
Page 13
Before Using…
Distributed by MicroDAQ.com, Ltd. www.MicroDAQ.com (603) 746-5524
Important Notes about the Installation Procedure (for using this
product with USB communication)
Thank you for choosing T&D Products.
In order to use a USB connection to communicate between this product and a
PC, it is necessary to install the application and the USB driver.
Before connecting this product to a PC with a USB cable, it is necessary
to first install the application and the
If you use the USB cable to connect the product to a PC before installation,
the USB driver may not properly install.
If you have connected the product to a PC without first installing the driver,
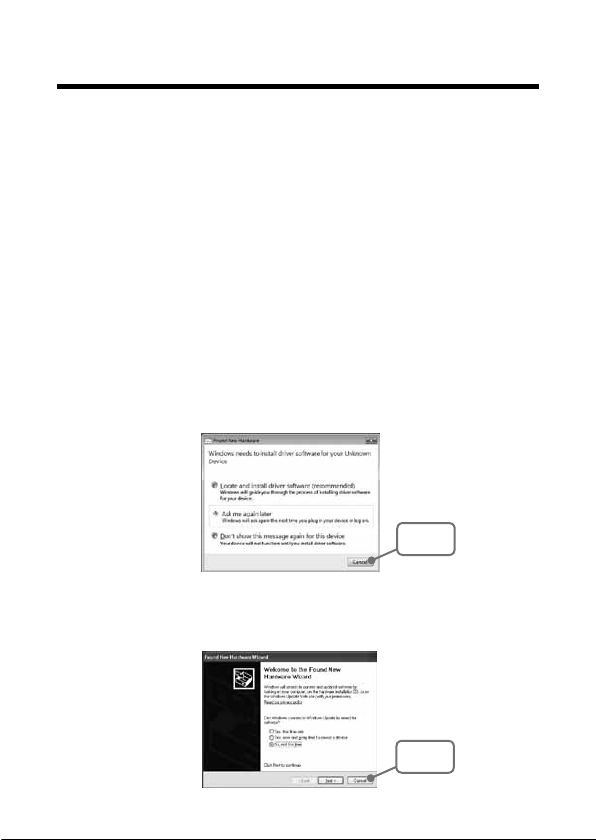
please make sure to press [Cancel] in the [Installation Wizard] window when it
pops up the PC screen and then disconnect the USB cable from the product.
For details about making TR-73U Unit
Data, see the explanation in the Software User's Manual and/or the Software Help.
If you are using Windows 8, carry out operations on the [desktop] which
can be accessed via a tile on the Start screen.
■ Windows 7 / Vista
■ For other Windows Operating Systems
* The screen shot below is from Windows XP. For other Windows OS, there is also a [Cancel]
button in the lower right of the screen. (Your screen may differ slightly if you are using a
Windows OS other than XP.)
USB driver.
Settings or about Downloading
[Cancel]
Button
[Cancel]
Button
4
Page 14
Part Names and Functions
Distributed by MicroDAQ.com, Ltd. www.MicroDAQ.com (603) 746-5524
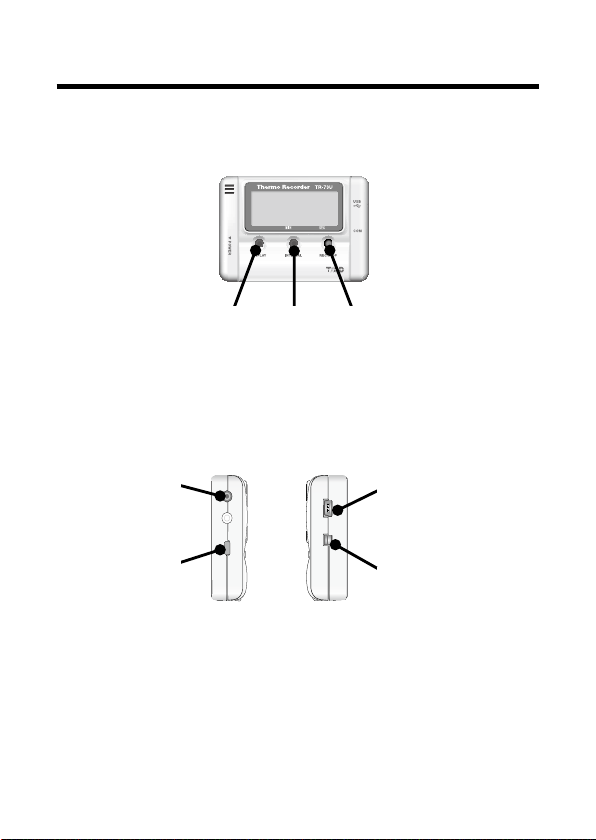
■ Part Names and Functions
FRONT
<DISPLAY>
button
DISPLAY :Pressing this button will change the LCD Display Mode.
INTERVAL :Pressing this button will display the currently set recording
interval.
REC/STOP :Pressing this button will start or stop recording.
LEFT SIDE
Sensor Jack
Power Switch
<INTERVAL>
button
RIGHT SIDE
<REC/STOP>
button
USB Cable Jack
Serial Cable Jack *1
*1: Not supported in TR-73U.
5
Page 15
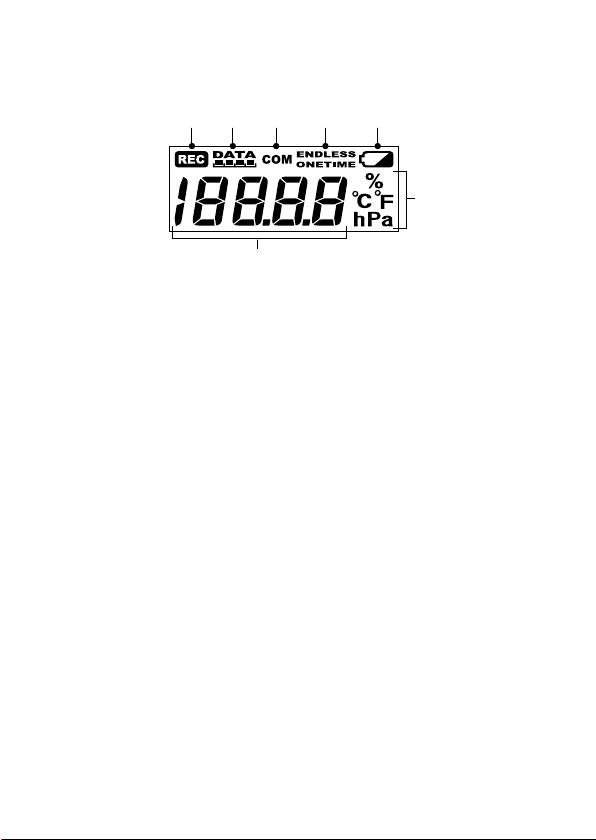
■ LCD Display
Distributed by MicroDAQ.com, Ltd. www.MicroDAQ.com (603) 746-5524
① ②
⑦
① Recording Mark
The recording condition will appear.
ON: Recording in progress.
BLINKING: Waiting for programmed start.
② Data Capacity Scale
After every 2000 readings the scale will be marked from left to right.
③ COM Mark
This will appear when data is being sent or received.
ON: USB cable is connected.
BLINKING: In communication with computer.
④ Recording Mode
One-time Mode: When the number of recorded readings reaches 8000, [FULL] will
appear in the unit's LCD display and recording will automatically stop.
Endless Mode : When the number of recorded readings reaches 8000, the oldest data
readings will be overwritten and recording will continue.
⑤ Battery Life Warning Signal
When the battery power becomes low, a mark will appear on the LCD of the main unit.
If the battery power becomes even low
Please change the battery as soon as the Battery Warning Mark appears.
IMPORTANT:
- If the main unit remains in sleep mode for about 1 month without a change of
battery, or if the battery is left out of the unit for more than 2 minutes, all recorded
data will be lost.
⑥ Unit of Measurement
The unit of the measurement for the display will appear.
⑦ Measurements and Messages Area
Current measurements or operational messages such as [FULL] or [SLP] will appear.
④
③
er, [SLP] will appear and normal operations will stop.
⑤
⑥
6
Page 16
Installing the Battery
Distributed by MicroDAQ.com, Ltd. www.MicroDAQ.com (603) 746-5524
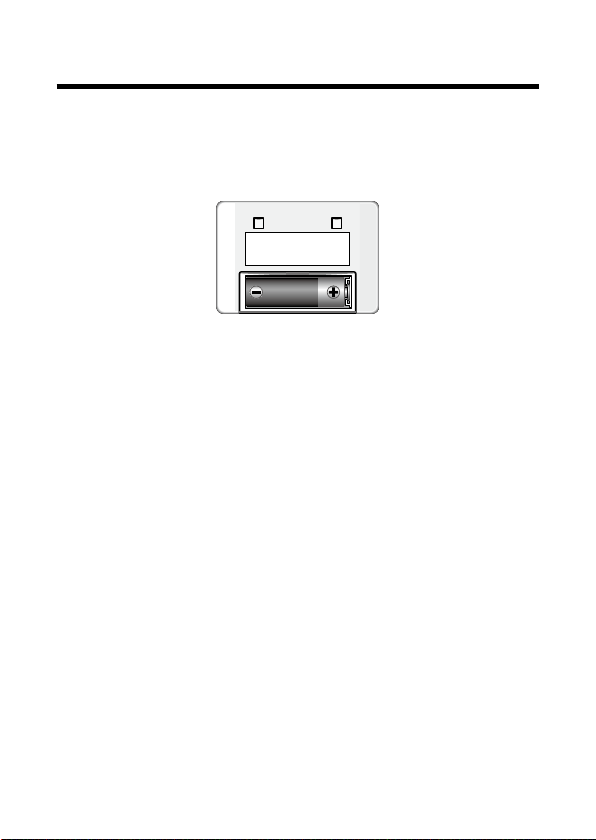
1.
Remove the battery cover form the back of the unit.
2.
Insert 1 AA alkaline battery, making sure that the + and – are in the
correct direction.
*Always use a new battery.
3.
Replace and close the battery cover.
[Changing the Battery]
1.
When battery power becomes low, a battery life warning signal will
appear in the unit's LCD display.
If , at t hi s time yo u chan g e the batt e r y, r e cor d ing will con t inu e
uninterrupted and all data will be saved for downloading.
2.
If the battery is not changed and power becomes even lower, [SLP] will
appear in the LCD display.
The unit will
data and all normal operations will stop.
If you change the battery at this point, it is still possible to download all
saved recorded data.
3.
If the battery is further left unchanged, the display will automatically shut
off.
If all battery power is lost, all data will be lost as well.
NOTE:
- If a unit is left without a battery for more than 2 minutes, all data will be lost, so
please work quickly when changing the battery.
automatically go into sleep mode in order to protect the
7
Page 17
Turning ON the Power
Distributed by MicroDAQ.com, Ltd. www.MicroDAQ.com (603) 746-5524
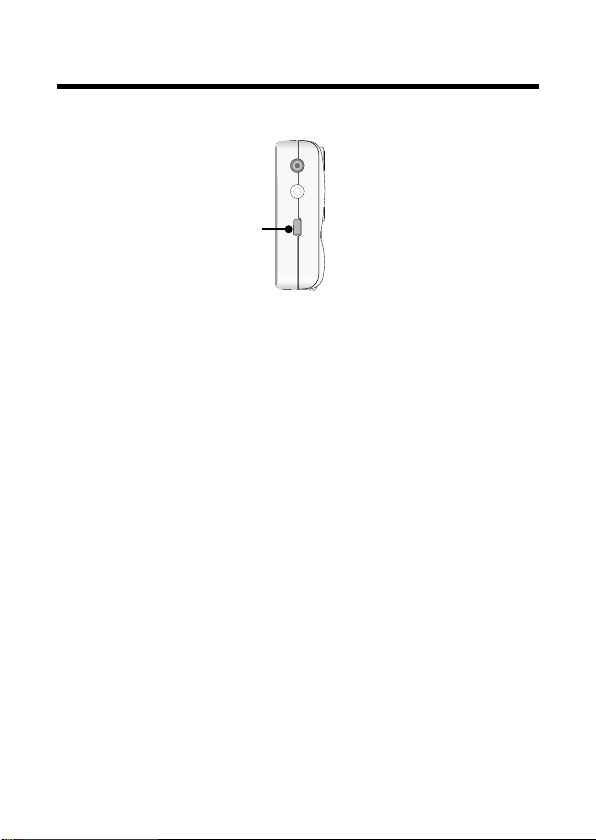
1.
By holding in the POWER switch at the left side, the unit will turn on.
POWER Switch
[Turning OFF the Power]
By holding in the POWER switch, the unit will turn off.
- During recording, the power cannot be turned off. Please stop recording first
and then turn off the power.
- Even if the power has been turned off, the recorded data will be saved.
However, if the battery power is totally lost, all data will be lost, so please
download data as soon as possible to avoid losing any necessa
ry data.
8
Page 18
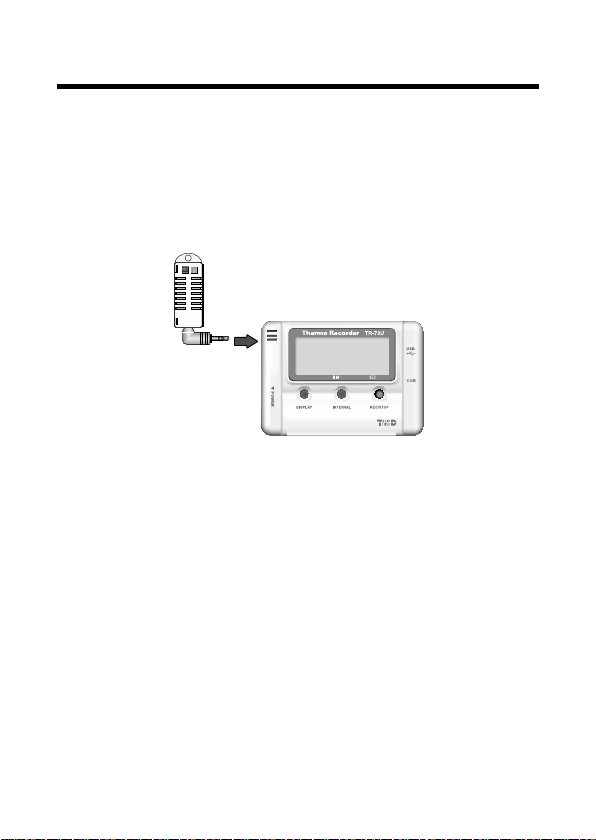
Connecting the Sensors
Distributed by MicroDAQ.com, Ltd. www.MicroDAQ.com (603) 746-5524
■ Connect the Sensor
*To avoid poor connections, be sure to push the sensor connector
securely into the jack.
* When using the temperature/humidity sensor in environments where
the temperature is 0 to 15 and humidity under 30 RH, there may occur
changes in measurement readings. This is not a malfunction.
NOTE:
- If a sensor extension cable is being used with the data logger connected by USB to
your computer, electromagnetic waves may cause large errors in measurements.
- For details about handling the temperature / humidity sensor, please refer to page ⅶ
Cautions about using the SensorsofSafety Precautions and Instructions
9
Page 19
Starting Recording from Main Unit Button
Distributed by MicroDAQ.com, Ltd. www.MicroDAQ.com (603) 746-5524
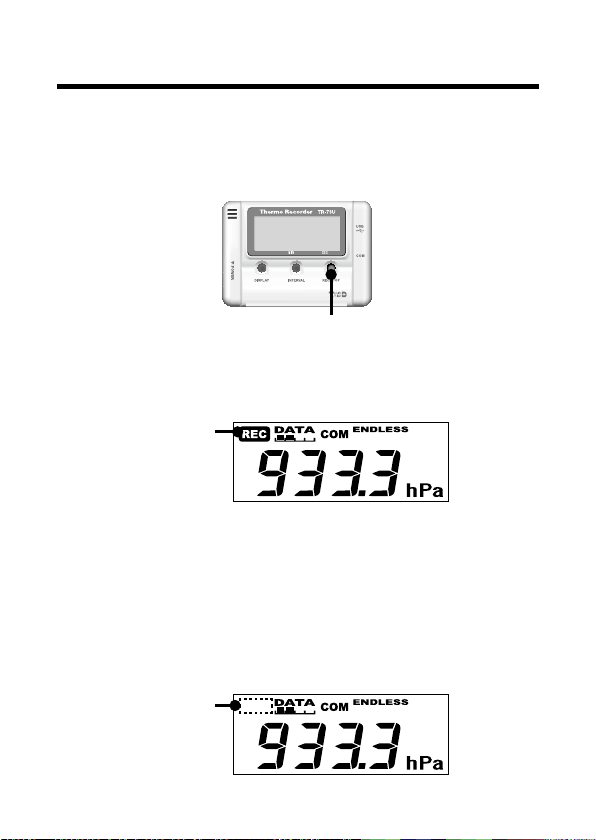
By pressing the <REC/STOP> button on the main unit you can start
a recording session immediately.
* If you wish to make changes to the device name, channel name,
recording mode or to any other recording conditions, you must make
those settings by connecting the device to your computer.
<REC / STOP>
button
■ Start Recording
Press in the <REC/STOP> button on the front of the unit until the [REC] mark
appears in the display. When displayed, recording has begun.
[REC] mark
lights up
NOTE:
- By starting a new recording session, all data currently saved in the unit will be erased.
- Even if the unit is waiting for a programmed recording to start via the provided
software, by pressing the <REC/ STOP> button until the [REC] mark appears, you
can start a new recording session immediately.
■ Stop Recording
You can stop a recording session by pressing the <REC/STOP> button until
the [REC] ma rk disappe ars from the display. When it h as disappe ared,
recording has stopped.
[REC] mark
disappears
10
Page 20
Setting Recording Interval from Main Unit Button
Distributed by MicroDAQ.com, Ltd. www.MicroDAQ.com (603) 746-5524
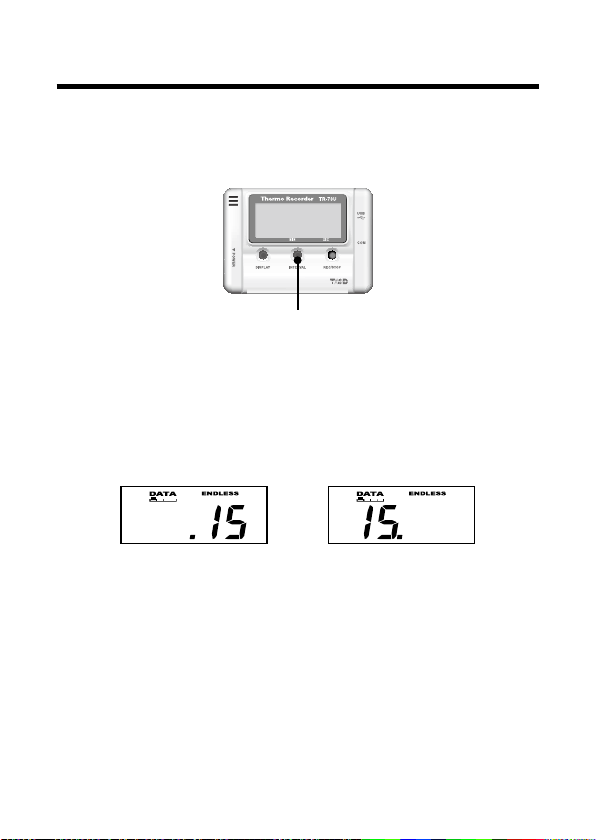
You ca n m ake or chan ge rec ordin g i nterval set tings from the
<INTERVAL> button on the front of the TR-73U main unit.
* During recording or while waiting for a programmed recording to start
via the provided software, there are not settings to be made.
<INTERVAL>
button
1.
Press in the <INTERVAL> button on the front of the device until the
recording interval appears in the display.
2.
With each pressing of the <INTERVAL> button the recording interval
time will change.
Press until the desired setting appears.
*Recording Interval : 1,2,5,10,15,20,30 seconds 1,2,5,10,15,20,30,60 minutes
15 seconds 15 minutes
3.
Wh en the desir ed rec ordin g int er val appea rs , s to p p re ssi ng the
<INTERVAL> button.
Within a few seconds, the current measurement readings will return to
the display and the setting will be finished.
* By pressing the <INTERVAL> button during recording or while waiting
for a programmed recording to start via the provided software, the
currently set recording interval will be displayed.
11
Page 21
Changing the LCD Display Mode from Main
Distributed by MicroDAQ.com, Ltd. www.MicroDAQ.com (603) 746-5524
Unit Button
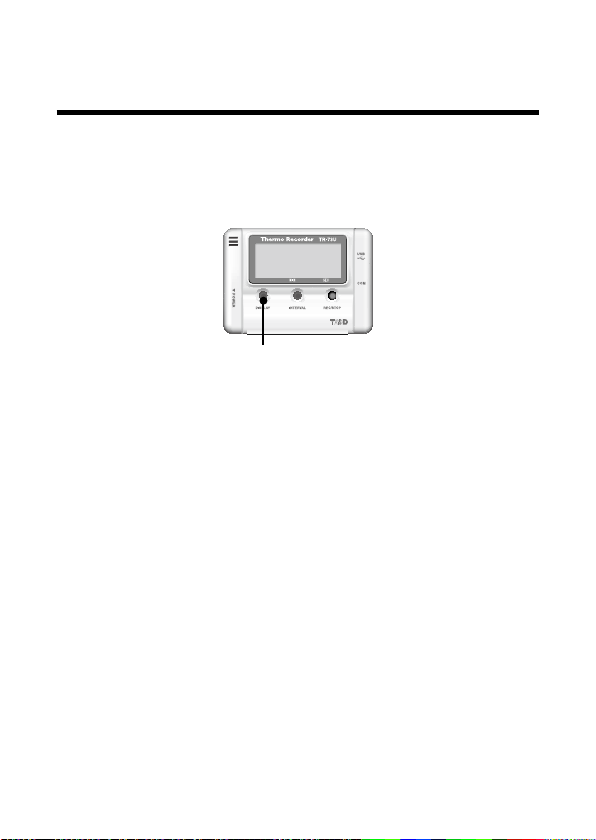
You c a n ma ke o r chan g e th e LCD disp l ay s etti n gs f r om t h e
<DISPLAY> button on the front of the TR-73U main unit.
1.
By pressing the <DISPLAY> button on the front of the unit, you can
change the screen display.
<DISPLAY>
button
2.
If the LCD display shows three channels' readings alternatively, it will
show one channel as a fixed display by pressing the button.
By pressing the button again, the LCD display pattern will be set for
displaying three channels alternatively.
If the display has been set for a fixed channel, with each pressing of the
button the channel display will change.
12
Page 22
Specifications
Distributed by MicroDAQ.com, Ltd. www.MicroDAQ.com (603) 746-5524
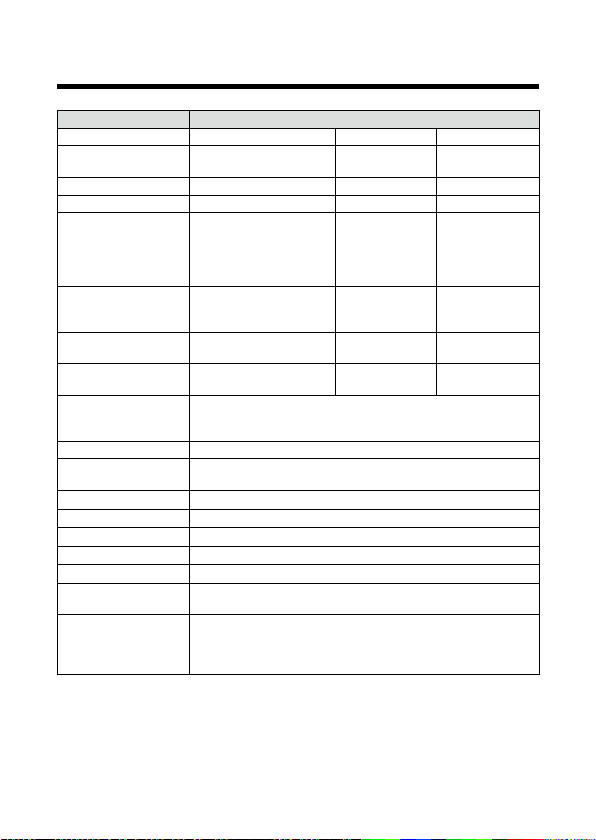
Device Type TR-73U
Measurement Items Barometric Pressure Temperature Humidity
Number of
Measurement Channels
with Internal Sensor 750 to 1100hPa -10 to 60℃ −
with External Sensor 750 to 1100hPa 0 to 50℃ 10 to 95 %
Internal Sensor
Thermal Time Constant
Measuring Accuracy
hed Sensor)
(with Attac
Measuring / Display
Resolution
Sensor
Recording Interval
Recording Capacity 8000 Readings x 3 channels
Recording Modes
Power AA alkaline battery LR6 x 1
Battery Life About 10 months *1
Interface USB Communication
Weight of Main Unit About 62 g (including one AA battery)
Dimensions H55mm x W78mm x D18mm
Working Environment
for Main Unit
Accessories included in
package
*1: Battery life depends upon the measuring environment, communication frequency,
recording interval, and quality of the battery being used.
Also, if the recording interval is less than 10 seconds, battery life will be much shorter.
It is possible to change the battery during recording.
The specifications listed above are subject to change without notice.
1 Channel 1 Channel 1 Channel
Responsiveness: 4
seconds or 40 seconds
(At a recording interval of
1minute or more:
40 seconds)
± 1.5hPa Average ± 0.3℃
0.1hPa 0.1℃ 1%RH
Barometric Pressure
Sensor
1,2,5,10,15,20 and 30 seconds / 1,2,5,10,15,20,30 and 60
Endless Mode (Overwrite oldest data when capacity is full)
One Time Mode
Humidity: under 90%RH (without condensation)
Temperature/Humidity sensor TR-3100 x 1
AA alkaline bat
USB communication cable(cable length1.5m)
Software x 1 / User's Manual (Warranty) x 1
12 minutes −
± 5%RH
[At 25℃・
50%RH]
Thermistor
Select from 15 choices:
minutes
(Stop recording when capacity is full)
Temperature: -10 to 60 ℃
tery (LR6) x 1
Macromolecular
Humidity Sensor
13
Page 23
Optional Accessories
Distributed by MicroDAQ.com, Ltd. www.MicroDAQ.com (603) 746-5524
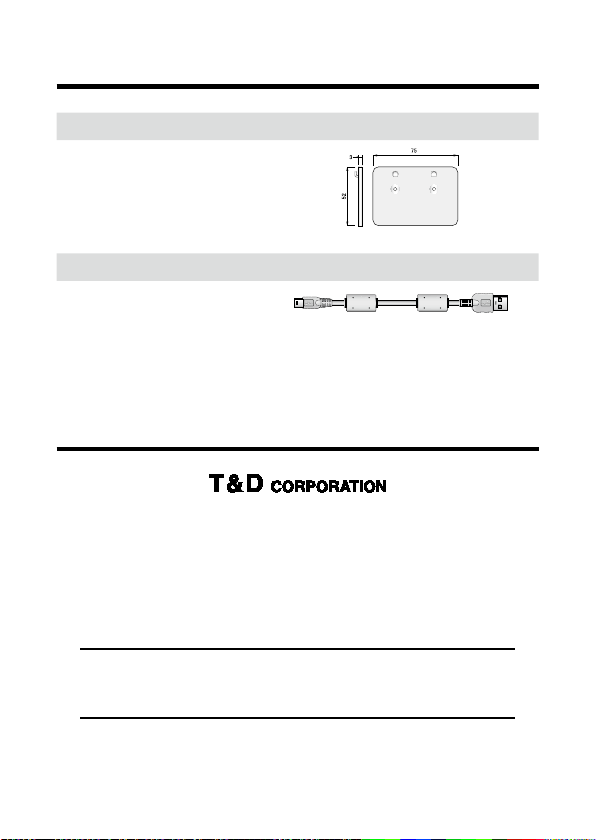
TR-07K2 Wall Attachment
Wall Attachment
Included:
screws x 2・double-sided tape x 1
US-15C USB Communication Cable
Cable Length
about 1.5 m
For product information or questions contact us at
Shimadachi 817-1, Matsumoto, Nagano 390-0852 Japan
Monday to Friday 9:00 – 12:00 / 13:00 – 17:00 excluding company holidays
Web Site
http://www.tandd.com/
(GMT +9:00 Tokyo Time)
Thermo Recorder TR-73U User's Manual
© Copyright T&D Corporation. All rights reserved. (2013.01 5th Edition)
This is printed o n recycled paper
.
14
 Loading...