

99
CD BURNING IN SPARK LE
PLUS
/
E N G L I S H
U S E R M A N U A L
LE

© BY TC WORKS SOFT & HARDWARE GMBH 1998 - 2002. ALL PRODUCT AND COMPANY NAMES ARE TRADEMARKS OF THEIR RESPECTIVE OWNERS.
ALL SPECIFICATIONS SUBJECT TO CHANGE WITHOUT NOTICE.ALL RIGHTS RESERVED.
3
TABLE OF CONTENTS
TABLE OF CONTENTS
INTRODUCTION-WELCOME
GETTING STARTED
SYSTEM REQUIREMENTS . . . . . . . . . . . . . . . . . . . . . . . . . . . . . . . 8
INSTALLATION . . . . . . . . . . . . . . . . . . . . . . . . . . . . . . . . . . . . . . 8
OPEN ARCHITECTURE:VST, ASIO . . . . . . . . . . . . . . . . . . . . . . . 10
THE USER INTERFACE CONCEPT . . . . . . . . . . . . . . . . . . . . . . . . 10
BROWSER VIEW
TRANSPORT WINDOW . . . . . . . . . . . . . . . . . . . . . . . . . . . . . . . 11
INPUT/OUTPUT SETTINGS . . . . . . . . . . . . . . . . . . . . . . . . . . . . . . . . . . . . . . . 11
TRANSPORT CONTROLS . . . . . . . . . . . . . . . . . . . . . . . . . . . . . . . . . . . . . . . . 13
RECORDING DIALOG . . . . . . . . . . . . . . . . . . . . . . . . . . . . . . . . . . . . . . . . . . 14
THE BROWSER VIEW . . . . . . . . . . . . . . . . . . . . . . . . . . . . . . . . 16
ACTIVE PART OF THE WINDOW . . . . . . . . . . . . . . . . . . . . . . . . . . . . . . . . . . . 18
FILE VIEW . . . . . . . . . . . . . . . . . . . . . . . . . . . . . . . . . . . . . . . . . . . . . . . . . 18
FILE FORMATS . . . . . . . . . . . . . . . . . . . . . . . . . . . . . . . . . . . . . . . . . . . . . . . 21
QUICKTIME IMPORT/EXPORT . . . . . . . . . . . . . . . . . . . . . . . . . . . . . . . . . . . . . 22
WAVE EDITOR . . . . . . . . . . . . . . . . . . . . . . . . . . . . . . . . . . . . 23
OVERVIEW . . . . . . . . . . . . . . . . . . . . . . . . . . . . . . . . . . . . . . . . . . . . . . . . . . 23
CURSORS . . . . . . . . . . . . . . . . . . . . . . . . . . . . . . . . . . . . . . . . . . . . . . . . . . 23
HOW TO MAKE A SELECTION . . . . . . . . . . . . . . . . . . . . . . . . . . . . . . . . . . . . . 24
Chapter 1
Chapter 2
English

4
TABLE OF CONTENTS
ZOOMING . . . . . . . . . . . . . . . . . . . . . . . . . . . . . . . . . . . . . . . . . . . . . . . . . . 25
INFO LINE . . . . . . . . . . . . . . . . . . . . . . . . . . . . . . . . . . . . . . . . . . . . . . . . . 26
UNDO/REDO . . . . . . . . . . . . . . . . . . . . . . . . . . . . . . . . . . . . . . . . . . . . . . . . 26
EDIT FUNCTIONS . . . . . . . . . . . . . . . . . . . . . . . . . . . . . . . . . . . . . . . . . . . . . 27
PROCESS . . . . . . . . . . . . . . . . . . . . . . . . . . . . . . . . . . . . . . . . . . . . . . . . . . 28
FADE OPTIONS . . . . . . . . . . . . . . . . . . . . . . . . . . . . . . . . . . . . . . . . . . . . . . 28
SAMPLE RAT E CONVERSION . . . . . . . . . . . . . . . . . . . . . . . . . . . . . . . . . . . . . 30
PLAY L
IST . . . . . . . . . . . . . . . . . . . . . . . . . . . . . . . . . . . . . . . 33
CD-BURNING . . . . . . . . . . . . . . . . . . . . . . . . . . . . . . . . . . . . . . . . . . . . . . . 40
MASTER VIEW
MASTER FADER . . . . . . . . . . . . . . . . . . . . . . . . . . . . . . . . . . . . . . . . . . . . . . 44
L
EVEL METERS . . . . . . . . . . . . . . . . . . . . . . . . . . . . . . . . . . . . . . . . . . . . . . 44
D
RY . . . . . . . . . . . . . . . . . . . . . . . . . . . . . . . . . . . . . . . . . . . . . . . . . . . . . . 45
CREATE FILE . . . . . . . . . . . . . . . . . . . . . . . . . . . . . . . . . . . . . . . . . . . . . . . . 45
FX S
LOTS
. . . . . . . . . . . . . . . . . . . . . . . . . . . . . . . . . . . . . . . 46
REALTIME EFFECTS . . . . . . . . . . . . . . . . . . . . . . . . . . . . . . . . . . . . . . . . . . . 46
WHICH PLUG-IN FORMATS CAN BE USED? . . . . . . . . . . . . . . . . . . . . . . . . . . . 47
NAV IGATI ON . . . . . . . . . . . . . . . . . . . . . . . . . . . . . . . . . . . . . . . . . . . . . . . 47
MOVIN G PLUG-INS . . . . . . . . . . . . . . . . . . . . . . . . . . . . . . . . . . . . . . . . . . . 47
HOW TO COPY PLUG-INS . . . . . . . . . . . . . . . . . . . . . . . . . . . . . . . . . . . . . . 48
REMOVING EFFECTS . . . . . . . . . . . . . . . . . . . . . . . . . . . . . . . . . . . . . . . . . . . 48
LEVEL INDICATION FOR EACH PLUG-IN . . . . . . . . . . . . . . . . . . . . . . . . . . . . . 48
CONTEXT SESITIVE MENU . . . . . . . . . . . . . . . . . . . . . . . . . . . . . . . . . . . . . . 49
SYSTEM PERFORMANCE:THE SYSTEM INFO SCREEN . . . . . . . . . . . . . . . . . . . . . 50
P
LUG-IN EDIT VIEW . . . . . . . . . . . . . . . . . . . . . . . . . . . . . . . . . . . . . . . . . . 50
TABLE OF CONTENTS
Chapter 3
5
TABLE OF CONTENTS
PLUG-IN
ONE BAND EQ . . . . . . . . . . . . . . . . . . . . . . . . . . . . . . . . . . . . 53
DELAYIT . . . . . . . . . . . . . . . . . . . . . . . . . . . . . . . . . . . . . . . . 53
MAXIT . . . . . . . . . . . . . . . . . . . . . . . . . . . . . . . . . . . . . . . . . . 54
MISCELLANEOUS
PREFERENCES . . . . . . . . . . . . . . . . . . . . . . . . . . . . . . . . . . . . . 55
SPARKLE FILE TYPES . . . . . . . . . . . . . . . . . . . . . . . . . . . . . . . 60
HARDWARE SUPPORT . . . . . . . . . . . . . . . . . . . . . . . . . . . . . . . . 61
LOOPING . . . . . . . . . . . . . . . . . . . . . . . . . . . . . . . . . . . . . . . . 61
SAV E / SAV E AS / EXPORT OPTIONS . . . . . . . . . . . . . . . . . . . . . 62
Chapter 4
English
Chapter 5

6
TABLE OF CONTENTS

Welcome to SPARK LE – TC WORKS’ entry-level application for digital audio editing
SPARK LE’s new design concept,high-end processing tools,and “one window approach” turn formerly complex edits into a creative experience.Now you can do things you thought weren’t possible,at a speed you didn’t dare dream of!
If you’d lik e e v en more features and pow er,check out SPARK LE’s big brother SPARK XL.As a
registered user of SPARK LE,you are entitled to a special upgrade off er.Contact your local
TC Electronic distributor for details.
CONTACT DETAILS
If you would like to get in touch with us,please e-mail:info@tcelectronic.com.Alternatively,you
may contact the TC Electronic distributor in your area,or write to:
TC ELECTRONIC A/S
Customer Support
Sindalsvej 34
Risskov DK-8240
Denmark
USA:
TC Electronic,Inc.
742-A Hampshire Rd.
Westlake Village,CA 91361
www.tcelectronic.com
e-mail:support@tcelectronic.com
TC Support Interactive
The TC Suppor t Interactive website is designed as an online support and information center.At the
site you can find answers to specific questions regarding TC software.All known issues are stored
in a database searchable by product, category,keywords,or phrases. Under the section "My Stuff"
you can login to check the status of your questions,download materials such as product manuals,
software updates and new presets.This site has been specifically designed to meet the needs of our
users.
We constantly update the database and you will find the site to be a huge resource of information.
Browse through Q&A’s and discover new aspects of your TC product. If you can’t find an answer
online, you have the option of submitting a question to our technical support staff who will then
reply to you by e-mail.The TC Support Team is on constant alert to help you in any way they can.
www.tcsupport.tc
© BY TC WORKS SOFT & HARDWARE GMBH / TC ELECTRONIC, AS 1998 - 2003.ALL PRODUCT AND COMPANY NAMES ARE
TRADEMARKS OF THEIR RESPECTIVE OWNERS.NATIVE BUNDLE IS A TRADEMARK OF TC WORKS,GmbH,VST IS A TRADEMARK
OF STEINBERG A.G., AUDIO UNITS IS A TRADEMARK OF APPLE COMPUTER.ALL SPECIFICATIONS SUBJECT TO CHANGE
WITHOUT NOTICE.ALL RIGHTS RESERVED.
TC WORKS IS A TC GROUP COMPANY.
7
INTRO-WELCOME
INTRODUCTION-WELCOME
Welcome

SYSTEM REQUIREMENTS
• Power Macintosh with G3 processor or higher
• MacOS X (10.1 or higher)
• 128 MB
• ASIO compatible sound card for optimal audio capabilities recommended
(ASIO 2.0 or Core Audio supported)
• CD Recorder and Roxio Toast, Jam or Apple iTunes software for CD recording
INSTALLATION
Run the SPARK LE installer and follow the instructions on screen:
1 First,you’ll see this Welcome Screen.Please click on “Continue”.
2 On the Second screen,you’ll find the license agreement.Before proceeding further,make
sure you read,understand and agree to the terms.Then click “Accept”.
8
GETTING STARTED
1
GETTING STARTED
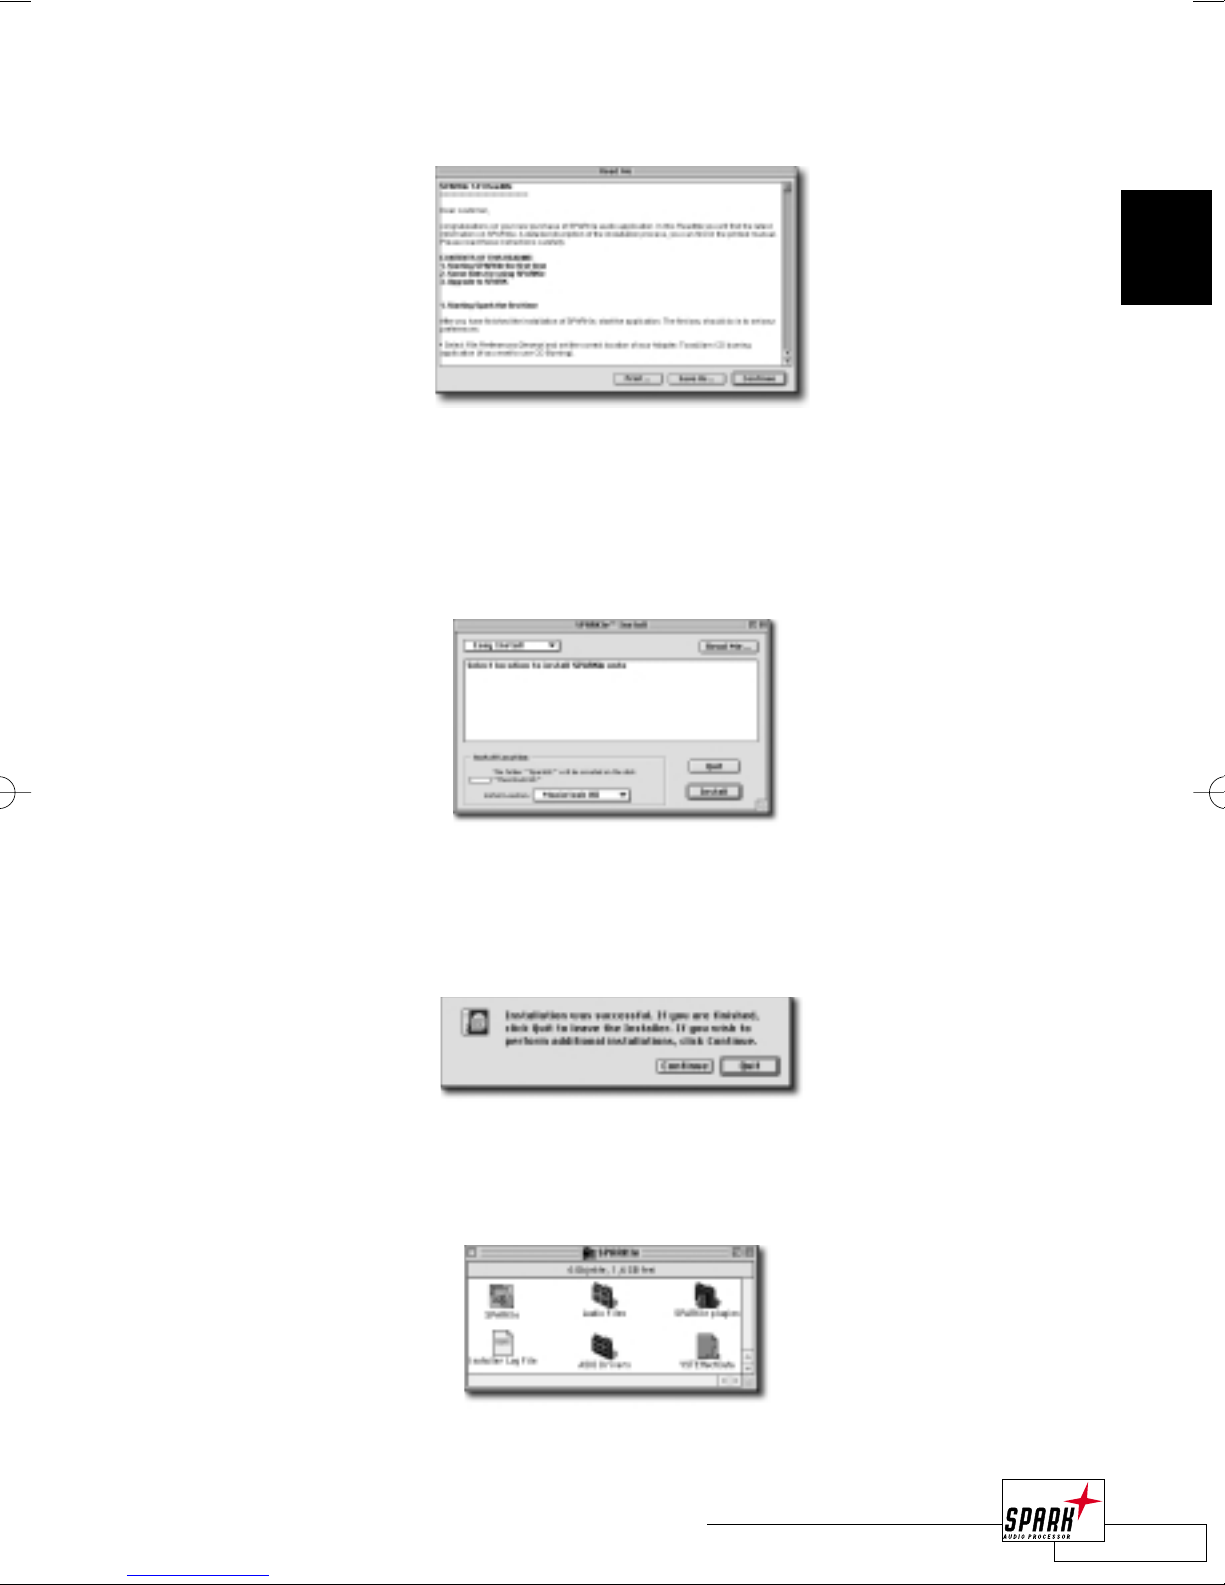
3 This screen presents you with the ReadMe file – read it, save it if you like, then click
on “Continue”.
4 Now you’re ready for the actual installation. Select “Easy Install” and pick a location for
SPARK LE by clicking on the location pop-up dialog at the bottom of the screen. If you
don’t set anything, SPARK LE will be installed to the root directory of your internal
hard disk into a folder also named “SPARK LE”.
5 Now the installation is performed, and you’ll be presented with the final dialog, saying
that installation was successful. Click on “Quit” and you’re done!
6 Now you’re ready to start using SPARK LE! The Folder on your hard disk should contain
the items you see pictured here:
Don’t forget to send in your registration card, or to register online!
9
GETTING STARTED
1

10
GETTING STARTED
OPEN ARCHITECTURE:VST, ASIO
SPARK LE supports VST Plug-Ins and the Steinberg ASIO interfaces for maximum
compatibility.
Most current digital audio cards are supplied with ASIO drivers and all the big names in
Plug-Ins make VST Plug-Ins! Both these formats are quickly becoming standards on the
Macintosh, and are already supported by the likes of Emagic, Opcode, Cakewalk – and of
course Steinberg – on the host application side and by Sonorus, KORG, RME, MOTU,
Lexicon and many others on the card side.
THE USER INTERFACE CONCEPT
SPARK LE integrates the whole editing, processing and mastering process into only two
windows:The Browser View and the Master View.
In the Browser View, you’ll find the project file database, the audio editor and the Play
List – all at one glance and with a fully customizable view.Your window setting is saved
with the Project file.
The Master View includes all the realtime processing and mixing – with the unique
FXmachine that enables you to route up to 4 Plug-Ins into the signal path, the high-resolution master faders and export features to apply the processing to your files permanently.
Thanks to this unique approach, you won’t be surfing the menus desperately looking for
key-features.They are all right where you need them!
1

11
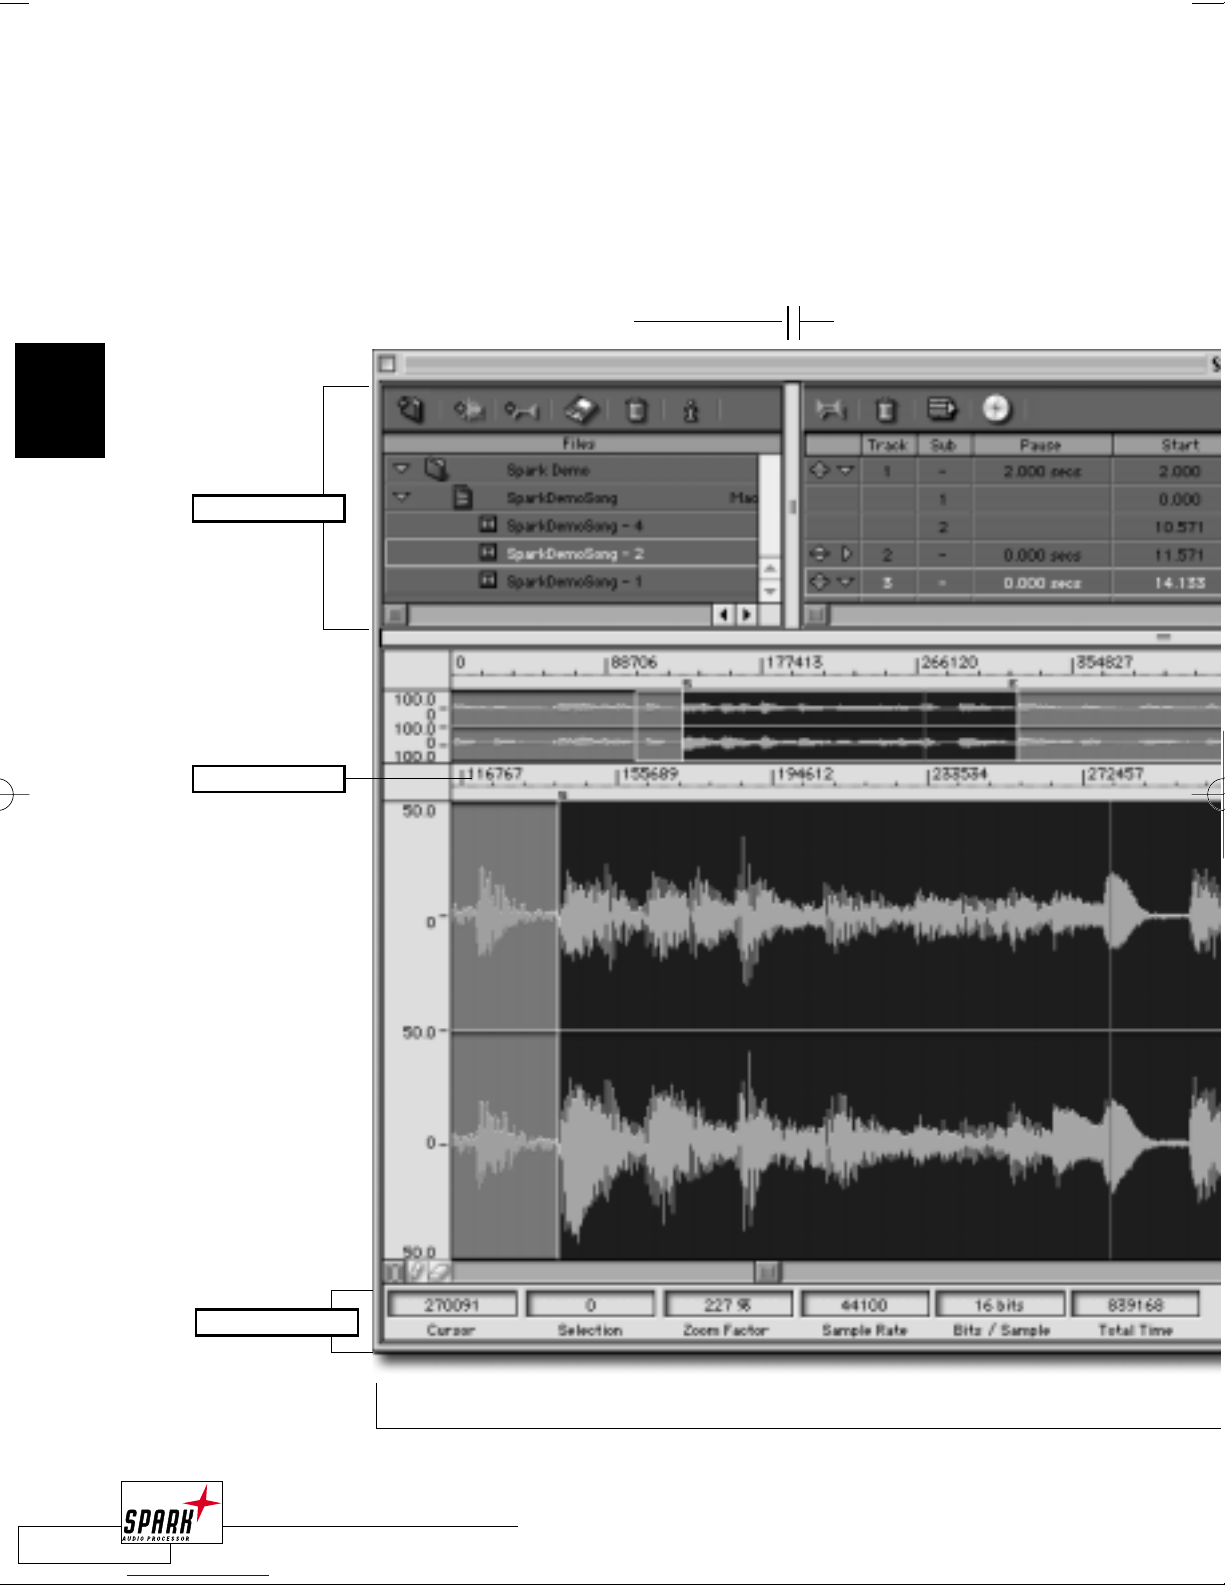
BROWSER VIEW
2
This chapter describes the Browser View and the Transport Window.
Before we go into the Browser View details, let’s have a look at the Transport Window:
TRANSPORT WINDOW
The Transport Window provides all the transport controls you need to navigate through
your audio file or Play List, as well as some basic audio output information.
INPUT/OUTPUT SETTINGS
On the left of the Transport Window, you will find your current output setting and the
currently active I/O sampling rate. If SPARK LE’s real-time resampling algorithm is active, this
will also be indicated here.
BROWSER VIEW
File View Play List
Wave Editor
I/O settings Transport Controls

12
BROWSER VIEW
2
HARDWARE SAMPLING RATE – Indicates the sample rate settings of your audio
– hardware.
RESAMPLING INDICATOR – Lit if waveform’s sampling rate and actual output
sampling rate are different, so SPARK LE’s software
resampling algorithm is active
.
SELECTED OUTPUT – Allows you to change the set of output channels used, if
multiple are available.
SETUP DIALOG – Click on the “Setup” button to change your audio
device settings. If the audio device doesn’t offer a setup
page, this button will be disabled. For details on how to
setup your audio device, refer to the documentation of
your audio card.
Selected Output
Resampling Indicator
Hardware Sample Rate
Setup Dialog

TRANSPORT CONTROLS
SCRUBBING VIA KEYBOARD COMMANDS
It is possible to use the scrub function via keyboard shortcuts. Enter this mode by pressing
PAUSE in the transport bar (or pressing the <ENTER> key on the numerical keypad).
Now, the scrubbing speed can be set by pressing the <CURSOR LEFT / RIGHT> keys.
This will change the speed in 5% steps. For fine trimming the speed, press
<SHIFT + CURSOR LEFT / RIGHT>.This allows to change the speed in 1% steps.
<OPTION + CURSOR LEFT / RIGHT> will change the scrubbing direction, but keep the
scrubbing speed.
To stop the scrubbing immediately, press the <SPACE BAR>.To leave the <PAUSE> mode,
press the <ENTER> key again.
13
BROWSER VIEW
2
Left Selection/Region position
(In Time)
Cursor Position/
Current Time
Right Selection/Region position
(Out Time)
Active File
Scroll Bar
Transport Controls (from left to right)
Cycle – Switches automatic repetition of the current selection on/off.
Alternatively, press </>.
Stop – One click stops Playback. Pressing Play afterwards will play from
the current cursor position. Double click moves the cursor back
to the start of the Region/File.
Play – Starts Playback. Pressing the <SPACE BAR> toggles between Stop
and Play.
Pause – Stops Playback, but Playback will continue from current position.
To enter the Pause mode from the keyboard, press <ENTER>.
Record – Opens the Recording Dialog. Check the I/O settings in your
SPARKle Preferences, if the Recording Dialog doesn’t open - the
selected I/O device might not offer a recording possibility.
Key command for recording is <*>.
Fast Rewind/Fast Forward – Jump to previous/next marker. In Play List mode
this is used for track up/down navigation
(<COMMAND + CURSOR UP/DOWN>)

14
BROWSER VIEW
2
RECORDING DIALOG
SPARK LE offers flexible recording facilities.The recording dialog allows you to keep adding
takes into the same file and to set your audio Inputs/Outputs right there.
Click on the “Record” button in the Transport Window and the Recording Dialog will open:
NOTE:The Recording dialog will not open if the selected audio device can not accept audio inputs.
For example,“SoundManager” does not feature recording capabilities. Instead, select the “ASIO
SoundManager” or your optional audio card’s driver in the “I/O” page of the Preferences dialog.
METERS
The Recording Meters enable you to display the signal level input.When you click on the
Meters or the Clip Indication, the system displays a pop-up menu with peak-hold options.
SOURCE
You can select your recording input device in the Source section.The Clock indicates the
input sampling rate. Click the “Setup” button to display options for your audio device.This
settings dialog (“I/O; Setup Audio Device”) can also be accessed from the preferences dialog
and the transport bar.
MONITOR
The Monitor enables you to preview the audio before actually recording it.Turn the Monitor
on and select the desired audio source in the “Source” pop-up. By pressing <M> on the keyboard,
you can switch monitoring on or off.
FILE
Here you set the file properties such as your recording’s filename and destination. Click
“New” to create a new file.A default name with an incrementing number will automatically
be assigned to the file if you don’t type anything.
Meters
File
Monitor
File Format
Time Display
Transport
Controls
Source

15
BROWSER VIEW
2
FILE FORMAT:AIFF, SD2 AND WAV
Select the File Format you prefer. In addition to the File type, you can adjust the Sampling
frequency, bit depth, and mono/stereo settings.There is no “quality difference” between the
different available file formats.The most common on the Mac is “AIFF”.
If you select a sampling rate that is different from the sampling rate of your audio device, the
resampling function will be activated.
For high quality recordings it is not recommended to resample on the fly. Perform the
resampling off-line after recording instead.
NOTE: Explanations of the different file formats can be found on page 26 in this manual.
TIME DISPLAY
The Time Display supplies you with three different time read outs:
Total Time – Indicates the total length of your recording
Disk Space – Indicates the available disk space for recording in minutes. If you change the
file settings, the available disk space will be recalculated according to the file
attributes (recording with higher bit depths and sample rates require more
room on your hard disk).
Current – This displays the current time position in your recording.This is helpful,
when you play back an already recorded file for verification purposes.
TRANSPORT CONTROLS
The Transport Controls enable you to move around in a recorded audio file, for example, to
rehearse a part of your recording, or to replace it with a new recording.
Click the “Record” button or press <*> to start recording at the current position.To stop
recording, click “Stop” or press <*>.
After you have finished your recordings, select “Done”.
16
BROWSER VIEW
2
THE BROWSER VIEW
The Browser View is one of the many innovations in SPARK LE’s user interface concept. For
the first time, the File database, Play List and Wave Editor are all integrated into one window.
The Browser View features dynamic movable borders to adjust the section’s sizes to your
needs – and an unparalleled level of transparency!
movable borders
▲
▲
File View
Time ruler
Info Line
17
BROWSER VIEW
2
The Browser View consists of three parts: The File View with all your audio files
and Regions used in your Project, the Play List where you arrange the Regions and define
Crossfades, and the Wave Editor to edit your audio and create Regions.
movable borders
▲
▲
▲
▲
Wave Editor
Playlist
Zoom Tools

18
BROWSER VIEW
2
ACTIVE PART OF THE WINDOW
The selected part of the Browser View is marked by a colored frame – that way you will
always know whether you have focussed the File View, the Play List or the Wave Editor.
To change between these three parts, simply click on the desired part, or press < TAB > /
<SHIFT + TAB> to change your focus.
The keyboard commands are always assigned to the active part of the window!
Note:There are some options in the Preferences (Edit; Preferences; Editor) on how this colored frame
should be indicated.Try the different options to find the one you prefer most.
FILE VIEW
The File View represents your virtual file database and includes references to the audio files
used in your project.You can build your own hierarchical order by creating virtual folders for
a better overview.
Of course, SPARK LE also supports drag & drop to and from the desktop, making it really
easy to load files or export regions into files.When you need to cut one long track into
many separate ones, this feature will save you hours! You can even import complete folders
with audio files just by dragging and dropping them to the File View!
Please note that the file tree that you build in your File View does not represent the actual
location or order of your files on your hard disks – audio viewed in the same folder could be
on totally different hard disks. So you can easily build different views of your files without
actually having to move them around.
New files will always be opened into the currently selected folder. Files can not be moved
from one folder to another.Also, it is not possible to rename audio files within SPARK LE.
colored frame
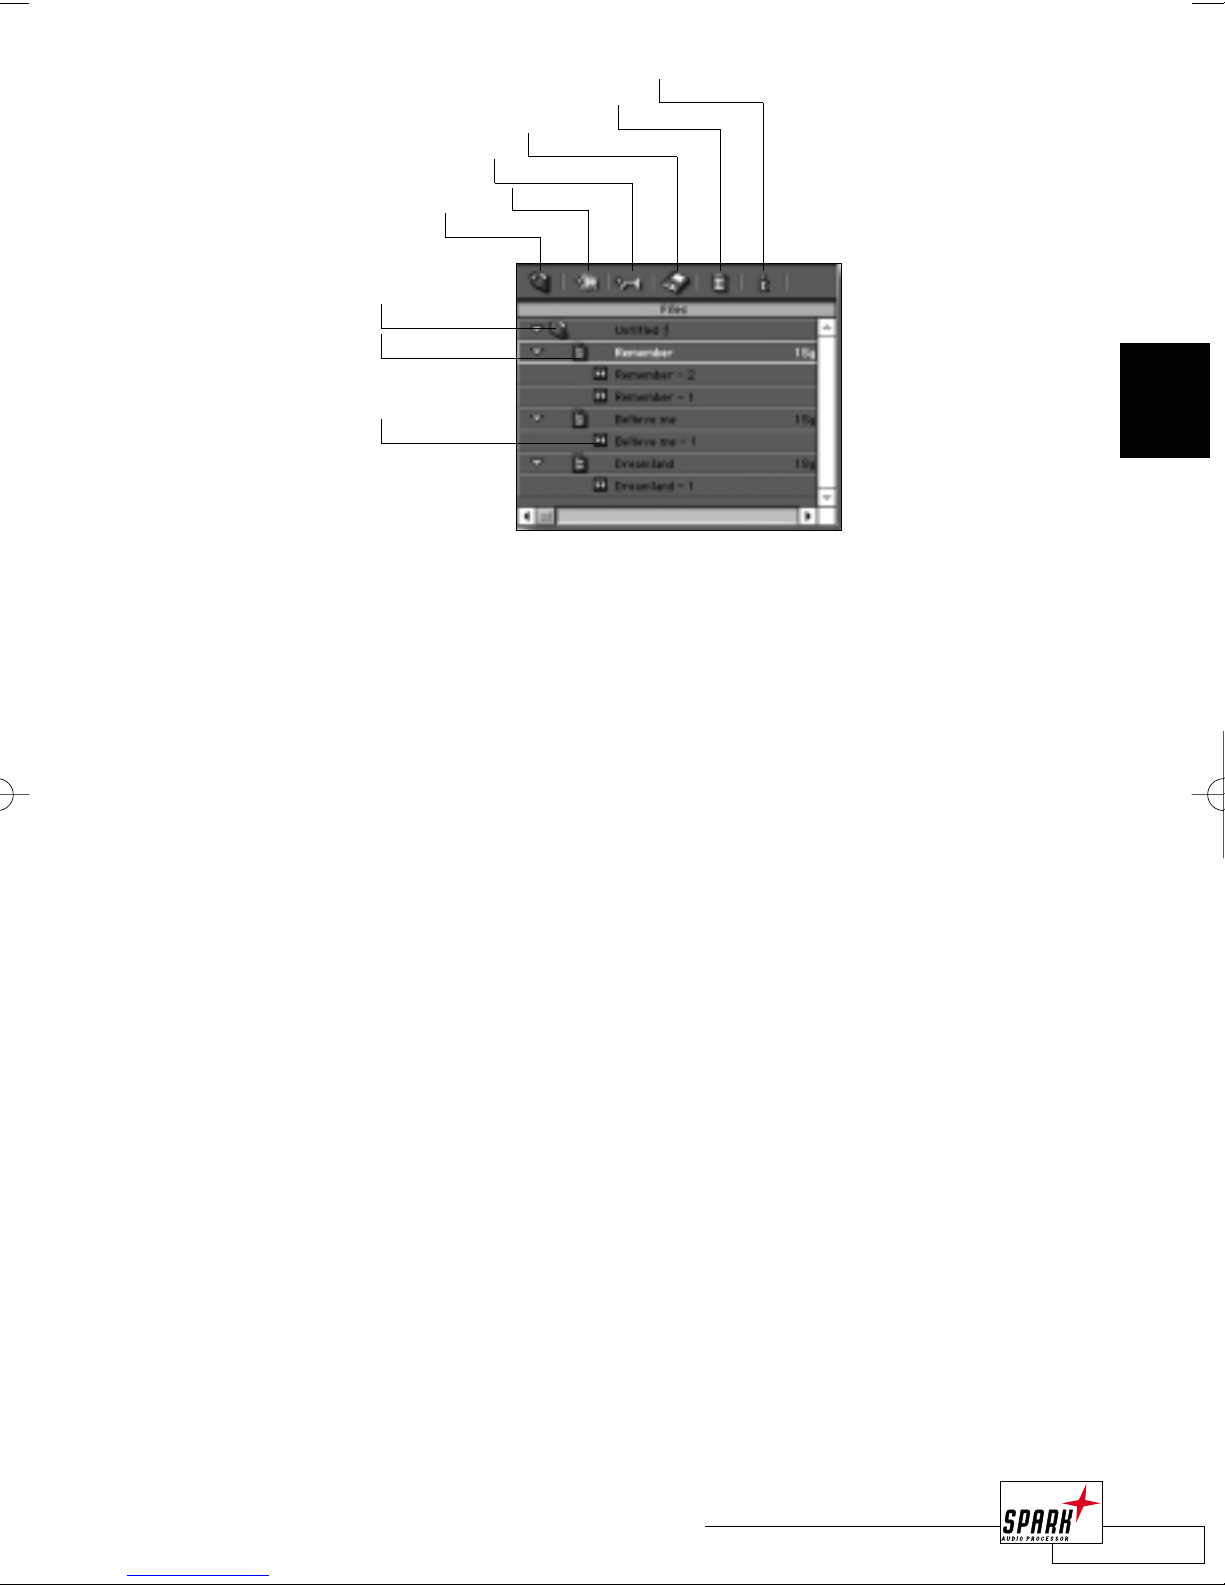
Add Folder – This will create a new virtual folder.
Add File – Click this button to add audio files to the File View.
Add/Copy Region – By clicking on this button, you will create a Region based on the
current selection in your audio file.Alternatively press <COMMAND + R>.
Save File/Region as – This allows you to copy the selected file or export a selected region a
discrete file on your hard disk. Dragging the file/region to the desktop
will create a discrete file of the same file type as the original file.
Trash – To Trash a File View entry, select this entry and click on the File View’s
trash bin or press <BACKSPACE>.The file on your hard disk is not
affected by this action, only the reference in the File View is removed.
However, if you have applied any kind of processing to this file, you will
be asked if you want to save the changes to the file before it is deleted
from the File View.
Info – This will open an info screen for the selected entry. In this info screen
you can, for example, change the region or folder name, or lock the
region start point and length. <COMMAND + I>
Use the cursor keys to navigate inside the File View. <CURSOR UP/DOWN> will select
the previous/next File View entry, <CURSOR LEFT/RIGHT> will open/close a folder.When
you select a File/Region in the File View, the waveform will be displayed in the Wave Editor
immediately.
19
BROWSER VIEW
2
Folder
File
Region
Add Folder
Add/Copy Region
Save File/Region as
Trash
Info
Add File
FOLDERS
Folders will help you to structure your audio material in the File View.At least one
folder must exist in the File View. Change the folder name by double-clicking on the folder
name or pressing <COMMAND + I>; this will bring up a dialog where you can enter a new
name.
FILES
If you click on the “Add File” button a file open dialog will pop-up.The selected
audio files will be opened into the File View. If you are working with split stereo files
(named *.L and *.R), SPARK LE will automatically open them as a stereo file, even if you
select just one of the files! To prevent SPARK LE from doing this, keep the <SHIFT> key
pressed while loading the file.
Note: To select multiple files in the “Add File” dialog hold the “shift” key while selecting the files.To
select all files press <COMMAND + A>.
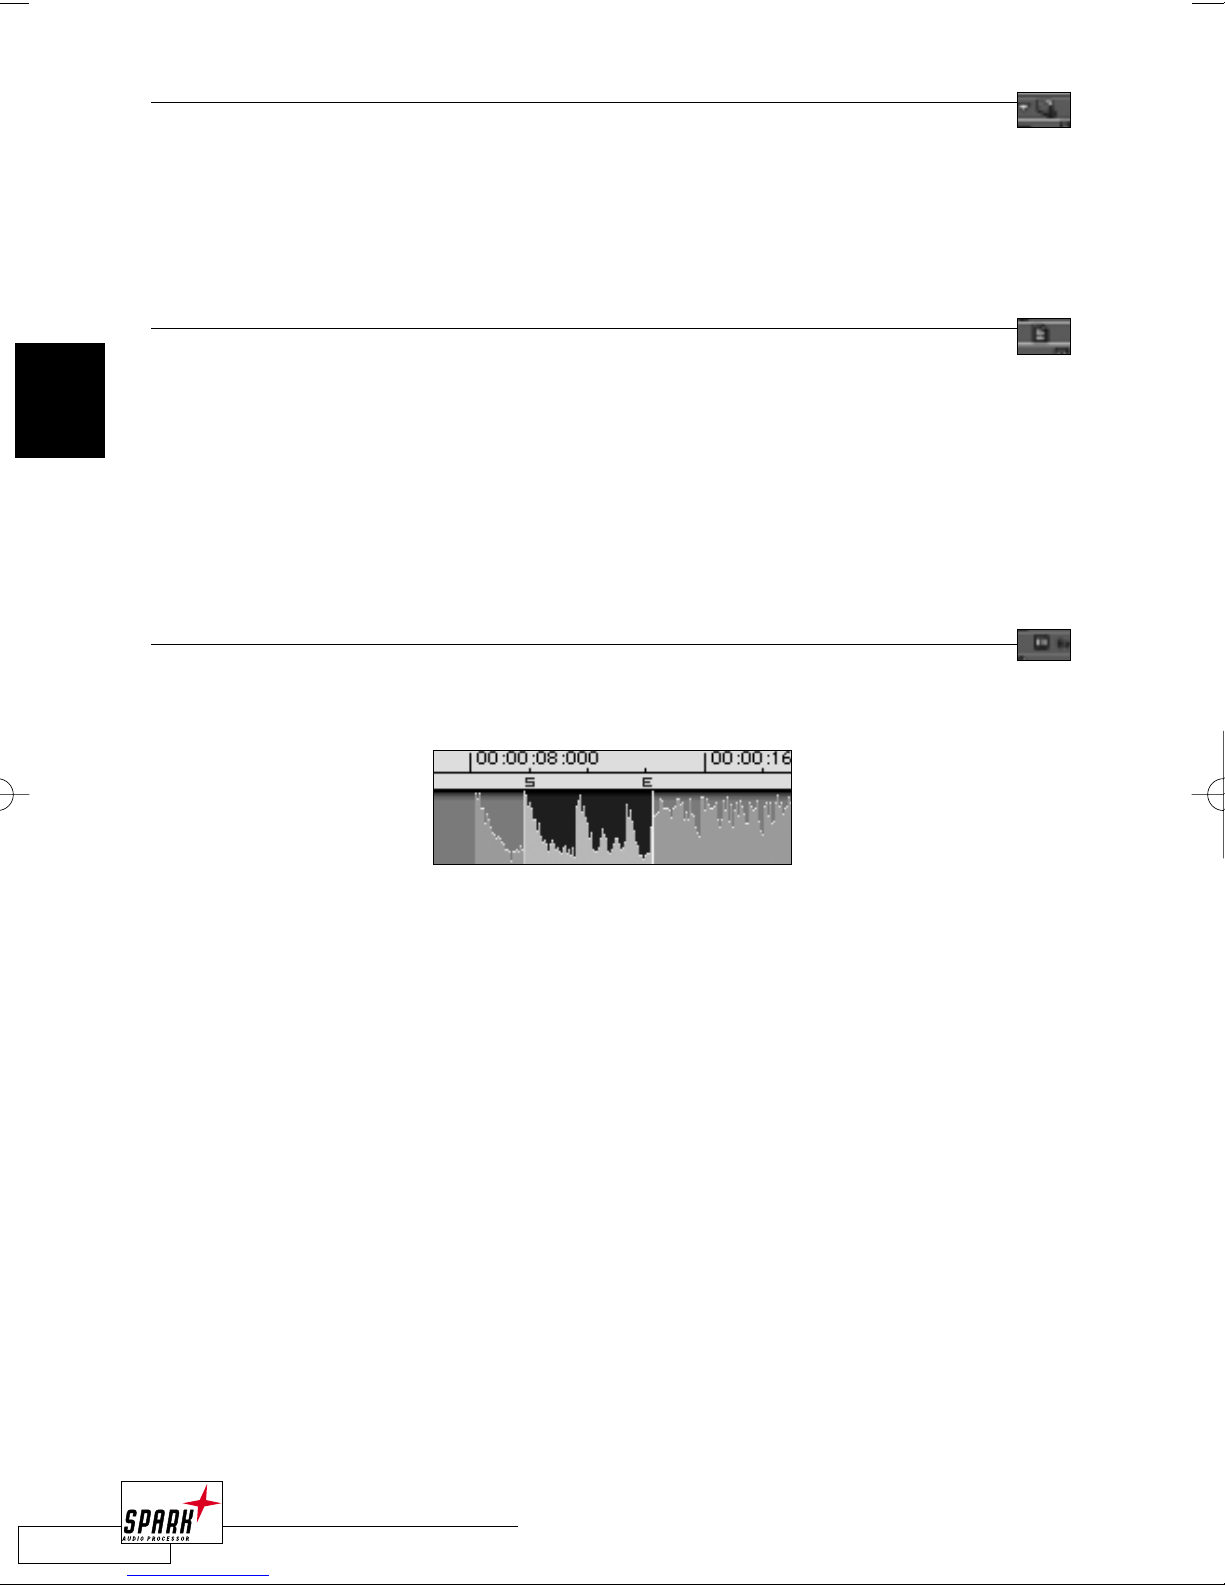
REGIONS
A Region marks a section of your audio file.The borders
(marked with a small “S” and “E”) define the start and end points for playback.
You can have as many regions referencing the same file as you like. Regions do not affect
your audio file. By creating, editing or deleting them, the audio file on your hard disk is not
touched or changed!
As Regions belong to certain audio files, they will always appear as sub-entries of the related
audio file.
• DEFINING A REGION
There are two ways to define a Region:
· Make a selection in a waveform, click on the File View’s “Add Region” – a new Region
appears in the File View!
· Make a selection in a waveform and press <COMMAND + R> on your keyboard – a new
Region appears in the File View!
20
BROWSER VIEW
2
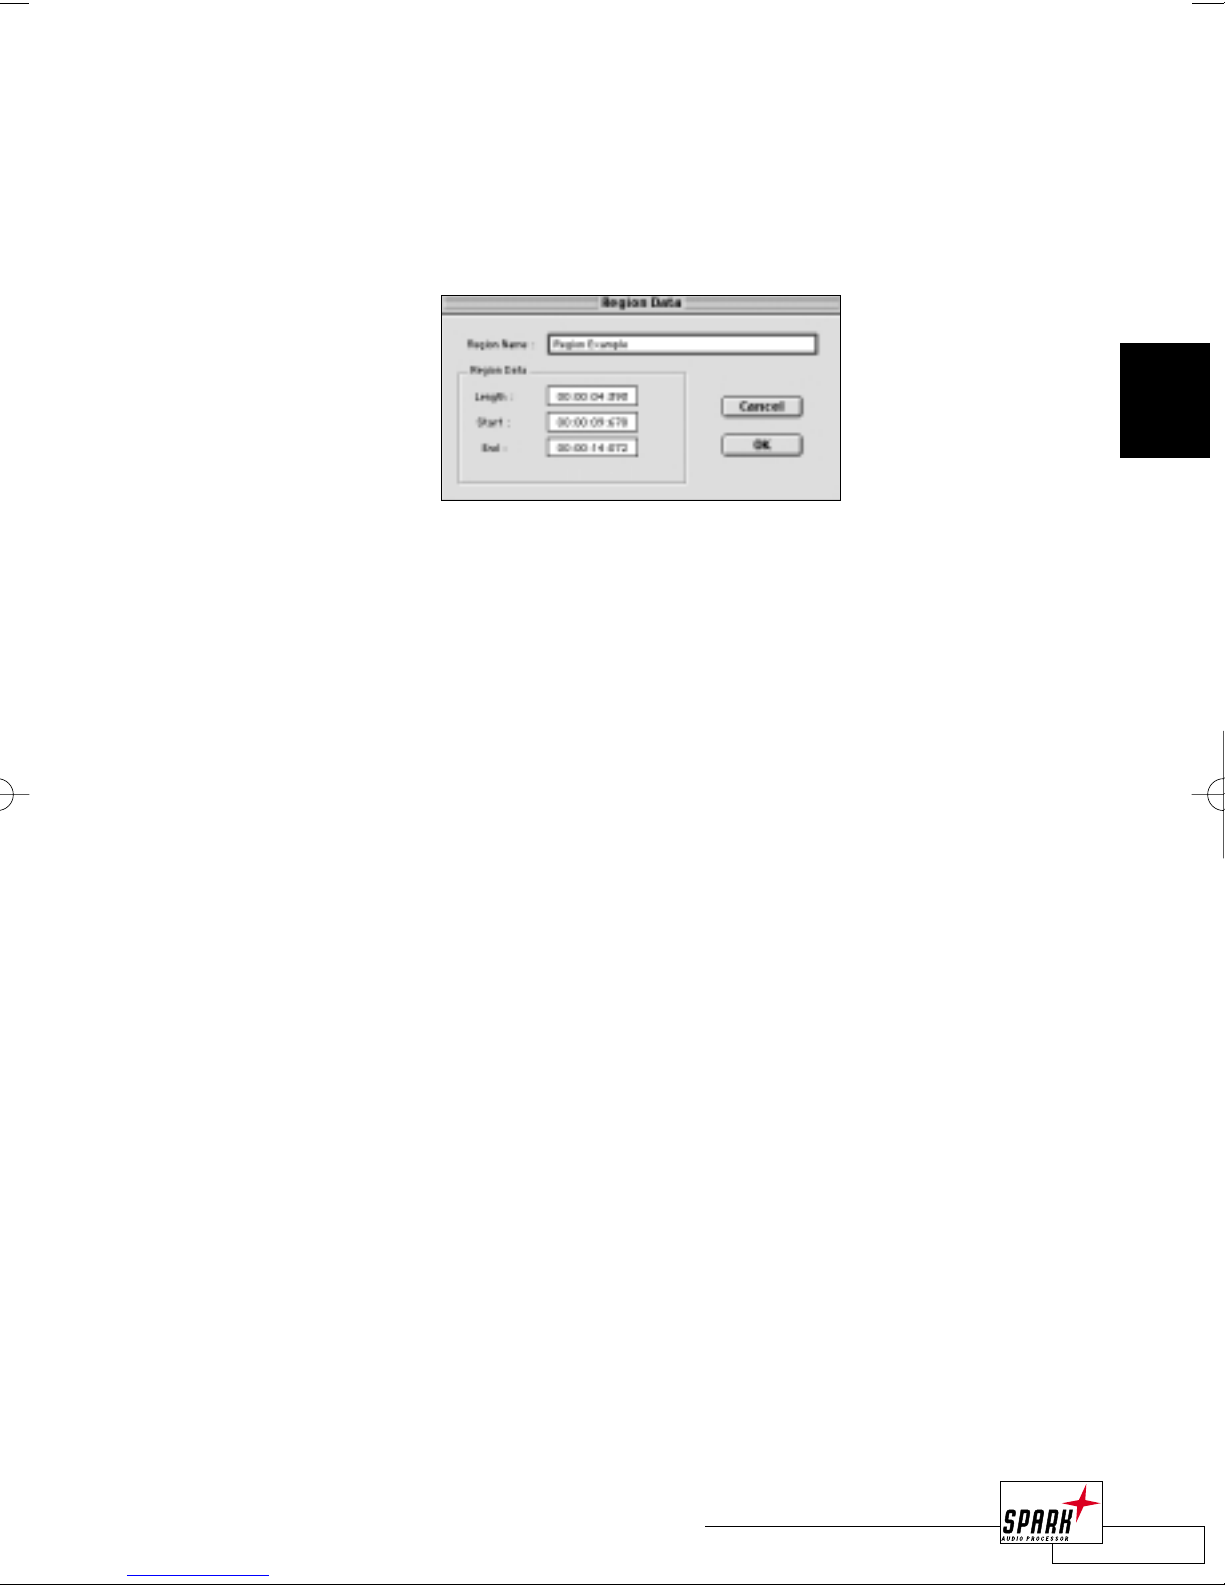
• EDITING A REGION
Click on the left or right Region marker in the Edit Window and move it around.To move
the whole region, press <CTRL + SHIFT + CURSOR LEFT/RIGHT>.
By double clicking on the Region name in the File View, you will get a Region Info screen,
where you can change the Region name as well as the Region Start- and End point (Alternatively
press <COMMAND + I> or click on the info button.).
• SELECTING A REGION
“Select Region” from the “Edit” menu will mark your Region for further editing.
Alternatively, double-click in between the region start and end markers of your file.
• EXPORTING A REGION INTO A NEW FILE
You may export any Region into a discrete file at any time by simply moving it to the
desktop, or by selecting the “Save as” button in the File View.
FILE FORMATS
SPARK LE supports several file formats – and for maximum compatibility you can even
import any file format supported by QuickTime.
All of the key formats may be used for professional recording – there is no “quality
difference”, as you might be used to from having to choose the right kind of tape.
Let’s have a look at the formats in more detail:
• AIFF – the Audio Interchange File Format was developed by Apple and is the most widely
used on the Mac.AIFF supports all of today’s important sample rates and bit depths.
Note:There is also a compressed AIFF format, called AIFc.This format must be imported using the
“Import Quicktime” feature from the File menu.
• SDII – The SoundDesigner II format was developed by Digidesign and is also a popular
file format on the Mac, as it is Pro Tools’ default file format. SDII supports all of today’s
important sample rates and bit depths.
• WAV – Don’t be scared, although this format was created by Microsoft and IBM! The
Windows WAVE format is standard on the PC and will make sure your audio files are
compatible with the other 95% of the computer market ;-)
The WAV format supports all of the important sample rates and bit depths, too.
21
BROWSER VIEW
2

22
BROWSER VIEW
2
QUICKTIME IMPORT/EXPORT
SPARK has the capability of importing and exporting files via Apple’s QuickTime.This gives
you the possibility to import all sorts of audio formats into SPARK, and also exporting audio
files in QuickTime formats (the available export formats depend on the QuickTime version
you are using, e.g. QuickTime Pro).
TO IMPORT QUICKTIME FILES INTO SPARK:
1 Drag & Drop the desired QuickTime movie into SPARK’s File View.
2 The movie will be imported and an temporary audio file of the movies audio track
generated.A movie window will be present while this file is selected in SPARK.
3 Now you can start editing the audio file of the QuickTime movie.
As alternative, you can import a QuickTime movie via the "Import QuickTime” option in
SPARK’s "File” menu, which will create an separate audio file:
1 Select "File” / "Import QuickTime…”
2 Select the movie file you want to import into SPARK and press "Convert…”
3 Select a destination file name and press "Save”
4 The movie will be imported and an extra audio file created in the specified folder.
5 Now you can start editing the audio file of the QuickTime movie.
TO EXPORT FILES IN QUICKTIME FORMAT:
1 To save an edited QuickTime movie from SPARK, just select "Save As…” (or "Save”) and
select the desired file name.
2 SPARK will ask if the same encoder should be used for the audio file that was used in the
original (imported) file. Select "Yes” if the audio encoder should be the same, or "No” in
case you want to use a different encoder and encoder quality – you will then be trans
ferred to the "Sound Settings” screen where you can set the encoding options.
3 The QuickTime file (including the movie) will be saved to the specified location.

23
BROWSER VIEW
2
WAVE EDITOR
The Waveform Display
The waveform display is the heart of any audio editor.The loaded audio file is displayed by
an amplitude graph over time. For a mono file you will see one graph; for stereo files, two.
The “0” line at the center of each graph marks the lowest, the “100” at the top and bottom
represent the highest possible signal level.
The upper part of the waveform display is the waveform overview, the lower part is the edit
view where the editing takes place.
OVERVIEW
The overview section of the waveform is for navigation through your audio file.You cannot
make any changes or edits in the OVERVIEW except to move the cursor.
CURSORS
SPARK LE features two cursors:The red PLAYBACK CURSOR will show the current
playback position, and the green EDIT CURSOR displays the current edit position.
When you start playback, the EDIT CURSOR will remain at the start position until you set
it to a different location by single clicking elsewhere on the waveform.
When you start playback, the PLAYBACK CURSOR will scroll through the audio during
playback.When you press "Stop” on the transport, the PLAYBACK CURSOR will rest at
the last playback position.
When you move the position of the PLAYBACK CURSOR, the EDIT CURSOR will jump to
the same position.
Waveform overview
Edit view
Zooming Tools
Info Line
Drawing Tools

INSTANT PLAYBACK
If you click on the waveform while keeping the <COMMAND> key
pressed, the playback will instantly start from the selected position. If
you are in stop mode, the playback will only play as long as the mouse
button in pressed.Afterwards the playback cursor will jump back to the
previous position.
If you are in play mode, the playback will continue playing from the
selected position.
HOW TO MAKE A SELECTION
Making selections is the basic task before you can do further editing.There are different ways
to make selections:
1. Point and click with the mouse to the waveform to mark the selection’s start position.
Press and hold the mouse button and drag it to the left or right until you have marked the
desired area.
2.To make a selection in the waveform overview, keep the <OPTION> key pressed and mark
the seletion by clicking/moving the mouse on the waveform overview. Selections can be
made on single channels as well: If you select mark the selection in the upper part of the left
channel, only the left channel will be selected. If you mark the selection in the lower part of
the right channel, the right channel will be selected. If you mark the region in the middle
(between the two 0-lines of the channels), both channels will be selected.
3. During playback you can set the selection start by pressing <OPTION + CURSOR UP >and
the end by pressing <OPTION + CURSOR DOWN>.
4. Double-click inbetween two Markers will make a selection between these two Markers.
5.With a triple-click on the waveform, the whole file will be selected.Alternatively, press
<COMMAND + A>.
TO TRIM A SELECTION:
To trim the selection borders, it is quite helpful to zoom in first.To zoom to a selection,
press <CTRL + “+”>. <CTRL + “-”> will zoom out completely.
When you hold the <SHIFT> key while clicking left or right of the start or end of the
selection, the cursor will get a small arrow and you can trim the seleciton. Hit <SPACE>
to monitor it and to verify if start and end point are properly set. Now you can turn this
selection into a region(<COMMAND + R>) or add processing.
The whole selection can be moved by pressing <OPTION + SHIFT> and moving the
selection with the mouse or with the <CURSOR LEFT/RIGHT> keys.
24
BROWSER VIEW
2
EDIT TOOLS
The Edit tools are only selectable when you have zoomed in to
drawing resolution, otherwise the bar is grayed out and the Selection
Tool is active.
Selection – This is the default tool, allowing you to select parts of your audio file.
Pencil – With the pencil tool you can draw changes into your waveform.A great tool for
manual click removal.When you hold the <SHIFT> key while performing the edit, it will be
applied to both channels.
Eraser – The Eraser makes it easy to apply silence anywhere in your recording.
Note: If you select the Use Pencil/Use Eraser option from the “Option” menu, you will get an
automatic zoom-in to drawing resolution.
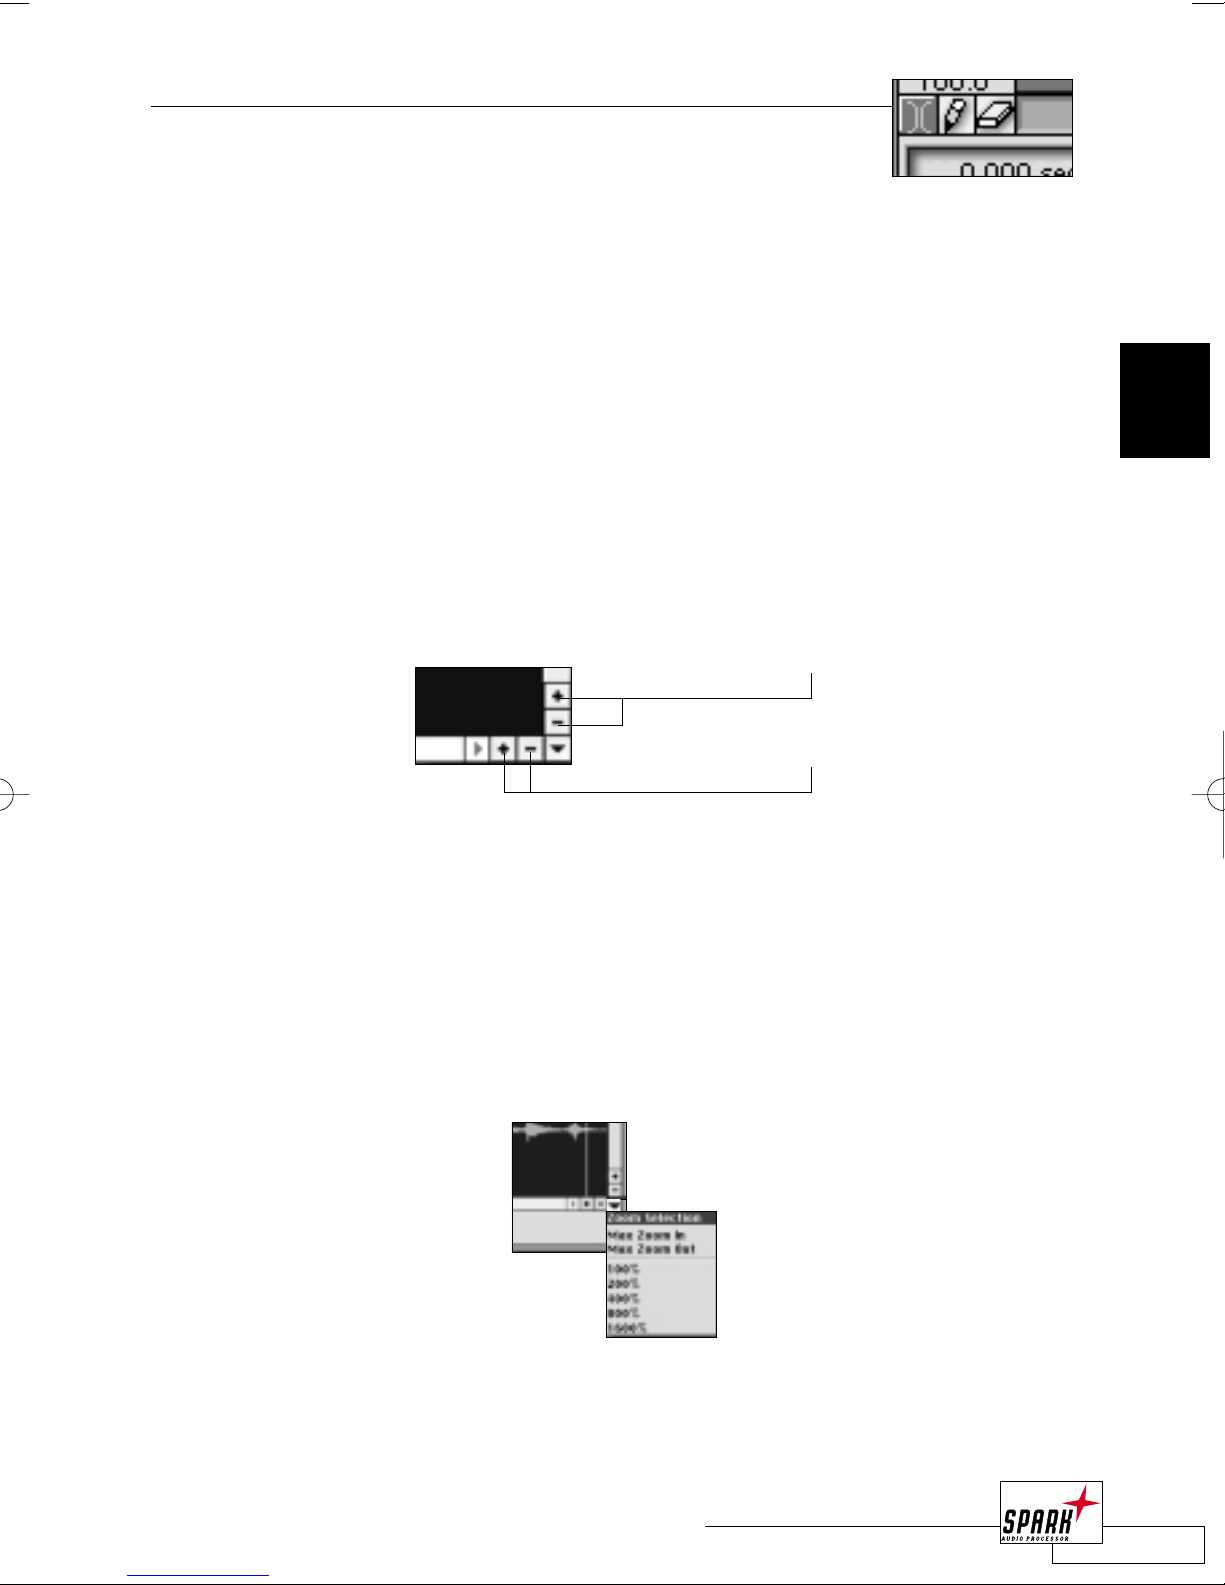
ZOOMING
Use the “+” and “–” zoom buttons in the lower right corner of the Edit Window to change
the waveform display’s zoom factor.You have one set of buttons for the horizontal – and
one for the vertical dimension. Horizontal zooming can also be done by pressing the <+>
and <-> keys.
Horizontal zoom-in: <+>
Horizontal zoom out: <->
Zoom-in to selection: <CTRL + “+”>
Zoom-out completely: <CTRL + “-”>
Zoom-in to sample level: <OPTION + “+”>
Clicking on the triangle inbetween the horizontal and vertical “+”/“–” buttons will open a
pop-up display with zoom presets as pictured here.
25
BROWSER VIEW
2
Vertical zoom in/out
Horizontal zoom in/out

An alternative method of zooming is to use the rectangle in
the overview: by clicking and dragging in the overview you
set the zoom level, if you click into the rectangle you will
see a hand which lets you move it around without changing
the set zoom factor:.The Wave Editor’s detailed view will
follow your every move!
If you move the zoom rectangle out of the wave overview, you will zoom out completely.
By pressing <OPTION> in the waveform edit view, the cursor will change to a
magnefying-glas and will allow you to draw the zoom area in here.
Note:To have the waveform view following the playback cursor, switch on the “Follow Cursor” option
in the “Option” menu (or press <F>).With the “Playback Cursor Centered” option (<SHIFT + F>),
you can even get a centered playback cursor with a scrolling waveform.
INFO LINE
At the bottom of the Edit Window you will find the Info Line with information about the
audio file and your selection:
C
URSOR – Displays the cursor position. Double-clicking will bring up a numerical input field
for editing.This field can also be selected by pressing <COMMAND + , >.
S
ELECTION – Displays the length of your selection. Double-clicking will bring up a numerical
input field for editing.This field can also be selected by pressing <SHIFT + COMMAND + ;>.
Z
OOM FACTOR – Displays the chosen zoom factor
S
AMPLING RATE – Displays the audio’s sampling rate
B
ITS/SAMPLE – Displays the audio’s bit depth
T
OTAL TIME – Displays the audio’s total playing time
Note:All time lengths can be displayed in the following formats: sample frames, Hours:Min:
Sec:msec, milliseconds or seconds.This is set in the Preferences dialog’s “Editor” setting.
UNDO/REDO
SPARK LE offers a powerful Undo/Redo mechanism: Unlimited undo/redo is possible (if set
in the preferences) The Undo/Redo is organized in “Clients”. Clients are for example the File
View, the Play List, the Master View or the Wave Editor.All these clients have their own undo
history, so even when change something in the Master View (e.g. inserting a new Plug-In) and
you switch to the Wave Editor, the undo command will undo the last edit you have made in
the Wave Editor.
26
BROWSER VIEW
2

To undo the last action select “Undo” from the “Edit” menu or press <COMMAND + Z>.
Select this option again will undo one more step and so on.To redo an action, press <SHIFT
+ COMMAND + Z>.
As the undo function is client based, you also need to take care that the right “Client” is
selected when you perform the undo action. E.g. if you are in the Play List, you can’t undo the
last action in the MasterView. But as you can always redo the action again, this will never
cause any serious damage.
If the number of “undo stages per client” in SPARK LE’s preferences is set to something
different than “unlimited”, undo steps will be deleted after the defined number of further
actions.
EDIT FUNCTIONS
In the “Edit” menu you will find besides the undo/redo also the basic Cut/Copy/Paste
functions:
“Cut” (<COMMAND + X>) will cut the selection out of the file and keep it in the clipboard.
“Copy” (<COMMAND + C>) will copy the selection to the clipboard
“Paste” (<COMMAND + V>) will paste the clipboard content to the current cursor position.
“Paste Special...” gives you some extra options on how the clipboard content should be
inserted:“Mix” will mix the clipboard to the current cursor position,“At End” this will be
added at the end of the file,“At start” will add the clipboard in the very beginning of the file.
“Silence” will paste digital zero to the current selection. If no selection is made, you will get a
dialog asking for the length of the silence that should be inserted at the cursor position.
“Trim” will remove everything from the file exept the current selection.
27
BROWSER VIEW
2

PROCESS
SPARK LE’s off-line “Process” menu supplies you with the key DSP function for destructive
editing. First, select the audio you want to process in the Wave Editor, then choose the
desired function:
FADE...
Create a fade-in or fade-out on a selection. Make a
selection at the desired fade position and choose “Fade”
from the Process Menu (or press <COMMAND + F>).
Select the Fade In/Out type and further adjustments of the
fade. Finally, press “OK” to process the fade to the file.
Depending on where you are in an audio file, the direction
of the fade will automatically be selected for you. If you
are with in the first half of the file, the fade will
automatically be set to "Fade In”. If you are with in the
second half of the file, the fade will automatically be set to
"Fade Out”.
FADE OPTIONS
Offset/Damping - With the “Offset” and “Damping” controls, you can adjust the fade curve:
“Offset” defines the position in the crossfade. 0% is the beginning of the fade, 100% is the
end.With “Damping”, the damping at the position defined by “Offset” is set.
“Direction” lets you select if the fade should be a fade-in or fade-out.
There is also a small choice of fade presets, that can be recalled from the “Presets” pop-up.
Also, the selection can be adjusted in the fade dialog itself: Set the selection start time, end
time or the fade duration.The “Channels” lets you select if you want to have the fade on the
left, right or both channels.
CHANGE GAIN...
To change the level of the selected audio part, open gain from Process Menu (or
press <COMMAND + G>) and set the gain change with the fader.The level can
be boosted up to +18dB!
28
BROWSER VIEW
2

NORMALIZE
This will optimize the level of your selection to the maximum value you
have set by the fader (usually 0dB).Open “Normalize” from the Process Menu
(or press <COMMAND + OPTION + N>).
REVERSE
Reverses the current selection.
INVERT
Inverts the Phase of your selection.This will invert the phase on all channels! To invert just
single channels, use the “Phase Shift” in the FXmachine!
RESAMPLE...
Select the sample frequency, the desired quality
and press “OK”. More information on the
resampling algorithm below.
29
BROWSER VIEW
2

30
BROWSER VIEW
2
SAMPLE RAT E CONVERSION
Sample rate conversion is one of those seemingly “boring” features – and a true life saver
once you run into those classic situations where you need it.
Here’s a scenario: your client hands you a DAT tape and asks you to master it for CD.
You put it in your DAT machine, hit play and say “oh no, it’s 48kHz....”
As CDs are still limited to 16 bits / 44.1 kHz, you’ll have to change the sample rate of your
material to work on the target media. Of course your source material could also be a
24 bit / 192 kHz file, or any of the other supported sample rates and bit depths.
When you resample a file, you will inevitably “worsen” the sound quality: naturally, as a 48
kHz or 192 kHz file has a better sonic quality – so the quality of the resampling algorithm is
quite key!
THE TECHNICAL VIEW
In many common resampling algorithms, you’ll get a stop band attenuation of around 60 dB
at the highest quality level.This is not good enough for critical masters!
As a rule of thumb, an attenuation of 80 dB is required to avoid noticeable aliasing (artifacts).
SPARK LE offers 3 quality modes for resampling – and the good news is, that all 3 of them
have a stop band attenuation which is greater than 90 dB!
What does this mean in real life? Simply put: if a resampling is not performed with high
enough a quality, aliasing (so-called “ghost tones”) will appear, spoiling the sound with nasty
artifacts. Have a look at the following plots:
On the following illustration you see a sine sweep from 16Hz – 20 kHz in 44.1 kHz, our
original file.
On the following illustration you see the same sweep after upsampling from 44.1 kHz to
48 kHz with a common algorithm.The strange “net” which is now visible on the plot
visualize the artifacts which have been added due to the low quality process, those nasty
ghost tones! And yes, you’ll hear them, as they are in the audible range of around 10 kHz
and up!
TIME
FREQUENCY
TIME
FREQUENCY

On the following illustratin you see the same sine sweep after processing with SPARK LE’s
resampling algorithm set to “good” quality. No artifacts, no ghost tones!
As you can see from this example, aliasing (or ghost tones) not only occur during
downsampling (e.g. 48kHz to 44.1kHz) but even when you resample to higher sampling
frequencies.
THE THREE MODES:GOOD,BETTER AND BEST
The main difference of the three quality levels is the slope of the transition from the pass
to the stop band. Have a look at the illustration to get an idea what’s going on during
resampling.
Choosing “good”, you’ll get what the mode’s name implies, but you’ll still lose a bit in the high
end of the frequency spectrum, which ideally should pass unaffected.
When “Best” is selected, the transition looks almost like a square, which means this is very
close to the theoretical model of loss-less sample rate conversion. Of course, we can’t give
you a totally loss-less result, but we’re pretty sure that you’ll be pleased by what you’ll hear!
Which mode you should choose depends on your requirements, of course the trade-off with
the higher quality modes is a slower processing speed, as many more calculations have to be
performed.
31
BROWSER VIEW
2
TIME
FREQUENCY
FREQUENCY
RESULT (E.G. GOOD)
IDEAL (THEORETICAL)
GAIN

WHICH MODE TO USE?
• First of all, it depends on the speed of your Mac and your patience. If it’s fast enough then
use “best”, as you’ll get superior results.
• If you have to save time, the “good” or “better” modes will be fine in most instances. Don’t
forget: even the lowest quality mode is better than most common algorithms!
Technically speaking, whenever you convert in the “inaudible range” (for example from
88200 to 96000 or vice versa), then “good” will do the job.
When you convert a file in the upper end of the audible range, for example from 48000 to
44100, then “good” will do the job in most cases – however,“better” reduces the risk of
aliasing even more.Those aliasing “ghost tones” are extremely annoying, so “better” is safer!
When you want to preserve as much quality as possible when resampling even further
down into the audible range (for example from 44100 to 22050), then use “best”.
• If you don’t want to worry about which quality level to use when, simply use “best”, and
you’ll always be on the safe side!
32
BROWSER VIEW
2
PLAY LIST
The Play List is used to arrange your audio material.This could either be for creating a new
edit of a song (e.g. a shortened radio-edit of a long album track) or to compile a couple of
songs for CD burning. Unlike some other applications, you are not limited to regions
referring to one physical audio file when building a Play List – you may freely combine
regions from any file in the File View.The only limitation is the sample rate: All regions used
in the Play List must have the same sample rate.The Play List’s sample rate is defined by the
first entry added to the Play List.
Some basics how to arrange audio material in SPARK LE:All arrangements made in the Play
List are non-destructive. In other words, the original audio material isn’t touched or changed.
If you want to create a completely different arrangement using the same files, you can! This is
also the fastest way to edit in SPARK LE. If you were to perform cuts in the waveform editor,
you would destructively change the audio file, which would alter your original material, once
you save the edited file - future editings/rearrangements would be almost impossible.
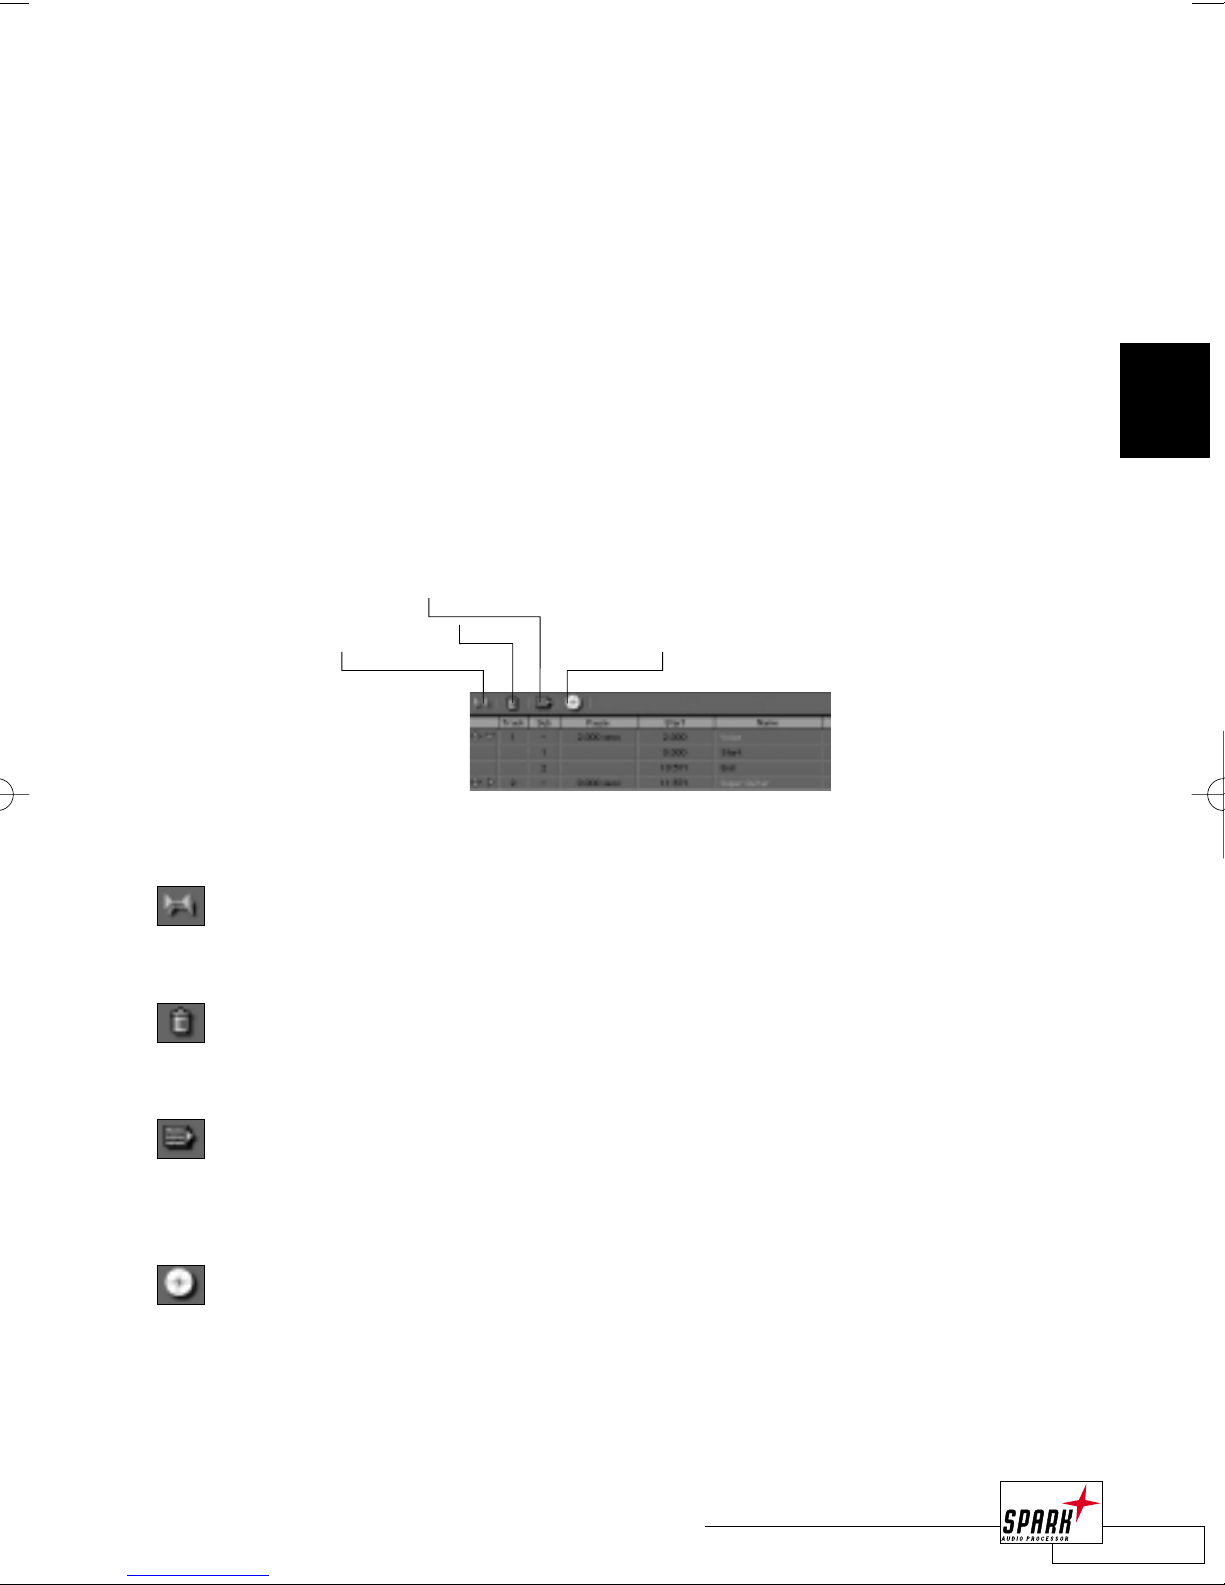
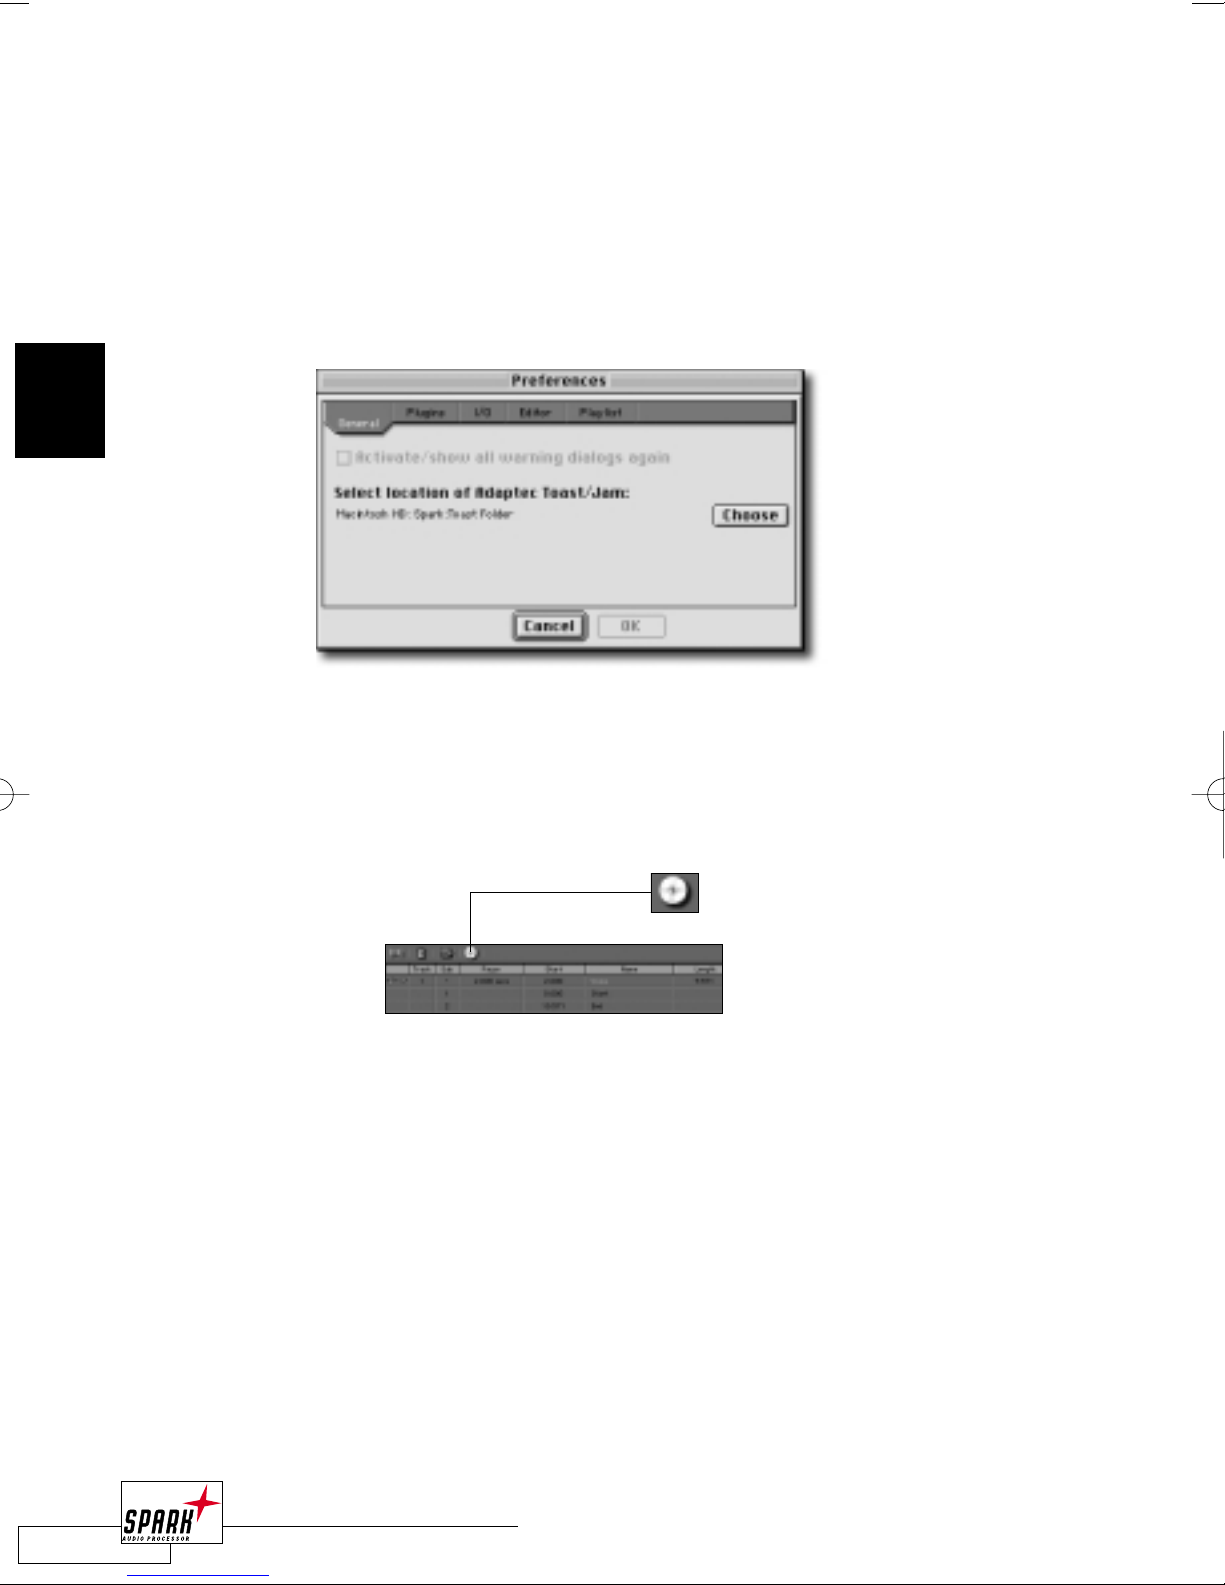
Copy Play List Entry: Press this icon to add the currently selected Region to the
Play List.The region will be added at the current Play List position.Alternatively, you
can drag and drop a Region from the FileView to the Play List.
Trash: To delete the current Play List entry, click on the “Trash” icon. This will not
delete any audio material on your hard disk – it will only delete its reference in the
Play List!
Export Play List: Once you have finished your Play List, you will probably use it as
either a new audio file or as a master for CD Burning.To make one file out of the
Play List, click on the “Export Play List” icon and enter a new filename.This will save
your Play List as a SDII file, including the transitions you have defined in the Play List.
Create CD: By clicking on the “Create CD Image” icon, SPARK LE will generate a
CD Image that is Adaptec Toast or Jam compatible and start this application afterwards.To enable this feature, you need to show SPARK LE where to find your CD
Burning application.This is set in SPARK LE’s preferences dialog. Have a look at the
CD Burning section on page 41 and the Preferences section for more details.
33
BROWSER VIEW
2
Copy Playlist Entry
Export Playlist
Trash
Create CD
PLAY LIST SETTINGS
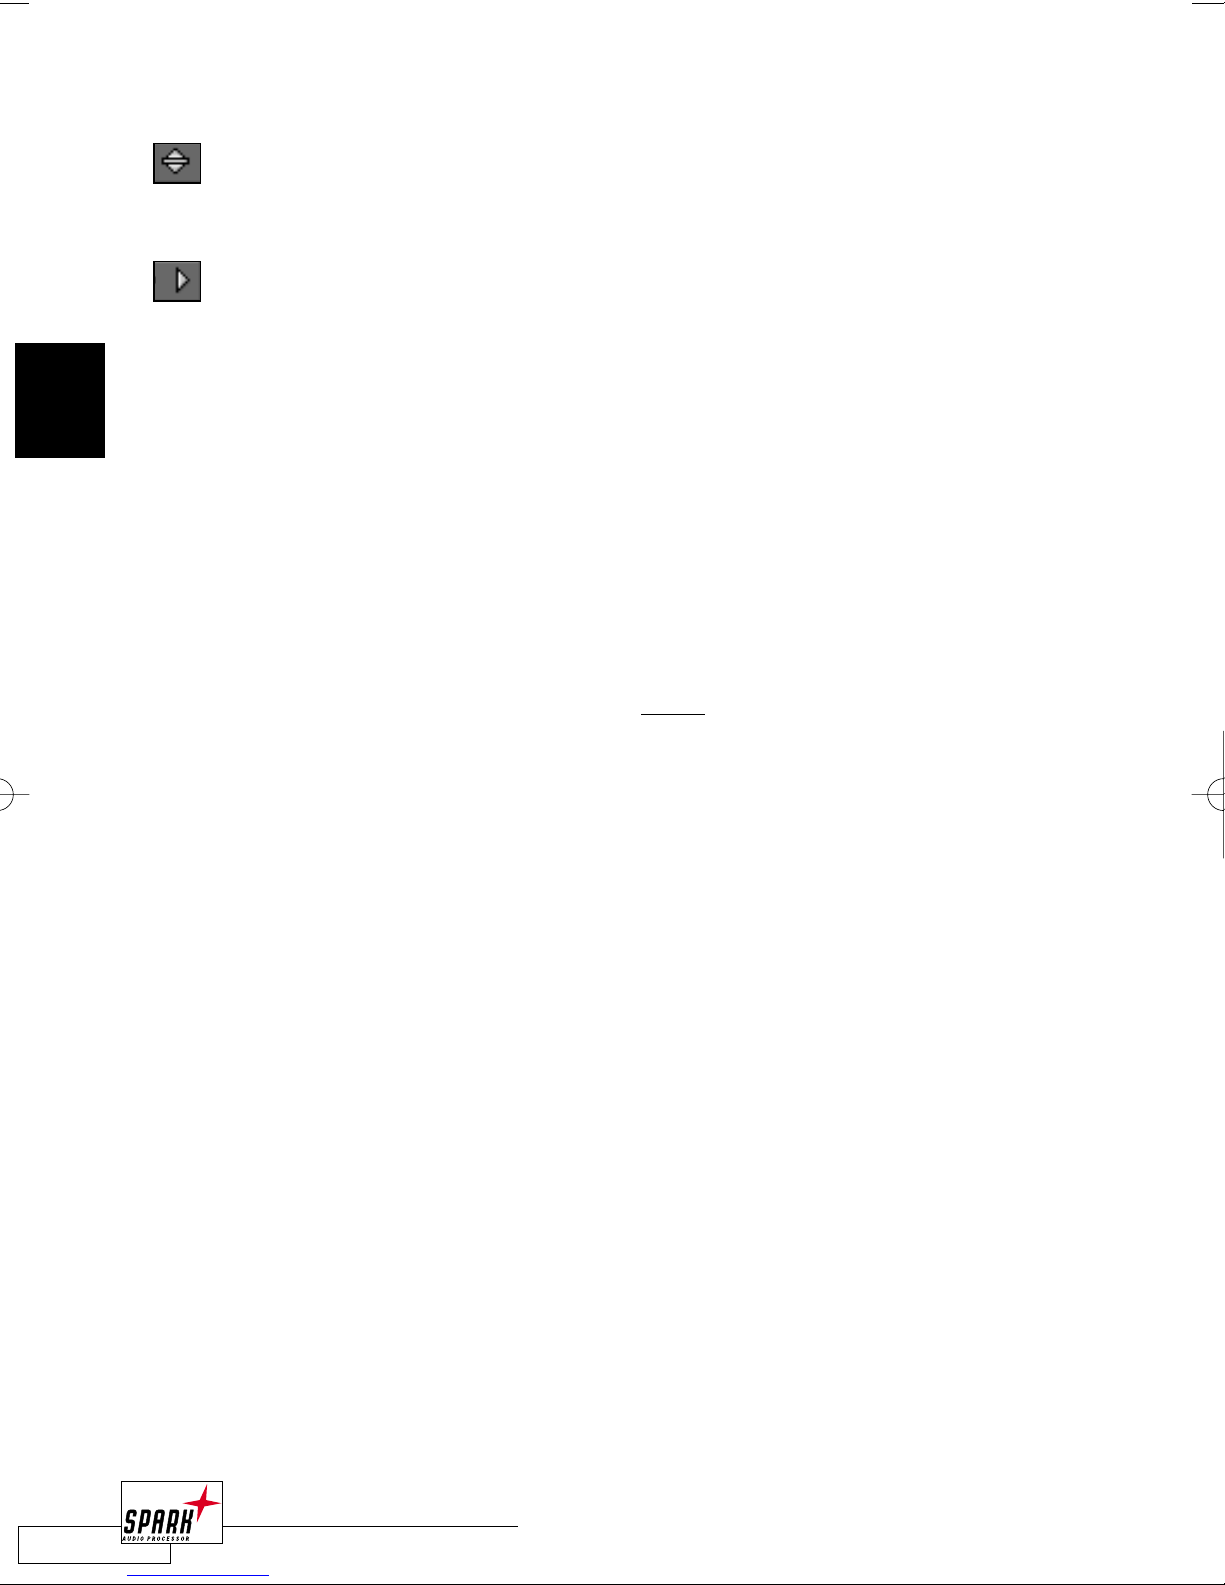
Move: To move a Region inside the Play List, you can grab it with the “Move” icon you
will find for each Region in the Play List. Click on it and move the selected entry to
the desired position in the Play List.
Show/Hide Sub-entries: By clicking on this icon (or <CURSOR LEFT/RIGHT>),
sub-entries for each track will be shown or hidden. Sub-entries are Start and Stop
Index and Markers.To fold/unfold the sub-entries for the entire Play List, press
<COMMAND + CURSOR LEFT/RIGHT>.
Track: Track Index on the CD. Each Region in the Play List will automatically get a track
index.This index can be disable by clicking on the track index and selecting “DISABLE” from
the pop-up.
Sub: sub index of a CD track. Each track has at least two of these entries: Start and Stop.
If there are markers set in the region, they will also get a sub index.
When you click on the SubIndex of a track, you will pre-listen to that transition.This is an
easy way to check the Play List’s transitions before you burn it on CD.
Pause: Pause length.According to the Red Book CD Format, the pause belongs to the
following CD track, therefore the pause is placed bef
ore the actual track start.You can either
choose a pause or a crossfade.
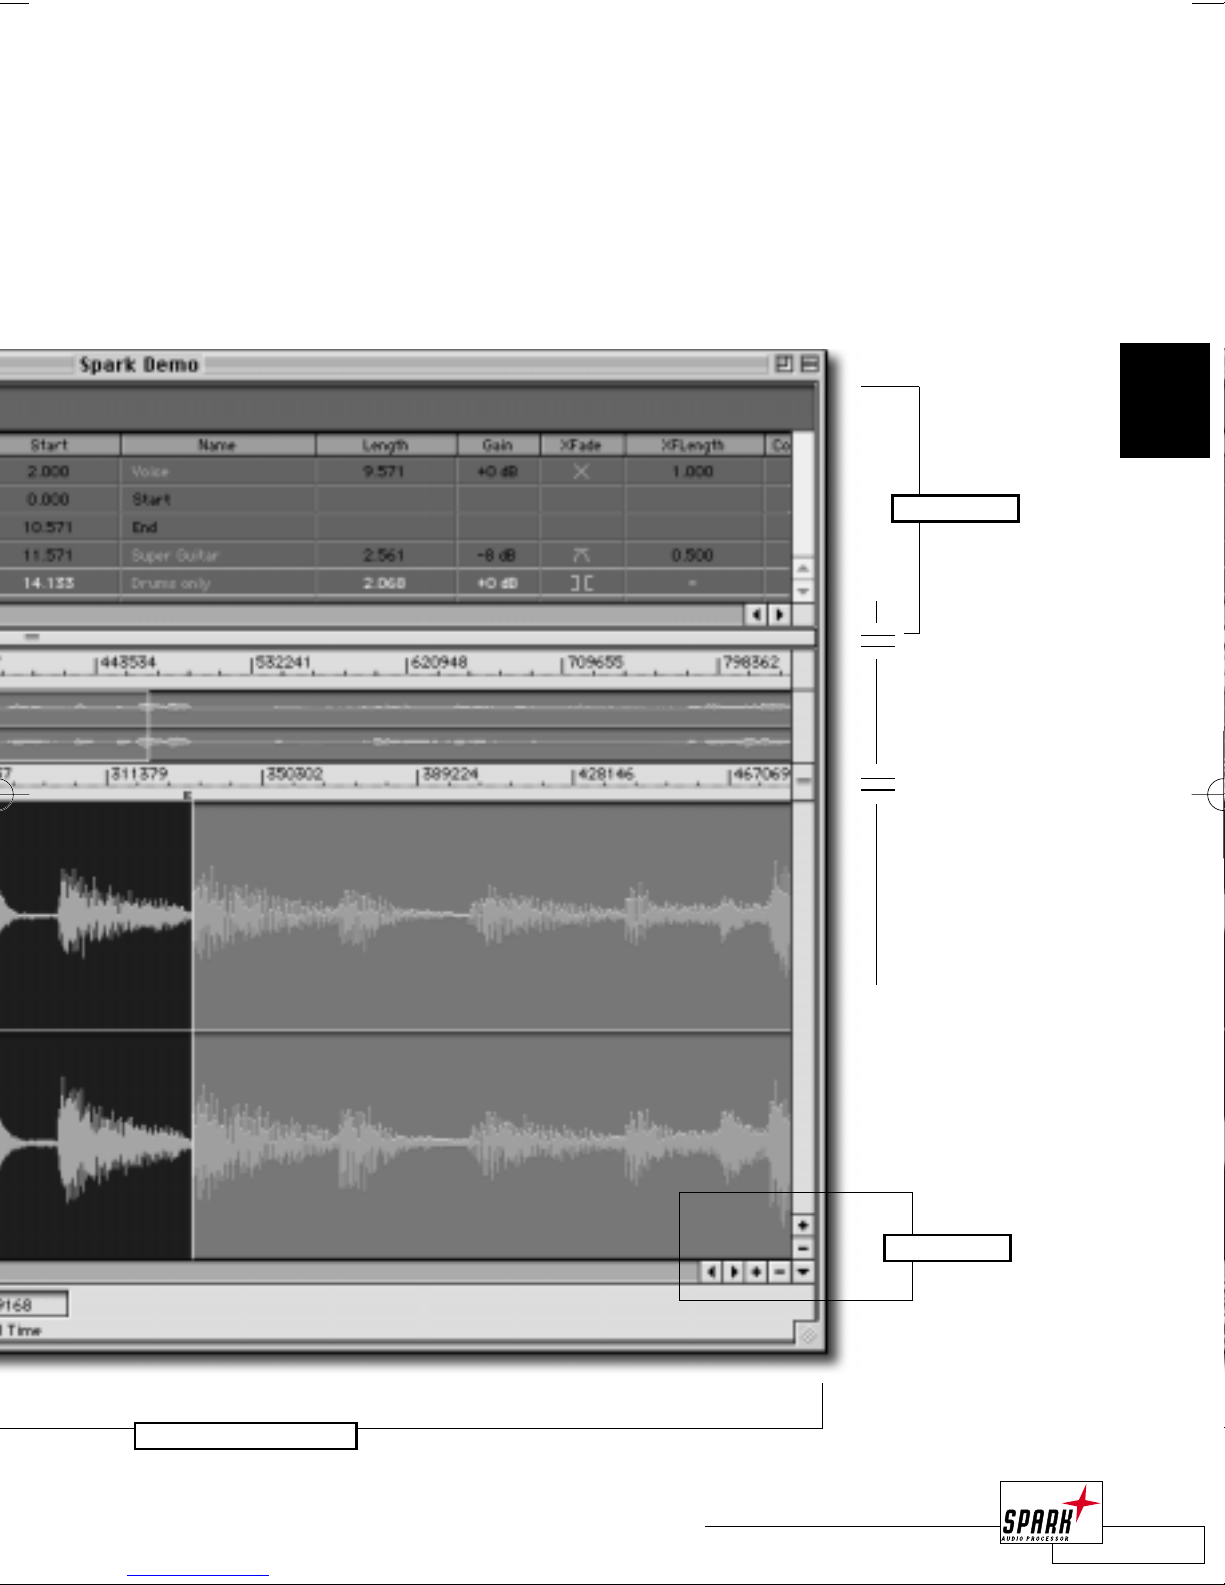
Start: Indicates the start time of the Play List entry.
Name: This is the name of the Play List entry. By default, it is the same name as the region
name in the FileView, but this name can be changed.
Length: Length of the current Play List entry.
34
BROWSER VIEW
2
Gain: The gain setting for the actual Play List entry. Can be adjusted in 0.1 dB steps from
–18.0 to +6.0 dB. Use this parameter to smoothen level differences between Play List
entries.
XFade: Transition type between the actual Play List entry and the following Play List entry.
If this is the last Play List entry, the transition type is fixed to pause.
In the XFade part of the playlist you
will set the transition type and length.
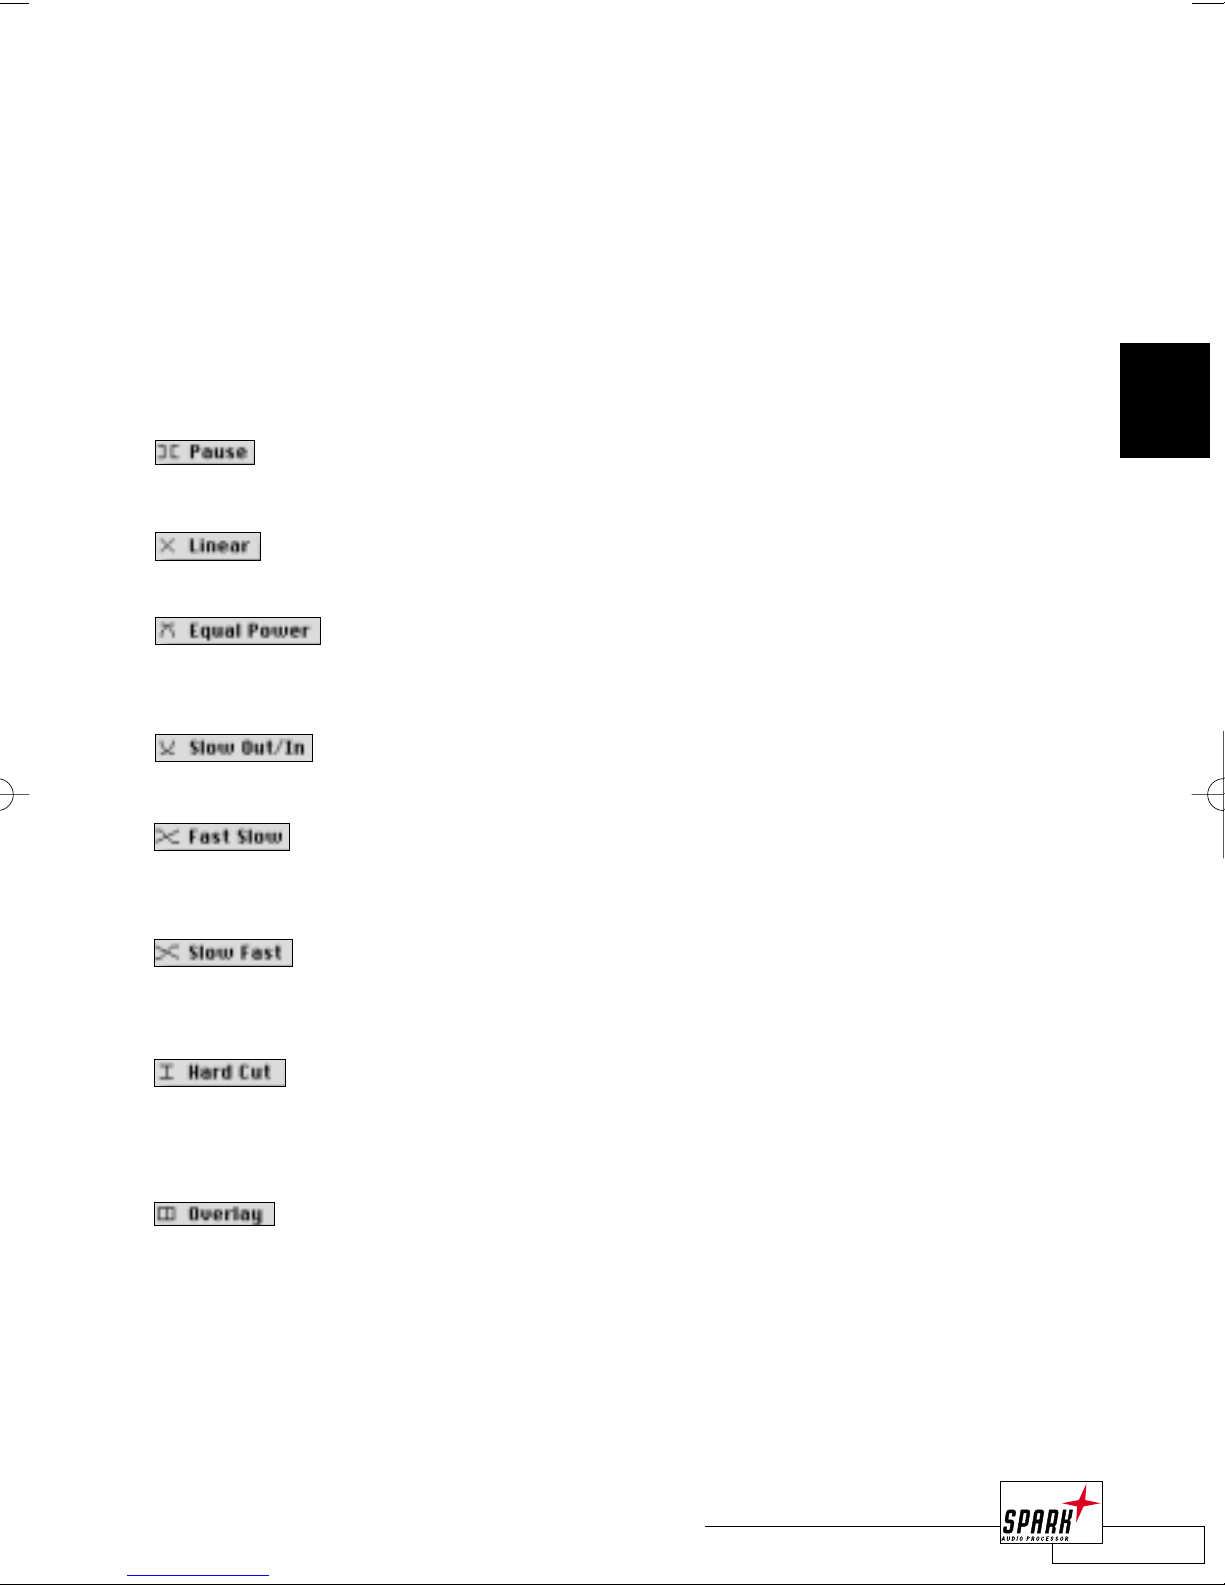
There are 8 different transition types:
Pause: a -∞ dB signal will be inserted between the regions, without cross
fades.
Linear:This is a linear crossfade between the regions. Fade In and Fade
Out times are the same.
Equal Power:This Equal Power crossfade will keep the signal’s energy
during the crossfade constant.A short crossfade of this type is probably
the most often used type to avoid clicking between two regions.
Slow In/Out:This crossfade type provides you with slow exponential fade
out and fade in times.
Fast Slow:This crossfade has a fast fade out time and a slow fade in time.
For example, if the total crossfade length is set to 1 sec, the fade out will
have a duration of 0.5 sec. and the fade in a duration of 1 sec.
Slow Fast:This crossfade has a slow fade out time and a fast fade in time.
For example, if the total crossfade length is set to 1 sec, the fade out will
have a duration of 1 sec. and the fade in a duration of 0.5 sec.
HardCut:A Hard cut has a length of 0.This means, there is no crossfade at
all. If you want two regions to follow directly after each other, without any
crossfade, this is your choice. But you can also set any other crossfade
type to a length of 0.This will have the same effect.
The Overlay transition type will play both regions during the defined
overlay length – without any fade in or fade out.
XLength: This is the length of the transition between the actual Play List entry and the
following entry.
XPlace: Depending on the transition mode (XMode), this is either the track index
placement or the placement of the extended crossfade.
35
BROWSER VIEW
2
XMode: Can be set to “Overlapping” or “Extending”.This defines the transition mode.
“Extending” is a more musical way of setting transitions, as the relation to the beat will be
kept.
There are two different modes for the crossfades:
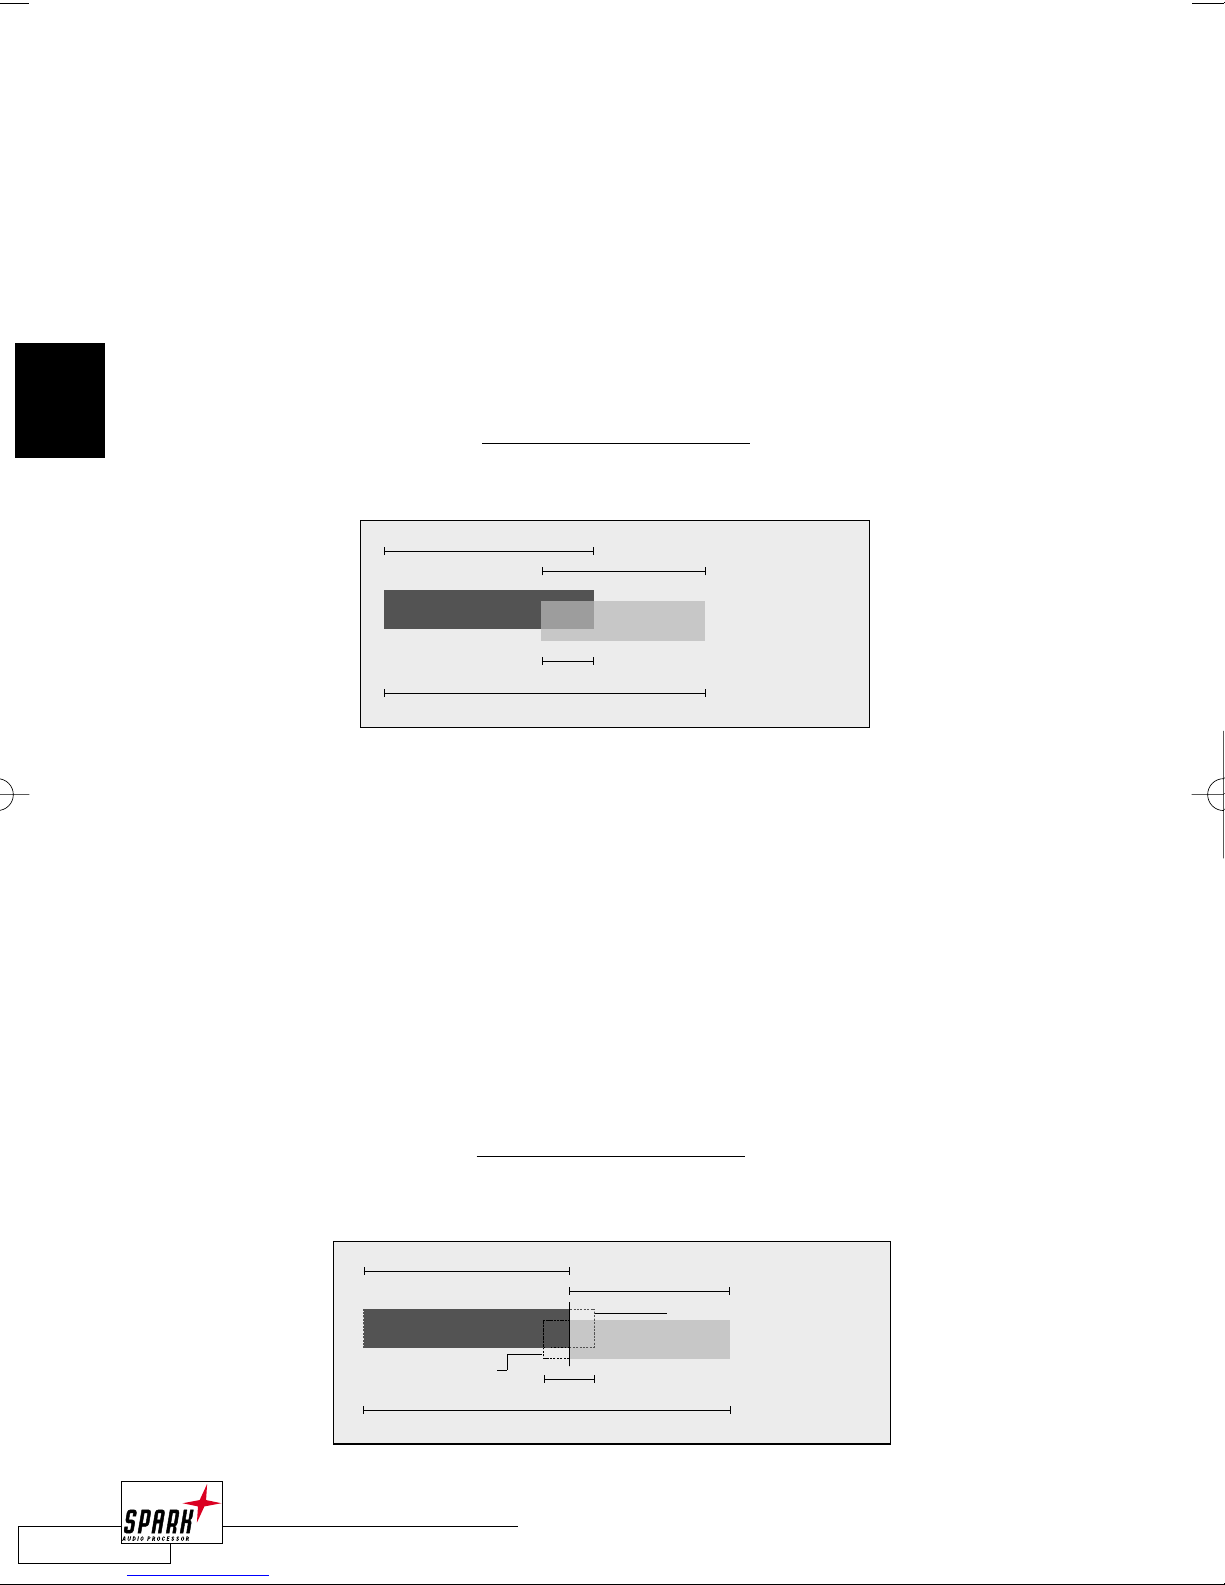
In “Overlapping” mode, the Regions are put on top of each other, meaning that if you have
two regions of 4 and 3 seconds, and you choose a 1 second crossfade, you will get a total
playing time of 6 seconds:
4 sec (first region)
+ 3 sec (second region)
-1 sec (crossfade duration)
= 6 seconds playing time
In “Extending” mode, the crossfade is created outside of the region borders. Depending on
the “Place” setting, the regions will be extended at the start or end – or even both. For
example, with an extending Crossfade and “Center” Place setting, the first region will be
extended at the end by half of the crossfade length; the second region will be extended at
the beginning by half of the crossfade length. So, if you have the same 3 and 4 second regions
as before, with the same crossfade of one second (but in “Extending” mode), you will get a 7
second playing time:
4 sec (first region)
+ 0.5 sec (extending region one by 1/2 crossfade length)
+ 0.5 sec (extending region two by 1/2 crossfade length)
+ 3 sec (second region)
-1 sec (crossfade duration)
= 7 seconds playing time
36
BROWSER VIEW
2
4 seconds
region lengths
1 second
3 seconds
crossfade length
total time
REGION 1
REGION 2
6 seconds
4 seconds
region lengths
1 second
Extension Region 2
3 seconds
crossfade length
total time
REGION 1
7 seconds
Extension Region 1
REGION 2
Which mode you prefer will probably depend on the way you are working, but as you can
see, the “Extending” mode might be the better choice for cutting music:You cut your source
audio into regions fitting to bars and beats, and with the extending crossfades you then
smooth the cuts without changing the music sections’ time position, whereas the “Overlapping”
crossfades might be the better choice for speech editing, as you don’t add audio in front or
at the end of a region, to make a crossfade – the crossfade will actually move the regions
closer together.
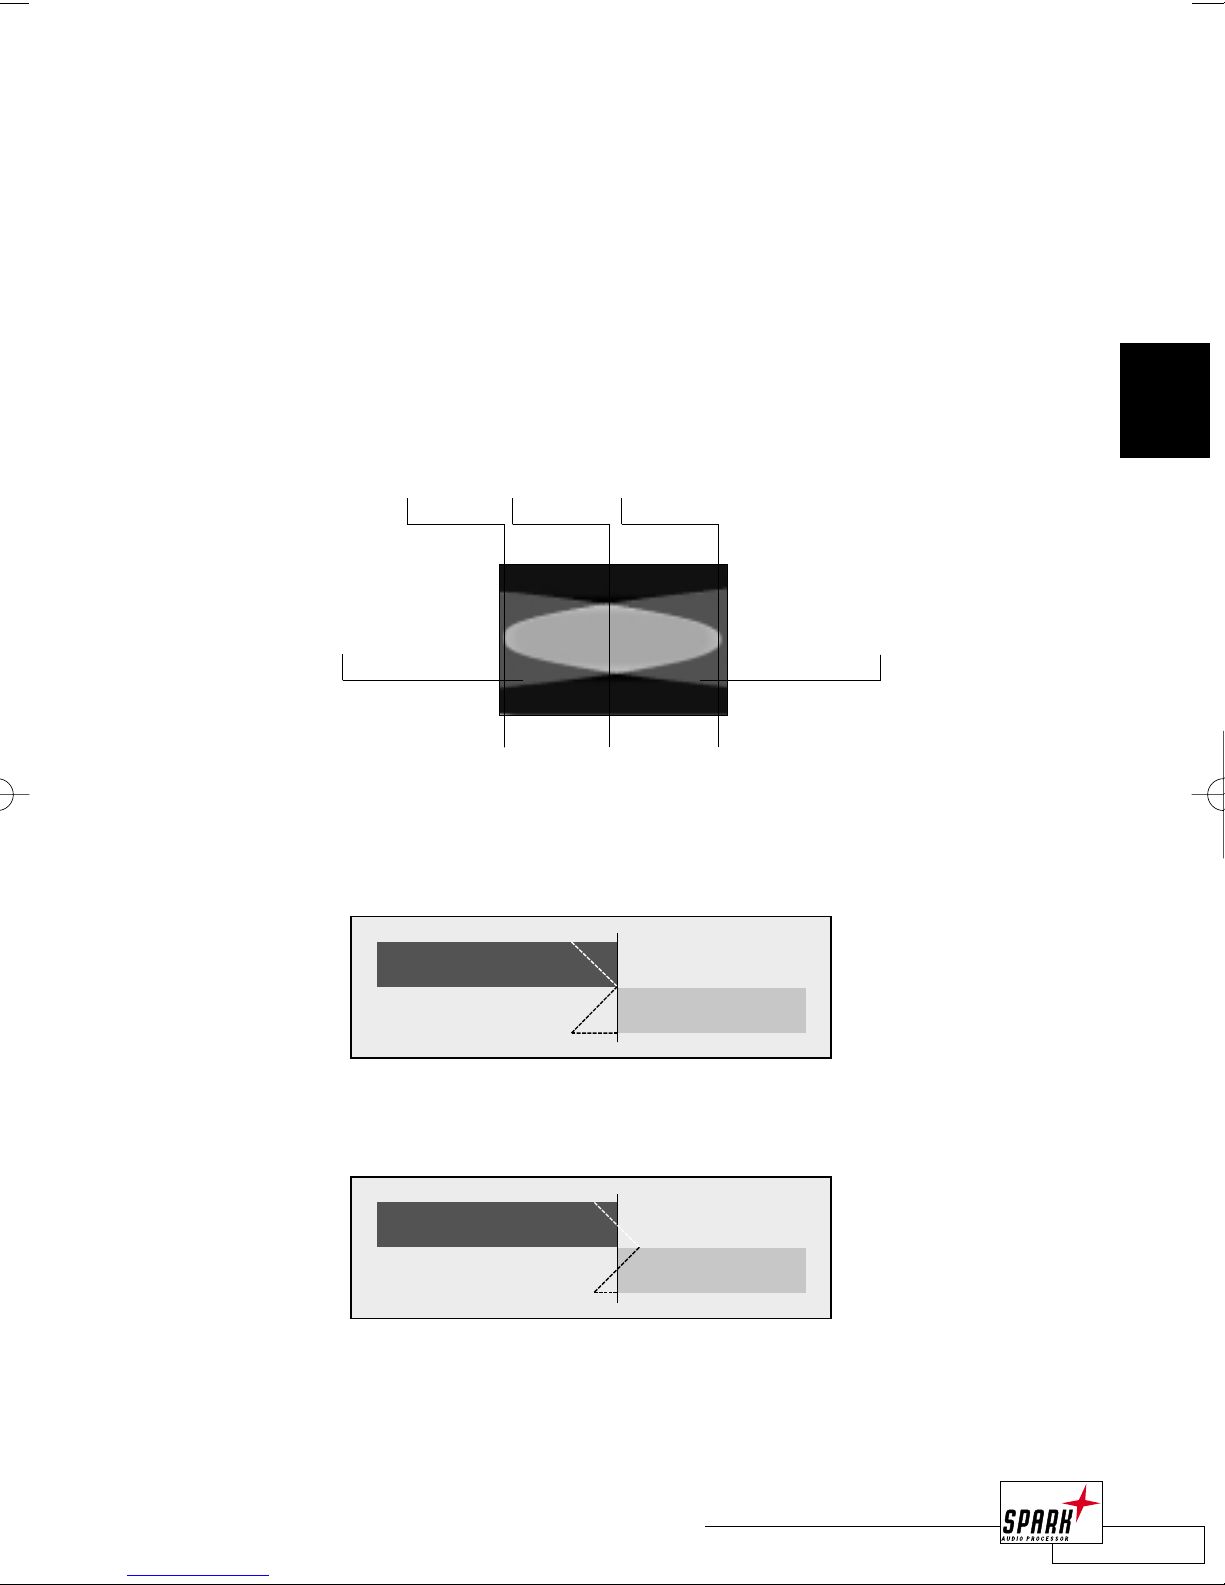
The Place setting allows you to change the track index setting for CD Burning:You can select
between three settings:
“Pre” will set the index to the starting point of the crossfade,“Center” will set it to the middle
of the crossfade, and “Post” finally will set it right behind the crossfade. In “Overlapping”
mode, these settings will not influence the crossfade itself!
In “Extending” mode, the Place parameter has a different function. It will not set the index
placement of the track index, but will define the placement of the crossfade:
Pre:The next entry will be extended forward.The first entry will remain unchanged in length.
Center: Both entries will be extended symmetrically.
37
BROWSER VIEW
2
Pre-splice
Entry A Entry B
Centered Post-splice
REGION 2
REGION 1
REGION 1
REGION 2

Post:The transition will be placed behind the first entry.
CopyProt: If this box is checked, the copy prohibit bit on the CD will be set.This will allow
only one digital copy stage of the CD track.
Emph.: The emphasis bit for this CD track will be set, if this box is checked.
Comment: In this field you can add comments for each Play List entry.
38
BROWSER VIEW
2
REGION 2
REGION 1

39
BROWSER VIEW
2
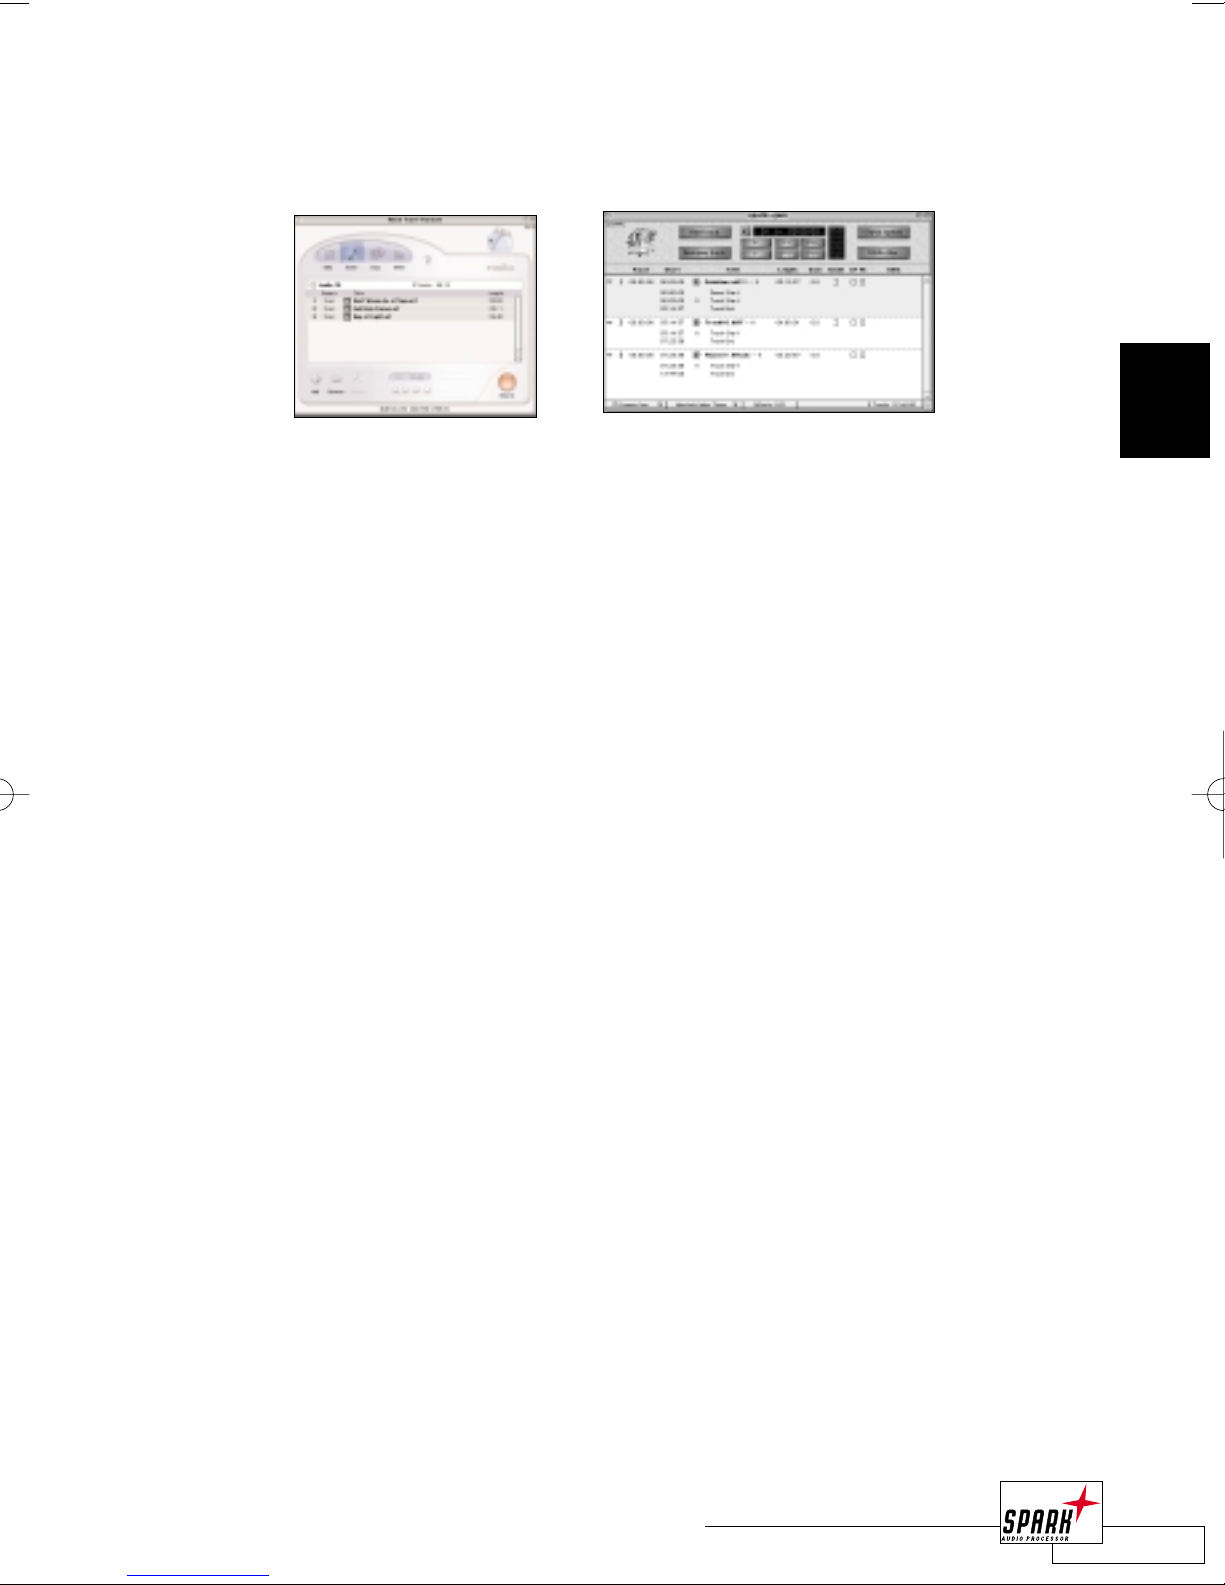
BUILDING A PLAY LIST
Building a Play List is easy: Simply drag regions from the FileView into the Play List – that’s it.
Want to change a sequence? Take an entry, drag it to the desired position, let go – done!
Want to delete an entry? Hit backspace or click on the Trash Icon on top of the Play List and
it’s gone!
Play List Examples
Building a new track arrangement in the Play List.
1 Load the required audio files into SPARK LE’s File View.
2 Build Regions for the parts you want to use for your new arrangement.
You can change the order of the entries even after dragging them into the Play List.
3 By dragging the Regions to the Play List, the default transition type defined in SPARK LE’s
preferences will be set between the Play List entries.
4 Once you have added the Regions to the Play List, you will probably want to fine-tune
the transitions between the Play List entries. Open the CutEditor to perform this
operation.The handling of the CutEditor is described in detail in the next chapter.
5 By clicking on the Region’s Index/Sub columns in the Play List, you will be able to preview
the selected Region if Playback is active.
6 When you have finished editing, you should create one new audio file from the Play List.
To do so, click on the “Export Play List” icon and select a location and name for the
new file.
Building a CD Play List with several tracks and sub-indices
1 Load the audio files for the CD you want to create into your SPARK LE project.
2 Create the proper Regions for the songs. In case you have prepared the material as
described in the previous example, simply use Regions that have the length of the whole
audio files (press <COMMAND + A> to select the whole file and <COMMAND + R> to
create a Region).
3 Now drag these Regions to the Play List.
4 Each Region dragged to the Play List will get its own Track Index.
5 Fine-tune the transitions between the single tracks.The Pause length can be easily adjusted
in the Play List by clicking on “Pause”.
6 When you are finished, click on the “Create CD” icon.You will be asked to enter a name
for this CD Image.Afterwards, the CD Image will be created. If you are using Adaptec’s
Toast to burn your disc, an audio file for each track will be created. For Adaptec’s Jam,
there will be a single image file.
7 Your CD Burning software will be launched automatically with the CD Image already
loaded. If you are using Adaptec Toast, you should verify the pause length. In Jam, you
only need to press the “Burn” button, as it reads all parameters you have set.
CD-BURNING
If you own a supported CD-writer, you can “burn” your own CDs from a Play List using
SPARK LE and the optional Adaptec TOAST or Adaptec JAM applications. Please note that
Adaptec Jam is required for Red Book compatible Audio CDs, which is the required format
for professional CD duplication.
“Disk at once” mode is one of the requirements of that format.
To burn CDs from SPARK LE, you first need to show SPARK LE the location of your TOAST
or JAM application.This is done in the “General” Preferences dialog as shown below:
If you do not assign a compatible application for CD burning, the “Create CD” icon in the
Play List will not be active!
When you have finished building your Play List, press the “Create CD” icon on top of the
Play List.
Now you will be asked to enter a name and select a folder for the CD image. Please choose
a drive that has enough space available for a complete CD image! Remember that a stereo
track at 44.1 kHz will use approx. 10 MB hard disk space per minute.This means that a
45-minute image will require about 450 MB-disk space!
Press “OK”. Now SPARK LE will create the CD image.This image includes all the transitions
you have defined in the Play List.
Note: If you are using TOAST, there will be as many files written on your hard disk as your Play List
has Tracks! The files will be automatically numbered in the track order of your Play List. If you are
using JAM, there will be just one file written.
40
BROWSER VIEW
2
Once SPARK LE has finished creating the CD image, Roxio TOAST, JAM or Apple iTunes will
be launched and the CD image will be automatically loaded:
Just check the CD burner settings and start burning the CD!
Note: If you are using Roxio TOAST or Apple iTunes, you should also check the Pause settings
between the tracks, as TOAST automatically sets a 2 second pause.
41
BROWSER VIEW
2

42
BROWSER VIEW
2

43
MASTER VIEW
3
MASTER VIEW
Open the Master View by choosing “Show Master” from the Windows menu on SPARK LE’s
menu bar or by pressing <COMMAND + 3>.
The Master Window consists of two main parts: on the left is the Master Section and on the
right the four effects slots.
You can see the Master View’s signal flow in the following illustration:
Opens “Create File” dialog
Master Section
Effects Slots
L
R
L
R
from Input FX processing Master Fader to Output

44
MASTER VIEW
3
MASTER
FADER
The Master Faders control SPARK LE’s master audio output.This is the last
stage of processing in the signal flow.
The two Master Faders are grouped, so you can easily adjust the level
for both channels simultaneously.To ungroup the faders, press the
<CONTROL> key while moving the appropriate fader.The offset between
the channels will be maintained when you change the levels again without
pressing the <CONTROL> key.
A numerical indication of the current fader setting appears below the level
meters.The level can be boosted by up to +6 dB.
To reset a fader to its default value of 0 dB, press the <OPTION> key and
click on the fader.
If you highlight a master fader by clicking on it or by stepping with the <TAB> key through
the different controls, you can adjust the fader settings with the cursor keys:
<CURSOR UP/DOWN> – small steps
<PAGE UP/DOWN> – bigger steps
<HOME> – maximum value (+6 dB)
<END> – minimum value (-96 dB)
LEVEL METERS
Watch the PPM (Peak Program Meter) Level Indication in the Master Section to
avoid Output Clipping.A numerical readout of the level appears right above the
LED meters.
When you click on a meter, you will get the Peak Hold Options for the meters.
The options range from “Disable Peak Hold” to “Hold Forever”. Here you will also
find the option to reset the Peak/Clip indication.
Above the Level Meters you will also find separate Clip LEDs for the left and right
channels.They will light up if the signal level exceeds 0 dB. Click on a Clip Indicator
LED to get the Clip Hold Options.These settings are independent from the Peak
Hold Options of the Level Meters. For example, you could set a Level
Peak Hold time of 6 seconds and an infinite Clip Hold time.
DRY
Pressing the “Dry” button will bypass the entire FXmachine.You can also use
the <COMMAND + SPACE> or <D> key command to perform this operation.
Note: In some configurations of MacOS, the key command <COMMAND + SPACE> is used to
switch between different keyboard font settings (e.g. switching between Japanese and Western
fonts). If your system is configured this way, please use <D> for switching to “Dry” mode.

45
MASTER VIEW
3
CREATE
FILE
The Create File dialog enables you to render the FXmachine settings to an
audio file. Depending on what screen (File View,Wave Editor or Play List) is active, you can
render a portion of a file, the entire file, or the entire Play List.
The Browser View focus determines which screen is active, and which audio will have the
effects applied.
To open the “create file” dialog, press the “create file” button or press <OPTION + M> on
the keyboard.
If the Browser View focus indicates that you are in the File View, then the following options
apply to the active file in the File View.
SELECTION
Renders the highlighted selection to disk.
WHOLE F
ILE
Renders the whole file to disk.
FX
MACHINE
By default, the FXMachine box is checked when creating a file. When disabled, or unchecked,
your audio will be created with no plug-in settings from the FX Slots. Disabling your effects
settings can be useful when you only wish to change a file type or bit depth for your new
audio file. (For example, to convert a 16 bit SDII file to a 32 bit WAV file.)
ADD TAIL
This option, when selected, will retain the ring out of effects such as reverb and delay.
To allow for this, enable the add tail option and select the desired tail length, which should
match the decay time of your reverb settings.The default is 2.0 seconds.
OVERWRITE ORIGINAL
This will “destructively” add the effects processing to your original file.When this is selected,
the destination location will not become active.
CREATE NEW FROM SELECTION
This will allow you to create a new audio file from the highlighted selection of audio with the
newly added effects processing.
CREATE NEW FROM WHOLE FILE
This will allow you to create a new audio file from the entire audio file with the newly added
effects processing.
This option is the default when creating a file from the Play List.

46
MASTER VIEW
3
LOCATION
When you choose to create a new file from either the “Create New from Selection” or the
“Create New from Whole File”, the location option will become active. Here, you can name
your new file, choose a destination folder, and change the file format and bit depth.
If the Browser View focus indicates that you are in the Play List, then it is only possible to
“Create New from Whole File”.This will render your entire Play List with the effects from
the FXmachine to a new file on your hard drive.You will still have the possibility to Add Tail
for effects ring out, and you will be able to have all of the location options, such as file formats
and bit depth options.
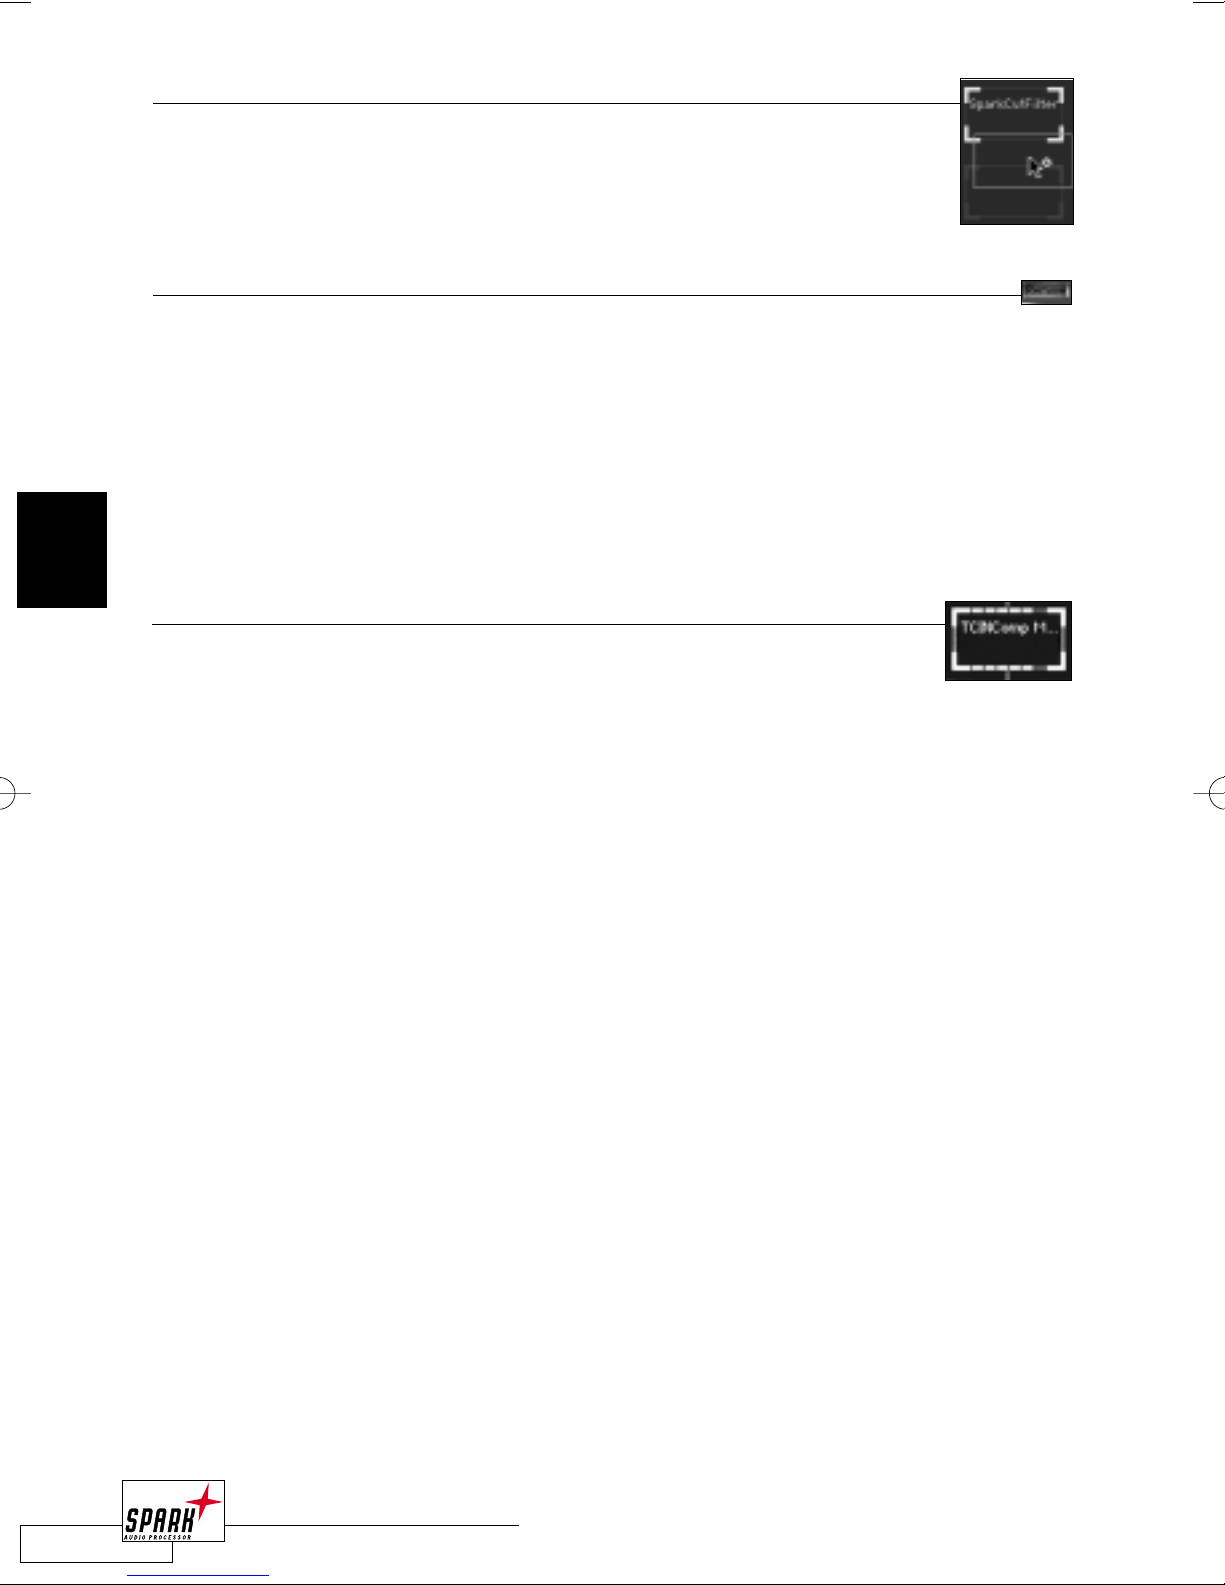
FX SLOTS
Remove Plug-In
Add Plug -In
Empty Slot
Selected Plug-In
Loaded Plug-In

47
MASTER VIEW
3
REALTIME
EFFECTS
SPARK LE supplies you with a 1x4 FX routing chain. So you can process your audio with up
to 4 Plug-Ins in real time simultaneously!
WHICH PLUG-IN FORMATS CAN BE USED?
SPARK LE supports VST Plug-Ins, the standard for native real-time processing on the Mac.
So you can choose from a wide variety of Plug-Ins.
NAVIGATION
Select a slot by clicking on one of the 4 grayed out frames, by using the
cursor keys on your keyboard.The selected slot is highlighted by a yellow
frame.
ADDING A PLUG-INTOTHE FXslots
Load a Plug-In to the selected slot by clicking on the “Add” button, which you will find at the
top of the FXmachine window. Don’t worry about the Plug-In position. Even after loading,
you can freely move the effect to any other position in the matrix.
Alternatively, hold down the <CONTROL> key while clicking on an empty slot to display a
context-sensitive selection menu right where you need it.This way, you won’t even need to
select the slot before loading.
Note: Contextual Menu Extensions must be enabled to show context sensitive menus.
The first Plug-In you load into the FXslots will automatically open the Plug-In window.
Note: If your desired Plug-In doesn’t show up in this pop-up list, but you are sure that it is installed
on your computer, you should check for the activated Plug-In folders in your SPARK LE preferences.
Please refer to the “Preferences” section for more details.
MOVING PLUG-INS
To move an effect to another position in the slots, simply drag & drop the effect from its
original position to the desired one.The Plug-In maintains all settings in its new position.
48
MASTER VIEW
3
HOW TO COPY
PLUG-INS
Would you like to have the same Plug-In in two (or more) places? No problem:
While holding down the <OPTION> key, drag the desired Plug-In from its original
position to the desired destination and drop it there.The copied Plug-In will
maintain all settings, which you can of course change independently of the “original.”
REMOVING EFFECTS
There are three ways to remove a Plug-In:
· Select the field and click the “Remove” button.
· Click on the field while holding down the <CONTROL> key to display the context
sensitive menu.Then click the “Remove” button.
· Alternatively, press <BACKSPACE>.
To remove all Plug-Ins from the FXmachine, hold down the <OPTION> key and click the
“Remove” button.
LEVEL INDICATION FOR EACH PLUG-IN
Each active slot indicates the input level of its Plug-In with its own small input
meters. Small LED meters display the level indication at the top and bottom of
each slot.These meters make it easy to keep an overview of the levels even within a complex
effect setting.To save a little bit of CPU power, you can deactivate this metering in the context sensitive menu.
49
MASTER VIEW
3
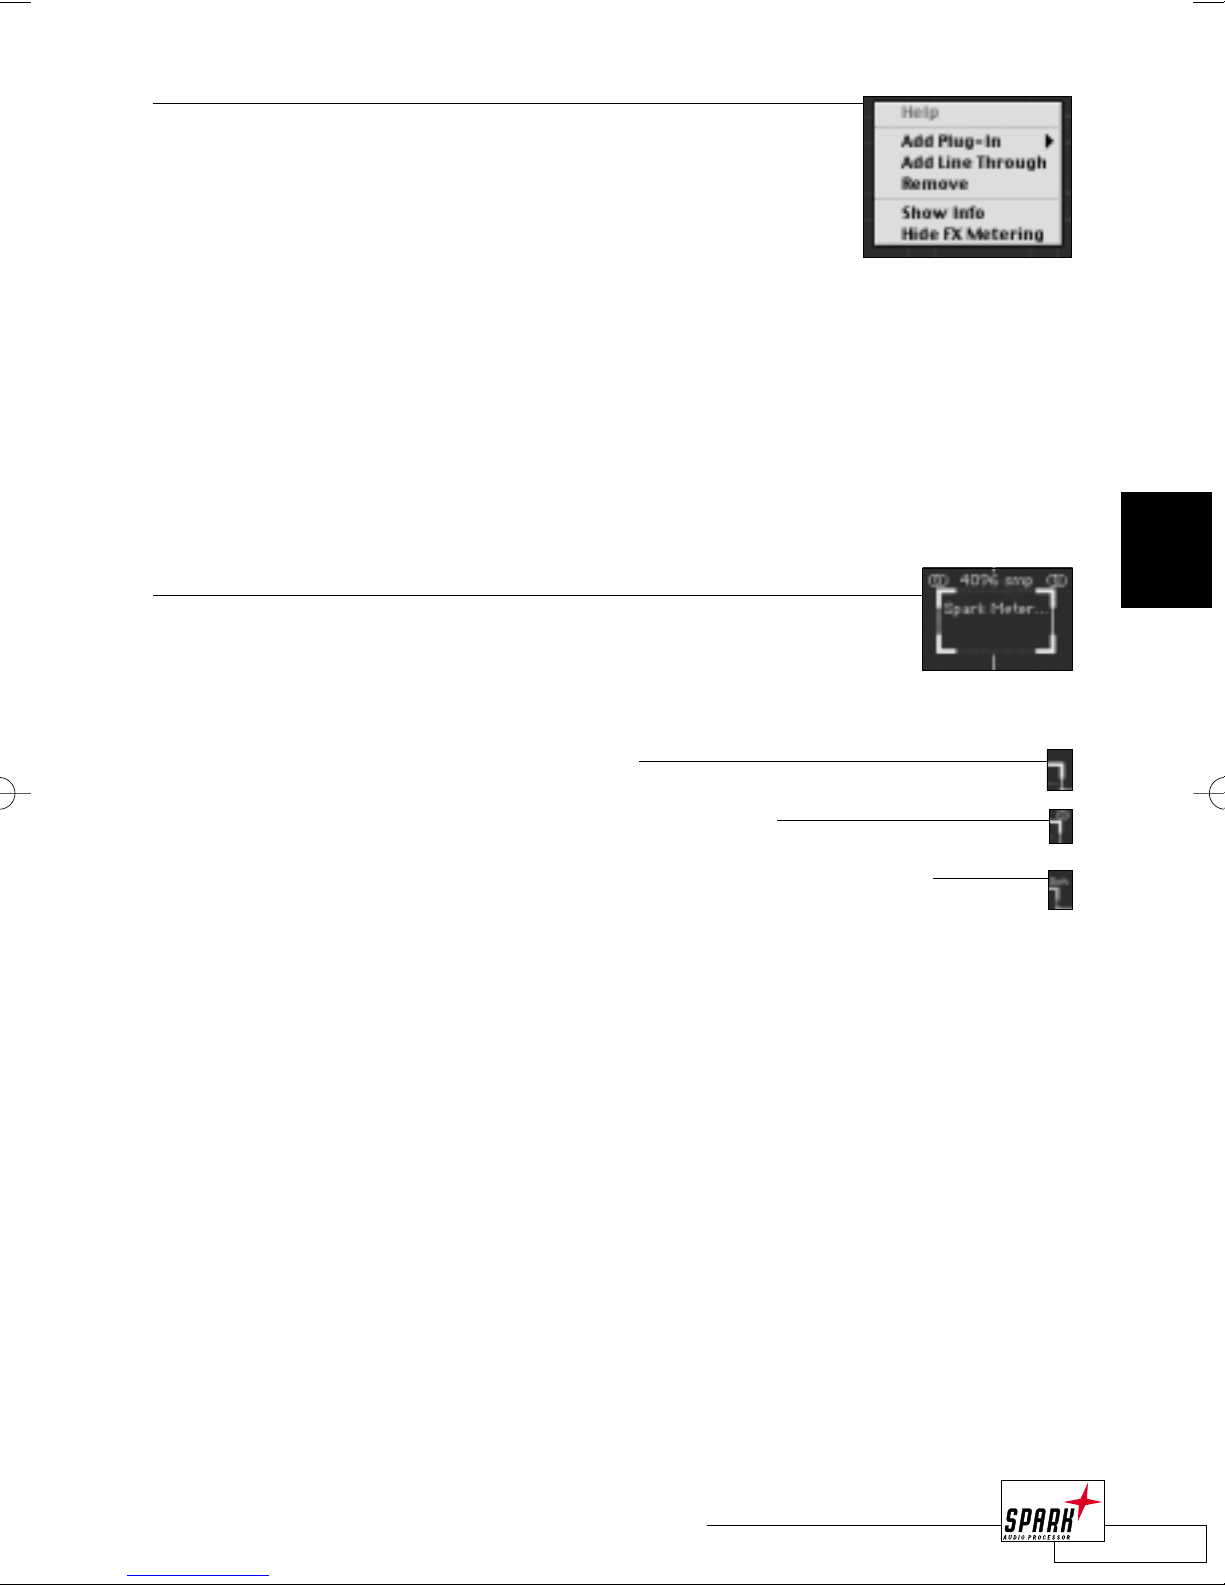
CONTEXT
SENSITIVE MENU
When <CTRL + Clicking> on a Plug-In slot, a context sensitive menu
will open.This will give you the possibility to add and remove Plug-Ins
to/from the current Plug-In slot as well as some general display
options for the FXmachine:
ADD PLUG-IN
Will let you choose a Plug-In for the current effect slot.
ADD L
INE THROUGH
Will insert a Line Through element to the current effect slot.
REMOVE
Will remove the Plug-In from the selected slot.
SHOW/HIDE INFO
This option will display additional info for all Plug-In slots:
The Plug-In delay in samples (Latency) will be indicated on top of each slot
(if this number is correctly reported by the Plug-In).Also, you will get
information about the number of input and output channels of each Plug-In:
· Mono: nothing is indicated on the input/output
· Stereo: the common icon for stereo signals will be indicated
· More than 2 channels: the exact number of output channels wil be indicated
SHOW / HIDE FX METERING
This option will enable/disable the input metering on all Plug-In slots. Disabling the metering
will free up some CPU resources.
50
MASTER VIEW
3
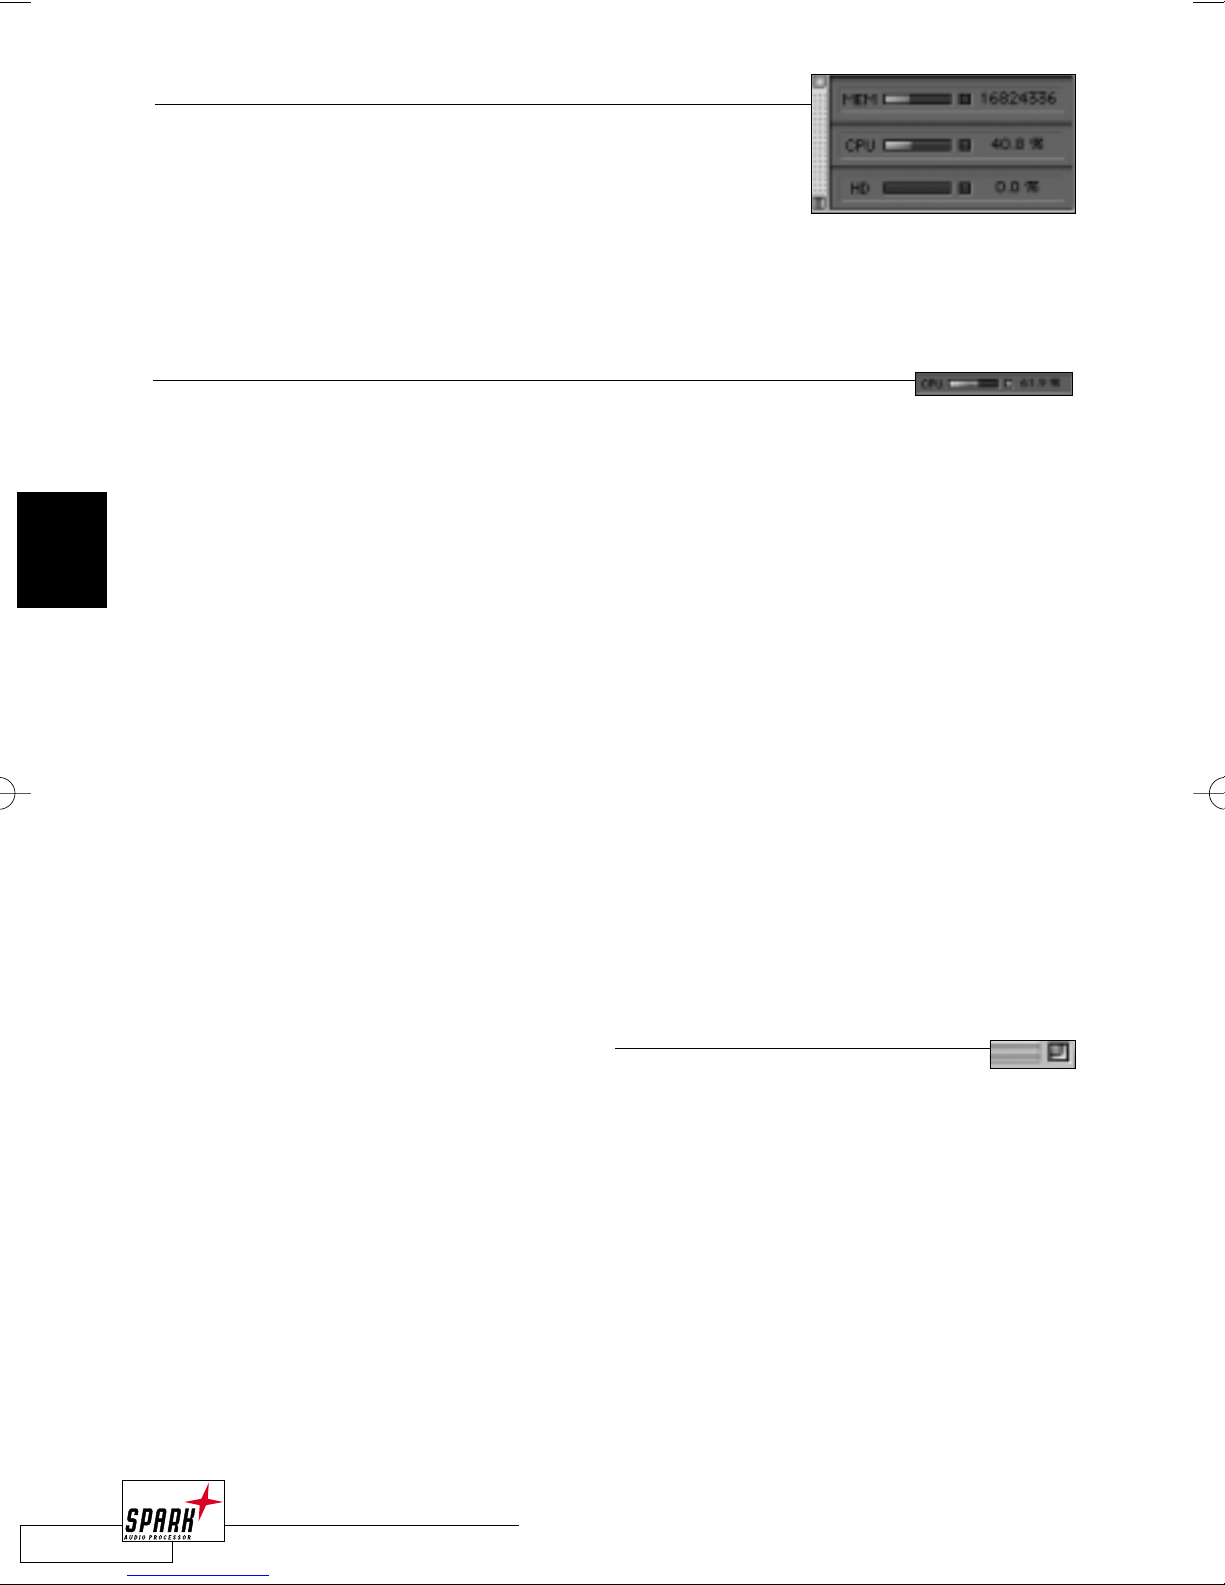
SYSTEM
PERFORMANCE:THE SYSTEM INFO SCREEN
The number of Plug-Ins that can be loaded into SPARK LE’s
FXmachine is dependent from the CPU Speed and the Memory
setting for SPARK LE.To give you valuable feedback on the
current system load, SPARK LE offers a “System Info” screen,
that indicates the available memory (in byte), the CPU load (in%) and the harddisk preformance (in %).This screen can be opened from the “Windows” menu (“Show System Info”)
or via <COMMAND + ^>.
CPU METER
The CPU meter displays the CPU power used for processing.The overload
LED will be active when you load more Plug-Ins into the matrix than your computer can
handle. However, you will still be able to render the effects into a file (see “Create File”
dialog).
You might note that with a high CPU load, the application will react slowly to your
commands.This is because the audio playback has top priority to avoid audio dropouts.
If more than a few dropouts occur, the CPU overload LED will light up and playback will
stop.
PLUG-IN EDIT VIEW
To open a Plug-In Edit View, double-click on the desired Plug-In in the FXmachine matrix.
This will open a screen with the Plug-In user interface. If the Plug-In doesn’t have its own
interface, you will get a “Standard FX View” with a fader control for each parameter.
If you double-click on another slot in the FXmachine, the Plug-In Edit View window will be
updated to view the new Plug-In.This avoids having windows open unnecessarily and will
display the Plug-In window in the same position for all Plug-Ins, so you don’t have to
rearrange your screen layout every few steps.
The size of this Edit View Window will stay adjusted to the largest Plug-In user interface that
has been viewed in this window.This is to avoid resizing of the window and will give you a
more stable view. Of course you can always resize the window manually by clicking on the
Zoombox icon in the title bar of the window.

51
MASTER VIEW
3
MULTIPLE
PLUG-IN EDIT VIEWS
Usually, when you open the edit view of a Plug-In, it will show up in the same window the
previous Plug-In used. In some cases, it might be helpful to get more than one effects window
open at one time.To open additional Plug-In edit screens, press the <OPTION> key while
double-clicking on the Plug-In on the matrix.This will open a Plug-In View for this particular
Plug-In.This window is reserved for this Plug-In and will not change or disappear when you
choose a Plug-In from another matrix slot.
Note: Pressing <COMMAND + 0> will show/hide the Master View and all Plug-In
windows by just one single key stroke.
THE HEADER OF THE PLUG-IN EDIT VIEW
On top of each Plug-In Edit View you will find the Plug-In header with “Compare”,“Bypass”
and “Mute” buttons, as well as the preset management of the Plug-In.
If you want to change to another Plug-In Edit View, simply choose one from the Plug-In
pop-up on top.
Note: Only slots with loaded Plug-Ins can be chosen from this pop-up list; empty slots will be
grayed out.
Save/Load Plug-In
Preset/Bank
Bypass Mute
Select Plug-In Preset
Select another loaded Plug-In
Compare

52
MASTER VIEW
3

53
PLUG-IN
4
PLUG-INS
SPARKle has a powerful realtime processing engine with 4 Plug-In slots.You can either load
any of the included SPARKle Plug-Ins or Plug-Ins which are compatible with Steinberg’s VST
Plug-In interface. Please note, that the included Plug-Ins do not support VST – so they can
only be used in SPARKle!
SPARKle includes the following three Plug-Ins:
ONE BAND EQ
This Plug-In supplies you with TC-quality equalization. By
loading multiple instances into SPARKle’s FX slots, you can
e.g. build up to 4 bands of Notch filtering to fix a noise
problem or create a comprehensive 4-band parametric EQ.
TYPE: Low Shelf, Hi Shelf, Parametric and Notch
FREQ: Frequency adjustment from 20Hz – 20 kHz
GAIN: -18 – +18dB, preset to -96 dB for the “Notch” type
BW: 3, 6, 9 or 12 dB/Oct. for shelving types, 0.1 to 4 octaves for parametric
and 1 to 100 for Notch.
NOTE: Double-clicking on a value field will bring up a dialog for numeric entry.
DELAYIT
This stereo delay line is great for use in a musical context,
as you can set the delay time not only in milliseconds, but
also in Beats Per Minute (BPM) – which makes it easy for
you to match the delay time with the tempo of your music.
Try working with half tempo on one side and double tempo
on the other and a Feedback of 0% – this will create a very
nice stereo effect.
Delay adjusts the delay time independent for left and right channel from 1.0 to 2000
milliseconds. Click on the display and move the mouse up or down for adjustment.
The Feedback parameter allows you to generate repetitions for your delayed audio,
creating the classic “echo” effect.
The Mix parameter adjusts the ratio between dry and effected audio.
NOTE: Double-clicking on a value field will bring up a dialog for numeric entry.
54
PLUG-IN
4
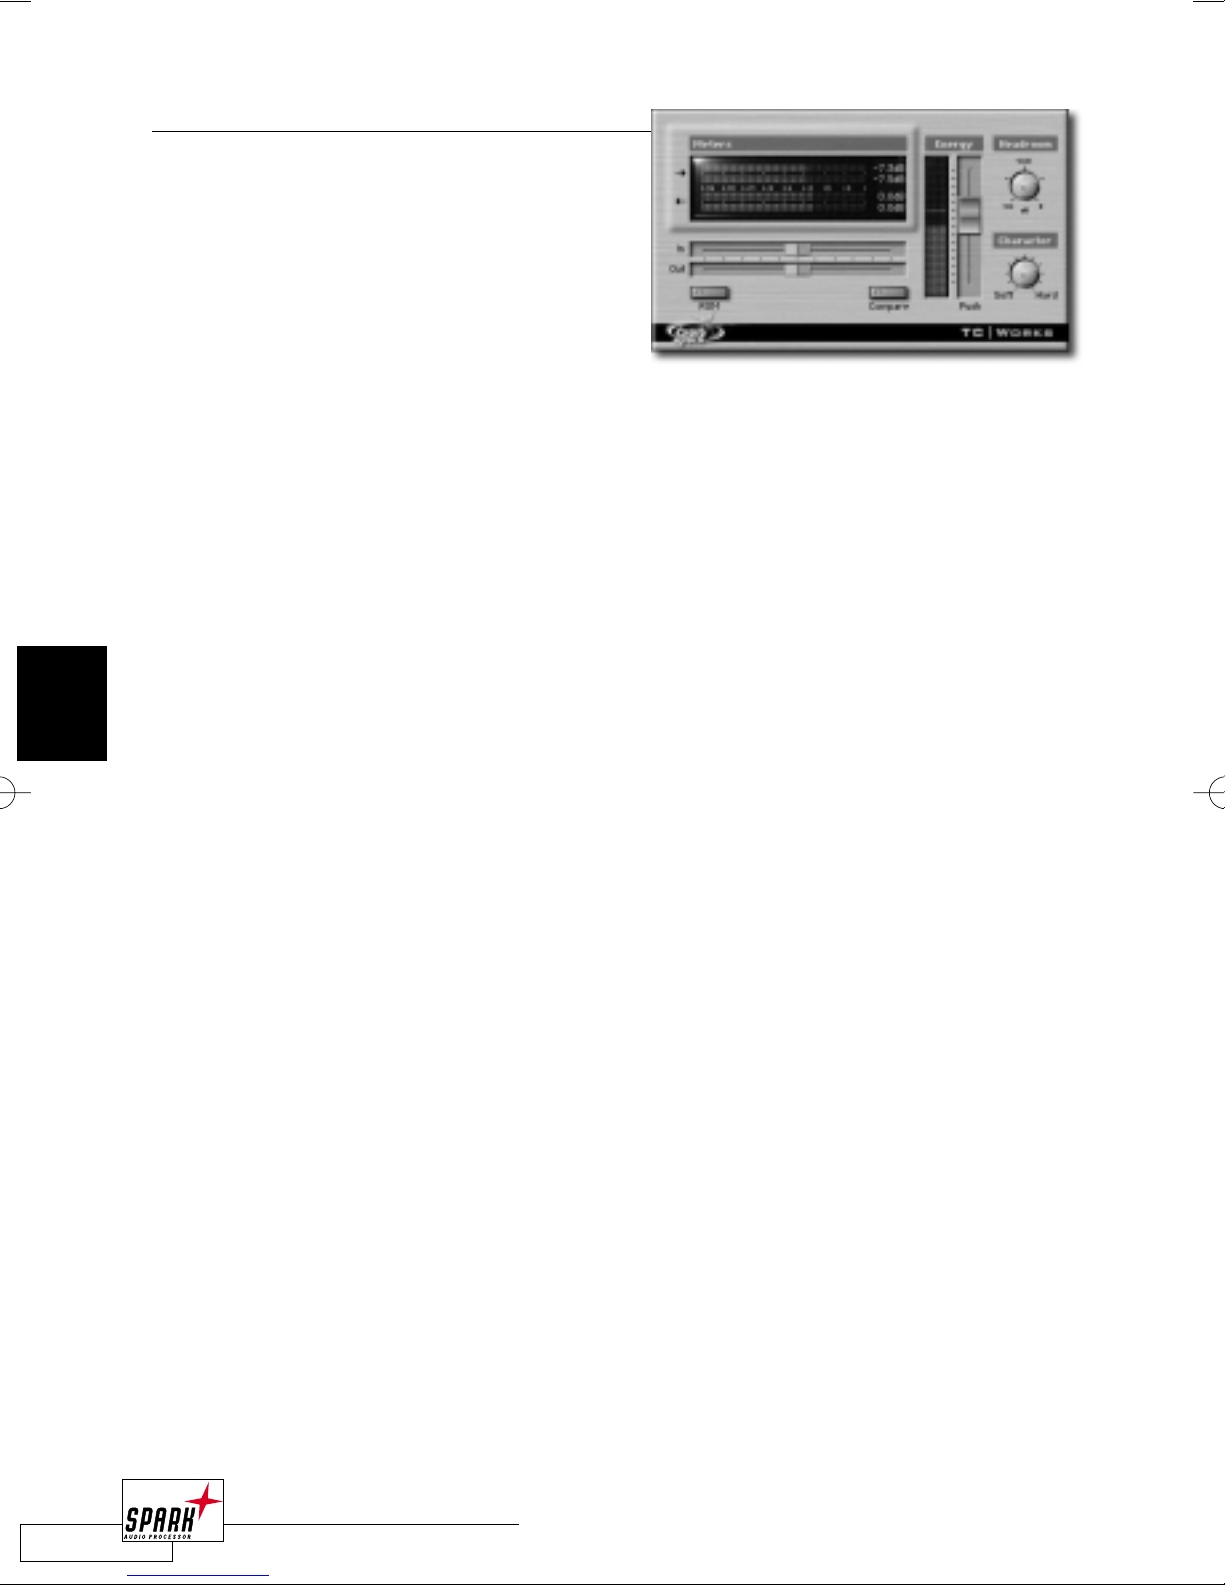
MAXIT
When mixing or mastering a project, you might
want to boost the loudness or “energy” of the
music. MaxIt will supply you with an easy-touse, yet powerful dynamics processing tool to
do just that! With only 3 parameters you’ll have
everything under control.
Energy determines the amount of “boost”.The
further you push it up, the more your audio will
be “squeezed” and sound subjectively louder. Be careful – don’t push too far, this is strong
medicine!
On the Energy meter you’ll be able to see how much processing is going on.
Character controls the strength of the dynamics processing. Of course you’ll only hear an
effect if the Energy fader is pushed up far enough so the algorithm is working.“Soft” adjusts
the algorithm to treat your material carefully, with clean-sounding results. But if you’d like
even more level boost – turn the knob towards “Strong” and you’ll notice how the process
will push the material even more. However, there’s a trade-off: depending on your material,
you might notice a “dirtier” sound. Like with the Energy Fader, handle with care!
Headroom is an essential parameter when you’re mastering for CD:You can decide to leave
some “room”, so your audio doesn’t go up to 0 dB, but is limited at a maximum of -0.1. Some
CD manufacturing plants do recommend to leave such a so-called headroom to eliminiate
the danger of having unnoticed clips in the material.

CD BURNING WITH SPARK
SUPPORTED FEATURES
To burn an Audio CD with SPARK, you must first assemble your audio files in
the Playlist. SPARK’s CD burning facilities supports your audio project with many
convenient features.
• High Resolution Recordings, such as 24 bit 96 kHz, can be used in the Playlist.
• With SPARK’s ”pause free” CD burning, you can have even the most complex
playlist, complete with seamless cross-fades between tracks.
• You can save your Playlist content to file, including all of the critical track data.
This allows you to easily manage your SPARK projects.
• Background CD burning allows you to continue editing or even working in other
applications while your CD is being created.
SPARK uses the Apple AudioCDBurn utility for CD-Recordable drives supported by
OS X. If you need to burn CDs for critical mastering jobs, you may want to verify with
Apple that AudioCDBurn is 100% Redbook compatible.
SUPPORTED CD-RECORDABLE DRIVES
ENGLISH
SPARK will use the internal CD-Recordable drive to burn audio CDs.
SPARK supports the internal CD-Recordable drives in all Apple models, including the
”SuperDrive” (DVD-R/CD-RW). Other CD-Recordable drives supported by OS X will also
function.
NOTE: SPARK cannot burn DVDs with the Apple ”SuperDrive”. You must use CD-R
media.
SUPPORTED CD-RECORDABLE MEDIA
SPARK supports both 74- and 80-minute CD-R Media. It is very important to pay
attention to Playlist lengths BEFORE burning a CD! If you have an 80-minute Playlist
and insert a 74-minute CD, the CD burn process will begin and it will take some time
before you receive an error message.
PREFERENCE SETTINGS
Setting a few preferences right away will greatly assist you when the time comes to
burn an audio CD with SPARK.
CD FRAMES
Data on an audio disc is organized into frames. As with cutting images in a moving
picture, you cut between frames, and not in the middle of a frame. In some
mastering applications, you may want to cut at CD Frame boundaries, and selecting
this option makes this possible. For almost all mastering applications, this option
is unimportant.
In the Editor Preferences, set the ”Unit used by editor” to ”CD Frames”.
SPARK LE PLUS CD /
1

The CD Frame time format is: HH:MM:SS:CD Frames. Frames in the CD Frame
time format begins with Frame 0 and ends with Frame 74.
NOTE: The CD Frame time format will only function in 44.1 kHz audio files.
USING EXTERNAL BURNING APPLICATIONS
In the General Preferences, you might want to set the ”Use external CD Burning
ENGLISH
Application” checkbox to activate an external application such as Roxio Toast or
Apple iTunes.
NOTE: These applications will set a 2 second pause between index points, no
matter what you have set in the playlist. This is also the case when exporting a
Playlist and then opening it in one of these applications.
Roxio JAM will create a CD compatible with your SPARK playlist.
BURNING YOUR CD
You can either begin the CD burning process by clicking on the ”CD” icon in the
Playlist view, or by selecting the ”Burn CD” entry from the Playlist Menu.
The process is straight forward. First, SPARK will confirm that your Playlist is Redbook
compatible. SPARK will then save a temporary Disc Image, and the AudioCDBurn
application will be launched. If there is no CD-Recordable Media in your drive, the tray
will open. Insert the CD-R and close the tray. Click ”Burn” in the AudioCDBurn dialog
to burn your CD.
CD burning is a background process, allowing you to continue editing with SPARK, or
even working in other applications while your CD is being created.
YOUR 24/96 PLAYLIST
Audio CDs only support 16-bit 44.1 kHz files. As an added feature, SPARK can handle
24-bit 44.1 kHz audio files when CD burning. Be sure to convert the sample-rate of all
audio file regions before you place them in the Playlist!
By selecting the “Use Dither on Create File” from the Playlist menu, or checking the
“Use Dither on Create File” checkbox from the Playlist view, SPARK will automatically
dither or noise shape the audio when creating the Disc Image, depending on your
dither or noise shaping settings.
DITHER AND NOISE SHAPING SETTINGS
You can select Dither or Noise Shaping types in the Master, just underneath Master
Fader. You can choose between Light Noise Shaping, Noise Shaping, and Ultra Noise
Shaping. The bit depth is set to 16 bit automatically when you click on the ”Create
CD” icon or select ”Burn CD” from the Playlist menu.
NOTE: If you do not select a Dithering or Noise Shaping setting in the Master View,
burning a CD will automatically result in an error message.
2
/ SPARK LE PLUS CD

SAVING YOUR PLAYLIST INFORMATION
From the Playlist menu, you can select the ”Save Playlist Content to file” option to
save your Playlist information as an HTML file. This is ideal for opening the Playlist
Content in your favorite web browser and printing the content of your Playlist. The
saved data is tab-delimited, allowing you to copy the text data into a plain text (ASCI)
editor with the appropriate arrangement of rows and columns.
The saved Playlist content meets Redbook standards, and can be provided to a
replication facility.
PROJECT
This is the name of your project. Saving Playlist Content from a project that has
not been saved will result in blank field.
PATH
This is the file path of project, letting you know where on the hard drive you have
saved your project. Saving Playlist Content from a project that has not been saved
will result in a blank field.
DATE
This is the date you saved the Playlist Content. The format is MM / DD / YY.
INDEX
This is the track index number.
START
ENGLISH
This field indicates the start time of the track.
NAME
This field indicates the name of the region. Only the name of the indexed track will
appear should you also have disabled indexes in the following tracks.
LENGTH
This indicates the length of the track. This is always in the CD Frame time format!
Length will be displayed as ”Hours: Minutes: Seconds: CD Frames”.
PQ CODES
PQ Information is the data on the disc that determines track start points, control bits,
timing information, etc. This is generated automatically and cannot be edited with
SPARK.
SUB-INDEXING
SPARK does not support track Sub-Indexing.
SPARK LE PLUS CD /
3

MISCELLANEOUS
55
MISCELLANEOUS
5
PREFERENCES
The Preferences dialog allows you to define defaults for SPARK LE, such as the location of
your Plug-Ins or your preferred time scale as well as many other settings.You will need to set
up most of SPARK LE’s Preferences only once. Preference settings are saved globally rather
than with each Project File.
To set the Preferences, choose “Preferences...” from the Edit menu ( <SHIFT + COMMAND + P> ).
The Preferences are stored in a file called “SPARK LE Preferences”, which is located in the
System Folder::Preferences. If SPARK LE can`t find this file, you will be notified by an error
message and a new Preferences file with the default settings will be created.
GENERAL
WARNING DIALOGS
Many dialogs allow you to check a box titled “Don’t show
again”. If you check that box, the corresponding message
won’t show up again. For example, if you click on the Trash
Icon in the File View, you will see the message “Do you
really want to delete this item?”.
If you feel that you don’t need this warning every time you click on the Trash icon, you can
check the “Don’t show again” box. From now on the selected file will be deleted immediately
without further warnings.
Checking the “Activate/show all warning dialogs again” function in the Preferences will
reactivate all deactivated warning dialogs.
CD EXPORT
If you are using Roxio Toast, Jam or apple iTunes for CD Burning, you need to point
SPARK LE to the location of that CD Burning application.This will enable SPARK LE to start
the application when pressing the “Create CD” icon in the Play List. Simply press the
“Choose Location” button and select the right folder.
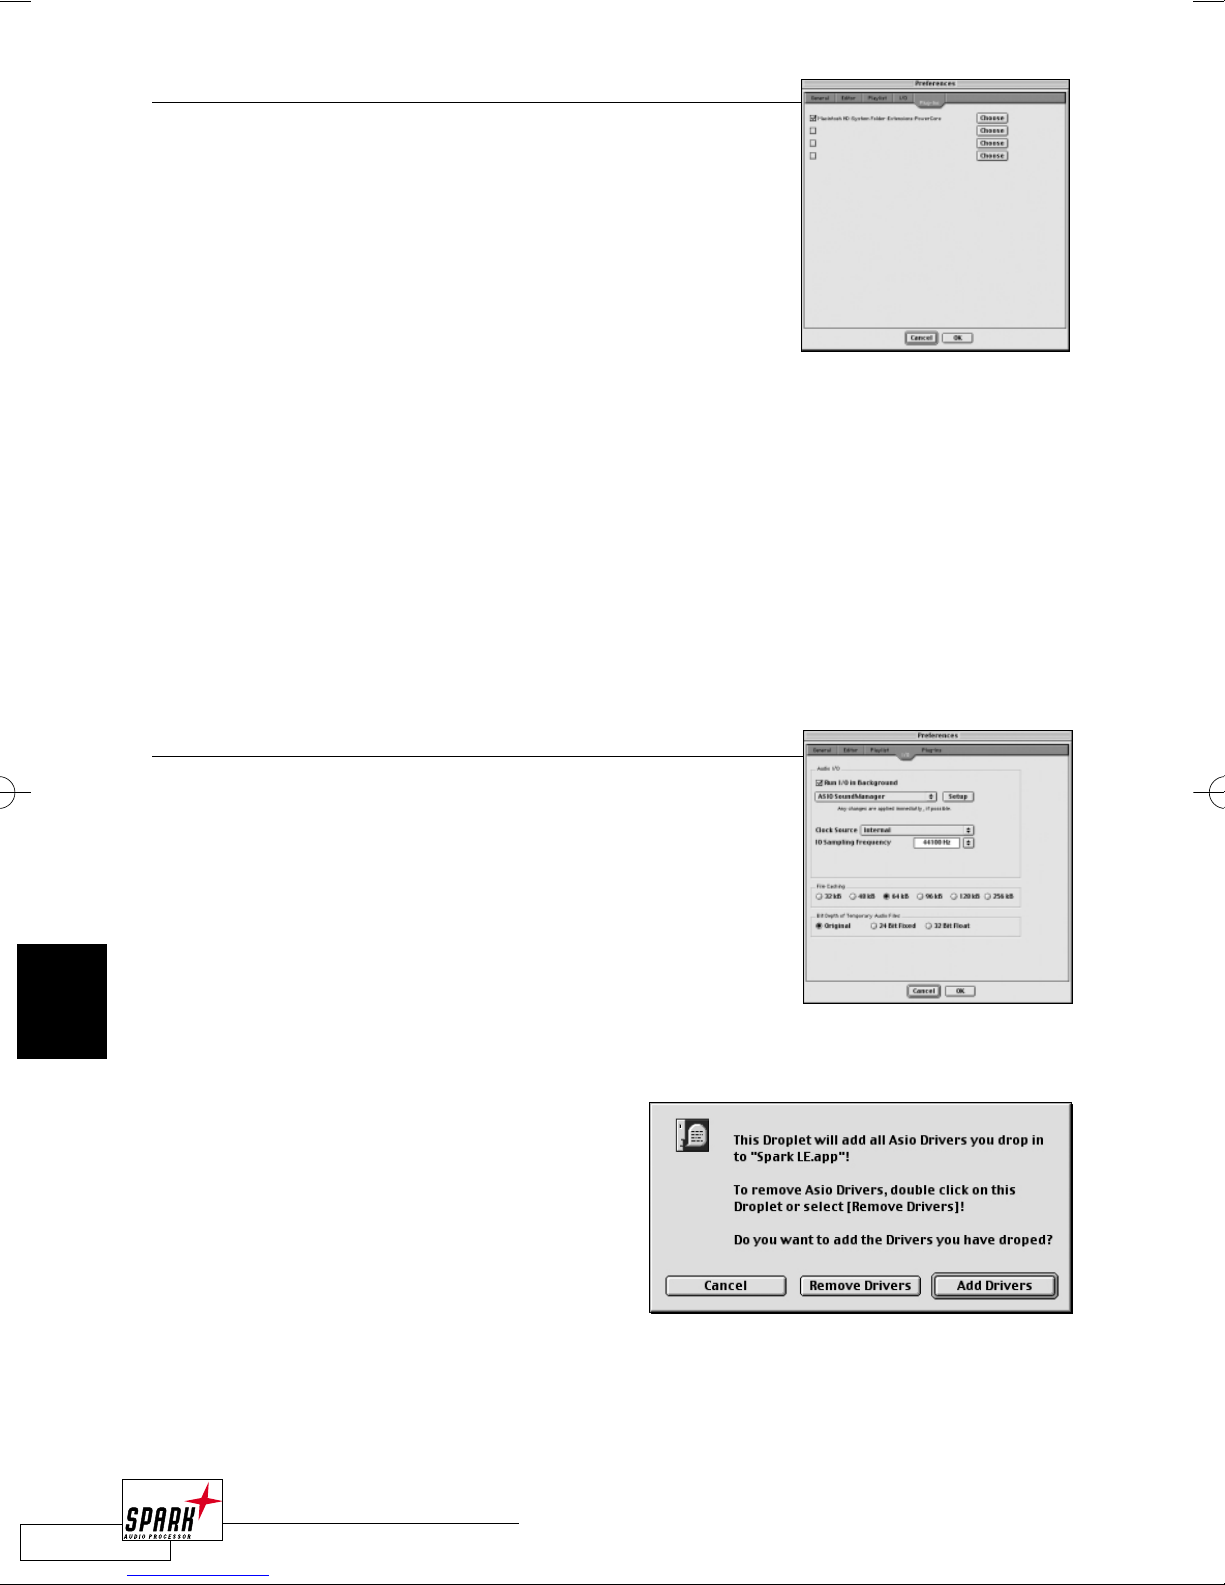
56
MISCELLANEOUS
5
PLUG-INS
PLUG-IN FOLDERS
On the Plug-In page, you can define up to four different
Plug-In folders for SPARK LE – and select which folders you
want activate.
For example, you could split your Plug-Ins into different groups,
a “Recording” group and a “Mastering” group. Or you might
have another application on your system that has its own VST
Plug-In folder.You don’t have to copy these Plug-Ins and have
the Plug-Ins on your harddisk multiple times:
Set the other Plug-In folder as one of SPARK LE’s Plug-In folders – that’s it!
To select a Plug-In folder, click on one of the four “Choose” buttons and select the right
folder.The default folder for SPARK LE’s own Plug-Ins is “VST Plug-Ins” in the SPARK LE
folder.
To activate/deactivate a Plug-In folder, check/uncheck the corresponding check box.
Note: SPARK LE will search in all subfolders of a Plug-In folder for valid Plug-Ins. If multiple
instances of a Plug-in were found in the defined Plug-In folders, only the first instance of the Plug-In
will show up in the Plug-In list – the Plug-In won’t show up multiple times.
I/O
This is probably the most important Preferences page. Here you
define SPARK LE’s I/O device, File Caching and how temporary
audio files are stored.
There are two ways to add an ASIO driver to Spark LE 2.6 in
Classic MacOS. While both methods are described below, it is
important to know that the "simple” method is transparent to
the end user, and the "Advanced” method requires access to
the Spark LE 2.6 app bundle.
The simple method is to drag the ASIO driver for your soundcard to the "Add ASIO
Drivers" folder before launching Spark LE.
Please note that this requires that you have
Apple Script enabled on your computer.
After dragging the ASIO driver to the "Add
ASIO Drivers” folder, An Apple Script dialog
will pop-up prompting you to "Cancel",
"Remove Drivers" or "Add Drivers".
Select "Add Drivers". The application will now
add the drivers to a sub-folder in the
"Spark.app” bundle.

57
MISCELLANEOUS
5
After the drivers have been added, the next screen will
provide you with a "List of currently installed ASIO
Drivers.”
Select "OK" to quit the application and return to the
finder.
The next time you launch Spark, your newly added ASIO
driver will be available from your I/O Preferences.
AUDIO I/O
The option “Run I/O in Background” will allow SPARK LE to
continue with the playback, even if you are currently working
with another application in the front. If you uncheck this option, the playback will immediately stop as soon as SPARK LE will be switched to the background.At the same time, the audio
device will be released by SPARK LE.This way, other audio applications will be able to use
this audio device as I/O.
Select your preferred audio I/O system, such as the ASIO SoundManager or the ASIO driver
for your audio card.Your audio hardware is only available in the pop-up list, if your audio
hardware’s ASIO driver is moved or copied into SPARK LE’s “ASIO Drivers” folder, located
inside SPARK LE’s main folder.
Usually, you can change between different ASIO drivers without relaunching SPARK LE. If this
is not possible, SPARK LE will request to be restarted.
Note: If you select SoundManager as the default I/O device, you will not be able to record audio.
Please choose ASIO SoundManager instead.
Press the Setup button to get your audio hardware settings (if applicable). Please have a look
in your audio hardware’s documentation for more information.Also, other options like the
available Clock Sources and I/O Sampling Frequencies are hardware dependent and
therefore not described in this manual.
FILE CACHING
The file caching parameter shouldn’t be touched unless you experience problems with
dropouts during recording or playback (especially when working with 96kHz or higher).
As a rule of thumb, slower hard drives (like PowerBook hard drives) will require a larger
buffer size – but remember that bigger cache sizes require also more memory for SPARK LE.
BIT DEPTH OF TEMPORARY AUDIO FILES
While you are editing files, SPARK LE will create temporary files with the changes you have
made.With this option, you can define the bit depth (and therefore the quality) of the
temporary files: Besides the bit depth of the original file, you can also choose 24 bit (fixed)
and 32 bit (float) for higher quality.

58
MISCELLANEOUS
5
EDITOR
UNIT USED BY EDITOR
The Editor page allows you to select the preferred time unit,
drawing mode and Clipboard settings.
“Unit used by editor” sets the preferred time unit, either in Sample Frames, Seconds, Hours:Minutes:Seconds or even
milliseconds.The chosen unit will be used for time indication
in the Browser View.
WAVE O
VERVIEW BEHAVIOUR
With this option, you can select the playback behaviour in the Waveform overview (the
upper waveform in the Editor) "Start Prelisten with <COMMAND + Click>” will start the
playback only, if you click in the overview while pressing the <COMMAND> key, while the
other option "Start Prelisten with Normal Click” will start the playback without any
additional key pressed.
DRAWING OPTIONS
The “Drawing options” should be set according to the speed of your computer.The default
setting is “High Quality”. If you get the impression that your computer isn’t fast enough for
waveform redraws, in the clipboard try “Normal” or “Fast Mode”.
WHEN RESIZING THE WINDOW
This option allows you to change the behaviour when you vertically resize SPARK LE’s
Browser View.“Zoom my current view” will show the same content as before,“Resize my
current view” will show/less of the current waveform.
PROPERTY DIALOG ON REGION CREATION
Check this option, to get the "Property” dialog with naming option for the Region
automatically every time you create a new region.
SPLIT STEREO FILES
SPARK LE can work directly on split stereo files. If you check the option “Automatically load
L & R files as stereo files”, files named “.L” and “.R” will be loaded as stereo files, even if you
just select one of them.
UNDO/REDO
Here you define the undo stages per client.A client is for example the Play List, the
FXmachine, a Plug-In, ... Set the number of undo steps you would like to have
(from “unlimited” down to 5).“Unlimited” is the most secure setting, but requires also most
memory (both, RAM and HD space). For more details on the Undo/Redo feature, please read
the Undo/Redo discription in chapter 2.

The “Temporary File Folder” defines the folder where temporary files are stored on your
system. By default, this is an invisible folder on your system harddisk.The Temporary File
Folder should be set to a drive with enough space for audio files!
PLAY LIST
DEFAULT PLAY LIST ENTRY
On the Play List page, there is the possibility to select a default
transition type for new entries that are addded to the Play List.
For example, if your preferred crossfade type is a 10ms Equal
Power crossfade, and you want to have this setting as default
for all regions you add to the Play List. Select Equal Power as
Crossfade Type and set the Crossfade length to 10ms.
Please note that, although you can set a Pause Length and a
Crossfade Length time only the time belonging to the selected Crossfade Type will be used!
If the default Crossfade Type is “Pause”, the Pause Length will be used, otherwise the
Crossfade length.As the “Hard Cut” type has a length of zero by definition, the Length
settings will be ignored if you choose this type.
BIT DEPTH OF PLAY LIST
When exporting the Play List via the “Export Play List” function, or when rendering effects
to the Play List (“Create File” dialog), this is the default value for the Play List bit depth.
However, if you can define a different setting in the “Save As” dialog when you specify the
file name.
59
MISCELLANEOUS
5

SPARKLE FILE TYPES
SPARK LE utilizes several types of files:
PROJECT
The Project file includes all the file references, Regions, Play Lists, FX settings and
configurations,Window settings, etc. In short, everything! Load and save Projects from the
File menu.
Saving a “default.prj” in the SPARK LE application folder will allow you to start SPARK LE
with preconfigured settings, presets and even preloaded files and Plug-Ins!
If you don’t want to load the “default.prj”, press <CONTROL + OPTION> while starting
SPARK LE.
WORKSHEET
A Worksheet includes all the information you find in the Browser View, including references
to the audio files used, Regions and Play List entries.
To save a Worksheet, select “Export Worksheet” from the File menu.To load a Worksheet,
select “Import Worksheet.”
Worksheets do not include information about the Master View (i.e. no FXmachine and
Plug-In settings).
P
LAY LIST
You can export your Play List as a CD-Image (a single audio file). Simply press the “Export”
button.This will create an Sounddesigner II file.You can use it to burn a CD directly.
PLUG-IN BANK
A Plug-In Bank consists of a number of Plug-In Presets.To load and save a Plug-In Bank, click
the “File” button in the Plug-In Edit View.VST Plug-In Banks are compatible with other VST
applications.
PLUG-IN PRESET
A Plug-In Preset includes one setting for a Plug-In.To load and save Plug-In Presets, click the
“File” button in the Plug-In Edit View.VST Plug-In presets are compatible with other VST
applications.
60
MISCELLANEOUS
5
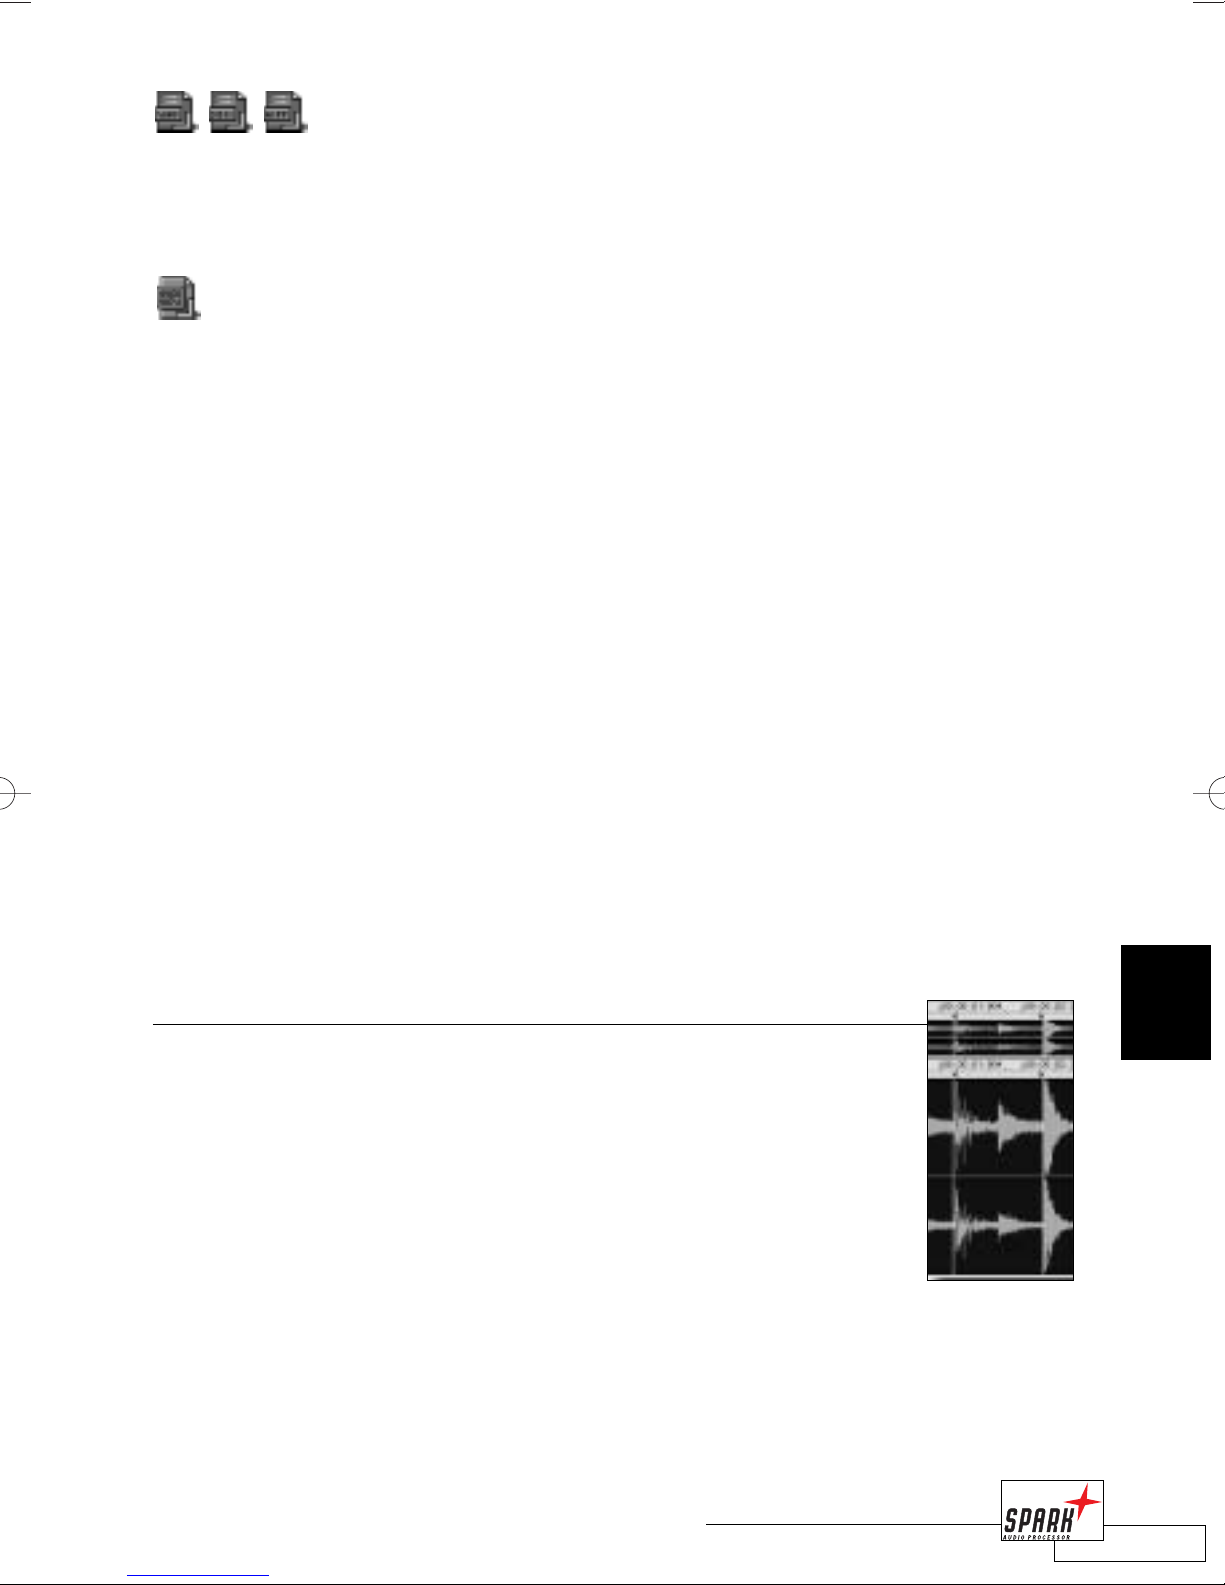
AUDIO FILES
SPARK LE will save your audio files as WAV, SDII or AIFF.Project Files only refer to these
audio files,they don’t include them! If you move an audio file to a different location,delete or
rename it,existing Project files won’t be able to find this file anymore.
OVERVIEW FILES (OVW)
For each audio file used in SPARK LE,there will be an overview file created.These overview
files contain the waveform overview and enable SPARK LE to show the waveform of a file
imediately when it is loaded.If the audio file and the overview file modificaton dates will
not match,SPARK LE will automatically create a new overview,to make sure that audio file
and waveform view are synced.
HARDWARE
SUPPORT
The ASIO interface is supplied by Steinberg,so finally all applications on the Mac can share
the same sound card drivers.This makes it much easier for y ou and for the manufacturer
of your sound card.Only one driver is required,for compatibility with all applications that
implement the ASIO interface!
Thanks to ASIO and the “ASIO settings” panel,you can optimize the performance of your
system.In native audio systems there’s a delay (called “latency”) between the input and the
output.You will notice this mainly when trying to record live.How much or little latency
you experience is primarily dependent on your sound card’s driver.Please consult your
sound card documentation for more details.
Also Apple’s Core Audio driver format is supported.This makes SPARK LE compatible with a
wide range of Soundcards.
LOOPING
In the “Options” menu,you can switch Loop Mode on and off.Select OFF to
deactivate the Loop function.“Forward” will pla y the Loops in the forward
direction,as the name suggests.
When Loop is activated,there are two loop markers in the waveform
display.When you start playback,SPARK LE will loop between these markers.
If you move a marker during playback,you will immediately hear the result of
this change,so you can easily fine-tune the loop to sound the way you want.
61
MISCELLANEOUS
5

If you would like to edit the loop points numerically,double-click
on the file name (not the region) in the file view to bring up
the Sample Data dialog.
Note: If you make a selection, the selection will be played instead
of the loop.
SAV E / SAVE AS / EXPORT OPTIONS
The save options in SPARK LE depend on conditions like how the file got into SPARK LE and
if the file has been edited or not. Here you will find a description of the available options.
WORKING WITH SPARKLE NATIVE AUDIO FILES (AIFF,WAV, SDII)
In case you are working with audio files that SPARK LE can work on directly, the "Save”
behaviour is quite simple.
"SAVE AUDIOFILE”: On files that are loaded into SPARK LE but are not modified, you don’t
get the option of saving the file, as no changes have been made.As soon as you made changes
to the file (e.g. remove a part of the file), this option will become available and allow you to
save the changes to the audio file.
"SAVE AUDIOFILE AS”: This option is always available and will let you save the audio file
under a new name.The original audio file will remain unchanged.
62
MISCELLANEOUS
5
 Loading...