

Page 1
Intelligent Flap Controller
with positioning set-points
Model: IFC-10
Flap positioning and control system
for DC motor actuators up to 10 amps
Pilot and Co-pilot control
Vfe protection
Programmable positions and manual mode
1 Rev 1.1 © 2015 TCW Technologies, LLC
Page 2

Intelligent Flap Controller (IFC) is an electronic controller designed
specifically to operate DC motor actuators including the Van’s Aircraft series of
Flap Actuators used in RV type homebuilt aircraft. IFC connects to the standard
up-off-(down) switches commonly used to control flap operation and directly
drives a Van’s flap actuator. IFC allows for Pilot and Co-pilot flap switches and
resolves the possible conflicts if the switches are operated in opposite directions.
IFC requires NO flap position sensor and is fully compatible with Safety-Trim
servo controllers.
IFC provides flap positioning presets that are easily set without having to
adjust a position sensor. Additionally, IFC includes a manual mode of operation
to raise or lower the flaps in proportion to the time the flap switch is held closed.
IFC receives switch inputs from Pilot and Co-pilot flap switches such as
those found on the Infinity Stick Grips. These switches provide a momentary
closure for Flaps Down and a maintained closure for Flaps UP. The switch
closures are referenced to a common ground. Based on the switch inputs, IFC
directly drives the flap actuator. IFC resolves any conflicts between the Pilot and
Co-pilot switches as well as any switches left in the maintained UP position.
Flap positions such as 0,10,20,40 degrees are selected by simply
pressing the flaps down switch for a momentary action of less than 1 second. If
flap positions other than those preset in the controller are desired the switch may
be held for longer than 1 second, giving manual control of flap position. When
the switch is released the flaps stop at their current position.
Additionally, when used with an ASW-1 airspeed switch IFC provides Vfe
protection by preventing flap deployment above a preset air speed. However,
IFC will not limit the flaps from being retracted regardless of airspeed.
The ASW-1 airspeed switch may be shared with a Safety-Trim servo controller
for system integration.
The Van’s flap actuators have no internally electrical limit switches and will
run continuously if not controlled. IFC prevents the flap actuator from running
endlessly when a flap switch is left in the UP position. After a 15 second
timeout, the flap actuator is shut off. Simply move a flap switch to the off or
down position to reset the operation of the flap actuator.
IFC is to be used with DC Flap Actuator motors rated for operation at 1224 volts DC and up to 10 amps continuous, 15 amps peak. No other uses are
permitted. The Flap Actuator must be mechanically or electrically limited for
travel length as the IFC unit does not set the minimum and maximum travel
lengths for the flap actuator. The Van’s flap actuator satisfies this requirement.
IFC is not TSO’d and must only be used in aircraft certified in the
Experimental category.
Flap input switches for DOWN actuation must be of the momentary
closure type. Flap input switches for UP actuation may be either momentary or
maintained type.
Compatible wiring harness model number: IFC-10-Harn
2 Rev 1.1 © 2015 TCW Technologies, LLC
Page 3

IFC must be installed using the current aircraft standards and practices.
Refer to AC 43.13-2A/1B. The installer/builder is solely responsible for
determining the suitability of the installation and use of this product.
Installation instructions:
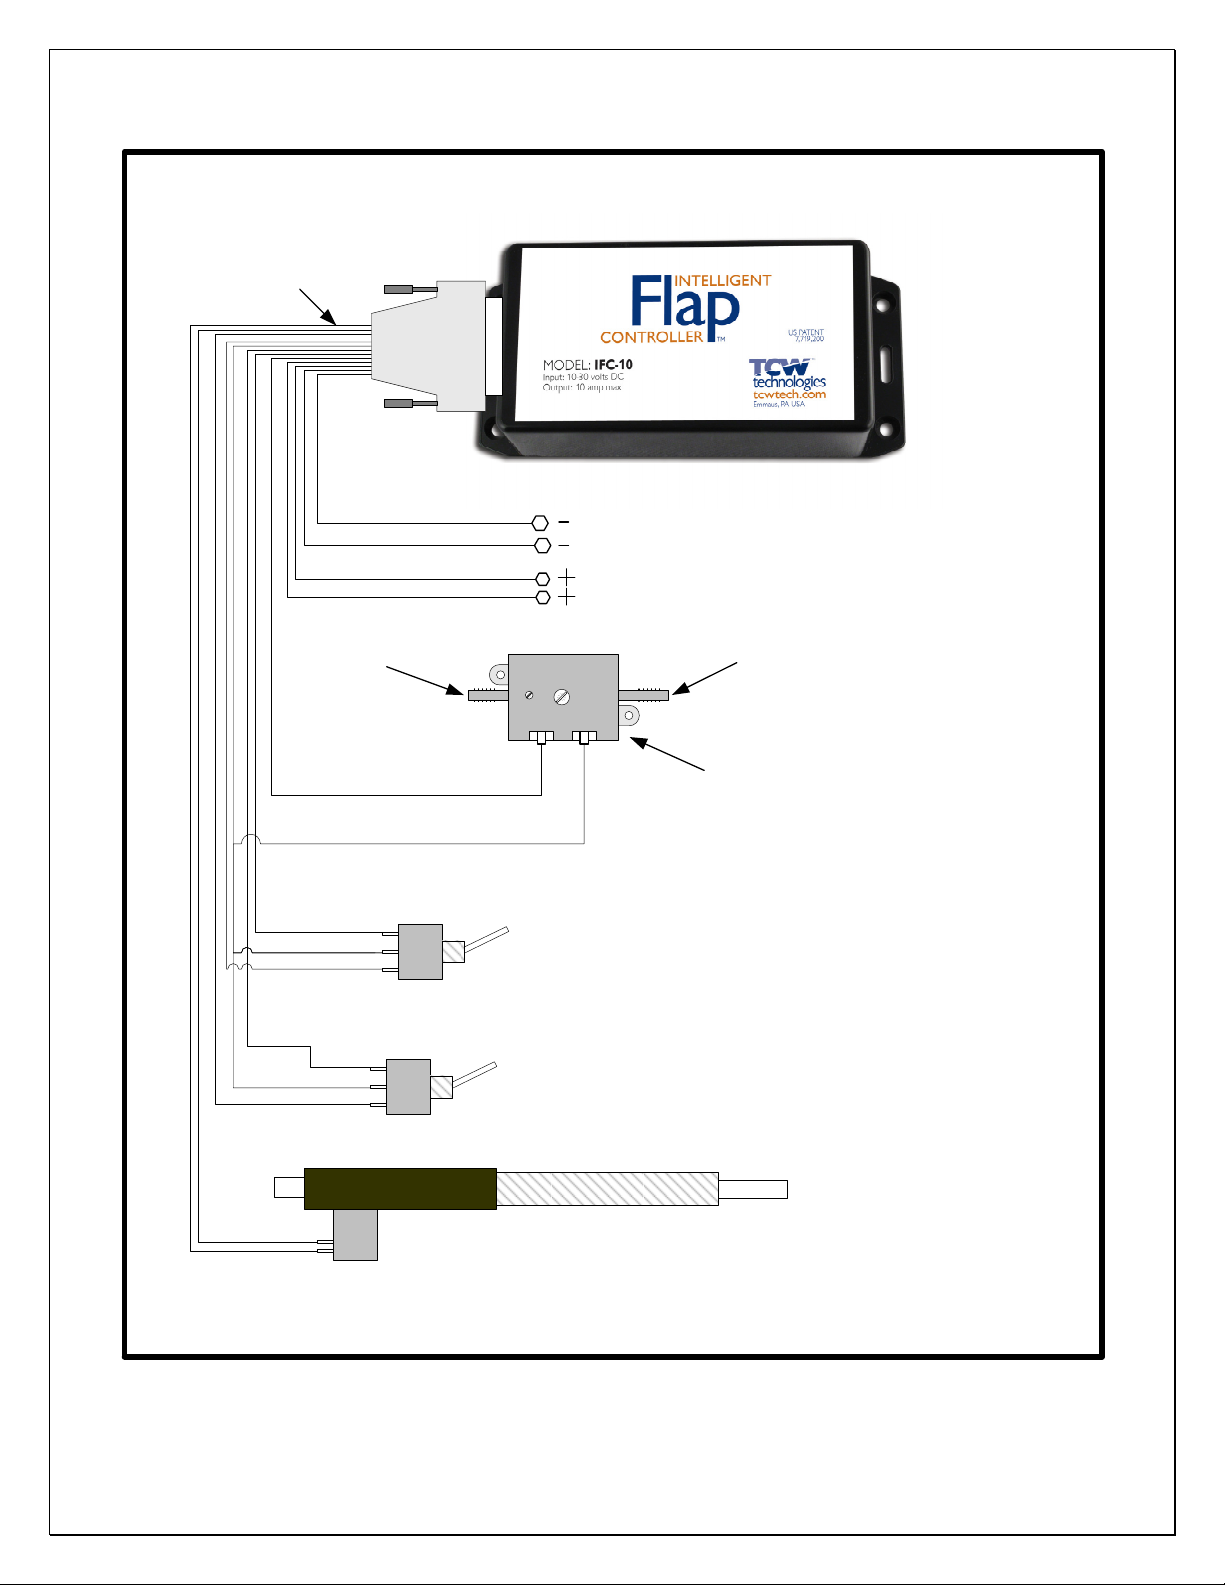
1) Connect the wiring harness as shown in the wiring diagram.
NOTE: Double power, ground and motor wires are ONLY required when
the flap actuator requires more than 7.5 amps continuous current. When
using the standard Van’s aircraft flap actuator double wires are NOT
required.
2) WHITE #20 gauge wire to + Aircraft Power via a 7.5 amp fuse or circuit
breaker.
(if using double WHITE #20 connect via a 10 amp fuse or c.b. )
BLACK #20 gauge wire(s) to – Aircraft ground.
(as shown on the wiring diagram)
3) Flap switch wires: DO NOT mix the pilot and copilot switch wires
PILOT: Blue #22 Flaps UP
Violet #22 Flaps DOWN
Co-pilot Orange #22 Flaps UP
Yellow #22 Flaps DOWN
4) Common (center) terminal of the Pilot and Co-pilot
flap switches and to the Airspeed switch (ASW-1) to ground of pin 7 or 15
Alternately aircraft chassis ground may be used instead of the connection
to pin 7,15 for the flap switches and airspeed switch.
5) Flap Actuator motor:
Red #20 to Flap Motor +
Green #20 to Flap Motor -
NOTE: This polarity must be used to drive the flap actuator in the UP
direction.
DO NOT LET THE FLAP ACTUATOR WIRES TOUCH EACH OTHER
OR GROUND!
3 Rev 1.1 © 2015 TCW Technologies, LLC
Page 4

6) White/Black#22 to the ASW-1 Airspeed Switch. Connect the other
terminal of the airspeed switch to pin 7,15 or common switch ground. If Vfe
protection is not going to be utilized, pin 8 must be capped off and not connected
to any other wires.
If utilizing a Safety-Trim controller, pin 8 of both the IFC and the SafetyTrim controller may be connected together and to a common ASW-1 Airspeed
Switch. The preset airspeed switch setting will enable flap deployment
protection in the IFC as well as the trim speed transition point for the Safety-Trim
controller.
7) Mount the IFC Control box inside the aircraft using the mounting tabs on
the enclosure. The control box can be mounted in any orientation. Do not
mount the control box in the firewall forward area or in an area likely to get wet.
Ensure access to the position set-up trim-pots on the side of the unit is
available.
8) Provide power to the flap control system and verify the flap switches drive
the flap actuator in the correct direction. Check the Pilot and the Co-pilot Flap
Switches separately. UP flap activation should drive the flap actuator
continuously for about 15 seconds. Down flap activation will drive the flap
actuator for about 4 seconds (factory calibration value) if the switch is pressed
for a quick tap ( less than 1 second long) If the Down switch is held for more
than 1 second the flap actuator should drive as long as the switch is held.
9) FULL MANUAL MODE: Note: The IFC-10 may be used in a full manual
mode without presets, operating just as our IFC-1 legacy product did. In this
mode the flaps are deployed for whatever duration the down flap switch is held
closed. Full manual mode may be accessed by connecting PIN 2 to ground.
FLAP POSITION SET-UP:
The IFC-10 system uses time intervals to drive the flaps to a particular position.
The time interval is set by the trim pots located on the side of the controller. The
flap positions for the pilot and co-pilot are independently set with their own trimpot. Turning the trim-pot clockwise increases the run time of the flap motor for
each preset position selection. Each press of the down flap switch will drive the
flap motor for the preset run time selected on the trim pot.
The IFC-10 unit is set to a 4 second run time at the factory. This value may be
adjusted from 1-10 seconds. Each time the flap down switch is activated for a
short press the system will drive the flap motor for this preset time.
4 Rev 1.1 © 2015 TCW Technologies, LLC
Page 5

The total flap travel and flap motor speed of your particular installation will
determine how many preset flap positions are obtained for a particular preset
time interval.
Examples:
A Van’s RV-10 flap system takes about 12 seconds to travel from full up to full
down. With a 4 second time interval each tap of the flap down switch will
deliver about 1/3 of the total flap travel. If you want more flap positions,
decrease the time interval.
A Van’s RV-8 flap system takes about 8 seconds to travel from full up to full
down, a 4 second time interval would provide for effectively 3 flap positions: UP
½, and Full Down. If an intermediate position was desired the time interval
would be reduced to about 2 ¾ seconds. Providing for flaps; UP, 1/3, 2/3, Full
Down.
During the set-up process it is recommended to connect a battery charger to the
aircraft battery to ensure the battery voltage remains close to the normal running
voltage obtained when the aircraft alternator is running (eg. Approx. 14 volts for
a 12 volt aircraft system)
If adjustments are made to the preset run time, ensure both the pilot and copilot
set points are adjusted and checked.
5 Rev 1.1 © 2015 TCW Technologies, LLC
Page 6

PRODUCT OPERATION:
1) Setting either the Pilot or Co-pilot flap switches to the UP position will drive
the flap actuator to the up position. If either of the flap switches are left in the
UP position the flap actuator will be driven for 15 seconds and then shut off.
2) Pressing either of the Pilot or Co-pilot flap switches to the DOWN position will
drive the flap actuator to the down position. A quick tap of the switch will drive
the flap actuator to the next down position set point. A quick tap is a press of
less than 1 second. If a down switch is held for more than one second the
system goes into manual mode and the actuator will drive flaps down as long as
the switch is held. When the switch is released, the flap motor will stop.
3) After the flaps are set to their full up position it is recommended to return the
flap switches to the center off position.
Conflict resolution:
If either or both flap switches are left in the UP position, and after the 15
second time-out period, the Flaps may be put DOWN by moving either of the flap
switches to the Down position. This may be done even if one of the flap
switches is left in the up position. The flaps may be retracted at any time,
(without delay) by placing a flap switch in the up position.
Vfe protection:
When the IFC is used with an airspeed switch (model ASW-1) the flaps
cannot be deployed above the airspeed switch set point. The ASW-1 airspeed
switch is supplied calibrated to a set point of 100 knots. The flaps can always be
retracted regardless of the airspeed set point. IF the Vfe protection feature is
not used, Pin 8 must be capped off and remain un-used.
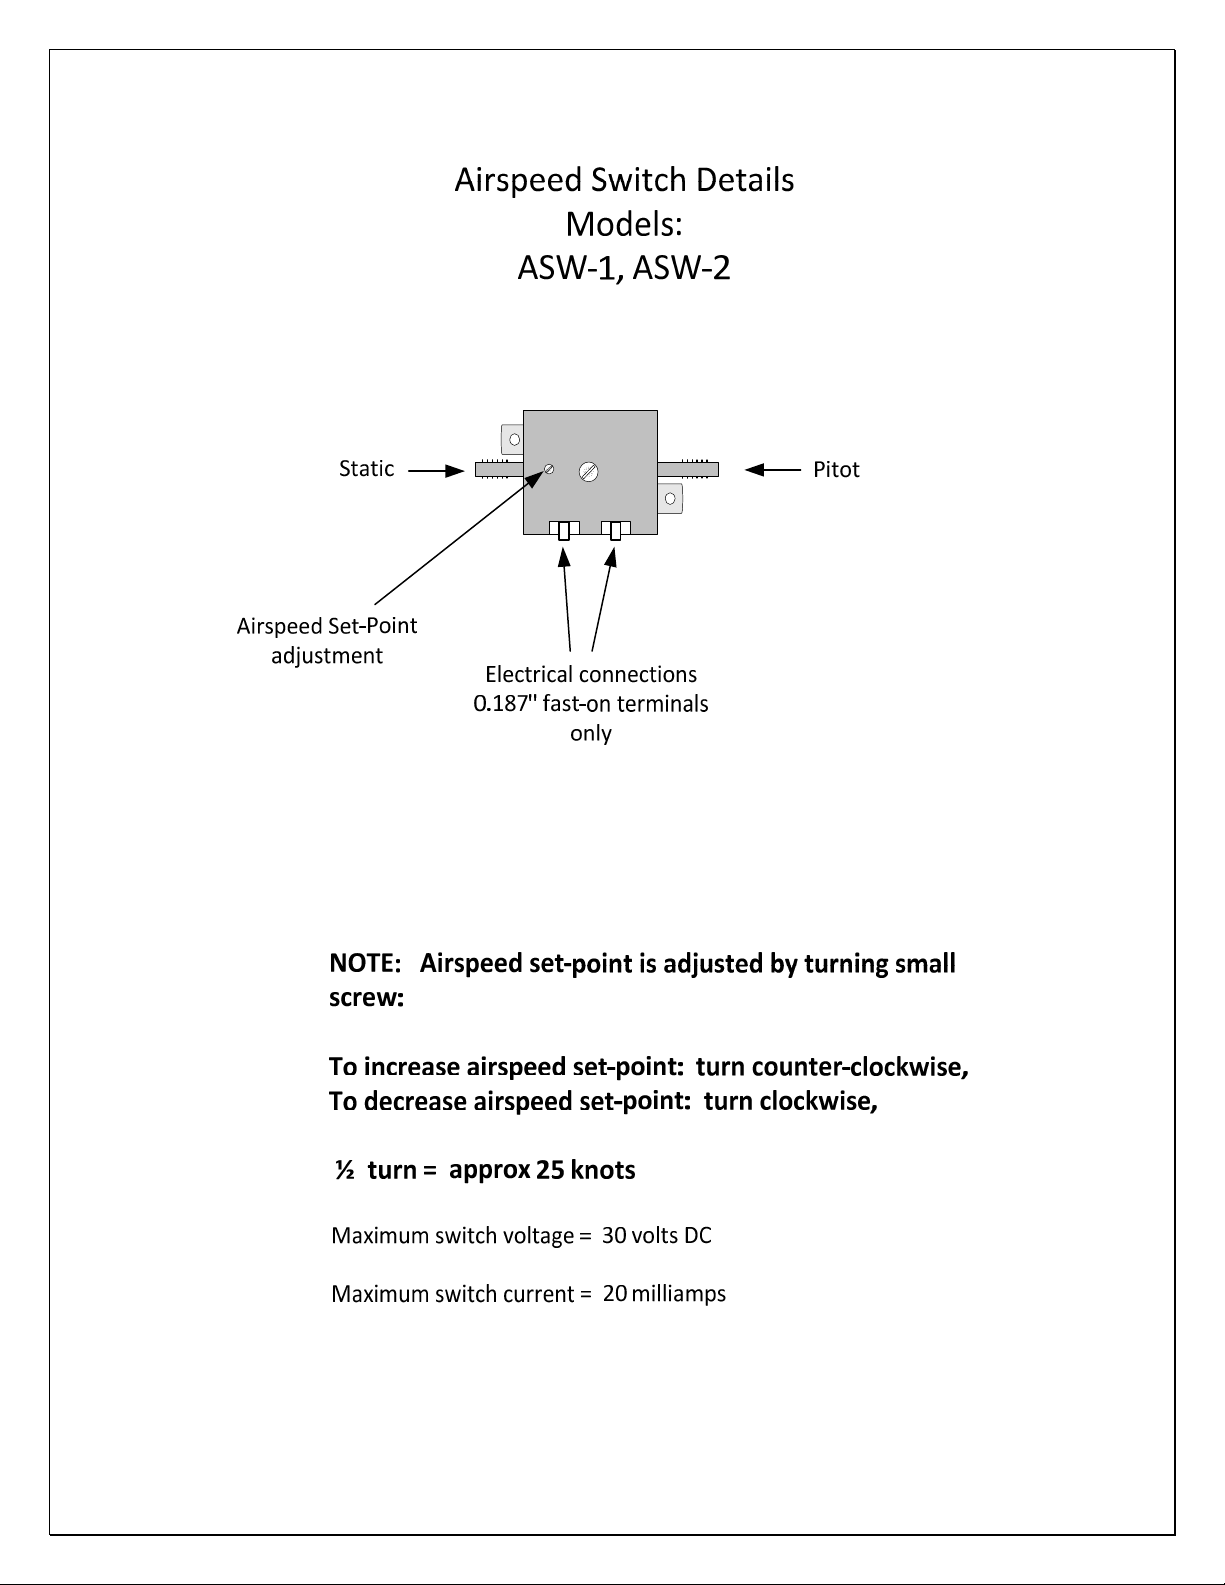
If a different airspeed set point is required, a small adjustment screw is
available on the ASW-1. Turning the screw clock-wise will lower the set point.
However, you must ensure the flaps can be deployed at an appropriate
airspeed by applying pitot pressure to the system and verifying the
airspeed for the set point. DO NOT ADJUST THE ASW-1 UNLESS YOU
DOUBLE CHECK THE PROPER AIRSPEED SET POINT. FAILURE TO DO
SO COULD PREVENT FLAP DEPLOYMENT IN FLIGHT !!!
6 Rev 1.1 © 2015 TCW Technologies, LLC
Page 7

TCW Technologies, LLC.
2955 Main Road East
Emmaus, PA 18049
610-928-3420
www.tcwtech.com
email: [email protected]
7 Rev 1.1 © 2015 TCW Technologies, LLC
Page 8
IFC-10-Harn
Wiring Diagram Model IFC-10
Static line
8
7
10
7
13
5
7
14
7
15
9
1
(Down)
(Down)
Aircraft ground
Aircraft ground
Aircraft power
Aircraft power
ASW-1
Up
Off
Up
Off
Pilot Flap control switch
Co-pilot Flap control switch
See instructions on fusing requirements
Pitot line
Note:
May be the same Airspeed
switch as used with a SafetyTrim Controller. Connect pin 8
of IFC to pin 8 of Safety-Trim
11 & 3
12 & 4
DC motor flap actuator
NOTE: Flap motors
greater than 7.5
amps must use
double wires as
shown
8 Rev 1.1 © 2015 TCW Technologies, LLC
Page 9

IFC-10 wiring harness detail
15 pin D-sub connector
Pin # Function
1 Power +
2 Manual mode only
3 FLAP motor +
4 FLAP motor 5 CO-PILOT DOWN switch terminal
6
7 Ground 8 2 speed switch
9 Power +
10 PILOT Down switch terminal
11 FLAP motor +
12 FLAP motor 13 PILOT UP switch terminal
14 CO-PILOT UP switch terminal
15 Ground -
Wire color Size
White
Red
Green
Yellow
Black
White/black
White
Violet
Red
Green
Blue
Orange
Black
#20
#20
#20
#22
#20
#22
#20
#22
#20
#20
#22
#22
#20
NOTES:
1. All switches share a common ground and may use aircraft
chassis ground or pin 7 or 15.
2. Confirm airspeed set point operation via a testing of the pitot
system.
3. Cap off any unused wires.
4. Verify each switch provides proper operation of the flap
motor.
5. Connect pin 2 to ground to access full manual only mode.
9 Rev 1.1 © 2015 TCW Technologies, LLC
Page 10
10 Rev 1.1 © 2015 TCW Technologies, LLC
Page 11

TCW Technologies, LLC.
During the first 24 months from the date of purchase and subject to the conditions hereinafter set forth,
TCW Technologies, LLC. (TCW) will repair or replace to the original user or consumer any portion of
your new Flap Controller product which proves defective due to defective materials or workmanship of
TCW. Contact TCW Technologies for warranty service. TCW shall have and possess the sole right and
option to determine whether to repair or replace defective equipment, parts or components. Damage due to
equipment, environment or conditions beyond the control of TCW Technologies are NOT COVERED BY
THIS WARRANTY.
LABOR, COSTS: TCW shall IN NO EVENT be responsible or liable for the cost of field labor or other
charges incurred by any customer in removing and/or reaffixing any TCW product, part or component
thereof.
THIS WARRANTY WILL NOT APPLY: (a) to defects or malfunctions resulting from failure to properly
install, operate or maintain the unit in accordance with printed instructions provided; (b) to failures
resulting from abuse, accident, or negligence; (c) to normal maintenance services and the parts used in
connection with such service; (d) to units which are not installed in accordance good trade practices; or (e)
to unit used for purposes other than for what it was designed and manufactured.
RETURN OR REPLACED COMPONENTS: any item to be replaced under this Warranty must be
returned to TCW Technologies in Emmaus, PA, or such place as TCW may designate, freight
prepaid.
PRODUCT IMPROVEMENTS: TCW reserves the right to change or improve its products or any
portions thereof without being obligated to provide such a change or improvement for units sold
and /or shipped prior to such change or improvement.
WARRANTY EXCLUSIONS: as to any specific TCW product, after the expiration of the time
period of the warranty applicable thereto as set forth above. THERE WILL BE NO
WARRANTIES, INCLUDING ANY IMPLIED WARRANTIES OR MERCHANTABILITY OR
FITNESS FOR ANY PARTICULAR PURPOSE.
Some states do not allow limitations on how long an implied warranty lasts, so the above
limitation may not apply to you. No warranties or representations at any time made by any
representative of TCW shall vary or expand the provisions hereof.
LIABILITY LIMITATION: IN NO EVENT SHALL TCW OR ITS AFFILIATES BE LIABLE OR
RESPONSIBLE FOR CONSEQUENTIAL, INCIDENTAL OR SPECIAL DAMAGES RESULTING
FROM OR RELATED IN ANY MANNER TO ANY TCW PRODUCT OR PARTS THEREOF. THE
SUITABILITY OF USE OF THE SAFETY-TRIM or INTELLIGENT FLAP CONTROLLER
PRODUCT IS TO BE DETERMINED BY THE AIRCRAFT HOMEBUILDER.
Some states do not allow the exclusion or limitation of incidental or consequential damages, so
the above limitation or exclusion may not apply to you.
This Warranty gives you specific legal rights and you may also have other rights which vary from
state to state. In the absence of other suitable proof of this installation date, the effective date of
this Warranty will be based upon the date of manufacture plus one year. Direct All Notices To:
Warranty and Product Service Department, TCW Technologies LLC., 2955 Main Road East.
Emmaus, PA 18049
11 Rev 1.1 © 2015 TCW Technologies, LLC
 Loading...