

Page 1

Table of Content
Buttons & Ports ........................................................................................................... 2
Charging Battery ......................................................................................................... 3
Installing Memory Card ............................................................................................... 3
Transferring Files ........................................................................................................ 3
Turning On/Off ............................................................................................................ 3
Unlocking the Screen .................................................................................................. 4
Home Screen .............................................................................................................. 4
Accessing Internet ...................................................................................................... 6
Using the Virtual Keyboard ......................................................................................... 7
Playing Music .............................................................................................................. 7
Playing Video .............................................................................................................. 8
Viewing Photos ........................................................................................................... 9
Using the Camcorder/Camera .................................................................................. 11
Exploring Files .......................................................................................................... 11
Sending/Receiving E-mails ....................................................................................... 12
Other Applications ..................................................................................................... 14
Managing Apps ......................................................................................................... 14
Managing Tasks ........................................................................................................ 15
Troubleshooting ........................................................................................................ 15
Safety Precautions ................................................................................................. 15
1
Page 2
P
M
opla
o
a
c
l
o
n
e
k
e
l
/
e
h
a
s
a
d
a
s
s
d
o
h
s
–
a
a
s
r
s
a
h
r
g
b
g
a
S
e
,
o
n
u
e
e
t
n
o
e
o
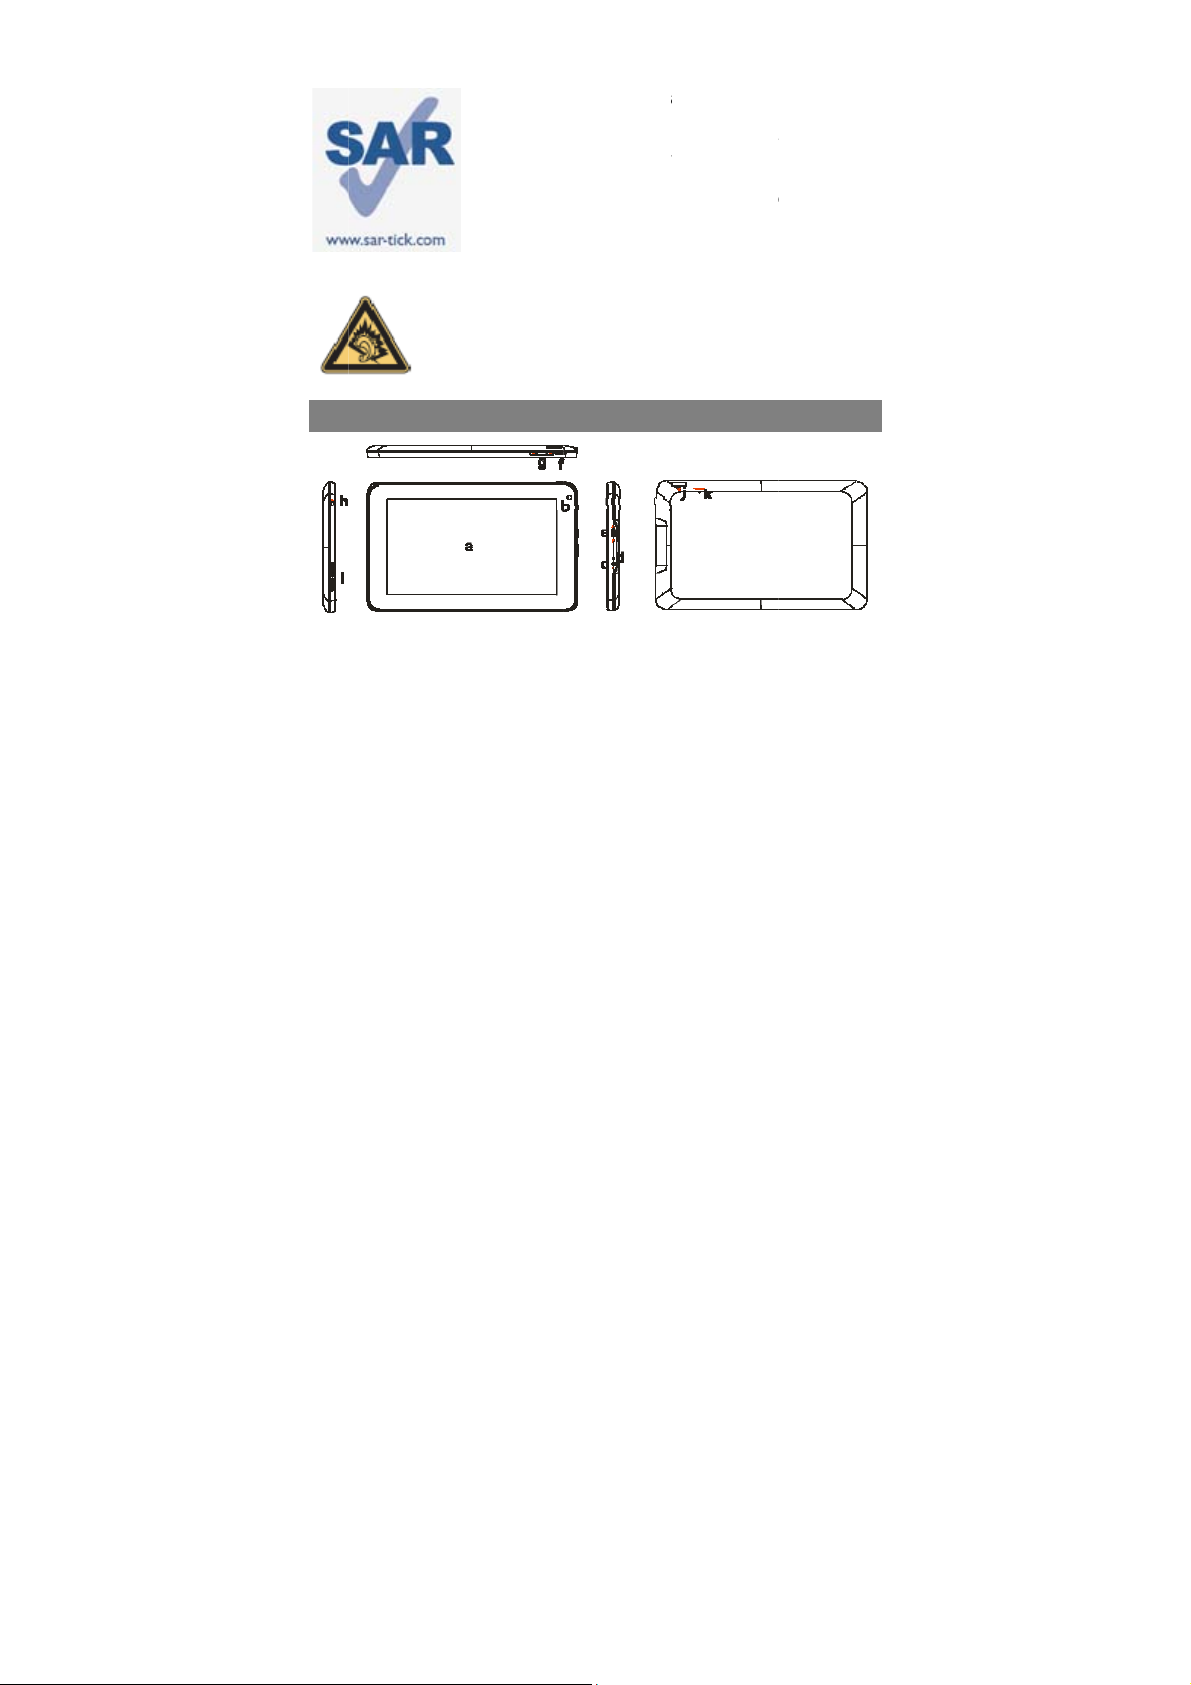
a.
b.
c.
d.
e.
f.
g.
h.
i.
j.
k.
Pr
vo
M
Touch Screen
Built-in Webc
DC-IN port – c
AC adaptor.
Charging indi
charging comp
Micro USB P
ower –Press a
unlock the scr
VOL+/- – Incre
Earphone soc
Built-in Speak
icro SD card S
Microphone
device freezes.
This devic
1.6W/kg. T
found on p
device or u
approved
maintain a
compliance
the product
it.
longed expos
yer may dam
lume safely. U
bile Limited an
Butto
m
onnects to any
ator– Lights re
etes.
rt – Connects t
d hold to turn o
en.
ase/ decrease t
et – connects to
rs
ot
Reset pin hole
meets applic
e specific m
ge 19 of this u
ing it while wo
ccessory such
istance of 0.5
with RF expo
may be transmi
ure to music
ge the listene
e only headp
d its affiliates.
ns & Po
tandard electric
during chargin
PC via USB ca
n or off the unit;
e volume.
tereo earphones
Sound recordin
ble national
ximum SAR v
er guide. Wh
n on your body
as a holster
cm from the b
ure requireme
tting even if yo
t full volume
r's hearing. S
ones recomm
ts
source through
, and lights ora
le.
briefly press to l
.
;reset your devic
AR limits of
alues can be
n carrying the
either use an
or otherwise
dy to ensure
ts. Note that
are not using
on the music
t your device
nded by TCT
he provided
ge as
ck or
if the
2
Page 3
Note: Pressing the Reset button will only turn off the device. To turn on the
device , user needs to press and hold the Power button.
Charging Battery
The device has a built-in recharg eable battery. No extra battery install ati on is required.
Just charge the device when it indicates low battery.
To charge the battery, connect the device to any standard wall outlet via the
DC-INport using the power adaptor.It takes about 5 hours to fully charge the battery.
When the battery is fully charged, the charge indicator should light up in orange.
During charging, the indicator lights up in red.
Note:
a. You are strongly recomm ended to char ge the batt ery imm ediately wh en the devic e indicates the batt ery
is lower than 15%!
b. For extended battery life, it is suggested NOT to use the device when it is charging.
c. For maximum performance, lithium-ion batteries need to be used often. If you don’t use the device
often, be sure to recharge the battery at least once per month.
d. Be sure to use only the dedicated power adaptor provided with the unit for charging.
Installing Memory Card
This devicecan read files directly from memory card.
To use a memory card, find the card slot on the device and then insert the memory
card into the slot in the correct orientation. To access the files stored in the memory
card, enter the Explorer mode by tapping the Explorer icon and select the “SDCard”
directory.
Transferring Files
Before reading or playing files, you may need to transfer media files from a computer
to the device.
(1) Connect the device to a computer with the supplied USB cable. Two removable
disks will be added to the computer, respectively referring to the internal flash
memory and the SD card.
(2) Once the connection is done, turn on the USB storage.
(3) Open a removable disk, then copy files from the PC to it.
Note:
Since pre-installed applications and Android OS occupies a considerable part of capacity – about2.0GB, it
is normal that you see huge difference between available memory space and total capacity.
Turning On/Off
To turn on the device, press and hold the Power button on the unit until you see the
boot-up screen then release. It may take a few minutes to start up the system, please
3
Page 4
wait
b
e
F
t
a
c
e
H
t
t
a
c
P
p
a
h
t
e
c
u
o
s
f
m
n
e
s
h
(
o
e
e
g
m
e
e
s
s
y
b
p
s
n
e
e
n
S
u
n
efore you proce
To t u
rn off the devi
“Pow
r Off”, tap on “
Tip:
or the sake of
when
here is no touch
You c
n briefly press t
Un
locking
The s
reen will be lock
need
to unlock the s
you continue t o
befor
ed.
e, press and h
ower Off” and t
ower saving,this
ction for a while
e Power button t
he Scr
d after the devic
reen by draggin
se the device.
old the Power
en tap on “OK”.
device may slee
depending on the
wake it up.
en
is idle for a few
the lock icon
utton until you
with the scree
actual setting of
econds. You
rightwards
see the option
display locked
creen Timeout).
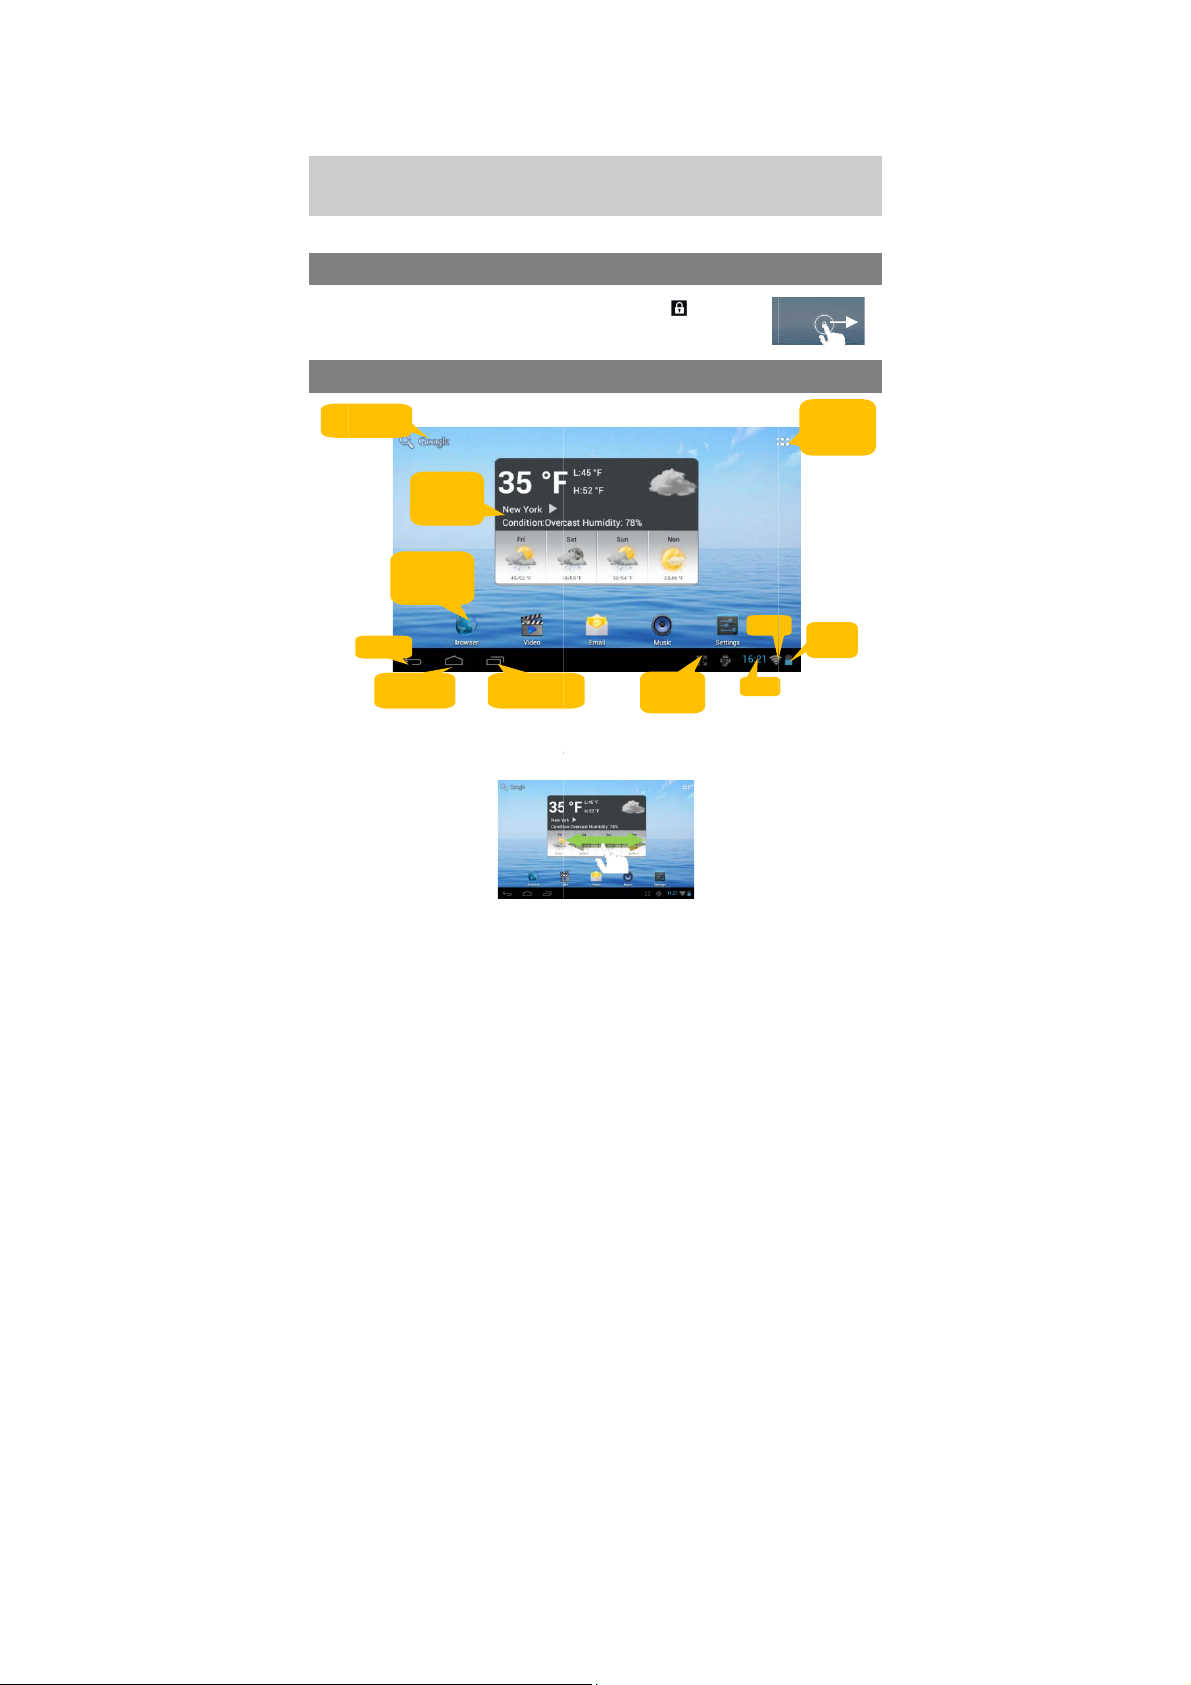
Go
o Google
Se
rch page
Return
extended H
The
The
ome Screen con
etc..S
lide your finger le
Cus
omizing Ho
World
Weath
foreca
Default
Shortcut
applicatio
Go to Home
screen
Ho
Cit
r
t
to
Recently u
application
me Screen
ists five separat
t or right on the s
e Screen It
e Scree
ed
screens for posit
creen to go to th
ms
Scre
mod
Wi-F
en
ioning the shortc
extended scree
Time
Go to
application
page
i
Battery
level
ts, widgets
s.
4
Page 5
a
p
e
e
prom
m
e
s
n
y
s
n
h
a
e
f
n
e
c
e
s
u
e
s
u
y
t
e
s
c
s
n
c
o
fo
t
t
a
a
e
d
d
g
p
d
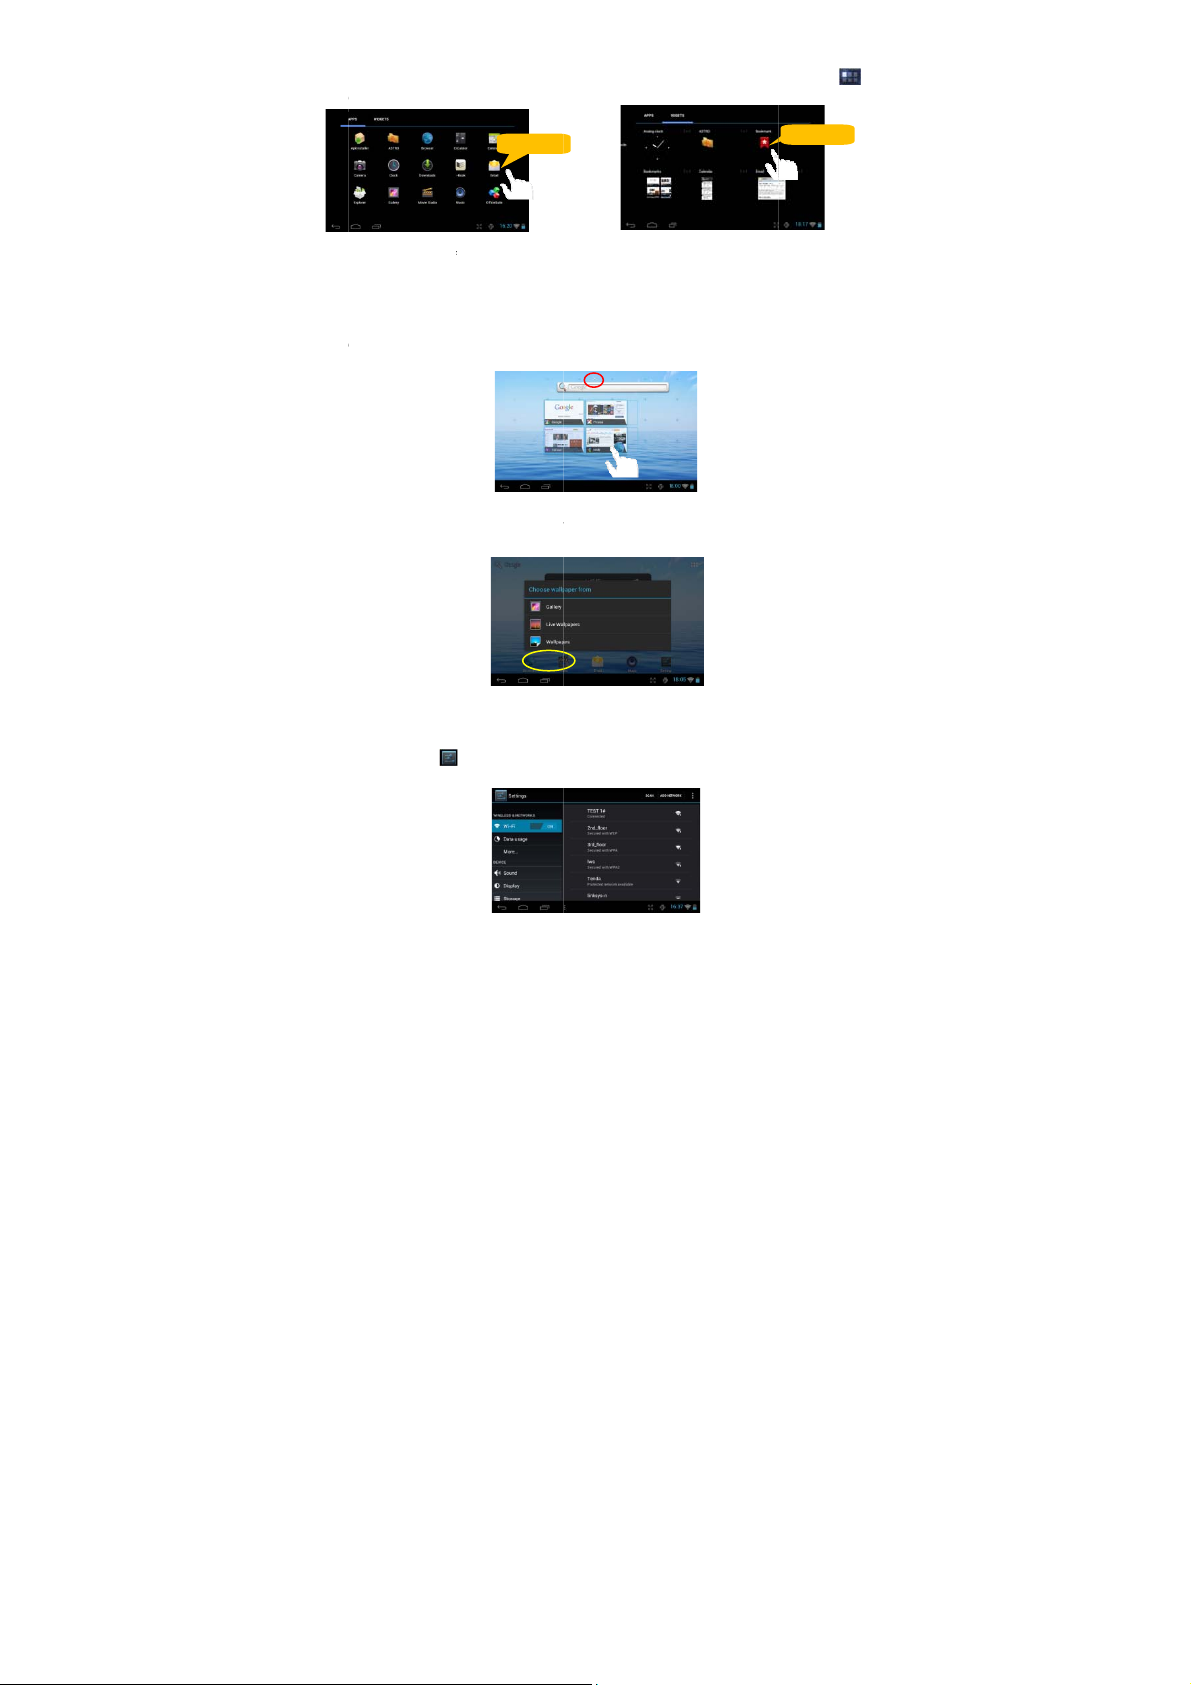
To
dd a Home Scre
dis
lay all application
pag
.
Not
: If current page o
pted that there is
To
ove a Home Scr
desi
red location, and
To r
move a Home S
bin
ymbol “X” and th
Cha
ging the wa
Hold
our tap on the
choo
e a picture as th
n item (shortcut,
s and widgets, th
Hold dow
Home Screen ha
o more room.
een item, hold yo
release it.
reen item, hold
en release your fi
llpaper
Home screen un
desktop wallpap
widgetetc.), you
n hold your tap
no enough room
r finger onto it to
our finger onto it
nger.
il a menu appe
r.
an tap the applic
n an item to plac
r a shortcut or wi
highlight it, then
o highlight it, dra
r. Tap on “Wall
tion icon to
it on the home
Hold down
get, you will be
rag it to the
it to the recycle
aper” and then
Cha
ging the Sy
Tap t
e Setting icon
relev
nt settings for yo
tem Setting
on the Home S
r device if neces
reen to open the
ary.
5
settings menu an
change
Page 6
Dis
p
d
c
d
n
W
n
e
e
a
ase
eon
hthe
hmacoap
e
r
n
u
c
t
g
c
e
d
e
I
d
n
a
h
c
k
w
c
W
s
e
W
w
o
a
s
e
p
i
F
m
f
d
w
s
s
r
h
d
r
a
e
c
n
n
f
w
n
w
s
d
t
e
y
o
w
e
n
w
e
m
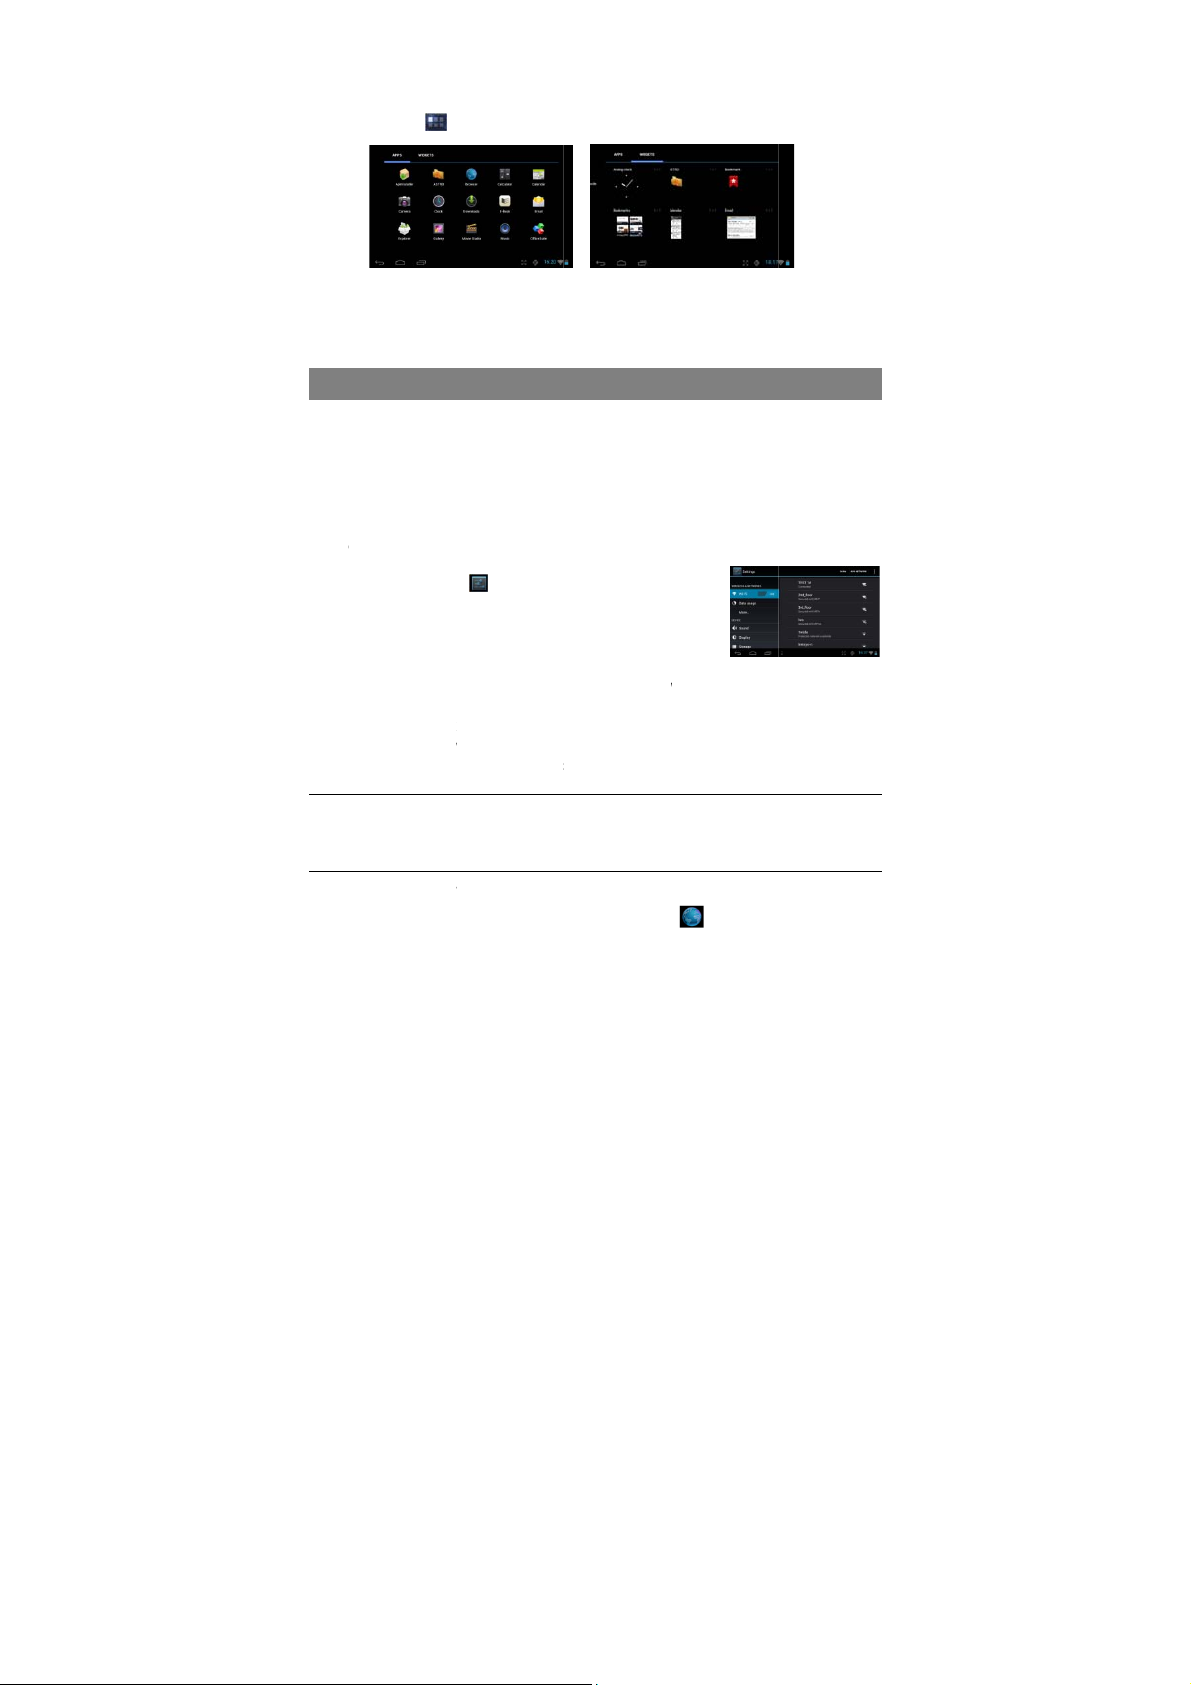
lay all Appli
The
evice has many
Appli
ation Tab
Tip
:
Holding your fin
ations and
useful applicati
o display them.
er on an item c
idgets
ns and widgets
n add it to the
pre-installed. Yo
esktop as a sho
u can tap the
rtcut.
This
evice features
the I
ternet.
For
i-Fi application,
stay i
a Wi-Fi servic
have
configured, the
Mak
WI-FI Conn
Befor
launching an
activ
te the Wi-Fi an
(1)
T
p the Setting ico
ttings menu.
(2) S
lect “Wi-Fi” and
Wi-Fi.
(3) T
e device will sc
right panel. T
ra
nge of your devi
(4) C
oose a networ
y be secured
nnection is suc
pear under the
Note:
1. The
available network li
2. Wh
n the Wi-Fi is enabl
are in
ange.
Lau
ching the
To la
nch the Web br
Acces
onnection of W
you need to con
zone. Whenev
evice will attem
ection
nternet applicat
configure a Wi-
on the Ho
slide the toggle
n automatically
e list of availab
e.
from the list an
ith password,
essful, the mes
IFI Setting.
t is constantly refre
d, the device will co
eb browse
owser, you tap t
ing Inte
i-Fi networks th
figure a Wi-Fi n
r it is within the
t to make a co
on such as the
i network.
e Screen to ope
switch to “ON” t
or available Wi-
le networks sho
then tap “Con
enter the pass
age Connecte
hed automatically.
nnect automatically
e Browser icon
net
t provides you
twork first, and
overage of a W
nection.
web browser, y
the
o turn
Fi networks and
s all the wirel
ect” to connect.
ord before co
to…(WiFi Net
o your configured n
in the Ho
asy access to
ou will have to
iFi network you
u first need to
display them in
ss networks in
Some network
necting. If the
ork Name) will
tworks when they
e screen.
6
Page 7
To di
s
n
a
n
odo
o
o
o
o
h
s
osc
a
p
e
e
a
s
s
n
m
p
y
m
r
u
r
y
V
t
i
o
h
m
c
i
p
m
o
V
b
W
o
c
m
a
s
a
e
d
o
y
play context m
Tappi
g on any text inp
enter
website addres
nus, tap .
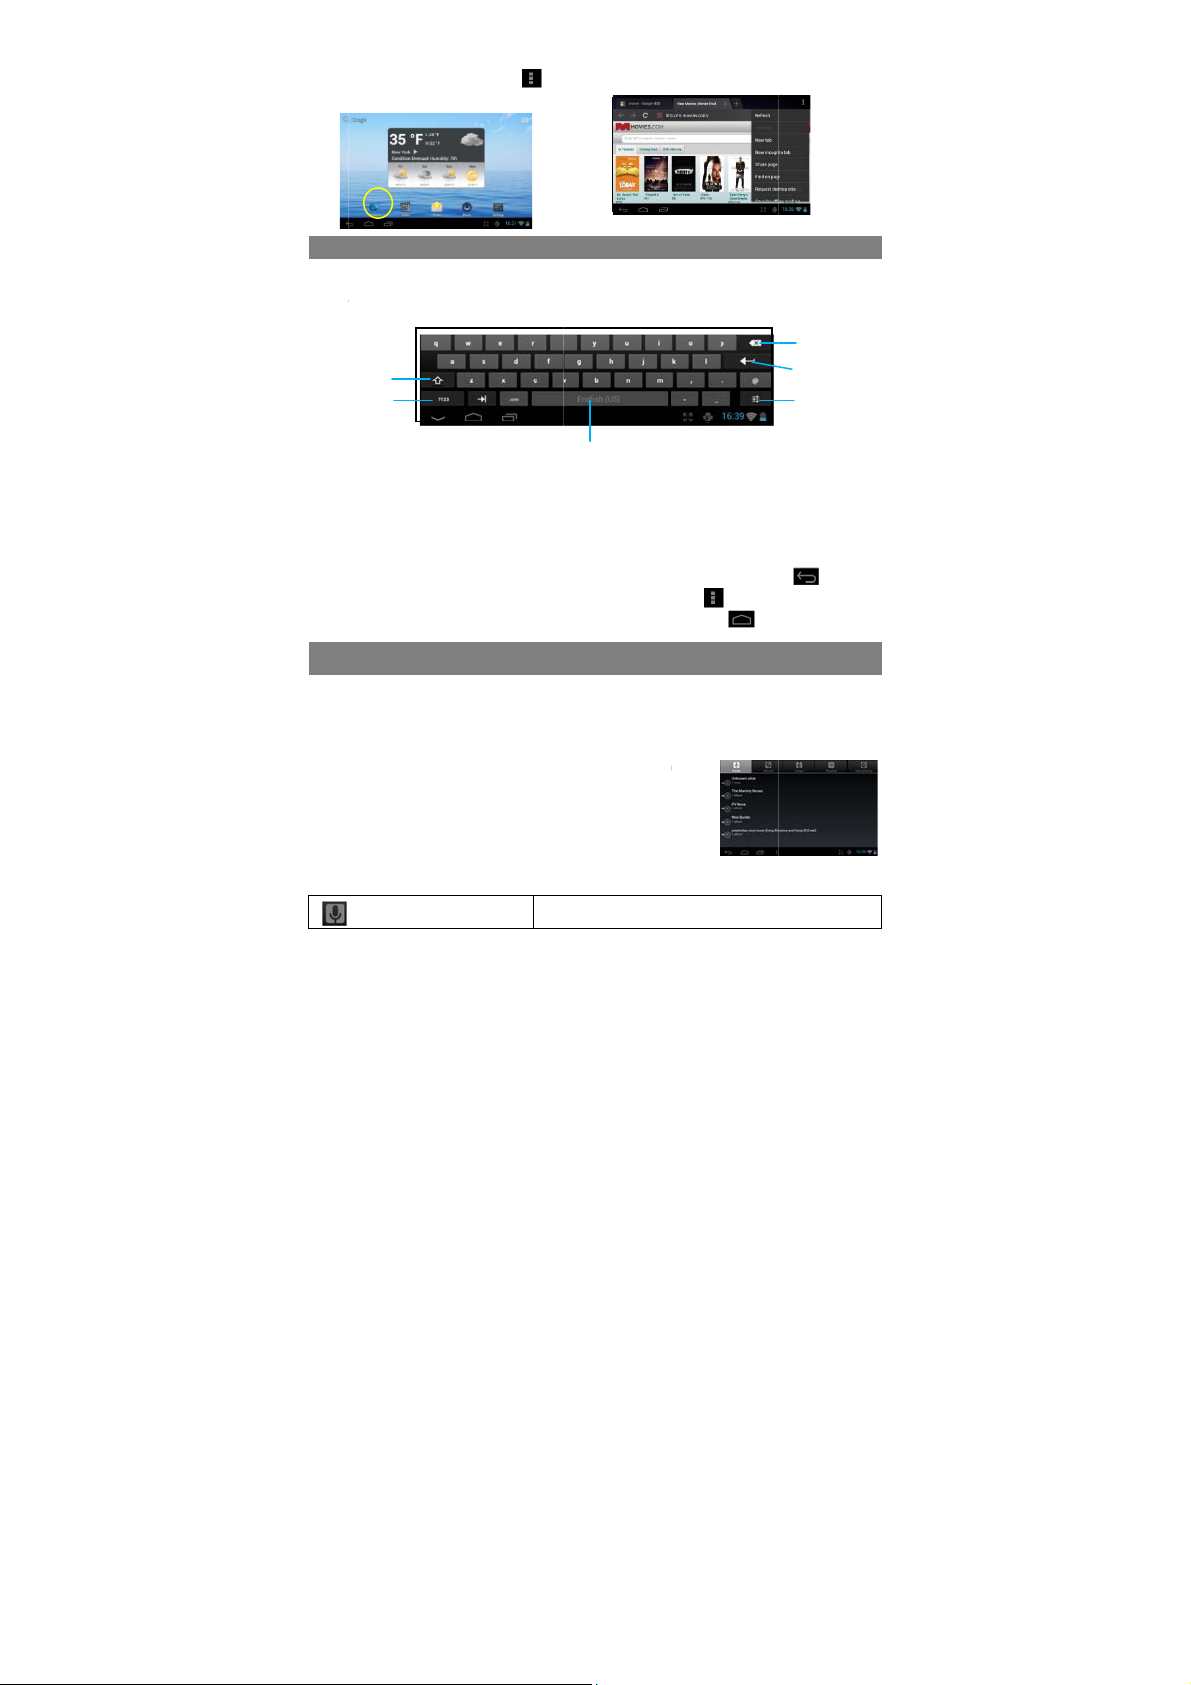
Using the
ut field can open
or any text requ
irtual Key
he virtual board.
red.
oard
ith the virtual k
yboard, you can
Backspace
Ca
s Lock
Num
ber/
Lett
r switch
Usi
g the Web B
Y
u can scroll the
wn (be careful
T
open a link, si
T
go back to the
T
display the ava
T
go back directl
Tap t
e Music icon in
Mus
ic Library
You
hould enter the
playe
r. The Music Lib
categ
ories (Artist, Alb
these
song informatio
Y
u can drag you
roll through it.
T
p a song to pla
Artist
rowser
creen up and d
ot to tap a link u
ply tap it.
revious page t
ilable menu ite
to the Home s
Play
the Home or ap
usic library onc
ary shows your
m, etc.) if your
n tags.
finger up and d
.
Space
wn by tapping o
ntil you are read
at you browsed,
s, tap the Menu
reen, tap the H
ng Musi
s page to laun
e you start the
music files sorte
usic files cont
wn on the file li
Lis
t music files by
n the page and
y!).
tap the Back ic
icon .
me icon .
c
h the music pla
usic
d by
in
t to
rtist.
Enter
input method
ragging it up or
n.
er.
7
Page 8

S N
y
y
g
u
y
p
d
s
a
o
a
h
i
g
m
o
u
r
t
t
h
g
j
o
n
h
a
t
t
i
p
j
a
o
y
n
a
p
a
a
o
h
s
/
a
N
s
u
n
s
p
t
t
e
e
Album
ongs
Playlists
ow Playing
Pla
back Screen
Pla
back menu
Durin
playback of a
men
:
Lis
t music files by
Lis
t all music files.
Lis
t your favorite s
G
to the Now Pla
a. Now Pla
a
d
c
b
e
f
h
i
k
usic file, tap o
b. Shuffle
c. Repeat
d. Display l
e. Artist N
f. Album
g. Title
h. Previou
i. Play/Pa
j. Next so
k. Progres
the MENU icon
lbum.
ngs.
ing screen.
ying List
ongs /Not shuffl
Not repeat
yric
me
ame
song/Rewind
se
g/Fast Forward
bar
to bring u
a context
Pla
list
The
laylist is a list of
To a
d the current tra
playli
t” and then cho
To pl
y a playlist,
(1) In
the Music men
y
u have added a
(2) T
p a song to star
Tap t
eVideo icon in
Nav
gate throug
songs that you
ck to a playlist, t
se a playlist or
,tap the Playlist
e listed.
playing.
Play
he Home or ap
Video Files
ave added ma
p during
ap “new” to cre
icon to displ
ng Vide
s page to launc
8
ually.
layback, selelec
te a new playlis
y all the playlis
the video play
t “Add to
.
. All songs that
r.
Page 9

You
s
odo
a
y
S
d
Vide
o
m
a
t
h
View
d
r
y
S
t
n
e
d
o
e
o
e
e
e
a
a
s
o
V
p
e
o
g
d
e
v
n
o
c
d
v
c
g
i
l
n
hould see the vi
Y
u can drag your
wn.
T
p a video to sta
Pla
back Screen
a
d
e f g
Note:
ome video files ma
the en
of the manual, and
eo list when yo
finger up and d
t playing.
b
h i j
not be played corr
make sure the vide
u enter the vide
wn on the video
a.
b.
c.
d.
e.
f.
g.
c
k
ctly with the device.
resolution, encodin
h.
i.
j.
k.
player.
list to scroll the
VOL-
Progress bar
VOL+
Bookmark
Brightness
Previous Video/
Play/Pause
Next video/Fast
View Mode
Exit
Video settings
Refer to the Techni
format or file type
ideo list up and
Fast Rewind
forward
al Specifications at
s supported.
o Playback
Tap
n the icon
De
lete Bookmark a
beginning
fro
De
lete Bookmark
Pl
y Mode
He
lp
Re
urn
Tap t
eGallery icon i
ing Photos
(1)
Photos should b
or right to brows
ettings
to display the vi
nd Play Delet
Delet
Singl
Repe
Repe
Get in
Exit fr
iewi
the Home or a
listed in thumb
e photos.
deo settings.
bookmark and pla
the video bookma
–Plays current vi
t One – Repeat th
t All – Repeat all
tructions on playi
m the menu.
ng Phot
ps page to laun
nail. You can sli
9
y from beginning.
rk.
eo and then stops
current video.
ideos.
g video.
s
h the Photo Ga
e your finger o
after playing.
lery.
the screen left
Page 10

(2)
T
T
T
p
n
T
m
T
r
T
u
g
h
u
n
u
c
n
s
e
e
ap a photo thu
bnail to view t
e photo in full s
reen.
(3)
o display the p
(4)
o zoom in or o
Dis
lay Menu
Whe
you are viewin
show
a menu.
evious/next pict
t the picture, pi
the picture, yo
re, slide your fi
ch your finger o
can tap on the
ger on the scre
n the picture.
creen or the M
n horizontally.
nu icon to
10
Page 11

Tap t
h
o
a
h
ovid
othe
c
n
g
athe
o
o
o
oLe WHo
n
d
c
e
l
o
r
o
o
o
a
a
u
e
e
k
o
o
o
/
v
a
d
e
v
e
h
e
r
n
f
v
c
n
k
a
a
a
p
i
d
p
p
eCamerain the
Viewf
inder
T
start making vi
re
cording.
T
p on the Start/S
T
e video clip / ph
T
play the video
eo.
T
view the photo
photo.
Usi
g the C
apps page to la
eo clips, tap on
top button
oto can be previ
lip that you hav
that you have ta
mcorde
nch the Camer
the Start/Stop b
again to stop vi
wed in the Pre
made, enter th
en, enter the P
r/Camer
.
Preview w
Zoom
Start/Sto
Settings
VCR mo
Photogra
utton to st
eo recording or
iew Window.
Video Player,
oto Viewer mod
ndow
e
hy mode
rt video
photographing.
nd then tap the
e, and then tap
You
an explore files
Usi
g the Explor
Navi
ate through Fi
T
p theExplorer ic
File Explorer.
Y
u can drag you
lis
t up and down.
T
open a file or f
Y
u can go back
or Nexticon
Y
u can go back
velUpbutton
herever you are
me screen by t
Expl
and folders with
es and Folders
n in the applica
finger up and d
lder, tap the file
r forward one le
.
ne level in the d
.
in the interface,
pping .
ring Fil
either the Explo
tion page to lau
wn to scroll the
folder.
el in the interfa
irectory by tappi
you can go bac
11
s
er or ASTRO a
ch
ile
e by tapping on
g on the
directly to the
plication.
the Back icon
Page 12

Tapping can hide/display the toolbar.
Tap the Home icon to go to the root directory.
Copy/Move Files and Folders
(1) In the file list, scroll up and down by sliding your finger to select the file/folder
that you want to copy or move.
(2) Hold the selected file/folder until a pop-up menu appears.
(3) Select “Copy” or “Move” from the pop-up menu.
(4) Navigate to the location where you wish to copy or move the file/folder to.
(5) Select the Editor icon from the toolbar and then choose “Paste.”
Delete Files and Folders
(1) In the file list, scroll up and down the list by sliding finger to select the file/folder
that you want to delete.
(2) Hold the selected file/folder until a pop-up menu appears.
(3) Select “Delete” from the pop-up menu, the n select “Del ete” to confirm or “Cancel ”
to quit.
Rename Files and Folders
(1) In the file list, scroll up and down the list by sliding finger to select the file/folder
that you want to rename.
(2) Hold the selected file/folder until a pop-up menu appears.
(3) Select “Rename” from the pop-up menu.
(4) Tap the input field to display the virtual keyboard, and then choose letters from
the virtual keyboard to rename the file/folders.
(5) Tap “OK” to confirm the new name.
Select Multiple Items
You can select more than one file or folder together.
(1) In the top toolbar, tap the Multi icon “ .”
(2) Tap the files/folders you want to choose. The file/folder name turns red when
selected. (To deselect the file/folder, tap it again.)
(3) Once you finished selection, you can delete, copy or move the selected files by
tapping on the Editor icon .
Sending/Receiving E-mails
This device has an E-mail application pre-installed. You can send or receive e-mails
from the Internet at any time with this device. Make sure you have an Internet
connection before using the email service.
In the Home Screen, tap the Applications shortcut to display all applications and then
tap the Email icon to launch the e-mail application.
12
Page 13

Setup Email Account
First you need to setup an E-mail account for receiving or sending emails.
(1) Start up the email application by tapping the Email application icon and you are
prompted to setup an account.
(2) Input your email address and login password. You can set the account as default
by selecting the option “Send email from this account by default”.
(3) Tap “Manual Setup” to set the email server information.
(4) Choose the server type from POP3, IMAP or Exchange for incoming emails. To
know what type of your email server is, you can consult the service provider,
network administrator or search for information in the Internet.
(5) Input required information (serve r, port etc.). You can obtain the information from
the service provider, network administrator or the Internet.
(6) Choose the server type for outgoing emails, and input required server information.
(7) Click “Next” to continue. Your tabletwill check the server settings. When it prompts
you that “Your account is set up, and email is on its way”, your account is set up
successfully.
(8) Input your name and then tap on “Done” to finish.
Note: If you have more than one account, every time when you start up the email application, you enter the
default email account.
Manage Accounts
You can setup more than one account and manage these accounts by checking
information about the account, adding another account or deleting an account.
Add another Account
Following these steps to add another account if you want.
(1) Launch the email application and then tap on the Menu icon to display the
menu item. Choose “Accounts” to display accounts.
(2) Tap on the Menu icon to display the menu item, and then choose “Add
account”.
(3) Follow the steps of setting up a Email Account to add an account.
Delete an Email Account
(1) When you are in the email box, tap on the Menu icon to display the menu
items.
(2) Tap on “Accounts” to display all email accounts.
(3) Hold your tap on the account that you want to delete until a menu pop up.
(4) Tap on “Remove Account”,and then tap on “OK” to con firm.
Check the Account Setting
(1) When you are in the email box, tap on the Menu icon to display the menu
items.
(2) Tap on “Accounts” to display all email accounts.
(3) Hold your tap on the account that you want to check until a menu pop up.
13
Page 14

(4) Tap “Account settings”,and then you should see all setting information about the
account. You can edit these settings as you want.
View Emails
You should enter your mailbox when you start up the email application.
In the mailbox, you can slide your finger up and down to scroll through the email
list.
Tap on an email to open it.
Holding your tap on the email can display a menu. With the menu, you can open,
reply, forward or delete the email.
Email Menu Items
In the email list, tap on the Menu icon to display the menu.
Refresh Refresh the emails.
Compose Compose a new email.
Folders Go back to email box.
Accounts View all email accounts.
Account Settings Check your account settings.
Other Applications
Some useful small apps have been preinstalled in this device, such as Calculator,
Calendar, Sound Recorder, Office Suite etc.. They are easy to use, thus no detailed
instructions are necessary for these apps. Please always follow the actual oper ation
of your device.
Managing Apps
You can manage your applications of the device easily.
There are number of useful apps pre-installed in the device as it is produced at the
factory, and you can copy some from other resources, download or purchase them
over the internet.
Download or Purchase Applications
With your device, you can visit an apps store or E-market website (e.g.Google Play)
that provides you plenty of free apps to download. For those apps that are not free,
you will have to pay for them if you want to have them.
Install Applications
You can install applications following these steps:
(1) Open the Explorer application, then find the app you want to install.
(2) Tap the app you want to install to start installation. However, for the sake of
security, the device may prompt you that there is possibility of attack risk if you install
and run some apps whose sources are not guaranteed. In this case, you shall turn to
the Settings menu and select Security to check the “Unknown sources” before you go
on with the installation.
14
Page 15

(3) O
nsc
n
a
e
a
a
o
o
a
o
d
o
u
T
f
e
o
tlocWT
o
a
a
p
b
o
e
e
d
d
t
h
T
p
n
f
n
e
h
r
n
c
e
o
a
n
c
d
i
e
g
a
m
e
s
n
s
w
P
h
y
e
s
d
r
m
s
b
a
e
e
e
e
s
d
.
e
r
s
n
u
s
n
ce the installati
reen. It is ready
Uni
stall Applic
(1) T
p the Settings s
(2) S
lect “Apps”.
(3) T
b on the applic
(4) T
b on “Uninstall”
(5) Y
u can simply ta
dr
ag it to the dust
Note:
Y
u cannot uninstall th
M
ke sure all apps y
S
me applications d
co
nsult the respectiv
n is completed,
for running.
tions
hortcut in the H
tion that you wa
to uninstall the
and hold on a
in icon to uninst
e pre-installed appli
u have copied or
veloped for Andro
software develop
you can find th
me Screen to di
nt to uninstall.
pplication.
app icon to jum
all it.
ations, but you can
ownloaded to you
d mobile might not
r for further infor
icon of the app
play setting me
p to the Home S
eactivate or stop th
device are in the
run properly in th
ation.
in the apps
nus.
creen, then
em.
apkformat.
device. Please
Your
evice can han
phot
s while listening
are r
nning. In order
can e
nd some tasks t
(1)
ap to dis
(2)
Hold your tap o
rom list”.
(3)
Besides, you ca
Res
t this devic
In
the event that t
h
lding the Powe
If
he Power butto
ated on the ba
e recommend
he manufactur
Mana
le multiple tasks
to music. Multit
o save system
at you don’t us
lay application
the application
open the Setti
Troub
e device freeze
button for a fe
does not reset
k the device.
Safety
that you read t
r disclaims an
ing Ta
at the same tim
sking is helpful
emory and enh
at the moment.
that you used r
that you want to
gs menu and s
leshooti
, you can force
seconds.
your device, us
recauti
is chapter car
liability for da
ks
e. For example,
ut inefficient if t
nce system pe
cently.
stop, and then
lect Apps to ma
ng
the device to sh
the “pinhole re
ons
fully before usi
mage, which m
you can view
oo many tasks
formance, you
elect “Remove
age the tasks.
t down by
et” button,
g your device.
ay result as a
15
Page 16

consequence of improper use or use contrary to the instructions contained
herein.
TRAFFIC SAFETY:
Given that studies show that using a device while driving a vehicle constitutes a
real risk, even when the hands-free kit is used (car kit, headset...), drivers are
requested to refrain from using their device w hen the vehicle is not parked.
When driving, do not use your device and headphone to listen to music or to the
radio. Using a headphone can be dangerous and forbidden in some areas.
When switched on, your device emits electromagnetic waves that can interfere
with the vehicle’s electronic systems such as ABS anti-lock brakes or airbags. T o
ensure that there is no problem:
- do not place your device on top of the dashboard or within an airbag
deployment area,
- check with your car dealer or the car manufacturer to make sure that the
dashboard is adequately shield ed from device RF energy.
CONDITIONS OF USE:
You are advised to switch off the device from time to time to optimize its
performance.
Switch the device off before boarding an aircraft.
Switch the device off when you are in healthcare facilities, except in designated
areas. As with many other types of equipment now in regular use, these devices
can interfere with other electrical or electronic devices, or equipment using radio
frequencies.
Switch the device off when you are near gas or flammable liquids. Strictly obe y
all signs and instructions posted in a fuel depot, petrol station, or chemical plant,
or in any potentially explosive atmosphere.
When the device is switched on, it should be kept at least 15 cm from any
medical device such as a pacemaker, a hearing aid or insulin pump, etc. In
particular when using the device, you should hold it against the ear on the
opposite side to the device, if any.
To avoid hearing impairment, move the handset away from your ear while using
the “hands-free” mode because the amplified volume might cause hearing
damage.
Do not let children use the device and/or play with the device and accessories
without supervision.
When replacing the cover please note that your device may contain substances
that could create an allergic reaction.
Always handle your device with care and keep it in a clean and dust-free place.
Do not allow your device to be exposed to adverse weather or environmental
16
Page 17

conditions (moisture, humidity, rain, infiltration of liquids, dust, sea air, etc). The
manufacturer’s recommended operating temperature range is 0°C to +45°C.
At over 45°C the legibility of the device’s display may be impaired, though this is
temporary and not serious.
Do not open, dismantle or attempt to repair your device yourself.
Do not drop, throw or bend your device.
Do not use the device if the glass ma de screen , is damaged , cracked or br oken
to avoid any injury.
Do not paint it.
Use only battery chargers and accessories which are recommended by TCT
Mobile Limited and its affiliates and are compatible with your device model. TCT
Mobile
Limited and its affiliates disclaim any liability for damage caused by the use of
other chargers or accessories.
Remember to make back-up copies or keep a written record of all important
information stored in your device.
Some people may suffer epileptic seizures or blackouts when exposed to
flashing lights, or when playing video games. These seizures or blackouts may
occur even
If a person never had a previous seizure or blackout. If you have experienced
seizures or blackouts, or if you have a family history of such occurrences, plea se
consult
your doctor before playing video games on your device or enabling a
flashing-lights feature on your device.
Parents should monitor their children’s use of video games or other features that
incorporate flashing lights on the device. All persons should discontinue use and
consult a doctor if any of the following symptoms occur: convulsion, eye or
muscle twitching, loss of awareness, involuntary movements, or disorientation.
To limit the likelihood of such symptoms, please take the following safety
precautions:
- Do not play or use a flashing -lights feature if you are tired or need sleep.
- Take a minimum of a 15-minute break hourly.
- Play in a room in which all lights are on.
- Play at the farthest distance possible from the screen.
- If your hands, wrists, or arms become tired or sore while playing, stop and rest
for several hours before playing again.
- If you continue to have sore hands, wrists, or arms during or after playing, stop
the game and see a doctor.
When you play games on your device, you may experience occasional
discomfort in your hands, arms, shoulders, neck, or other parts of your body.
Follow the instructions to avoid problems such as tendinitis, carpal tunnel
syndrome, or other musculoskeletal disorders.
Prolonged exposure to music at full volume on the music player
17
Page 18

may damage headphones recommended by TCT Mobile Limited and its
affiliates.
●PRIVACY:
Please note that you must respect the laws and regulations in force in your
jurisdiction or other jurisdiction(s) where you will use your device phone
regarding taking photographs and recording sounds with your device. Pursuant
to such laws and regulations, it may be strictly forbidden to take photographs
and/or to record the voices of other people or any of their personal attributes,
and duplicate or distribute them, as this may be considered to be an invasion of
privacy. It is the user's sole responsibility to ensure that prior authorization be
obtained, if necessary, in order to record private or confidential conversations or
take a photograph of another person; the manufacturer, the seller or vendor of
your device (including the operator) disclaim any liability which may result from
the improper use of the device.
● BATTERY:
Observe the following precautions for bat tery use:
- Do not attempt to open the battery (due to the risk of toxic fumes and burns).
- Do not puncture, disassemble or cause a short-circuit in a battery,
-Do not burn or dispose of a used battery in household rubbish or store it at
temperatures above 55°C.
Batteries must be disposed of in accordance with locally applicable
environmental regulations.
This symbol on your device, the battery and the
accessories means that these products must be
taken to collection points at the end of their life:
-Municipal waste disposal centres with specific
bins for these items of equipment
- Collection bins at points of sale.
They will then be recycled, preventing substances
being disposed of in the environment, so that their
components can be reused.
In European Union countries :
These collection points are accessible free of
charge. All products with this sign must be brought
to these collection points.
In non-European Union jurisdictions :
Items of equipment with this symbol are not to be
thrown into ordinary bins if your jurisdiction or your
18
Page 19

region has suitable recycling and collection
facilities; instead the y are to be taken to collect ion
points for them to be recycled.
● CHARGERS:
Mains powered chargers will operate within the temperature range of: 0°C to 40°C.
The chargers designed for your device meet with the standard for safety of
information technology equipment and office equipment use. They are also compliant
to the ecodesign directive 2009/125/EC. Due to different applicable electrical
specifications, a charger you purchased in one jurisdiction may not work in another
jurisdiction. They should be used for this purpose only.
● RADIO WAVES:
THIS DEVICE MEETS INTERNATIONAL GUIDELINES FOR EXPOSURE TO RADIO
WAVES
Your device is a radio transmitter and receiver. It is designed not to exceed the limits
for exposure to radio waves (radio fr equ ency electromagnetic fields)recommended by
international guidelines. The guidelines were developed by an independent scientific
organization (ICNIRP) and include a substantial safety margin designed to assure the
safety of all persons, regardless of age and health. The radio wave exposure
guidelines use a unit of measurem ent know n as th e Specifi c Abs orption Rate, or SA R.
The SAR limit for mobile devices is 1.6 W/kg.
Tests for SAR are conducted using standard operating positions with the device
transmitting at its highest certified power level in all tested frequency bands. The
highest SAR values for this device model is:
Maximum SAR for this model and conditions under which it was recorded:
Body-worn SAR Wi-Fi 0.073W/kg.
During use, the actual SAR valu es for this device are usu ally well below the values
stated above. This is because, for pu rpo se s of system efficiency and to minimize
interference on the network, the operating power of your device is automatically
decreased when full power is not needed. The lower the power output of the device,
the lower its SAR value.
To meet RF exposure guidelines during body-worn operation, the device should be
positioned at least this distance away from the body. If you are not using an approved
accessory ensure that whatever product is used is free of any metal and that it
positions the device the indicated distance away from the body.
Organizations such as the World Health Organization and the US Food and Drug
19
Page 20

Administration have suggested that if people are concerned and want to reduce their
This symbol on your device, the battery and the accessories means that these
products must be taken to coll ectio n poi nts at t he e nd o f thei r li fe: ex pos ur e they co uld
use a hands-free accessory to keep the wireless device away from the head or body
during use, or reduce the amount of time spent on the device.
This device complies with part 15 of the FCC rules. Operation is subject to the
following two conditions: (1) this device may not cause harmful interference, and (2)
this device must accept any interference received, including interference that may
cause undesired opera tion.
NOTE: The manufacturer is not responsible for any radio or TV interference caused
by unauthorized modifications to this equipment. Such modifications could void the
user’s authority to operate the equipment.
NOTE: This equipment has been tested and found to comply with the limits for a
Class B digital device, pursuant to part 15 of the FCC Rules. These limits are
designed to provide reasona ble pro tecti on aga inst harmful inter ference in a resid ential
installation. This equipment generates uses and can radiate radio frequency energy
and, if not installed and used in accordance with the instructions, may cause harmful
interference to radio communications. However, there is no guarantee that
interference will not occur in a particular installation. If this equipment does cause
harmful interference to radio or television reception, which can be determined by
turning the equipment off and on, the user is encouraged to try to correct the
interference by one or more of the following measures:
- Reorient or relocate the receiving antenna.
- Increase the separation between the equipment and receiver.
-Connect the equipment into an outlet on a circuit different from that to which the
receiver is connected.
-Consult the dealer or an experienced radio/TV technician for help
●LICENCES:
The Wi-Fi Logo is a certif icati on mark of th e Wi-Fi
Alliance.
Your device uses non-harmonized frequency and
is intended for use in all European countries.
The WLAN can be operated in the EU without
restriction indoors, but cannot be operated
outdoors in France.
20
Page 21

Gen
e
e
t
u
c
e
r
d
e
s
o
c
e
e
a
M
s
h
u
d
i
s
r
h
m
i
a
w
g
w
w
m
e
t
c
e
n
i
q
n
d
s
a
s
s
s
e
t
s
u
g
e
u
u
d
t
a
e
r
e
n
t
e
u
t
c
b
r
y
h
t
e
e
n
e
e
t
e
a
s
h
i
i
“
d
c
e
c
o
n
m
b
e
e
t
o
n
r
v
w
m
a
e
a
t
p
e
ral informat
• Int
rnet address: w
• Ho
Line Number: s
On o
r website, you
also
ontact us by e-
An el
ctronic version
acco
ding to availabili
Your
evice is a trans
This
quipment is in
provi
ions of Directiv
for y
ur telephone ca
ion
w.alcateloneto
ee “TCT Mobile
ill find our FAQ
ail to ask any q
of this user gui
y on our server:
eiver that oper
compliance with
1999/5/EC. Th
be obtained th
ch.com
Services” leaflet
(Frequently Ask
estions you ma
e is available i
www.alcatelon
tes on Wi-Fi.
the essential r
entire copy of t
ough our websi
or go to our we
d Questions) s
y have.
English and o
touch.com
quirements and
he Declaration
e: www.alcatelo
site.
ction. You can
her languages
other relevant
f Conformity
etouch.com.
Dis
laimer
Ther
may be certa
devic
’s operation, d
oper
tor services.
TCT
obile shall not
their
potential conse
exclu
ively.
This
andset may co
or so
rce code form,
(“Thir
Party Material
All th
rd party materi
kind,
whether expres
fitnes
for a particular
mate
ials or applicati
purc
aser undertake
incu
bent upon it as
with I
ntellectual Prop
inabil
ty or failure of
inter
ction with any o
by la
, TCT Mobile di
more
specifically – b
arisin
out of the us
n differences b
epending on th
be held legally
uences, which
tain materials, i
which is submit
”).
ls in this hands
or implied, incl
purpose or use/
ons of the pur
that TCT Mo
a manufacture
rty rights. TCT
the Third Part
her devices of t
claims all liabili
t not limited to
, by whatever
etween the us
software rele
responsible for
responsibility s
cluding applicat
ed by third part
t are provided
ding the implie
hird party appli
haser and non-
ile has compli
of mobile devi
Mobile will at n
Materials to
e purchaser. To
y for any claims,
– tort law actio
means, or atte
21
r manual desc
se of your de
uch differences
all be borne b
ons and softwar
es for inclusion
as is”, without
warranties of
ation, interoper
infringement of
d with all qu
es and handse
o stage be res
perate on this
the maximum e
demands, suits
s, under any th
pts to use, su
iption and the
ice or specific
, if any, nor for
y the operator
e in executable
in this handset
arranty of any
erchantability,
bility with other
copyright. The
lity obligations
s in complying
onsible for the
handset or in
xtent permitted
or actions, and
ory of liability,
ch Third Party
Page 22

Materials. Moreover, the present Third Party Materials, which are provided free of
charge by TCT Mobile, may be subject to paid updates and upgrades in the future;
TCT Mobile waives any responsibility regarding such additional costs, which shall be
borne exclusively by the purchaser. The availability of the applications may vary
depending on the countries a nd the op erat ors whe re the ha ndse t is us ed; in no event
shall the list of possible applications and software provided with the handsets be
considered as an undertaking from TCT Mobile; it shall remain merely as information
for the purchaser. Therefore, TCT Mobile shall not be held responsible for the lack of
availability of one or more applications wished for by the purchaser, as its availability
depends on the country and the operator of the purchaser. TCT mobile reserves the
right at any time to add or remove Third Party Materials from it s hands ets w ithout prior
notice; in no event shall TCT Mobile be held responsible by the purchaser for an y
consequences that such removal may have on the purchaser regarding the use or
attempt to use such applications and Third Party Materials.
22
 Loading...