

Page 1

Virgin mobile 001
Page 2

Conventions used in this guide
In this user guide, we use the following symbols to indicate useful and important information:
NOTE
NOTE Notes, usage tips, or additional information
Warning Situations that could cause injury to yourself or others
Caution Situations that could cause damage to your device or other equipment
002 Virgin mobile
Page 3

MEMO
Page 4

Contents
Specifications .................................................................................................. 010
Basics ............................................................................................................... 011
In Box ..............................................................................................................................................011
Phone Overview ..............................................................................................................................012
Proper Holding Position ..................................................................................................................014
Battery ...........................................................................................................................................014
MicroSD Card ...................................................................................................................................017
Turning Phone On or O ..................................................................................................................018
Phone Options ................................................................................................................................020
Finger Gestures ...............................................................................................................................021
Keyboard.......................................................................................................... 022
Using the QWERTY Keyboard ...........................................................................................................022
Using the Onscreen Keyboard ..........................................................................................................024
Editing Text .....................................................................................................................................032
Getting Started ................................................................................................ 034
Google Account ...............................................................................................................................034
Getting to Know the Home Screen ..................................................................................................037
Customizing the Home Screen ........................................................................................................038
Essential Display Icons .....................................................................................................................041
004 Virgin mobile
Page 5

Notications Panel ..........................................................................................................................044
Opening and Switching Between Applications ................................................................................045
Sleep Mode .....................................................................................................................................046
Adjusting Volume ............................................................................................................................047
Searching Your Phone and the Web .................................................................................................049
Connecting Your Phone to a Computer ............................................................................................051
Phone Calls ...................................................................................................... 052
Making Calls ....................................................................................................................................052
Answering or Rejecting Calls ...........................................................................................................054
Using In-Call Options.......................................................................................................................056
Using Call Log ..................................................................................................................................056
Listening to Your Voicemail .............................................................................................................059
Using Voice Dialer ............................................................................................................................059
Contacts .......................................................................................................... 061
About Contacts ................................................................................................................................061
Opening Your Contacts ....................................................................................................................061
Getting Started ...............................................................................................................................061
Editing/ Deleting Contacts ..............................................................................................................065
Communicating ..............................................................................................................................067
Account Setting ...............................................................................................................................069
Messaging........................................................................................................ 070
Virgin mobile 005
Page 6

About Messaging ............................................................................................................................070
Sending Messages...........................................................................................................................070
Reading Messages...........................................................................................................................073
Receiving CMAS Alerts Messages ....................................................................................................074
Changing Messaging Settings .........................................................................................................075
Google ............................................................................................................. 077
Gmail ..............................................................................................................................................077
Google Talk ......................................................................................................................................082
Maps ...............................................................................................................................................087
Places ..............................................................................................................................................090
Navigation ......................................................................................................................................090
Latitude ..........................................................................................................................................093
Calendar ..........................................................................................................................................096
News & Weather .............................................................................................................................101
Market ............................................................................................................................................103
Books ..............................................................................................................................................106
Web ................................................................................................................. 110
Email ...............................................................................................................................................110
Browser ...........................................................................................................................................115
YouTube ..........................................................................................................................................121
Facebook .........................................................................................................................................125
006 Virgin mobile
Page 7

Twitter ............................................................................................................................................126
Wi-Fi ...............................................................................................................................................126
Downloads ......................................................................................................................................128
Trac Manager ...............................................................................................................................130
Bluetooth ......................................................................................................... 131
Using Bluetooth ..............................................................................................................................131
Disconnecting or Unpairing from a Bluetooth Device ......................................................................132
Connecting to a Bluetooth Headset .................................................................................................133
Sending and Receiving Information Using Bluetooth ......................................................................134
Entertainment ................................................................................................. 136
Camera/Camcorder .........................................................................................................................136
Gallery ............................................................................................................................................139
Videos .............................................................................................................................................143
Sound Recorder ...............................................................................................................................143
Music ..............................................................................................................................................144
Tools .................................................................................................................149
Clock ...............................................................................................................................................149
Calculator ........................................................................................................................................151
Memo .............................................................................................................................................151
My Files ...........................................................................................................................................152
OceSuite ......................................................................................................................................153
Virgin mobile 007
Page 8

Virgin Mobile Applications ............................................................................... 156
My Account .....................................................................................................................................156
Telespree .........................................................................................................................................157
Mobile ID ........................................................................................................................................158
V3 ...................................................................................................................................................160
Mobile Zone ....................................................................................................................................161
Future Dial ......................................................................................................................................162
Cellebrity .........................................................................................................................................163
Skylink/TEL .....................................................................................................................................164
Settings ........................................................................................................... 165
Settings on Your Phone ...................................................................................................................165
Safety Information ........................................................................................... 172
Safety Information for Wireless Handheld Phones ..........................................................................172
FCC Hearing-Aid Compatibility Regulations for Wireless devices .....................................................175
FCC Hearing-Aid Compatibility (HAC) Regulations for Wireless Devices ...........................................176
Safety Information for FCC RF Exposure ...........................................................................................179
SAR Information ..............................................................................................................................180
FDA Consumer Update ....................................................................................................................182
Emergency Calls ..............................................................................................................................189
Compliance with Other FCC Regulations..........................................................................................191
General Safety .................................................................................................................................191
008 Virgin mobile
Page 9

Battery ............................................................................................................................................193
Adapter/Charger .............................................................................................................................195
FCC Compliance Information ...........................................................................................................197
Copyright & Patent ........................................................................................... 198
Software Copyright Notice ..............................................................................................................198
Warranty .......................................................................................................... 199
Manufacturer’s Warranty .................................................................................................................199
Virgin mobile 009
Page 10

Specifications
Display
t 2.8 inches QVGA, IPS full-angle viewing, TFT 262k colors
t Multitouch capacitive touch screen
Camera
t 2Mp FF with LED ash
Dimensions and Weight
t Dimensions: 119 x 58 x 12.43 mm
t Weight: 122 g
Memory
t 512MB (ROM)/512MB (RAM)
t External memory: microSD support up to 32GB
Operating Frequencies
t Networks: CDMA 1900(BC1) - 1XEV-DO rA
Wi-Fi(802.11 b/g/n) (802.11n 2.4GHz only)
t Data speed: Up To HSDPA 7.2Mbps
Operating System
t Android 2.3.4 (Gingerbread)
010 Virgin mobile
Page 11

Connectivity
t BT 3.0 (HSP/HFP/A2DP/OPP), Wi-Fi 802.11 b/g/n, a-GPS, eCompass, proximity
Sensors
t A-GPS, Accelerometer, E- compass, Proximity Sensor
Power Management (Per formance)
Battery Type Capacity Standby Time Talk Time
Lithium-Ion(Li-ion) 1300mAh 245 hours (Slot Index 2) 4 hours (CDG89)
Basics
In Box
The Juke comes with the following items included in the box:
t Battery
tUSB cable
Charger
ⰺ
2G SD card
ⰺ
Virgin mobile 011
Page 12
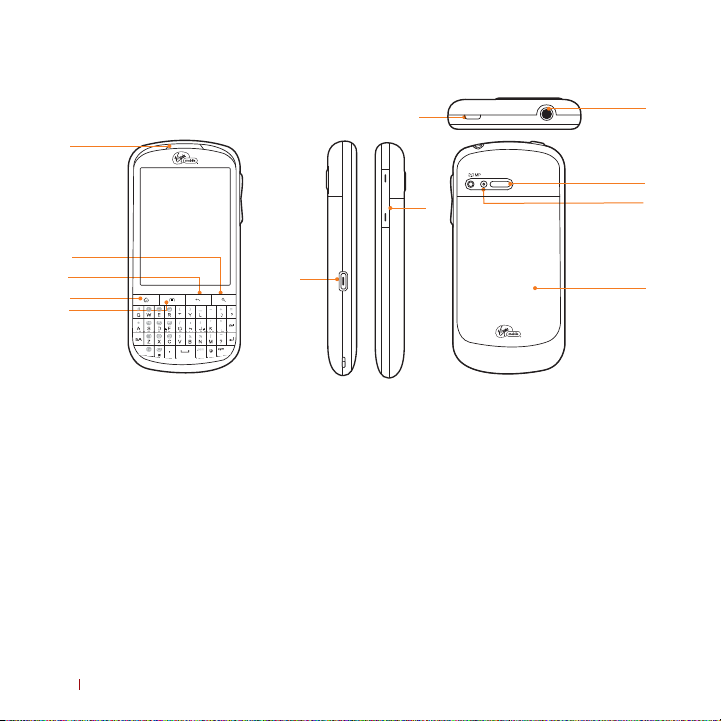
Phone Overview
1
2
3
4
5
8
7
6
9
10
11
12
1. Earpiece
2. Search key
Quick search
3. Back key
Move to the previous screen
4. Home key
Move to Home screen
Press and hold : Show eight most recently
used apps.
5. Menu key
Options
012 Virgin mobile
6. USB Port
Charging / PC connectivity
7. Volume key
Volume Up / Down
8. Power/Lock key
Short press: Screen lock mode
Press and hold: Power ON / Phone Options
9. Headset jack
3.5mm headset jack
10. External Speaker
11. Camera
12. Battery cover
Page 13

QWERTY Keyboard Overview
1
2
3
4
Your phone has a QWERT Y keyboard which provides a superior typing experience for easy and
comfortable texting.
5
6
7
8
9
1. Caps/Shift key
2. Function key
3. @
4. Space bar
5. A-Z
6. Delete key
7. Return key
8. Symbol key
9. Smiley key
Virgin mobile 013
Page 14
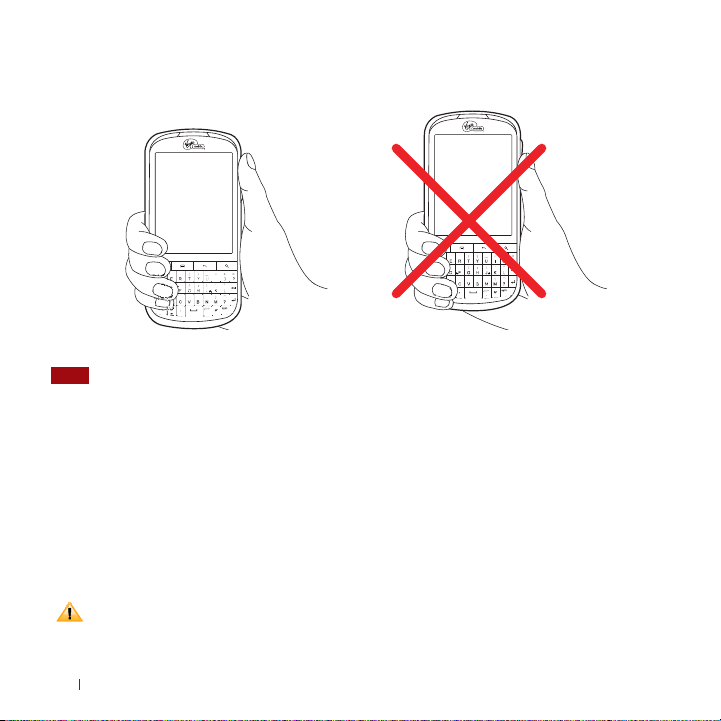
Proper Holding Position
The Juke is equipped with an antenna located in the base of the unit. For optimum call quality, hold
NOTE
the phone along the sides and avoid touching the top and bottom of the phone while in a call.
Battery
Note that browsing the web frequently, extended data usage, being in a poor signal area, or
subjecting the device to extreme temperatures will cause the battery to discharge quickly. To increase
battery life, limit your data usage, or turn o Wi-Fi, GPS, and Bluetooth when not required.
Installing the battery
Please use only the original batteries and accessories you received with your phone or Virgin mobile
recommended replacements.
014 Virgin mobile
Page 15
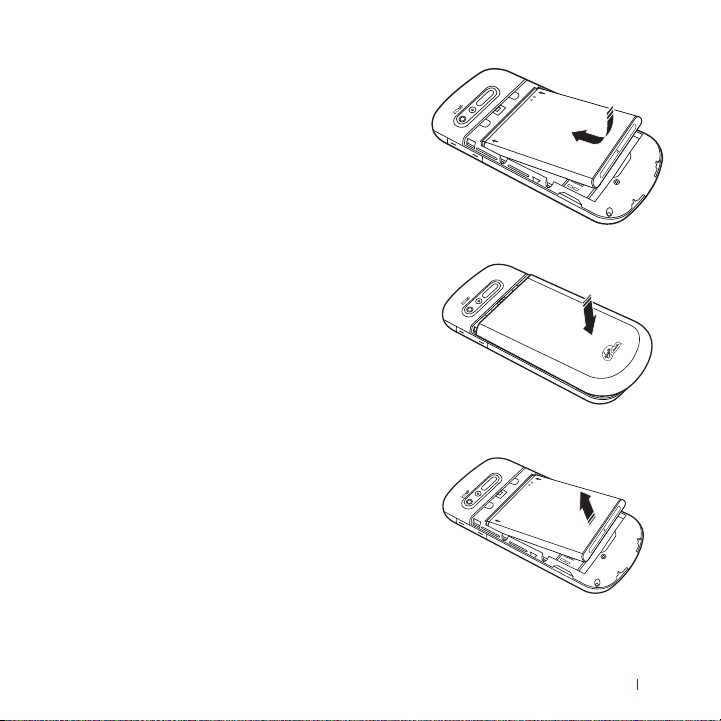
1. Remove the battery cover from the unit.
2. Align the battery’s exposed gold contacts
with the battery connectors inside the battery
compartment.
3. Insert the contact side of the battery rst and
then gently push the battery into place.
4. Replace the battery cover over the battery
compartment and press down until you hear
a click.
Removing the battery
1. Make sure that your device is turned o, and
then remove the battery cover.
2. Push the bottom of the battery to upwards and
remove the battery.
Virgin mobile 015
Page 16
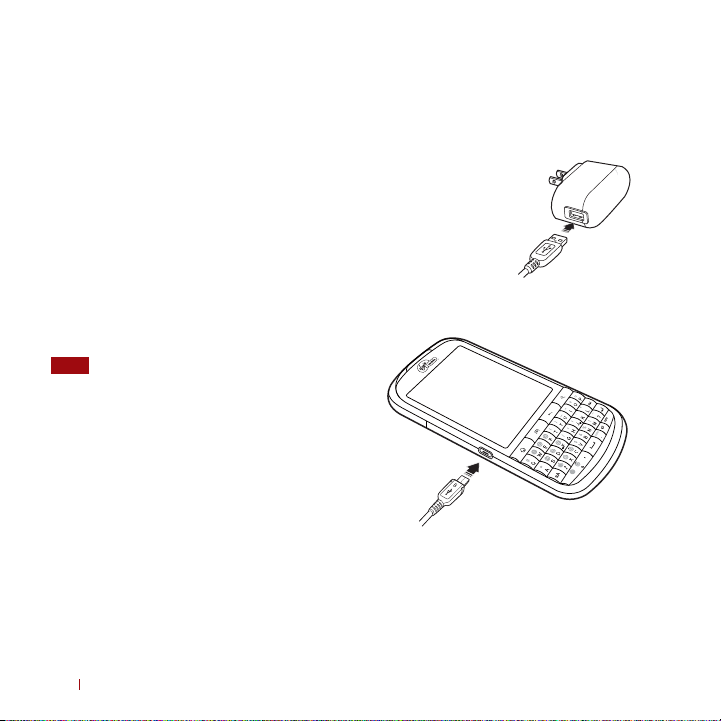
Charging your battery
Before you turn on your device and start using it, it is recommended that you charge the battery.
1. Plug the USB cable into the USB power adapter.
2. Plug the power adapter into a standard outlet.
3. To access the USB port located on the left side of
your device, gently open the USB ap.
4. Plug the other end of the USB cable into the
phone’s micro USB port.
5. The USB icon on the cable should always face
up when connecting the cable to your device
as shown.
t*UJTNPSFFóDJFOUUPDIBSHFUIFCBUUFSZXJUI
NOTE
your device powered o.
t#BUUFSZPQFSBUJOHUJNFHSBEVBMMZEFDSFBTFT
over time.
t*GUIFCBUUFSZGBJMTUPQFSGPSNOPSNBMMZZPV
may need to replace the battery.
t5IFCBUUFSZNVTUCFJOTUBMMFEGPSUIFQIPOFUP
work properly.
016 Virgin mobile
Page 17
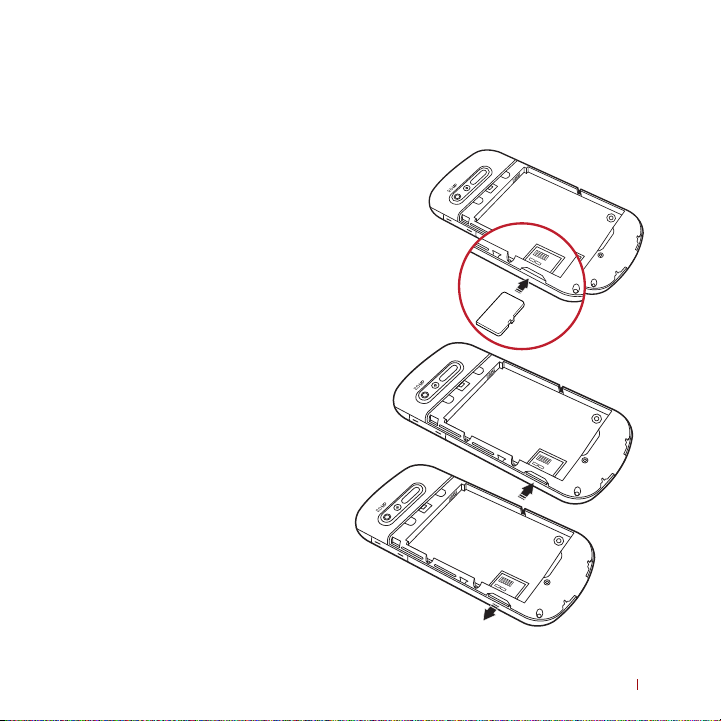
MicroSD Card
Use the microSD card to store your photos, videos, music and some memory card enabled Android
applications. You can also move and copy les to your computer from your device.
Inserting the microSD card
1. Remove the battery cover.
2. Locate the microSD card slot.
3. Insert the microSD card into the slot with its gold
contacts facing down until it clicks into the place.
4. Replace the battery cover.
Removing the microSD card
1. Make sure that your device is turned o,
and then remove the battery cover.
2. Press the microSD card to eject it from the slot,
then slide it out the rest of the way.
Virgin mobile 017
Page 18

Removing the microSD card while the phone is on
If you need to remove the microSD card while the phone is on, unmount the microSD card rst to
prevent corrupting or damaging the les in the microSD card.
1. From the Home screen, tap
Storage > Unmount SD card > OK.
2. Tap
3. Remove the microSD card by following the steps in “
Apps > Settings. Or press Menu > Settings.
Removing the microSD card”.
Turning Phone On or Off
Turning your phone on
1. Press and hold Power/Lock.
NOTE
The rst time you use your phone you’ll need to set it up. See the Getting Started chapter for details.
Activating your phone
Activate on your computer
Visit virginmobile.com/activate and follow the instructions.
Activate on your phone
NOTE
For security reasons, you will need your Virgin Mobile phone number and PIN to use this activation
method.
1. Turn on your new phone. Your device will automatically attempt Hands-Free Activation.
t Your device will need to complete one hands-free ac tivation attempt before you can continue.
2. Tap
Activate to override auto-activation and start the manual activation wizard.
018 Virgin mobile
Page 19
t If you don’t override Hands-Free Activation, your device will attempt to autoactivate ve times.
Wait for Retry to appear on your screen. Tap Retry and then tap Activate.
t You can activate your phone later. Tap
Home or Back on the activation screen and
then from the Home screen, tap Apps > Activate.
3. Follow the onscreen prompts to complete the ac tivation process.
4. After you have completed the wizard, make a phone call to conrm your activation.
If your phone is still not activated or you do not have access to the Internet, contact Virgin Mobile
Customer Service at 1-888-211-4727 for assistance.
NOTE
Do not press while the phone is being activated. Pressing cancels the activation process.
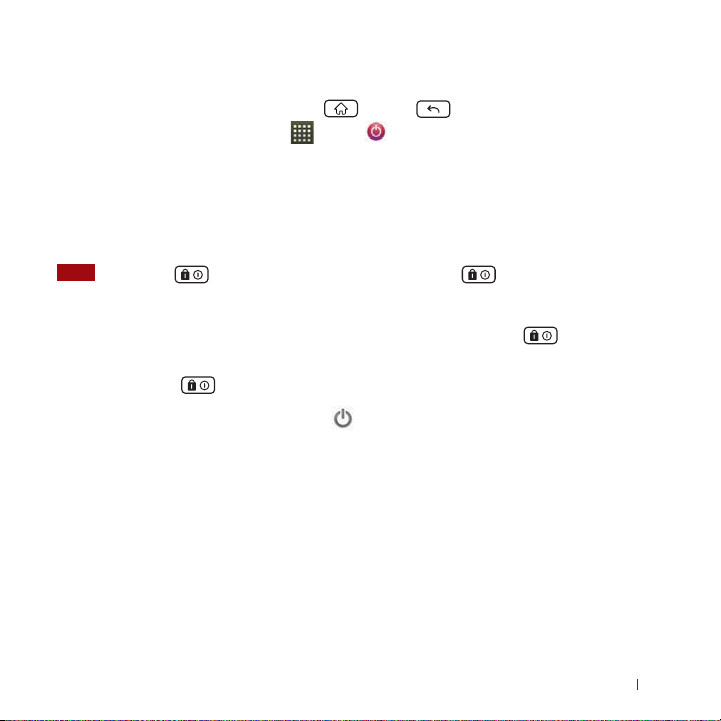
Turning your phone off
1. If the display is o, press any of the 4 buttons on the front of the phone or Power/Lock to
turn it back on.
2. Press and hold
3. When Phone options menu appears, tap
Power/Lock for a few seconds.
Power off > OK.
Virgin mobile 019
Page 20
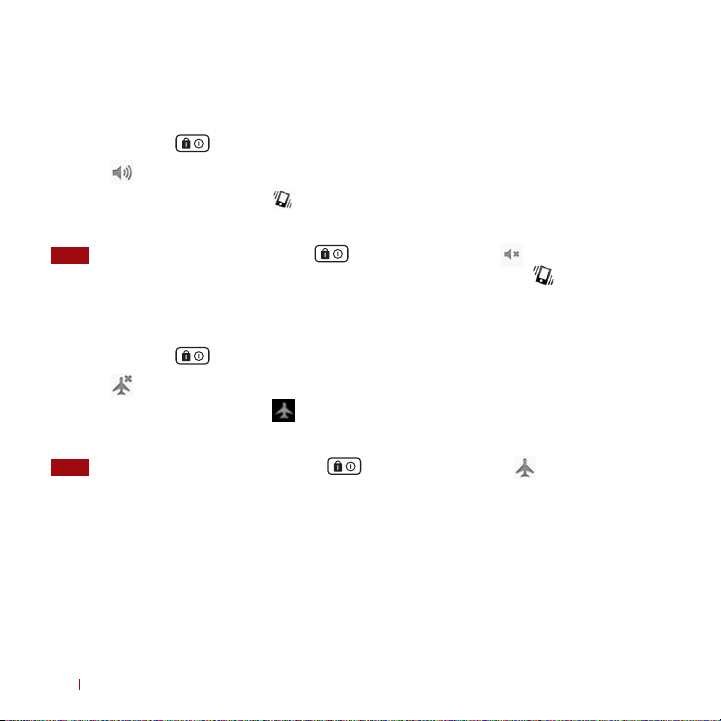
Phone Options
Silent mode
1. Press and hold Power/Lock.
2. Tap
Silent mode.
t When you select Silent mode, is displayed in the Status bar. R ingtones, aler ts, and all audible
sounds except media and alarms are silenced.
To turn silent mode o, press and hold Power/Lock and then tap Silent mode again.
NOTE
You can also press the down volume key until the vibrate phone icon appears and then you can
resume audio by pressing up on the volume keys.
Airplane mode
1. Press and hold Power/Lock.
2. Tap Airplane mode.
t When you set Airplane mode,
network functions are all disabled.
To turn airplane mode o, press and hold Power/Lock and then tap Airplane mode
NOTE
again.
is displayed in the Status bar. WiFi, Bluetooth, and mobile
020 Virgin mobile
Page 21

Finger Gestures
Tap To select onscreen items such as application and settings icons or press
onscreen buttons, simply touch them with your nger.
Tap and hold To open available options for the item, simply touch and hold your
Swipe or slide Quickly drag your nger vertically or horizontally across the screen.
Drag Tap and hold your nger before you start to drag. While dragging, do
Flick Flicking the screen is similar to swiping, but you only need to swipe
Rotate For most screens, you can automatically change the screen orientation
nger on the screen over the item.
not release your nger until the item reaches your desired location.
your nger in lighter and quicker strokes. This nger gesture is always
in a vertical direction, such as icking through the contacts or the
message lists.
from portrait to landscape by turning the phone sideways. When
entering text, you can turn the phone sideways to bring up a bigger
on-screen keyboard.
Virgin mobile 021
Page 22
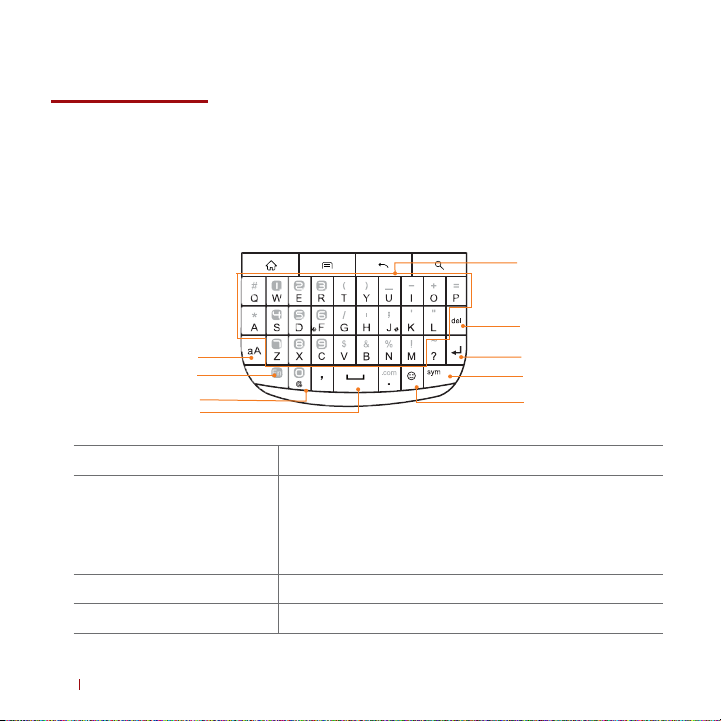
Keyboard
Using the QWERTY Keyboard
Your device has a specially designed QWERT Y keyboard that provides a superior, easy, and
comfortable typing experience on the Juke.
5
6
1
2
3
4
1. Caps/Shift key To type a single uppercase letter.
2. Fn (Function key) To type the number or symbol printed on the keys in gray,
hold down the Fn key and press one or more letter keys. To
return to typing letters, release the
To continuously type numbers and symbols, press Fn key
twice to lock it. Press Fn key again to unlock.
3. @ To type “@”.
4. Space bar To type a blank space.
7
8
9
Fn key.
022 Virgin mobile
Page 23

5. A-Z (alphanumeric keys) To enter numbers, letters or special characters. Go to the
Google Search screen if pressed on the Home screen.
6. Delete (Delete key) To delete a character. Press and hold to rapidly delete the
entire entry.
7. Return (Return key) To begin a new line or to select an item.
8. Sym (Symbol key) Pressing the Sym key opens a pop up menu of additional
symbols.
9. Smiley key To type Smiley icons. (Emoticons)
For better performance in low-light environments, your handset includes a backlight feature which
NOTE
illuminates the QWERTY keyboard so you can type with ease.
Virgin mobile 023
Page 24

Using the Onscreen Keyboard
In addition to the QWERTY keyboard you can also enter tex t using the onscreen keyboard. Some
applications open the keyboard automatically. In others, tap anywhere in a text eld to open the
keyboard. You can choose between two included on-screen keyboards to select the one that best ts
your typing preferences.
To use the onscreen keyboard, from the Home screen, tap Apps > Settings > Language
NOTE
& keyboard > Soft keyboard switch > Select Landscape mode or Portrait mode.
t Tap Landscape mode to use the onscreen keyboard in landscape orientation on your screen.
Portrait mode to use the onscreen keyboard in portrait orientation on your screen.
t Tap
CooTek keyboard Swype lets you enter a word in one continuous motion. To enter
Android keyboard This keyboard is similar to a desktop computer’s keyboard. This
t If you want to change the on-screen keyboard type: Tap and hold the text input eld > Tap
method > Select CooTek keyboard or Android keyboard.
t Remember, the Juke has a built-in QWERT Y keyboard, which you can use for all phone functions.
You can change all keyboard settings including User dictionary through the settings menu. From the
NOTE
Home screen, tap
Or press
Menu >
Using the Android Keyboard
Displaying the keyboard and entering text
If you want to switch from CooTek to Android keyboard, tap and hold the text input eld > Tap Input
method > Select Android keyboard.
Use the following keys while entering. (This screenshot is the keyboard mode of Email application.)
024 Virgin mobile
a word, just drag your nger over each letter in the word without
lifting your nger.
is the standard Android keyboard layout. Android keyboard is
selected as the default entry method.
Apps > Settings > Language & keyboard.
Settings > Language & keyboard.
Input
Page 25
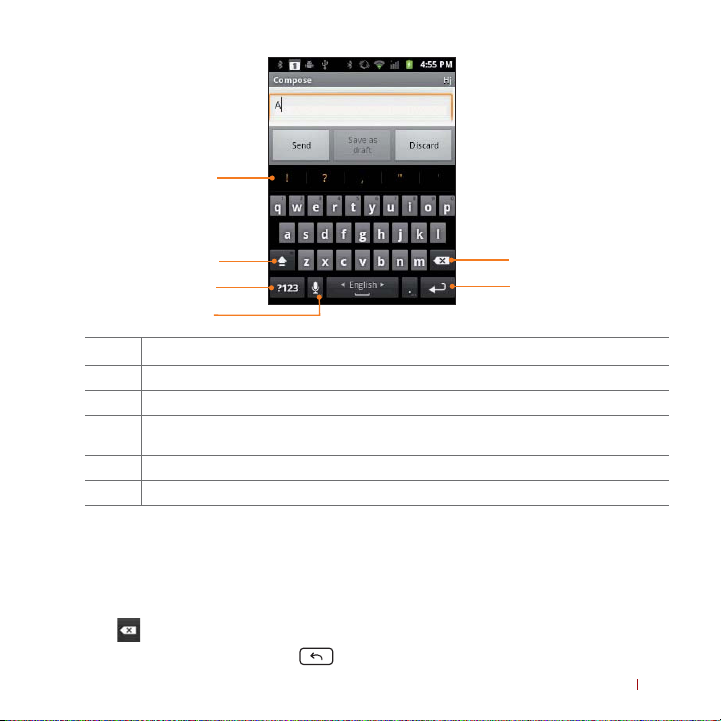
1
2
3
5
6
4
1 Tap the suggestion to enter it.
2 Shift key. Tap once to capitalize the next letter you type. Tap it twice for all caps.
3 Symbol key. Tap to switch to the numeric and symbol keyboard.
4 Microphone key. Tap to enter text by speaking. Tap and hold it for Android keyboard
settings.
5 Backspace key. Tap to delete the previous character.
6 Enter key. Tap to create a new line.
1. Tap the text eld to open the onscreen keyboard.
2. Tap the onscreen keys to type.
t The characters you’ve typed appear in a strip above the keyboard with word predictions to the
right. Tap a suggested word to enter it.
3. Use
4. When you’ve nished typing, press
to erase characters to the left of the cursor.
Back to close the keyboard.
Virgin mobile 025
Page 26
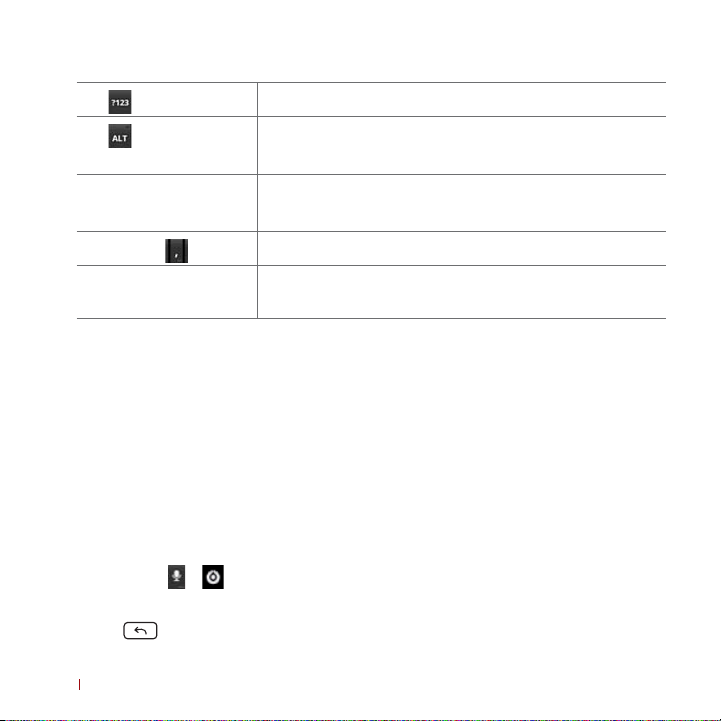
To enter numbers, symbols, and other characters
Tap
Tap
on the numeric
keyboard
Tap and hold a vowel or
the C, N, or S key
Tap and hold
Tap and hold a number or
symbol key
To switch to the numeric keyboard.
To view additional symbols, tap it again to switch back.
To open a pop up menu to select an accented vowel or other
alternate letter.
To open a pop up menu with a set of common symbols.
To open a pop up menu of additional symbols. Not all keys have
additional symbols.
t Slide your nger smoothly up from the main keyboard to open an extension keyboard, with
numbers and symbols. To enter a number or symbol from that keyboard, slide your nger onto
it and then lift your nger. When you lift your nger, the extended keyboard will no longer be
visible.
t When you tap a key, a larger version displays briey over the keyboard. Keys with alternate
characters display an ellipsis (...) below the character.
Changing the keyboard language
< Selecting the Android keyboard languages >
1. Tap a text eld to open the onscreen keyboard.
2. Tap and hold
> Android keyboard settings.
3. Tap Input languages > Select one or more languages.
4. Press Back to save.
026 Virgin mobile
Page 27

< Changing the keyboard language >
If you’ve selected more than one keyboard language, the active keyboard language is displayed on
the Space bar. You can switch languages easily as follows:
1. Tap and hold
.
2. Without lifting your nger, move it to the left or right until the language you want appears in the
center of the small window above
.
3. Lift your nger.
If you have many languages available, you may have to repeat the above steps to reach your desired
language.
Entering the text by speaking
You can use voice input to enter text. Voice input is an experimental feature using Google’s speechrecognition service. You must have a data connection on a mobile or Wi-Fi network to use voice input.
< Turning on voice input >
If the onscreen keyboard does not display
, voice input is not turned on or you have congured it to
display only on the symbol keyboard.
1. From the Home screen, tap
Apps > Settings. Or press Menu > Settings.
2. Tap Language & keyboard > Android keyboard.
t You can also tap and hold
on the onscreen keyboard. In the alternate menu that opens, tap
.
3.Tap
Voice input.
4. Tap the option for where you want to use
(On main keyboard or On symbols keyboard). Or
tap Off to turn o voice input.
Virgin mobile 027
Page 28

< Entering text by speaking >
You can enter text by speaking, in most places that you can enter text with the Android keyboard.
1. Tap a text eld.
2. Tap the
on the keyboard.
3. When prompted to “Speak now,” speak what you want to enter.
t Say “comma,” “period,” “question mark,” or “exclamation point” to enter punc tuation.
t When you pause, what you spoke is transcribed by the speech-recognition ser vice, entered in
the text eld and underlined. You can tap
to erase the underlined text. If you start typing or
entering more text by speaking, the underline disappears.
t You can edit the onscreen tex t by typing or speaking.
028 Virgin mobile
Page 29

Using CooTek Text Entr y Method
Entering text using the CooTek keyboard
CooTek keyboard signicantly improve the user experience of inputting on touch screens of handheld
devices. Typing on CooTek keyboard is pretty easy. You just need to tap and slide.
t You only need to tap and use the auto-word predic tion to input the right word. In other
cases, you can slide left/right for a specic letter, slide up for uppercase, or slide down for a
punctuation.
t For example, to enter ‘Love’ : If you tap l, the related words list will appear. You can select love
from the list.
Virgin mobile 029
Page 30
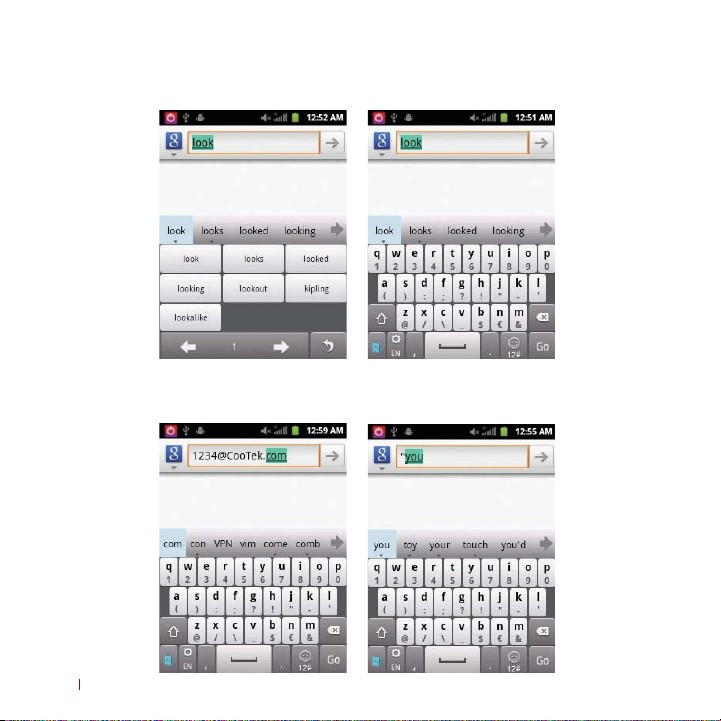
t looking : This keyboard supports context-based prediction. To enter “looking”, you only need to
enter “look”.
t 1234@cootek.com : CooTek keyboard can store anything as word. Even the word contains “.” you
can input predictively.
030 Virgin mobile
Page 31

tMySpace: If you enter “my” + “space”, it automatically composes words to be a new word
“MySpace”.
Adding, Editing or Deleting Words in the User Dictionary
Sometimes you may need to add a word to the predictive text dictionary, for example a name or a
specialized technical word. If you want to add a word to your User dictionary while entering text,
double tap the word to highlight it, then tap and hold the word and selec t Add ** to dictionary.
< Adding a word manually >
1. From the Home screen, tap
2. Tap
Language & keyboard > User dictionary.
3. Press
4. Type the word > Tap
Menu > Add.
OK.
Apps > Settings. Or press Menu > Settings.
< Editing or deleting a word >
1. From the Home screen, tap Apps > Settings. Or press Menu > Settings.
Virgin mobile 031
Page 32

2. Tap Language & keyboard > User dictionary.
t To edit words from the dictionary, tap the word you want to edit >
OK.
t To delete words from the dictionar y, tap the word you want to delete >
Edit > Edit the word > Tap
Delete.
Editing Text
You can select, copy or cut the text you’ve entered, then paste it in another text eld within the user
interface.
NOTE
Some applications may oer dierent text editing methods.
Selecting text
1. Tap the text eld.
2. Move the cursor to the beginning or end of the desired text by tapping in the location you want
the cursor.
3. Tap and hold the text eld.
4. Tap
Select word in the pop up menu.
Select all to select all the text in the text eld.
t Or tap
5. Drag your nger to move the text cursor to a letter within the text that you want to select. The
selected text is highlighted in orange.
Cutting and copying the text
1. Select the text to cut or copy it.
2. Tap and hold the selec ted text.
032 Virgin mobile
Page 33

3. Tap Cut or Copy in the menu that opens.
t If you tap
Cut, the selected text is removed from the text eld. In this case, the text is saved to
the clipboard, so that you can paste it into another tex t eld.
NOTE
Be sure to only cut one section of text at a time, as the clipboard only saves a single text string.
Pasting the text
1. Cut or copy the text to paste.
2. Tap the text eld where you want to paste the text and move the cursor to your desired location.
t You can paste text that you copied from one application into the text eld in any other
application.
3. Tap and hold then selec t
t The text is inserted after the cursor. The text also remains in the clipboard, so you can paste that
same text into another location.
Paste in the pop up menu.
Virgin mobile 033
Page 34

Getting Started
Google Account
You must sign in to a Google account to use Gmail, Google Calendar, and other Google applications; to
download applications from Android Market; to back up your settings to Google ser vers; and to take
advantage of other Google services on your phone.
Set Up Wizard
To complete the startup wizard and add a Google account, a network connection is required.
1. Tap the android to begin.
034 Virgin mobile
Page 35

2. Tap Begin to learn more about Google account. If you want to bypass this information, tap Skip.
3. Tap
Sign in to sign in to your Google account.
t If you don’t have a Google account, tap
page.
4. Enter your Google account
5. Select your preferences for Google’s location services and tap
service selection and tap Next.
6. The Home screen appears. You are now ready to use your phone.
t Once a Google account is added, your existing contacts and Gmail messages are downloaded to
your phone. Contacts, Gmail and Calendar data will be synchronized between your phone and
your online Google account.
NOTE
For more details on signing in or creating a Google account, please see the following sections.
Username and Password > Tap Sign in.
Create. Go to ‘Creating a new Google account’ on the nex t
Next. Then conrm the back-up data
Registering a Google account
Gmail, Android Marketplace, and some other applications require a valid Google account for use. If
you did not login or create an account during the initial phone setup, you will be prompted to login in
to Google the rst time you use these applications.
1. Tap
Sign in to register your Google account.
t If you don’t have a Google account, tap
2. Enter your Google account
Username and Password > Tap Sign in.
Create instead. See the next section for more details.
Creating a new Google account
1. Tap Create > Enter First name, Last name and Username > Tap Next.
2. Enter a password in to the Type a password, Confirm password elds, then tap Next.
t Password tip: Your password must be a minimum of 8 characters in length.
Virgin mobile 035
Page 36

3. Select Security question and enter the Answer, which will be needed if you forget your password
and then enter a Secondary Email > Create.
4. Read through Google Terms of Service > Tap
5. Enter the letters shown on the screen > Tap
I agree, Next.
Next > Tap Finish.
Adding a Google account
1. From the Home screen, tap Apps > Settings.
2. Tap
Accounts & sync > Add account.
3. Tap
Google > Tap Next.
4. Tap
Sign in to register your Google account.
5. Enter your Google account Username and Password > Tap Sign in > Finish.
t The Juke supports multiple Google accounts.
t If you have the same contact across multiple Google accounts, you can merge duplicates into a
single item in the contact list.
Removing a Google account
1. From the Home screen, tap Apps > Settings.
2. Tap
Accounts & sync.
3. Select the account to be deleted > Tap
t All information associated with that account will be deleted. This includes contacts, emails,
messages, calendar events, etc. At least one Google account is required for normal phone
operation.
NOTE
The phone must be reset to remove a solitary Google account.
Remove account > Remove account.
036 Virgin mobile
Page 37

Getting to Know the Home Screen
The Home screen is displayed when the device is in idle mode. You can add your favorite apps,
shortcuts, folders and widgets to the Home screen so they’re only a tap away.
The Home screen is actually ve separate screens. Slide your nger the left or right and you’ll discover
more space to add icons, widgets, and more. Press
NOTE
To change number of Home screens, from the Home screen, tap Apps > Settings >
Home screen settings > Number of home screens > Select 3 screen, 5 screen or 7 screen > OK.
Home to return to the center Home screen.
Virgin mobile 037
Page 38

Previewing the Home screens
1. From any Home screen, tap and hold Apps.
2. When you choose a desired Home screen, the display shifts to the selected Home screen.
Customizing the Home Screen
The Home screens and display wallpaper are extensively customizable.
Home screen customization options
1. Open the Home screen you want to customize.
2. Press Menu > Add. Or just tap and hold an empty area on the Home screen.
3. On the menu that appears, select from the following choices.
038 Virgin mobile
Page 39

Shortcuts
Widgets
Folders
Wallpapers
Shortcuts can cover such functions as Applications, Bookmark,
Contact, Direct dial, Direct message, Directions & Navigation,
Email, Gmail label, Music playlist and Settings.
Widgets are mini-applications for functions as Analog clock,
Calendar, Digital clock, Facebook, Google Search, Home screen
tips, Latitude, Market, Music, News & Weather, Picture frame,
Power Control, Rate Places, Trac, TracManager, Tutorial #1,
Tutorial #2, Tutorial #3, Tutorial #4, Tutorial #5 and YouTube.
If you create a new folder, you can drag icons into the folder to
organize them.
You can choose from your Galler y photos, ID wallpapers, Live
wallpapers or Wallpapers to change the display background.
Moving an item on the Home screen
1. From the Home screen, tap and hold the item you want to move until it vibrates. Don’t lift your
nger.
2. Drag the item to a new location on the Home screen.
3. Lift your nger at the location where you want the item.
To add a shortcut to any application from the Launcher, tap
drag it o the Launcher and onto a Home screen.
Apps, tap and hold the item, then
Removing an item from the Home screen
1. From the Home screen, tap and hold an item until it vibrates. Don’t lift your nger. The D ock menu
changes into the .
2. Drag the item to the
3. When the item turns red, lift your nger.
.
Virgin mobile 039
Page 40

Changing the Wallpaper of the Home screen
1. From the Home screen, press Menu > Wallpaper. Or just tap and hold any empty area
on a Home screen > Wallpapers.
2. Tap one of the following:
Choose a photo from your camera gallery or memory card
storage. You can crop the image before setting it as the wallpaper.
Choose from the available wallpapers that were included in your
Mobile ID pack.
Choose from pre-loaded animated wallpapers. Additional live
wallpapers can be downloaded from the Google Marketplace.
Choose from the pre-loaded animated or static wallpapers.
Additional wallpapers can be downloaded from the Google
Marketplace.
Set wallpaper.
3. Tap
Gallery
ID wallpapers
Live wallpapers
Wallpapers
Renaming a folder
1. Tap the folder to open it.
2. Tap and hold the title bar of the folder window.
3. Enter a new name in the dialog box that appears, and then tap
040 Virgin mobile
OK.
Page 41

Essential Display Icons
Status icons
You can tell a lot about your phone when you understand the icons in the Status bar. Here’s what each
one means:
Signal strength EDGE data downlink active
No signal EDGE data uplink & downlink active
Airplane mode 3G connected
GPRS connected 3G data downlink active
GPRS data downlink active 3G data uplink & downlink active
GPRS data uplink & downlink
active
EDGE connected 3G (HSDPA) connected
3G (HSDPA) data uplink &
downlink active
3G (HSDPA) voice connection only
(WiFi data in use)
Data synchronizing Silent mode-no audio or vibration
3G voice connection only (WiFi data
in use)
No battery
Unknown battery
Virgin mobile 041
Page 42

Synchronization error Vibrate only mode
Wi-Fi is on but not connected Speakerphone is on
Connected to a Wi-Fi network Wired headset connected
Wi-Fi signal strength Bluetooth is on
~
TTY connected GPS is on and ac tive
Battery is full Bluetooth device connected
Battery is charging Tethering or USB connected
It indicates that battery is remaining
~
(Empty to full charge states )
042 Virgin mobile
Page 43

Notification icons
Notication icons in the Status bar alert you to items that may require your attention such as new
messages, calendar event reminders, missed call notications, etc. Here’s what each one means:
Call in progress Downloading data
Call using a Bluetooth headset Uploading data (animated)
Call on hold General Alert Icon
Call forwarding is active USB debugging connected
Missed call No microSD card installed
Connected to a computer via USB cable MicroSD card is being prepared
Storage card memory is low ECB mode
More (not displayed) notications Microphone is muted
Network sharing is on Alarm is set
New Google Talk instant message
New voicemail Bluetooth Sharing is on
New message Updates available (Market)
New Gmail Twitter sync
New Email
Wi-Fi is on and wireless networks are
available
Virgin mobile 043
Page 44

Notifications Panel
When you receive a new notication, an icon will be displayed in your status bar at the top of your
screen.
Viewing and responding to Notifications
1. Tap and hold Status bar, and then slide your nger downward to open the Notications panel.
2. If you have multiple notications, you may need to scroll to see them all.
3. Tap a notication to respond to it.
Closing the Notifications panel
Drag the bottom bar of the panel up. Or just press Back.
044 Virgin mobile
Page 45

Opening and Switching Between Applications
The Launcher, which you open from the Home screen, shows the icons of all installed applications on
your phone.
Opening and closing the Launcher
1. To open, from the Home screen, tap Apps.
2. To close, press Home or Back.
Virgin mobile 045
Page 46

Switching to a recently used application
1. From any screen, press and hold Home.
2. Tap an icon to open the application or press Back to return to your previous screen.
Sleep Mode
Sleep mode saves battery power by turning o your display. You will still receive messages and calls
when the display is turned o.
Switching to Sleep mode
Press Power/Lock to switch your phone to Sleep mode.
Your phone automatically turns o the display after a period of inactivity. To customize the screen
timeout settings, from the Home screen, tap
timeout.
046 Virgin mobile
Apps > Settings > Display > Screen
Page 47

Waking up from Sleep mode
Your phone automatically wakes up when you have an incoming call.
To wake it up manually, press
Search. You’ll need to unlock the screen as described below.
Power/Lock, Home, Menu, Back or
Unlocking the screen
On the lock screen, tap the unlock icon and slide your nger in the direction of the arrows to unlock
the screen. The screen unlocks automatically when you answer an incoming call.
NOTE
If you have set up a screen unlock pattern, pin, or password, you will be asked to draw the pattern on
the screen or enter the PIN or password to access the phone soft ware.
Activating Secure Screen Lock
1. From the Home screen, tap Apps > Settings. Or press Menu > Settings.
2. Tap
Location & security > Set up screen lock.
t If you have already congured the screen lock, tap Change screen lock to change how to lock or
unlock your screen.
3. Tap
Pattern, PIN, or Password. And then, enter a custom pattern, PIN or password as prompted.
t If you select ‘None’, screen unlock security is cancelled.
Adjusting Volume
Ringtone and Media volume are independent of each other and adjusted separately.
Adjusting the ringer volume
From the Home screen, press Volume up or Volume down on the right side of the phone to
Virgin mobile 047
Page 48

adjust the ringer volume to your desired level.
t While in the lowest ringer volume level, press
mode. Press Volume down again to set your phone to Silent mode.
t While in the Silent mode, press
up again to switch to ringtone mode.
Volume up once to switch to Vibrate mode. Press Volume
Volume down once to set your phone to Vibrate
Adjusting the media volume
While playing music, watching a video or using preloaded or downloaded games or applications,
press Volume up or Volume down on the right panel of the phone to adjust the media volume.
Adjusting the earpiece volume for phone calls
During a phone call, press Volume up or Volume down.
Adjusting the volume via Settings menu
1. From the Home screen, tap Apps > Settings. Or press Menu > Settings.
Sound > Volume.
2. Tap
3. Drag the volume sliders left or right to adjust your phone’s Ringtone, Media, and Alarm. Your
phone plays a sample tone at the selected volume level while you drag the slider.
NOTE
If you uncheck the option to use call volume for notications, you can set the notication ringtone
volume independently.
4. When you’re done, tap OK.
048 Virgin mobile
Page 49

Searching Your Phone and the Web
The search key is a powerful part of the Juke’s software and enables you to quickly locate les,
contacts, and applications. You can also search the web using your favorite web search ser vice.
1. Press
2. Begin entering text, or tap a previously used search term.
t As you enter the text, matching items on your phone and suggestions from Google web search
3. Tap a suggestion to go directly to that result.
Search. Or tap Apps > Google Search.
will appear on the screen.
1
2
Tap to change the target of your search location(All, Web, Apps or Contacts).
1
Type in your search criteria.
2
Tap to search by voice.
3
Tap to put suggestion automatically in the search box.
4
3
4
Virgin mobile 049
Page 50

Setting search options
1. Press Search.
2. Press
3. Tap any of the following:
Menu > Search settings.
Web Google search Show web suggestions, Use My Location, Search history,
Phone Searchable items Opens list of searchable locations on your phone.
Clear shortcuts Erases the list of previously chosen search suggestions.
Manage search history.
Using Voice search
1. Press and hold Search.
Or tap the in the Google search box or in the Browser’s URL box.
2. Speak what you want to search for.
3. Searched words with similar pronunciations are listed. If you select a desired search result, the
Google result appears with the corresponding keyword.
t If you speak inaccurately, the desired keyword may not appear.
050 Virgin mobile
Page 51

Connecting Your Phone to a Computer
Copying files to/from the microSD card
You can copy your music, photos, and other les to the microSD card of your phone.
NOTE
This option is available only when a microSD card is inserted into the slot of your phone. While your
phone is connected to a computer, USB Mass storage mode prevents you from using applications
that access the memory card.
1. Connect your phone to your computer using the supplied USB cable.
2. Open the Notications panel > Tap
3. Tap
Turn on USB storage.
On your computer, the connected phone is recognized as a removable hard drive.
4. Navigate to the removable drive and open it.
5. Do one of the following:
t Copy the les from the computer to the microSD card ’s root folder.
t Copy the les from the phone’s microSD card to a folder in your computer.
6. After copying the les, unmount the removable drive (that is, the connected phone) as required by
your computer’s operating system to safely remove your phone.
7. After you have unmounted the removable drive, you can disconnect the phone from the computer.
USB connected.
Virgin mobile 051
Page 52

Phone Calls
Making Calls
The simplest way to make a call is to dial the number direc tly. You can also call numbers listed in your
call log or Contacts list.
Making a call from the dialer screen
1. From the Home screen, tap Phone. Or tap > Phone.
2. Tap the number you want to dial.
t If you make a mistake, tap
string.
3. Tap
.
t The Calling screen is shown and the icon appears in the Status bar while the call is active.
t To change the volume during a call, press
4. To end the call, tap
Entering a Pause/Wait
Pause and wait options can help you dial additional numbers such as a voicemail password, or phone
banking system menus.
1. From the Home screen, tap Phone.
2. Tap the number you wish to dial > Press
t Add 2-sec pause : Your phone will wait for 2 seconds then continue to dial the remaining
to erase a single character. Tap and hold to erase the entire
Volume up / Volume down.
End Call.
Menu > Add 2-sec pause or Add wait.
052 Virgin mobile
Page 53

numbers automatically.
Add wait : Your phone will wait with the message, ‘Send the following tone?’ until Send is
t
tapped, then continue dialing the remaining numbers.
Making an international call
1. From the Home screen, tap Phone.
2. Tap and hold
3. Tap the countr y code, area code, and phone number.
4. Tap
0 until the international prex ‘+’ appears.
.
Calling a number from the Call log
Your phone logs all incoming and outgoing calls.
1. From the Home screen, tap
Call log.
at the right of any entry to dial.
2. Tap
t Calls are listed with the most recent at the top.
t Calls to the same phone number are grouped together.
t Scroll up or down to view additional entries in the log.
t If you want to edit a number before calling, tap and hold the desired number, and then tap
number before call
Phone > Call log. Or tap Apps > Contacts >
.
Making a call from the Contact list
1. From the Home screen, tap Phone > Contacts. Or tap Apps > Contacts.
2. Scroll through the contact list.
t To nd a specic contact, you can search by pressing
Search or press Menu >
Edit
Virgin mobile 053
Page 54

Search. Enter the name of the contact you’re searching for. As you type, contacts with matching
names appear below the search box. Or you can use the tab on the right hand side of the screen
to scroll through the alphabetical contacts.
3. Tap the contact you want to call.
4. Tap
.
Making an emergency call
Your phone supports international emergency numbers such as 911. Emergency calling is supported
anywhere the phone has a network signal.
Making an emergency call
1. From the Home screen, tap Phone.
2. Tap the emergency number for your location. This is usually 911, *911 or #911.
3. Tap
.
4. To end the emergency call, tap
Making an emergency call while the phone is locked
1. Tap Emergency call.
2. Tap the emergency number for your location. This is usually 911, *911 or #911.
3. Tap
.
4. To end the emergency call, tap
End Call.
End Call.
Answering or Rejecting Calls
When you receive a phone call, the screen displays the caller’s name, phone number, and caller ID
icon (if stored in Contacts).
054 Virgin mobile
Page 55

When you receive a phone call from a phone number not stored in your Contacts, only the default
caller ID icon and phone number are shown.
All incoming calls are recorded in the Call log. If you miss a call, you receive a reminder notication.
Answering or rejecting an incoming call
1. Drag the icon in the direction of the arrows to answer the call. Or drag the icon in the
direction of the arrows to reject the call.
t If you were already in a call, the rst call is placed on hold during answering the new call.
t To silence the ringer before answering the call, press either of the volume keys.
NOTE
The caller you reject is sent directly to your voicemail box to leave a message.
Checking missed calls
t If you miss a call, is displayed in the Status bar.
t If you open the Notications panel, you will see the number of missed calls. Tap the notication
to be taken to the call log and view detailed information.
Virgin mobile 055
Page 56

Using In-Call Options
When a call is in progress, the following options are available:
Dialpad Drag Dial Pad in the direction of the arrows to enter
Mute You can unmute the microphone by tapping Mute icon again.
Speaker You can turn the speakerphone o by tapping the Speaker
Bluetooth When a Bluetooth device is paired and connected to your
Contacts You can search for contacts during a call.
NOTE
To avoid damaging your hearing, do not hold the phone up to your ear when the speakerphone is on.
additional numbers during your call.
icon again.
The speaker is turned o automatically when your current
call ends.
phone, you can conduct all calls using Bluetooth for handsfree conversation. When using Bluetooth headset during a
call, the current call screen has a blue border and the Ongoing
Call icon turns blue in the Status bar.
Bluetooth icon to toggle in-call audio to and from the
Tap
Bluetooth accessory.
Using Call Log
The phone stores the numbers of all incoming and outgoing calls in the Call log. The Call log displays
the details of the call including time, date, and duration.
Opening the Call log
056 Virgin mobile
Page 57

1. From the Home screen, tap Phone > Call log. Or tap Apps > Contacts > Call log.
t Calls are listed with the most recent at the top. Calls of the same phone number are grouped
together. Scroll to view earlier entries in the log.
NOTE
You can tap and hold the desired number in the call log list to select options such as Call, View
contact, Edit number before call, Send text message, Add to contacts, Remove from call log.
1
2
3
4
5
6
1 Missed call.
2 Incoming call.
3 Tap to open a group of calls to the same phone number.
4 Outgoing call.
5 Tap to dial this contact.
6 Tap the number for more call details, or tap and hold the contact for more options.
Virgin mobile 057
Page 58

Calling a number from the Call log
1. From the Home screen, tap Phone > Call log.
2. If you want to call a number directly, tap at the right of the entr y.
Or, select a contact > Tap .
t If you want to edit a number before calling, tap and hold the desired entr y, and then tap
number before call.
Adding a phone number from your Call log to your the Contacts lists
1. From the Home screen, tap Phone > Call log.
2. Tap and hold the desired entry > Add to contacts.
3. In the list of contacts that opens, tap
4. Tap Done.
Create new contact or add to an existing contact.
Sending a text message from the Call log
1. From the Home screen, tap Phone > Call log.
2. Tap and hold the contact > Send text message.
3. Enter your message and tap Send.
Clearing the Call log
1. From the Home screen, tap Phone > Call log.
2. Press Menu > Clear call log.
t To remove just one entr y from the Call log, tap and hold the entry. In the pop up menu, tap
Remove from call log.
Edit
058 Virgin mobile
Page 59

Listening to Your Voicemail
When you have a new voicemail message, appears in the Status bar. If you have not set up your
voicemail number, or if you need to change it, you will need to set it up using the Call settings menu.
Entering your voicemail number
1. From the Home screen, tap Apps > Settings. Or press Menu > Settings.
2. Tap Call settings > Voicemail settings > Voicemail number.
3. Enter your voicemail number >
OK.
Calling your voicemail
1. From the Home screen, tap Apps > Voicemail.
Calling your voicemail from the Dialer
1. From the Home screen, tap Phone.
2. Tap and hold 1. Or, Tap 1 and tap .
Calling your voicemail from the Notification panel
1. Open the Notications panel and tap New voicemail.
Using Voice Dialer
You can use the Voice Search application or Voice Dialer application to place a phone call by speaking
the name of a contact or a phone number.
1. From the Home screen, tap
t If you have a Bluetooth headset that supports “voice-recognition” or “voice-dialing,” you may be
Apps > Voice Dialer.
Virgin mobile 059
Page 60

able to open Voice Search by pressing your headset’s main button and dial by voice using your
headset. For details, see your headset manual.
2. The Voice Dialer opens, listens for your spoken instruc tions, and displays some hints for how to use it.
3. Say “Call” followed by the name of the contact to call.
t Or, follow one of the suggestions for dialing a number or controlling your phone in other ways.
060 Virgin mobile
Page 61

Contacts
About Contacts
Contacts give you quick and easy access to the people you want to reach. Contacts from Google
accounts are also downloaded and synced with the Contact list.
You can manage your communications with your contacts via phone, messaging, and email without
the need to jump from one app to another.
Opening Your Contacts
Open Contacts to add, view, and communicate with your friends and acquaintances.
1. From the Home screen, tap Apps > Contacts.
t All of your contacts are displayed alphabetically in a scrolling list.
t You can use the tab on the right hand side of the screen, or ick your nger up or down to scroll
quickly.
Getting Started
Adding a new contact
1. From the Home screen, tap Apps > Contacts.
2. Press
Menu > New contact.
Virgin mobile 061
Page 62

3. If you have more than one account, selec t an account, then enter the information for the contact.
> Select Take photo or Select photo from Gallery to add a picture.
t Tap
t Enter your contact’s information.
Done.
4. Tap
Saving a phone number from the Dial Pad
1. From the Home screen, tap Phone.
2. Enter the number > press Menu > Add to contacts.
3. Tap
Create new contact or an Existing contact.
4. Enter the information for the contact > Tap
Storing a contact using Call log
1. From the Home screen, tap Apps > Contacts.
2. Tap Call log > Tap the number you want to save > Add to contacts.
3. Tap
Create new contact or select an Existing contact.
4. If you have more than one account, tap the account where you want to save the contact > Enter
the information for the contact > Tap
Done.
Done.
Importing/Exporting /Sharing contacts
Importing contacts from your microSD card
If you have contacts stored in vCard format on the microSD card, you can import them into Contacts
on your phone.
1. From the Home screen, tap
2.
Press Menu > Import/Expor t.
Apps > Contacts.
062 Virgin mobile
Page 63

3. Tap Import from SD card.
4. If you have more than one account on your phone, select the desired account.
5. Tap the option to
Import one vCard file, Import multiple vCard files or Import all vCard files
on the SD card. The contac ts are impor ted.
Exporting contacts to your microSD card
1. From the Home screen, tap Apps > Contacts.
2. Press
Menu > Import/Export.
3. Tap Export to SD card.
4. Tap
OK to conrm.
t This process creates a le containing all your contac ts with a .vc f ex tension on your SD card.
Sharing visible contacts
1. From the Home screen, tap Apps > Contacts.
2. Press Menu > Import/Expor t.
3. Tap
Share visible contacts > Select Bluetooth, Email, Gmail or Messaging.
Virgin mobile 063
Page 64

Viewing details about a contact
1. From the Home screen, tap Apps > Contacts.
2. Tap the contact whose details you want to view.
3. Tap the communication icon to start dialing, texting, or emailing the contact.
12
1 Tap to open Quick Contact.
Add to favorites : To remove a contact from your favorites list, tap the gold star
2
again. The star turns gray and the contac t is removed from your favorites list.
3 Tap to call.
4 Tap to compose a text message.
5 Tap to send an email.
6 Tap to chat.
7 Tap to view the address on Maps.
3
4
5
6
7
064 Virgin mobile
Page 65

Search for a contact
1. From the Home screen, tap Apps > Contacts.
2. Press
3. Start entering the contact’s name.
As you type, contacts with matching names appear below the search box.
4. Tap the matching contact in the list to open.
Search or press Menu > Search.
Editing/ Deleting Contacts
Editing contact details
1. From the Home screen, tap Apps > Contacts.
2. Tap and hold the contact you want to edit > Tap Edit contact.
3. Edit the contact information.
4. Tap
Done.
Setting a contact’s default phone number/email
Setting a contact’s default phone number
The default phone number is used when you initiate a call or text message by tapping and holding a contact.
1. From the Home screen, tap
2. Find the desired contact > Tap and hold the phone number to designate it as the default phone
number.
3. Tap Make default number.
t The default phone number is indicated with a checkmark.
Apps > Contacts.
Virgin mobile 065
Page 66

Setting a contact’s default email
The default email is used when you send an email from the list by tapping and holding a contact.
1. From the Home screen, tap
2. Find the desired contact > Tap and hold the email address to designate it as the default email
address.
3. Tap
Make default email.
t The default email is indicated with a checkmark.
Apps > Contacts.
Setting a ringtone for a contact
1. From the Home screen, tap Apps > Contacts.
2. Tap the desired contact.
3. Press
t Tap a ringtone from the list to play when the contact calls. A sample of the ringtone is played.
4. Tap
Menu > Options > Ringtone.
OK.
Adding a contact to your favorites
1. From the Home screen, tap Apps > Contacts.
2. Tap and hold the desired contact >
t To remove a contact from your favorites list, tap and hold the contact >
Add to favorites.
Remove from favorites.
Joining contacts
1. From the Home screen, tap Apps > Contacts.
2. Tap the contact you want to save. The others will merge into this le. This is the contact you will
see in contacts after joining.
3. Press
066 Virgin mobile
Menu > Edit contact > press Menu > Join.
Page 67

4. Tap the contact you want to join with the rst contact. The information from the second contact is
added to the rst contact, and the second contact is hidden.
Separating contacts
1. From the Home screen, tap Apps > Contacts.
2. Tap the contact you want to separate.
3. Press Menu > Edit contact > press Menu > Separate > OK.
4. The contact information is split into separate contacts.
Deleting a contact
1. From the Home screen, tap Apps > Contacts.
2. Tap and hold contact you want to delete >
Or tap the contact you want to delete > press Menu > Delete contact.
3. Tap
OK.
Delete contact.
Communicating
Sending text message
1. From the Home screen, tap Apps > Contacts.
2. Tap and hold the contact you want to send >
tThe Primary Phone Number is used, or you are prompted to choose a phone number.
Making calls
1. From the Home screen, tap Apps > Contacts.
Text contact.
Virgin mobile 067
Page 68

2. Tap and hold the contact to call > Call contact.
t The Primary Phone Number is used, or you are prompted to choose a phone number.
Map of contacts
1. From the Home screen, tap Apps > Contacts.
2. Tap the desired contact > Tap the place icon
3. The mapping application will open.
of the address.
Connecting by using Quick Contact
1. From the Home screen, tap Apps > Contacts.
2. Tap the icon or photo next to your desired contact > Tap the desired communication method.
t Only the icons relevant to your contact’s data are displayed.
t If there are too many icons to t on the screen, drag to the left or right to selec t an icon.
068 Virgin mobile
Page 69

Account Setting
Working with Google
1. From the Home screen, tap Apps > Contacts.
2.
Press Menu > Accounts.
t After registering your Google account, your online Google contacts are synchronized to your
phone. Changes made online or on the phone are automatically synchronized and updated in
both locations. This address book will be used throughout the user interface.
t If you register two or more accounts, you can merge address books from the multiple accounts
into one address book.
Contact List Display Options
1. From the Home screen, tap Apps > Contacts.
2. Press
t Only contacts with phones: Only contacts with phone numbers are shown in the contacts list.
t Sort list by: Select
t View contact names as: Select Given name first or Family name first.
t Choose contacts to display: Touch an account to open its list of groups. Check or uncheck the
3. Tap
Menu > Display options.
Given name or Family name.
groups you want to display in the contact list.
Done.
Virgin mobile 069
Page 70

Messaging
About Messaging
Use Messaging to send text messages (SMS) and multimedia messages (MMS) to other mobile
phones.
1. From the Home screen, tap Apps > Messaging.
On the Messaging screen, your sent and received messages are neatly grouped into conversations, by
contact names or phone number. You can:
t Scroll up or down the list of conversations by icking your nger on the screen.
t Tap a contact name or number to view the conversation history.
t Tap and hold the photo or
Sending Messages
Sending a Text Message
NOTE
Depending on your billing plan, if you exceed the single text message character limit, you will be
billed for multiple messages.
1. From the Home screen, tap Apps > Messaging.
2. Tap
New message. Or press Menu > Compose.
3. Enter the phone number in the
t Enter the rst few letters of a contact name or phone number. Matching contacts are displayed.
070 Virgin mobile
to open additional menu options.
To eld. Fill in one or more recipients. You can:
Page 71

Continue typing or tap a name or phone number from the search results.
t Tap
> Select message recipients from your contact list > Add.
4. Tap
Type to compose > Enter your message.
Menu to see more options.
t Press
Add subject
Attach
Send
Insert smiley
Discard
All threads
Send.
5. Tap
t Press
NOTE
Your text message automatically becomes a multimedia message on below condition:
Back to save the message as a draft.
Add subject.
Attach Media Files or a Slideshow with-in the message.
Send the message.
Insert a smiley in the message.
Delete the message in progress.
Go back to text messaging inbox.
t$PNQPTFBNFTTBHFPWFSDIBSBDUFST
t"EETVCKFDU
t"UUBDIBOJUFN
Virgin mobile 071
Page 72

Sending a multimedia message (MMS)
To compose a multimedia message, star t by creating a new tex t message. Then simply add an attachment.
1. From the Home screen, tap
2. Tap
New message. Or press Menu > Compose.
3. Enter the phone number in the To eld. Or select recipients from the contact list.
Type to compose > Enter your message.
4. Tap
5. Press Menu > Attach > Choose the type of attachment.
Apps > Messaging.
Pictures
Capture picture
Videos
Capture video
Audio
Record audio
Slideshow
vCard
vCalendar
6. From the message body, tap:
View: To view the attached item.
t
Replace: To change attached les.
t
Remove: To remove attached les.
t
Send MMS.
7. Tap
t Press
072 Virgin mobile
Back to save it as a draft.
Select a photo.
Capture a new photo.
Select a video.
Record a new video.
Select an audio le.
Record a new audio le.
Create a slideshow from up to 10 of your photos.
Select a contact card.
Select a calendar event.
Page 73

Resuming a draft message
1. From the Home screen, tap Apps > Messaging.
2. Tap the message indicated by “
3. When you nish editing, tap
Draft” to resume editing.
Send.
Reading Messages
1. From the Home screen, tap Apps > Messaging.
2. Tap a message thread.
3. Tap and hold an individual message to see more options.
Lock/Unlock message To lock/unlock a message.
Call *** To call the message sender. (Only on incoming messages)
Send message to *** To reply back to the sender. (Only on incoming messages)
Add *** to contacts To save the phone number or email address to Contacts. (Only
Forward To forward a message. Enter a recipient, edit the content of the
Copy message text To copy text from a message.
View message details To view details about a message.
Delete message To delete a message.
Deleting a message thread
1. From the Home screen, tap Apps > Messaging.
on incoming messages)
message as needed > Tap
Send.
Virgin mobile 073
Page 74

2. Tap and hold the message thread > Delete thread.
t If you want delete all message threads, press Menu > Delete threads.
3. Tap
Delete.
Searching messages
1. From the Home screen, tap Apps > Messaging.
2. Press Menu > Search or press Search.
3. Enter the search term > Tap .
Replying to a message
1. From the Home screen, tap Apps > Messaging.
2. Tap the received message > Tap
3. Tap
Send.
Type to compose > Enter your message.
Receiving CMAS Alerts Messages
Commercial Mobile Alert System (CMAS) service allows you to receive automatic alerts in times of
crisis. (e.g., earthquake, hurricanes, etc.)
CMAS Alerts Messages Settings
1. From the Home screen, tap Apps > Messaging.
2. Press
3. If
Imminent Threat - Severe or CMAS Test.
NOTE
Presidential option is present on the list but it is “read only”.
Menu > Settings.
CMAS Enable is checked, you can check the checkbox of Amber, Imminent Threat - Extreme,
074 Virgin mobile
Page 75

Receiving CMAS Alerts Messages
1. From the Home screen, tap Apps > Messaging.
2. Tap CMAS aler ts message you want to view.
CMAS alert messages are indicated with
t If CMAS alert arrives on your phone during a call, CMAS icon is displayed in the Status bar. If
Presidential, CMAS icon ashes. If non-Presidential, CMAS icon is static icon.
t ONLY the Presidential CMAS icon is displayed under the Time/Date on the unlock/lock screen.
t If you are on a CMAS screen in the Messaging application, the following options are removed or
disabled : Reply, Forward, and Call.
t If you have power cycled your phone and a Presidential Alert has NOT been viewed, the
Presidential CMAS icon will continue to ash when the device is powered on again.
CMAS alert icon.
Changing Messaging Settings
1. From the Home screen, tap Apps > Messaging.
2. Press
Storage settings
Delete old messages Check to delete older messages in a thread when messaging
Text message limit Tap to set the number of messages to save per message
Multimedia message limit Tap to set the number of messages to save per message
Menu > Settings.
memory or thread limits are reached. Uncheck to keep all
messages. You may need to manually delete messages if the
messaging memory limit is reached.
thread. When the limit is reached, older messages are deleted
if ‘Delete old messages’ is checked.
thread. When the limit is reached, older messages are deleted
if ‘Delete old messages’ is checked.
Virgin mobile 075
Page 76

Multimedia message (MMS) settings
Auto-retrieve Uncheck to download only the heading of multimedia
messages. You will need to tap the MMS message heading
and manually download each MMS message. You may want
to use this feature when roaming or when connected to a
slow data network.
Number of Retry Attempts Set number of retry attempts.
Notication settings
Notications Check to be notied whenever you receive a new message.
Select ringtone Select or de-select a ringtone to sound when you receive new
message notications.
Vibrate Set the phone to vibrate ever y time you receive a new
message notication, only in Silent mode, or never.
Receive CMAS Alerts
CMAS Enable Check to receive CMAS Alerts.
Presidential Set to receive Presidential CMAS Alerts. Presidential Alerts are
always displayed.
Amber Set to receive Amber CMAS Aler ts.
Imminent Threat - Ex treme Set to receive Extreme CMAS Alert.
Imminent Threat - Severe Set to receive Severe CMAS Alert.
CMAS Test Set to receive CMAS Test message.
076 Virgin mobile
Page 77

Google
Gmail
Opening your Inbox and Reading your Gmail
The inbox is your default Gmail view. All your received emails are delivered to your inbox.
1. From the Home screen, tap
2. Tap the email you want to read.
t Tap
to star the email.
t If the sender is a friend in Google Talk, you can see your friend’s online status.
t Tap
Archive to archive the message.
Delete to delete the message from your inbox.
t Tap
t Tap
t Press
Replying to or forwarding an email message
1. From the Home screen, tap Apps > Gmail.
2. When reading a message,
t To reply to the sender, tap .
t To reply to all message recipients, tap
t To forward the message, tap > .
or to see the previous or next message in the list.
Menu to see more options( Change labels, Mark read/Mark unread,
Mark important/Not important, Go to inbox, Mute, More(Add star/Remove
star, Report spam, Settings, Help, Select text).
Apps > Gmail.
> .
Virgin mobile 077
Page 78

Sending a new email
1. From the Home screen, tap Apps > Gmail.
2. From any message list, press
3. Enter a name or address in the
address with a comma.
4. Enter a subject in the
5. Type the message text in the
t To attach an image le, press Menu > Attach > Select the picture you want to attach.
6. Tap
or press Menu > Send.
t To save the message as a draft, Tap
Subject eld.
Menu > Compose.
To eld. To send the email to several recipients, separate each email
Compose Mail eld.
or press Menu > Save draft.
Working with Multiple Email Messages
You can archive, delete or label groups of email messages at the same time.
1. From the Home screen, tap
2. From any message list,
t Tap Archive to move messages out of your inbox without deleting. Archived emails are assigned
the All Mail label.
t Tap
Delete to delete selected messages.
t Tap
Labels > Select the labels that you want to assign > Tap OK.
t Or press
important/Not important, Report spam, Mute, More(Deselect all, Help, About)
Menu > To Add star/Remove star, Mark read/Mark unread, Mark
Apps > Gmail.
check the box next to the email messages you want to work with.
Switching between Google accounts
If you have set up two or more Google Accounts on your phone, you can switch between them in Gmail.
078 Virgin mobile
Page 79

Gmail displays only one Google Account at a time. The current account is shown at the top right of
any message list.
1. From the Home screen, tap
2. From any message list, press
3. Tap the account that you want to view. You can also tap the account name at the top of the screen
to see a list of your accounts.
Apps > Gmail.
Menu > Accounts.
Searching for email messages
All elds of your email messages are searchable.
Search will include all your Gmail Messages, not just those that synchronized to your phone.
1. From the Home screen, tap
2. From any message list, press Menu > Search or press Search.
3. Enter a search term >
t Your previous searches are shown below the search box.
Apps > Gmail.
Tap .
Labeling email messages
You can organize your emails by label. Gmail has preset labels. Or you can create your own labels in
Gmail when viewed on a computer. (Note: Custom label colors created on the web are not supported
on your phone).
Labeling an email
1. From the Home screen, tap Apps > Gmail.
2. When reading a message, press Menu > Change labels.
3. Select a label > Tap
OK.
Virgin mobile 079
Page 80

Viewing emails by label
1. From any message list, press Menu > Go to labels.
2. Tap a label to view matching email messages.
Starring/un-starring an email message
You can star an important email to make it easy to nd again. Starred emails are assigned the Starred
labels.
1. From the Home screen, tap
2. From any message list,
t Tap
to star a message.
t Tap to un-star a message.
Apps > Gmail.
Gmail settings
Settings are unique to each Gmail account. Changes will only aect the active account.
1. From the Home screen, tap
2. From any message list, press Menu > More > Settings.
Apps > Gmail.
General
preferences
080 Virgin mobile
Message
Actions
Clear search
history
Clear “Show
pictures”
You can set message actions not to show message actions
outside of a message’s header.
Delete all previous search terms used when searching your
Gmail messages.
Congure the phone to restore default for all senders (don’t
show pictures automatically).
Page 81

Account settings
General settings Priority Inbox Check to make Priority Inbox your default
inbox for this account.
Signature Enter a signature to append to every
outgoing message.
Conrm actions Congure archive, delete or send ac tions to
require a manual conrmation.
Reply all Check to replace the Reply button with the
Reply all button.
Auto-advance Select what is displayed after you delete or
archive an email.
Message text size Select the text size used when reading
messages on the phone.
Batch operations Check to allow label operations on more
than one conversation.
Sync inboxes and labels Select which labels are synchronized.
Notication settings Email notications Check to show notication icon in Status bar
when you receive a new email.
Labels to notify You can set notication preferences for
synced labels.
Virgin mobile 081
Page 82

Google Talk
Use Google Talk to send instant messages to other Google Talk users anywhere they are logged in.
Signing in or out of Talk
Opening Talk and Signing in
1. From the Home screen, tap Apps > Talk.
When you rst open Talk, your Friends list is displayed.
NOTE: When you rst turn on your phone and sign in to your Google Account, you are automatically
signed in to Google Talk. You will remain signed in, even while you’re using other applications, until
you deliberately sign out.
Talk syncs data only from the rst Google Account you added to your phone.
Signing out of Talk
1. From the Talk friends list, press Menu > Sign out.
Updating Your Online Status, Profile Picture, and Status Message
1. From the Home screen, tap Apps > Talk.
2. Tap your name at the top of the Talk friends list.
t Tap your picture
SD card.
t Tap the online status
t Enter a new status message.
3. Tap
Done.
Your picture, online status, and message will be updated anywhere your TALK status is displayed.
> Remove to delete the image or Change to select another picture from your
bar > select your online status: Available, Busy, or Invisible.
082 Virgin mobile
Page 83

Adding and managing Friends list
Online Status Indicators
Available
Away
Monitoring online status
The Talk friends list is sorted by online status: active chats, online, away, busy, and oine. Within
each status group, friends are listed alphabetically.
Icons in Talk, Gmail, Maps, and other applications indicate Talk status.
Adding a friend to your Friends list
1. From the Home screen, tap Apps > Talk.
2. Press
3. Enter a Google Talk ID or a Gmail address > Send invitation.
When your friend accepts the invitation, the friend is added to your Talk contacts list.
To view a list of pending invitations to friends, press
Accepting chat invitations
When you are added to a friend’s Talk contact list, you will receive a notication and an invitation
appears in your Friends list.
1. From the Home screen, tap
2. From the Talk Friends list, tap
t Tap
t Tap Cancel if you don’t want to chat or share your Talk status with the sender.
t Tap Block to block and add the sender to your blocked users list.
Menu > Add friend.
Apps > Talk.
Chat invitation.
Accept to accept the invitation. The friend is added to your Friend list.
Busy
Oine
Menu > More > Invites.
Virgin mobile 083
Page 84

Viewing all friends or most popular friends
1. From the Home screen, tap Apps > Talk.
t Press
t When viewing All friends, press
Menu > All friends to view all your friends.
Menu > Most popular to view only friends that you
often chat with.
Managing a friend
1. From the Home screen, tap Apps > Talk.
2. Tap and hold a friend’s name to see more options (
Start chat/Go to chat/End chat, Friend info,
Block friend, Remove friend, View contact, Always show friend/Auto show friend, Hide
friend).
NOTE
Block friend: This option will block a user from sending you messages and add the user to your
blocked friends list.
Always show friend: This setting will add the friend to your Most popular list. To remove a friend
from the Most popular list, tap and hold the friend’s name then tap > Auto show friend.
Chatting with friends
Chatting with a friend
1. From the Home screen, tap Apps > Talk.
2. Tap an online friend.
3. Enter your message in the text box >
Accepting an invitation to chat
When a friend sends you a Talk message, you receive a notication. There are 2 ways to respond:
t On your friends list, tap the friend who sent you the chat invitation or
t Open the notications panel and tap the chat notication.
084 Virgin mobile
Send.
Page 85

Adding another friend to your chat
1. When you’re chatting with a friend, press Menu > Add to chat.
2. Tap a friend to invite.
This will start a new group chat for all parties. Only those who accept the new chat invitation will be
joined to the group chat.
Switching between active chats
You can switch between multiple active chats.
1. When you’re chatting with a friend,
t Press
Menu > Switch chats > tap the desired ac tive chat.
t Or swipe left or right across the screen to switch between chats.
Ending your current chat
1. From the Home screen, tap Apps > Talk.
2. From any chat window, press
Menu > End chat.
Virgin mobile 085
Page 86

Talk settings
1. From the Home screen, tap Apps > Talk.
2. Press
Menu > Settings.
General settings Automatically sign in Automatically sign in to Talk when
Mobile indicator When selected, your status will
Automatic away-status Set your status to away when your
Clear search history Clear previous Talk chat searches
Notication settings IM notications Show a notication icon on the
Select ringtone Select the Talk Notication
Vibrate Vibrate the phone when a new Talk
Invitation notications Notify on the status bar when
About Terms & privacy Read detailed Google Talk legal
086 Virgin mobile
you turn your phone on.
indicate you are using Talk on your
mobile phone.
phone’s display is o.
from showing up in the Search box.
status bar when you have new
message.
ringtone.
message arrives.
friend invitations are received.
Terms and privacy statements.
Page 87

Maps
Use Maps to nd your current location and get directions. You can search for addresses, landmarks
and businesses directly on a street map or satellite image.
NOTE
You need an active mobile data or Wi-Fi connec tion to use Maps.
To see your location and get directions, you must turn on location services. From the Home screen,
tap Apps > Settings > Location & security. Select one or both from Use wireless
networks or Use GPS satellites.
Maps may not be available for all locations.
Opening and viewing Maps
Viewing your location
1. From the Home screen, tap Apps > Maps.
2. Press
Using Maps
1. From the Home screen, tap Apps > Maps.
2. While viewing a map, swipe to any direction on the screen.
Zooming in and out of a map
1. From the Home screen, tap Apps > Maps.
2. To Zoom In/Out of a map,
t Tap
t Tap
Menu > My Location.
shows your location on the map and points north for your reference.
or double-tap on the map to zoom in.
to zoom out.
Virgin mobile 087
Page 88

Viewing location details
Viewing information for a location
1. From the Home screen, tap Apps > Maps.
2. While viewing a map, tap and hold a location, starred place, or a search result on the map.
t A balloon opens over the location, with summary information.
3. Tap the balloon to see the address or more information.
Starring or un-starring a location
Add a Star to bookmark and easily return to a map location.
1. While viewing detail information for a location,
t Tap
to star the location.
t Tap to un-star the location.
Viewing a location in Street view
Street view mode provides a street-level view of the location. Street view may not be available for all areas.
1. From the Home screen, tap
2. While viewing detailed information for a location, tap .
t To view surrounding areas, swipe the screen in any direction.
t To zoom in or out, tap
Apps > Maps.
or .
Searching for a location
You can search Google Maps for specic locations, company names, or business types.
1. From the Home screen, tap Apps > Maps.
2. Press
3. Enter the search criteria. As you type, suggested matches from your contacts, the web, and
088 Virgin mobile
Search to open the Search Maps.
Page 89

previously searched items are displayed.
t Tap to search or
t Tap a suggested search term.
4. The search results are displayed as
t Tap markers and titles to view more information.
to show the search results as a list > Tap each item to see more information.
t Tap
markers with letter labels on the map.
Viewing map layers
Initially, Google Maps opens with a street map. You can view additional map layers, such as satellite
images and trac information. You can also view custom Web created Google Maps.
1. From the Home screen, tap Apps > Maps.
2. Press Menu > Layers. A dialog opens with a list of layers.
3. Turn layers on or o by tapping the layer name. A check mark indicates the layer is selected.
t Tap
Clear Map to deselect all layers.
Layers may change the map entirely or overlay additional information. Tap icons or interactive items
to explore dierent layer types.
Getting directions
1. From the Home screen, tap Apps > Maps.
2. Press Menu > Directions.
3. Use your current location as the starting point, or enter a location in the Start point eld.
Or tap
to select an address from your contacts, a point that you tap on a map, or My places.
4. Enter your destination in the End point eld. Or tap to select an address from your contacts, a
point that you tap on the map, or My places.
5. Tap
or or to select your transportation method > Tap Get directions.
Virgin mobile 089
Page 90

Places
Use Google Places to explore your current location.
NOTE
You need an active mobile data or Wi-Fi connec tion to use Places.
To see your location and get directions, you must turn on location services. From the Home screen,
tap Apps > Settings > Location & security. Select one or both from Use wireless
networks or Use GPS satellites.
Maps may not be available for all locations.
Searching
1. From the Home screen, tap Apps > Places.
2. From the Places categories,
t Tap the Find places eld on top of the screen > Enter the place you want to search > Tap
narrow your results, select a category before searching.
3. The search results display in a list, with their approximate distance and direction.
to see your results on a map.
t Tap
t Tap a place to view more information.
Navigation
Navigation is an internet-connected GPS navigation system with voice guidance.
Navigation provides both spoken and on-screen turn-by-turn driving directions.
NOTE
You need an active mobile data or Wi-Fi connection to use Navigation.
To see your location and get directions, you must turn on location services. From the Home screen,
tap Apps > Settings > Location & security. Select one or both from Use wireless
networks or Use GPS satellites.
Maps may not be available for all locations.
090 Virgin mobile
. To
Page 91

Opening & Using Navigation
There are many ways to view the map and travel progress while in Navigation mode. See the
Changing Views section below for more information.
Navigating with Turn by Turn Directions
1. From the Home screen, tap Apps > Navigation or tap when viewing driving
directions in Google Maps.
2. Customize your navigation settings for highways or tolls by tapping
t Tap Map to begin tracking your journey, even if you haven’t chosen a destination.
3. From the list of destination options,
Speak Destination to search the destination with voice.
t Tap
t Tap Type Destination to enter the destination.
Contacts to use a contact’s address information.
t Tap
t Tap Starred Places to select the destination from starred places.
t Tap a recent destination to selec t the previous destination.
A map opens with your route drawn in blue. Specic instructions are listed at the top of the screen.
As you navigate your route, each direction is spoken in turn, and the next turn is displayed. Your
current location is shown as a blue arrow on the map, which is updated as you navigate your route.
Google Navigation downloads and temporarily stores a copy of the directions and other information
about your route on the phone, so if you lose your connec tion to a data network, you can still
navigate to your destination.
You can control the volume of the spoken instructions with
turn o the spoken directions, press Menu > Mute.
Previewing your route
1. From an active navigation, tap the directional instruction banner at the top of the screen.
Volume up / Volume down. To
.
Virgin mobile 091
Page 92

2. Tap or to preview the next or previous segment of your route.
When you preview a route, tap
3. Tap
to return to your current location and next turn direction.
to switch to the street-level view of your route.
Changing views of your route
You can view your progress on your route as a map with dierent informational layers. Zoom in and
out or drag to view adjacent areas. You can also view your progress in Satellite or Street View.
1. While viewing an active navigation,
t Press
Menu > Layers to switch to views trac or a Satellite View, or to show the locations
of parking, restaurants, and other landmarks along your route.
t Press
Menu > Route Info for a high-level summary of your route, with options to pick a
new route, see trac information, and more.
Tap while on the Route Info screen to view each turn as a scrolling list of written directions.
t Drag the map to view adjacent areas, or tap the map to see controls for zooming in and out.
Finding an alternate route
If trac is slow on your current route, or if you just want to try a dierent route, you can request an
alternate route from the Google Maps Navigation ser vice.
1. From an active navigation,
2. Press
Menu > Route Info > .
3. Select the alternate route you’d like to use to resume turn-by-turn guidance.
Exiting Navigation
You can exit Navigation mode when you reach your destination, or at any time by pressing Menu >
Exit Navigation.
092 Virgin mobile
Page 93

Latitude
Latitude allows you to share your location with friends and view their locations on a map.
Your location is not shared automatically. You must join Latitude, and then invite your friends to view
your location or accept their invitations. Only friends that you have explicitly invited or accepted can
see your location.
NOTE
You need an active mobile data or Wi-Fi connec tion to use Latitude.
To see your location and get directions, you must turn on location services. From the Home screen,
tap Apps > Settings > Location & security. Select one or both from Use wireless
networks or Use GPS satellites.
Maps may not be available for all locations.
Joining and opening Latitude
1. From the Home screen, tap Apps > Latitude.
2. The rst time you join Latitude, you’re prompted to accept or rejec t the Google privacy policy.
Adding friends
Add friends to Latitude to share your location with them and request to see their location. Only
friends you have explicitly invited or accepted can see your location within Latitude.
Inviting friends
1. From the Home screen, tap Apps > Latitude.
or press Menu > Add friends.
2. Tap
t Tap
Select from Contacts > Select contacts to invite > Add friends > When asked to conrm,
Yes .
t Or tap Add via email address > Enter one or more email addresses, separated by “ , ” > Add
friends > When asked to conrm, Yes.
Virgin mobile 093
Page 94

t Or tap to add a friend from suggested friends’ list > Ye s.
If your friends are current Latitude users, they will appear at the top of your Google Contacts lists with
a Latitude icon. Current users will receive email request and a request within Latitude.
If your friends aren’t using Latitude, they ’ll receive a location request email, but they must sign into
Latitude with a supported Google account before they can accept your request. If you invite a friend
who is not using a Google ID, you or your friends will need to re-send any location requests once they
have signed into Latitude with a supported Google account.
Responding to an invitation
1. From the Home screen, tap Apps > Latitude.
New sharing request.
2. Tap
t Tap Accept and share back to share locations between you and your friend.
t Tap
Accept, but hide my location to see the friend’s location, and hide your location.
t Tap
Don’t accept to reject the request.
3. Tap
Done.
Viewing friends’ locations and managing friends
You can view your friends’ locations on a map or in a list.
t When you open Latitude, you are shown list of your Latitude friends with location summaries.
t When you open Maps, your friends’ locations are shown. Each friend is represented by a photo
and arrow indicating their approximate location. If a friend has chosen to share only city-level
location details the friend’s photo is shown in the friend’s city center location.
Viewing friends’ prole
t While using Map mode, tap the friend’s photo. Your friend’s name appears in a balloon. Tap the
balloon.
094 Virgin mobile
Page 95

t From the Latitude friend’s list, tap a friend.
Managing friends’ communication and privacy options
1. From the Home screen, tap Apps > Latitude.
2. From a friend’s prole,
t Tap
t Tap
t Tap to view the friend’s location in street view.
t Tap the friend’s photo to open Quick contact where you can view contact details, send an email,
and more.
t Tap
Share best available location Share your precise location information.
to view the friend’s location on the map.
to get directions to the friend’s location.
Sharing options to change sharing options for the friend.
Share only city level location Share only your city location, not a street-level
Hide from this friend Stop sharing your location with this friend.
t Tap
Remove this friend to remove the friend from your list and stop sharing locations.
location. Your friend will see your picture in the
middle of your current city.
Privacy settings
Only the last location sent to Latitude is stored by Google. If you turn o Latitude or are hiding, no
location is stored.
To change your privac y settings:
1. From the Home screen, tap
2. Press Menu > Settings.
Apps > Latitude.
Virgin mobile 095
Page 96

Location reporting Detect your location Let Latitude detect and update
your location as you move.
The update frequency is
determined by several factors,
including your phone’s battery
level and how recently your
location has been updated.
Set your location Choose from several methods
and set your location manually.
Do not update your location Hide your location from all your
friends.
Location History settings Enable location history Store your past locations and
visualize them on the Latitude
website.
Account settings Sign out of Latitude Disable Latitude and stop
sharing your location and
status. You can always join
Latitude again.
Calendar
The Calendar application data on your phone syncs with the web-based Google Calendar service. It is
also compatible with Microsoft Exchange ActiveSync Calendar.
Opening Calendar
1. From the Home screen, tap Apps > Calendar.
096 Virgin mobile
Page 97

Events are color coded to enable you to distinguish between multiple calendars. Events times are
shown using your local time zone, which is provided by your active mobile network. When traveling,
you may want to set a home time zone in Calendar.
Creating an event
Events created on your phone will be synced to Google Calendar or Microsoft Exchange automatically.
1. From the Home screen, tap
2. There are t wo ways to create an event:
t Press
t In Day, Week, or Month view, tap and hold the screen at the date and/or time you want >
event.
3. Enter the name, time, location, description, and optional additional details for your event.
t If you have more than one calendar, choose the calendar to which to add the event.
t In the Guests eld, enter email addresses of anyone you want to invite. Separate multiple
addresses with commas ( , ). If your invitees use Google Calendar, they’ll receive an invitation in
Calendar and by email.
t If the event occurs on a regular basis, tap the Repetition box and choose the reoccurrence
information.
t Tap
t Press
4. Tap
Menu > More > New event. Or press Menu + n at the same time.
to add reminders. You can set multiple for an event.
Menu > Show extra options to add additional details about the event.
Done.
Apps > Calendar.
New
Viewing calendar and events
Changing calendar view
When you open Calendar, Month view is shown by default. You can also view the Calendar by
Virgin mobile 097
Page 98

Agenda, Day, or Week.
1. From the Home screen, tap
2. Press
Menu > Choose the type of view that you want.
Apps > Calendar.
Day
Week
Month
Agenda
Today
More
Viewing event details
t In Day, Week, or Agenda view, tap an event.
t In Month view, tap a day to switch to Day view > Tap an event.
Displays a chart of the events of one day, in a table of one-hour rows. Allday and multiday events are displayed at the top. Each event is displayed at
the corresponding time.
Swipe left or right to change dates, and swipe up or down to view earlier or
later times.
Displays one week calendar. All-day and multiday events are displayed at
the top. Swipe left or right to change weeks, and swipe up or down to view
earlier or later times.
Displays a chart of the events of the month. Events are shown as blue bars
on each calendar date. Swipe left or right to switch months.
A list of your events in chronological order. All-day and multiday events are
listed at the start of each day. Days without events are not shown.
Flick up or down to view earlier or later events.
Displays a chart of the events of today.
You can select New event, Calendars or Settings.
Editing or deleting an event
1. In event details view, press Menu > Edit event to edit the event.
2. Make your changes to the event > Tap
098 Virgin mobile
Done.
Page 99

tTo delete the event, press Menu > Delete event > Tap OK.
Synchronizing and displaying calendars
You can select which calendars to show or hide on your phone’s Calendar, and which ones to
synchronize.
1. From the Home screen, tap
2. Press Menu > More > Calendars.
All the calendars you’ve added or subscribed to are displayed. (Calendars for accounts you’ve
congured not to synchronize are not included in the list.)
3. Tap the icon next to a calendar to change storage and visibility settings.
Apps > Calendar.
4. Tap OK.
Calendar events stored on phone and visible in Calendar
Calendar events stored on phone but not visible in Calendar
Calendar events not synchronized to phone
Virgin mobile 099
Page 100

Changing Calendar settings
1. From the Home screen, tap Apps > Calendar.
2. Press
Calendar view setting Hide declined events Check if you don’t want to see
Week number setting Display week number Check if you want to see week
Reminder settings Set alerts & notications Congure event reminders.
About Build version The version of Calendar in use.
Menu > More > Settings. Or press Menu + p at the same time.
events to which you’ve declined
invitations.
Use home time zone Displays calendars and event times in
your home time zone when traveling.
Home time zone If Use home time zone is checked,
you can set home time zone.
number in Calendar.
First week of year If Display week number is checked,
you can set rst week of year.
Select ringtone Select which ringtone will
sound when you receive an
event reminder.
Vibrate Congure the phone to vibrate
whenever you receive an event
reminder.
Default reminder time Select the default reminder
time used when creating new
calendar events.
100 Virgin mobile
 Loading...