

Page 1

T 60 USER MANUAL
Page 2

WELCOME
Thank you for purchasing Alcatel onetouch T60 Tablet. This device will provide you with high quality mobile
communication and entertainment based on Alcatel’s exceptional technology and high standards.This quick
guide introduces main functions of this tablet, tips and notes. Please read it carefully before using it. Images and
content in this guide are for reference purposes only, and may dier from the actual item, which is the standard.
CONTENT
1 ASSEMBLING ................................................................................................................................................... 5
1.1 Unpack ............................................................................................................................................................................................5
1.2 Assemble & Charge ....................................................................................................................................................................6
2 GETTING STARTED ..........................................................................................................................................7
2.1 Your device ....................................................................................................................................................................................7
2.2 Keys ..................................................................................................................................................................................................8
2.3 Turn your device on and o ....................................................................................................................................................9
2.4 Use the Touch Screen ................................................................................................................................................................9
2.5 Get to know the Home Screen .............................................................................................................................................10
2.6 Access Applications..................................................................................................................................................................14
2.7 Connection ..................................................................................................................................................................................14
2.8 Entering Text ...............................................................................................................................................................................16
3 CONTACTS ......................................................................................................................................................16
4 EMAI L ............................................................................................................................................................16
4.1 Set up an email account .........................................................................................................................................................16
4.2 Send an email message ..........................................................................................................................................................17
User Manual
| 01
Page 3

5 WEB .................................................................................................................................................................17
5.1 Go to a webpage .......................................................................................................................................................................17
5.2 Navigate on a webpage ..........................................................................................................................................................17
5.3 Open a new browser window ..............................................................................................................................................17
5.4 Bookmark a webpage .............................................................................................................................................................18
5.5 Find text within a webpage ..................................................................................................................................................18
5.6 Select text ....................................................................................................................................................................................18
6 FILE MANAGER ..............................................................................................................................................19
7 MULTIMEDIA ..................................................................................................................................................20
7.1 Music .............................................................................................................................................................................................20
7.2 Video ..............................................................................................................................................................................................21
7.3 Camera ..........................................................................................................................................................................................23
7.4 Recorder .......................................................................................................................................................................................25
7.5 Album ............................................................................................................................................................................................26
8 TOOLS ............................................................................................................................................................. 27
8.1 Memo ............................................................................................................................................................................................27
8.2 Calendar .......................................................................................................................................................................................28
8.3 Clock ..............................................................................................................................................................................................28
User Manual
8.4 World time ...................................................................................................................................................................................29
8.5 Stopwatch ....................................................................................................................................................................................29
8.6 Timer ..............................................................................................................................................................................................30
8.7 Calculator .....................................................................................................................................................................................30
8.8 Unit Converter ............................................................................................................................................................................30
9 GOOGLE APPLICATIONS ...............................................................................................................................30
9.1 Google Mail .................................................................................................................................................................................30
9.2 Talk..................................................................................................................................................................................................32
9.3 YouTube ........................................................................................................................................................................................33
9.4 Market ...........................................................................................................................................................................................34
9.5 Google Maps™............................................................................................................................................................................35
9.6 Google Maps Navigation™ ....................................................................................................................................................36
9.7 Latitude ........................................................................................................................................................................................36
9.8 Places .............................................................................................................................................................................................36
9.9 Voice Search ................................................................................................................................................................................37
9.10 Google Search .........................................................................................................................................................................37
9.11 News & Weather ......................................................................................................................................................................37
10 SETTINGS .....................................................................................................................................................38
10.1 Wireless & networks ...............................................................................................................................................................38
10.2 Sound Settings ........................................................................................................................................................................40
10.3 Display Settings ......................................................................................................................................................................41
User Manual
| 03 02 |
Page 4

10.4 Location & security ................................................................................................................................................................42
10.5 Applications..............................................................................................................................................................................43
10.6 Accounts & sync ......................................................................................................................................................................45
10.7 Privacy ........................................................................................................................................................................................45
10.8 SD Card & Device Storage ...................................................................................................................................................46
10.9 Language & keyboard ...........................................................................................................................................................46
10.10 Voice input & output ...........................................................................................................................................................47
10.11 Accessibility............................................................................................................................................................................47
10.12 Date & Time ............................................................................................................................................................................47
10.13 About Device .........................................................................................................................................................................48
11 THIRD PARTY APPLICATION ......................................................................................................................49
12 SAFTY & USE ................................................................................................................................................50
13 GENERAL INFORMATION............................................................................................................................ 64
1. Assembling
1.1 Unpack
Check your product box for the following items:
t Tablet
t Battery
t Charger
t Micro USB cable
t Headset
t Quick guide
Caution: The supplied accessories perform best for your device. Accessories other than the supplied ones
may not be compatible with your device.
User Manual
User Manual
| 05 04 |
Page 5
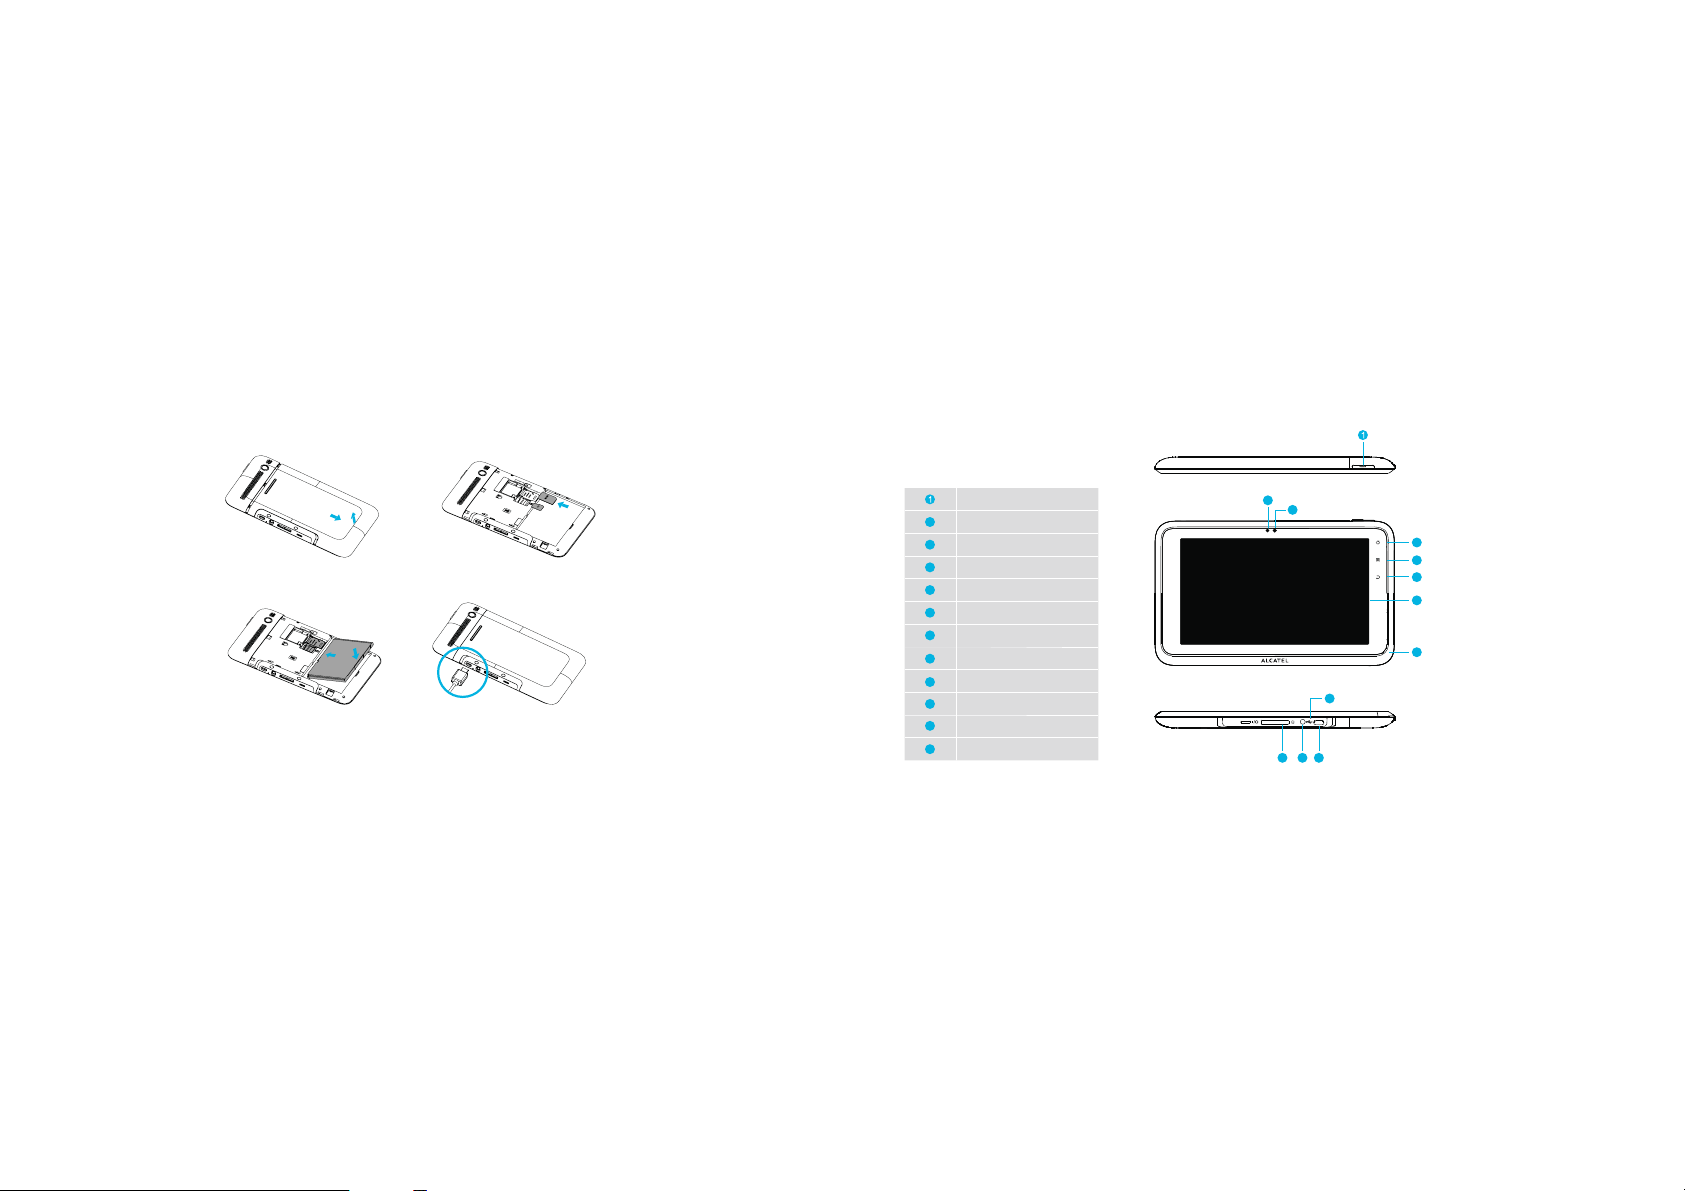
1.2 Assemble & Charge
2. Getting started
2.1 Your Device
1. Cover o
3. Battery in
User Manual
2. SIM and Micro SD card in
4. Cover on and charge up
Caution:
1. Please read “Safety & Use” rst.
2. Use only Alcatel-approved
chargers. Unauthorised chargers
can cause batteries to explode or
damage your device.
3. Please plug or unplug SIM
card or SD card when the device
power o. It is forbidden to
remove SD card or SIM card when
the device is running. Any data
loss or damage resulting from the
faulty operations is attributed to
users.
Power key
2
Light sensor
3
Front camera lens
4
Home key
5
Menu key
6
Back key
7
Touch screen
8
Microphone
LED charge indicator
9
10
I/O port
11
Headset jack
12
Micro USB Connector
2
3
4
5
6
7
8
9
12
10
11
User Manual
| 07 06 |
Page 6
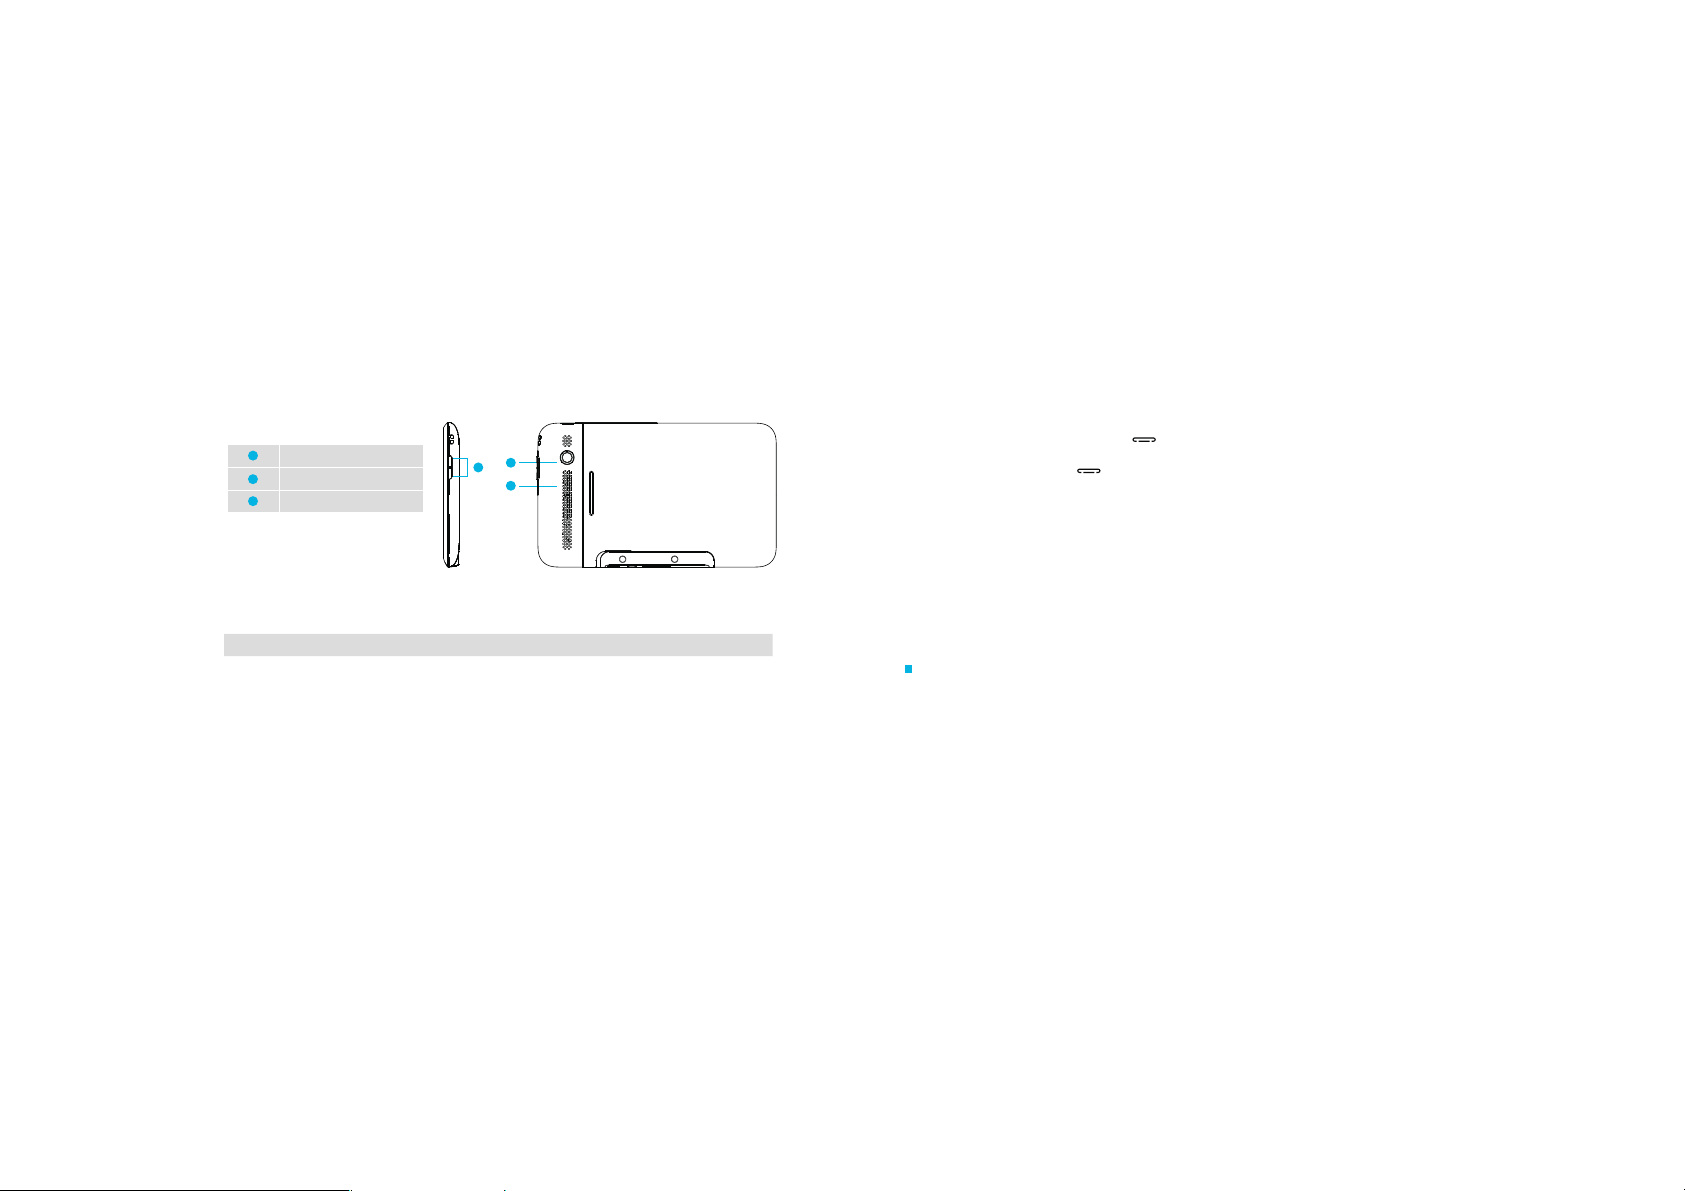
13
14
15
Volume key
Rear camera lens
Speaker
14
13
15
2.2 keys
Key Function
Power Press to put the screen to sleep, or hold to turn on/o.
Home Press to return to the home screen, or hold to open the list of recent applications.
Menu Press to open menu option.
Back Press to go back.
Volume Press to adjust the device’s volume.
2.3 Turn your device on and o
1. To turn on your device, press and hold [ Power]. If you turn on your device for the rst time, follow
the on-screen instructions to set up your device.
2. To turn it o, press and hold [ Power], and then select “Power o“, then “OK”.
2.4 Use the touch screen
Your device’s touch screen lets you easily select items or perform functions. Learn basic actions to use the
touch screen.
Control your touch screen with the following actions:
t Tap: Touch once with your nger to select or launch a menu, option, or application.
t Tap and hold: Tap an item and hold it for more than 2 seconds to open a pop-up option list.
t Drag: Tap and drag your nger up, down, left, or right to move to items on lists.
t Drag and drop: Tap and hold your nger on an item, and then drag your nger to move the item.
t Double-tap: Tap twice quickly with your nger to zoom in or out while viewing photos or web pages.
Rotate the touch screen
Your device has built-in motion sensor that detects its orientation. If you rotate the device, the interface
will automatically rotate according to the orientation.
To set the interface to keep the orientation, you can turn o “Auto-rotate screen” in Setting > Display
settings.
User Manual
User Manual
| 09 08 |
Page 7

Lock and Unlock the touch screen
When you do not use the device for a specic period, your device turns o the touch screen and
automatically locks the touch screen to prevent any unwanted device operations. To manually lock the
touch screen, press [
To unlock, turn on the screen by press [ Power], and drag Unlock icon to right. If you set a screen
lock, you need to enter your PIN or password, or draw a pattern.
Power].
2.5 Get to know the home screen
When the device is in Idle mode, you will see the home screen. From the home screen, you can view your
device’s status and access applications. Scroll left or right to a panel of the home screen.
Add items to the home screen
1. In Idle mode, press [ Menu] > Add.
2. Select the item category (shortcuts, widgets, folders, wallpapers) and select an item.
Move items on the home screen
1. Tap and hold an item to move until the selected box appears.
2. Drag the item to the location you want.
Remove items from the home screen
1. Tap and hold an item to remove.
2. The trash bin appears at the bottom of the Home screen.
3. Drag the item to the trash bin.
4. When the item turns green, release the item.
Add a shortcut to an application
1. In Menu mode, tap and hold an application icon. The shortcut icon for the application is added to the
home screen.
2. Move the icon to the location you want or move it anther panel of the home screen.
Use the shortcuts panel
1. Press to show all applications.
2. Press
3. Press
4. Press
5. Press
6. Press
Home screen menu
Press [ Menu] on the desktop, and it displays desktop Menu, including: Add, Wallpaper, Search,
to launch Email.
to launch Browser.
to launch Video.
to launch Camera.
to switch 6 panels.
User Manual
User Manual
| 11 10 |
Page 8

Notication, Settings. Touch any option to enter its interface and operate the corresponding functions.
1. Add
Tap “Add ”, then select an item to add, including: shortcuts, Widgets, Folders, Wallpapers.
2. Wallpaper
Tap “Wallpaper”, then select the item category (shortcuts, widgets, folders, wallpapers) and select an
item, tap “Save” or “Set wallpaper” to set it as wallpaper.
3. Search
Tap “Search” to enter Google Search.
4. Notication
Tap “Notication” to enter the notication interface quickly.
5. Settings
Touch “Settings” to enter Setting directly.
Status & Notication
The status bar at the top of the screen contains icons that tell you about messages and your device’s
status. To view your notications, tap the status bar and drag it down.
Indicator icons
Icon Icon Icon
Signal strength GPS on Wi-Fi connected
No service Airplane mode
3G connected No SIM card An open Wi-Fi available
3G in use Full disk USB connected
Bluetooth on USB tethering
Bluetooth connected Charging
Alarm clock
USB debugging
Downloading data
New mail Uploading data
New voicemail
Note: The illustrations are for reference only.
User Manual
User Manual
| 13 12 |
Page 9

2.6 Access applications
1. In Idle mode, select to access applications list.
2. Scroll up or down to select an application.
3. Touch any letter or slide on A-Z bar to quickly index the applications initialed with A-Z.
Back] to return to the previous screen; press [ Home] to return to the home screen.
4. Press [
Access recent applications and task manager
1. Press and hold [ Home] to open the list of applications you have accessed recently.
2. Select an application to open it.
3. Touch “Manage tasks” to view the currently running application.
4. Tap “End” to end the selected application, or tap “End All” to end all applications.
Note: Multitasking may cause hang-ups, freezing, memory problems, or additional power consumption. To
avoid these problems, end unnecessary programs using the task manager.
2.7 Connection
Wi-Fi Connection
This device supports “Wi-Fi 802.11 b/g/n”. You can access to the local network through Wi-Fi.
Press [ Menu] >settings> Wireless & networks> Wi-Fi settings to set Wi-Fi.
Once the Wi-Fi has been turned on, your device will automatically scan for available wireless networks,
displaying them in the Wi-Fi networks list. You can select one to connect or add a new network.
Bluetooth Connection
This device supports Bluetooth 2.1. With Bluetooth, you can establish a wireless connection with any
other Bluetooth compatible device.
Press [
Menu] > Settings > wireless & networks > Bluetooth settings to set Bluetooth.
Once the Bluetooth has been turned on, your device will automatically scan Bluetooth devices nearby.
After scanning, your tablet will list all the discovered devices. Tap one and input PIN to pair with the
device.
Note: Bluetooth function and operations are based on the real product.
PC Connections
You can connect your device to a PC using a Micro USB cable. You can connect your device to a PC as
a removable disk and access the le directory. If you insert a memory card in the device, you can also
access the les directory from the memory card by using the device as a memory card reader.
1. Turn on USB storage
Connect this device to a computer with Micro USB cable, drag out the notication bar. Touch USB
Connected > Turn on USB storage > OK. Then on the computer, you can view data in Device and SD
Card storage. So data transferring can be achieved between this device and computer.
2. Turn o USB Storage
After data is mounted onto the computer, you can drag out the notication bar, touch Turn O USB
Storage > Turn o USB Storage to disconnect with USB connection.
Note: It is forbidden to disconnect USB link during transferring data, because it can lead to data loss or
damage.
User Manual
User Manual
| 15 14 |
Page 10

2.8 Entering text
Press and hold in any input eld, then tap “Input Method”. You can select an input method to use.
3 Contacts
You can add or import contacts into your device. All of your contacts are displayed alphabetically in a list.
TIPS:
1. Tap an item to view contact information, Tap & hold to edit, delete and more.
2. Press [
Menu] for more options like search, import/export.
4 E-mail
You can use this device to receive or send your Email anywhere or at any time.
Note: E-mail can be used normally when the wireless network is well connected.
4.1 Set up an email account
1. Enter your email address and password.
2. Select “Next” (for general email accounts, such as Google Mail and Yahoo) or “Manual setup” (for other
company email accounts).
3. Follow the on-screen instructions to nish setting.
4.2 Send an email message
1. Press [ Menu] > Compose.
2. Enter an email address, a subject and content.
3. Press [
4. Tap “Send” to send the message.
Menu] for more options like Attach or Attach Cc/Bcc.
5 Web
You can connect to the internet anywhere an access point or wireless hotspot is available.
5.1 Go to a webpage
In Idle mode, open the application list and select “Browser” to launch a specied homepage.
To access a specic webpage, select the URL input eld, enter the address (URL) of the webpage, and select
“Go”.
5.2 Navigate on a webpage
You can swipe your nger on the screen to navigate and view other areas of the webpage.
5.3 Open a new browser window
Open multiple browser windows to make it easier for you to switch from one website to another. While
User Manual
User Manual
| 17 16 |
Page 11

viewing a webpage, press [ Menu] >Windows.
5.4 Bookmark a webpage
While viewing a webpage, press [ Menu] >More>Add bookmark.
Edit the bookmark name if needed, and then tap “Ok” .
5.5 Find text within a webpage
While viewing a webpage, press [ Menu] >More> Find on page.
Enter what you want to search for. As you enter characters, matching characters will be highlighted.
Tap the left or right arrow to go to the previous or next matching item.
5.6 Select text
1. Press [ Menu] >More>Select text.
2. Press and hold on a word.
3. Drag the start and end markers to highlight the surrounding text you want to select. Then the selected
text is copied to the clipboard.
4. In a text entry eld (for example while composing a message), press and hold at the point where you
want to paste the text. Tap “Paste”.
6 File manager
Learn to quickly and easily access all of your images, videos, music, and other types of les stored in
local disk and SD card.
In Idle mode, open the application list and select “File manager”.
In a folder, press [
t5PDSFBUFBOFXGPMEFSTFMFDUAdd folder.
t5PEFMFUFöMFTPSGPMEFSTTFMFDUDelete.
t5PDIBOHFUIFWJFXNPEFTFMFDUList view/Thumbnail.
t5PTPSUöMFTPSGPMEFSTTFMFDUSort type.
t5PTFBSDIBöMFTFMFDUSearch.
t5PVTFBEEJUJPOBMGFBUVSFTVTJOHBöMFTVDIBTDPQZNPWFTIBSFPSTIPXIJEEFOöMFTTFMFDUMore.
You can also access to “File manager” to install applications stored in local disk and SD card.
Menu] to use the following options:
User Manual
User Manual
| 19 18 |
Page 12

7 Multimedia
7.1 Music
Music player supports various audio formats, including: Midi, MP3, OGG, AAC, AAC+, and Amr, etc.
Play/Pause
When there are some songs in the playlist, touch to play; touch to pause.
Drag Slider
While playing a song, drag the slider from left to right to fast-forward or rewind.
Switch Songs
If there are some songs in the playlist, touch to play the previous or the next song.
Switching Play Modes
Touch to change play modes, including: Single, Repeat Single, Sequentially, in loops and Shue.
Mute
Touch to mute voice, touch to turn on voice.
Volume
Press Volume key to adjust volume.
Lyrics Display
If there are songs and their lyrics in the same gallery, when playing these songs, at the meanwhile, it can
display the lyrics.
Stars Display
In the play interface, tap “Star” icons to set the star grade of the current song, you can set it as 0~5 stars.
Menu Operations
In the playing interface, press [ Menu], you can carry out such functions as “Add to Playlist”, “Gallery”,
“Playlist”, “Play Mode”, “Share” and “Details” .
7.2 Video
Video Player supports various formats, such as MP4, 3GP, etc.
Video Folder
Enter Video interface, you can view and manage videos by folder, press [ Menu] to spring options,
and you can do the following operations: “select all”, “deselect all”, “share”, “delete”.
User Manual
User Manual
| 21 20 |
Page 13

Video Gallery
Tap one of folders to enter, all the videos and movies display as thumbnails. Scroll through the
thumbnails by icking them up or down. Touch a thumbnail to start playing.
Play video
When you are playing a video, press [ Menu] or touch the screen to spring the control bars.
t Play/Pause/Stop
In video gallery or playlist, you can touch a video le to play; in playing interface, you can tap
tap
to pause, tap to stop.
t Play Slider
When it is playing a video, you can drag the slider to fast-forward or rewind.
t Switch Videos
When there are some videos in the playlist, tap
t Play Modes
On playing interface, tap
t Full screen
Tap
to switch between full screen and default screen.
t Brightness
Drag the control bar on the screen to adjust the brightness.
t Volume
Press Volume key, or drag control bar on the screen to adjust volume. Tap
to change dierent modes, including: “Sequentially”, “In loops”, etc.
and to play the previous or the next video
to mute voice, tap to
to play,
turn on voice.
7.3 Camera
This device has double lens, Front lens: 0.3 million pixels; Rear lens: 3 million pixels.
After entering camera interface, tap
Press [
Menu] to carry out such operations as “Switch to video/Switch to camera”, “Gallery/Camcorder”,
“Storage”.
1. Camera Mode
Shoot Photos
In Camera interface, you can tap
View Photo
Touch the thumbnail, you can enter “my photos” to view the photo you have shoot.
Parameters settings
When capturing a photo, you can touch parameter icons on the screen to set options.
Options Description
, you can switch between them.
or
to take a photo, it can be saved in Local disk or SD Card.
User Manual
User Manual
| 23 22 |
Page 14

Shutter Enable or Disable
Picture Size 2048 x 1536, 1600 x 1200, 1024 x 768, 640 x 480, 320 x 240.
Photo Quality Clear, Standard, Normal.
Exposure -2, -1,0, +1, +2.
Color Eect None, Sepia, Black White, Negative.
Camera Settings Restore to default.
Switch Camera Rear or Front
White Balance Auto, Daylight, Cloudy, Fluorescent, Tungsten.
Timing O , 2s, 10s.
Continuous Shooting Single shoot; Three continuous shoot.
2. Video Mode
Record videos
in Camera interface to change to Video mode; Tap
Tap
it.
View Video
User Manual
begin to record; Tap
to nish and save
Touch the thumbnail, you can enter “my camcorder” to view the video you have recorded.
Parameters settings
When recording a video, you can touch parameter icons on the screen to set options.
Options Description
Exposure -2, -1,0, +1, +2
Camera Settings Restore to default
Video Quality High, Low
White Balance Auto, Sunlight, Cloudy, Fluorescent, Incandescent
Switch Camera Rear or Front
Video Duration 60s(for MMS), 10 min, 30 min, no limits
Video Format 320*240, 640*480
Select output format 3GP, MP4
7.4 Recorder
The format of recording les is *.amr, and the default save path is “Local disk”. The recording length depends
on the size of Local disk.
User Manual
| 25 24 |
Page 15

Record
In Recorder interface, tap “Record” to start recording, tap “Stop” to stop recording, and then name and
save this recording.
Play
Select a le from the recording list; tap “Play” to play it.
Mark and Delete
Under the recording list, press [Menu], and then choose “Mark” to select one or more les from the
recording playlist and delete one or more.
7.5 Album
Album supports such picture formats as “bmp”, “jpg”, “gif” and “png”, etc. You can perform basic editing tasks,
view a slideshow, set photos as wallpaper or contact image, and share.
Picture Folders
Enter Album interface, you can view and manage pictures by folder, press [ Menu] to spring options,
and you can do the following operations: “select all”, “deselect all”, “share”, “delete”.
Picture Gallery
Touch one of folders to enter, all the photos and pictures display as thumbnails. Scroll through the
thumbnails by icking them up or down.
View Pictures
Touch a thumbnail to view the picture. You can perform such functions as Slideshow, Zoom, Share,
Delete, Details, Set as, Crop, Rotate, etc.
8 Tools
8.1 Memo
You can record the memo anywhere and at any time. It is a convenient tool to your work or life.
Create a memo
On memo interface, press [ Menu] > Create. Touch the input eld and input content. Press [ Menu]
> Save. Enter the title, touch “OK” to save a memo.
Edit a memo
On records list, touch and hold a record, then select “Edit” to edit it. Select “Rename” to rename it.
User Manual
User Manual
| 27 26 |
Page 16

Delete a memo
On records list, touch and hold a record to display Option box, select “Delete”, tap “OK”.
8.2 Calendar
With the Calendar feature, you can consult the calendar by day, week, or month, create events, and set an
alarm to act as a reminder, if necessary.
Add Calendar Events
Press [ Menu] > More > New event. Enter event details and tap “Save”.
Manage Calendar Events
t To edit an event: Press [ Menu] > Edit event. Edit event details, then when you’re done, tap “Save”.
t To delete an event: Press [ Menu] > Delete event.
t To go to today: Press [ Menu] > Today.
8.3 Clock
On clock interface, there are 4 shortcuts available, including: “alarm” “slideshow” “music” “home”.
Alarm
In Alarm interface, you can add and set a new alarm.
User Manual
Click a clock to enter its setting state, you can set “Turn alarm on”, “Time”, “Repeat”, “Ringtone”, “Vibrate”,
“Label”, etc.
Slideshow
Tap “Slideshow” to go to picture’s slideshow.
Music
Tap “Music” to go to music playing interface.
Home
Tap “Home”, go back to home screen.
8.4 World time
You can view the current time of major cities in the world. Touch the clock icon to select world cities again.
8.5 Stopwatch
You can record the duration of an activity with a stopwatch. You can carry out such operations as “Start”,
“Stop”, “Resume”, “Record” and “Clear”, etc.
User Manual
| 29 28 |
Page 17

8.6 Timer
You can use the timer to record the duration of an activity by countdown. You can set “Time” and “Alert”, and
then tap “Start” to countdown or “Cancel” it.
8.7 Calculator
Calculator supports four arithmetic operations such as “+”, “-”, “x” and “/”, and it also displays the calculation
list. Press [ Menu], you can choose “Advanced panel” for achieving more functions.
8.8 Unit Converter
You can convert Length, Weight, Area, Capacity, Temperature, etc.
9 Google Applications
9.1 Google Mail
You can retrieve new email messages from Google Mail™ to your Inbox. When you access this application,
the Inbox interface appears. The total number of unread messages displays in the title bar and unread
messages display in bold.
This feature may be unavailable depending on your region or service provider.
Send an email message
1. Press [ Menu] > “compose” to create a new email.
2. Enter a name or address, a subject and message.
3. To attach an image or le, press [
4. Select “Send” to send the message.
View an email messages
From the Inbox interface, tap an email to open and view it.
From the message view, use the following options:
t To reply to the message, select “Reply”.
t To reply to the message including all recipients, select “Reply all”.
t To forward the message to other people, select “Forward”.
t To view an attachment, select “Preview”. To save it to your device, select “Download”.
t To archive the message, select “Archive”.
t To delete the message, select “Delete”.
t To move to the previous or next message, select “<” or “>”.
Organize email by labels
You can organize your email by labeling your messages or adding stars to mark important messages.
You can sort messages by label lter.
Menu]> “Attach”.
User Manual
User Manual
| 31 30 |
Page 18

Add a label to a message
From the Inbox interface, tap and hold a message. Select “Change labels”.
Select a label to add and select “OK ”.
Add a star to a message
From the Inbox interface, tap and hold a message.
Select “Add star”. The star icon next to the message is activated.
Filter messages
From the Inbox interface, press [ Menu] > Go to labels.
Select the label of the messages you want to view.
9.2 Talk
Learn to chat with friends and family via Google Talk™.
This feature may be unavailable depending on your region or service provider.
Add friends to your friend list
1. Tap the application thumbnail to open Google Talk. The friend list shows all of your Google Talk
contacts at a glance.
2. Press [ Menu] > Add friend.
3. Enter an email address of the friend and select “Send invitation”.
User Manual
4. When your friend accepts the invitation, the friend is added to your friend list.
Start a chat
1. Select a friend from the friend list. The chat screen opens.
2. Enter your message and select “Send”.
3. To insert emoticons, press [
4. To switch between active chats, press [ Menu] > Switch chats.
5. To end the chat, press [ Menu] > End chat.
Menu] > More > Insert smiley.
9.3 YouTube
YouTube is a free online video streaming service. Learn to watch and share videos via YouTube. Tap the
application thumbnail to open it.
Note: This feature may be unavailable depending on your region or service provider.
Watch videos
1. Select a video from the list.
2. Rotate the device anti-clockwise to landscape view.
3. Control playback with the following keys:
Slider: you can drag the slider to fast-forward or rewind.
HQ: Change the quality of the display.
User Manual
| 33 32 |
Page 19

Share videos
1. Tap and hold a video.
2. Select Share>an option.
Upload videos
1. Press [ Menu]>Upload and select a video. If you want to upload new videos, select Camera icon to
turn on the camera.
2. Aim the lens at the subject and make any adjustments.
3. Select Record to start recording.
4. Select Record to stop recording.
5. Select Save to upload the video that you have recorded.
6. Enter your user name and password and select Sign in (if necessary).
7. Enter details of the upload and select Upload.
9.4 Market
You can download games, ringtones, or other applications from the Android Market.
Note: This feature may be unavailable depending on your region or service provider.
Install an application
1. Tap the application thumbnail to open Market.
2. Select Accept when the terms and conditions appear.
User Manual
3. Select an item category > an item.
4. Select Install (for free items) or Buy.
If you select Install, select “OK ” to download the item immediately.
If you select Buy, you need to enter your credit card information. Follow the on-screen instructions.
Uninstall an application
1. From the Android Market home screen, select Downloads.
2. Tap and hold the item you want to delete and select Uninstall.
3. Select an option and select “OK ”.
9.5 Google Maps™
You can use Google Maps to nd your location, search the online map for streets, cities, or countries, and
get directions.
This feature may be unavailable depending on your region or service provider.
Search for a specic location
Open Google Maps, it will display your current location. Press [ Menu] > Search, enter an address and
to go.
Get directions to a specic destination
Press [ Menu] > Directions, enter the addresses of the starting location and the ending location.
Select a travel method (car, bus, or walk) and select “Go”.
User Manual
| 35 34 |
Page 20

For help, just touch [ Menu] > More > Help.
9.6 Google Maps Navigation™
Google Maps Navigation is an Internet-connected GPS navigation system with voice guidance.
Follow the prompts to speak or type your destination. For more, go to www.google.com/mobile/navigation .
9.7 Latitude
See where your friends and family are on Google Maps™. Plan to meet up, check that your parents got
home safely, or just stay in touch.
You need to join Latitude, and then invite your friends to view your location or accept their invitations.
When using Google Maps (in any mode except in Street View), touch [
privacy policy and, if you agree with it, choose to continue.
t From Latitude interface, Press [ Menu] > Add friends>Select from Contacts or Add via email address.
t Select friends you want to add or enter an email address, and select Add friends > Yes.
t When your friend accepts your invitation, you can share locations.
t Press [ Menu] > See map. Your friends’ locations are marked with their photos on the map.
Menu] > Join Latitude. Read the
9.8 Places
Places is an application that uses Google Maps and your location to help you nd Restaurants, Coee, Bars,
Hotels, Attractions, ATMs, an Gas Stations. You can also add your own locations.
Select a category, and then your device searches for places around your current location that are related to
the category. Select a place name to view its details.
9.9 Voice Search
Learn to search for information on the web by voice.
Note: This feature may be unavailable depending on your region or service provider.
1. Tap to the application thumbnail to open Voice Search.
2. Say a keyword into the microphone.
3. The device searches for information and web pages related to the keyword.
9.10 Google Search
The Google Search Bar provides you an on-screen Internet search engine powered by Google™.
1. Tap the Google Search bar.
2. Use the on-screen keyboard to enter the item you want to search for, then tap “G o”.
3. Use the drop-down list to narrow your search results. Select All, Web, or App to only search those areas.
to use Google Voice Search.
4. Tap
9.11 News & Weather
New & Weather provides you information of local weather and news.
User Manual
User Manual
| 37 36 |
Page 21

10 Settings
This section explains the sound and tablet settings for your tablet. It includes such settings as: Wireless &
networks, Sound, Display, Location & security, Applications, Accounts & sync, Privacy, SD Card & Device storage,
Language & keyboard, Voice input & output, Accessibility, Date & time and About device.
10.1 Wireless & networks
In Wireless & networks interface, you can set Airplane mode, Wi-Fi, Bluetooth, Tethering &por table hotspot,
VPN settings, Mobile networks, etc.
Airplane mode
Touch “Airplane mode” to switch between “On” and “O”. If Airplane mode is on, all the wireless
networks will be unavailable in this mode.
Warning: Even if airplane mode is activated, it is forbidden to use on plane or in some special labs
or under hospital equipment, other special environments, etc., so as to prevent the intervention of
electronic equipment to the communication or this device, you are advised to power o this device in such
environments.
Wi-Fi settings
Touch “Wi-Fi” to switch between “On” or “O ”.
Once the Wi-Fi has been turned on, your device will automatically scan for available wireless networks,
displaying them in the Wi-Fi networks list. You can select one to connect or add a new network.
Bluetooth settings
With Bluetooth, you can establish a wireless connection with any other Bluetooth compatible device.
Touch “Bluetooth” to switch between “On” and “O ”.
You can scan Bluetooth devices nearby. After scanning, your tablet will list all the discovered devices.
Tap one and input PIN to pair with the device.
Tethering & portable hotspot
You can share your device’s mobile networks via USB or as a portable Wi-Fi hotspot.
VPN settings
You can set up & manage virtual private networks by VPN settings.
Mobile networks
You can set options for roaming, networks, APNs:
t Data enable: Turn on to enable data access over mobile network.
t Data roaming: Turn on to connect to data services when roaming.
t Use only 2G networks: Touch to turn on/o.
t Network operators: Select a network operator of your choice.
User Manual
User Manual
| 39 38 |
Page 22

10.2 Sound Settings
In the setting interface, you can set Silent Mode, Volume, Notication Ringtone, Audible Touch Tones,
Audible Selection, Haptic Feedback, etc.
Silent Mode
After the Silent mode is on, all the sounds will be mute except Media and Clock alarm.
Volume
Set the volume of notications rings.
Notication Ringtone
Set ringtone type of notication.
Feedback
t Audible Touch Tones
Set the sound eect of dial keyboard as “On” or “O ”.
t Audible Selection
Set the sound eect when selecting by touching the screen.
t Screen lock sounds
Set the sound eect when locking or unlocking the screen.
t Haptic Feedback
Set the vibration when pressing soft keys and on certain UI interactions.
10.3 Display Settings
In the setting interface, you can perform such operations as “Brightness”, “Auto-rotate screen”, “Calibrate
G-Sensor”,, “Animation”, “Screen Timeout”, etc.
Brightness
The screen brightness can be adjusted manually.
Note: When adjusting screen brightness manually, you are required to close the function of “Automatic
Brightness”.
Auto-rotate screen
Turn on “Auto -rotate screen”, and then this device can switch orientation automatically when rotating
it.
Note: The display of the horizontal screen and the vertical screen on some particular interfaces is limited. The
function of switching orientation is based on the real product.
Calibrate G-Sensor
Calibrate G-sensor for adjusting and improving the sensitivity for switching the screen orientation.
User Manual
User Manual
| 41 40 |
Page 23

Animation
Turn on to displays the animation eect when changing interfaces or windows.
Screen Timeout
To save power, you can set the duration of screen timeout, such as 15s, 30s, 1 min, 2 min, 10 min, 30 min,
never timeout, etc.
10.4 Location & security
My Location
t Use Wireless Network
If it is on, the device location can be determined by WI-FI or mobile network.
t Use GPS Satellites
If it is on, the location can be accurate to street level.
t Use assisted GPS
If it is on, this device can use server to assist GPS.
Screen unlock
You can lock the screen in with a pattern, PIN or Password.
SIM card lock
You can prevent another user from accessing information stored on your SIM card by using a PIN code.
Passwords
If it is set as on, all the inputted passwords are visible. If it is set as o, the inputted passwords will display
as dots.
Device administration
Allow you to add or remove device administrators.
Credential Storage
This option allows certain applications to access secure certicates and other credentials. Certicates
and credentials can be installed to the SD card and password protected.
10.5 Applications
Unknown source
Enabling this feature, you can install non-Market applications.
User Manual
User Manual
| 43 42 |
Page 24

Quick launch
Set keyboard shortcuts to launch applications.
Manage Applications
User can manage and remove the installed applications.
Running Services
View and stop the currently running applications.
Development
Set the options for application development.
t USB Debugging
Open or close USB debugging mode when USB is connected.
t Say Awake
The screen will not sleep during charging if this function is on.
t Allow Mock Locations
The position can be simulated during debugging.
10.6 Accounts & sync
General sync settings
t Background data
When background data is enabled, applications can sync, send, and receive data at any time.
t Auto-sync
When auto –sync is enabled, applications can sync data automatically.
Manage accounts
You can add or delete account.
10.7 Privacy
Backup and restore
t Back up my data
Enable this feature to back up your settings and other application data.
t Automatic restore
With this item on, you can restore backed up settings or other data when reinstalling an application.
Factory data reset
You can erase all the data in this device and go back to factory data reset.
User Manual
User Manual
| 45 44 |
Page 25

10.8 SD Card & Device Storage
SD Card
t Total Space: It displays the space of SD card when SD card is inserted.
t Available space: It displays the available space of SD card.
t Mount SD Card: You can insert a SD card for mounting.
t Format SD Card: You can format (erase) SD card.
Note: If you format SD card, it will erase all the data in SD card, please be prudential to use this feature.
Local disk
t Total space: It displays the space of local disk.
t Available space: It displays the available space of local disk.
t Format local Disk: You can format local disk.
Note: If you format local disk, it will erase all the data in local disk, please be prudential to use this feature.
Internal device storage
Available Space: It displays the available space of internal device storage.
10.9 Language & keyboard
This setting allows you to congure the language in which to display the menus. You can also set on-screen
keyboard options.
Language Settings
You can select the language you wish to use to operate your device.
Text Settings
Here you can choose any input methods available in your device, you can also download and install
input method you want to use.
10.10 Voice input & output
You can set voice recognizer to input voice, and output voice by setting text-to-speech.
10.11 Accessibility
Manage accessibility options.
Note: This feature is based on the real product.
10.12 Date & Time
This setting allows you to change the current time and date displayed.
Automatic
Tap Automatic to allow the network set the date and time.
User Manual
User Manual
| 47 46 |
Page 26

Set Date
Tap “Set date” and use the plus or minus icons to set the “Month”, “Day”, and “Year ”, then tap “Set”.
Note: The date scope is from Jan. 1, 2000 to Dec. 31, 2037.
Select Time Zone
Tap to select the time zone.
Set Time
Tap “Set date” and use the plus or minus icons to set “Hour”, and “Minute”, PM or AM, then tap “Set”.
Use 24-hour Format
Tap to switch on or o, if it is o, the device automatically uses 12-hour format.
Select Date Format
Tap to select the date format type.
10.13 About Device
This feature contains legal information, system tutorial information, and other phone information such as
the model number; rmware version, baseband version, kernal version, and software build number.
11 Third Party Application
This device is compatible with the third party applications of Android 2.2. You can install and remove
according to needs.
Note: When installing or using the third party applications, please take care! Only the user is responsible to the
data damage or data loss, etc. that are resulted from the installation and use of the third party application.
User Manual
User Manual
| 49 48 |
Page 27

12 Safety & Use
Battery use & safety
t Don’t let the product come in contact with liquids. Liquids can get into the product’s circuits, leading
to corrosion.
t Don’t place your product near a heat source. High temperatures can cause the battery to swell, leak,
or malfunction.
t Don’t dry a wet or damp product with an appliance or heat source, such as a hair dryer or microwave
oven.
t Don’t leave your product in your car in high temperatures.
t Don’t drop the product. Dropping your product, especially on a hard surface, can potentially cause
damage.
t Contact your retailer or TCT Mobile Limited if your product has been damaged by dropping, liquids or
high temperatures.
Warning: Never dispose of battery powered products in a re because they may explode.
Battery charging
Notes for charging your product’s battery:
t During charging, keep your battery and charger near room temperature for ecient battery charging.
t New batteries are not fully charged.
t New batteries or batteries stored for a long time may take more time to charge.
t Batteries and charging systems have circuitry that protects the battery from damage from
overcharging.
t A socket outlet that is installed near equipment and that shall be easily accessible.
USB cable
Due to the used enclosure material, the device shall only be connected to a USB interface of version 2.0
or higher. The connection to so called power USB is prohibited.
Driving precautions
Responsible and safe driving is your primary responsibility when behind the wheel of a vehicle. Using a
mobile device or accessory while driving may cause distraction and may be prohibited or restricted in
certain areas. Always obey the laws and regulations on the use of these products.
t Do not enter or review written data.
t Do not surf the web.
t Do not input navigation information.
t Do not perform any other functions that divert your attention from driving.
User Manual
User Manual
| 51 50 |
Page 28

t Always keep your eyes on the road.
t Always use voice activated features (such as voice commands) and speaking features (such as audible
directions), if available.
t Always obey all local laws and regulations for the use of mobile devices and accessories in the vehicle.
Caution about high volume usage
Warning: Exposure to loud noise from any source for extended periods of time may aect your hearing.
Repetitive motion
When you repetitively perform actions such as pressing keys or entering nger-written characters, you
may experience occasional discomfort in your hands, arms, shoulders, neck, or other parts of your body.
If you continue to have discomfort during or after such use, stop use and see a physician.
Small children
Keep your mobile device and its accessories away from small children. These products are not toys and
may be hazardous to small children. For example:
t A choking hazard may exist for small, detachable parts.
t Improper use could result in loud sounds, possibly causing hearing injury.
t Improperly handled batteries could overheat and cause a burn.
Display/Touch-screen
Please note the following information when using your mobile device:
Warning regarding display:
The display on your mobile device is made of glass or acrylic and could break if your mobile device is
dropped or if it receives signicant impact. Do not use if screen is broken or cracked as this could cause
injury to you.
Warranty disclaimer:
If your mobile device has a touch-screen display, please note that a touch-screen responds best to a light
touch from the pad of your nger or a non-metallic stylus. Using excessive force or a metallic object
when pressing on the touch-screen may damage the tempered glass surface and void the warranty.
Operating environment
Remember to follow any special regulations in force in any area, and always switch your mobile device
o whenever it is forbidden to use it, or when it may cause interference or danger. When connecting the
mobile device or any accessory to another device, read its user’s guide for detailed safety instructions.
Do not connect incompatible products.
Using your mobile device near other electronic devices
Most modern electronic equipment is shielded from Radio Frequency (RF) signals. However, certain
electronic equipment may not be shielded against the RF signals from your wireless mobile device.
User Manual
User Manual
| 53 52 |
Page 29

Consult the manufacturer to discuss alternatives.
Implantable medical devices
A minimum separation of six (6) inches should be maintained between a handheld wireless mobile
device and an implantable medical device, such as a pacemaker or implantable cardioverter debrillator,
to avoid potential interference with the device.
Persons who have such devices:
t Should ALWAYS keep the mobile device more than six (6) inches from their implantable medical
device when the mobile device is turned on;
t Should not carry the mobile device in a breast pocket;
t Should use the ear opposite the implantable medical device to minimize the potential for interference;
t Should turn the mobile device o immediately if there is any reason to suspect that interference is
taking place;
t Should read and follow the directions from the manufacturer of your implantable medical device. If
you have any questions about using your wireless mobile device with an implantable medical device,
consult your health care provider.
Other medical devices
If you use any other personal medical devices, consult the manufacturer of your device to determine if
it is adequately shielded from external RF energy. Your physician may be able to assist you in obtaining
this information. Switch your mobile device o in health care facilities when any regulations posted in
these areas instruct you to do so. Hospitals or health care facilities may be using equipment that could
be sensitive to external RF energy.
Vehicles
RF signals may aect improperly installed or inadequately shielded electronic systems in motor vehicles.
Check with the manufacturer or its representative regarding your vehicle before using your mobile
device in a motor vehicle. You should also consult the manufacturer of any equipment that has been
added to your vehicle.
Posted facilities
Switch your mobile device o in any facility where posted notices require you to do so.
Potentially explosive environments
Switch your mobile device o when in any area with a potentially explosive atmosphere and obey all
signs and instructions. Sparks in such areas could cause an explosion or re resulting in bodily injury or
even death. Users are advised to switch the mobile device o while at a refueling point (service station).
Users are reminded of the need to observe restrictions on the use of radio equipment in fuel depots
(fuel storage and distribution areas), chemical plants, or where blasting operations are in progress. Areas
with a potentially explosive atmosphere are often, but not always, clearly marked. They include below
deck on boats, chemical transfer or storage facilities, vehicles using liqueed petroleum gas (such as
propane or butane), areas where the air contains chemicals or particles, such as grain, dust, or metal
powders, and any other area where you would normally be advised to turn o your vehicle engine.
User Manual
User Manual
| 55 54 |
Page 30

Specic absorption rate (IEEE)
YOUR MOBILE DEVICE COMPLIES WITH REGULATIONS FOR EXPOSURE TO RADIO WAVES.
Your mobile device is a radio transmitter and receiver. It is designed not to exceed the limits for exposure
to radio waves (radio frequency electromagnetic elds) adopted by the Federal Communications
Commission (FCC) and the Council of the European Union (CE). These limits include a substantial safety
margin designed to assure the safety of all persons, regardless of age and health.
The radio wave exposure guidelines use a unit of measurement known as the Specic Absorption Rate,
or SAR.
The SAR limit of USA (FCC) is 1.6 W/kg averaged over one gram of tissue. This model (FCC ID: RAD189)
has also been tested against this SAR limit. The highest SAR value reported under this standard during
product certication for use when properly worn on the body is 1.156 W/kg. This device was tested for
typical body-worn operations with the back of the Tablet PC kept 0.5cm from the body. To maintain
compliance with FCC RF exposure requirements, use accessories that maintain a 0.5cm separation
distance between the user’s body and the back of the handset. The use of belt clips, holsters and similar
accessories should not contain metallic components in its assembly. The use of accessories that do not
satisfy these requirements may not comply with FCC RF exposure requirements, and should be avoided.
This equipment complies with FCC RF radiation exposure limits set forth for an uncontrolled
environment.
The SAR limit of Europe is 2.0 W/kg. Device types one touch T60 has also been tested against this SAR
limit. The highest SAR value reported under this standard during product certication for use on the
body is 0.811W/kg. This device was tested for typical body-worn operations with the back of the handset
kept 0.5cm from the body.To maintain compliance with RF exposure requirements, use accessories that
maintain a 1.5cm separation distance between the user’s body and the back of the handset. The use
of belt clips, holsters and similar accessories should not contain metallic components in its assembly.
The use of accessories that do not satisfy these requirements may not comply with RF exposure
requirements, and should be avoided.
The World Health Organization has stated that present scientic information does not indicate the need
for any special precautions for the use of mobile devices. They recommend that if you are interested in
further reducing your exposure then you can easily do so by limiting your usage. Additional information
can be found at
Information from the world health organization
“A large number of studies have been performed over the last two decades to assess whether mobile
phone pose a potential health risk. To date, no adverse health eects have been established for mobile
phone use.”
Source: WHO Fact Sheet 193
Further information:
European union directives conformance statement
The following CE compliance information is applicable to mobile devices that carry one of the following
CE marks:
www.who.int/emf (World Health Organization).
http://www.who.int/emf
Page 31

This equipment is in compliance with the essential requirements and other relevant provisions of
Directive 1999/5/EC. The entire copy of the Declaration of Conformity for your device can be obtained
through our website:
FCC Statement
Note: This equipment has been tested and found to comply with the limits for a Class B digital device
pursuant to part 15 of the FCC Rules. These limits are designed to provide reasonable protection against
harmful interference in a residential installation. This equipment generates, uses and can radiate radio
frequency energy and, if not installed and used in accordance with the instructions, may cause harmful
interference to radio communications.
However, there is no guarantee that interference to radio or television reception, which can be
determined by turning the equipment o and on, the user is encouraged to try to correct the
interference by one or more of the following measures:
t Reorient or relocate the receiving antenna.
t Increase the separation between the equipment and receiver.
t Connect the equipment into an outlet on a circuit dierent from that to which the receiver is
connected.
t Consult the dealer or an experienced radio/TV technician for help.
www.alcatelonetouch.com
Changes or modications not expressly approved by the party responsible for compliance could void
the user’s authority to operate the equipment.
For the receiver devices associated with the operation of a licensed radio service (e.g. FM broadcast),
they bear the following statement:
This device complies with Part 15 of the FCC Rules. Operation is subject to the condition that this device
does not cause harmful interference.
For other devices, they bear the following statement:
This device complies with Part 15 of the FCC Rules. Operation is subject to the following two conditions:
(1) this device may not cause harmful interference
(2) this device must accept any interference received, including interference
that may cause undesired operation.
Caution!
The manufacturer is not responsible for any radio or TV interference caused by unauthorized
modications to this equipment. Such modications could void the user authority to operate the
equipment.
Location services (GPS & AGPS)
Your mobile device may use Global Positioning System (GPS) signals for location-based applications.
GPS uses satellites controlled by the U.S. government that are subject to changes implemented in
User Manual
User Manual
| 59 58 |
Page 32

accordance with the Department of Defense policy and the Federal Radio Navigation Plan. These
changes may aect the performance of location technology on your mobile device.
Your mobile device may also use Assisted Global Positioning System (AGPS), which obtains information
from the cellular network to improve GPS performance. AGPS uses your wireless service provider’s
network and therefore airtime, data charges, and/or additional charges may apply in accordance with
your service plan. Contact your wireless service provider for details.
Your location
Location-based information includes information that can be used to determine the approximate
location of a mobile device. Mobile devices which are connected to a wireless network transmit
location-based information. Devices enabled with GPS or AGPS technology also transmit location-based
information. Additionally, if you use applications that require location-based information (e.g. driving
directions), such applications transmit location-based information. This location-based information may
be shared with third parties, including your wireless service provider, applications providers, TCT Mobile
Limited, and other third parties providing services.
Navigation
Maps, directions, and other navigation data may contain inaccurate or incomplete data, and
circumstances can and do change over time. In some areas, complete information may not be available.
Therefore, you should always visually conrm that the navigational instructions are consistent with what
you see before following them. All users should pay attention to road conditions, closures, trac, and
all other factors that may impact safe driving or walking. Always obey posted road signs..
Privacy & Data security
TCT Mobile Limited understands that privacy and data security are important to everyone. Because
some features of your mobile device may aect your privacy or data security, please follow these
recommendations to enhance protection of your information:
t Monitor access—Keep your mobile device with you and do not leave it where others may have
unmonitored access. Lock your device’s keypad where this feature is available.
t Secure Personal Information—Your mobile device can store personal information in various locations
including your SIM card, memory card, and internal memory. Be sure to remove or clear all personal
information before you recycle, return, or give away your device. You can also backup your personal
data to transfer to a new device.
t Applications—Install third party applications from trusted sources only. Applications can have access
to private information such as call data, location details and network resources.
t Location-based information—Location-based information includes information that can be used to
determine the approximate location of a mobile device. Products which are connected to a wireless
network transmit location-based information. Devices enabled with GPS or AGPS technology also
transmit location-based information. Additionally, if you use applications that require location-based
information (e.g. driving directions), such applications transmit location-based information. This
location-based information may be shared with third parties, including your wireless service provider,
applications providers, ALCATEL, and other third parties providing services.
User Manual
User Manual
| 61 60 |
Page 33

Use & Care
To care for your mobile device, please observe the following:
Liquids Do not expose your mobile device to water, rain, extreme humidity, sweat, or other liquids. If
it does get wet, don’t try to accelerate drying with the use of an oven or dryer, as this may damage the
mobile device.
t Extreme heat or cold
Do not store or use your mobile device in temperatures below 0°C (32°F) or above 45°C (113°F). Don’t
recharge your mobile device in temperatures below 0°C (32°F) or above 40°C (104°F)
t Microwaves
Do not try to dry your mobile device in a microwave oven. Doing so may cause a re or explosion.
t Dust and dirt
Do not expose your mobile device to dust, dirt, sand, food, or other inappropriate materials.
t Cleaning solutions
Do not use harsh chemicals, cleaning solvents, or strong detergents to clean the mobile device. Wipe it
with a soft cloth slightly dampened in a mild soap-and-water solution.
t Shock and vibration
Do not drop, knock, or shake the mobile device. Rough handling can break internal circuit boards.
t Paint
User Manual
Do not paint the mobile device. Paint can clog the device’s moving parts or ventilation openings and
prevent proper operation.
t protection
To help protect your mobile device, always make sure that the battery compartment and any connector
covers are closed and secure.
Recycling
Please do not dispose of mobile devices or electrical accessories (such as chargers, headsets, or
batteries) with your household waste, or in a re. These items should be disposed of in accordance with
the national collection and recycling schemes operated by your local or regional authority.
Product packaging and product guides should only be disposed of in accordance with national
collection and recycling requirements. Please contact your regional authorities for more details.
Software copyright notice
ALCATEL products may include copyrighted ALCATEL and third-par ty software stored in semiconductor
memories or other media. Laws in the United States and other countries preserve for ALCATEL and thirdparty software providers certain exclusive rights for copyrighted software, such as the exclusive rights to
distribute or reproduce the copyrighted software. Accordingly, any copyrighted software contained in
ALCATEL products may not be modied, reverse-engineered, distributed, or reproduced in any manner
to the extent allowed by law. Furthermore, the purchase of ALCATEL products shall not be deemed to
grant either directly or by implication, estoppel, or otherwise, any license under the copyrights, patents,
User Manual
| 63 62 |
Page 34

or patent applications of ALCATEL or any third-party software provider, except for the normal, nonexclusive, royalty-free license to use that arises by operation of law in the sale of a product
13 General information
t Internet address: www.alcatelonetouch.com
t Hot Line Number: go to our Internet site.
On our Internet site, you will nd our FAQ (Frequently Asked Questions) section. You can also contact us
by e-mail to ask any questions you may have.
An electronic version of this user guide is available in English and other languages according to
availability on our server:
Disclaimer
There may be certain dierences between the user manual description and the tablet’s operation,
depending on the software release of end user tablet or specic Licensor services. TCT Mobile shall
not be held legally responsible for such dierences, if any, nor for their potential consequences, which
responsibility shall be borne by the Licensor exclusively.
Software incorporated with tablet can not be used on a stand-alone basis; End user may not transfer,
rent or lease the software, or copy any written materials accompanying the software. All intellectual
www.alcatelonetouch.com
property rights such as but not limited to patents, trademarks, copyrights or trade secret rights related
to the software are the property of and remains vested in TCT Mobile /its suppliers.
End user shall not modify, translate, reverse engineer, decompile or disassemble the software or any part
thereof or otherwise attempt to derive source code or create derivative works therefrom.
End user are not allowed to remove, alter or destroy any proprietary, trademark or copyright markings
or notices placed upon or contained with the software.
End user expressly acknowledges and agrees that use of the software is at end user own risk and that
the software is provided “as is” without any warranties or conditions whatsoever. TCT Mobile or its
suppliers do not warrant that the functions of the software will meet end user requirements or that
the operation of the software will be uninterrupted or error free. End user assumes responsibility for
selecting the software to achieve end user intended results, and for the use and the results obtained
from the software.
End user acknowledge that the software is not intended for use in (i) on-line control of aircraft, air
trac, aircraft navigation or aircraft communications; or (ii) in the design, construction, operation or
maintenance of any nuclear facility.
TCT Mobile and its suppliers disclaim all warranties, express or implied, including but not limited to
warranties related to: non-infringement, lack of viruses, accuracy or completeness of responses or
results, implied warranties of merchantability and tness for a particular purpose.
In no event shall TCT Mobile or its suppliers be liable for any indirect, incidental, special or consequential
damages or for any damages whatsoever (including but not limited to damages for loss of business
prots, business interruption, loss of business information, personal injury, loss of privacy or other
User Manual
User Manual
| 65 64 |
Page 35

pecuniary or other loss whatsoever) arising out of use or inability to use the software, even if advised of
the possibility of such damages. TCT Mobile also disclaims all liability for acts or material presented by
the advertiser, ad-serving partners or others (including unauthorized users, or “crackers”)
Regardless of the form of action, TCT Mobile and its supplier’s aggregate liability arising out of or
related to this agreement shall not exceed the total amount payable by end user under this agreement.
The foregoing limitations, exclusions and disclaimers shall apply to the maximum extent allowed by
applicable law.
In addition to the above general restrictions, Use of certain software in the tablet maybe subject to
specic license terms, before activating those software, please read carefully those terms and conditions,
and if you do not agree, you are not entitled to use those software.
Use of some software may incur some fees; you are warned to read any notices provided by service
provider before you activate the software. If you have any questions, please contact corresponding
service provider.
Page 36

 Loading...