

Page 1

SmartStuff App Instructions
Page 2

SmartStuff App Instructions
TCP® | 325 Campus Dr. | Aurora, Ohio 44202 | P: 800-324-1496 | www.tcpi.com
1 P a g e
Update History
Version
Author
Date
Description
Version 1.0
S. Crider
11/04/2020
Created
Contents
1. TCP SmartStuff App Initial Setup .............................................................................................................................. 2
2. Light Tab .................................................................................................................................................................... 6
3. Accessory Tab ......................................................................................................................................................... 12
4. Group Tab ............................................................................................................................................................... 15
5. Collect Tab .............................................................................................................................................................. 19
6. More Tab ................................................................................................................................................................. 21
Page 3

SmartStuff App Instructions
TCP® | 325 Campus Dr. | Aurora, Ohio 44202 | P: 800-324-1496 | www.tcpi.com
2 P a g e
1. TCP SmartStuff App Initial Setup
The TCP SmartStuff App is used to configure the Bluetooth® Signal Mesh and TCP SmartStuff devices. Download
the TCP SmartStuff App using the following options:
• Download the SmartStuff App from the Apple® App Store or Google™
Play Store
• Use the QR Codes here:
Once the SmartStuff App has been installed, the user will need to register the App before beginning use.
1.1.0 Register the TCP SmartStuff App
1.1.1
Open the TCP SmartStuff App. The App will start at the Login Screen. Click
on the Register Button.
Login Screen
1.1.2
1. Return to the Login Screen.
2. Enter Email Address.
3. Enter Password.
4. Hides or makes Password visible.
5. Select Country.
6. Service Terms and Privacy Statement Checkbox.
7. Register Button.
Enter in the necessary information and press the Register Button. The user
should receive an email that has a link that the user must follow to
complete the Registration.
Registration Screen
Page 4
SmartStuff App Instructions
TCP® | 325 Campus Dr. | Aurora, Ohio 44202 | P: 800-324-1496 | www.tcpi.com
3 P a g e
1.1.3
1. Enter Email Address.
2. Enter Password.
3. Hides or makes Password visible.
4. Select Country.
5. Login.
Return to the Login Screen, fill out all the fields, then press the “Login”
Button to enter the TCP SmartStuff App.
Login Screen
1.2 Reset Password
1.2.1
If the user has forgotten or needs to reset their Password, press the
“Forgot Password” Button at the Login Screen.
Login Screen
1.2.2
1. Return to the Login Screen.
2. Enter Email Address.
3. Enter New Password.
4. Hides or makes Password visible.
5. Confirm Password.
6. Select Country.
7. Save Button.
Fill out all the fields and press Save. TCP will then send you a
corresponding email with a link to complete the reset process.
Reset Password Screen
Page 5
SmartStuff App Instructions
TCP® | 325 Campus Dr. | Aurora, Ohio 44202 | P: 800-324-1496 | www.tcpi.com
4 P a g e
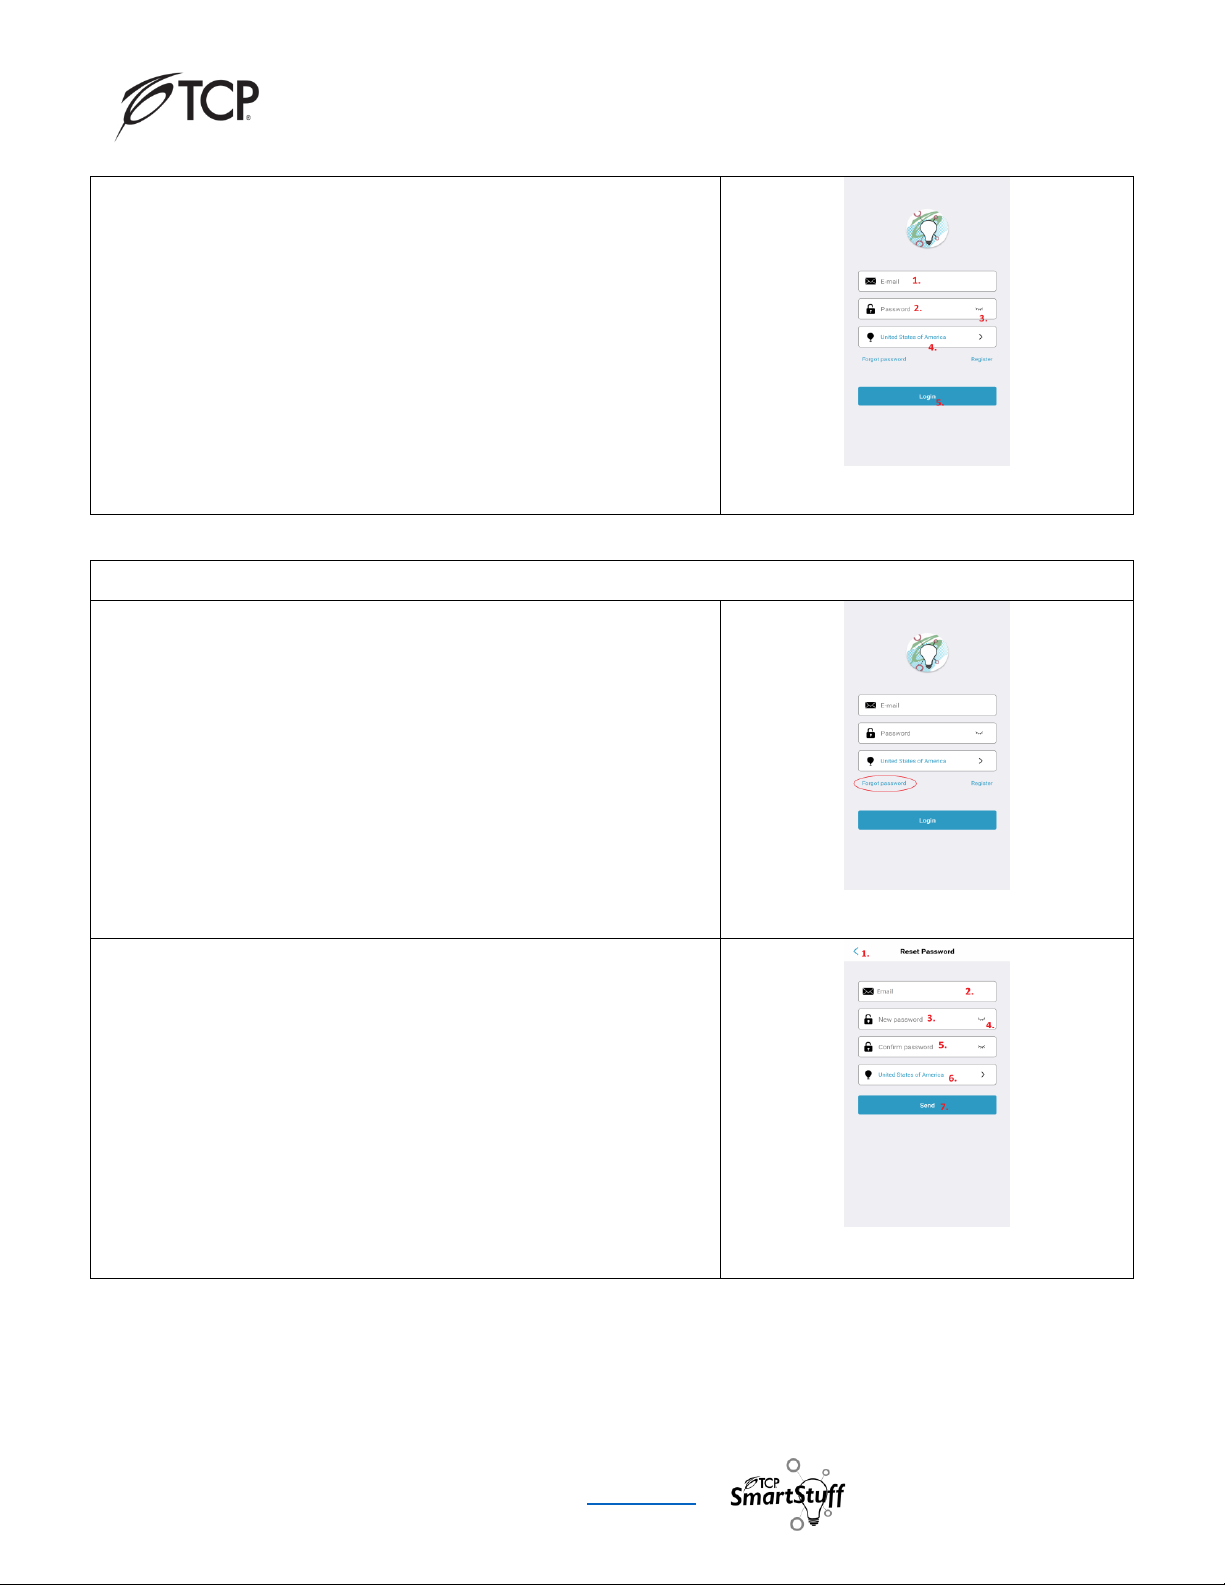
1.3 Initial Screen – Light Tab
1.3.1
1. Cloud/Server - indicates the TCP SmartStuff App is connected to
its server
2. Bluetooth ID - shows the Bluetooth ID associated with the device
3. Light Tab - used to setup and configure TCP SmartStuff devices.
4. Accessory Tab - used to setup and configure TCP SmartStuff
Accessories.
5. Group Tab - allows the user to group TCP SmartStuff devices
together.
6. Collect Tab - allows the user to create different Collections for
TCP SmartStuff devices.
7. More Tab - provides other settings for the TCP SmartStuff App.
After the Login process has completed, the TCP SmartStuff App will
automatically open in the Light Tab, allowing you to proceed to the next
section of the App.
Light Tab
1.4.0 Connect Lighting Products to the App
1.4.1 Connect Lighting Products to the App
Turn on power to the TCP SmartStuff Lighting Products.
On the App
In the upper right corner of the Light Tab, press the "plus" button. A drop-
down box will appear. Select “Mesh Light” to search for Bluetooth
connected lamps and “WiFi Light” to search for WiFi connected lamps.
Light Tab
Page 6
SmartStuff App Instructions
TCP® | 325 Campus Dr. | Aurora, Ohio 44202 | P: 800-324-1496 | www.tcpi.com
5 P a g e
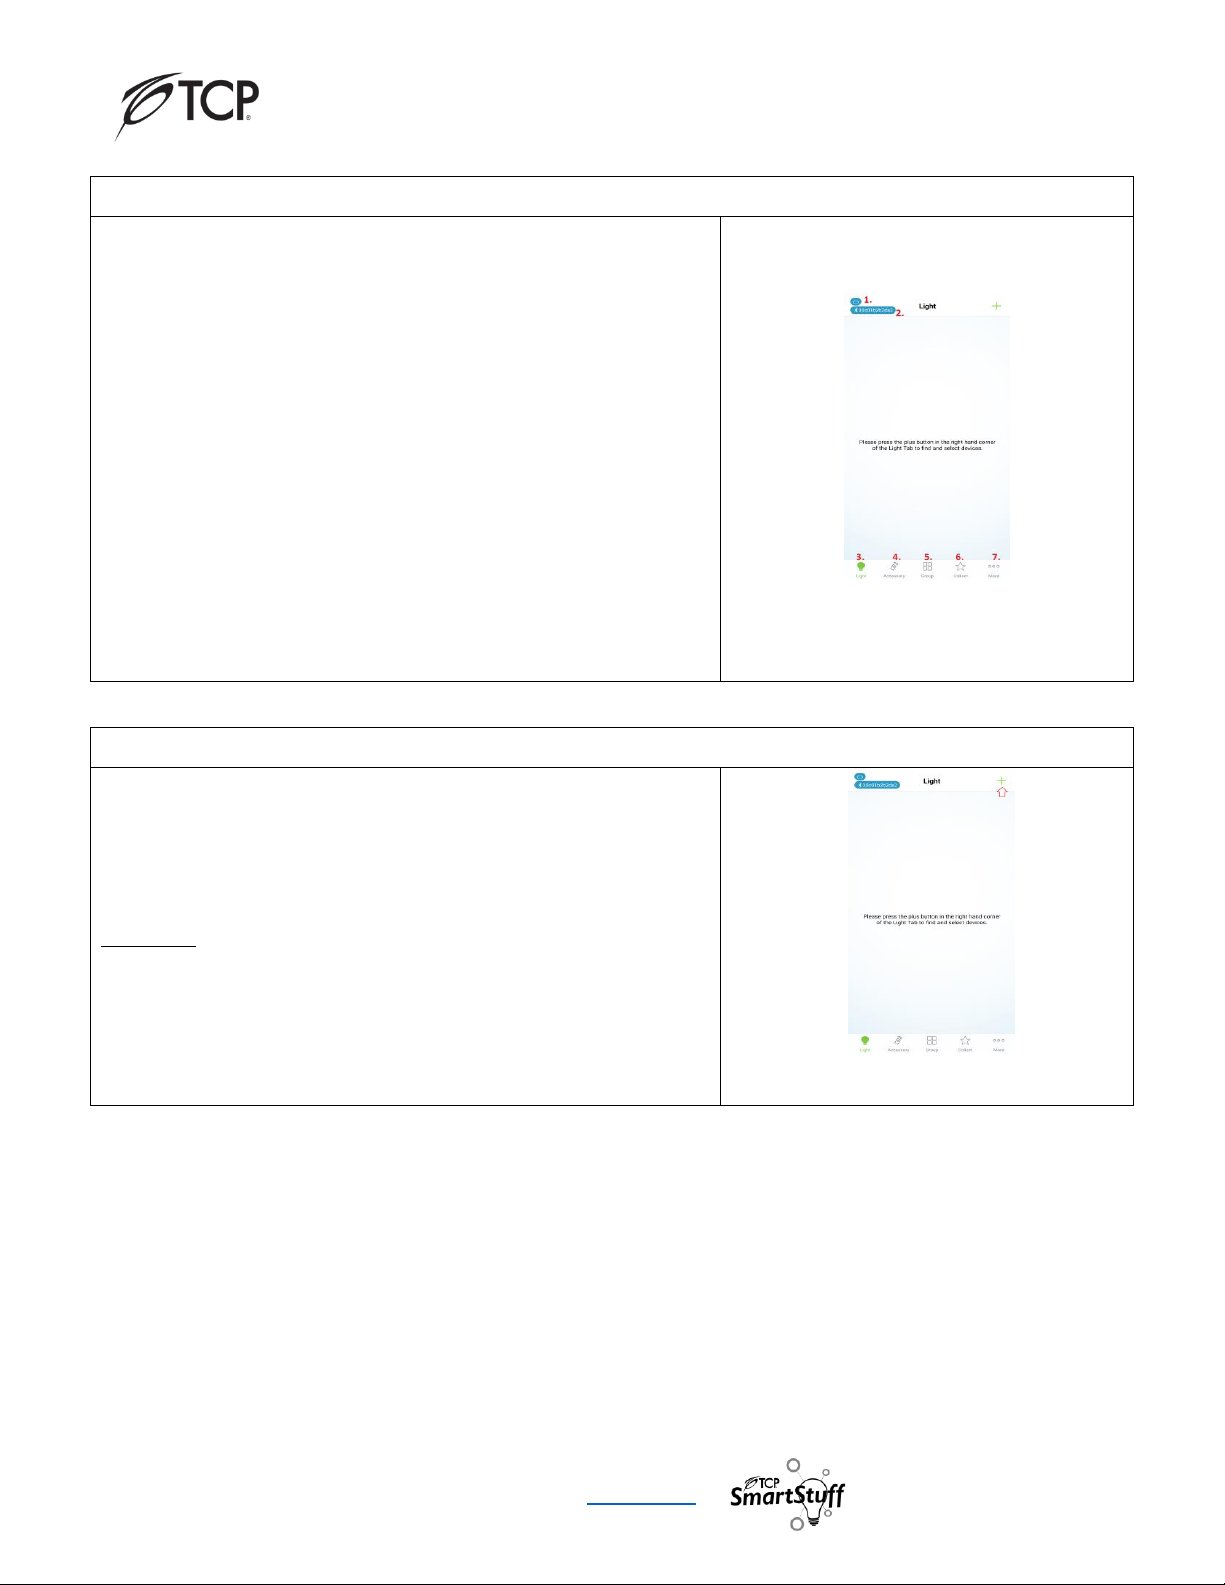
1.4.2 Connect Lighting Products to the App
1. Return to the Light Tab.
2. Press device to add.
3. Checks all devices in the list.
Once the Lighting Products have been found, the screen will populate with
the Product IDs. Select the Products(s) you wish to connect to and press
the button at the bottom of the screen to finish the setup.
Note: During this step, devices will flash during configuration. Once it has
been completed, the devices will return to the constant light state.
Add Mesh Light Screen
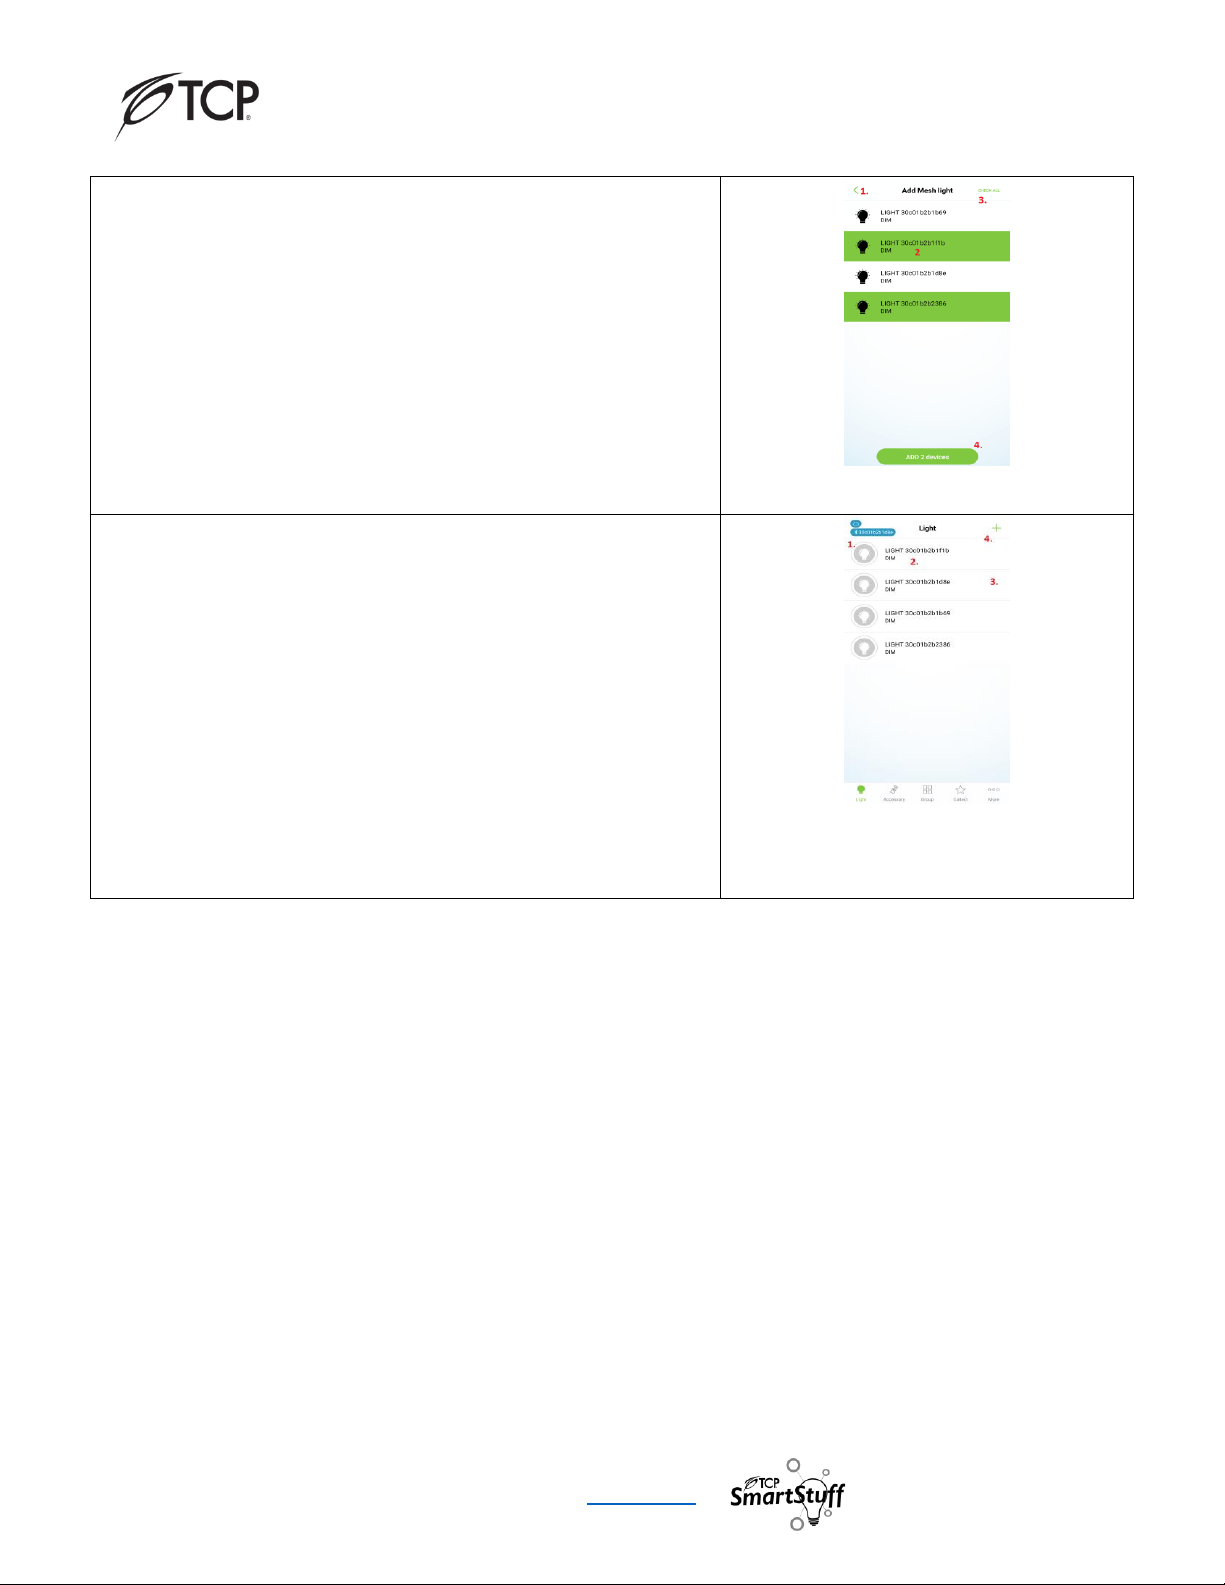
1.4.3 Connect Lighting Products to the App
1. Turns the device on/off.
2. Tapping the device name goes into the Adjust Tab. Press and hold
the Device Name causes a pop-up that will allow the user to:
− Rename: Change the Device Name.
− Delete: Deletes the Group from the SmartStuff
App.
− View Information: Views technical information
about each device in the group.
3. Press and hold in the highlighted section will allow you to dim the
device. Slide your finger left and right to dim the device.
4. Press the “Plus Button” to add more devices.
Light Tab
Page 7

SmartStuff App Instructions
TCP® | 325 Campus Dr. | Aurora, Ohio 44202 | P: 800-324-1496 | www.tcpi.com
6 P a g e
2. Light Tab
The Light Tab is the first tab the user will see. One of the main functions of the Light Tab is for the user to connect
TCP SmartStuff devices to the SmartStuff App. Next, the user can control individual TCP SmartStuff devices.
Actions such as on/off and dimming for each device can be controlled here. By clicking on the name of each
device, the user can access more features:
Adjust Tab - Provides the same actions: on/off and dimming, but on a device specific tab. The user can save the
setting in a Scene, which can be accessed later. There are three different Light Tab configurations that will change
depending on the device.
- Adjust Tab 1 is for TCP SmartStuff devices that have Single Color Temp and Smart Controls.
- Adjust Tab 2 is for TC SmartStuff devices that are Tunable White Color Temperature.
- Adjust Tab 3 is for TC SmartStuff devices that are RBW Tunable Color Temperature.
Scene Tab - Here the Scenes that the user has made for each individual device are stored here. Clicking on each
Scene will activate them.
Scheduling Tab - The user can create a schedule for each individual SmartStuff device. This mean when a device
turns on, off, or its dimming power can be programmatically at a specific day and time throughout the week.
Scenes can also be utilized and implemented in schedules as well.
Setting Tab - If the TCP SmartStuff device has a sensor, the Setting Tab will appear. It will allow the user to change
and enable the setting for the sensor. There are two different Setting Tabs:
- Setting Tab 1 is for TCP SmartStuff devices that has a sensor.
- Setting Tab 2 is for TC SmartStuff devices that has a sensor, and its sensing capability can be grouped with
other TCP SmartStuff devices.
Picture Tab - If the TCP SmartStuff device are RBGW Tunable, the Picture Tab will appear. It will allow the user to
change the color temperature of the lamp based on either pictures stored on the smart device.
2.1.0 Light Tab
1. Turns on/off the device.
2. Tapping the device name goes into the Adjust Tab. Press and hold
the Device Name causes a pop-up that will allow the user to:
− Rename: Change the Device Name.
− Delete: Deletes the Device from the SmartStuff App.
− View Information: Views technical information about each
device in the group.
3. Press and hold in the highlighted section will allow you to dim the
device. Slide your finger left and right to dim the device.
4. Press the “Plus Button” to add more devices.
Light Tab
Page 8
SmartStuff App Instructions
TCP® | 325 Campus Dr. | Aurora, Ohio 44202 | P: 800-324-1496 | www.tcpi.com
7 P a g e
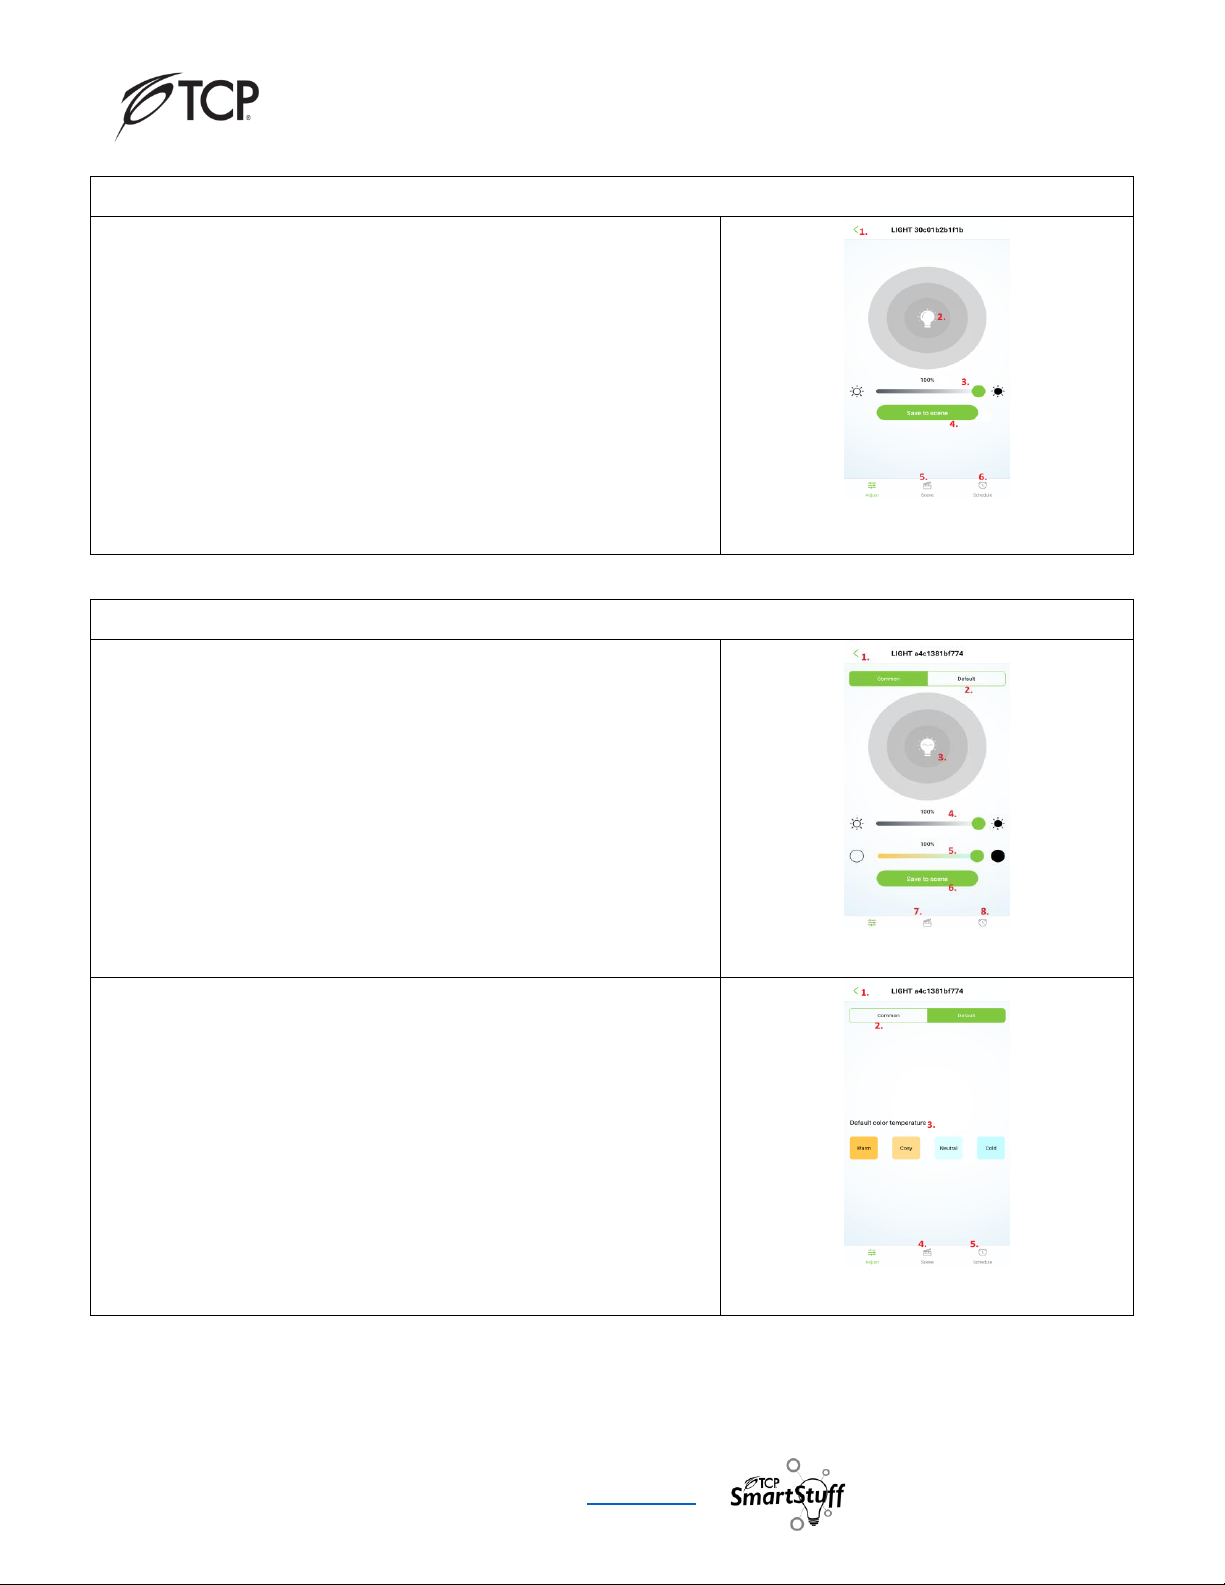
2.2.0 Adjust Tab (For Single Color Temp Lamps & Smart Controls)
1. Returns to the Light Tab.
2. Turns the device on/off.
3. Move slider to dim the device.
4. Once the device has been set to the ideal state press the "Save to
Scene" button pop up to save the scene.
5. Selects the Scene Tab.
6. Selects the Schedule Tab.
Adjust Tab Single Color
2.3.0 Adjust Tab (For Tunable White Lamps)
1. Returns to the Light Tab.
2. Goes to the Default Screen.
3. Turns the device on/off.
4. Move slider to dim the device.
5. Move slider to change the color temperature of the device.
6. Once the device has been set to the ideal state press the "Save to
Scene" button pop up to save the scene.
7. Selects the Scene Tab.
8. Selects the Schedule Tab.
Adjust Tab Tunable White Common Screen
1. Returns to the Light Tab
2. Goes to the Common Screen
3. Select preset color temperatures
4. Selects the Scene Tab.
5. Selects the Schedule Tab.
Adjust Tab Tunable White Default Screen
Page 9

SmartStuff App Instructions
TCP® | 325 Campus Dr. | Aurora, Ohio 44202 | P: 800-324-1496 | www.tcpi.com
8 P a g e
2.4.0 Adjust Tab (For RBGW Lamps)
1. Returns to the Light Tab
2. Goes to the Color Screen
3. Goes to the Default Screen
4. Turns the device on/off.
5. Move slider to dim the device.
6. Once the device has been set to the ideal state press the "Save to
Scene" button pop up to save the scene.
7. Selects the Scene Tab.
8. Selects the Schedule Tab.
9. Selects the Picture Tab
Adjust Tab RBGW Tunable Common Screen
1. Returns to the Light Tab.
2. Goes to the Common Screen.
3. Goes to the Default Screen.
4. Move slider to change the color temperature of the device.
5. Resets the color temperature of the device to white.
6. Selects the Scene Tab.
7. Selects the Schedule Tab.
8. Selects the Picture Tab
Adjust Tab RBGW Tunable Color Screen
1. Returns to the Light Tab.
2. Goes to the Color Screen.
3. Goes to the Common Screen.
4. Selects the color temperature from the preset colors.
5. Selects the Scene Tab.
6. Selects the Schedule Tab.
7. Selects the Picture Tab
Adjust Tab RBGW Tunable Default Screen
Page 10

SmartStuff App Instructions
TCP® | 325 Campus Dr. | Aurora, Ohio 44202 | P: 800-324-1496 | www.tcpi.com
9 P a g e
2.5.0 Scene Tab (For Smart Lamps and Controls)
1. Returns to the Light Tab.
2. Tapping the Scene will activate it. Press and hold the Scene will
causes a pop-up that will allow the user to:
− Rename: Change the Scene name.
− View Information: Views technical information about the
Scene.
− Delete: Deletes the Scene from the SmartStuff App.
Once a Scene has been saved, you can enable the Scene, which
engages the preset values. Press and hold on a Scene icon to rename
the Scene, View Information, or Delete the Scene
Scene Tab
2.6.0 Schedule Tab (For Smart Lamps and Controls)
1. Return to the Light Tab
2. Goes to the Scheduling Setting Screen.
The Scheduling Tab is where individual device schedules can be created,
viewed, and edited. Press on the “Plus Button” to create a new schedule.
Schedule Tab
1. Goes back to the Schedule Tab.
2. Select time for the schedule in 24 Hours.
3. Select the days of the week that the schedule is active.
4. Actions that the device can take during the schedule:
− Power On: Turns ON the device.
− Power Off: Turns OFF the device.
5. Adds a Scene to be activated during the schedule.
6. Press to create a new schedule.
The Schedule Setting Tab is where a schedule can be created and edited.
Select the time and day(s) of the week in which the schedule will activate.
The actions that the device can take are on/off or a Scene can be used if
one has been created. Press Save to complete the schedule.
Schedule Setting
Page 11

SmartStuff App Instructions
TCP® | 325 Campus Dr. | Aurora, Ohio 44202 | P: 800-324-1496 | www.tcpi.com
10
P a g e
1. Return to the Light Tab.
2. Shows the time of a schedule in 24hrs.
3. Shows the days in the week in which the schedule is active.
4. Shows the action the group will take.
5. Press to create a new schedule.
Once a Schedule has been completed, the SmartStuff App will return to the
Scheduling Tab. Clicking on the completed schedules will allow the user to
go in and edit the Schedule. To remove a schedule, the device will have to be
deleted from the SmartStuff App and re-installed.
Note: To remove a schedule, the device will have to be deleted and reinstalled.
Schedule Tab
2.7.0 Setting 1 Tab (For Smart Controls and Lamps w/ Sensor)
2.7.1 Setting 1 Tab
1. Returns to the Light Tab.
2. Enables/disables the Microwave Sensor.
3. Enables/disables the Daylight Sensor.
4. Sets the Microwave Sensor Strength: Low and High.
5. Hold Time: the time that the device will stay on after the sensor
has been engaged.
6. Hold Dimming Level - allows the user to set the luminaire light
level during the hold time.
7. Stand-By Dimming Level - allows the user to set the luminaire light
level after the hold time has elapsed.
Setting Tab 1 is for TCP SmartStuff devices that have a sensor. The TCP
SmartStuff device’s sensor functions cannot be grouped to control other
TCP SmartStuff devices.
Setting Tab 1
Page 12

SmartStuff App Instructions
TCP® | 325 Campus Dr. | Aurora, Ohio 44202 | P: 800-324-1496 | www.tcpi.com
11
P a g e
2.8.0 Setting 2 Tab (For Smart Controls and Lamps w/ Sensor Grouping)
2.8.1 Setting 2 Tab
1. Returns to the Light Tab.
2. Brings up the Reconfiguration Screen.
3. Sensor Disengaged Scene.
4. Sensor Engaged Scene.
5. Hold Time - the time that the device will stay on after the sensor
has been engaged.
6. Light Gears - Sets the lux levels for the Daylight Sensor.
Setting Tab 2 is for TCP SmartStuff devices that have a sensor, and it can
be grouped to control other TCP SmartStuff devices by using Scenes.
Creating Scenes from the Adjust Tab will link sensor to a single SmartStuff
Device. Please see the section on the Scene Tab for more information.
To group other TCP SmartStuff devices, the Scenes must be created in the
Collect Tab. Please see the section on Collect Tab for more information.
Setting 2 Tab
2.8.2 Pick Device Screen
Once the two Scenes have been created, click on either the “Sensor
Disengaged Scene” or the “Sensor Engaged Scene” in the Setting Tab 2
and the “Pick Device Screen” will display. Select the correct Scene for the
action the TCP Smart device(s) will take.
Pick Device Screen
2.8.1 Setting Tab
Once a Scene has been selected, it will show up under the “Sensor
Disengaged/Engage Scene”. Make the necessary change to the Hold Time
and Light Gears.
Setting 2 Tab
Page 13

SmartStuff App Instructions
TCP® | 325 Campus Dr. | Aurora, Ohio 44202 | P: 800-324-1496 | www.tcpi.com
12
P a g e
3. Accessory Tab
The Accessory Tab is the place where all of TCP’s SmartStuff Accessories are set up for use. Each SmartStuff
Accessory will have its own unique hub screen in the App to configure it for use. Below are the accessories that
are available:
• SmartStuff Remote - Compatible with other TCP SmartStuff devices, the Smart Remote allows for control
of functions such as on/off, dimming, and group controls that are connected to its Bluetooth Mesh
Network.
3.1.0 Smart Remote Button Descriptions
3.1.1 Smart Remote Button Descriptions
ON / OFF: Turns on/off all TCP Smart Stuff devices.
DIM+ / DIM-: Increases/decreases the brightness of TCP SmartStuff
devices
CCT+ / CCT-: Increases/decreases the CCT of the TCP SmartStuff devices,
if applicable.
Group (1, 2, 3, 4) On: Turns on all TCP Smart Stuff devices that are
grouped together.
Group (1, 2, 3, 4) Off: Turns off all TCP Smart Stuff devices that are
grouped together.
Group (1, 2, 3, 4) Select: Selects the corresponding group.
To Reset the TCP SmartStuff Remote to the Factory Setting
with the SmartStuff Remote:
1. Press and hold "ON” and “DIM+” buttons for 3 seconds.
2. The Status Light will slowly flash 3 times.
3. SmartStuff Remote has been reset to the Factory Setting.
3.2.0 How to Program the TCP SmartStuff Remote
3.2.1 How to Program the TCP SmartStuff Remote
1. On the SmartStuff Remote:
a. Press and hold the "ON” and “DIM-” buttons for 3 seconds.
The Status Light will flash for 60 seconds.
2. While the Status Light on the Smart Remote is still flashing:
a. Go to the SmartStuff App and to the Accessory Tab.
b. Press the "Plus Button” and drop-down box will appear.
Select “Mesh accessory” to begin to scan for the TCP
SmartStuff Accessories.
c. On the SmartStuff Remote, press and hold any button on
the Smart Remote.
Accessory Tab
Page 14

SmartStuff App Instructions
TCP® | 325 Campus Dr. | Aurora, Ohio 44202 | P: 800-324-1496 | www.tcpi.com
13
P a g e
3.2.2 How to Program the TCP SmartStuff Remote
1. Returns to the Accessory Tab.
2. Checks all the devices the SmartStuff App found.
3. Pressing the Device Text will select the SmartStuff device to
be added to the SmartStuff App.
4. Once a device has been selected, this icon will appear.
Press to begin adding all the SmartStuff devices to the
SmartStuff App.
The SmartStuff App will begin to scan for the devices. Once the
device(s) have been found, the screen will populate as shown.
Select on the device(s) to be added to the SmartStuff App and press
“Add device.”
Add Accessory
3.3.0 SmartStuff Remote
3.3.1 SmartStuff Remote
1. Pressing the “Plus Icon” allows the user to add more accessories
to the SmartStuff App.
2. Tapping the device name goes into the Linkage Config. Press and
hold the device name causes a pop-up that will allow the user to:
− Rename: Change the group name.
− Delete/Reset: Deletes the Group from the SmartStuff App.
− View Information: Views technical information about each
device in the groups.
After SmartStuff Remote has been setup, it will control all the SmartStuff
devices on its Bluetooth Mesh. If the remote line is darkened out on the
TCP SmartStuff App, press any of the buttons to awaken it.
For the SmartStuff Remote to controls groups of SmartStuff devices, the
groups must be set up in the SmartStuff App. Up to four groups can be
programmed with the SmartStuff Remote. Once the group(s) have been
created, click on the device name to bring up the Linkage Config Screen.
Please see the SmartStuff Group Tab Guide for more information.
Accessory Tab
Page 15

SmartStuff App Instructions
TCP® | 325 Campus Dr. | Aurora, Ohio 44202 | P: 800-324-1496 | www.tcpi.com
14
P a g e
3.3.2 SmartStuff Remote
1. Returns to the Accessory Tab.
2. Goes to the Reconfiguration Screen.
3. Pressing any Group will configure a corresponding group to a
group button on the SmartStuff Remote.
The Linkage Config Tab where pre-created groups can be assigned to the
Smart Remote.
Linkage Config
3.3.3 SmartStuff Remote
1. Goes back to the Group Schedule Tab.
2. Removes a group from the remote.
3. Select which group is to be programmed with the remote.
4. Clicking on the “Bulb Icon” will turn on/off the group.
Pressing on the group name will program that group to the corresponding
group button on the SmartStuff Remote. Press and hold button any button
on the SmartStuff Remote to ensure that the device is “awake” while the
SmartStuff Remote is being programmed.
Group Select - Pick a Device
3.3.4 SmartStuff Remote
1. Returns to Linkage Config Screen.
2. Pressing the Group Name will select it to reconfigure the
SmartStuff Remote.
3. Clicking on the “Bulb Icon” will turn on/off the group.
4. Once the groups have been selected, press to complete the
SmartStuff Remote reconfiguration.
The Reconfiguration Screen is the second way to program the SmartStuff
Remote. By selecting up to four groups, the SmartStuff App will
automatically assign the groups to a number on the remote. Press
“Complete” to start the programming. Press and hold any button on the
SmartStuff Remote to ensure that the device is “awake” while the
SmartStuff Remote is being programmed.
Reconfiguration Screen - Pick a Device
Page 16

SmartStuff App Instructions
TCP® | 325 Campus Dr. | Aurora, Ohio 44202 | P: 800-324-1496 | www.tcpi.com
15
P a g e
4. Group Tab
The TCP SmartStuff App allows the user to group multiple SmartStuff devices together and have them perform in
unison. Functions such as on/off and dimming can be synced across as many as 100 different devices. The
SmartStuff App can also create ten different groups which allows the user for more creativity and flexibility in
control schemes. Once the devices are grouped, the user will have access to the following:
Adjust Tab - provides the same functions: on/off and dimming, but on a group specific hub.
Scheduling Tab - The user can create a schedule for a group of SmartStuff devices. This means that a group of
devices can turn on/off programmatically at a specific day and time throughout the week.
4.1.0 Creating a Group
4.1.1 Creating a Group
Press the “Plus Button” to bring up the Group Manage Screen.
Group Tab
4.1.2 Creating a Group
1. Returns to the Group Tab.
2. Create a Group Name by entering in the text in the filed or use
the drop-down list.
3. Press the “Add Button” to add devices to the group.
Either create a name for the new group by typing it into the Group Name
Field or use the Drop-Down Box to select a name from the Default List.
Next, press the “Plus Button” to add the TCP SmartStuff devices to the
group.
Group Manage Screen
Page 17

SmartStuff App Instructions
TCP® | 325 Campus Dr. | Aurora, Ohio 44202 | P: 800-324-1496 | www.tcpi.com
16
P a g e
4.1.3 Creating a Group
1. Return to the Group Manage Screen.
2. Pressing the “Bulb Button” allows the user to turn on/off the
devices.
3. Selecting the Device Name will select/deselect the device for the
group.
4. Button allows the user to either Select All or Clears all devices
from a group.
5. Once the user has selected the devices for the Group, press
Complete.
Select the desired TCP SmartStuff devices by tapping on their names. You
can also press “Check All” to select the all the SmartStuff devices that are
available. Once finished selecting the devices for the group, press
Complete.
Pick Device Screen
4.1.4 Creating a Group
1. Return to the Group Manage Tab.
2. Group Name can be changed by entering in the text in the field
or use the drop-down list.
3. Pressing the “Bulb Button” allows the user to turn on and off the
devices.
4. Pressing the device name can select the device to be removed
from the group.
5. Press the “Add Button” to add devices to the group.
Next, the SmartStuff App will return to the Group Manage Tab. A pop-up
window will display “Finish,” meaning the app has finished creating the
group. Press the “Back Arrow” to return to the Group Tab.
Group Manage Screen
Page 18

SmartStuff App Instructions
TCP® | 325 Campus Dr. | Aurora, Ohio 44202 | P: 800-324-1496 | www.tcpi.com
17
P a g e
4.2.0 Group Tab
4.2.1 Group Tab
1. Pressing the “Bulb Icon” allows the user to turn on and off the
devices in the group.
2. Tapping the Group Name goes into the Group Control Screen.
Press and hold the Group Name causes a pop-up that will allow
the user to:
− Rename: Change the group name.
− Group Manage: Add or remove devices from a group.
− View Information: Views technical information about each
device in the group.
− Delete: Deletes the Group from the SmartStuff App.
3. Press the “Plus Button” to create more groups.
Press the Group Name to bring up the Group Control Main Screen
Note: Devices must be deleted from the group before the group can be
deleted.
Group Tab
4.2.2 Group Tab
1. Return to the Group Manage Screen.
2. Turns the device on/off.
3. Pressing the device name will bring up the Group Adjust Tab.
4. Press and hold to DIM the device.
5. Press to enter the Group Controls.
On the Group Control Main Screen, the user can control the individual
devices that are in the group. Press “Enter group control” button to
control all the devices in the group at the same time.
Group Control Main Screen
Page 19

SmartStuff App Instructions
TCP® | 325 Campus Dr. | Aurora, Ohio 44202 | P: 800-324-1496 | www.tcpi.com
18
P a g e
4.2.3 Group Tab
1. Return to the Group Control Main Tab.
2. Turns the devices in the group on/off.
3. Dimming Bar. This dims the devices in the group.
4. Brings up the Control Scheduling Tab.
Group Adjust Tab
4.2.4 Group Tab
1. Return to the Group Control Main Tab.
2. Shows the time of a schedule in 24 Hours.
3. Shows the days in the week in which the schedule is active.
4. Shows the action the group will take.
5. Press to create a new Schedule.
6. Brings to the Group Adjust Tab.
The Group Scheduling Tab is where group schedules can be created,
viewed, and edited. Press on the “Plus Button” to create a new schedule.
Pressing on the actual schedule will bring up the Group Schedule Setting
Tab where setting such as the time, day(s) of the week, and what actions
group will take can be edited.
Group Scheduling Tab
4.2.5 Group Tab
1. Returns to the Group Schedule Tab.
2. Enables user to select time for the schedule in 24 Hours.
3. Enables user to select the days of the week that the schedule is
active.
4. Actions that the group can take during the schedule.
− Power On: Turns on all the devices in the group
− Power Off: Turns off all the devices in the group
5. Press to create a new Schedule.
The Group Schedule Setting Tab is where a schedule can be created and
edited. Select the time and day(s) of the week in which the schedule will
activate. The two actions that the group can take are either ON or OFF.
Press Save to complete the group schedule.
Group Schedule Setting Tab
Page 20

SmartStuff App Instructions
TCP® | 325 Campus Dr. | Aurora, Ohio 44202 | P: 800-324-1496 | www.tcpi.com
19
P a g e
5. Collect Tab
Like the Grouping, Collections (or Collect for short) is another way the TCP SmartStuff App allows for grouping of
TCP SmartStuff devices together. Instead of having all the devices behave the same, by creating a Collection, the
user can group TCP SmartStuff devices together but have each device behave differently. An example of this is to
have a group of devices where one device is on, another device is off, and the third device is at 50 % dimming.
5.1.0 Creating New Collections
5.1.1 Creating New Collections
Press the "Plus Button” and drop-down box will appear. Select “Mesh
Light” to search for TCP SmartStuff devices.
Collect Tab
5.1.2 Creating New Collections
1. Return to the Collection Tab.
2. Turns the device on/off.
3. Selecting the Device Name will select/deselect the device for the
group.
4. Either Select All or Clears all devices from a group.
5. Once the user has selected the devices for the Collection, press
Complete.
Select the desired TCP SmartStuff devices by tapping on their names. You
can also press “Check All” to select the all the SmartStuff devices that are
available. Once finished selecting the devices for the collection, press
Complete.
Pick Device Screen
Page 21

SmartStuff App Instructions
TCP® | 325 Campus Dr. | Aurora, Ohio 44202 | P: 800-324-1496 | www.tcpi.com
20
P a g e
5.1.3 Creating New Collections
1. Return to the Collection Tab.
2. Turns the device on/off.
3. Press and hold to DIM the device.
4. Press to add more devices to the Collection.
5. Press to Save.
Each device can be set to its own setting here. Once
finished, press Save to finish.
Create Scene Screen
Page 22

SmartStuff App Instructions
TCP® | 325 Campus Dr. | Aurora, Ohio 44202 | P: 800-324-1496 | www.tcpi.com
21
P a g e
6. More Tab
The More Tab is the place to find other features and information for the SmartStuff App.
6.1.0 More Tab
6.1.1 Creating New Collections
1. Account Information: account information can be viewed and
changed here.
2. Setting: Setting for the SmartStuff App can be viewed and
changed here.
3. OTA Update: firmware updates for the TCP SmartStuff devices
occur here.
4. Share: Currently unavailable.
5. QR Code: Currently unavailable.
6. 3rd Party Apps: Currently unavailable.
More Tab
6.2.0 Account Information
6.2.1 Account Information
1. Returns to the More Tab.
2. Reset the password.
3. Change time zone.
4. Closes TCP SmartStuff Account.
5. Logs out of the TCP SmartStuff App.
Account Setting
Page 23

SmartStuff App Instructions
TCP® | 325 Campus Dr. | Aurora, Ohio 44202 | P: 800-324-1496 | www.tcpi.com
22
P a g e
6.3.0 Setting
6.3.1 Setting
1. Control: Sets the minimum dimming value for the TCP SmartStuff
devices.
2. Language: Sets the text for the TCP SmartStuff App.
3. Functions: Sets different functions that changes how the TCP
SmartStuff App behaves.
4. Switch Display Theme: The background of the TCP SmartStuff App
can be changed here.
5. About: Shows the SmartStuff App version along with the
firmware versions.
Setting Screen
6.3.2 Setting
1. Returns to the Setting Screen.
2. Dimming Slide Bar.
Use the Dimming Slide Bar to adjust the minimum dimming value for the
TCP SmartStuff devices.
Setting - Control Screen
6.3.3 Setting
1. Returns to the Setting Screen.
2. Save Setting.
Uses the choices on the screen to select the language for the TCP
SmartStuff App. Follow System will use the language that is set on the
smartphone or tablet.
Setting – Select Language
Page 24

SmartStuff App Instructions
TCP® | 325 Campus Dr. | Aurora, Ohio 44202 | P: 800-324-1496 | www.tcpi.com
23
P a g e
6.3.4 Function Screen
1. Returns to the Setting Screen.
2. Enable Layout Animation: shows animation when the interface is
updated.
3. Show Picture Preview Color: shows the color taken from the
picture that the RBGW lamps will produce.
4. Show Connection State: shows the Cloud/Bluetooth connection
on the main screen.
5. Show Online Connected Devices First: devices that are connected
to the app are shown first.
Function Screen
6.3.4 Change Theme Screen
1. Returns to the Setting Screen.
2. Selects Theme.
Pressing any of the buttons Light, Dark, and Classic will change the
background of SmartStuff App and returns to the Light Tab. Pressing the
Custom button will bring up another window called Switch Display Theme.
Choose Theme Screen
6.3.4 Switch Display Theme Screen
1. Returns to the Setting Screen.
2. Saves Theme.
3. Change Theme Display.
4. Selects Accent Color.
Pressing Change Theme brings up a window that new background themes
can be selected. Selecting the “Accent Color” will change the buttons on
the SmartStuff App to that color.
Switch Display Theme Screen
Page 25
SmartStuff App Instructions
TCP® | 325 Campus Dr. | Aurora, Ohio 44202 | P: 800-324-1496 | www.tcpi.com
24
P a g e
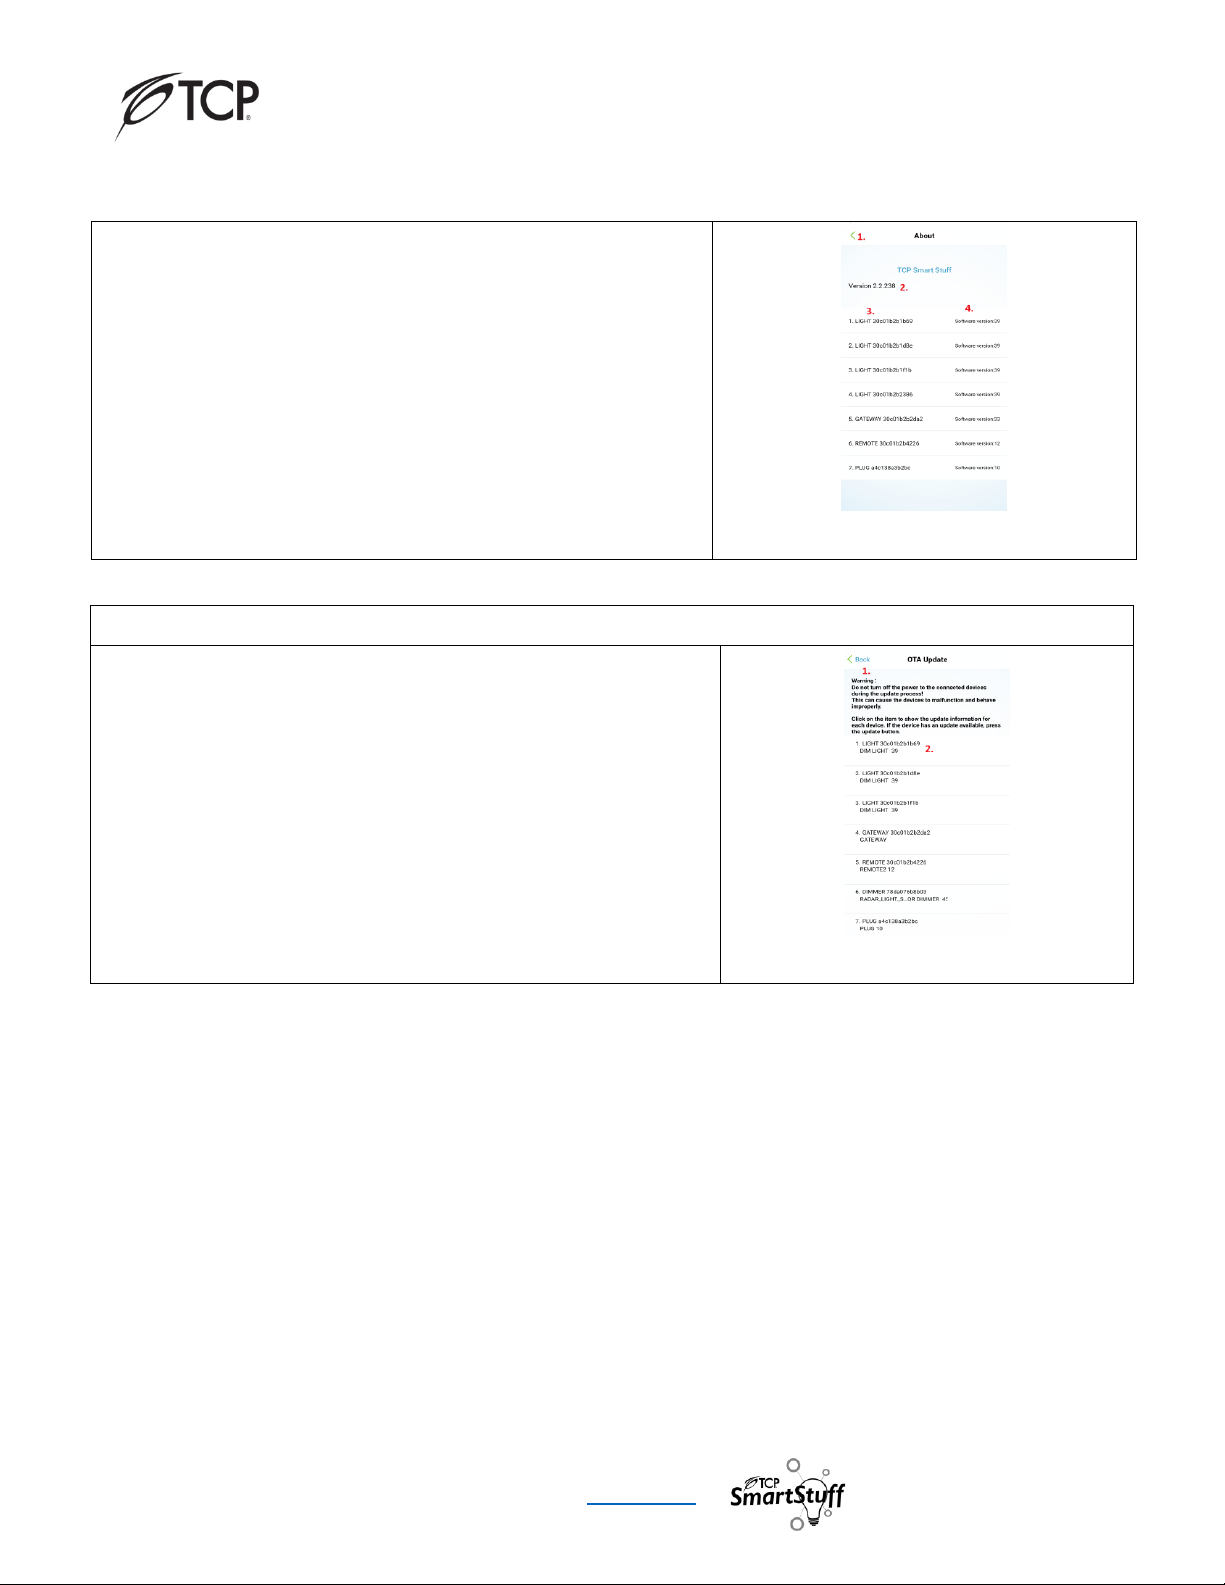
6.3.5 About Screen
1. Returns to the Setting Screen.
2. Shows the TCP SmartStuff App Version.
3. Shows the TCP SmartStuff devices list that is associated to the
device.
4. Shows the Firmware Version for each TCP SmartStuff devices.
About Screen
6.4.0 OTA Update
6.4.1 OTA Update
1. Returns to the Setting Screen.
2. TPC SmartStuff device name and firmware version.
OTA stands for “over the air.” This means TCP SmartStuff devices can be
updated “over the air’ through the TCP SmartStuff App by updating the
firmware for each device. If there is an update available, an update box
will appear. Press the update box to begin the update. The TCP SmartStuff
App will let you know when the update is completed.
OTA Update Screen
The "Android" name, the Android logo, Google Play and the Google Play logo are trademarks of Google LLC.
Page 26

SmartStuff App Instructions
TCP® | 325 Campus Dr. | Aurora, Ohio 44202 | P: 800-324-1496 | www.tcpi.com
25
P a g e
Apple, the Apple logo, and the App Store are trademarks of Apple Inc., registered in the U.S. and other countries.
The Bluetooth® word mark and logos are registered trademarks owned by Bluetooth SIG, Inc. and any use of such marks by TCP Inc. is under license.
 Loading...