


T-Comfort 930 DSL
Mounting and Commissioning


Contents
Fea tu re s 9
Factory Settings on Delivery 14
Telephony Functions . . . . . . . . . . . . . . . . . . . . . . . . . . . . . . . . . . . . . . . . . . . . . . . . . . . . . . . . 14
Authorisations. . . . . . . . . . . . . . . . . . . . . . . . . . . . . . . . . . . . . . . . . . . . . . . . . . . . . . . . . . . . . . 14
Internet Functions . . . . . . . . . . . . . . . . . . . . . . . . . . . . . . . . . . . . . . . . . . . . . . . . . . . . . . . . . . 17
Installation 19
Scope of Delivery . . . . . . . . . . . . . . . . . . . . . . . . . . . . . . . . . . . . . . . . . . . . . . . . . . . . . . . . . . . 19
Safety Precautions. . . . . . . . . . . . . . . . . . . . . . . . . . . . . . . . . . . . . . . . . . . . . . . . . . . . . . . . . . 19
Mounting Location. . . . . . . . . . . . . . . . . . . . . . . . . . . . . . . . . . . . . . . . . . . . . . . . . . . . . . . . . . 21
Wall Mounting. . . . . . . . . . . . . . . . . . . . . . . . . . . . . . . . . . . . . . . . . . . . . . . . . . . . . . . . . . . . . . 21
Installing an Expansion Set . . . . . . . . . . . . . . . . . . . . . . . . . . . . . . . . . . . . . . . . . . . . . . . . . . 22
Installing Interface Cards . . . . . . . . . . . . . . . . . . . . . . . . . . . . . . . . . . . . . . . . . . . . . . . . . . . . 25
■ V.24 and Doorstation Equipment Slots . . . . . . . . . . . . . . . . . . . . . . . . . . . . . . . . . . . . 25
■ Slots for Additional Interface Cards . . . . . . . . . . . . . . . . . . . . . . . . . . . . . . . . . . . . . . . 26
Available Ports . . . . . . . . . . . . . . . . . . . . . . . . . . . . . . . . . . . . . . . . . . . . . . . . . . . . . . . . . . . . . 28
■ T-Comfort 930 DSL Version 1 . . . . . . . . . . . . . . . . . . . . . . . . . . . . . . . . . . . . . . . . . . . . 28
■ T-Comfort 930 DSL Version 2 . . . . . . . . . . . . . . . . . . . . . . . . . . . . . . . . . . . . . . . . . . . . 29
■ Positions of the Ports. . . . . . . . . . . . . . . . . . . . . . . . . . . . . . . . . . . . . . . . . . . . . . . . . . . . 30
Interface Cards . . . . . . . . . . . . . . . . . . . . . . . . . . . . . . . . . . . . . . . . . . . . . . . . . . . . . . . . . . . . . 31
Port Assignment, Termination, Cable Lengths. . . . . . . . . . . . . . . . . . . . . . . . . . . . . . . . . . 34
1

■ S
Ports . . . . . . . . . . . . . . . . . . . . . . . . . . . . . . . . . . . . . . . . . . . . . . . . . . . . . . . . . . . . . . . 34
0
■ U
■ a/b Ports . . . . . . . . . . . . . . . . . . . . . . . . . . . . . . . . . . . . . . . . . . . . . . . . . . . . . . . . . . . . . . 36
■ Actor/Sensor. . . . . . . . . . . . . . . . . . . . . . . . . . . . . . . . . . . . . . . . . . . . . . . . . . . . . . . . . . . 37
■ LAN Port. . . . . . . . . . . . . . . . . . . . . . . . . . . . . . . . . . . . . . . . . . . . . . . . . . . . . . . . . . . . . . . 37
■ T-DSL Port . . . . . . . . . . . . . . . . . . . . . . . . . . . . . . . . . . . . . . . . . . . . . . . . . . . . . . . . . . . . . 38
Ports . . . . . . . . . . . . . . . . . . . . . . . . . . . . . . . . . . . . . . . . . . . . . . . . . . . . . . . . . . . . . . 36
pn
Power Failure. . . . . . . . . . . . . . . . . . . . . . . . . . . . . . . . . . . . . . . . . . . . . . . . . . . . . . . . . . . . . . . 39
Connectible Devices . . . . . . . . . . . . . . . . . . . . . . . . . . . . . . . . . . . . . . . . . . . . . . . . . . . . . . . . 40
■ Internal/External S
■ U
■ a/b Ports . . . . . . . . . . . . . . . . . . . . . . . . . . . . . . . . . . . . . . . . . . . . . . . . . . . . . . . . . . . . . . 41
■ Actor/Sensor Ports . . . . . . . . . . . . . . . . . . . . . . . . . . . . . . . . . . . . . . . . . . . . . . . . . . . . . 43
■ COM Port . . . . . . . . . . . . . . . . . . . . . . . . . . . . . . . . . . . . . . . . . . . . . . . . . . . . . . . . . . . . . . 45
■ LAN Port. . . . . . . . . . . . . . . . . . . . . . . . . . . . . . . . . . . . . . . . . . . . . . . . . . . . . . . . . . . . . . . 45
Ports . . . . . . . . . . . . . . . . . . . . . . . . . . . . . . . . . . . . . . . . . . . . . . . . . . . . . . . . . . . . . . 41
pn
Ports. . . . . . . . . . . . . . . . . . . . . . . . . . . . . . . . . . . . . . . . . . . . . . . . 40
0
Accessories and Adapters 46
U
Adapter. . . . . . . . . . . . . . . . . . . . . . . . . . . . . . . . . . . . . . . . . . . . . . . . . . . . . . . . . . . . . . . . 46
pn
Audio Adapter. . . . . . . . . . . . . . . . . . . . . . . . . . . . . . . . . . . . . . . . . . . . . . . . . . . . . . . . . . . . . . 47
Device Combinations . . . . . . . . . . . . . . . . . . . . . . . . . . . . . . . . . . . . . . . . . . . . . . . . . . . . . . . 49
■ Configurations without Plug-in Power Supply (Range up to 500 m) . . . . . . . . . . . 49
■ Configurations without Plug-in Power Supply (Range 500 to 1000 m). . . . . . . . . 51
■ Configurations with Plug-in Power Supplies. . . . . . . . . . . . . . . . . . . . . . . . . . . . . . . . 52
Configuration 53
Brief Guide to Initial Configuration . . . . . . . . . . . . . . . . . . . . . . . . . . . . . . . . . . . . . . . . . . . . 54
■ First Configuration via Serial Port . . . . . . . . . . . . . . . . . . . . . . . . . . . . . . . . . . . . . . . . . 56
2

Configuring the T-Comfort 930 DSL . . . . . . . . . . . . . . . . . . . . . . . . . . . . . . . . . . . . . . . . . . 56
■ Preparing the Configuration . . . . . . . . . . . . . . . . . . . . . . . . . . . . . . . . . . . . . . . . . . . . . 56
■ Starting the Web Console . . . . . . . . . . . . . . . . . . . . . . . . . . . . . . . . . . . . . . . . . . . . . . . 57
■ Loading the Online Help. . . . . . . . . . . . . . . . . . . . . . . . . . . . . . . . . . . . . . . . . . . . . . . . . 59
■ Finishing the Configuration . . . . . . . . . . . . . . . . . . . . . . . . . . . . . . . . . . . . . . . . . . . . . . 59
■ Remote Configuration. . . . . . . . . . . . . . . . . . . . . . . . . . . . . . . . . . . . . . . . . . . . . . . . . . . 59
■ Codes for IP Configuration. . . . . . . . . . . . . . . . . . . . . . . . . . . . . . . . . . . . . . . . . . . . . . . 59
■ Saving and Loading the Configuration . . . . . . . . . . . . . . . . . . . . . . . . . . . . . . . . . . . . 60
■ Receiving System Messages as E-Mail . . . . . . . . . . . . . . . . . . . . . . . . . . . . . . . . . . . . 61
■ Loading SW Updates. . . . . . . . . . . . . . . . . . . . . . . . . . . . . . . . . . . . . . . . . . . . . . . . . . . . 61
■ Resetting the System Data. . . . . . . . . . . . . . . . . . . . . . . . . . . . . . . . . . . . . . . . . . . . . . . 62
■ Basic Hardware Settings Switch . . . . . . . . . . . . . . . . . . . . . . . . . . . . . . . . . . . . . . . . . . 62
■ Generating Your Own MoH Files. . . . . . . . . . . . . . . . . . . . . . . . . . . . . . . . . . . . . . . . . . 63
Configuration Examples 65
T-Comfort 930 DSL in Computer Networks . . . . . . . . . . . . . . . . . . . . . . . . . . . . . . . . . . . . 65
Introduction to TCP/IP . . . . . . . . . . . . . . . . . . . . . . . . . . . . . . . . . . . . . . . . . . . . . . . . . . . . . . 66
T-Comfort 930 DSL in a Serverless LAN . . . . . . . . . . . . . . . . . . . . . . . . . . . . . . . . . . . . . . . 67
■ DNS Name Resolution . . . . . . . . . . . . . . . . . . . . . . . . . . . . . . . . . . . . . . . . . . . . . . . . . . 68
■ Internet Access. . . . . . . . . . . . . . . . . . . . . . . . . . . . . . . . . . . . . . . . . . . . . . . . . . . . . . . . . 68
■ RAS Access. . . . . . . . . . . . . . . . . . . . . . . . . . . . . . . . . . . . . . . . . . . . . . . . . . . . . . . . . . . . 69
T-Comfort 930 DSL in a LAN with an IP-enabled Server . . . . . . . . . . . . . . . . . . . . . . . . . 70
■ DNS Name Resolution . . . . . . . . . . . . . . . . . . . . . . . . . . . . . . . . . . . . . . . . . . . . . . . . . . 71
■ Internet Access. . . . . . . . . . . . . . . . . . . . . . . . . . . . . . . . . . . . . . . . . . . . . . . . . . . . . . . . . 71
■ RAS Access. . . . . . . . . . . . . . . . . . . . . . . . . . . . . . . . . . . . . . . . . . . . . . . . . . . . . . . . . . . . 72
Branch Link. . . . . . . . . . . . . . . . . . . . . . . . . . . . . . . . . . . . . . . . . . . . . . . . . . . . . . . . . . . . . . . . 73
Useful Information on Internet Access . . . . . . . . . . . . . . . . . . . . . . . . . . . . . . . . . . . . . . . . . 74
3

■ Costs. . . . . . . . . . . . . . . . . . . . . . . . . . . . . . . . . . . . . . . . . . . . . . . . . . . . . . . . . . . . . . . . . . 74
■ Using the Web. . . . . . . . . . . . . . . . . . . . . . . . . . . . . . . . . . . . . . . . . . . . . . . . . . . . . . . . . . 74
■ E-mail . . . . . . . . . . . . . . . . . . . . . . . . . . . . . . . . . . . . . . . . . . . . . . . . . . . . . . . . . . . . . . . . . 75
■ NAT . . . . . . . . . . . . . . . . . . . . . . . . . . . . . . . . . . . . . . . . . . . . . . . . . . . . . . . . . . . . . . . . . . . 75
PBX Cascading 77
Variants of PBX Cascading. . . . . . . . . . . . . . . . . . . . . . . . . . . . . . . . . . . . . . . . . . . . . . . . . . . 77
Functionality of PBX Cascading . . . . . . . . . . . . . . . . . . . . . . . . . . . . . . . . . . . . . . . . . . . . . . 77
Putting a Cascaded PBX into Operation . . . . . . . . . . . . . . . . . . . . . . . . . . . . . . . . . . . . . . . 78
■ Notes. . . . . . . . . . . . . . . . . . . . . . . . . . . . . . . . . . . . . . . . . . . . . . . . . . . . . . . . . . . . . . . . . . 79
PBX Networking 81
Connections . . . . . . . . . . . . . . . . . . . . . . . . . . . . . . . . . . . . . . . . . . . . . . . . . . . . . . . . . . . . . . . 81
■ Protocol: Q.SIG or DSS1. . . . . . . . . . . . . . . . . . . . . . . . . . . . . . . . . . . . . . . . . . . . . . . . . 82
■ Master/Slave. . . . . . . . . . . . . . . . . . . . . . . . . . . . . . . . . . . . . . . . . . . . . . . . . . . . . . . . . . . 82
■ L1 Clock. . . . . . . . . . . . . . . . . . . . . . . . . . . . . . . . . . . . . . . . . . . . . . . . . . . . . . . . . . . . . . . 83
Types of Point-to-Point Connections . . . . . . . . . . . . . . . . . . . . . . . . . . . . . . . . . . . . . . . . . . . 84
■ Direct Connection . . . . . . . . . . . . . . . . . . . . . . . . . . . . . . . . . . . . . . . . . . . . . . . . . . . . . . 84
■ Connection via an Active Transmission System. . . . . . . . . . . . . . . . . . . . . . . . . . . . . 85
■ Connection via the Public Network . . . . . . . . . . . . . . . . . . . . . . . . . . . . . . . . . . . . . . . 85
Configuration . . . . . . . . . . . . . . . . . . . . . . . . . . . . . . . . . . . . . . . . . . . . . . . . . . . . . . . . . . . . . . 86
■ Trunk groups . . . . . . . . . . . . . . . . . . . . . . . . . . . . . . . . . . . . . . . . . . . . . . . . . . . . . . . . . . . 86
■ Routes . . . . . . . . . . . . . . . . . . . . . . . . . . . . . . . . . . . . . . . . . . . . . . . . . . . . . . . . . . . . . . . . 87
■ Numbering . . . . . . . . . . . . . . . . . . . . . . . . . . . . . . . . . . . . . . . . . . . . . . . . . . . . . . . . . . . . 87
Technical Details . . . . . . . . . . . . . . . . . . . . . . . . . . . . . . . . . . . . . . . . . . . . . . . . . . . . . . . . . . . 88
4

Team F unctions 90
Introduction. . . . . . . . . . . . . . . . . . . . . . . . . . . . . . . . . . . . . . . . . . . . . . . . . . . . . . . . . . . . . . . . 90
■ Explanation of Keys . . . . . . . . . . . . . . . . . . . . . . . . . . . . . . . . . . . . . . . . . . . . . . . . . . . . . 90
■ Team Configuration . . . . . . . . . . . . . . . . . . . . . . . . . . . . . . . . . . . . . . . . . . . . . . . . . . . . . 92
Examples of Use. . . . . . . . . . . . . . . . . . . . . . . . . . . . . . . . . . . . . . . . . . . . . . . . . . . . . . . . . . . . 92
■ Executive/Secretary Team . . . . . . . . . . . . . . . . . . . . . . . . . . . . . . . . . . . . . . . . . . . . . . . 93
■ Three-member Team . . . . . . . . . . . . . . . . . . . . . . . . . . . . . . . . . . . . . . . . . . . . . . . . . . . . 94
■ Unified Team . . . . . . . . . . . . . . . . . . . . . . . . . . . . . . . . . . . . . . . . . . . . . . . . . . . . . . . . . . . 96
■ Toggle Team . . . . . . . . . . . . . . . . . . . . . . . . . . . . . . . . . . . . . . . . . . . . . . . . . . . . . . . . . . . 97
Call Queue 99
Introduction. . . . . . . . . . . . . . . . . . . . . . . . . . . . . . . . . . . . . . . . . . . . . . . . . . . . . . . . . . . . . . . . 99
■ Activation of Queues . . . . . . . . . . . . . . . . . . . . . . . . . . . . . . . . . . . . . . . . . . . . . . . . . . . 100
■ Call Forwarding . . . . . . . . . . . . . . . . . . . . . . . . . . . . . . . . . . . . . . . . . . . . . . . . . . . . . . . 100
■ Pickup . . . . . . . . . . . . . . . . . . . . . . . . . . . . . . . . . . . . . . . . . . . . . . . . . . . . . . . . . . . . . . . 101
■ Hunt Groups . . . . . . . . . . . . . . . . . . . . . . . . . . . . . . . . . . . . . . . . . . . . . . . . . . . . . . . . . . 101
Examples of Use. . . . . . . . . . . . . . . . . . . . . . . . . . . . . . . . . . . . . . . . . . . . . . . . . . . . . . . . . . . 101
■ Enquiry Station for an Operator with Two System Telephones . . . . . . . . . . . . . . . 101
■ Group of Three Enquiry Stations. . . . . . . . . . . . . . . . . . . . . . . . . . . . . . . . . . . . . . . . . 103
Multi-Company Variant 105
Configuring the Multi-Company Variant . . . . . . . . . . . . . . . . . . . . . . . . . . . . . . . . . . . . . . 106
■ Activating the Multi-Company Variant . . . . . . . . . . . . . . . . . . . . . . . . . . . . . . . . . . . . 106
■ Configuring and Managing Companies . . . . . . . . . . . . . . . . . . . . . . . . . . . . . . . . . . 107
■ Assigning Users . . . . . . . . . . . . . . . . . . . . . . . . . . . . . . . . . . . . . . . . . . . . . . . . . . . . . . . 107
5

■ Assigning Trunk Groups . . . . . . . . . . . . . . . . . . . . . . . . . . . . . . . . . . . . . . . . . . . . . . . . 108
■ Allocating Routing Codes . . . . . . . . . . . . . . . . . . . . . . . . . . . . . . . . . . . . . . . . . . . . . . 108
■ Configuring the Company Exchange. . . . . . . . . . . . . . . . . . . . . . . . . . . . . . . . . . . . . 109
Working with the Multi-Company Variant . . . . . . . . . . . . . . . . . . . . . . . . . . . . . . . . . . . . . 109
■ Company Telephone Book. . . . . . . . . . . . . . . . . . . . . . . . . . . . . . . . . . . . . . . . . . . . . . 109
■ Making Calls Between Companies . . . . . . . . . . . . . . . . . . . . . . . . . . . . . . . . . . . . . . 110
■ Billing Charges per Company . . . . . . . . . . . . . . . . . . . . . . . . . . . . . . . . . . . . . . . . . . . 110
Configuring the PC Software 111
Setting up TAPI. . . . . . . . . . . . . . . . . . . . . . . . . . . . . . . . . . . . . . . . . . . . . . . . . . . . . . . . . . . . 111
Setting up NET CAPI . . . . . . . . . . . . . . . . . . . . . . . . . . . . . . . . . . . . . . . . . . . . . . . . . . . . . . . 113
Using the Systray Display . . . . . . . . . . . . . . . . . . . . . . . . . . . . . . . . . . . . . . . . . . . . . . . . . . . 114
Browser for Telefonie-Assistent and Comfort Pro A Hotel . . . . . . . . . . . . . . . . . . . . . . . 115
Setting up Video Telephony . . . . . . . . . . . . . . . . . . . . . . . . . . . . . . . . . . . . . . . . . . . . . . . . . 116
Synchronising the PC Clock . . . . . . . . . . . . . . . . . . . . . . . . . . . . . . . . . . . . . . . . . . . . . . . . 117
Address Queries using LDAP . . . . . . . . . . . . . . . . . . . . . . . . . . . . . . . . . . . . . . . . . . . . . . . 118
T-Sinus 61data/T-Sinus 620data on the T-Comfort 930 DSL . . . . . . . . . . . . . . . . . . . 119
■ General Information. . . . . . . . . . . . . . . . . . . . . . . . . . . . . . . . . . . . . . . . . . . . . . . . . . . . 119
■ Installation and Configuration . . . . . . . . . . . . . . . . . . . . . . . . . . . . . . . . . . . . . . . . . . . 119
■ Technical Data . . . . . . . . . . . . . . . . . . . . . . . . . . . . . . . . . . . . . . . . . . . . . . . . . . . . . . . . 120
Configuration Guide 121
Overview . . . . . . . . . . . . . . . . . . . . . . . . . . . . . . . . . . . . . . . . . . . . . . . . . . . . . . . . . . . . . . . . . 122
PBX Ports . . . . . . . . . . . . . . . . . . . . . . . . . . . . . . . . . . . . . . . . . . . . . . . . . . . . . . . . . . . . . . . . . 123
LAN . . . . . . . . . . . . . . . . . . . . . . . . . . . . . . . . . . . . . . . . . . . . . . . . . . . . . . . . . . . . . . . . . . . . . . 124
WAN Settings . . . . . . . . . . . . . . . . . . . . . . . . . . . . . . . . . . . . . . . . . . . . . . . . . . . . . . . . . . . . . 125
6

RAS Settings . . . . . . . . . . . . . . . . . . . . . . . . . . . . . . . . . . . . . . . . . . . . . . . . . . . . . . . . . . . . . . 126
Branch Settings . . . . . . . . . . . . . . . . . . . . . . . . . . . . . . . . . . . . . . . . . . . . . . . . . . . . . . . . . . . 127
E-mail Function. . . . . . . . . . . . . . . . . . . . . . . . . . . . . . . . . . . . . . . . . . . . . . . . . . . . . . . . . . . . 128
E-mail Access . . . . . . . . . . . . . . . . . . . . . . . . . . . . . . . . . . . . . . . . . . . . . . . . . . . . . . . . . . . . . 129
Frequently Asked Questions 130
General/Hardware. . . . . . . . . . . . . . . . . . . . . . . . . . . . . . . . . . . . . . . . . . . . . . . . . . . . . . . . . 131
Telephony . . . . . . . . . . . . . . . . . . . . . . . . . . . . . . . . . . . . . . . . . . . . . . . . . . . . . . . . . . . . . . . . 132
DECT . . . . . . . . . . . . . . . . . . . . . . . . . . . . . . . . . . . . . . . . . . . . . . . . . . . . . . . . . . . . . . . . . . . . 134
LAN . . . . . . . . . . . . . . . . . . . . . . . . . . . . . . . . . . . . . . . . . . . . . . . . . . . . . . . . . . . . . . . . . . . . . . 135
Internet . . . . . . . . . . . . . . . . . . . . . . . . . . . . . . . . . . . . . . . . . . . . . . . . . . . . . . . . . . . . . . . . . . . 136
More Questions? . . . . . . . . . . . . . . . . . . . . . . . . . . . . . . . . . . . . . . . . . . . . . . . . . . . . . . . . . . 138
Technical Specifications 139
Index 142
7

8

Features
Features
The T-Comfort 930 DSL is a communications system for integrated voice and data communication. The out-
standing feature of this communications system is its modular structure:
■ Even with the smallest T-Comfort 930 DSL version, it is possible to use all the most important communi-
cations applications. The basic module enables telephony with system telephones, ISDN telephones and
analogue terminals, Internet / intranet data communication, CTI applications, sub-system operation and
system configuration using a standard Web browser.
The expansion module of the T-Comfort 930 DSL provides three slots for further interface cards. Using
different combinations of interface cards, the configuration of the T-Comfort 930 DSL can be tailored ex-
actly to your communications requirements. The need for additional U
S
ports or more a/b ports can be met using one or more interface cards without changing the system.
0
■ The base module of the T-Comfort 930 DSL’s version 1can be expanded to connect an door entrance
ports supporting DECT, further
pn
intercom and a serial interface. For a T-Comfort 930 DSL version 2 we recommend to connect a Doorline
entrance intercom (see Intercom System (for a/b) starting on page 42).
■ You can use an additional insertable memory card (CompactFlash) to operate further program packages.
■ Another special interface card provides an internal U-R2 compatible T-DSL modem. Additional infor-
mation can be found in the corresponding user manual of the DSL modem.
Cascading
Using the expansion module, the T-Comfort 930 DSL can be cascaded with a second T-Comfort 930 DSL
communications system.
Tel ep ho ny
The T-Comfort 930 DSL communications system is designed to be connected to an ISDN basic access using
the DSS1 protocol. System access (point-to-point) and multi-terminal access (point-to-multipoint) are both
supported. The two forms of access can be configured in parallel.
For this purpose
■ the T-Comfort 930 DSL basic module includes two S
switched between internal/external),
ports (one external one and one that can be
0
9

Features
■ the T-Comfort 930 DSL expansion module with additional interface cards provides up to eight further S
ports (switchable between internal/external). An overview of the available cards can be found under
Interface Cards starting on page 31,
The firmware of the T-Comfort 930 DSL is designed for configuring up to 300 users.
You can connect the following devices to the T-Comfort 930 DSL:
■ analogue terminals
■ Euro-ISDN terminals
■ T-Comfort 630, T-Comfort 730 and T-Comfort 830 system telephones
■ Comfort Pro P 100, Comfort Pro P 300 and Comfort Pro P 500 system telephones
■ T-Comfort 730 DECT base stations
■ T-Comfort 830 handsets/Comfort Pro CM 300 handsets (via a T-Comfort 730 DECT base station on the
DECT-enabled U
port of an interface card)
pn
0
An S
port can be used by Euro-ISDN terminals working in accordance with DSS1.A Upn port is suitable for
0
the T-Comfort 630/730/830 Comfort Pro P100/300/500 system telephones. T-Comfort 730 DECT base sta-
tions can also be connected to the DECT-enabled U
ports on interface cards. An analogue port is used by
pn
standard analogue devices.
If the CNIP (calling name identification presentation) feature is supported by your network provider, the latter
will show you the name of callers in addition to their number for each incoming trunk call. The T-Comfort
930 DSL supports the display of the name on system telephones. However, if you have created an entry in the
telephone book of the T-Comfort 930 DSL under the number of the caller, this will be displayed instead.
The T-Comfort 930 DSL can be integrated into an existing network (LAN) and be used by all workstations as
an Internet access router and mail client.
Configuration and programming of the T-Comfort 930 DSL is performed by means of a special Web browser
(known as the “Web console”), which can be run on a connected PC.
The T-Comfort 930 DSL can be configured and maintained from the T-Com service centre via remote access.
A PC can be connected via a retrofitted V.24 module (only possible on the T-Comfort 930 DSL version 1) to
the COM port for the purpose of configuring the system or transferring connection data.
10

Features
To connect the T-Comfort 930 DSL to existing company hardware, two “actor” ports (output) and three
“sensor” ports (input) can be provided by retrofitting a doorstation module (only possible on the
T-Comfort 930 DSL version 1). For example, this can be used to operate a door opener and a doorbell via the
T-Comfort 930 DSL (this requires additional equipment).
The T-Comfort 930 DSL allows you to use CTI (Computer Telephony Integration) applications made by other
manufacturers. This requires installation of a TAPI driver on a Windows PC (see Setting up TAPI starting on
page 111). The T-Comfort 930 DSL also has an integrated dialling wizard: the Telefonie-Assistent. Via the
Telefonie-Assistent users can call up and use telephone functions on PCs without first having to install a
special TAPI driver.
The T-Comfort 930 DSL complies with the regulations for telecommunications equipment. The DSS1 pro-
tocol is implemented.
Packet data in the D channel
Some business applications, for instance POS terminals, cash registers or credit card terminals, require a per-
manent data connection over the X.25 packet data network. Packet data transfer through the ISDN D channel
(according to X.31 via SAPI 16) can also be established between several S
interfaces of the T-Comfort
0
930 DSL. Simultaneous connections are distinguished by means of a TEI (Terminal Endpoint Identifier).
X.31 packet data can be forwarded between two S
interfaces (for instance an internal and external S0
0
interface). Equally, data can be forwarded (“routed”) over permanent Q.SIG lines. It is possible to operate mul-
tiple terminals with the same TEI on different internal S
connections to be routed to the same external S
0
interfaces. A TEI mapping table allows these X.31
0
interface.
The routing table for X.31 packet data is set in the Configurator under PBX Configuration: X.31. Additional
information can be found in the Configurator online help files.
Internet Access
It is possible to connect individual PCs to the T-Comfort 930 DSL via the internal S
ports, or to connect an
0
entire LAN to the T-Comfort 930 DSL via the Ethernet port. These PCs can access the Internet via the
T-Comfort 930 DSL. If Internet access is already available from an Internet service provider, this can be con-
figured in the T-Comfort 930 DSL. If the client network is not IP-capable, the T-Comfort 930 DSL can admin-
ister the IP configuration necessary for Internet access. The T-Comfort 930 DSL has an integrated DHCP
server and a DNS server, which in this case take over IP address administration and name resolution for the
client PCs.
11

Features
The T-Comfort 930 DSL enables Internet access for all connected PCs by means of a common IP address.
Only this is externally visible. The local IP addresses of the client PCs are translated to the IP address of the
T-Comfort 930 DSL by network address translation (NAT). In this way the client PCs in the LAN cannot be
reached directly from the Internet. This protects them from direct external attack. The LAN is additionally pro-
tected by the T-Comfort 930 DSL filter lists, which can be customised individually (firewall function).
N
Note: We recommend you to read through the explanations under Useful Information
on Internet Access starting on page 74.
DECT Data Communication
The T-Sinus 61data, T-Sinus 620data or the T-Comfort 830 handset enable PCs that are not connected to the
T-Comfort 930 DSL via the internal S
make full use of all the Internet and e-mail features of the T-Comfort 930 DSL.
Data is transmitted via the internal data interface of the T-Comfort 830 handset. For this the handset is con-
nected via a supplied adapter with the serial port of the PC. The Internet can then be accessed directly via the
remote data transfer (i.e. dial-up) network. The T-Comfort 830 handset sets up a data connection with the
T-Comfort 930 DSL via the DECT air interface. The remainder of the connection set-up is either direct -
through an ISDN B-channel - or indirect - through the internal RAS access of the T-Comfort 930 DSL. Indirect
RAS access is preferable. This uses the routing function of the T-Comfort 930 DSL and thus also the security
features of the shared Internet access.
Using the T-Sinus 61data/T-Sinus 620data a PC can set up an ISDN data connection via DECT. The
T-Sinus 61data/T-Sinus 620data is connected to the PC via the USB interface.
ports or the Ethernet interface to access the Internet. These PCs can
0
For detailed information on the installation of the required driver software and the various types of configu-
ration, refer to the chapter T-Sinus 61data/T-Sinus 620 data on the T-Comfort 930 DSL starting on
page 119 and the user guide for the T-Comfort 830 handset. For information on configuration of the
T-Comfort 830 handset with a data interface, please refer to the online help documentation of the
T-Comfort 930 DSL.
E-mail
The T-Comfort 930 DSL has an integrated e-mail function that is able to use the POP3, APOP or IMAP4 pro-
tocols to check the Internet service provider for incoming mail. When configuring the T-Comfort 930 DSL, e-
mail account query can be configured for every member of staff. The T-Comfort 930 DSL then fetches the
incoming e-mail headers (subjects) and senders from the mail server at set intervals, and forwards them to
users’ system terminal.
12

Features
E-mail accounts for the sending e-mail can also can be configured for users. E-mails can then, for example, be
sent directly from the Telefonie-Assistent to other users. In addition, users who have had a voicebox con-
figured for themselves, can let themselves be notified of new voicebox messages via e-mail.
Important events and errors are kept by the T-Comfort 930 DSL in an internal log book: the error store. To
inform or alert the system administrators, entries in the log book (system messages) can be sent via e-mail.
Further Network Features
You can offer staff the possibility of dialling into the LAN by means of RAS access.
A LAN-to-LAN link can also be implemented by ISDN. In this way two T-Comfort 930 DSLs can connect their
LANs by dial-in on demand.
A NET-CAPI program (driver software on the system CD-ROM) allows you to use ISDN functions on those PCs
that do not possess a built-in ISDN card.
Further Telephony Features
Installing an extra memory card allows you to operate a digital voice memory and voice information system.
For more information, refer to the user guides called “Comfort Pro A IAB (integrated answering machine)”
and “Comfort Pro A IAM (interactive call manager)”.
You can optimise your telephone communication by using the team functions and the call-queuing function.
With an additional licence, the web application “Comfort Pro A IVE (integrated connection data recording)”
can be used. This web application enables you to register and store telephony connections and evaluate the
connections with user defined filters. Further information can be found in the online help of the web console.
You can connect two T-Comfort 930 DSL communications system with each other (cascading). Using PBX
cascading you can increase the number of connectible devices in a simple way.
As your company’s requirements grow, the T-Comfort 930 DSL can be networked with other telecom
systems. The T-Comfort 930 DSL can then operate as a sub-system or DECT server. To operate the system as
a DECT server the system’s U
ports must be DECT-capable. It is also possible to create a telecom system
pn
with several networked telecom installations.
Glossary
Refer to the explanations in the glossary (supplied as a PDF file on the system CD).
13

Factory Settings on Delivery Telephony Functions
Factory Settings on Delivery
The following basic settings and features are active on delivery. We recommend that you configure the
T-Comfort 930 DSL to your individual requirements before putting it into operation (see Configuration
starting on page 53).
The factory settings apply to smallest version of the T-Comfort 930 DSL (only with the basic module). If an
expansion module with interface cards exists, the additional interfaces are initially unconfigured. You must
therefore first configure the slots of the expansion module to commission the interfaces.
Telephony Functions
■ The S
■ System telephones with the telephone numbers 30 to 32 are configured on the three U
■ Analogue terminals with the telephone numbers 10 to 13 are configured on the four a/b ports.
■ The T-Comfort 930 DSL is configured ready for operation in Germany.
■ Analogue devices: The dialling mode (pulse dialling or DTMF) is automatically detected.
■ All corded terminals connected to the basic module ring when there are incoming external calls.
■ The system PIN, for example for remote-programmable call diversion, is set at “0000”.
1 port is configured as a multi-terminal connection, and the S02 port as a system port.
0
pn
ports.
Authorisations
The use of functions by a terminal on the T-Comfort 930 DSL is regulated by means of authorisations. Author-
isation is configured by means of user groups to which the users with their terminals are then assigned.
Three user groups are preset: “Administrators”, “Standard” and “Guests”. “Administrators” have access to all
functions of the T-Comfort 930 DSL and unrestricted configuration rights. Users in the “Guests” group cannot
configure the T-Comfort 930 DSL, are not able to make external calls, and have only restricted use of the ter-
14

Authorisations Factory Settings on Delivery
minal functions of the T-Comfort 930 DSL. The “Standard” user group, because of its default settings, is well
suited as a starting point for the creation of user groups for normal users of the system (e.g. the staff members
of a company).
N
Note: When the T-Comfort 930 DSL is commissioned, all connected terminals are ini-
tially in the “Administrators” group until a user logs on to the Web console. Subse-
quently, all terminals are automatically in the “Guests” group (see also the chapter
entitled Configuring the T-Comfort 930 DSL starting on page 56). For more details on
the configuration of user groups, refer to the online help in the chapter entitled “User
Manager”.
The following terminal functions are factory preset to the “Administrators” group:
■ External line access: international numbers can be dialled from all configured telephones. External lines
must be seized by entering a prefixed code.
■ Least cost routing is not active. As soon as LCR is configured, users can make calls via individually
selected providers.
■ “VIP call” is activated.
■ Announcements to system telephones are possible.
■ Baby calls can be configured.
■ If a call key is configured for a user on more than one terminal, he can program this key for more than one
outgoing call, i.e. he can use his various terminals to make parallel calls from this telephone number.
■ “Pick-up” and “Pick-up selective” of calls from other telephones are activated. Pick-up protection is deac-
tivated.
■ “Call removal” is deactivated.
■ Callback (on busy) can be activated.
■ If more than one terminal is configured for a user under the same number, they can suppress the sig-
nalling of calls on the parallel terminals.
■ Function “Reaction: Connection will be disconnected” is deactivated as callers trying to reach a terminal
that cannot be reached or is busy will hear a busy signal.
15

Factory Settings on Delivery Authorisations
■ The “call queue” function is deactivated.
■ Call forwarding to internal or external numbers can be activated. Call forwarding after delay is executed
after 20 seconds. Door calls and MSN groups can be forwarded. Call forwarding for other users and call
forwarding by other users are deactivated.
■ It is possible to transfer an external call to an external subscriber.
■ Three-party conferences can be set up.
■ Connections can be parked.
■ Call protection can be activated, call-waiting protection, announcement protection and pick-up protection
can not be activated.
■ Transmission of one’s own phone number (MSN or system access number) can be suppressed on a per-
call basis.
■ The telephone lock can be activated. The terminal PIN is “0000”.
■ Interception of “malicious” callers is possible if this feature has been ordered from the network operator.
■ The white list, black list and call filters are not preconfigured and thus not active. If these lists are con-
figured, they can be activated for the user groups. A special list with emergency telephone numbers is
preset and activated.
■ Call lists on terminals list internal calls, external calls, calls from the door and calls that the user received
while they were telephoning.
■ Function keys can be programmed on system telephones, no keys are locked.
■ The evaluation of connection data by external cost-recording programs is deactivated.
■ The cost multiplier is set to 100%, i.e. the costs are not multiplied by any factor. There are no preset basic
amounts for the charging of calls.
■ Speed dialling is possible if this has been configured in the T-Comfort 930 DSL central telephone book.
■ Keypad dialling can be used.
■ The door opener can be activated from all terminals. Door calls can be forwarded.
■ Time control is not active as there are no time groups configured.
16

Internet Functions Factory Settings on Delivery
■ Call diversion for SMS calls in the fixed-line network is not activated.
■ Calls can be marked with a booking number for the purpose of project based accounting.
■ Users can use the Telefonie-Assistent to send short messages to other users.
■ Every user can change the configuration of the T-Comfort 930 DSL.
■ Every user can create a personal telephone book and edit entries in the central telephone book.
■ Every user can read out the charges.
■ Applications requiring a license (e.g. Comfort Pro A IVE) can be used after being activated.
■ Access via RAS is not allowed.
■ E-mail notification to system terminals is possible. There are no user accounts configured for the sending
of e-mails, the authorisation for sending e-mails is not deactivated.
■ The multi-company variant is not activated.
Internet Functions
■ RAS access (with or without callback) can be set up for every T-Comfort 930 DSL user. RAS access
requires activation of the RAS authorisation.
■ More than one mail account query can be set up for every user.
■ Every user with a system terminal can be informed automatically of the receipt of e-mails.
■ Users can disconnect existing Internet connections (via the T-Comfort 930 DSL Web console and from a
system terminal if the function has been configured on that terminal).
The following IP addresses are preset for the network configuration:
■ Host name: host
■ IP address: 192.168.99.254
■ Network mask: 255.255.255.0
17

Factory Settings on Delivery Internet Functions
The following addresses are transmitted to the client PCs in the LAN via DHCP or PPP:
■ Gateway address: 192.168.99.254
■ Domain name: domain
■ Domain name server: 192.168.99.254
■ PPP addresses: 192.168.100.0 to 192.168.100.10
■ DHCP addresses: 192.168.99.129 to 192.168.99.148
You can change the IP settings in the Configurator. Check with the network administrator responsible for the
LAN if you wish to do this.
18

Scope of Delivery Installation
Installation
Scope of Delivery
The delivery consists of:
■ One T-Comfort 930 DSL communications system in a basic version (with a basic module)
■ One connection cable for the ISDN S
■ One set of mounting screws and wall plugs
■ One plug-in power supply (of the TR25240-E-01A13 type) to supply the basic module
■ One set of short user guides
■ One CD including the complete documentation and software
The T-Comfort 930 DSL expansion set consists of:
■ One expansion module
■ One AC adapter with a connection cable to supply the expansion module with power
■ One mounting set with which to install the expansion module and the AC adapter in the
T-Comfort 930 DSL housing
■ One (short) Ethernet connection cable with which to connect the basic module to the expansion module.
port
0
Safety Precautions
S
Please note: Installation and maintenance should only be performed by specially
trained personnel. Always remove the power plug and the plug-in power supply from
the mains socket before connecting devices to the T-Comfort 930 DSL ports.
19

Installation Safety Precautions
DANGER! This device contains hazardous voltages. To make the system power-
S
The T-Comfort 930 DSL may only be plugged into mains sockets with a protective earth conductor. Mount the
T-Comfort 930 DSL only close to easily accessible sockets.
Only use the original plug-in power supply: No. 4512699 (TR25240-E-01A13 type) for the basic module.
The housing cover may only be opened by authorised personnel. Unauthorised opening of the housing cover
and improper repair may damage the T-Comfort 930 DSL and invalidate the warrantee.
less, remove the power plug and the plug-in power supply from the socket.
Caution!
Static charges can damage the T-Comfort 930 DSL. Make sure you discharge yourself
and your tools before and while installing electrical and electronic components of the
T-Comfort 930 DSL.
Only devices that deliver safety extra-low voltage (SELV) may be connected to the T-Comfort 930 DSL. Proper
use of authorised devices meets this requirement.
Only devices meeting the technical requirements may be connected to the analogue ports. For details, refer
to the section entitled a/b Ports starting on page 36.
Use a shielded Ethernet cable (STP cable, Shielded Twisted Pair cable) to connect the T-Comfort 930 DSL to
a Local Area Network (LAN).
Do not allow any fluid to penetrate the T-Comfort 930 DSL, because this may cause electric shocks or short
circuits.
Do not install the T-Comfort 930 DSL during a storm. Do not connect or disconnect lines during a storm.
The T-Comfort 930 DSL is designed for indoor use only. Lay the cables so that they cannot be walked on or
tripped over.
The connection of external devices to the sensor/actor should be performed by a qualified electrician.
20

Mounting Location Installation
Mounting Location
The ambient temperature for operating the T-Comfort 930 DSL must be between +5 and +40°C. The power
supply must be 230 V/50 Hz AC. A separate fuse for the power supply is recommended.
To maintain the prescribed ambient temperature, mount the T-Comfort 930 DSL in a well-ventilated location,
away from direct sources of heat.
Do not position the T-Comfort 930 DSL
■ in front of or above heat sources such as radiators,
■ in direct sunlight,
■ behind curtains,
■ in small, unventilated, damp rooms,
■ on or near inflammable materials,
■ or near high-frequency devices such as transmitters, X-ray or similar apparatus.
Use a separate 230 V power circuit and install overvoltage protection.
Wall Mounting
The T-Comfort 930 DSL is mounted on the wall with three screws as shown in this diagram:
A
332
BC
184
134
D
Mounting plan
21

Installation Installing an Expansion Set
To fasten the screws at points B and C, remove the cover of the T-Comfort 930 DSL and insert the screws in
the holes provided for this purpose. The T-Comfort 930 DSL is suspended from the screw at point A, so there
must be a space of 3 mm between the screw and the wall.
Installing an Expansion Set
You can either install the expansion module when you first assemble the system or later as part of a system
upgrade. In both cases, follow the mounting sequence as described here:
1. Turn off the T-Comfort 930 DSL. Unplug the plug-in power supply from the socket. You should not install
the expansion module or install or uninstall additional interface cards while the T-Comfort 930 DSL is
turned on.
2. Open the housing cover of the T-Comfort 930 DSL. In this case, carefully follow the Safety Precautions
starting on page 19.
The existing basic module is mounted in the left half of the housing. No components may be mounted in
the right half of the housing.
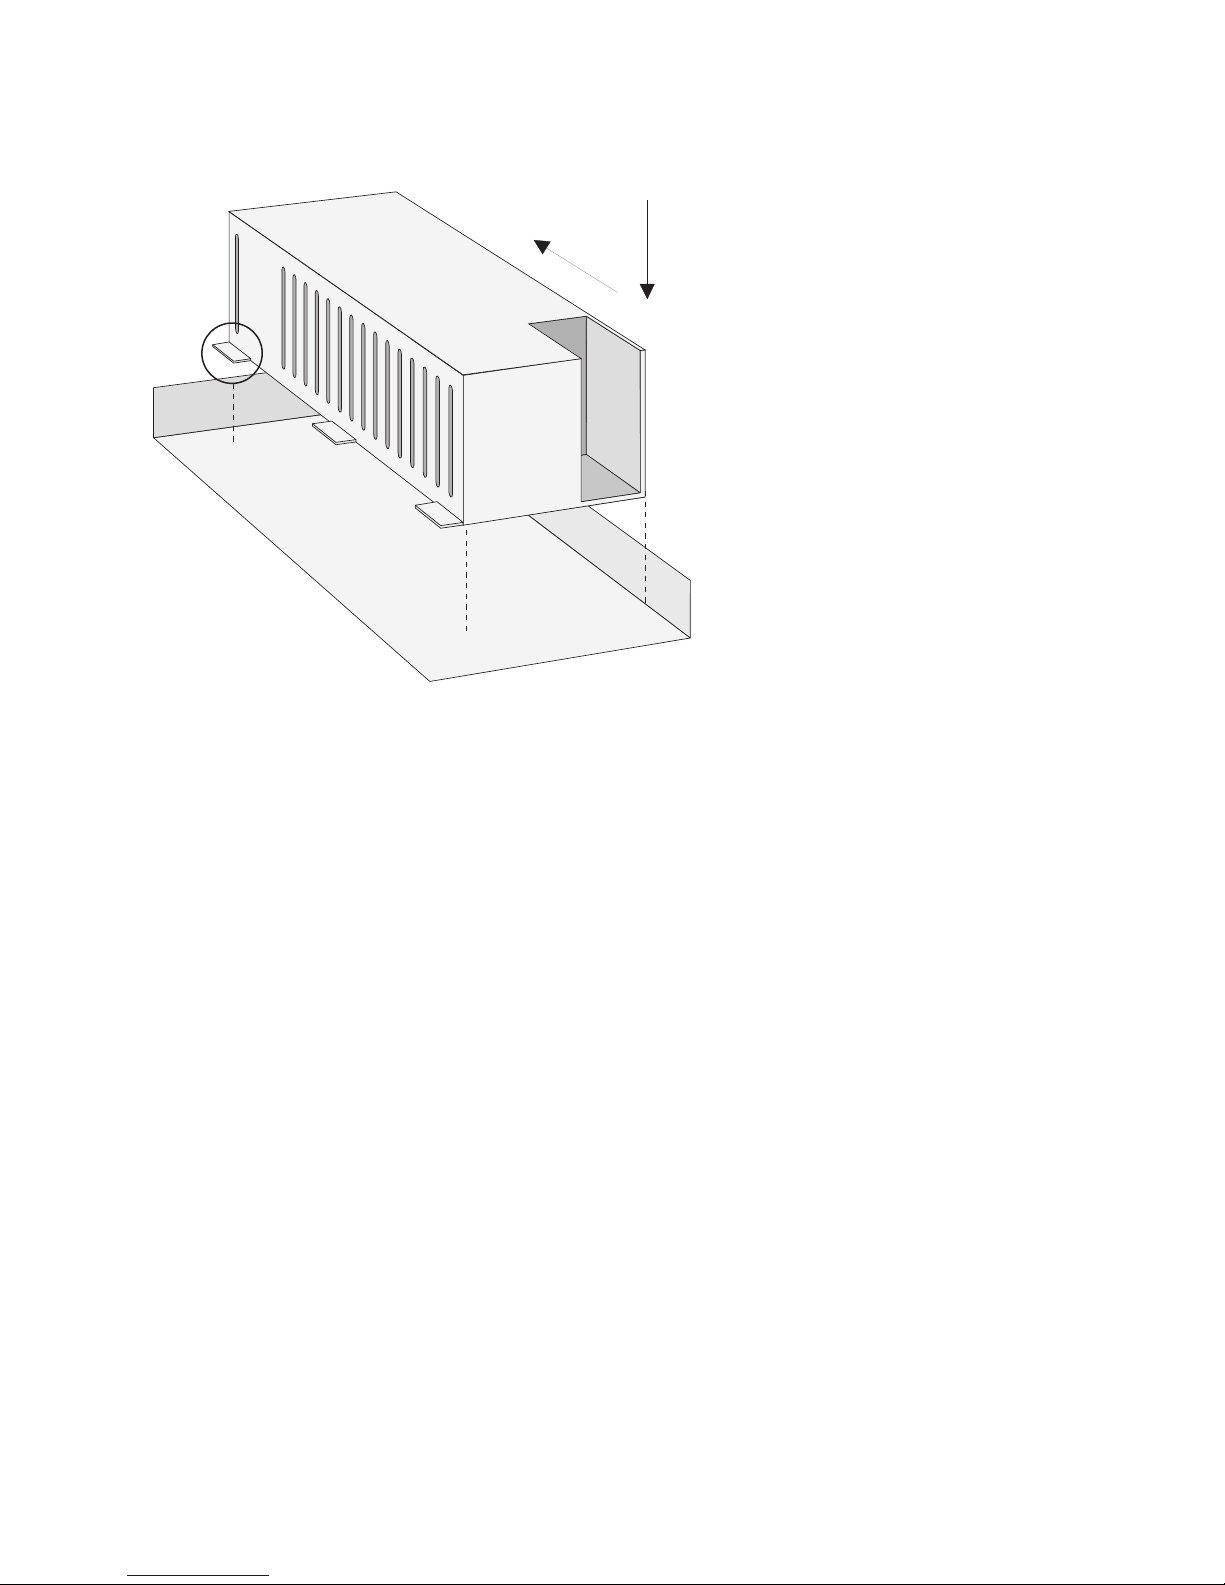
3. Place the expansion module in the intended mounting location in the right half of the housing. Be sure to
align the 96-pin connector properly to the socket on the basic module. Push the expansion module
towards the basic module so that both modules are securely connected to one another via the 96-pin con-
nector.
22

Installing an Expansion Set Installation
A
4
Slot 1 Slot 2 Slot 3
2
1
3
B
Installing the expansion module
4. Carefully press the expansion module at the top and bottom right, pushing it into the locking hooks pro-
vided (see “A” and “B” in the diagram). Secure the expansion module using the Phillips screws provided
in the expansion set (see “1” to “4” in the diagram).
23
Installation Installing an Expansion Set
2.
A
Installing the power supply for the expansion module
5. Place the power supply to the right of the expansion module. Carefully press the power supply into the
mounting recess provided (shown in the diagram as “1”). Move the power supply forwards until it snaps
1.
into place in all six pressure terminals (“A”, “2”).
6. Connect the power supply output (flat conductor cable) to the appropriate jack of the expansion module.
Insert the fully insulated connector of the mains supply in the power supply connection provided.
7. Establish an Ethernet connection between the LAN port of the basic module and the LAN1 port of the
expansion module (see also Positions of the Ports starting on page 30). To do this, use the short Ethernet
connection cable from the expansion set. The LAN0 port of the expansion module is intended for con-
nection to a corporate LAN. You can connect an existing Ethernet connection cable to the LAN0 port of
the expansion module.
You usually install at least one interface card on the expansion module. To do this, read the instructions in the
following section.
S
Please note: Two power supplies are provided for the T-Comfort 930 DSL with an ex-
pansion module. Always turn on the power supply of the expansion module first and
then plug in the plug-in power supply.
24

Installing Interface Cards Installation
Installing Interface Cards
The expansion module and the basic module of the T-Comfort 930 DSL Version 1 can be expanded using
interface cards.
Please note: Turn off the T-Comfort 930 DSL. Unplug the plug-in power supply and
S
V.24 and Doorstation Equipment Slots
the main supply from the socket. You must not install or uninstall interface cards while
the T-Comfort 930 DSL is turned on.
Doorstation
equipment
Slots on the basic module
(only T-Comfort 930 DSL Version 1)
The T-Comfort 930 DSL Version 1 has two smaller slots in which special interface cards can be operated
(V.24 and doorstation equipment). You can see the location of these slots in the diagram entitled Position of
the ports on the basic module (T-Comfort 930 DSL Version 1).
■ The doorstation equipment module provides two “actor” ports and three “sensor” ports.
■ The V.24 module provides a serial port.
Proceed as described below to install one or both of these interface cards:
V.24
1. Turn off the T-Comfort 930 DSL. Open the housing cover.
25

Installation Installing Interface Cards
2. Remove the slot card from the transport packaging. Check that it is the correct type of slot card. (There is
a sticker with the type name on the connector.)
Caution!
Static charges can damage electronic components. Pay attention to the regulations re-
garding the handling of electrostatically sensitive components.
3. Carefully insert the interface card in the slot provided. The component side must face to the right.
Ensure the plug-in connection is sitting securely.
4. Connect the required port cable to the corresponding pressure terminals or RJ45 jacks (see also
Positions of the Ports starting on page 30).
5. Close the housing cover. Turn on the T-Comfort 930 DSL.
You can query the status of the doorstation equipment module and the V.24 module in the Web console when
the T-Comfort 930 DSL is operational again. To do this, call up the PBX Configuration: Ports: Slots menu
page. The Status column in the table displays a green tick beside the name of the interface card.
Slots for Additional Interface Cards
The T-Comfort 930 DSL has three large slots in which you can operate interface cards. Each interface card is
connected to via two port jacks. The following properties characterise the large slots:
■ There is no prescribed order in which to use the jacks. You can, for example, therefore operate an
interface card in slot 3 even though slot 2 is not occupied.
■ Each of the slots is connected to a group of pressure terminals. Therefore there are also three pressure
terminal groups on the expansion module. To be able to distinguish these, all the pressure terminals in a
group are the same colour.
■ The slots are not of the same type. Therefore some of the available interface cards may not be operated in
all slots. Note the overview under Interface Cards starting on page 31.
26

Installing Interface Cards Installation
Type (name) of
interface card
Installing an interface card in an expansion module slot
Proceed as described below to install an interface card:
1. Turn off the T-Comfort 930 DSL. Open the housing cover.
2. Remove the slot card from the transport packaging. Check that it is the correct slot card type. There is a
sticker with the type name on the connector.
Caution!
Static charges can damage electronic components. Pay attention to the regulations re-
garding the handling of electrostatically sensitive components.
3. Carefully insert the interface card in the slot provided. The component side must face to the right.
Ensure the plug-in connection is sitting securely.
4. Connect the required port cable to the corresponding pressure terminals of the relevant pressure terminal
group (see also Positions of the Ports starting on page 30).
5. Close the housing cover and turn on the T-Comfort 930 DSL again.
27

Installation Available Ports
The software of the T-Comfort 930 DSL can detect the type of interface card present. The interface card must
still be configured individually for commissioning.
You can query the status of the interface cards in the Web console when the T-Comfort 930 DSL is opera-
tional again. To do this, call up the PBX Configuration: Ports: Slots menu page. The Status column of the
table displays a green tick beside the slot name (0/1, 0/2 and 0/3). The column of the table must list the
correct type of interface card.
Available Ports
The T-Comfort 930 DSL has the following ports (see also Positions of the Ports starting on page 30):
T-Comfort 930 DSL Version 1
The listed interfaces and ports are located on the basic module of the T-Comfort 930 DSL Version 1. Further
interfaces and ports can be added by installing the expansion set and additional interface cards (see
Installing an Expansion Set starting on page 22 and Installing Interface Cards starting on page 25).
■ One S
■ One switchable S
port to connect to an external S0 bus (usually the NTBA), designed as an RJ45 jack (S01)
0
port (S02), which can be connected as either an internal or external S0 bus. The
0
internal connection is via a pressure terminal and the external connection via an RJ45 jack.
■ Three U
■ Four analogue a/b ports, designed as pressure terminals (a/b1 to a/b4)
■ One slot to incorporate a doorstation equipment module. The following ports can be used with such a
ports, designed as pressure terminals (Upn1 to Upn3)
pn
card:
two actor ports for connection to a door opener and the intercom of doorstation equipment. These are de-
signed as pressure terminals (actor1 to activate a door opener and actor2 to activate doorstation equip-
ment);
three sensor ports for connection to the bell keys of doorstation equipment, designed as pressure termi-
nals (sensor 1 to sensor 3)
28

Available Ports Installation
■ One slot to incorporate a V.24 module. The following port can be used with the V.24 module:
one COM port to connect to a PC to configure and transmit connection data, designed as an RJ45 jack
■ One port to the LAN (10BaseT), designed as an RJ45 jack
■ One CompactFlash socket to incorporate a type I or type II CompactFlash memory card. These cards are
necessary to operate the internal answering machine. Only use high speed memory cards acquired with
the license. Other memory cards or “Microdrive” type memory cards may not be able to maintain the
required access speed.
■ One port jack to connect the plug-in power supply to power the basic module. Only use the original
T-Comfort 930 DSL plug-in power supply provided in the supply scope to power the basic module.
T-Comfort 930 DSL Version 2
The listed interfaces and ports are located on the basic module of the T-Comfort 930 DSL Version 1. Further
interfaces and ports can be added by installing the expansion set and additional interface cards (see
Installing an Expansion Set starting on page 22 and Installing Interface Cards starting on page 25).
■ One S
■ One switchable S
port to connect to an external S0 bus (usually the NTBA), designed as an RJ45 jack (S01)
0
port (S02), which can be connected as either an internal or external S0 bus. The
0
internal connection is via a pressure terminal and the external connection via an RJ45 jack.
■ Three U
■ Four analogue a/b ports, designed as pressure terminals (a/b1 to a/b4)
■ One CompactFlash socket to incorporate a type I or type II CompactFlash memory card. These cards are
ports, designed as pressure terminals (Upn1 to Upn3)
pn
necessary to operate the internal answering machine. Only use high speed memory cards acquired with
the license. Other memory cards or “Microdrive” type memory cards may not be able to maintain the
required access speed.
■ One port jack to connect the plug-in power supply to power the basic module. Only use the original
T-Comfort 930 DSL plug-in power supply provided in the supply scope to power the basic module.
29
Installation Available Ports
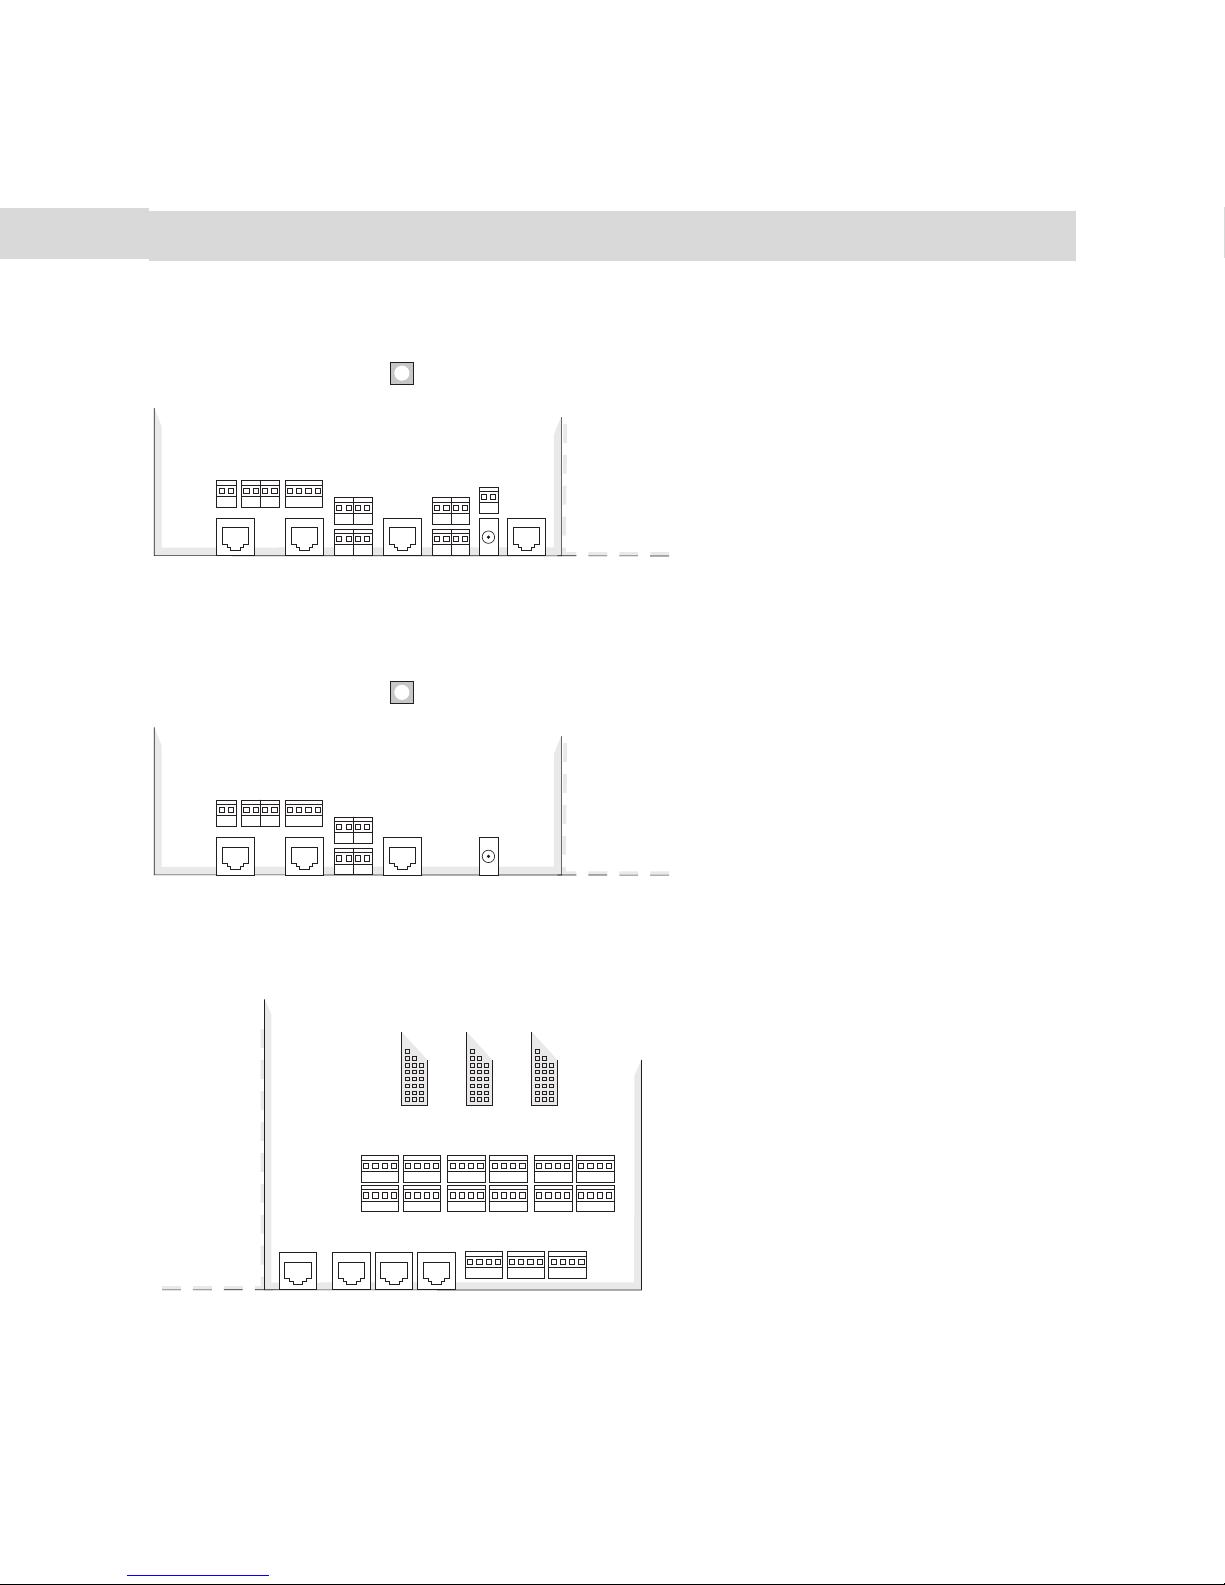
Positions of the Ports
The following diagrams show the positions of the ports:
Default setting
U
pn
Upn1
2+3
S02
a/b
3+4
Sensor
1+2
Sensor
3
RJ45
S
0
a/b
RJ45
1
2
S
0
LAN V.24
1+2
Actuator
1+2
DC
in
Position of the ports on the basic module (T-Comfort 930 DSL Version 1)
Default setting
U
pn
Upn1
RJ45
S
0
S02
2+3
1
RJ45
S
0
a/b
3+4
a/b
LAN
1+2
2
DC
in
Position of the ports on the basic module (T-Comfort 930 DSL Version 1)
Slot 1 Slot 2 Slot 3
1-1 1-2 2-1
2-2
3-1 3-2
1-3
PCM LAN 1 LAN 2 LAN 0
Position of the ports on the expansion module (T-Comfort 930 DSL)
30
1-4
2-3
1-5
2-4
2-5
3-3 3-4
3-5

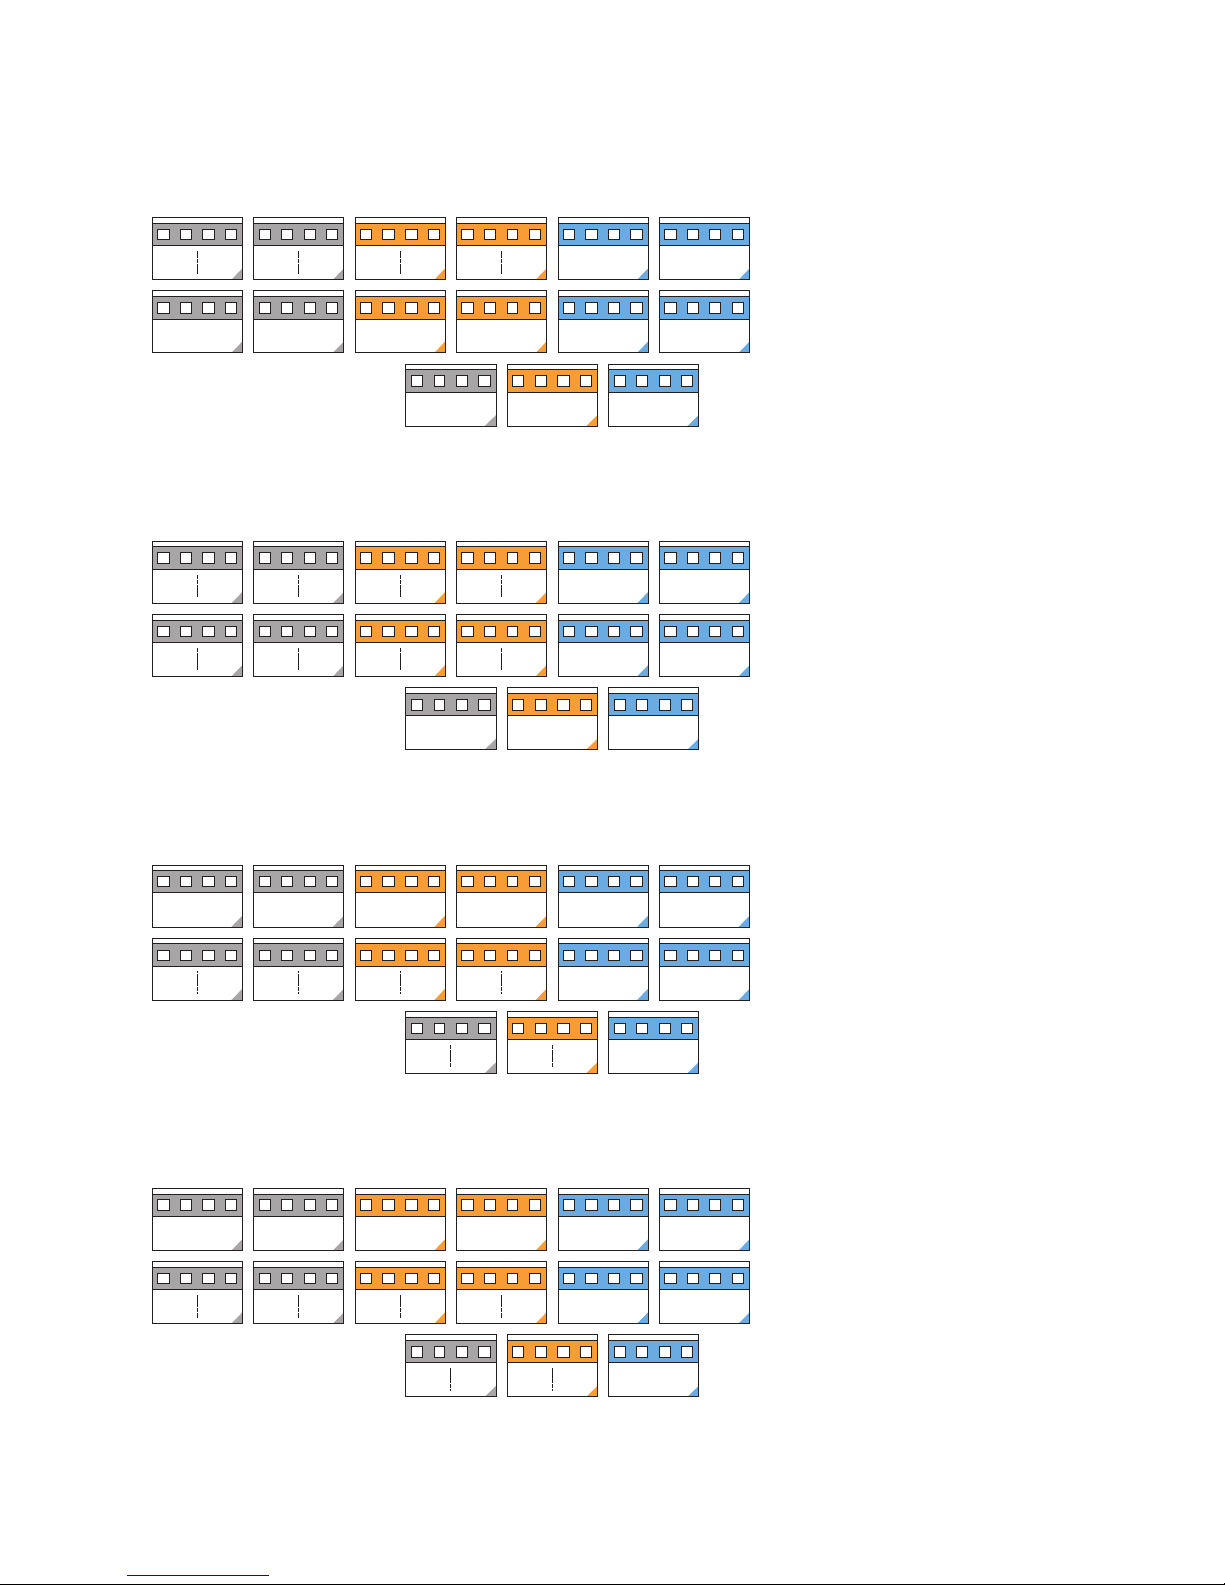
Interface Cards Installation
Interface Cards
The following overview shows the available interface cards.
Interface card Slots Special features
1 2 3
4 x S0 ● ● S
4 x U
8 x U
2 x S
● ● U
pn
● ● U
pn
and 6 x Upn ● ● U
0
are switchable internally/externally
0
are DECT-enabled
pn
are DECT-enabled
pn
are DECT-enabled
pn
S0 are switchable internally/externally
2 x S
and 6 x a/b ● ● S
0
4 x a/b
8 x a/b
DSL Modem for T-Comfort 930
● ● ●
● ● ●
● DSL modem
are switchable internally/externally
0
DSL
Slot 1 Slot 2 Slot 3
S01/1
S
1/3 S01/4
0
Ports: 4 x S
1/2
S
0
0
2/1 S02/2
S
0
S
2/3 S02/4
0
----
31
Installation Interface Cards
Slot 1 Slot 2 Slot 3
Upn1/1 Upn1/2 Upn1/4Upn1/3 Upn2/1 Upn2/2 Upn2/3 Upn2/4
-- -- -- --
----
Ports: 4 x Upn
Slot 1 Slot 2 Slot 3
Upn1/1 Upn1/2 Upn1/4Upn1/3
U
1/5 Upn1/6 Upn1/7 Upn1/8
pn
Ports: 8 x U
S0 1/1
U
1/1 Upn1/2 Upn1/3 Upn1/4
pn
pn
Slot 1 Slot 2 Slot 3
S
1/2
0
Ports: 2 x S0 und 6 x Upn
Upn2/1 Upn2/2 Upn2/3 Upn2/4
U
2/5 Upn2/6 Upn2/7 Upn2/8
pn
S0 2/1 S02/2
U
2/1 Upn2/2 Upn2/3 Upn2/4
pn
U
1/5 Upn1/6
pn
U
pn
----
2/5 Upn2/6
Slot 1 Slot 2 Slot 3
S0 1/1
ab 1/1 ab 1/2 ab 1/3 ab 1/4
1: S
1/2 S0 2/1 1: S02/2
0
ab 2/1 ab 2/2 ab 2/3 ab 2/4
ab 1/5 ab 1/6
Ports: 2 x S0 und 6 x a/b
32
ab 2/5 ab 2/6

Interface Cards Installation
Slot 1 Slot 2 Slot 3
ab 1/1 ab 1/2 ab 1/4ab 1/3 ab 2/1 ab 3/1ab 2/2 ab 3/2ab 2/3 ab 3/3ab 2/4 ab 3/4
-- -- -- -- -- --
------
Ports: 4 x a/b
Slot 1 Slot 2 Slot 3
ab 1/1ab 1/
2
ab 1/5ab 1/6ab 1/7ab 1/
ab 1/
3
ab 1/
4
8
ab 2/
1
ab 2/
5
ab 2/
2
ab 2/
6
Ports: 8 x a/b
Slot 1 Slot 2 Slot 3
DSL Modem for T-Comfort 930 DSL
ab 2/
3
ab 2/
7
ab 2/
4
ab 2/
8
ab 3/
1
ab 3/
5
ab 3/
2
ab 3/
6
ab 3/
3
ab 3/
7
------
a
U-R2
--
ab 3/
4
ab 3/
8
----
b
---
33

Installation Port Assignment, Termination, Cable Lengths
Port Assignment, Termination,
Cable Lengths
S0 Ports
Whether you use the switchable S
cations requirements and the existing basic accesses.
Note that the S
In the case of the T-Comfort 930 DSL, the S
port configuration in the Configurator on the Web console.
You can connect up to eight terminals on every internal S
without an external power supply. The length of the four-wire cable of an internal S0 bus must not exceed
150 m. The power consumption of each internal S
T-Comfort 930 DSL
IAE IAE
bus requires a terminating resistor of 100 ohms at each end.
0
ports for internal or external communication depends on your communi-
0
buses are terminated by software. You make this setting in the S
0
bus; up to three of the terminals can operate
0
bus is approx. 2 W.
0
TR
0
The S0 bus is terminated at one end by the T-Comfort 930 DSL.
IAE = ISDN socket (German: “ISDN Anschluss Einheit”) or an ISDN terminal.
TR = terminating resistor, the S
This can also be done by an appropriately wired IAE.
34
termination. The TR must be at the termination of the line.
0

Port Assignment, Termination, Cable Lengths Installation
T-Comfort 930 DSL
TRTR
IAE
IAE
The S0 bus is terminated by the TR at the ends.
1a
1b
2a
2b
TR
TR
Termination on an ISDN socket
S
Ports on Interface Cards
0
2a
S0int
2b 1a 1b
S0ext
1b 2a 2b
1a
12345678
Switchable S
You can add further S
12345678
port on a pressure terminal
0
ports to the T-Comfort 930 DSL by installing suitable interface cards in a slot. These
0
S0 ports can be switched between internal and external operation.
In contrast to the basic module, the expansion module does not provide any additional RJ45 jacks for external
S
ports. Therefore you can also use the pressure terminals of the expansion module for an external S0 port.
0
The port assignment of the pressure terminals is changed when the switch is made from internal to external
operation. This can be seen in the diagram.
35

Installation Port Assignment, Termination, Cable Lengths
Let us say you have activated an IAE on an internal S0 port, for example. If you switch
t
this S0 port to external operation, you require a crossed ISDN line to connect the IAE to
an NTBA. The assignment of a crossed line is described in the chapter PBX Networ-
king under Direct Connection starting on page 84.
Upn Ports
Each of the U
ports enable the connection of a T-Comfort 730 DECT base station, a T-Comfort 630/730/
pn
830 system telephone, or a Comfort Pro P 100/300/500 system telephone using a twin-wire cable.
The maximum permissible length of the twin-wire cable on a U
port is 500 m. This line may only be laid
pn
inside buildings.
The maximum permissible length of the twin-wire cable on a U
port of an interface card is 1,000 m when
pn
0.6 mm cable (with twisted pairs) is used.
The power consumption of each U
S0int
2b 1a 1b
2a
12345678
Upn/RFP with 1 U
12345678
RFP with 2 U
pn
pn
port is approx. 3 W.
pn
12345678
Pin assignment of the S
and Upnports
0
a/b Ports
The a/b ports are for operating analogue devices (e.g. a fax machine, modem or telephone). The maximum
permissible length of the cable is 1,000 m when twin-wire 0.6 mm cable (with twisted pairs) is used.
36

Port Assignment, Termination, Cable Lengths Installation
Doorstation equipment can be activated on an a/b1 port of a T-Comfort 930 DSL Version 1. In this case, an
electronic switch enables the low-frequency voltage to be separated from the feed.
Actor/Sensor
N
In order to operate an entrance intercom and door opener (only T-Comfort 930 DSL Version 1), you need four
twin-wire cables:
■ one cable between the entrance intercom and the a/b1 port,
■ one cable between the door opener and the Actor1 port,
■ one cable between the intercom input and the Actor2 port to activate the amplifier as well as
■ one cable between the doorbell and the sensor port.
Only use entrance intercoms and door openers complying with the German FTZ Guideline no. 123D12.
LAN Port
Note: With the T-Comfort 930 DSL Version 2 a door station of the type “DoorLine” can
be operated (see Intercom System (for a/b) starting on page 42).
The LAN port on the basic module enables integration of the T-Comfort 930 DSL into an existing in-house
LAN by means of a 10 Mbit hub.
The LAN ports on the expansion module (LAN0, LAN1 and LAN2) lead to the Ethernet switch of the
expansion module. These LAN ports support 10 Mbit/s and 100 Mbit/s transmission speeds in half- or full-
duplex operation. The change in transmission rate and mode of operation is automatic (“auto-sensing
function”). The switch is also automatic for connections which require a crossed LAN line. For this reason, you
can also use an uncrossed LAN line for a connection to another hub or switch.
A LAN line (twisted-pair line in accordance with 10BaseT or 100BaseTX) can be up to 100 m long. Secure
operation with 100 Mbit/s requires the use of category 5 lines and line sockets. Use a shielded Ethernet cable
(STP cable, Shielded Twisted Pair cable).
37

Installation Port Assignment, Termination, Cable Lengths
T-DSL Port
With the T-Comfort 930 DSL, an external T-DSL modem as well as an internal T-DSL modem (realized as a
special interface card) can be operated. Further explanations regarding the integrated U-R2 compatible DSL
modem can be found in the “DSL Modem for T-Comfort 930 DSL” manual.
External T-DSL modems can be connected via the LAN port. In the case of the T-Comfort 930 DSL, the output
of the T-DSL modem (NTBBA) is led to the LAN port of the T-Comfort 930 DSL via an external switch or hub.
The router subsequently converts the T-DSL protocol to the TCP/IP protocol of the LAN.
S
0
T-Comfort 930 DSL
S0Net
TCP/IP &
PPPoE
Hub
PC
TCP/IP
Netz
TAE
DSL & Uk
T-DSL
Splitter
DSL
T-DSL
Modem
0
Uk
NTBA
0
Crosslinked twisted pair cable
PPPoE
Connecting the T-Comfort 930 DSL to the network via T-ISDN and T-DSL
Connection of the T-DSL modem is via a crossover twisted-pair line. You can also use a switchable port on the
hub, which is usually indicated by an “X”.
Note: If an expansion module is installed, you can also use the unused LAN2 port to
N
activate the T-DSL modem. Due to the “auto-crossover” function, you do not require a
cross-wired line with a LAN port of the expansion module. If you are operating the
T-Comfort 930 DSL as a slave system in a cascaded PBX, the LAN0 port on the expan-
sion module of the slave system can be used instead (see PBX Cascading starting on
page 77).
38

Power Failure Installation
Power Failure
In the event of a power failure, all the contents in the memory (program and user data) are saved without
change. The internal clock continues to run for 24 hours. If the power failure lasts longer than 24 hours, the
time and date are reset to the factory setting when power is switched on again. When the first external out-
going call is made, the time and date are set to the current value as given by the exchange. With the
T-Comfort 930 DSL Version 2, date and time generally will be adjusted after the first outgoing connection.
On the multi-terminal access, the T-Comfort 930 DSL Version 1 include an emergency service. In the event of
a power failure, the external S
ephone to make a call.
Emergency operation on a system access is not possible.
1 port is switched over to the S02 port so that you can still use a connected tel-
0
39

Installation Connectible Devices
Connectible Devices
The T-Comfort 930 DSL ports already offer a large number of possibilities for connecting devices. By
installing additional interface cards, the number of ports can be increased as required.
One of the many possible configurations is shown in the following diagram.
Hub
Intercom / Relay
LAN
Sensor 1
S
1 ext
0
COM
Intercom / Door opener
R
NTBA
R
S0 2 int
Actuator
1 + 2
U
1/2
U
pn
pn
3/4
a/b
1/2
a/b
3/4
Example of port assignment of the T-Comfort 930 DSL with terminals
Internal/External S0Ports
All S
ports can be operated externally, i.e. on an ISDN network termination unit. The S02 port on the basic
0
module can also be connected internally. S
ports on interface cards can also be switched external/internal.
0
It is not possible to use both assignments simultaneously.
Up to eight devices per bus (ISDN telephones, ISDN fax machines, ISDN base stations, ISDN cordless tele-
phones, ISDN adapters for the PC among others) can be connected to the internal S
cables. The power for three of these devices can be supplied by the bus; if more devices are used, they then
require their own power supplies. The internal S
tocol (Euro-ISDN); the same features as with T-Net-ISDN from T-Com are supported.
40
ports by twin-pair
0
buses enable point-to-multi-point calls as per the DSS1 pro-
0

Connectible Devices Installation
Upn Ports
A system terminal can be connected to every U
The system telephones T-Comfort 630/730/830 and Comfort Pro P 100/300/500 are cord-bound system ter-
minals. The T-Comfort 730 DECT base station is required for the use of cordless system telephones (e.g. T-
Comfort 830 handset, Comfort Pro CM 300 or Sinus 61 S). The T-Comfort 830 handset features an USB port
on which you can transfer data and surf on the Internet.
Note: You can only operate DECT base stations on the ports of Upn interface cards.
port by a twin-wire cable.
pn
N
If this base station is connected to a U
the handsets. If the base station is connected to two U
However, note that only as many external connections are possible as there are externally connected B-
channels available.
a/b Ports
port of an interface card, four simultaneous calls are possible with
pn
ports, eight simultaneous calls are possible.
pn
The a/b ports a/b1 to a/b4 can be used for connecting analogue terminals. These can be for voice or data
communication, and use DTMF or pulse dialling, e.g.
■ analogue telephones
■ class 3 fax machines
■ analogue modems (external or internal)
■ external devices for music on hold
■ external voice mail systems.
Additional a/b ports can be provided by installing interface cards.
41

Installation Connectible Devices
Please note: Adhere to the following notes and recommendations regarding the con-
S
Analogue Telephones
If analogue telephones are to be used, we recommend the use of devices featuring voice-frequency (VF) sig-
nalling, as the additional features of the T-Comfort 930 DSL cannot be used with pulse dialling.
Modems
The maximum transmission rate for analogue modems is 33.6 kbit/s (V.34+).
Music on Hold
If you do not operate an external MoH device, the T-Comfort 930 DSL offers an internal MoH, which you can
load in the Web console Configurator in the SYS Configuration: Components menu. For details, refer to the
online Help.
nection of analogue devices. Devices not meeting the technical requirements of the
T-Comfort 930 DSL can cause damage to it.
S
Voice Mail
If you are using an external voice mail system, it must be capable of handling the number of digits used for
internal telephone numbers, e.g. five digits if you have configured five-digit internal numbers.
The external voice mail system can be connected to internal a/b ports as well as to internal S
port types the voice mail system can activate the notification for system terminals with the code procedures
*68 resp. #68.
Intercom System (for a/b)
The intercom systems “DoorLine T01/02” and “DoorLine T03/04” can be connected via the “DoorLine M06”
to any a/b port. The “DoorLine” module provides the actor for the door opener contact.
Observe the following when connecting:
■ The intercom system and the “DoorLine” module should be set to their factory settings.
Please note: Use only devices with an input impedance of 600 ohms, floating con-
nection, for external music on hold. Incorrect input impedance can cause irreparable
damage to the T-Comfort 930 DSL.
ports. For both
0
■ In the PBX Configuration: Ports: a/b: Change menu in the Configurator, select Doorstation 2-wire
under Type. Activate the Actuator option, if you want to use the actor port of the T-Comfort 930 DSL
42

Connectible Devices Installation
instead of the “DoorLine” relay. The “DoorLine” actor can be operated only when the speech channel is
open at the same time. The internal actor can be operated at any time.
■ The “DoorLine” intercom system has a number of bell keys to which you can assign different call numbers
in the PBX Configuration: Ports: Doorbell menu in the Configurator.
■ You can call the “DoorLine” intercom system by entering the code procedure *102.
■ The “DoorLine” intercom system can be connected to any a/b port. However, you can use only one
“DoorLine” with the T-Comfort 930 DSL.
For details on installing and configuring the “DoorLine” intercom system, refer to the product user guide.
The intercom system should be installed by qualified personnel only as sensor/actor contacts will need to be
connected to the “DoorLine” module.
Actor/Sensor Ports
For the assignment of the ports, refer to the section Available Ports starting on page 28. The
T-Comfort 930 DSL also functions together with a Freehand Entry-Phone manufactured by Siedle or Behnke.
43

Installation Connectible Devices
a/b1
Relay
Actor2
Actor1
Door opener
Sensor
230 V ~
To
Ts
-T
+T
To
Ts *
b
a
PVG 402-0
Amplifier
NG 402-02
Ac adapter
c1
7
LW
1
Siedle
12
11
9
+
b
12 V ~
c
+
-
9
11
12
9
+
Door bell
Connection of doorway equipment produced by Siedle
N
Note: The above diagram shows the usage of the “PVG 402-0” module (which merely
serves as an example). Other modules can also be operated, such as its successor,
“PVG 602-01”.
44

Connectible Devices Installation
COM Port
By installing theV.24 module (only for T-Comfort 930 DSL Version 1) a serial port on the COM interface is pro-
vided.
S
A PC for configuring the T-Comfort 930 DSL or transmitting call data can be connected to the COM port. This
call data can be evaluated in detail with a call charge registration program (e.g. DGV at T-Comfort).
LAN Port
Using the LAN port (Ethernet) you can integrate an T-Comfort 930 DSL into your corporate network (local
area network), and thus use it, among other things, as an IP router for accessing the Internet.
The LAN ports of the Ethernet switches on the expansion module process Ethernet data traffic with different
degrees of priority. You should therefore assign the three LAN ports on the expansion module as follows:
■ LAN2: Use this port if you cascade a second communications system as a slave system (see PBX Cas-
cading starting on page 77).
■ LAN1: Here connect the short Ethernet connection line to the basic module.
Please note: The connection line for the COM port can be up to three metres long.
■ LAN0: You should use the port with the lowest priority to connect to your corporate network.
Both internal LAN ports of the Ethernet switch are reserved for usage on interface cards.
45

Accessories and Adapters Upn Adapter
Accessories and Adapters
The T-Comfort 730/830 system telephones have one or two slots on the rear for various adapters and other
accessories. Further information on installing and operating these add-ons can be found in the
“T-Comfort 630/730/830 System Telephone” user guide under “Add-ons (with & without an Adapter)”.
In the following you will find technical details on the add-ons and a list of compatible accessories.
N
U
The Upn adapter is an adapter with a Upn port for connecting another T-Comfort 630/730/ 830 system tele-
phone and a socket for an extra plug-in power supply.
Weight: 70 g
Dimensions: 73 x 60 x 30 mm
Power consumption: max. 195 mW
Cable length: max. 30 m
Adapter
pn
S
Note: Please contact the T-Com Technical Support if you need further equipment
such as headsets, second handsets, recording devices, etc.
Please note: The Upn adapter may be used only for connecting the system terminals
listed above. The U
used outdoors.
extension cable must not exceed 30 m in length and must not be
pn
N
46
Note: An extra plug-in power supply is required to operate combinations of equipment
with a power consumption that exceeds the power output of the U
ports.
pn

Audio Adapter Accessories and Adapters
Audio Adapter
The audio adapter is an adapter extension with four different ports for external audio and signalling devices.
Weight: 70g
Dimensions: 73 x 60 x 30 mm
Power consumption: max. 260 mW (with relay active).
Audio Adapter Pin Assignment
Port Used for Socket Assignment
1Ear cap,
second handset,
headset,
active speaker or micro-
phone
2 Recording device; relay con-
tact generates signal for
starting and stopping re-
cording.
3 Not used on T-Comfort
930 DSL
4 Door display RJ-11 or
RJ-10
(4-pin
Western
socket)
Stereo jack, 3.5 mm 1 (GND): recording
Round power socket
(4 mm)
RJ-12
(6-pin
1: microphone -
2: speaker +
3: speaker -
4: microphone +
signal, relay contact 1
2 (peak): recording signal +
3 (ring): relay contact 1
-
4, 5: relay contact 2
1, 2, 3, 6: NC
Western socket)
47

Accessories and Adapters Audio Adapter
Electrical Data of Ports
Port Connection Values
Microphone,
microphone of second handset,
headset microphone
Ear cap,
loudspeaker of second handset,
Electret microphone
Typical sensitivity: 10 mV/Pa
Power feed: I < 300 µA at 1.5 V
Typical impedance: 150 ± 30 ohms
Typical sensitivity: 94 dB/1 mW (0 dB = 20 µPa)
headset, headset loudspeaker
Active speaker Max. output voltage: 1 V
rms
at input impedance > 10 kOhms
Recording device audio input Typical input sensitivity: 0.24 mV
(microphone level)
Recording device start/stop
(relay contact 1)
Max. switching voltage:
50 VDC/29 V AC
Max. switching current: 1 ADC/0.7 A AC
Door display
Max. switching voltage: 50 VDC/29 V
AC
(relay contact 2)
Max. switching current: 1 ADC/0.7 A AC
48

Device Combinations Accessories and Adapters
Device Combinations
You can use the following power values to calculate the power consumption of combined equipment:
■ U
■ Audio adapter: 260 mW
■ T-Comfort 630 system telephone: 1,000 mW
■ T-Comfort 730 system telephone: 1,025 mW
■ T-Comfort 930 system telephone: 1,140 mW
■ Up to three add-on keypad modules: 330 mW
adapter: 195 mW
pn
These symbols are used in the following tables:
● This combination is possible.
❍ Reduced tone ringing, open listening and hands-free talking volume possible.
Configurations without Plug-in Power Supply (Range up to 500 m)
The following table shows examples of equipment combinations for which the maximum power consumption
of 2.4 W is not exceeded.
Basic Unit: T-Comfort 730 System Telephone
Add-ons 2nd Terminal Power
Audio adapter Upn adapter up to 3 keypad
modules
–––– 1025 mW
●
–
– – – 1285 mW
●
– T-Comfort 630
2220 mW
system telephone
without adapter
49

Accessories and Adapters Device Combinations
Basic Unit: T-Comfort 730 System Telephone
Add-ons 2nd Terminal Power
Audio adapter Upn adapter up to 3 keypad
modules
–
●
– T-Comfort 730
2245 mW
system telephone
without adapter
–
●
– T-Comfort 830
2360 mW
system telephone
without adapter or keypad
module
Basic Unit: T-Comfort 830 System Telephone
Add-ons 2nd Terminal Power
Audio adapter Upn adapter Up to 3 keypad
modules
–––– 1140 mW
––
●
–
–
–
●
●
50
●
●
– 1470 mW
– 1730 mW
– T-Comfort 630
system telephone
without adapter
– T-Comfort 730
system telephone
without adapter
2335 mW
2360 mW

Device Combinations Accessories and Adapters
Basic Unit: T-Comfort 830 System Telephone
Add-ons 2nd Terminal Power
Audio adapter Upn adapter Up to 3 keypad
modules
–
❍
– T-Comfort 830
2475 mW
system telephone
without adapter or keypad
module
Configurations without Plug-in Power Supply (Range 500 to 1000 m)
The following table shows examples of equipment combinations for which the maximum power consumption
of 2.2 W is not exceeded.
Basic Unit Add-ons Power
Audio adapter Upn adapter Up to 3 keypad
modules
T-Comfort 730
system telephone
T-Comfort 830
system telephone
●
– – 1285 mW
––
●
–
●
●
1470 mW
1730 mW
51

Accessories and Adapters Device Combinations
Configurations with Plug-in Power Supplies
The following table shows examples of equipment combinations operating with additional power from a plug-
in power supply.
Basic Unit: T-Comfort 730 System Telephone
Add-ons: 2nd Terminal (System Telephone):
Up to 3 key-
pad modules
Audio
adapter
adapter
U
pn
and plug-in
T-Comfort 630
without adapter
T-Comfort 730
without adapter
power supply
● ●
● ●
● ●
Basic Unit: T-Comfort 830 System Telephone
Add-ons: 2. Terminal (System Telephone):
Up to 3 key-
pad modules
Audio
adapter
adapter
U
pn
and plug-in
T-Comfort 630
without adapter
T-Comfort 730
without adapter
power supply
T-Comfort 830
without adapter
and with 1 key-
pad module
T-Comfort 830
without adapter
and with 1 key-
pad module
● ● ●
● ● ●
● ● ●
● ● ● ●
● ● ● ●
● ● ● ●
52
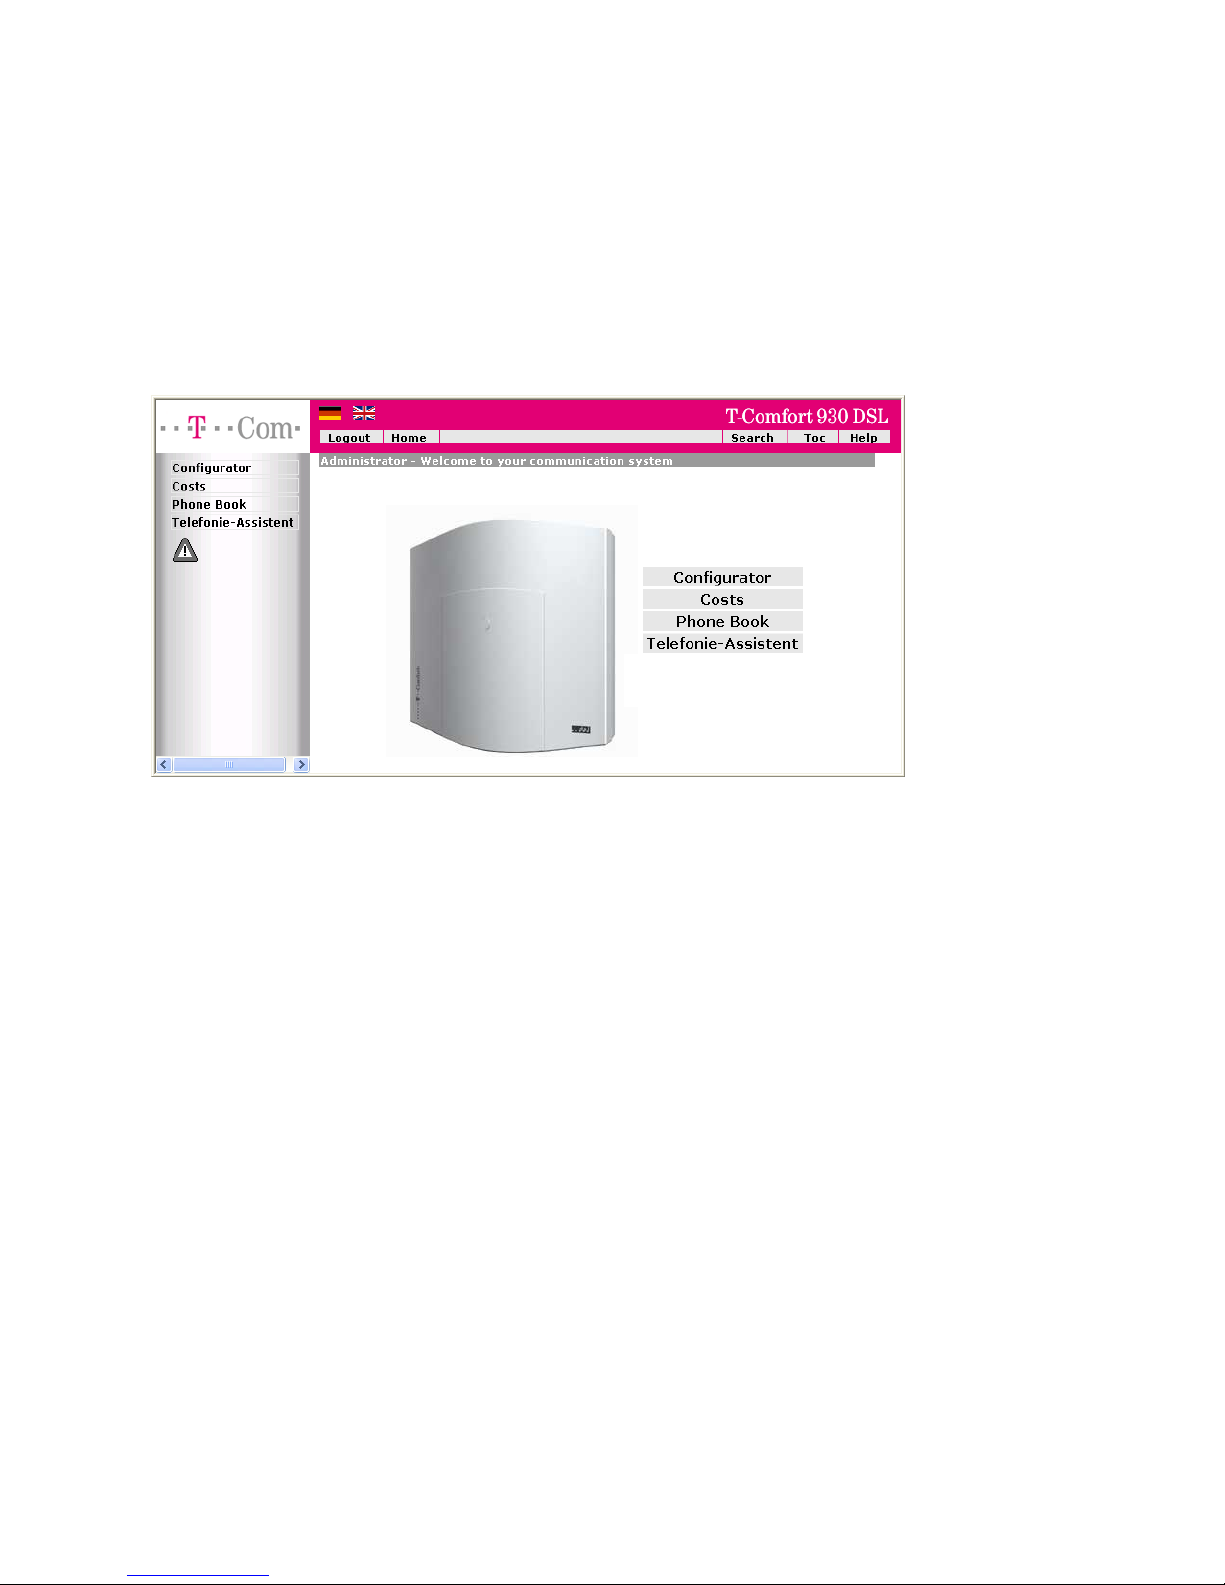
Configuration
Configuration
Configuration and programming of the T-Comfort 930 DSL is performed by the Configurator, a special
software application integrated into the system. The Configurator is operated via the Web console, which can
be run on any PC connected to the T-Comfort 930 DSL.
The T-Comfort 930 DSL Web console
Using the Web console, you can:
■ perform the initial configuration of the T-Comfort 930 DSL,
■ configure users of the T-Comfort 930 DSL and authorise them to use certain system services,
■ carry out further system maintenance,
■ use PC-supported telephony functions,
■ read out call charge information,
■ access the T-Comfort 930 DSL telephone book.
The Web console has an integrated online help function that offers comprehensive information on configu-
ration and maintenance of the T-Comfort 930 DSL (see Loading the Online Help starting on page 59).
For the initial configuration you can connect the PC to the T-Comfort 930 DSL via the Ethernet port. A COM
port can also be used. The TCP/IP network protocol is used to set up a connection via one of these ports. You
can then open the Web console of the T-Comfort 930 DSL and call up the Configurator from there.
53

Configuration Brief Guide to Initial Configuration
Note: To avoid problems with existing network installations, the T-Comfort 930 DSL’s
N
DHCP server is designed for static address assignment in its factory settings. The
T-Comfort 930 DSL’s IP address is always168.99.254 in its factory settings.
Brief Guide to Initial Configuration
Setting up a first connection is quite simple with a standard Windows PC:
1. Connect the PC’s network card with one of the T-Comfort 930 DSL.’s LAN ports Use a cross-wired Eth-
ernet cable to do this.
2. Windows 2000/XP: log on as a user with “Administrator” rights.
3. You will find the IP settings in Windows 2000/XP under Start: Settings: Network connections: Local
Area Connection. Open the dialogue box Local Area Connection Properties, and then the dialogue box
Internet Protocol TC/IP Properties (see figure: Setting the IP address in Windows XP on page 55).
4. Note down the existing settings so that you can restore them after completing the initial configuration.
5. Change the IP Address to 192.168.99.253. Change the subnet mask to 255.255.255.0, confirm with OK
and Close.
6. Start a Web browser and in the address field enter “http://192.168.99.254/”.
The Web console’s log-on page will be displayed. Enter the user name “Administrator” without a password for
the initial configuration. To support your next configuration steps, you should activate the Assistant mode on
the entry page of the Configurator. Please also pay attention to the online help.
54

Brief Guide to Initial Configuration Configuration
Setting the IP address in Windows XP
t
N
To find out the IP address of the Web console, enter the code digit procedure
*182on a connected system telephone. You can also view the net mask by entering the procedure *183. The PC’s IP address must be in this network
range.
Note: Deactivate any connection via a proxy server which has been configured. Open
the Internet Explorer, go to the menu Extras and open the Internet options dialogue
box. Select the Connections register and deactivate the Proxy Server.
55

Configuration Configuring the T-Comfort 930 DSL
First Configuration via Serial Port
The serial port can also be used as alternative access for the first configuration. To do this, the V.24 module
(only available for a T-Comfort 930 DSL version 1) must be installed. Additionally, you require a crossed serial
line with RJ45 plug (“null modem”).
1. Install the “Setup Dial-up Network Connection” program from the system CD. To do this, you must log on
as an administrator under Windows NT or Windows 2000/XP.
2. Shut down the PC. Remove all connected network leads. Connect the serial port of the PC to the COM
port of the T-Comfort 930 DSL.
3. Restart the PC. Set up a dial-up link with the icon configured on the desktop under step 1. Enter “Admin-
istrator” without a password as your user name.
4. Start the Web browser. Enter “http://192.168.99.254/” in the address box.
You will see the log-on page of the Web console. Enter the user name “Administrator” without a password for
the initial configuration.
Configuring the T-Comfort 930 DSL
Preparing the Configuration
Before starting with the configuration, make sure you have the following documents at hand:
■ An overview of the ports
■ A list of the terminals to be connected
■ A list of the IPEIs, if you wish to log on DECT terminals in the secure procedure
■ A list of the users to be set up (staff entitled to use the services of the T-Comfort 930 DSL) with their
names, departments, and the internal call numbers you want to allocate to them
■ For Internet access: the Internet service provider access data.
56

Configuring the T-Comfort 930 DSL Configuration
Data not available for initial configuration can be updated or corrected at a later date.
Note: Use the Configuration Guide starting on page 121. This will assist you in mak-
N
Starting the Web Console
1. Start your Web browser. Enter the T-Comfort 930 DSL IP address in the “Address” box: http://
192.168.99.254/.
If the configuration PC gets its IP address automatically from the T-Comfort 930 DSL or if the T-Comfort
930 DSL is entered as the domain name server, you can also start the Web console by entering the DNS
name. The DNS name in the factory setting is host.domain. You can change this in the Configurator
ing the settings in the correct sequence.
(NET Configuration: LAN menu).
2. This will call up the T-Comfort 930 DSL Web console.
S
Please note: If the T-Comfort 930 DSL is brand new, you will now be asked to import
current firmware. Please note the information on the interface informing you who to
contact about this.
T-Comfort 930 DSL: log-on dialogue box
57

Configuration Configuring the T-Comfort 930 DSL
3. To commence configuration, you must first log on. For the initial configuration, enter your:
- user name: “Administrator”
- password: for the initial configuration, leave this box blank.
4. Confirm this by clicking on OK. This puts all connected terminals into the “Guest” user group with
restricted user rights. In this way you prevent international external calls from the terminals, for example,
while you are configuring the T-Comfort 930 DSL and the users.
T-Comfort 930 DSL: dialogue box for initial access
5. The software opens a dialogue for initial access. Determine an administrator password and enter it in this
dialogue. Also fill in the other input fields.
6. Confirm your input with Apply.
7. Click on the Configurator button on the home page.
You will find notes on using the Configurator and in the online help. Click on Help in the menu bar or click on
TOC to activate an overview of help topics.
58

Configuring the T-Comfort 930 DSL Configuration
Loading the Online Help
The online help can now be loaded in the Configurator:
1. Go to the SYS Configuration: Components menu. Select the entry Online Help and click on Browse.
2. Look for one of the language-specific ZIP files in the OLH directory of the product CD. Confirm your
choice by clicking on Open.
3. Then click on Load to transfer the online help to the system.
Please note: After completion of the loading operation, the system will take a few
S
minutes to analyse the transferred file.
Finishing the Configuration
1. When you have completed all the settings in the Configurator, you must save the configuration (see also
Saving and Loading the Configuration on page 60).
2. Then select the Log-off command in the upper menu bar.
Remote Configuration
The T-Com service centre can also change or update the configuration of the T-Comfort 930 DSL using
remote configuration The prerequisite for this is that access for remote configuration for the T-Com Service
centre is activated in the T-Comfort 930 DSL. Please contact T-Com’s technical customer services for further
information.
Codes for IP Configuration
The IP configuration of the T-Comfort 930 DSL is performed on the Web console in the Configurator, in the
NET Configuration: LAN menu.
59

Configuration Configuring the T-Comfort 930 DSL
In the event that the IP configuration of the T-Comfort 930 DSL has to be changed and access via the Web
console is not possible, you can also use a code digit procedure to change these basic settings. Entry can be
made from an analogue telephone, an ISDN telephone and from system telephones.
Set IP address
H *182 Z (system PIN) *
Z (www) * Z (xxx) * Z (yyy) * Z (zzz) #
Set NET mask
H *183 Z (system PIN) *
Z (www) * Z (xxx) * Z (yyy) * Z (zzz) #
Example
Enter: H*1830000*192*168
*99*254#
If required, initiate a system restart with this procedure:
H * 1 8 5 Z (system PIN) #
Use the PIN you entered in the dialogue box for initial access. The factory setting is “0000”.
Saving and Loading the Configuration
Configurations are saved in a file archive and can be loaded to the T-Comfort 930 DSL either locally from a
connected configuration PC, or by remote configuration.
The following configuration and customer data can be saved and loaded again:
■ Telephony and network parameters
■ User data
60

Configuring the T-Comfort 930 DSL Configuration
■ Telephone book entries
■ LCR tables
For further information, refer to the online help documentation under the topic SYS Configuration: Data
backup.
Receiving System Messages as E-Mail
Important events and errors are kept by the T-Comfort 930 DSL in an internal log book: the error store. To
inform or alert the system administrators, entries in the log book (system messages) can be sent via e-mail.
In order not to notified of every error, the administrator can define corresponding log filters (in the Configu-
rator, the LOG Configuration: LOG Filter menu). These filters define which errors (category, severity, number
per time interval) should be notified. The e-mails always include an internal event or error number, as well as
an explanation of the message. Further, extra parameters (such as the port number when a trunk line drops
out) are also provided.
The mail account for this service (Account for LOG filter) is configured in the Configurator,
NET Configuration: E-Mail Access.
Loading SW Updates
New versions of the system and terminal software can be loaded to the system.
New software versions of the T-Comfort 930 DSL are loaded from the configuration PC, which accesses the
Configurator (see the SYS Configuration: Firmware menu). For information on connecting a configuration
PC, see Brief Guide to Initial Configuration on page 54.
The terminal software is part of the T-Comfort 930 DSL software and is automatically loaded into the ter-
minals via the T-Comfort 930 DSL.
Note: If you are operating an PBX cascade, new system software is automatically
N
For further information, refer to the online help documentation under the item SYS Configuration: Firmware.
transferred to the slave system from the master system.
61

Configuration Configuring the T-Comfort 930 DSL
Resetting the System Data
You can restore the factory settings of the T-Comfort 930 DSL in the Configurator. If this is not possible, refer
to the next section entitled Basic Hardware Settings Switch.
S
Proceed as follows:
1. In the Configurator, call up the SYS Configuration: Restart menu.
2. Click on Restart with Defaults.
3. Confirm this by pressing “OK” when the query dialogue box opens.
Basic Hardware Settings Switch
The T-Comfort 930 DSL configuration can also be returned to the factory settings by means of the basic
hardware settings switch.
Please note: If this is done, all individual settings and the user data are then lost. For
this reason, you should back up your configuration regularly, the best time to do so be-
ing after every change. For details, refer to the chapter entitled Saving and Loading
the Configuration starting on page 60 and to the Web console online help.
S
To restore the T-Comfort 930 DSL basic settings, proceed as follows:
1. Switch off the T-Comfort 930 DSL by disconnecting the power plug and the plug-in power supply of the
basic module.
2. Remove the cover.
62
Please note: If the factory settings are restored, all customer settings and user data
will be lost.
Caution!
Static charges can damage electronic devices. Observe the regulations regarding
electrostatically sensitive components.

Configuring the T-Comfort 930 DSL Configuration
3. The basic settings switch is designed as a key switch. The location of the switch can be found in the
chapter entitled Interface Cards starting on page 31. Press and hold the switch.
4. Replace the power plug in the mains socket. Wait about 30 seconds until the indicator on the front of the
T-Comfort 930 DSL constantly flashes.
5. Disconnect the power plug from the mains socket again.
6. Release the key switch.
The system data is now reset.
7. Replace the power plug in the mains socket.
The T-Comfort 930 DSL will now reboot in the default configuration. The procedure is completed when all
connected system terminals show the time on their displays.
8. Log on to the Web console (see Starting the Web Console on page 57). Configure the T-Comfort
930 DSL (possibly by loading a saved configuration; see Saving and Loading the Configuration on
page 60).
Generating Your Own MoH Files
The T-Comfort 930 DSL comes with an internal MoH file for Music on Hold. The T-Comfort 930 DSL product
CD contains a number of MoH files with different volume levels, which you can load at a later time as nec-
essary.
The file format for non-resident Music on Hold is *.wav. You can also save your own MoH in a *.wav file and
load it into the T-Comfort 930 DSL.
If you have a Windows operating system, you can use the “Sound Recorder” program to generate your own
MoH file. This program is usually located in the Windows directory called “Multimedia”.
The MoH file must be coded with 8000 Hz, 8 bit mono in accordance with CCITT, A-Law. This coding is
required for the T-Comfort 930 DSL and can be set in the “Sound Recorder” when you save the file under
Format (CCITT, A-Law) and Attributes (8000 Hz, 8 bit mono). The maximum allowable size for a MoH file is
63

Configuration Configuring the T-Comfort 930 DSL
256 KB (approx. 32 sec. play time). If a larger file is loaded then this will be “truncated” and thereby will also
only be played for 32 seconds. The MoH capacity can be subdivided in a maximum of 5 files. These files can
be used for different companies or for internal and external calls.
N
Load your MoH file in the Web console's Configurator, in the SYS Configuration: Components menu.
N
Note: If you don't have the Sound Recorder program or the appropriate codec on your
Windows operating system, you should install these components from your Windows
CD.
Note: When generating your own MoH file, you may incur a fee for the use of non-resi-
dent melodies (e.g. a GEMA fee in Germany or MCPS fee in the UK). The MoH files that
come with your T-Comfort 930 DSL can be used free of charge.
64

T-Comfort 930 DSL in Computer Networks Configuration Examples
Configuration Examples
T-Comfort 930 DSL in Computer
Networks
One of the outstanding features of the T-Comfort 930 DSL is the integration of telephony and computer net-
works. Connect the T-Comfort 930 DSL via a computer network (LAN) with suitably configured workstations,
and you can use its network features from these workstations. Using a Web browser you can access:
■ the T-Comfort 930 DSL Configurator
■ call charge administration
■ the Telefonie-Assistent, with which telephone functions can be used on a PC
■ the T-Comfort 930 DSL central telephone book and your personal telephone book as well as to the
company telephone book (if the multi-company variant is activated).
In addition, the T-Comfort 930 DSL can be used as an Internet access server. RAS access can also be imple-
mented using the T-Comfort 930 DSL, which enables the integration of external staff in the LAN.
In this chapter you will find several examples of configurations showing integration of the T-Comfort 930 DSL
in a LAN. Which example applies to your situation depends on the size and properties of the existing or
planned LAN infrastructure.
Note: Several menu entries mentioned in this chapter are available only, if you switch
N
on the Level: Expert in the top level dialogue of the Configurator.
65

Configuration Examples Introduction to TCP/IP
The following LAN prerequisites are possible:
Server configuration in the LAN T-Comfort 930 DSL Functions
No IP server present T-Comfort 930 DSL functions automatically as
DHCP and DNS server
IP server present
DHCP server present
IP server present
No DHCP server present
T-Comfort 930 DSL functions automatically as
DHCP client
System Administrator must assign IP address and
DNS name for T-Comfort 930 DSL
Special case when integrating the T-Comfort
930 DSL in a LAN; settings in the
NET Configuration: LAN menu must be coordi-
nated with the responsible system administrator
Introduction to TCP/IP
In a single LAN it is possible to use various protocols for the transmission of data. The connection between a
workstation computer and the T-Comfort 930 DSL runs via the IP protocol (also named TCP/IP) used on the
Internet. IP can be used together with other protocols (e.g. NetBEUI, AppleTalk or IPX/SPX) on the same
network.
Every device participating in data transmission using IP requires a unique IP address. An IP address consists
of four groups of digits from 0 to 255, each separated by a full stop. The supplementary protocols DHCP and
PPP automatically assign IP addresses to devices. Class C networks normally use IP addresses in which the
first three numbers are the same and the last number is uniquely assigned to a specific device in the LAN. On
the Internet, unique addresses assigned by a special organisation created for this purpose are used. Within a
LAN, you can use addresses which are not unique world-wide:
IP Range Common Netmask Comment
192.168.0.0-192.168.255.255 255.255.255.0 256 smaller networks
172.16.0.0-172.31.255.255 255.240.0.0 1 medium network
10.0.0.0-10.255.255.255 255.0.0.0 1 large network
66

T-Comfort 930 DSL in a Serverless LAN Configuration Examples
IP enables the establishment of connections via one or more intermediate stations. The decision whether to
connect directly or indirectly to the partner device depends on the network mask. The network mask for a
class C network is 255.255.255.0. If the IP address of the partner device does not fit the network mask, the
connection is established via the default gateway. If a device knows several data routes to different interme-
diate stations, one speaks of a router.
The domain name system (DNS) resolves a plain text DNS name into an IP address. The DNS is a hierarchi-
cally structured database, distributed worldwide. A DNS server can supply information on the names and IP
addresses for which it is responsible. For all other information, a DNS server contacts other DNS servers. For
the establishment of every connection from the workstation, it is possible to give either an IP address, or a
name that a DNS server resolves into an IP address.
Note: For further explanations of technical terms, refer to the Glossary on the CD
N
supplied.
T-Comfort 930 DSL in a Serverless LAN
In a peer-to-peer network, the workstations are connected to one another via network cables. In many net-
works, the cables run in the form of a star from a central hub or switch. Such networks do not require special
servers. This configuration example is also valid for a LAN with a server using a protocol other than IP (e.g.
AppleTalk or IPX/SPX).
ISP
(DNS)
S
Ext.
PC
S
0
0
T-Comfort
(DHCP, RAS,
int. DNS, Internet)
S0Net
PC 1
Net Hub
PC 2
Net
The T-Comfort 930 DSL in a serverless LAN
67

Configuration Examples T-Comfort 930 DSL in a Serverless LAN
In a serverless LAN, the T-Comfort 930 DSL takes over the IP configuration of the connected workstations. All
IP settings necessary for the workstations are assigned by the T-Comfort 930 DSL via DHCP (dynamic host
configuration protocol). In this operating mode, an IP address space reserved for such networks is used:
192.168.99.254 T-Comfort 930 DSL IP address
255.255.255.0 Network mask (class C network)
192.168.99.254 DNS server IP address
192.168.99.254 Default gateway IP address
Install the IP network protocol and a Web browser for every workstation which is to have access to the
T-Comfort 930 DSL network features.
DNS Name Resolution
In a serverless LAN, the internal DNS name resolution is performed by the T-Comfort 930 DSL. If you type the
string “host.domain” into your browser, a DNS request is sent to the T-Comfort 930 DSL IP address. The
T-Comfort 930 DSL responds with the correct IP address, so that the Configurator home page can be called
up.
In a peer-to-peer network (Windows network), the workstations each have a name which is displayed in the
network environment. These NetBIOS names can differ from the DNS names assigned to the workstations by
the T-Comfort 930 DSL. The T-Comfort 930 DSL is not visible in the network environment.
Internet Access
If access to an ISP has been configured on the T-Comfort 930 DSL, the T-Comfort 930 DSL can be operated
as an Internet access server without any additional configuration of the workstations. When you want to see a
Web page, you simply type the URL (uniform resource locator; Internet address; “http://...”) in your browser. In
a serverless LAN, the T-Comfort 930 DSL is configured as a DNS server and default gateway. The workstation
therefore sends its Internet connection request to the T-Comfort 930 DSL.
68

T-Comfort 930 DSL in a Serverless LAN Configuration Examples
In almost all cases, the request will contain a DNS name which is unknown in the internal network. When you
type a URL into your browser, the T-Comfort 930 DSL receives the request to find the corresponding IP
address. If the name is unknown in the LAN, the request is forwarded to an ISP’s external DNS server.
N
RAS Access
You can establish a connection to the T-Comfort 930 DSL from an external PC via an ISDN card.
The necessary IP settings are transmitted by the T-Comfort 930 DSL on establishment of the connection. The
computer that has dialled in has access to all services in the LAN that can be used via the IP protocol. The
authorisation for RAS access is set up in the Configurator via the User Manager: User Groups menu.
The technical properties of the connection can be configured in the Configurator via the NET Configuration:
Note: Workstation PCs automatically add a domain name to URLs without a dot. You
specify this domain name in the Configurator. For example, if you have configured
“firm.co.uk” as the domain name, an access request for “www.firm.co.uk” will be inter-
preted as a local DNS request which does not lead to the establishment of an Internet
connection. For this reason, you should choose a name which is not used in the Inter-
net as the domain name (“my-firm.co.uk” for example).
RAS menu. Further information can be found in the online help of the web console.
In a serverless LAN, Windows uses the NetBIOS protocol for accessing files and printers via the network envi-
ronment. NetBIOS can use NetBEUI, IPX/SPX or IP as the transport protocol. In the network environment, you
can only access files and printers on workstations using IP for NetBIOS.
69

Configuration Examples T-Comfort 930 DSL in a LAN with an IP-enabled Server
T-Comfort 930 DSL in a LAN with an
IP-enabled Server
In a LAN with an IP-enabled server, you should coordinate integration of the T-Comfort 930 DSL with the
responsible network administrator. You must decide on the IP address space to be used and which network
services (DHCP, DNS, RAS, Internet access) the T-Comfort 930 DSL is to handle in the LAN.
ISP
(DNS)
S
Ext.
PC
S
T-Comfort
0
0
S0Net
PC 1
Net Hub
S0 int
Server
(DHCP, RAS,
int. DNS,
Internet)
S0Net
PC 2
Net
The T-Comfort 930 DSL in a LAN with an IP-enabled server
In many cases, an IP-enabled server configures the IP settings via DHCP for all workstations. On starting, the
T-Comfort 930 DSL requests IP settings via DHCP. If this request is responded to, the T-Comfort 930 DSL
uses the IP settings received. You can then use a workstation to access the T-Comfort 930 DSL Configurator
under the IP address assigned by the server.
In networks in which the IP settings are made manually, you have to enter the corresponding IP settings in the
T-Comfort 930 DSL Configurator (NET Configuration: LAN menu). Here the T-Comfort 930 DSL acts as the
DHCP server. A workstation requesting the IP settings via DHCP then receives the settings you made in the
Configurator.
70

T-Comfort 930 DSL in a LAN with an IP-enabled Server Configuration Examples
DNS Name Resolution
In a LAN with an IP-enabled server, the latter is also responsible for DNS name resolution. If you want to start
the Configurator by entering a DNS name, you must link this name on the server with the IP address used by
the T-Comfort 930 DSL. For further information, refer to the server documentation.
Note: To access the T-Comfort 930 DSL under the same IP address after a restart, you
N
must specify this IP address permanently on a DHCP server. On a DHCP server it is
possible to link the MAC address of a network card with a specific IP address. You will
find details in the server documentation.
Internet Access
You can also use the T-Comfort 930 DSL as an Internet access server in a LAN with an IP-enabled server. To
do this, you must enter the T-Comfort 930 DSL IP address on the server as the default gateway. In addition,
you must edit the internal DNS server configuration so that the resolution of external DNS names is forwarded
to the T-Comfort 930 DSL.
In this example, the Internet connection is established from a workstation via the server, which in turn
requests Internet access from the T-Comfort 930 DSL.
There are two different ways of suitably configuring the internal DNS server. You can enter the T-Comfort
930 DSL IP address as a DNS forwarder. If you require access to extended DNS information, you can also
configure the DNS server for a recursive DNS request without the DNS forwarder. For further explanation,
refer to the DNS server documentation.
71

Configuration Examples T-Comfort 930 DSL in a LAN with an IP-enabled Server
RAS Access
ISP
(DNS)
S
Ext.
PC
S
T-Comfort
(Internet)
0
0
S0Net
PC 1
Net Hub
S0 int
Server
(DHCP, RAS,
int. DNS)
S0Net
PC 2
Net
The T-Comfort 930 DSL as a DNS server in a LAN with an IP
server
In a LAN with an IP-enabled server you can also enable external computers to dial in via the T-Comfort
930 DSL. To do this, you should coordinate with the network administrator the IP address space which can be
assigned to an external computer dialling in, and enter it in the Configurator, NET Configuration: RAS: ISDN
menu, under Address Range.
ISP
(DNS)
S
Ext.
PC
S
T-Comfort
(RAS, Internet)
0
0
S0Net
PC 1
Net Hub
Server
(DHCP,
int. DNS)
Net
PC 2
Net
RAS access by the T-Comfort 930 DSL in a LAN with an IP server
72
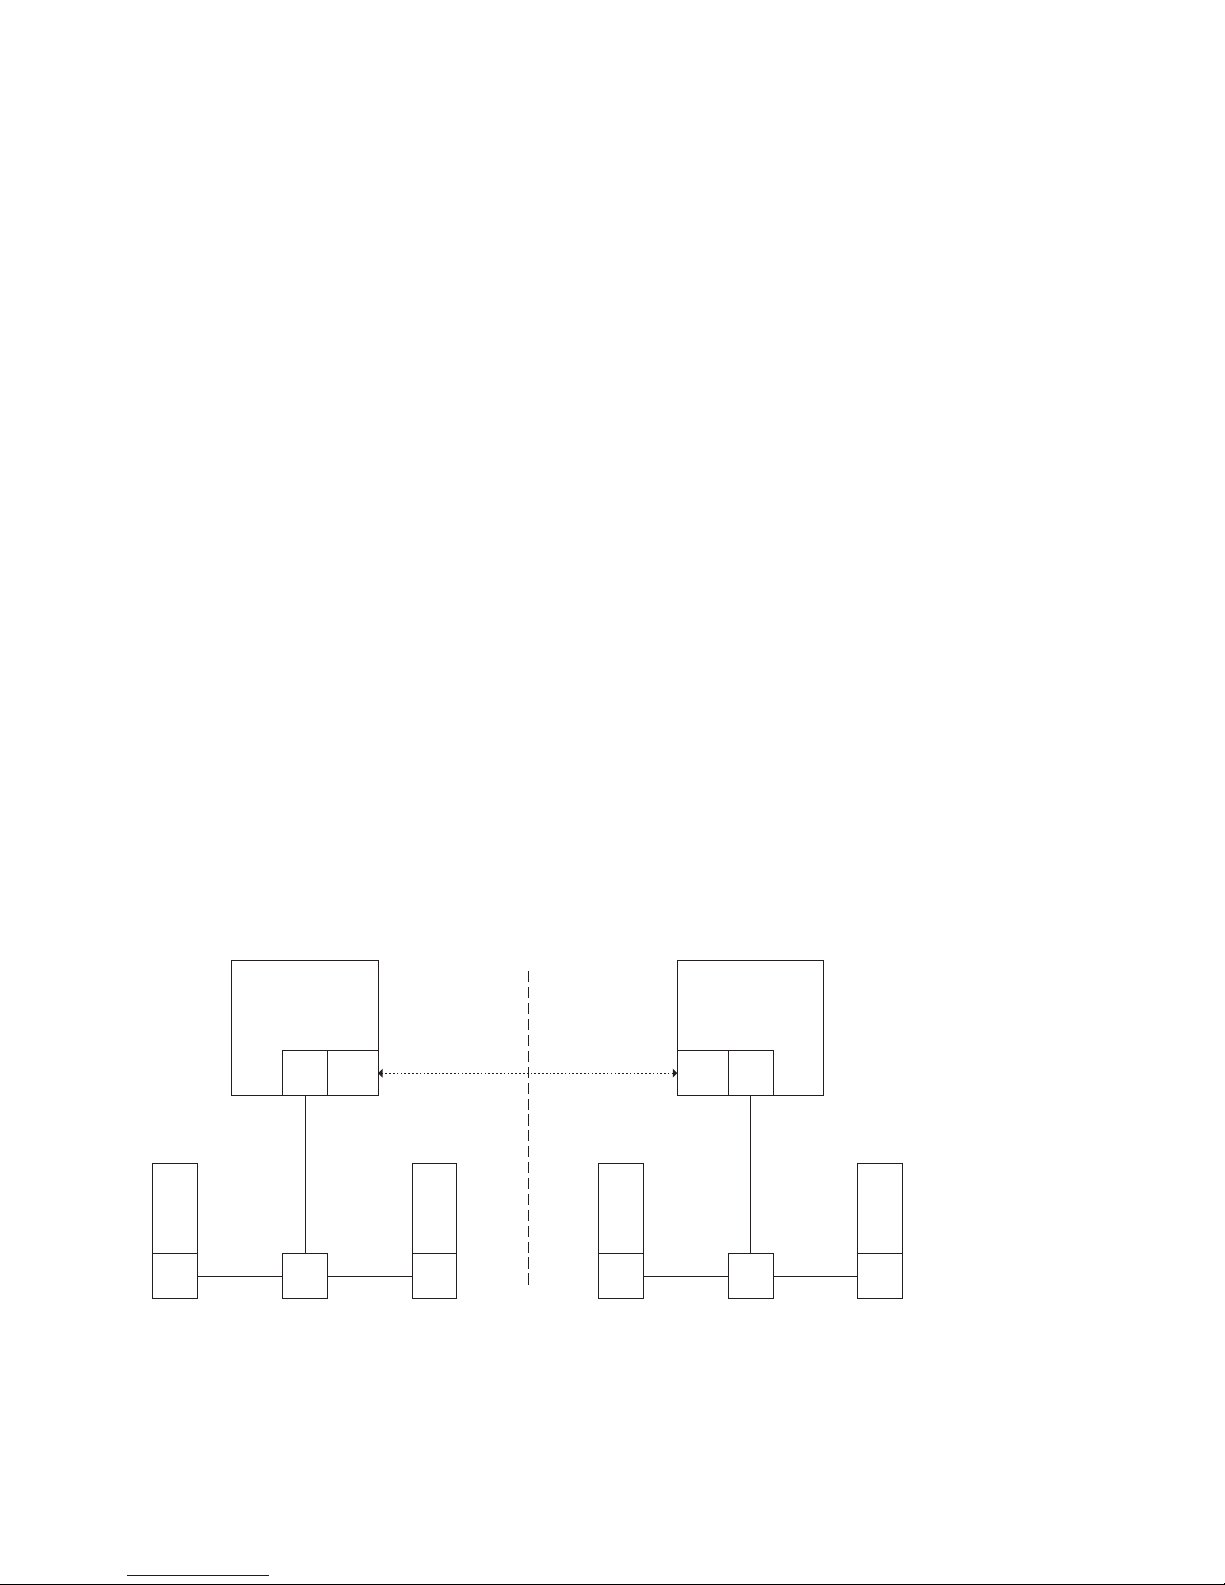
Branch Link Configuration Examples
The user account administered by the T-Comfort 930 DSL, with which dialling in is permitted, only allows the
establishment of direct and anonymous TCP/IP connections such as HTTP, FTP or SMTP connections. If you
additionally want to allow file or printer access in the network, you must set up a suitable user account on the
addressed server for network log-in. If you use the same log-in name for the T-Comfort 930 DSL user account
and the same password for the network log-in, you have to enter this combination only once when dialling in.
N
Note: In a larger Windows network with several segments, the lists of computer names
visible in the network environment can no longer be established by broadcasts. In this
case you use a special WINS server whose address the T-Comfort 930 DSL does not
make known to the workstation when dialling in with ISDN. For this reason, you enter
the address of a WINS server manually in the network settings of the workstation.
Branch Link
You can use the T-Comfort 930 DSL to interlink two LANs via ISDN.
To do this, you configure two T-Comfort 930 DSL systems so that they can dial in to each other.
In order for this to work, the two LANs must be configured for different IP address ranges (subnetworks). For
at least one of the T-Comfort 930 DSL systems, change the prescribed address range for the LAN.
T-Comfort
(IP=192.168.99.254,
Net=192.168.99.0)
T-Comfort
(IP=192.168.11.254,
Net=192.168.11.0)
S
Net
0
PC 1
Net Hub
The T-Comfort 930 DSL in a LAN-to-LAN link
In the Configurator, NET Configuration: Branch menu you can configure the dial-in settings. The T-
Comfort 930 DSL will set up a connection whenever a IP data transfer to the other LAN is requested.
PC 2
Net
S0Net
PC 1
Net Hub
PC 2
Net
73

Configuration Examples Useful Information on Internet Access
Note that such a connection is only set up when specific requests are made. These can be for FTP file
transfers, e-mails or downloading Web pages. Name resolution via broadcasts is not possible. If you wish to
use the LAN-to-LAN link to access files and printers in the Windows network, you need an IP-enabled server
that administers the name resolution for the Windows network.
As the IP address range, you can select one of the 256 class C subnetworks designed for local LANs. Select a
class C sub-network in the range from 192.168.0.0 to 192.168.255.0.
Useful Information on Internet Access
Costs
The T-Comfort 930 DSL uses a router function to access the Internet, which means that it automatically estab-
lishes an Internet connection when required and terminates the connection after a certain period of time if no
data are being transmitted.
Unfortunately, programs other than those typically intended to access the Internet (such as your browser or
your e-mail software) may send out data packets which cause an Internet connection to be established, even
if these programs are not strictly Internet-associated applications.
Examples of such programs are the Microsoft
as Realplayer
(the so-called “phone home function”).
It is therefore highly advisable to limit ISP access by specifying the maximum monthly connection time under
Connection time per month (maximal) in the NET Configuration: WAN: [Provider] menu on the web
console.
Using the Web
TM
and anti-virus applications that may establish an Internet connection for automatic updates
TM
XPTM operating system, various multimedia programs such
A Web browser not only enables you to use the T-Comfort 930 DSL Configurator from every workstation but
also to obtain a wealth of information from the Internet. Simply enter the desired URL in the address field of
74

Useful Information on Internet Access Configuration Examples
the browser. Access from a stand-alone PC via an online service differs from Internet access via the T-Comfort
930 DSL in the following respects:
■ When you request a Web page, dialling in results automatically. There is no display of dialogues with
manual confirmation of dialling in or hanging up.
■ Requesting Web pages is not a connection-orientated service. When the Web page has been loaded
completely, the TCP/IP connection is cleared. If you do not request further Web pages, the T-Comfort
930 DSL automatically releases the connection to the Internet after a certain, specifiable duration.
■ It is possible to call up Web pages simultaneously from several workstations.
■ The T-Comfort 930 DSL can block access to certain Web pages by means of filter lists.
E-mail
One of the most important services in the Internet is e-mail. E-mails are buffered in individual e-mail accounts
on a mail server. Mail servers are operated by ISPs for example. With the T-Comfort 930 DSL you can set up
one or more e-mail accounts for every user account configured on the T-Comfort 930 DSL. These e-mail
accounts are then checked at regular intervals.
If there are new e-mails in an e-mail account, and the T-Comfort 930 DSL has been configured for this
function, the user specified in the T-Comfort 930 DSL user account is notified of the new e-mail on his system
terminal. T-Comfort 730/830 DSL system telephones can also display information such as the sender or the
subject of the e-mail.
NAT
Network address translation (NAT) is activated on accessing the Internet (ISP). You require this feature in
order to translate internal IP addresses to valid external IP addresses. This has three important consequences
for Internet access:
■ Several workstations can share a single Internet access. You do not require a LAN access, only a single
account with the Internet service provider.
75

Configuration Examples Useful Information on Internet Access
■ The IP addresses used in the LAN are translated into IP addresses valid worldwide. So you require no
such addresses for your LAN.
■ Only IP connections triggered from a workstation can be established. Consequently, while you can call up
Web pages from a workstation, you cannot install a Web server visible in the Internet on a workstation.
Certain protocols cannot be used when NAT is being used. This affects protocols with the following prop-
erties:
■ IP addresses are transported in the useful load, e.g. NetBIOS over TCP/IP.
■ The protocol requires an active, inward-directed connection establishment, e.g. ICQ.
■ The protocol will function without TCP/UDP port numbers, e.g. ICMP or IGMP.
The T-Comfort 930 DSL NAT has suitable processes for ensuring the functions of many important protocols
affected by these rules. These are the protocols FTP (in “active” mode), CuSeeMe (“videoconferencing”), IRC
(“chat”), ICMP errors (“traceroute”) and ICMP echo (“ping”).
Protocols which require inward-directed connection establishment can be configured in the Net Configu-
ration: Port Access menu. For further information, refer to the online help of this menu.
76

Variants of PBX Cascading PBX Cascading
PBX Cascading
As requirements grow, the T-Comfort 930 DSL can be operated together with other PBX installations. If you
merely need a larger number of connections, it is easy to link a second PBX (PBX Cascading). If you want to
operate the T-Comfort 930 DSL at several locations with different PBXs, this is possible by PBX Networking
(see page 81).
Variants of PBX Cascading
You can combine two PBXs in order to increase the number of terminals that can be connected. A master
PBX and a slave PBX are connected to one another by means of two cables. The two PBXs essentially
function like a single PBX with a higher number of ports. The master PBX controls the slave PBX. The fol-
lowing PBXs from the product family can be used for cascading:
Master system Slave system
T-Comfort 930 DSL T-Comfort 930 DSL
Functionality of PBX Cascading
PBX cascading requires two twisted-pair leads with RJ45 plugs between the PBXs:
■ Voice data: one lead with all eight pins wired 1 to 1. Connect this to the PCM ports of the PBXs. The
shielded CAT-5 lead may be up to three meters long.
The PCM port is on the add-on module of the T-Comfort 930 DSL. You must therefore install an add-on
module in each of the two PBXs before they can be cascaded.
■ Administration data: one CAT-5 Ethernet lead.
Connect the LAN2 port of the master system’s add-on module with a LAN2 port of the slave system’s add-
on module.
77

PBX Cascading Putting a Cascaded PBX into Operation
PBX 1
(Master)
Basisbaugruppe Erweiterungs-
baugruppe
PCM LAN1 LAN2 LAN0LAN
Voice data lead (eight
pins assigned, joined
1 to 1)
Basic module Add-on module
Hub/Switch
(in LAN of company)
PBX 2
(Slave)
PCM LAN1 LAN2 LAN0LAN
CAT-5 Ethernet lead
Cascaded PBX system
Putting a Cascaded PBX into Operation
Proceed as follows to put a cascaded PBX system into operation:
1. Take the additional slave system out of its packaging and place it in immediate proximity to the master
system. Connect a system telephone to the slave system for a later performance check. Use the U
press-fit terminal of the basic module or one of the U
ports of an interface card.
pn
pn
1
2. Back up the master system data. For further information, refer to the online help topic SYS Configuration:
Data Backup.
3. Switch off the master system if it is operating. Disconnect the module from the power supply by pulling
out the mains plug.
4. If necessary, install the add-on module for the master system. If you use an T-Comfort 930 DSL as the
slave system, you also have to install an add-on module.
5. Connect the two modules by means of two suitable cables as described above.
6. Power on the two PBXs. The order in which you do this does not matter.
7. In the PBX Configuration: Ports: Slots dialogue of the master system’s Configurator, click on Slave.
Select the slave Typ e in the Slave: Change dialogue.
If a possible slave system was detected when the system was started, there is an additional entry in the
Ty pe field (“Online: PBX type”). If you select this entry, the settings for Type and MAC address are applied
automatically.
78

Putting a Cascaded PBX into Operation PBX Cascading
Please note: If you change the type of slave system later on, the port settings that
S
The master system then initialises the slave system. This may involve transfer of firmware (operating soft-
ware) from the master system to the slave system. The transfer process is only executed for two
T-Comfort 930 DSL PBXs. This can take a few minutes.
8. Configure the system telephone connected to the slave system for testing purposes in the Configurator.
In the PBX Configuration: Ports: Upn dialogue, click on one of the additionally displayed entries of the
have been made will be deleted.
type Upn 1/0/n (1: slave system, n: U
N
You can see that the initialisation has been completed from the display on the system telephone connected to
the slave system.
Notes
Observe the following when operating a cascaded PBX system:
■ All U
■ The S
, S0 and a/b ports of the slave system can be used with appropriate telephones. All features of
pn
system telephones on U
ports of the slave system can also be used for trunk lines or for PBX networking (see PBX Net-
0
working starting on page 81).
Note: Changes to the configuration while initialising the slave system may trigger error
reports referring to the ongoing initialisation.
ports are available without restriction.
pn
port number).
pn
■ It is not possible to operate a DECT base station on one of the U
■ The COM, actor/sensor and LAN ports of the slave system cannot be used. The LAN ports on the add-on
module of slave system can be used without restriction.
■ The two communications systems must have a direct Ethernet connection or be connected via a hub in
order to exchange data. They cannot be connected through a router.
■ The slave system cannot be addressed directly through a LAN. For configuration, always use the Web
console of the master system.
ports of the slave system.
pn
79

PBX Cascading Putting a Cascaded PBX into Operation
■ A memory card installed in the slave system (Comfort Pro A IAB (integrated answering machine) cannot
be used.
■ To operate the slave system again normally, you must reset it to its factory settings (refer to Resetting the
System Data starting on page 62).
80

Connections PBX Networking
PBX Networking
T-Comfort 930 DSL provides all the features necessary for PBX networking. You need PBX networking in the
following cases:
■ To operate the T-Comfort 930 DSL as a subsidiary system on another PBX. This will also allow you to use
the T-Comfort 930 DSL as a DECT server, for example.
■ To network several T-Comfort 930 DSLs into a PBX system.
■ To use flexible configuration possibilities of trunk lines for a T-Comfort 930 DSL.
All settings that affect the configuration of PBX networking can be found in the Configurator menu
PBX Configuration: Trunks and in the PBX Configuration: System: Settings dialogue under System
linking. Refer also refer to the corresponding help topics in the T-Comfort 930 DSL online help.
Note: If you do not need the features of PBX networking, the simplified configuration is
N
sufficient in most cases. For this purpose, assign the preconfigured trunk groups (bun-
dles) Multi-terminal access or System access to the ports. The preconfigured route
called External trunk now makes it possible to seize an external line immediately or by
first dialling the prefix “0”. You can rename the preconfigured bundle and the preconfi-
gured route if required, but you cannot delete them.
Connections
Networking two or more TK systems means interconnecting them. The T-Comfort 930 DSL allows you to use
the following connections:
■ ISDN trunk lines
■ ISDN point-to-point connections (Q.SIG) on external S
ports
0
81

PBX Networking Connections
PBX PBX PBXPBX
PBX
Trunk line
Point-to-point
connection
Example of a PBX network
Various line types and transmission protocols can be used for point-to-point connections. The required
network topology (distance, connection capacity) determines which type of point-to-point connection is most
suitable.
Protocol: Q.SIG or DSS1
The Q.SIG protocol, designed for ISDN point-to-point connections, is the preferable choice as the trans-
mission protocol; alternatively, the DSS1 protocol, designed for ISDN dial-up connections in the Euro-ISDN,
can be used. Certain PBX networking features can only be used with the Q.SIG protocol, however. In par-
ticular, the identifier indicating whether a call is internal or external cannot be transmitted using DSS1.
Both protocols implement communication on several protocol layers:
■ L1: Layer 1 defines the physical line properties and the electrical coding of signals.
■ L2: Layer 2 enables communication via individual error-protected channels that are independent of each
other.
■ L3: Layer 3 defines the administration of the individual channels and implements the features designed
for ISDN.
Master/Slave
For an ISDN connection, it is possible to determine which PBX is the protocol master and which the protocol
slave. This relationship can be determined for all three protocol layers independently of one another.
82

Connections PBX Networking
For each protocol layer, the PBX at the other end always has to be suitably configured. If one PBX is the pro-
tocol master for a layer, the other PBX must be the protocol slave for this same layer. Normally all three pro-
tocol layers are configured identically. In the case of a trunk line, the network operator is the protocol master
for all three layers.
L1 Clock
To enable PBXs in the ISDN network to communicate with each other, they must be “clock-aligned”. The L1
protocol master sets the clock for layer 1, and the L1 protocol slave adopts (synchronises to) this clock.
When planning a PBX networking scheme, you must make sure that the L1 clock propagates from a master
via a number of PBXs.
Network
operator
MS
PBX1
M
S
PBX 2
M
M
PBX 3
S
Trunk line
Point-to-point
connection
S
Example: propagation of the L1 clock
If more than one port with the setting L1 Type = “Slave” is configured on anT-Comfort 930 DSL and the
setting L1 sync possible has been activated, then one of the ports is automatically defined as the L1 clock
source. The T-Comfort 930 DSL will automatically switch the clock source to another port configured as an
L1 clock source (if a line fails, for example).
S
Please note: Reciprocal or circular application of the L1 clock is not allowed.
Example: In the above case you could reverse the L1 slave/master setting for the connection between PBX 1
and PBX 3. However, if you then activate the setting L1 sync possible for the port of PBX 1, this may cause
parts of the PBX network to stop functioning temporarily.
When applying the L1 clock of trunk lines, you can assume that the public network is “clock-aligned”. So, in
the above example, you can connect additional trunk lines to one of the PBXs.
83

PBX Networking Types of Point-to-Point Connections
Types of Point-to-Point Connections
There are different types of connection available for an point-to-point connection between two PBXs,
depending on the distance between them.
Direct Connection
This type of ISDN point-to-point connection joins the two systems directly to each other using a crossover
twisted-pair cable. An S
connection can be used for distances up to 1,000 metres. Normally one PBX is the
0
protocol master for all three layers, and the other PBX is the protocol slave for all three layers.
PBX 1
L1 master
L2 master
L3 master
PBX 2
L1 slave
L2 slave
L3 slave
Direct connection
■ Use the RJ45 jacks on one of the external S
ports for an S0 connection between two T-Comfort
0
930 DSLs. You can use the corresponding pressure terminals for S0 ports on interface cards.
ext
PBX 1, S
0
12345678
87654321
PBX 2, S
ext
0
(RJ-45 socket)
PBX 1, S
2M
Rx+ Rx- Tx+ Tx-
Rx+ Rx- Tx+ Tx-
PBX 2, S
(Pressure clamps)
2M
N
Note: If you use an S0 port on an interface card (pressure terminal) and an S0 port with
an RJ45 jack for the direct connection, make sure you make the necessary changes to
the port assignment (see S0 Ports on Interface Cards starting on page 35).
84
Wiring of a direct connection

Types of Point-to-Point Connections PBX Networking
Connection via an Active Transmission System
For distances exceeding the range of a direct connection, an active transmission system can increase the
range to up to 50 km. Normally the L1 master is the transmission system for the two connected PBXs. For the
protocol layers L2 and L3, one PBX is normally the protocol master and the other PBX is the protocol slave.
PBX 1
L1 slave
L2 master
L3 master
Transmission
System
L1 master
PBX 2
L1 slave
L2 slave
L3 slave
Connection by an active transmission system
Note: The active transmission system itself gets its L1 clock either from the network
N
operator or from a clock generator connected by wire.
Connection via the Public Network
Point-to-point connections via the public network of a network operator can be used for bridging distances
beyond 50 km. Due to the long distance involved, for technical reasons it is not possible to synchronise the L2
protocol. Consequently, the public network is normally the protocol master for protocol layers L1 and L2. One
PBX is therefore the L3 master and the other PBX the L3 slave.
PBX 1
L1 slave
L2 slave
L3 master
Public
network
L1 master
L2 master
PBX 2
L1 slave
L2 slave
L3 slave
Point-to-point connection via a public network
85

PBX Networking Configuration
Configuration
The possible configurations described below can be set up in the Web console using the PBX Configuration:
Trunks menu.
Trunk groups
This is a group of lines of the same type and direction. A line can only be assigned to one trunk group
(bundle).
Network
operato
r
PBX 1
A
C
B
PBX 2
PBX 3
E
D
Point-to-point
connection
Example of a PBX network with trunk groups
In the above example, the following trunk groups are configured for PBX 1:
■ Two S
lines in a multi-terminal configuration to the network operator which are assigned to the “A” trunk
0
group.
■ Two S
■ One S
N
point-to-point connections to PBX 2 which are assigned to the “C” trunk group.
0
point-to-point connection to PBX 3 which is assigned to the “E” trunk group.
0
Note: A line or a trunk group cannot be seized directly. It is always performed indirectly
via a route.
Bundle
Trunk line
86

Configuration PBX Networking
Routes
A route is a group of trunk groups enabling a connection in one direction. If the first trunk group of a route is
fully utilized, the next trunk group is seized (“trunk group overflow”). One trunk group can also be used for dif-
ferent routes.
In the above example, a route set up for PBX 1 allows a connection to PBX 2. Trunk groups “C,” “E” and “A”
are assigned to this route. If a user connected to PBX 1 wants to reach a party in PBX 2, lines will be seized in
the following order:
■ PBX 1 first searches for a free channel in the “C” trunk group.
■ If all the lines in trunk group “C” are busy, the system tries to set up a connection via trunk group “E”.
PBX 3 switches the connection through, provided it is appropriately configured (refer to Numbering
starting on page 87).
■ If it was not possible to set up an indirect connection via PBX 3, the system tries again via trunk group “A”.
The “prefix” necessary for this can be configured with the route.
■ The user does not get a busy signal until the attempt to set up an indirect connection via the network
operator has also failed.
N
For each route you can define a randomly selectable code digit for seizing the route. You can also configure
whether a user is authorised to seize a particular route, whether LCR is to be used for one of the trunk groups.
Numbering
Note: If an internal connection is switched via a network operator, the call is signalled
using the external number of the calling PBX.
A user can seize a particular route by pre-dialling a specific code digit. With this “open numbering”, a user
must always dial this code digit and then the telephone number in order to reach a party in another PBX.
If none of the telephone numbers in your PBX network occur twice, you can also configure “closed num-
bering”, allowing the same telephone number to be used for reaching each user within the PBX network.
87
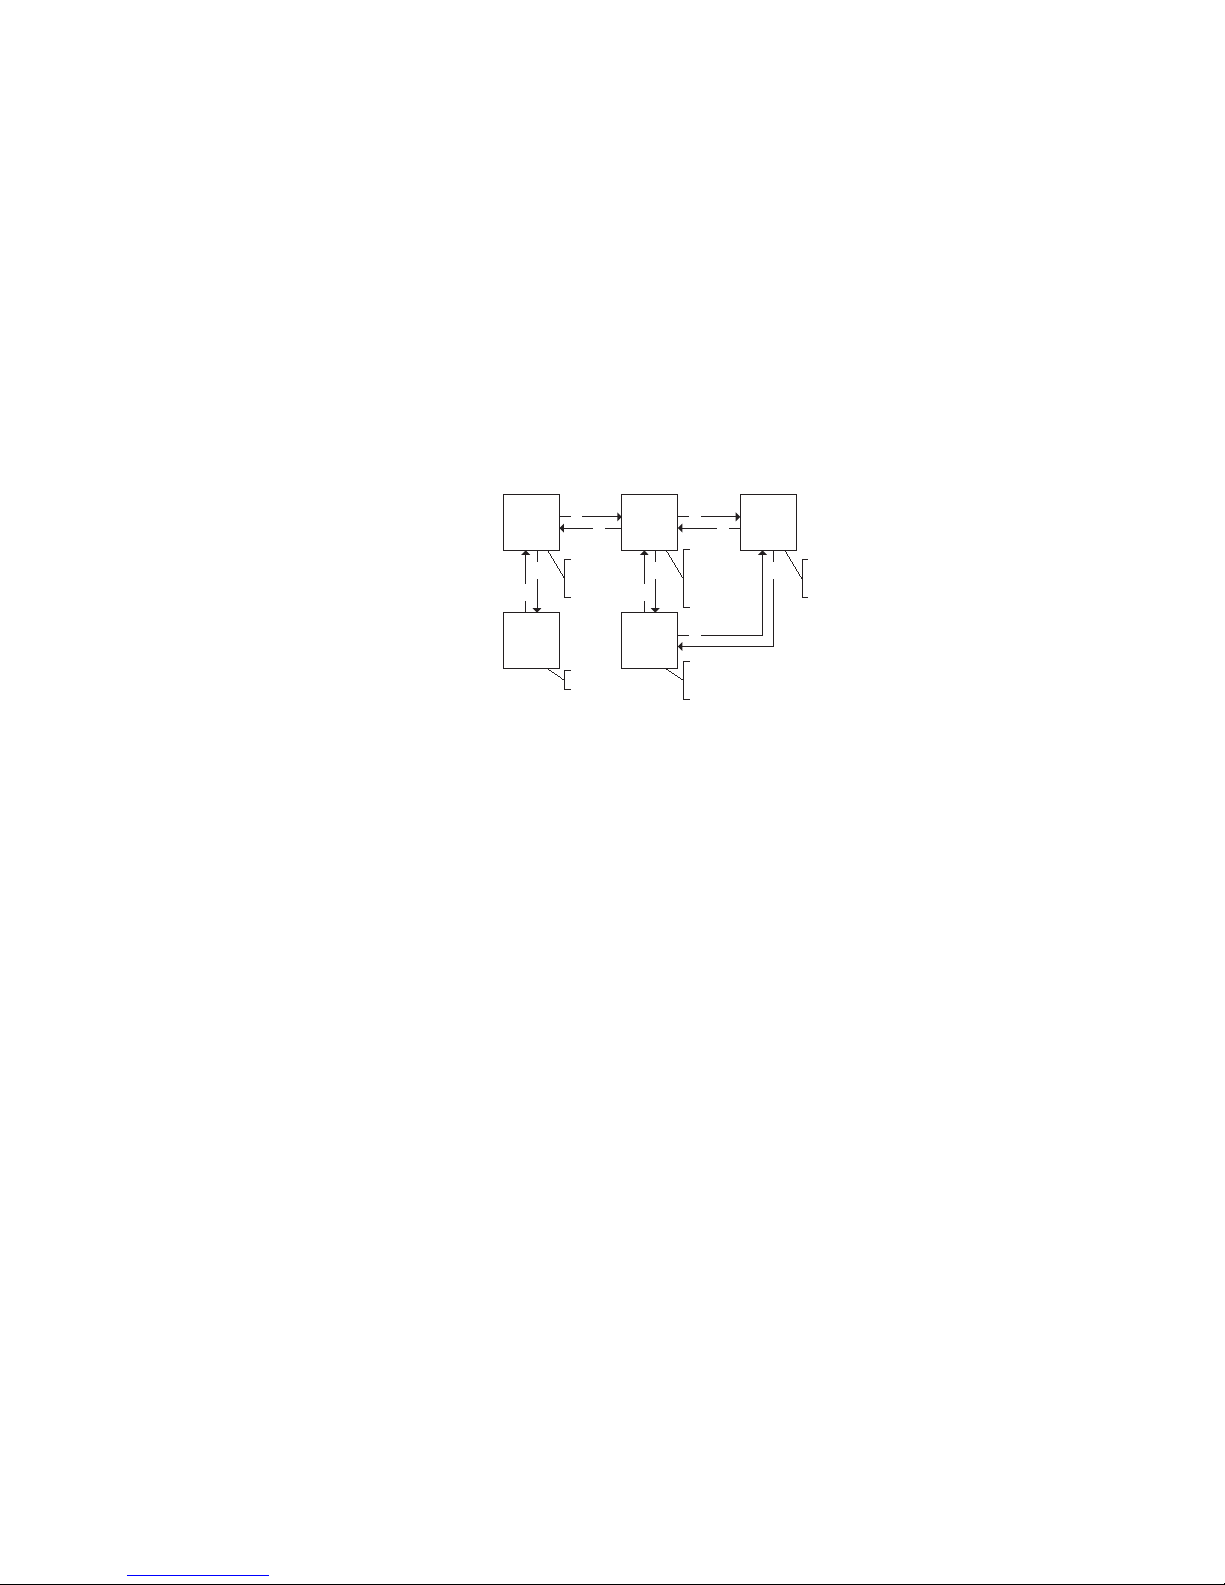
PBX Networking Technical Details
With closed numbering, the T-Comfort 930 DSL determines which route to seize from the telephone number
dialled. The information needed for routing a call can be configured in a numbering table containing up to
100 entries. You use this table to assign telephone numbers and/or ranges of telephone numbers to a par-
ticular route.
A default entry in the numbering table makes it possible to seize a “default route” for all remaining unas-
signed numbers. In particular, this simplifies configuration of the T-Comfort 930 DSL as a subsidiary system:
the only entry you assign to the default entry is the route to the host system
PBX
100-
199
a
PBX
400-
499
c
4: b
b
D: c
D: a
PBX
e
200-
d
299
3: e
h
5: h
g
D: d
PBX
i
500599
3: i
D: g
PBX
300-
f
399
5: k
k
D: f
D:Default
Route
Example of closed numbering tables
The automatic switching of call requests (i.e. routing) by means of trunk group overflow or default numbering
can lead to “circular switching”.
To avoid this, a “transit” counter is incremented whenever a connection is switched through on Q.SIG lines.
When the configured maximum value is reached, further switching stops.
Technical Details
A different PBX number must be set for each T-Comfort 930 DSL in a PBX network. This setting can be found
in the Web console, in the menu PBX Configuration: System: Settings under the heading System linking.
You can also set the maximum value for the transit counter there. This value depends on the topology of the
PBX network and should allow the system to have the maximum number of further connections possible.
You can display the connection status of the lines at any time in the Configurator menu System info: PBX:
Trunks. You should check this in particular after making changes to a configuration to see whether all the
lines used for system networking are operable.
88

Technical Details PBX Networking
Some of the features possible in Q.SIG are not supported by T-Comfort 930 DSL with all their options, for
example callback on busy within the Q.SIG network. The call categories defined in Q.SIG (e.g. Emergency
Call, Operator, Normal) and the Q.SIG name transmission feature (“user names”) are fully supported.
The code digits to be used for seizing a route with open numbering are not transmitted to the destination PBX
and thus cannot be evaluated by it. To reseize a route (for example for a callback), you must set the appro-
priate digit prefixes in the trunk group configuration for the routes to be reseized.
t
Owing to their hardware properties, not all S
working without restrictions. Depending on the type of system, some ports can only operate in the L1 master
mode or L1 slave mode. The external S
T-Comfort 930 DSL S M/S - - -
Legend
S = Slave
M/S = Master/Slave
M = Master
If, for example, you are configuring a route which can be seized using routing code “5”
and have selected one or more bundles for this route, change the Prefix for dest. call
number at incoming internal setting to “5” for this bundle in order to enable the route
to be reseized.
ports of the T-Comfort 930 DSL can be used for PBX net-
0
ports can be set according to the following table.
0
S0 1 S0 2 S0 3 S0 4 S0 5
N
Note: The S0 ports on add-on cards can be operated in both L1 master and L1 slave
mode.
89

Team Functions Introduction
Team Functions
Introduction
With the team functions you can manage your telephone communication tasks by assigning lines with sep-
arate call numbers to the keys of different terminals. The terminal users, or team members, can thus pick up
one another’s calls or telephone each other using the configured keys.
Team functions can only be configured on the T-Comfort 630/730/830 and Comfort Pro P 100/300/500
system telephones because only these have the required features.
Explanation of Keys
The team functions are programmed on the call keys of the T-Comfort 630/730/830 telephones. Depending
on the terminal, different numbers of call keys are available:
System telephone Number of keys
T-Comfort 630 One key with a display, five keys without a display
T-Comfort 730 Three keys with a display, five keys without a display
T-Comfort 830 Nine keys with a display
T-Comfort 830 with an additional keypad module 19 keys with a display: nine on the telephone itself
and 10 on an add-on keypad module
Comfort Pro P 100 One key with a display, five keys without a display
Comfort Pro P 300 Three keys with a display, five keys without a display
90

Introduction Team Functions
System telephone Number of keys
Comfort Pro P 300 with an additional
keypad extension Comfort Pro P 300 TM
Comfort Pro P 500 Nine keys with a display
Comfort Pro P 500 with an additional
keypad extension Comfort Pro P 500 TM
Note: Only one function or call number can be programmed for each call key.
36 additional keys without a display
Up to three of these keypad extensions can be used
with a Comfort Pro P 300.
20 additional keys with a display
Up to three of these keypad extensions can be used
with a Comfort Pro P 500.
N
The following keys can be used:
■ Trunk key: Calls (for the programmed call number, e.g. 11) are signalled to this key, and you can make
internal and external calls via this number. A trunk key can be programmed with a substitute function
(with another team member acting as the substitute). Calls for you are then signalled to the terminal of
another team member. A trunk key also provides functions for managing calls. For example, you can con-
figure call protection if you do not want to be disturbed, or call diversion to another telephone.
■ Team key: As with a trunk key, a team key can be used to receive or make calls. However, this key cannot
be used to change the settings for managing calls; it is not possible, for example, to configure call
diversion to another telephone. Calls made via a team key are signalled to all terminals with a trunk key
that has been programmed with the same number. For example, the team key with the number 11 calls all
trunk keys with the number 11.
■ Busy key: The purpose of a busy key is to make the busy status of other team members visible. An
incoming call for a busy team member is signalled on the other team member's busy key. That team
member can take this call by pressing the busy key, which seizes his own terminal's trunk key. Calls taken
via the busy key are not entered in the call list of the team member who was originally called. In addition, it
is possible to call the respective team member via his busy key when his terminal is idle. You set up a call
to this team member by pressing your own trunk key.
91

Team Functions Examples of Use
■ Direct call key: Only outgoing calls can be made with a direct call key; they are signalled to all terminals
with the same number programmed to a trunk key. Calls via a direct call key are signalled to the desti-
nation terminal even if that terminal has been programmed with a substitution function or call protection.
If the destination terminal has been configured for call diversion, the direct call is not diverted.
Which key is suitable for which purpose?
■ Trunk keys can be assigned call numbers for managing central communication tasks, for example, cus-
tomer support. If the call numbers of the support department are assigned to trunk keys on all of its ter-
minals, then all members of the support department can receive and manage calls and use the substitute
function.
■ Team keys, for example, can be used to create a project group within a department. Calls from customers
of this group can then be answered by any team member who is not busy. The team members can call
each other by the team keys.
■ A busy key can be used to configure an enquiry station showing the status of the individual users. The
enquiry station sees the status of the users and can put calls through by simply pressing the key.
■ Direct call keys, for example, can be configured at a terminal in a conference room to call the secretary.
Team Configuration
You can create teams and program call keys in the Configurator of the T-Comfort 930 DSL (PBX Configu-
ration: Groups and Ports: Upn menu).
Call key 1 is preset as a trunk key on all system telephones. This setting can be changed by the system admin-
istrator.
Examples of Use
The following examples illustrate the various uses of teams and team functions.
For information on the display texts and how to use the individual functions, refer to the chapter “Managing
Calls in a Team” in the “T-Comfort 630/730/830” and “Comfort Pro P 100/300/500” user guide.
92

Examples of Use Team Functions
Executive/Secretary Team
In this example, the executive/secretary team comprises two members: the executive and the secretary. The
secretary has one T-Comfort 730 system telephone, and the executive has two, one of which is used as a par-
allel telephone in a sofa suite.
Secretary
TrK 11: Secretary
TrK 10: Executive
11
DK 10: Executive
10
Executive
TrK 10: Executive
TrK 11: Secretary
TrK 12: Private
12
Example: executive/secretary team
Line Seizure
The secretary can be reached on the call number 11 (trunk key TrK 11: secretary’s office).
The executive can be reached on the call number 10 (trunk key TrK 10: executive’s office). He can also
Executive´s Parallel
TrK 10: Executive
TrK 12: Private
answer calls from his parallel telephone. In addition, a private line is configured for both of the executive’s tel-
ephones (trunk key TrK 12: private).
Call numbers 11 and 10 are both configured as a trunk key on the executive’s and the secretary’s terminal
respectively. Thus the executive and the secretary can use either call number (for answering as well as
making calls). Each can act as a substitute for the other.
93

Team Functions Examples of Use
The secretary’s terminal also has the executive’s call number configured as a direct call number (DK 10: exec-
utive’s office). The secretary can therefore reach the executive and put through calls even if the executive has
programmed a substitute.
Line Busy Indication
If a line is busy, e.g. TrK 11 secretary’s office, the other terminal will indicate this. The executive’s private calls
via TrK 12 are not indicated on the secretary’s terminal since no appropriate trunk key is configured on the
latter’s telephone.
Call Signalling
In this configuration example, calls to one’s own call number are signalled acoustically on the following tele-
phones:
■ Call number 11 on the secretary’s telephone
■ Call numbers 10 and 12 on the executive’s telephone.
Calls for the other team member’s call number are indicated by an optical signal on one’s own telephone
(flashing trunk key LED).
The parallel telephone will indicate calls only by an optical signal.
Time-delayed acoustic signalling can be configured for TrK 10 on the secretary’s telephone. If the executive,
for example, does not answer a call within 10 seconds, the secretary’s telephone will start to ring.
If the executive activates a substitute function with the secretary as the substitute, calls for call number 10 will
be indicated on the executive’s telephone by an optical signal only, but signalled acoustically on the sec-
retary’s telephone. The secretary can also activate a substitute function. Calls for call number 11 are then sig-
nalled acoustically on the executive’s telephone, and indicated by an optical signal on the parallel telephone
and the secretary’s telephone.
Three-member Team
The three-member team described here is an example of a team configuration within a project group, e.g.
export sales.
Each team member has one T-Comfort 730 system telephone with all call keys programmed as trunk and
team keys.
94

Examples of Use Team Functions
Miller
10
11
12
TrK 10: Miller
TK 11: Johnson
TK 12: Smith
Johnson
Trk 11: Johnson
TK 10: Miller
TK 12: Smith
Smith
TrK 12: Smith
TK 10: Miller
TK 11: Johnson
Example: three-member team
Line Seizure
Each team member’s call number, e.g. call number 10 for Miller, is programmed as a trunk key on his tele-
phone.
On the other telephones in the team, this call number is programmed as a team key (e.g. TK 10 on Johnson’s
and Smith’s telephones). The team members can thus see which number a call is for and can answer it by
pressing the appropriate team key.
The team members can call each other via the team keys. For example, Miller can call number 12 by pressing
TK 12; the call is then signalled to Smith’s telephone on TrK 12.
Line Busy Indication
If a line is busy, e.g. TrK 11 Johnson, the team keys 11 on Miller’s and Smith’s telephones will indicate this.
Call Signalling
In this example, calls via the trunk keys are signalled acoustically. Calls via the team keys are indicated by a
visual signal (the team key LED flashes).
95

Team Functions Examples of Use
Unified Team
The unified team described here is an example of a team configuration within a department in which calls are
to be managed quickly (e.g. support department).
Each team member has one T-Comfort 730 system telephone with all call keys programmed as trunk keys.
Miller
TrK 10: Support 1
TrK 11: Support 2
TrK 12: Support 3
10
11
12
Johnson
TrK 10: Support 1
TrK 11: Support 2
TrK 12: Support 3
Smith
TrK 10: Support 1
TrK 11: Support 2
TrK 12: Support 3
Example: unified team
Line Seizure
Call numbers 10, 11 and 12 are programmed as trunk keys on each team member’s telephone (TrK 10
toTrK 12.
All team members can use these numbers for answering as well as making calls.
In this team configuration it is useful to program one of the function keys on each tele-
t
phone with the “Hold” function. A call, e.g. for TrK 11, can then be put on hold by
pressing the function key. If another team member then presses trunk key TrK 11 on
his telephone, he can accept the call. For further information on function keys, refer to
the “T-Comfort 630/730/830” and “Comfort Pro P 100/300/500” user guide.
96

Examples of Use Team Functions
Line Busy Indication
If a line is busy, e.g. TrK 11 Johnson, the trunk keys on the other team telephones will indicate this.
Call Signalling
In this example, calls via all trunk keys are signalled acoustically.
Toggle Team
The toggle team described here illustrates how a large number of call numbers can be managed efficiently
with the help of team functions.
Each team member has one T-Comfort 830 system telephone with all call keys programmed as trunk and
team keys.
10
11
12
13
14
15
Example: toggle team
Miller
TrK
10: Support 1
TrK
11: Support 2
TK
14: Support 3
Johnson
TrK
12: Hotline 1
TrK
13: Hotline 2
TK
10: Support 1
Smith
TrK
14: Support 3
TrK
15: Support 4
TK
12: Hotline 1
Line Seizure
Each team member is assigned two call numbers, each programmed as a trunk key (LT 10 to LT 15).
97

Team Functions Examples of Use
The first number of each team member is programmed as a team key on the other member’s telephone, e.g.
LT 10 on Miller’s telephone as TT 10 on Johnson’s telephone. The assumption here is that most calls will go to
the respective first call numbers, and team members can thus help each other out by answering one
another’s calls.
On each telephone it is possible to toggle between the calls on individual lines, e.g. TrK 10 and TrK 11, by
pressing the appropriate key (toggling).
Every call on a trunk key can be transferred to any other party by means of the R key. For more information,
refer to the chapter entitled “Consultation, Toggling, Transfer and Conference” in the “T-Comfort 630/730/
830” and “Comfort Pro P 100/300/500” user guide.
Line Busy Indication
If a line is busy, e.g. TrK 10 on Miller’s telephone, the appropriate team key will indicate this, e.g. TK 10 on
Johnson’s telephone.
Call Signalling
In this example, calls via trunk keys are signalled acoustically. Calls via team keys are indicated by a visual
signal (the team key LED flashes).
98
 Loading...