

Page 1
F:\HT-CZ1-11_UC2\4559026111\4559026111HTCT180UC2\00COVHTCT180UC2\080BCO.fm
masterpage: Left
F:\HT-CZ1-11_UC2\4559026111\4559026111HTCT180UC2\00COVHTCT180UC2\010COV.fm
masterpage:
Right
Sound Bar
Operating Instructions
Manuel d’instructions
Manual de instrucciones
GB
FR
ES
©2015 Sony Corporation Printed in China
4-559-026-11(1)
HT-CT180
4-559-026-11(1)
HT-CT180
HT-CT180
4-559-026-11(1)
Page 2

F:\HT-CZ1-11_UC2\4559026111\4559026111HTCT180UC2\01GB-
Información adicional
HTCT180UC2\020REG.fm
masterpage: Left
C:\SONY\HT_CZ1_CZ2_CZ3\CZ1\UC2\4559026111\4559026111HTCT180UC
2\4559026111\4559026111HTCT180UC2\03LaES-HTCT180UC2\070ADD.fm
masterpage:
Right
Owner’s Record
The model and serial numbers are
located on the bottom of the Bar
Speaker. Record serial numbers in the
space provided below. Refer to them
whenever you call upon your Sony
dealer regarding this product.
Model No. HT-CT180
Serial No._____________________________
WARNING
To reduce the risk of fire or electric
shock, do not expose this apparatus
to rain or moisture.
The unit is not disconnected from the
mains as long as it is connected to the
AC outlet, even if the unit itself has been
turned off.
To reduce the risk of fire, do not cover
the ventilation opening of the appliance
with newspapers, tablecloths, curtains,
etc.
Do not expose the appliance to naked
flame sources (for example, lighted
candles).
To reduce the risk of fire or electric
shock, do not expose this appliance to
dripping or splashing, and do not place
objects filled with liquids, such as vases,
on the appliance.
As the main plug is used to disconnect
the unit from the mains, connect the
unit to an easily accessible AC outlet.
Should you notice an abnormality in the
unit, disconnect the main plug from the
AC outlet immediately.
Do not install the appliance in a
confined space, such as a bookcase or
built-in cabinet.
Do not expose batteries or appliances
with battery-installed to excessive heat,
such as sunshine and fire.
Indoor use only.
For the customers in the U.S.A.
The Caution Marking is put on the
Bottom Enclosure (For the Bar Speaker).
This symbol is intended to alert
the user to the presence of
uninsulated “dangerous
voltage” within the product’s enclosure
that may be of sufficient magnitude to
constitute a risk of electric shock to
persons.
This symbol is intended to alert
the user to the presence of
important operating and
maintenance (servicing) instructions in
the literature accompanying the
appliance.
For the Bar Speaker
The nameplate and the date of
manufacture marking are located on the
bottom.
Important Safety Instructions
1) Read these instructions.
2) Keep these instructions.
3) Heed all warnings.
4) Follow all instructions.
5) Do not use this apparatus near
water.
6) Clean only with dry cloth.
7) Do not block any ventilation
openings. Install in accordance with
the manufacturer’s instructions.
8) Do not install near any heat sources
such as radiators, heat registers,
BLUETOOTH conectado con el
sistema, el entorno de
comunicaciones o las condiciones
circundantes.
Si desea realizar alguna pregunta o
solucionar algún problema relacionado
con el sistema, póngase en contacto
con el distribuidor Sony más cercano.
GB
2
HT-CT180
4-559-026-11(1)
4-559-026-11(1)
25
HT-CT180
ES
Page 3
F:\HT-CZ1-11_UC2\4559026111\4559026111HTCT180UC2\01GBHTCT180UC2\020REG.fm
010COV.book Page 3 Tuesday, December 2, 2014 2:44 PM
masterpage:
Right
stoves, or othe r apparatus (including
amplifiers) that produce heat.
9) Do not defeat the safety purpose of
the polarized or grounding-type
plug. A polarized plug has two
blades with one wider than the
other. A grounding type plug has
two blades and a third grounding
prong. The wide blade or the third
prong are provided for your safety. If
the provided plug does not fit into
your outlet, consult an electrician for
replacement of the obsolete outlet.
10) Protect the power cord from being
walked on or pinched particularly at
plugs, convenience receptacles, and
the point where they exit from the
apparatus.
11) Only use attachments/accessories
specified by the manufacturer.
12) Use only with the cart, stand, tripod,
bracket, or table specified by the
manufacturer, or sold with the
apparatus. When a cart is used, use
caution when moving the cart/
apparatus combination to avoid
injury from tip-over.
13) Unplug this apparatus during
lightning storms or when unused for
long periods of time.
14) Refer all servicing to qualified service
personnel. Servicing is required
when the apparatus has been
damaged in any way, such as powersupply cord or plug is damaged,
liquid has been spilled or objects
have fallen into the apparatus, the
apparatus has been exposed to rain
or moisture, does not operate
normally, or has been dropped.
The following FCC statement applies
only to the version of this model
manufactured for sale in the U.S.A.
Other versions may not c omply with FCC
technical regulations.
NOTE:
This equipment has been tested and
found to comply with the limits for a
Class B digital device, pursuant to Part
15 of the FCC Rules. These limits are
designed to provide reasonable
protection against harmful interference
in a residential installation. This
equipment generates, uses and can
radiate radio frequency energy and, if
not installed and used in accordance
with the instructions, may cause
harmful interference to radio
communications.
However, there is no guarantee that
interference will not occur in a particular
installation. If this equipment does
cause harmful interference to radio or
television reception, which can be
determined by turning the equipment
off and on, the user is encouraged to try
to correct the interference by one or
more of the following measures:
– Reorient or relocate the receiving
antenna.
– Increase the separation between the
equipment and receiver.
– Connect the equipment into an outlet
on a circuit different from that to
which the receiver is connected.
– Consult the dealer or an experienced
radio/TV technician for help.
CAUTION
You are cautioned that any changes or
modifications not expressly approved in
this manual could void your authority to
operate this equipment.
This equipment must not be co-located
or operated in conjunction with any
other antenna or transmitter.
This equipment complies with FCC
radiation exposure limits set forth for an
uncontrolled environment and meets
GB
3
HT-CT180
4-559-026-11(1)
GB
Page 4

F:\HT-CZ1-11_UC2\4559026111\4559026111HTCT180UC2\01GBHTCT180UC2\020REG.fm
020REG.fm Page 4 Thursday, December 4, 2014 11:24 PM
masterpage: Left
the FCC radio frequency (RF) Exposure
Guidelines. This equipment has very low
levels of RF energy that it deemed to
comply without maximum permissive
exposure evaluation (MPE). But it is
desirable that it should be installed and
operated keeping the radiator at least
20cm or more away from person's body
(excluding extremities: hands, wrists,
feet and ankles).
For the customers in Canada
This device complies with Industry
Canada’s licence-exempt RSSs.
Operation is subject to the following
two conditions:
(1) This device may not cause
interference; and
(2) This device must accept any
interference, including interference that
may cause undesired operation of the
device.
This equipment complies with IC
radiation exposure limits set forth for an
uncontrolled environment and meets
RSS-102 of the IC radio frequency (RF)
Exposure rules.
This equipment has very low levels of RF
energy that it deemed to comply
without maximum permissive exposure
evaluation (MPE). But it is desirable that
it should be installed and operated
keeping the radiator at least 20cm or
more away from person’s body
(excluding extremities: hands, wrists,
feet and ankles).
The BLUETOOTH® word mark and logos
are registered trademarks owned by
Bluetooth SIG, Inc. and any use of such
marks by Sony Corporation is under
license.
The N Mark is a trademark or registered
trademark of NFC Forum, Inc. in the
United States and in other countries.
Android™ is a trademark of Google Inc.
“ClearAudio+” is a trademark of Sony
Corporation.
Other trademarks and trade names are
those of their respective owners.
Copyrights and Trademarks
This system incorporates Dolby* Digital
Surround System.
* Manufactured under license from
Dolby Laboratories.
Dolby, and the double-D symbol are
trademarks of Dolby Laboratories.
GB
4
HT-CT180
4-559-026-11(1)
Page 5

F:\HT-CZ1-11_UC2\4559026111\4559026111HTCT180UC2\01GBHTCT180UC2\020REG.fm
010COV.book Page 5 Tuesday, December 2, 2014 2:44 PM
About these operating
instructions
•The instructions in these Operating
Instructions describe the controls on
the remote control. You can also use
the controls on the main unit if they
have the same or similar names as
those on the remote control.
•Some illustrations are presented as
conceptual drawings, and may be
different from the actual products.
masterpage:
Right
5
HT-CT180
4-559-026-11(1)
GB
Page 6
F:\HT-CZ1-11_UC2\4559026111\4559026111HTCT180UC2\01GBHTCT180UC2\010COVTOC.fm
010COV.book Page 6 Tuesday, December 2, 2014 2:44 PM
Table of Contents
masterpage: Left
Connecting
About these operating
instructions ...........................5
Startup Guide (separate document)
Listening
Listening to sound from a TV,
cable/satellite box, etc. .......7
Listening to music from a
BLUETOOTH device ..............7
Sound Adjustment
Enjoying sound effects ..............8
BLUETOOTH Functions
Listening to music from a
BLUETOOTH device ..............9
Turning on or off the
BLUETOOTH function ..........11
Setting the BLUETOOTH
standby mode ..................... 11
Other Functions
Enabling the Secure Link
function ...............................11
Auto standby function ..............11
Mounting the Bar Speaker
on a wall ............................. 12
Additional Information
Precautions .............................. 13
Troubleshooting ....................... 14
Guide to parts and controls ..... 18
Supported audio formats ........ 21
Specifications ........................... 21
On BLUETOOTH
communication ..................23
GB
6
HT-CT180
4-559-026-11(1)
Page 7

F:\HT-CZ1-11_UC2\4559026111\4559026111HTCT180UC2\01GB-
Listening
HTCT180UC2\030LSN.fm
010COV.book Page 7 Tuesday, December 2, 2014 2:44 PM
masterpage:
Right
Listening
Listening to sound from a
TV, cable/satellite box,
etc.
Press the input button of the jack to
which you connected the device you
want to listen.
The indicator of the selected device
lights up.
OPTICAL button
TV that is connected to the OPTICAL jack
ANALOG button
Analog device that is connected to the
ANALOG jack
(BLUETOOTH) button
BLUETOOTH device that supports A2DP
Tip
• If you press INPUT on the Bar Speaker, the
device changes cyclically as follows.
OPTICAL ANALOG BLUETOOTH
Listening to music from a
BLUETOOTH device
Refer to “BLUETOOTH Functions”
(page 9).
7
HT-CT180
4-559-026-11(1)
GB
Page 8

F:\HT-CZ1-11_UC2\4559026111\4559026111HTCT180UC2\01GBHTCT180UC2\040SND.fm
010COV.book Page 8 Tuesday, December 2, 2014 2:44 PM
Setting the Voice mode
Sound Adjustment
The Voice mode helps make dialogs
clearer.
Enjoying sound effects
To set sound effects, press one of the
sound effects buttons on the remote
control.
Selecting the sound effects
Press SURROUND repeatedly during
playback.
The surround effects change cyclically
as follows.
CLEARAUDIO+
SURROUND Off
CLEARAUDIO+
The suitable sound setting is automatically
selected for the sound source. The
CLEARAUDIO+ indicator lights up.
SURROUND On
Sounds are played back with surround
effects. The SURROUND indicator lights up.
SURROUND Off
The input source is down-mixed for 2
channels. The CLEARAUDIO+ and SURROUND
indicators turn off.
SURROUND On
Setting the Night mode
Sounds are played back enhanced with
sound effects and clarity of dialog.
Press VOICE.
The ANALOG indicator flashes twice.
To inactivate the Voice mode, press
VOICE again. The OPTICAL indicator
flashes twice.
Selecting multiplex
broadcast sound (Dual
Mono)
You can enjoy multiplex broadcast
sound when the system receives a
Dolby Digital multiplex broadcast signal.
Press AUDIO repeatedly.
The channel changes cyclically as
follows.
Sub Main/Sub
Main
Main
Outputs only the main channel. The OPTICAL
indicator flashes twice.
Sub
Outputs only the sub channel. The ANALOG
indicator flashes twice.
Main/Sub
Main sound is output from the left speaker
and sub sound is output from the right
speaker. The OPTICAL and ANALOG
indicators flash twice.
masterpage: Left
Press NIGHT.
The ANALOG indicator flashes twice.
To inactivate the Night mode, press
NIGHT again. The OPTICAL indicator
flashes twice.
GB
8
HT-CT180
4-559-026-11(1)
Page 9

F:\HT-CZ1-11_UC2\4559026111\4559026111HTCT180UC2\01GB-
Sound Adjustment/BLUETOOTH Functions
HTCT180UC2\050BLT.fm
010COV.book Page 9 Tuesday, December 2, 2014 2:44 PM
Setting Dolby DRC (Dynamic
Range Control)
Useful for enjoying movies at low sound
volume. DRC applies to Dolby Digital
sources.
Hold down AUDIO for 5 seconds, then
VOICE for 5 seconds to turn on or off
Dolby DRC.
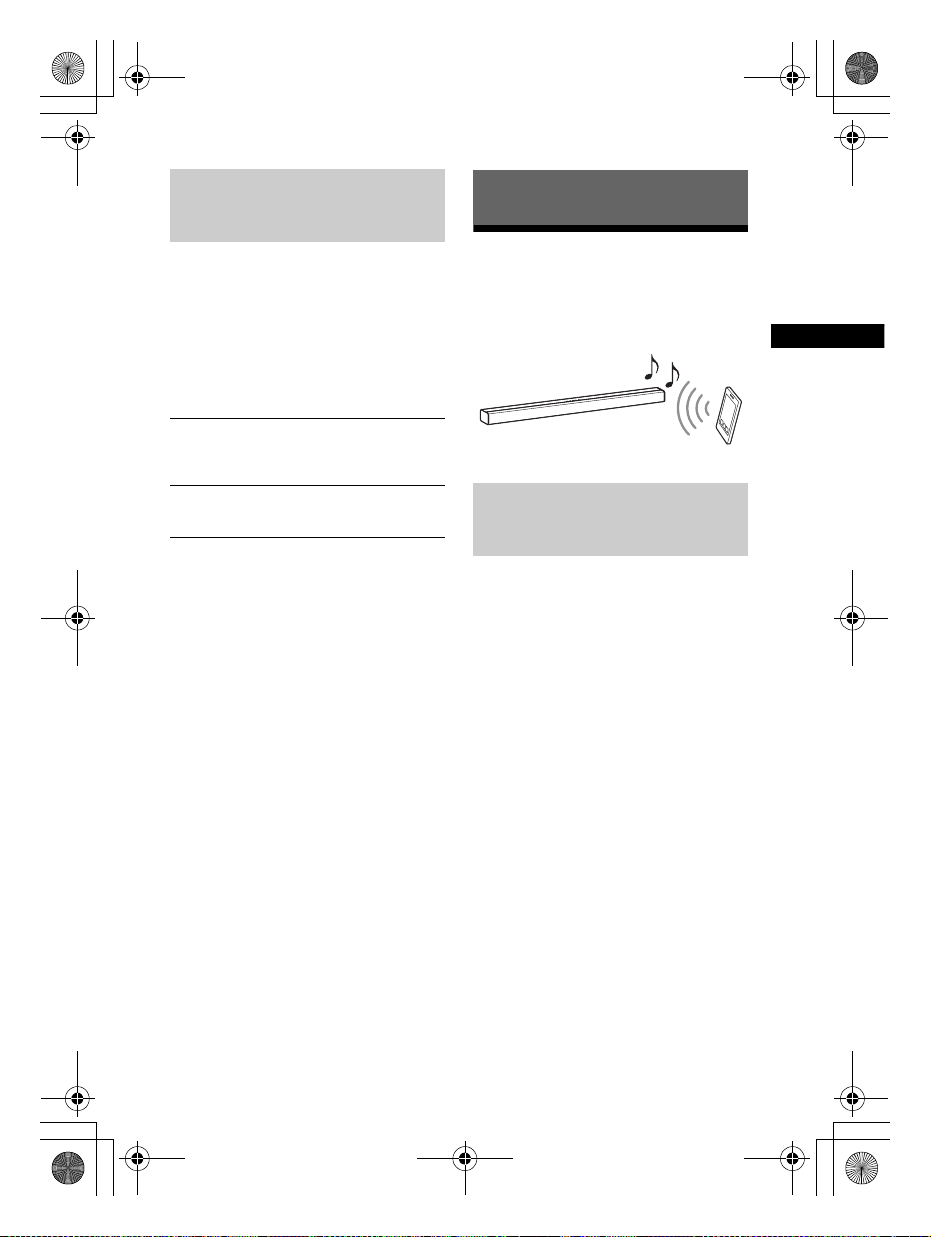
BLUETOOTH Functions
Listening to music from a
BLUETOOTH device
masterpage:
Right
On
Compresses sound in accordance with the
information contained in the content. The
ANALOG indicator flashes twice.
Off
Sound is not compressed. The OPTICAL
indicator flashes twice.
Pairing this system with a
BLUETOOTH device
Pairing is the process required to create
a link between BLUETOOTH devices to
allow wireless connection. You must
pair a device with the system before you
start using the system.
Once BLUETOOTH devices are paired,
there is no need to pair them again.
1 Press PAIRING on the Bar Speaker.
The BLUETOOTH indicator (blue)
flashes quickly during BLUETOOTH
pairing.
2 Turn on the BLUETOOTH function
on the BLUETOOTH device, search
for devices and select “HT-CT180.”
If a Passkey is requested, enter
“0000.”
3 Make sure that the BLUETOOTH
indicator (blue) lights up.
Connection has been established.
Note
• You can pair up to 8 BLUETOOTH
devices. If the 9th BLUETOOTH device
is paired, the least recently
connected device will be replaced by
the new one.
9
HT-CT180
4-559-026-11(1)
GB
Page 10

F:\HT-CZ1-11_UC2\4559026111\4559026111HTCT180UC2\01GBHTCT180UC2\050BLT.fm
010COV.book Page 10 Tuesday, December 2, 2014 2:44 PM
masterpage: Left
Listening to music of the
registered device
1 Press (BLUETOOTH).
2 On the BLUETOOTH device, select
“HT-CT180.”
3 Make sure that the BLUETOOTH
indicator (blue) lights up.
4 Start playback on the BLUETOOTH
device.
Connecting to a BLUETOOTH
device by One-touch
functions (NFC)
By holding an NFC-compatible
BLUETOOTH device near to the N-Mark
on the system, the system and
BLUETOOTH device proceed to
complete pairing and the BLUETOOTH
connection automatically.
Compatible devices
Smartphones, tablets, and music
players with the NFC function built-in
(OS: Android 2.3.3 or later, excluding
Android 3.x)
1 Download, install, and start the
“NFC Easy Connect” application.
2 Touch the N-Mark of the Bar
Speaker with the BLUETOOTH
device.
3 Make sure that the BLUETOOTH
indicator (blue) lights up.
Connection has been established.
Notes
•You can connect only one device at a
time.
• Depending on your device, you may need
to set the NFC function to on beforehand.
Refer to the operating instructions of your
device.
Tip
• If pairing and the BLUETOOTH co nnection
fail, do the following.
– Relaunch “NFC Easy Connect” and
move the BLUETOOTH device slowly
over the N-Mark.
– Remove the case from the BLUETOOTH
device if using a commercially available
device case.
Notes
• The application may not be available
in some countries/regions.
•Depending on your BLUETOOTH
device, this operation may not be
required.
GB
10
HT-CT180
4-559-026-11(1)
Page 11

F:\HT-CZ1-11_UC2\4559026111\4559026111HTCT180UC2\01GB-
BLUETOOTH Functions/Other Functions
HTCT180UC2\060OTH.fm
010COV.book Page 11 Tuesday, December 2, 2014 2:44 PM
masterpage:
Right
Turning on or off the
Other Functions
BLUETOOTH function
Hold down SURROUND for 5 seconds,
then CLEARAUDIO+ for 5 seconds.
On: The ANALOG indicator flashes
twice.
Off: The OPTICAL indicator flashes
twice.
Note
•If you change the setting to off, the
BLUETOOTH function is disabled.
Setting the BLUETOOTH
standby mode
When the system has pairing
information, the system is in
BLUETOOTH standby mode even when
it is turned off.
Hold STANDBY down for 5 seconds.
On: The ANALOG indicator flashes
twice.
Off: The OPTICAL indicator flashes
twice.
Note
•During BLUETOOTH standby mode,
standby power consumption increases.
Enabling the Secure Link
function
You can specify the wireless connection
to link the Bar Speaker to the subwoofer
using the Secure Link function. This
function can help preven t interference if
you use multiple wireless products or
your neighbors use wireless products.
1 Press LINK on the rear of the
subwoofer.
You will hear beeps from the
subwoofer.
2 Hold down PAIRING on the Bar
Speaker for 5 seconds, then VOL –
for 5 seconds.
The OPTICAL and ANALOG
indicators flash alternately.
When the Bar Speaker is linked to
the subwoofer, the indicators stop
flashing.
If it failed, the indicators light up for
5 seconds. Try again the above
operation.
Auto standby function
The system enters standby mode
automatically when you do not operate
the system for about 20 minutes and
the system is not receiving an input
signal.
11
HT-CT180
4-559-026-11(1)
GB
Page 12

F:\HT-CZ1-11_UC2\4559026111\4559026111HTCT180UC2\01GB-
4 mm (3/16 in)
More than 30 mm (1
3
/16 in)
4.6 mm
(
3
/16 in)
Hole on the rear of the Bar Speaker
9 mm
(
9
/25 in)
560 mm
(22
1
/20 in)
8 mm to
9mm
(approx.
11
/32 in)
HTCT180UC2\060OTH.fm
010COV.book Page 12 Tuesday, December 2, 2014 2:44 PM
masterpage: Left
Mounting the Bar
Speaker on a wall
You can mount the Bar Speaker on a
wall.
Notes
•Prepare screws (not supplied) that are
suitable for the wall material and
strength. As a plasterboard wall is
especially fragile, attach the screws
securely to two studs in the wall beam.
Install the Bar Speaker horizontally, hung
by screws in studs in a continuous flat
section of the wall.
• Be sure to subcontract the installation to
Sony dealers or licensed contractors and
pay special attention to safety during the
installation.
•Sony shall not be held responsible for
accidents or damage caused by improper
installation, insufficient wall strength,
improper screw installation or natural
calamity, etc.
1 Prepare screws (not supplied) that
are suitable for the holes on the
rear of the Bar Speaker.
2 Fasten the screws to 2 studs in the
wall.
The screws should protrude by
8 mm to 9 mm (approx.
11
/32 in).
3 Hang the Bar Speaker on the
screws.
Align the holes at the rear of the Bar
Speaker with the screws, then hang
the Bar Speaker on the two screws.
12
GB
HT-CT180
4-559-026-11(1)
Page 13
Additional Information
F:\HT-CZ1-11_UC2\4559026111\4559026111HTCT180UC2\01GBHTCT180UC2\070ADD.fm
010COV.book Page 13 Tuesday, December 2, 2014 2:44 PM
buildup and prolong the life of the
system.
Additional Information
Precautions
On safety
•Should any solid object or liquid fall into
the system, unplug the system and have
it checked by qualified personnel before
operating it any further.
•Do not climb on the Bar Speaker and
subwoofer, as you may fall down and
injure yourself, or system damage may
result.
On power sources
•Before operating the system, check that
the operating voltage is identical to your
local power supply. The operating voltage
is indicated on the nameplate on the
bottom of the Bar Speaker.
•If you are not going to use the system for
a long time, be sure to disconnect the
system from the wall outlet (mains). To
disconnect the AC power cord (mains
lead), grasp the plug itself; never pull the
cord.
•One blade of the plug is wider than the
other for the purpose of safety and will fit
into the wall outlet (mains) only one way.
If you are unable to insert the plug fully
into the outlet, contact your dealer.
•AC power cord (mains lead) must be
changed only at a qualified service shop.
On heat buildup
Although the system heats up during
operation, this is not a malfunction.
If you continuously use this system at high
volume, the system temperature at the
rear and bottom rises considerably. To
avoid burning yourself, do not touch the
system.
On placement
•Place the system in a location with
adequate ventilation to prevent heat
• Do not place the system near heat
sources or in a place subject to direct
sunlight, excessive dust, or mechanical
shock.
• Do not place anything at the rear of the
Bar Speaker and subwoofer that might
block the ventilation holes and cause
malfunctions.
• If the system is being used in combination
with a TV, VCR, or tape deck, noise may
result and picture quality may suffer. In
such a case, place the system away from
the TV, VCR, or tape deck.
• Use caution when placing the system on a
surface that has been specially treated
(with wax, oil, polish, etc.), as staining or
discoloration of the surface may result.
• Take care to avoid any possible injury
from the corners of the Bar Speaker and
subwoofer.
On operation
Before connecting other equipment, be
sure to turn off and unplug the system.
If you encounter color irregularity
on a nearby TV screen
Color irregularities may be observed on
certain types of TV.
• If color irregularity is observed...
Turn off the TV, then turn it on again after
15 to 30 minutes.
• If color irregularity is observed again...
Place the system further away from the
TV.
On cleaning
Clean the system with a soft, dry cloth. Do
not use any type of abrasive pad, scouring
powder, or solvent such as alcohol or
benzine.
If you have any question or problem
concerning your system, please consult
your nearest Sony dealer.
masterpage:
Right
13
HT-CT180
4-559-026-11(1)
GB
Page 14

F:\HT-CZ1-11_UC2\4559026111\4559026111HTCT180UC2\01GBHTCT180UC2\070ADD.fm
010COV.book Page 14 Tuesday, December 2, 2014 2:44 PM
The TV sound from this system lags
Troubleshooting
If you experience any of the following
difficulties while using the system, use
this troubleshooting guide to help
remedy the problem before requesting
repairs. Should any problem persist,
consult your nearest Sony dealer.
Be sure to bring both your Bar Speaker
and subwoofer, even if it seems as
though only one has a problem, when
you request to repair.
General
The power does not turn on.
Check that the AC power cord
(mains lead) is connected securely.
The system does not work normally.
Disconnect the AC power cord
(mains lead) from the wall outlet
(mains), then reconnect after
several minutes.
Sound
No TV sound is output from the system.
Press the input button of the jack to
which you connected the TV
(page 7).
Check the sound output of the TV.
Refer to the operating instructions
of the TV for the TV settings.
Increase the volume on the TV or
cancel muting.
If no sound is output from an optical
digital output jack or the TV does
not have an optical digital output
jack, connect the cable box or
satellite box directly to the OPTICAL
jack of the system.
The sound is output from both the
system and the TV.
Turn off the sound of the TV.
behind the image.
When you a re watching movies, you
may hear the sound with a slight
delay from the image.
No sound or only a very low-level
sound of the device connected to the
Bar Speaker is heard from the Bar
Speaker.
Press the
the remote control and check the
volume level (page 18).
Press the
(volume)
control to cancel the muting
function (page 18).
Make sure the input source is
selected correctly. You should try
other input sources by pressing a
different input button on the
remote control (page 7).
Check that all the cables and cords
of the system and the connected
device are firmly inserted.
No sound or only a very low-level
sound is heard from the subwoofer.
Press the SW
volume)
control to increase the subwoofer
volume (page 18).
Make sure that the on/standby
indicator on the subwoofer is lit in
green. If not, refer to “No sound is
heard from the subwoofer.” in
“Subwoofer wireless sound”
(page 16).
A subwoofer is for reprod ucing bass
sound. In the case of input sources
that contain very little bass sound
components (i.e., a TV broadcast),
the sound from the subwoofer may
be difficult to hear.
When you play content compatible
with copyright protection
technology (HDCP), it is not output
from the subwoofer.
masterpage: Left
(volume) + button on
(muting) or
+ button on the remote
(subwoofer
+ button on the remote
14
GB
HT-CT180
4-559-026-11(1)
Page 15

F:\HT-CZ1-11_UC2\4559026111\4559026111HTCT180UC2\01GB-
Additional Information
HTCT180UC2\070ADD.fm
010COV.book Page 15 Tuesday, December 2, 2014 2:44 PM
masterpage:
Right
The surround effect cannot be
obtained.
Depending on the input signal and
the sound field setting, surround
sound processing may not work
effectively. The surround effect may
be subtle, depending on the
program or disc.
To play multi channel audio, check
the digital audio output setting on
the device connected to the syste m.
For details, refer to the operating
instructions supplied with the
connected device.
BLUETOOTH device
BLUETOOTH connection cannot be
completed.
Make sure that the BLUETOOTH
indicator (blue) is lit (page 18).
System status BLUETOOTH
During BLUETOOTH
pairing
The system is attempting
to connect with a
BLUETOOTH device
The system has
established connection
with a BLUETOOTH
device
The system is in
BLUETOOTH standby
mode (when the system
is off)
Make sure the BLUETOOTH device
to be connected is turned on and
the BLUETOOTH function is
enabled.
Bring this system and the
BLUETOOTH device closer together.
Pair this system and the
BLUETOOTH device again. You may
need to cancel the pairing with this
indicator
(blue)
Flashes quickly
Flashes
Lit
Unlit
system using your BLUETOOTH
device first.
If the BLUETOOTH fun ction is turned
off, turn it on (page 11).
Pairing cannot be achieved.
Bring this system and the
BLUETOOTH device closer together.
Make sure this system is not
receiving interference from a
wireless LAN equipment, other
2.4 GHz wireless devices, or a
microwave oven. If a device that
generates electromagnetic
radiation is nearby, move the device
away from this system.
No sound is output from the connected
BLUETOOTH device.
Make sure that the BLUETOOTH
indicator (blue) is lit (page 18).
Bring this system and the
BLUETOOTH device closer together.
If a device that generates
electromagnetic radiation, such as a
wireless LAN equipment, other
BLUETOOTH devices, or a
microwave oven is nearby, move
the device away from this system.
Remove any obstacle between this
system and the BLUETOOTH device
or move this system away from the
obstacle.
Reposition the connected
BLUETOOTH device.
Try changi ng the wireless frequency
of the Wi-Fi router, computer, etc.
to 5 GHz band.
Increase the volume on the
connected BLUETOOTH device.
The sound is not in sync with the
image.
When you are watching movies, you
may hear the sound with a slight
delay from the image.
15
HT-CT180
4-559-026-11(1)
GB
Page 16

F:\HT-CZ1-11_UC2\4559026111\4559026111HTCT180UC2\01GBHTCT180UC2\070ADD.fm
010COV.book Page 16 Tuesday, December 2, 2014 2:44 PM
masterpage: Left
Subwoofer wireless sound
No sound is heard from the subwoofer.
Check that the AC power cord
(mains lead) of the subwoofer is
connected properly. (Refer to the
supplied Startup Guide.)
The on/standby indicator does not
light.
– Check that the AC power cord
(mains lead) of the subwoofer is
connected properly.
– Press the / (on/standby)
button of the subwoofer to turn
on the power.
The on/standby indicator flashes
slowly in green or lights in red.
– Move the subwoofer to a
location near the Bar Speaker so
that the on/standby indicator
lights in green.
– Follow the steps in “Enabling the
Secure Link function” (page 11).
The on/standby indicator flashes
quickly in green.
– Consult your nearest Sony
dealer.
The on/standby indicator flashes in
red.
– Press the / (on/standby)
button of the subwoofer to turn
off the power and check
whether the ventilation opening
of the subwoofer is blocked or
not.
The subwoofer is designed for
playback of bass sound. When the
input source does not contain much
of bass sound, as is the case with
most TV programs, the bass sound
may not be audible.
Press the SW
volume)
control to increase the volume of
the subwoofer (page 20).
(subwoofer
+ button on the remote
Sound skips or has noise.
If there is a device nearby that
generates electromagnetic waves
like a wireless LAN or a microwave
oven in use, locate the system apart
from it.
If there is an obstacle between the
Bar Speaker and the subwoofer,
move or remove it.
Locate the Bar Speaker and the
subwoofer as close as possible.
Switch the wireless LAN frequency
of any nearby Wi-Fi router or
personal computer to 5 GHz band.
Remote control
The remote control does not function.
Point the remote control at the
center of the front panel (remote
control sensor) of the system
(page 18).
Remove any obstacles in the path
between the remote control and the
system.
Replace both batteries in the
remote control with new ones, if
they are weak.
Make sure you are pressing the
correct button on the remote
control (page 20).
Others
Sensors of the TV do not work properly.
The Bar Speaker may block some
sensors (such as the brightness
sensor) and the remote control
receiver of your TV, or the “emitter
for 3D glasses (infrared
transmission)” of a 3D TV that
supports the infrared 3D glass
system or the wireless
communication. Move the Bar
Speaker away from the TV within a
range that allow those parts to
operate properly. For the locations
of the sensors and remote control
16
GB
HT-CT180
4-559-026-11(1)
Page 17

Additional Information
F:\HT-CZ1-11_UC2\4559026111\4559026111HTCT180UC2\01GBHTCT180UC2\070ADD.fm
010COV.book Page 17 Tuesday, December 2, 2014 2:44 PM
receiver, refer to the operating
instructions supplied with the TV.
Reset
If the system still does not operate
properly, reset the system as follows:
1 While holding down the / (on/
standby) button on the system,
hold down the INPUT and VOL –
buttons simultaneously for 5
seconds.
All 5 indicators on the Bar Speaker
flash 3 times, and the settings
return to their initial status.
2 Disconnect the AC power cord
(mains lead).
masterpage:
Right
17
HT-CT180
4-559-026-11(1)
GB
Page 18

F:\HT-CZ1-11_UC2\4559026111\4559026111HTCT180UC2\01GBHTCT180UC2\070ADD.fm
010COV.book Page 18 Tuesday, December 2, 2014 2:44 PM
Guide to parts and controls
For more information, refer to the pages indicated in parentheses.
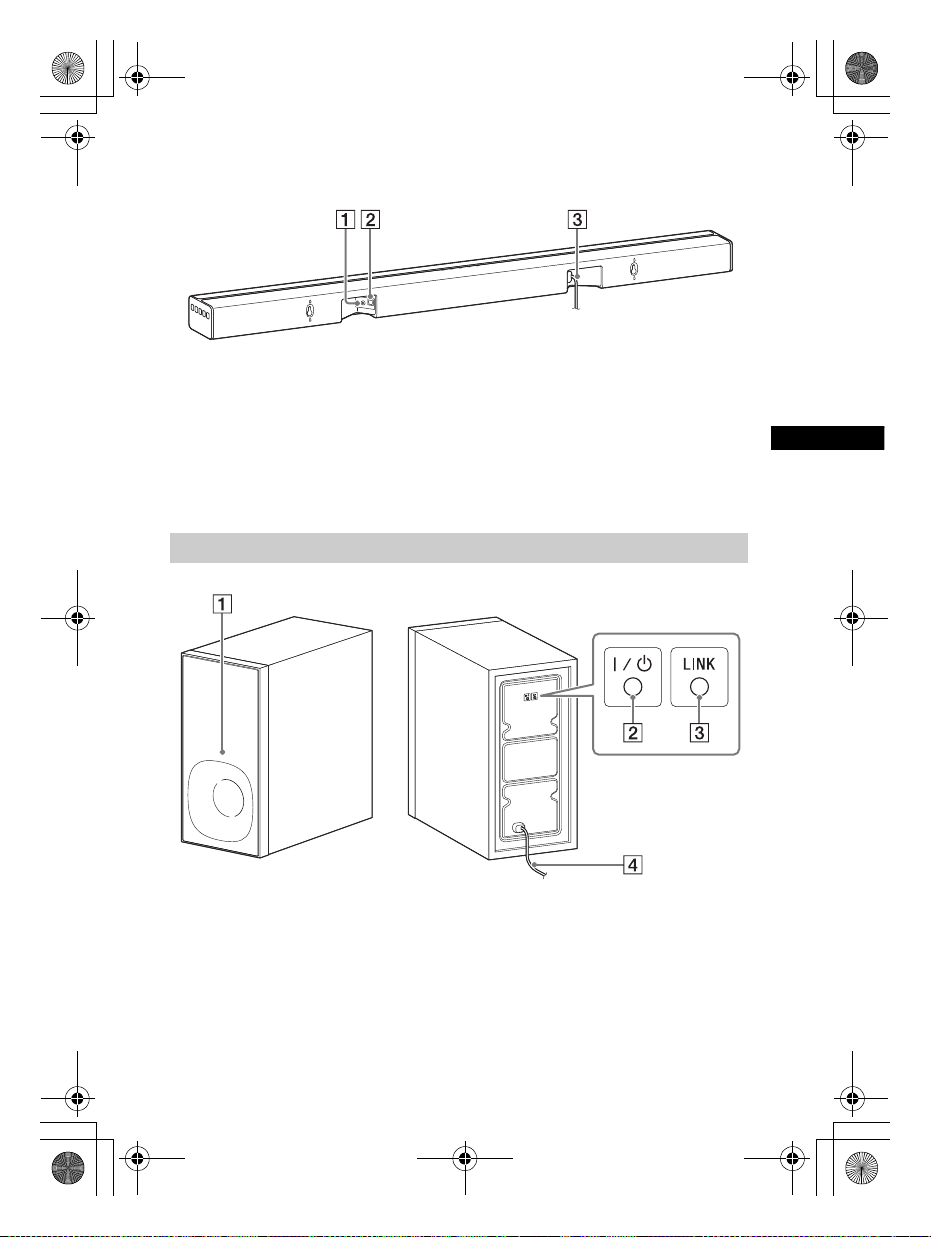
Bar Speaker
Top, front, and side panels
masterpage: Left
OPTICAL indicator (page 7)
ANALOG indicator (page 7)
BLUETOOTH indicator (blue)
BLUETOOTH status
– During BLUETOOTH pairing:
Flashes quickly
– BLUETOOTH connection is being
attempted: Flashes
– BLUETOOTH connection has been
established: Lit
– BLUETOOTH standby mode (when
the system is off): Unlit
Tip
•When the BLUETOOTH function is
disabled (page 11), the BLUETOOTH
indicator turns amber.
GB
18
SURROUND indicator (page 8)
CLEARAUDIO+ indicator
(page 8)
N-Mark (page 10)
When using the NFC function, touch
your NFC-compatible device to the
mark.
Remote control sensor
/ (on/standby) button
Turns on the system, or sets it to
standby mode.
INPUT button (page 7)
PAIRING button (page 9, 11)
VOL (volume) +/– buttons
HT-CT180
4-559-026-11(1)
Page 19
F:\HT-CZ1-11_UC2\4559026111\4559026111HTCT180UC2\01GB-
Additional Information
HTCT180UC2\070ADD.fm
010COV.book Page 19 Tuesday, December 2, 2014 2:44 PM
Rear panel
masterpage:
Right
ANALOG jack
OPTICAL jack
Subwoofer
On/standby indicator
/ (on/standby) button
AC power cord (mains lead)
LINK button (page 11)
AC power cord (mains lead)
19
HT-CT180
4-559-026-11(1)
GB
Page 20

F:\HT-CZ1-11_UC2\4559026111\4559026111HTCT180UC2\01GBHTCT180UC2\070ADD.fm
010COV.book Page 20 Tuesday, December 2, 2014 2:44 PM
masterpage: Left
Remote control
(volume) +*/– buttons
Adjusts the volume.
SW (subwoofer volume) +/–
buttons
Adjusts the volume of bass
sound.
(muting) button
Turns off the sound temporarily.
CLEARAUDIO+ button
Automatically selects the suitable
sound setting for the sound
source.
SURROUND button (page 8)
VOICE button (page 8)
AUDIO button* (page 8)
NIGHT button (page 8)
*The AUDIO and + buttons have a
tactile dot. Use it as a guide during
operation.
Controlling a connected TV
You can control a Sony TV connected to
the system with the following buttons.
TV / (on/standby) button
Turns on or off the TV.
TV INPUT button
Selects the input signal.
TV (muting) button
Turns off the sound temporarily.
TV / (on/standby) button
/ (on/standby) button
TV INPUT button
TV (muting) button
(BLUETOOTH) button (page 7)
STANDBY button (page 11)
ANALOG button (page 7)
OPTICAL button (page 7)
GB
20
HT-CT180
4-559-026-11(1)
Page 21
F:\HT-CZ1-11_UC2\4559026111\4559026111HTCT180UC2\01GB-
Additional Information
HTCT180UC2\070ADD.fm
010COV.book Page 21 Tuesday, December 2, 2014 2:44 PM
masterpage:
Right
Supported audio formats
Audio formats supported by this system
are as follows.
•Dolby Digital
•Linear PCM 2ch 48kHz or less
Specifications
Bar Speaker (SA-CT180)
Amplifier section
U.S. models:
POWER OUTPUT AND TOTAL HARMONIC
DISTORTION:
(FTC)
Front L + Front R:
With 4 ohms loads, both channels
driven, from 200 Hz - 20,000 Hz; rated
13 Watts per channel minimum RMS
power, with no more than 1% total
harmonic distortion from
250 milliwatts to rated output.
POWER OUTPUT (reference)
Front L/Front R speaker:
25 Watts (per channel at 4 ohms,
1kHz)
Canadian models:
POWER OUTPUT (rated)
Front L + Front R:
13 W + 13 W (at 4 ohms, 1 kHz, 1% THD)
POWER OUTPUT (reference)
Front L/Front R speaker:
25 Watts (per channel at 4 ohms,
1kHz)
Inputs
OPTICAL
ANALOG
BLUETOOTH section
Communication system
BLUETOOTH Specification version 4.0
Output
BLUETOOTH Specification Power Class
2
Maximum communication range
Line of sight approx. 10 m (33 ft)
Maximum number of devices to be
registered
8 devices
Frequency band
2.4 GHz band (2.4000 GHz -
2.4835 GHz)
Modulation method
FHSS (Freq Hopping Spread Spectrum)
1)
21
HT-CT180
4-559-026-11(1)
GB
Page 22

F:\HT-CZ1-11_UC2\4559026111\4559026111HTCT180UC2\01GBHTCT180UC2\070ADD.fm
070ADD.fm Page 22 Monday, December 8, 2014 2:46 PM
masterpage: Left
Compatible BLUETOOTH profiles
A2DP (Advanced Audio Distribution
Profile)
Supported Codecs
4)
SBC
Transmission range (A2DP)
3)
2)
20 Hz - 20,000 Hz (Sampling frequency
44.1 kHz)
1)
The actual range will vary depending on
factors such as obstacles between
devices, magnetic fields around a
microwave oven, static electricity,
cordless phone, reception sensitivity,
operating system, software application,
etc.
2)
BLUETOOTH standard profiles indicate
the purpose of BLUETOOTH
communication between devices.
3)
Codec: Audio signal compression and
conversion format
4)
Subband Codec
Speakers
Front L/Front R speaker section
Speaker system
2-way speaker system, Acoustic
suspension
Speaker
Tweeter: 14 mm - 25 mm (
balance dome type
Woofer: 40 mm × 120 mm (1
3
4
/4in) cone type
9
/16in - 1 in)
5
/8in ×
General
Power requirements
120 V AC, 60 Hz
Power consumption
On: 17 W
Standby mode: 0.5 W or less
BLUETOOTH Standby mode: 3 W or
less
Dimensions (approx.) (w/h/d)
901 mm × 52 mm × 84 mm
1
(35
/2in × 21/8in × 33/8in)
Mass (approx.)
2kg (4lb 7oz)
Speaker
130 mm (5
Power requirements
1
/8in) cone type
120 V AC, 60 Hz
Power consumption
On: 13 W
Standby mode: 0.6 W or less
Dimensions (approx.) (w/h/d)
170 mm × 342 mm × 325 mm
3
(6
/4in × 131/2in × 127/8in)
Mass (approx.)
5.5kg (12Ib 2oz)
Wireless transmitter/
receiver
Frequency band
2.4 GHz band (2.404 GHz - 2.476 GHz)
Modulation method
GFSK
Design and specifications are subject to
change without notice.
Subwoofer (SA-WCT180)
POWER OUTPUT (reference)
50 W (per channel at 4 ohms, 100 Hz)
Speaker system
Subwoofer system, Bass reflex
GB
22
HT-CT180
4-559-026-11(1)
Page 23

Additional Information
F:\HT-CZ1-11_UC2\4559026111\4559026111HTCT180UC2\01GBHTCT180UC2\070ADD.fm
010COV.book Page 23 Tuesday, December 2, 2014 2:44 PM
o n th is sy st em an d B LU ET OO TH de vi ce
On BLUETOOTH
communication
• BLUETOOTH devices should be used
within approximately 10 meters
(33 feet) (unobstructed distance) of
each other. The effective
communication range may become
shorter under the following
conditions.
– When a person, metal object, wall or
other obstruction is between the
devices with a BLUETOOTH
connection
– Locations where a wireless LAN is
installed
– Around microwave ovens that are in
use
– Locations where other
electromagnetic waves occur
• BLUETOOTH devices and wireless LAN
(IEEE 802.11b/g) use the same
frequency band (2 .4 GHz). When using
your BLUETOOTH device near a device
with wireless LAN capability,
electromagnetic interference may
occur. This could result in lower data
transfer rates, noise, or inability to
connect. If this happens, try the
following remedies:
– Use this system at least 10 meters
(33 feet) away from the wireless LAN
device.
– Turn off the power to the wireless
LAN device when using your
BLUETOOTH device within 10 meters
(33 feet).
– Install this system and BLUETOOTH
device as closer to each other as
possible.
• The radio waves broadcast by this
system may interfere with the
operation of some medical devices.
Since this interference may result in
malfunc tion, always t urn off the po wer
in the following locations:
– I n hospitals, on trains, in airplanes, at
gas stations, and any place where
flammable gasses may be present
– Near automatic doors or fire alarms
• This system supports security
functions that comply with the
BLUETOOTH specification to ensure
secure connection during
communication using BLUETOOTH
technology. However, this security
may be insufficient depending on the
setting contents and other factors, so
always be careful when performing
communication using BLUETOOTH
technology.
• Sony cannot be held liable in any way
for damages or other loss resulting
from information leaks during
communication using BLUETOOTH
technology.
• BLUETOOTH communication is not
necessarily guaranteed with all
BLUETOOTH devices that have the
same profile as this system.
• BLUETOOTH devices connected with
this system must comply with the
BLUETOOTH specification prescribed
by the Bluetooth SIG, Inc ., and must be
certified to comply. However, even
when a device complies with the
BLUETOOTH specification, there may
be cases where the characteristics or
specifications of the BLUETOOTH
device make it impossible to connect,
or may result in different control
methods, display or operation.
• Noise may occur or the audio may cut
off depending on the BLUETOOTH
device connected with this system,
the communications environment, or
surrounding conditions.
If you have any questions or problems
concerning your system, please consult
your nearest Sony dealer.
masterpage:
Right
23
HT-CT180
4-559-026-11(1)
GB
Page 24

C:\SONY\HT_CZ1_CZ2_CZ3\CZ1\UC2\4559026111\4559026111HTCT180UC
2\4559026111\4559026111HTCT180UC2\02CaFR-HTCT180UC2\020REG.fm
010COV.book Page 2 Monday, December 8, 2014 2:51 PM
masterpage: Left
Enregistrement du propriétaire
Le modèle et le numéro de série sont
situés sous la barre de
haut-parleurs. Notez le numéro de série
dans l’espace ci-dessous. Vous devrez
vous y référer lors d’un appel à votre
revendeur Sony au sujet de ce produit.
N ° de m o d è le H T - CT 1 8 0
N° de sé rie
AVERTISSEMENT
Pour réduire les risques
d’incendie ou d’électrocution,
gardez cet appareil à l’abri de la
pluie et de l’humidité.
L’appareil n’est pas débranché du
secteur aussi longtemps qu’il est
raccordé à la prise secteur, même s’il
s’éteint automatiquement.
Pour réduire le risque d’incendie,
n’obstruez pas l’orifice de ventilation de
l’appareil avec un journal, une nappe,
une tenture, etc. N’exposez pas
l’appareil à une source de flamme nue
(par exemple, une bougie allumée).
Pour réduire le risque d’incendie ou
d’électrocution, n’exposez pas cet
appareil à des éclaboussures ou des
gouttes d’eau et ne posez pas dessus
des objets remplis de liquides,
notamment des vases.
La fiche principale étant utilisée pour
déconnecter l’unité de l’alimentation
secteur, connectez l’unité à une prise
secteur aisément accessible. Si vous
remarquez une anomalie dans
l’appareil, débranchez immédiatement
la fiche principale de la prise secteur.
N’installez pas cet appareil dans un
endroit confiné, comme sur une étagère
ou un meuble TV intégré.
N’exposez pas les piles ou un appareil
contenant des piles à une chaleur
excessive, notamment aux rayons
directs du soleil ou à des flammes.
Utilisation à l’intérieur seulement.
Pour les clients aux États-Unis
Le marquage Attention est situé sous le
boîtier (pour la barre de haut-parleurs).
Ce symbole est destiné à
renseigner l’utilisateur sur la
présence à l’intérieur du boîtier
de l’appareil d’une « tension
dangereuse » non isolée et
suffisamment puissante pour présenter
un risque d’électrocution.
Ce symbole est destiné à
renseigner l’utilisateur sur la
présence d’importantes
instructions d’utilisation et
d’entretien (service) dans les
documents qui accompagnent
l’appareil.
Pour la barre de haut-parleurs
La plaque signalétique et la date de
fabrication sont situées sous la barre.
Consignes de sécurité
importantes
1) Lisez ces instructions.
2) Conservez ces instructions.
3) Respectez tous les avertissements.
4) Respectez toutes les instructions.
5) N’utilisez pas cet appareil à
proximité de l’eau.
6) Nettoyez-le uniquement avec un
chiffon sec.
7) N’obstruez pas les orifices de
ventilation. Installez l’appareil
FR
2
HT-CT180
4-559-026-11(1)
Page 25

C:\SONY\HT_CZ1_CZ2_CZ3\CZ1\UC2\4559026111\4559026111HTCT180UC
2\4559026111\4559026111HTCT180UC2\02CaFR-HTCT180UC2\020REG.fm
010COV.book Page 3 Monday, December 8, 2014 2:51 PM
masterpage:
Right
conformément aux instructions du
fabricant.
8) N’installez pas l’appareil à proximité
des sources de chaleur telles que les
radiateurs, les registres de chaleur,
les poêles ou autres appareils (y
compris les amplificateurs)
produisant de la chaleur.
9) N’altérez pas le dispositif de sécurité
de la fiche polarisée ou mise à la
terre. Une fiche polarisée compte
deux lames de largeur différente.
Une fiche de type mise à la terre
possède deux lames et une broche
de mise à la terre. La lame la plus
large ou la troisième broche assure
une fonction de sécurité. Si la fiche
fournie d’origine ne s’adapte pas à
votre prise, faites remplacer la prise
obsolète par un électricien.
10) Protégez le cordon d’alimentation
des lieux de passage ou des points
de pincement, en particulier au
niveau des fiches, des prises de
courant et de sa sortie de l’appareil.
11) Utilisez uniquement des accessoires
spécifiés par le fabricant.
12) Utilisez uniquement l’appareil avec
le chariot, socle, trépied, support ou
table spécifié par le fabricant ou
vendu avec l’appareil. Si vous utilisez
un chariot, soyez prudent lorsque
vous le déplacez avec l’appareil afin
d’éviter toute chute susceptible de
provoquer des blessures.
13) Débranchez cet appareil en cas
d’orage ou d’inutilisation prolongée.
14) Confiez toutes les réparations à du
personnel de service qualifié.
L’appareil doit être réparé en cas de
dommage quelconque, notamment
lorsque le cordon d’alimentation ou
sa fiche est endommagé, du liquide
ou un objet a pénétré à l’intérieur de
l’appareil, l’appareil a été exposé à la
pluie ou à l’humidité, l’appareil ne
fonctionne pas normalement ou est
tombé.
La déclaration de la FCC suivante
s’applique uniquement à la version de
ce modèle fabriquée pour la vente aux
Etats-Unis. Il se peut que les autres
versions ne soient pas conformes aux
réglementations techniques de la FCC.
REMARQUE :
Cet appareil a été testé et s’est révélé
conforme aux limites des appareils
numériques de Classe B, conformément
à l’alinéa 15 de la réglementation FCC.
Ces limites sont conçues pour assurer
une protection raisonnable contre les
interférences nuisibles dans une
installation résidentielle. Cet appareil
génère, utilise et peut rayonner de
l’énergie de fréquence radio qui, en cas
d’installation et d’utilisation non
conformes aux instructions, peut
engendrer des interférences nuisibles
avec les communications radio. Il n’est
toutefois pas garanti qu’aucune
interférence ne surviendra dans une
installation particulière. Si cet appareil
altère effectivement la réception radio
ou té lévisé e, ce qui peut êt re dé term iné
en le mettant hors tension, puis à
nouveau sous tension, nous vous
encourageons à essayer de remédier à
la situation en prenant une ou plusieurs
mesures ci-après :
– Réorientez ou repositionnez
l’antenne de réception.
– Augmentez la distance qui sépare
l’appareil du récepteur.
– Raccordez l’appareil à la prise d’un
circuit différent de celui auquel le
récepteur est raccordé.
– Sollicitez l’aide de votre revendeur ou
d’un technicien en radio/télévision
expérimenté.
FR
3
HT-CT180
4-559-026-11(1)
FR
Page 26
C:\SONY\HT_CZ1_CZ2_CZ3\CZ1\UC2\4559026111\4559026111HTCT180UC
2\4559026111\4559026111HTCT180UC2\02CaFR-HTCT180UC2\020REG.fm
010COV.book Page 4 Monday, December 8, 2014 2:51 PM
masterpage: Left
ATTENTION
Vous êtes prévenu que toute
modification ou changement non
expressément approuvé dans ce
manuel peut annuler votre autorisation
à utiliser cet appareil.
Cet appareil ne doit pas se trouver à
proximité d’un autre émetteur ou d’une
autre antenne, ou encore être utilisé en
même temps que ceux-ci.
Cet appareil est conforme aux limites
d’exposition au rayonnement de la FCC
déterminées pour un environnement
incontrôlé et répond aux
recommandations d’exposition de la
radiofréquence (RF) de la FCC. Cet
équipement présente des niveaux
d’énergie RF très ba s considérés comme
conformes et ne nécessite pas
d’évaluation d’exposition maximale
admise (MPE). Il est toutefois
souhaitable de l’installer et de l’utiliser
en laissant l’appareil rayonnant à une
distance d’au moins 20cm de votre
corps (sans compter les extrémités :
mains, poignets, pieds et chevilles).
Pour les clients au Canada
Le présent appareil est conforme aux
CNR d’lndustrie Canada applicable aux
appareils radio exempts de licence.
L’exploitation est autorisée aux deux
conditions suivantes :
1) l’appareil ne doit pas produire de
brouillage;
2) I’utilisateur de l’appareil doit accepter
tout brouillage radioélectrique subi,
même si le brouillage est susceptible
d'en compromettre le fonctionnement.
Cet appareil est conforme aux limites
d’exposition au rayonnement d’IC
déterminées pour un environnement
incontrôlé et correspond aux règles
d’exposition RSS-102 de la
radiofréquence (RF) d’IC.
Cet équipement présente des niveaux
d’énergie RF très ba s considérés comme
conformes et ne nécessite pas
d’évaluation d’exposition maximale
admise (MPE). Il est toutefois
souhaitable de l’installer et de l’utiliser
en laissant l’appareil rayonnant à une
distance d’au moins 20cm de votre
corps (sans compter les extrémités :
mains, poignets, pieds et chevilles).
Droits d’auteur et marques
commerciales
Ce système intègre Dolby* Digital
Surround System.
*Fabriqué sous licence de Dolby
Laboratories.
Dolby et le symbole double-D sont des
marques commerciales de Dolby
Laboratories.
Le terme et les logos BLUETOOTH® sont
des marques déposées appartenant à
Bluetooth SIG, Inc. et tout usage de ces
marques par Sony Corporation s’inscrit
dans le cadre d’une licence.
N Mark est une marque commerciale ou
une marque déposée de NFC Forum,
Inc. aux États-Unis et dans d’autres
pays.
Android™ est une marque commerciale
de Google Inc.
« ClearAudio+ » est une marque
commerciale de Sony Corporation.
Les autres marques commerciales et
noms commerciaux appartiennent à
leurs propriétaires respectifs.
FR
4
HT-CT180
4-559-026-11(1)
Page 27
C:\SONY\HT_CZ1_CZ2_CZ3\CZ1\UC2\4559026111\4559026111HTCT180UC
2\4559026111\4559026111HTCT180UC2\02CaFR-HTCT180UC2\020REG.fm
010COV.book Page 5 Monday, December 8, 2014 2:51 PM
À propos de ce manuel
d’instructions
•Les instructions contenues dans ce
manuel d’instructions décrivent les
commandes de la télécommande.
Vous pouvez également utiliser les
commandes sur l'unité principale si
elles portent le même nom ou un nom
similaire à celles de la télécommande.
•Certaines illustrations sont présentées
comme des dessins conceptuels et
peuvent différer des produits réels.
masterpage:
Right
5
HT-CT180
4-559-026-11(1)
FR
Page 28

C:\SONY\HT_CZ1_CZ2_CZ3\CZ1\UC2\4559026111\4559026111HTCT180UC
2\4559026111\4559026111HTCT180UC2\02CaFRHTCT180UC2\010COVTOC.fm
010COV.book Page 6 Monday, December 8, 2014 2:51 PM
Table des matières
masterpage: Left
Branchement
À propos de ce manuel
d’instructions .......................5
Manuel de démarrage (document séparé)
Écoute
Écoute du son d’un téléviseur,
boîtier câble/satellite, etc. ... 7
Écoute de musique depuis un
dispositif BLUETOOTH .......... 7
Réglage du son
Profiter des effets sonores ........8
Fonctions BLUETOOTH
Écoute de musique depuis un
dispositif BLUETOOTH ..........9
Activation ou désactivation de la
fonction BLUETOOTH .......... 11
Réglage du mode veille
BLUETOOTH .........................11
Autres fonctions
Activation de la fonction Secure
Link ......................................11
Fonction de veille
automatique ........................11
Installation de la barre de
haut-parleurs sur un mur ... 12
Informations
supplémentaires
Précautions .............................. 13
Dépannage ............................... 14
Guide des pièces et des
commandes ....................... 18
Formats audio pris en
charge ................................. 21
Caractéristiques ....................... 21
À propos de la communication
BLUETOOTH ........................23
FR
6
HT-CT180
4-559-026-11(1)
Page 29
C:\SONY\HT_CZ1_CZ2_CZ3\CZ1\UC2\4559026111\4559026111HTCT180UC
Écoute
2\4559026111\4559026111HTCT180UC2\02CaFR-HTCT180UC2\030LSN.fm
010COV.book Page 7 Monday, December 8, 2014 2:51 PM
masterpage:
Right
Écoute
Écoute de musique
depuis un dispositif
Écoute du son d’un
téléviseur, boîtier câble/
satellite, etc.
Appuyez sur le bouton input de la
prise à laquelle vous avez branché le
dispositif dont vous souhaitez écouter
le son.
Le témoin du dispositif sélectionné
s'allume.
Bouton OPTICAL
TV branchée sur la prise OPTICAL
Bouton ANALOG
Dispositif analogique branché à la prise
ANALOG
Bouton (BLUETOOTH)
Dispositif BLUETOOTH prenant en charge
A2DP
Conseil
• Si vous appuyez sur la touche INPUT de la
barre de haut-parleurs, le dispositif
change dans l'ordre suivant.
OPTICAL ANALOG BLUETOOTH
BLUETOOTH
Consultez « Fonctions BLUETOOTH »
(page 9).
7
HT-CT180
4-559-026-11(1)
FR
Page 30
C:\SONY\HT_CZ1_CZ2_CZ3\CZ1\UC2\4559026111\4559026111HTCT180UC
2\4559026111\4559026111HTCT180UC2\02CaFR-HTCT180UC2\040SND.fm
010COV.book Page 8 Monday, December 8, 2014 2:51 PM
Réglage du mode Voix
Réglage du son
Le mode Voix rend les dialogues plus
clairs.
Profiter des effets
sonores
Pour configurer les effets sonores,
appuyez sur l’un des boutons
correspondant à un effet sonore de la
télécommande.
Sélection des effets sonores
Appuyez plusieurs fois sur SURROUND
pendant la lecture.
Les effets ambiophoniques changent
dans l’ordre suivant.
CLEARAUDIO+
SURROUND désactivé
CLEARAUDIO+
Le réglage sonore adapté est sélectionné
automatiquement pour la source sonore. Le
témoin CLEARAUDIO+ s
SURROUND activé
Les sons sont lus avec des effets
ambiophoniques. Le témoin SURROUND
s
’allume.
SURROUND désactivé
Le mixage de la source d'entrée est réduit
pour 2 canaux. Les témoins CLEARAUDIO+ et
SURROUND s
SURROUND activé
’allume.
’éteignent.
Appuyez sur VOICE.
Le témoin ANALOG clignote deux fois.
Pour désactiver le mode Voix, appuyez
de nouveau sur VOICE. Le témoin
OPTICAL clignote deux fois.
Sélection du son multiplexé
(Dual Mono)
Vous pouvez profiter de son multiplexé
lorsque le système reçoit un signal
Dolby Digital multiplexé.
Appuyez plusieurs fois sur AUDIO.
Le canal change dans l'ordre suivant.
Principal
Secondaire
Principal
Émet uniquement le canal principal. Le
témoin OPTICAL clignote deux fois.
Secondaire
Émet uniquement le canal secondaire. Le
témoin ANALOG clignote deux fois.
Principal/Secondaire
Le son principal est émis par le haut-parleur
gauche et le son secondaire par le hautparleur droit. Les témoins OPTICAL et
ANALOG clignotent deux fois.
Secondaire Principal/
masterpage: Left
Réglage du mode Nuit
Les sons sont lus améliorés avec des
effets sonores et des dialogues clairs.
Appuyez sur NIGHT.
Le témoin ANALOG clignote deux fois.
Pour désactiver le mode Nuit, appuyez
de nouveau sur NIGHT. Le témoin
OPTICAL clignote deux fois.
FR
8
HT-CT180
4-559-026-11(1)
Page 31
C:\SONY\HT_CZ1_CZ2_CZ3\CZ1\UC2\4559026111\4559026111HTCT180UC
Réglage du son/Fonctions BLUETOOTH
2\4559026111\4559026111HTCT180UC2\02CaFR-HTCT180UC2\050BLT.fm
010COV.book Page 9 Monday, December 8, 2014 2:51 PM
masterpage:
Right
Pa ra mét re r l a f on ct io n D ol by
DRC (Dynamic Range
Fonctions BLUETOOTH
Control)
Utile pour regarder les films à un volume
sonore faible. DRC s'applique aux
sources Dolby Digital.
Écoute de musique
depuis un dispositif
BLUETOOTH
Appuyez sur AUDIO pendant
5 secondes puis sur VOICE pendant
5 secondes pour activer ou désactiver
la fonction Dolby DRC.
Activé
Compresse le son en fonction des
informations présentes dans le contenu. Le
témoin ANALOG clignote deux fois.
Désactivé
Le son n'est pas compressé. Le témoin
OPTICAL clignote deux fois.
Appairage de ce système
avec un dispositif
BLUETOOTH
L'appairage est le processus requis pour
créer un lien entre des dispositifs
BLUETOOTH afin d'établir une
connexion sans fil. Vous devez apparier
un dispositif avec le système avant de
commencer à utiliser ce dernier.
Une fois les dispositifs BLUETOOTH
appariés, il n'est plus nécessaire de les
apparier de nouveau.
1 Appuyez sur PAIRING sur la barre
de haut-parleurs.
Le témoin BLUETOOTH (bleu)
clignote rapidement pendant
l’appairage BLUETOOTH.
2 Activez la fonction BLUETOOTH
sur le dispositif BLUETOOTH,
recherchez les dispositifs et
sélectionnez « HT-CT180 ».
Si un « Passkey » est demandé,
entrez « 0000 ».
3 Vérifiez que le témoin BLUETOOTH
(bleu) s’allume.
La connexion a été établie.
9
HT-CT180
4-559-026-11(1)
FR
Page 32

C:\SONY\HT_CZ1_CZ2_CZ3\CZ1\UC2\4559026111\4559026111HTCT180UC
2\4559026111\4559026111HTCT180UC2\02CaFR-HTCT180UC2\050BLT.fm
010COV.book Page 10 Monday, December 8, 2014 2:51 PM
Remarque
• Vous pouvez apparier 8 dispositifs
BLUETOOTH au maximum. Si un 9e
dispositif BLUETOOTH est apparié, le
dispositif dont la dernière connexion
est la plus ancienne sera remplacé
par le nouveau.
Remarques
Écoute de musique du
dispositif enregistré
1 Appuyez sur (BLUETOOTH).
2 Sur le dispositif BLUETOOTH,
sélectionnez « HT-CT180 ».
3 Vérifiez que le témoin BLUETOOTH
(bleu) s’allume.
•L'application peut être indisponible
dans certains pays/régions.
•Selon votre dispositif BLUETOOTH,
cette opération peut ne pas être
nécessaire.
2 Touchez la marque N de la barre
de haut-parleurs avec le dispositif
BLUETOOTH.
4 Démarrez la lecture sur le
dispositif BLUETOOTH.
Connexion à un dispositif
BLUETOOTH grâce aux
fonctions une touche (NFC)
Maintenez un dispositif BLUETOOTH
compatible NFC à proximité de la
marque N du système ; le système et le
dispositif BLUETOOTH s'apparient
automatiquement via une connexion
BLUETOOTH.
Dispositifs compatibles
Smartphones, tablettes et lecteurs de
musique dotés de la fonction NFC
intégrée
(SE : Android 2.3.3 ou versions
ultérieures, sauf Android 3.x)
1 Téléchargez, installez et démarrez
l'application « Connexion NFC
facile ».
3 Vérifiez que le témoin BLUETOOTH
(bleu) s’allume.
La connexion a été établie.
Remarques
•Vous ne pouvez connecter qu'un
dispositif à la fois.
•Selon votre périphérique, vous pourriez
devoir activer la fonction NFC à l'avance.
Consultez le manuel d'instructions de
votre dispositif.
Conseil
•Si l'appairage et la connexion
BLUETOOTH échouent, procédez comme
suit.
– Relancez « Connexion NFC facile » et
passez doucement le dispositif
BLUETOOTH au-dessus de la marque N.
– Retirez le dispositif BLUETOOTH de son
étui si vous en utilisez un.
masterpage: Left
10
FR
HT-CT180
4-559-026-11(1)
Page 33

C:\SONY\HT_CZ1_CZ2_CZ3\CZ1\UC2\4559026111\4559026111HTCT180UC
Fonctions BLUETOOTH/Autres fonctions
2\4559026111\4559026111HTCT180UC2\02CaFR-HTCT180UC2\060OTH.fm
010COV.book Page 11 Monday, December 8, 2014 2:51 PM
masterpage:
Right
Activation ou
Autres fonctions
désactivation de la
fonction BLUETOOTH
Appuyez sur SURROUND pendant
5 secondes, puis sur CLEARAUDIO+
pendant 5 secondes.
Marche : Le témoin ANALOG clignote
deux fois.
Arrêt : Le témoin OPTICAL clignote deux
fois.
Remarque
•Si vous changez le réglage sur Arrêt, la
fonction BLUETOOTH est désactivée.
Activation de la fonction
Secure Link
Vous pouvez spécifier l a connexion sans
fil pour lier la barre de haut-parleurs au
caisson de graves à l'aide de la fonction
Secure Link. Cette fonction permet
d'éviter les interférences si vous utilisez
plusieurs produits sans fil ou si vos
voisins utilisent des produits sans fil.
1 Appuyez sur LINK à l'arrière du
caisson de graves.
Le caisson de graves émet des bips.
2 Appuyez sur PAIRING sur la barre
Réglage du mode veille
BLUETOOTH
Lorsque le système dispose
d’informations d’appairage, le système
est en mode veille BLUETOOTH même
lorsqu’il est hors tension.
Appuyez sur STANDBY pendant
5secondes.
Marche : Le témoin ANALOG clignote
deux fois.
Arrêt : Le témoin OPTICAL clignote deux
fois.
Remarque
•En mode veille BLUETOOTH, la
consommation électrique en mode veille
augmente.
de haut-parleurs pendant
5secondes, puis sur VOL–
pendant 5 secondes.
Les témoins OPTICAL et ANALOG
clignotent alternativement.
Lorsque la barre de haut-parleurs
est liée au caisson de graves, les
témoins cessent de clignoter.
Si la liaison échoue, les témoins
s'allument pendant 5 secondes.
Réessayez l'opération ci-dessus.
Fonction de veille
automatique
Le système entre en mode veille
automatiquement lorsque vous
n'utilisez pas le système pendant
environ 20 minutes et que le système ne
reçoit aucun signal d'entrée.
11
HT-CT180
4-559-026-11(1)
FR
Page 34

C:\SONY\HT_CZ1_CZ2_CZ3\CZ1\UC2\4559026111\4559026111HTCT180UC
4mm (3/16 po)
Plus de 30 mm (1
3
/16 po)
4,6 mm
(
3
/16 po)
Trou à l'arrière de la barre de hautparleurs
9 mm
(
9
/25 po)
560 mm
(22
1
/20 po)
8mm à
9mm
(environ
11
/32 po)
2\4559026111\4559026111HTCT180UC2\02CaFR-HTCT180UC2\060OTH.fm
010COV.book Page 12 Monday, December 8, 2014 2:51 PM
masterpage: Left
Installation de la barre
de haut-parleurs sur un
mur
Vous pouvez installer la barre de hautparleurs sur un mur.
Remarques
• Utilisez des vis (non fournies) adaptées au
matériau et à la résistance du mur.
Comme les plaques de plâtre sont
particulièrement fragiles, fixez
fermement les vis avec deux boulons à
une poutre du mur. Installez la barre de
haut-parleurs horizontalement,
accrochée par des vis dans des boulons
sur une partie plate continue du mur.
•Veillez à confier l’installation à des
revendeurs ou à des installateurs agréés
Sony et portez une attention particulière
aux consignes de sécurité pendant
l’installation.
•Sony ne peut être tenu responsable des
accidents ou dégâts occasionnés par une
mauvaise installation, une résistance
insuffisante du mur, une mauvaise
fixation des vis, une catastrophe
naturelle, etc.
1 Utilisez des vis (non fournies)
adaptées aux trous à l’arrière de la
barre de haut-parleurs.
2 Fixez les vis avec 2 boulons au
mur.
Les vis doivent dépasser de 8 mm à
9 mm (environ
11
/32po).
3 Suspendez la barre de haut-
parleurs aux vis.
Alignez les trous à l'arrière de la
barre de haut-parleurs avec les vis,
puis suspendez la barre de hautparleurs aux deux vis.
12
FR
HT-CT180
4-559-026-11(1)
Page 35

C:\SONY\HT_CZ1_CZ2_CZ3\CZ1\UC2\4559026111\4559026111HTCT180UC
Informations supplémentaires
2\4559026111\4559026111HTCT180UC2\02CaFR-HTCT180UC2\070ADD.fm
010COV.book Page 13 Monday, December 8, 2014 2:51 PM
arrière et inférieure. Pour éviter de vous
brûler, ne touchez pas le système.
Informations supplémentaires
Précautions
Concernant la sécurité
• Si un objet ou du liquide venait à pénétrer
à l’intérieur du système, débranchez-le et
faites-le vérifier par un technicien qualifié
avant de le remettre en marche.
• Il est interdit de marcher sur la barre de
haut-parleurs et le caisson de graves, car
cela pourrait entraîner une chute et des
blessures ou endommager le système.
Concernant les sources
d’alimentation
•Avant de mettre en marche le système,
vérifiez que la tension de fonctionnement
est identique à celle de votre source
d’alimentation locale. La tension de
fonctionnement est indiquée sur
l’étiquette située sous la barre de hautparleurs.
•Si vous prévoyez de ne pas utiliser le
système pendant une période prolongée,
assurez-vous de le débrancher de la prise
murale. Pour débrancher le cordon
d’alimentation, tirez sur la fiche et non sur
le cordon.
• Pour des raisons de sécurité, l’une des
broches de la fiche est plus large que
l’autre et elle s’insère dans la prise murale
dans un seul sens. Si vous ne parvenez
pas à insérer la fiche à fond dans la prise,
contactez votre revendeur.
•Le cordon d’alimentation doit être
remplacé uniquement dans un centre de
service après-vente qualifié.
Concernant l’accumulation de
chaleur
Bien que le système chauffe lors du
fonctionnement, il ne s’agit pas d’un
dysfonctionnement. Si vous utilisez le
système continuellement à un volume
élevé, la température augmente
considérablement au niveau de ses faces
Concernant l’emplacement
• Installez le système dans un endroit
correctement ventilé pour éviter
l’accumulation de chaleur et prolonger la
durée de vie de votre système.
• N’installez pas le système à proximité de
sources de chaleur ou dans un endroit
soumis aux rayons du soleil, à une
poussière excessive ou à des chocs
mécaniques.
• Ne mettez rien sur barre de haut-parleurs
ou sur le caisson de graves qui pourrait
bloquer les trous de ventilation et causer
des dysfonctionnements.
• Si le système est utilisé conjointement
avec un téléviseur, un magnétoscope ou
un magnétophone, cela peut provoquer
des parasites et diminuer la qualité de
l’image. Dans ce cas, placez le système
loin du téléviseur, du magnétoscope ou
du magnétophone.
• Faites attention lorsque vous installez le
système sur une surface traitée (avec de
la cire, de l’huile, etc.), car vous risquez de
la tacher et de la décolorer.
• Évitez de vous blesser sur les coins de la
barre de haut-parleurs et du caisson de
graves.
Concernant le fonctionnement
Avant de raccorder un autre appareil,
assurez-vous d’éteindre et de débrancher
le système.
Si l’écran du téléviseur situé à
proximité présente des
irrégularités de couleurs
Des irrégularités de couleurs peuvent être
constatées sur certains types de
téléviseurs.
• En cas d’irrégularités de couleurs…
Mettez le téléviseur hors tension, puis
remettez-le sous tension après 15 à
30 minutes.
• En cas d’irrégularités de couleurs
persistantes…
masterpage:
Right
13
HT-CT180
4-559-026-11(1)
FR
Page 36
C:\SONY\HT_CZ1_CZ2_CZ3\CZ1\UC2\4559026111\4559026111HTCT180UC
2\4559026111\4559026111HTCT180UC2\02CaFR-HTCT180UC2\070ADD.fm
010COV.book Page 14 Monday, December 8, 2014 2:51 PM
masterpage: Left
Éloignez davantage le système du
téléviseur.
Concernant l’entretien
Nettoyez le système avec un chiffon sec et
doux. N’utilisez pas de tampons abrasifs,
de poudre à récurer ou de solvant tel que
de l’alcool ou de la benzine.
Si vous avez des questions ou si vous
rencontrez des problèmes avec votre
système, consultez votre revendeur Sony
le plus proche.
Dépannage
Si vous rencontrez l’une des difficultés
suivantes lors de l’utilisation de ce
système, consultez ce guide de
dépannage pour tenter de résoudre le
problème. Si le problème persiste,
consultez votre revendeur Sony le plus
proche.
Lorsque vous demandez une
réparation, apportez la barre de hautparleurs et le caisson de graves, même
si un seul élément semble présenter
une panne.
Caractéristiques générales
Le système ne s'allume pas.
Vérifiez que le cordon
d’alimentation est correctement
raccordé.
Le système ne fonctionne pas
normalement.
Débranchez le cordon
d'alimentation de la prise murale,
puis rebranchez-le après plusieurs
minutes.
Son
Le système n’émet aucun son
provenant du téléviseur.
Appuyez sur le bouton d'entrée de
la prise sur laquelle vous avez
branché le téléviseur (page 7).
Vérifiez la sortie audio du téléviseur.
Consultez le manuel d’instructions
du téléviseur pour voir ses réglages.
Montez le volume du téléviseur ou
annulez la fonction de mise en
sourdine.
Si aucun son n'est émis depuis une
prise de sortie numérique optique
ou si le téléviseur n'a pas de prise de
sortie numérique optique, branchez
le décodeur câble ou le récepteur
satellite directement à la prise
OPTICAL du système.
Le système et le téléviseur
reproduisent le son.
Éteignez le son du téléviseur.
Le son du téléviseur de ce système est
en retard sur l’image.
Lors du visionnage d’un film, vous
pourriez constater un décalage
entre le son et l’image.
La barre de haut-parleurs ne reproduit
aucun son ou ne reproduit que très
faiblement le son provenant de
l’appareil raccordé à la barre de hautparleurs.
Appuyez sur le bouton
+ de la télécommande et vérifiez le
volume sonore (page 18).
Appuyez sur le bouto n
(volume) + de la
ou
télécommande pour annuler la
fonction de mise en sourdine
(page 18).
Assurez-vous que la source
d’entrée est correctement
sélectionnée. Vous devez essayer
d'autres sources d'entrée en
appuyant sur un bouton d'entrée
(volume)
(sourdine)
14
FR
HT-CT180
4-559-026-11(1)
Page 37

C:\SONY\HT_CZ1_CZ2_CZ3\CZ1\UC2\4559026111\4559026111HTCT180UC
Informations supplémentaires
2\4559026111\4559026111HTCT180UC2\02CaFR-HTCT180UC2\070ADD.fm
010COV.book Page 15 Monday, December 8, 2014 2:51 PM
masterpage:
Right
différent de la télécommande
(page 7).
Vérifiez que tous les câbles et
d’informations, reportez-vous au
manuel d'instructions qui
accompagne l’appareil raccordé.
cordons du système et de l’appareil
raccordé sont complètement
insérés.
Le caisson de graves ne reproduit
aucun son ou ne reproduit que très
faiblement le son.
Appuyez sur le bouton SW
(volume du caisson de graves)
+ de
la télécommande pour augmenter
le volume du caisson de graves
(page 18).
Assurez-vous que le témoin
marche/arrêt sur le caisson de
graves est allumé en vert. Si ce n'est
pas le cas, consultez « Le caisson de
graves n’émet aucun son. » dans
« Son sans fil du caisson de graves »
(page 16).
Un caisson de graves permet de
reproduire les sons graves. En cas
de sources d’entrée contenant très
peu de composants sonores graves
(par exemple, une émission de
télévision), il peut s’avérer difficile
d’entendre le son du caisson de
graves.
Lors de la lecture de contenu
compatible avec la technologie de
protection des droits d’auteur
(HDCP), le son n’est pas émis par le
caisson de graves.
Vous n’arrivez pas à obtenir les effets
surround.
Selon le signal d’entrée et le réglage
du champ acoustique, le traitement
du son surround peut ne pas
fonctionner correctement. L’effet
ambiophonique peut être subtil
selon le programme ou le disque en
cours de lecture.
Pour lire un son multicanaux,
vérifiez le réglage de sortie du son
numérique sur l’appareil raccordé
au système. Pour plus
Dispositif BLUETOOTH
La connexion BLUETOOTH ne peut pas
être finalisée.
Vérifiez que le témoin BLUETOOTH
(bleu) est allumé (page 18).
État du système Témoin
Pendant l’appairage
BLUETOOTH
Le système tente de se
connecter à un dispositif
BLUETOOTH
Le système a établi une
connexion avec un
dispositif BLUETOOTH
Le système est en mode
veille BLUETOOTH
(lorsque le système est
hors tension)
Assurez-vous que le dispositif
BLUETOOTH à connecter est bien
sous tension et que la fonction
BLUETOOTH est activée.
Rapprochez le système et le
dispositif BLUETOOTH.
Appairez de nouveau le système et
le dispositif BLUETOOTH. Vous
devez peut-être d’abord annuler
l’appairage avec ce système à l’aide
de votre dispositif BLUETOOTH.
Si la fonction BLUETOOTH est
désactivée, activez-la (page 11).
L’appairage ne fonctionne pas.
Rapprochez le système et le
dispositif BLUETOOTH.
Assurez-vous que ce système ne
reçoit pas d’interférences
provenant d’un équipement de
réseau local sans fil, d’autres
dispositifs sans fil 2,4 GHz ou d’un
BLUETOOTH
(bleu)
Clignote
rapidement
Clignote
Allumé
Éteint
15
HT-CT180
4-559-026-11(1)
FR
Page 38

C:\SONY\HT_CZ1_CZ2_CZ3\CZ1\UC2\4559026111\4559026111HTCT180UC
2\4559026111\4559026111HTCT180UC2\02CaFR-HTCT180UC2\070ADD.fm
010COV.book Page 16 Monday, December 8, 2014 2:51 PM
masterpage: Left
four à micro-ondes. Si un dispositif
générant des radiations
électromagnétiques est situé à
proximité, éloignez le dispositif de
ce système.
Le dispositif BLUETOOTH connecté
n’émet aucun son.
Vérifiez que le témoin BLUETOOTH
(bleu) est allumé (page 18).
Rapprochez le système et le
dispositif BLUETOOTH.
Si un dispositif générant des
radiations électromagnétiques, tel
qu’un équipement de réseau local
sans fil, d’autres dispositifs
BLUETOOTH ou un four à microondes, est situé à proximité,
éloignez le dispositif de ce système.
Retirez tout obstacle pouvant se
trouver entre le système et le
dispositif BLUETOOTH ou éloignez
le système de cet obstacle.
Repositionnez le dispositif
BLUETOOTH connecté.
Essayez de régler la fréquence sans
fil du routeur Wi-Fi, de l’ordinateur,
etc. sur la bande 5 GHz.
Montez le volume du dispositif
BLUETOOTH connecté.
Le son n’est pas synchronisé avec
l’image.
Lors du visionnage d’un film, vous
pourriez constater un décalage
entre le son et l’image.
Son sans fil du caisson de
graves
Le caisson de graves n’émet aucun
son.
Vérifiez que le cordon
d’alimentation du caisson de graves
est correctement raccordé.
(Consultez le manuel de démarrage
fourni.)
Le témoin marche/arrêt ne s’allume
pas.
– Vérifiez que le cordon
d’alimentation du caisson de
graves est correctement
raccordé.
– Appuyez sur le bouton /
(marche/arrêt) du caisson de
graves pour le mettre sous
tension.
Le témoin marche/arrêt clignote
lentement en vert ou s’allume en
rouge.
– Approchez le caisson de graves
de la barre de haut-parleurs afin
que le témoin marche/arrêt
s’allume en vert.
– Suivez les étapes de la section
« Activation de la fonction
Secure Link » (page 11).
Le témoin marche/arrêt clignote
rapidement en vert.
– Consultez votre revendeur Sony
le plus proche.
Le témoin marche/arrêt clignote en
rouge.
– Appuyez sur le bouton /
(marche/arrêt) du caisson de
graves pour le mettre hors
tension et vérifier si l’orifice de
ventilation du caisson de graves
est bien dégagé.
Le caisson de graves est conçu pour
reproduire les sons graves. Lorsque
la source d’entrée contient très peu
de sons graves, comme c’est le cas
pour la plupart des émissions de
télévision, les graves peuvent ne
pas être audibles.
Appuyez sur le bouton SW
(volume du caisson de graves)
la télécommande pour augmenter
le volume du caisson de graves
(page 20).
+ de
16
FR
HT-CT180
4-559-026-11(1)
Page 39

C:\SONY\HT_CZ1_CZ2_CZ3\CZ1\UC2\4559026111\4559026111HTCT180UC
Informations supplémentaires
2\4559026111\4559026111HTCT180UC2\02CaFR-HTCT180UC2\070ADD.fm
010COV.book Page 17 Monday, December 8, 2014 2:51 PM
masterpage:
Right
Le son présente des interruptions ou
des parasites.
Si un dispositif générant des ondes
électromagnétiques, tel qu’un
réseau local sans fil ou un four à
micro-ondes en cours d’utilisation,
se trouve à proximité, éloignez-le
du système.
Si un obstacle est présent entre la
barre de haut-parleurs et le caisson
de graves, déplacez-le ou retirez-le.
Placez la barre de haut-parleurs et
le caisson de graves aussi proches
que possible.
Réglez la fréquence de réseau local
sans fil des routeurs Wi-Fi ou
ordinateurs se trouvant à proximité
sur la bande 5 GHz.
Télécommande
La télécommande ne fonctionne pas.
Pointez la télécommande vers le
centre du panneau avant (capteur
de télécommande) du système
(page 18).
Retirez tous les obstacles se
trouvant entre la télécommande et
le système.
Si les piles de la télécommande sont
usées, remplacez-les.
Assurez-vous d’appuyer sur le bon
bouton de la télécommande
(page 20).
communication sans fil. Éloignez la
barre de haut-parleurs du télév iseur
à une distance leur permettant de
fonctionner correctement. Pour
connaître l’emplacement des
capteurs et du capteur de la
télécommande, consultez le
manuel d’instructions fourni avec le
téléviseur.
Réinitialiser
Si le système ne fon ctionne toujours pas
correctement, réinitialisez-le comme
suit :
1 Tout en appuyant longuement sur
le bouton / (marche/arrêt) sur
le système, appuyez longuement
sur les boutons INPUT et VOL –
simultanément pendant
5secondes.
Les 5 témoins sur la barre de haut-
parleurs clignotent 3 fois, et les
réglages reviennent à leur état
initial.
2 Déconnectez le cordon
d’alimentation.
Autres
Les capteurs du téléviseur ne
fonctionnent pas correctement.
La barre de haut-parleurs peut
bloquer certains capteurs (tels que
le capteur de luminosité) ainsi que
le capteur de télécommande du
téléviseur ou l’« émetteur pour
lunettes 3D (transmission
infrarouge) » d’un téléviseur 3D
prenant en charge le système de
lunettes 3D infrarouge ou la
17
HT-CT180
4-559-026-11(1)
FR
Page 40

C:\SONY\HT_CZ1_CZ2_CZ3\CZ1\UC2\4559026111\4559026111HTCT180UC
2\4559026111\4559026111HTCT180UC2\02CaFR-HTCT180UC2\070ADD.fm
010COV.book Page 18 Monday, December 8, 2014 2:51 PM
Guide des pièces et des commandes
Pour plus d'informations, consultez les pages indiquées entre parenthèses.
Barre de haut-parleurs
Panneaux du haut, avant et latéraux
masterpage: Left
Témoin OPTICAL (page 7)
Témoin ANALOG (page 7)
Témoin BLUETOOTH (bleu)
État BLUETOOTH
– Pendant l’appairage BLUETOOTH :
Clignote rapidement
– La connexion BLUETOOTH est
tentée : Clignote
– La connexion BLUETOOTH a été
établie : Allumé
– Mode veille BLUETOOTH (quand le
système est hors tension) : Éteint
Conseil
•Lorsque la fonction BLUETOOTH est
désactivée (page 11), le témoin
BLUETOOTH devient orange.
FR
18
Témoin SURROUND (page 8)
Témoin CLEARAUDIO+ (page 8)
Marque N (page 10)
Lorsque vous utilisez la fonction
NFC, touchez votre appareil NFC sur
la marque.
Capteur de télécommande
Bouton / (marche/arrêt)
Met le système sous tension ou le
met en mode veille.
Bouton INPUT (page 7)
Bouton PAIRING (page 9, 11)
Boutons VOL (volume) +/–
HT-CT180
4-559-026-11(1)
Page 41

C:\SONY\HT_CZ1_CZ2_CZ3\CZ1\UC2\4559026111\4559026111HTCT180UC
Informations supplémentaires
2\4559026111\4559026111HTCT180UC2\02CaFR-HTCT180UC2\070ADD.fm
010COV.book Page 19 Monday, December 8, 2014 2:51 PM
Panneau arrière
masterpage:
Right
Prise ANALOG
Prise OPTICAL
Cordon d’alimentation
Caisson de graves
Témoin marche/arrêt
Bouton / (marche/arrêt)
Bouton LINK (page 11)
Cordon d’alimentation
19
HT-CT180
4-559-026-11(1)
FR
Page 42

C:\SONY\HT_CZ1_CZ2_CZ3\CZ1\UC2\4559026111\4559026111HTCT180UC
2\4559026111\4559026111HTCT180UC2\02CaFR-HTCT180UC2\070ADD.fm
010COV.book Page 20 Monday, December 8, 2014 2:51 PM
masterpage: Left
Télécommande
Boutons (volume) +*/–
Ajuste le volume.
Boutons SW (volume du
caisson de graves) +/–
Ajuste le volume des sons graves.
Bouton (sourdine)
Coupe le son temporairement.
Bouton CLEARAUDIO+
Sélectionne automatiquement le
réglage sonore adapté à la source
audio.
Bouton SURROUND (page 8)
Bouton VOICE (page 8)
Bouton AUDIO* (page 8)
Bouton NIGHT (page 8)
* Les boutons AUDIO et + ont un point
tactile. Utilisez-les comme guide
pendant le fonctionnement.
Contrôle d'un téléviseur connecté
Vous pouvez contrôler un téléviseur
Sony connecté au système avec les
boutons suivants.
Bouton TV / (marche/arrêt)
Met le téléviseur sous ou hors
tension.
Bouton TV INPUT
Sélectionnez le signal d'entrée.
Bouton TV (sourdine)
Coupe le son temporairement.
Bouton TV / (marche/arrêt)
Bouton / (marche/arrêt)
Bouton TV INPUT
Bouton TV (sourdine)
Bouton (BLUETOOTH)
(page 7)
Bouton STANDBY (page 11)
Bouton ANALOG (page 7)
Bouton OPTICAL (page 7)
FR
20
HT-CT180
4-559-026-11(1)
Page 43
C:\SONY\HT_CZ1_CZ2_CZ3\CZ1\UC2\4559026111\4559026111HTCT180UC
Informations supplémentaires
2\4559026111\4559026111HTCT180UC2\02CaFR-HTCT180UC2\070ADD.fm
010COV.book Page 21 Monday, December 8, 2014 2:51 PM
masterpage:
Right
Formats audio pris en
Caractéristiques
charge
Les formats audio pris en charge par ce
système sont les suivants.
•Dolby Digital
•Linear PCM 2ch 48kHz ou moins
Barre de haut-parleurs
(SA-CT180)
Partie amplificateur
Modèles des États-Unis :
PUISSANCE DE SORTIE ET DISTORSION
HARMONIQUE TOTALE :
(FTC)
Avant G + avant D :
Avec des charges de 4 ohms, les deux
canaux étant excités, de 200 Hz à
20 000 Hz ; puissance efficace
minimale de 13 Watts par canal, avec
une distorsion harmonique totale
maximale de 1% de la puissance de
sortie nominale de 250 milliwatts.
PUISSANCE DE SORTIE (référence)
Haut-parleurs avant G/avant D :
25 Watts (par canal à 4 ohms, 1 kHz)
Modèles du Canada :
PUISSANCE DE SORTIE (nominale)
Avant G + avant D :
13 W + 13 W (à 4 ohms, 1 kHz, 1% THD)
PUISSANCE DE SORTIE (référence)
Haut-parleurs avant G/avant D :
25 Watts (par canal à 4 ohms, 1 kHz)
Entrées
OPTICAL
ANALOG
Section BLUETOOTH
Système de communication
Spécification BLUETOOTH : version 4.0
Sortie
Spécification BLUETOOTH : classe 2 de
puissance de la norme
Portée maximum de communication
Visibilité directe d’environ 10 m
1)
(33 pi)
Nombre maximal de dispositifs à
enregistrer
8 dispositifs
Bande de fréquence
Bande 2,4 GHz (2,4000 GHz à
2,4835 GHz)
Méthode de modulation
FHSS (Freq Hopping Spread Spectrum)
21
HT-CT180
4-559-026-11(1)
FR
Page 44

C:\SONY\HT_CZ1_CZ2_CZ3\CZ1\UC2\4559026111\4559026111HTCT180UC
2\4559026111\4559026111HTCT180UC2\02CaFR-HTCT180UC2\070ADD.fm
010COV.book Page 22 Monday, December 8, 2014 2:51 PM
masterpage: Left
Profils BLUETOOTH compatibles
A2DP (Advanced Audio Distribution
Profile)
Codecs pris en charge
4)
SBC
Portée de transmission (A2DP)
20 Hz - 20 000 Hz (fréquence
d’échantillonnage 44,1 kHz)
1)
La portée réelle variera selon des facteurs
tels que les obstacles entre les
dispositifs, les champs magnétiques
autour d’un four à micro-ondes, de
l’électricité statique, d’un téléphone sans
fil, de la sensibilité de réception, du
fonctionnement du système, de
l’application logicielle, etc.
2)
Les profils BLUETOOTH standard
indiquent le but de la communication
BLUETOOTH entre les dispositifs.
3)
Codec : Format de compression et de
conversion de signal audio
4)
Codec de sous-bande
3)
2)
Haut-parleurs
Section de haut-parleurs avant G/
avant D
Système de haut-parleur
Système de haut-parleur
bidirectionnel, suspension acoustique
Haut-parleur
Haut-parleur d'aigus : 14 mm - 25 mm
9
/16po - 1 po) de type à dôme
(
équilibre
Haut-parleur de graves : 40 mm ×
120 mm (1
conique
5
/8po × 43/4po) de type
Caractéristiques générales
Puissance de raccordement
120 V CA, 60 Hz
Consommation électrique
Marche : 17 W
Mode veille : 0,5 W ou moins
Mode veille BLUETOOTH : 3 W ou
moins
Dimensions (environ) (l/h/p)
901 mm × 52 mm × 84 mm
1
/2po × 21/8po × 33/8po)
(35
Poids (environ)
2kg (4lb 7oz)
Caisson de graves
(SA-WCT180)
PUISSANCE DE SORTIE (référence)
50 W (par canal à 4 ohms, 100 Hz)
Système de haut-parleur
Système de caisson de graves, Bass
reflex
Haut-parleur
130 mm (5
Puissance de raccordement
120 V CA, 60 Hz
Consommation électrique
Marche : 13 W
Mode veille : 0,6 W ou moins
Dimensions (environ) (l/h/p)
170 mm × 342 mm × 325 mm
(6
Poids (environ)
5,5kg (12Ib 2oz)
1
/8po) de type conique
3
/4po × 131/2po × 127/8po)
Transmetteur/récepteur
sans fil
Bande de fréquence
Bande 2,4 GHz (2,404 GHz à
2,476 GHz)
Méthode de modulation
GFSK
La conception et les caractéristiques sont
sujettes à modification sans préavis.
22
FR
HT-CT180
4-559-026-11(1)
Page 45

C:\SONY\HT_CZ1_CZ2_CZ3\CZ1\UC2\4559026111\4559026111HTCT180UC
Informations supplémentaires
2\4559026111\4559026111HTCT180UC2\02CaFR-HTCT180UC2\070ADD.fm
010COV.book Page 23 Monday, December 8, 2014 2:51 PM
• L’émission d’ondes radio par ce
À propos de la
communication
BLUETOOTH
• Les dispositifs BLUETOOTH devraient
être éloignés d’au maximum
10 mètres (33 pieds) (distance
dégagée) les uns des autres. La portée
efficace de communication peut être
plus courte dans les conditions
suivantes.
– Lorsqu’une personne, un objet
métallique, un mur ou une autre
obstruction est situé entre les
dispositifs avec une connexion
BLUETOOTH
– Dans les lieux où un réseau local
sans fil est installé
– Autour de fours à micro-ondes en
cours d’utilisation
– Dans des lieux où d’autres ondes
électromagnétiques sont générées
• Les dispositifs BLUETOOTH et le
réseau local sans fil (IEEE 802.11b/g)
utilisent la même bande de fréquence
(2,4 GHz). Lorsque vous utilisez votre
dispositif BLUETOOTH près d’un
dispositif disposant d’une capacité de
réseau local sans fil, des interférences
électromagnétiques peuvent se
produire. Ceci pourrait causer une
réduction des taux de transfert de
données, des parasites ou l’incapacité
de se raccorder. Si ceci se produit,
essayez les solutions suivantes :
– Utilisez ce système à au moins
10 mètres (33 pieds) du dispositif de
réseau local sans fil.
– Coupez l’alimentation du dispositif
de réseau local sans fil lorsque vous
utilisez votre dispositif BLUETOOTH à
moins de 10 mètres (33 pieds).
– Installez ce système et le dispositif
BLUETOOTH aussi proches que
possible l'un de l'autre.
système peut interférer avec le
fonctionnement de certains dispositifs
médicaux. Puisque cette interférence
peut causer un dysfonctionnement,
coupez toujours l’alimentation de ce
système et du dispositif BLUETOOTH
dans les emplacements suivants :
– Dans les hôpitaux, les trains, les
avions, les stations-services et à
n’importe quel endroit où des gaz
inflammables peuvent être présents
– Près des portes automatiques ou
des alarmes d’incendie
• Ce système prend en charge des
fonctions de sécurité qui se
conforment à la norme BLUETOOTH
pour garantir la sécurité lors des
communications utilisant la
technologie BLUETOOTH. Toutefois,
cette sécurité peut être i nsuffisante en
fonction des réglages et d'autres
facteurs. Soyez donc toujours prudent
lorsque vous communiquez avec la
technologie BLUETOOTH.
• Sony ne peut pas être tenu
responsable de quelque façon que ce
soit pour les dommages ou d’autre
pertes résultant de fuites
d’informations pendant l’utilisation de
la technologie de communication
BLUETOOTH.
• La communication BLUETOOTH n’est
pas nécessairement garantie avec
tous les dispositifs BLUETOOTH qui
ont le même profil que ce système.
• Les dispositifs BLUETOOTH raccordés
avec ce système doivent se conformer
à la norm e BLUETOOTH pres crite par le
Bluetooth SIG, Inc., et doivent être
certifiés conformes. Toutefois, même
lorsqu’un dispositif se conforme à la
norme BLUETOOTH, dans certains cas,
les particularités ou les
caractéristiques du dispositif
BLUETOOTH rendent le raccordement
impossible, ou peuvent causer
différentes méthodes de contrôle,
d’affichage ou de fonctionnement.
masterpage:
Right
23
HT-CT180
4-559-026-11(1)
FR
Page 46

C:\SONY\HT_CZ1_CZ2_CZ3\CZ1\UC2\4559026111\4559026111HTCT180UC
2\4559026111\4559026111HTCT180UC2\02CaFR-HTCT180UC2\070ADD.fm
010COV.book Page 24 Monday, December 8, 2014 2:51 PM
• Des parasites peuvent se produire ou
le son peut se couper en fonction du
dispositif BLUETOOTH raccordé à ce
système, de l’environnement de
communication ou des conditions
environnantes.
Si vous avez des questions ou si vous
rencontrez des problèmes avec votre
système, consultez votre revendeur
Sony le plus proche.
masterpage: Left
24
FR
HT-CT180
4-559-026-11(1)
Page 47
C:\SONY\HT_CZ1_CZ2_CZ3\CZ1\UC2\4559026111\4559026111HTCT180UC
Informations supplémentaires
2\4559026111\4559026111HTCT180UC2\02CaFR-HTCT180UC2\070ADD.fm
010COV.book Page 25 Monday, December 8, 2014 2:51 PM
masterpage:
Right
25
HT-CT180
4-559-026-11(1)
FR
Page 48

C:\SONY\HT_CZ1_CZ2_CZ3\CZ1\UC2\4559026111\4559026111HTCT180UC
2\4559026111\4559026111HTCT180UC2\03LaES-HTCT180UC2\020REG.fm
010COV.book Page 2 Tuesday, December 9, 2014 2:36 PM
masterpage: Left
Registro de propiedad
El número de serie y del modelo se
encuentran en la parte inferior de la
barra parlante. Anote el número de serie
en el espacio que aparece a
continuación. Consúltelo cuando deba
llamar a un distribuidor Sony con
respecto a este producto.
N.º de modelo HT-CT180
N. º de seri e
ADVERTENCIA
Para reducir el riesgo de
incendios o electrocución, no
exponga el aparato a la lluvia ni a
la humedad.
La unidad no estará d esconectada de la
fuente de alimentación de ca mientras
esté conectada a la toma de pared,
aunque se haya apagado la propia
unidad.
Para reducir el riesgo de incendio, no
cubra la abertura de ventilación del
dispositivo con periódicos, paños,
cortinas, etc. No exponga el dispositivo
a fuentes de llamas vivas (velas
encendidas, por ejemplo).
Para reducir el riesgo de incendio o
descarga eléctrica, no exponga el
dispositivo a goteos ni salpicaduras de
líquidos. No coloque objetos llenos de
líquido, como vasos, sobre el
dispositivo.
Dado que el enchufe del cable de
alimentación se utiliza para desconectar
la unidad de la fuente de alimentación,
conecte la unidad en una toma de ca de
fácil acceso. En caso de percibir alguna
anomalía en la unidad, desconecte
inmediatamente el en chufe del cable de
alimentación de la toma de ca.
No sitúe el aparato en un espacio
cerrado, como una estantería o un
armario empotrado.
No exponga las baterías ni los
dispositivos con batería a un calor
excesivo, como la luz directa del sol o
fuego.
Solo para ser usado en interiores.
Para los clientes en los EE.UU.
Las marcas de precaución se
encuentran en la parte inferior (para la
barra parlante).
Este símbolo señala al usuario la
presencia de “voltaje peligroso”
sin aislamiento en el interior del
aparato de tal intensidad que podría
presentar riesgo de descarga eléctrica.
Este símbolo indica al usuario
que el manual que acompaña a
este aparato contiene
instrucciones importantes referentes a
su funcionamiento y mantenimiento.
Para la barra parlante
La placa de identificación y la fecha de
fabricación se encuentran en la parte
inferior.
Instrucciones de seguridad
importantes
1) Lea estas instrucciones.
2) Conserve estas instrucciones.
3) Preste atención a las advertencias.
4) Siga las instrucciones.
5)
No utilice este aparato cerca del
agua.
6) Límpielo sólo con un paño seco.
ES
2
HT-CT180
4-559-026-11(1)
Page 49

C:\SONY\HT_CZ1_CZ2_CZ3\CZ1\UC2\4559026111\4559026111HTCT180UC
2\4559026111\4559026111HTCT180UC2\03LaES-HTCT180UC2\020REG.fm
010COV.book Page 3 Tuesday, December 9, 2014 2:36 PM
masterpage:
Right
7) No bloquee los orificios de
ventilación. Instale el aparato según
las instrucciones del fabricante.
8) No instale el equipo cerca de fuentes
de calor, como radiadores, rejillas de
calefacción, estufas u otros aparatos
(incluidos amplificadores) que
producen calor.
9) No anule el propósito de seguridad
del enchufe polarizado o enchufe
con descarga a tierra. Un enchufe
polarizado dispone de dos hojas,
una más ancha que la otra. Un
enchufe de tipo conexión a tierra
tiene dos hojas y una tercera clavija
para la conexión a tierra. La hoja
ancha o la tercera clavija se
proporcionan por razones de
seguridad. Si el enchufe
suministrado no entra en la toma,
contacte a un electricista para que
reemplace la toma obsoleta.
10) Evite pisar o perforar los cables de
alimentación, sobre todo en la parte
del enchufe, en los receptáculos y en
el punto en el que el cable sale del
equipo.
11) Use solamente los accesorios
indicados por el fabricante.
12) Use solamente con el carrito,
soporte, trípode, ménsula o mesa
indicados por el fabricante, o que se
venden con el equipo. Al utilizar el
carrito, tenga cuidad al desplazar el
carrito con el aparato, para evitar
lesiones y que se vuelque el equipo.
13) Desenchufe este equipo durante
tormentas eléctricas o cuando no se
vaya a utilizar por períodos
prolongados.
14) Consulte a personal de servicio
calificado para cualquier
mantenimiento. Se requiere servicio
de mantenimiento cuando se ha
dañado el equipo de algún modo, tal
como cuando se daña el cable o
enchufe de alimentación, se ha
derramado líquido sobre el equipo o
han caído objetos dentro de él, se ha
expuesto el equipo a lluvia o
humedad o cuando el equipo no
opera como de costumbre o se ha
dejado caer.
La siguiente declaración de la FCC
(Comisión Federal de Comunicaciones)
sólo se aplica a la versión de este
modelo fabricado para la venta en los
EE. UU. Las demás versiones no
cumplen con las regulaciones técnicas
de la FCC.
NOTA:
Este equipo ha sido sometido a pruebas
y se ha determinado que c umple con los
límites requeridos por los aparatos
digitales de la clase B, en cumplimiento
con la Sección 15 de las regulaciones de
la FCC. Estas especificaciones han sido
diseñadas para proporcionar una
protección razonable contra
interferencias perjudiciales en una
instalación residencial. Este equipo
genera, utiliza y puede emitir energía de
radiofrecuencia y, de no ser instalado y
utilizado de acuerdo con las
instrucciones podría ocasionar
interferencias perjudiciales en las
comunicaciones de radio. No obstante,
no se garantiza que no ocurra ninguna
interferencia en una instalación
particular. Si el presente equipo causa
interferencia en la recepción de radio o
televisión, que puede determinarse al
apagar y encender el equipo, se
recomienda que el usuario intente
corregir la interferencia mediante una o
más de las siguientes medidas:
– Cambie la orientación o ubicación de
la antena de recepción.
– Aumente la separación entre el
equipo y el receptor.
ES
3
HT-CT180
4-559-026-11(1)
ES
Page 50

C:\SONY\HT_CZ1_CZ2_CZ3\CZ1\UC2\4559026111\4559026111HTCT180UC
2\4559026111\4559026111HTCT180UC2\03LaES-HTCT180UC2\020REG.fm
010COV.book Page 4 Tuesday, December 9, 2014 2:36 PM
masterpage: Left
– Conecte el equipo en una toma de
circuito distinta a la que está
conectado el receptor.
– Consulte con su distribuidor o con un
técnico especializado en radio/
televisión para solicitar asistencia.
PRECAUCIÓN
Queda notificado que ante cualquier
cambio o modificación que no haya sido
aprobado expresamente en este
manual se podrían invalidar sus
facultades para utilizar este equipo.
Este equipo no debe colocarse ni
utilizarse junto con otras antenas o
transmisores.
Este equipo cumple con los límites de
exposición a la radiación de la FCC
establecidos para un ambiente no
controlado y cumple con las pautas de
exposición a radiofrecuencia (RF) de la
FCC. Este equipo tiene niveles muy
bajos de energía de RF que se
considerará que se cumplen sin la
evaluación de exposición máxima
permitida (MPE). Sin embargo, este
equipo debería ser instalado y operado
a una distancia mínima de 20cm entre el
dispositivo radiador y el cuerpo de una
persona (excluidas las extremidades:
manos, muñecas, pies y tobillos).
Para los clientes en Canadá
El dispositivo cumple con los RSS
exentos de licencia de Industry Canada.
Su funcionamiento está sujeto a las dos
condiciones siguientes:
(1) Este dispositivo no debe provocar
interferencias; y
(2) Este dispositivo debe aceptar
cualquier interferencia, incluidas las que
pueden causar un funcionamiento no
deseado.
controlado y cumple con RSS-102 de las
normas de exposición a radiofrecuencia
(RF) de la IC.
Este equipo tiene niveles muy bajos de
energía de RF exigidos sin la evaluación
de exposición máxima permitida (MPE).
Sin embargo, este equipo debería ser
instalado y operado a una distancia
mínima de 20cm entre el dispositivo
radiador y su cuerpo (excluidas las
extremidades: manos, muñecas, pies y
tobillos).
Derechos de copyright y
marcas comerciales
El sistema incorpora el Dolby* Digital
Surround System.
* Fabricado bajo licencia de Dolby
Laboratories.
Dolby y el símbolo de la doble D son
marcas comerciales de Dolby
Laboratories.
®
La marca de palabra BLUETOOTH
logotipos son marcas comerciales
registradas propiedad de B luetooth SIG,
Inc. y todo uso que Sony Corporation
haga de dichas marcas está sujeto a una
licencia.
N Mark es una marca comercial o una
marca comercial registrada de NFC
Forum, Inc. en los Estados Unidos y en
otros países.
Android™ es una marca comercial de
Google Inc.
“ClearAudio+” es una marca comercial
de Sony Corporation.
Otras marcas y nombres comerciales
tienen sus respectivos propietarios.
y sus
Este equipo cumple con los límites de
exposición a la radiación de la IC
establecidos para un ambiente no
ES
4
HT-CT180
4-559-026-11(1)
Page 51

C:\SONY\HT_CZ1_CZ2_CZ3\CZ1\UC2\4559026111\4559026111HTCT180UC
2\4559026111\4559026111HTCT180UC2\03LaES-HTCT180UC2\020REG.fm
010COV.book Page 5 Tuesday, December 9, 2014 2:36 PM
Acerca de este manual de
instrucciones
•Las instrucciones contenidas en este
manual de instrucciones describen los
controles en el mando a distancia.
También puede utilizar los controles
en la unidad principal si tienen los
mismos nombres o similares a
aquellos en el mando a distancia.
•Algunas ilustraciones se presentan
como dibujos conceptuales y pueden
ser diferentes de los productos reales.
masterpage:
Right
5
HT-CT180
4-559-026-11(1)
ES
Page 52

C:\SONY\HT_CZ1_CZ2_CZ3\CZ1\UC2\4559026111\4559026111HTCT180UC
2\4559026111\4559026111HTCT180UC2\03LaESHTCT180UC2\010COVTOC.fm
010COV.book Page 6 Tuesday, December 9, 2014 2:36 PM
Tabla de contenidos
masterpage: Left
Conexión
Acerca de este manual de
instrucciones ........................5
Guía de inicio (documento separado)
Escuchar
Escuchar sonido proveniente de
un televisor, caja de cable/
satélite, etc. ..........................7
Escuchar música desde un
dispositivo BLUETOOTH ....... 7
Ajuste de sonido
Disfrutar de los efectos de
sonido ...................................8
Funciones BLUETOOTH
Escuchar música desde un
dispositivo BLUETOOTH .......9
Apague y encienda la función
BLUETOOTH ........................ 12
Ajuste del modo de espera de
BLUETOOTH ........................ 12
Otras funciones
Habilitar la función de enlace
seguro ................................ 12
Función de espera
automática ......................... 12
Fijación de la barra parlante
sobre una pared ................. 13
Información adicional
Precauciones ............................ 14
Solución de problemas ............ 15
Guía para las partes y los
controles ............................. 19
Formatos de audio
compatibles ........................22
Especificaciones .......................22
En comunicación
BLUETOOTH ........................24
ES
6
HT-CT180
4-559-026-11(1)
Page 53

C:\SONY\HT_CZ1_CZ2_CZ3\CZ1\UC2\4559026111\4559026111HTCT180UC
Escuchar
2\4559026111\4559026111HTCT180UC2\03LaES-HTCT180UC2\030LSN.fm
010COV.book Page 7 Tuesday, December 9, 2014 2:36 PM
masterpage:
Right
Escuchar
Escuchar sonido
proveniente de un
televisor, caja de cable/
satélite, etc.
Presione el botón de entrada de la
toma a la que conectó el dispositivo
que desea escuchar.
El indicador del dispositivo
seleccionado se ilumina.
Botón OPTICAL
Televisor que está conectado a la toma
OPTICAL
Botón ANALOG
Dispositivo analógico que está conectado a
la toma ANALOG
Botón (BLUETOOTH)
Dispositivo BLUETOOTH que soporta A2DP
Sugerencia
•Si presiona INPUT en la barra parlante, el
dispositivo cambia cíclicamente de la
siguiente manera.
OPTICAL ANALOG BLUETOOTH
Escuchar música desde
un dispositivo
BLUETOOTH
Consulte “Funciones BLUETOOTH”
(página 9).
7
HT-CT180
4-559-026-11(1)
ES
Page 54

C:\SONY\HT_CZ1_CZ2_CZ3\CZ1\UC2\4559026111\4559026111HTCT180UC
2\4559026111\4559026111HTCT180UC2\03LaES-HTCT180UC2\040SND.fm
010COV.book Page 8 Tuesday, December 9, 2014 2:36 PM
Ajuste del modo Voz
Ajuste de sonido
El modo Voz ayuda a aclarar los
diálogos.
Disfrutar de los efectos
de sonido
Para ajustar los efectos de sonido,
presione uno de los botones de efectos
de sonido del mando a distancia.
Presione VOICE.
El indicador ANALOG parpadea dos
veces.
Para desactivar el modo Voz, presione
VOICE nuevamente. El indicador
OPTICAL parpadea dos veces.
masterpage: Left
Selección de efectos de
sonido
Presione SURROUND en forma
repetida durante la reproducción.
Los efectos de sonido envolvente
cambian cíclicamente de la siguiente
manera.
CLEARAUDIO+
encendido
CLEARAUDIO+
La configuración de sonido adecuada está
automáticamente seleccionada para la
fuente de sonido. El indicador CLEARAUDIO+
se enciende.
SURROUND encendido
Los sonidos se reproducen con efectos de
sonido envolvente. El indicador SURROUND
se enciende.
SURROUND apagado
La fuente de entrada está mezclada para
2 canales. Los indicadores CLEARAUDIO+ y
SURROUND se apagan.
SURROUND
SURROUND apagado
Ajuste del modo noche
Se reproducen los sonidos mejorados
con efectos de sonido y claridad de
diálogo.
Presione NIGHT.
El indicador ANALOG parpadea dos
veces.
Para desactivar el modo Noche,
presione NIGHT nuevamente. El
indicador OPTICAL parpadea dos veces.
Selección de sonido de
emisión multiplex (Mono
dual)
Puede disfrutar de sonido de emisión
multiplex cuando el sistema recibe una
señal de emisión multiplex Dolby
Digital.
Presione AUDIO en forma repetida.
El canal cambia cíclicamente de la
siguiente manera.
Principal
Principal
Da salida solo al canal principal. El indicador
OPTICAL parpadea dos veces.
Sub
Da salida solo al subcanal. El indicador
ANALOG parpadea dos veces.
Principal/Sub
El sonido principal se emite del altavoz
izquierdo y el sub-sonido se emite por el
altavoz derecho. Los indicadores OPTICAL y
ANALOG parpadean dos veces.
Sub Principal/Sub
ES
8
HT-CT180
4-559-026-11(1)
Page 55

C:\SONY\HT_CZ1_CZ2_CZ3\CZ1\UC2\4559026111\4559026111HTCT180UC
Ajuste de sonido/Funciones BLUETOOTH
2\4559026111\4559026111HTCT180UC2\03LaES-HTCT180UC2\050BLT.fm
010COV.book Page 9 Tuesday, December 9, 2014 2:36 PM
masterpage:
Right
Ajuste de Dolby DRC (Campo
de ajuste dinámico)
Útil para disfrutar de películas a
volumen bajo. DRC aplica a fuentes
Dolby Digital.
Mantenga presionado AUDIO durante
5 segundo, luego VOICE durante
5 segundo para habilitar o
deshabilitar Dolby DRC.
Encendido
Comprime el sonido según la información
existente en el contenido. El indicador
ANALOG parpadea dos veces.
Apagado
El sonido no está comprimido. El indicador
OPTICAL parpadea dos veces.
Funciones BLUETOOTH
Escuchar música desde
un dispositivo
BLUETOOTH
Sincronización de este
sistema con un dispositivo
BLUETOOTH
La sincronización es el proceso
requerido para crear un enlace entre los
dispositivos BLUETOOTH para permitir
conexiones inalámbricas. Debe
sincronizar un dispo sitivo con el sistema
antes de comenzar a utilizar el sistema.
Una vez que los dispositivos
BLUETOOTH están sincronizados, no
hay necesidad de emparejarlos
nuevamente.
1 Presione PAIRING en la barra
parlante.
El indicador BLUETOOTH (azul)
parpadea rápidamente durante la
sincronización BLUETOOTH.
2 Encienda la función BLUETOOTH
en el dispositivo BLUETOOTH,
busque dispositivos y elija
“HT-CT180”.
Si se solicita la clave de paso,
ingrese “0000”.
HT-CT180
4-559-026-11(1)
ES
9
Page 56
C:\SONY\HT_CZ1_CZ2_CZ3\CZ1\UC2\4559026111\4559026111HTCT180UC
2\4559026111\4559026111HTCT180UC2\03LaES-HTCT180UC2\050BLT.fm
010COV.book Page 10 Tuesday, December 9, 2014 2:36 PM
masterpage: Left
3 Asegúrese de que el indicador
BLUETOOTH (azul) esté
encendido.
Se ha establecido la conexión.
Nota
•Puede sincronizar hasta 8
dispositivos BLUETOOTH. Si se
sincroniza el noveno dispositivo
BLUETOOTH, el dispositivo
conectado de mayor antigüedad será
remplazado por el nuevo.
Escuchar música del
dispositivo registrado
1 Presione (BLUETOOTH).
2 En el dispositivo BLUETOOTH, elija
“HT-CT180”.
3 Asegúrese de que el indicador
BLUETOOTH (azul) esté
encendido.
4 Inicie la reproducción en el
dispositivo BLUETOOTH.
Conexión a un dispositivo
BLUETOOTH por medio de
Funciones one touch (NFC)
Al sostener un dispositivo BLUETOOTH
compatible con NFC cerca de la marca N
en el sistema, el sistema y el dispositivo
BLUETOOTH proceden a completar la
sincronización y la conexión
BLUETOOTH automática.
Dispositivos compatibles
Teléfonos inteligentes, tabletas y
reproductores de música con la
función NFC incorporada
(Sistemas operativos: Android 2.3.3 o
posterior, excluyendo Android 3.x)
1 Descargue, instale e inicie la
aplicación “Conexión fácil NFC”.
Notas
• Es posible que no esté disponible la
aplicación en algunos países/
regiones.
•Dependiendo del dispositivo
BLUETOOTH, es posible que no sea
necesario realizar esta operación.
10
ES
HT-CT180
4-559-026-11(1)
Page 57
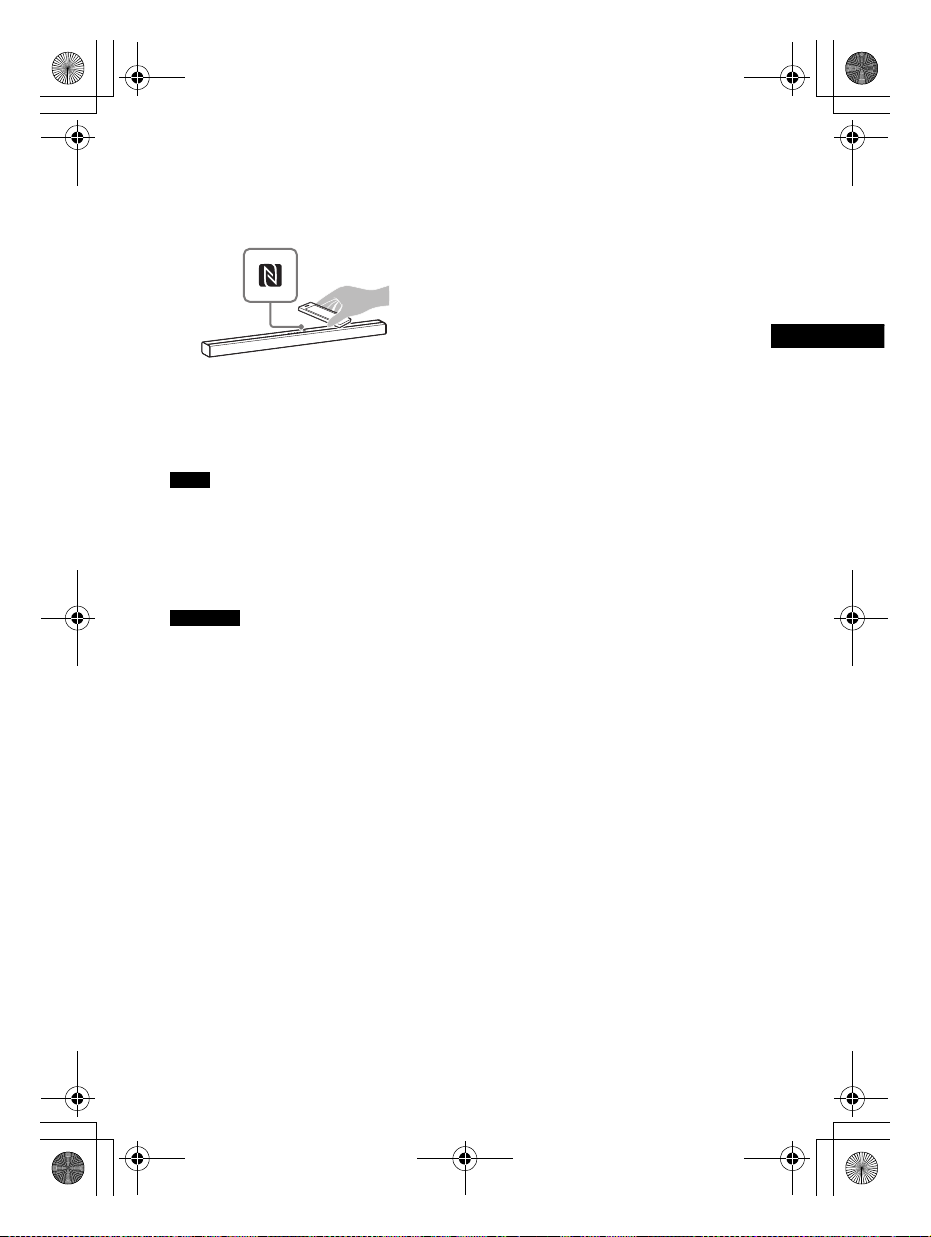
C:\SONY\HT_CZ1_CZ2_CZ3\CZ1\UC2\4559026111\4559026111HTCT180UC
Ajuste de sonido/Funciones BLUETOOTH
2\4559026111\4559026111HTCT180UC2\03LaES-HTCT180UC2\050BLT.fm
010COV.book Page 11 Tuesday, December 9, 2014 2:36 PM
2 Toque la marca N en la barra
parlante con el dispositivo
BLUETOOTH.
masterpage:
Right
3 Asegúrese de que el indicador
BLUETOOTH (azul) esté
encendido.
Se ha establecido la conexión.
Notas
• Solo puede conectar un dispositivo a la
vez.
• Dependiendo del dispositivo, es posible
que tenga que encender la función NFC
de antemano. Consulte el manual de
instrucciones del dispositivo.
Sugerencia
•Si la sincronización y la conexión
BLUETOOTH fallan, haga lo siguiente.
– V uelva a iniciar la “Conex ión fácil NFC” y
mueva lentamente el dispositivo
BLUETOOTH sobre la marca N.
– Quite la funda del dispositivo
BLUETOOTH en caso de que se esté
utilizando una funda para dispositivo
disponible comercialmente.
11
HT-CT180
4-559-026-11(1)
ES
Page 58
C:\SONY\HT_CZ1_CZ2_CZ3\CZ1\UC2\4559026111\4559026111HTCT180UC
2\4559026111\4559026111HTCT180UC2\03LaES-HTCT180UC2\060OTH.fm
010COV.book Page 12 Tuesday, December 9, 2014 2:36 PM
masterpage: Left
Apague y encienda la
función BLUETOOTH
Mantenga presionado SURROUND
durante 5 segundo, luego
CLEARAUDIO+ durante 5 segundo.
Encendido: El indicador ANALOG
parpadea dos veces.
Apagado: El indicador OPTICAL
parpadea dos veces.
Nota
•Si cambia el ajuste a apagado, la función
BLUETOOTH se deshabilita.
Ajuste del modo de
espera de BLUETOOTH
Cuando el sistema termina de
sincronizar la información, se encuentra
en modo de espera de BLUETOOTH
incluso si está apagado.
Mantenga presionado STANDBY
durante 5 segundos.
Encendido: El indicador ANALOG
parpadea dos veces.
Apagado: El indicador OPTICAL
parpadea dos veces.
Nota
• Durante el modo de espera de
BLUETOOTH, aumenta el consumo de
energía en espera.
Otras funciones
Habilitar la función de
enlace seguro
Puede especificar la conexión
inalámbrica para enlazar la barra
parlante con el subwoofer utilizando la
función de enlace seguro. Esta función
puede ayudar a prevenir una
interferencia si utiliza productos
inalámbricos múltiples o sus vecinos
utilizan productos inalámbricos.
1 Presione LINK en la parte trasera
del subwoofer.
Escuchará pitidos provenientes del
subwoofer.
2 Mantenga presionado PAIRING en
la barra parlante durante
5 segundos, luego VOL – durante
5 segundo.
Los indicadores OPTICAL y ANALOG
parpadean alternadamente.
Cuando la barra parlante está
enlazada con el subwoofer, los
indicadores dejan de parpadear.
Si eso falló, los indicadores se
encienden durante 5 segundos.
Intente nuevamente la anterior
operación.
Función de espera
automática
12
El sistema pasa automáticamente a
modo de espera cuando no opera el
sistema durante unos 20 minuto y el
sistema no recibe una señal de entrada.
ES
HT-CT180
4-559-026-11(1)
Page 59
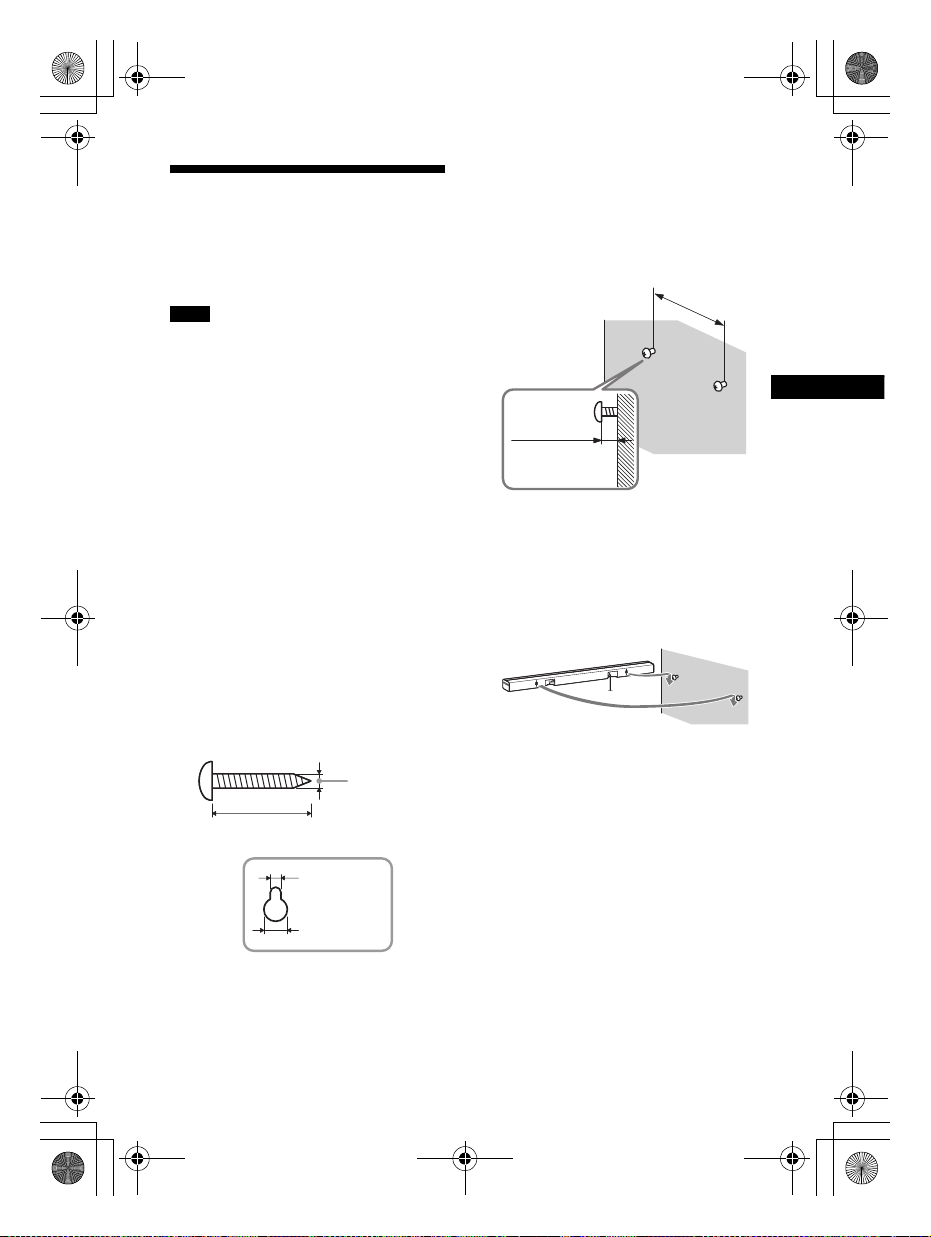
C:\SONY\HT_CZ1_CZ2_CZ3\CZ1\UC2\4559026111\4559026111HTCT180UC
Funciones BLUETOOTH/Otras funciones
4 mm
(
3
/16 pulgadas)
Más de 30 mm (1
3
/16 pulgadas)
4,6 mm
(
3
/16 pulgadas)
Agujero en la parte trasera de la barra
parlante
9 mm
(
9
/25 pulgadas)
560 mm
(22
1
/20 pulgadas)
8 mm a
9mm
(aprox.
11
/32 pulgada)
2\4559026111\4559026111HTCT180UC2\03LaES-HTCT180UC2\060OTH.fm
010COV.book Page 13 Tuesday, December 9, 2014 2:36 PM
masterpage:
Right
Fijación de la barra
parlante sobre una pared
Puede fijar la barra parlante sobre una
pared.
Notas
•Prepare tornillos (no suministrados) que
sean apropiados para el material y la
fortaleza de la pared. Debido a que una
pared de yeso es especialmente frágil,
asegure los torn illos a dos tacos en la viga
de la pared. Instale la barra parlante de
manera horizontal, colgado en tacos
mediante tornillos en una sección plana y
continua de la pared.
• Asegúrese de subcontratar la instalación
a proveedores o contratistas licenciados
de Sony y preste especial atención a la
seguridad durante la instalación.
• Sony no se hará responsable de
accidentes o daños ocasionados por la
instalación incorrecta, fortaleza
insuficiente de la pared, instalación
incorrecta de los tornillos o desastre
natural, etc.
1 Prepare tornillos (no
suministrados) que sean
apropiados para los agujeros en la
parte trasera de la barra parlante.
2 Sujete los tornillos a dos tacos en
la pared.
Los tornillos deben sobresalir de
8 mm a 9 mm (aprox.
11
/32 pulgada).
3 Cuelgue la barra parlante en los
tornillos.
Alinee los agujeros en la parte
trasera de la barra parlante con los
tornillos, luego cuelgue la barra
parlante en los dos tornillos.
13
HT-CT180
4-559-026-11(1)
ES
Page 60

C:\SONY\HT_CZ1_CZ2_CZ3\CZ1\UC2\4559026111\4559026111HTCT180UC
2\4559026111\4559026111HTCT180UC2\03LaES-HTCT180UC2\070ADD.fm
010COV.book Page 14 Tuesday, December 9, 2014 2:36 PM
Ubicación
Información adicional
Precauciones
Seguridad
•En caso de que caiga algún objeto sólido
o líquido dentro del sistema,
desconéctelo y solicite al personal
especializado que realice un a verificación
antes de volver a utilizarlo.
• No se apoye en la barra parlante y el
subwoofer, dado que podría caerse y
lastimarse, o podría ocasionar daños en el
sistema.
Fuentes de alimentación
• Antes de conectar el sistema, compruebe
que la tensión de funcionamiento sea
idéntica a su fuente de alimentación
local. La tensión de funcionamiento se
indica en la placa de identificación en la
parte inferior de la barra parlante.
• Si no va a utilizar el sistema por un tiempo
prolongado, asegúrese de desconectarlo
de la toma de pared. Para desconectar el
cable de alimentación de ca tire del
enchufe, nunca del cable.
• Una clavija del enchufe es más ancha que
la otra por motivos de seguridad y entrará
en la toma de pared de una sola manera.
Si no puede insertar la totalidad del
enchufe en la toma, comuníquese con su
proveedor.
• El cable de alimentación de ca solo
deberá ser reemplazado en un centro de
servicio autorizado.
Acumulación térmica
Si bien el sistema se calienta durante su
funciona miento, no se trata de una falla de
funcionamiento. El uso prolongado de este
sistema con un volumen alto puede
provocar un incremento considerable en la
temperatura de la parte trasera e inferior
del mismo. Para evitar quemaduras, no
toque el sistema.
•Instale el sistema en un lugar con
ventilación adecuada para evitar la
acumulación térmica y prolongar su vida
útil.
• No lo instale cerca de fuentes de calor ni
en lugares ex puestos a la luz sola r directa,
polvo excesivo, vibraciones mecánicas.
• No coloque objetos en la parte posterior
de la barra parlante y del subwoofer que
puedan bloquear las ranuras de
ventilación y ocasionar fallas de
funcionamiento.
• Si el sistema se utiliza junto con un
televisor, video grabadora o lector de
cintas, puede ocasionar ruido y la calidad
de imagen se podría ver afec tada. En este
caso, coloque el sistema lejos del
televisor, video grabadora o lector de
cintas.
• Tenga cuidado al colocarlo sobre una
superficie que haya sido tratada de
manera especial (encerada, barnizada
con aceite, pulida, etc.), ya que puede
mancharse o decolorarse.
• Tenga cuidado para evitar posibles
lesiones producidas con los bordes de la
barra parlante y del subwoofer.
Funcionamiento
Antes de conectar otro equipo, asegúrese
de apagar y desenchufar el sistema.
Si encuentra irregularidad de
color en una pantalla de
televisión cercana
Se pueden observar irregularidades de
color en determinados tipos de televisores.
•Si se observa una irregularidad de color...
Apague el televisor y luego vuelva a
encenderlo después de 15 a 30 minuto.
•Si se vuelve a observar una irregularidad
de color...
Instale el sistema más lejos del televisor.
Limpieza
Limpie el sistema con un paño seco y
suave. No utilice estropajos abrasivos,
detergente en polvo ni disolventes, como
alcohol o bencina.
masterpage: Left
14
ES
HT-CT180
4-559-026-11(1)
Page 61

C:\SONY\HT_CZ1_CZ2_CZ3\CZ1\UC2\4559026111\4559026111HTCT180UC
Información adicional
2\4559026111\4559026111HTCT180UC2\03LaES-HTCT180UC2\070ADD.fm
010COV.book Page 15 Tuesday, December 9, 2014 2:36 PM
masterpage:
Right
Si desea realizar alguna pregunta o
solucionar algún problema relacionado
con el sistema, póngase en contacto con el
distribuidor Sony más cercano.
Solución de problemas
Si al utilizar el sistema, surge alguna de
las siguientes dificu ltades, consulte esta
guía de solución de problemas para
resolver el inconveniente antes de
solicitar reparaciones. Si el problema
persiste, póngase en contacto con el
distribuidor Sony más cercano.
Cuando solicita una reparación,
asegúrese de traer tanto su barra
parlante como su subwoofer, incluso si
parece que solo uno tiene un problema.
General
El aparato no enciende.
Compruebe que el cable de
alimentación de ca esté bien
conectado.
El sistema no trabaja con normalidad.
Desconecte el cable de
alimentación de ca del
tomacorriente de pared, luego
reconecte después de varios
minutos.
Sonido
No se emiten sonidos del televisor
desde el sistema.
Presione el botón de entrada de la
conexión a la que conectó el
televisor (página 7).
Compruebe la salida de sonido del
televisor. Consulte el manual de
instrucciones del televisor para ver
la configuración del televisor.
Suba el volumen del televisor o
cancele el silencio.
Si no se emite ningún sonido desde
la conexión de salida digital óptica o
el televisor no tiene una conexión
de salida digital óptica, conecte la
caja de cable o satélite
directamente a la toma OPTICAL del
sistema.
El sonido se emite desde el sistema y el
televisor.
Apague el sonido del televisor.
El sonido del televisor de este sistema
está demorado con respecto a la
imagen.
Cuando mira películas, es posible
que escuche el sonido con un leve
retraso en comparación con la
imagen.
No hay sonido o se oye un sonido muy
bajo del dispositivo conectado a la
barra parlante desde la barra parlante.
Presione el botón
en el mando a distancia y revise el
nivel de volumen (página 19).
Presione el botón
(volumen)
para cancelar la función de silencio
(página 19).
Asegúrese de que se haya
seleccionado la fuente de entrada
de forma correcta. Debe probar
otras fuentes de entrada
presionando un botón de entrada
diferente en el mando a distancia
(página 7).
Compruebe que todos los cables
del sistema y de los dispositivos
conectados estén totalmente
insertados.
No hay sonido o se oye un sonido muy
bajo desde el subwoofer.
Presione el botón SW
de subwoofer)
distancia para aumentar el volumen
del subwoofer (página 19).
(volumen) +
(silencio) o
+ en el mando a distancia
(volumen
+ en el mando a
15
HT-CT180
4-559-026-11(1)
ES
Page 62

C:\SONY\HT_CZ1_CZ2_CZ3\CZ1\UC2\4559026111\4559026111HTCT180UC
2\4559026111\4559026111HTCT180UC2\03LaES-HTCT180UC2\070ADD.fm
010COV.book Page 16 Tuesday, December 9, 2014 2:36 PM
masterpage: Left
Asegúrese de que el indicador de
encendido/en espera del
subwoofer esté iluminado de color
verde. De no se r así, consulte “No se
escuchan sonidos desde el
subwoofe r.” en “Sonido inalám brico
del subwoofer” (página 17).
Un subwoofer sirve para reproducir
sonidos graves. En caso de fuentes
de entrada que contienen muy
pocos componentes de sonidos
graves (es decir, una transmisión
televisiva), es posible que sea difícil
oír el sonido del subwoofer.
Cuando usted reproduce contenido
compatible con la tecnología de
protección de derechos de autor
(HDCP), no se emite desde el
subwoofer.
No se puede obtener el efecto de
sonido envolvente.
Dependiendo de la señal de
entrada y de la configuración del
campo acústico, el procesamiento
de sonido envolvente podría no
funcionar de forma efectiva. El
efecto envolvente puede ser sutil
según el programa o el disco.
Para emitir audio multicanal,
compruebe la configuración de
salida de audio digital en el
dispositivo conectado al sistema.
Para conocer más detalles, consulte
el manual de instrucciones
suministrado con el dispositivo
conectado.
Dispositivo BLUETOOTH
No se puede completar la conexión
BLUETOOTH.
Asegúrese de que el indicador
BLUETOOTH (azul) esté encendido
(página 19).
Estado del sistema Indicador
Durante la sincronización
BLUETOOTH
El sistema intenta
conectarse con un
dispositivo BLUETOOTH
El sistema ha establecido
una conexión con un
dispositivo BLUETOOTH
El sistema está en el
modo de espera de
BLUETOOTH (cuando el
sistema está apagado)
BLUETOOTH
(azul)
Parpadea
rápidamente
Parpadea
Encendido
Apagado
Compruebe que el dispositivo
BLUETOOTH a conectarse esté
encendido y que la función
BLUETOOTH esté activada.
Acerque el sistema al dispositivo
BLUETOOTH.
Sincronice nuevamente el sistema y
el dispositivo BLUETOOTH. Puede
que necesite cancelar la
sincronización con el sistema
usando primero su dispositivo
BLUETOOTH.
Si la función BLUETOOTH está
apagada, enciéndala en (página 12).
No se pudo realizar la sincronización.
Acerque el sistema al dispositivo
BLUETOOTH.
Asegúrese de que este sistema no
está recibiendo interferencia de un
equipo LAN inalámbrica, otros
dispositivos inalámbricos de
2,4 GHz o un horno microondas. Si
hay un dispositivo que genera
radiación electromagnética cerca,
aleje el dispositivo del sistema.
No se emiten sonidos desde el
dispositivo BLUETOOTH conectado.
Asegúrese de que el indicador
BLUETOOTH (azul) esté encendido
(página 19).
16
ES
HT-CT180
4-559-026-11(1)
Page 63
C:\SONY\HT_CZ1_CZ2_CZ3\CZ1\UC2\4559026111\4559026111HTCT180UC
Información adicional
2\4559026111\4559026111HTCT180UC2\03LaES-HTCT180UC2\070ADD.fm
010COV.book Page 17 Tuesday, December 9, 2014 2:36 PM
masterpage:
Right
Acerque el sistema al dispositivo
BLUETOOTH.
Si hay un dispositivo que genera
radiación electromagnética, como
por ejemplo un equipo LAN
inalámbrica, otros dispositivos
BLUETOOTH o un horno microo ndas
cerca, aleje el dispositivo del
sistema.
Retire cualquier obstáculo entre
este sistema y el dispositivo
BLUETOOTH o aparte el sistema del
obstáculo.
Vuelva a posicionar el dispositivo
BLUETOOTH conectado.
Intente cambiar la frecuencia
inalámbrica del enrutador Wi-Fi,
computadora, etc., a la banda de
5GHz
Suba el volumen en el dispositivo
BLUETOOTH conectado.
El sonido no está sincronizado con la
imagen.
Cuando mira películas, es posible
que escuche el sonido con un leve
retraso en comparación con la
imagen.
Sonido inalámbrico del
subwoofer
No se escuchan sonidos desde el
subwoofer.
Compruebe que el cable de
alimentación de ca del subwoofer
esté correctamente conectado.
(Consulte la Guía de inicio
proporcionada).
El indicador de encendido/en
espera no se ilumina.
– Compruebe que el cable de
alimentación de ca del
subwoofer esté correctamente
conectado.
–Presione el botón /
(encendido/en espera) del
subwoofer para encender la
energía.
El indicador de encendido/en
espera parpadea lentamente en
color verde o se ilumina en color
rojo.
– Mueva el subwoofer a una
ubicación cercana a la barra
parlante para que el indicador
de encendido/en espera se
ilumine en color verde.
– Siga los pasos en “Habilitar la
función de enlace seguro”
(página 12).
El indicador de encendido/en
espera parpadea rápidamente en
color verde.
– C onsulte a su proveedor de Sony
más cercano.
El indicador de encendido/en
espera parpadea en color rojo.
–Presione el botón /
(encendido/en espera) del
subwoofer para apagar la
energía y compruebe si el
orificio de ventilación del
subwoofer está bloqueado o no.
El subwoofer está diseñado para
reproducir sonidos graves. Cuando
la fuente de entrada no contiene
muchos sonidos graves, como es el
caso de la mayoría de los
programas televisivos, es posible
que no se escuche el sonido grave.
Presione el botón SW
de subwoofer)
distancia para aumentar el volumen
del subwoofer (página 21).
El sonido salta o tiene ruido.
Si hay un dispositivo cerca que
genera ondas electromagnéticas
como una LAN inalámbrica o un
horno microondas en uso, instale el
sistema lejos del mismo.
Si hay un obstáculo entre la barra
parlante y el subwoofer, muévalo o
quítelo.
(volumen
+ en el mando a
17
HT-CT180
4-559-026-11(1)
ES
Page 64

C:\SONY\HT_CZ1_CZ2_CZ3\CZ1\UC2\4559026111\4559026111HTCT180UC
2\4559026111\4559026111HTCT180UC2\03LaES-HTCT180UC2\070ADD.fm
010COV.book Page 18 Tuesday, December 9, 2014 2:36 PM
masterpage: Left
Instale la barra parlante y el
subwoofer lo más cerca posible.
Cambie la frecuencia LAN de
cualquier enrutador Wi-Fi o
computadora personal cercanos a
la banda de 5 GHz
Mando a distancia
El mando a distancia no funciona.
Apunte el mando a distancia al
centro del panel frontal (sensor del
mando a distancia) del sistema
(página 19).
Retire cualquier obstáculo que se
interponga entre el mando a
distancia y el sistema.
Si las pilas del mando a distancia
tienen poca energía, reemplace
ambas por otras nuevas.
Asegúrese de presionar el botón
correcto en el mando a distancia
(página 21).
Otros
Los sensores del televisor no funciona n
correctamente.
La barra parlante puede bloquear
algunos sensores (como el sensor
de brillo) y el receptor del mando a
distancia de su televisor, o el
“emisor para los anteojos 3D
(transmisión infrarroja)” de un
televisor 3D compatible con el
sistema de anteojos 3D o la
comunicación inalámbrica. Mueva
la barra parlante lejos del televisor
dentro de un rango que permita
que esas partes funcionen
correctamente. Para las ubicaciones
de los sensores y del receptor del
mando a distancia, consulte el
manual de instrucciones
proporcionadas con el televisor.
Reiniciar
Si el sistema sigue sin funcionar
correctamente, reinícielo de la siguiente
manera:
1 Mientras mantiene presionado el
botón / (encendido/en espera)
en el sistema, mantenga
presionados los botones INPUT y
VOL – simultáneamente durante
5 segundo.
Los 5 indicadores en la barra
parlante parpadean 3 veces, y los
ajustes vuelven a su estado inicial.
2 Desconecte el cable de
alimentación de ca.
18
ES
HT-CT180
4-559-026-11(1)
Page 65
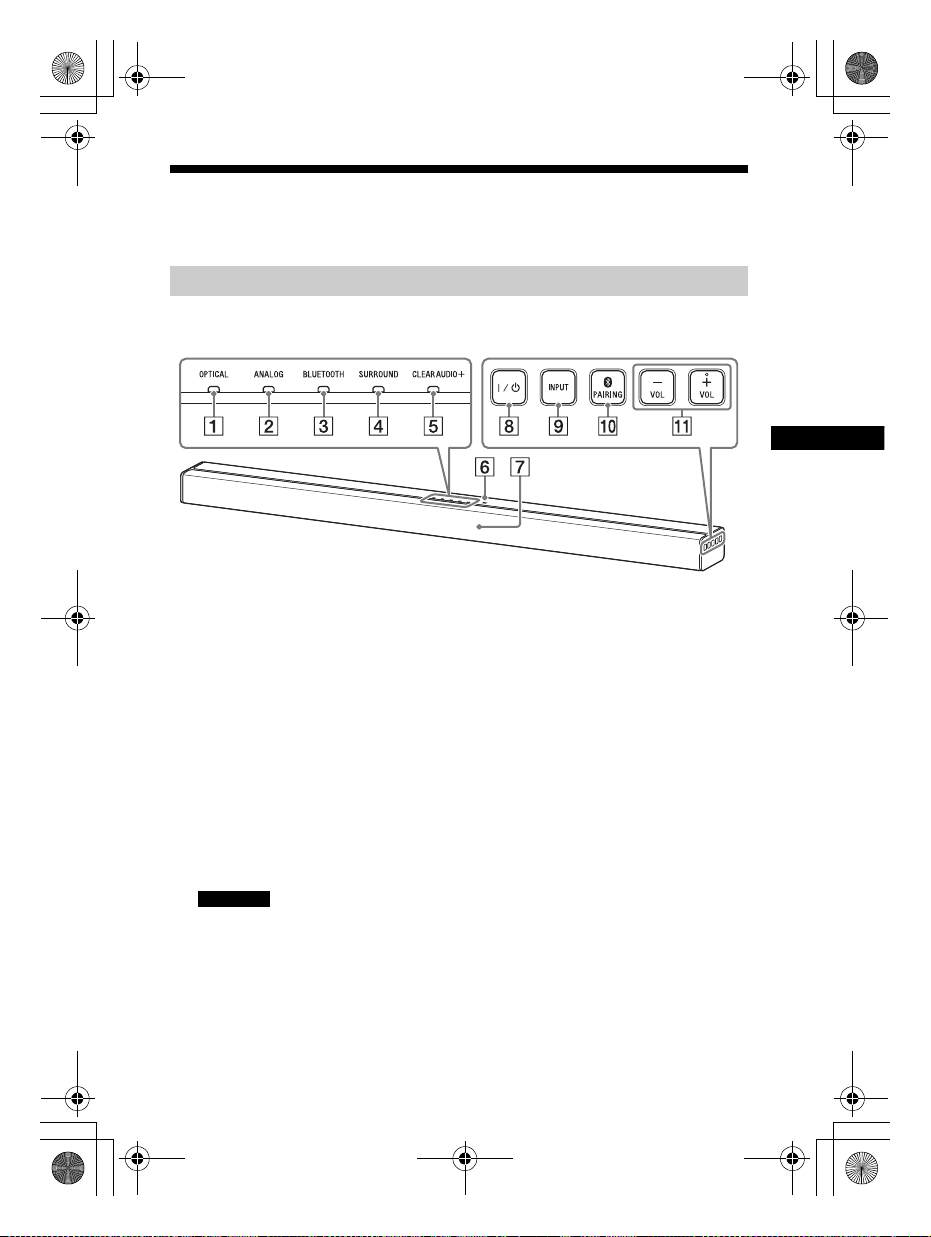
Información adicional
C:\SONY\HT_CZ1_CZ2_CZ3\CZ1\UC2\4559026111\4559026111HTCT180UC
2\4559026111\4559026111HTCT180UC2\03LaES-HTCT180UC2\070ADD.fm
010COV.book Page 19 Tuesday, December 9, 2014 2:36 PM
Guía para las partes y los controles
Para obtener más información, consulte las páginas indicadas en paréntesis.
Barra parlante
Paneles superior, frontal y laterales
masterpage:
Right
Indicador OPTICAL (página 7)
Indicador ANALOG (página 7)
Indicador BLUETOOTH (azul)
Estado BLUETOOTH
– Durante la sincronización
BLUETOOTH: Parpadea
rápidamente
– Se está intentando la conexión
BLUETOOTH: Parpadea
– Se ha establecido la conexión
BLUETOOTH: Encendido
– Modo en espera de BLUETOOTH
(cuando el sistem a está apagado):
Apagado
Sugerencia
•Cuando la función BLUETOOTH está
desactivada (página 12), el indicador
BLUETOOTH se torna ámbar.
Indicador SURROUND (página 8)
Indicador CLEARAUDIO+
(página 8)
Marca N (página 11)
Cuando usa la función NFC, toque
su dispositivo compatible con NFC
con la marca.
Sensor de mando a distancia
Botón / (encendido/en
espera)
Enciende el sistema o lo pone en
modo en espera.
Botón INPUT (página 7)
Botón
PAIRING (página 9, 12)
Botones VOL (volumen) +/–
19
HT-CT180
4-559-026-11(1)
ES
Page 66

C:\SONY\HT_CZ1_CZ2_CZ3\CZ1\UC2\4559026111\4559026111HTCT180UC
2\4559026111\4559026111HTCT180UC2\03LaES-HTCT180UC2\070ADD.fm
010COV.book Page 20 Tuesday, December 9, 2014 2:36 PM
Panel trasero
masterpage: Left
Toma ANALOG
Toma OPTICAL
Subwoofer
Indicador encendido/en espera
Botón / (encendido/en
espera)
Cable de alimentación de ca
Botón LINK (página 12)
Cable de alimentación de ca
20
ES
HT-CT180
4-559-026-11(1)
Page 67

C:\SONY\HT_CZ1_CZ2_CZ3\CZ1\UC2\4559026111\4559026111HTCT180UC
Información adicional
2\4559026111\4559026111HTCT180UC2\03LaES-HTCT180UC2\070ADD.fm
010COV.book Page 21 Tuesday, December 9, 2014 2:36 PM
masterpage:
Right
Mando a distancia
Botón TV / (encendido/en
espera)
Botón / (encendido/en
espera)
Botón TV INPUT
Botón TV (silencio)
Botón (BLUETOOTH)
(página 7)
Botón STANDBY (página 12)
Botón ANALOG (página 7)
Botón OPTICAL (página 7)
Botones (volumen) +*/–
Se ajusta del volumen.
Botones SW (volumen de
subwoofer) +/–
Ajusta el volumen del sonido de
bajos.
Botón (silencio)
Apaga temporalmente el sonido.
Botón CLEARAUDIO+
Selecciona automáticamente el
ajuste de sonido adecuado para
la fuente de sonido.
Botón SURROUND (página 8)
Botón VOICE (página 8)
Botón AUDIO* (página 8)
Botón NIGHT (página 8)
*Los botones AUDIO y + tienen un
punto táctil. Úselo como guía durante la
operación.
Control de un televisor conectado
Puede controlar un televisor Sony
conectado al sistema con los siguientes
botones.
Botón TV / (encendido/en
espera)
Apaga o enciende el televisor.
Botón TV INPUT
Selecciona la señal de entrada.
Botón TV (silencio)
Apaga temporalmente el sonido.
21
HT-CT180
4-559-026-11(1)
ES
Page 68

C:\SONY\HT_CZ1_CZ2_CZ3\CZ1\UC2\4559026111\4559026111HTCT180UC
2\4559026111\4559026111HTCT180UC2\03LaES-HTCT180UC2\070ADD.fm
010COV.book Page 22 Tuesday, December 9, 2014 2:36 PM
masterpage: Left
Formatos de audio
compatibles
Los formatos de audio compatibles con
este sistema son los siguientes.
•Dolby Digital
• Linear PCM 2ch 48 kHz o menos
Especificaciones
Barra parlante (SA-CT180)
Sección del amplificador
Modelos para EE. UU.:
POTENCIA DE SALIDA Y DISTORSIÓN
ARMÓNICA TOTAL:
(FTC)
Frontal I + Frontal D:
Con cargas de 4 ohmio, ambos
canales accionados, entre 200 y
20 000 Hz; potencia media mínima de
13 W por canal y una distorsión
armónica total que no supera el 1%,
que va desde los 250 miliwatt hasta la
potencia nominal.
POTENCIA DE SALIDA (referencia)
Altavoces Frontal I/Frontal D:
25 W (por canal a 4 ohmio, 1 kHz)
Modelos para Canadá:
POTENCIA DE SALIDA (nominal)
Frontal I + Frontal D:
13 W + 13 W (a 4 ohmio, 1 kHz 1% THD)
POTENCIA DE SALIDA (referencia)
Altavoces Frontal I/Frontal D:
25 W (por canal a 4 ohmio, 1 kHz)
Entradas
OPTICAL
ANALOG
Sección BLUETOOTH
Sistema de comunicación
Especificación BLUETOOTH versión 4.0
Salida
Especificación BLUETOOTH clase de
energía 2
Rango máximo de comunicación
Línea visual aprox. 10 m (33 pies)
Número máximo de dispositivos a
registrarse
8 dispositivos
Banda de frecuencia
Banda de 2,4 GHz (2,4000 GHz a
2,4835 GHz)
Método de modulación
FHSS (Freq Hopping Spread Spectrum)
Perfiles BLUETOOTH compatibles
A2DP (Advanced Audio Distribution
Profile)
2)
1)
22
ES
HT-CT180
4-559-026-11(1)
Page 69

C:\SONY\HT_CZ1_CZ2_CZ3\CZ1\UC2\4559026111\4559026111HTCT180UC
Información adicional
2\4559026111\4559026111HTCT180UC2\03LaES-HTCT180UC2\070ADD.fm
010COV.book Page 23 Tuesday, December 9, 2014 2:36 PM
masterpage:
Right
Códecs compatibles
4)
SBC
Rango de transmisión (A2DP)
3)
20 Hz - 20 000 Hz (frecuencia de
muestreo de 44,1 kHz)
1)
El rango real varía según distintos
factores, como obstáculos entre los
dispositivos, campos magnéticos de un
horno de microondas, electricidad
estática, teléfono inalámbrico,
sensibilidad de recepción, sistema
operativo, aplicación de software, etc.
2)
Los perfiles BLUETOOTH estándar indican
el objetivo de la comunicación
BLUETOOTH entre los dispositivos.
3)
Códec: Compresión de señal de audio y
formato de conversión
4)
Códec de banda secundaria
Altavoces
Sección Altavoces Frontal I/Frontal D
Sistema de altavoz
Sistema de altavoz bidireccional,
suspensión acústica
Altavoz
Altavoz de agudos: 14 mm - 25 mm
9
/16 pulgadas - 1 pulgada) tipo domo
(
de balance
Woofer: Tipo cónico de 40 mm ×
120 mm (1
4
5
3
/4 pulgadas)
/8pulgadas ×
General
Requisitos de alimentación
120 V ca, 60 Hz
Consumo de energía
Encendido: 17 W
Modo en espera: 0,5 W o menos
Mo d o e n e sp er a d e B LU ET OO TH : 3 W o
menos
Dimensiones (aprox.) (an./al./prf.)
901 mm × 52 mm × 84 mm
1
/2 pulgadas × 2 1/8 pulgadas ×
(35
3
/8 pulgadas)
3
Peso (aprox.)
2kg (4 libras 7 onzas)
Subwoofer (SA-WCT180)
POTENCIA DE SALIDA (referencia)
50 W (por canal a 4 ohmio, 100 Hz)
Sistema de altavoz
Sistema Subwoofer, reflejo de graves
Altavoz
Tipo cónico de 130 mm
1
/8 pulgadas)
(5
Requisitos de alimentación
120 V ca, 60 Hz
Consumo de energía
Encendido: 13 W
Modo en espera: 0,6 W o menos
Dimensiones (aprox.) (an./al./prf.)
170 mm × 342 mm × 325 mm
3
/4 pulgadas × 13 1/2 pulgadas ×
(6
7
12
/8 pulgadas)
Peso (aprox.)
5,5 kg (12 libras 2 onzas)
Transmisión/recepción
inalámbrica
Banda de frecuencia
Banda de 2,4 GHz (2,404 GHz a
2,476 GHz)
Método de modulación
GFSK
El diseño y las especificaciones están
sujetos a cambios sin previo aviso.
23
HT-CT180
4-559-026-11(1)
ES
Page 70

C:\SONY\HT_CZ1_CZ2_CZ3\CZ1\UC2\4559026111\4559026111HTCT180UC
2\4559026111\4559026111HTCT180UC2\03LaES-HTCT180UC2\070ADD.fm
010COV.book Page 24 Tuesday, December 9, 2014 2:36 PM
interferencia puede generar fallas de
En comunicación
BLUETOOTH
• Los dispositivos BLUETOOTH se deben
usar dentro de aproximadamente
10 metros (33 pies) (distancia sin
obstrucciones) uno del otro. El rango
de comunicación eficaz puede
acortarse en las siguientes
condiciones.
– Cuando una persona, objeto
metálico, pared u otra obstrucción
está entre los dispositivos con una
conexión BLUETOOTH
– Ubicaciones donde está instalada
una LAN inalámbrica
– Cerca de hornos de microondas que
estén en uso
– Ubicaciones donde se den otras
ondas electromagnéticas
• Los dispositivos BLUETOOTH y LAN
inalámbrica (IEEE 802.11b/g) usan la
misma banda de frecuencia (2,4 GHz)
Al usar el dispositivo BLUETOOTH
cerca de un dispositivo con
capacidades de LAN inalámbrica,
puede ocurrir interferencia
electromagnética. Esto pu ede generar
una menor velocidad de transferencia
de datos, ruido o imposibilidad para
conectarse. Si esto sucede, intente lo
siguiente:
– Utilice este sistema al menos a
10 metros (33 pies) del dispositivo de
LAN inalámbrica.
– Apague el dispositivo de LAN
inalámbrica al utilizar el dispositivo
BLUETOOTH dentro de un rango de
10 metros (33 pies).
– Instale este sistema y el dispositivo
BLUETOOTH tan cerca como sea
posible el uno del otro.
• Las ondas de radio que emite este
sistema pueden interferir con el
funcionamiento de algunos
dispositivos médicos. Dado que la
funcionamiento, siempre apague el
sistema, y el dispositivo BLUETOOTH
en los siguiente lugares:
– En hospitales, trenes, aviones,
estaciones de combustible y en
cualquier lugar donde puedan haber
gases inflamables
– Cerca de puertas automáticas o
alarmas de incendio
• Este sistema admite funciones de
seguridad que cumplen con la
especificación de BLUETOOTH para
garantizar la conexión segura durante
las comunicaciones por medio de la
tecnología BLUETOOTH. Sin embargo,
esta seguridad puede ser insuficiente
dependiendo de los contenidos de los
ajustes y otros factores, de modo que
siempre tenga cuidado al realizar
comunicaciones utilizando tecnología
BLUETOOTH.
• Sony no puede ser responsable de
ninguna manera por daños u otras
pérdidas producto de la divulgación
de información durante la
comunicación mediante la tecnología
BLUETOOTH.
• No se garantiza con certeza la
comunicación de BLUETOOTH con
todos los dispositivos BLUETOOTH
que tengan el mismo perfil del
sistema.
• Los dispositivos BLUETOOTH
conectados con este sistema deben
cumplir con la especificación de
BLUETOOTH que indica Bluetooth SIG,
Inc., y deben tener certificación de
ello. No obstante, incluso si un
dispositivo cumple con la
especificación de BLUETOOTH, puede
haber casos donde las características
o especificaciones del dispositivo
BLUETOOTH hacen que sea imposible
conectarlo o pueden generar métodos
de control, visualización o
funcionamiento diferentes.
• Puede producirse ruido o el audio se
puede interrumpir segú n el dispositivo
masterpage: Left
24
ES
HT-CT180
4-559-026-11(1)
 Loading...