

Page 1

USER GUIDE
MODEL : TL603-LD
900MHz 40 Channel Cordless Telephone
Before operating the unit, please read this manual
thoroughly and retain it for future reference.
Page 2

TABLE OF CONTENTS
BEFORE OPERATING THE PHONE
1. Features
2. Checking the package contents
IDENTIFYING THE PARTS
3. Base unit
4. Cordless handset
INSTALLATION
5. Connecting the base phone
6. Installing the battery into the handset
7. Charging the battery pack
OPERATING THE PHONE
8. Change the system security code
9. Adjusting the ringer
10. Adjusting the receiver volume
11. Making a call
12. Answer a call
13. Redial the last number
14. Channel selection
15. FLASH function
16. Store number in memory
17. Making memory dialing calls
18. Page the handset
19. Battery low in handset
20. Replacing the Battery
21. Choosing Tone or Pulse Dialing
22. Setting the standby time of Handset battery
TROUBLE SHOOTING
23. Error tone
24. Interference
25. Malfunction
IMPOTANT NOTES
26. The factory presetting
27. Specification
1
Page 3

COMPLIES WITH PART 68 FCC RULES HAC MODEL NO.: TL603-LD
FCC REGISTRATION NO.: FCC ID :
R INGEER EQUIVANENCE : TCL Communication Int’l Ltd
USOC JACK : RJ11C, RJ11W MADE IN CHINA
DATE :
CAUTION : ANY CHANGES OR MODIFICATION IN CONSTRUCTION OF THIS DEVICE
WHICH
ARE NOT EXPRESSLY APPROVED BY THE PARTY RESPONSIBLE FOR COMPLIANCE
COULD
VOID THE USER’S AUTHORITY TO OPERATE THE EQUIPMENT.
PRIVACY OF COMMUNICATIONS MAY NOT BE ENSURED WHEN USING THIS PHONE.
THIS
DEVICE COMPLIES WITH PART 15 OF THE FCC RULES. OPERATION IS SUBJECT TO THE
FOLLOWING TWO CONDITIONS : (1) THIS DEVICE MAY NOT CAUSE HARMFUL
INTERFENCE,
AND (2) THIS DEVICE MUST ACCEPT ANY INTERFERRENCE RECEIVED, INCLUDING
INTERFERENCE THAT MAY CAUSE UNDESIRED OPERATION.
BEFORE OPERATING THE PHONE
1. Features
1) U.S.A. 40-channel auto select.
2) Random 20-bit digital security code.
3) Manual change channel with channel availability test.
4) Out-of-range indication and release of an engaged line.
5) Volume High / Low selection on handset.
6) Ten 16-digit speed dial memory
7) Last number redial (up to 32 digits).
8) Flash (100 / 300 / 600 mS selectable).
9) One way paging. (base page handset).
10) Auto receive when handset is lifted off the cradle during ringing.
11) Auto standby for power saving when the handset is at idle mode.
12) Lighted dial keypad(optional)
13) Tone / Pulse dialing
14) 40:60 / 33:66 make / break ratio selectable.
2
Page 4
15) Pause function.
Y
A
16) Key tone, error tone and confirmation tone.
17) Low battery indication with warning tone on handset.
18) 4 ringer cadence selectable by handset program key.
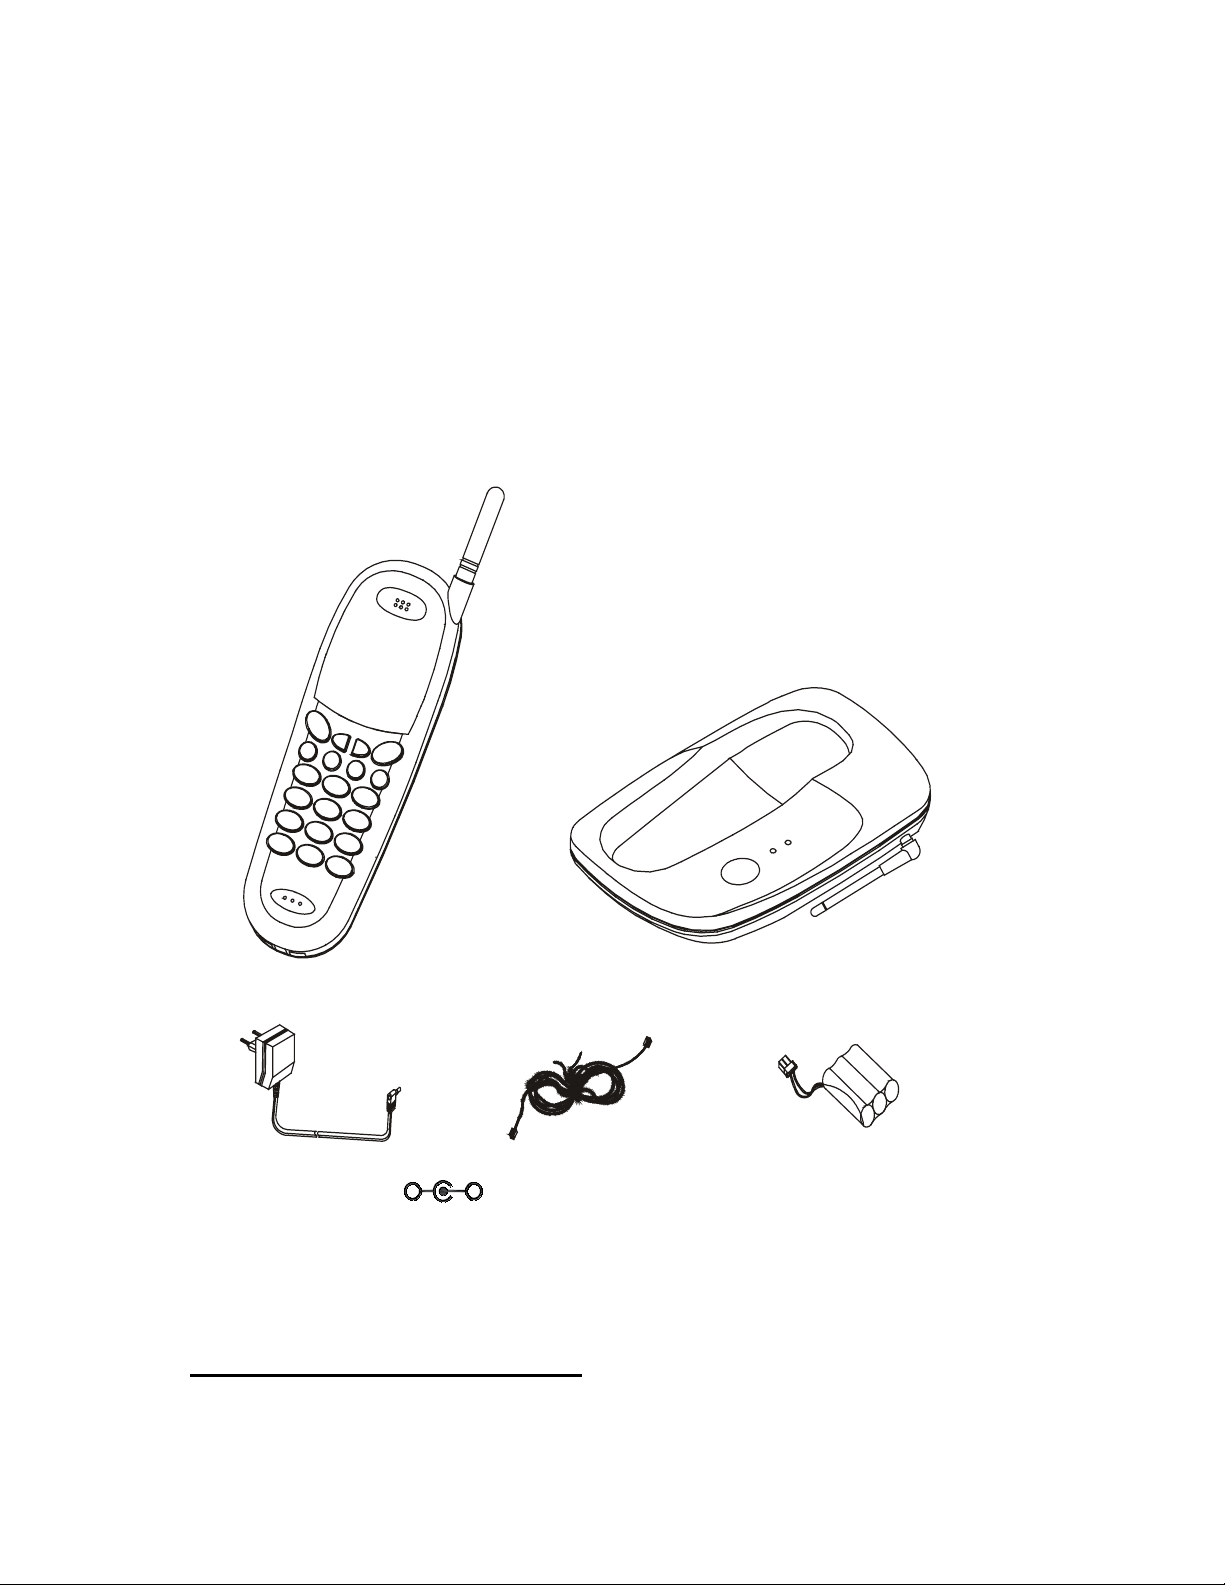
2. Checking the package contents
Make sure the follo wing items are included in t he package. If anythi ng is missing, contac t your
local dealer.
HANDSE T
POWER A DAPTOR
DC 9V 200 m
_
+
IDENTIFYING THE PARTS
3. Base unit
TEL. LINE
3
BASE
RECHARGEABLE BATTER
Page 5
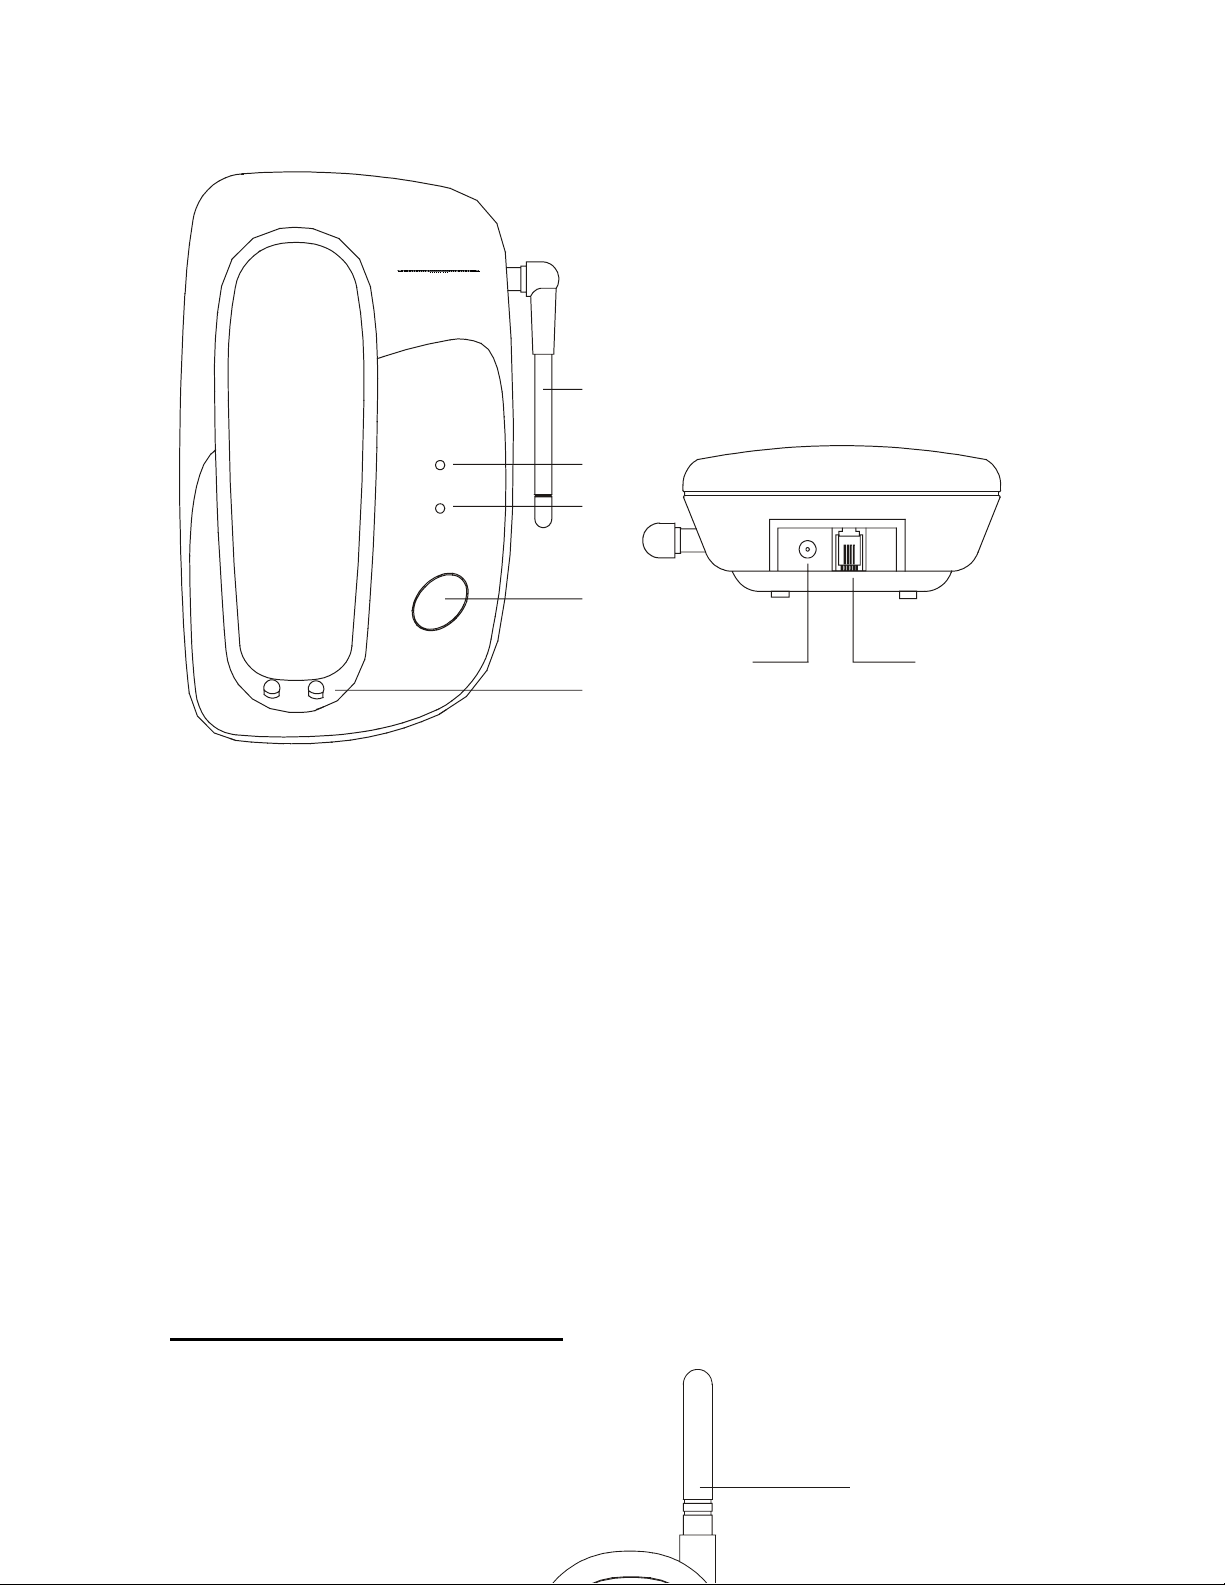
900
MHz
Cordless Telephone
1
IN USE / CHARGE
POWER
2
3
4
PAGE
6
5
1) ANTENA
2) IN USE / CHARGE INDICATOR
Lighting when the unit is in use AND the Handset is placed in the cradle.
3) POWER INDICATOR
Lighting when the power input is connected .
4) PAGE BUTTON
Press this button to send a page signal to the handset.
5) CHARGING CONTRACT POINT
7
6) POWER INPUT (DC 9V/300mA) JACK
7) TELEPHONE LINE – IN JACK
IDENTIFYING THE PARTS
4. Cordless Handset
4
7
Page 6

1) IN USE INDICATOR
2) VOLUME LOW BUTTON
3) TALK BUTTON
Let you make or receive a call
4) REDIAL / PAUSE BUTTON
Redial the last number called.
Pause function when between the dialing digit .
5) CHANNEL BUTTON
Allow you to change channel when interference occurs.
6) MICROPHONE
7) ANTENNA
8) RECEIVER
9) VOLUME HIGH BUTTON
5
Page 7

10) PROGRAM BUTTON
Allow you to set the phone setting (Ringer type, Tone / Pulse, M/B, Flash).
11) FLASH BUTTON
12) MEMORY BUTTON
Allow you to store telephone number, or recall telephone number up to 16 digits.
13) LING BUTTONS (0-9, */T, #)
INSTALLATION
5. Connecting The Base Phone
5.1 Connect the AC power ad apt er int o a n A C wall outlet, and the cord p lu g e nd into the DC 9 V jack
in the back the base phone.
5.2 Plug one end of the telephone line cord (supplie d) into the TELEPHONE LINE-IN jack and t he
other end into a telephone outlet.
5.3 Turn the antenna to vertical direction.
1. Never install telephone jacks during a lighting storm.
2. Nev er install telephon e jacks in wet location unless the t elephone line has been disc onnected
at the network interface.
WARNING
6
Page 8

3. Never touch un-insulated telephone wires or terminals unless the telephone line has been
disconnected at the network interface.
4. Use caution when installing or modifying telephone lines.
6. Installing the battery into the Handset
6.1 Remove the battery compartment lid.
6.2 Plug the battery pack cord into the connector inside the battery compartment.
6.3 Place the battery pack in the battery compartment.
6.4 Replace the lid by sliding up over the pack until firmly in place.
7. Charging the Battery pack
7.1 Place the handset in the charging cradle, until the CHARGE indicator lights.
7.2 Charge the handset for a full10-12 hours.
7.3 Remove the handset from the charging cradle.
7.4 Press the TALK button and make sur e the IN USE i ndicator does n ot f lash lig ht (T he BATTE RY
LOW indicator flash lights when the handset needs recharging).
From then on, rechar ge the b atter y pack by placing the ha ndset in the c hargi ng crad le whe n th e
IN USE indicator flash lights.
OPERATING THE PHONE
8. Change the system security code
The security code pr events your teleph one from being opera ted by another cor dless telephone.
The
code is changed every time the handset is placed in the charging cradle.
8.1 Place the handset in the charging cradle until the CHARGE indication lights.
8.2 The handset will automatically select a random code from a total of one 1,048,576 combinations.
7
Page 9

8.3 If the code and c hannel are changed succ essfully, there will be a confirmation beep tone fr om
the handset.
8.4 Repeat the procedure until there is a confirmation beep tone from the handset.
9. Adjusting The Ringer Melody
There are 4 kinds of ringer tone can be selected to suit different environment conditions.
9.1 In standby mode, press PROG button, you will see the IN USE indicator flash light.
9.2 Press “1” key to select the ringer type 1.
9.3 Press “2” key to select the ringer type 2.
9.4 Press “3” key to select the ringer type 3.
9.5 Press “4” key to select the ringer type 4.
9.6 To finish the setting, press the PROG button again.
10. Adjusting the Receiver volume
In talk mode, the original volume setting is LOW.
10.1 Press the “VOL>” to set the volume HIGH.
10.2 Press the “VOL<” to set the volume LOW.
11. Making a call
11.1 Press the TALK button to be c onnected to the ph one line. The handset IN USE indicator (as
well as
the base IN USE indic at o r) will li ght.
11.2 Dial the phone number when you hear the dialing tone.
11.3 Press the TALK button again or place the handset in the charging cradle o disconnect the
phone line.
12. Answer a call
12.1 If the handset is out of the cradle, press any button to be connected to the phone line.
12.2 If the handset is in the cradle, lift the handset. Do not press the TALK button, you will be
connected to
the phone line automatically.
12.3 Press the TALK button or place the handset in the charging cradle to d isconnect the phone
line.
13. Redial the last number dialed
You can dial the last number you dialed.
13.1 In standby mode, press the TALK button to be connected to the phone line. Press the REDIAL
button
8
Page 10

to redial the last number you dialed.
13.2 In talk mode, pres s REDIAL button, it will be reconnected to the phone line, then it will redial
the last
number you dialed automatically.
OPERATING THE PHONE
14. Channel Selection
This feature allows you to select the channel that gives you the clearest reception.
14.1 During conversation on the phone, if the interf erence occurs, pressing the CHANNEL button
will
change to a new channel. Each pressing the CHANNEL button will change to new channel.
14.2 If interference continues, move the handset close to the base phone.
NOTES :
If the c hannel selection function f ails because of excessive interf erence, the handset m ay end
the call.
To help normalize reception, place the handset in the cradle for a few seconds.
15. FLASH Function
Similar to depressing the hook switch, the FLASH button is used for activating custom calling
from your
local phone company, such as call waiting and call transferring (subscription the phone company
required and generally incur and extra monthly fee).
15.1 For call waiting, press the FLASH button once during a ca ll to t emporar ily switch f rom existing
call to a
new incoming call. Press the FLASH button again to return to the original call.
15.2 Flash timing setting
Press the PROG button, you will see the IN USE indicator f lash light, press the num ber key in
the key
board to select the timing (100 / 300 / 600). Press the PROG button again to finish the setting.
15.3 For 100 mS setting, press PROG, press “9” key, press PROG button to finish.
15.4 For 300 mS setting, press PROG, press “*” key, press PROG button to finish.
15.5 For 600 mS setting, press PROG, press “0” key, press PROG button to finish.
NOTES :
Refer to the phone company’s instructions for more details on how to use this button for specific
9
Page 11

features.
16. Store number in memory
You c an store up to 10 telephone numbers in memory, thes e can be speed dialed by pressing
two
buttons.
16.1 In standby mode, press MEMORY button, IN USE indicator will flash.
16.2 Dial the telephone number (0-9, */T , # PAUSE) that you want to s tore on the k eypad (u p to 16
digits).
16.3 Press the MEMORY button again.
16.4 Press the memory location number (0 through 9) where the number is to be stored.
16.5 A confirmation beep will be heard to confirm the number has been successfully stored.
16.6 To store numbers in order locations, repeat the above steps.
NOTES :
Each tone or pause entered uses one of the available digits . If you do not pres s a key for more
than 20
seconds while programming, an error tone will be heard. You must repeat the procedure.
OPERATING THE PHONE
17. Making memory dialing calls
Once the numbers have been stored in the memory, you can make a call with two buttons.
17.1 Press the TALK button to be connected to the phone line.
17.2 Press the MEMORY button ( 0 through 9).
17.3 Press the desired memory location num ber, the phone number stored in the button will be
dialed.
18. Page the handset
You can send a page signal from the base to the handset in order to locate it.
18.1 Press the PAGE button on the base.
18.2 Beep tone will s ound from the ha ndset, IN USE indicator will flash. These s ignals will last for
10
seconds,
18.3 Pressing the TALK button on the handset will be connected to the phone line.
19. Battery low in handset
In talk mode, if the battery becomes low, the LED will flash and the beep tone will sound from the
handset.
10
Page 12

20. Replacing the battery
If the handset battery pack will not las t for m ore than two hours e ven af ter an o vernight charge , it
must
be replaced.
Replace the battery pack with the same type and size batt ery pack only, and the polarit y must
match
with the handset.
20.1 Slide the battery compartment cover down and take it off the handset.
20.2 Gently pull the battery wires until the wire connector comes out of the socket.
20.3 Remove the battery pack, inset and connect a new one.
20.4 Replace the battery compartment cover.
21. Choosing Tone or Pulse Dailing
DIAL MODE
PT
Set the DIAL MODE switch to :
TONE if your dialing system is tone.
PULSE if your dialing system is pulse.
21.1 Slide the battery compartment cover down and take it off the handset.
21.2 Remove the batter y pack, you can see the TONE / PULSE switch inside, set it to TONE or
PULSE.
21.3 Remove the battery pack back and replace the battery compartment cover.
Replace the battery compartment cover.
11
Page 13

OPERATING THE PHONE
22. Setting the standby time of Handset battery
You ca program the Handset to select the battery standby time as you want.
There are 4 kinds of setting for you to pr ogr am, if you want to set a l ong standby, please selec t 4
kind ,
but it will miss the first or second ring, If you want to select the firs t kind, the ring will be nor mal,
but the
standby time will be short, the factor y presetting is 3
ring.
22.1 Press PROG button on Handset, press # button 1/2/3/4 tim es, you hear beep sound 4/1/2/3/
times, 1
sound for the first kind …. 4 sound for 4
th
kind, press PROG button to finish the setting.
rd
kind, sometim es it will be m issing the first
TROUBLE SHOOTING
23. Error tone
If you hear an error tone when you press the TALK button, you may be out of operating range.
1. Be sure the antenna is on vertical direction.
th
2. If necessary, move closer to the base.
3. If there is still a problem , check to be sure the bas e is plugged in and then p lace the hands et
in the
base cradle for a few seconds.
24. Interference
This phone operat es on the principl e of a two-wa y radio. Like a radio, it can be aff ected in som e
cases by
the local environment (for example, aluminum siding, electrical appliances, etc.) Although
occasional
interference is normal, every effort has been made to make your cordless phone radio
communication
crisp and clear.
If you experience unusual levels of noise :
12
Page 14

1. Try selecting another channel.
2. Make sure the antenna of base is on vertical direction.
3. Try relocating the base unit. You may want to try several locations to attain the best
performance.
25. Malfunction
If you experience any malfunction in operation :
1. Place the handset in the cradle until there is confirmation beep.
2. Remove the handset battery pack and then replace it.
IMPORTANT NOTES
26. The factory presetting
Flash : 600mS
Make / Break : 40 / 60
Volume : Low
Ringer melody type : First
Standby time mode : 3
rd
kind of standby time setting
27. Specification
Description Base Handset
Modulation FM FM
Frequency generation PLL PLL
Tx frequency (MHz) 902.80 ~ 904.75 925.30 ~ 927.25
Rx frequency (MHz) 925.30 ~ 927.25 902.80 ~ 904.75
Operation voltage
Warning : Changes or modifications to this unit not expressly approved by the party
responsible for compliance could void the user’s authority to operate the equipment.
NOTE : This equipment has bee n tested and found to compl y with the lim its for a class B digital
device, pursuant to Part 15 of the FCC rules, These limits are designed to provide reasonable
protection against harmful interference in residential installation. This equipm ent generates, uses
and can radiate radio frequency energy and, if not installed and used in accordance with the
instructions, may cause harmful interference to radio communications.
However, these is no guarantee that interference will not occur in a particular installation. If this
220 V AC- 9 V DC / 300mA 3.6 V DC/280 mAh
equipment does cause harmful interference to radio or television reception which can be
13
Page 15

determined by turning the equ ipment off and on, the enc o ur ag ed t o tr y to c orr ect the inter f er ence b y
one more of the following measures.
* Reorient or relocate the receiving antenna.
* Increase the separation between the equipment and receiver.
* Connect the equipment in to an outlet on a circuit different from that to which the receiver is
needed.
* Consult the dealer or an experienced radio / TV technician for help.
REF NO : 603LDMNU
14
 Loading...