

Page 1
QUICK START GUIDE
TABLET
3 T
BC
CJB1NLOLZAAA
Page 2

Device Overview ...................................................... 1
SIM Card ................................................................... 3
Battery ....................................................................... 4
Power ........................................................................ 5
Home Screen ........................................................... 6
Applications ............................................................. 7
Accessing Files ........................................................ 9
Data Sharing .......................................................... 10
Volume & sound ....................................................11
Contacts .................................................................11
GMAIL ..................................................................... 11
Messaging .............................................................. 12
Web Browser..........................................................13
Bluetooth® ............................................................. 13
Help Protect Your Device .................................... 14
Page 3

Software updates .................................................. 15
Firmware Versions ................................................16
Additional Information .........................................16
Disclaimer...............................................................17
Page 4
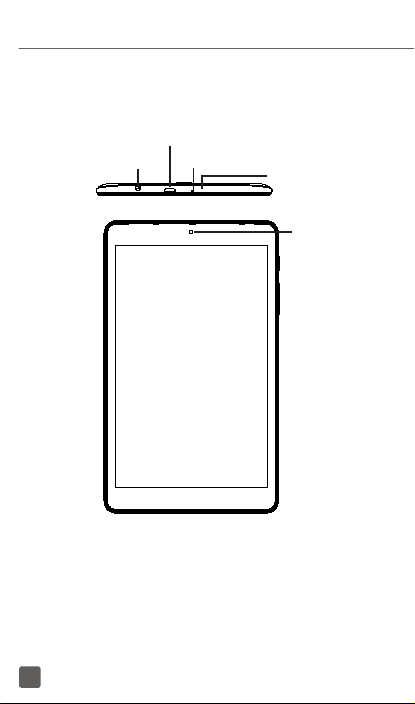
Device Overview
Micro USB
Headset Connector
Microphone
Infrared
Front
Camera
1
Page 5
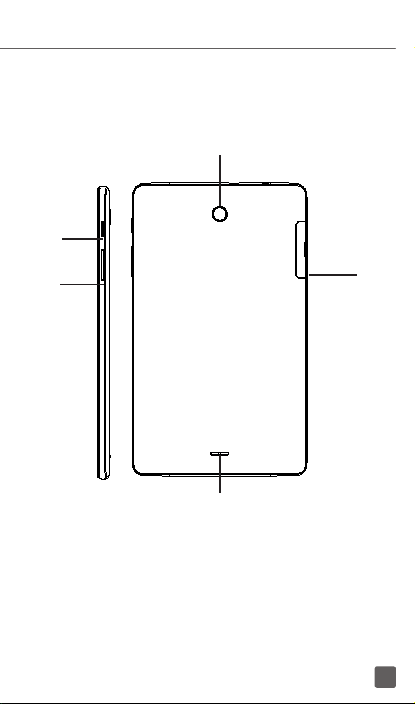
Power
Key
Volume
Keys
Rear Camera
SIM/SD slot
Speaker
2
Page 6
SIM Card
The SIM (Subscriber Identity Module) card identifies
your device to the wireless network. A SIM card or
Wi-Fi connection is required to browse the Internet.
You don't need to power off your device before
inserting or removing the SIM card.
Note: Your device only supports MicroSIM cards. To avoid
damage to your device, do not attempt to insert other SIM
types, such as Standard and Nano SIM cards.
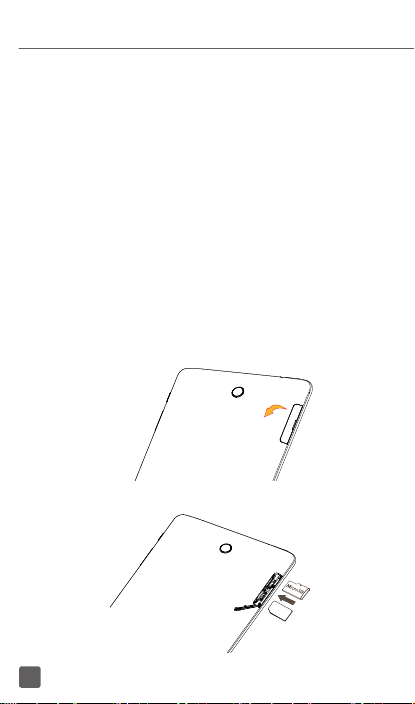
Insert/Remove the MicroSIM and MicroSD
Cards
1. Open the slot.
2. Insert/Remove the MicroSIM card and MicroSD
card.
SIM
3
Page 7
Note: MicroSD Cards are sold separately
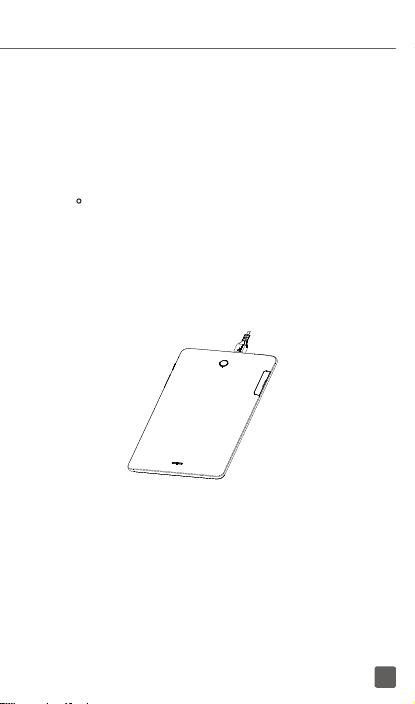
Battery
To optimize battery performance, be sure to fully
charge your device before using it for the first time.
• The back cover and battery are not removable.
Disassembling the device may damage your
bat tery.
Charging the device
1. Insert the small end of the charging cable into
the charge port as shown.
2. Connect charger to power outlet
Note: Please use the cable that came with your device.
Using other cables may damage the charging port or reduce
battery performance.
Optimize Battery Life
To optimize battery life, adjust your screen brightness
and display timeout.
4
Page 8

1. Adjusting brightness level: Lowering your
screen brightness level can optimize your
battery level. To adjust the brightness level,
from the Home screen, touch > Settings
> Display > Brightness level. To lower the
brightness level, move the wheel to the left.
2. Power Saving Mode: Power Saving mode
minimizes battery usage to extend battery life. To
turn on your Power Saving mode, from the Home
screen, touch > Settings > Battery. Then,
turn on the Standby intelligent power saving
and the Battery saver.
Power
Power on your device
Hold down the Power key until the device powers on.
Unlock your device by using Swipe, PIN, Password
or pattern if necessary and the Home screen will be
displayed.
Power off your device
Hold down the Power key until options appear and
select Power off.
Home Screen
You can bring all of the items (applications, shortcuts,
5
Page 9

folders and widgets) you love or use most frequently
to your Home screen for quick access. Touch the
Home key to get instant access to the Home screen.
Status bar
• Touch and drag down to open
Home key
the notifications panel.
Search bar
• Touch to enter tex t search
screen.
• Touch to enter voice search
screen.
Favorite applications tray
•
Touch to enter the applications.
•
Touch and hold to move or change
applications.
Recent apps key
•
Touch to view recent apps.
Back key
•
Touch to go back to
last screen.
Home screen is provided in an extended format to
allow more space for adding applications, shortcuts,
etc. Slide all Home screens horizontally left and right
to get a complete view of the Home screens. The
white line at the lower part of the screen indicates
which screen you are viewing.
Status Bar
The Status bar appears at the top of your Home
screen. Icons indicating your device's status and new
notification alerts will appear in the Status bar.
6
Page 10

Icon Status
Bluetooth® active
Wi-Fi® active
Network (full signal)
Network (roaming)
4G LTE data service
3G data service
Airplane mode
Alarm set
Battery (charging)
Battery (fully charged)
New SMS message
Applications
App List
Press the Application from the home screen to
access the App list.
7
Page 11

Add/Remove Application
1. Add: You can touch and hold a folder, an
application, or a widget to activate the Move
mode and drag the item to any Home screen you
prefer.
2. Reposition: Touch and hold the item to be
repositioned to activate the Move mode, drag
the item to the desired position and then release.
You can move items both on the Home screen
and the Favorite tray. Hold the icon on the left
or right edge of the screen to drag the item to
another Home screen.
3. Remove: Touch and hold the item to be removed
to activate the Move mode, drag the item up to
the top of the Remove icon and release.
4. Create folders: To improve the organization of
8
Page 12

items (shortcuts or applications) on the Home
screen, you can create a folder by stacking one
app on top of another. To rename a folder, open
it and touch the folder’s title bar to input the new
name.
5. Wallpaper customization:
Use either of these methods to change your
wallpaper:
1. Touch and hold an empty area on the Home
screen and then select WALLPAPERS from
bottom options. Slide left and right to view
and select one Wallpaper image, touch Set
wallpaper on top left bar and then select Home
screen to set image as Home screen. You can
set different wallpapers for Lock screen and
Home screen.
2. Change your wallpaper by going to Settings >
Display >Wallpaper.
Accessing Files
To access media files and photos saved on your
device or to transfer files from your device’s SD card
(sold separately) to your computer, follow these steps:
To connect device to PC
1. Use the USB cable that came with your device
to connect the device to a USB port on your
computer. You will receive a notification that the
USB is connected.
9
Page 13

2. If you use MTP or PTP, your device will be
automatically connected. Note: Before using
MTP, make sure that the driver (Windows Media
Player 11 or higher version) has been installed.
To locate data you have transferred or downloaded
to your microSD card/internal storage:
• Touch to open the applications list.
• Touch Files Go .
All data you have downloaded is stored in Files Go.
Here you can view media files (videos, images, audio
and others), install applications to your device, etc.
Data Sharing
You can share your device’s mobile data connection
with a single computer via USB cable (USB tethering)
or with up to eight devices at once by turning your
device into a portable Wi-Fi hotspot.
To turn on USB tethering or Wi-Fi Hotspot:
1. Touch Settings > Network & connection >
Tethering & Mo bile HotSpot .
2. Touch the switch for USB tethering to activate
this function.
3. Touch Mobile HotSpot Settings then touch the
switch to activate this function.
Note: These functions may incur additional network
charges from your network operator. Extra fees may
also be charged in roaming areas.
10
Page 14

Volume & sound
Adjust Sound and Volume
1. From the Home screen, press Application
and select Settings, then select Sound.
2. Position the slider to adjust volume for Media,
Alarm, or Notification, separately.
3. Set sound for Device, Notification and Alarm
separately.
4. Touch a named switch to turn its sound on or off
Contacts
Create a New Contact
1. From the Home screen, touch Application
, and select Contacts .
2. Touch to create a new contact.
3. Enter contact’s name and other contact
information.
4. When finished, touch to Save.
GMAIL
Set Up Gmail Accounts
• From the Home s creen, touch > G mail An
email wiz ard will guide you thro ugh the steps to set
up an email account.
• Enter the email address and password of the
account you want to set up.
11
Page 15

Messaging
Use the messaging feature to send and receive text
(SMS) and multimedia (MMS) messages.
Create and Send a Message
1. From the Home screen, touch >
Messaging to enter .
2. Touch to write text messages.
3. Enter the phone number of the recipient in the
bar at the top of the page or touch to add
recipients.
4. Press the Typ e message bar to enter the text
of the message.
5. Press to send text messages.
An SMS message of more than 160 characters will be
charged as several SMS. A counter will be on the right
of the text box to remind you how many characters
are allowed to be entered in one message.
Note: Specific letters (accented) will also increase
the size of the SMS, this may cause multiple SMS to
be sent to your recipient.
Send a Multimedia Message
MMS enables you to send video clips, images,
animations, slides and sounds to other compatible
mobiles and e-mail addresses.
An SMS will be converted to MMS automatically
when media files (image, video, audio, etc.) are
12
Page 16

attached or subject or email addresses are added.
To send a multimedia message, enter the recipient’s
phone number in the To bar and touch the Type
message bar to enter the text of the message. Touch
to attach a picture, video, audio, and so on.
When finished, touch to send the multimedia
message.
Note: Data must be turned on to successfully send
MMS messages.
Web Browser
From the Home screen, touch > Chrome .
A web browser with which you can surf the Internet.
Your bookmarks, browsing history, and settings
across all devices with the browser installed can be
synchronized with your Google Account.
Bluetooth®
Your device comes with Bluetooth connectivity, a
wireless technology that enables a data connection
between your device and a Bluetooth headset or
other Bluetooth device (sold separately).
Connect to Bluetooth
1. From the Home screen, touch > Settings
> Network & Connection.
13
Page 17

2. Touch the switch for Bluetooth to activate this
function.
4. The device will automatically search for
compatible devices within range.
5. Select the desired Bluetooth device to pair with
your device.
Help Protect Your Device
To help prevent others from using your device without
your permission, activate the following security
options:
From the Home screen, touch > Settings >
Security & location > Device security
1. Screen lock
• None: Touch to disable screen unlock security.
• Swipe: Touch to enable slide unlock mode.
• Pattern: Touch to draw a pat tern to unlock screen.
• PIN: Touch to setup a numeric PIN to unlock
screen.
• Password: Touch to setup a password to unlock
screen.
2. Apps Lock:
Touch to set a pattern lock for some applications.
When the application has a lock, you need to draw
an unlock pattern every time you want to use it.
14
Page 18

3. Encrypt tablet
This function can encrypt your accounts, settings,
downloaded apps and their data and other files.
After you encrypt your tablet, you need to unlock the
screen to decrypt the tablet every time you power
it on.
Note: Encrypting tablet will take a while to complete.
If you interrupt it, you may lose some or all of your
data.
Software updates
To access Software Updates, follow these steps:
1. Connect your device to a Wi-Fi network and
make sure it has a strong data connection
2. Ensure your battery is fully charged before
starting the software update. Your device’s
current battery level can be found on your
device under Settings > Battery
3. Touch Application from the Home screen
then select Settings > System > Updates
4. Touch Check for updates now and the device
will search for the latest software
5. If software update is available, click on
Download update. Once the software is
downloaded, touch Install update > Install
6. Now your device has the latest version of the
software
15
Page 19

Firmware Versions
This device will only operate with firmware versions
that have been approved for use by the device
manufacturer. If unauthorized firmware is placed on
the device, it will not function.
Additional Information
Use of some content or features may require
qualifying service, or access to a Wi-Fi connection.
Mobile HotSpot: Qualifying service required. Plan
data allotment applies. Roaming and on-network data
allotments differ; see your selected service for details.
Wi-Fi: Device will not transition between Wi-Fi and the
cellular network. Devices using wireless connections
may be vulnerable to unauthorized attempts to
access data and software stored on the device. Plan
data allotment applies to use by connected devices
sharing Wi-Fi.
Devices and screen images are simulated. Coverage
not available in some areas. See Terms and
Conditions (including arbitration provision) on the
official website, for rate plan information, charges for
features and services, and restrictions and details.
16
Page 20

Disclaimer
There may be certain differences between the user
manual description and the device’s operation,
depending on the software release of your device or
specific operator services.
This device may contain materials, including
applications and software in executable or source
code form, which is submitted by third parties for
inclusion in this device (“Third Party Materials”).
All third party materials in this device are provided
“as is”, without warranty of any kind, whether express
or implied, including the implied warranties of
merchantability, fitness for a particular purpose or
use/third party application, interoperability with
other materials or applications of the purchaser
and non-infringement of copyright. The purchaser
undertakes that TCL Communication has complied
with all quality obligations incumbent upon it as
a manufacturer of mobile devices and devices in
complying with Intellectual Property rights.
17
Page 21

18
 Loading...