

Page 1
VOICE PRO
VP206, VP408, VP412
Quick Start Guide
VP408 VP412
VP206
ALL IN ONE
VOICE MAIL AND PHONE SYSTEM
FOR SMALL OFFICE AND Home OFFICE
Remove contents from box.
1.
Check for the following:
– Voice Pro system
– Power supply (wall mounted transformer that plugs into
AC outlet)
– Documentation package
– Two double-ended, 7-foot line cords (6 for VP408 and VP412)
1909 N. Glenville Dr. #100 • Richardson, Texas 75081
Tel: 972.671.8100
www.voicelogicinc.com • Email: janderson
– Two 6-inch line cords for VP206 (four for VP408 and VP412)
– One line splitter that plugs into phone jack (2 for VP408
and VP412)
– One extension splitter that allows a 2-line phone to plug
into two extensions on the Voice Pro (2 included for
VP408 and VP412)
– One double-ended 3.5mm music cord
– One template to wall mount Voice Pro
•
Fax: 972.671.9343 • Toll-free: 888.671.8108
@voicelogicinc.com & kseaman@voicelogicinc.com
Sold by:
http://www.TWAcomm.com
Toll Free: (877) 892-2666
Page 2
Sold by:
http://www.TWAcomm.com
Toll Free: (877) 892-2666
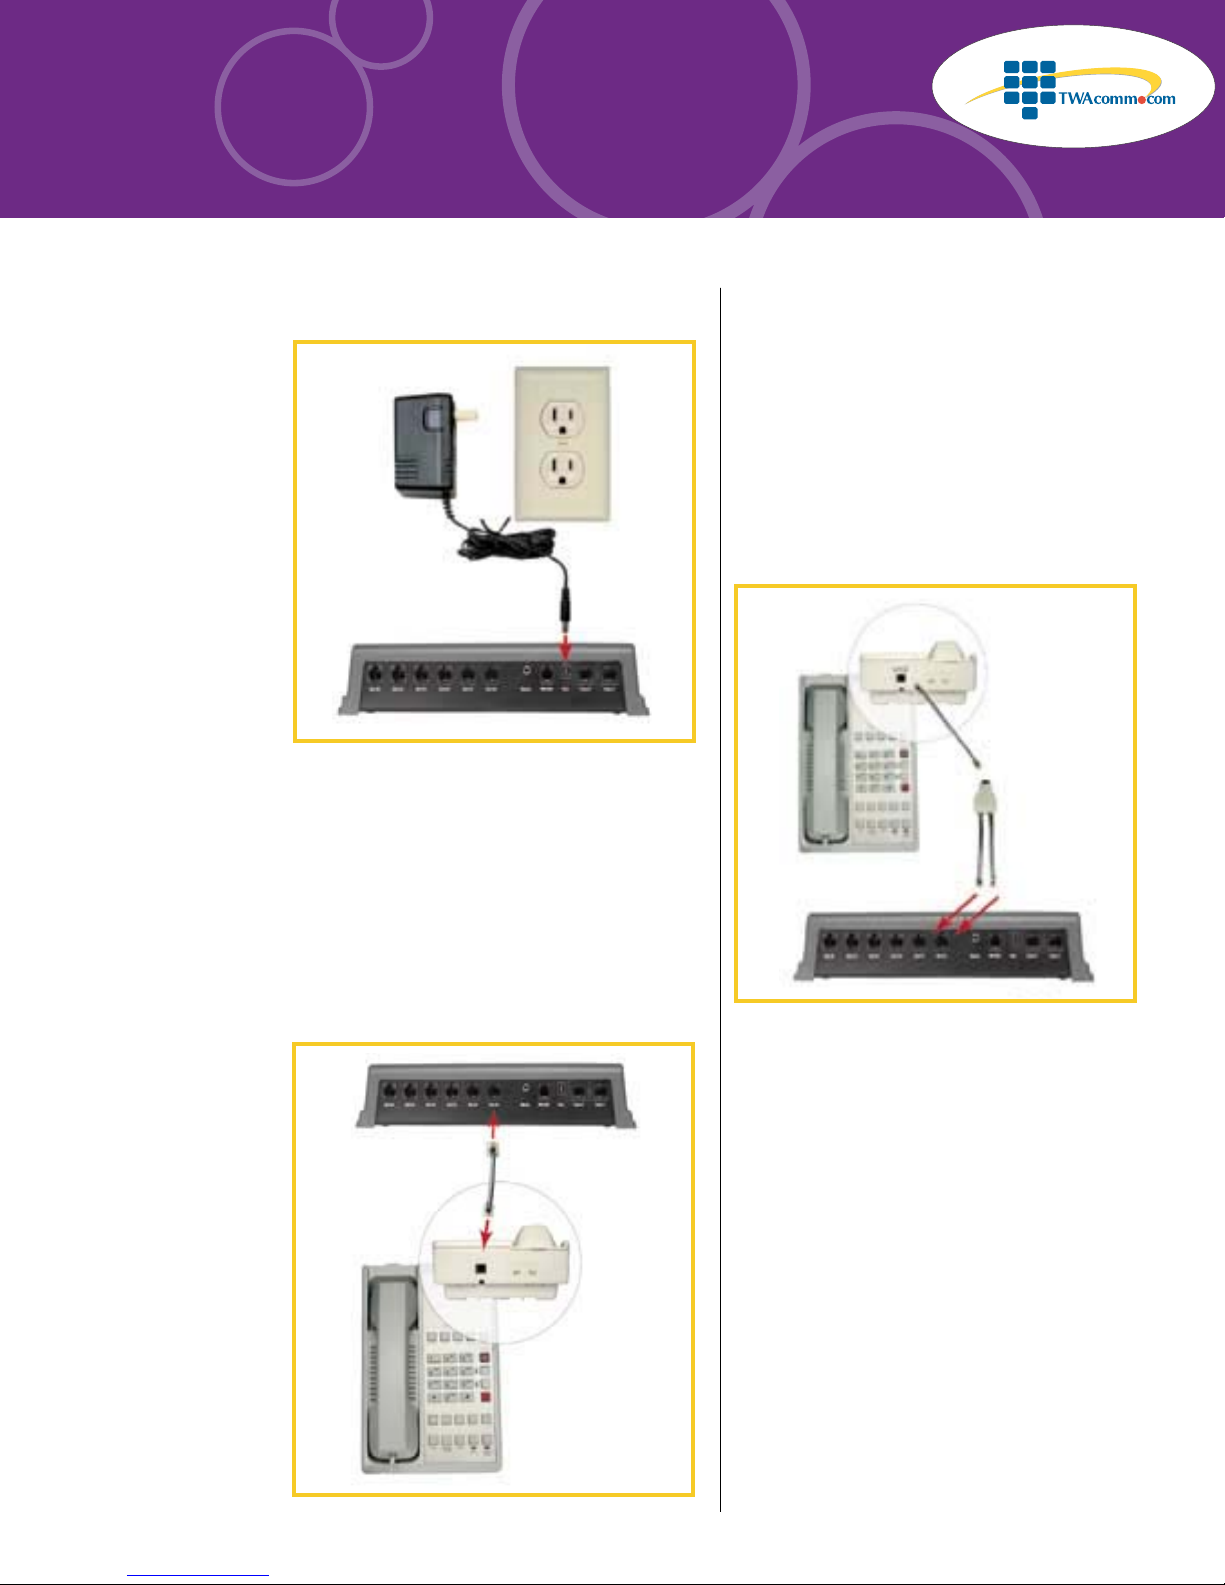
Powering up the Voice Pro.
2.
a.) Place the Voice Pro on the desk or (using the wall
mount template) mount Voice Pro on the wall.
b.) Plug power supply into AC outlet. Connect the male con-
nector to the power jack on the rear of the Voice Pr o system.
c.) After connecting the power supply, the red power light
should be illuminated, and the green light should flash.
The Voice Pro system supports up to 6 telephone extensions.
Single (one) line telephones plug directly into the desired
jack on the Voice Pro.
As many as 6 devices may be connected – corded or cordless
phones, fax machines or even credit card machines.
Connecting 2-line telephones to Voice Pro.
4.
Connecting 1-line telephones to the Voice Pro.
3.
If you are connecting a 2-line telephone to the Voice Pro,
proceed as follows:
a.) If your 2-line telephone has 1 jack on the back of
the telephone:
- Connect a line cord to the rear of the telephone.
- Connect the other end of the line cord to the splitter.
Use the two 6-inch line cords to connect to the splitter then
to the desired extensions of the Voice Pro.
Page 3

b.) If your 2-line telephone has two jacks on the back of the
telephone, connect two line cords from the telephone to the
desired extension jacks on the Voice Pro.
Sold by:
http://www.TWAcomm.com
Toll Free: (877) 892-2666
Connecting 4-line telephones to the Voice Pro
408 and Voice Pro 412. (If you have a Voice Pro
5.
206, disregard this step.)
(above) Voice Pro 408
Connect both line cords from your phone to the line splitters
as shown above. Then, using the four 6-inch cords included,
connect them from the splitters to the desired extensions on
the Voice Pro.
Connecting telephone lines to the Voice Pro.
6.
The Voice Pro can support two (VP206) or four (VP408 and
VP412) incoming telephone lines.
If you are attaching two incoming telephone lines to your
Voice Pro, follow one of the next three illustrations, depending
upon the configuration of your telephone jacks.
(above) Voice Pro 412
Continued
on back.
Page 4

Sold by:
http://www.TWAcomm.com
Toll Free: (877) 892-2666
Continued from
inside spread.
If you have a VP408 or VP412, you can attach up to four
incoming lines (twice those shown in the these illustrations)
to the system.
Connecting a music source.
7.
Connect one end of the cable to the music jack on the
Voice Pro and the other end to the music source (radio, CD
player, etc.).
Programming your Voice Pro.
8.
1.) You should have your telephone lines and telephone
extensions installed before programming your Voice Pro.
2.) From any station, lift the receiver and press the # key.
The Automated Voice should be heard, saying,
"Welcome to Voice Pro."
3.) Enter the 4-digit default password (the default password
is 1234), then the # key.
4.) Program lines installed (press 2 then # key).
a. If one line is installed press 1 then # key.
b. If two lines are installed press 1,then, 2 plus # key.
5.) Set clock
While still in programming mode, press 19 then
# key.
- Enter hour followed by the # key
(Example: 8 or 12).
- Enter two digit minute followed by # key
(Example: 05 or 36).
- Enter 1 for AM or 2 for PM followed by # key.
6.) Set date
While still in programming mode, press 20 followed
by the # key.
- Enter month followed by # key (one or two digits).
(Examples: Press 3 for March, 11 for November)
- Enter day of the month followed by # key (1-31).
- Enter year followed by # key. (Example: 00 for 2000)
- Enter number for the day of week followed by # key.
(1 for Mon., 2 for Tue., 3 for Wed., 4 for Thur., 5 for
Fri., 6 for Sat., 7 for Sun.)
7.) Record main greeting (The recording that plays when
someone calls, i.e., Auto Attendant.)
While still in programming mode, press 21 followed
by the # key. Begin your greeting after the tone.
There is a 6-foot cable with 3.5mm headphone jacks at
each end for connecting a music source to the Voice Pro.
*Sample Greeting: "Thank you for calling ABC company. If you know
your party’s extension number you may press it at any time, or press 0
to speak to the Operator, and thanks again for calling!"
When finished recording, press the # key.
8.) T o exit programming mode pr ess**. Refer to installation manual
for further programming options.
 Loading...