

TCL Verizon User Manual

Meet
your phone

Have questions about your Prepaid phone?
You’re in the right place.
Find out how to set up and use your phone, access special features, get
help and lots more. We’re here to help.
1
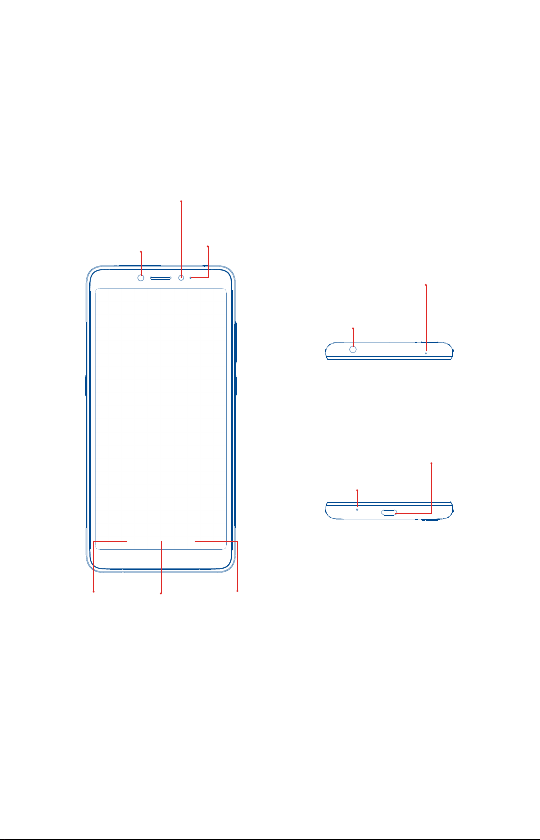
About your phone
Ambient Light
Sensor & Proximity
Sensor
Front
Camera
LED
Indicator
About your phone
Microphone
Audio
Connector
USB Type-C /
Charger Port
Microphone
Back
Home
NOTE: Devices and software are constantly evolving—the screen images
and icons you see here are for reference only.
Recent
Apps
2
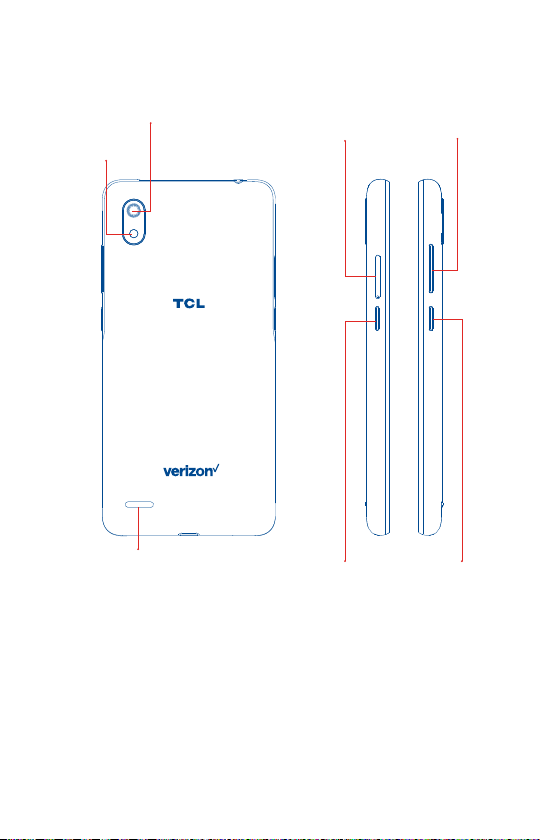
About your phone
LED
Flash
Rear
Camera
SIM &
microSD™
Tray
Volume
Key
Speaker
3
Google
Assistant
Button
Power/
Lock Key
Setting up your phone
Your phone already has a NANO SIM card installed. MicroSD cards
(capacity up to 256GB) may be purchased separately.
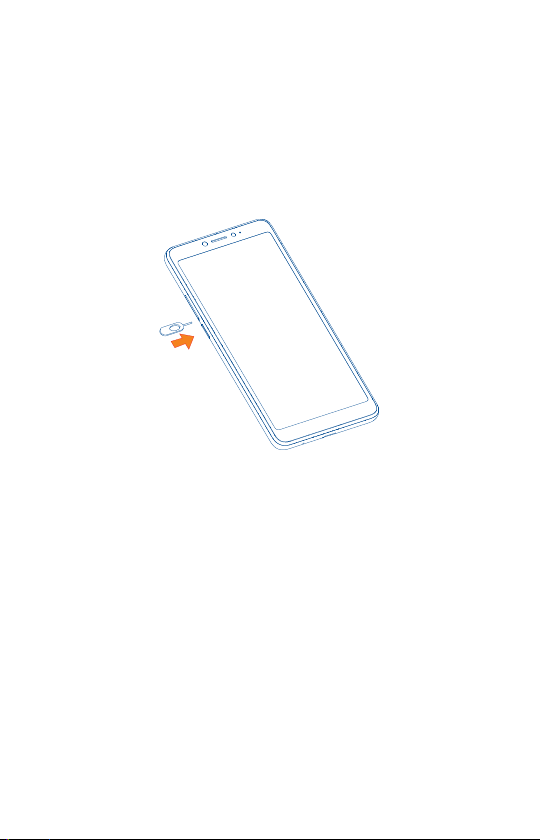
Install the SIM card /microSD card
Step 1. If you need to replace the NANO SIM card and/or insert an optional
microSD card, use the SIM tool provided in the box to open the SIM tray.
Step 2. Remove the NANO SIM card/microSD card tray.
Setting up your phone
4
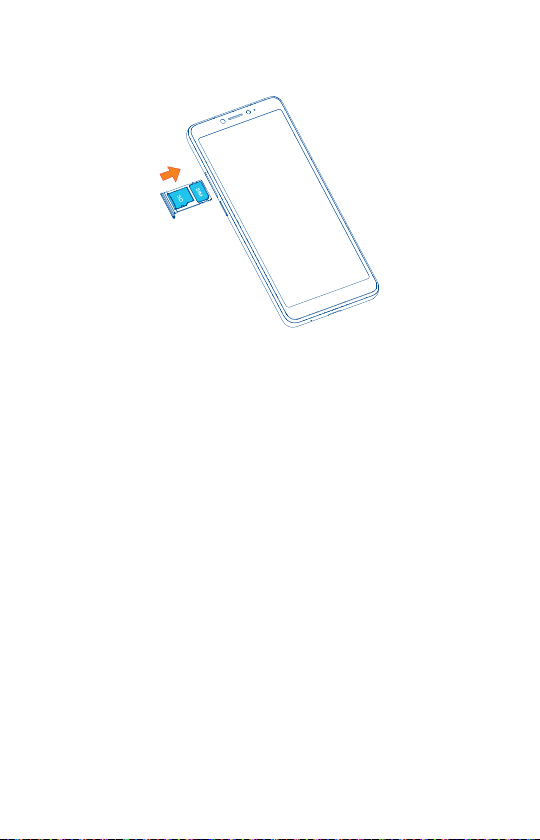
Step 3. Position the SIM card and/or microSD card in the tray correctly,
aligning the cutout tab and gently snap into place. Be sure the edges are
aligned.
Setting up your phone
Step 4. Slide the tray slowly into the SIM tray slot. It only fits one direction.
Do not force into place. Keep the SIM tool in a safe place for future use.
NOTE: The microSD card is sold separately.
5
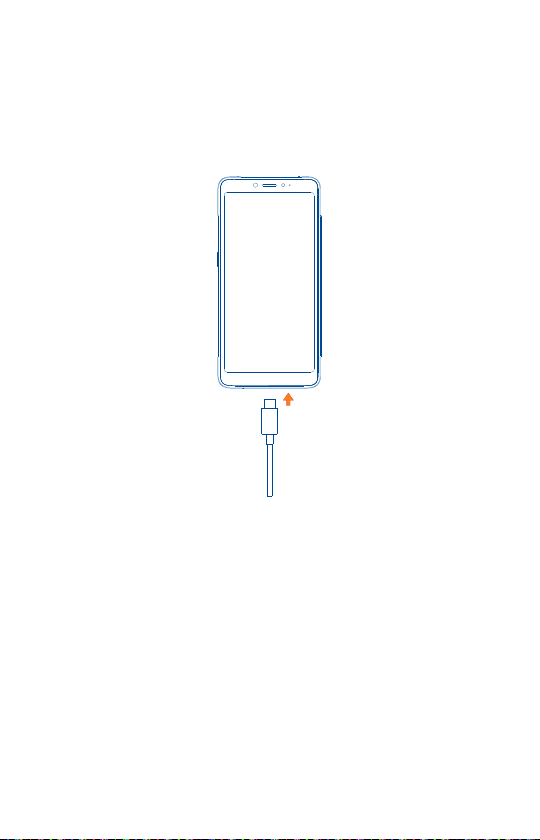
Charge your phone
You might need to charge the battery before using your phone by inserting
the small end of the charging cable into the charger port as shown.
Charge your phone fully before turning it on and starting the set up
process. Insert the other end of the USB cable into your wall charger and
plug it into a wall outlet.
WARNING: Only use the charger and cable supplied with your device.
Using incompatible chargers or tampering with the charger port could
damage your device and void the warranty.
Setting up your phone
6

Using your phone
Turn your phone on/off
To turn on your phone, press and hold the Power/Lock Key.
To turn o your phone, press and hold the Power/Lock Key, and tap
Power O on the screen when it appears.
NOTE: The first time you turn on your phone, you will need to activate it.
See the Get started guide included with your phone.
Locking/unlocking the screen
To turn on your screen, press the Power/Lock Key. Then swipe up on the
screen to unlock it.
To create a screen unlock pattern, touch Setting > Security > Screen lock.
To turn o your screen and prevent accidental key presses, press the
Power/Lock Key.
Touch screen tips
Using your phone
Use touch gestures to move around the screen, open menus, select items,
zoom in and out of web pages and more.
There are several touch gestures recognized by your phone:
• Tap—Tap the screen with your finger to select items or press buttons
on the screen.
• Touch and hold—Touch and hold an item on the screen (such as a link
in a web page) to open available options.
• Swipe—Swipe by quickly sliding your finger in any direction.
• Drag—To drag, touch and hold an item and move it to a new position.
• Double tap—Double tap to zoom in/out on a web page or picture.
• Multi-touch—Pinch or spread your thumb and index finger
to zoom in or out.
7

Home screen
The Home screen provides quick access to all the items (applications,
shortcuts, folders and widgets) you like to use most frequently.
Touch the Home symbol to get instant access to the Home screen.
Home
Back
The Home screen is provided in an extended format with multiple panes to
allow more space for adding applications, shortcuts etc. To navigate to the
additional panes swipe your finger on the screen horizontally to the right.
Swipe left to see more pages for Home screen applications.
Notification bar
Touch and drag
down to open the
notifications panel.
Google Search bar
Touch to enter
text search screen.
Touch to
speak to Google
Assistant.
Favorite
applications tray
Touch to enter the
applications.
Touch and hold to
move or change
applications.
Recent apps
Verizon Cloud
Verizon Cloud oers secure online storage to back up your contacts and
sync them with your other Cloud-connected devices.
To learn more, go to vzw.com/cloud.
Using your phone
8

Making a call
1. From the Home Screen, tap Call .
2. Tap Keypad .
3. Enter the number you want to call in the keypad or use the Search
Contacts bar to enter the first few letters of a contact’s name. Tap the
correct entry to make a call.
4. Tap Call to place the call.
Receiving a call
When you receive a call, a call window will be presented on top of the
screen. Touch DECLINE to dismiss a call or ANSWER to answer a call.
Touch the call window to open the Phone call screen.
On the Phone call screen:
• Swipe Phone up to answer the call;
• Swipe Phone down to reject the call;
• Swipe Message up to reject the call by sending a preset message.
To mute incoming calls, press the Volume Key.
Using your phone
9

Setting up Voice Mail
1. Dial *86 and press Call
2. When you hear a greeting, press # to interrupt
3. Follow the instructions to set up your voice mail
Checking Voice Mail
From your phone:
1. Press Call
2. From Keypad , press and hold number 1
From other phones
1. Dial your wireless number
2. When the greeting begins, press # to interrupt
3. Follow the instructions to listen to, save or discard phone messages
NOTE: Voice mailboxes not set up within 45 days will be canceled. Your
voice mailbox is not password protected until you create a password by
following the setup tutorial. Voice Mail may not be available in some areas.
Follow the setup instructions to password-protect your Verizon Wireless
Voice Mailbox. Verizon Wireless is not responsible for missed messages
or deletions of messages from your Voice Mailbox, even if you havesaved
them.
Using your phone
10
 Loading...