

Page 1

CONTENTS
SAFETY INSTRUCTIONS
....................................................................................3
1. INSTALLING IP VIDEOPHONE...........................................................................4
1.1 Components ....................................................................................................4
1.2 Name of parts and functions............................................................................5
[Front View] .......................................................................................................5
[Keypad] ............................................................................................................6
[Rear view].........................................................................................................7
[Side and Bottom view]......................................................................................7
1.3 Network Configuration – Using Wizard............................................................7
2. OPERATION INSTRUCTION...............................................................................8
2.1 Main menu.......................................................................................................8
2.2 PhoneBook......................................................................................................8
2.2.1 Viewing Phone Number List......................................................................8
2.2.2 Adding Phone Number..............................................................................8
2.2.3 Searching Phone Number ........................................................................9
2.3 CallLog.............................................................................................................9
2.4 UserSet............................................................................................................9
2.4.1 Ring ..........................................................................................................9
2.4.2 Codec Setting.........................................................................................10
2.4.3 Call Setting .............................................................................................10
2.4.3.1 Auto Answer....................................................................................10
2.4.3.2 Exten. Service.................................................................................10
2.4.3.3 Call Hold ......................................................................................... 11
2.4.3.4 Call Transfer....................................................................................11
2.4.3.5 Busy Mode - Call waiting ................................................................11
2.4.3.6 Busy Mode - Call Forward ..............................................................11
2.4.3.7 Call Bar...........................................................................................12
2.4.3.8 3-way Calling ..................................................................................12
2.4.3.9 Bit Rate...........................................................................................12
2.4.4 System Setting .......................................................................................12
2.4.5 Extra Setting...........................................................................................13
2.4.5.1 Calendar/Time.................................................................................13
2.4.5.2 Install Wizard ..................................................................................13
2.4.5.3 Password Protection.......................................................................14
2.4.5.4 Remote Provision............................................................................14
2.4.5.5 Call Charge.....................................................................................14
2.5 Network Setting .............................................................................................14
2.5.1 Connect Setting......................................................................................15
2.5.2 Account setting.......................................................................................15
2.5.3 Proxy Setting..........................................................................................15
2.5.4 STUN Client............................................................................................15
2.5.5 Network Status .......................................................................................15
2.6 Internet...........................................................................................................15
- 1 -
Page 2

2.6.1 Internet Share.........................................................................................16
2.6.2 Web Browser..........................................................................................16
2.7 Add-In ............................................................................................................16
2.7.1 Photo Album...........................................................................................16
2.7.2 Music Player...........................................................................................16
2.7.3 Recorder.................................................................................................17
2.7.4 SMS........................................................................................................17
2.7.5 My Document .........................................................................................17
3. IP VIDEOPHONE-BASED CALLING.................................................................18
3.1 Making a Call.................................................................................................18
3.1.1 Making a call using dialpad ....................................................................18
3.1.2 Making a call using redial.......................................................................18
3.1.3 Making a Call from the PhoneBook........................................................18
3.1.4 Making a call from the CallLog...............................................................18
3.2 Receiving a Call.............................................................................................18
3.3 Dropping a Call..............................................................................................19
3.4 Call Transfer ..................................................................................................19
3.5 Rejecting a call ..............................................................................................19
3.5.1 Rejecting a Call in waiting mode ............................................................19
3.5.2 Rejecting a Call from the third party during your call..............................19
3.6 Useful Functions during a Call.......................................................................19
3.6.1 Video Mode ............................................................................................19
3.6.2 Privacy....................................................................................................20
3.6.3 Volume Control.......................................................................................20
3.6.4 Call Forward during a call.......................................................................20
3.6.5 Capture pictures during your call............................................................20
3.7 Auto Answering Mode....................................................................................20
3.8 Input Mode.....................................................................................................20
3.9 Software Upgrading.......................................................................................20
APPENDIX 1: MENU STRUCTURE ......................................................................22
APPENDIX 2: TROUBLESHOOTING GUIDE.......................................................24
APPENDIX 3: IP VIDEOPHONE SPECIFICATIONS.............................................25
- 2 -
Page 3

Safety Instructions
Please read the following instructions carefully to ensure correct use and to prevent
unexpected accident and damage caused by incorrect use.
1. Do not disassemble or modify the IP videophone or power adapter by anyone
other than the authorized personnel.
The warranty will not cover any defect that occurs due to such mishandling.
2. Install the unit on a stable and flat surface to ensure safe operation.
3. Do not install the unit in such a location where the unit can be affected by dust or
gas.
4. Do not install the unit in a place subject to direct sunlight, or near heat sources
such as radiators.
5. Do not touch the electric adapter when it is thundering and lightning to avoid
electric shock.
6. Do not install the unit near humid location to avoid any defect, heat and electric
shock.
7. Keep the unit safe from sudden shock to prevent defect. And do not apply
excessive force especially to the LCD screen and the camera.
8. Clean the camera and LCD screen with soft and clean clothes. Do not use
coarse material to avoid damage.
9. Do not apply sudden change of temperature. Installing in a place with severe
temperature change may cause defect of the unit.
10. Make sure to use the exclusive power adapter.
11. Make sure to turn off the power switch before disconnecting the mains lead.
Disconnecting the main with the power switch on will cause defect of the unit.
12. Disconnect the power cable when the unit is not in use for a long time.
- 3 -
Page 4
1. Installing IP Videophone
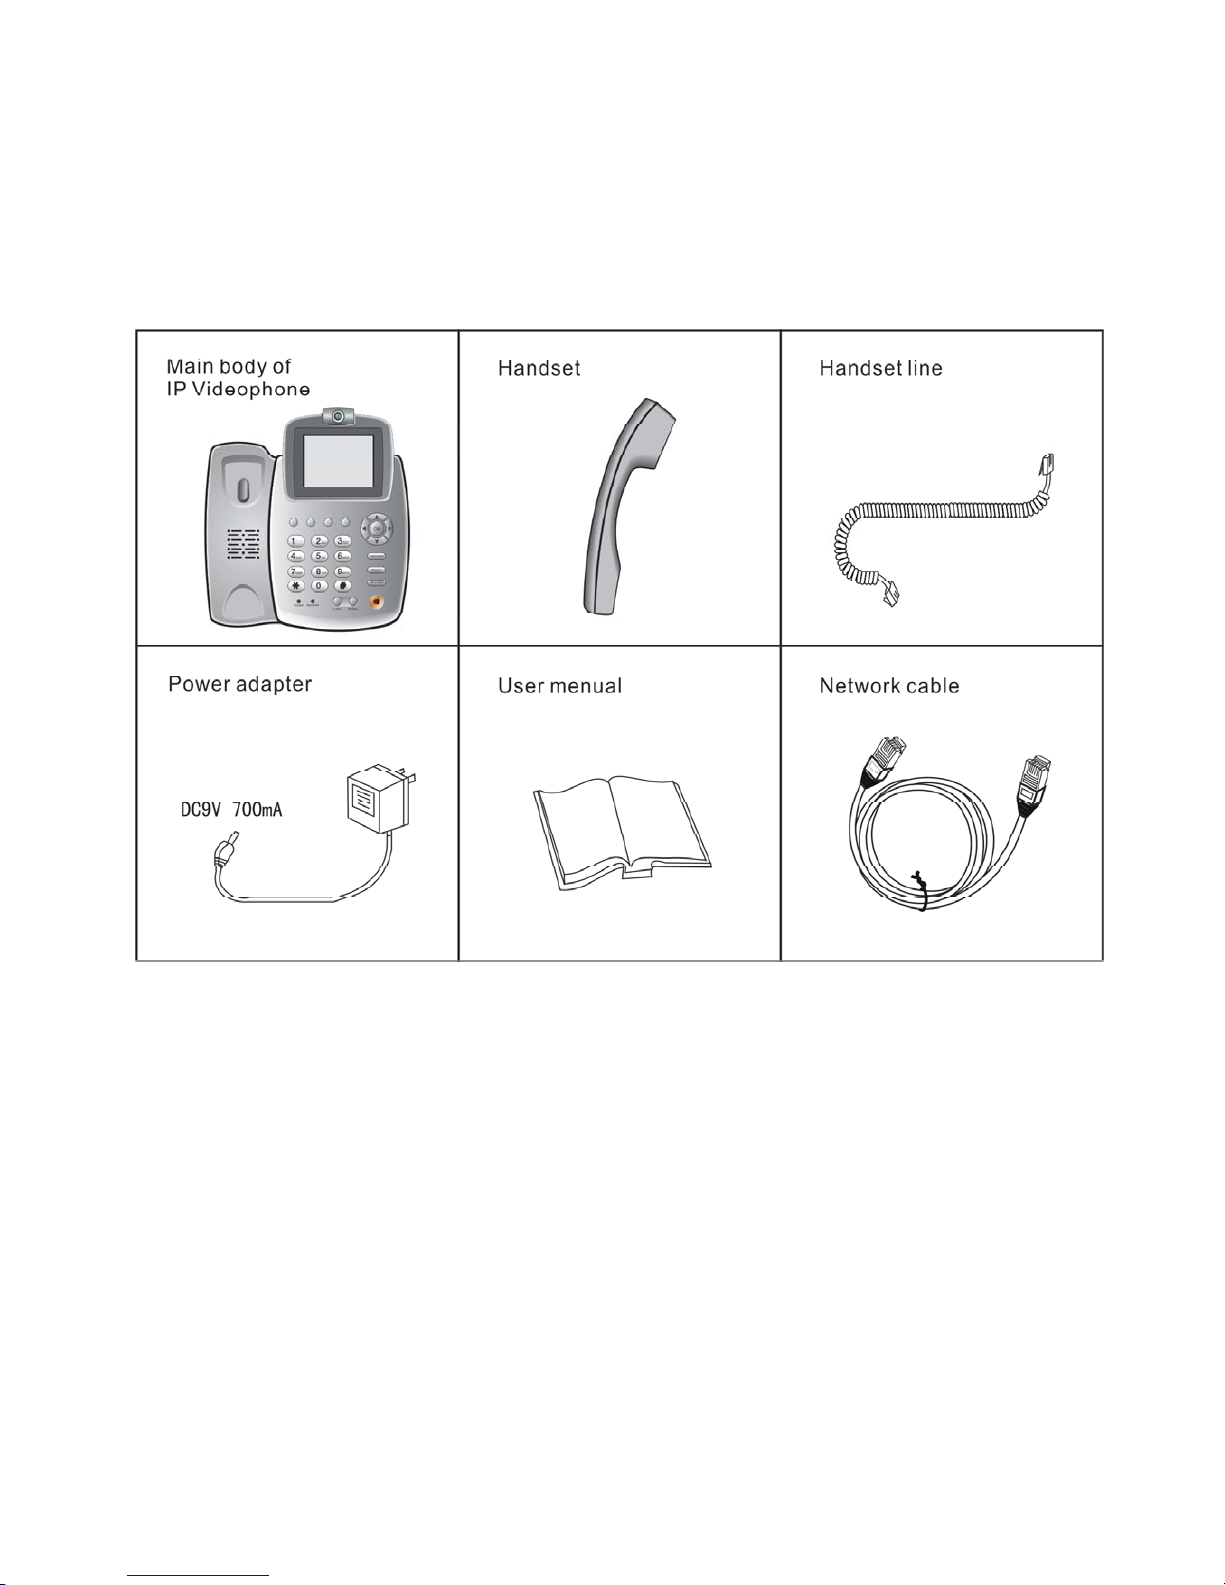
1.1 Components
The following parts are included in the product package. Be sure that you received
all the parts.
Design and parts may vary depending on the model.
When you received the package, check the parts by model.
- 4 -
Page 5
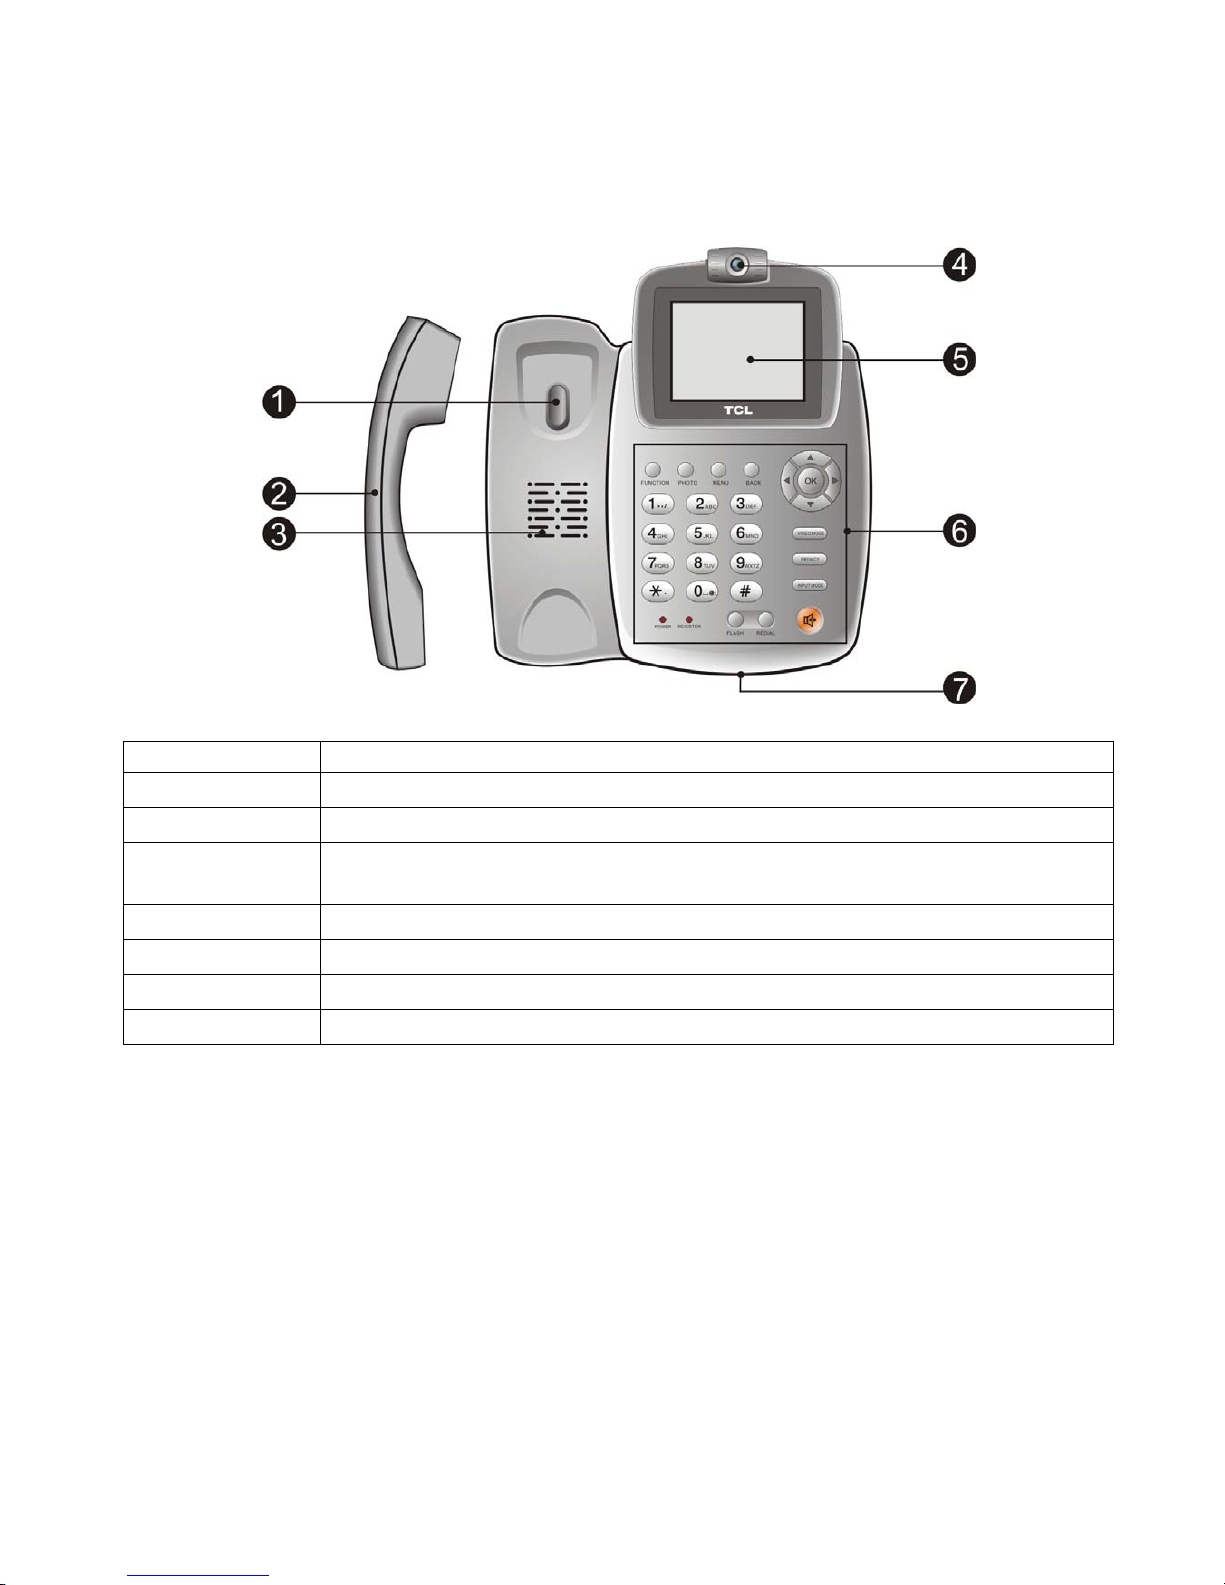
1.2 Name of parts and functions
[Front View]
NAME FUNCTUON
①Hook
Hook of IP Videophone
②Handset
Handset of IP Videophone
③Speaker
rings bell or sounds off the voice of the other party in the
speakerphone mode.
④Camera
captures your image to send to the other party.
⑤LCD Screen
displays images of yours and the other party during the call.
⑥Keypad
the buttons operate the functions of the IP Videophone.
⑦Microphone
receives voice in the speakerphone mode.
- 5 -
Page 6
[Keypad]
(1) Numeric Keys
Enters phone number in the dialing mode or the letters in the User
Configuration menu.
Enters “*”.
(2) *
Enters “.”.
(3) #
Enters “#”.
Makes a call to the dialed numbers/ CallLog in off-hook mode.
Moves to the User Configuration menu.
(4) OK
Saves the setting in User Configuration menu.
Moves among the User Configuration menu.
(5) Arrow keys
Moves between the items in the edit mode of PhoneBook or CallLog in
User Configuration menu.
(6) BACK
Moves to the previous menu from the User Configuration menu or the
Setup menu during a call.
(7) MENU
Enters the main menu.
(8) PHOTO
Captures pictures.
Rejects incoming calls.
(9) FUNCTION
Function key is used to switch on extra service during a call.
(10) VIDEO MODE
Changes the display mode during a call.
(11) PRIVACY
Stops or starts transmitting the video data during a call.
(12) INPUT MODE
Selects the type of letters in the input mode.
(Numeric/Lowercase/Capital)
(13)
Activates or deactivates the speakerphone mode.
(14) REDIAL
Makes a call to the last dialed number.
(15) FLASH
Flash Key
(16) REGISTER
Green LED is on when the IP Videophone registered to the Internet
phone service.
Green LED blinks during system starting up.
(17) POWER
Indicates if the IP Videophone is switched on.
- 6 -
Page 7
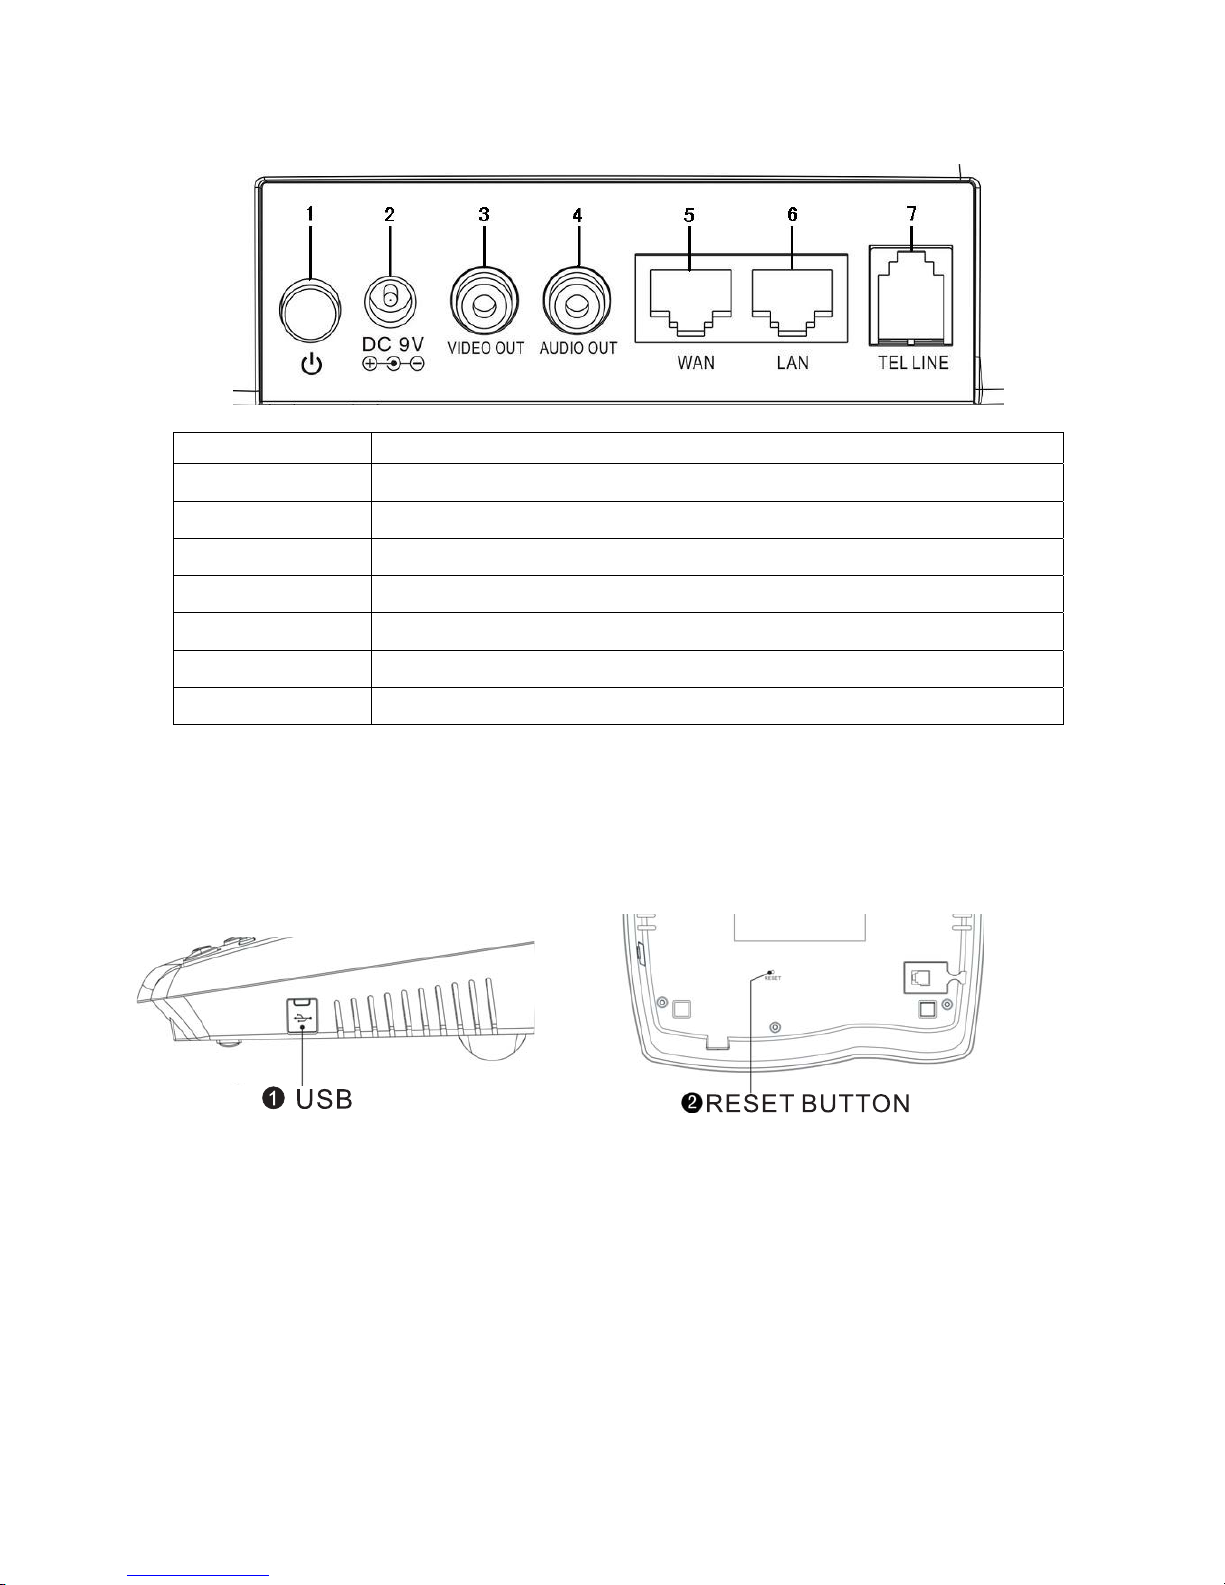
[Rear view]
NAME FUNCTION
ON/OFF
Turns on/off the power
POWER (DC IN)
Connects the power adapter
VIDEO OUT
Sends out video data
AUDIO OUT
Sends out audio data
WAN
Connects to Internet
LAN
Connects to the computer with LAN cable (optional)
TEL
Connects to the telephone line (optional)
NOTE: A/V cable of audio/video input/output is not included in the package.
NOTE: When connecting T V to VIDEO OUT, the LCD screen of IP Videophone may not be fully
displayed depending on the model of TV.
[Side and Bottom view]
①Connect to PC USB interface ②Reset the IP videophone
1.3 Network Configuration – Using Wizard
With connection the IP videophone to the network and sucessful setup, can the IP videophone be
operated. The Install Wizard Menu enables you easily set up network parameters. <MENU> →
[UserSet] → [Extra Setting] → [Install Wizard].
The Setting Process:
[ Network Link ] → [SIP Account] → [STUN Setting] → [Code Setting] → [NTP Setting]
→ [Proxy Setting]
When the setting is finished, the system will be rebooted automatically and registered to the
Internet phone service.Green LED [REGISTER] will be on, if it is registered successfully.
- 7 -
Page 8
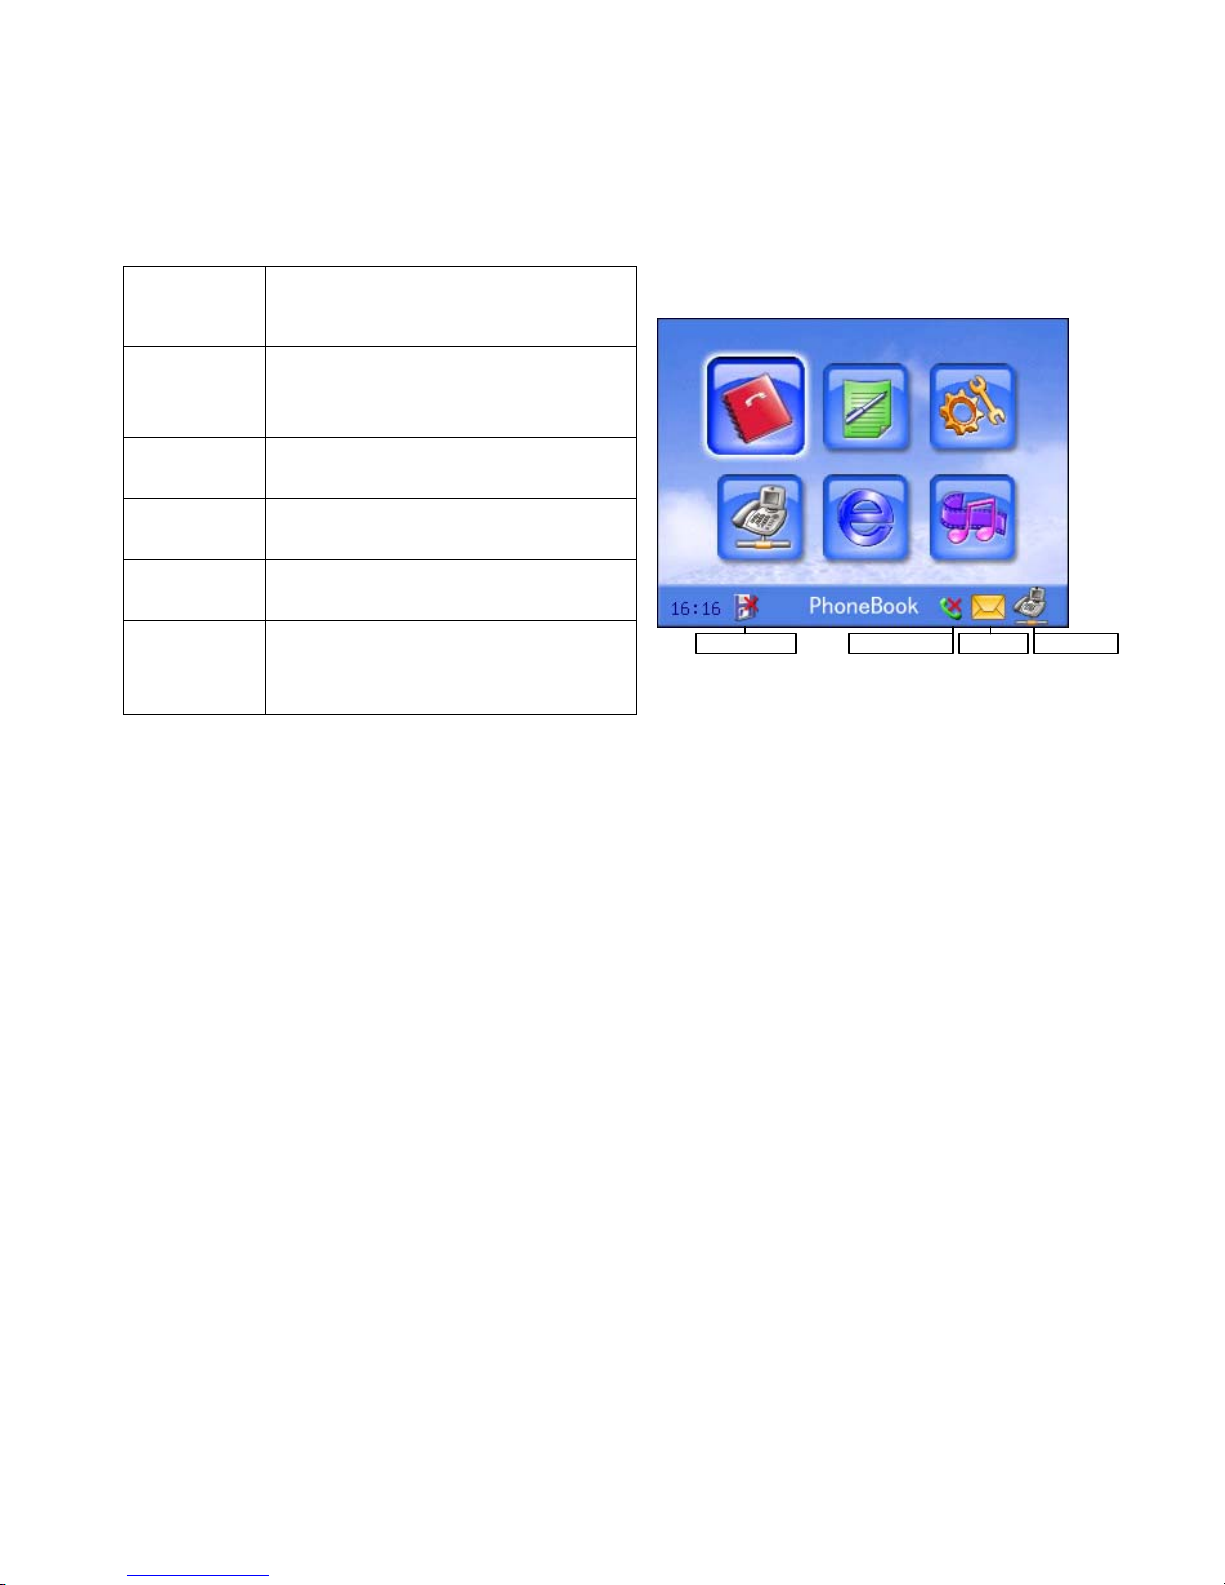
2. Operation Instruction
2.1 Main menu
Phonebook
Enables you to view, delete,
modify, and search the added
phone numbers.
CallLog
The phone numbers of recent calls
are listed in CallLog.
UserSet
Customize the functional options.
Network
VOIP network connection setting.
Internet
Internet browser and share setting.
Add-In
Multimedia tools: Photo Album,
Music player, SMS and etc.
SMS f l agabs ent c all flag register flag
un backup fl ag
2.2 PhoneBook
PhoneBook enables you to save the frequently used phone numbers and makes call directly while
you search the menu.
Operation:
Choose [PhoneBook] in main menu → press OK to enter this menu.
[PhoneBook] → use ST to select an item → press OK to enter.
Press <BACK> to back to the previous menu.
Note: An IP V ideophone may store up to 100 items. Internet phone, Mobile phone, Fax and e-mail
are stored.
2.2.1 Viewing Phone Number List
Press ST to select a name.
Press X to view detailed information, which can be deleted or modified.
Press <BACK> to back to the previous menu.
NOTE: In the process of browsing phone numbers, press ST to inquiry different record. Then
press X to [modify] or [delete]. If you choose [delete], the present record will be deleted. If you
choose [modify], modified interface will display. Click [modify] to modify, and then press OK to
save the change.
NOTE: Press< INPUT MODE> to shift the Input Method.
2.2.2 Adding Phone Number
PressST to select and fill in each field. After filling in the fields, press <BACK> if you want to
- 8 -
Page 9

move to the previous menu. A message will be displayed in case of the change of filling, which
prompts whether the new number will be added.
NOTE: Press <INPUT MODE> to shift the Input Method.
NOTE: An IP Videophone may store up to 100 items.
NOTE: Name, Internet phone, Mobile phone, Fax and e-mail are stored.
2.2.3 Searching Phone Number
Press W X to select Name/ Phone Num/ Email.
Press ST to move cursor and input Name/ Phone Num/ Email,
Select [Search] and press OK to find. The number that matches with the condition will be
displayed.
Press <BACK> to move to the previous menu.
NOTE: Press <INPUT MODE> to shift the Input Method.
2.3 CallLog
The phone numbers of the recent calls are listed in CallLog, including sent call, received call,
absent call and auto answering message. (20 records for each group) These records are all with
save and redial function.
Operation:
Choose [CallLog] in main menu → press OK to enter this menu.[CallLog]
PressST to select an item → Press OK to enter
Press ST to select a recent phone number.
Press <BACK> to move to the previous menu.
NOTE: Sent call, received call, absent call and auto answer message can be recorded in the
CallLog (20 for each group) according to time.
NOTE: Detailed information can be saved, which includes name (Name information is from the
phonebook. If there is no same information in the phonebook, phone number will display directly),
phone number, and time.
If Call Charge Function is on, every call charge will be recorded.
NOTE: The record cannot be deleted, except for resetting the unit.
2.4 UserSet
You can customize the options, including ring, code, call, system and extra setting.
Operation:
Choose [UserSet] in main menu → Press OK to enter this menu.
[UserSet] → Press ST to select an item → Press OK to enter
Press W X to select the type
PressST to set certain field
Press numeric key to input parameters.
Press <BACK> to go back to the previous menu.
NOTE: Press “*” instead of “.” during setting.
2.4.1 Ring
Press W X to select type
Press ST to enter certain setting filed.
- 9 -
Page 10

2.4.2 Codec Setting
Set up certain options which are applied to video and audio call. The options includes video switch,
video rate, DTMF, video encode and audio encode.
Operation for Audio Encode Setting:
Put the cursor on [Audio Encode]
press W X and select “optional” →Press OK to enter
Then you can check both disabled codecs and enabled codecs on the screen.
Enabled Audio Codecs:
Put the cursor on [Disabled Codecs], press ST to select necessary codec, and press X and
move the cursor on “→”, press OK to add the codec, or press W to return.
You can continue the same operation to add more.
Disabled Audio Codecs:
Put the cursor on [Enabled Codecs], which needs deletion. Press W and move the cursor on“←”,
then press OK, and this codec will be deleted. PressXto return.
You can continue the same operation to delete more.
NOTE: If you are not clear about the selection of video encode, you can choose “h263auto“, and
audio encode you can choose “auto”. The IP videophone will search for appropriate codecs
according to communication server to realize connection automatically.
2.4.3 Call Setting
In this mode, you can do the following setups - Auto Answer, Extended. Service, Call Bar, 3-way
Calling and Bit Rate.
Press OK to enter this interface
Press ST to select certain item.
Press OK to do certain setting.
When you enter this interface, press WX to select type.
Press ST to enter parameter setting field
Press numeric keys to input parameters
Press <BACK> to move to the previous menu.
2.4.3.1 Auto Answer
[Call Setting] → select [Auto Answer] → press OK
Press W X to select “ON” if you want to use auto answer function.
Filling in seconds before the auto answer is activated.
Press W X to select the answer ring, which can be your own recorded voice through the recorder
in [Add-In].
NOTE: If [ON/OFF] set “ON”, the [Auto Answer] and [Answer Ring] will be active, the range of
auto answer time must be set [1-60].seconds.
2.4.3.2 Exten. Service
Extension Service includes Call Hold, Call Transfer, Call forward and Call waiting in busy mode,
and Forward Address Setting.
NOTE: If [Call Hold] set “OFF”, the [Call Tr ansfer] will be inactive. Only when [Busy mode]
- 10 -
Page 11

select “call forward”, [Forward Addr] will be active.
2.4.3.3 Call Hold
The Call Hold feature allows a user to place an active call on hold. The feature is useful in
combination with other call features such as call transfer.
Operation:
If you are on an active call, press <FUNCTION>, then press “1” to put the call on hold.
Audio/video data will stop sending to both parties.
To resume the call which is on hold, press “1” again.
IP videophone only supports one-way call on hold at present.
2.4.3.4 Call Transfer
Call Transfer allows the user to move a call to a new destination. The user can perform transfers
with consultation and without consultation. Call transfer functions are often best used when
combined with call hold.
Operation of Call Transfer without Consultation:
In a call both parties, press <FLASH>, you can hear the dialing sound, enter the telephone
numbers, press “OK” to end.
Then press<FLASH> again; the present call will be transferred to the third party.
And the call will no longer under your control when the third party answers.
Operation of Call Transfer with Consultation:
In a call both parties, you press <FUNCTION> and numeric key “4”, then input telephone numbers.
Press “OK” to end.
Then the present call will be transferred to the third party. At this point, the second party will
automatically be put on hold. Press numeric key “1” to shift the two-way calls.
Note: Please turn off the 3 ways calling when the Call Transfer is on.
Note: The outgoing calls in Call Transfer mode will be affected when Outgoing Call Bar is ON.
2.4.3.5 Busy Mode - Call waiting
If the user is already in a call, other incoming calls will be sent call waiting when you select [call
waiting]. The users can receive or reject the call as your will.
Operation:
When the busy mode services is off, call waiting is invalid.
When you set [call waiting] “ON”, the incoming calls will be listed in the waiting list at the time
that the telephone is off-hook or in busy mode.
You can press <FUNCTION> then press “2” to reject the call, while you press <FUNCTION> then
press “3” to answer the call.
2.4.3.6 Busy Mode - Call Forward
If user already in a call (Busy Mode), other incoming calls will be forwarded when you select [call
forward].
Operation:
In an active call, the incoming calls from the third party will be automatically sent to forward IP
address. The call is forwarded automatically before answering, without incoming call indication, so
the users cannot see the information of the incoming calls.
- 11 -
Page 12

2.4.3.7 Call Bar
This function sets bars for all incoming and outgoing calls.
When [Calling Bar] turns on, all the dialing calls are invalid. There is dialing notice on the
interface.
When [Called Bar] turns on, all the incoming calls are rejected with interface notice.
2.4.3.8 3-way Calling
After you dialed the first call and while in the active call, you dial the second call to the third party.
As soon as the third party answers the call, a 3-way calling will be set up between the three
parties.
Operation:
1. When [3-way Calling] turns on, you should fill in attached account and ring for controller. (The
attached account and main account should belong to the same SIP Server.)
2. To create a 3-way calling, make the first call as normal and press <FUNCTION> then press “7”
which will allow the second call to be made. Upon press the “7”, the music of call hold will be
played. Dial a second call in normal manner. Press “7” again the second call will added to
conference and a three parties conference will be set up.
NOTE: Make sure that you turn off [Exten. Service] before you use the [3-way Calling].
NOTE: If the second call have been rejected, please press “7” again to resume the original call.
2.4.3.9 Bit Rate
Select bit rate:
Slow :64k bit/s
Normal :128k bit/s
Fast :384k bit/s
2.4.4 System Setting
[System Setting] includes Video Adjust, Version EN/CH, System Upgrade, Config Recovery and
System Test.
Video Adjust is for the sets of LCD bright, Expose MIN, Expose MAX and TV output.
[Version EN/CN] supports two languages - English and Chinese.
In the [System Upgrade] menu, IP videophone can download the latest software version from a
remote server through Internet. For details, refers to 3.9
When the configuration is abnormal, you can choose [Config Recovery] to restore the back up
configuration or recover initial configuration.
[Config backup]: backup the current system configuration.
[Config Restore]: Restore the latest configuration stored on the IP Videophone.
[Config Init]: Initializes (deletes) all information stored on the IP Videophone.
NOTE: Please be cautious to apply [Config Init] function.
[System Test] is only for factory test.
- 12 -
Page 13

2.4.5 Extra Setting
2.4.5.1 Calendar/Time
You can check data information in the calendar interface.
One month per page.
When NTP option is ON, input required information. Then connect the IP videophone to a time
server on the Internet, the phone receives the information of current time automatically.
If there is no timeserver, press W X to select “OFF” for [NTP ON/OFF].
2.4.5.2 Install Wizard
The detailed setting operation is as follow:
1.[Network Setting]→ 2.[SIP Account Setting] → 3.[STUN Setting] → 4.[Code Setting] →
5.[NTP Setting] → 6.[SIP proxy Setting].
- 13 -
Page 14

<BACK>proceed to the previous step; [Next] proceed to the next step, [Finish] finish wizard.
The IP videophone provides the Install Wizard menu for the network setting and user’s SIP
account setting. After finishing setting, the system will be rebooted automatically.
2.4.5.3 Password Protection
Password Protection protects the functional and network setting from unauthorized modification.
2.4.5.4 Remote Provision
Remote Provision is applied to remote setting for ISP.
2.4.5.5 Call Charge
Call Charge is operated under the set charge rule. You can check the call duration and charge
from the Call Log.
2.5 Network Setting
You can do Connect Setting and some parameters setting in this interface for the connection
method between IP Videophone and Internet.
Operation:
Choose [Network] in main menu Press OK to enter the menu
Press ST to select items And press OK for further setting
Press W X to select the type (static IP, ADSL, auto-obtain IP)
Press ST to be in certain parameter setting field
Press numeric keys to input parameters (press “*” for “.”)
Press <BACK> to move to the previous menu.
Network connection supports static IP, DHCP and PPPoE.
NOTE: For Internet connection method, please contact with the ISP.
NOTE: “OK” should be clicked for every input.
- 14 -
Page 15

2.5.1 Connect Setting
Operation:
Press W X to select the Internet access method (static IP, DHCP, and PPPoE)
Press ST to select a setting item.
Press numeric key and “.” to fill in fields.
Press <BACK> to move to the previous menu.
NOTE: Any information for connection to Internet, please inquire the ISP.
2.5.2 Account setting
You must set user ’s basic information for SIP call. If the phone is subscribed to the SIP service
provider, the server information must be set up.
a. User Information
Set Display Name, User Name, Auth. ID, Password, SIP Address, all the items must have the
values given by the service provider when the phone is registered to the Internet phone service.
NOTE: If the IP Videophone is successfully registered to the Internet phone service, the Green
LED is on.
b. Advanced Setting
[Port]: SIP Server Port. The factory setting is 5060.
[Expires]: IP Videophone will automatically register to the server in every certain second. It is
about register setting. The factory setting is 3600.
NOTE: If the advanced setting is changed, the system will be rebooted.
2.5.3 Proxy Setting
Enable to set SIP proxy server address when press W X to select “ON” for [Proxy ON/OFF].
2.5.4 STUN Client
This enables videophone to be easily configured to communicate with exterior IP-sharing router
through STUN function.
Enable to set the remote STUN server IP address and port when press W X to select “ON” for
[STUN ON/OFF].
Keep Alive is only applied to NAT environment.
2.5.5 Network Status
In this menu, the current IP configuration of videophone is shown – IP address, Subnet mask,
Gateway address, DNS address, NAT address, PPPoE address.
2.6 Internet
Internet Share and Web Brower are both enabled in this menu.
- 15 -
Page 16

Operation:
Choose [Internet] in main menu → Press OK to enter the menu.
Press ST to select an item.
Press OK to enter sub-menu.
Press W X to select the type
Press ST to be in certain parameter setting field
Press numeric keys to input parameters (Press “*” for “.”)
Press <BACK> to move to the previous menu.
2.6.1 Internet Share
You can set the IP videophone on the private network, which is implemented with the NAT.
(Network Address Translation).
Enable to set the IP address and mask when press W X to select “ON” for [NAT ON/OFF].
2.6.2 Web Browser
If you are successfully connected to site that corresponds to the URL, the website page appears.
If you move to URL window using OK, you can directly type URL of the corresponding site.
If a web page is bigger than IP videophone screen, scroll to the left/right using W X or scroll
up/down using ST.
2.7 Add-In
Add-In function includes Photo Album, Music Player, Recorder, SMS (Short Message Service),
and My Document.
Operation:
Choose [Add-In] in main menu → Press OK to enter the menu.
Press ST to select an item.
Press OK to enter sub-menu.
Press <BACK> to move to the previous menu.
2.7.1 Photo Album
In the photo album, you can view/delete the photos.
Operation:
Press OK to popup menu.
Press ST to select an item.
2.7.2 Music Player
Press W X to select Music file and play it.
Press ST to adjust the volume.
Press <BACK> to move to the previous menu and exit.
- 16 -
Page 17

2.7.3 Recorder
Recorder can record your voice and play it. The recorded voice files are used for auto answer
rings.
Operation:
Press <MENU> to start recording.
Press <BACK> to end recording and prompt save.
Press ST to select the record file and play it.
Press OK and choose [delete], selected record file will be deleted.
2.7.4 SMS
The IP Videophone’s SMS function is similar to mobile’s.
[New Msg.]: Users can edit new messages.
[InBox]: The received messages are listed in the Inbox
[OutBox] : Messages which haven’t been sent out are saved in the outbox.
[DraftBox]: After you finish editing messages, you can save it to the draft box.
[Msg. Setting]:
1. Repair Msg. - abnormal SMS function can be repaired.
2. Voice - Alert sound will be played when new messages arrived.
3. Memory Status - numbers of present messages and free space left.
NOTE: In every InBox, OutBox, and DraftBox can store up 120 messages, per message including
50 unicode characters at most.
NOTE: The SMS will stop sending if the SMS have not been sent out in 10 seconds.
2.7.5 My Document
From My Document, we can view the total space, available space and used percentage of the
memory space
- 17 -
Page 18

3. IP Videophone-based calling
3.1 Making a Call
3.1.1 Making a call using dialpad
Hook off → input telephone numbers you want to
call→ < OK >
3.1.2 Making a call using redial
Pick up your handset or press <SPEAKER>.
Press <REDIAL>, the latest phone number dialed
out will be sent.
3.1.3 Making a Call from the PhoneBook
Pick up your handset or press <SPEAKER>.
Press <MENU> and select [PhoneBook]
Select a number from the phonebook list
Press OK to make a call.
3.1.4 Making a call from the CallLog
Pick up your handset or press <SPEAKER>.
Press <MENU> and select [CallLog]
Browse CallLog and select a number
Press OK to make a call.
3.2 Receiving a Call
If an incoming call is arrived, videophone begins
ringing, caller number and the following animation is
displayed on the LCD screen.
- 18 -
Page 19

3.2.1 Pick up the handset to answer the call.
3.2.2 Press <
SPEAKER> to answer the call.
60 seconds, while the auto-answer
ill send an indicator to the caller that
there is nobody answers the call.
3.3 Dropping a Call
speakerphone mode, you can press <
SPEAKER> to
3.4 Call Transfer
Note: The ring will stop, if there is nobody answers the call in
function has not been set at the same time. Then the phone w
3.3.1 Hang up your handset to drop a call.
3.3.2 If you are in
drop a call.
For detailed operation, refers to 2.4.3.2
3.5 Rejecting a call
ress <FUNCTION> to reject the incoming call in waiting mode.
y during your call
call, other incoming calls will be sent call waiting when you select [call
s <FUNCTION> then press “2” to reject the call.
3.6 Useful Functions during a Call
ress <VIDEO MODE> to change display mode of the video on your LCD screen.
3.5.1 Rejecting a Call in waiting mode
P
3.5.2 Rejecting a Call from the third part
If you are already in a
waiting]. You can pres
3.6.1 Video Mode
P
- 19 -
Page 20

3.6.2 Privacy
Press <PRIVACY> to keep your video from delivering to the other side. If you want to release
rivacy mode, press <PRIVACY> again.
3.6.3 Volume Control
by pressing ST during a call.
ur phone to any other phone. For detailed
peration, refers to 2.4.3.2.
p
You can control the volume
3.6.4 Call Forward during a call
Call Forward allows you to forward a call from yo
o
our call
3.7 Auto Answering Mode
In auto answering mode, an incoming call is automatically received after ringing the predefined
3.6.5 Capture pictures during y
Press <Photo>during your call to capture pictures.
times, and an absent message is delivered. For detailed operation, refers to 2.4.3.1
Refer to main menu → [CallLog] → [Auto Answer Message] on how to retrieve messages.
ernet.
ath for software upgrading: [UserSet] → [System Setting] → [System Upgrade].
the IP videophone is successfully connected to the server, system will automatically download
e latest software form it. If software upgrading is finished, the system will be rebooted.
3.8 Input Mode
Press <INPUT MOOD> to choose the input mode (Numeric/Lowercase/Capital/Pinyin) you want
to use. The current input type is indicated on the LCD screen.
3.9 Software Upgrading
IP videophone can download the latest software version from a remote server through Int
P
Connect IP videophone to the server and check the latest software version.
Fill in Server address and connect Type (support TFTP),
Select [Upgrade System] → Press OK.
If
th
- 20 -
Page 21

NOTE: Make sure that software upgrade should not be stopped. In other words, do not cut off
ower in the course of upgrading. If the procedure of upgrading stops, the existing software is
eleted and not normally operated. If any problem occurs, do not turn off power and try attempt
pgrading again. If it continues to fail, please contact the A/S center.
p
d
u
- 21 -
Page 22

Appendix 1: Menu Structure
ne iew/delete/modify 1.View Pho
Num
ber List
V
phone number
2.Add Phone
Number
Add a new phone
umber
n
1.PhoneBoo
k
umber
3.Search
Phone N
1. Sent Call
2.Received
Call
3. Absent Call
2.CallLog
Message
4. Auto Answer
1. Ring e Ring, Volum
2.Code Setting
eo
o/A
Video
ON/OFF,Vid
Rate,DTMF,Vide
udio Encode
1. Auto Answer
2. Extended. Service
3. Call Setting
3. Call Bar
4. 3-way Calling
5. Bit Rate
1. Video Adjust LCD,Camera,TV out
2. Version EN/CH
3. System Upgrade
1. Config Backup
2. Config Restore
4. Config Recovery
3. Config Init
4.System
Setting
5. System Test
1. Calendar 1. Calendar/Time
. Time/Date
2
1. Network Setting
2. Account Setting
3. STUN Setting
4
2. Install W
. Code Setting
5. NTP Setting
izard
. SIP proxy
6
3.Password
Protection
4.Remone Provision
3.User Set
5.Extra Setting
harge Switch/Rule
5.Call Charge C
- 22 -
Page 23

1.Connect
Setting
StaticIP/DHCP/PPP
oE
User information 2.Account
Setting
Advance Setting Port/Expires
3.Proxy
Setting
roxy Address P
4. STUN Client STUN/Keep Alive
4.Network
5.Network
Status
1.Internet
AT
Share
N5.Internet
Browser
2.Web
1.Photo Album
2.Music Player
3. Recorder
4. SMS
6.Add-In
5.My
Document
- 23 -
Page 24

Appendix 2: Trou
Problem
bleshooting Guide
Troubleshooting
I cannot turn on the power.
Check if the power cable is correctly connected.
LCD screen is not turned on.
I cannot hear any call
connection signal from
handset.
whether the handset volume is set to be
Check if the handset is connected to the right port of the
videophone. Check
too low.
Check if the Internet line is connected.
Press <MENU> to enter main menu →[Network]→[Network
status], Check if the handset is connected to Internet.
If it is connected to ITSP(Internet Telephony Service Provider)
check if the registration lamp(Green LED) turns on check if the
server and account information are correct.
If it is connected to ITSP the called party may not be registered
with the same network.
If you are using speed dialing, check if it is correct in
[PhoneBook].
, it may not be connected.
I cannot make an IP call.
If a called party uses IP videophone installed in a private
network or a firewall system
Someone calls me but I
cannot receive the call.
IP videophone installed in a private If a called party uses
network or a firewall system, you may not receive a call.
When I receive a call, the e volume is set to be too low.
screen is turned on, but any
ring sound cannot be heard
Check if th
If the videophone is installed in private network or on firewall,
you may not be received the other party’s screen.
The call is connected, but the
other party’s screen is dark
and the sound is very bad
P Check if a camera is connected to the other party’s I
videophone.
Check if the other party’s videophone is installed in private
network or firewall system
Volume up the handset
The call is connected, I can
see the screen, but cannot
dio/video encode
hear any voice.
Check if both sides have the same au
protocol.
Check if the other party’s videophone is installed in a private
network or firewall system.
Check if the audio/video input path is correctly configured in the
setup menu during a call.
The call is connected and I
can see the screen, and hear
the voice, but the other party
cannot see and hear me.
Check if the other party’s audio/video device works properly.
Check if the videophone is connected to Internet properly. The other party’s screen stops
sconnected
suddenly and the voice is not
heard any more.
Check if the other party’s videophone has gotten di
from Internet before the call is completed.
Check the Internet environment is corrected configured.
Check if the DNS server address is correct.
The browser is not connected
to the website I want.
e in service. Ch ck if the website is
When the videophone is When external video o
connec
image
ted to TV set, the
utput port is connected to TV, a certain
image is not displayed on LCD screen of the IP videophone.
is displayed on both
screen are different.
- 24 -
Page 25

Appendix 3: IP Videophone Specifications
System ITEF Recommendation:SIP(RFC 3261)
Video
ITU-T Recommendation: H.263, H.263+, mpeg4
Resolution: CIF : 352 × 288 pixels
QCIF: 176 × 144 pixels
Max. frames per second: 30 fps
Audio
ITU-T Recommendation: G.711(A-law , G.729a, , μ-law), G.723, G.726_16/24/32/40
Gsm_amr, iLBC
Frequency response: 200 Hz ~ 3.4 KHz
Camera
CMOS Camera: 640 × 480 pixels
Sensor Size: 2.76 × 2.05 mm
Horizontal field of view: 50°
maximum
Vertical field of view: 30° maximum
Automatic exposure and brightness
adjust
Display
TFT-LCD: a-Si TFT active matrix
Resolution: 320(H) × 3(RGB) × 240(V) pixels
Size: 3.5 inch
Pixel pitch: 0.219(W) × 0.219(V) mm
Display colors: 24-bits Color
System format: NTSC/PAL
Network interface
LAN: 10/100 Base-T(RJ-45 jack)
ADSL, Cable Interface
Network protocol
TCP/IP, UDP, ICMP, DHCP, NTP, HTTP etc.
Supplementary Services - Optional
Call Transfer, 3-way Calling, Music Play essage Service), etc. er, SMS(Short M
Voice Encryption - Optional
Remote Upgrade and Configuration
Remote Upgrade: download the latest software version from server using TFTP.
Remote Configuration: Setting system Configuration using Web server, SNMP – optional
Electrical
Operation voltage: 9V, 700mA
Power consumption(Max.): 6.3W
Power Supply(AC Adapter): 220V,
50HZ
Videophone Size:
Width: 218 mm
Depth: 204 mm
Height: 180 mm
*The exterior and specification might be changed to improve its performance or design
without notice.
- 25 -
 Loading...