

2.1 Channel Home Theater Sound Bar
TS5010
User manual

Product Registration
Please register your purchase on-line at www.tcl.com. It will
make it easier to contact you should it ever be necessary.
Registration is not required for warranty coverage.
Product Information
Keep your sales receipt to obtain warranty parts and service
and for proof of purchase. Attach it here and record the
serial and model numbers in case you need them. These
numbers are located on the product.
Model No. ____________________________________________
Purchase Date ________________________________________
Serial No. ____________________________________________
Dealer/Address/Phone _________________________________

Contents
1 Important safety instructions 3
Important information 3
Important safety instructions 5
2 Welcome 10
What’s in the box 10
Overview of the Sound Bar main unit 12
Overview of the wireless subwoofer 14
Overview of the remote control 15
Set up your Sound Bar system 16
3 Connect your Sound Bar system 21
Connect with the optical cable 21
Connect with the 3.5mm-to-3.5mm audio cable 23
Connect your Sound Bar to power supply 24
Connect your Sound Bar with your Bluetooth device 25
Connect your wireless subwoofer to the Sound Bar 27
Connect the IR pass-through cable 29
4 Use your Sound Bar system 30
Use your Sound Bar with the top panel or remote
control 30
Sound settings 31
Listen to music from your Bluetooth device 32
Use the USB cable or device for music playback 33
1

5 Specications 34
6 Notice 36
Declaration of conformity 36
Disposal of your old product and battery 36
Trademarks 38
7 FAQ 39
2
1 Important safety
instructions
Important information
CAUTION
RISK OF ELECTRIC SHOCK
DO NOT OPEN
CAUTION: TO REDUCE THE RISK OF ELECTRIC
SHOCK, DO NOT REMOVE COVER (OR BACK).
NO USER-SERVICEABLE PARTS INSIDE. REFER
SERVICING TO QUALIFIED SERVICE PERSONNEL.
Thelightningashwitharrowheadsymbol,withinan
equilateral triangle is intended to alert the user to the
presence of uninsulated dangerous voltage within the
3
product’senclosurethatmaybeofsucientmagnitudeto
constitute a risk of electric shock.
The exclamation point within an equilateral triangle is
intended to alert the user to the presence of important
operating and maintenance (servicing) instructions in the
literature accompanying the product.
This symbol indicates that this product incorporates
double insulation between hazardous main voltage and
user accessible parts. When servicing, use only identical
replacement parts.
Warnings
To reduce the risk of re or electric shock, do not
•
expose this product to rain or moisture. This product
should not be exposed to dripping or splashing. No
objects lled with liquids, such as vases, should be
placed on or near the product.
• The product is unstable if it is not properly placed
or mounted to the wall. Be sure to follow the wall
mounting instructions provided in this user manual to
ensure your safety.
• Do not expose batteries to excessive heat such as
sunshine, re, and so forth.
4

Important safety instructions
• Read these instructions - Read all the safety and
operating instructions before operating the product.
• Retain these instructions - Retain the safety and
operating instructions for future reference.
• Heed all warnings - Adhere to all warnings on the
product and in the operating instructions.
• Follow all instructions - Follow all operating and use
instructions.
• Do not use this apparatus near water – The appliance
should not be used near water or moisture – for example,
in a wet basement or near a swimming pool and the like
• Clean only with a dry cloth.
• Do not block any ventilation openings. Install in
accordance with the manufacturer’s instructions.
• Do not install near any heat sources such as radiators,
heat registers, stoves, or other apparatus (including
ampliers)thatproduceheat.
• Do not defeat the safety purpose of the polarized or
grounding-type plug. A polarized plug has two blades with
one wider than the other. A grounding type plug has two
blades and a third grounding prong. The wide blade or the
third prong are provided for your safety. If the provided
plugdoesnottintoyouroutlet,consultanelectricianfor
replacement of the obsolete outlet.
• Protect the power cord from being walked on or pinched
particularly at plugs, convenience receptacles, and the
point where it exits from the product.
5

• Use only attachments/accessoriesspeciedbythe
manufacturer.
• Use only with the cart, stand, tripod, bracket, or table
speciedbythemanufacturer,orsoldwiththeapparatus.
When a cart is used, use caution when moving the
cart/apparatus combination to avoid injury from tip-over.
• Unplug this apparatus during lightning storms or when
unused for long periods of time.
• Refer all servicingtoqualiedservicepersonnel.
Servicing is required when the apparatus has been
damaged in any way, such as power-supply cord or plug
damaged, liquid has been spilled or objects have fallen
into the apparatus, the apparatus has been exposed to
rain or moisture, does not operate normally, or has been
dropped.
Cautions
•
To prevent electric shock, match wide blade of plug to
wide slot, fully insert.
• The product shall not be exposed to dripping or
splashing.
• Do not place any sources of danger on the product (for
example:liquidlledobjects,lightedcandles).
6

Cautions
•
Disconnectthepowercordtoshutowhenndtrouble
or not in use. The power cord shall be readily operable.
• Use of controls or adjustments or performance of
procedures other than those described herein, may
result in hazardous radiation exposure or other unsafe
operation.
• The power cord/appliance coupler is used as the
disconnect device, the disconnect device must remain
readily operable.
Battery caution and disposal information
• Install only new batteries of the same type in your product.
• Failure to insert batteries in the correct polarity, as
indicated in the battery compartment, may shorten the life
of the batteries or cause batteries to leak.
• Do not mix old and new batteries.
• Do not use rechargeable (Nickel Cadmium) or (Nickel
Metal Hydride) batteries.
• Do not mix alkaline, standard (Carbon-Zinc) or
rechargeable (Nickel Cadmium) or (Nickel Metal Hydride)
batteries.
• Donotdisposeofbatteriesinreorwater.
• Recycle or dispose of batteries as per state and local
guidelines.
• Danger of explosion if battery is incorrectly replaced.
Replace only with the same or equivalent type.
7

• When the remote control is not to be used for a long time
(more than a month), remove the battery from the remote
control to prevent it from leaking.
• If the batteries leak, wipe away the leakage inside the
battery compartment and replace the batteries with new
ones.
• Keep away the batteries from heat or moisture.
• Do not carry or store batteries with other metallic objects.
Doing so could cause batteries to short circuit, leak or
explode.
• Do not carry or store batteries with other metallic objects.
Doing so could cause batteries to short circuit, leak or
explode.
• Neverrechargeabatteryunlessitisconrmedtobea
rechargeable type.
• The product/remote control contains a coin/button type
battery, which can be swallowed. Keep the battery out of
reach of children at all times! If swallowed, the battery can
cause serious injury or death. Severe internal burns can
occur within two hours of ingestion.
• If you suspect that a battery has been swallowed or
placed inside any part of the body, seek immediate
medical attention.
• When you change the batteries, always keep all new
and used batteries out of reach of children. Ensure that
the battery compartment is completely secure after you
replace the battery.
• If the battery compartment cannot be completely secured,
discontinue use of the product. Keep out of reach of
children and contact the manufacturer.
8

Installation location
• Thisproductisdesignedtositonarm,atsurface.Do
not place the product on built-in installation such as a
bookcase or rack because the ventilation slots around
the product will be blocked, resulting in reduced lifetime
from overheating. To assure adequate ventilation for this
product, maintain a spacing of 7.8 inches (20cm) or more
around the product.
• Make sure the product on the furniture is of adequate size
and strength to prevent it from being accidentally tipped
over,pushedo,orpulledo.Thiscouldcausepersonal
injury and/or damage to the product.
• Installation of wall mount must be carried out by
qualiedpersonnelonly.Incorrectassemblycanresult
in severe personal injury and property damage (if you
intend to install this product yourself, you must check
for installations such as electrical wiring and plumbing
that may be buried inside the wall). It is the installer’s
responsibility to verify that the wall will safely support the
total load of the product and wall mount brackets.
9
2 Welcome
Congratulations on the purchase of your new TCL Sound
Bar! After it is set up and connected, you can experience
a superb sound quality and state-of-the-art design to best
tyourhomeentertainmentsystem.Youarerecommended
to read through this user manual which helps you set up,
connect and operate the product easily and properly. For
more information, visit www.tcl.com
Let’s get started.
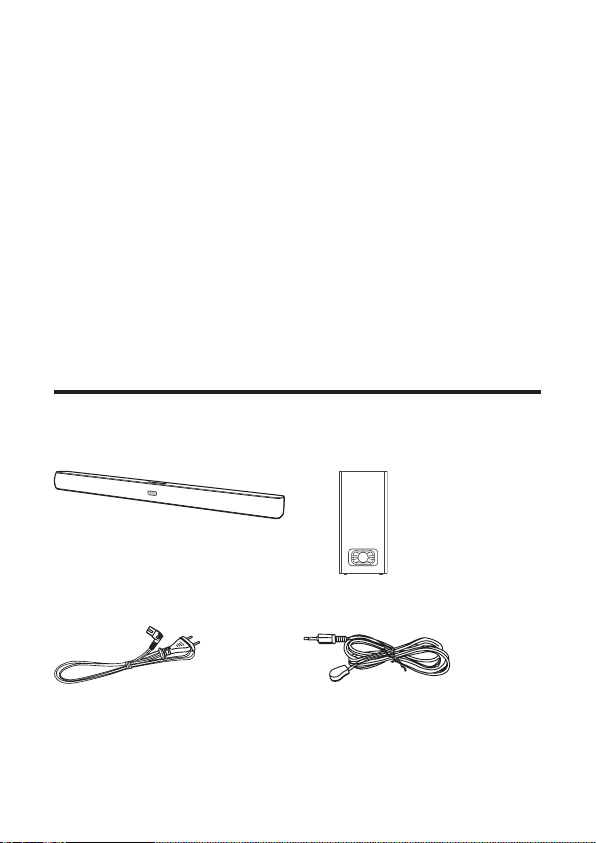
What’s in the box
Sound Bar main unit
Wireless subwoofer
AC power cord x 2
IR pass-through cable
10
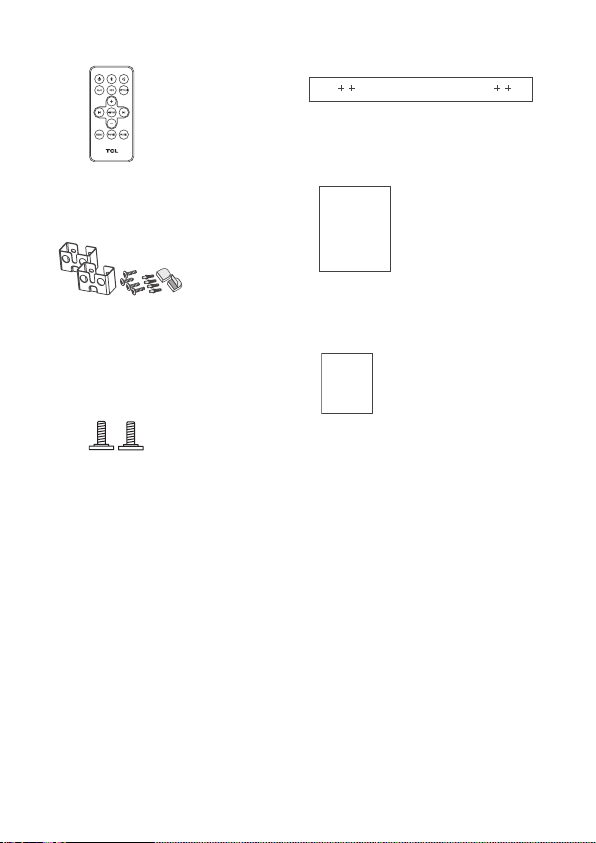
QSG
Warranty
Remote control (with battery)
Wall mount template
Wall anchor x 4
Silicone pad x 2
Wall mount bracket x 2
Wall bracket screw (M4)
Wall mounting screw (M3) x 2
Quick start guide
Warranty card
11
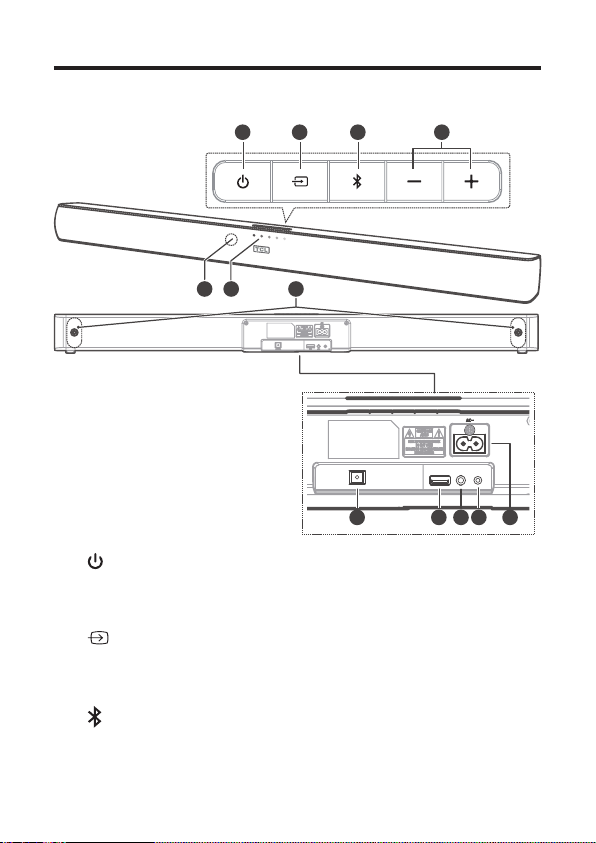
Overview of the Sound Bar main unit
1 2 3 4
65
7
OPTICAL
8 9 10 11 12
USB AUX
1
Press to turn the Sound Bar main unit on or to standby
mode.
2
Press to switch the audio source among
AUX/Bluetooth/Optical/USB modes.
3
Press to select the Bluetooth function.
12
IR

4 +/-
Press to increase or decrease the volume level.
5 Remote control sensor
Receive signals from the remote control.
6 LED indicators
Red: in standby mode.
Green: in AUX mode.
Blue: in Bluetooth mode.
Orange: in Optical mode.
White: in USB mode.
7 Wall bracket screws
8 Optical input connector
9 USB Type A connector (only for music playback)
10 AUX input connector
11 IR pass-through cable connector
12 AC input power connector
13
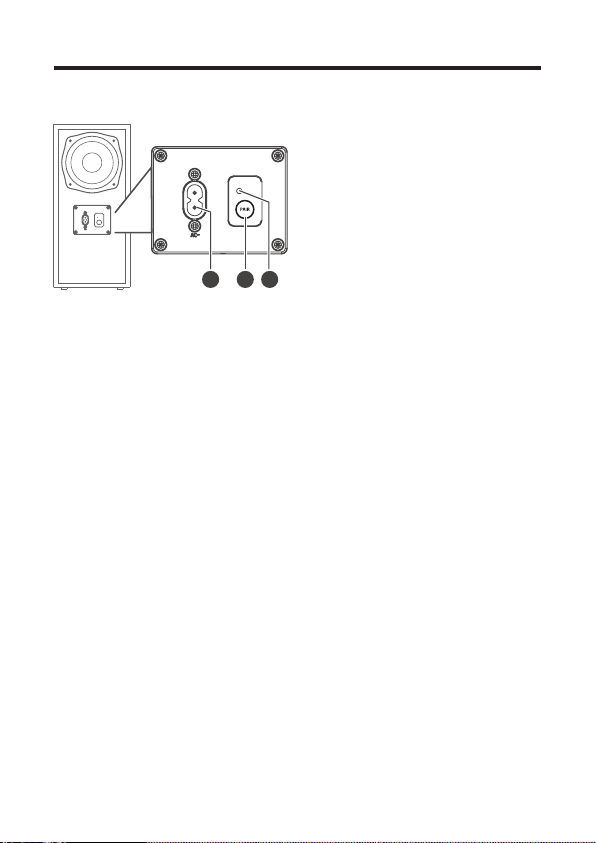
Overview of the wireless subwoofer
PAIR
1 2 3
1 AC input power connector
2 PAIR
Press and hold to activate pairing with the Sound Bar main
unit.
3 Orange LED indicator
• ashesslowlywhenthesubwooferisinidlemode.
• ashesquicklywhenpairingisinprogress.
• remains on solidly when pairing is successful.
14
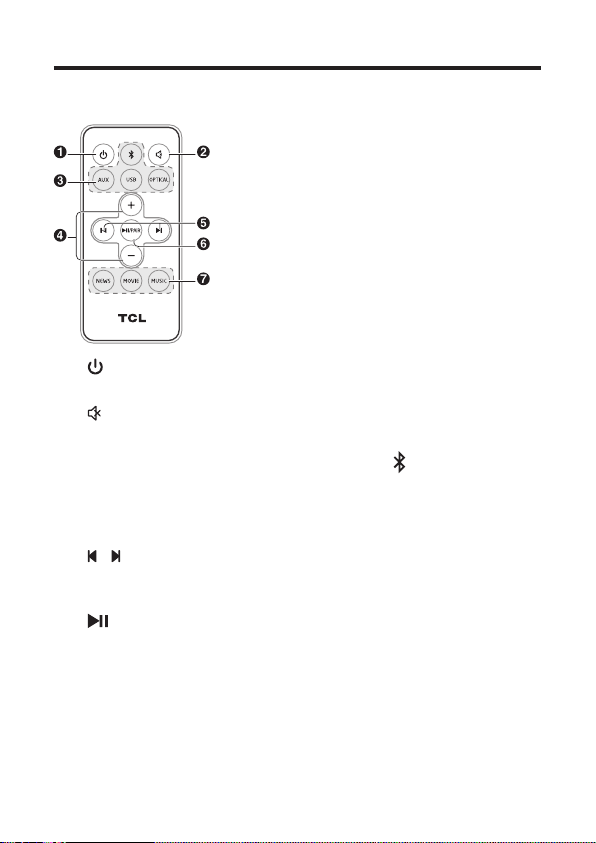
Overview of the remote control
1
Press to turn the Sound Bar on or to standby mode.
2
Press to mute or unmute the sound.
3 Source buttons - AUX/OPTICAL/USB/
Presstoswitchtheaudiosourceamongdierentmodes.
4 +/-
Press to increase or decrease the volume level.
5 /
Press to skip to previous/next track in Bluetooth/USB
mode.
6 /PAIR
Play/pause/resume playback in Bluetooth/USB mode.
Press and hold to activate the pairing function in Bluetooth
mode or disconnect the paired Bluetooth device.
7 NEWS/MOVIE/MUSIC
Presstoselecttheequalizer(EQ)eectwhenyouare
watching news or movies or listening to music.
15
Set up your Sound Bar system
Notes
• Make sure you read all the safety information before you mount
the Sound Bar main unit on the wall (see ‘Important safety
instructions’ on page 5).
• Make sure you use screws and wall mount brackets provided
orspeciedbytheauthorizedmanufacturer.
• TCL Entertainment Solutions Limited bears no responsibility for
accidents or damage caused by improper wall mounting and
screwsinstallationorinsucientwallstrength,etc.
• Additional tools (not supplied) are required for installation.
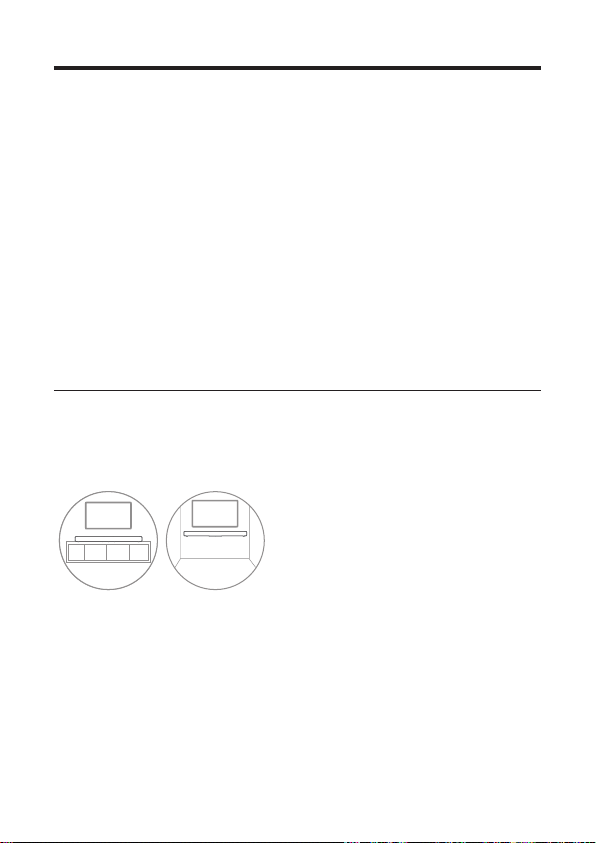
Mount your Sound Bar main unit on the wall
YoucanchoosetoplaceyourSoundBarmainunitbelowthe
center of your TV or mount it on the wall.
A B
Place the supplied wall mount template on the wall. Make
1
sure the wall mount template is at least 2 inches (5cm)
below the center of the TV.
Use a level to make sure the Sound Bar is positioned
2
accurately.
Usethetapetostickthewallmounttemplatermlyonthewall.
3
16
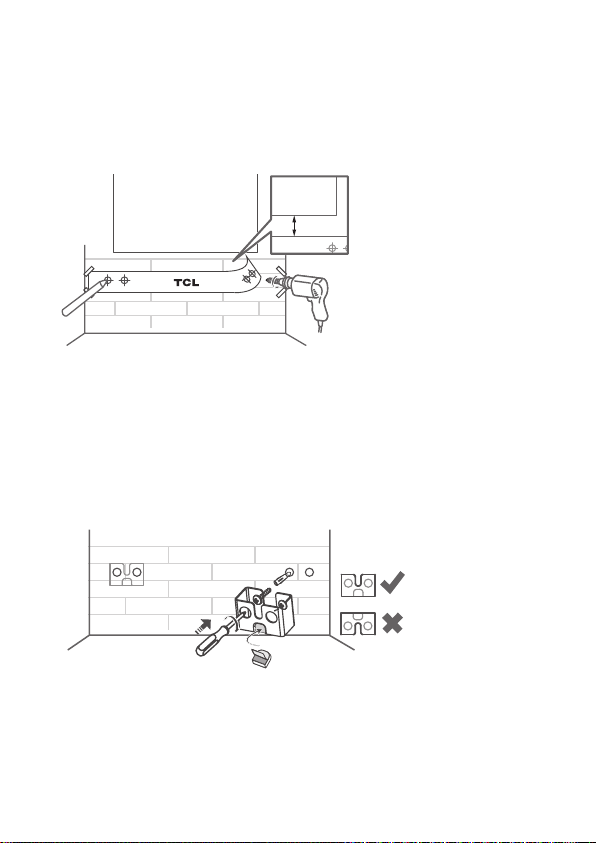
Mark on the wall using each marking on the template on the
4
template through the mounting holes.
Take away the wall mount template.
5
Drill a screw hole at each marking on the wall.
6
TV
TV
> 5cm
1
Insert the supplied wall anchors into 4 screw holes on the
7
wall.
Insert the supplied wall bracket screws into the wall
8
anchors.
Fix and tighten the wall bracket screws on the wall. Stick the
9
silicone pads on the wall mount brackets when necessary to
adjust the direction of the Sound Bar main unit.
Replace the screws at the back of the Sound Bar main unit
10
with the supplied wall mounting screws.
17
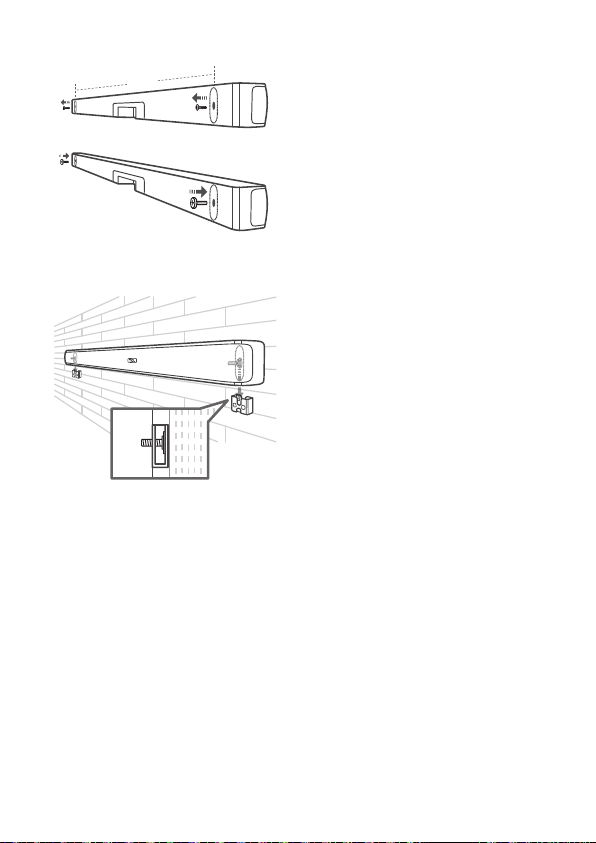
735 mm
Hang the Sound Bar main unit on the wall mount brackets.
11
Notes
• Check the installation location before you mount the Sound
Bar on the wall (see ‘Installation location’ on page 9).
• Youmayconsidertoconnectthecablesrstbefore
mounting the Sound Bar on the wall.
18
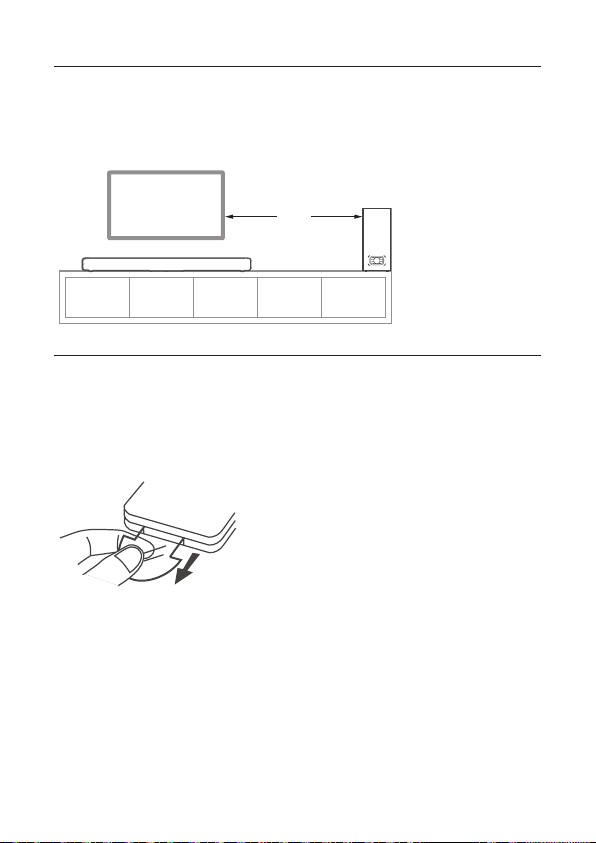
Position your subwoofer
TV
The distance between the subwoofer and the Sound Bar
main unit should be within 3 meters (9.8 feet).
< 3m
Activate the remote control
Thebatteryispre-installedintheremotecontrol.Forrst
time use, remove the battery protective tab from the battery
door to activate battery connection.
19
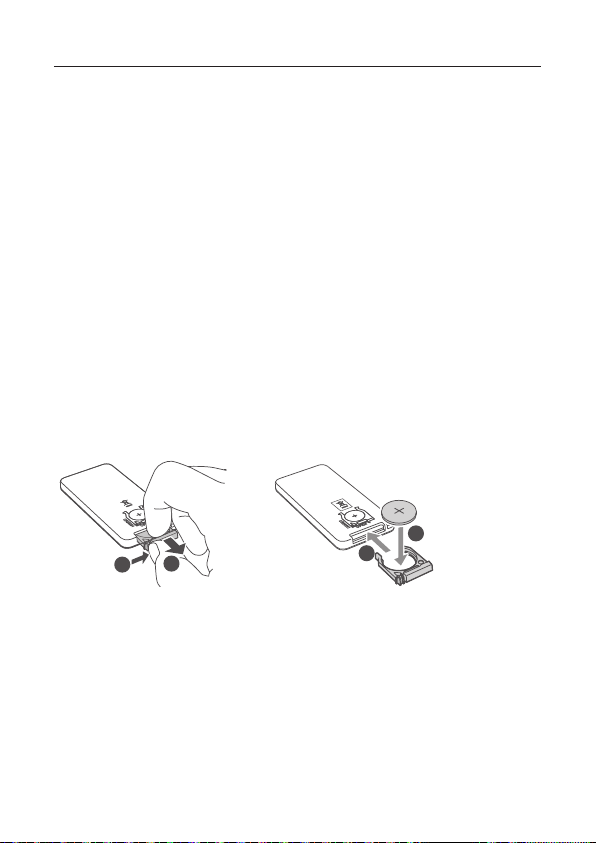
Replace the remote control battery
Warnings
Danger of explosion if battery is incorrectly replaced.
•
Replace only with the same or equivalent type.
• The product/remote control may or may not contain a
coin/button type battery, which can be swallowed. Keep
the battery out of reach of children at all times!
Open the battery compartment and remove the old
1
battery.
Place a new lithium CR2025 battery into the battery
2
compartment with the correct polarity (+/-).
Close the battery compartment.
3
3
2
1
4
20
3 Connect your Sound
Bar system
AfteryouhavexedthepositionoftheSoundBarmainunit,
you can start connecting it to your TV or other devices and
listen to the audio through your Sound Bar. Make sure you
have muted the audio of your TV or device. For information,
check the user manual of your TV or device.
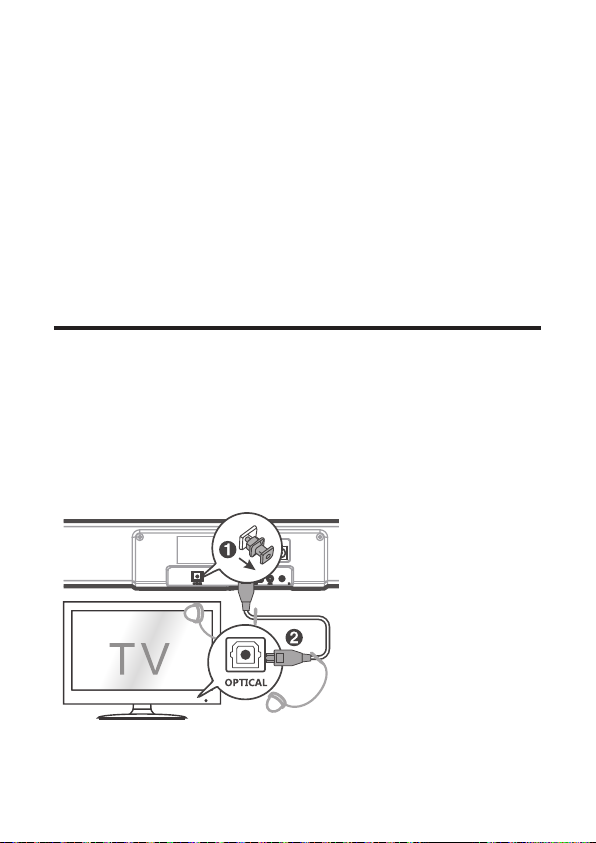
Connect with the optical cable
Remove the protective caps from the optical cable (sold
1
separately) when necessary.
Connect one end of the optical cable to the optical input
2
connector on your Sound Bar main unit and another end
to the optical output connector of your TV or device.
21
Note
• If there is no sound output from the Sound Bar main unit and
theorangeLEDashesrapidly,trytoactivatethePCMsignal
output on your TV or device. PCM is used to convert analog
audio signals into digital audio signals in most devices. For more
information of how to activate the PCM signal output, check the
user manual of your TV or device.
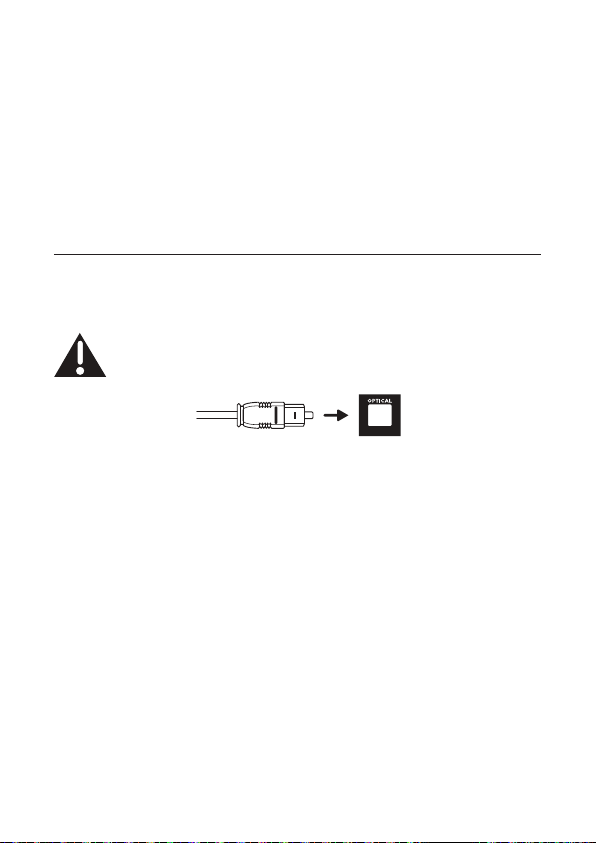
Direction for setting up your Sound Bar using an
optical cable
Do not bend or kink the optical cable (SPDIF) as it
is fragile and can easily get damaged and broken.
To get the best possible audio experience using the optical
cable:
Press the Settings button on your TCL TV remote.
1
Navigate to Audio options.
2
Set TV speakers to O.
3
22
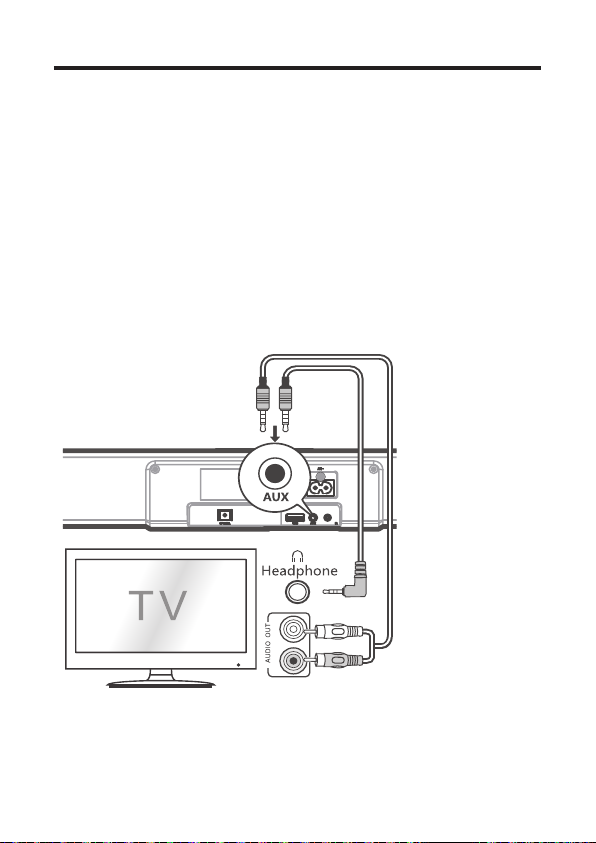
Connect with the 3.5mm-to-3.5mm
audio cable
Youcaneither:
• connect one end of the 3.5mm-to-3.5mm audio cable (sold
separately) to the AUX input connector on your Sound
Bar main unit and another end to the headphone or audio
output connector on your TV or device. This will disable the
sound of your TV built-in speakers; or
• connect one end of an RCA-to-3.5mm audio cable (sold
separately) to the AUX input connector on your Sound
Bar main unit and other ends to the TV’s audio output
connectors.
23
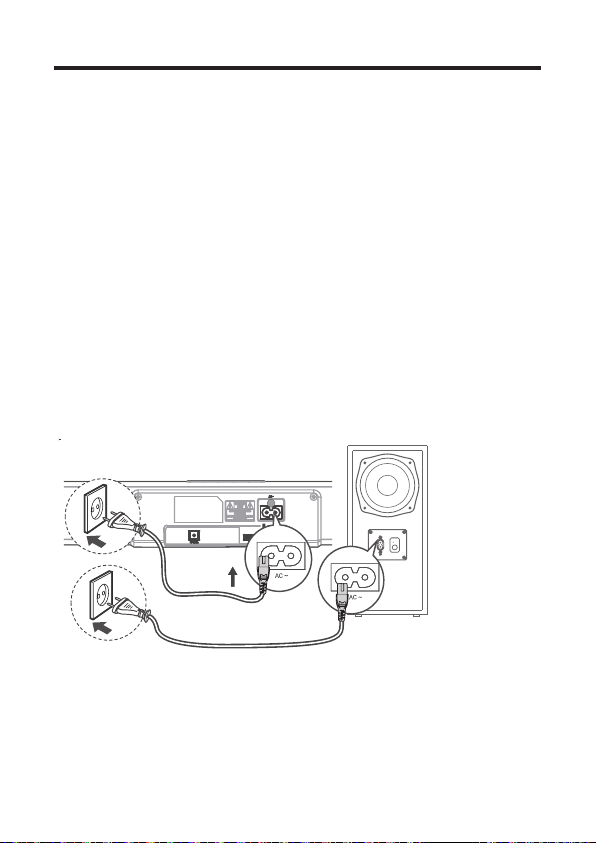
Connect your Sound Bar to power
PAIR
supply
Make sure that you have completed all other
1
connections before connecting the Sound Bar to power
supply.
Make sure the power supply voltage complies with your
2
country’ssafetystandards(see‘Specications’onpage
39).
Connect one end of another supplied AC power cord to
3
the AC input connector on your subwoofer and another
end to the power socket on the wall.
Connect one end of a supplied AC power cord to the
4
AC input connector on your Sound Bar main unit and
another end to the power socket on the wall.
24

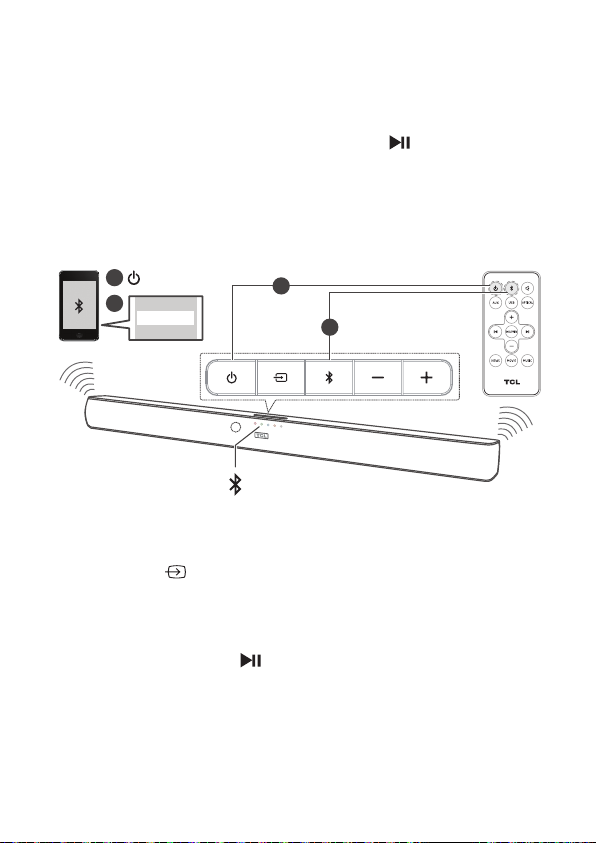
Connect your Sound Bar with your
Bluetooth device
Notes
• Make sure your wireless device supports the Bluetooth
function.
• The operational range between the Sound Bar main unit
and your Bluetooth device is approximately 10 meters
(without any obstacle between the Bluetooth device and
Sound Bar main unit).
Press on the top panel of your Sound Bar main unit or
1
remote control to power on the Sound Bar.
Press on the top panel of your Sound Bar main unit or
2
remote control.
TheblueLEDashesslowly.TheSoundBarisready
to pair.
Power on your Bluetooth device and activate its
3
Bluetooth function.
Select TCL TS5010 on the pairing list of your Bluetooth
4
device.
Youheardistinctdoublebeepsounds.
The blue LED remains on solidly when pairing is
successful.
25
Tip
3
• IfyoucannotndthemodelnameTCL TS5010 on
your Bluetooth device, press and hold
/PAIR on
theremotecontrol.YouwillseetheblueLEDashes
rapidly. Now the Sound Bar main unit is entering the
pairing mode.
4
TCL TS5010
1
2
YourSoundBarsystemisnowsetupandreadytouse.
To disconnect the Bluetooth function, you can:
5
• press
on the Sound Bar main unit or the source
buttons on the remote control to switch to another
source; or
• disable the Bluetooth function on your device; or
• press and hold
/PAIR on the remote control.
26
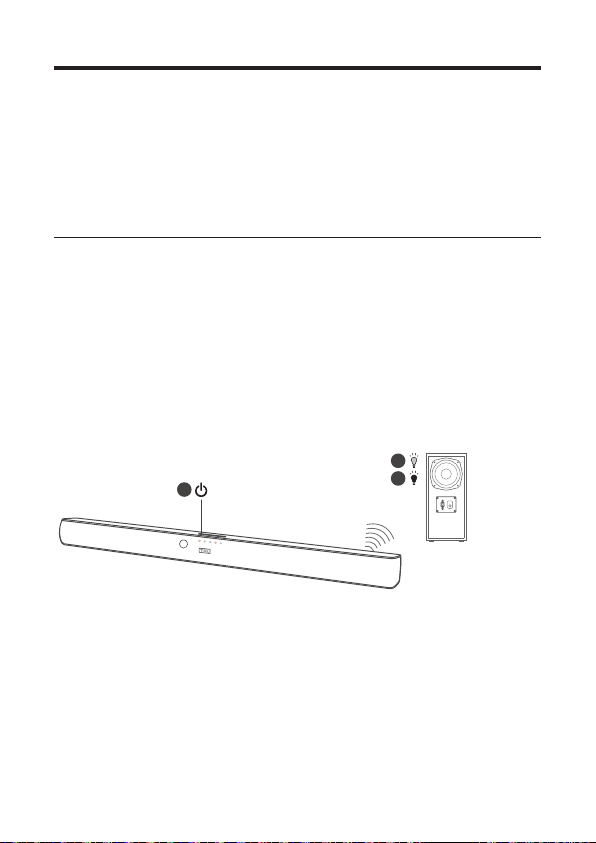
Connect your wireless subwoofer to
2
the Sound Bar
When the wireless subwoofer is connected, you can enjoy
powerful deep bass sounds and a truly immersive audio
experience.
Auto pairing
Make sure both the Sound Bar and wireless subwoofer are
connected to the power supply and are turned on.
The Sound Bar will pair with the subwoofer
automatically.
TheorangeLEDwillashwhenpairingisinprogress.
The orange LED will remain on solidly when pairing is
successful.
1
3
Note
• Do not press PAIR at the back of the wireless
subwoofer during auto pairing.
27
PAIR

Manual pairing
Make sure the Sound Bar and wireless subwoofer are
1
properly connected to the power supply.
Press and hold PAIR at the back of the wireless
2
subwoofer until the orange LED on the subwoofer
ashesquickly.
The wireless subwoofer is ready to pair.
Press on the top panel of your Sound Bar main unit
3
or the remote control to power on your Sound Bar main
unit.
The Sound Bar and wireless subwoofer will pair
automatically.
Pairing is successful. The orange LED remains on
solidly.
Note
• If the orange LED at the back of the subwoofer still
ashesafterpairing,itmeanspairingisnotsuccessful.
Disconnect the AC power cord from the wireless
subwoofer and then connect again after 3 minutes. Then
repeat steps 1 to 3.
28

Connect the IR pass-through cable
If the Sound Bar blocks the IR receiver of the TV when
placing directly in front of it, you can connect the Sound Bar
and TV with the supplied IR pass-through cable so that it
can receive signal from the remote control of your TV.
Connect one end of the supplied IR pass-through cable to
the IR pass-through cable connector on your Sound Bar
main unit. Then, place another end with the IR blaster close
to the TV sensor. For more information, check the user
manual of your TV.
29

4
Use your Sound Bar
system
Use your Sound Bar with the top panel
or remote control
Make sure the Sound Bar is properly connected to the
1
power supply and sources.
Press on the top panel of your Sound Bar main unit or
2
remote control to power on the Sound Bar.
The Sound Bar will pair with the subwoofer
automatically. If pairing is not successful, pair
your Sound Bar with the subwoofer manually (see
‘Connect your wireless subwoofer to the Sound Bar’
on page 27).
Press on the top panel of your Sound Bar main unit
3
or the source buttons on the remote control to switch to
the correct source.
LED behaviors under dierent source modes
LED indicators Sound Bar status
The red LED is on solidly. in standby mode
The green LED is on solidly. in AUX mode
The blue LED is on solidly. in Bluetooth mode
30

TheblueLEDashesslowly. ready to pair
TheblueLEDashesquickly. pairing in progress
The orange LED is on solidly. in optical mode
The white LED is on solidly. in USB mode
Note
• After powering on your Sound Bar, if there is no
operation performed on either the Sound Bar main unit
or remote control within 15 seconds, all LED indicators
ontheSoundBarmainunitwillturnoandlightup
again when the operation is resumed.
Tip
• Youcanusemoreadvancedfunctionsontheremote
control (see ‘Overview of the remote control’ on page
15).
Sound settings
Youcanenjoyyourmoviesormusicwithyouridealsound.
• Press
• Press
+/- to adjust the volume.
on the remote control to mute the sound. Press
again to unmute the sound.
31

• Press the EQ buttons (NEWS/MOVIE/MUSIC) on the
remotecontroltoselecttheequalizer(EQ)eectwhen
you are watching news or movies or listening to music.
Listen to music from your Bluetooth
device
Make sure that your device supports A2DP and/or
1
AVRCP.Forinformation,checkthespecicationofyour
device.
Pair your Bluetooth device with the Sound Bar main
2
unit (see ‘Connect your Sound Bar with your Bluetooth
device’ on page 25).
• Start listening to music stored in your Bluetooth
devicethroughtheSoundBar.IfyourBluetooth
device supports A2DP, you can listen to music, but
you cannot control the playback.
• If your Bluetooth device supports AVRCP, you can
listen to music and control music playback with
the remote control. Press
resume music playback. Press
previous/next track.
Note
• The operational range between the Sound Bar and your
Bluetooth device is approximately 10 meters (without
any obstacle between the Bluetooth device and Sound
Bar main unit).
/PAIR to pause or
/ to skip to the
32

Use the USB cable or device for music
playback
Connect the USB device to the USB Type A connector on
1
your Sound Bar main unit.
Press on the Sound Bar main unit or USB on the remote
2
control.
The white LED is on.
YoucannowlistentomusicthroughtheSoundBar.
3
• To pause or resume music, press /PAIR on the
remote control.
• To skip to the previous or next track, press or on the
remote control.
Operation LED indicators
Listen to music. The white LED is on.
Press
Press
previous/next track
to pause the music. The white LED is on solidly.
or to skip to the
The white LED is on solidly.
33

5
Specifications
Sound Bar main unit
• Power adapter: AC100-240V, 50/60Hz
• Power consumption: 25W
• Power consumption at standby mode: < 0.5W
• Impedance:8Ω
• Frequency response: 150 Hz-20 kHz
• Dimensions (W x H x D): 800 x 66 x 84 mm
• Weight: 1.5 kg
• Operating temperature: 0°C - 45°C
Wireless subwoofer
• Power adapter: AC100-240V~, 50/60Hz
• Power consumption: 20W
• Power consumption at standby mode: < 0.5W
• Frequency response: 40 Hz-120 Hz
• Frequency range: 2400 Mhz ~ 2483 Mhz
• Max transmitting power: 6dBm
• Dimensions (W x H x D): 320 x 150 x 220 mm
• Weight: 2.8 kg
Bluetooth
• Bluetoothversion:4.2,Bluetoothprole-Bluetooth
stereosupported(AdvancedAudioDistributionProle-
A2DP;AudioVideoRemoteControlProle-AVRCP)
• Frequency range: 2402 Mhz – 2480 Mhz
• Max transmitting power: 5dBm
34

Remote control
• Distance/Angle: 6m/ 30°
• Battery type: Lithium CR2025 battery (160 mAh) x 1,
user replaceable.
Note
• Specicationsaresubjecttochangewithoutnotice.
35

6 Notice
Declaration of conformity
Hereby, TCL Entertainment Solutions Limited declares that
this product is in compliance with the essential requirements
andotherrelevantprovisionsofDirective2014/53/EU.You
canndtheDeclaration of Conformity on www.tcl.com.
Disposal of your old product and
battery
Yourproductisdesignedandmanufacturedwithhigh
quality materials and components, which can be recycled
and reused.
This symbol on a product means that the product is covered
by European Directive 2012/19/EU.
36

This symbol means that the product contains a battery
covered by European Directive 2013/56/EU which cannot be
disposed of with normal household waste. Inform yourself
about the local separate collection system for electrical
and electronic products and batteries. Follow local rules
and never dispose of the product and batteries with normal
household waste. Correct disposal of old products and
batteries helps prevent negative consequences for the
environment and human health.
Remove the disposable battery
To remove the disposable batteries, see the section
‘Replace the remote control battery’.
Environmental protection and sustainability
We have omitted all unnecessary packaging and make sure
it is eco-friendly and sustainable.
37

Trademarks
Bluetooth
The Bluetooth® word mark and logos are registered
trademarks owned by Bluetooth SIG, Inc. and any use
of such marks by TCL Corporation under license. Other
trademarks and trade names are those of their respective
owners.
Dolby Audio
Manufactured under license from Dolby Laboratories. Dolby,
Dolby Audio, and the double-D symbol are trademarks
of Dolby Laboratories. Copyright 1992-2015 Dolby
Laboratories. All rights reserved
38

7 FAQ
No power
• Make sure the AC power cord and AC input connector
are connected properly.
• Make sure there is power supply.
• Make sure the Sound Bar has turned on.
No sound
• Make sure the audio cable is connected to the Sound
Bar and your device.
• Make sure you have selected the correct source.
• Press
• Make sure the Sound Bar is not muted.
The remote control does not work.
• Make sure you have selected the correct source.
• Make sure the distance of remote control and the Sound
• Make sure the battery is correctly inserted and is
• Make sure the remote control is close to the remote
I hear distorted sound.
• Make sure all cables are properly connected.
• Make sure you have selected the correct source.
• Make sure the TV is muted if you play audio from the TV.
+ to increase the volume level.
Bar main unit is within operational range.
working.
control sensor of the Sound Bar main unit.
39

IcannotndtheBluetoothnameofthisSoundBaronmy
Bluetooth device.
• Make sure the Bluetooth function is activated on your
Bluetooth device.
• Make sure the Sound Bar has paired with your
Bluetooth device.
TheLEDindicatorofthesubwooferiso.
• Reset the subwoofer by disconnecting the power supply
and reconnecting after 2 minutes.
For further support, visit www.tcl.com/support
40

WE ARE
READY TO
contact us first
HELP
TAKE CARE WHEN
REMOVING THE SOUNDBAR
2019 © TCL Entertainment Solutions Limited.
All rights reserved. This product has been
manufactured by and is sold under the
responsibility of TCL Entertainment Solutions
Limited.
TS5010_EU_EN_UM_V1.0
with any questions

2.1-kanaals soundbar voor
thuisbioscoop
Gebruiksaanwijzing
TS5010

Productregistratie
Registreer uw aankoop online op www.tcl.com. Dat maakt
het gemakkelijker om contact met u op te nemen als dit ooit
nodig zou zijn. Er is geen registratie vereist voor dekking
onder de garantie.
Productinformatie
Bewaar het betaalbewijs om aanspraak te kunnen maken
op onderdelen en reparaties onder garantie en als bewijs
van aanschaf. Bevestig het hier en leg de serie- en
modelnummers vast voor het geval u deze nodig hebt. Deze
nummers bevinden zich op het apparaat.
Modelnr. _____________________________________________
Aankoopdatum _______________________________________
Serienr. ______________________________________________
Dealer/adres/telefoon __________________________________

Inhoud
1 Belangrijke veiligheidsaanwijzingen 3
Belangrijke informatie 3
Belangrijke veiligheidsaanwijzingen 5
2 Welkom 10
Wat zit er in de doos 10
Overzicht van de hoofdeenheid van de soundbar 12
Overzicht van de draadloze subwoofer 14
Overzicht van de afstandsbediening 15
Installatie van het soundbarsysteem 16
3 Het soundbarsysteem aansluiten 21
Sluit deze aan met de optische kabel 21
Sluit deze aan met de 3,5 mm naar 3,5 mm
audiokabel 23
De soundbar op de stroomvoorziening aansluiten 24
De soundbar met het Bluetoothapparaat verbinden 25
De draadloze subwoofer verbinden met de
soundbar 27
Sluit de kabel voor doorkoppelen IR aan 29
1

4 Het soundbarsysteem gebruiken 30
De soundbar gebruiken met het bovenpaneel of de
afstandsbediening 30
Geluidsinstellingen 31
Naar muziek van het Bluetoothapparaat luisteren 32
De USB-kabel of een apparaat voor afspelen van
muziek gebruiken 33
5 Specicaties 34
6 Mededeling 36
Verklaring van conformiteit 36
Afvoer van oude apparaten en batterijen 36
Handelsmerken 38
7 Veel gestelde vragen 39
2

1 Belangrijke veilig-
heidsaanwijzingen
Belangrijke informatie
LET OP
RISICO OP ELEKTRISCHE
SCHOKKEN
NIET OPENEN
LET OP: VERWIJDER DE AFDEKKING (OF
DE ACHTERKANT) NIET OM HET RISICO OP
ELEKTRISCHE SCHOKKEN TE VERMINDEREN. ER
BEVINDEN ZICH GEEN DOOR DE GEBRUIKER TE
REPAREREN ONDERDELEN IN HET APPARAAT.
LAAT ALLE REPARATIES DOOR BEVOEGD
ONDERHOUDSPERSONEEL UITVOEREN.
Het symbool van de bliksemits met de pijlpunt in een
gelijkzijdige driehoek is bestemd om de gebruiker te wijzen
op de aanwezigheid van niet geïsoleerde gevaarlijke spanning
3

in de behuizing van het apparaat die van voldoende omvang
kan zijn om een risico op elektrische schokken te vormen.
Het uitroepteken in een gelijkzijdige driehoek is bestemd om
de gebruiker te wijzen op de aanwezigheid van belangrijke
aanwijzingen voor bediening en onderhoud (reparaties) in de
bij het apparaat gevoegde documentatie.
Dit symbool geeft aan dat dit apparaat is voorzien van
dubbele isolatie tussen gevaarlijke lichtnetspanning en
voor de gebruiker toegankelijke onderdelen. Gebruik bij
reparaties uitsluitend identieke reserveonderdelen.
Waarschuwingen
•• Stel•dit•apparaat•niet•bloot•aan•regen•of•vocht,•
om•het•risico•op•brand•of•elektrische•schokken•
te•verminderen.•Dit•apparaat•mag•niet•worden•
blootgesteld•aan•druppels•of•spatten.•Er•mogen•geen•
met•vloeistof•gevulde•voorwerpen,•zoals•vazen,•op•of•
in•de•buurt•van•het•apparaat•worden•geplaatst.•
•• Het•apparaat•is•onstabiel•als•het•niet•juist•wordt•
geplaatst•of•niet•juist•aan•de•wand•wordt•gemonteerd.•
Zorg•er•voor•uw•veiligheid•voor•om•de•aanwijzingen•voor•
wandmontage•in•de•gebruiksaanwijzing•op•te•volgen.
•• Stel•batterijen•niet•bloot•aan•overmatige•warmte,•zoals•
zonlicht,•brand•enzovoort.•
4

Belangrijke veiligheidsaanwijzingen
•• Lees•deze•aanwijzingen - lees alle veiligheids- en
gebruiksaanwijzingen voordat u het apparaat bedient.
•• Bewaar•deze•aanwijzingen - Bewaar de veiligheids- en
gebruiksaanwijzing om deze in de toekomst te kunnen
raadplegen.
•• Besteed•aandacht•aan•alle•waarschuwingen - Houd
u aan alle waarschuwingen op het apparaat en in de
gebruiksaanwijzing.
•• Volg•alle•aanwijzingen - Volg alle aanwijzingen voor
bediening en gebruik.
•• Gebruik•dit•apparaat•niet•in•de•buurt•van•water – Het
apparaat mag niet worden gebruikt in de buurt van water
of vocht – bijvoorbeeld in een natte kelder of in de buurt
van een zwembad en dergelijke
•• Alleen•met•een•droge•doek•schoonmaken.
•• Blokkeer•geen•ventilatieopeningen. Installeer het apparaat
in overeenstemming met de aanwijzingen van de fabrikant.
•• Installeer•het•apparaat•niet•in•de•buurt•van•
warmtebronnen, zoals radiators, verwarmingsroosters,
fornuizen of andere apparaten (inclusief versterkers) die
warmte produceren.
•• Doe•het•veiligheidsdoel van de gepolariseerde of
geaarde steker niet teniet. Een gepolariseerde stekker
heeft twee pennen, waarvan de ene breder is dan de
andere. Een geaarde stekker heeft twee pennen en
een derde aardpen. De brede pen of de derde pen zijn
voorzien voor uw veiligheid. Als de meegeleverde stekker
niet in uw stopcontact past, raadpleeg dan een elektricien
om het verouderde stopcontact te vervangen.
5

•• Bescherm•het•netsnoer tegen erover lopen of afknellen,
in het bijzonder bij stekkers, wandcontactdozen en het
punt waar dit uit het apparaat komt.
•• Gebruik•alleen•hulpstukken/accessoires die door de
fabrikant zijn gespeciceerd.
•• Gebruik•alleen•met•het•karretje, de standaard, het
statief, de beugel of tafel die door de fabrikant wordt
gespeciceerd of bij het apparaat wordt verkocht. Als er
een karretje wordt gebruikt, wees dan voorzichtig bij het
verplaatsen van de combinatie karretje/apparaat om letsel
door omvallen te voorkomen.
•• Ontkoppel•dit•apparaat tijdens onweer of wanneer het
voor langere periodes niet wordt gebruikt.
•• Laat•alle•reparaties door bevoegd onderhoudspersoneel
uitvoeren. Reparatie is vereist als het apparaat op enige
wijze is beschadigd, zoals een beschadigd netsnoer of
beschadigde stekker, er vloeistof is geknoeid of voorwerpen
in het apparaat zijn gevallen, het apparaat is blootgesteld
aan regen of vocht, niet normaal werkt of is gevallen.
Waarschuwingen
• Steek de brede pen van de stekker volledig in de brede
sleuf, om elektrische schokken te voorkomen.
• Het apparaat mag niet worden blootgesteld aan
druppels of spetters.
• Plaats geen gevarenbronnen op het apparaat
(bijvoorbeeld: met vloeistof gevulde voorwerpen,
brandende kaarsen).
6

Waarschuwingen
• Ontkoppel het netsnoer als er zich problemen voordoen
of u het apparaat niet gebruikt. Het netsnoer moet goed
bereikbaar zijn.
• Gebruik van bedieningsorganen of aanpassingen of
het uitvoeren van procedures anders dan die hierin
zijn gespeciceerd kan leiden tot blootstelling aan
gevaarlijke straling of andere onveilig gebruik.
• Het netsnoer/de koppling van het apparaat wordt
gebruikt voor het ontkoppelen van het apparaat en moet
goed bereikbaar blijven.
Informatie over zorg voor en afvoer van batterijen
• Plaats alleen nieuwe batterijen van dezelfde soort in het
apparaat.
• Als de batterijen niet met de juiste polariteit worden
geplaatst, zoals in het batterijvak is aangegeven, kan dit
de levensduur van de batterijen verkorten of kunnen de
batterijen gaan lekken.
• Gebruik geen oude en nieuw batterijen door elkaar.
• Gebruik geen herlaadbare (nikkelcadmium-) of
(nikkelmetaalhydride-) batterijen.
• Gebruik geen alkaline-, standaard- (zinkkoolstof) of
herlaadbare (nikkelcadmium-) of (nikkelmetaalhydride-)
batterijen door elkaar.
• Gooi batterijen niet in vuur of water.
• Batterijen volgens lokale en nationale richtlijnen recyclen
of afvoeren.
• Als de batterij onjuist wordt geplaatst, bestaat er
7

explosiegevaar. Vervang alleen door dezelfde of een
vergelijkbare soort.
• Als de afstandsbediening gedurende een langere periode
(meer dan een maand) niet wordt gebruikt, verwijder dan
de batterij om lekkage hiervan te voorkomen.
• Als de batterijen lekken, veeg dan de lekkage in het
batterijvak weg en vervang de batterijen door nieuwe.
• Houd de batterijen uit de buurt van warmte of vocht.
• Batterijen niet met andere metalen voorwerpen dragen of
opslaan. Hierdoor kunnen batterijen kortsluiten, lekken of
exploderen.
• Batterijen niet met andere metalen voorwerpen dragen of
opslaan. Hierdoor kunnen batterijen kortsluiten, lekken of
exploderen.
• Herlaad een batterij nooit, tenzij u hebt bevestigd dat het
een herlaadbare batterij is.
• Het product/de afstandsbediening kan een
knoopcelbatterij bevatten, die kan worden ingeslikt. Houd
de batterij te allen tijde buiten bereik van kinderen! Als de
batterij wordt ingeslikt, kan deze ernstig letsel of de dood
veroorzaken. Er kunnen zich binnen twee uur na inname
ernstige inwendige brandwonden voordoen.
• Als u vermoedt dat een batterij is ingeslikt of zich binnen
enig deel van het lichaam bevindt, raadpleeg dan
onmiddellijk een arts.
• Als u de batterijen verwisselt, houd dan altijd alle nieuwe
en gebruikte batterijen buiten bereik van kinderen.
Verzeker dat het batterijvak volledig is gesloten nadat u de
batterij vervangt.
• Als het batterijvak niet volledig kan worden gesloten,
gebruik dan het apparaat niet meer. Houd het buiten
bereik van kinderen en neem contact op met de fabrikant.
8

Installatielocatie
• Dit apparaat is ontworpen om op een stevige, vlakke
ondergrond te staan. Plaats het apparaat niet in
ingebouwde installaties, zoals een boekenkast of -rek,
omdat de ventilatiesleuven rondom het apparaat worden
geblokkeerd, wat leidt tot een verkorte levensduur door
oververhitting. Houd een ruimte van 7,8 inch (20 cm) of
meer rondom het apparaat aan, om voldoende ventilatie
voor dit apparaat te verzekeren.
• Zorg ervoor dat het meubilair waarop het apparaat wordt
geplaats groot en sterk genoeg is om te voorkomen dat
het per ongeluk omver kan worden gestoten of eraf kan
worden geduwd of getrokken. Dit kan persoonlijk letsel
en/of schade aan het apparaat veroorzaken.
• De installatie van de wandbevestiging mag alleen door
gekwaliceerd personeel worden uitgevoerd. Onjuiste
assemblage kan leiden tot ernstig persoonlijk letsel en
ernstige materiële schade (als u van plan bent om dit
apparaat zelf te installeren, moet u controleren of er zich
geen elektrische bedrading of loodgieterswerk in de wand
bevindt). Het is de verantwoordelijkheid van de installateur
om te veriëren dat de wand de totale belasting van het
apparaat en beugels voor wandbevestiging veilig kan
ondersteunen.
9

2 Welkom
Gefeliciteerd met de aanschaf van uw nieuwe soundbar van
TCL! Nadat deze is geïnstalleerd en aangesloten, kunt u een
grootse geluidskwaliteit en ultramodern ontwerp beleven
die het beste passen bij uw home entertainment-systeem.
Het wordt aanbevolen om deze gebruiksaanwijzing door
te lezen, wat u helpt bij het gemakkelijk en juist installeren,
aansluiten en bedienen van het apparaat. Bezoek
www.tcl.com voor meer informatie
Laten we aan de slag gaan.
Wat zit er in de doos
Hoofdeenheid van de
soundbar
2 netsnoeren Kabel voor doorkoppelen IR
Draadloze subwoofer
10

Afstandsbediening
QSG
Warranty
(met batterij)
4 wandpluggen
2 siliconen dopjes
2 beugels voor
wandbevestiging
Schroef voor wandbeugel
(M4)
Sjabloon voor
wandbevestiging
Snelstartgids
2 schroeven voor
wandbevestiging (M3)
Garantiebewijs
11

Overzicht van de hoofdeenheid van de
1 2 3 4
soundbar
65
7
OPTICAL
8 9 10 11 12
USB AUX
1
Druk hierop om de hoofdeenheid van de soundbar in te
schakelen of in de stand-bymodus te zetten.
2
Druk hierop om de geluidsbron om te schakelen tussen
de AUX-/Bluetooth-/optische/USB-modus.
12
IR

3
Druk hierop om de Bluetoothfunctie te selecteren.
4 +/-
Druk hierop om het volume te verhogen of te verlagen.
5 Afstandsbedieningssensor
Signalen van de afstandsbediening ontvangen.
6 Led-indicatielampjes
Rood: in stand-bymodus.
Groen: in AUX-modus.
Blauw: in Bluetoothmodus.
Oranje: in optische-modus.
Wit: in USB-modus.
7 Schroeven•voor•wandbeugel
8 Optische•ingangsaansluiting•
9 Aansluiting•USB•type•A•(alleen•voor•afspelen•van•
muziek)
10 AUX-ingangsaansluiting
11 Aansluiting•voor•doorkoppelen•IR
12 Lichtnetaansluiting•
13

Overzicht van de draadloze subwoofer
PAIR
1 2 3
1 Lichtnetaansluiting•
2 PAIR
Houd deze ingedrukt om koppelen met de hoofdeenheid
van de soundbar te activeren.
3 Oranje•led-indicatielampje•
• itst traag als de subwoofer zich in de inactieve modus
bevindt.
• itst snel als het koppelen bezig is.
• blijft constant branden als het koppelen is gelukt.
14

Overzicht van de afstandsbediening
1
Druk hierop om de soundbar in te schakelen of in de standbymodus te zetten.
2
Druk hierop het geluid te dempen of het dempen op te
heffen.
3 Bronknoppen•-•AUX/OPTICAL/USB/
Druk hierop om de geluidsbron tussen verschillende modi
om te schakelen.
4 +/-
Druk hierop om het volume te verhogen of te verlagen.
5 /
Druk hierop om in de Bluetooth-/USB-modus naar het
vorige/volgende nummer te springen.
6 /PAIR
Afspelen/pauzeren/hervatten afspelen in Bluetooth-/USBmodus. Houd deze ingedrukt om de koppelfunctie in
de Bluetooth-modus te activeren of het gekoppelde
Bluetoothapparaat te ontkoppelen.
15

7 NEWS/MOVIE/MUSIC
Druk hierop om het equalizereect (EQ) te selecteren als u
het nieuws of lms kijkt of naar muziek luistert.
Installatie van het soundbarsysteem
Opmerkingen
• Zorg ervoor dat u alle veiligheidsinformatie leest voordat u de
hoofdeenheid van de soundbar aan de wand monteert (zie
'Belangrijke veiligheidsaanwijzingen' op pagina 5).
• Zorg ervoor dat u gebruik maakt van schroeven en beugels
voor wandbevestiging die door de geautoriseerde fabrikant zijn
geleverd of gespeciceerd.
• TCL Entertainment Solutions Limited draagt geen
verantwoordelijkheid voor ongevallen of schade als gevolg
van onjuiste wandmontage en installatie van schroeven of
onvoldoende sterkte van de wand enz.
• Er zijn aanvullende gereedschappen (niet inbegrepen) nodig
voor de installatie.
De hoofdeenheid van de soundbar aan de wand
monteren
U kunt ervoor kiezen om de hoofdeenheid van de soundbar onder
het midden van de tv te plaatsen of deze aan de wand te monteren.
A B
16

Plaats het meegeleverde sjabloon voor wandbevestiging
1
tegen de wand. Zorg ervoor dat het sjabloon voor de
wandbevestiging zich ten minste 2 inch (5 cm) onder het
midden van de tv bevindt.
Gebruik een waterpas om ervoor te zorgen dat de soundbar
2
nauwkeurig wordt geplaatst.
Gebruik het plakband om het sjabloon voor de wandbevestiging
3
stevig op de wand te plakken.
Markeer alle bevestigingsgaten op de wand met de
4
markeringen op het sjabloon.
Haal het sjabloon voor wandbevestiging weg.
5
Boor een schroefgat bij iedere markering op de wand.
6
TV
TV
> 5cm
1
Steek de meegeleverde wandpluggen in de 4 schroefgaten
7
in de wand.
Steek de meegeleverde schroeven voor de wandbeugel in
8
de wandpluggen.
Draai de schroeven van de wandbeugel in de wand en draai
9
ze vast. Plak indien nodig de siliconen dopjes op de beugels
voor wandbevestiging om de richting van de hoofdeenheid
van de soundbar aan te passen.
17

Vervang de schroeven aan de achterkant van de
10
hoofdeenheid van de soundbar met de meegeleverde
schroeven voor de wandbevestiging.
735 mm
Hang de hoofdeenheid van de soundbar aan de beugels
11
voor wandbevestiging.
18

Opmerkingen
TV
• Controleer de installatielocatie voordat u de soundbar aan
de wand monteert (zie 'Installatielocatie' op pagina 9).
• U kunt overwegen om eerst de kabels aan te sluiten
voordat u de soundbar aan de wand monteert.
De subwoofer plaatsen
De afstand tussen de subwoofer en de hoofdeenheid van de
soundbar moet minder dan 3 meter (9,8 voet) bedragen.
< 3m
Activeer de afstandsbediening
De batterij is vooraf geïnstalleerd in de afstandsbediening.
Verwijder vóór het eerste gebruik de beschermlip voor de batterij
van het batterijdeksel om de batterijaansluiting te activeren.
19

De batterij van de afstandsbediening vervangen
Waarschuwingen
•• Als•de•batterij•onjuist•wordt•geplaatst,•bestaat•er•
explosiegevaar.•Vervang•alleen•door•dezelfde•of•een•
vergelijkbare•soort.•
•• Het•product/de•afstandsbediening•kan•wel•of•geen•
batterij•van•het•type•knoopcel•bevatten,•die•kan•worden•
ingeslikt.•Houd•de•batterij•te•allen•tijde•buiten•bereik•van•
kinderen!•
Open het batterijvak en verwijder de oude batterij.
1
Plaats een nieuwe lithiumbatterij CR2025 met de juiste
2
polariteit (+/-) in het batterijvak.
Sluit het batterijvak.
3
3
2
1
4
20

3 Het soundbarsysteem
aansluiten
Nadat u de positie van de hoofdeenheid van de soundbar
hebt vastgesteld, kunt u beginnen met het aansluiten op de
tv of andere apparaten en via de soundbar naar het geluid
luisteren. Zorg ervoor dat u het geluid van de tv of het
apparaat hebt gedempt. Raadpleeg de gebruiksaanwijzing
van de tv of het apparaat voor informatie.
Sluit deze aan met de optische kabel
Verwijder indien nodig de beschermdoppen van de
1
optische kabel (afzonderlijk verkrijgbaar).
Sluit een uiteinde van de optische kabel aan op de
2
optische ingangsaansluiting op de hoofdeenheid van
de soundbar en het andere uiteinde op de optische
uitgangsaansluiting van de tv of het apparaat.
21

Opmerking
• Als er is geen geluidsweergave van de hoofdeenheid van de
soundbar is en de oranje led itst snel, probeer dan om de
PCM-signaaluitgang op de tv of het apparaat te activeren. PCM
wordt in de meeste apparaten gebruikt voor het omvormen van
analoge audiosignalen naar digitale audiosignalen. Raadpleeg
de gebruiksaanwijzing van de tv of het apparaat voor meer
informatie over het activeren van de PCM-signaaluitgang.
Aanwijzingen voor de installatie van de soundbar
met een optische kabel
Buig of knik de optische kabel (SPDIF) niet,
omdat deze teer is en gemakkelijk kan worden
beschadigd en gebroken.
Om de best mogelijke geluidsbeleving met de optische
kabel te krijgen:
Druk op de knop Instellingen op de afstandsbediening
1
van de TCL-tv.
Navigeer naar Audio-opties.
2
Stel de luidsprekers van de tv in op Uit.
3
22

Sluit deze aan met de 3,5 mm naar
3,5 mm audiokabel
U kunt:
• een uiteinde van de 3,5 mm naar 3,5 mm audiokabel
(afzonderlijk verkrijgbaar) aansluiten op de AUXingangsaansluiting op de hoofdeenheid van de soundbar
en het andere uiteinde op de hooftelefoon- of audiouitgangsaansluiting op de tv of het apparaat. Dit schakelt
het geluid van de ingebouwde luidsprekers van de tv uit; of
• een uiteinde van een tulp naar 3,5 mm audiokabel
(afzonderlijk verkrijgbaar) aansluiten op de AUXingangsaansluiting op de hoofdeenheid van de soundbar
en het andere uiteinde op de audio-uitgangsaansluiting van
de tv.
Hoofdtelefoon
23

De soundbar op de stroomvoorziening
PAIR
aansluiten
Zorg ervoor dat u alle andere aansluitingen hebt
1
voltooid, voordat u de soundbar aansluit op de
stroomvoorziening.
Zorg ervoor dat de spanning van de stroomvoorziening
2
voldoet aan de veiligheidsnormen in uw land (zie
'Specicaties' op pagina 34).
Sluit een uiteinde van het andere meegeleverde
3
netsnoer aan op de lichtnetaansluiting op de subwoofer
en het andere uiteinde op het stopcontact aan de wand.
Sluit een uiteinde van een meegeleverd netsnoer aan
4
op de lichtnetaansluiting op de hoofdeenheid van de
soundbar en het andere uiteinde op het stopcontact aan
de wand.
24

De soundbar met het
Bluetoothapparaat verbinden
Opmerkingen
• Zorg ervoor dat het draadloze apparaat de
Bluetoothfunctie ondersteunt.
• Het werkbereik tussen de hoofdeenheid van
de soundbar en het Bluetoothapparaat is
ongeveer 10 meter (zonder obstakels tussen het
Bluetoothapparaat en de hoofdeenheid van de
soundbar).
Druk op op het bovenpaneel van de hoofdeenheid
1
of op de afstandsbediening van de soundbar om de
soundbar in te schakelen.
Druk op op het bovenpaneel van de hoofdeenheid of
2
op de afstandsbediening van de soundbar.
De blauwe led itst traag. De soundbar is klaar om te
koppelen.
Schakel het Bluetoothapparaat in en activeer de
3
Bluetoothfunctie hiervan.
Selecteer TCL•TS5010 op de koppellijst van het
4
Bluetoothapparaat.
U hoort duidelijke dubbele pieptonen.
De blauwe led blijft constant branden als het koppelen
is gelukt.
25

Tip
3
• Als u de modelnaam TCL•TS5010 niet kunt vinden
op het Bluetoothapparaat, houd dan /PAIR op de
afstandsbediening ingedrukt. U ziet de blauwe led snel
itsen. De hoofdeenheid van de soundbar opent nu de
koppelmodus.
4
TCL TS5010
1
2
Het soundbarsysteem is nu geïnstalleerd en klaar voor
gebruik.
U kunt voor het ontkoppelen van de Bluetoothfunctie:
5
• drukken op op de hoofdeenheid van de soundbar
of de bronknoppen op de afstandsbediening om
naar een andere bron om te schakelen; of
• de Bluetoothfunctie op het apparaat uitschakelen; of
• /PAIR op de afstandsbediening ingedrukt houden.
26

De draadloze subwoofer verbinden
2
met de soundbar
Als de draadloze subwoofer is verbonden, kunt u genieten
van krachtige diepe basgeluiden en een waarlijk immersieve
geluidsbeleving.
Automatisch koppelen
Zorg ervoor dat zowel de soundbar als de draadloze
subwoofer zijn aangesloten op de stroomvoorziening en zijn
ingeschakeld.
De soundbar koppelt automatisch met de subwoofer.
De oranje led itst als het koppelen bezig is.
De oranje led blijft constant branden als het koppelen
is gelukt.
1
3
PAIR
Opmerking
• Druk tijdens automatisch koppelen niet op PAIR op de
achterkant van de draadloze subwoofer.
27

Handmatig koppelen
Zorg ervoor dat de soundbar en draadloze subwoofer
1
juist zijn aangesloten op de stroomvoorziening.
Houd PAIR op de achterkant van de draadloze
2
subwoofer ingedrukt, totdat de oranje led op de
subwoofer snel itst.
De draadloze subwoofer is klaar om te koppelen.
Druk op op het bovenpaneel van de hoofdeenheid
3
of op de afstandsbediening van de soundbar om de
hoofdeenheid van de soundbar in te schakelen.
De soundbar en draadloze subwoofer koppelen
automatisch.
Koppelen is gelukt. De oranje led blijft constant
branden.
Opmerking
• Als de oranje led op de achterkant van de subwoofer
na het koppelen nog steeds itst, betekent dit dat het
koppelen is mislukt. Ontkoppel het netsnoer van de
draadloze subwoofer en sluit het na 3 minuten weer
aan. Herhaal dan de stappen 1 tot 3.
28

Sluit de kabel voor doorkoppelen IR
aan
Als de soundbar direct vóór de tv wordt geplaatst en
hierdoor de IR-ontvanger van de tv blokkeert, dan kunt u
de soundbar en tv aansluiten met de meegeleverde kabel
voor doorkoppelen IR, zodat deze het signaal van de
afstandsbediening van de tv kan ontvangen.
Sluit een uiteinde van de meegeleverde kabel voor
doorkoppelen IR aan op de aansluiting voor doorkoppelen
IR op de hoofdeenheid van de soundbar. Plaats dan het
andere uiteinde met de IR-blaster dichtbij de tv-sensor.
Raadpleeg de gebruiksaanwijzing van de tv of het apparaat
voor meer informatie.
Tv-sensor
29

4
Het soundbarsysteem
gebruiken
De soundbar gebruiken met het
bovenpaneel of de afstandsbediening
Zorg ervoor dat de soundbar juist is aangesloten op de
1
stroomvoorziening en de bronnen.
Druk op op het bovenpaneel van de hoofdeenheid
2
of op de afstandsbediening van de soundbar om de
soundbar in te schakelen.
De soundbar koppelt automatisch met de subwoofer.
Als het koppelen mislukt, koppel dan de soundbar
handmatig met de subwoofer (zie 'De draadloze
subwoofer verbinden met de soundbar' op pagina 27).
Druk op op het bovenpaneel van de hoofdeenheid van
3
de soundbar of de bronknoppen op de afstandsbediening
om naar de juiste bron om te schakelen.
Gedrag•van•leds•onder•verschillende•bronmodi
Led-indicatielampjes Status•soundbar
De rode led brandt constant. in stand-bymodus
De groene led brandt constant. in AUX-modus
De blauwe led brandt constant. in Bluetooth-modus
30

De blauwe led itst traag. gereed om te koppelen
De blauwe led itst snel. koppelen bezig
De oranje led brandt constant. in optische modus
De witte led brandt constant. in USB-modus
Opmerking
• Als er op de soundbar binnen 15 seconden na het
inschakelen geen bediening wordt uitgevoerd op de
hoofdeenheid of de afstandsbediening, dan gaan alle
led-indicatielampjes op de hoofdeenheid uit en gaan
weer aan als de bediening wordt hervat.
Tip
• U kunt meer geavanceerde functies op de
afstandsbediening gebruiken (zie 'Overzicht van de
afstandsbediening' op pagina 15).
Geluidsinstellingen
U kunt met uw ideale geluid genieten van lms of muziek.
• Druk op +/- om het volume aan te passen.
• Druk op op de afstandsbediening om het geluid te
dempen. Druk nogmaals op om het dempen van het
geluid op te heffen.
31

• Druk op de EQ-knoppen (NEWS/MOVIE/MUSIC) op
de afstandsbediening om het equalizereffect (EQ) te
selecteren als u het•nieuws of lms•kijkt of naar muziek
luistert.
Naar muziek van het
Bluetoothapparaat luisteren
Zorg ervoor dat het apparaat A2DP en/of AVRCP
1
ondersteunt. Raadpleeg de specicatie van uw apparaat
voor informatie.
Koppel het Bluetoothapparaat met de hoofdeenheid
2
van de soundbar (zie 'De soundbar met het
Bluetoothapparaat verbinden' op pagina 25).
• Begin met via de soundbar luisteren naar muziek
die op het Bluetoothapparaat is opgeslagen. Als
het Bluetoothapparaat A2DP ondersteunt, kunt u
luisteren naar muziek, maar kunt u het afspelen niet
bedienen.
• Als het Bluetoothapparaat AVRCP ondersteunt,
kunt u luisteren naar muziek en kunt u het afspelen
van de muziek met de afstandsbediening bedienen.
Druk op /PAIR om het afspelen van muziek te
pauzeren of te hervatten. Druk op / om naar het
vorige/volgende nummer te springen.
Opmerking
• Het werkbereik tussen de soundbar en het
Bluetoothapparaat is ongeveer 10 meter (zonder
obstakels tussen het Bluetoothapparaat en de
hoofdeenheid van de soundbar).
32

De USB-kabel of een apparaat voor
afspelen van muziek gebruiken
Sluit het USB-apparaat aan op de USB-connector type A
1
op de hoofdeenheid van de soundbar.
Druk op op de hoofdeenheid van de soundbar of USB
2
op de afstandsbediening.
De witte led is aan.
U kunt nu via de soundbare naar muziek luisteren.
3
• Druk op /PAIR op de afstandsbediening om de
muziek te pauzeren of te hervatten.
• Druk op of op de afstandsbediening om naar het
vorige of volgende nummer te springen.
Bediening Led-indicatielampjes
Naar muziek luisteren. De witte led is aan.
Druk op om de muziek te
pauzeren.
Druk op of om naar het
vorige/volgende nummer te
springen
De witte led brandt
constant.
De witte led brandt
constant.
33

5
Specificaties
Hoofdeenheid van de soundbar
• Lichtnetadapter: AC 100 - 240 V, 50/60 Hz
• Opgenomen vermogen: 25 W
• Stroomverbruik in stand-bymodus: < 0,5 W
• Impedantie: 8 Ω
• Frequentiebereik: 150 Hz - 20 kHz
• Afmetingen (b x h x d): 800 x 66 x 84 mm
• Gewicht: 1,5 kg
• Bedrijfstemperatuur: 0 °C - 45 °C
Draadloze subwoofer
• Lichtnetadapter: AC 100 - 240 V~, 50/60 Hz
• Opgenomen vermogen: 20 W
• Stroomverbruik in stand-bymodus: < 0,5 W
• Frequentiebereik: 40 Hz - 120 Hz
• Frequentiebereik: 2400 MHz ~ 2483 MHz
• Maximaal zendvermogen: 6 dBm
• Afmetingen (b x h x d): 320 x 150 x 220 mm
• Gewicht: 2,8 kg
Bluetooth
• Bluetoothversie: 4.2, Bluetoothproel - Bluetooth stereo
ondersteund (proel geavanceerde geluidsverdeling
(Advanced Audio Distribution Prole) - A2DP; Proel
afstandsbediening audio/video (Audio Video Remote
Control Prole) - AVRCP)
• Frequentiebereik: 2402 MHz – 2480 MHz
34

• Maximaal zendvermogen: 5 dBm
Afstandsbediening
• Afstand/hoek: 6 m/30°
• Soort batterij: 1 lithiumbatterij CR2025 (160 mAh), door
de gebruiker te vervangen.
Opmerking
• Specicaties zijn onderworpen aan wijzigingen zonder
aankondiging.
35

6 Mededeling
Verklaring van conformiteit
Hierbij verklaart TCL Entertainment Solutions Limited dat
dit apparaat voldoet aan de essentiële vereisten en andere
relevante bepalingen van Richtlijn 2014/53/EU. U treft de
verklaring van conformiteit aan op: www.tcl.com
Afvoer van oude apparaten en
batterijen
Het apparaat is ontworpen en geproduceerd met
hoogwaardige materialen en componenten, die kunnen
worden gerecycled en hergebruikt.
Dit symbool op een apparaat betekent dat het apparaat valt
onder Europese Richtlijn 2012/19/EU.
36

Dit symbool betekent dat het apparaat een batterij bevat
die valt onder Europese Richtlijn 2013/56/EU en die niet
bij het normale huishoudelijk afval mag worden afgevoerd.
Informeer uzelf over het lokale systeem voor gescheiden
inzameling van elektrische en elektronische apparaten en
batterijen. Volg lokale regels en voer het apparaat en de
batterijen nooit af met het normale huishoudelijk afval. De
juiste afvoer van oude apparaten en batterijen helpt het
voorkomen van negatieve gevolgen voor het milieu en de
menselijke gezondheid.
Verwijder•de•wegwerpbatterij
Zie de paragraaf 'De batterij van de afstandsbediening
vervangen', om de wegwerpbatterijen te verwijderen.
Milieubescherming•en•duurzaamheid
We hebben alle onnodige verpakkingsmaterialen weggelaten
om ervoor te zorgen dat deze milieuvriendelijk en duurzaam
is.
37

Handelsmerken
Bluetooth
Het woordmerk en de logo's van Bluetooth® zijn
geregistreerde handelsmerken en zijn eigendom van
Bluetooth SIG, Inc. en enig gebruik van dergelijke
markeringen door TCL Corporation is onder licentie.
Andere handelsmerken en merknamen zijn die van hun
respectievelijke eigenaren.
Dolby Audio
Geproduceerd onder licentie van Dolby Laboratories. Dolby,
Dolby Audio en het dubbele-D-symbool zijn handelsmerken
van Dolby Laboratories. Copyright 1992-2015 Dolby
Laboratories. Alle rechten voorbehouden
38

7 Veel gestelde vragen
Geen stroom
• Zorg ervoor dat het netsnoer en de lichtnetaansluiting
goed zijn aangesloten.
• Zorg ervoor dat er stroomvoorziening is.
• Zorg ervoor dat de soundbar is ingeschakeld.
Geen geluid
• Zorg ervoor dat de audiokabel op de soundbar en het
apparaat is aangesloten.
• Zorg ervoor dat u de juiste bron hebt geselecteerd.
• Druk op +•om het volume te verhogen.
• Zorg ervoor dat de soundbar niet is gedempt.
De afstandsbediening werkt niet.
• Zorg ervoor dat u de juiste bron hebt geselecteerd.
• Zorg ervoor dat de afstand tussen de afstandsbediening
en de hoofdeenheid van de soundbar binnen het
werkbereik is.
• Zorg ervoor dat de batterij juist is geplaatst en werkt.
• Zorg ervoor dat de afstandsbediening zich dichtbij de
afstandsbedieningssensor van de hoofdeenheid van de
soundbar bevindt.
39

Ik hoor vervormd geluid.
• Zorg ervoor dat alle kabels goed zijn aangesloten.
• Zorg ervoor dat u de juiste bron hebt geselecteerd.
• Zorg ervoor dat de tv is gedempt als u geluid vanaf de
tv afspeelt.
Ik kan de Bluetoothnaam van deze soundbar niet vinden op
mijn Bluetoothapparaat.
• Zorg ervoor dat de Bluetoothfunctie op het
Bluetoothapparaat is geactiveerd.
• Zorg ervoor dat de soundbar is gekoppeld met het
Bluetoothapparaat.
Het led-indicatielampje van de subwoofer is uit.
• Herstel de subwoofer door de stroomvoorziening te
ontkoppelen en deze na 2 minuten weer aan te sluiten.
Bezoek voor meer ondersteuning www.tcl.com/support
40

WE STAAN
KLAAR OM TE
neem eerst contact
HELPEN
WEES VOORZICHTIG BIJ HET
VERWIJDEREN VAN DE SOUNDBAR
2019 © TCL Entertainment Solutions Limited.
Alle rechten voorbehouden. Dit apparaat is
geproduceerd door en wordt verkocht onder
de verantwoordelijkheid van TCL Entertainment
Solutions Limited.
TS5010_EU_NL_UM_V1.0
met ons op als u
vragen hebt

2.1-канальная звуковая панель для
домашнего кинотеатра
TS5010
Руководство
пользователя

Регистрация изделия
Зарегистрируйте свою покупку онлайн на сайте
www.tcl.com. Это упростит связь с вами в случае
необходимости. Для гарантийного покрытия
регистрация не требуется.
Информация об изделии
Сохраните чек на покупку, чтобы получить
обслуживание и детали по гарантии, а также
подтвердить факт покупки. Прикрепите его здесь и
запишите серийный номер и номер модели на случай
необходимости. Эти номера указаны на изделии.
№ модели ___________________________________________
Дата покупки ________________________________________
Серийный № _________________________________________
Дилер/адрес/телефон ________________________________

Содержание
1 Важные правила техники безопасности 3
Важная информация 3
Важные правила техники безопасности 5
2 Приветствуем вас 12
Комплектация 12
Обзор основного блока звуковой панели 14
Обзор беспроводного сабвуфера 16
Обзор пульта дистанционного управления 17
Настройка звуковой панели 18
3 Подключение звуковой панели 24
Подключение с помощью оптического кабеля 24
Подключение с помощью аудиокабеля с
разъемами 3,5 мм. 26
Включение питания звуковой панели 27
Подключение звуковой панели к устройству
Bluetooth 28
Подключение беспроводного сабвуфера к
звуковой панели 30
Подключение переходного ИК-кабеля 32
1

4 Использование звуковой панели 33
Управление звуковой панелью с помощью
кнопок на верхней крышке или пульта
дистанционного управления 33
Настройки звука 35
Воспроизведение музыки с устройства Bluetooth 36
Использование USB-кабеля или устройства для
воспроизведения музыки 37
5 Технические характеристики 39
6 Декларация 41
Декларация соответствия 41
Утилизация отработанного изделия и батареи 41
Товарные знаки 43
7 Частые вопросы 44
2

1 Важные
правила техники
безопасности
Важная информация
ВНИМАНИЕ!
ОПАСНОСТЬ ПОРАЖЕНИЯ
ЭЛЕКТРИЧЕСКИМ ТОКОМ
НЕ ОТКРЫВАТЬ
ОСТОРОЖНО! ВО ИЗБЕЖАНИЕ ПОРАЖЕНИЯ
ЭЛЕКТРИЧЕСКИМ ТОКОМ НЕ СНИМАЙТЕ
КРЫШКУ (ИЛИ ЗАДНЮЮ ПАНЕЛЬ). УСТРОЙСТВО
НЕ СОДЕРЖИТ ДЕТАЛЕЙ, ОБСЛУЖИВАЕМЫХ
ПОЛЬЗОВАТЕЛЕМ. РАБОТЫ ПО ТЕХНИЧЕСКОМУ
ОБСЛУЖИВАНИЮ ДОЛЖНЫ ВЫПОЛНЯТЬСЯ
КВАЛИФИЦИРОВАННЫМ ПЕРСОНАЛОМ
СЕРВИСНОЙ СЛУЖБЫ.
3

Символ молнии в форме стрелы, заключенной
в равносторонний треугольник, служит для
предупреждения пользователя о наличии опасного
напряжения при отсутствии изоляции в корпусе
устройства, достаточного для возникновения риска
поражения электрическим током.
Восклицательный знак, заключенный в равносторонний
треугольник, служит для предупреждения пользователя
о том, что в литературе, прилагаемой к изделию,
имеются важные инструкции по эксплуатации и
техническому (сервисному) обслуживанию устройства.
Данный символ указывает на то, что устройство
оснащено двойной изоляцией между источником
опасного сетевого напряжения и деталями, доступными
для пользователя. При выполнении работ по
техническому обслуживанию используйте только
идентичные запасные части.
4

Предупреждения
•• Не•допускайте•воздействия•на•устройство•дождя•
или•влаги•в•целях•снижения•риска•поражения•
электрически•током.•Не•допускайте•попадания•
брызг•или•капель•жидкости•на•устройство.•
Не•следует•ставить•на•устройство•сосуды,•
наполненные•жидкостью,•например,•вазы.•
•• Для•обеспечения•надлежащей•устойчивости•
устройство•следует•установить•должным•образом•
или•закрепить•его•на•стене.•Для•обеспечения•
безопасности•соблюдайте•инструкции•по•
настенному•монтажу,•приведенные•в•руководстве•
пользователя.
•• Не•подвергайте•аккумуляторы•чрезмерному•
нагреву,•например,•под•воздействием•солнечного•
света,•открытого•пламени•и•т.•д.•
Важные правила техники
безопасности
• Прочтите эту инструкцию — перед использованием
изделия ознакомьтесь со всеми инструкциями по
безопасности и эксплуатации.
• Сохраните эту инструкцию — сохраните инструкции
по безопасности и эксплуатации для дальнейшего
использования.
5

• Обращайте внимание на все предупреждения —
соблюдайте все предупреждения на изделии и в
инструкции по эксплуатации.
• Следуйте всем инструкциям — соблюдайте все
инструкции по эксплуатации.
• Не используйте это изделие вблизи воды —
не используйте это изделие вблизи воды или в
помещения с высокой влажностью, например в
подвале или рядом с бассейном.
• Выполняйте очистку устройства только с помощью
сухой ткани.
• Не блокируйте вентиляционные отверстия.
Устанавливайте устройство в соответствии с
инструкциями производителя.
• Не устанавливайте устройство рядом с
источниками тепла, например, батареями отопления,
обогревателями, печами и другими приборами
(включая усилители), генерирующими тепло.
• Не отключайте функцию безопасности полярной
штепсельной вилки или вилки, имеющей контакт
заземления. Полярная штепсельная вилка оснащена
двумя плоскими контактами, один из которых шире
другого. Вилка с заземлением оснащена двумя
плоскими контактами и одним контактом заземления.
Широкие плоские контакты и контакт заземления
служат для обеспечения вашей безопасности. Если
имеющаяся вилка не подходит для вашей розетки,
обратитесь к специалисту-электрику для установки
розетки, соответствующей требованиям.
• Обеспечьте защиту силового кабеля от защемления
и сдавливания, в особенности в зоне расположения
6

вилок и электрических розеток, а также на участке
выхода кабеля из устройства.
• Используйте только те комплектующие
детали/принадлежности, которые указаны
производителем.
• Используйте только с тележкой, стойкой,
штативом, кронштейном или столом, указанными
производителем или продаваемыми вместе с
устройством. Если используется тележка, соблюдайте
осторожность при перемещении комбинации тележки
и устройства, чтобы не допустить ее опрокидывания и
получения травм.
• Отключайте устройство от сети на время грозы или
на период длительного неиспользования.
• Работы по техническому обслуживанию должны
выполняться квалифицированным персоналом
сервисной службы. Сервисное обслуживание
проводится при возникновении каких-либо
неисправностей устройства, например, повреждении
сетевого кабеля или вилки, проникновении в
устройство воды или других посторонних предметов,
воздействии дождя или влаги или падении
устройства.
7

Меры предосторожности
• Для предотвращения поражения электрическим
током совместите широкий плоский контакт вилки с
широким пазом розетки и вставьте вилку до упора.
• Не допускайте попадания брызг или капель
жидкости на устройство.
• Не ставьте на устройство предметы, которые могут
стать источником опасности (например, сосуды,
наполненные жидкостью, зажженные свечи).
• Отсоедините силовой кабель, чтобы отключить
устройство, если возникла неисправность или если
устройство не используется. Силовой кабель всегда
должен находиться в рабочем состоянии.
• Использование элементов управления и настроек,
а также выполнение операций, отличающихся от
указанных в настоящем документе, может привести
к возникновению вредного излучения или других
опасных условий при эксплуатации.
• Силовой кабель/штепсельный соединитель служит
в качестве устройства отключения, которое всегда
должно находиться в рабочем состоянии.
Меры предосторожности и правила
утилизации батарей.
• Устанавливайте в устройство только новые батареи
того же типа.
8

• Установка батарей с неправильной полярностью,
отличной от обозначенной в отсеке для батарей,
может сократить срок их службы или привести к
протечке батарей.
• Не используйте старые и новые батареи
одновременно.
• Не используйте перезаряжаемые (никель-кадмиевые)
или (никель-металлогидридные) батареи.
• Не используйте одновременно щелочные,
стандартные (углерод-цинковые) или перезаряжаемые
(никель-кадмиевые) или (никель-металлогидридные)
батареи.
• Не допускайте попадания батарей в огонь или воду.
• Переработка и утилизация батарей должны
осуществляться в соответствии с национальными и
местными предписаниями.
• Опасность взрыва батареи в случае неправильной
установки. Используйте для замены только батареи
того же типа или их аналоги.
• Если пульт дистанционного управления не
используется в течение продолжительного времени
(более одного месяца), выньте батарею из пульта
управления, чтобы предотвратить протечку.
• В случае протечки батареи удалите жидкость из
аккумуляторного отсека и вставьте новые батареи.
• Держите батареи вдали от источников тепла и влаги.
• Не перевозите и не храните батареи вместе с другими
металлическими предметами. В противном случае
может возникнуть короткое замыкание батарей,
протечка или взрыв.
9

• Не перевозите и не храните батареи вместе с другими
металлическими предметами. В противном случае
может возникнуть короткое замыкание батарей,
протечка или взрыв.
• Прежде чем заряжать батарею, убедитесь в том, что
это батарея перезаряжаемого типа.
• Устройство/пульт дистанционного управления могут
быть оснащены миниатюрным кнопочным элементом
питания, который легко проглотить. Батареи должны
всегда находиться в недоступном для детей месте!
Проглатывание элемента питания может привести к
тяжелой травме или летальному исходу. Серьезные
внутренние ожоги могут возникнуть в течение двух
часов после проглатывания.
• Если у вас имеются подозрения о проглатывании
элемента питания или о попадании его в какую-либо
часть тела, немедленно обратитесь за медицинской
помощью.
• Выполняя замену, всегда держите новые и
использованные батареи в недоступном для детей
месте. Убедитесь в том, что отсек для батарей
полностью защищен.
• Если отсек для батарей не может быть полностью
защищен, прекратите использование устройства.
Поместите устройство в недоступное для детей место
и свяжитесь с производителем.
10

Место установки
• Это изделие предназначено для установки на прочную
ровную поверхность. Не устанавливайте изделие во
встроенную мебель, например книжный шкаф или
стеллаж, поскольку вентиляционные щели изделия
будут заблокированы, что приведет к сокращению
срока службы из-за перегрева. Для достаточной
вентиляции оставьте свободное пространство не
менее 20 см вокруг изделия.
• Мебель, на которой установлено изделие, должна
иметь достаточный размер и прочность, чтобы
предотвратить случайное опрокидывание или падение
изделия. Падение может стать причиной травм и/или
повреждения изделия.
• Монтаж настенного кронштейна должен выполнять
только квалифицированный персонал. Неправильный
монтаж может привести к серьезным травмам
и повреждению имущества (если вы намерены
установить это изделие самостоятельно, необходимо
проверить наличие скрытой электропроводки и
водопроводных труб внутри стены). Установщик
обязан убедиться в том, что стена безопасно
выдержит общий вес изделия и кронштейнов для
настенного монтажа.
11

2 Приветствуем вас
Поздравляем с приобретением новой звуковой панели
TCL! После того ее настройки и подключения вы можете
оценить превосходное качество звука и современный
дизайн, который максимально соответствует вашей
домашней развлекательной системе. Рекомендуется
изучить настоящее руководство пользователя, которое
поможет легко и правильно настроить, подключить и
использовать устройство. Подробную информацию см.
на сайте www.tcl.com
Давайте начнем.
Комплектация
Основной блок звуковой
панели
Сетевой шнур питания,
2 шт.
Беспроводной сабвуфер
Переходный ИК-кабель
12
 Loading...