

Page 1
72-TM25H0-001
:Q/WP1034-2005
:QB/44130033952-2005
TCL
4008-123456
TM25H/TM29H
:
4008-123456
0752-2636307
: 516006
Page 2
02
03
03
03
04
04
05
6
7
01
Page 3
:
2-3
02
Page 4
1, 2) S
HDTV YPbPr , RGB
PAL
(1)60Hz (2)75Hz (3)100Hz (4) 85Hz
NTSC
(1)60Hz
AV:PAL NTSC358(NTSC3.58) NTSC443(NTSC4.43)
12
S
Y Pb/Cb, Pr/Cr
1.0Vp-p
1.0Vp-p 0.7Vp-p
1.0Vp-p 0.7Vp-p; HDTV
1920 1080P/60Hz 1920 1080i/60Hz 1920 1080i/50Hz
1280 720P/60Hz DVD 720X576i/50Hz 720X
480i/60Hz DVD Y,Pb,Pr 720X576P/50Hz,
720X480P/60Hz.
R G B 0.7Vp-p
VGA 640 480 /60Hz SVGA 800 600 /60Hz
XGA1024 768 /60Hz
160V-250V 50Hz
95W TM25H
100W TM29H
59cm(TM25H); 68cm(TM29H)
(mm)
590x553x484(TM25H);
38kg(TM25H);
660x568x542(TM29H)
48kg(TM29H)
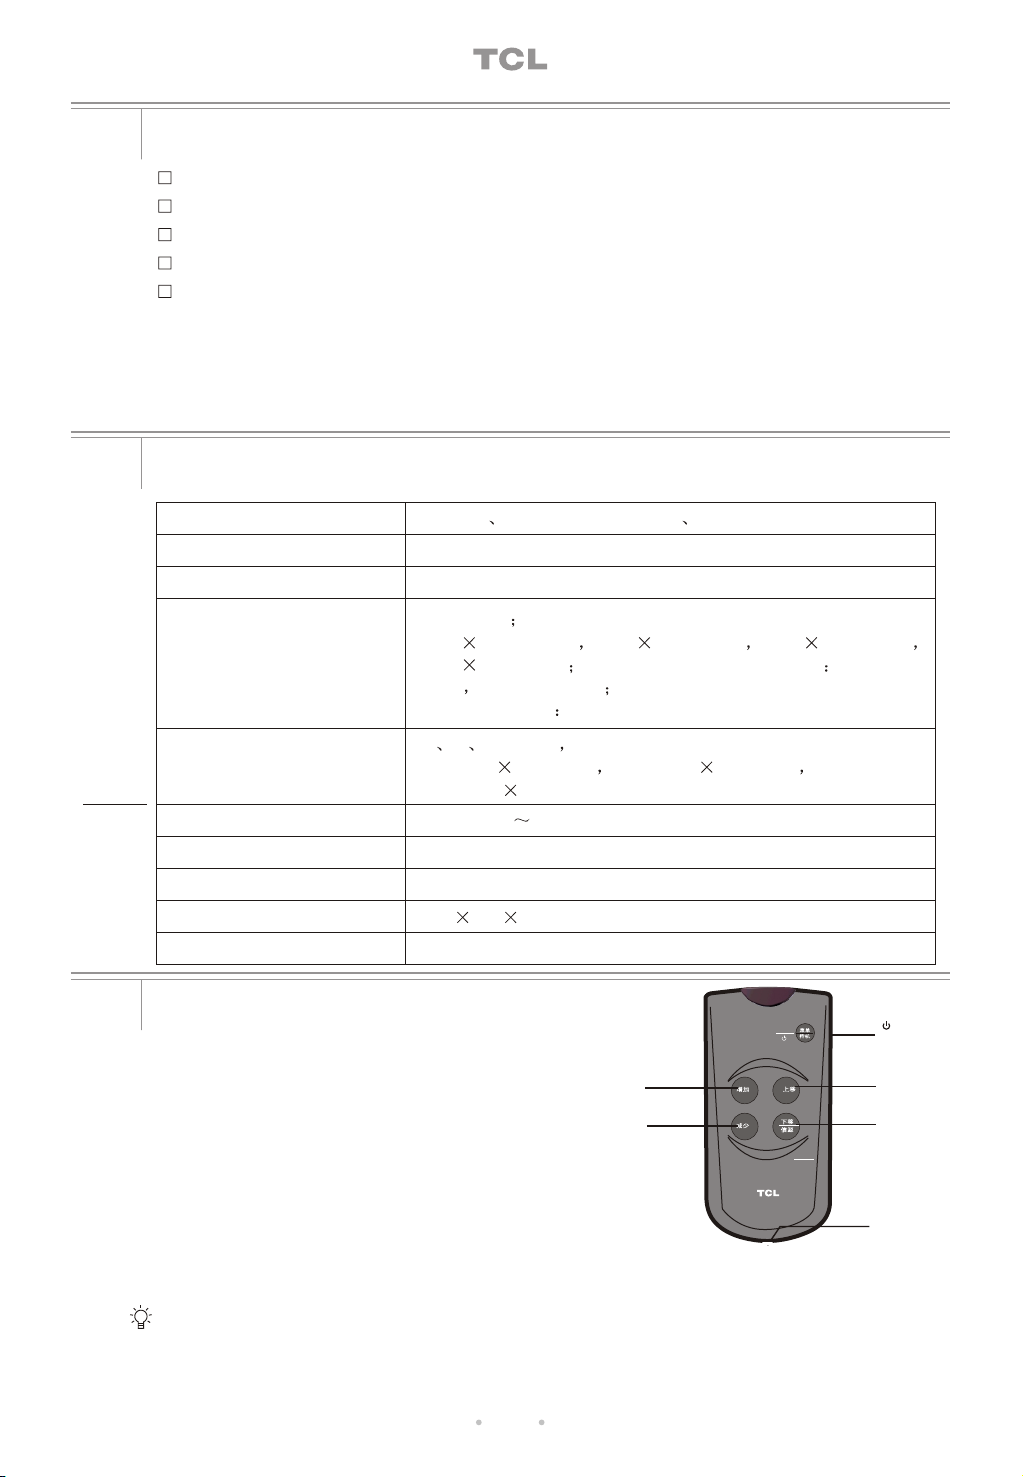
7 1.5V
RIGHT
MENU
UP
/
1
,
LEFT
DOWN
SOURCE
/
2
03
Page 5

7 8
AV LOOP IN2&OUT2 AV LOOP IN1&OUT1
1
Pb/Cb
2
Pr/Cr
3 4 5 6
2/
/
AV LOOP IN2&OUT2 AV LOOP IN1&OUT1
Pb/Cb
Pr/Cr
S
S
VIDEO IN-2 VIDEO IN-1
AV LOOP IN2&OUT2 AV LOOP IN1&OUT1
TM25H
04
Pb/Cb
Pr/Cr
LEFT
Y Pb/Cb Pr/Cr
SOURCE
DOWN
VIDEO OUT-2 VIDEO OUT-1
DVD
UP
RIGHT
MENU
DVD
HDTV
Page 6

/
I
O
/
//1
2S
HDTV
1. 1080i 1080P 720P 16 9
2. /
43 169
/
AUTO
60P
/
AUTO/PAL/NTSC358/NTSC443
OK 7
05
TM29H
/ENGLISH
Page 7

?
1
2
S
1680RPM
30 C
5
1.
2.
3. /
4. /
0
/
/
3 100
/
1
/
2
/
/
/
S
06
Page 8

Contents
02 Warnings and Precautions
03 Features
03 Specifications
03 Remote Control
04 External Schematic
04 Connection Illustrations
05 Basic Operations
05 Turning on/off the Unit
05 Signal Source Selection
05 Aspect Ratio Selection in HDTV Mode
05 Picture Adjustments
05 Set Up Menu
06 Picture s Geometry Size Adjustments
06 System Settings
Packing List
Main Unit - one set
Remote Control - one pc, including two AAA batteries and
one remote control cable
Operation Manual - one pc (including warranty card, quality
certificate, etc.)
01
Page 9

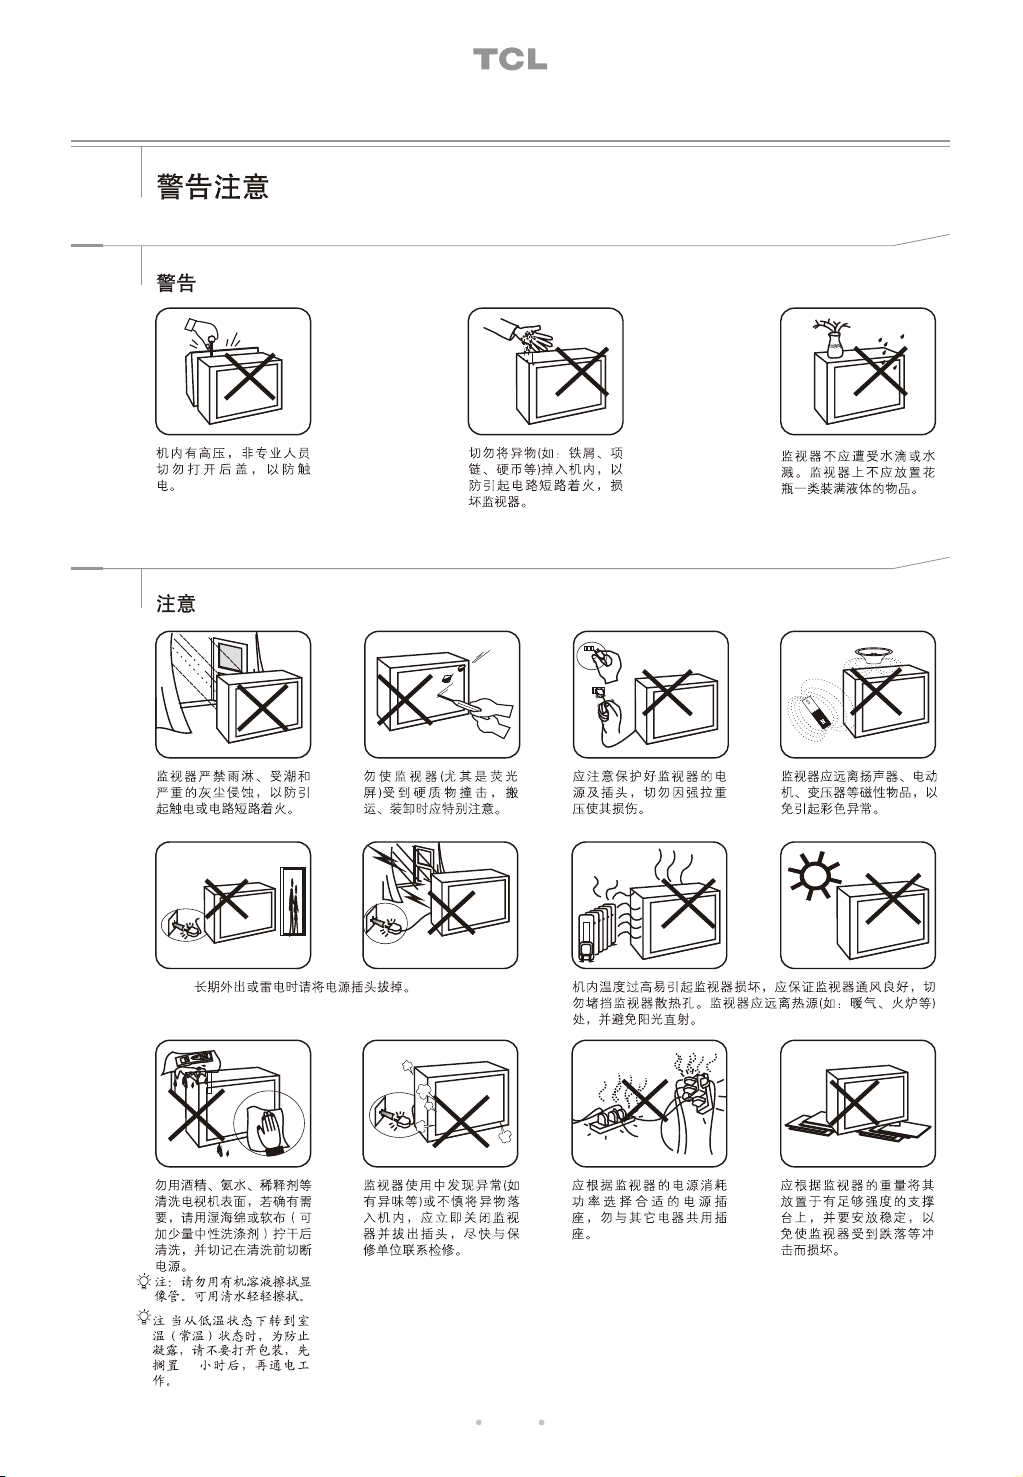
Warnings and Precautions
Warnings
High voltage inside! To
reduce the risk of electric
shock, do not remove cover
(or back). Refer servicing
to qualified personnel.
Do not push objects of any
kindinto the unit as this may
causefire or short circuit and
damage the unit.
Precautions
To prevent fire or shock hazard,
do not expose the unit to rain,
moisture or heavy dust areas.
Remove the power plug when the unit will not be used for a
long period of time, or when it is thunder or lightning.
Protect the unit, especially
the screen, from being attacked
by hard objects. Please take
care during transportation
and loading/unloading.
The unit shall not be exposed
to dripping or splashing and
no objects filled with liquids
such as vases, shall be
placed on the unit.
To protect the power cord,
do not pull it or press it with
excessive force.
High temperature inside may cause the damage to the
unit. Please keep it well ventilated and do not block the
ventilation slots and openings. Keep away from heat sources
such as stove and radiator and avoid direct sunshine.
To avoid color abnormality,
keep the unit away from the
magnetic objects, such as
the speaker, electromotor
or transformer.
Do not use chemicals such
as alcohol, ammonia or thinner
for cleaning. If necessary,
use a piece of wet cloth or
sponge with some diluted
neutral detergent, wrung dry
for cleaning. Be sure to cut
off the power before your
cleaning.
Notes: Use water instead of organic
solutions to clean the CRT.
.
Notes: In case of becoming frozen, do
not unpack the unit right after moving
from a very cold place to a warmer place.
It s recommended to wait for 2 to 3 hours
before you turn it on.
During your operation, if there
is something abnormal found,
such as strange smell, or if
some objects fall into the unit,
switch off and unplug the unit
immediately and contact the
service personnel as soon as
possible.
02
Use suitable power outlet based
on power consumption of the unit.
Do not share a power outlet with
other electrical appliances.
Place the unit on a platform
strong enough for supporting.
Keep it stable to avoid falling
off and causing the damage.
Page 10
Features
2 AV (AV-1, AV-2) LOOP IN/OUT, 1 S-VIDEO Input
1HD TV(YPbPr) Input, 1 VGA (RGB) Input
Detecting Inner Temperature to Dynamically Adjust the Fan Speed
Sensitive to Ambient Light to Adjust the Brightness
Multi Imaging Modes
Imaging Modes of PAL Pictures:
(1)60Hz Digital Progressive Scanning (2)75Hz Interlaced Scanning
(3)100Hz Digital Double Frequency (4)85Hz Digital Progressive Scanning
Imaging Mode of NTSC Pictures:
(1)60Hz Progressive Scanning
Specifications
Receiving System
AV1&AV2 Input/Output Loop
S-VIDEO Input
YPbPr (HDTV) Input
AV:PAL NTSC358(NTSC3.58) NTSC443(NTSC4.43)
Video: 1.0Vp-p
Y: 1.0Vp-p; C: 0.7Vp-p
Y: 1.0Vp-p C: 0.7Vp-p;supporting the following HDTV modes:
1920 1080P/60Hz 1920 1080i/60Hz 1920 1080i/50Hz
1280 720P/60Hz supporting DVD signals input 720X576i/
50Hz 720X480i/60Hz supporting DVD Y,Pb,Pr progressive
component input 720X576P/50Hz,720X480P/60Hz.
VGA Input
R G B signals 0.7Vp-p supporting the following input modes:
VGA 640 480 /60Hz SVGA 800 600 /60Hz
XGA1024 768 /60Hz
Operating Voltage
Power Consumption
Visible Diagonal Size
Dimensions(mm)
Gross Weight
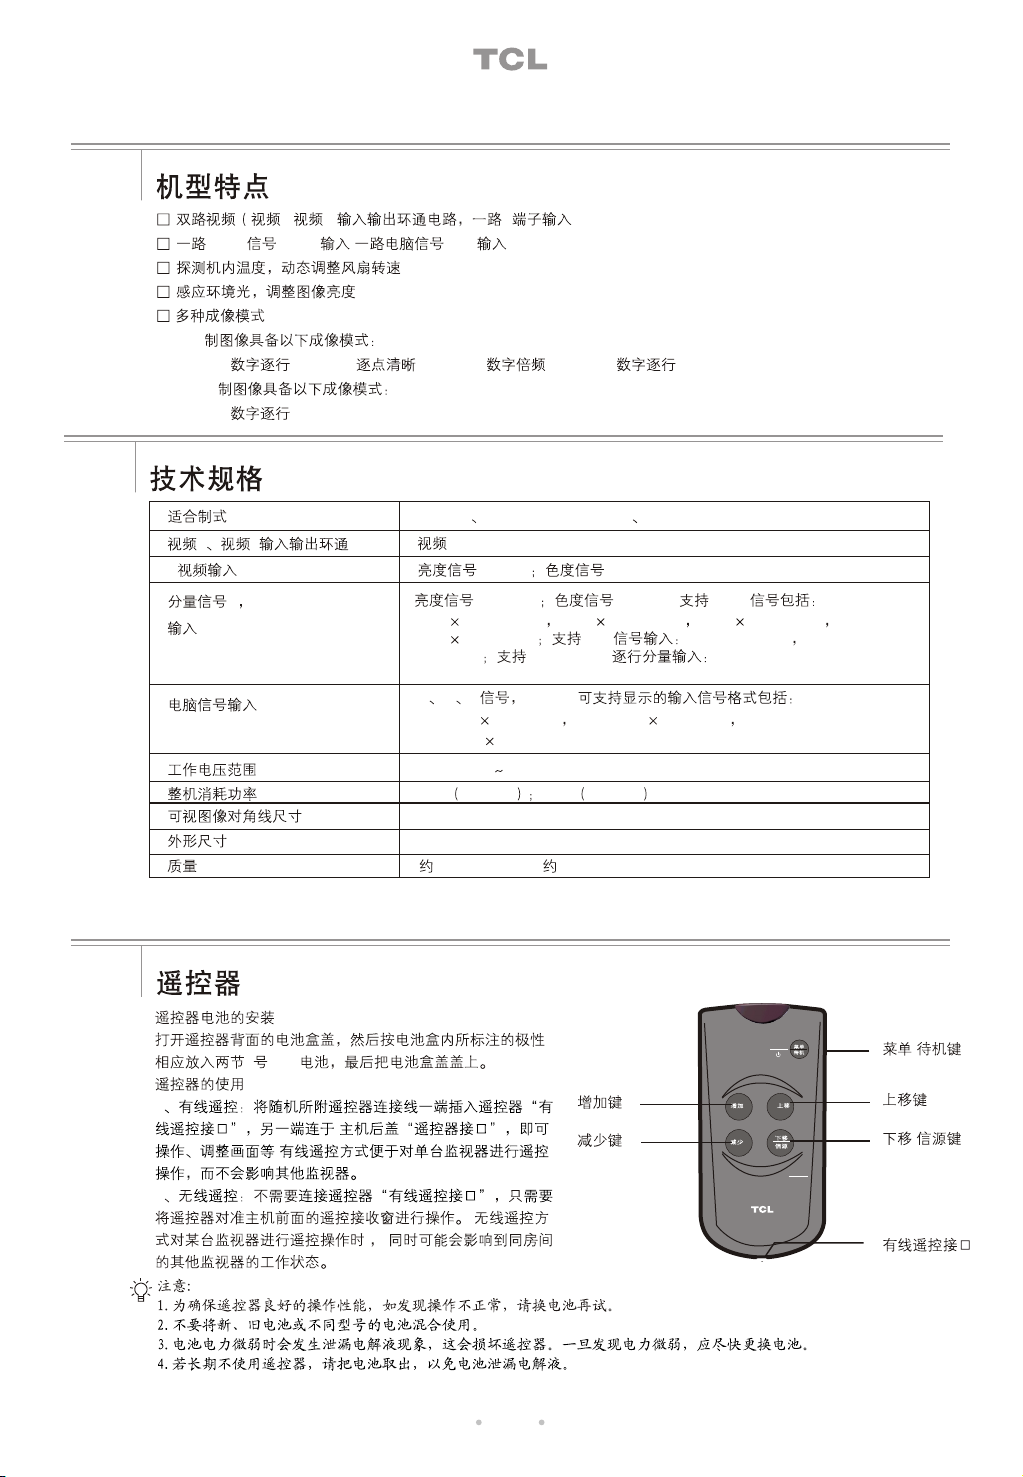
Remote Control
Battery Installation
Remove the battery compartment lid from the back of the
remote, insert the 2 x 1.5V AAA batteries, paying attention
to the polarity, and then replace the cover.
Using the Remote Control
1. Wire Remote: Connect one end of the attached remote
160V-250V 50Hz
95W (TM25H) ; 100W (TM29H)
59cm (TM25H) ; 68cm (TM29H)
590 553 484 (TM25H) ; 660X568X542 (TM29H)
about 38kg (TM25H) ; about 48kg (TM29H)
MENU
RIGHT
RIGHT button
LEFT button
LEFT
DOWN
SOURCE
UP
MENU/ button
UP button
DOWN/SOURCE
button
cable to the jack on the remote and the other end to the
remote jack on the rear panel, then you can use this wire
remote to adjust menu controls. Operations with the wire
Remote Jack
remote work only on the connected monitor.
2. Wireless Remote: No need to connect it with the remote jacks. Point this wireless remote directly
toward the infra-red sensor on the unit. When you use the wireless remote to operate a certain
monitor, this operation may affect the working status of other monitors in the same room.
Notes:
1. For better performance, once you find the operation is abnormal, please replace the batteries
and have a try again.
Do not mix old and new batteries or different types.2.
3. When the batteries are to be exhausted, battery leakage may occur and cause the damage to
03
Page 11

the remote. When the operation is not sensitive enough, the battery may be low, so please
change batteries immediately.
4. If the device is not to be used for a long period of time, remove the batteries to prevent damage
or injury from possible battery leakage.
External Schematic
Power Indicator
Light Sensor
Remote Sensor
1
2
1.Power Switch
3 4 5 6
2.Power Cord Jack
3.VGA Input
4.S-Video Input
Connection Illustrations
AV LOOP IN2&OUT2 AV LOOP IN1&OUT1
Pb/Cb
Pr/Cr
7
AV LOOP IN2&OUT2 AV LOOP IN1&OUT1
Pb/Cb
Pr/Cr
5.Remote Jack
6.Y,PbCb,PrCr Input
7.Video Input2/Output2
8.Video Input1/Output1
Camcoder
S-VIDEO
VIDEO IN-2 VIDEO IN-1
8
Power Cord
SOURCE
DOWN
UP
MENU
Note:
The socket graphics are taken TM25H as an
example and are for representation only.
04
LEFT
RIGHT
Pb/Cb
Pr/Cr
Y Pb/Cb Pr/Cr
DVD
AV LOOP IN2&OUT2 AV LOOP IN1&OUT1
VIDEO OUT-2 VIDEO OUT-1
Video Recorder
DVD Burner
Page 12

Basic Operations
Turning the Unit on/off
Turning on: Press the "I" on the POWER button of the rear panel to turn on the unit, then the
indicator flashes lighting. After a few seconds, the picture appears on the screen.
Turning off: press the "O" on the POWER button of the rear panel to turn the unit off.
Standby mode: press and hold the MENU/ button to put the unit into standby mode. Any press can
restart the unit from standby mode.
Signal Source Selection
Press the DOWN/SOURCE button on the remote control to display the source selection menu.
Then press UP/DOWN to select AV-1, AV-2, S-VHS, YPBPR and VGA.
After selecting a certain source, press LEFT/RIGHT to enter.
Aspect Ratio Selection in HDTV Mode
When the input signal is 1080i, 1080P or 720P, the aspect ratio should be set to 16:9.
1.
2. Press the MENU to highlight the SET
UP menu. And press UP or DOWN/SOURCE to select SCAN MODE "4:3". Use the LEFT/RIGHT
button to select 16:9.
Picture Adjustments
/ button to display the main menu then press LEFT/RIGHT
Press the MENU to highlight the PICTURE
/ button to display the main menu then press LEFT/RIGHT
menu. And press UP or DOWN/SOURCE to scroll through the features and use LEFT/RIGHT to adjust:
PICTURE
BRIGHTNESS
CONTRAST
SATURATION
SHARPNESS
HUE
PICTUREMODE
SOFT
50
50
50
50
50
Features
BRIGHTNESS
CONTRAST
SATURATION
SHARPNESS
HUE
PICTUREMODE
Press LEFT Press RIGHT
To become darker To become brighter
To become weaker
To become lighter
To become softer
To become greenish
STANDARD/SOFT/BRIGHT/PERSONAL
Results
To become stronger
To become darker
To become clearer
To become purplish
Remark
To adjust the brightness of the picture,
in general, along with CONTRAST
To adjust the difference between the
black portions and white portions.
To add or remove color
To adjust sharpness in the picture.
Only available in NTSC mode
To select a picture mode
Set Up Menu
Press the MENU to highlight the SETUP
menu. And press UP or DOWN/SOURCE to scroll through the features and use LEFT/RIGHT to adjust:
SETUP
COLOR T EMP
COLOR SYS
SCAN MODE
DEGAUSS
PALETTE
3D NR
This arrow symbol means there are more
feature items if you press DOWN/SOURCE.
/ button to display the main menu then press LEFT/RIGHT
Features
NORMAL
AUTO
60P
OFF
HIGH
COLOR TEMP NORMAL/WARM/COOL
COLOR SYS
SCAN MODE
DEGAUSS
PALLET
3D NR
ROTATE
FELSHCOLOR
LANGUAGE
AUTO/PAL/NTSC358/NTSC443
60P/75I/100I/85P (4:3/16:9 in YPbPr mode)
ON/OFF (when ON, the CRT degausses itself automatically)
In its submenu, you can adjust the RED, GREEN, BLUE, CYAN, MGENTA,
YELLOW, FLESH separately. There is a RESET option with which you can
make all adjustments back to the factory default by pressing LEFT/RIGHT.
LOW/MID/HIGH/OFF
The picture might lean due to geomagnetism in different positions and
directions. With this option, you can make the picture in place.
This feature is only available on TM29H.
ON/OFF, to adjust the flesh
/ENGLISH
Remark
05
Page 13

Picture s Geometry Size Adjustments
GEOMETRY
GEOM-VSIZE
GEOM-VPOS
GEOM-HSIZE
GEOM-HPOS
GEOM-RESET
1. Press the MENU
0
0
0
?
0
2. Press LEFT/RIGHT
3. Use UP or DOWN/SOURCE to select a feature item then use
LEFT/RIGHT to adjust.
4. If the result is not satisfactory, press UP or DOWN/SOURCE to
select GEOM-RESET then use LEFT/RIGHT to confirm. This makes
/ button to display the main menu
to highlight the GEOMETRY menu.
all features back to default 0.
System Settings
Press the MENU to highlight the SYSTEM
menu. And press UP or DOWN/SOURCE to scroll through the features and use LEFT/RIGHT to adjust:
SYSTEM
SCAN
SCAN SET
FAN SPEED
FAN SET
TEMPEARTURE
RAY CONTROL
/ button to display the main menu then press LEFT/RIGHT
SCAN ON/OFF (when ON, SCAN SET can be highlighted.)
OFF
AUTO
60P
1680RPM
SHIFT
30 C
SCAN SET
FAN SPEED
FAN SET
TEMPERATURE
RAY CONTROL
In its submenu, you can set the SCANTIME and turn every signal channel
on or off for browsing.
Features Remark
Press LEFT/RIGHT to set any time between 3S and
SCANTIME
AV-1
AV-2
S-VHS
YPBPR
VGA
Notes: while browsing, press the MENU/ bu tton, and the process will stop.
If you want to reactivate the browsing function, you have to enter the SYSTEM
menu and set SCAN to ON.
100S. This is the time every signal channel stays
while browsing.
ON/OFF (when ON, AV-1 is available for browsing.)
ON/OFF (when ON, AV-2 is available for browsing.)
ON/OFF (when ON, S-VHS is available for browsing.)
ON/OFF (when ON, YPBPR is available for browsing.)
ON/OFF (when ON, VGA is available for browsing.)
To tell the fan s speed.
FIXED/SHIFT. When set to FIXED, the fan runs at the highest speed. When
set to SHIFT, the fan runs with inside temperature. The higher temperature, t
he faster it runs. Contrarily, the lower temperature, the slower it runs.
To tell the real temperature inside the unit.
ON/OFF. When ON, it can dynamically adjust the brightness of the picture
according to the ambient light.
Notes: Specifications are subject to change without notice.
06
 Loading...