

Page 1
TAW08CR19
TAW08CREB19W
TAW10CR19
TAW12CR19
Page 2

INTRODUCTION
IMPORTANT SAFETY INSTRUCTION ...........................................................................
ELECTRICAL REQUIREMENTS
PACKING LIST ............................................................................................................
INSTALLATION & ASSEMBLY INSTRUCTIONS ..............................................................
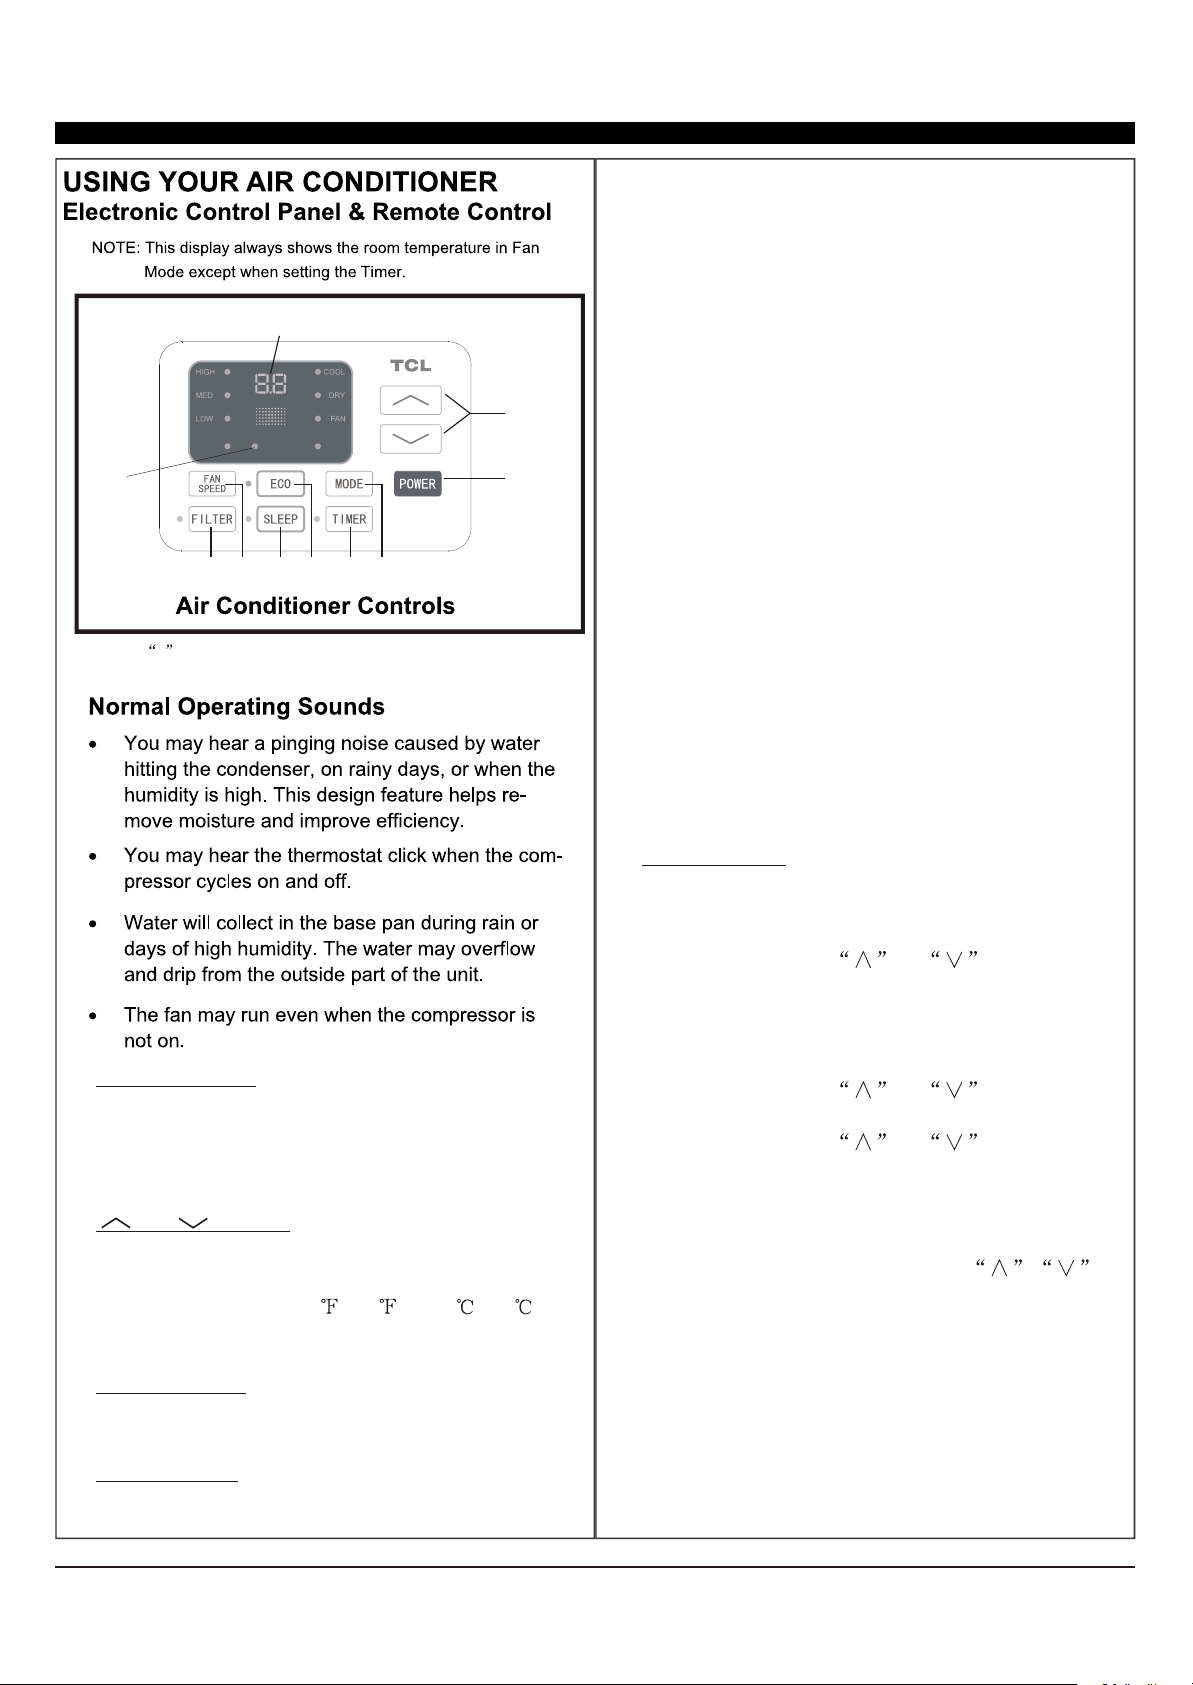
USING YOUR AIR CONDITIONER ................................................................................
OPERATING YOUR AIR CONDITIONER
CARE AND CLEANING ................................................................................................
TROUBLESHOOTING .................................................................................................
...................................................................................
........................................................................
1
2
3
4
9
11
12
13
Page 3
1
Page 4
(8K) 0-8 amps
(10K-12K) 0-12 amps
(8K) 10-amp
(10K-12K) 15-amp
2
Page 5
(Only for E-star model)
Battery
3
Page 6
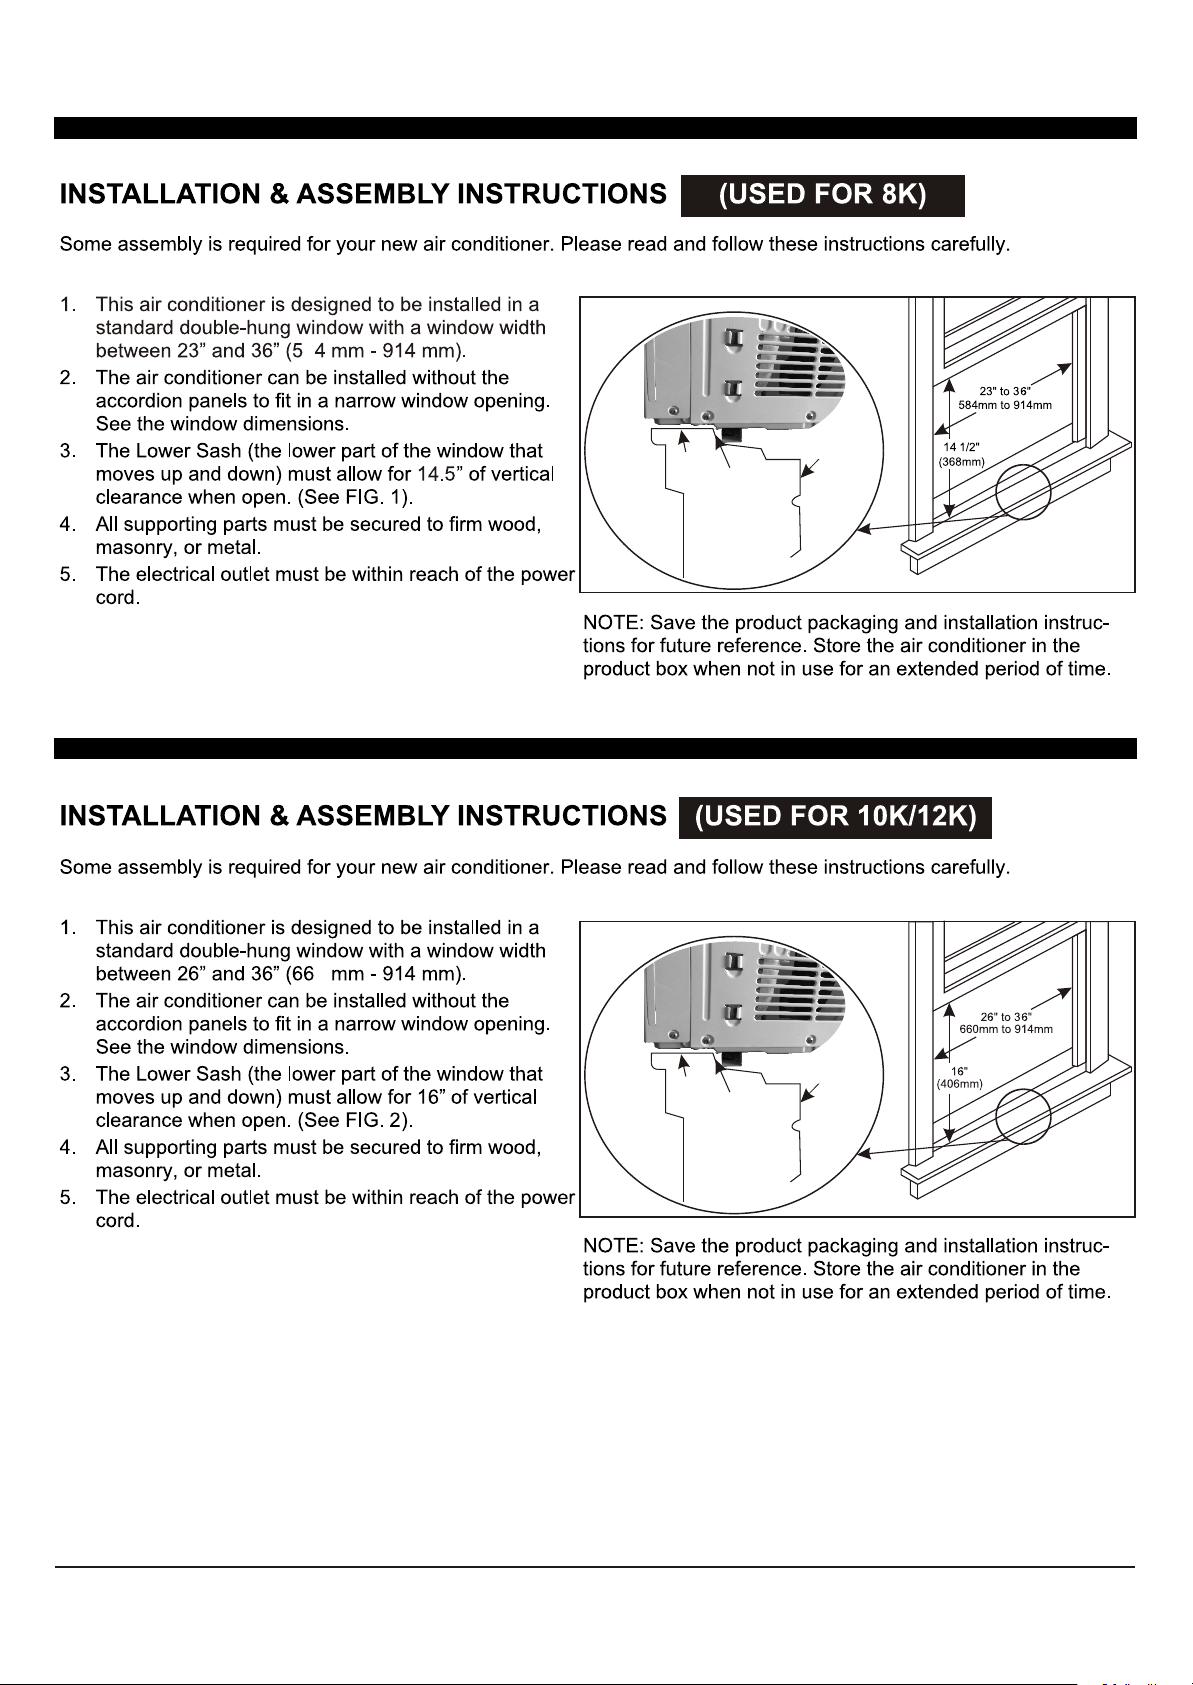
FIG. 1
8
EXTERIOR
WALL
INTERIOR
WALL
STOOL
SILL
OFFSET
FIG. 2
0
EXTERIOR
WALL
INTERIOR
WALL
STOOL
SILL
OFFSET
4
Page 7
(Only used for 8K)
5
Page 8

Top Rail and Sliding Panels at each side
are offset to provide the proper pitch of 5/16" to the
rear of the air conditioner.
3
FIG. 3
FIG. 4
FIG. 5
6
Page 9
Keeping
(It is suggested to keep a downward
angle so accumulated rain water can drain out from the
backside of the unit.)
FIG. 6
FIG. 7
FIG. 10
FIG. 11
FIG. 8
FIG. 12
FIG. 13
FIG. 9
7
Page 10
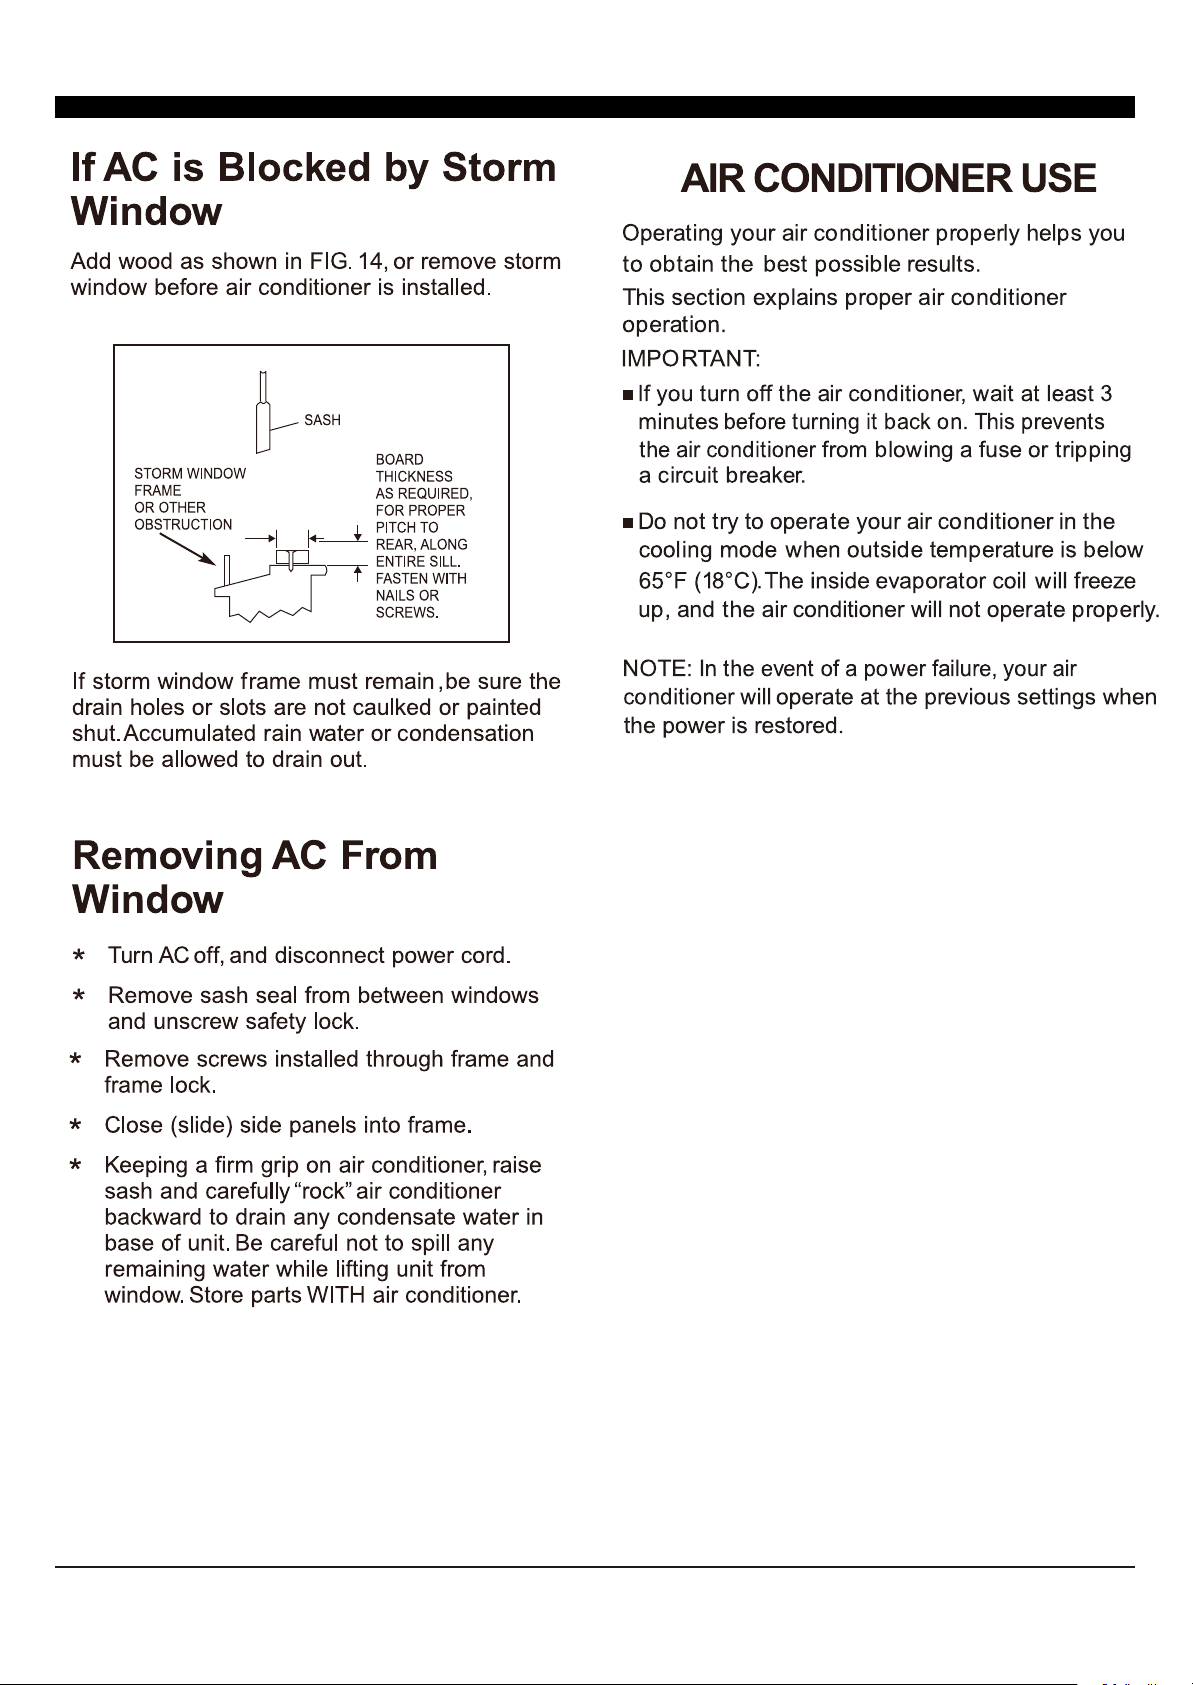
FIG. 14
8
Page 11
1
AUTO
SPEED
WIFI
WIFI Symbol*
9
8
NOTE: * means only available for WIFI models. For more
information, please see the WIFI manual.
AUTO
MODE
7
5
6
4
Cool Mode: The cooling function allows the air
conditioner to cool the room and at the same time
reduces air
humidity
. Press the MODE button to
activate the cooling function. To optimize the
function of the air conditioner, adjust the
temperature and the speed by pressing the button
indicated.
Dry Mode: This function reduces the humidity of
the air to make the room more comfortable. Press
2
the MODE button to set the DRY mode. An
automatic function of alternating cooling cycles
3
and air fan is activated.
Fan Mode: This function only works when the air
conditioner is vented. Press the MODE button to
set the FAN mode. With pressing the FAN SPEED
button, the speed changes in the following
sequence: Hi, Med and Lo in FAN mode.
Auto Mode: In AUTO mode the unit automatically
chooses the mode of operation (COOL,DRY or
FAN).In this mode the temperature will be set
according to the room temperature (tested by the
temperature sensor which is incorporated in the
indoor unit.).
1. When the timer is not in use,
Digital Display:
the operation mode and the set temperature will
be displayed. Time will be displayed under the
timer setting.
and Button:2. Use these buttons on the
control panel and remote to increase or decrease
the Set Temperature or Timer.
Temperature range: 61 ~88 or 16 ~31 .
3. Turn the air conditioner on and
Power Button:
off.
5. Timer Button:
Use these buttons on the control
panel and remote to set the Timer.
Timer Off: The timed stop is programmed by
pressing TIMER button. Set the rest time by
pressing the button or until the rest
time displayed is to your demand then press
TIMER button again.
Timer On: When the unit is off, press TIMER
button at the first time, set the temperature with
pressing the button or . Press TIMER
button at the second time, set the rest time with
pressing the button or . Press TIMER
button at the third time, confirm the setting,
will show on the display.
Note: It can be set to automatically turn off or on
in 0.5-24 hours. Each press of the
buttons will increase or decrease the timer. The
Timer can be set in 0.5 hours increment below 10
hours and 1 hour increment for 10 hours or above.
The SET light will turn on while setting.
To cancel the set function, press the TIMER
button again.
then it
Press the mode button to cycle
4. Mode Button:
through the various modes: Cool, Dry, Fan and
Auto.
9
Page 12

When the unit is in ECO mode, the
6. Eco Button:
light will turn on. In ECO mode, the unit will
turn off once the room is cooled to the user-set
temperature.
The unit will turn back on when the room
temperature rises above the user-set temperature.
Before the compressor starts, the fan motor will
run for a while, then it will stop for a while, and will
repeat to provide a much more comfortable feeling
and save energy.
7. Sleep Button:
Press the SLEEP button, all of the
display lights will turn off after a while, but the
Sleep light is always on. In SLEEP mode, the air
conditioner will automatically adjust the
temperature and fan speed to make the room
more comfortable during the night. The set
temperature will automatically raise every 30-60
10.
To direct the airflow,
Directional Louvers:
use the
direction, control the
vertical direction.
horizontal wheel to control the horizontal
and use the air deflectors to
horizontal wheelair deflector air deflector
minutes, and at most change six times until the
set temperature is 81 or 82 .
Press the FAN SPEED button
8. Fan Speed Button:
to choose the fan speed options. You can choose
Hi, Med, Lo or auto speed in COOL mode and
choose Hi, Med, Lo in FAN mode.
9.
When the Filter Check light is off,
Filter Button:
it is not necessary to press the Filter Check button.
When the Filter Check light is on, you can turn off
the light by pressing the Filter Check button. After
the fan motor works for 500 total hours, the Filter
Check light will turn on to remind the user to clean
the filter.
10
Page 13

1
3
4
5
6
3
2
7
8
9
10
Use these buttons on the control panel
5. Timer:
and remote to set the Timer.
Timer Off: The timed stop is programmed by
pressing TIMER button. Set the rest time by
pressing the button or until the rest
time displayed is to your demand then press
TIMER button again.
Timer On: When the unit is off, press TIMER
button at the first time, set the temperature with
pressing the button or . Press TIMER
button at the second time, set the rest time with
pressing the button or . Press TIMER
button at the third time, confirm the setting, then
the rest time to next automatical switching-on
could be read on the display of the machine.
Note:
It can be set to automatically turn off or on
in 0.5-24 hours. Each press of the
buttons will increase or decrease the timer. The
Timer can be set in 0.5 hours increment below
10 hours and 1 hour increment for 10 hours or
above. The SET light will turn on while setting.
To cancel the set function, press the TIMER
button again.
1.
Turn the air conditioner on and off.
Power:
2.
Press the COOL button to COOL mode.
Cool:
and :3.
Use these buttons on the control
panel and remote to increase or decrease the
Set Temperature or Timer. Temperature range:
61 ~88 or 16 ~31 .
Press the SLEEP button, all of the
4. Sleep:
display lights will turn off after a while, but the
Sleep light is always on. In SLEEP mode, the air-
conditioner will automatically adjust the temperature and fan speed to make the room more comfortable during the night. The set temperature will
automatically raise every 30-60 minutes
and at most change six times until the set
temperature is 81 or 82 .
In AUTO mode the unit automatically
6. Auto Mode:
chooses the mode of operation(COOL,DRY or
FAN). In this mode the temperature will be set
automatically according to the room temperature
(tested by the temperature sensor which is
incorporated in the indoor unit.).
Press the FAN SPEED button to
7. Fan Speed:
choose the fan speed options. You can choose
Hi, Med, Lo or auto speed in COOL mode and
choose Hi, Med, Lo in FAN mode.
To press the DISPLAY button, it can
8. Display:
switch off/on all lights or LED display.
When the unit is in ECO mode, the light
9.
Eco:
will turn on. In ECO mode, the unit will turn off
once the room is cooled to the user set temperature.
The unit will turn back on when the room
temperature rises above the user set temperature.
Before the compressor starts, the fan motor will
run for a while, then it will stop for a while, and will
repeat to provide a much more comfortable feeling
and save energy.
10.
Fan Only:
Press the Fan Only button to FAN
ONLY mode.
11
Page 14

15
FIG. 15
12
Page 15

13
Page 16

14
Page 17

Page 18

You can also view this manual online from our website:
https://www.tclusa.com.
Page 19

Modelos
TAW08CREB19W
TAW10CR19
TAW12CR19
Acondicionador de aire de ventana electrónica
Instrucciones de funcionamiento
Page 20

INTRODUCCIÓN
INSTRUCCIONES DE SEGURIDAD IMPORTANTES......................................................
REQUISITOS ELÉCTRICOS.........................................................................................
LISTA DE EMPAQUE...................................................................................................
INSTRUCCIONES DE ENSAMBLAJE E INSTALACIÓN..................................................
CÓMO UTILIZAR EL EQUIPO DE AIRE ACONDICIONADO............................................
OPERACIÓN DEL EQUIPO DE AIRE ACONDICIONADO................................................
CUIDADO Y LIMPIEZA.................................................................................................
SOLUCIÓN DE PROBLEMAS........................................................................................
1
2
3
4
9
11
12
13
Page 21

INSTRUCCIONES DE SEGURIDAD IMPORTANTES
Antes de instalar el equipo de aire acondicionado, por favor lea el manual detenidamente. Guárdelo en un lugar seguro para
cualquier referencia en el futuro. Su seguridad y la seguridad de otros son muy importantes para nosotros. Preste atención a todos
los avisos de seguridad en este manual.
ADVERTENCIA: Con el fin de evitar lesiones al usuario u otras personas y daños a la propiedad, debe seguirse las siguientes
precauciones básicas:
Enchufe a un tomacorriente de tres extremidades con salida a
tierra.
No retire la extremidad de conexión a tierra.
No utilice un adaptador.
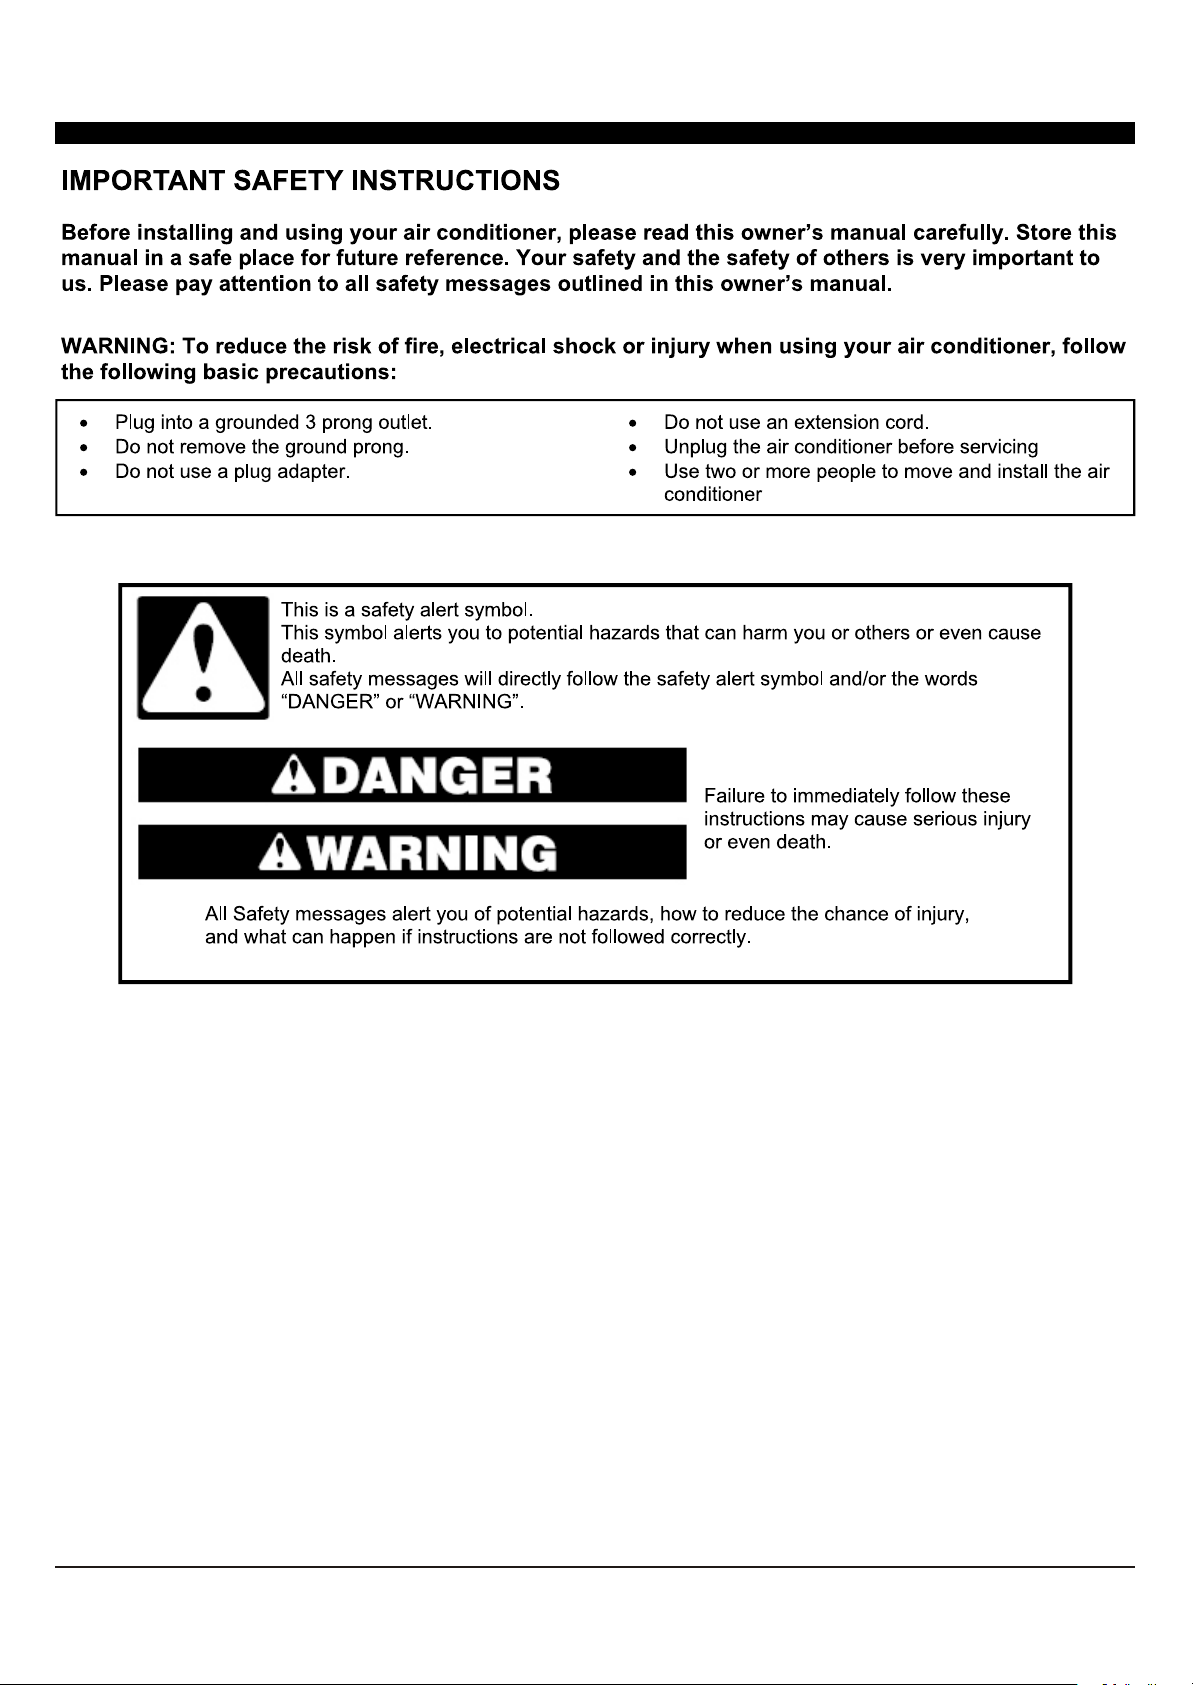
Este es un símbolo de alerta de seguridad.
Este símbolo de alerta de peligros potenciales que pueden dañarlo a usted y a otros cuarta
causar la muerte.
Todos los mensajes de seguridad Irán precedidos de este símbolo de alerta o de las palabras
PELIGRO o ADVERTENCIA.
PELIGRO
ADVERTENCIA
Todos los mensajes de seguridad y alertar ante posibles peligros, como reducir las posibili-
dades de lesiones y lo que podría ocurrir si no se sigue las instrucciones correctamente.
No utilice un cable de extensión.
Desenchufe el equipo de aire acondicionado antes de efectuar
cualquier mantenimiento.
Utilice dos o más personas para trasladar e instalar el equipo
de aire acondicionado.
Si no se sigue estas instrucciones, se
podría causar lesiones graves o hasta la
muerte.
1
Page 22

REQUISITOS ELÉCTRICOS
ADVERTENCIA
La resistencia eléctrica del equipo de airea condicionado se encuentra indicada en
la etiqueta de modelo y número de serie ubicada en la parte delantera izquierda del
equipo (mirándolo desde el frente).
En el cuadro de más abajo se indica los requisitos eléctricos específicos. Siga estos
requisitos para el tipo de enchufe ni el cordón de alimentación.
Requisitos del cableado Cordón de alimentación
Peligro descarga eléctrica
Enchufe a un tomacorriente de tres extremidades con
salida a tierra.
No retire la extremidad de conexión a tierra.
No utilice un adaptador.
No utilice un cable de extensión.
Si no se sigue estas instrucciones, se podría causar
lesiones graves o hasta la muerte.
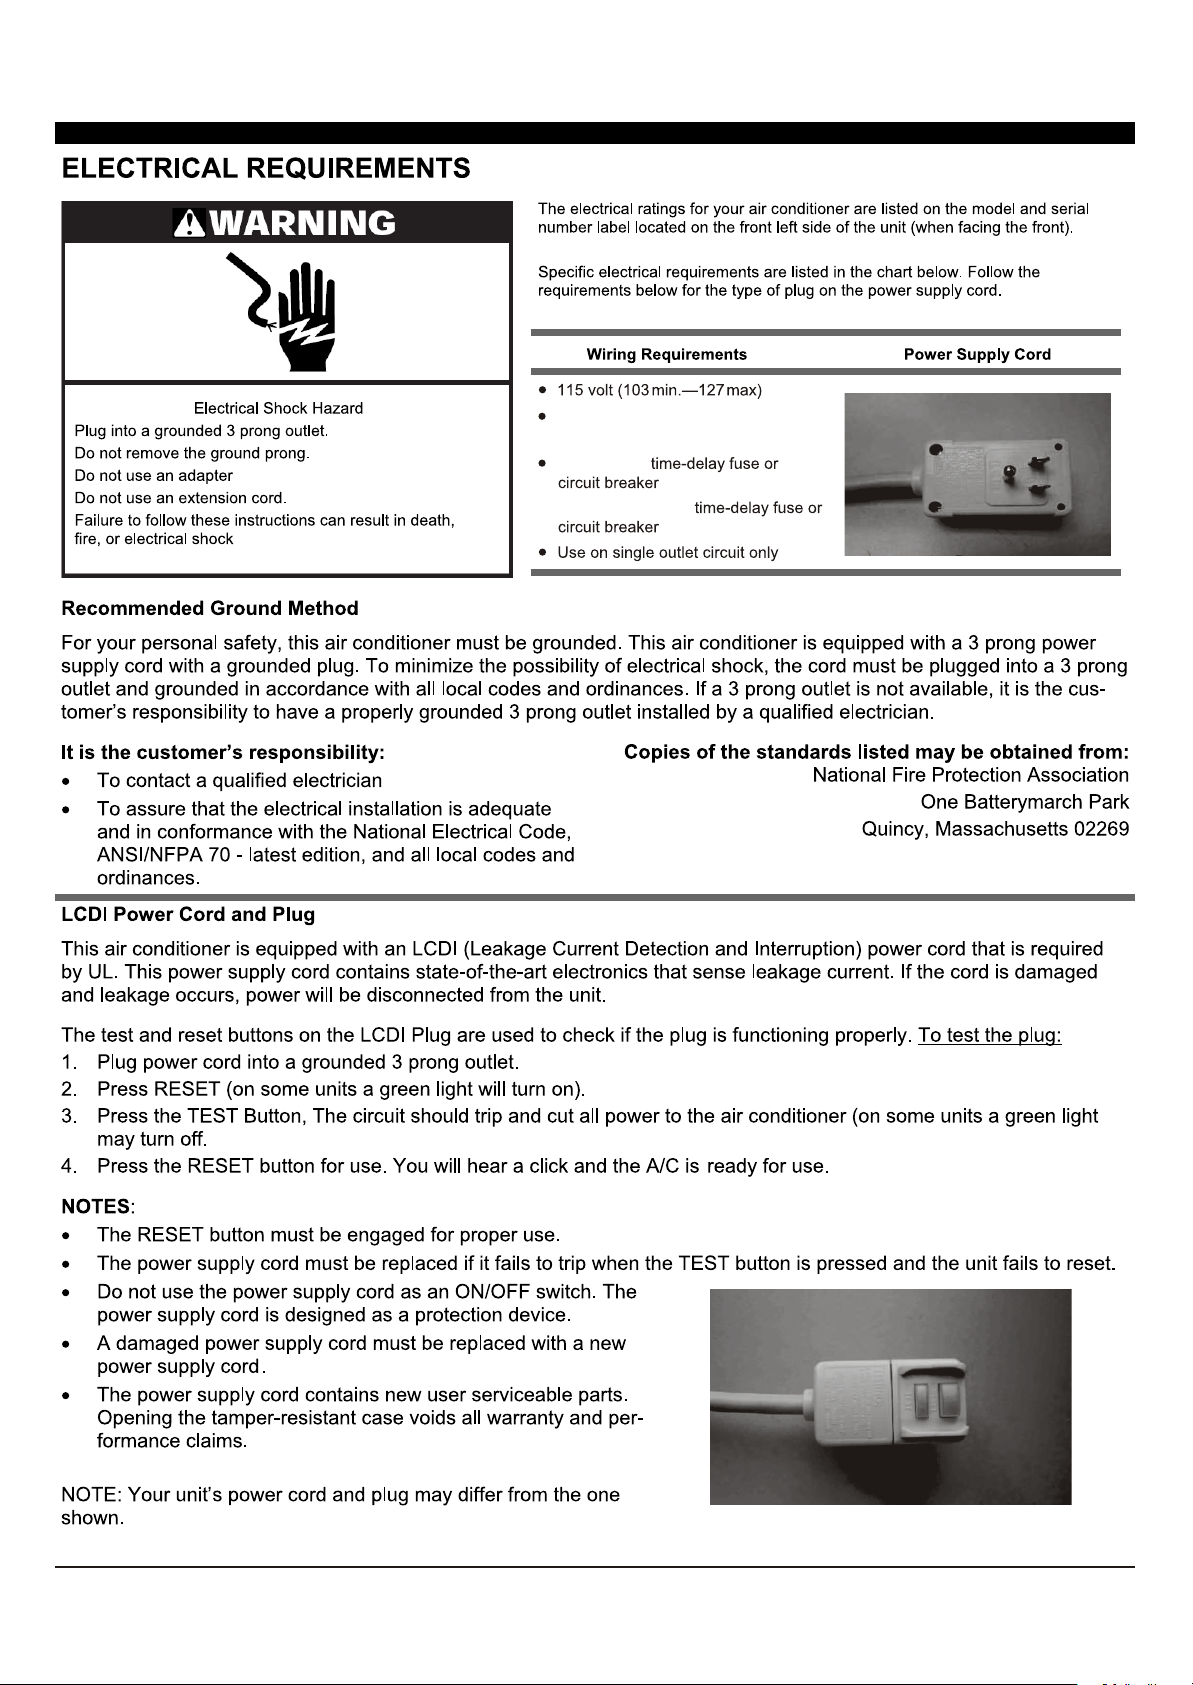
• 115 Voltios (103 min. – 127 max.)
• (8K) 0-8 amperios
(10K-12K) 0-12 amperios
• (8K) fusible o circuito interruptor de demora
de tiempo de 10 amperios
(10K-12K) fusible o circuito interruptor de
demora de tiempo de 15 amperios
• Utilice sólo con un circuito de toma corriente
único.
Método recomendado de conexión a tierra
Para su seguridad personal, este equipo de aire acondicionado debe conectarse a tierra. Este equipo de aire acondicionado cuenta con un cordón
de tres alambres y un enchufe de trece extremidades. Con el fin de reducir la posibilidad de una descarga eléctrica, este tipo de enchufe debe
conectarse a un toma corriente de tres ranuras y con conexión a tierra conforme a los códigos y ordenanzas de su localidad. Si no se cuenta con un
tomacorriente de tres ranuras, es responsabilidad del cliente instalado contar con este tipo de toma corriente por parte de un electricista calificado.
Es de responsabilidad del cliente:
• Ponerse en contacto con un electricista calificado
• Asegurarse de que toda la instalación eléctrica sea
adecuada y de conformidad con las Normas Eléctricas
Nacionales ANSI/NFPA 70, en su versión más reciente así
como con cualquier otra norma y ordenanza local.
Se puede conseguir copias de los estándares o normas de:
Asociación de Protección Nacional Contra los Incendios
One Batterymarch Park
Quincy, Massachusetts 02269
Cordón de alimentación y enchufe LCDI
Este equipo de aire acondicionado viene equipado con un cordón LCDI (detección de interrupción de fuga de corriente) requerido por parte de UL.
Este cordón contiene componentes electrónicos de última generación que pueden detectar una fuga de corriente. Si el cordón se dañara y ocurriera
una fuga, se desconectará la electricidad del equipo.
Los botones de prueba y de reinicio del enchufe LCDI se puede utilizar para verificar si el enchufe se encuentra funcionando adecuadamente. Para
llevar a cabo una prueba del enchufe:
1. Proceda a conectar a un tomacorriente de tres ranuras.
2. Presione el botón RESET (reiniciar). En algunos equipos se iluminará la luz verde.
3. Presione el botón TEST (prueba). El circuito deberá saltar y desconectar toda la energía del equipo de aire acondicionado (en algunos equipos la
luz verde se apagará).
4. Presione el botón RESET para utilizar. Se escuchará un sonido de
enganche y el equipo de aire acondicionado quedará listo para su uso.
NOTAS:
• El botón RESET deberá engancharse correctamente para un uso
adecuado.
• Se deberá reemplazar el cordón de alimentación si no saltará al momento
de presionar el botón TEST y si el equipo no se reinicia.
• No utilice el cordón de alimentación como un dispositivo de encendido. El
cordón de alimentación se encuentra diseñado como un dispositivo de
protección.
• Deberá reemplazarse el cordón de alimentación dañado.
• El cordón de alimentación no contiene ninguna pieza utilizable a nivel
usuario. Si se abre o se manipula la cubierta, se anulará la garantía.
NOTA: El cordón de alimentación y el enchufe de su equipo podría diferir de
la ilustración mostrada.
2
Page 23

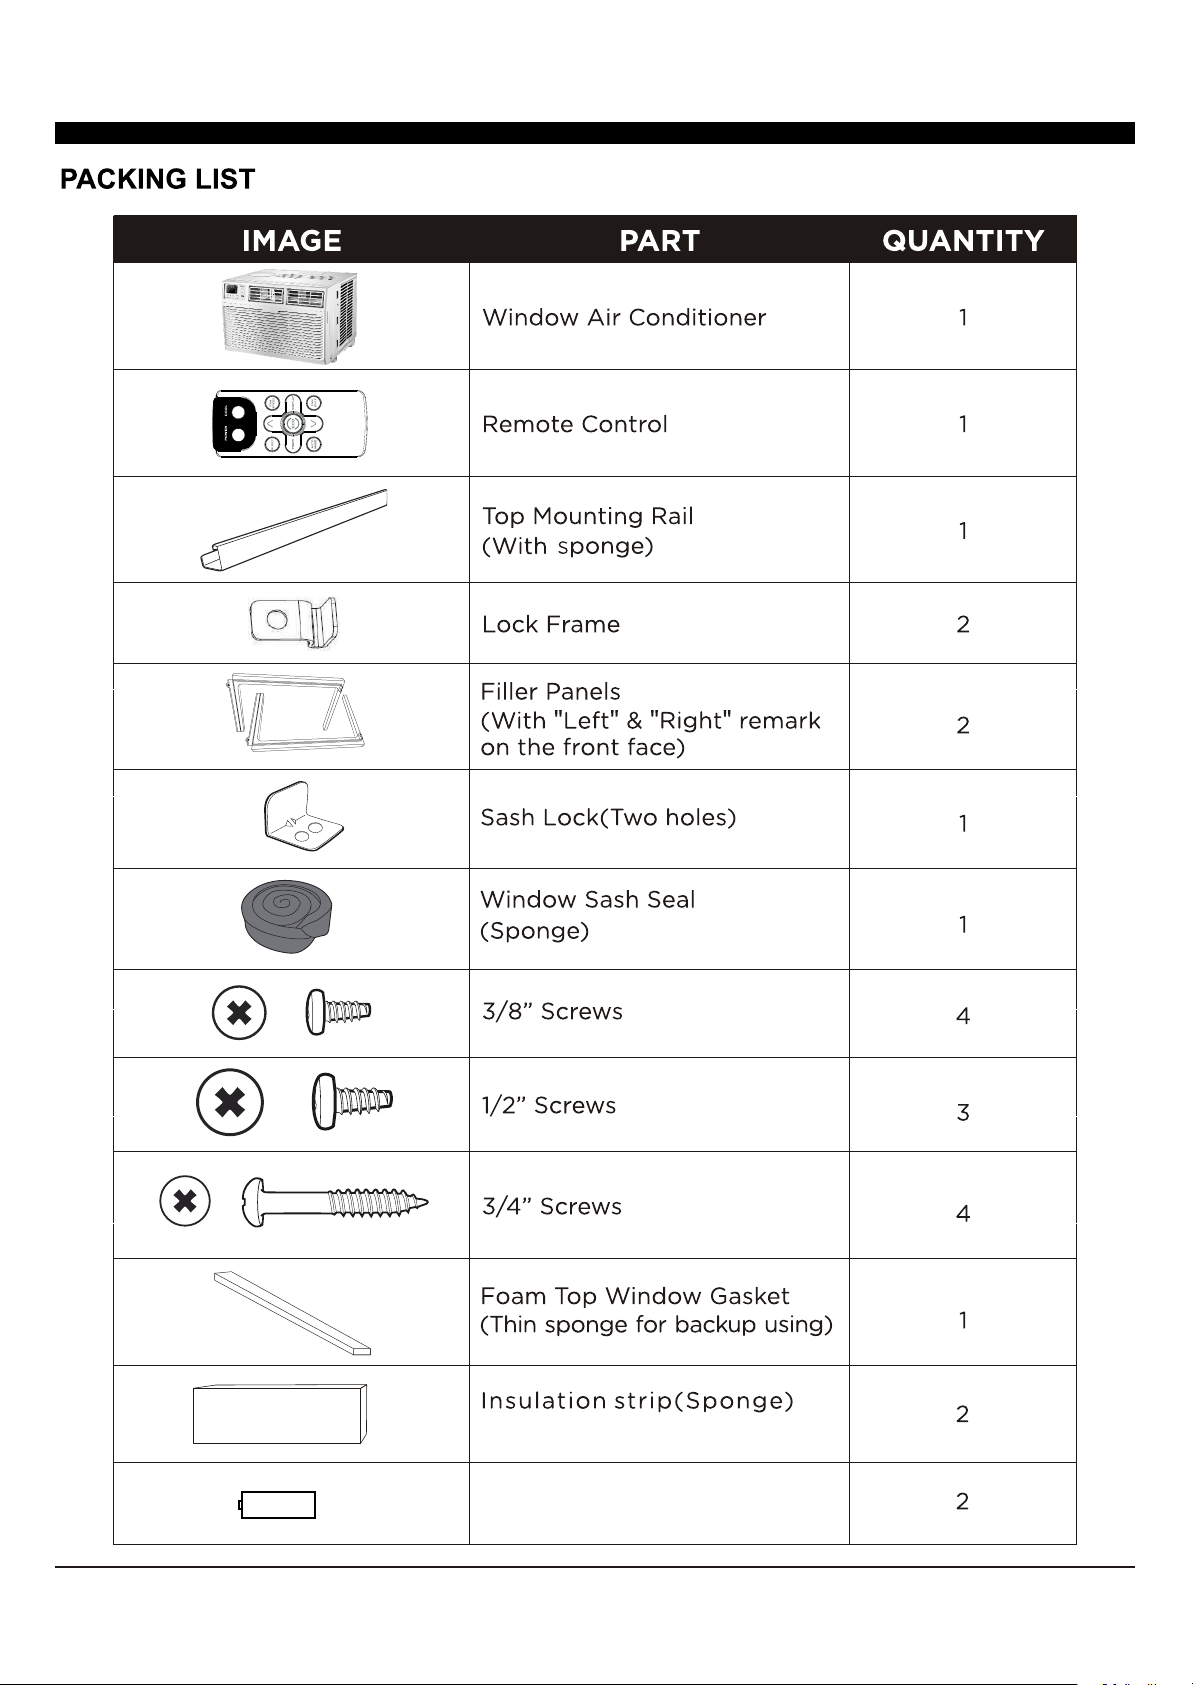
LISTA DE EMPAQUE
IMAGEN PIEZA CANTIDAD
Equipo de aire acondicionado
para ventana
Control remoto
Riel superior de montaje
(con esponja)
Esquinero de sujeción
Paneles de relleno (con marcas
“izquierda” y “derecha” en la
parte delantera)
Asegurador de alféizar
(dos agujeros)
Sello de alféizar de ventana
(esponja)
Tornillos de 3/8”
Tornillos de 1/2”
Tornillos de 3/4”
Empaquetadura de espuma superior
para ventana (esponja delgada para
uso de cubierta posterior)
Tira de aislamiento (esponja)
(Sólo para E-star modelo)
Bateria
3
Page 24

AVISO
Toda la información y especificaciones técnicas que se presentan en este manual del usuario son
brindadas por el fabricante.
INSTRUCCIONES DE INSTALACIÓN Y DE ENSAMBLAJE
Se requerirá llevar a cabo algún tipo de ensamblaje de su equipo de aire acondicionado. Verifique las siguientes instrucciones con cuidado:
1. Este equipo de aire acondicionado ha sido diseñado para instalarse
en una ventana de doble hoja y con una ventana de un ancho de entre
23” a 36” (584 mm - 914 mm).
2. Este equipo de aire acondicionado puede instalarse sin los paneles
de acordeón para poderlo encajar dentro de una abertura de ventana
más angosta. Véase las dimensiones de la ventana.
3. El alféizar inferior (la parte inferior de la ventana que se mueve hacia
arriba y hacia abajo) debe permitir un área libre vertical de 14.5” al
momento de abrir se. (Véase la Fig.1).
4. Toda las piezas de sujeción deben asegurarse a madera firme,
albañilería o mental.
5. El tomacorriente debe quedar accesible para poder conectar el
cordón de alimentación.
FIG. 1
SOPORTE
ESPACIO
O APOYO
PARED
INTERIOR
NOTA: conserve los empaques del producto o y las instruc-
(PARA 8K)
PARED
EXTERIOR
23" to 36"
584 mm to 914 mm
14 1/2" min
(368mm)
ciones de instalación para cualquier consulta en el futuro.
Guarde el equipo de aire acondicionado en su caja original sino
se lo va a utilizar durante un periodo prolongado.
INSTRUCCIONES DE INSTALACIÓN Y DE ENSAMBLAJE
Se requerirá llevar a cabo algún tipo de ensamblaje de su equipo de aire acondicionado. Verifique las siguientes instrucciones con cuidado:
1. Este equipo de aire acondicionado ha sido diseñado para instalarse
en una ventana de doble hoja y con una ventana de un ancho de entre
26” a 36” (660 mm - 914 mm).
2. Este equipo de aire acondicionado puede instalarse sin los paneles
de acordeón para poderlo encajar dentro de una abertura de ventana
más angosta. Véase las dimensiones de la ventana.
3. El alféizar inferior (la parte inferior de la ventana que se mueve hacia
arriba y hacia abajo) debe permitir un área libre vertical de 16” al
momento de abrir se. (Véase la Fig.2).
4. Toda las piezas de sujeción deben asegurarse a madera firme,
albañilería o mental.
5. El tomacorriente debe quedar accesible para poder conectar el
cordón de alimentación.
FIG. 2
SOPORTE
ESPACIO
O APOYO
PARED
INTERIOR
NOTA: conserve los empaques del producto o y las instruc-
(PARA 10K/12K)
26" to 36"
660mm - 914mm
PARED
EXTERIOR
16" min
(406mm)
ciones de instalación para cualquier consulta en el futuro.
Guarde el equipo de aire acondicionado en su caja original sino
se lo va a utilizar durante un periodo prolongado.
4
Page 25

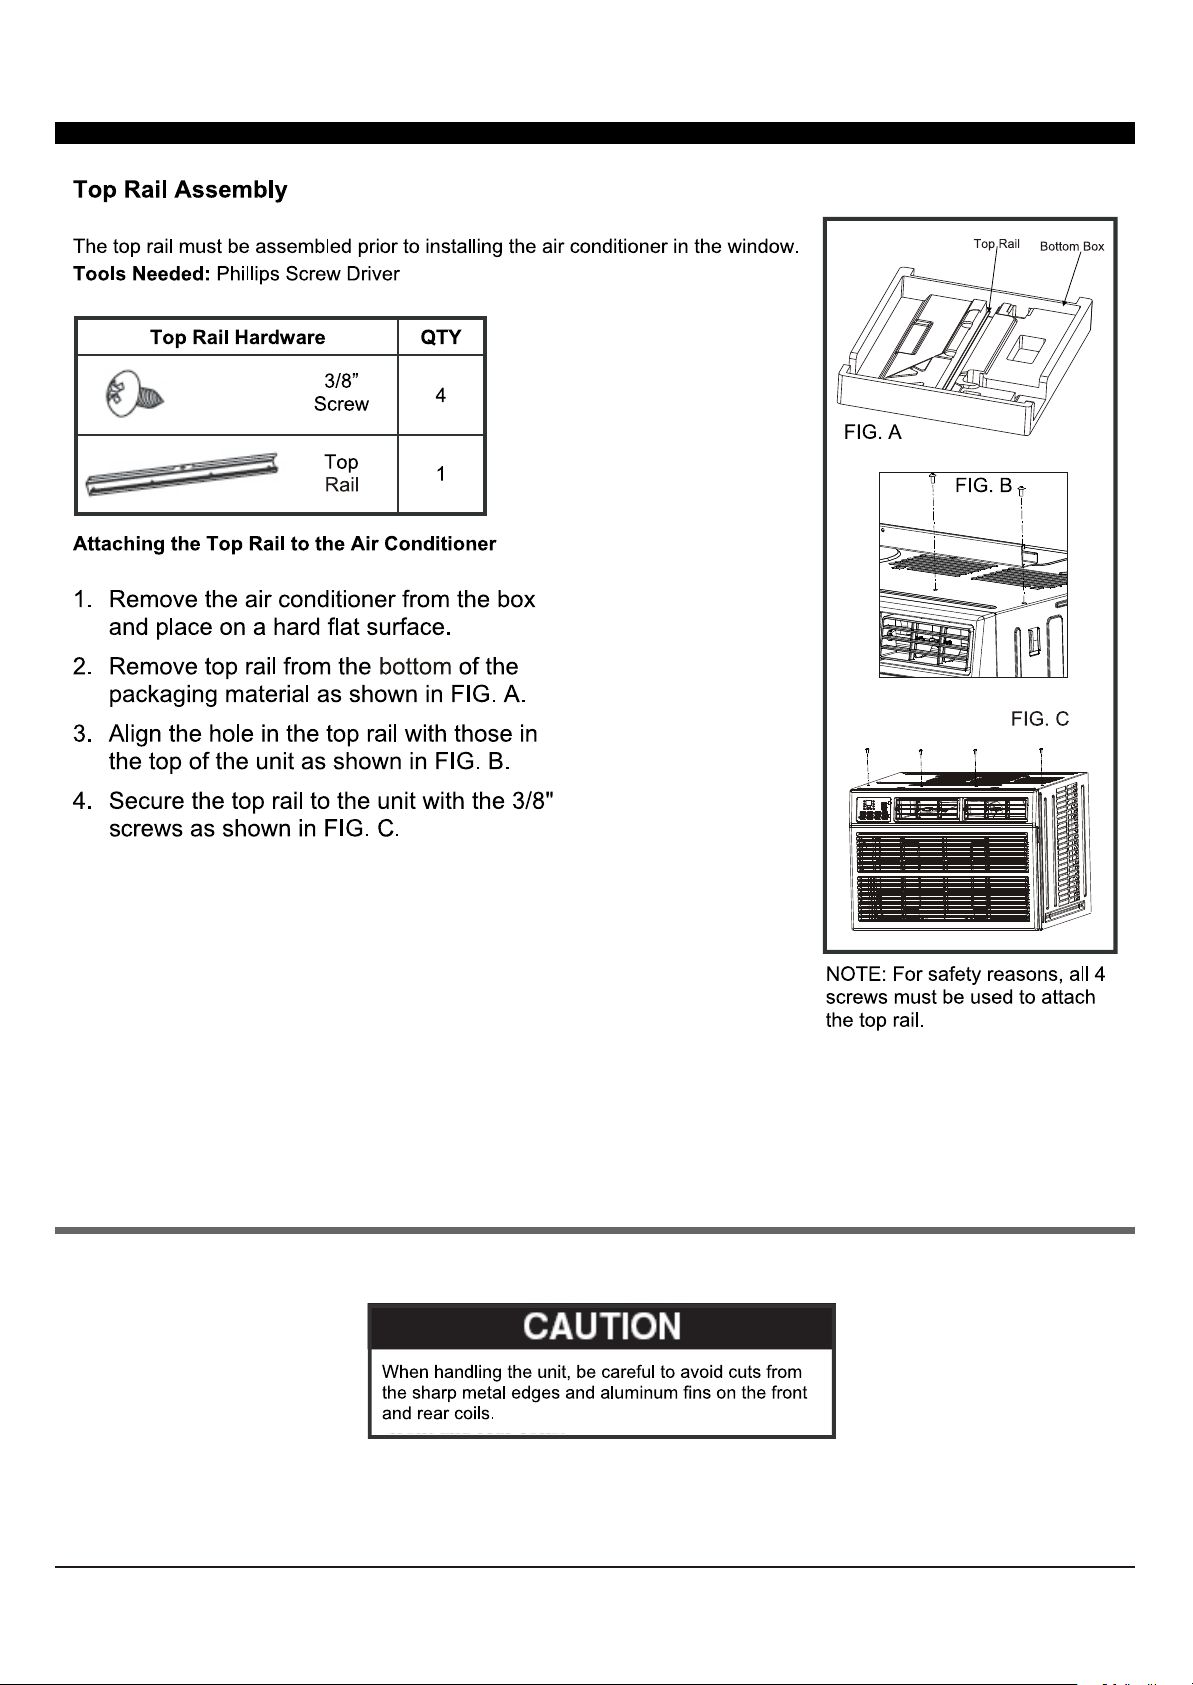
Ensamblaje del riel superior (solamente utilizado para 8K)
El riel superior debe ensamblar se previamente a la instalación del equipo de aire acondicionado en la ventana.
Herramientas necesarias: Destornillador Phillips
HERRAMIENTAS DEL RIEL SUPERIOR CANTIDAD
TORNILLO
RIEL
SUPERIOR
Cómo acoplar el riel superior al equipo de aire acondicionado
1. Retire el equipo de aire acondicionado de sus empaques y colóquelo sobre una
superficie plana.
2. Retire el riel superior de la parte inferior de los materiales de empaque como se
muestra en la Figura A.
3. Alinee el agujero en el riel superior con el que se encuentra la parte superior del
equipo como se muestra la Figura B.
Riel Superior
Caja inferior
4. Asegure el riel superior al equipo utilizando los tornillos de 3/8” como se muestra
en la Figura. C.
PRECAUCIÓN
Al momento de manipular el equipo, tenga cuidado
para evitar cortes debido a los bordes de metal
afilados y a las aletas de aluminio en las bobinas
delantera sea posteriores.
NOTA: Por motivos de seguridad,
los cuatro tornillos deben
utilizarse para acoplar el riel
superior.
5
Page 26

Herramientas para el ensamblaje
Tornillos ¾”
Tornillos ½”
Esquinero de
sujeción
Seguro de
alféizar
Seguro de hoja
Herramientas necesarias:
• Destornillador Phillips
• Taladro (si fuera necesario agujeros
piloto)
Cómo instalar
NOTA: El riel superior y los paneles deslizantes en cada
lado cuentan con un espacio para proporcionar la inclinación apropiada hacia atrás de 5/6”. Esto es necesario
para permitir la adecuada condensación del agua y su
drenaje. Si no se va a utilizar los paneles laterales por
cualquier motivo, deberá mantenerse de todas maneras
de inclinación hacia atrás.
Coloque el equipo sobre el piso, sobre un banco una
mesa. Existe un panel de relleno para ventana e
izquierdo y derecho. Asegúrese de utilizar el panel
correctamente para cada costado. Al momento de
instalar la bisagra para asegurar el panel en su lugar en la
ventana, ésta deberá quedar de cara hacia la habitación.
A. Sujete el panel de acordeón con una mano y con cuidado
tire hacia atrás de la parte central para liberar el extremo
abierto. Véase la Figura 3.
FIG. 3
PRECAUCIÓN
Al momento de manipular el equipo, tenga cuidado
para evitar cortes debido a los bordes de metal
afilados y a las aletas de aluminio en las bobinas
delantera sea posteriores.
B. Deslice el extremo libre del panel dentro de la cabina como
se muestra la Figura 4. Deslice el panel hacia abajo.
Asegúrese de dejar suficiente espacio para poder insertar la
parte superior e inferior del armazón dentro de los rieles de la
cabina.
FIG. 4
C. Una vez que se haya instalado el panel en la parte lateral de
la cabina, asegúrese de que queden correctamente asegurados dentro del canal del armazón haciendo los ajustes necesarios. Deslice los extremos inferiores superior del armazón
dentro de los rieles inferior y superior de la cabina. Véase la
Figura 5.
FIG. 5
D. Deslice el panel totalmente y repita con el otro costado.
6
Page 27

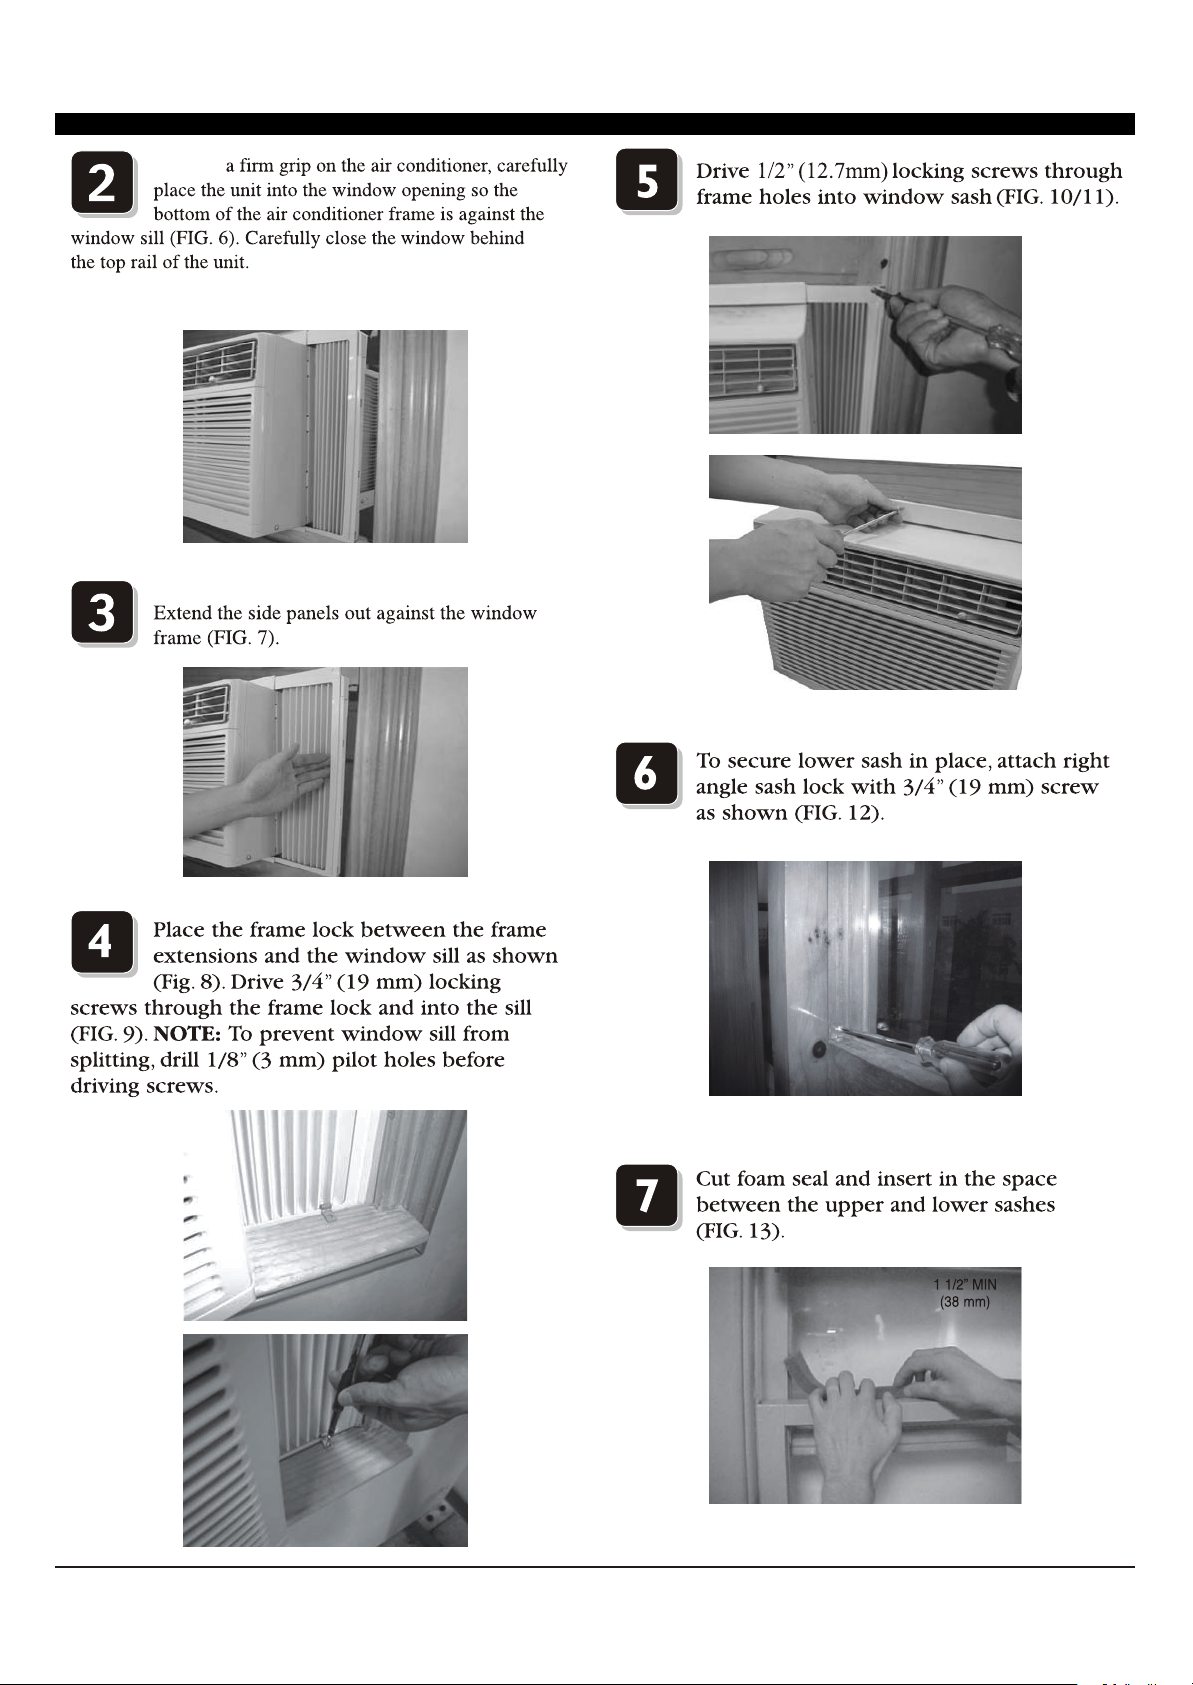
Sujete el equipo de aire acondicionado firmemente
y con cuidado coloque el equipo sobre la abertura
de la ventana de manera que la parte inferior del
equipo repose sobre el apoyo de la ventana (Fig. 6). Con
cuidado cierre la ventana por detrás del riel superior del
equipo. (Se sugiere mantener un ángulo descendente para
el agua de lluvia acumulada puede drenar hacia fuera de la
parte trasera de la unidad.)
FIG. 6
Extienda los paneles laterales hacia afuera contra
del marco de la ventana (Fig. 7).
FIG. 7
Coloque los tornillos aseguradores de ½” (12.7 mm)
a través de los agujeros del armazón y dentro del
alféizar de la ventana (Figuras 10 y11).
FIG. 10
FIG. 11
Coloque el esquinero de sujeción entre las
extensiones del marco y el apoyo de ventana
como se muestra en la Fig. 8. Coloque los tornillos
aseguradores de ¾” (19 mm) a través del esquinero de
sujeción y dentro del marco de la ventana. (Fig. 9). NOTA:
para evitar que el marco de la ventana se abra, perfore
agujeros piloto de 1/8” (3mm) antes de entornillar.
FIG. 8
Para asegurar la hoja inferior de la ventana en su
lugar, acople el asegurador de ángulo derecho
utilizando un tornillo de ¾” como se muestra en la
figura (Figura 12).
FIG. 12
Corte el sello de espuma e inserte lo en el espacio
entre las hojas superior e inferior (Figura 13).
FIG. 13
FIG. 9
7
Page 28

Si el equipo de aire acondicionado
USO DEL EQUIPO DE AIRE
quedará obstruido por parte de
una ventana contra tormentas
Añada madera como se muestra en la Fig. 14 o retire la
ventana contra tormentas antes de instalar el equipo de aire
acondicionado
FIG. 14
HOJA
MARCO DE LA
VENTANA
CONTRA
TORMENTAS
Si no se puede retirar el marco de la ventana contra tormentas, asegúrese de que los agujeros o ranuras de drenaje no
queden obstruidos o sellados con pintura. Se debe permitir el
drenaje de la acumulación de agua de lluvia o de
condensación.
Grosor del tablero
requerido para
una inclinación
hacia atrás a lo
largo del marco
completo. Asegure
con clavos o
tornillos.
ACONDICIONADO
El uso apropiado de su equipo de aire acondicionado le
ayudará a obtener los mejores resultados.
Esta sección le explicara el uso adecuado de su equipo de
aire acondicionado.
IMPORTANTE:
• Si se apaga el equipo de aire acondicionado, espere por lo
menos 3 minutos hasta volverlo a encender. Esto ayudará a
que el fusible o interruptor se quemen.
• No intente poner a funcionar el equipo de aire acondicionado
bajo la función de enfriamiento o cuando la temperatura
exterior se encuentre por debajo de los 65° F (18 °C). La
bobina del evaporador interior podría congelarse y el equipo
podría no funcionar correctamente,
NOTA: En el caso de falta de energía, el equipo de aire
acondicionado funcionará según la programación anterior una
Cómo retirar el equipo de aire
acondicionado de la ventana
• Apague el equipo de aire acondicionado ni desenchufe.
• Retire el sello de las hojas de entre las ventanas.
• Retire los tornillos instalados en el armazón y en el
esquinero de sujeción.
• Cierre (deslice) los paneles laterales.
• Sujete el equipo de aire acondicionado firmemente,
levante la hoja de la ventana y con cuidado incline el
equipo de aire acondicionado hacia atrás para drenar
cualquier cantidad de agua condensada en la base del
equipo. Tenga cuidado de no derramar cualquier agua
restante al momento de levantar el equipo proceda a
guardar las piezas junto con el equipo de aire acondicionado.
8
Page 29

USANDO SU ACONDICIONADOR DE AIRE
Panel de control electrónico y control remoto
Nota:
Esta pantalla muestra siempre la temperatura ambiente en el
modo de ventilador, excepto cuando se ajusta la temperatura
programada o el cronometrador.
1
2
AUTO
SPEED
WIFI
WIFI Symbol*
9 8 7 6 5 4
Controllador de Acondicionador de Aire
NOTA: "*" significa disponible solo para WiFi modelos, para
más información, consulte el manual de WiFi.
Sonidos normales de funcionamiento
Usted puede escuchar un ruido de golpeteo causado
por el agua que golpea el condensador, en días
lluviosos, o cuando la humedad es alta. Esta
característica de diseño ayuda a eliminar la humedad
y mejorar la eficiencia.
Usted puede oír el chasquido del termostato cuando
el compresor se enciende y se apaga.
El agua se acumulará en la bandeja base durante la
lluvia o días de alta humedad. El agua puede rebosar
y gotear de la parte exterior de la unidad.
El ventilador puede funcionar incluso cuando el
compresor no está encendido.
Pantalla digital:
1.
operación se está enfriando, seco, ventilador y auto, y se
mostrará la temperatura establecida.
El tiempo se demostrará en el ajuste del cronometrador.
2.
Butón de o :
control y el control remoto para aumentar o disminuir la
temperatura de ajuste o el cronometrador.
Alcance de temperaturas: 61°F-88°F o 16 ~ 31 .
3.
Botón de Encendido:
acondicionador de aire.
4.
Botón MODO:
los diferentes modos: enfriar, secar, ventilador y auto.
sin ajuste del temporizador, el modo de
Utilice estos botones en el panel de
Presione el botón MODO para recorrer
AUTO
MODE
Encienda y apague el
3
Modo de Enfriar:
la función de enfriamiento permite que
el acondicionador de aire enfríe la habitación y al mismo
tiempo reduce el humidificador de aire. Pulse el botón
MODE para activar la función de refrigeración. Para
optimizar la función del acondicionador de aire, ajuste la
temperatura y la velocidad presionando el botón indicado.
Modo de Secar:
Esta función reduce la humedad del aire
para hacer el cuarto más cómodo. Pulse el botón MODO
para ajustar el modo de Secar. Una función automática
de alternar ciclos de enfriamiento y ventilador de aire se
activa.
Modo de Ventilador:
el acondicionador funciona sólo en
ventilación. Pulse el botón MODE para ajustar el modo
Fan. Con presionar el botón de velocidad del ventilador la
velocidad cambia en la secuencia siguiente: Hola, Med y
lo en el modo de ventilador.
Modo de Auto:
En el modo automático, la unidad elige
automáticamente el modo de funcionamiento (enfriar,
secar o ventilador). En este modo la temperatura se
ajustan automáticamente según la temperatura ambiente
(probada por el sensor de temperatura que se incorpora
en la unidad interior.).
5.
Botón de Cronometrador:
Utilice estos botones en el
panel de control y el mando a distancia para ajustar el
Cronometrador. Cronometrador apagado: la parada
temporizada se programa pulsando el botón de
Cronometrador. Ajuste el tiempo de descanso pulsando
el botón de " " o " " hasta que el tiempo de descanso
mostrado sea su demanda y luego presione el botón
Cronometrador nuevamente.
Cronometrador encendido:
cuando la unidad está
apagada, presione el botón de Cronometrador en la
primera vez, ajuste la temperatura presionando el botón
de " " o " ". Pulse el botón de Cronometrador en la
segunda vez, ajuste el tiempo de reposo pulsando el
botón de " " o " ". Presione el botón del contador de
tiempo en la tercera vez, confirme el ajuste, después el
tiempo de descanso a la conmutación automática
siguiente se podría leer en la exhibición de la máquina.
Nota:
puede ajustarse para que se apague o encienda
automáticamente en 0.5-24 horas. Cada vez que se
presionan los botones de " " " " aumentará o
disminuirá el cronometrador. El cronometrador puede
ajustarse en un incremento de 0.5 horas por debajo de
10 horas y un incremento de 1 hora durante 10 horas o
más. La luz de ajuste se encenderá durante el ajuste.
Para cancelar la función programada, pulse de nuevo el
botón Timer
9
Page 30

USANDO SU ACONDICIONADOR DE AIRE
Panel de control electrónico y control remoto
6. Botón de ECO:Lorsque le climatiseur est en mode ECO,
le voyant s'illuminera. En mode ECO, l'appareil s'arrêtera
une fois que la température de la pièce atteint la
température réglée;
L'appareil se remettra en marche une fois que la
température ambiante sera plus élevée que le réglage de
température. Avant que le compresseur ne se mette en
marche, le moteur du ventilateur fonctionnera pendant un
certain temps, puis s'arrêtera. Il fonctionnera ainsi de
façon intermittente pour plus de confort et pour une
économie d'énergie.
7. Botón del Sleep: Presione el botón SLEEP, todas
las luces de la pantalla se apagarán después de un rato,
pero la luz Sleep está siempre encendida. En el modo
de Sleep, el acondicionador de aire ajustará
automáticamente la temperatura y la velocidad del
ventilador para que la habitación se sienta más cómoda
durante la noche. La temperatura ajustada aumentará
automáticamente cada 30-60 minutos y a lo sumo
cambiará seis veces hasta que la temperatura ajustada
sea 81 o 82°F. Y cada tiempo de funcionamiento
depende de la temperatura fijada.
10. Persianas Direccionales: Para dirigir el flujo de aire,
rueda horizontal para controlar la dirección horizontal,
el deflector aéreo para controlar la dirección vertical.
Rueda horizontalDeflector de aire Deflector de aire
8. Botón de Velocidad del Ventilador: Presione el botón
de velocidad del ventilador para elegir las opciones de
velocidad del ventilador. Usted puede elegir la velocidad
de Alta, Media, Baja o Auto en el modo de Enfriar y elegir
Alta, Media, Baja en el modo de ventilador.
9. Botón Filtro: Cuando la luz de verificación del filtro está
apagada, es inútil presionar el botón de verificación del
filtro. Cuando la luz de verificación del filtro está
encendida, puede apagar la luz presionando el botón de
verificación del filtro. Después de que el motor del
ventilador funcione durante 500 horas totales, la luz de
verificación del filtro se encenderá para recordar al
usuario que debe limpiar el filtro.
10
Page 31

CÓMO UTILIZAR EL EQUIPO DE AIRE ACONDICIONADO
5.
CONTROL REMOTO
1
3
4
5
6
3
2
7
8
9
10
TIMER: Utilice estos botones en el panel de control y en el
control remoto para programar el temporizador.
Temporizador apagado: El tiempo de apagado será ha
programado al presionar el botón del temporizador. Programe
el tiempo restante presionado los botones o hasta que el
tiempo restante se muestre en pantalla según lo deseado y
luego presione de nuevo el botón del temporizador
Temporizador encendido: Con el equipo apagado, presione el
botón del temporizador una vez. Programe la temperatura
utilizando los botones o . Presione el botón del temporizador por segunda vez y proceda a programar el tiempo restante
utilizando los botones o . Presione el temporizador por
tercera vez para confirmar lo programado. Luego el tiempo
restante se mostrará la pantalla del equipo.
Nota: Se podrá programar el apagado o encendido del equipo
en un rango de 0.5 a 24 horas. Con cada pulsación de los
botones o se aumentará o disminuirá el temporizador. El
temporizador puede programarse en incrementos de 0.5 horas
por debajo de 10 horas y en incrementos de 1 hora por encima
de 10 horas.
La luz indicadora de programación SET se iluminará.
Para cancelar la función programada, presione el botón del
temporizador TIMER de nuevo.
1. Encendido: Para encender o apagar el equipo de aire
acondicionado.
COOL: Presione el botón COOL para ingresar a la función
2.
de enfriamiento.
Botones o : Utilice estos botones en el panel de
3.
control o en el control remoto para aumentar o disminuir la
temperatura programada o el temporizador. Rango de temperatura: 61° F- 88° F o 16 °C - 31 °C.
4.
SLEEP: Presione el botón SLEEP, todas las luces de la
pantalla se apagarán después de un rato, pero la luz Sleep
está siempre encendida. Bajo la función SLEEP, el equipo
de aire acondicionado regularán automáticamente la temperatura y la velocidad del ventilador para mantener el ambiente
cómodo durante la noche. La temperatura programada aumentar automáticamente cada 30 a 60 minutos y como máximo
cambiará seis veces hasta que la temperatura programada se
81 o 82°F. Los tiempos dependerán de las
ha de
temperaturas programadas.
6.
AUTO: Bajo la función AUTO, el equipo automáticamente
seleccionará la opción de funcionamiento (enfriamiento, secado
ventilador). En esta opción, a de temperatura quedarán
lautomáticamente programadas según la temperatura de
ambiente (percibidas por el sensor de temperatura que viene
incorporado el equipo interno).
7.
FAN SPEED: Presione el botón de velocidad de ventilador
FAN SPEED para seleccionar las opciones de velocidad. Se
puede seleccionar entre alta, media y baja o velocidad
automática bajo la opción de enfriamiento y velocidad alta,
media y baja bajo la opción de ventilador.
8.
DISPLAY: Presione este botón para activar o desactivar las
luces o la pantalla.
ECO: Cuando el equipo se encuentre bajo la función ECO,
9.
se iluminará la luz indicadora. Bajo la función ECO, el equipo
se apagará una vez que el ambiente se haya enfriado según la
temperatura programada por parte del usuario.
El equipo se encenderá de nuevo cuando la temperatura de
ambiente se eleve por encima de la temperatura programada
por parte del usuario. Antes de que la compresora se active
de nuevo, el motor del ventilador funcionará durante un tiempo,
luego se detendrá por un tiempo y lo repito para proporcionar
una sensación mucho más confortable y ahorrar energía.
10.
FAN ONLY: Presione el botón de sólo ventilador para
ingresar al opción de funcionamiento de solamente ventilador.
Tamaño de baterías: AAA - NOTA: No mezcle baterías nuevas con usadas ni diferentes tipos de baterías AAA.
11
Page 32

CUIDADO Y LIMPIEZA
Lleve a cabo la limpieza del equipo de aire acondicionado con el fin de mantenerlo nuevo y minimizar la
acumulación de polvo.
Limpieza del filtro de aire
Deberá verificarse el filtro de aire por lo menos una vez
al mes para cerciorarse de que no necesite limpieza.
Las partículas atrapadas y el polvo pueden acumularse
en el filtro y podrían disminuir el flujo de aire y así como
causar que las bobinas acumulen escarcha de hielo.
Para limpiar el filtro de aire:
1. Retire el filtro tirando hacia debajo de las lengüetas
del compartimiento del filtro en la parte delantera del
equipo. (Véase la Fig. 15).
2. Lave el filtro utilizando líquido lavavajillas y un poco
de agua tibia. Enjuague el filtro completamente. Sacuda
el filtro para retirar cualquier exceso de agua.
3. Deje que el filtro se seque completamente antes de
colocarlo en el equipo.
4. Si no se desea lavar el filtro, se puede utilizar una
aspiradora para retirar polvo y otras partículas.
Limpieza de la cabina
Para limpiar la cabina del equipo de aire acondicionado:
• Es enchufe el equipo de aire acondicionado para
evitar una descarga eléctrica o el peligro de que se
produzca un incendio. La cabina y el panel delantero
del equipo de aire acondicionado pueden limpiarse del
polvo utilizando un paño suave o un paño ligeramente
humedecido con una solución de agua tibia y jabón
líquido. Enjuague completamente y seque.
• Nunca utilice en interiores abrasivos, cera o pulidores
para limpiar la cabina.
• Asegúrese de exprimir cualquier exceso de agua del
paño antes de aplicarlo sobre los controles. El exceso
de agua en los controles podrían causar daños al
equipo de aire acondicionado.
Almacenamiento durante el invierno
Para guardar el equipo de aire acondicionado sino se lo
va a utilizar durante un periodo prolongado, proceda a
retirarlo con cuidado de la ventana conforme a las
instrucciones de instalación y cúbralo con plástico o
colóquelo en su empaque original.
FIG. 15
Deterioro
Con el fin de reducir el deterioro del equipo de aire
acondicionado, espere por lo menos 3 minutos antes
de cambiar opciones de funcionamiento. Esto ayudará
a prevenir que la compresora se sobre caliente y ya que
el interruptor de circuito o salte
12
Page 33

SOLUCCIÓN A PROBLEMAS
PROBLEMBA CAUSAS POSIBLES SOLUCCIONES
El acondicionador de aire no se
enciende.
El acondicionador de aire no enfría
como debe ser.
El acondicionador de aire está
desenchufado
El fusible está fundido/el disyuntor se
dispara
Desconexión de encendido
El dispositivo de interrupción actual se
dispara
El flujo de aire está restringido
Cerciórese de que el acondicionador
de aire sea enchufe se empuja
completamente en el enchufe
Revise la caja de fusibles/disyuntores
de la casa y reemplace el fusible o
restablezca el disyuntor
La unidad volverá a arrancar automáticamente cuando se restablezca la
energía
Hay un retraso de tiempo de protección (aprox. 3 minutos) para evitar el
tropiezo de la sobrecarga del
compresor. Por esta razón, es posible
que la unidad no inicie la refrigeración
normal durante 3 minutos después de
volver a encenderla.
lPresione el botón de REINICIAR
ubicado en el enchufe del cable de
alimentación
Si el botón de Reiniciar no permanecerá activado, deje de usar el
acondicionador de aire y póngase en
contacto con un técnico de servicio
calificado
Asegúrese de que no haya cortinas,
persianas o muebles que bloqueen la
parte frontal del acondicionador de aire
El acondicionador de aire se está
congelando.
El Control remoto no funciona.
El control de la temperatura no se
puede fijar correctamente
El filtro de aire está sucio
La habitación puede ser demasiado
caliente
El aire frío se escapa
Las bobinas de enfriamiento se
congelan
El hielo bloquea el flujo de aire y detiene
el aire acondicionado de enfriar la
habitación
Las baterías se colocan
incorrectamente
Las baterías pueden estar muertas
incorrectly
Baje la temperatura ajustada del
termostato
Limpie el filtro. Consulte la sección de
limpieza y cuidado en el manual
Por favor deje que la habitación se
enfríe después de encender el
acondicionador de aire
Comprobar los registros de hornos
abiertos y las devoluciones de aire
frío
Ver "el Acondicionador de Aire se
está congelando"
Fije el modo al ventilador alto o alto
refresqúese y fije el termóstato a una
temperatura más alta
Compruebe la posición de las pilas
Reemplace las baterías
13
Page 34

SOLUCCIÓN A PROBLEMAS
PROBLEMBA CAUSAS POSIBLES SOLUCCIONES
El agua está goteando afuera. Clima cálido y húmedo
El agua está goteando dentro de la
habitación.
El agua recoge en la bandeja de la
base.
Se puede leer "E1", "E2" en la
pantalla digital.
El acondicionador de aire no está
correctamente inclinado hacia afuera
La humedad quitada del aire está
drenando en la cacerola de la base
Un sensor ha fallado
Esto es normal
Para un drenaje adecuado del agua,
asegúrese de que el acondicionador
de aire esté ligeramente inclinado
hacia abajo desde la parte delantera
de la unidad hacia atrás
Esto es normal por un período corto
en áreas con baja humedad y normal
durante un período más largo en
áreas con alta humedad
Contacte con servicio al cliente
14
Page 35

Page 36

Tambi n puedes ver este manual online desde nuestro sitio web:
https://www.tclusa.com.
 Loading...