

Page 1

Training Material of
MS901K-AP Chassis
Page 2

Contents Page
MS901K-AP Series…………………………..………………………………….…….1
Main Preinstall Function……….………….……………………………….…….4
Interface Introduction……..….………………….……….……….….….……8
Module Introduction……..….……………….…………………….….….……10
Block Diagram……..….………….………………………….….…….….….…13
Key Components Introduction….………………………….………….…………17
Key Components List…..………………………………………………………..…18
Key Test Point ....…………………………………………………………….………....21
Unit Circuit Analysis and Testing…..……………………………………….……31
Accessories Introduction...……………………………………….……….…….38
3D TV Introduction ...……….……………………………………….……….…….42
Trouble Shooting .……………………………………………………………...…45
System Reset & Enter Factory Menu…..……………………...…..…...…...…..50
Software Update From USB.…………………………………………………….....53
Page 3

MS901K-AP Series
---- Main Chip Introduction
The MSD6A901IV is MStar’s most up-to-date system-on-chip solution for flat
panel integrated digital television products. Building on the success of MStar’s
current solutions, the MSD6A901IV hosts the most advanced picture processing
engine, MStarACE-PRO2UC, for all the Experts in various TV video quality tuning
fields to develop the state-of-the-art TV and TV system.
FEATURES
Single chip iDTV solution that
supports dual 8/10bit LVDS
output, channel decoding,
MPEG decoding, 3D formatter,
security OS, andmedia-center
functionality enabled by a high
performance AV CODEC, CPU,
and security engine.
Key features includes,
1. DVB-C Front-End Demodulator
2. 3D Formatter Engine
3. A Multi-Standard A/V Format Decoder
4. The MACE-PRO2UC Video Processor
5. Home Theater Sound Processor
6. Internet and Variety of Connectivity Support
7. Advanced dual Core CPU and four Core GPU
8. Peripheral and Power Management
9. Robust and efficient security engine
-1-
Page 4
MS901K-AP Series
---- Menu Display
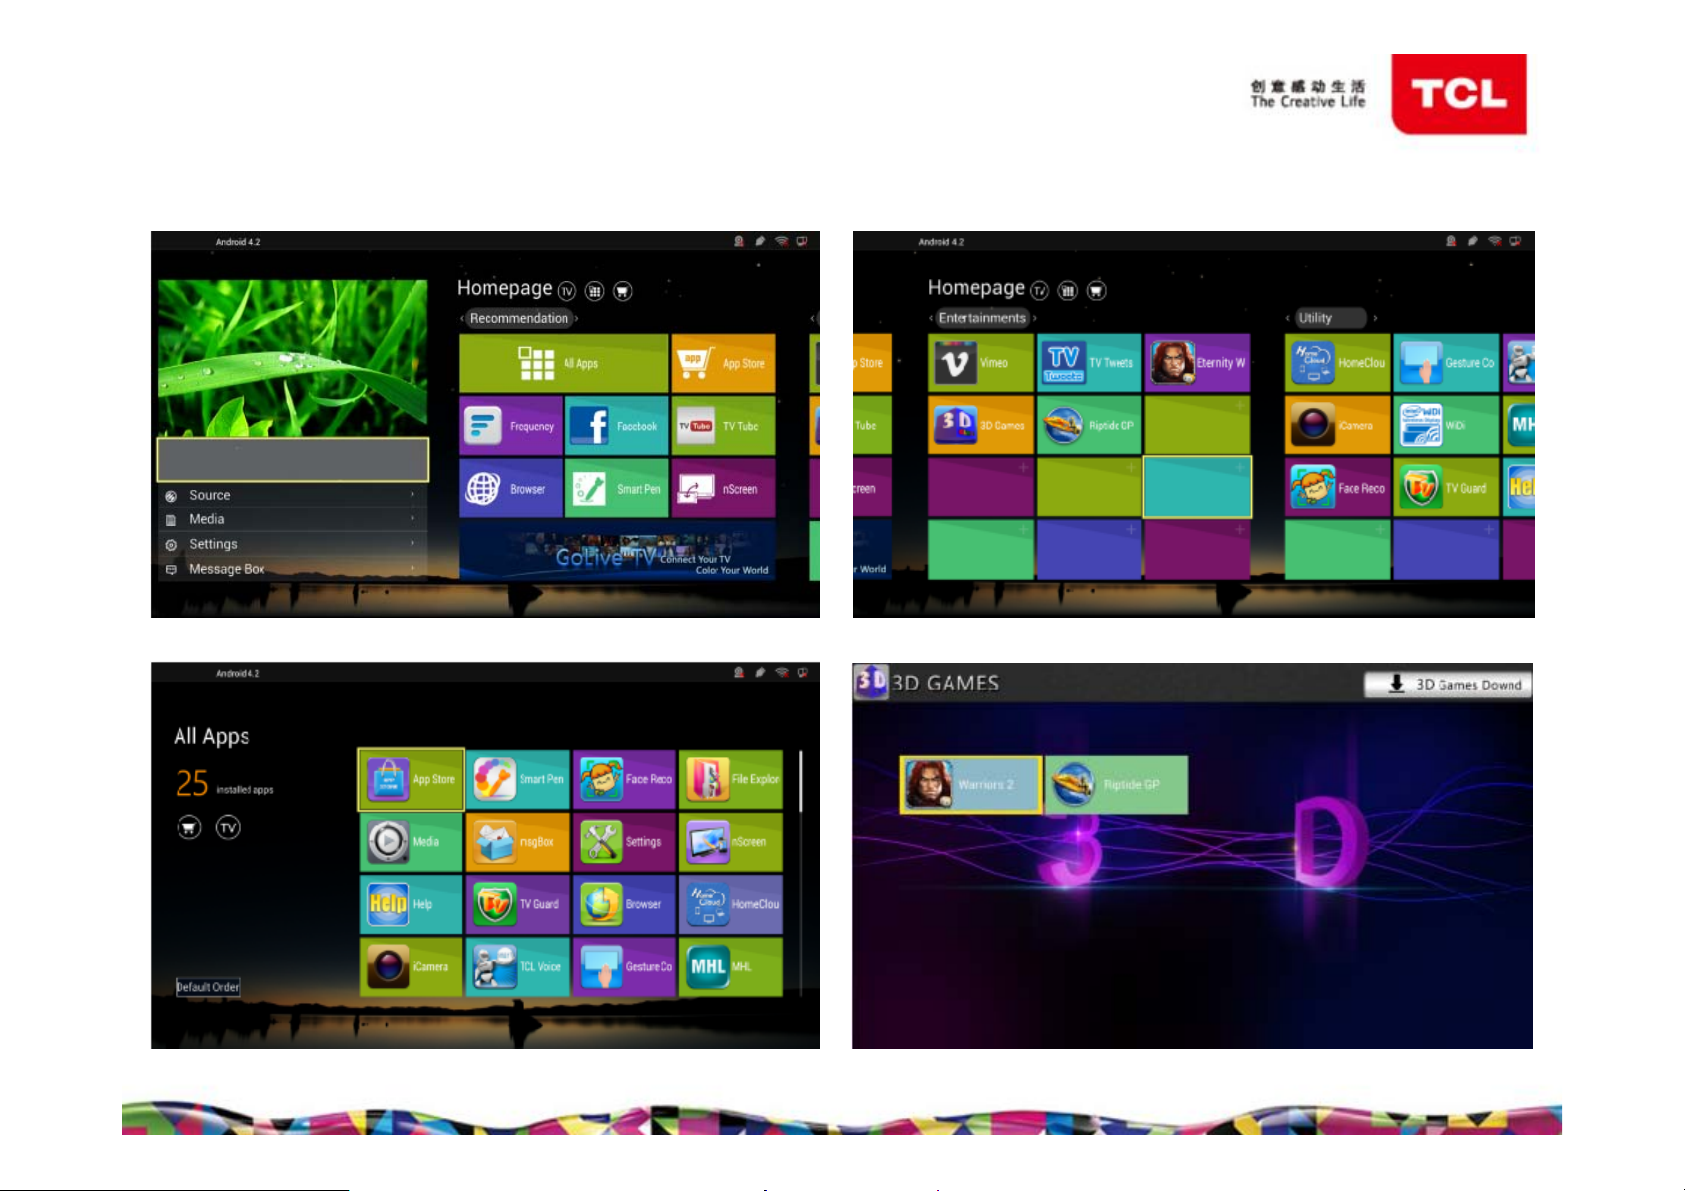
◆ Homepage(1) ◆ Homepage(2)
◆ All Apps ◆ 3D Games
-2-
Page 5
MS901K-AP Series
---- Menu Display
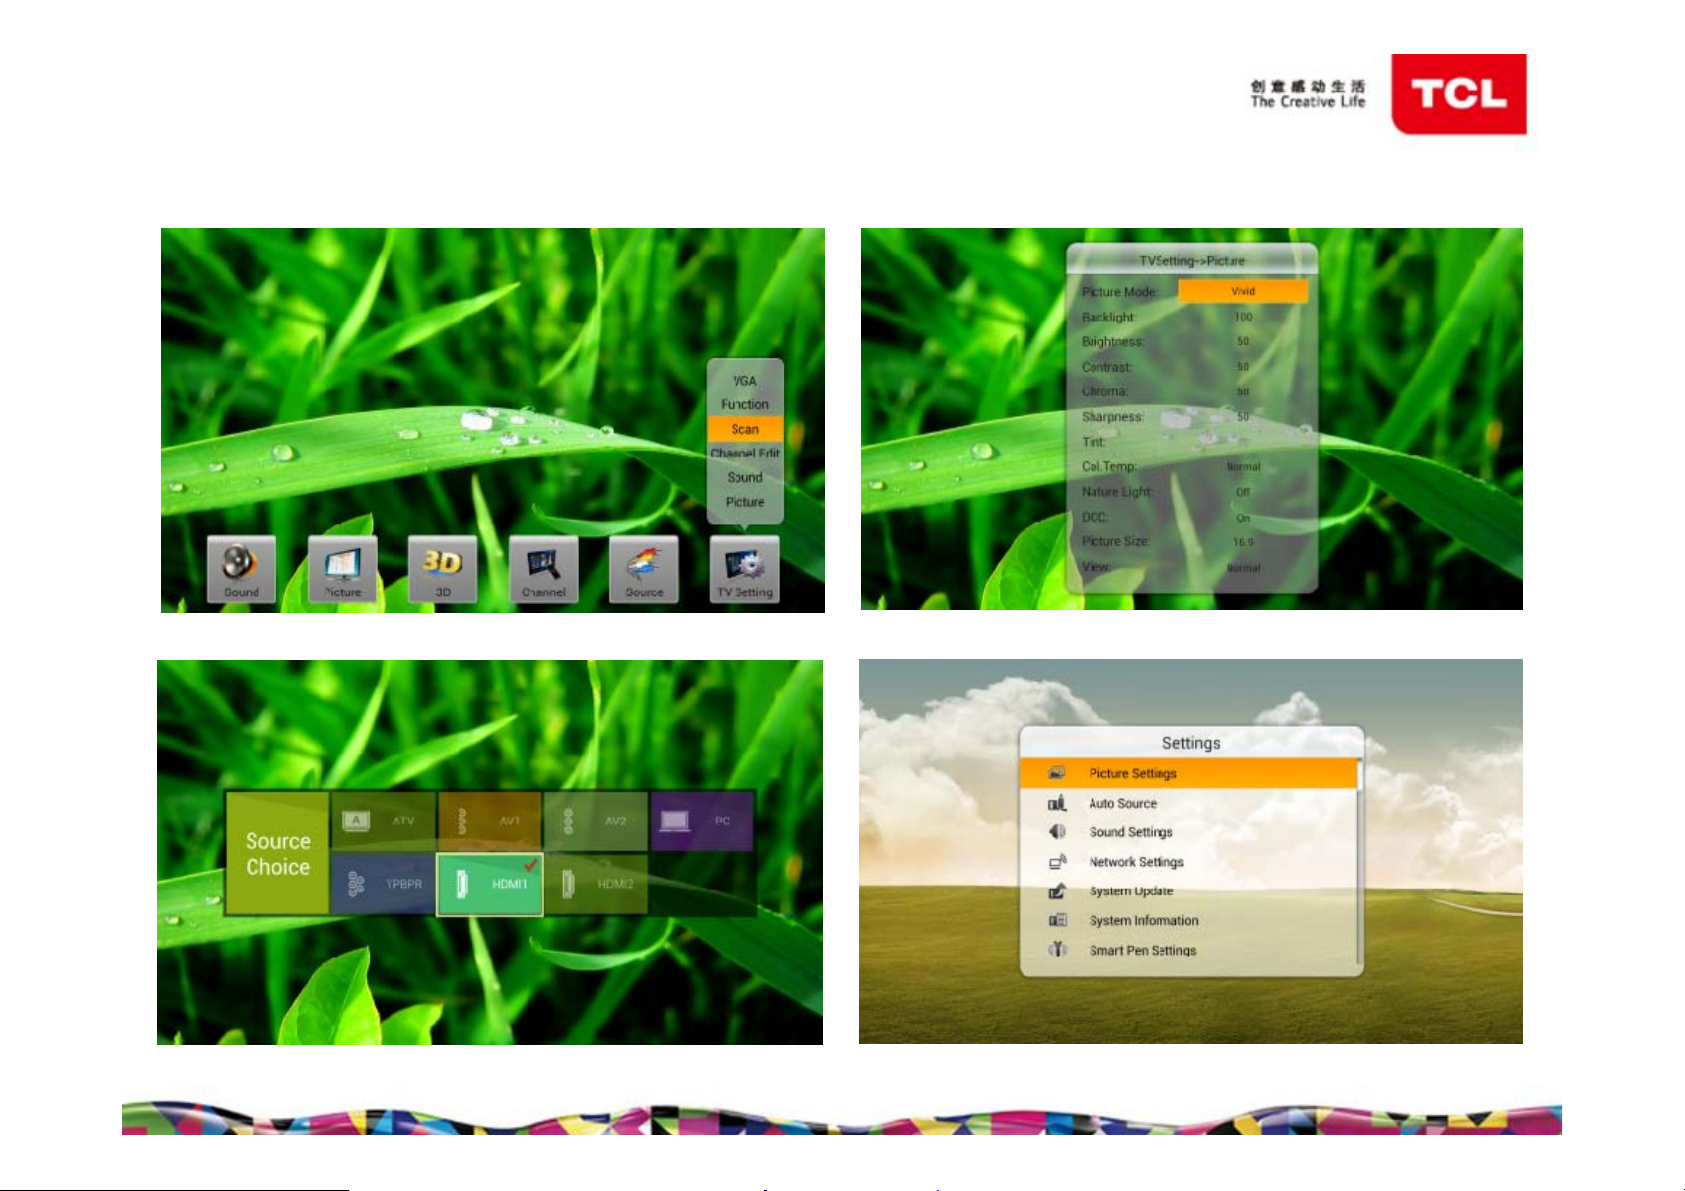
◆ Menu
◆ Source ◆ Settings
◆ Picture Setting
-3-
Page 6

Main Preinstall Function
Weather: Provides weather forecast for cities, and lets you know real-time weather.
TCL Voice: Use voice to control the Smart TV. By speaking towards the mic of a smart
phone with Android system or an RCU with 2.4G function, we can let the TV perform the
related tasks(including changing channels, opening app and power off, etc.) For details, refer
to relevant introductions about this app on the screen.
[Note: This application is also included in nScreen. So before using it by phone, you should
enter the nScreen first.]
Face Recognition: Detect the face via the camera if there’s person watching TV. It can
automatically shut down the TV screen for energy-saving when you’re out of the camera’s
view. And it will turn on again when you’re back. Press “Left/Right” to switch among the menu
items. Press “OK” to enter the menu corresponding to the selected item. Press “Back” to exit,
and return to the previous menu. The specific operation can be carried out in accordance
with Help information in the menu.
[Note: To use this function, the TV must be connected with a camera.]
Gesture Control: Control the TV by simple hand movement. Just operate in accordance with
the prompts from the wizard, then you can experience TV control like changing channels,
turning pages, selecting an object and returning from an app or menu, etc.
[Note: To use this function, the TV must be connected with a camera.]
-4-
Page 7

Main Preinstall Function
Smart Pen: A function jointly developed by well-known educational institutes.
It contains various stories, fairies and fables, etc which make learning quite interesting
and never bored. Children can hear the sound, and see the vivid animation which they are
interested in by click the contents with the Smart Pen. Detailed steps:
1) When the TV is in startup status, open books equipped with Smart Pen and find the
contents you are interested in.
2) Use Smart pen to click the contents of this book.
3) The exciting contents are presented.
nScreen: Centering around the Smart TV as the core, it achieves the interconnectivity and
interoperability among TV, mobilephone and Pad, also the interactivity of multimedia, remote
control, and other functions. Please download and installl the client software of TCL nScreen
to your smart phone or Pad with Android system first, then open the client software and
operate according to the prompt on the smart phone and the screen of TV. After they are
connected with TV via wireless network, you can experience the Remote Control, Media
Sharing, Interactive Games, TV Postback, Voice Assistant and Help.
Remote Control: Smart phone can be used as a remote control unit to operate TV.
Media Sharing: Video or music files can be sent to TV and played on it.
Interactive Games: Make the Phone as controller to play games
TV Postback: The image on TV screen can be sent to smart phone.
Voice Assistant: Control the TV by voice.
Help: Brief introduction about the features and usage of functions under nScreen.
-5-
Page 8

Main Preinstall Function
TV Guard: System management application including TV Checkup, One Key Install, System
Information, Startup Optimizer, Memory Manager, Network Manager, Software Manager,
Security Protection, File Manager and Settings.
TV Checkup: Detect the tasks and apps, optimize system.
One Key Install: Select and install app.
System Information: Display the system status, SW version etc.
Startup Optimizer: Optimize startup speed.
Memory Manager: Memory space management and settings.
Network Manager: Internet related applications management.
Software Manager: App backup, upgrading,move etc.
Security Protection: Enable or disable apps.
File Manager: Browse files.
Settings: Change the settings of TV Guard.
App Store: Intelligent classification of application that provide many useful and amusing apps.
After entering, you can see the recommended excellent apps. Press “Left/Right” to select,
press “OK” to enter. You can see the menu of App Store including Categories, My Apps,
Installation Required, Search, User center on the top, and New app, Hot, All playing in the
middle.
-6-
Page 9

Main Preinstall Function
Browser: A TV browser specially developed for Smart TV . After click the icon and enter the
browser, you can input URL to browse a webpage, and add your favorite websites on the
homepage, etc.
TV Tube: The largest video sharing site in the world. After you click the icon and enter the app,
you can view a variety of videos.
Frequency: A web video discovery application. It can provide users with many useful channels,
including Facebook, Twitter. You can enter the app, and find the videos you are interested in.
TV Tweets: A social networking and micro-blogging service provider. Via TV Twitter client, Users
can browse, communicate with friends, post and update web contents.
Facebook: A TV client of Facebook social application. After click the icon and enter the
application, users can browse contents and communicate online via the TV.
Vimeo: A video-centric networking site. You can search and watch the Vimeo video online
through the TV. After successfully associating your TV with your Vimo account, you will enjoy
more function.
-7-
Page 10
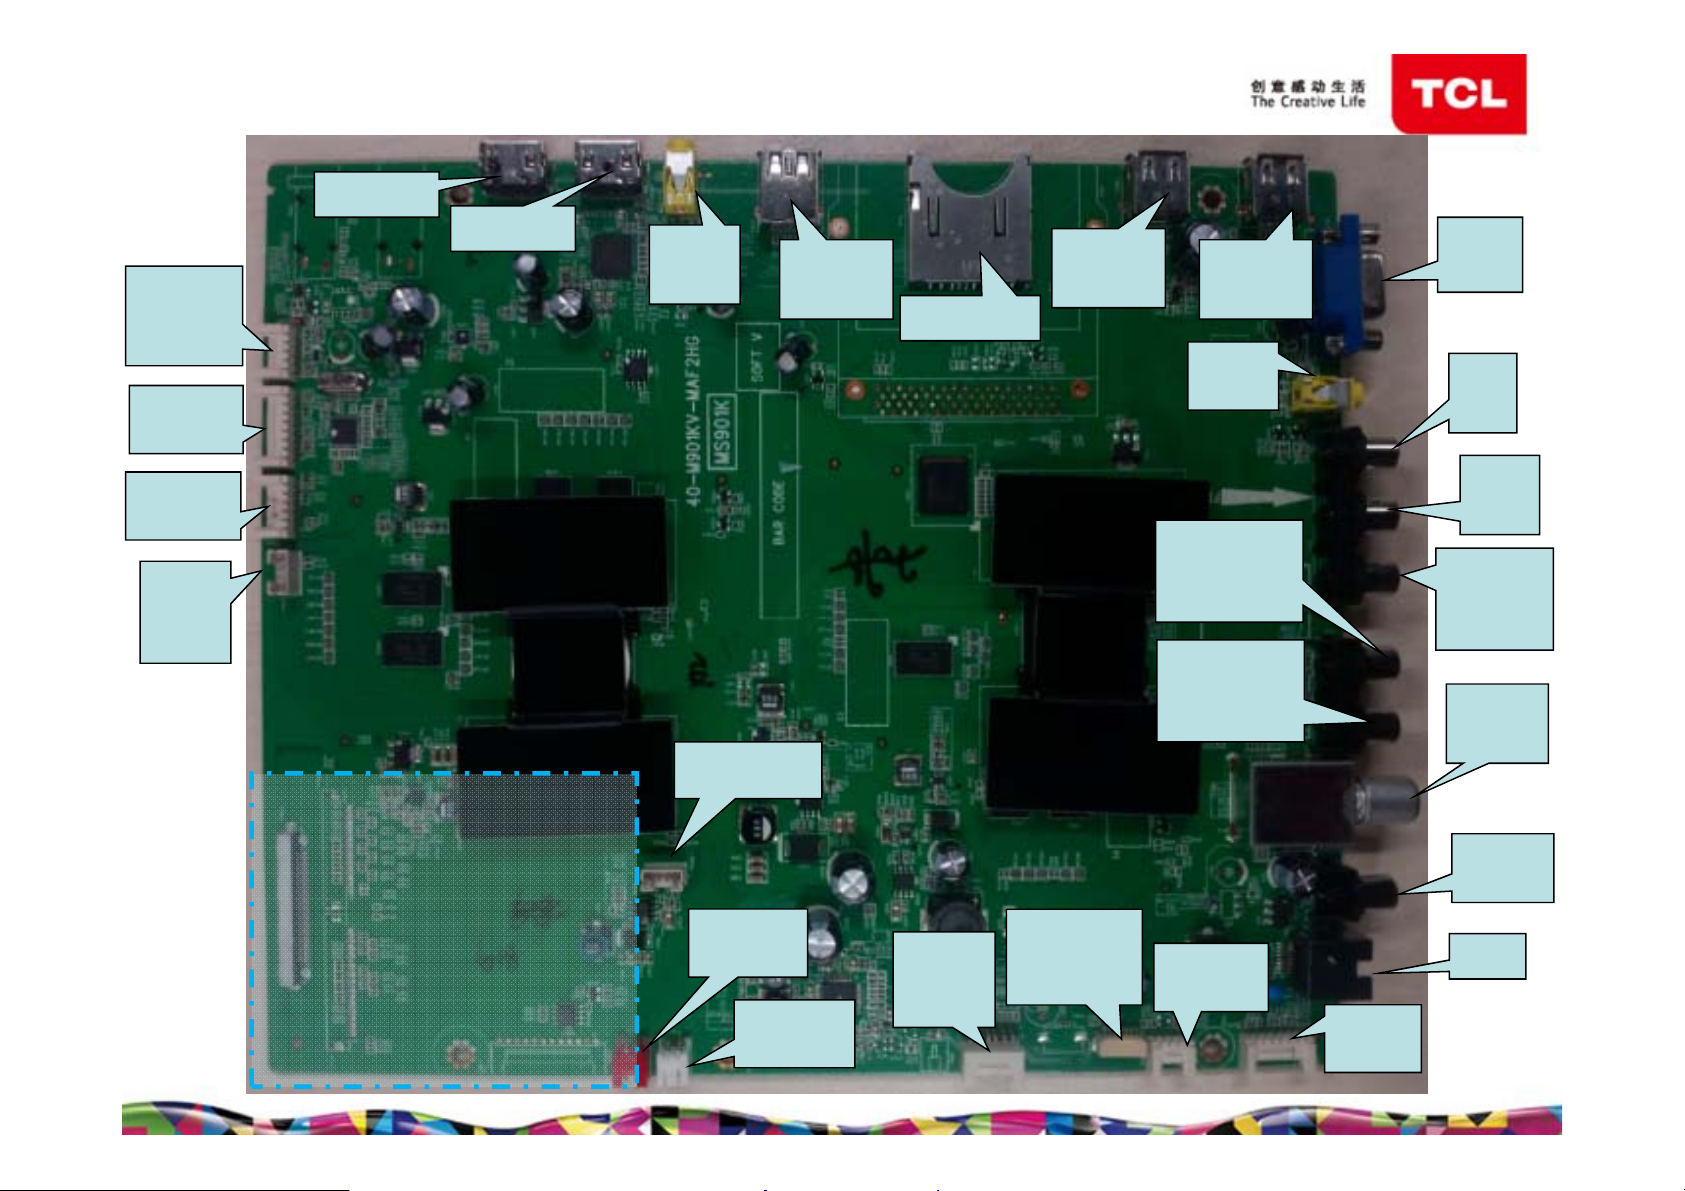
Interface Introduction
To
Camera
Dongle
To 2.4G
Dongle
HDMI1
HDMI2
AV1
IN
USB1
(3.0)
SD Card
USB2
(2.0)
USB3
(2.0)
AV
OUT
VGA
IN
Y
IN
To W I F I
Dongle
Debug
Display
In this area of the
MS901K mainboards,
there’re different
types of interface
matching with
various panels.
(see next page)
Debug Port
To Right
Speaker
To Left
Speaker
Power
Supply
Socke
t
To 3 D
Bluetooth
Dongle
Audio L IN
of (YPbPr
&AV2&VGA)
Audio R IN
of (YPbPr
&AV2&VGA)
To KEY
Board
Pb
IN
Pr &
Video of
AV2 IN
Tuner
(RF IN)
SPDIF
OUT
LAN
To IR
Board
-8-
Page 11
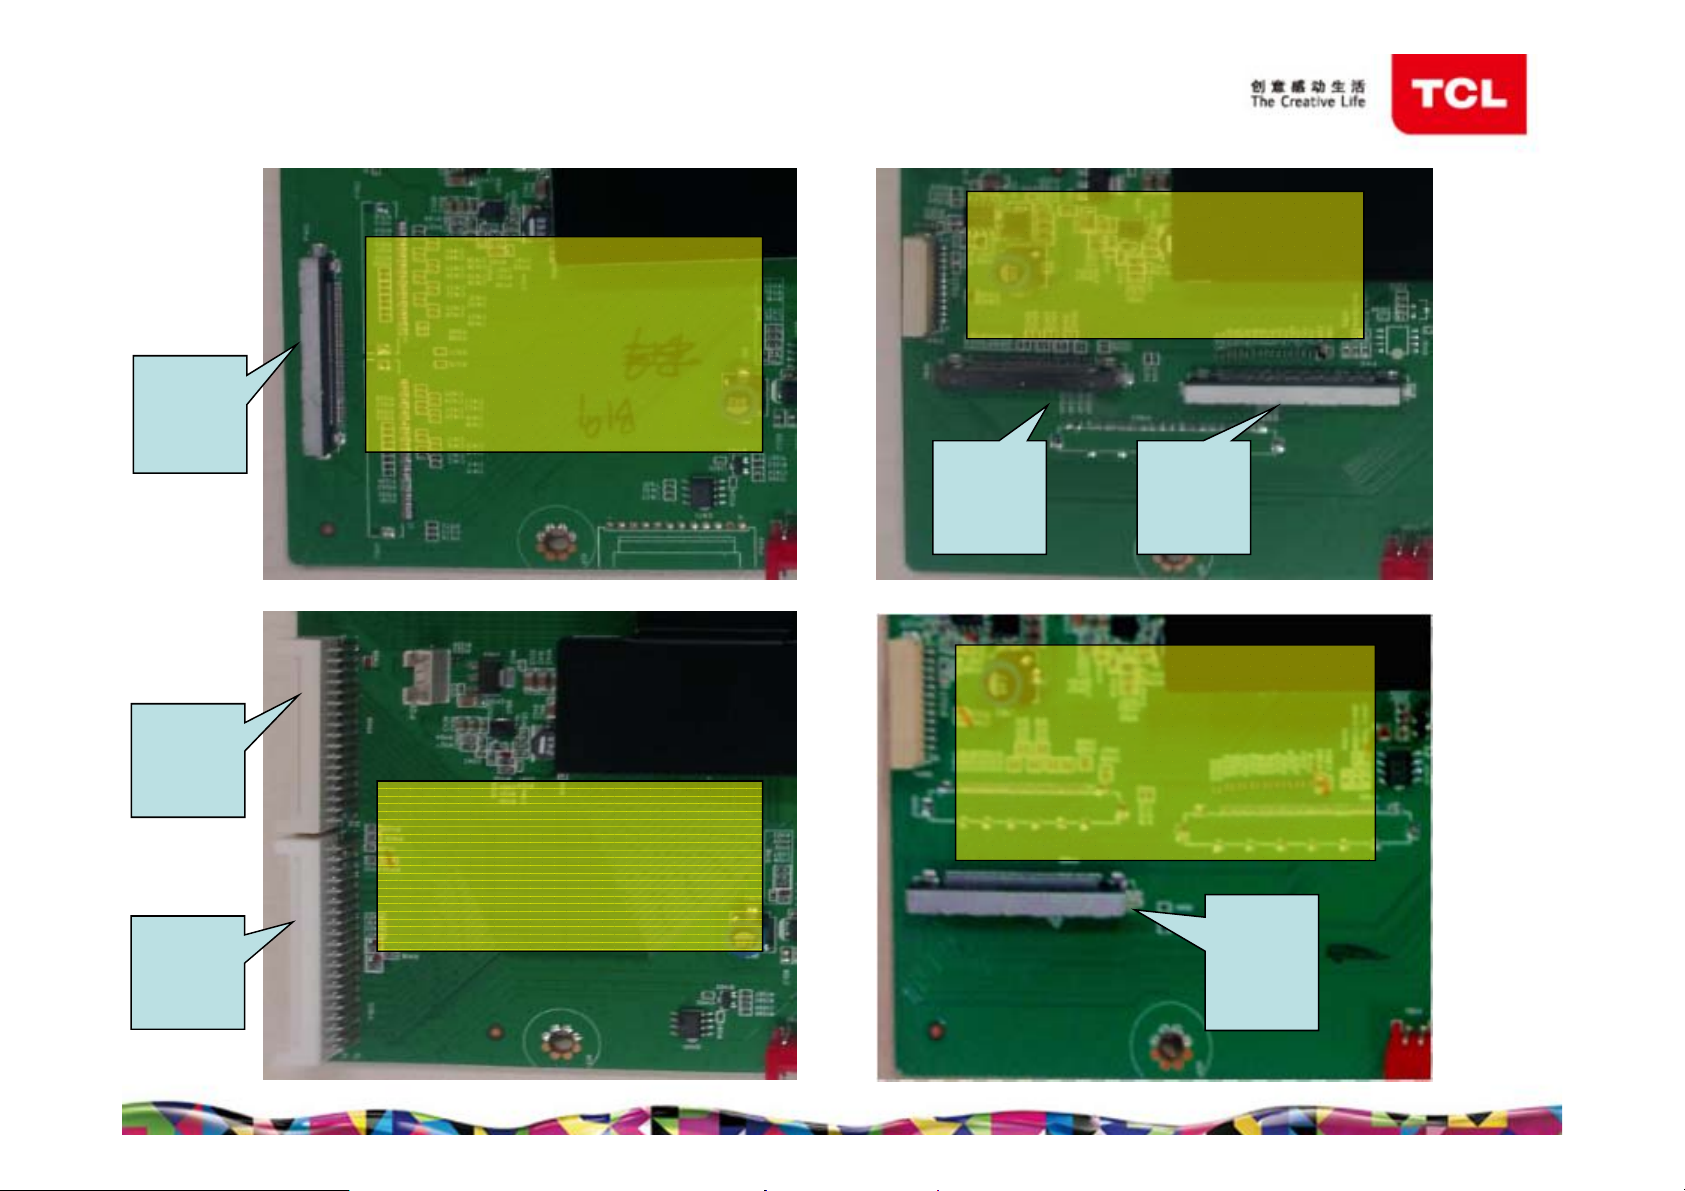
51 PIN
Vby1
Cable
34 PIN
LVDS
Cable
40 PIN
LVDS
Cable
Interface Introduction
40-M901KV—MAD2HG
40-M901KV—MAG2HG
matching with Vby1 panels
(eg. CSOT MT4851D01-1,
MT5461D01-1, MT5461D01-3;
TCL LVU550SE4L CD9W00,)
40-M901KL—MAG2HG
matching with LVDS panels
(eg. INX V420DK1-LS1,
V500DK1-LS1)
---- to Panel
40-M901K2—MAB2HG
40-M901K2—MAE2HG
matching with Vby1 panels
(eg. SDC LTA850FJ01)
41 PIN
Vby1
Cable
40-M901K2—MAD2HG
40-M901KI—MAA2HG
matching with Vby1 panels
(eg. INX V400DK1-KS1,
V420DK1-KS1, V500DK2-KS1,
V650DK1-KS1)
51 PIN
Vby1
Cable
51 PIN
Vby1
Cable
-9-
Page 12
Module Introduction
---- Wireless Module
To P1003
To P1003
07-AR1021-MG0G
(built-in antenna)
07-240WU5-MA3G
07-240WU5-MA8G
(built-in antenna)
-10-
Page 13
Module Introduction
08-46V7501-GR300AA
----Bluetooth Module
(external antenna)
To P905
07-BT4D02-BT0G
07-BT4D02-BT1G
(built-in antenna)
To P905
(or P906 for 85”)
External
Antenna
-11-
Page 14
Module Introduction
----2.4G Module (for 85”)
07-240WU5-MS3G
(external antenna)
To P1005
External
Antenna
-12-
Page 15
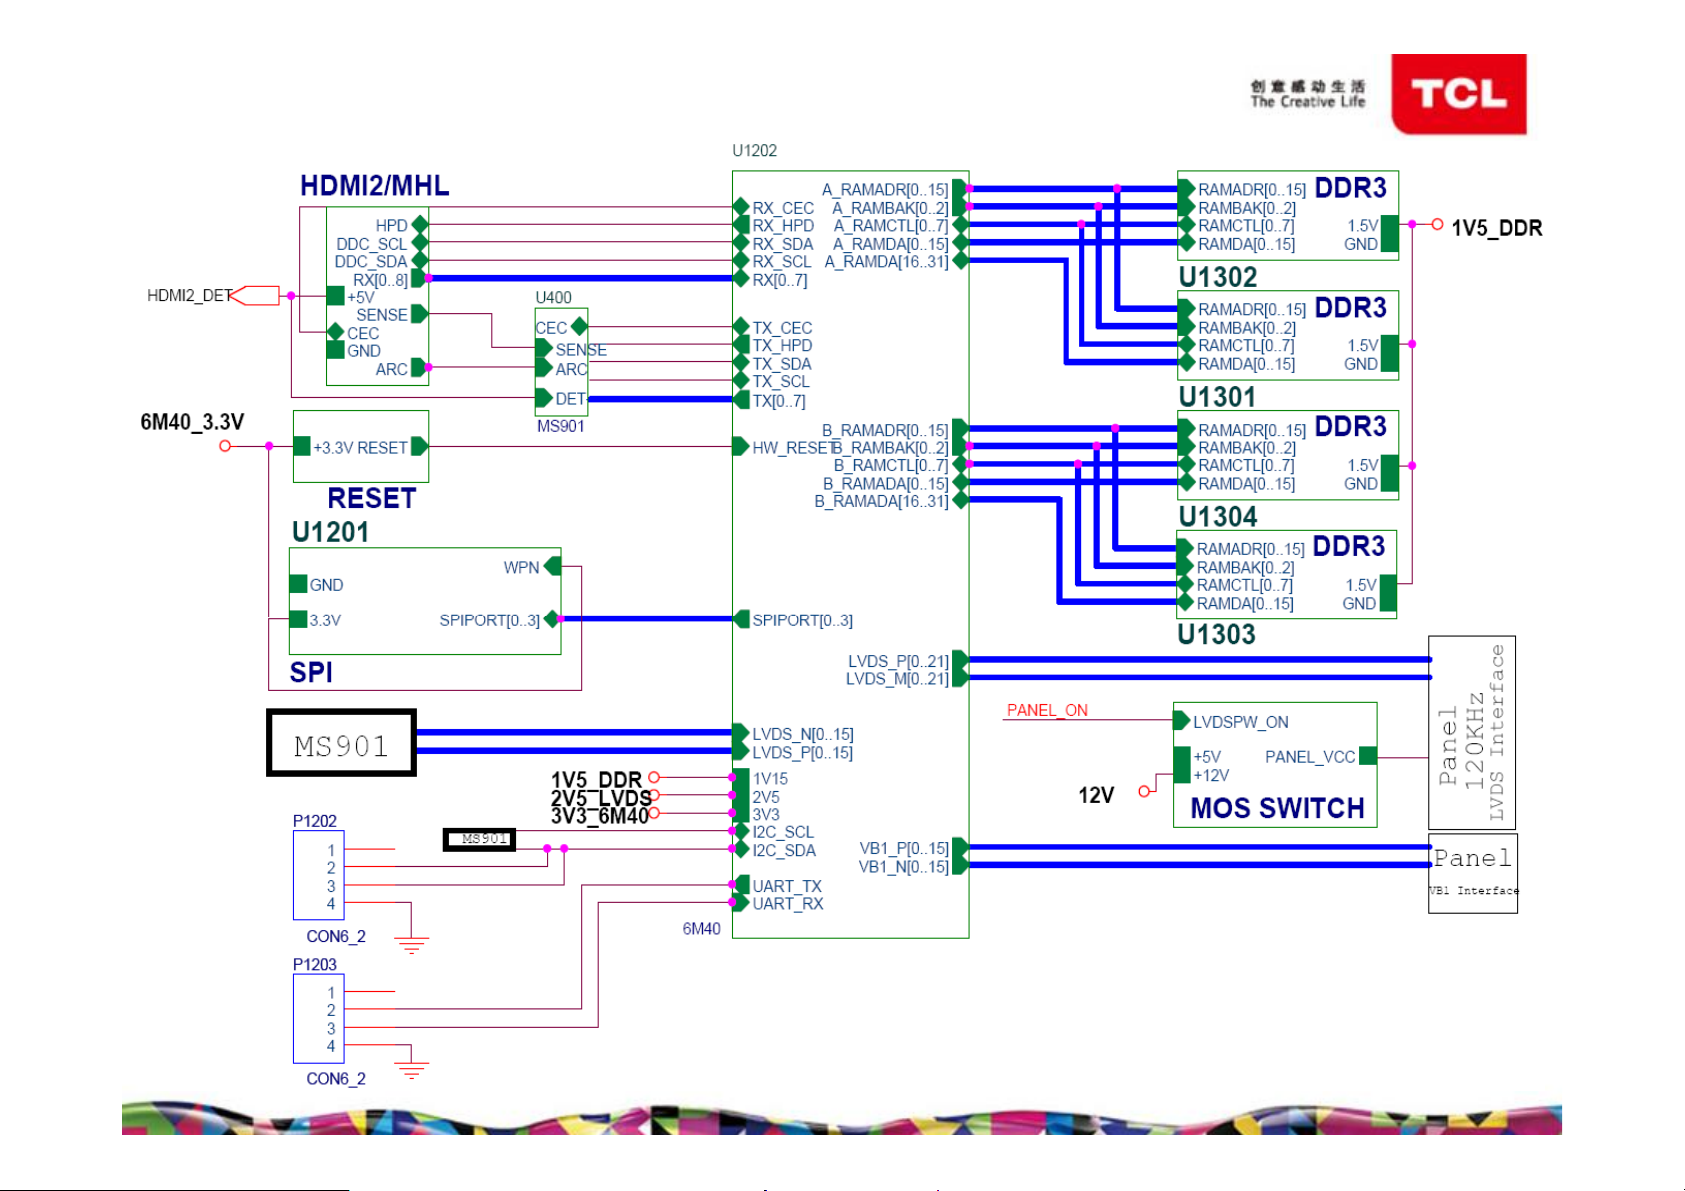
Chassis Block Diagram ---- MS901
DDR3: 1V5
DDR2: 1V8
DDR1: 2V5
-13-
Page 16
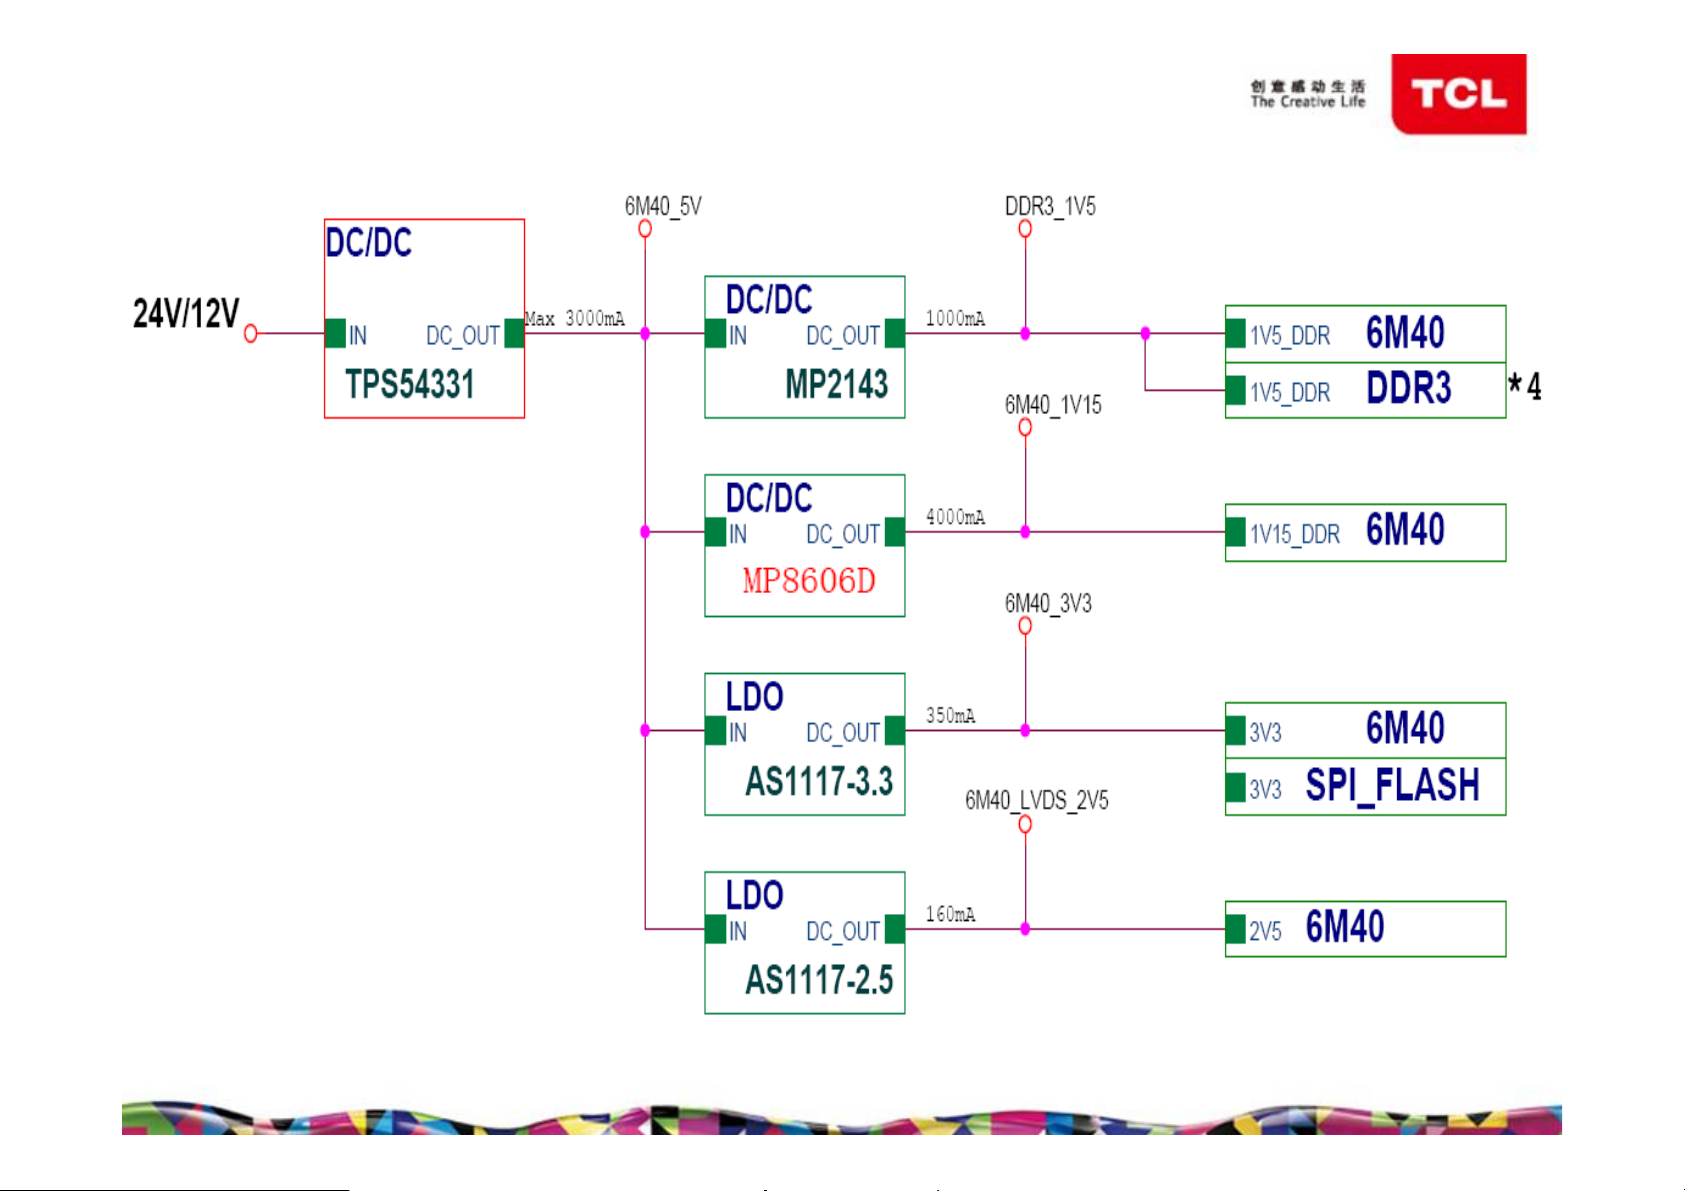
Chassis Block Diagram ---- 6M40
-14-
Page 17
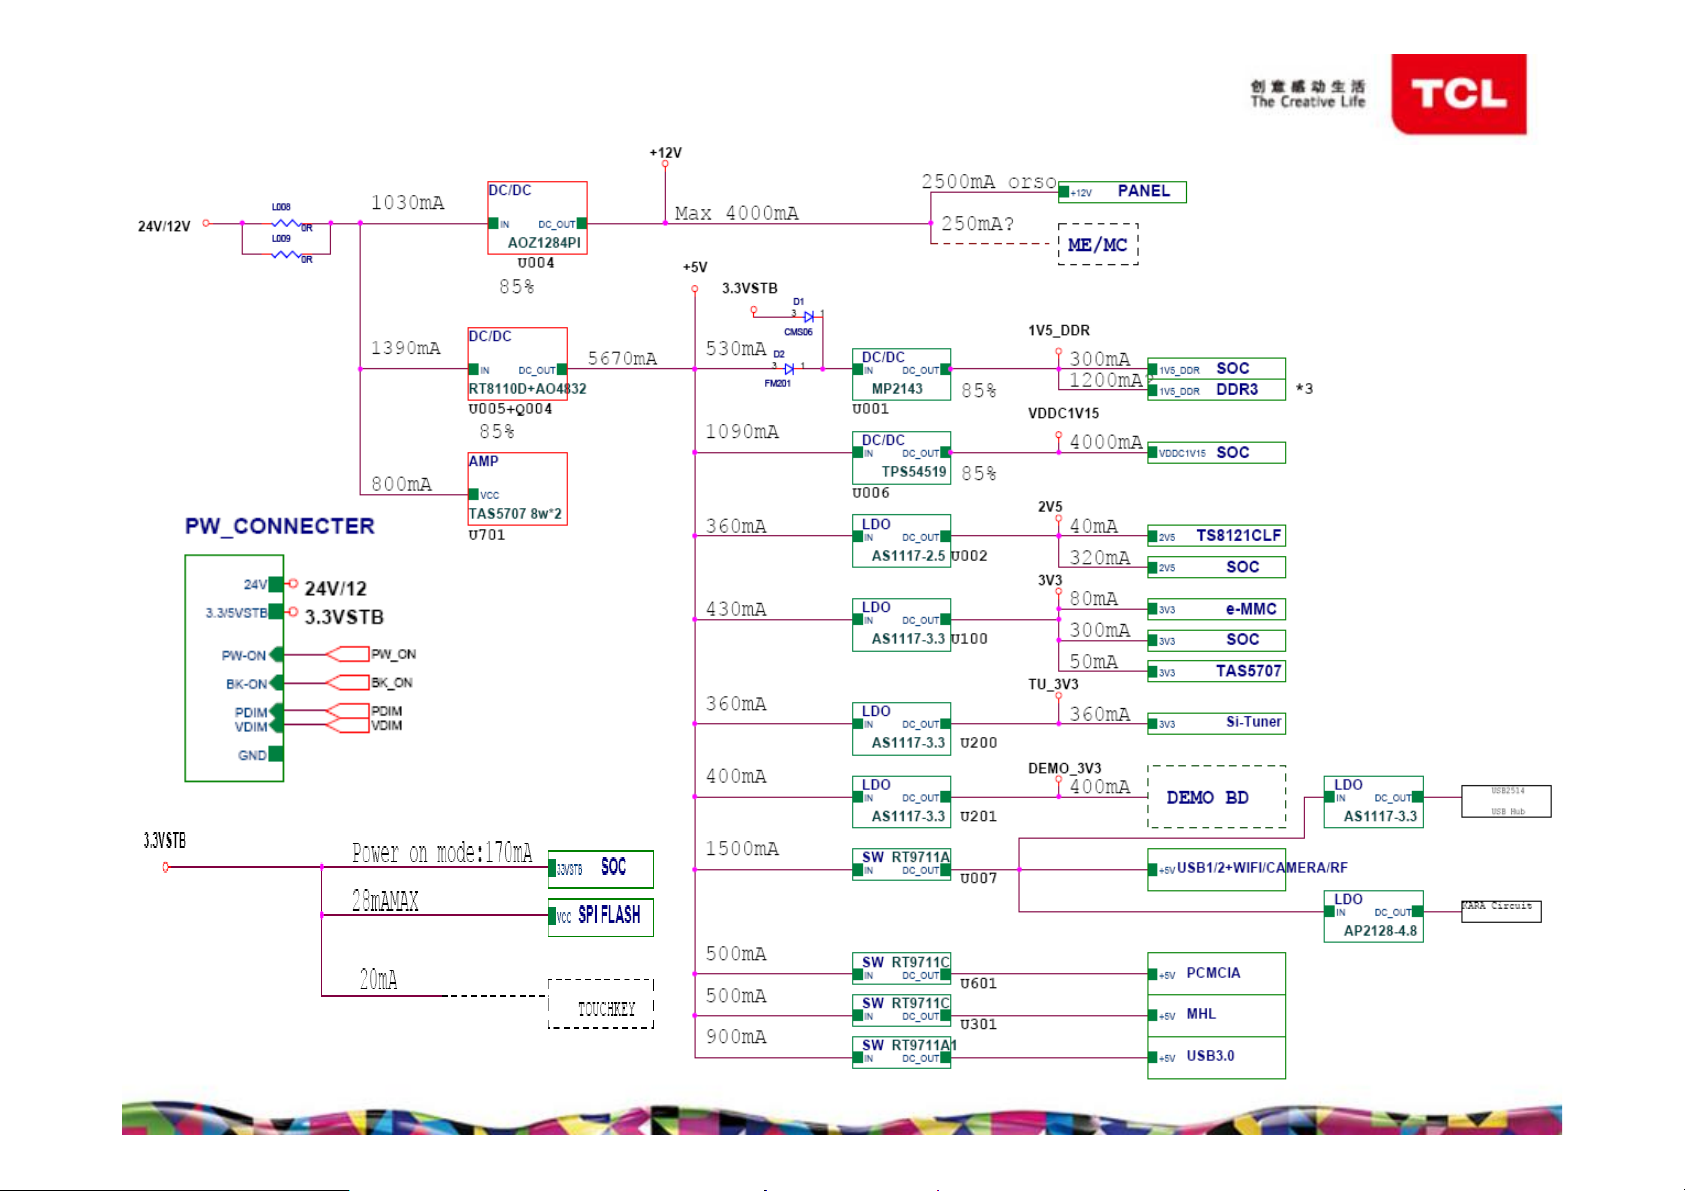
Power Supply Block Diagram
-15-
Page 18
Power Supply Block Diagram
-16-
Page 19

Key Components Introduction
U403
USB_5V to
U1001
USB HUB
Controller
6M40_5V to
+1.5V_DDR_S
U1103
6M40_5V to
+2.5V_6M40
to VCORE
U1003
USB_3V3
U1102
6M40_5V to
+3.3V_6M40
U1104
U1301,
U1302
DDR
U1106
6M40_5V
Port
Processor
U1201
SPI Flash
(6M40)
U1303, U1304
DDR
U1202
MEMC IC
U1105
24V to
6M40_5V
Q1401+Q1402
Panel Power
U301
6M40_5V
to HB_5V
USB_5V_C
U008
5V to
VDDC1V15
U004
24V/12V
to 12V
U201
5V to
U005
+Q004
24V/12V
to 5V
U701
Audio
Amplifier
U602
EMMC
(Main
Software)
U501
DDR
U001
5V to
1V5_DDR
U502,U503
Main IC
DDR
5V to 3v3
U007
5V to
USB_5V
U002
5V to 2V5
U400
U402
SPI Flash
(Mboot, Mac
Device ID)
U101
5V to
TU_3V3
U003
-17-
Page 20

Key Components List
Part No. Component Type / Model location
13-MSD6A9-01B
13-FHG5A1-4GB
13-W25Q16-00B
13-MST6M4-0AB MEMC IC SPEC MEMC MST6M40 U1202
13-W25Q32-FVB
13-T18273-HNB
13-TAS570-70B Audio Amplifier IC MS68C HTQFP 48 TAS5707 U701
SOC
EMMC
(Main Software /
User Data)
SPI Flash
(Mboot / EDID /
MAC / Device ID)
SPI Flash
(6M40)
Silicon Tuner
IC MAIN SOC MSD6A901IV U400
IC MAIN 4GBYTE EMMC FLASH 19NM
U602(CPP)
V4.41 INTERFACE THGBM5G5A1JBAIRY
IC MS19C-LA 16M BIT SERIAL FLASH
U402(CPP)
TAPE SOIC 208MIL WINBOND
IC MAIN MEMORY WINBOND U1201(CPP)
IC SILICON TUNER IC TDA18273HN UT1
13-SI9687-00B Port Processor
13-USB251-4AB
USB Hub
IC MAIN PORT PROCESSOR SILICON
IMAGE
OPTICOUP N3T USB 2.0 HIGH-SPEED
4-PORT HUB CONTROLLER QFN USB2514
36-PIN
-18-
U403
U1001
Page 21

Key Components List
Part No. Component Type / Model location
13-DRH5TQ-BCB4G DDR
13-DRNT5C-4GB DDR IC MAIN DDR NT5CB256M16CP-DI U501/U502/U503
13-H5TQ2G-BCB DDR
13-DRNT5C-2GB DDR
13-DRH5TQ-BCB1G DDR
13-DRNT5C-1GB
DDR
IC MEMORY 4G-DDR3-1600MHZ
H5TQ4G63AFR-PBC
IC MEMORY 2G-DDR3-1600MHZ
H5TQ2G63DFR-PBC
IC MEMORY 2G-DDR3-1600MHZ
NT5CB128M16FP-DI
IC MEMORY 1G-DDR3-1600MHZ
H5TQ1G63EFR-PBC
IC MAIN DDR NT5CB64M16FP-DH
U501/U502/U503
U501
U501
U1301/U1302/
U1303/U1304
U1301/U1302/
U1303/U1304
12-BT3906-0BX
RESET
SWITCH
TR-SMD PNP 40V 200MI0A_ 250MHZ
Q401/Q404
225MI0W SOT23 MMBT3906LT1(PNP)
-19-
Page 22

Key Components List
Part No. Component Type / Model location
13-AO1284-PIB 24V to 12V
12-MK50XP-0BX
12-BT3904-0BX
13-LDTS54-33B
13-RT8110-D0B
12-AO4832-0BX
13-RT9721-ABB 5V SWITCH
13-RT9711-APB
13-AS1117-33B 5V to 3V3 IC 3.3V SOT-223 AS1117-33 CX
12V to
PANEL _VCC
24V to
6M40_5V
24V to 5V
5V SWITCH
IC MAIN DC/DC BULK CONTROL IC
AOZ1284PI-1
MOSFET-SMD P 20V 7.9A 5W SO8 PMK50XP Q1401
TR-SMD NPN 40VV 200MAA_ 300HZ 0.25W
SOT23 MMBT3904LT1
IC DC/DC CONVERTER TPS54331 U1105
IC POWER CONTROL IC RE8110D U005
MOSFET-SMD N 30V 10A 1.9V 0.0175OHM 2W
AO4832
IC MAIN USB/MHL POWER SWITCH
RT9721AB
IC-SWITCH USB 1.5A HIGH-SIDE POWER
SWITCH
U004
Q1402
Q004
U301
U007/U201/
U1004
U003/U101/
U405/U1102
13-AZ1117-33B 5V to 3V IC 3.3V LOW DROPOUT LINEAR REGULATOR U1003
13-AS1117-25B 5V to 2V5 IC SOT-223 AS1117-25 CX U002/U1103
13-MP8606-00B
5V to 1.15V
IC MAIN DC-DC IC MP8606 U008/U1106
-20-
Page 23

Key Test Point
PANEL_VCC
POWER_ON
24V
3V3SB
DIM
BL_ON
5V_2
3V3SB3
3D_SYNC_I
3D_EN
WIFI_5V
BT_ 5V
CAM_5V
VX1T_HTPDN
VX1T_LOCKN
3D_SYNC_O
WIFI_ON
USB_HUB_3V3
6M40_3V3
6M40_2V5
DDR_1V5
1V2
6M40_5V
U_RESET
V_AUDIO
1V5_DDR2
1V5DDR3
EM_3V3
5V
3V3
MCU_RESET
3V3SB1
2V5
TU_3V3
TUN_AGC
USB3_5V
3V3II
USB2_5V
USB_5V_1
-21-
Page 24

P001
Key Test Point
----Power Supply
When TV set working normally, the voltage of each pin of P001 is as below:
Pin 1/2/4: 24V
Pin 3/5/6/9: 0V(GND)
Pin 7/12: 3.3V
Pin PIN8: 0V(2D mode), 3.3V(3D mode)
Pin 10: 2.8V
Pin 11: Dim signal , 3.17V
-22-
Page 25

Key Test Point
----DC to DC
24V to 12V
L007
U004
-23-
Page 26

Key Test Point
----DC to DC
24V to 5V
Q004 U005
L001
-24-
Page 27

Key Test Point
----DC to DC
24V to 6M40_5V
L1103
U1105
-25-
Page 28

Key Test Point
----DC to DC
5V to 1V5_DDR (U001) same with
6M40_5V to +1.5V_DDR_S (U1102)
L016 &
L1102
U001 &
U1102
-26-
Page 29

Key Test Point
U008 & U1106
----Core Power
L002 &
L1104
5V to VDDC1V15 (U008) similar to
6M40_5V to VCORE (U1106)
but two tantalum capacitors close to VCORE
-27-
Page 30

Key Test Point
----LDO
5V to 2V5 (U002) same with
6M40_5V to +2.5V_6M40 (U1103)
U002 &
U1103
5V to 3V3 (U003) same with
6M40_5V to +3.3V_6M40 (U1102)
U003 &
-28-
Blur Photo ?
U1102
Page 31

Key Test Point
----LDO
5V to TU_3V3
U101
-29-
Page 32

Key Test Point
----Panel Power
Q1401
-30-
Q1402
Page 33

Unit Circuit Analysis and Testing
----Standby and Power On
① Once AC Inputs, power board will provide a 3V3SB to the main board. Then
TV set enters standby mode, and the indicator on.Press the power button of
the remote control or the key board to turn on TV, then the Indicator off.
② Pin C3 of U400 sends out a high level, across R002, then directly send to
power board through pin10 of P001 on the main board, control the Power on.
Then the power board output 24V to main board and driver board.
-31-
Page 34

Unit Circuit Analysis and Testing
----Backlight and Dimming
① Pin J4 of U400 sends out a high or low level, across R003, then
directly send to power board through pin12 of P001 on the main board,
control the backlight on or off.
② Pin B8 of U400 sends out PWM signal, across R006, then directly
sends to power board through pin11 of P001 on the main board, adjust
back light brightness.
Dimming waveform when
“Backlight” is set to 0
in setting menu.
(“Nature Light” off)
-32-
Page 35

Unit Circuit Analysis and Testing
----Backlight and Dimming
Backlight 100 Backlight 50
-33-
Page 36

Unit Circuit Analysis and Testing
----Reset Circuit
MCU resets when MCU_RESET is high.
When 3V3SB comes, it charges C409
through R419, and Q401 turns on.
When the voltage of C409 is charged
about 2.6V, the Q401 starts to turn off
and MCU_RESET is pulled to low level.
Reset process finished.
To reset when AC is cut off, the nether
circuit works. When 12V drops to about
8.9V, Q404 turns on. Then the voltage
NC
of MCU_RESET follows the drop of
-34-
3V3SB. Reset process finished.
Page 37

Unit Circuit Analysis and Testing
----Amplifier
The TAS5707 is a 20-W, efficient, digital-audio power amplifier for driving stereo bridge-tied speakers.
One serial data input allows processing of up to two discrete audio channels and seamless integration
to most digital dudio processers and MPEG decoders.
I2S, also known as Inter-IC Sound, is an electrical serial bus interface standard used for connecting
digital audio devices together.The bus consists of at least three lines: 1.Serial Clock, also named BCLK;
2.Word clock line - also called word select (WS) or left right clock (LRCLK);3.The serial data SDATA.
It may also include the Master clock (typical 256 or 384 x LRCLK).
-35-
Page 38

Unit Circuit Analysis and Testing
----Amplifier
-36-
R742
MUTE
C713
AMP_RESET
R717
MCLK
R715 BCLK
R714 SDATA
R716 LRCLK
Page 39

Unit Circuit Analysis and Testing
----Amplifier
Pin23: SDA Pin24:SCL Pin19: Mute Signal.
Pin1/46: Right Channel Output Pin36/39: Left Channel Output.
When the input signal and power supply are normal, but there is no output,
you need to check whether the back-end short-circuit or the amplifier was
damaged.
High-frequency Low-frequency
Red-MCLK(R717) Orange-BCLK(R715) Purple-LRCLK(R716) Green-SDATA(R714)
MCLK(12.3M)=4*BCLK(3.07M)=256*LRLCK(48.1K)
-37-
Page 40

Accessories Introduction
----Remote Control
Note: You can learn more from the manuals of the TV and RCU.
MIC
Mouse
SliderSlider
Touch
Plate
RC360
VOL+/-
Up/Down
Left/Right
OK
RC520
VOL+/-
It’s equipped
with general
functions of
infrared
remote control
and wireless
remote control.
-38-
Page 41

Accessories Introduction
----Smart Pen Kits
Title
(BooksRB301)
BUNNY
ENGLISH
FEELING
MONKEY
FIGHTSWHITE
BONEDEMON
THESPEEDY
SLED
Cover
videoparameter
SD(withvideo)
FLVH.264
25fps960*720
FLVH.264
25fps1280*720
FLVH.264
25fps1280*720
FLVH.264
25fps1280*720
Pen RP301(with audio)
Pen point
Vol +/-
Infrared transmitter
power/stop/play/ok
LED
TV/audio
USB
THEMAGIC
PAINTBRUSH
FLVH.264
25fps1280*720
-39-
Note: You can learn more from
the instructions of Smart Pen Kits.
Page 42

Accessories Introduction
----Camera
Generally, the camera was placed on the top middle of the TV set.
1.Tear off the dustproof paper from the TV camera.
2.Please connect the camera through a USB hub, the camera will be installed successfully
when the camera logo displayed on the right top corner of TV Homepage.
3.The camera's vertical angle can be adjusted by the stem on the back of the camera.
-40-
Page 43

Accessories Introduction
----3D TV Glasses
3D Bluetooth Glasses(SG)
GX21AB Kits
Battery
Communicate with
3D TVs via the
2.4GHz RF band
(learn more from the
manual of the GX21AB)
Liquid crystal
shutter
LED & Power
-41-
Page 44

3D TV Introduction
3DTV is television that conveys depth perception to the viewer by employing techniques.
Most modern 3D television sets use an active shutter 3D system or a polarized 3D system,
and some are autostereoscopic without the need of glasses.
The MS901K-AP series use an active shutter 3D system.
How can we see the 3D image?
1.The left eye can only see the left
The formation of 3D
image in the brain
eye image, the right eye can only
see the right eye image.
2.Right and left eyes see image with
parallax.
Right and left eyes
see image with parallax
-42-
Page 45

3D TV Introduction
An active shutter 3D system is a
technique of displaying stereoscopic
3D images. It works by openly presenting
the image intended for the left eye while
blocking the right eye's view, then
presenting the right-eye image while
blocking the left eye, and repeating
this so rapidly that the interruptions
do not interfere with the perceived fusion
of the two images into a single 3D image.
The glasses are controlled by a timing
signal that allows the glasses to
alternately darken over one eye, and
then the other, in synchronization with
the refresh rate of the screen. The
timing synchronization to the video
equipment can be achieved via a
wireless signal by either an Bluetooth
transmitter.
Bluetooth Glasses(SG)
-43-
Page 46

3D TV Introduction
Bluetooth 3D Block Diagram
SOC
Panel
Shutter
Glasses
(SG)
ON/OFF
Power
-44-
Bluetooth
Emmiter
Antenna
Page 47

Trouble Shooting----No Picture
-45-
Page 48

Trouble Shooting----No Sound
-46-
Page 49

Trouble Shooting----Abnormal Picture
-47-
Page 50

Trouble Shooting----Network Fault(wired)
-48-
Page 51

Trouble Shooting----Network Fault(wireless)
-49-
Page 52

Reset and Repair the system
Press “Home” to open the Homepage.
Enter Settings→ System Update menu.
① Select Factory Default to do reset.
② Select System Repair to do repair.
-50-
Page 53

Enter Factory Menu
How to enter the Factory menu? (Need a RCU with number keys)
Enter any source but USB, then press Menu and successively select:
TV setting → Picture . When orange highlight is on the “Contrast” option
(Figure.1), press the subsequence RCU keys “1”, “9”, “5” , “0” to enter
Design menu (Figure.2), or press “9”, “7”, “3” , “5” to directly enter Factory
menu (Figure.3).
◆ Figure. 1 ◆ Figure. 2
Displayed on the left top of the screen
◆ Figure. 3
-51-
Page 54

Change Project ID
How to change Project ID
Enter the Server menu from Design menu.
Move the highlight onto Project ID and press
Left/Right or number keys to change it.
Remember to press OK after you confirm.
New Project ID will take effect by restarting.
There’s another method to change Project
ID via shortcut key combinations.
Enter any source but USB, and successively
press “0”, “6”, “2”, “5”, “9”, “8”, “Menu”, “X”,
“X”, “X”. [Note. XXX is the target Project ID you
want to change. (eg. 053)]
Then TV will restart in 2 seconds, if it works.
-52-
Page 55

USB Update
----Mboot
1. Download the update file (generally
named V8-MS90101-LB1VXXX.bin) to the
root directory of your USB device, and
change the file name to “mboot.bin”. Make
sure there’s no other bin file named
analogously. Then insert the USB device
to USB interface of TV set.
2. Enter USB Update from Factory menu.
3. Select Mboot Upgrade, and press Right
to begin.
4. Upgrade process takes about 10
seconds. After “Success!” is shown on the
middle bottom, restart the TV and check
whether the MbootVersion is updated.
-53-
Note: The mboot will be written in U402.
Updating Mboot from USB Update will
erase the Device ID, MAC and HDCP
key. It may limit the internet services, and
HDMI source may not work as well. So
don’t update Mboot If not that necessary.
Page 56

USB Update
----MEMC
The Upgrade method of MEMC is similar
to Mboot’s.
Just name the update file as 6m30.bin.
And select MEMC Upgrade.
[Note. ”6m30.bin” is just a path to update, and the actual
MEMC chip for MS901K-AP series is 6M40]
Other operation is the same as Mboot
Upgrade. But MEMC Upgrade process
takes more time (about 3 minutes).
-54-
Page 57

Local Update
----Firmware & Mboot
1. Download the update file “V8-M901K01-LF1VXXX.zip” to the root directory
of your USB device. Make sure there’s no other bin file named analogously.
Then insert the USB device to USB interface of TV.
2. Successively enter Settings→ System Update→System Software Update
from Home, and select Local Update.
3. If the upgrade file is found, TV will pop up a message that it is verifying.
4. TV displays a warning message.
Select “Confirm” to continue.
Then TV will restart to update
automatically.
5. During updating, do not power off
the TV. It will restart after finished.
-55-
Page 58

Upgrade Compulsively
----Firmware
1. Download the update file (generally named V8-MS90102.bin. If not, correct it)
to the root directory of your USB device. Make sure there’s no other bin file
named analogously. Then insert the USB device to USB 2.0 interface of TV.
2. Turn TV into standby mode and wait for the logo indicator getting on.
3. Press and hold the POWER key of key board for more than 10 seconds.
Then TV will begin to update when you see the screen showing as below.
4. Do not power off the TV or
unplug the USB device. After
updating, the TV set will turn into
standby mode or restart
automatically.
Note:The main software will be written
in U602. This method can be used even
when the TV displays abnormally, but
the White Balance data will be erased.
-56-
Page 59

Thank you!
 Loading...