

Page 1
ML17/ML19/ML22/ML26
LCD MONITOR
This unit is with multi functions, so for best performance
please read the instructions carefully before your operation.
OPERATIONMANUAL
72-MS91JT-EU1A
TCL CORPORATION
No.19 District, Zhongkai High-tech Develop-
ment Zone, Huizhou City, Guangdong Province
FCC Information
This device complies with Part 15 of the FCC Rules.
Operation is subject to the following two conditions: (1) this device may not cause harmful interference,
and (2) this device must accept any interference received, including interference that may cause undesired
operation.
Changes or modifications not expressly approved by the party responsible for compliance could void the
user's authority to operate the equipment.
Recycling
Your product is designed and manufactured with high quality materials and components, which can be
recycled and reused. When you see the crossed-out wheeled bin symbol attached to a product, it means
Never dispose of your product with other household waste. Please inform yourself about the local rules
on the separate collection of electrical and electronic products. The correct disposal of your old product
the product is covered by the European Directive 2002/96/EC:
helps prevent potentially negative consequences for the environment and human health.
NOTE: This equipment has been tested and found to comply with the limits for a Class B digital device,
pursuant to part 15 of the FCC Rules. These limits are designed to provide reasonable protection
against harmful interference in a residential installation. This equipment generates, uses and can
radiate radio frequency energy and, if not installed and used in accordance with the instructions, may
cause harmful interference to radio communications. However, there is no guarantee that interference
will not occur in a particular installation. If this equipment does cause harmful interference to radio or
television reception, which can be determined by turning the equipment off and on, the user is
encouraged to try to correct the interference by one or more of the following measures:
- Reorient or relocate the receiving antenna.
- Increase the separation between the equipment and receiver.
-Connect the equipment into an outlet on a circuit different from that to which the receiver is connected.
-Consult the dealer or an experienced radio/TV technician for help.
Page 2

Contents
02 Warnings and Precautions
03 Features of Model ML17
03 Specifications and Connections of Model ML17
04 Features of Model ML19
04 Specifications and Connections of Model ML19
05 Features of Model ML22
05 Specifications and Connections of Model ML22
06 Features of Model ML26
06 Specifications and Connections of Model ML26
07 Remote Control
07 Basic Operations
07 Turning On the Unit
07 Turning Off the Unit (Standby)
07 Menu Functions
07 Menu Operations
07 Picture
Packing List
08 Sound
08 Setting
09 Info
09 Geometry
09 Installation
10 Troubleshooting
10 Maintenance
Main Unit - one set
Remote Control Handset - one set, including two AAA batteries
Operation Manual - one pc
Power Adapter - one pc (for Model ML17)
Power Cable - one pc
01
Page 3
Warnings and Precautions
Read all of the instructions before operating the set. Keep these instructions well for later use.
PRODUCT
Do not cover or block the ventilation openings on the back cover.
Do not use the sharp objects, the metal or the liquid to touch the signal plugs or push the object of this kind into the
ventilation slots as it may cause short circuit and damage the unit.
Unplug the set when it is not used for a long period of time.
Do not dismantle or disassemble any parts of this product by yourself as this may damage the product, cause personal
injuries and violate the warranty of your products.
Do not touch the screen surface with fingers as this may scratch the LCD screen. Also it is hard to clear the skin grease
left on the screen.
Do not impact the LCD screen with hard pressure as the LCD screen is very delicate and fragile.
POWER
PLUG
If the set will not be used for a long period of time;
If the power cord or the power outlet/plug is damaged;
Following the instructions to install and adjust the product. Do not adjust or operate the unit by the method or programes
not covered in this operation manual. Once you insist on doing so and unexpected circumstance happens, unplug the
set and call the service/technical personnel for an assistance;
If the set is subject to impact or has been dropped to have the cabinet damaged.
Note: Where the mains plug or an appliance coupler is used as the disconnect device, the disconnect device shall remain
readily operable.
All instructions must be followed during the operation.
Please use the 2-pin plug.
Unplug the set under the following conditions:
POWER CORD & SIGNAL CABLE
Do not allow anything to rest on the power cord or signal cable.
To prevent the power cord or signal cable from being trampled, do not make them through the walkway, or the place
where people often walk.
.
Do not overload the power cord or power outlet.
Do not expose the power cord or signal cable to moisture.
USE ENVIRONMENT
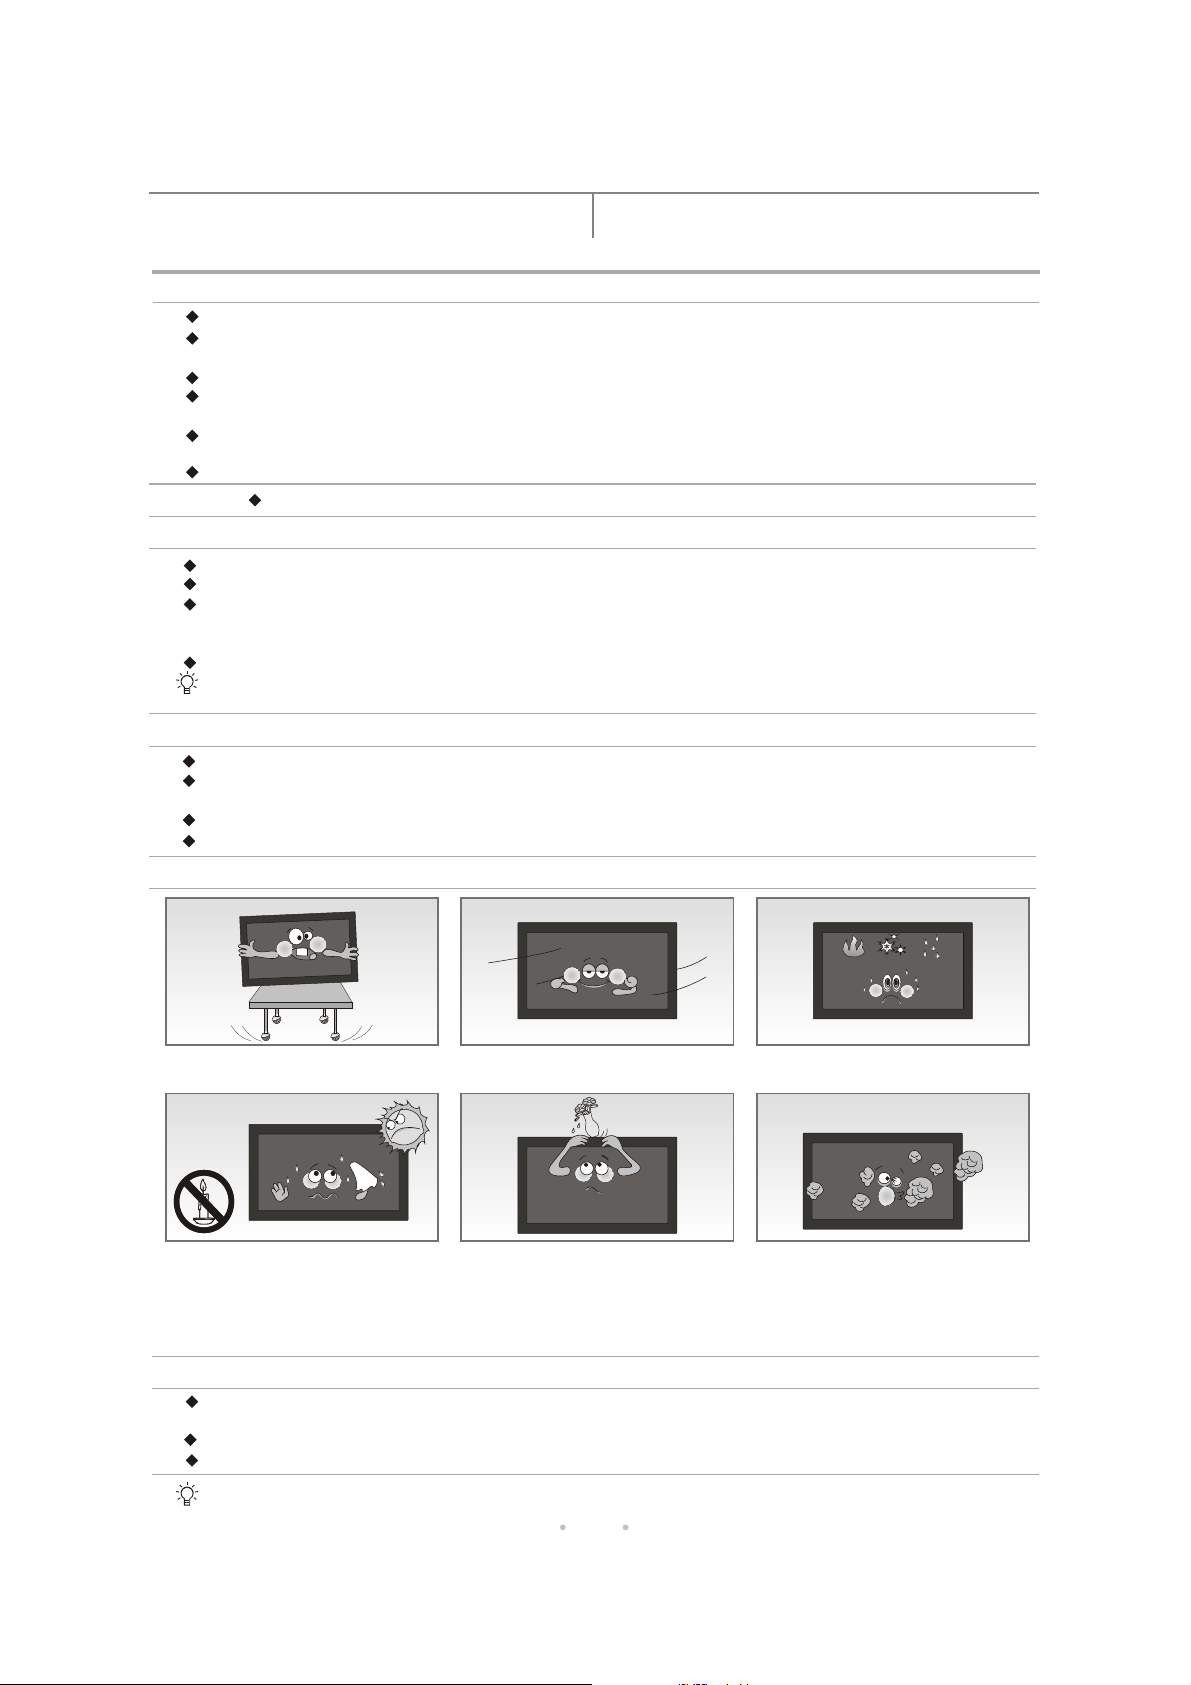
Do not place the set on an unstable cart,
stand, or table.
Never place the set, remote control or
batteries near naked flames or other heat
sources, including direct sunlight.
To prevent the spread of fire, keep candles
or other flames away from the set, remote
control and batteries at all times.
Put the set on a place that allows good
ventilation.
Apparatus shall not be exposed to dripping
or splashing and no objects filled with liquids,
such as vases, shall be placed on the apparatus.
Do not put the set near the too hot, cold or
damp place.
Do not put the set near the heavy dust place.
CLEANING
When cleaning the LCD screen, please use a dry, soft and hairy cloth or use the specific cleaner for liquid crystal to
clear the dust and the smudge.
Do not apply excessive force to the screen when cleaning.
Do not use water or other chemical cleaner to clean the screen as this may damage the surface of the LCD screen.
Note: The unit is applied to industry, not fit for domestic use.
02
Page 4
Features of Model ML17
Slim Bezel Design
Full Metal Shell
Embedded 3D Y/C Separative Tech.
Auto Backlight System
Over Scan
Source Browse Function
Running State Display
Selection
Specifications of Model ML17
Model ML17
Resolution 1280 1024
Visible Diagonal Size 43cm
Video Input Socket
S-Video Socket Y/C component Y signal 1.0Vp-p C signal 0.7Vp-p
VGA Socket D-sub15 socket
Video System PAL, NTSC3.58, NTSC4.43
Operating Voltage 12V DC
Power Consumption 40W
Dimensions 366.5mm 327mm 71.5mm H D
Dimensions of Display Area 340mm 272.3mm(W H)
Weight About 5.5Kg
BNC socket 1Vp-p
Connections of Model ML17
Two Video Input/Loop Output
One S-Video Input
One VGA (PC) Input
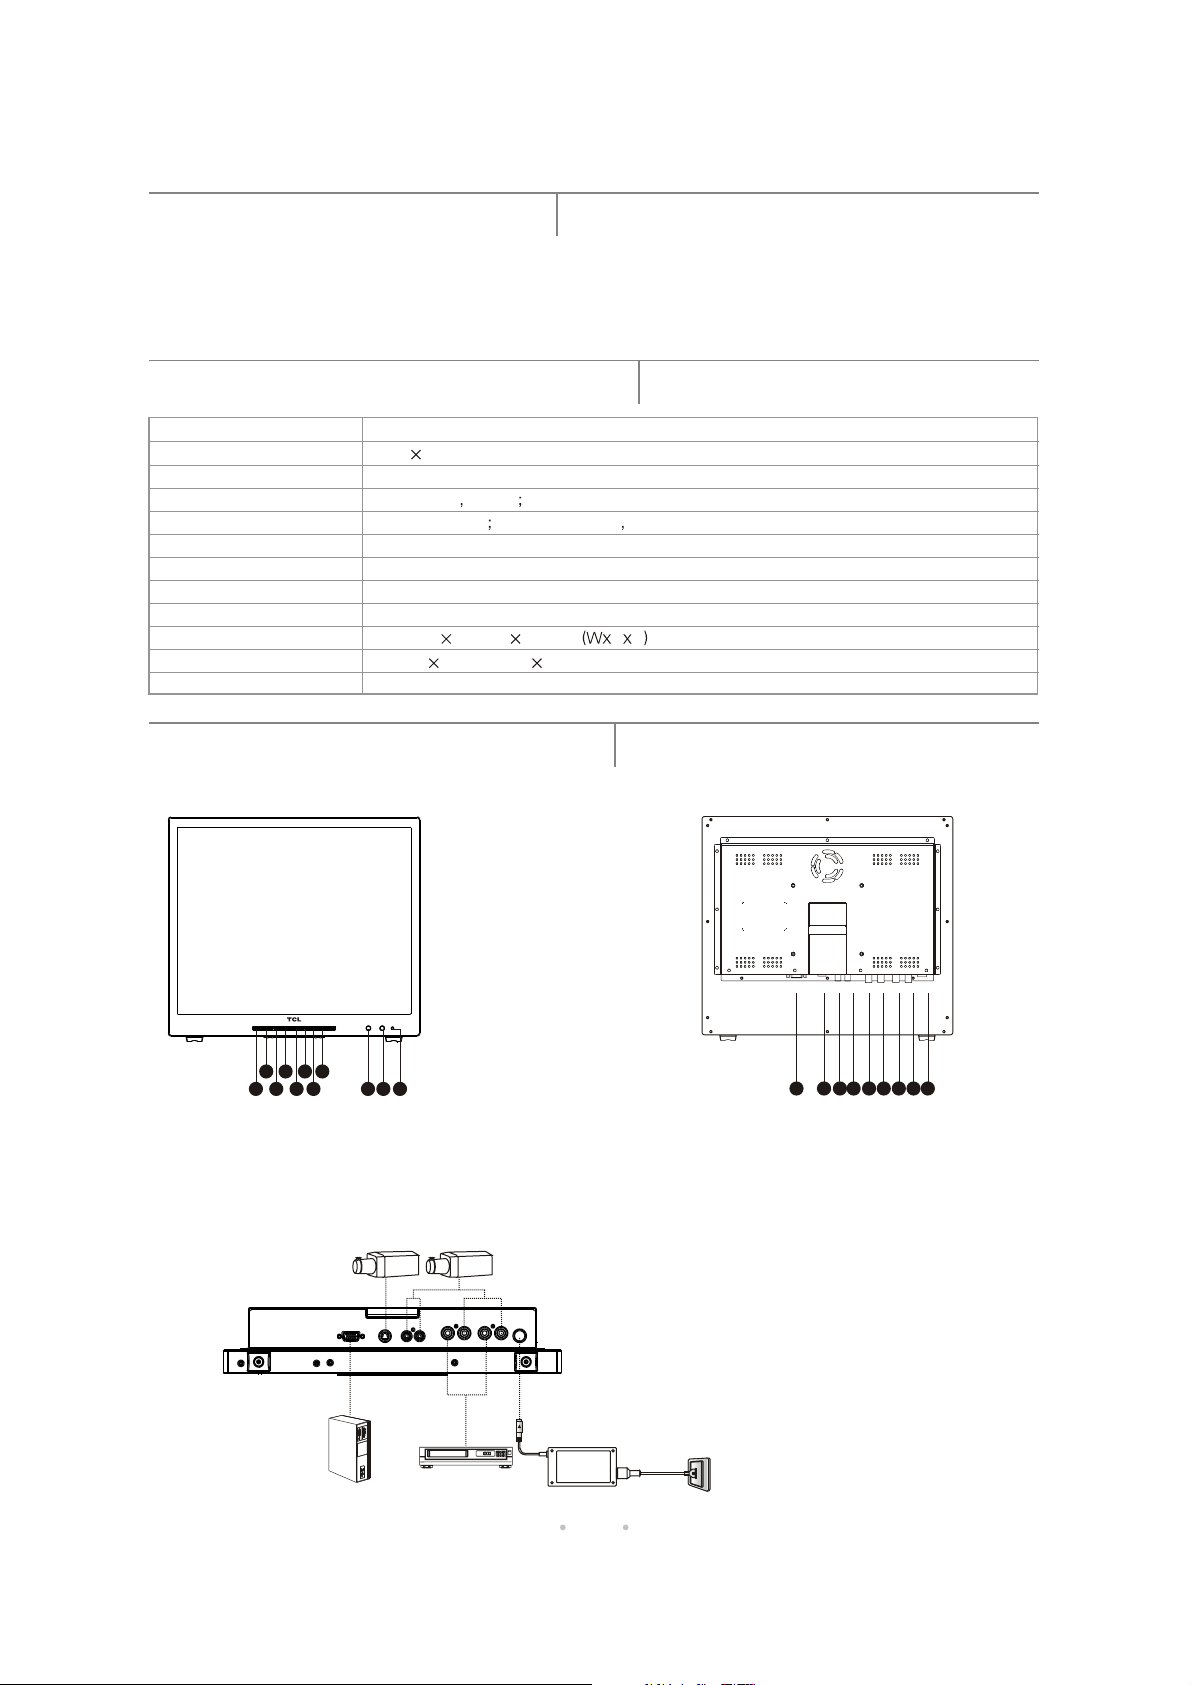
Front View
1. STANDBY
2. FUNCTION
3. SOURCE
4. MENU
5. LEFT button
6. RIGHT button
7. DOWN button
8. UP button
9.
Intelligent Light Sensor
10. Remote Sensor
11. Power Indicator
2 468
1 357 9
Note: The FUNCTION button is the shortcut key
to adjust the brightness and contrast.
10 11
Camcorder Camcorder
Back View
1 2 1 43 5 6 7 8 9
1. VGA Input
2. S-Video Input
3. Audio Input 2
4. Audio Input 1
5. Video Output 2
6. Video Input 2
7. Video Output 1
8. Video Input 1
9. Power Input
Note: S-Video Input and Video Input 2 are
sharing the Audio Input 2 socket. And there
is no audio input function in VGA mode.
PC
Power Adapter
VCR
03
Page 5

Features of Model ML19
Slim Bezel Design
Full Metal Shell
Embedded 3D Y/C Separative Tech.
Auto Backlight System
Wide Voltage Design
Over Scan
Source Browse Function
Running State Display
Selection
Specifications of Model ML19
Model ML19
Resolution 1280 1024
Visible Diagonal Size 48cm
Video Input Socket
S-Video Socket Y/C component Y signal 1.0Vp-p C signal 0.7Vp-p
VGA Socket D-sub15 socket
Video System PAL, NTSC3.58, NTSC4.43
Operating Voltage 100-240V ~ 50Hz/60Hz
Power Consumption 45W
Dimensions 404mm 344mm 70.3mm H D
Dimensions of Display Area 378.3mm 302.1mm(W H)
Weight About 6.2Kg
BNC socket 1Vp-p
Connections of Model ML19
Two Video Input/Loop Output
One S-Video Input
One VGA (PC) Input
Front View
1. STANDBY
2. FUNCTION
3. SOURCE
4. MENU
5. LEFT button
6. RIGHT button
7. DOWN button
8. UP button
9.
Intelligent Light Sensor
10. Remote Sensor
11. Power Indicator
2 468
1 357
Note: The FUNCTION button is the shortcut key
to adjust the brightness and contrast.
9
10 11
Camcorder Camcorder
Back View
10
1
9
1. VGA Input
2. S-Video Input
3. Audio Input 2
4. Audio Input 1
5. Video Output 2
6. Video Input 2
7. Video Output 1
8. Video Input 1
9. AC Power Switch
10. AC Power Input
Note: S-Video Input and Video Input 2 are
sharing the Audio Input 2 socket. And there
is no audio input function in VGA mode.
2345678
PC
VCR
04
Page 6

Features of Model ML22
Slim Bezel Design
Full Metal Shell
Embedded 3D Y/C Separative Tech.
Auto Backlight System
Wide Voltage Design
Over Scan
Source Browse Function
Running State Display
Selection
Specifications of Model ML22
Model ML22
Resolution 1366 768
Visible Diagonal Size 55cm
Video Input Socket
S-Video Socket Y/C component Y signal 1.0Vp-p C signal 0.7Vp-p
VGA Socket D-sub15 socket
Video System PAL, NTSC3.58, NTSC4.43
Operating Voltage 100-240V ~ 50Hz/60Hz
Power Consumption 50W
Dimensions 509mm 319mm 70.3mm H D
Dimensions of Display Area 479.5mm 269.5mm(W H)
Weight About 6.5Kg
BNC socket 1Vp-p
Connections of Model ML22
Two Video Input/Loop Output
One S-Video Input
One VGA (PC) Input
Front View
1. STANDBY
2. FUNCTION
3. SOURCE
4. MENU
5. LEFT button
6. RIGHT button
7. DOWN button
8. UP button
9.
Intelligent Light Sensor
10. Remote Sensor
11. Power Indicator
Note: The FUNCTION button is the shortcut key
to adjust the brightness and contrast.
2 468
1 357
10
11
9
Camcorder Camcorder
Back View
1 2
34567
8
9
1. VGA Input
2. S-Video Input
3. Audio Input 2
4. Audio Input 1
5. Video Output 2
6. Video Input 2
7. Video Output 1
8. Video Input 1
9. AC Power Switch
10. AC Power Input
Note: S-Video Input and Video Input 2 are
sharing the Audio Input 2 socket. And there
is no audio input function in VGA mode.
10
PC
VCR
05
Page 7

Features of Model ML26
Slim Bezel Design
Full Metal Shell
Embedded 3D Y/C Separative Tech.
Auto Backlight System
Wide Voltage Design
Over Scan
Source Browse Function
Running State Display
Selection
Specifications of Model ML26
Model ML26
Resolution 1366 768
Visible Diagonal Size 68cm
Video Input Socket
S-Video Socket Y/C component Y signal 1.0Vp-p C signal 0.7Vp-p
VGA Socket D-sub15 socket
Video System PAL, NTSC3.58, NTSC4.43
Operating Voltage 100-240V ~ 50Hz/60Hz
Power Consumption 80W
Dimensions 635mm 400mm 94mm H D
Dimensions of Display Area 575mm 323mm(W H)
Weight About 10.5Kg
BNC socket 1Vp-p
Connections of Model ML26
Two Video Input/Loop Output
One S-Video Input
One VGA (PC) Input
Front View
1. Power Indicator
2. Remote Sensor
Intelligent Light Sensor
3.
Camcorder Camcorder
Back View
2
3
1
1. VGA Input
2. S-Video Input
3. Audio Input 2
4. Audio Input 1
5. Video Output 2
6. Video Input 2
7. Video Output 1
8. Video Input 1
9. AC Power Input
10. AC Power Switch
Note: S-Video Input and Video Input 2 are
sharing the Audio Input 2 socket. And there
is no audio input function in VGA mode.
1 2
34567
8 9
10
PC
VCR
06
Page 8

Remote Control
Battery Installation
Remove the battery compartment lid from the back of
the remote, insert the 2 x 1.5V AAA batteries, paying
attention to the polarity, and then replace the cover.
Using the Remote Control
Point the remote directly toward the infra-red sensor on the unit.
Notes:
RIGHT BUTTON
LEFT BUTTON
RIGHT
MENU
UP
MENU/STANDBY
BUTTON
UP BUTTON
DOWN/SOURCE
LEFT
DOWN
SOURCE
BUTTON
1. For better performance, once you find the operation is abnormal,
please replace the batteries and have a try again.
Do not mix old and new batteries or different types.2.
3. When the batteries are to be
exhausted, battery leakage may occur and damage to the
remote. When the operation is not sensitive enough, the battery may be low, so please change batteries immediately.
4. If the device is not to be used for a long period of
time, remove the batteries to prevent battery leakage.
Basic Operations
Turning On the Unit
Plug one end of the power cable to the power socket on the rear of the unit, and plug the other end to an appropriate outlet.
Press the power switch (Model ML19, ML22 and ML26), then the unit normal operation mode, and the power indicator
goes to
lights up in green.
Note:
Press " " on the power switch to connect the power and press " " to disconnect the power.
Turning Off the Unit (Standby)
ress and hold the MENU/STANDBY button on the remote control or the STANDBY button on
the front panel, the unit enters into standby mode, and the power indicator lights up in red.
Note:
Unplug the set when it is not used for a long period of time.
Menu Functions
1 Menu Operations
1 Press MENU/STANDBY on the remote or MENU on the front panel to display the main menu.
2 Press UP/DOWN to highlight the desired menu/item.
3 Press RIGHT/LEFT to enter the selected menu/item.
4 Press MENU to go back to the previous menu
5 Press RIGHT/LEFT to change the setting.
6 Press to exit a menu.MENU/STANDBY
2 Picture
TYPEITEM FUNCTION OPERATION RANGE APPLICABILITY
PICTURE
Selects display types
MODE
Adjusts the darkest parts
BRIGHT-
of the picture, usually the
NESS
adjustments are made
together with the
CONTRAST setting
Adjusts the distinction
CON-
between the black and
TRAST
white parts of the picture.
The proper contrast can
cture clear
SATU-
PICTURE
RATION
SHARPNESS
HUE
COLOR
TONE
PALETTE
make the pi
and bright
Adjusts the richness
of color.
Improves picture
details.
Compensates color
variations
Adjusts the color components to achieve a warm
or cold effect
RED
GREEN
BLUE
CYAN
MAGENTA
YELLOW
FLESH
PALETTE RESET
Press RIGHT/
LEFTto adjust
.
USER/STANDARD
/BRIGHTNESS
/SOFT
0-100
0-100
0-100
0-100
0-100
5600K/6500K/
9300K/11000K
0-15
0-15
0-15
0-15
0-15
0-15
0-15
Display "OK" when
the operation
completes
ALL INPUTS
ALL INPUTS
ALL INPUTS
ALL INPUTS
except VGA
ALL INPUTS
except VGA
Only available in
NTSC mode
ALL INPUTS
ALL INPUTS except VGA
Note: PLATTE PRESET
function can make the unit
restore the factory default
settings
.
07
5600K
>>>
>>>
50
50
50
50
50
Page 9

Menu Functions
TYPEITEM FUNCTION OPERATION RANGE APPLICABILITY
PICTURE
3D NR
ADVANCE
Reduce the
noise level of
the picture
OVER SCAN
H-POSITION
V-POSITION
H-SIZE
V-SIZE
SCALE
FLESH COLOR
DCC
GAMMA
COLOR
MODE
NO SIGNAL
LOGO
Press RIGHT/LEFT
to adjust
Press RIGHT/LEFT
to adjust
0-100
0-100
0-100
0-100
4:3/16:9/14:9
OFF/LOW/MID/HIGH
NO SCAN
/90%/95%/100%
/105%/110%
ON/OFF
ON/OFF
ON/OFF
ON/OFF
ON/OFF
ALL INPUTS
except VGA
ALL INPUTS except VGA
ALL INPUTS except VGA
ALL INPUTS except VGA
ALL INPUTS except VGA
ALL INPUTS except VGA
ALL INPUTS
Note: only 4:3 and 16:9 are
available in VGA mode
ALL INPUTS except VGA
ALL INPUTS except VGA
The setting is ON
by default
ALL INPUTS except VGA
ALL INPUTS
3 Sound
TYPEITEM FUNCTION OPERATION RANGE APPLICABILITY
VOLUME
SOUND
MUTE
SOUND
SOUND
INPUT
Adjusts the
volume
Switches on/
off the sound
Selects the
source of the
sound
Press RIGHT/
LEFT to adjust
0-100
ON/OFF
AUTO: The source of sound
is consistent with picture'ss.
NULL: No sound input
AV 1: selects the sound
from AV 1
AV 2: selects the sound
from AV 2
ALL INPUTS except VGA
50
50
50
50
4 : 3
9
4 Setting
TYPEITEM FUNCTION OPERATION RANGE APPLICABILITY
SETTING
LANGUAGE
COLOR
SYSTEM
KEY
BOARD
MENU
TIMER
HALF
TONE
BROWSE
TEMPERATURE
Selects the
OSD
language
Selects color
system
Switch on/off
KEY BOARD
Sets the time
to exit a menu
automatically
Sets the
transparency
of the menu
BROWSE
BROWSE TIME
AV1
AV2
SVIDEO
VGA
FAN
SWITCH
TEMP.
PROTECT
LOCAL
TEMP.
FAN RATE
Press RIGHT/
LEFT to adjust
English
AUTO/PAL/
NTSC3.58/
NTSC4.43
ON/OFF
5S/10S/30S
/60S/180S/360S
OFF/30%/50%/70%
ON/OFF
5-100s
ON/OFF
ON/OFF
ON/OFF
ON/OFF
ON/OFF/MAX RATE
O
20-40 C (unadjustable
in the MAX RATE mode)
Display the temperature
of the unit, which cannot
be adjusted.
Display the rate of the fan,
which cannot be adjusted.
ALL INPUTS
ALL INPUTS except VGA
ALL INPUTS
Note: This function is not
available for model ML26.
ALL INPUTS
ALL INPUTS
ALL INPUTS
Note: BROWSE takes effect
only when at lest two interfaces
are ON. If you want to stop the
browse, press MENU to exit and
BROWSE OFF will appear at the
bottom of the screen. If you want
to activate this function, enter the
BROWSE menu again.
ALL INPUTS
>>>
>>>
50
08
Page 10

Menu Functions
TYPEITEM FUNCTION OPERATION RANGE APPLICABILITY
SETTING
5 Info
TYPEITEM FUNCTION OPERATION RANGE APPLICABILITY
INFO
BACKLIGHT
LIGHT
USER
RESET
COLOR
SYSTEM
PICTURE
MODE
VOLUME
SCALE
COLOR
TONE
OVER
SCAN
3D NR
BROWSE
Adjusts the
brightness of the
initiative backlight
Automatically
set the state of
the brightness,
which varies
along with the
room lighting
Restore user
parameter to
factory default
settings
Displays the current
color system
Displays the current
picture mode
Displays the current
volume
Displays the current
scale
Displays the current
color tone
Displays the current
state of over scan
Displays the current
state of 3D NR
Displays the current
state of the browse
0-100
ON/OFF
Displays "USER RESET"
when adjusting
Cannot adjust,
for the check only
Refers to the
range of the
related item
ALL INPUTS
ALL INPUTS
ALL INPUTS
Refers to the applicability
of the related item
FAN SWITCH
BACKLIGHT
MENU
TIMER
Displays the current
state of fan switch
Displays the current
state of backlight
Displays the current
time setting of
exiting menu
6 Geometry
TYPEITEM FUNCTION OPERATION RANGE APPLICABILITY
AUTO
H-POSITION
V-POSITION
GEOMETRY
CLOCK
PHASE
Adjusts the geometry
position of the picture
automatically
Adjusts the
horizontal position
Adjusts the vertical
position
Adjusts the
frequency of clock
Adjusts the phase
of A/D
Press RIGHT/
LEFT to adjust
“
Displays AUTO
“
ADJUST when
adjusting
VGA INPUT
Installation
100
100
100
100
1 2 3
09
Page 11

Troubleshooting
Before contacting with the service personnel, consult the following troubleshooting list.
SYMPTOM POSSIBLE CAUSES
The power indicator doesn’t light up
and the unit won’t turn on
No picture, no color
Noisy picture
The remote control doesn’t work.
Blank screen in VGA mode
(When used as the PC monitor)
The power cord is not connected.
The POWER button on the main unit is off.
Brightness & contrast may be set to min. (Refer to the PICTURE settings section.)
The color system is not appropriate.
Possible interference from the surroundings.
Replace the power outlet
The batteries need to be replaced.
Clean the front of the remote control (the t
Check the battery connection.
The resolution set in the PC is not identified. Suggest changing the resolution into the
optimum resolution or other standard WINDOWS resolution.
ransmitter).
If you still cannot solve the problems, please call the local service center.
Maintenance
The LCD screen is the core part of LCD monitor. If the maintenance and use are incorrect, the useful life will be shortened in
a large extent, so it is very important to use and maintain LCD monitor appropriately.
1. Do not overwork the screen
First, do not hi
the picture highlighted too long period of time can short down the life of backlight tube. Therefore, turn off the screen or decrease
the display brightness if the unit will not be used for a long period of time in order to prevent parts inside from being aged or
burned out. Please attach great importance to this ki
circumstance, suggest to follow the precautions below.
ghlight the screen too long period of time. The display manner of LCD is different from that of CRT screen. Keeping
nd of damage because it is permanent and beyond retrieval. To avoid this
1) Turn off the screen if no used;
2) Change the display contents in different intervals frequently;
djust the backlight to a lower level;
3) A
4) Display a blank screen;
2. Keep the dry working environment
According to its working principle, LCD screen is very rigorous about the air temperature, so please keep the unit working in
vely dry environment, especially prevent the moisture from entering the parts inside. Users who are working in the moist
a relati
environment (for example: in some southern area where the air is relatively moist) should pay
use some drying agents to keep the surroundings of the screen dry, or use a clean soft cloth to keep the screen dry any time. If
the moisture has entered the screen, place the unit
on the power, otherwise the LCD pole may be eroded and destroyed permanently..
3. Avoid unnecessary touch or vibration
The LCD screen is very fragile, do not point to the screen
spots, even form a patch of bad spots if seriously. This is why some users find more and more bad spots after using the LCD
screen a period of ti
the LCD screen is made from the precise glass parts and the alarmed and sensitive electric parts and the serious impact will
damage, the screen, the related parts and the circuit. When moving the LCD screen, people often hold one part of the screen
carelessly, which may damage the LCD screen. Therefore, strongly suggest to avoid the big vibrati
screen. Only hold the frame and stand When moving the unit.
me. Moreover, the impact resistance is also inferior to the CRT screen, even of the latest model, because
in a dry position to vaporize the moisture. And in the meantime, do not turn
randomly by hand, because any slight touch may cause partial bad
more attention to this. Suggest to
on and heavy impact to the
10
Page 12

Maintenance
4. Timely and correctly cleaning the LCD screen in time
Because of the dirty substances, e.g. dust, there will be some smudges on the surface of LCD screen, so please clean it in time
and in a correct way. Usually drop the soft, non-fibre material e.g. absorbent cotton, lens ti
to clean the screen. If it cannot be cleaned well, you can buy some cleaning products which are special for LCD. Because
nowadays the LCD manufacturing techniques focus on the design of low
interference and environmental protection, all of the parts have been processed in the multi-protective treatment, e.g. multi layer
of film, or painted with more special macromo
alkaline, alcohol or inorganic salt. Do not use the cleanser containing those substances to clear the screen. Moreover, the frame
the screen is processed in triple antistatic techniques, which achieves anti bacterial and antistatic effects, reduces the adhesive
of
dusts, easily keeps the unit clean and prevent the user against electric shock when touching
5. Do not disassemble the LCD screen by yourself when encountering the problems
Because the LCD screen is very delicate and fragile, do not replace the parts at random like the CRT monitor. Do not disassemble
the LCD screen by yourself regardless of any problems. If the
for an assistance. Within a certain period of time after powering off the unit, the CFL converter in the LCD backlight illumination
assembly still carries
personal harm, the new trouble may occur and the screen may be damaged permanently once non professionals cannot
dispose of i
t well.
1000V high voltage (although it is micro electric current). For the LCD screen, even if it may not cause
lecule polymer elements, which are easily destroyed by some chemicals containing
LCD screen cannot work normally, please refer to the professionals
radiation, anti reflector, glare resistance, antistatic
ssue or glasses fabric, into some water
the screen in a dry environment.
11
 Loading...