

Page 1

MC14
72-MC2100-001
Q/WP1034-2005
:
No.
Product Implementation Standard :
:
QB/44130033952-2005
Product Standardization File No.:
If you encounter any problem with your monitor, please call TCL
4008-123456
customer service hotline 4008-123456 for assistance.nationwide
Q/WP1034-2005
QB/44130033952-2005
TCL
No.19 District, Zhongkai High-tech Development Zone, Huizhou City, Guangdong Province
MC15
MC21
COLOR MONITOR
OPERATION MANUAL
This apparatus is with multi functions, so to use it properly,
please read the instructions carefully before your operation.
Page 2
02
03
03
03
04
05
05
05 AV
05
05
06
01
7
Page 3
02
Page 4
NTSC
AV(BNC) S AV (BNC)
AV NTSC3.58 NTSC4.43 PAL
AV1 AV2 (BNC)
S
MC14
34cm
390x478x325(mm)
13kg
50W 60W 70W
1.0Vp-p 0.5VRMS
1.0Vp-p 0.7Vp-p
165V-250V 50Hz
MC15
36cm
390x478x325(mm)
15kg
MC21
51cm
504x512x420(mm)
30kg
7 1.5V
1
2
:
1.
2.
3.
4.
03
Page 5

MC21
1
1
2
2
VIDEO1
AUDIO1
VIDEO2
AUDIO2
INPUT
INPUT
INPUT
INPUT
OUTPUT
OUTPUT
OUTPUT
OUTPUT
REMOTE INPUT
1.
2.
1
2
INPUT
OUTPUT
VIDEO1
1
INPUT
OUTPUT
AUDIO1
1
INPUT
OUTPUT
VIDEO2
2
AUDIO2
2
INPUT
OUTPUT
REMOTE INPUT
04
Page 6

O
AV
SVHS S
SVHS S
S1
I
1
1
50
50
50
50
:
1 NTSC
2
3
4
5
6
1
16 16
1
ENGLISH
2
50 50
50
50
50
2
16
1
ENGLISH ENGLISH
3
3
SYSTEM
VOLUME 16
VIDEO MODE INPUT 1
LANGUAGE LANGUAGE
49
12
05
Page 7

1
ÆÆÆ
2
ÆÆÆ
3
11
4
11
1
ÆÆÆ
2
ÆÆÆ ÆÆÆ
3
1-99
12 1 2
12 S
S2
06
Page 8

Contents
02 Warnings and Precautions
03 Features
03 Specifications
03 Remote Control
04 Connection Illustrations
05 Basic Operations
05 Turning on/off the Unit
05 AV Function
05 Picture Adjustments
05 System Settings
06 Browse Settings
Packing List
Main Unit - one set
Remote Control Handset - one set, including two AAA batteries
Operation Manual - one pc (including warranty card, quality certificate, etc.)
Remote Control Cable - one pc
01
Page 9

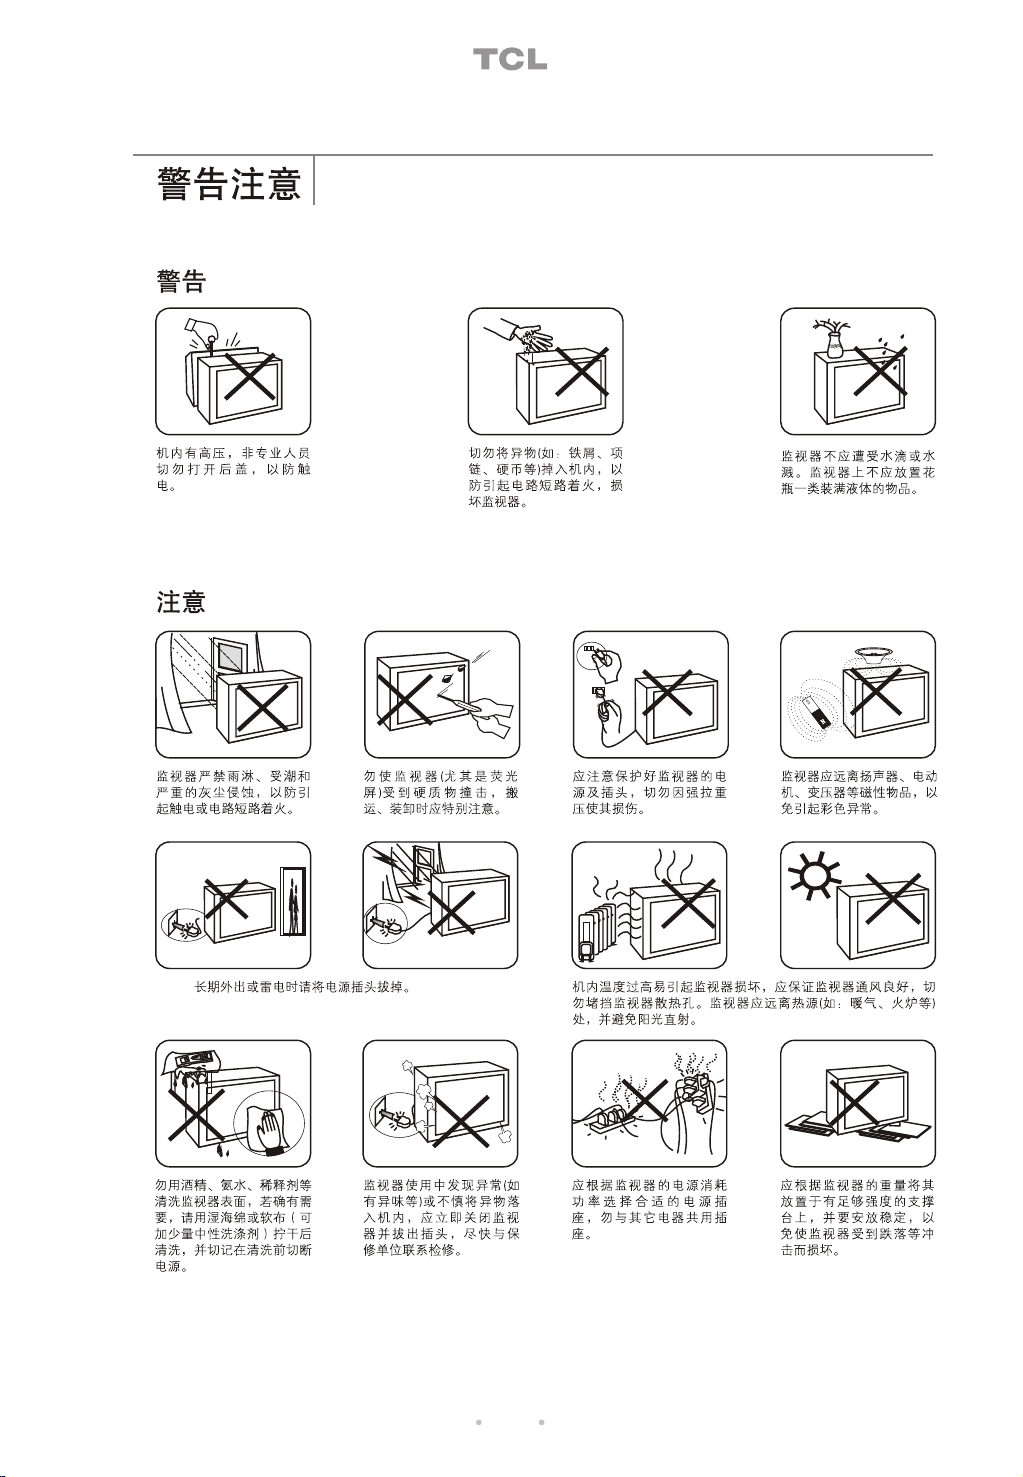
Warnings and Precautions
Warnings
High voltage inside! To reduce
the risk of electric shock, do not
remove cover (or back). Refer
servicing to qualified personnel.
Do not push objects of any kind
into the unit as this may cause
fire or short circuit and damage
the unit.
Precautions
To prevent fire or shock hazard,
do not expose the unit to rain,
moisture or heavy dust areas.
Remove the power plug when the unit will not be used for a
long period of time, or when it is thunder or lightning.
Protect the unit, especially the
screen, from being attached by
hard objects. Please take care
during transportation and
loading/unloading.
The unit shall not be exposed
to dripping or splashing and
no objects filled with liquids
such as vases, shall be placed
on the unit.
To protect the power cord,
do not pull it or press it
with excessive force.
High temperature inside may cause the damage to the
unit. Please keep it well ventilated and do not block the
ventilation slots and openings. Keep away from heat sources
such as stove and radiator and avoid direct sunshine.
To avoid color abnormality,
keep the unit away from the
magnetic objects, such as
the speaker, electromotor
or transformer.
Do not use chemicals such as
alcohol, ammonia or thinner for
cleaning. If necessary, use a piece
of wet cloth or sponge with some
diluted neutral detergent, wring dry
for cleaning. Be sure to cut off the
power before your cleaning.
During your operation, if there
is something abnormal found,
such as strange smell, or if
some objects fall into the unit,
switch off and unplug the unit
immediately and contact the
service personnel as soon as
possible.
02
Use suitable power outlet based
on power consumption of the unit.
Do not share a power outlet with
other electrical appliances.
Place the unit on a platform
strong enough for supporting.
Keep it stable to avoid falling
off and cause the damage.
Page 10

Features
Specifications
AV NTSC3.58, NTSC4.43, PAL
Video: 1.0Vp-p; Audio: 0.5VRMS
Y: 1.0Vp-p; C: 0.7Vp-p
165V-250V 50Hz
MC14
34cm
390x478x325(mm)
13kg
50W 60W 70W
MC15
36cm
390x478x325(mm)
15kg
51cm
504x512x420(mm)
MC21
30kg
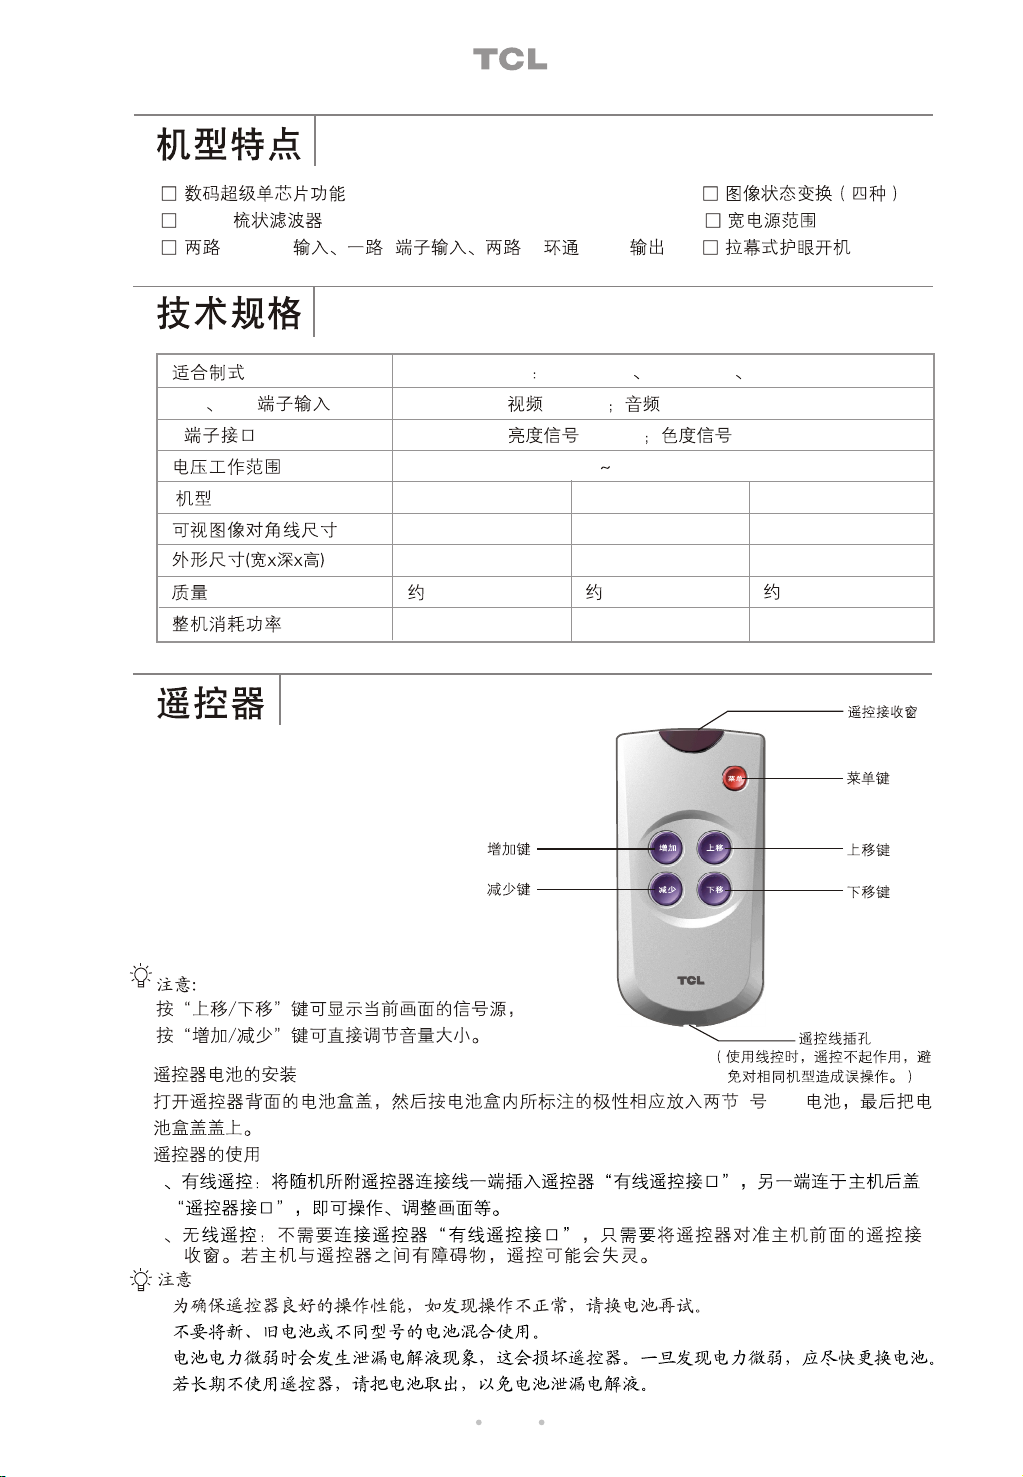
Remote Control
RIGHT button
LEFT button
Note:
UP/DOWN buttons and LEFT/RIGHT buttons take effect
only in the MENU mode.
Battery Installation
Using the Remote Control
Notes:
1. For better performance, once you find the operation is abnormal, please replace the batteries
and have a try again.
Do not mix old and new batteries or different types.2.
3. When the batteries are to be exhausted, battery leakage may occur and cause the damage to
the remote. When the operation is not sensitive enough, the battery may be low, so please
change batteries immediately.
4. If the device is not to be used for a long period of time, remove the batteries to prevent damage
or injury from possible battery leakage.
Transmitter
MENU
UP button
DOWN button
Remote Jack
(When you use wire remote,
the operation works only on
the connected monitor.)
03
Page 11

Connection Illustrations
Take MC 21 for an example:
1
1
2
2
VIDEO1
AUDIO1
VIDEO2
AUDIO2
INPUT
INPUT
INPUT
INPUT
OUTPUT
OUTPUT
OUTPUT
OUTPUT
REMOTE INPUT
1
1.Sensor
2. LED indicator
Shooting Camera
2
Camcorder
Shooting Camera
INPUT
OUTPUT
VIDEO1
1
AUDIO1
INPUT
OUTPUT
REMOTE INPUT
1
INPUT
OUTPUT
VIDEO2
2
INPUT
OUTPUT
AUDIO2
2
04
Remote Control
Page 12

Basic Operations
Connect the power cord first.
Turning on/off the Unit
AV Function
Note:
There is an SVHS (S-VIDEO) input jack on the unit. If your apparatus
has an SVHS jack, you can connect it to the S-VIDEO input jack to
achieve the high quality pictures. Please do not use the S-VIDEO jack
and VIDEO1 jack simultaneously.
Picture Adjustments
VIDEO1
1
PICTURE
STATUS BRIGHTSTATUS BRIGHT
CONTRAST
BRIGHT
COLOR
SHARP
COLOR TEMP
50
50
50
50
NORMAL
2
PICTURE
STATUS BRIGHT
CONTRST 50CONTRST 50
BRIGHT
COLOR
SHARP
COLOR TEMP
50
50
50
NORMAL
3
CONTRAST 49
Notes:
1 TINT is available only in NTSC mode.
2 CONTRAST adjusts the distinction between the black and white parts of the picture.
3 BRIGHT is used to brighten the darkest parts of the picture. Usually it is adjusted together
with CONTRAST setting.
4 COLOR is used to add or reduce color.
5 SHARP improves picture details.
6 COLOR TEMP (color temperature) includes 3 modes: NORMAL, COLD and WARM.
System Settings
1
Press twice
SYSTEM
VOLUME VOLUME
VIDEO MODE VIDEO1
LANGUAGE
1616
VOLUME: Increase/Decrease the sound level by pressing UP/DOWN buttons.
VIDEO MODE: INPUT 1, INPUT 2
LANGUAGE: CHINESE, ENGLISH
2
SYSTEM
VOLUME 16
VIDEO MODE INPUT 1
LANGUAGE LANGUAGE
3
16
1
ENGLISH ENGLISH
05
Page 13

Browse Settings
1
Press three times
4
1
Press three times
BROWSE
BROWSE TIMEBROWSE TIME
VIDEO CHOICE
BROWSE SWITCH
VIDEO CHOICE
INPUT 1INPUT 1
INPUT 2
BROWSE
BROWSE TIMEBROWSE TIME
VIDEO CHOICE
BROWSE SWITCH
ÆÆÆ
OFF
OFF
ÆÆÆ
OFF
ONON
2
2
BROWSE
BROWSE TIME
VIDEO CHOICEVIDEO CHOICE
BROWSE SWITCH
BROWSE
BROWSE TIME
VIDEO CHOICE
BROWSE SWITCHBROWSE SWITCH
ÆÆÆ
OFF
ÆÆÆ
OFFOFF
3
3
VIDEO CHOICE
INPUT 1INPUT 1
INPUT 2
BROWSE
BROWSE TIME
VIDEO CHOICE
BROWSE SWITCHBROWSE SWITCH
OFFOFF
OFF
ÆÆÆ
99
ONON
99
99
BROWSE TIME: The time can be adjusted from 1 to 99 seconds.
VIDEO CHOICE: INPUT 1, INPUT 2 (If both INPUT 1 and INPUT 2 are set to ON, you can
cyclically browse these two input channels.
If S-VIDEO input jack is connected, the system will automatically select
S-VIDEO and INPUT 2 as the input channels to browse.)
BROWSE SWITCH: The browse function will take effect only when ON is set.
Note:
When you want to stop the function, press MENU to exit directly and then “ BROWSE SWITCH
browse
OFF” appears on the screen. If you want to activate this function again, enter the BROWSE menu to
make menu controls.
06
 Loading...