

Page 1
TCL多 媒体科技控股有限公司
xzm
数字签名人 xzm
DN:cn=xzm,c=<无>,
o=GOC,ou=PE,
email=xiongzm@tcl
.com
日期:2016.10.13
15:28:15 +08'00'
2016.10.
13
16:39:50
+08'00'
刘洋
数字签名者:刘洋
DN:cn=刘洋, o, ou,
email=vasya.liu@tcl.c
om, c=<无
日期:2016.10.13
19:52:41 +08'00'
运营中心 - 制 造中 心 - T V一厂
TV工 程部产品辅助设计室(外销)
制作表编号:HZ2016-10-003R
物 料 编 号:72-MS68AA-XAPBX
内 容:说明书
型 号:L55C1CUS
机 芯:MS68A-AP
牌子名称: TCL L55C1CUS
销 往 RUSSIA 地:
BOM编号:H7-55C10FI-URNC0AA
批 次 号:
日 期:2016-10-10
ELQ126824A
1:1
A5 148X210(MM)
80g双胶纸
白底黑字
英语+俄语, 客户要求
俄语以业务签名确认为准
英语: 72-MS68AA-EAP1A R5
俄语:72-MS68AA-EAP1A R5 翻译而来
最后一页为客户要求增加的参数表
制 作 人
PREPARED BY
邱美茜
:
13 437 657 70 1
项目/美工 工程师
ENG.CHECKED BY:
市场业务中心确认
CONFIRM BY:
Page 2

SMART TV
OPERATION MANUAL
L55C1CUS L65C1CUS
Figures and illustrations in this User’s Guide are
provided for reference only and may dier from
actual product appearance. Product design and
specications may be changed without notice.
Page 3

Chapter 1: Introduction
Precautions ............................................................... 3
Product .................................................................... 3
Power and Plug ....................................................... 3
Power Cord and Signal Cable ................................. 3
Use Environment ..................................................... 3
Cleaning................................................................... 3
Hanging the TV Set on the Wall...............................3
Important Information............................................... 3
Buttons on the TV ..................................................... 4
Sockets ...................................................................... 5
Remote Control Functions ...................................... 6
Chapter 2: General Operation
Switching on ............................................................. 7
Switching off ............................................................. 7
Network Connection ................................................. 8
Initial Setup ............................................................... 9
Step 1 Select your language ................................... 9
Step 2 Agree the disclaimer ..................................... 9
Step 3 Set up the network ....................................... 9
Step 4 Select your country....................................... 9
Step 5 Set up the time ............................................. 9
Step 6 All Done ........................................................ 9
Chapter 3: Homepage Operation
Using Homepage - Home ....................................... 10
History.................................................................... 10
Search ................................................................... 10
Using Homepage
Using Homepage - TV ............................................ 11
TV Window ............................................................ 11
Input Source .......................................................... 11
Using Homepage - Apps ........................................ 12
App Store ............................................................... 12
Pre-installed Apps .................................................. 12
- Videos...................................... 11
Table of Contents
Using System Settings ........................................... 15
Picture.................................................................... 15
Sound .................................................................... 15
Channel ................................................................. 16
Network.................................................................. 17
System ................................................................... 18
Applications ........................................................... 19
Chapter 5: Other Information
Problems & Solutions ............................................ 20
Troubleshooting .....................................................21
Chapter 4: Menu Operation
Using Quick Access Menu ..................................... 13
Picture Preset ........................................................ 13
Sound Preset ......................................................... 13
T-Link ..................................................................... 13
Time Shift ............................................................... 13
PVR ...................................................................... 14
Schedule List ......................................................... 14
Settings .................................................................. 14
2
Page 4

IntroductionChapter 1
Precautions
Read all of the instructions before operating the set.
Keep these instructions well for future use.
Product
• Do not block or cover the ventilation openings on the
back cover.
• Do not push objects of any kind into this unit through
the cabinet slots as they could touch the current
carrying parts or short-circuit parts, resulting in re,
electric shock, or damage to the unit.
• Do not attempt to open the cabinet as this may cause
damage. There are no parts inside you can service by
yourself. Refer all servicing to qualied personnel.
• Do not touch the screen surface with ngers as this
may scratch or mar the TV screen.
• Do not impact the TV screen with hard pressure as
this may damage the TV screen severely.
Power and Plug
• Unplug the set under the following conditions:
- If the set will not be used for a long period of time.
- If the power cord or the power outlet/plug is
damaged.
- Follow the instructions to install and adjust the
product. Adjust those controls that are covered in
these operating instructions as improper adjustment
of other controls may result in damage. If this
happens, unplug the set and refer to the service
personnel.
- If the set is subject to impact or has been dropped
and the cabinet has been damaged.
• Where the mains plug or an appliance coupler is used
as disconnect device, the disconnect device shall
remain readily operable.
(*Where an all-pole mains switch is used as the
disconnect device, the switch shall remain readily
operable.)
Power Cord and Signal Cable
• Do not allow anything to rest on or roll over the power
cord and the signal cable.
• Protect the power cord and the signal cable from
being trampled.
• Do not overload the power cord or the power outlet.
• Do not expose the power cord and the signal cable to
moisture.
Use Environment
• Do not place the set on an unstable cart, stand, or
table.
• Place the set on a place that allows good ventilation.
• Do not use the set near damp, and cold areas. Protect
the set from overheating.
• Keep the set away from direct sunlight.
• The apparatus shall not be exposed to dripping or
splashing and no objects lled with liquids, such as
vases, shall be placed on the apparatus.
• Do not use the set in dusty environments.
• Operating Temperature: 5°C to 35°C (41°F to 95°F)
Operating Humidity: 20% to 80%, non-condensing
Storage Temperature: -15°C to 45°C (5°F to 113°F)
Storage Humidity: 10% to 90%, non-condensing
Cleaning
• Dust the set by wiping the screen and the cabinet with
a soft, clean cloth or some special liquid cleaner.
• Do not apply excessive force to the screen when
cleaning.
• Do not use water or other chemical cleaner to clean
the screen as this may damage the surface of the TV
screen.
Hanging the TV Set on the Wall
Warning: This operation requires two people.
To ensure a safe installation, observe the following
safety notes:
• Check that the wall can support the weight of the TV
set and wall mount assembly.
• Follow the mounting instructions provided with the
wall mount.
• The TV set must be installed on a vertical wall.
• Make sure to use only screws suitable for the material
of the wall.
• Make sure that the TV set cables are placed so that
there is no danger of tripping over them.
All other safety instructions about our TV sets are
also applicable here. (Note: Certain TV model is not
designed to be mounted to the wall.)
Important Information
If a television is not positioned in a sufciently stable
location, it can be potentially hazardous due to falling.
Many injuries, particularly to children, can be avoided by
taking simple precautions such as:
• Using cabinets or stands recommended by the
manufacturer of the television.
• Only using furniture that can safely support the
television.
• Ensuring the television is not overhanging the edge of
the supporting furniture.
• Not placing the television on tall furniture (for example,
cupboards or bookcases) without anchoring both the
furniture and the television to a suitable support.
• Not standing the television on cloth or other materials
placed between the television and supporting furniture.
• Educating children about the dangers of climbing on
furniture to reach the television or its controls.
3
Page 5
Introduction
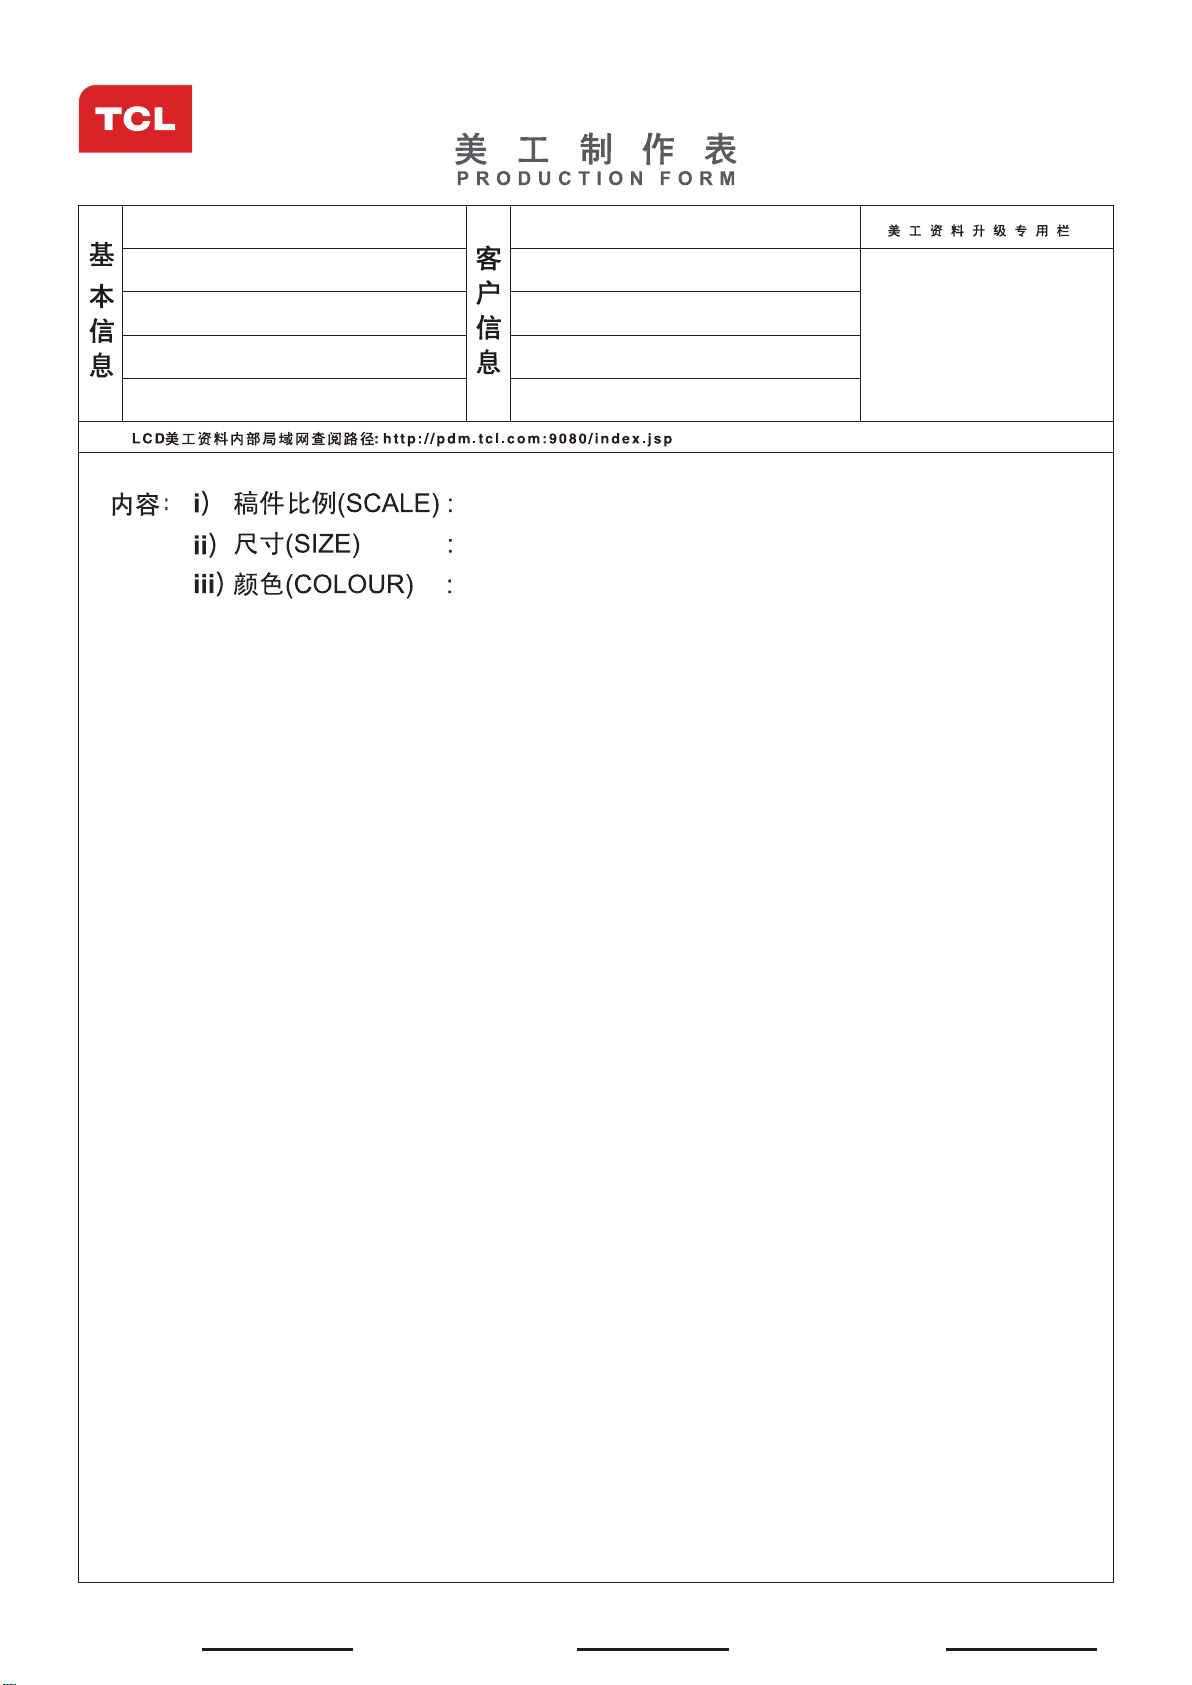
Buttons on the TV
Note: The product colour and shape may vary depending on the model. Figures are provided for reference only.
1.
Press to turn the TV on from the standby mode.
Short press within 2 seconds, it acts like OK button
on the remote to conrm your selection in menu
mode or to display channel list in TV mode.
Long press for more than 2 seconds, the NAV menu
will display on the screen. Without the remote, the
NAV menu are shorcuts to Source, Menu, Home,
Back and Standby. And the shortcuts may vary
depending on models.
To exit the NAV menu, highlight
to conrm.
2.
Scans up/down through the channel list. In menu
mode, they act like the UP/DOWN direction buttons
on the remote and adjust menu controls.
3.
Increases/decreases the volume. In menu mode,
they act like the RIGHT/LEFT direction buttons on the
remote and adjust menu controls.
and then press
OR
On-screen NAV menu
4
Page 6
Introduction
COMPONENT
IN (Y
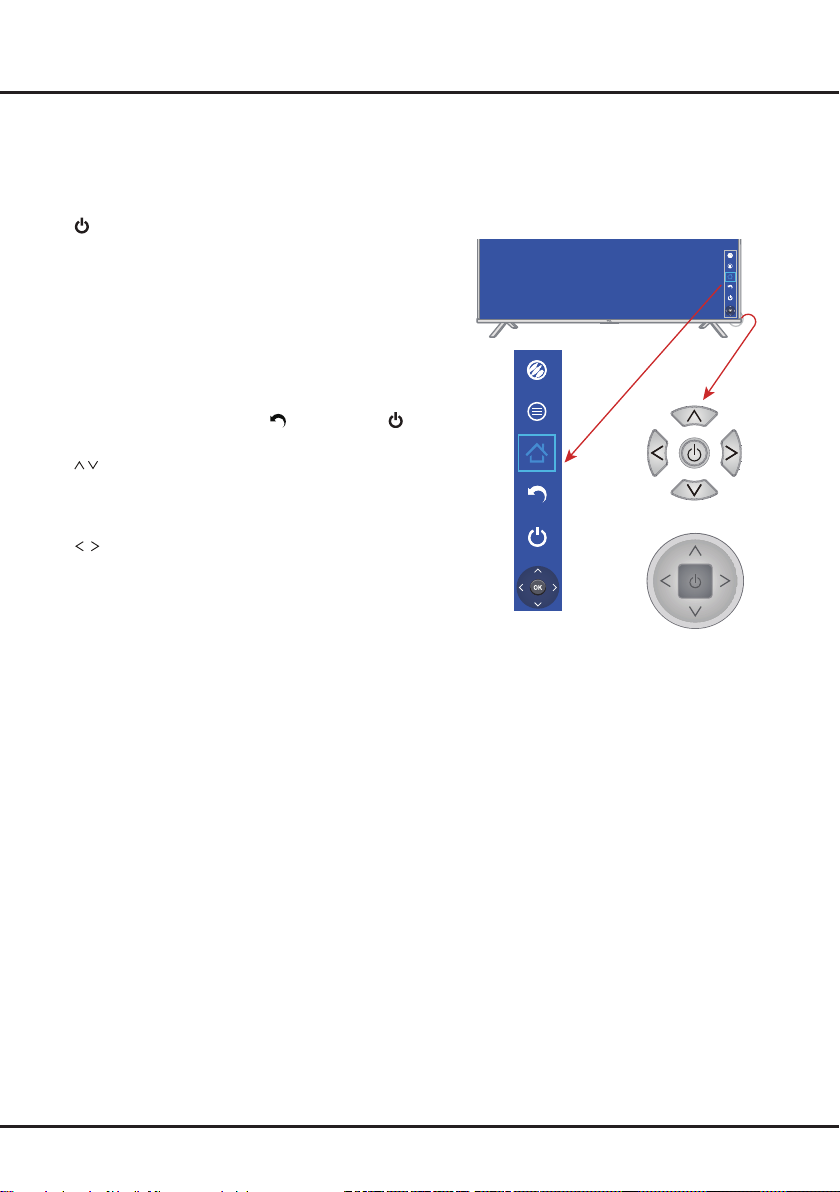
Sockets
Note: The location and names of the sockets on the TV may vary according to TV model, and not all sockets
available on all models.
HDMI 1 (MHL)
or HDMI 2 (ARC)
or HDMI 3
ANTENNA/CABLE IN
PB
PR)
AV
IN
AUDIO IN
LAN
SPDIF
USB 2.0
or
USB 3.0
VGA IN
Y/VIDEO
VGA/
LAN
This socket can be used to connect to external modem or network access
equipment.
SPDIF socket (output)
This socket can be used to connect a compatible digital audio receiver.
HDMI1/HDMI2/HDMI3 socket (input)
The HDMI (High-Denition Multimedia Interface) socket lets you connect a
device, such as a Blu-ray player, with a HDMI output for best picture quality.
It also provides an uncompressed digital connection that carries both video
and audio data by way of an integrated mini-plug cable.
Note: Only HDMI sockets with the MHL identication will support the MHL
function, MHL stands for Mobile High-denition Link, and allows you to link
an MHL-capable mobile device to the television.
USB 2.0/USB 3.0 socket (input)
This socket can be used to connect a USB device.
ANTENNA/CABLE IN socket (input)
This socket can be used to connect the outside aerial or cable network.
VGA IN socket (input)
This socket can be used to connect a computer.
Note: VGA IN shares the same audio sockets with AV IN.
Y
P
component sockets (input)
B
PR
PB
PR
These Y
P
sockets can be used to connect a device that has component
B
PR
video sockets, such as a DVD player. The component sockets can
recognize if the device you're connecting to is Y
P
compatible. The
B
PR
component sockets provide excellent picture quality because the video is
R
L
separated into three separate parts.
AV RCA audio + video sockets (input)
The AV IN sockets can be used to connect a range of equipment, including
video recorders, camcorders, decoders, satellite receivers, DVD players, or
games consoles. The VIDEO socket provides composite video connection.
Note: AV IN shares video (Y/VIDEO) and audio sockets with Y
P
.
B
PR
AUDIO
OUT
COMMON
INTERFACE
R
RCA AUDIO OUT sockets
Use an RCA audio cable to connect your TV to a compatible audio
L
receiver.
Common Interface socket
This socket can be used to watch encrypted digital TV channels by inserting
a common interface module and a card provided by a digital TV service
operator.
5
Page 7
Introduction
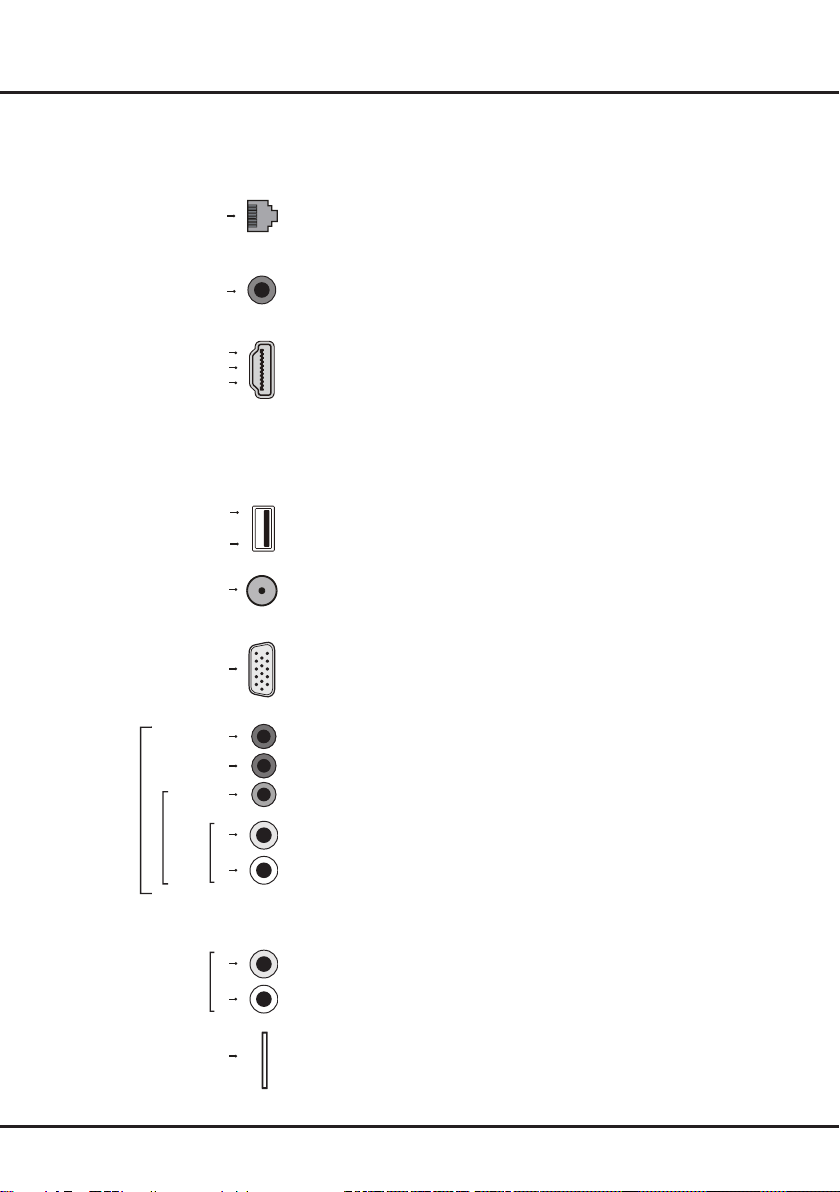
Remote Control Functions
Most of your television's functions are available via the menus that appear on the screen. The remote control(s)
supplied with your set can be used to navigate through the menus and to congure all the general settings.
Note: Figures and illustrations in this operation manual are provided for reference only and may differ from actual
product appearance. Certain function may not be available for some models, e.g. 3D is only available for 3D models,
and EPG/SUBTITLE/REC functions are only available under DTV source. And DTV is not availbale for certain model.
Standby / quit standby.
3D Not supported.
TV To access TV mode.
0-9 To enter channel numbers.
SOURCE To enter source selection interface.
HISTORY To show or hide history list.
VOL +/- To control the volume.
CH +/- To adjust channels.
(MUTE button) To mute and un-mute the sound.
(INFO button) To display program information, if available.
Quick access to App Store.
APP
(HOME button) To enter/exit Homepage.
EPG To bring up the Electronic Program Guide under DTV source.
(MENU button) To access the options menu; to move the highlight on
the tab in browser.
OK To conrm an entry or selection; to access system keyboard when
doing input; to display program list under TV source.
▲▼
To navigate through the menus; to select menu options; to switch
to the previous or next photo, song or video in USB function; to
adjust channels during GoLive playback.
To navigate through the menus; to set functions and change values.
◄ ►
can also be used to open the corresponding submenu.
►
(BACK button) To go back to the previous menu or interface; to exit a
running app.
ZOOM-/ZOOM+ To select the picture format.
Colored buttons To select tasks or Teletext pages.
EXIT To go back to the previous menu or interface; to exit a running app.
TEXT To toggle Teletext on or off.
SLEEP To set the TV to turn off after a given amount of time.
PRE-CH To return to the previous channel.
FAV To bring up the favorite channel list menu.
LIST To display the channel list.
Lang To select a sound type available for selected analogue TV program; to
select an audio language available for selected digital TV program.
REC To record programs under DTV source.
SUBTITLE To select a subtitle language available for selected digital TV program.
To select the previous or the next photo, music or video.
To start playback.
To pause playback.
To start fast reverse or fast forward.
To stop playback.
6
Page 8
Chapter 2 General Operation
Switching on
Follow the instructions on this page on how to switch on your TV set
and the remote control before going on to following pages describing
how to use the channel set-up procedure.
1. Insert two AAA batteries in the remote control.
Precautions on using batteries:
- Only use the battery types specied.
- Make sure you use the correct polarity.
- Do not mix new and used batteries.
- Do not use rechargeable batteries.
- Do not expose batteries to excessive heat such as sunshine,
re or the like, throw them in a re, recharge them or try to open
them, as this could cause them to leak or explode.
- Remove the batteries from the remote control if you are not using
it for a long period of time.
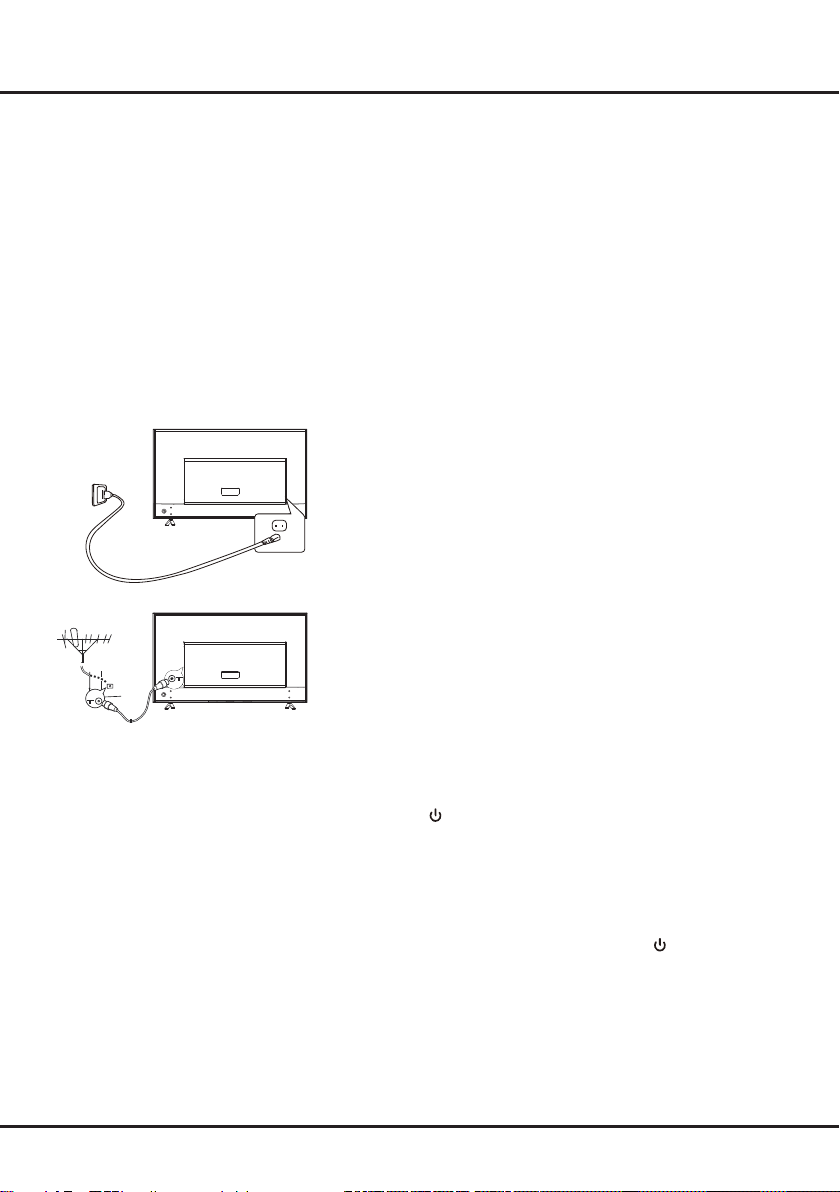
2. Connect the power cable FIRST to the television, THEN to a mains
socket. (Note: If the power cable is connected to the television,
please only connect the power cable to the mains socket.)
Your TV set should only be connected to an AC supply. It must not
be connected to a DC supply. If the plug is detached from the ca-
ble, do not, under any circumstances, connect it to a mains socket,
as there is a risk of electric shock.
Note: The gures are for representation only, the location of power
socket of the television may differ depending on the model.
3. Connect an outside aerial to the ANTENNA IN socket at the back
of the TV set.
The aerial socket (75 OHM - VHF / UHF / cable) can be used for
connecting an external aerial or other equipment tted.
Note: If you want to receive the signal from your cable or cable
box, please connect a coaxial cable to the CABLE IN socket at the
back of the TV set.
4. When powered on, the TV will be turned on directly or be in
standby mode.
If the power indicator lights up, the TV set is in standby mode.
Press the
on the TV.
button on the remote control or on the TV set to turn
Switching off
• To put the TV set into standby mode, press the button on the
remote control. The TV set remains powered up, but with low
energy consumption.
• To switch off the TV set, unplug the mains socket from the mains
outlet.
7
Page 9
General Operation
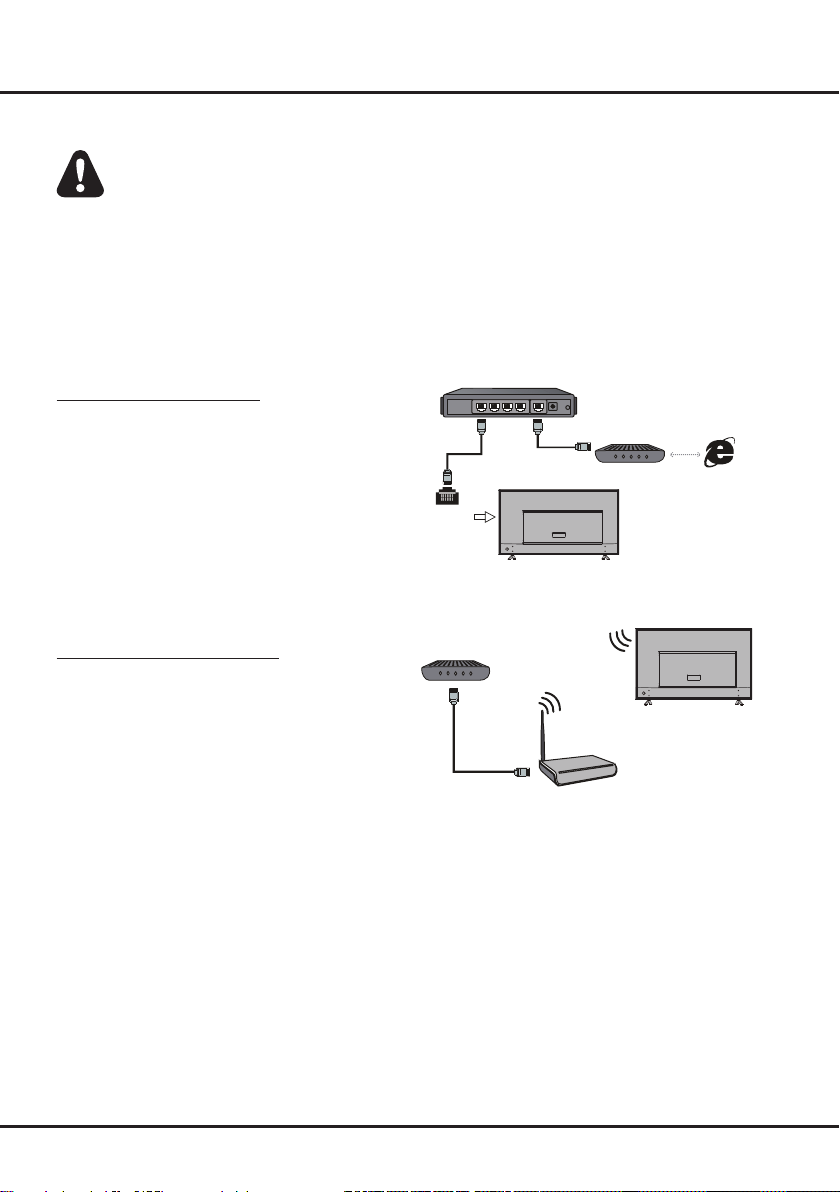
Modem Internet
TV Set
Router
Ethernet
Port on the
back panel
Wireless Router
Modem
TV Set
Built-in wireless
connection
Network Connection
Your TV will require an internet connection to operate all functions. Data usage charges may apply.
Please refer to your Internet Service Provider (ISP) for additional information.
To access the Internet, you must subscribe to high speed broadband Internet service with your Internet service
provider (ISP).
Your TV can be connected to your home network in two ways:
• Wired, using the RJ45 (LAN) connector on the back panel.
• Wireless, using the internal wireless and your home wireless network.
Note: Instructions below are just the usual ways to connect your TV to the wired or wireless network. The connection
method may be different depending on your actual network conguration. If you have any questions about your home
network, please refer to your ISP.
Connecting to a wired network
To connect to a wired network:
1. Ensure you have:
• An Ethernet cable long enough to reach your TV
• A router or modem with an available Ethernet
port
• A high-speed Internet connection
• An Ethernet (LAN) port on the back of the TV
2. Connect your Ethernet cable to the router and to
the Ethernet port on the back of the TV.
3. Use the Network menu to configure the TV.
Connecting to a wireless network
To connect to a wireless network:
1. Ensure you have:
• A router broadcasting a high-speed wireless
signal
• A high-speed Internet connection
2. Use the Network menu to configure the TV.
8
Page 10
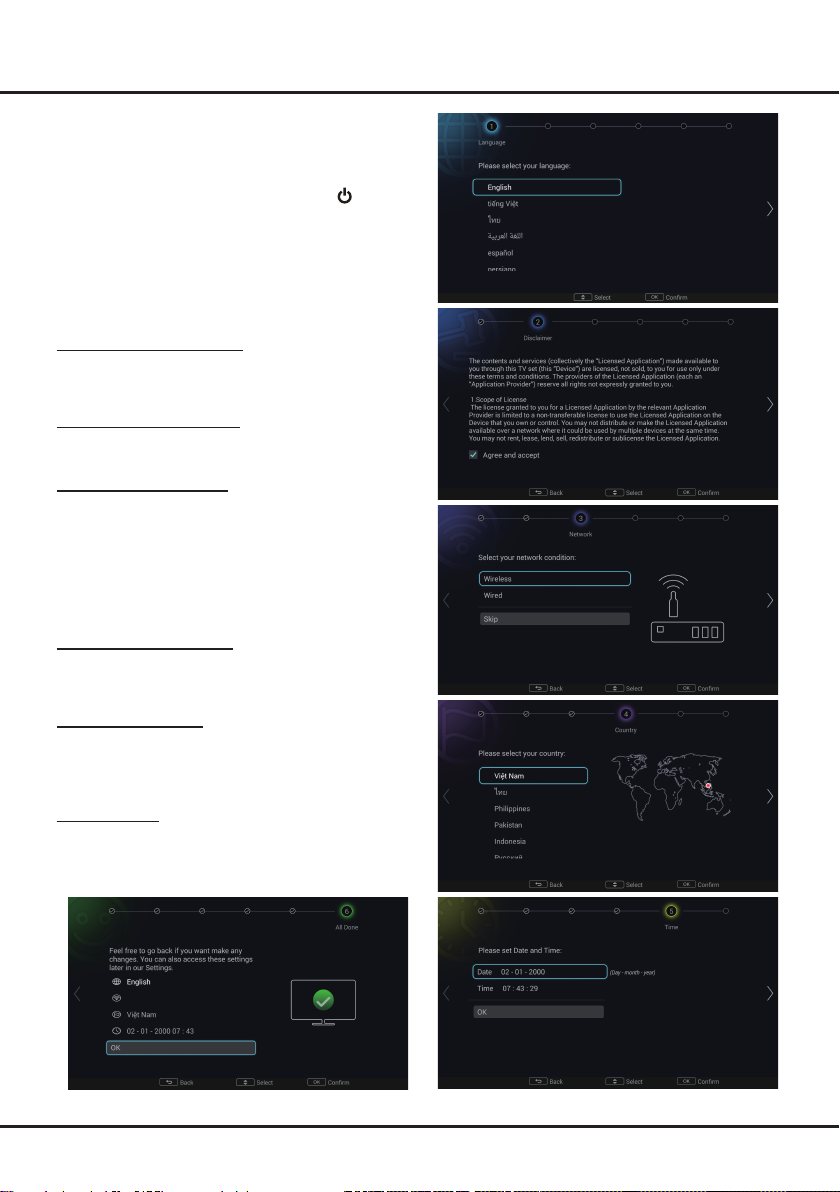
Initial Setup
The rst time you switch the set on, the Initial setup wizard
opens, which guides you through the initial setup
Perform the following steps before you press on the
remote control.
• Insert the batteries into the remote control.
• Connect the antenna cable to the TV.
• Plug in the AC cord to the AC outlet.
• Connect your TV to a network.
Make sure that the television is switched on and follow all
the steps in turn specied hereafter.
Step 1 Select your language
Use ▲/▼ to select your desired language. Press OK to
conrm and move to next step. (Note: optional languages
may be different according to TV model.)
Step 2 Agree the disclaimer
Use ▲/▼ to select [Agree and accept]. Press OK to tick.
Then press OK to conrm and move to next step.
Step 3 Set up the network
Android-based TV requires Internet service to access the
web and Smart TV applications. Connect Internet using
your existing wireless home network or Ethernet cable,
and follow the guides on the screen. Select [Wireless] or
[Wired] and press OK to proceed to the next screen. You
can also skip this step by selecting [Skip], and connect
to the internet later. For details, please see "Network
Connection" & "Network Setup".
Step 4 Select your country
Use ▲/▼ to select your country. Press OK to conrm
and move to next step. (Note: optional countries may be
different according to TV model.)
Step 5 Set up the time
Use ▲/▼ to move your cursor to the Date or Time, press
OK to enter the submenu. Use ▲/▼ to scroll between the
numbers and select the correct date and time. Select OK
and press OK to conrm and move to next step.
Step 6 All Done
When all setup is done, the [All Done] interface displays
on the screen, and press OK to nish the initial setup. You
can also go back to former step and make any changes by
using ◄ or BACK.
process.
General Operation
9
Page 11
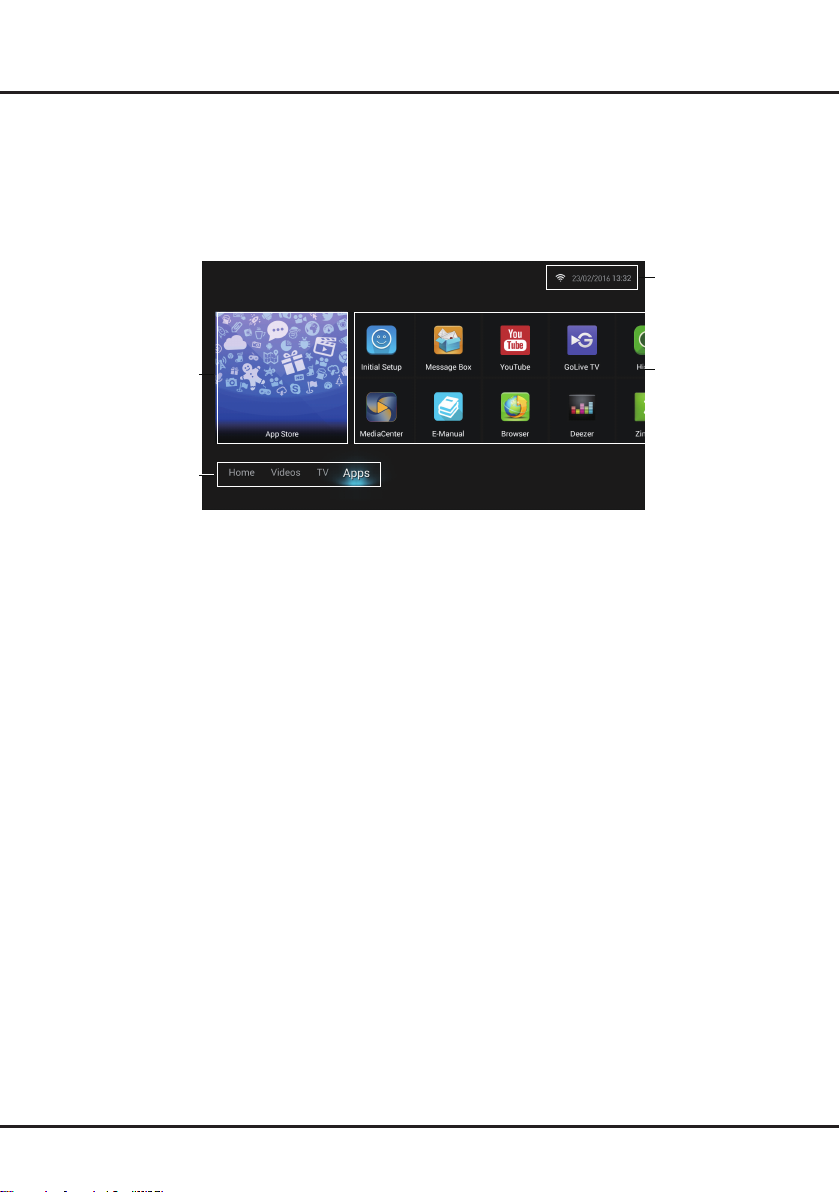
Chapter 3 Homepage Operation
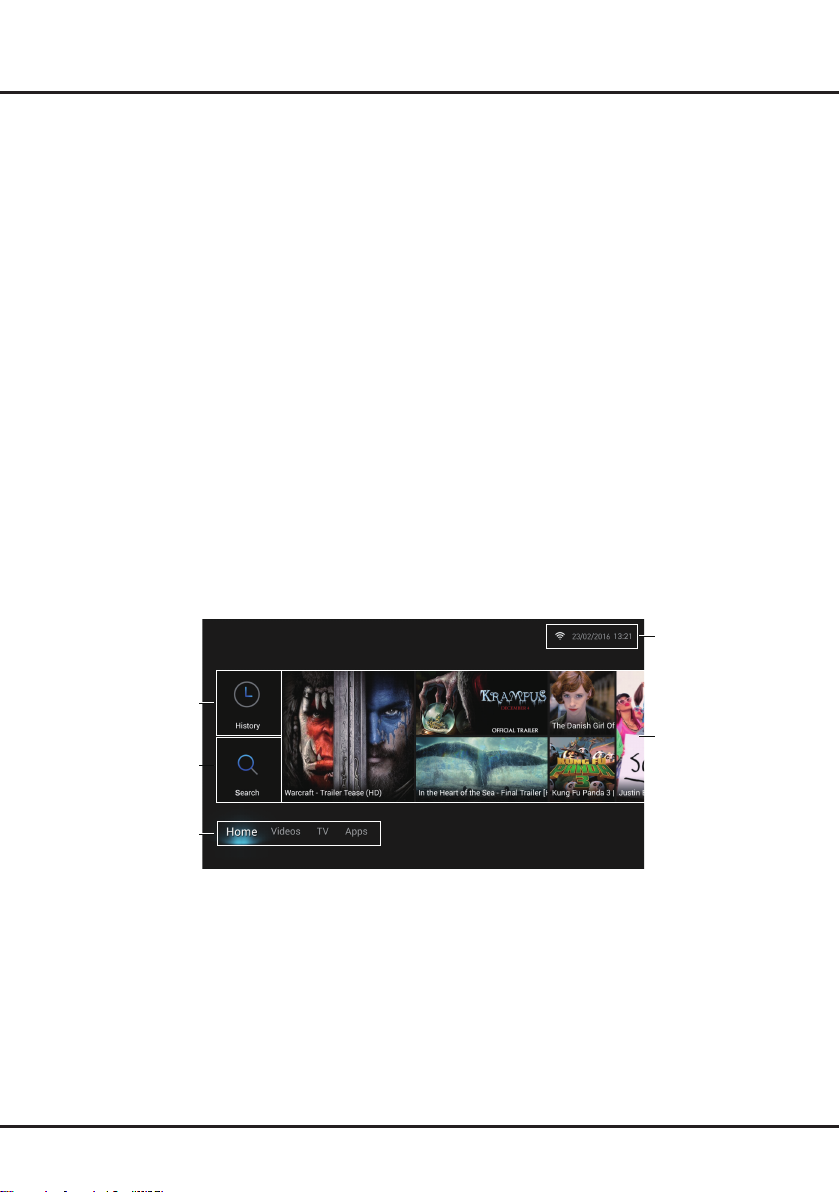
Home/Videos/TV/Apps:
Note: Figures and illustrations in this User Manual are provided for reference only and may differ from actual product
appearance. And for some models, certain options are not available.
You can select all the features from homepage.
1. Press HOME to display homepage.
2. Press ▲/▼/◄/► to select icons from the screen list.
3. Press OK to enter each option.
4. To exit the menu, press BACK.
Homepage contains 4 parts: Home, Videos, TV, and Apps. Use ◄/► to switch among them.
Shortcuts: Press ▲ to move the cursor to the very top of the screen under any homepage, the Multimedia (only
available when a USB device is plugged in) and Settings options will appear. You can directly access the USB
multimedia les and settings options accordingly here.
WARNING:
• Congure the network settings before using Smart TV.
• Slow responses and/or interruptions may occur, depending on your network conditions.
• If you experience a problem using an application, please contact the content provider.
• According to circumstances of the contents provider, an application’s updates or the application itself may be
discontinued.
• Depending on your country’s regulations, some applications may have limited service or not be supported.
Using Homepage - Home
This section explores the most commonly used menu of your TV.
Press HOME on the remote control to display the homepage. Press ▲/▼/◄/► to enter the Home page and select
icons from the screen list. Press OK to enter each option. To exit the menu, press BACK.
Status:
Network Status/
Date/Time
History
Search
Use ◄/► to focus
on each item.
History
This page shows your recently watched programs. To delete the history, press MENU on the remote control, press
◄/► to highlight Delete One or Delete All, click OK, and then operate according to on-screen instructions.
Search
You can search for your desired programs using the virtual keyboard.
10
Recommendations
Page 12

Homepage Operation
Home/Videos/TV/Apps
Home/Videos/TV/Apps:
Using Homepage - Videos
Note: The information displayed will be updated periodically.
Press HOME on the remote control to display the homepage. Press ▲/▼/◄/► to enter the Videos page and select
icons from the screen list. Press OK to enter each content. To exit the menu, press BACK.
This interface enables you to search for videos by genre, such as movies, sports, music, popular, news, education,
and game, etc. according to your local platform.
Status:
Network Status/
Date/Time
Use ◄/► to focus
:
on each item.
Using Homepage - TV
Note: Some options may not be available for certain signal sources.
This section explores the input sources of your TV.
Press HOME on the remote control to display the homepage. Press ▲/▼/◄/► to enter TV page and select input
source you want from the screen list. Press OK to conrm. To exit the menu, press HOME.
Status:
Network Status/
Date/Time
TV Window
Use ◄/► to focus
on each item.
TV Window
Displays the current selected program.
Input Source
Select the input source from devices connected to TV through different ports, including TV, HDMI1, HDMI2, HDMI3,
AV, YPbPr, USB, and PC. Press ▲/▼/◄/► to select your desired source, and then press OK to conrm.
Note: The available source might differ depending on the model.
Input Source
11
Page 13
Homepage Operation
Home/Videos/TV/Apps:
Using Homepage - Apps
Note: The pre-installed apps or items cannot be deleted. And the apps (regardless of order) listed in the below gure
may differ from actual product. For some models, certain apps are not available.
Press HOME on the remote control to display the homepage. Press ▲/▼/◄/► to enter the Apps page and select
icons from the screen list. Press OK to enter each option. Press HOME or BACK repeatedly to return to the
homepage.
Status:
Network Status/
Date/Time
App Store
Use ◄/► to focus
on each item.
Pre-installed Apps
App Store
Many useful and entertaining apps are available for downloading. After entering App Store, you will see the
recommendations. Press ▲/▼/◄/► to select, press OK to enter. The buttons on the top right, such as Required,
Search can provide convenient operations.
Pre-installed Apps
These are recommended Apps. Highlight an app and press OK to open it. To see all the apps that have been in-
stalled on your TV, highlight All Apps and press OK. On the interface, you can press MENU to uninstall or sort the
apps.
Notes:
- The pre-installed apps or items cannot be deleted.
- You may need a webcam to use certain apps. The webcam is an optional accessory, and is available by separate
purchase. Only use the specified webcam. Some external devices like webcam, smartphone, joystick and
external wireless adapter may not be supported.
12
Page 14
Chapter 4 Menu Operation
Using Quick Access Menu
Note: Some of the functions might be unavailable in
certain sources. And for some models, certain options
are not available.
This section explores the menus and settings of your
TV. Each menu is outlined and detailed to help you get
the most from your TV. To access the menu system:
1. In TV mode, press MENU on the remote control to
display the quick access list.
2. Press ▲/▼ to select the desired item, then press
OK /► to open the corresponding submenu.
3. In submenus, use ◄/► and OK buttons to make
the adjustments, or use ▲/▼ to select an item, use
OK/► to enter and operate according to the on-
screen display or guide.
4. Press BACK to return to the previous menu.
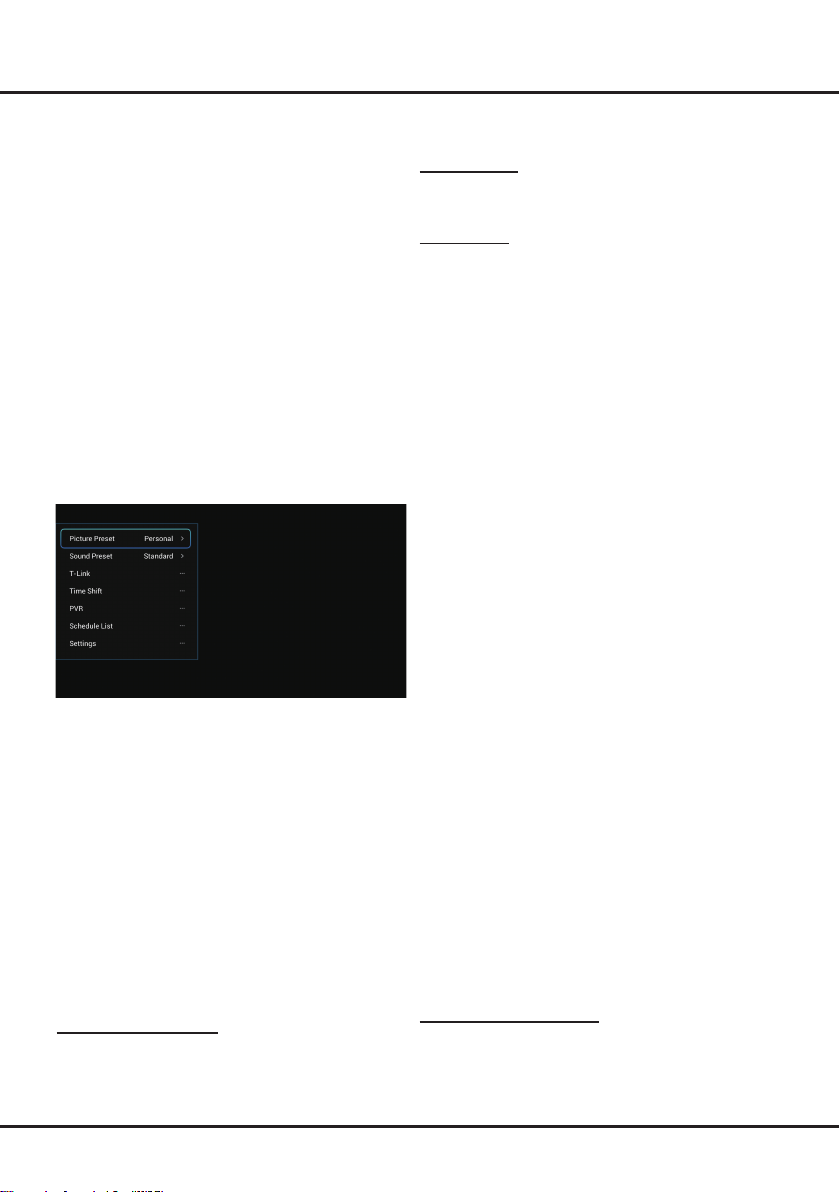
The quick access list includes the items below, they are
Picture Preset, Sound Preset, T-Link, Time Shift,
PVR, Schedule List and Settings.
Picture Preset
Press OK/► to display its submenus:
Use ◄/► to scroll through the picture preset settings:
Standard, Dynamic, Natural, Movie and Personal.
And then press OK to conrm the selection.
Sound Preset
Press OK/► to display its submenus:
Use ◄/► to scroll through the sound preset settings:
Standard, Music, Movie, Clear Voice and Personal.
And then press OK to conrm the selection.
T-Link
To search for CEC devices connected to the HDMI
sockets in your TV and enable auto power on and auto
standby between CEC devices.
Enable or disable T-Link
1. Press MENU and select T-Link > T-Link.
2. Press OK/► to display its submenus, and use ◄/►
to select On or Off to enable or disable T-Link.
Note: Below T-Link setting options will be available only
when T-Link is set to On.
Auto power on: Enables the TV to automatically power
on when you power on a CEC device (e.g. DVD) with the
device’s remote. Select On to enable this function.
Auto standby: Enables all CEC devices to automatically
go to the standby mode when you turn off the TV with the
TV remote. Select On to enable this function.
Note: The CEC functions depend on the devices
connected and it is possible that some devices may not
interoperate correctly when connected to this TV. The user
manual or the manufacturer of the problematic devices
should be consulted for further information.
Time Shift
Note: This option is only available when Time Shift is set
to On: Select Settings > Channel > Time Shift, press
OK/► to enter and use ▲/▼ to set Time Shift to On.
Allows you to pause, fast forward and rewind live TV, so
you don’t have to miss any part of your favourite programs.
Before you use the function, connect a USB drive to the
TV rst. For the rst time, you should complete the disk
setup for the USB drive.
1. Press MENU on the remote control and select Time
Shift, then press OK to confirm.
2. Follow the directions on the screen to do the disk setup
if you use time shift for the first time.
3. After the disk setup is done, time shift will start, and
the time shift menu displays on the screen.
4. For later use, press MENU and select Time Shift.
press OK to display the time shift menu and operate
according to the on-screen prompt.
5. Pressing Stop button stops the time shift and exits.
- When the time shift menu disappears and only the
timing of the time shift remains on the screen, you can
press OK to call out the time shift menu.
Notes:
- Before you plug the USB drive to TV, make sure
you have backed up the data on the drive to avoid
unforeseen malfunction and data loss.
- We recommend that you use a USB drive with at least
1GB free space and a disk speed faster than 5.0MB/
sec.
- The bigger the USB drive free space for time shift, the
bigger the recording length.
Quick Access of Time Shift: Insert a USB disk, press
PLAY(►) on the remote control, it will access Time Shift
automatically.
13
Page 15

Menu Operation
PVR
PVR (Personal Video Recorder) allows you to record
your favourite TV programs. Before you use the
function, connect a USB drive to the TV rst.
Note: The feature is available only in selected products
and, due to specic TV network limitations and country
technical requirements, might not be available in
product or place of installation. Feature might also be
blocked by TV network due to copyright protection (HD
content, recording protection). Please use MENU on the
remote control to check if the feature is available in your
product.
1. Press MENU on the remote control and select PVR.
2. Press OK/► to enter. It starts to record
automatically.
3. Press MENU on the remote control and use
▲/▼/◄/► to adjust the recording duration.
4. Press OK to stop recording manually, the recorded
file will be saved. In normal operation, the recording
will stop automatically when the recording duration
expires.
5. In recording, the PVR mini pane will also show on
the screen to indicate the recording progress.
6. To watch the recorded program, exit PVR mode first,
press HOME, and go to Apps > MediaCenter > All.
Select the folder PVR, then select the related record
file. Press OK to play. (It is the same if you record a
digital radio program).
Notes:
- This feature is available only for digital non
encrypted channels. Even when CICAM (CI or CI+)
is inserted, this feature is not available on encrypted
channels.
- Before you connect the USB drive to the TV, make
sure you have backed up the data in the drive
to avoid the loss of your important data due to
unforeseen malfunction.
- The bigger the USB drive free memory for the PVR
function, the bigger the recording length.
- If you want to change channel or signal source
during recording, store the recording data before
changing the channel or source.
- The TV cannot play files normally if the parameters
of the file exceed the limitations of the system, the
file format is not supported, the file is damaged, or
the file cannot be decoded.
- Do not disconnect the USB drive when the system
is reading a file or transmitting data, otherwise the
system or the drive may be damaged.
Schedule List
This function is used to perform scheduled recording.
1. Press MENU on the remote control and select
Schedule List.
2. Press OK/► to display the schedule list.
3. To add a schedule into your schedule list, press
the red button first to display schedule information.
Then,
- Channel number: Press OK/► to enter, then use
▲/▼ to select the channel number.
- Start date: set the recording date.
- Start time: set the starting time of the recording.
- Stop time: set the stopping time of the recording.
- Schedule type:
a. Set Reminder to be reminded that you can
switch to the scheduled program when the time
you have set comes. When time is out and you
do not execute any operation, the dialogue box
will disappear and no further operation will be
executed.
b. Set Record, if you really want to start your
scheduled recording when the time you have set
comes. When time is out and you do not execute
any operation, scheduled recording will start
automatically.
- Repeat type: set different repeat modes for the
recording.
After you enter all the information, use ▲/▼ to select
OK, then press OK to add the schedule you set into
your schedule list.
4. Press the red button and repeat above procedures
to add another schedule.
5. If you wish to edit a schedule, select it and press OK
to enter. You can also remove the selected schedule
by pressing green button.
6. You can also enter EPG (Electronic Program Guide)
here by pressing blue button and operate according
to the on-screen guide.
7. Press BACK to close the menu.
Settings
The Settings menu allows you to congure the TV
with your preferences. For details, please refer to the
following Using System Settings part.
14
Page 16

Menu Operation
Dynamic
Backlight
Using System Settings
The Settings menu allows you to congure the TV with
your preferences.
Display the main menu by pressing MENU and
select Settings, or choose Settings under TV part
of homepage, then press OK to display its options:
Picture, Sound, Channel, Network, System and
Applications.
Picture
The menus for adjusting the picture are used to obtain
the best picture settings according to your preference,
the type of program you are watching and the ambient
lighting.
Select Settings > Picture, then the Picture menu
appears on the right with the following options. Press ►
to enter and use ▲/▼to choose an option.
Note: Some options may not be available for certain
modes. Some options may appear in the next page of
the Picture menu, you can press
Picture preset: Use ◄/► to scroll through the picture
preset settings: Standard, Dynamic, Natural, Movie
and Personal.
Brightness: Adjusts the brightness of the picture.
Contrast: Adjusts the difference between light and dark
areas of the picture.
Saturation: Adjusts the richness of colour.
Sharpness: Adjusts the crispness of the edges in the
picture.
Backlight: Adjusts the brightness of the backlight,
depending on room lighting.
Note: This option is only available when Energy saving
of ECO settings is set to off.
Tint: Adjusts the balance between the red and green
levels.
▲/▼ to switch.
Colour temperature: Adjusts the colour temperature
of the picture. Use ◄/► to scroll through the colour
settings: Normal, Warm, Cool and Customer.
Auto format: Use ◄/► to select On and Off, when On
is selected, the TV will display the picture according to
HD signal's format.
Note: Auto format is available only in TV and HDMI
mode.
Screen mode: Use ◄/► to select the picture format.
Notes:
- Screen mode is only available when Auto format is
set to Off. And the options available vary according
to the signal source selected.
- You are recommended to use the full screen mode. Do
not use the display mode with black bars on both sides
of the picture (such as 4:3) for a long time, otherwise
the TV screen may be damaged permanently.
Overscan: Set overscan function to On or Off.
ECO settings: Press OK/► to display its submenu.
Note: This option is not available when Picture preset
is set to Standard.
• Energy saving: Press ◄/► to select the desired
power saving mode: High, Low or Off.
Advanced settings: Press OK/► to display its
submenu.
reduction, to adjust for obtaining a clearer picture.
Note: The options offered depend on the program you
are watching.
Picture reset: Select to reset the picture settings to the
factory default.
Use
▲/▼
to select the items, such as Noise
Sound
Select Settings > Sound, then the Sound menu
appears on the right with the following options. Press ►
to enter and use ▲/▼ to choose an option.
15
Page 17

Menu Operation
Channel scan
Channel list
Channel organizer
Channel diagnostics
Time shift
Subtitle
Teletext
Teletext
off
Note: Some options may not be available for certain
signal sources. Some options may appear in the next
page of the Sound menu, you can press
▲/▼ to switch.
Sound preset: Press OK/► to display the option list.
Use ▲/▼ to select a sound type from the list: Standard,
Music, Movie, Clear voice and Personal.
TV placement: Use ▲/▼ to balance the sound between
Desk top and Wall mount.
Auto volume control: Select On mode to reduce the
annoying blasts in volume during commercial breaks
and also amplifies softer sounds in program material.
Eliminates the need to constantly adjust the volume.
SPDIF type: Connect to an audio device through the
SPDIF output. Select SPDIF type and press OK/► to
display the options. Select a proper sound type from the
list for digital programs.
- If the current program outputs sound in Dolby
format, then either PCM or Dolby can be selected.
- If the current program does not output sound in
Dolby format, only PCM can be selected. Otherwise
no sound will be output.
Note: The options you may choose depend on the
program you are watching. If you select PCM and
the sound output is ahead of the picture, you can
select SPDIF delay from the Sound menu and
press ◄/►
the sound
to adjust the delay time to synchronize
with the picture.
SPDIF delay: If the sound output does not match
the picture, press ◄/► to adjust the delay time to
synchronize the sound with the picture.
Bluetooth audio only: Press OK/► to enter. Turn on
Bluetooth on your smart phone/pad, you will find the TV
set name (which is also displayed on TV screen). Select
the TV set name, and then pair the device and the TV
according to on-screen instructions. Once paired, you
can enjoy playing the audio files from your device on
the TV. While playing, you can press OK on the remote
to turn the TV screen off. Press any button to turn the
screen back on.
Note: This option is not available for some models. For
better connection, please place your Bluetooth device
within a range of 3 meters from the TV.
Advanced settings
Use
▲/▼
to select the items, such as Balance, to obtain
a better sound.
Note: The options offered depend on the program you
are watching.
:
Press
OK/►
to display its submenu.
Channel
Select Settings > Channel, then the Channel menu
appears on the right with the following options. Press ►
to enter and use ▲/▼ to choose an option.
Channel scan: Press OK/► to display channel scan
options.
• Country: Press OK/► to display the country list and
use ▲/▼ to select your country.
• Tuner mode: select Antenna or Cable option
according to your actual use.
Note: The Cable option may not be available for
certain model.
• Automatic search: Select Digital & Analogue (or
Digital or Analogue), then press OK/► to start the
automatic search process. The search may take a few
minutes. During the process, you can press OK to
abort halfway.
• Analogue manual scan: Press OK to enter. Press
▲/▼/◄/► and the number buttons or OK to search,
ne tune or store the channel.
• Antenna manual installation: Allows you to start
manual searching the available channels from the
current frequency or any frequency you input.(Only
for digital channels). Press OK to start search from
the current frequency, or use digit keys to input a
frequency, then press OK to start search. During the
process, you can press OK to abort halfway and press
OK to restart, or press BACK to return.
• Color system: Allows you to select your preferred
color system among Auto, PAL , SECAM, and NTSC.
• Sound system: Allows you to select your preferred
sound system among BG, DK, I, and M.
Note: Color system and Sound system are only
available under ATV source after channel scan is
nished.
Channel list: Press OK/► to display channel list.
Channel organizer: You can skip channels, edit
channels, or delete channels, Press OK/► to enter.
Channel skip: If a channel is stored twice or its
reception is poor, you can simply skip it. The skipped
channels will no longer be selected by pressing the
16
Page 18

Menu Operation
CH +/- button. Press OK/► to display Channel skip
menu. Press ▲/▼ to select a channel and press OK
to check the box.
Channel edit: Press OK/► to display the channel list.
Press ▲/▼ to select a channel you want to edit, then
press OK to enter. Press ▲/▼ to select Channel
name, then press OK to access the virtual keyboard
and edit the channel name, and highlight OK and
press OK to conrm. When you have nished, press
BACK to return.
Channel delete: Press OK/► to display Channel list.
Press ▲/▼ to select a channel you want to delete,
then press OK to delete the channel.
Channel diagnostics (only for digital channels): Press
OK/► to display some signal information on current
digital channel, such as signal strength, frequency, etc.
Time shift: Set Time Shift to On or Off. Default setting
is On. For details, please see the introduction of Time
Shift on page 13.
Subtitle: This enables subtitle for digital TV channels.
Select Subtitle, press OK/► to display its submenus:
• Subtitle: Press OK/► to enter, press ▲/▼ to turn On
or Off the subtitles. When Subtitle is set to On, you
can enable subtitle languages on digital TV channels:
1. Press ▲/▼ to select Digital subtitle language.
2. Press OK/► to enter, press ▲/▼ to select a subtitle
language as your preferred language.
3. Press ▲/▼ to select Digital subtitle language 2nd.
4. Press OK/► to enter, press ▲/▼ to select a
secondary subtitle language.
5. Press Exit or BACK to return to previous menu.
Note: Press SUBTITLE on the remote control to
directly select a subtitle language available for
selected digital TV program.
• Subtitle type: press OK/► to enter, press ▲/▼
to select a subtitle type. You can select Hearing
impaired to display the hearing impaired subtitle with
your selected language.
Teletext: press OK/► to display its submenu.
• Decoding page language: Select a proper type of
language in which Teletext will display.
• Digital teletext language: For digital TV channels,
your TV could zap to a service with multiple initial
Teletext pages in different languages. This function
allows you to select an available language as primary
language which relates to different initial Teletext
page.
Network
You can set up your TV so that it can access the Internet
through your local area network (LAN) using a wired or
wireless connection.
Ethernet settings: you can attach your TV to your LAN
using cable in three ways:
- You can attach your TV to your LAN by connecting
the LAN port on your TV to an external modem
using a Cat 5 cable.
- You can attach your TV to your LAN by connecting
the LAN port on your TV to an IP Sharer which is
connected to an external modem. Use Cat 5 cable for
the connection.
- Depending on how your network is configured,
you may be able to attach your TV to your LAN by
connecting the LAN port on your TV directly to a
network wall outlet using a Cat 5 cable. Note that
the wall outlet is attached to a modem or router
elsewhere in your house.
Select Settings > Network > Ethernet settings and
press OK, and then congure the IP settings to connect
to a wired network. You can also check the network
information here.
Wireless settings: To connect your TV to your network
wirelessly, you need a wireless router or modem and a
wireless LAN adapter.
Note: If your TV doesn’t have an in-built wireless
adapter, then
sold separately)
USB port.
Select
settings to connect to a wireless network. you can set
up the wireless network connection accordingly.
• WiFi switch: Select WiFi switch and press OK/► to
enter, use ▲/▼ to set it to On, then below options are
available. Otherwise, they are hided.
• Scan: Select Wireless settings > Scan, then press
OK/►, the TV will scan all access points within
range. The access points found by the TV will be
displayed. Select an available access point, then
press OK to connect the TV to it.
you need a
Settings >
wireless USB dongle (which is
. Connect
the USB dongle to your TV’s
Network, then select Wireless
17
Page 19

Menu Operation
Notes:
- If you select a protected access point, you will
to enter the corresponding password. Press
have
OK
on
the remote control to display virtual
keyboard to enable you to enter it.
- This set has a memory function of available access
points, which enables your set to be connected to
the network even if you switch on TV after power off.
• Manual:
• Wi-Fi Direct:
• Information:
Select Wireless settings > Manual, then
OK/►
press
SSID of an available wireless router to set up the
connection.
then press
password setting and change the password here.
then press
about WiFi status, etc.
, you will be prompted to enter the correct
Select Wireless settings >
OK/►
to enter, you can do Wi-Fi direct
Select Wireless settings >
OK/►
to enter, you will nd the information
Wi-Fi Direct,
Information
System
Select Settings > System, then the System menu
appears on the right with the following options. Press
OK/► to enter and use ▲/▼ to choose an option.
Language: Press OK/► to display the language list and
use ▲/▼ to select a language.
Timer: The Timer menu allows you to set the time zone
on your TV set, to program an automatic turn-off or
wake-up timer and to view the calendar.
Select System > Timer and press OK/► to conrm.
The Timer options are as below:
• Time zone: Use ▲/▼ to select the local time zone.
• Clock: Press OK/► to display its options:
- Synchronization: Use ▲/▼ to select Auto or
Manual. If Auto is selected, the TV will get the
time automatically from DTV signals, and the Time
item cannot be adjusted. If you select Manual, you
should set date and time at Date and Time item.
Highlight
Date or Time, press
use
▲/▼/◄/► and OK buttons to change
or time
.
Note: If Manual is selected, the time set in Time option
will not be memorized when turning on the TV next
time, and the TV 's time will start from the default.
OK
to enter and then
the date
- Power on timer: Use ▲/▼ to select Once, Daily
or Off. If you select Once or Daily, you should
set a time period after which the TV automatically
switches to on at Time below this item. Highlight
Time,
press OK to enter and then use
and OK buttons to change
- Power off timer: Use ▲/▼ to select Once, Daily
or Off. If you select Once or Daily, you should
set a time period after which the TV automatically
switches to off at Time below this item. Highlight
Time,
press OK to enter and then use
and OK buttons to change
• Sleep timer: Sets a period of time after which the
TV set goes into standby mode. Use ▲/▼ to set
the period (120 minutes maximum). To disable this
function, select Off.
,
• Auto standby: Sets a period of time after which the
TV set goes into standby mode. Use ▲/▼ to select
the period: 4 Hours, 6 Hours and 8 Hours. To disable
this function, select Off.
Lock: This menu can control the special function for TV
channels.
Note: You must enter your personal code before
entering the Lock menu. The factory default code is
1234. And the super password is 0423. If you forget
your code, enter it to override any existing codes.
Select System > Lock and press OK/► to conrm.
Then press the number buttons to enter the password to
enter the Lock menu.
The Lock options are as below:
• Parental rating: This option allows you to set a rating
to a program. Highlight Parental rating, press OK/►
to display Parental rating menu. Then use ▲/▼ to
adjust.
• Front panel lock: Press OK/► to display the
submenu, then use ▲/▼ to select On to lock the set's
buttons.
• Change password: This option allows you to change
the password. Press OK/► to enter, then press the
number buttons to enter the new password twice.
Input Settings: Select System > Input Settings, press
OK/► to enter. User can select the device name of the
input source here, easy to identify the source.
Software update: Select System > Software update,
press OK/► to enter. You can update software by
network, by USB or by channel.
• By network: Enables you to download and install the
latest software version from the Internet. Make sure
to set up a wired or wireless network connection rst,
then select By network and press OK/► to enter.
Follow the on-screen instructions to continue. When
new-version software is available, a progress bar
appears. When the download nishes, the TV will go
the time
the time
▲/▼/◄/►
.
▲/▼/◄/►
.
18
Page 20

Menu Operation
black and upgrade the software.
Note: Do not switch off or unplug the TV until the
upgrade is completed. Keep successful network
connection during upgrade.
• By USB: Enables you to install the latest version of
the software from your USB ports if available. Select
By USB and press OK/► to enter. Follow the on-
screen instructions to continue your installation.
• By Channel: Enables you to install the latest version
of the software if available. Select By channel and
press OK/► to enter.
- Use ◄/► to select Yes under Auto download
to automatically download the latest software if
available. After the software has been downloaded
successfully, you will be prompted to decide if you
want to install it right now. If yes, follow the on-
screen instructions to complete your installation. You
can also select to ignore the installation here.
- Select No under Auto download to decline the
automatic download.
- Select Manual download and press OK/► to start
manual scanning the latest software. Follow the on-
screen instructions to complete. During the scan,
press OK/EXIT to cancel or exit the process.
• Restore factory settings: Allows you to reset the TV
to factory default settings.
- Select Restore factory settings and press OK/► to
enter.
- Use the digit buttons to enter the password.
Note: The factory default code is 1234. And the
super password is 0423. If you forget your code,
enter it to override any existing codes.
- Press ◄/► to select OK and press OK to confirm.
- The Initial setup menu appears. Follow the related
Instructions to continue.
There is also information about the TV such as Current
version, etc.
HDMI type: Select 2.0 or 1.4 according to the signal
input from the selected HDMI source.
• 2.0: 4K@60Hz signal is input. Select this setting if the
external HDMI device outputs 4K@60Hz signal.
• 1.4: Select this setting if the external HDMI device
does not output 4K@60Hz signal.
Note: This option is only available under HDMI source.
HDMI auto switch:
When user plug in an HDMI signal source:
• Auto: Auto switch your TV to the HDMI Source.
• Manual: A tip will display on screen to remind user to
select if switch to the HDMI source.
• Off: Close this function.
Location: Use ▲/▼ to select Home, Shop or Shop
with demo.
Input method: This TV supports virtual keyboard input.
Common interface: press OK and then you will find
CAM Info and Application Info.
Note: This option is only available under DTV source,
and please insert the common interface card to the
socket on the back of TV before using this function.
Common Interface is not available for certain model.
Bluetooth: Press OK/► to enter, use ◄/► to turn
Bluetooth on or off. when it was turned on, highlight
Refresh and press OK to find the Bluetooth devices
nearby, choose the device you want and press OK to
connect it.
Note: This option is not available for some models. For
optimal connection, please place your Bluetooth device
within a range of 3 meters from the TV.
Applications
Select Settings > Applications, then the Applications
menu appears with the following options. Press ► to
enter and use ▲/▼ to choose an option.
All Apps: Press OK to display the information of all the
apps.
Running Apps: Press OK to display the information of
the running apps.
Updated Apps: Press OK to display the apps ready to
be updated, and click Update All to update the apps .
Available space: Press OK to display the available
space.
19
Page 21

Chapter 5 Other Information
Problems & Solutions
Note: Problems & solutions 1 to 2 are for the TV models which have network functions, so users of non-connected
TV models can disregard them.
1. Fail to link to the network.
- Check if your TV is connected with the network;
- Reboot your TV;
- Consult your internet service provider, to conrm
if access of your router is supported. Refer to the
operation manual of your router, and activate its
DHCP function after linking the network to your TV.
- Make sure your TV is connected to a router, and
make sure your router is powered on. Check that
your router/modem has an internet connection, and
that your Ethernet cables/wireless connection is OK.
Test your connection with a computer to make sure it
is OK. Should the problem persist, contact customer
service.
2. The video could not be played smoothly.
- Videos from your USB ash drive --- It may result
from data transmission, or its code ow is far beyond
the supported formats of this TV set.
- Videos downloaded from internet, or online videos.
a. It may be caused by the lower bandwidth of your
network. A high network speed is required to
handle online videos.
b. Peak internet usage times may affect the
bandwidth.
c. Check if any other computers on the same
network are also operating, as they may be using
up bandwidth. Especially if they are downloading
or displaying on-line videos.
d. The video may not be smooth itself, it is not the
problem of your TV or network.
3. When two mobile hard disks are connected
with the TV at the same time, they will not be
recognized some times.
- All mobile hard disks consume a lot of power,
which may result in power supply problems. We
recommend inserting only one hard disk, or a low
power consumption mobile hard disk.
4. The video from a mobile hard disk (USB) is
playing with no sound.
- The audio format of the video in your mobile hard
disk is not supported by the TV player.
5. Some videos fail to play.
- The formats of the videos may not be supported
by the TV, especially videos shot by certain kinds
of cameras, generally with their private protocol of
formats, which are not compatible with your TV.
6. Video stops playing midway.
- Mistakes may occur when videos are copied or
compressed, so they may automatically stop playing
during playback.
7. What should I pay attention to, when I do SW
updating?
- No power cuts when SW updating;
- Avoid any operations with your remote control when
SW updating;
- Depending on your internet connection speed, the
software updating process may take some time.
8. There are no distinct changes of TV interface
after SW updating.
- Under certain conditions, SW updating may not only
update or add new functions but also improve the
performance of the TV set, without distinct changes
of interface. Also, there may be no changes to the
user interface at all.
9. What should I do when SW updating process
stops due to a sudden power-off?
- If you do SW updating by USB, do not pluck the
USB from your TV, and restart your TV to continue
SW updating; If you do SW updating by Network,
also restart your TV and check if it is well functioned.
10. With a USB device being inserted into the TV in
advance, I am prompted that no USB devices are
detected after I access Media, why?
- There may be something wrong with your mobile
hard disk(s), damaged or with low voltage. You could
increase power supply by inserting the two plugs
on one end on the USB wire into TV's USB port
simultaneously.
11. External device cannot be recognized.
- Some external devices (e.g. webcam, smart phone,
tablet, game handle, and external wireless adapter)
may not be compatible with the TV and cannot be
supported for certain functions (nScreen, wireless
display, gesture control, face recognition, if any).
Please try a similar device. If it does not work,
contact your local dealer.
20
Page 22

Other Information
Troubleshooting
Most problems you encounter with your TV can be corrected by consulting the following troubleshooting list.
No picture, no sound
1. Check if the fuse or circuit breaker is working.
2. Plug another electrical device into the outlet to make
sure it is working or turned on.
3. Power plug is in a bad contact with the outlet.
4. Check the signal source.
No color
1. Change the color system.
2. Adjust the saturation.
3. Try another channel. Black-white program may be
received.
Remote control does not work
1. Change the batteries.
2. Batteries are not installed correctly.
No picture, normal sound
1. Adjust the brightness and contrast.
2. Broadcasting failure may happen.
Normal picture, no sound
1. Press the VOLUME UP button to increase volume.
2. Volume is set to mute, press the MUTE button to
restore sound.
3. Change the sound system.
4. Broadcasting failure may happen.
Unorderly ripples on the picture
It is usually caused by local interference, such as cars,
daylight lamps and hair driers. Adjust the antenna to
minimize the interference.
Snowy dots and interference
If the antenna is located in the fringe area of a television
signal where the signal is weak, the picture may be
marred by dots. When the signal is extremely weak,
it may be necessary to install a special antenna to
improve the reception.
1. Adjust the position and orientation of the indoor/
outdoor antenna.
2. Check the connection of antenna.
3. Fine tune the channel.
4. Try another channel. Broadcasting failure may
happen.
Ignition
Black spots or horizontal streaks appear, or the picture
utters or drifts. This is usually caused by interference
from car ignition system, neon lamps, electric drills, or
other electrical appliance.
Ghost
Ghosts are caused by the television signal following
two paths. One is the direct path, the other is reected
from tall buildings, hills, or other objects. Changing the
direction or position of the antenna may improve the
reception.
Radio frequency interference
This interference produces moving ripples or diagonal
streaks, and in some case, loss of contrast in the
picture. Find out and remove the radio interference
source.
* To bring you better visual experience, please remove
all labels from TV front panel and screen before use.
21
Page 23

Page 24

L55C1CUS L65C1CUS
Page 25

Содержание
Раздел 1: Введение
Меры предосторожности ..................................3
Прибор ...............................................................3
Электропитание и подключение ......................3
Сетевой шнур и сигнальный кабель ................3
Условия использования....................................3
Чистка ................................................................3
Настенный монтаж ТВ ......................................3
Важная информация ........................................3
Кнопки на ТВ ........................................................4
Разъёмы ...............................................................5
Функции пульта дистанционного управления
................................................................................6
Раздел 2: Основные операции
Включение ......................................................7
Выключение ...................................................7
Сетевое подключение ...................................8
Начальная настройка ....................................9
Шаг 1. Выбор языка ....................................9
Шаг 2. Принятие условий заявления об
отказе от ответственности .........................9
Шаг 3. Настройка сети ................................9
Шаг 4. Выбор страны ..................................9
Шаг 5. Настройка времени .........................9
Шаг 6. Все готово ........................................9
Раздел 4: Использование меню
Использование меню быстрого доступа ..........
...............................................................................13
Режим изображения ........................................13
Режим звука .....................................................13
T-Link ................................................................. 13
Временной сдвиг .............................................13
PVR ...................................................................14
Расписание ....................................................... 14
Настройки .........................................................14
Использование настроек системы .....................
...............................................................................14
Изображение ..................................................15
Звук ..................................................................15
Канал ............................................................... 16
Сеть .................................................................17
Система ...........................................................18
Приложения ....................................................20
Раздел 5: Другая информация
Проблемы и способы их устранения ........ 21
Устранение неисправностей
.............................................. 23
.......................22
.................... 23
Раздел 3: Главная страница
Использование домашней страницы: Home
.........................................................................10
История .....................................................10
Поиск .........................................................10
Использование домашней страницы:
Videos ............................................................ 11
Использование главной страницы: TV ... 11
Окно ТВ .....................................................11
Источник входных данных ........................11
Использование главной страницы: APPS
.........................................................................12
Магазин приложений ................................ 12
Предустановленные приложения ............ 12
2
Page 26

Раздел 1 Введение
Меры предосторожности
Для вашей безопасности внимательно прочтите
эту инструкцию и сохраните её для дальнейшего
использования.
Прибор
• Запрещается создавать препятствия вентиляции
воздуха, закрывая вентиляционные отверстия на
корпусе телевизора.
• Не просовывайте никакие предметы в телевизор через
отверстия на корпусе, так как они могут прикоснуться
к деталям, находящимся под опасным напряжением
или вызвать короткое замыкание, что может привести
к поражению электрическим током или пожару.
• Не пытайтесь выполнять техническое обслуживание
телевизора самостоятельно, так как при открывании
или снятии крышки вы можете подвергнуться
воздействию высокого напряжения или другим
опасностям. Всё техническое обслуживание должен
выполнять квалифицированный специалист по
обслуживанию телевизоров.
• Не прикасайтесь к поверхности экрана пальцами,
чтобы не поцарапать экран телевизора.
• Не давите сильно на экран телевизора, чтобы не
повредить его.
Электропитание и подключение
• Отключите телевизор при следующих условиях.
- если телевизор не будет использоваться в течение
длительного времени
- при повреждении сетевого шнура или розетки/вилки
- при установке и настройке ТВ, следуйте в данном
руководстве указанным инструкциям, в противном
случае неправильные действия могут привести к
повреждениям прибора. В таком случае отключите
телевизор от электросети и вызовите мастера.
- если ТВ прибор упал или имеются повреждения
корпуса.
• Если сетевая вилка или штепсельная розетка
используются в качестве основного выключателя,
отсоединяющие устройства должны быть легко
доступными.
(*Если в качестве размыкающего устройства
используется многополюсный силовой переключатель,
переключатель должен быть доступен в любой момент
времени.)
Сетевой шнур и сигнальный кабель
• Сетевой шнур должен быть проложен безопасно, чтобы
предотвратить возникновение опасности для жизни и
собственности из-за поврежденного сетевого шнура.
• К сетевому шнуру должен обеспечиваться легкий
доступ и во время использования не должно
создаваться препятствий для отсоединения шнура от
розетки электросети.
• Во избежание пожара и поражения электрическим
током, не перегружайте розетки и удлинители.
• Не допускайте попадания влаги на сетевой шнура.
Условия использования
• Не устанавливайте телевизор на неустойчивую
тележку, стойку, столик или полку.
• Обеспечьте прибору хорошую вентиляцию. Запрещается
создавать препятствия вентиляции воздуха.
• Изделие необходимо располагать подальше от
источников тепла и холода. Берегите прибор от
перегревания.
• Защитите прибор от попадания на него прямых
солнечных лучей.
• На изделие не должны попадать капли или брызги
воды, и на него запрещается ставить наполненные
водой предметы, например, вазу с цветами.
• Не используйте прибор в пыльной среде.
• Температура эксплуатации: 5 - 35 ºC
Относительная влажность: от 20 % до 80 % (без
образования конденсата)
Температура хранения: -15 - 45 ºC
Влажность хранения: от 10% до 90% (без образования
конденсата)
Чистка
• Пыль с экрана и корпуса очистите мягкой сухой
салфеткой или специальным жидким чистящим
средством.
• Во время чистки не давите сильно на экран.
• Не пользуйтесь для чистки жидкими чистящими
средствами и аэрозолями.
Настенный монтаж ТВ
Внимание: эту процедуру следует выполнять вдвоём.
Для обеспечения безопасного монтажа, необходимо
следовать следующим указаниям:
• убедитесь, что стена может выдержать нагрузку ТВ.
• строго следуйте указаниям инструкции по настенному
монтажу.
• ТВ следует монтировать только на вертикальной стене.
• убедитесь, что используете подходящие винты.
• убедитесь, что кабели ТВ проложены безопасно.
Необходимо соблюдать все другие инструкции по
безопасности. (Примечание: Некоторые модели
телевизора не предназначены для крепления на стене.)
Важная информация
Если телевизор не установлен в достаточно устойчивом
положении, возникает потенциальная опасность его
падения. Во избежание телесных повреждений, особенно
детьми, соблюдайте простые меры предосторожности,
например, перечисленные ниже:
• Используйте подставки и стойки, рекомендуемые
изготовителем телевизора.
• Используйте только такую мебель, на которой
телевизор может стоять безопасно.
• Телевизор не должен выступать за край мебели, на
которой стоит.
• Не ставьте телевизор на высокую мебель (например,
на буфет или книжный шкаф) без надлежащего
крепления мебели и телевизора.
• Не ставьте телевизор на ткань или другие материалы,
находящиеся между телевизором и опорной
поверхностью мебели.
• Сообщите детям о том, что опасно взбираться на
мебель, чтобы добраться до телевизора или его
элементов управления.
3
Page 27

Введение
Кнопки на ТВ
Примечание: Кнопки телевизора могут отличаться в зависимости от модели. Изображения
представлены только для справки.
1.
Нажмите, чтобы включить телевизор, когда он в режиме
ожидания.
При коротком нажатии в течение 2 секунд кнопка
аналогична кнопке OK на пульте управления, т. е. она
подтверждает выбор в режиме меню или открывает
список каналов в режиме телевизора.
Если удерживать кнопку более 2 секунд, открывается
меню NAV (Навигация). Доступны следующие команды:
Source (Источник), Menu (Меню), Home (Домашняя),
Back (Назад) и Standby (Режим ожидания). Команды
могут отличаться в зависимости от модели.
Чтобы закрыть меню NAV (Навигация), выберите
нажмите
2.
Сканирование списка каналов. В системе меню эти
кнопки аналогичны кнопкам ВВЕРХ/ВНИЗ на пульте
управления и изменяют элементы управления меню.
3.
Чтобы изменить громкость, перемещайте ТВконтроллер влево или вправо. В системе меню эти
кнопки аналогичны кнопкам ВЛЕВО/ВПРАВО на пульте
управления и изменяют элементы управления меню.
для подтверждения.
и
ИЛИ
Меню NAV на телеэкране
4
Page 28

Введение
Разъёмы
Примечание: Расположение и название функциональных клавиш и выключателя питания может
отличаться в зависимости от модели, а также вообще отсутствовать.
LAN
SPDIF
HDMI 1(MHL)
или HDMI 2(ARC)
или HDMI 3
USB2.0
или
USB3.0
LAN
К этому разъему можно подключить внешний модем или другое сетевое
оборудование.
Разъем SPDIF (выход)
Разъем SPDIF используется для подключения совместимого цифрового
звукового ресивера.
Разъем HDMI 1/HDMI 2/HDMI 3 (вход)
К разъему HDMI можно подключить такое устройство, как проигрыватель
Blu-ray с выходом HDMI, и наслаждаться высоким качеством изображения.
Технология HDMI предоставляет цифровое соединение без сжатия с
передачей и видео, и звука с помощью интегрированного кабеля.
Примечание: Только разъемы HDMI с маркировкой MHL поддерживают
функцию MHL. MHL означает мобильный канал высокой четкости
(Mobile High-denition Link) и позволяет подключить совместимое с MHL
устройство к телевизору.
Разъем USB 2.0/USB 3.0 (вход)
Этот USB разъем используется для подключения USB-устройства.
ANTENNA/CABLE IN
COMPONENT
IN (YP
)
BPR
VGA IN
Y/VIDEO
AV
IN
VGA/
AUDIO IN
AUDIO OUT
COMMON
INTERFACE
Разъем ANTENNA/CABLE IN (вход)
Для подключения к системе телевизионной антенны или кабеля.
Разъем VGA IN (вход)
Для подключения к гнезду видеовыхода на вашем ПК.
Примечание: Разъем VGA IN совместно использует аудиоразъемы с AV IN.
P
R
P
B
Входные разъемы YP
К этим разъемам YPBPR можно подключить устройство с компонентным
видеовыходом, например DVD-проигрыватель. Телевизор может определить,
поддерживает ли подключаемое устройство технологию YP
подключение обеспечивает превосходное качество изображения, так как
BPR
BPR
. Такое
видеосигнал передается по трем отдельным кабелям.
R
L
Аудио и видеоразъемы AV RCA (вход)
Разъемы AV IN могут использоваться для подключения различного
оборудования, в том числе видеомагнитофона, видеокамеры, декодеры
спутникового ресивера, DVD-плеера и игровой приставки. Разъем VIDEO
используется для подключения компонентного видеокабеля.
Примечание: Для AV IN и YP
VIDEO) и аудио.
R
L
Разъемы RCA AUDIO OUT
Используйте аудиокабель RCA для подключения телевизора к совместимому
аудиоресиверу.
используются общие разъемы видео (Y/
BPR
Разъем COMMON INTERFACE
Этот разъем можно использовать для просмотра зашифрованных
телеканалов. Для этого необходимо установить модуль Common Interface и
плату, предоставленную оператором цифрового телевидения.
5
Page 29

Введение
Функции пульта дистанционного управления
Большинство функций вашего телевизора доступны через экранное меню. Поставляемый с телевизором
пульт можно использовать для управления и настройки всех основных параметров.
Примечание: Рисунки в данном руководстве представлены только для справки, реальный внешний вид
продукта может отличаться. Некоторые функции могут быть недоступны на определенных моделях,
например функция 3D доступна только на моделях с 3D, а функции EPG/SUBTITLE/REC доступны только
для источника DTV. При этом источник DTV поддерживается не всеми моделями.
Режим ожидания/выход из режима ожидания.
3D Не поддерживается.
TV Переход в режим телевизора.
0-9 Ввод номеров каналов.
SOURCE Переход в интерфейс выбора источника.
HISTORY Показать/скрыть список предыдущих каналов.
VOL+/- Управление громкостью.
CH+/- Настройка каналов.
(Кнопка MUTE) Выключение и включение звука.
(Кнопка INFO) Отображение сведений о программе (если они
доступны).
APP Быстрый доступ к магазину приложений.
(Кнопка HOME) Открыть/закрыть домашнюю страницу.
EPG Открытие телегида для источника DTV.
(Кнопка MENU) Открыть меню параметров/перемещение фокуса
на вкладке в браузере.
Подтверждение ввода или выбора; доступ к системной клавиатуре
OK
для ввода текста; отображение списка программ для источника ТВ.
Перемещение по меню; выбор параметров меню; переход к
следующей или предыдущей фотографии, песне или видео для
USB; настройка каналов во время воспроизведения GoLive.
Перемещение по меню; выбор функций и изменение значений.
► Также используется, чтобы открыть подменю.
(
Кнопка BACK
закрытие запущенного приложения.
EXIT
Возврат в предыдущее меню или интерфейс; закрытие
запущенного приложения.
ZOOM-/ZOOM+
SLEEP Настройка выключения телевизора через заданное время.
PRE-CH Возврат к предыдущему каналу.
SUBTITLE Выбор языка субтитров для выбранной телепередачи.
Цветные кнопки
Выбор формата изображения.
TEXT Включение/выключение телетекста.
FAV Отображение меню избранных каналов.
LIST Отображение списка каналов.
Lang Выбор типа аудио для выбранной телепередачи; выбор языка
аудио для выбранной телепередачи.
REC Запись программ для источника DTV.
Выбор задач или страниц телетекста.
Выбор предыдущей или следующей фотографии, песни или видео.
Начало воспроизведения.
Приостановка воспроизведения.
Быстрая перемотка назад или вперед.
Остановка воспроизведения.
) Возврат в предыдущее меню или интерфейс;
6
Page 30

Раздел 2 Основные операции
Включение
Для правильного включения ТВ или настройки пульта
дистанционного управления соблюдайте указания, приведённые на
этой странице.
1. Вставьте две батареи ААА в пульт дистанционного управления.
Указания по использованию батареи:
- нельзя использовать батареи другого формата.
- соблюдайте полярность батареи.
- нельзя использовать старые батареи вместе с новыми.
- не используйте перезаряженные батареи.
- нельзя нагревать батареи питания, подвергать их воздействию
ярких солнечных лучей или огня.
- если пульт не используется долгое время, необходимо извлечь
батареи из отсека, чтобы избежать опасности протекания
батарей.
2. Сначала вставьте электрокабель в прибор, потом в сетевую
розетку. (Примечание: если кабель питания уже подключен к
телевизору, вставьте кабель в сетевую розетку.)
Ваш ТВ должен быть подключен только к источнику переменного
тока.Его нельзя подключать к источнику постоянного тока. Если
штепсельная вилка отсоединяется от кабеля, ни при каких
условиях не подключайте её к розетке, так как существует риск
поражения электрическим током.
Примечание: Рисунки приведены только в качестве примера.
Расположение основного разъёма может меняться в
зависимости от модели телевизора.
3. Подключите внешнюю эфирную антенну к разъему ANTENNA IN
сзади телевизора.
Сопротивление антенного входа этого ТВ прибора равно 75 Ом.
75–омный коаксиальный кабель антенны диапазона МВ/ДМВ
может подсоединяться к гнезду антенного кабеля напрямую.
Примечание: Если вы хотите получать сигнал от кабельной
или другой приставки, подключите коаксиальный кабель к
разъему CABLE IN сзади телевизора.
4. После включения телевизор также будет включен или будет
находиться в режиме ожидания.
Если горит индикатор питания, телевизор находится в режиме
ожидания. Чтобы включить телевизор, нажмите кнопку
пульте дистанционного управления или телевизоре.
на
Выключение
• Чтобы перевести телевизор в режим ожидания, нажмите кнопку
на пульте дистанционного управления. Телевизор будет
включен в сеть, но с пониженным потреблением энергии.
• Если Вы хотите полностью отключить телевизор, отключите
вилку из сети переменного тока.
7
Page 31

Основные операции
Сетевое подключение
Для использования всех функций требуется подключение к Интернету. Может взиматься
плата за трафик.
Дополнительные сведения можно получить у поставщика услуг Интернета.
Для доступа к Интернету необходимо подписаться к высокоскоростному интернет-каналу (ISP).
Ваш телевизор можно подключить к домашней сети двумя способами:
• к проводной сети, используя разъем RJ45 (LAN) на задней панели.
• к беспроводной сети, используя внутренний беспроводной сети.
Примечание: Далее описаны обычные способы подключения телевизора к проводной или беспроводной
сети. Способ подключения может отличаться в зависимости от фактической конфигурации сети. Если у
вас есть вопросы по домашней сети, обращайтесь к поставщику услуг Интернета.
Подключение к проводной сети
Для подключения к проводной сети:
1. Убедитесь, что у вас есть:
• Ethernet-кабель достаточной длины для
подключения к телевизору
• маршрутизатор или модем с доступным портом
Ethernet
• высокоскоростное интернет-подключение
• порт (LAN) в задней части телевизора
2. Подключите Ethernet-кабель к маршрутизатору и
Ethernet port (порту Ethernet) сзади телевизора.
3. Используйте меню Network (Сеть) для настройки
телевизора.
Ethernet-порт
на задней
панели
Маршрутизатор
Телевизор
Модем
Internet
Подключение к беспроводной сети
Для подключения к беспроводной сети
1. Убедитесь, что у вас есть:
• маршрутизатор, передающий
высокоскоростной беспроводной сигнал
• высокоскоростное интернет-подключение
2. Используйте меню Network (Сеть) для настройки
телевизора.
Модем
Телевизор
Беспроводной
маршрутизатор
Встроенный модуль
беспроводной связи
8
Page 32

Основные операции
Начальная настройка
После первого включения телевизора открывается
мастер начальной настройки. Выполните следующие
действия, прежде чем нажать
• Вставьте батарейки в пульт управления.
• Подключите антенну к телевизору.
• Подключите кабель питания к розетке.
• Подключите телевизор к сети.
Убедитесь, что телевизор включен, и выполните все
действия, описанные ниже, по очереди.
Шаг 1. Выбор языка
С помощью кнопок ▲/▼ выберите нужный язык.
Нажмите OK для подтверждения и продолжения.
(Примечание: Доступные языки зависят от модели
телевизора.)
Шаг 2. Принятие условий заявления об отказе от
ответственности
С помощью кнопок ▲/▼ выберите [Agree and accept]
(Принять). Нажмите OK, чтобы установить флажок.
Затем нажмите OK для подтверждения и продолжения.
Шаг 3. Настройка сети
Для доступа к Интернету и приложениям Smart TV
на телевизорах под управлением Android требуется
подключение к Интернету. Подключитесь к Интернету,
используя домашнюю беспроводную сеть или кабель
Ethernet, и следуйте инструкциям на экране. Выберите
[Wireless] (Беспроводная) или [Wired] (Проводная)
и нажмите OK для продолжения. Вы также можете
пропустить этот этап, выбрав [Skip] (Пропустить),
чтобы подключиться к Интернету позднее.
Дополнительные сведения см. в разделах «Сетевое
подключение» и «Сеть».
Шаг 4. Выбор страны
С помощью кнопок ▲/▼ выберите страну. Нажмите
OK для подтверждения и продолжения. (Примечание:
Доступные страны зависят от модели телевизора.)
Шаг 5. Настройка времени
С помощью кнопок ▲/▼ переместите курсор к
полю Date (Дата) или Time (Время) и нажмите OK
для перехода в подменю. С помощью кнопок ▲/▼
выберите нужную дату и время. Выберите OK и
нажмите OK для подтверждения и продолжения.
Шаг 6. Все готово
После завершения настройки появляется экран [All
Done] (Все готово). Нажмите OK для завершения
настройки. Вы также можете вернуться на предыдущий
этап и изменить настройки, нажав ◄ или BACK.
Вернитесь назад, если требуется сделать
изменения. Получить доступ к этим параметрам
можно позже в меню Настройки.
Русский
Русский
02 - 01 - 2000 07 :43
OK
Назад ВыбeритеПодтвердить
на пульте управления.
Все готово
Язык
Пожалуйста Выберите Язык:
English
ВыбeритеПодтвердить
Отказ от ответственности
Контент и услуги (далее - «Лицензионное приложение»), доступные на данном ТВ (далее «Устройство»), предоставляются вам безвозмездно по лицензии исключительно в
соответствии с настоящими условиями, Поставщики лицензионных приложений (каждый
«Поставщик приложения») сохраняют все права, неявно предоставленные вам. 1. Область
действия лицензии Поставщик приложения предоставляет вам ограниченную
непередаваемую лицензию на Лицензионное приложение, которое должно использоваться на
том Устройстве, которым вы владеете или распоряжаетесь. Вы не имеете права
распространять Лицензионное приложение или делать его доступным по сети для
использования на нескольких устройствах одновременно. Вы не имеете права арендовать,
сдавать в аренду, передавать, продавать, распространять или сублицензировать
Лицензионное приложение. Вы признаете, что все лицензионные приложения
Согласен и принимаю
Назад Выбeрите Подтвердить
Сеть
Выберите сетевое подключение:
Беспроводное соединение
Проводное соединение
пропустить
Назад ВыбeритеПодтвердить
Страна
Выберите свою страну:
Назад ВыбeритеПодтвердить
Время
Установите дату и время:
Дата 02 - 01 - 2000
Время 07 : 43 : 29
OK
Назад ВыбeритеПодтвердить
(День - Месяц - Год)
9
Page 33

Раздел 3 Главная страница
Примечание: Данное руководство предназначено для общего использования. Рисунки и иллюстрации в
этом руководстве представлены только для справки и могут отличаться от реального устройства. Для
некоторых модулей определенные параметры недоступны.
Все функции доступны на домашней странице.
Нажмите HOME на пульте управления, чтобы открыть главную страницу.
1.
Нажмите ▲/▼/◄/► для выбора значков из списка на экране.
2.
Нажмите OK для выбора параметра.
3.
Чтобы закрыть меню, нажмите BACK.
4.
Домашняя страница состоит из 4 частей: Home (Домашняя), Videos (Видео), TV (ТВ) и Apps (Приложения).
Для переключения между ними используйте кнопки ◄/►.
Быстрый доступ: Нажмите ▲, чтобы переместить курсор в верхнюю часть экрана на домашней странице,
после чего появятся раздел Multimedia (мультимедиа) (если подключено USB-устройство) и Settings
(настройки). Здесь вы можете напрямую открыть файлы с USB и настроить различные параметры.
ВНИМАНИЕ:
Настройте сеть перед использованием Smart TV.
•
В зависимости от состояния сетевого подключения скорость реакции может быть медленной/работа может
•
прерываться.
Если у вас возникли проблемы с приложением, обратитесь к поставщику контента.
•
Возможно, поставщик контента прекратил обновление или поддержку приложения.
•
В зависимости от местного законодательства некоторые приложения могут быть ограничены или могут не
•
поддерживаться.
Использование домашней страницы: Home (Домашняя)
В этом разделе описываются часто используемые меню телевизора.
Нажмите кнопку HOME на пульте управления, чтобы открыть домашнюю страницу. С помощью кнопок
▲/▼/◄/►можно перейти на домашнюю страницу и выбрать значки на экране. Нажмите OK для выбора
параметров. Чтобы закрыть меню, нажмите кнопку BACK.
Status (Статус):
статус сети/Дата
время
History (История)
Search (Поиск)
Home (Домашняя)/Videos (Видео)/
TV (Телевизор)/APPS (Приложения):
Используйте ◄/► для выбора
элемента.
История
Поиск
Видео TB Приложения
Recommendations
(Рекомендации)
History (История)
На этой странице отображаются программы, которые вы недавно смотрели. Чтобы удалить историю, нажмите
кнопку MENU на пульте управления, с помощью кнопок ◄/► выберите Delete One (Удалить один) или Delete
All (Удалить все), нажмите OK и следуйте инструкциям экране.
Search (Поиск)
С помощью виртуальной клавиатуры можно искать нужные программы.
10
Page 34

Главная страница
Использование домашней страницы: Videos (Видео)
Примечание: Отображаемая информация периодически обновляется.
Нажмите кнопку HOME на пульте управления, чтобы открыть Videos (Видео) страницу. С помощью кнопок
▲/▼/◄/►можно перейти на домашнюю страницу и выбрать значки на экране. Нажмите OK для выбора
параметров. Чтобы закрыть меню, нажмите кнопку BACK.
В этом меню можно искать видео по жанру, например фильмы, спорт, музыку, популярные передачи, новости,
образование и игры, доступные на вашей платформе.
Status (Статус):
статус сети/Дата
время
Home (Домашняя)/Videos (Видео)/
TV (Телевизор)/APPS (Приложения):
Используйте ◄/► для выбора
Использование главной страницы: TV (телевизор)
Примечание: Некоторые параметры для определенных источников недоступны.
В этом разделе описываются меню вашего телевизора.
Нажмите HOME на пульте управления, чтобы открыть главную страницу. С помощью кнопок ▲/▼/◄/►
откройте страницу TV (ТВ), выберите источник сигнала в списке, а затем нажмите OK для подтверждения.
Чтобы закрыть меню, нажмите HOME.
элемента.
Status (Статус):
статус сети/Дата
время
Окно TV (ТВ)
Home (Домашняя)/
Videos (Видео)/
TV (Телевизор)/
APPS (Приложения):
Используйте ◄/► для выбора
элемента.
Окно TV (ТВ)
Здесь отображается текущая телепрограмма.
Input Source (Источник входных данных)
Выберите источник сигнала среди устройств, подключенных к различным портам телевизора, например TV,
HDMI1, HDMI2, HDMI3, AV, YPbPr, USB и PC. С помощью кнопок ▲/▼/◄/► выберите нужный источник и
нажмите OK для подтверждения.
Примечание: Доступные источники зависят от модели.
11
Input Source
(Источник входных
данных)
Page 35

Главная страница
Использование главной страницы: APPS (Приложения)
Примечание: Предустановленные приложения и элементы удалить нельзя. Приложения (независимо от
папки), указанные на рисунке ниже, могут отличаться от реальных. Для некоторых модулей определенные
приложения недоступны.
Нажмите HOME, чтобы открыть главную страницу. С помощью кнопок ▲/▼/◄/► откройте страницу Apps
(Приложения) и выберите нужные значки из списка. Нажмите OK для выбора параметров. Нажмите HOME
или BACK несколько раз для возврата на главную страницу.
Status (Статус):
статус сети/Дата
время
APP Store
Home (Домашняя)/
Videos (Видео)/
TV (Телевизор)/
APPS (Приложения):
Используйте ◄/► для выбора
APP Store (Магазин приложений)
вы можете загрузить множество полезных и развлекательных приложений. После входа в APP store вам будут
показаны рекомендации. Нажмите ▲/▼/◄/► для выбора и нажмите OK для подтверждения. Кнопки в правом
верхнем углу, такие как Required (Требуется), Search (Поиск), позволяют быстро получить доступ к некоторым
функциям.
Предустановленные приложения
это рекомендуемые приложения. Выделите приложение и нажмите OK, чтобы открыть его. Чтобы просмотреть
все приложения, установленные в телевизоре, выделите пункт All Apps (Все приложения) и нажмите OK. В
открывшемся интерфейсе можно MENU удалить и отсортировать приложения.
Примечание:
- Предустановленные приложения и элементы удалить нельзя.
- Для некоторых приложений требуется веб-камера. Веб-камера — это дополнительный аксессуар,
который приобретается отдельно. Используйте только указанную веб-камеру. Некоторые внешние
устройства, такие как веб-камера, смартфон, джойстик и внешний беспроводной адаптер, могут не
поддерживаться.
элемента.
Предустановленные
приложения
12
Page 36

Раздел 4 Использование меню
Использование меню быстрого доступа
Примечание: Некоторые функции недоступны для
определенных источников сигнала. В некоторых
моделях определенные параметры недоступны.
В этом разделе описываются меню и настройки
телевизора. Изучите эти сведения, чтобы
использовать все возможности телевизора. Доступ к
меню:
1. В режиме ТВ нажмите MENU кнопку на пульте
управления, чтобы открыть список быстрого
доступа.
2. С помощью кнопок ▲/▼ выберите нужный
элемент, а затем нажмите OK/►, чтобы открыть
подменю.
3. В подменю нажимайте кнопки ◄/► и OK для
изменения настроек или нажмите ▲/▼ для выбора
элемента, а затем — OK/► для подтверждения и
следуйте инструкциям на экране.
4. Нажмите BACK для возврата в предыдущее меню.
Список быстрого доступа содержит следующие
элементы: Picture Preset (Режим изображения),
Sound Preset (Режим звука), T-Link, Time Shift
(Временной сдвиг), PVR (Запись), Schedule List
(Расписание) и Settings (Настройки).
Режим изображения Пользовательский
Режим звука Стандартный
T-Link
Временной сдвиг
PVR
Расписание
Настройки
Picture Preset (Режим изображения)
Нажмите OK/►, чтобы открыть подменю.
Используйте кнопки ◄/► для выбора режима
изображения: Standard (Стандартный), Dynamic
(Динамический), Natural (Естественный), Movie
(Кино) и Personal (Пользовательский). Нажмите OK
для подтверждения выбора.
Sound Preset (Режим звука)
Нажмите OK/►, чтобы открыть подменю.
С помощью кнопок ◄/► выберите нужный режим
звука: Standard (Стандартный), Music (Музыка),
Movie (Кино), Clear Voice (Четкий голос) и
Personal (Пользовательский). Нажмите OK для
подтверждения выбора.
T-Link
Используется для поиска устройств CEC,
подключенных к разъемам HDMI телевизора, и
включения автовключения и автовыключения
устройств CEC.
Включение/выключение T-Link
1. Нажмите MENU и выберите T-Link> T-Link.
2. Нажмите OK/►, чтобы открыть подменю, и с
помощью кнопок ◄/► выберите значение
On (Вкл.) или Off (Выкл.), чтобы включить или
выключить функцию T-Link.
Примечание: Следующие параметры T-Link
доступны, только если для параметра T-Link
выбрано значение On (Вкл.).
Auto Power On (Автовключение): при
использовании этой функции телевизор будет
включаться автоматически при включении
устройства CEC (например, DVD) с помощью пульта
управления этого устройства. Выберите On (Вкл.),
чтобы включить эту функцию.
Auto Standby (Автоматический переход в режим
ожидания): эта функция позволяет автоматически
переводить все устройства CEC в режим ожидания
при выключении телевизора с помощью пульта
управления. Выберите On (Вкл.), чтобы включить эту
функцию.
Примечание: Доступные функции CEC зависят от
подключенного устройства, при этом некоторые
устройства могут не поддерживаться. Для
получения дополнительных сведений изучите
руководство пользователя устройства или
обратитесь к его производителю.
Time Shift (Временной сдвиг)
Примечание: Этот параметр доступен, только
если для функции Time Shift (Временной сдвиг)
выбрано значение On (Вкл.). Выберите Settings
(Настройки) > Channel (Канал) > Time Shift
(Временной сдвиг), нажмите OK/►, а затем
используйте кнопки ▲/▼ для выбора значения On
(Вкл.).
Эта функция позволяет приостановить текущую
передачу, перейти назад и вперед, поэтому вы
никогда не пропустите любимые моменты. Перед ее
использованием подключите к телевизору USB-диск.
При первом использовании необходимо настроить
USB-диск.
1. Нажмите MENU на пульте управления и выберите
Time Shift (Временной сдвиг), а затем нажмите
OK для подтверждения.
2. Следуйте инструкциям на экране для настройки
диска (при первом использовании функции
временного сдвига).
3. После настройки диска меню временного сдвига
появится на экране.
4. В дальнейшем, чтобы воспользоваться функцией,
нажмите MENU и выберите Time Shift (Временной
сдвиг). Нажмите кнопку OK, чтобы открыть меню
временного сдвига, и следуйте инструкциям на
экране.
5. Нажмите кнопку Stop, чтобы отключить режим
временного сдвига.
- Когда меню временного сдвига исчезнет, а на
экране останется только метка времени, можно
нажать кнопку OK, чтобы снова открыть меню.
Примечания:
- Перед подключением USB-диска к телевизору
сохраните важные данные, чтобы избежать их
потери в случае ошибки.
13
Page 37

Использование меню
- Рекомендуется использовать USB-диск как
минимум с 1 ГБ свободного места и скоростью
выше 5,0 МБ/с.
- Чем больше свободного места на USB-диске,
тем больше данных может быть записано.
Быстрый доступ к функции временного сдвига:
Вставьте USB-диск, нажмите кнопку воспроизведения
(►) на пульте управления, после чего функция
временного сдвига автоматически активируется.
PVR
Позволяет записывать любимые телепередачи.
Перед ее использованием подключите к телевизору
USB-диск.
Примечание: Эта функция поддерживается
только в некоторых моделях. Из-за ограничений
телесети и местных требований она может
быть недоступна. Телесеть также может
заблокировать функцию для защиты авторских
прав (для контента высокой четкости).
Воспользуйтесь MENU пультом управления, чтобы
узнать, доступна ли функция в вашем устройстве.
1. Нажмите кнопку MENU на пульте управления и
выберите PVR (Запись видео).
2. Нажмите кнопку OK/►. Запись начнется
автоматически.
3. Нажмите кнопку MENU на пульте управления
и с помощью кнопок ▲/▼/◄/► выберите
длительность записи.
4. Нажмите OK, чтобы вручную остановить
запись, после чего видеофайл будет записан
на диск. В обычном режиме запись остановится
автоматически после указанного времени.
5. Во время записи на экране отображается минипанель PVR с информацией о ходе записи.
6. Чтобы просмотреть записанную передачу,
сначала выйдите из режима PVR и откройте
пункт HOME > Apps (Приложения) > MediaCenter
(Медиацентр) > All (Все). Выберите папку PVR,
а затем выберите нужный файл. Нажмите OK
для воспроизведения. (Процедура аналогична
воспроизведению цифровой радиостанции).
Примечания:
- Эта функция доступна только для каналов без
шифрования, даже если установлена плата
CICAM (CI или CI+).
- Перед подключением USB-диска к телевизору
сохраните важные данные, чтобы избежать их
потери в случае ошибки.
- Чем больше свободного места на USB-диске,
тем больше данных может быть записано.
- Если вы хотите сменить канал или источник
сигнала во время записи, сначала сохраните
данные записи.
- Телевизор не сможет воспроизводить файлы,
если их параметры не соответствуют
ограничениям системы, формат файла не
поддерживает, файл поврежден или не может
быть декодирован.
- Не отсоединяйте USB-диск, когда система
считывает файл или передает данные, иначе
система или диск могут быть повреждены.
Schedule List (Расписание)
Эта функция используется для записи передач по
расписанию.
1. Нажмите кнопку MENU на пульте управления и
выберите Schedule List (Расписание).
2. Нажмите OK/►, чтобы открыть расписание.
3. Чтобы добавить элемент в расписание, нажмите
красную кнопку, чтобы открыть меню расписания.
Затем выполните следующие действия.
- Channel number (Номер канала): нажмите OK/► и
с помощью кнопок ▲/▼ выберите номер канала.
- Start date (Дата начала): выберите дату начала
записи.
- Start time (Время начала): выберите время
начала записи.
- Stop time (Время остановки): выберите время
остановки записи.
- Schedule type (Тип расписания):
а. Настройте Reminder (напоминание), чтобы
система напоминала о запланированной для
записи программы в нужное время. Когда время
наступит и пользователь не будет выполнять
никаких операций, диалоговое окно исчезнет.
б. Настройте Record (запись), чтобы начать
запланированную запись в указанное время.
Когда время наступит и пользователь не будет
выполнять никаких операций, запись начнется
автоматически.
- Repeat type (Тип повтора): выберите режим
повтора записи.
После ввод данных используйте кнопки ▲/▼
для выбора пункта OK, а затем нажмите OK,
чтобы добавить элемент в расписание.
4. Нажмите красную кнопку и повторите процедуры,
описанные выше, чтобы добавить другой элемент
в расписание.
5. Чтобы изменить запланированный элемент,
выберите его и нажмите OK. Вы также можете
удалить элемент, нажав зеленую кнопку.
6. Кроме того, здесь можно открыть электронный
телегид (EPG), нажав синюю кнопку и следуя
инструкциям на экране.
7. Нажмите BACK, чтобы закрыть меню.
Settings (Настройки)
В меню Settings (Настройки) можно настроить
различные параметры телевизора по вашему
усмотрению. Дополнительные сведения см. в
разделе Использование настроек системы далее.
Использование настроек системы
В меню Settings (Настройки) можно настроить
различные параметры телевизора по вашему
усмотрению.
Откройте главное меню, нажав MENU, выберите
Settings (Настройки), или выбирайте настройку под
TВ на главной странице а затем нажмите OK, чтобы
открыть параметры: Picture (Изображение), Sound
(Звук), Channel (Канал), Network (Сеть), System
(Система) и Applications (Приложения).
14
Page 38

Использование меню
Picture (Изображение)
Эти меню позволяют добиться оптимального
качества изображения в соответствии с вашими
предпочтениями, типа передачи и освещения.
Изображение
Звук
Канал
Сеть
Система
Приложения
Режим изображения
Яркость
Контрастность
Насыщение
Резкость
Оттенок
Цветовая температура
Автоформат
Режим экрана
Растянутая развертка
Параметры ECO
Экономия энергии
Дополнительные настройки
Сброс настроек
Динамический
Нормальный
Выкл.
Вкл.
Выберите Settings (Настройки) > Picture
(Изображение), после чего справа появится
меню Picture (Изображение) со следующими
параметрами. Нажмите ► и затем с помощью кнопок
▲/▼ выберите параметр.
Примечание: Некоторые параметры могут быть
недоступны в определенных режимах. Некоторые
параметры могут размещаться на следующей
странице меню Picture (Изображение), для перехода
на которую нажмите ▲/▼.
Picture preset (Режим изображения): Используйте
кнопки ◄/► для выбора режима изображения:
Standard (Стандартный), Dynamic (Динамический),
Natural (Естественный), Movie (Кино) и Personal
(Пользовательский).
Brightness (Яркость): изменение яркости
изображения.
Contrast (Контрастность): изменение разницы
между светлыми и темными областями изображения.
Saturation (Насыщение): изменение насыщенности
цвета.
Sharpness (Резкость): изменение резкости краев
изображения.
Backlight (Подсветка): изменение яркости подсветки
в зависимости от освещения.
Примечание: Этот параметр доступен, только
если режим Energy saving (экономии энергии ) в
ECO settings (параметрах ECO) выключен.
Tint (Оттенок): изменение баланса между уровнями
красного и зеленого.
Colour temperature (Цветовая температура):
изменение цветовой температуры изображения.
Используйте кнопки ◄/► для выбора режима:
Normal (Нормальный), Warm (Теплый), Cool
(Холодный) и Customer (Пользовательский).
Auto format (Автоформат): кнопками ◄/► выберите
On (Вкл.) или Off (Выкл.). Если выбрано значение
On (Вкл.), будет использоваться формат HD-сигнала.
Примечание: Функция Auto format (Автоформат)
доступна только в режиме ТВ и HDMI.
Screen mode (Режим экрана): выберите формат
изображения кнопками ◄/►.
Примечание:
- Screen mode (Режим экрана) доступен, только
если для функции Auto format (Автоформат)
выбрано значение Off (Выкл.). Доступные
параметры зависят от выбранного источника
сигнала.
- Рекомендуется использовать полноэкранный
режим. Не используйте формат, при которым
черные полосы находятся по сторонам экрана
(например, 4:3) длительное время, иначе
телевизор может быть поврежден.
Overscan (Растянутая развертка): выберите
значение On (Вкл.) или Off (Выкл.).
ECO settings (Параметры ECO): Нажмите OK/►,
чтобы открыть подменю.
Примечание: Этот параметр недоступна
доступен, только если для функции Picture Preset
(Режим изображения) выбрано значение Standard
(Стандартный).
• Energy saving (Экономия энергии): с помощью
кнопок ◄/► выберите нужный режим экономии
энергии — High (Высокий), Low (Низкий) или Off
(Выкл.).
Advanced settings (Дополнительные настройки):
нажмите OK/►, чтобы открыть подменю. Кнопками
▲/▼ выберите нужный элемент, например Noise
reduction (Шумоподавление), чтобы улучшить
качество изображения.
Примечание: Доступные параметры зависят от
текущей передачи.
Picture Reset (Сброс настроек): выберите эту
функцию, чтобы восстановить заводские настройки.
Sound (Звук)
Выберите Settings (Настройки) > Sound (Звук),
после чего справа появится меню Sound (Звук) со
следующими параметрами. Нажмите ► и затем с
помощью кнопок ▲/▼ выберите параметр.
Режим звука
Изображение
Размещение ТВ Тумбочка
Звук
Тип SPDIF
Канал
Задержка SPDIF
Дополнительные настройки
Сеть
Система
Приложения
Примечание: Некоторые параметры могут
быть недоступны для определенных источников.
Некоторые параметры могут размещаться на
следующей странице меню Sound (Звук), для
перехода на которую нажмите ▲/▼.
Вкл.Автонастройка громкости
15
Page 39

Использование меню
Sound Preset (Режим звука): нажмите OK/►, чтобы
открыть список параметров. С помощью кнопок ▲/▼
выберите звуковой режим: Standard (Стандартный),
Music (Музыка), Movie (Кино), Clear voice (Четкий
голос) и Personal (Пользовательский).
TV placement (Размещение ТВ): с помощью кнопок
▲/▼ выберите параметр Desktop (Тумбочка) и Wall
mount (Стена).
Auto volume control (Автонастройка громкости):
выберите значение On (Вкл.), чтобы автоматически
корректировать громкость во время рекламы и
усиливать звук во время просмотра телепередач.
Это устраняет необходимость постоянно менять
громкость вручную.
SPDIF type (Тип SPDIF): подключите
аудиоустройство к выходу SPDIF. Выберите пункт
SPDIF type (Тип SPDIF) и нажмите OK/►, чтобы
открыть параметры. Выберите нужный тип звука из
списка для цифровых программ.
- Если для текущего канала используется формат
Dolby, можно выбрать PCM или Dolby.
- Если текущий канал не поддерживает формат
Dolby, выбрать можно только PCM.
В противном случае звук не будет
воспроизводиться.
Примечание: Доступные параметры зависят
от текущей передачи. Если вы выбрали PCM, а
звук опережает изображение, можно выбрать
параметр SPDIF delay (Задержка SPDIF) в
меню Sound (Звук) и нажмите ◄/►, чтобы
настроить время задержки для синхронизации
звука с изображением.
SPDIF delay (Задержка SPDIF): если звук не
совпадает с изображением, нажмите ◄/►, чтобы
настроить время задержки для синхронизации звука
с изображением.
Bluetooth audio only (Только аудио Bluetooth):
нажмите кнопку OK/►. Откройте настройки Bluetooth
на смартфоне. В списке устройств вы увидите
название телевизора (оно отображается на экране
телевизора). Выберите его и нажмите кнопку
Pair (Сопряжение) на телефоне, чтобы слушать
аудиофайлы с телефона на телевизоре. Выберите
имя телевизора и свяжите устройство с телевизорам,
следуя инструкциям на экране. После сопряжения
вы сможете слушать аудиофайлы с устройства на
телевизоре. Во время воспроизведения нажмите
OK на пульте управления, чтобы включить экран
телевизора. Нажмите любую кнопку, чтобы включить
экран.
Примечание: Этот параметр поддерживается не
всеми моделями. Для оптимального соединения
разместите устройство Bluetooth в пределах 3
метров от телевизора.
Advanced settings (Дополнительные настройки):
нажмите OK/►, чтобы открыть подменю. Кнопками
▲/▼ выберите нужный элемент, например Balance
(Баланс), чтобы улучшить качество звука.
Примечание: Доступные параметры зависят от
текущей передачи.
Channel (Канал)
Выберите Settings (Настройки) > Channel (Канала),
после чего справа появится меню Channel (Канала)
со следующими параметрами. Нажмите ► и затем с
помощью кнопок ▲/▼ выберите параметр.
Изображение
Поиск каналов
Список каналов
Звук
Организация каналов
Диагностика каналов
Временной сдвиг Выкл.
Канал
Субтитры
Сеть
Телетекст
Система
Приложения
Channel scan (Поиск каналов): нажмите OK/►,
чтобы открыть параметры поиска каналов.
• Country (Страна): нажмите OK/►, чтобы открыть
список стран, и с помощью кнопок ▲/▼ выберите
страну.
• Tuner Mode (Режим тюнера): выберите Antenna
(Антенна) или Cable (Кабель) в зависимости от
типа источника сигнала.
Примечание: Параметр Cable (Кабель) может
быть недоступен для определенных моделей.
• Automatic Search (Автопоиск Поиск): выберите
пункт Digital & Analogue (Цифровые и аналоговые)
(или Digital (Цифровые) либо Analogue
(Аналоговые)), а затем нажмите OK/►, чтобы
начать автоматический поиск. Для операции может
потребоваться несколько минут. Чтобы отменить
ее, нажмите кнопку OK.
• Analogue Manual scan (Аналоговая ручная
настройка): нажмите OK для выбора. Нажмите
▲/▼/◄/► и номер или нажмите OK для поиска,
точной настройки или сохранения канала.
• Antenna Manual Installation (Ручная установка
антенны): позволяет выполнить ручной поиск
доступных каналов от текущей или введенной
вами частоты (только для цифровых каналов).
Нажмите OK, чтобы начать поиск от текущей
частоты, или введите частоту с помощью
цифровых кнопок и нажмите OK для начала
поиска. Чтобы отменить операцию, нажмите
кнопку OK. Нажмите OK для перезапуска или
BACK для возврата.
• Color system (Цветовая система): позволяет
выбрать цветовую систему — Auto (Авто), PAL ,
SECAM и NTSC.
• Sound system (Звуковая система): позволяет
выбрать звуковую систему — BG, DK, I и M.
Примечание: Параметры Color system
(Цветовая система) и Sound system (Звуковая
система) доступны только для источника
ATV после завершения поиска каналов.
Channel list (Список каналов): нажмите OK/►,
чтобы открыть список каналов.
16
Page 40

Использование меню
Channel organiser (Организация каналов):
позволяет пропускать, изменять и удалять каналы.
Нажмите OK/► для выбора.
Channel skip (Пропуск канала): если канал
сохранен дважды или уровень сигнала плохой, его
можно пропустить. Пропущенные каналы больше
не будут выбираться при нажатии кнопки CH +/-.
Нажмите OK/►, чтобы открыть меню Channel
skip (Пропуск канала). С помощью кнопок ▲/▼
выберите канал и нажмите OK, чтобы установить
флажок.
Channel edit (Редактирование каналов):
нажмите OK/►, чтобы открыть список каналов.
Кнопками ▲/▼ выберите нужный канал и нажмите
OK. С помощью кнопок ▲/▼ выберите Channel
name (Имя канала), а затем нажмите OK, чтобы
открыть виртуальную клавиатуру и изменить имя
канала. Затем выделите OK и нажмите OK для
подтверждения. По завершении нажмите BACK
для возврата.
Channel delete (Удалить канал): нажмите OK/►,
чтобы открыть список каналов. Кнопками ▲/▼
выберите нужный канал и нажмите OK, чтобы
удалить его.
Channel Diagnostics (Диагностика каналов) (для
ЦТВ): нажмите OK/►, чтобы просмотреть сведения
о текущем цифровом канале, например уровень
сигнала, частоту и т. д.
Time Shift (Временной сдвиг): выберите для
функции Time Shift (Временной сдвиг) значение On
(Вкл.) или Off (Выкл.). Значение по умолчанию: On
(Вкл.). Дополнительные сведения см. в описании
функции Временной сдвиг на стр. 13.
Subtitle (Субтитры): включение субтитров для
цифровых каналов. Выберите Subtitle (Субтитры) и
нажмите OK/►, чтобы открыть подменю:
• Subtitle (Субтитры): нажмите OK/► и с помощью
кнопок ▲/▼ выберите значение On (Вкл.) или Off
(Выкл.). Если Subtitle (Субтитры) включены, вы
можете выбрать язык субтитров для цифровых
каналов.
1. С помощью кнопок ▲/▼ выберите Digital subtitle
language (Язык субтитров).
2. Нажмите OK/► и с помощью кнопок ▲/▼
выберите язык субтитров.
3. С помощью кнопок ▲/▼ выберите Digital subtitle
language2nd (2 язык субтитров).
4. Нажмите OK/► и с помощью кнопок ▲/▼
выберите второй язык субтитров.
5. Нажмите Exit или BACK для возврата в
предыдущее меню.
Примечание: Нажмите SUBTITLE на пульте
управления, чтобы напрямую выбрать язык
субтитров для выбранного канала.
• Subtitle type (Тип субтитров): нажмите OK/► и
с помощью кнопок ▲/▼ выберите тип субтитров.
Можно выбрать параметр Hearing impaired (Для
слабослышащих), чтобы показать субтитры для
слабослышащих на выбранном языке.
Teletext (Телетекст): нажмите OK/►, чтобы открыть
подменю.
• Decoding page language (Язык страницы
кодировки): выберите язык телетекста.
• Digital teletext language (Язык цифрового
телетекста): для цифровых каналов телевизор
может подключиться к службе с несколькими
страницами телетекста на разных языках. Эта
функция позволяет выбрать доступный язык
в качестве основного, связанного с другой
начальной страницей телетекста.
Network (Сеть)
Вы можете настроить телевизор для подключения к
Интернету по локальной сети с помощью проводного
или беспроводного соединения.
Изображение
Настройки Ethernet
Настройки беспроводной сети
Звук
Канал
Сеть
Система
Приложения
Настройки Ethernet: Вы можете подключить
телевизор к локальной сети с помощью кабеля тремя
способами:
- Можно подключить телевизор к сети, подключив к
порту LAN внешний модем, используя кабель кат.
5.
- Можно подключить телевизор к сети, подключив
к порту LAN распределитель IP-адресов,
подключенный к внешнему модему. Используйте
кабель кат. 5.
- В зависимости от настроек сети вы можете
подключить телевизор к сети, соединив порт LAN
телевизора и сетевую розетку кабелем кат. 5.
Обратите внимание, что сетевая розетка должна
быть подключена к модему или маршрутизатору.
Выберите Settings (Настройки) > Network (Сеть) >
Ethernet settings (Настройки Ethernet), нажмите OK
и настройте IP-адрес для подключения к проводной
сети. Здесь также можно просмотреть сведения о
сети.
Настройки беспроводной сети: Для подключения
телевизора к беспроводной сети требуется
маршрутизатор или модем, а также адаптер
беспроводной сети.
Примечание: Если в телевизоре нет встроенного
адаптера беспроводной связи, вам необходим USBмодуль (продается отдельно). Подключите USBмодуль к порту USB телевизора.
Выберите Settings (Настройки) > Network (Сеть) и
выберите Wireless settings (Настройки беспроводной
сети), чтобы подключиться к беспроводной сети.
• WiFi switch (Коммутатор WiFi): выберите WiFi
switch (Коммутатор WiFi) и нажмите OK/►. С
помощью кнопок ▲/▼ выберите значение On
(Вкл.), чтобы открыть следующие параметры.
17
Page 41

Использование меню
В противном случае они будут скрыты.
• Scan (Поиск): выберите Wireless settings
(Настройки беспроводной сети) > Scan (Поиск) и
нажмите OK/►, после чего телевизор выполнит
поиск точек доступа. Все найденные точки доступа
будут показаны на экране. Выберите точку доступа
и нажмите OK, чтобы подключиться к ней.
Примечания:
- Если вы выбрали защищенную точку доступа,
потребуется ввести соответствующий
пароль. Нажмите OK на пульте управления,
чтобы открыть виртуальную клавиатуру и
ввести пароль.
- Телевизор может сохранять точки доступа,
чтобы не терять подключение к сети даже
после выключения телевизора.
• Manual (Вручную): выберите Wireless settings
(Настройки беспроводной сети) > Manual
(Вручную), а затем нажмите OK/►. Появится
запрос на ввод имени сети (SSID).
• Wi-Fi Direct: выберите Wireless settings
(Настройки беспроводной сети) > Wi-Fi Direct и
нажмите OK/►. Здесь вы сможете изменить пароль
Wi-Fi Direct.
• Information (Информация): выберите Wireless
settings (Настройки беспроводной сети) >
Information (Информация), а затем нажмите OK/►,
после чего появится сведения о WiFi, например
состояние подключения.
System (Система)
Выберите Settings (Настройки) > System (Система),
после чего справа появится меню System (Система)
со следующими параметрами. Нажмите OK/► и с
помощью кнопок ▲/▼ выберите параметр.
Изображение
Язык Русский
Таймер
Звук
Блокировка
Параметры ввода
Канал
Обновление ПО
Автопереключение HDMI Авто
Сеть
Расположение Дом
Система
Система
Способ ввода
Common Interface
Приложения
Bluetooth
Language (Язык)
список языков, и с помощью кнопок ▲/▼ выберите
язык.
Timer (Таймер)
выбрать часовой пояс телевизора, настроить
автовыключение или включение телевизора, а также
просмотреть календарь.
Выберите System (Система) > Timer (Таймер) и
нажмите OK/► для подтверждения.
Доступны следующие параметры Таймер.
• Time zone (Часовой пояс)
▲/▼ выберите местный часовой пояс.
• Clock (Часы): нажмите OK/►, чтобы открыть
параметры часов.
:
нажмите OK/►, чтобы открыть
:
меню Timer (Таймер) позволяет
:
с помощью кнопок
- Synchronization (Синхронизация): с помощью
кнопок ▲/▼ выберите Auto (Авто) или Manual
(Вручную). Если выбрано значение Auto (Авто),
телевизор будет получать время автоматически
от телесети, при этом изменить время будет
невозможно. Если выбрать параметр Manual
(Вручную), введите дату и время в элементах
Date (Дата) и Time (Время). Выберите элемент
Date (Дата) или Time (Время) нажмите OK и с
помощью кнопок ▲/▼/◄/► и OK измените дату
или время.
Примечание: Если выбран параметр Manual
(Вручную), время, заданное в параметре Time
(Время) не будет сохранено до следующего
включения телевизора, при этом будет
использоваться время по умолчанию.
- Power on timer (Таймер включения): с
помощью кнопок ▲/▼ выберите Once (Один
раз), Daily (Ежедневно) или Off (Выкл.). Если
выбрать параметр Once (Один раз) или Daily
(Ежедневно), укажите время, через которое
телевизор автоматически включится, в параметре
Time (Время) под этим элементом. Выберите
Time (Время), нажмите OK и с помощью кнопок
▲/▼/◄/► и OK измените время.
- Power off timer (Таймер выключения): с
помощью кнопок ▲/▼ выберите Once (Один
раз), Daily (Ежедневно) или Off (Выкл.). Если
выбрать параметр Once (Один раз) или Daily
(Ежедневно), укажите время, через которое
телевизор автоматически выключится, в
параметре Time (Время) под этим элементом.
Выберите элемент Time (Время), нажмите OK
и с помощью кнопок ▲/▼/◄/► и OK измените
время.
• Sleep timer (Таймер сна): выберите время, через
которое режим перейдет в режим ожидания.
Выберите время с помощью кнопок ▲/▼ (120
минут максимум). Чтобы отключить функцию,
выберите Off (Выкл.).
• Auto standby (Автоматический переход в
режим ожидания): выберите время, через
которое режим перейдет в режим ожидания. С
помощью кнопок ▲/▼ выберите время: 4 ч, 6 ч, 8 ч.
Чтобы отключить функцию, выберите Off (Выкл.).
Lock (Блокировка): В этом меню можно настроить
специальные функции телеканалов.
Примечание: Чтобы открыть меню Lock
(Блокировка), введите личный код. Код по
умолчанию: 1234. Суперпароль: 0423. Если вы
забыли код, введите суперпароль.
18
Page 42

Использование меню
Выберите System (Система) > Lock (Блокировка) и
нажмите OK/► для подтверждения. Затем введите
пароль, нажимая цифровые кнопки, чтобы открыть
меню Lock (Блокировка).
Доступны следующие параметры Lock (Блокировка).
• Parental rating (Возрастной рейтинг): этот
параметр позволяет указать возрастной рейтинг
для программы. Выберите пункт Parental rating
(Возрастной рейтинг) и нажмите OK/►, чтобы
открыть меню Parental rating (Возрастной рейтинг).
Измените настройки с помощью кнопок ▲/▼.
• Front panel lock (Блокировка передней панели):
нажмите OK/►, чтобы открыть подменю, и с
помощью кнопок ▲/▼ выберите On (Вкл.), чтобы
заблокировать кнопки на панели телевизора.
• Change password (Изменить пароль): этот
параметр позволяет изменить пароль. Нажмите
OK/► и введите новый пароль дважды, используя
цифровые кнопки.
Input Settings (Параметры ввода): выберите
System (Система) > Input Settings (Параметры
ввода) и нажмите OK/► для подтверждения. Здесь
можно выбрать название устройства-источника
сигнала, чтобы легко его определять.
Software update (Обновление ПО): выберите
System (Система) > Software update (Обновление
ПО) и нажмите OK/► для подтверждения. Вы
можете обновить программное обеспечение по сети,
с помощью USB-диска или канала.
• By network (По сети): позволяет загрузить и
установить последнюю версию программного
обеспечения из Интернета. Сначала настройте
проводное или беспроводное подключение к
сети, а затем выберите By network (По сети) и
нажмите OK/►. Следуйте инструкциям на экране
для продолжения. Если доступна новая версия
ПО, появится панель хода выполнения. После
окончания загрузки, телевизор обновит ПО.
Примечание: Не выключайте телевизор и не
отсоединяйте его от розетки до завершения
обновления. Во время обновления необходимо
стабильное подключение к сети.
• By USB (По USB): позволяет установить
последнюю версию ПО, используя порт USB.
Выберите By USB (По USB) и нажмите OK/►.
Следуйте инструкциям на экране для продолжения
установки.
• By Channel (По каналу): позволяет установить
последнюю версию ПО, если она доступна.
Выберите By Channel (По каналу) и нажмите
OK/►.
- C помощью кнопок ◄/► выберите Yes (Да) для
параметра Auto download (Автозагрузка), чтобы
автоматически скачивать обновления ПО,
если они доступны. После успешной загрузки
вам будет предложено установить ПО сразу
же. Если вы захотите установить обновление,
следуйте инструкциям на экране. Вы также
можете проигнорировать установку.
- Выберите No (Нет) для параметра Auto
download (Автозагрузка), чтобы отменить
автоматическую загрузку.
- Выберите Manual download (Ручная загрузка)
и нажмите OK/►, чтобы вручную проверить
наличие обновлений ПО. Следуйте инструкциям
на экране для продолжения. Во время проверки
можно нажать OK/EXIT для отмены процесса.
• Restore Factory settings (Восстановление
заводских настроек): позволяет восстановить
заводские настройки телевизора.
- Выберите Restore Factory settings
(Восстановление заводских настроек) и
нажмите OK/►.
- Введите пароль, используя цифровые кнопки.
Примечание: Код по умолчанию: 1234.
Суперпароль: 0423. Если вы забыли код,
введите суперпароль.
- Нажмите ◄/►, чтобы выбрать пункт OK и
нажмите OK для подтверждения.
- Появится меню начальной настройки.
Следуйте соответствующим инструкциям для
продолжения.
Также на экране отображается информация о
телевизоре, например текущая версия и т. д.
HDMI type (Тип HDMI): выберите 2.0 или 1.4 в
зависимости от типа сигнала подключенного
устройства HDMI.
• 2.0: сигнал 4K, 60 Гц. Выберите этот параметр,
если внешнее устройство HDMI передает сигнал
4K с частотой 60 Гц.
• 1.4: Выберите этот параметр, если внешнее
устройство HDMI не передает сигнал 4K с частотой
60 Гц.
Примечание: Этот параметр доступен только
для источника HDMI.
HDMI Auto Switch (Автопереключение HDMI):
этот параметр используется, если к телевизору
подключено HDMI-устройство.
• Auto (Авто): автоматическое переключение на
источник HDMI.
• Manual (Вручную): на экране появляется
напоминание о том, что можно выбрать источник
HDMI.
• Off (Выкл.): отключить функцию.
Location (Расположение): с помощью кнопок ▲/▼
выберите Home (Дом), Shop (Магазин) или Shop
with demo (Магазин с демонстрацией).
Input method (Способ ввода): этот телевизор
поддерживает ввод с виртуальной клавиатуры.
Common Interface: нажмите OK для просмотра
сведений о CAM и приложениях.
Примечание: Этот параметр доступен только
для источника DTV. Вставьте плату Common
Interface в разъем в задней части телевизора перед
использованием этой функции.
19
Page 43

Использование меню
При этом Common Interface поддерживается не
всеми моделями.
Bluetooth: нажмите OK/► и с помощью кнопок
◄/► включите или выключите Bluetooth. Выберите
Refresh (Обновить) и нажмите OK для поиска
устройств Bluetooth поблизости. Выберите нужное
устройство и нажмите OK для подключения.
Примечание: Этот параметр поддерживается не
всеми моделями. Для оптимального соединения
разместите устройство Bluetooth в пределах 3
метров от телевизора.
Applications (Приложения)
Выберите Settings (Настройки) > Applications
(Приложения), после чего справа появится меню
Applications (Приложения) со следующими
параметрами. Нажмите ► и затем с помощью кнопок
▲/▼ выберите параметр.
Изображение
Все приложения
Обновление приложений
Звук
Запущенные приложения
Свободное место
Канал
Сеть
Система
Приложения
All Apps (Все приложения): нажмите OK для
просмотра сведений о всех приложениях.
Running Apps (Запущенные приложения):
нажмите OK для просмотра сведений о запущенных
приложениях.
Updated Apps (Обновление приложений): Нажмите
OK, чтобы просмотреть приложения, готовыек
обновлению, и нажмите Update All (Обновить все),
чтобы обновить все приложения.
Available space (Свободное место): нажмите OK
для просмотра свободного места на диске.
20
Page 44

Раздел 5 Другая информация
Проблемы и способы их устранения
Примечание: Проблемы и способы их устранения 1-2 относятся к моделям телевизора с сетевыми
функциями, поэтому пользователи моделей без сетевых функций могут их игнорировать.
1. Не удается подключиться к сети.
- Убедитесь, что телевизор подключен к сети.
- Перезапустите телевизор.
- Обратитесь к поставщику услуг Интернета,
чтобы проверить, поддерживается ли доступ с
вашего маршрутизатора. Изучите руководство
пользователя маршрутизатора и включите
на нем функцию DHCP после подключения
телевизора к сети.
- Убедитесь, что телевизор подключен к
включенному маршрутизатору. Убедитесь,
что маршрутизатор или модем подключены
к Интернету, а кабельное (Ethernet) или
беспроводное соединение стабильное. Проверьте
подключение на компьютере. Если проблема
сохраняется, обратитесь в службу поддержки.
2. Видео воспроизводится с рывками.
- Видео с USB-носителя: проблема может быть
вызвана передачей данных или тем, что поток
кодировки не поддерживается телевизором.
- Видео, загруженные из Интернета или онлайн-
видео.
а. Это может быть вызвано низкой скоростью
сети. Для просмотра онлайн-видео
необходима высокоскоростная сеть.
б. В моменты пиковой нагрузки скорость сети
может быть ограничена.
в. Проверьте, работают ли другие компьютеры
в сети — они могут использовать полосу
пропускания сети, особенно если они
загружают или воспроизводят онлайн-видео.
г. Видео само по себе может быть неплавным,
проблема не связана с телевизором или сетью.
3. Когда к телевизору одновременно подключены
два мобильных жестких диска, иногда они не
распознаются.
- Все мобильные жесткие диски потребляют много
мощности, что может привести к проблемам с
подачей питания. Мы рекомендуем вставлять
только один жесткий диск или мобильный диск с
низким энергопотреблением.
4. Видео с мобильного жесткого диска (USB)
воспроизводится без звука.
- Формат звука видео на мобильном диске не
поддерживается телевизором.
5. Не удается воспроизвести некоторые видео.
- Формат видео может не поддерживаться
телевизором, особенно формат видео, снятых
на определенные камеры, которые используют
собственные форматы, несовместимые с вашим
телевизором.
6. Видео перестает воспроизводиться
посередине.
- При копировании или сжатии видео могут
возникать ошибки, поэтому их воспроизведение
может прекращаться автоматически.
7. О чем следует помнить при обновлении
программного обеспечения
- Не выключайте питание во время обновления ПО.
- Не используйте пульт управления во время
обновления ПО.
- В зависимости от скорости интернет-соединения
обновление ПО может занять определенное
время.
8. После обновления ПО интерфейс телевизора
не изменился.
- В некоторых случаях обновление ПО может не
изменять и не добавлять функции, а улучшать
производительность телевизора, при этом
интерфейс существенно не меняется. Кроме
того, иногда интерфейс совсем не изменятся.
9. Что делать, если обновление ПО
останавливается из-за внезапного отключения
питания?
- Если вы обновляете ПО с USB-диска, не
отсоединяйте USB-диск от телевизора
и перезапустите его, чтобы продолжить
обновление. При обновлении по сети также
перезапустите телевизор и проверьте его
работоспособность.
10. USB-устройство подключено к телевизору,
но после доступа к файлам мультимедиа
отображается сообщение, что USB-устройства
не найдены. Почему?
- Возможно, мобильный диск поврежден или ему
не хватает напряжения. Вы можете увеличить
мощность, вставив одновременно два разъема
на одном конце USB-кабеля в порт USB
телевизора.
11. Внешнее устройство не определяется
- Некоторые внешние устройства (например, веб-
камера, смартфон, планшет, игровая консоль
и внешний адаптер беспроводной связи) могут
быть несовместимы с телевизором или не
поддерживают определенные функции (nScreen,
беспроводной дисплей, управление жестами,
распознавание лица и т. д.). Попробуйте
использовать аналогичное устройство. Если это
не работает, обратитесь к местному торговому
представителю.
21
Page 45

Раздел 5 Другая информация
Устранение неисправностей
Большинство проблем, с которыми Вы можете столкнуться при эксплуатации телевизора, перечислены ниже.
Отсутствие изображение, отсутствие звука
1. Проверьте работу плавкого предохранителя или
автоматического выключателя.
2. Подключите к розетке другое устройство для
того, чтобы убедиться в ее исправности.
3. Разъем электропитания плохо подключен к
розетке.
4. Проверьте источник сигнала.
Отсутствие цвета
1. Измените систему цветного телевидения.
2. Настройте цветовую насыщенность.
3. Переключите на другой канал. Черно-белое
изображение может транслироваться.
Пульт дистанционного управления не работает
1. Замените элементы питания.
2. Неверное положение элементов питания.
Отсутствие изображения, хороший звук
1. Настройте яркость и контраст.
2. Возможны неполадки при трансляции.
Хорошее изображение, отсутствие звука
1. Для увеличения громкости нажмите кнопку
ГРОМКОСТЬ ВВЕРХ.
2. Отключен звук. Для включения звука нажмите
кнопку MUTE.
3. Измените систему звука.
4. Возможны неполадки при трансляции.
Рябь на экране
Как правило, оно вызвано местными помехами –
машинами, лампами дневного света и фенами. Для
уменьшения помех отрегулируйте антенну.
Экран снежит, наличие помех
В том случае, если антенна расположена в
отдаленной зоне сигнала телевизора, где сигнал
очень слабый, изображение на экране телевизора
может быть ухудшено точками. При крайне слабом
сигнале необходимо установить специальную
антенну для улучшения приема сигнала.
1. Отрегулируйте положение и направление
уличной/комнатной антенны.
2. Проверьте соединение антенны.
3. Точная настройка канала.
4. Переключите на другой канал. Возможны
неполадки при трансляции.
Возгорание
Появление темных пятен или горизонтальных полос,
мерцающее или сдвинутое изображение. Это, как
правило, вызвано помехами от системы зажигания
машин, неоновых ламп, электродрелей или других
электрических устройств.
Тень
Наличие теней вызвано прохождением
телевизионного сигнала по двум каналам. Один
канал – прямой; другой – отражается от высоких
зданий, холмов или других объектов. Изменение
направления или положения антенны может
улучшить прием сигнала.
Помехи радиочастот
Данные помехи вызывают рябь или диагональные
полосы в некоторых случаях – потерю контакта
изображения. Необходимо определить и устранить
источник радиоволн.
* Для оптимального просмотра снимите все
наклейки с передней панели и экрана телевизора.
22
Page 46

Изготовитель: ООО “M&K&D”, 238151, Российская федерация, Калининградская обл., г. Черняховск,
ул. Спортивная, 5
Page 47

Page 48

Page 49

72-MS68AA-XAPBX
 Loading...