

Page 1
L32P11FZE L40P11FZE
L46P11FZE L55P11FZE
Page 2

Table of Contents
2
Chapter 1: Introduction
Chapter 2: General Operation
Chapter 3: Advanced Functions
Chapter 4: Other Information
14
3
3
3
3
3
3
3
3
4
5
6
7
7
8
8
8
9
9
9
10
10
11
11
12
12
13
Precautions .........................................................................................................................................
Product .............................................................................................................................................
Power and Plug .................................................................................................................................
Power Cord and Signal Cable ...........................................................................................................
Use Environment ...............................................................................................................................
Cleaning ............................................................................................................................................
Hanging the TV Set on the Wall ........................................................................................................
........................................................................................................................
Bottom Panel Buttons ........................................................................................................................
Sockets ................................................................................................................................................
Remote Control Functions .................................................................................................................
Important Information
Switching on ........................................................................................................................................
Switching off .......................................................................................................................................
........................................................................................................................................
Using Menu System ............................................................................................................................
Automatic Channel Set-up .................................................................................................................
Automatic Update ...............................................................................................................................
Digital Test Reception ........................................................................................................................
................................................................................................................
Initial Set-up
Analog Manual Installation
Adjusting the Picture ..........................................................................................................................
Adjusting the Sound ...........................................................................................................................
PAP Function... ....................................................................................................................................
...................................................................................................................
Setting the Timer
Using the Lock Function..
..................................................................................................................................
Special Functions ...............................................................................................................................
USB Functions......................................................................................................................................
Troubleshooting ..................................................................................................................................
Page 3

Introduction
3
Chapter 1
Precautions
Product
Read all of the instructions before operating the set.
Keep these instructions well for future use.
Do not block or cover the ventilation openings on the
back cover.
Cleaning
Dust the set by wiping the screen and the cabinet with
a soft, clean cloth or some special liquid cleaner.
Unplug the set under the following conditions:
Power and Plug
Do not allow anything to rest on or roll over the power
cord and the signal cable.
Power Cord and Signal Cable
Hanging the TV Set on the Wall
Warning: This operation requires two people.
Do not push objects of any kind into this unit through
the cabinet slots as they could touch current carrying
parts or short-circuit parts, resulting in fire, electric
shock, or damage to the unit.
Do not attempt to open the cabinet
. There are no parts inside you can service by
yourself. Refer all servicing to qualified personnel.
as this may cause
damage
Do not touch the screen surface with fingers as this
may scratch or mark the LED screen.
Do not impact the LED screen with hard pressure as
this may damage the LED screen severely.
The appliance is not intended for use by young children
or infirm persons without supervision. Young children
should be supervised to ensure that they do not play
with the appliance.
- If the set will not be used for a long period of time.
- If the power cord or the power outlet/plug is damaged.
- Follow the instructions to install and adjust the
product. Adjust those controls that are covered in these
operating instructions as improper adjustment of other
controls may result in damage. If this happens, unplug
the set and refer to the service personnel.
- If the set is subject to impact or has been dropped to
have the cabinet damaged.
Where an all-pole mains switch is used as the
disconnect device, the switch shall remain readily
operable.
Protect the power cord and the signal cable from being
trampled.
Do not overload the power cord or the power outlet.
Do not expose the power cord and the signal cable to
moisture.
Do not place the set on an unstable cart, stand, or table.
Use Environment
Place the set on a place that allows good ventilation.
Do not use the set near damp, and cold areas. Protect
the set from overheating.
Keep the set away from direct sunlight.
The set shall not be exposed to dripps or splashes
and no objects filled with liquids, such as vases, shall be
placed on the set.
Do not use the set in dusty environments.
Do not apply excessive force to the screen when
cleaning.
Do not use water or other chemical cleaners to clean the
screen as this may damage the surface of the LED
screen.
Check that the wall can support the weight of the TV
set and wall mount assembly.
All other safety instructions about our TV sets are also
applicable here.
Follow the mounting instructions provided with the wall
mount.
The TV set must be installed on a vertical wall.
Make sure to use only screws suitable for the material
of the wall.
Make sure that the TV set cables are placed so that
there is not danger of tripping over them.
To ensure a safe installation, observe the following safety
notes:
Important Information
Using cabinets or stands recommended by the
manufacturer of the television.
If a television is not positioned in a sufficiently stable
location, it can be potentially hazardous due to falling.
Many injuries, particularly to children, can be avoided by
taking simple precautions such as:
Note: Graphics contained within this publication
are presentation only.
Only using furniture that can safely support the television.
Ensuring the television is not overhanging the edge of
the supporting furniture.
Not placing the television on tall furniture (for example,
cupboards or bookcases) without anchoring both the
furniture and the television to a suitable support.
Not standing the televisions on cloth or other materials
placed between the television and supporting furniture.
Educating children about the dangers of climbing on
furniture to reach the television or its controls.
Page 4
Introduction
4
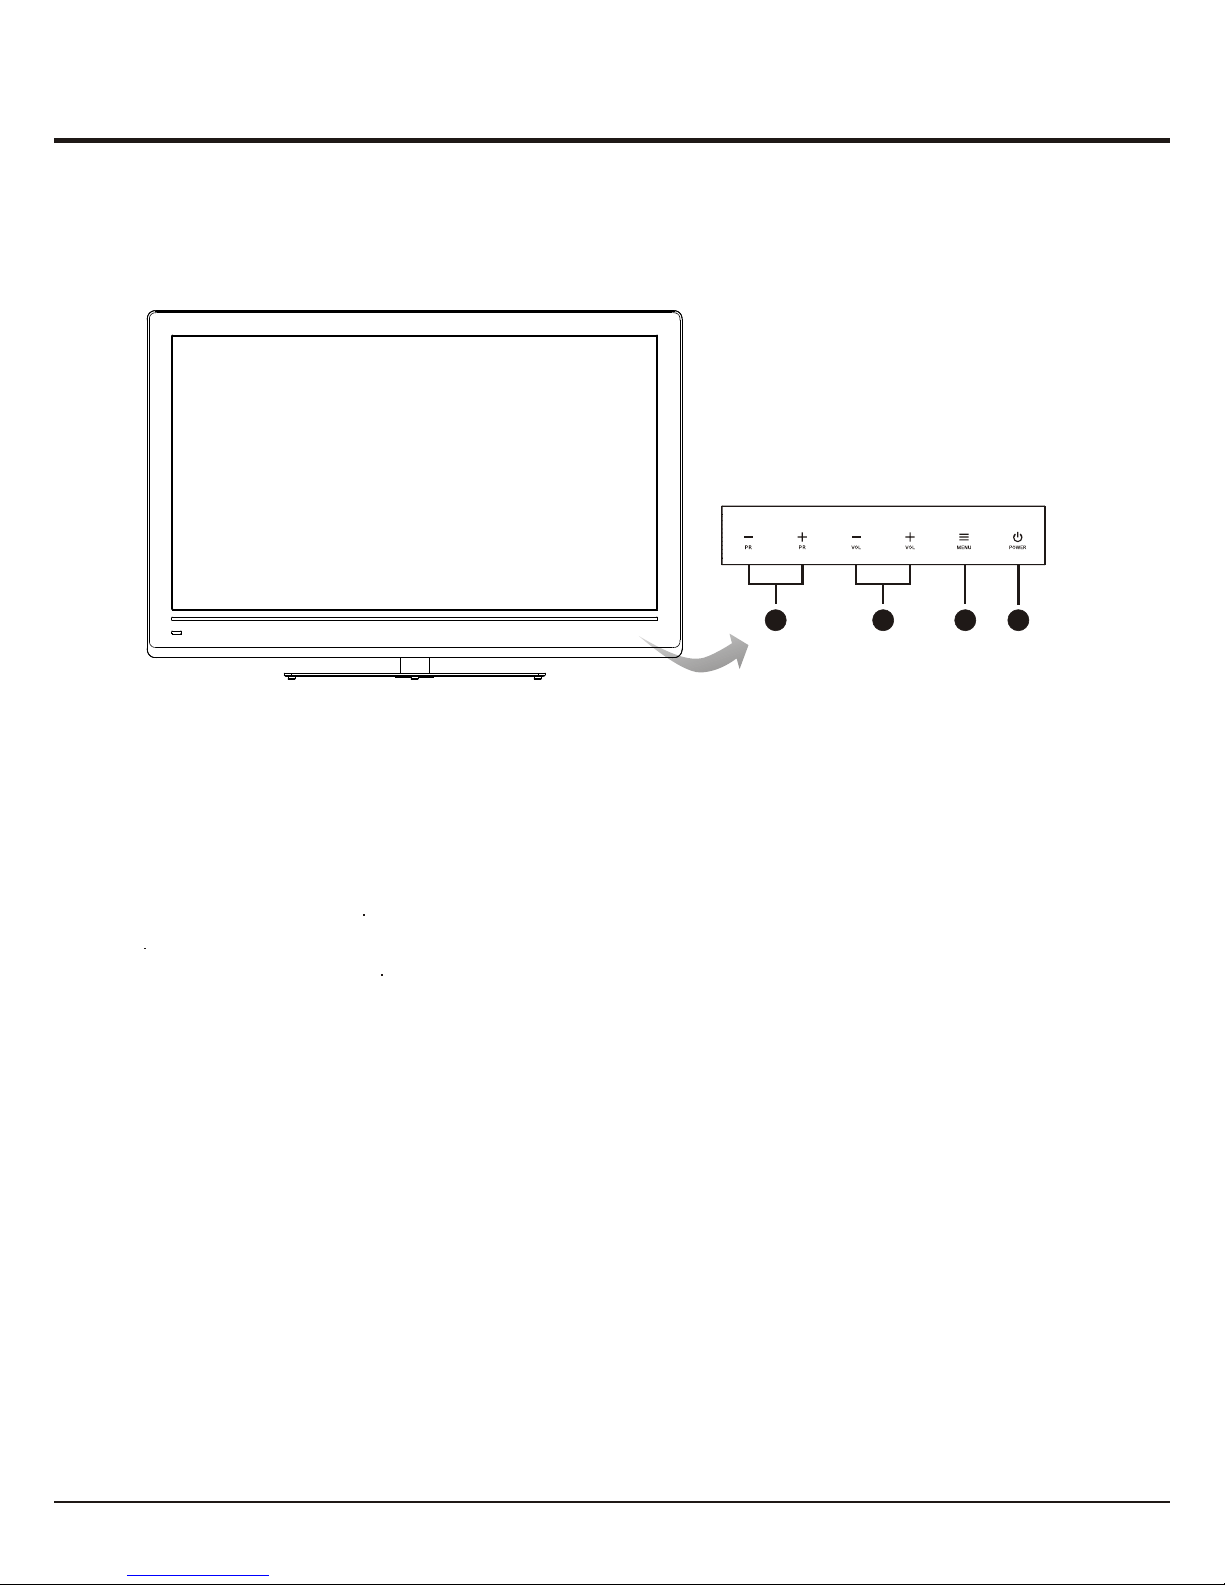
1. PROGRAM DOWN/UP button
Scans down/up through the channel list. In the menu system. PROGRAM DOWN acts like the OK button on the
remote in the main menu, and in other menu, it acts like the left direction button on the remote and adjusts menu;
PROGRAM UP acts like the right direction buttons on the remote and adjust menu controls.
2
MENU button
Brings up the menu system
4. POWER button
Turns the TV on or standby.
. VOLUME DOWN/UP button
Decreases/increases the volume. In the menu system, they act like the down/up direction buttons on the remote
and adjust menu controls
3
Bottom Panel Buttons
Take a certain model for an example:
Note: The location and names of the function buttons and power button on the TV may vary according to TV model.
PR
PR
1
2
3
4
Page 5
Introduction
VGA
SPDIF
ANTENNA IN
CMP
adapter
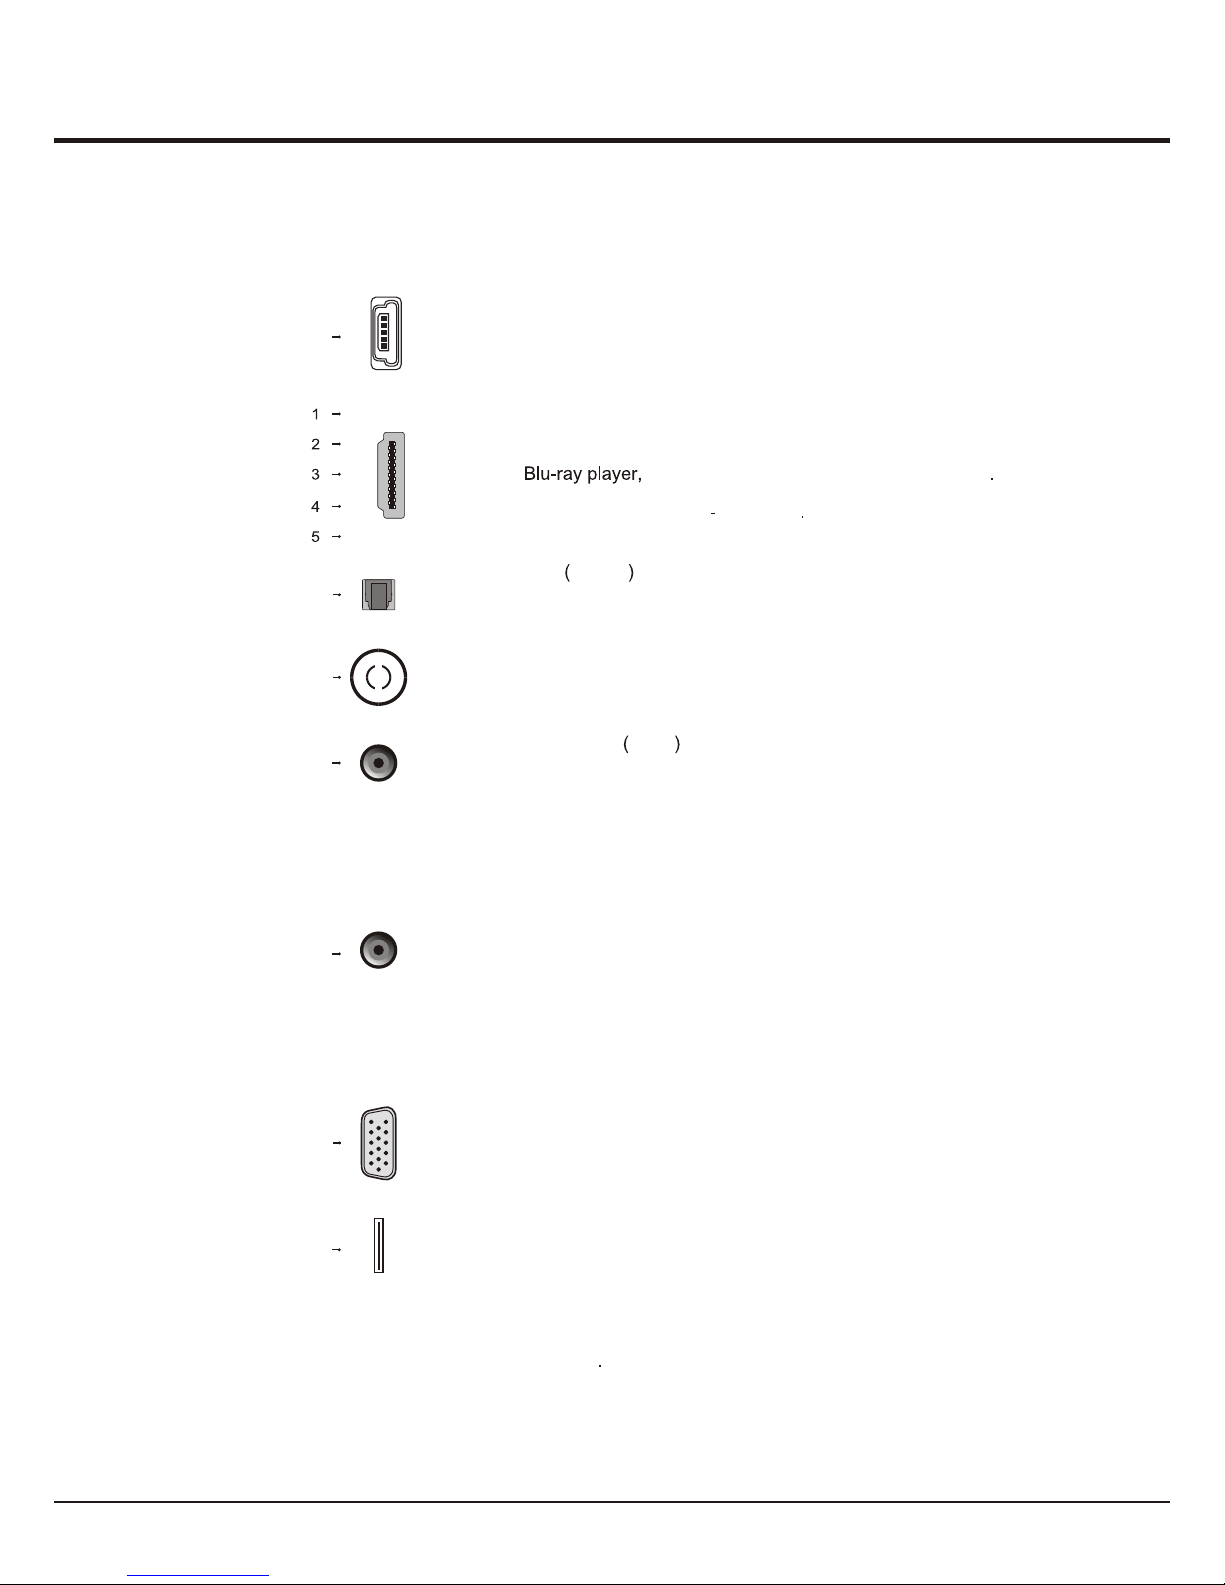
CMP adapter socket input at the side (bottom)
The socket can be used to connect the attached CMP adapter cable with YPBPR
component sockets, then can be used to connect a device that has component
video sockets, such as a DVD player. The component sockets can recognize if
the device you're connecting to is Y Pb Pr compatible or Y Cb Cr compatible.
The component sockets provides excellent picture quality because the video is
separated into three separate parts.
AV adapter (input/output) socket at the side (bottom)
The socket can be used to connect the attached AV adapter cable with VIDEO
and AUDIO L & R IN/OUT sockets, then AV IN sockets can be used to connect
a range of equipment, including video recorders, camcorders, decoders, satellite
receivers, DVD players, or games consoles. The VIDEO IN socket provides
composite video connection; AV OUT sockets can be used to connect a VCR
to record programs You must leave the TV on the same channel you are recording.
The VIDEO OUT socket provides composite video connection.
SPDIF socket output at the side (bottom)
Use a digital cable to connect your TV to a digital amplifier. optical
ANTENNA INsocket (input) at the side (bottom)
This socket can be used to connect to an external antenna.
VGA socket (input) at the side (bottom)
This socket can be used to connect a computer.
5
AUDIO in
adapter
AUDIO in adapter socket (input) at the
W, t
and
And t
side (bottom)
hen using the CMP adapter socket he socket can be used to connect the
attached AUDIO in adapter cable with audio L & R sockets, be used to
obtain sound.
his socket provides audio connection when using the HDMI jack for DVI,
or used to obtain sound when a PC is connected to the VGA socket.
AV
adapter
USB socket (input) at the side (right)
This socket can be used to connect a USB device.
Sockets
Note: The location and names of the sockets on the TV may vary according to
TV model, and not all sockets available on all models.
USB
HDMI1/HDMI2/HDMI3/HDMI4/HDMI5 sockets (input) at the side (right)
The HDMI (High-Definition Multimedia Interface) socket lets you connect a device,
p
such as a with a HDMI output for best picture quality It also
rovides an uncompressed digital connection that carries both video and audio
data by way of an integrated mini plug cable
HDMI
HDMI
HDMI
or
or
HDMI
HDMI
or
or
Note: When connecting the AV adapter cable, please make sure the side with
triangular mark towards outside. And for AV IN or OUT sockets, you can find the
AV IN or AV OUT mark on the big crunode.
Page 6

6
Introduction
Remote Control Functions
Mute
Switches sound off and back again.
(On/Off button) Turns the TV on or standby.
Source Brings up the signal source selection menu.
Picture
Toggles through the picture preset settings: Vivid, Standard, Movie,
Power saver and Personal.
Sound Toggles through the sound modes: Speech, Music, Movies,
Multimedia and Personal.
0-9 (numeric buttons) Enters channel numbers.
Enters a letter, a digit or a symbol in some functions.
Menu Brings up the main menu or press to return to the previous menu.
Exit Exits the menu system.
(up, down direction buttons) Highlights different items in the menu
system and adjusts the menu controls.
OK
When in the menu system, confirms your selection or changes settings.
INFO
Displays the status information of the current program.
PR (PROGRAM UP/DOWN) Scans up or down through the current channel
list and input sources.
(VOLUME UP/DOWN) Increases or decreases the TV's volume.Vol
FAV
Activates the Favorites Program List menu.
Guide
Toggles the Electronic Programme Guide between on and off. Only
available for digital channels.
Return
Returns you to the previous channel.
In USB function, returns to the previous menu.
Subtitle
Toggles between On (to display the subtitle) and Off in DTV mode.
Text
(Purple button) Toggles teletext between on and off.
Coloredbutt ons
(Red/Green/Yellow/Blue) To select tasks and teletext pages.
Starts fast reverse.
Starts fast forward.
Stops playback.
Starts playback.
Pauses playback.
List Displays channel list.
Freeze Freezes the picture.
(Zoom -/+) (left and right direction buttons) Highlights different items in the menu
system and adjusts the menu controls.
Selects the picture format.
TEXT STOP
Holds the displayed page in Teletext.
TEXT
Reveals or hides information if any in Teletext.
TEXT ZOOM
Displays the Teletext page in a different mode.
Toggles USB on or off.
Digital Media
T LINK Not supported for these models.
REC, this function is not available.
USB function buttons
Most of your television's functions are available via the menus that appear on the
screen. The remote control supplied with your set can be used to navigate through
the menus and to configure all the general settings.
Page 7

7
Chapter 2
General Operation
Switching on
Follow the instructions on this page on how to switch on your TV set and the remote
control before going on to following pages describing how to use the channel set-up
procedure.
1. Insert two AAA batteries in the remote control.
Precautions on using batteries:
- Only use the battery types specified.
- Make sure you use the correct polarity.
- Do not mix new and used batteries.
- Do not use rechargeable batteries.
-
- Remove the batteries from the remote control if you are not using it for a long
period of time.
Do not expose batteries to excessive heat such as sunshine, fire or the like,
throw them in a fire, recharge them or try to open them, as this could cause
them to leak or explode.
3. Connect an outside aerial to the ANTENNA IN socket at the back of the TV set.
The aerial socket (75 OHM - VHF / UHF / cable) can be used for connecting
an external aerial or other equipment fitted.
4. When powered on, the TV will be turned on directly.
If the power indicator lights up, the TV set is in standby mode. Press the
button on the remote control or at the bottom of the TV set to turn on the TV.
2. Connect the power cable FIRST to the television, THEN to a mains socket.
Your TV set should only be connected to an AC supply. It must not be connected
to a DC supply. If the plug is detached from the cable, do not, under any
circumstances, connect it to a mains socket, as there is a risk of electric shock.
Note: The figures are for representation only. The location of the power socket at
the back of the television might differ depending on the model.
Switching off
To put the TV set into standby mode, press the button on the remote control
or on the TV, the TV set remains powered up, but with low energy consumption.
To switch off the TV set, unplug the mains socket from the mains outlet.
Page 8

Picture Sound PAP Options
USB Timer Lock Setup
8
General Operation
Initial set-up involves selecting all the settings required to
be able to search for and store all the channels you can
receive. Make sure that the television is switched on and
follow all the steps in turn specified hereafter.
1. Press the up or down direction button to select the Scan
option and press the OK or right direction button to start
the search automatically. All available TV programmes
are stored. This operation takes a few minutes. The
display shows the progress of the search and the number
of programs found.
Note: To prevent the channel setup process from being
interrupted, wait for the message indicating that the setup
is complete.
In this step, you can also select Skip Scan to skip the
initial setup progress. But when you turn the TV on next
time, the Initial setup menu will still appear.
2. During the setup, user can follow the hints available at
the bottom of the screen to return to the last step by
pressing the left direction button. Or press Exit to exit
or interrupt the search halfway.
3. After initial setup is complete, press OK to exit. The
channels are arranged in a preset order. If you wish to
skip channels, modify the preset order or rename
channels, select Setup > Organiser and press the OK
or right direction button to enter.
Initial Set-up
0%
Back
Select
Next
EXIT
Exit
Using Menu System
This section explores the menus of your TV. Each menu
is outlined and detailed to help you get the most from
your TV.
To access the menu system:
1. Press the Menu button to display the main menu.
2. Press the up, down, left, right direction button to select
the desired item, then press the OK button to open the
corresponding submenu.
3. In submenus, use the up or down direction button to
select menu options, use the left or right direction button
to set functions or change values. Use the OK button
to activate a setting. Use the OK or right direction button
to open the corresponding submenu.
4. Press Menu to return to the previous menu or press
Exit to close the menu.
Automatic Channel Set-up
This option allows the TV to search for, find and store all
the available analog and digital channels for the antenna
or cable input selected. Follow all the steps in turn specified
hereafter.
1. Press the Menu button to display the main menu, and
select the Setup > Channel install, then press the OK
or right direction button to enter.
2. Select the Automatic search and press the OK or right
direction button to start the automatic search process.
The search may take a few minutes. During the process,
you can press Menu or Exit to abort halfway.
3. Once the automatic search ends, press the Menu button
to return to the last step or press OK to restart your
channel search.
4. After the automatic search, channels are arranged in a
preset order. You can skip channels, modify the preset
order or rename channels, select Setup >Organiser
and press the OK or right direction button to enter.
Skipping channels: If a channel was stored twice or its
reception is poor, you can simply skip it. The skipped
channels can not be selected by pressing the
PROGRAM UP /DOWN button.
Select the Channel skip option and press the OK or
right direction button to display Channel skip menu
Press the up or down direction button to select a
channel and press the OK button to check the box
Page 9

9
General Operation
Sorting channels swaps two channels’ position
1. Select the Channel sort option and press the OK or
right direction button to display Channel sort menu
2. press the up or down direction button to select a
channel, and press OK to confirm
3. Press the up or down direction button to select your
swapped channel, and press OK to swap the two
channels.
Edit channels: Select the Channel edit option and
press the OK or right direction button to display
Channel edit menu Press the OK button to enter
Then press the number button to edit the channel
When you have finished press Menu to return or press
Exit to close the menu
Automatic Update
This allows you to update all available channels without
altering the sorting of existing channels
1. Display the Channel install menu, press the up or
down direction button to highlight Automatic update
option.
2. Press the OK or right direction button to start to update
the channels. To stop the update process, press the
Menu button.
3. When the search is completed, press Menu to return,
or press OK to restart.
Digital Test Reception
If using digital broadcasts, you can check the signal quality
of digital channels. This allows you to reposition the
antenna for the best reception
Display the Channel install menu press the up or down
direction button to highlight Digital Test reception then
press the OK or right direction button to enter it
1. Use digit keys to manually enter the frequency of the
channel you want to test, then press the OK button to
start the test from the current frequency.
2. If the signal quality is good, press the OK button to store.
If it is poor, please check the frequency, antenna
connection and position, and retest again.
3. Press Menu to return to the previous menu or press
Exit to close the menu.
Analog Manual Installation
1. Display the Channel install menu, press the up or down
direction button to highlight Analog manual installation,
press the OK or right direction button to enter.
2. Press the up/down/left/right direction and number or OK
button to search, fine tune or store the channel.
3. Press Menu to return to the previous menu or press
Exit to close the menu.
Page 10

10
The menus for adjusting the picture are used to obtain
the best picture settings according to your preference,
the type of program you are watching and the ambient
lighting.
Display the main menu by pressing Menu and select
Picture, then press the OK button to confirm. The
Picture options are as below:
Note: Some options may be not available for certain
signal sources.
Picture preset: use the left or right direction button to
scroll through the picture preset settings: Vivid,
Standard, Movie, Power saver and Personal.
Brightness: adjusts the brightness of the picture.
Contrast: adjusts the difference between light and dark
areas of the picture.
Saturation: adjusts the richness of colour.
Sharpness: adjusts the crispness of the edges in the
picture.
Note: This function is not available in VGA mode.
Back light: this option can be used to adjust the
brightness of the back light, depending on room lighting.
Dynamic back light: Auto adjusts the back light,
depending on the detected picture light and shade. Use
the left or right direction button to select On or Off, if On
is selected, the Back light option is not available.
Natural light: auto adjusts the back light, depending on
room lighting. Use the left or right direction button to
select On or Off, if On is selected, the Back light option
is not available.
Color temperature: adjusts the color temperature of
the picture. Use the left or right direction button to scroll
through the color settings: COOL for a more blue palette
of picture colors; NORMAL; and WARM for a more red
Note: Standard is recommended Home Viewing mode,
which confirms to recommendation of MEPS (
. And the energy rating
label is performed in this mode.
Minimum
energy performance standards)
Note: The Dynamic back light option is available only
when the Picture preset is Personal. And in Home mode
(see page 12), When the Dynamic back light is On, or
the value of Back light exceeds the defaulted value in
Standard mode, the TV will not satisfy the MEPS
certification. And when turning on the TV next time, a
prompt will appear.
Note: The Natural light option is available only when
the Picture preset is Personal.
Adjusting the Picture
palette of picture colors.
Note: For some models, the Color temperature option
cannot be available.
Screen mode: Use the left or right direction button to select
the picture size: 4:3 format, cinerama, 14:9 zoom,16:9
zoom, 16:9 zoom up and 16:9 format. (Note: You are
recommended to use the full screen mode. Do not use the
display mode with black bars on both sides
of the picture(such as 4:3) fro long time, otherwise the LED
screen may be damaged permanently.)
Note: In HD mode, 16:9 format, Stretch zoom, Wide
zoom2, Zoom2, Wide zoom and 4:3 format are available.
Auto format: use the left or right direction button to select
On and Off, when On selected, the picture will display the
picture according to HD Signal's format.
Note: Auto format is available only in TV and AV/S-Video
mode.
Noise reduction: Sets the level at which noise is measured
and reduced in the picture.
Motion enhance: This function is used to cancel motion
judder. Select the Motion enhance option, then press the
right direction or OK button to display the Motion enhance
menu. Motion enhance
Effect: Use the left or right direction button set the Motion
enhance effect: Low, Middle, High and Off. (Note: When
Off is selected, the Demo partition and Demo options are
not selectable.)
Demo partition: Use the left or right direction button to
toggle among Left, Right and All.
Demo: This function is used for demo. Press the right
direction or OK button to demonstrate the Motion enhance
effect in selected demo partition.
Note: The Auto format, Noise reduction or Motion
enhance option may appear in the next page of Picture
menu, you can press the up or down direction button to
switch.
Adjusting the Sound
Display the main menu by press the Menu button and select
Sound, then press the OK button to confirm.The Sound
menu appears with the following options:
Sound preset: select a sound type from the list using the
left or right direction button: Speech, Music, Movies,
Multimedia and Personal.
The menu appears with the
following options:
Chapter 3
Advanced Functions
Page 11

Advanced Functions
11
Using the Lock Function
This menu can control the special function for TV
channels.
Note: You must enter your personal code before entering
the Lock menu.
Display the main menu by pressing Menu and select
Lock, then press OK to confirm. Then press the number
button to enter the password to enter the Lock menu.
To display the pictures from different source inputs side
by side. Note that one window is for both analog and
digital TV inputs, the other is for VGA, HDMI and CMP
inputs.
1. Display main menu by pressing Menu. Select PAP and
press OK to confirm.
2. Select the PAP item, and press the left or right direction
button to turn on/off PAP function.
3. When On is selected, select TV position, press the left
or right direction button to reposition the TV window.
Note: Press the left or right direction button to toggle the
focus window. When focus in TV window, digit keys and
PROGRAM UP/DOWN work in TV. When focus in the
other window, PROGRAM UP/DOWN can change
available extension sources.
PAP Function
The factory default code is 0000. And the super
password is 0812. If you forget your code, enter it to
override any existing codes.
The Lock options are as below:
Channel Lock: this option allows you to lock a certain
TV channel. Highlight Channel lock, press the OK or
right direction button to display Channel lock menu. Use
the up or down direction button to select a certain TV
channel you want to lock, then press the OK button to
lock. To unlock, use the same operation.
Parental rating: this option allows you to set a rating to
a program. Highlight Parental rating, press the OK or
right direction button to display Parental rating menu.
Then use the left or right direction button to adjust.
Input lock: this option allows you to lock a certain
external source you want to lock. Press the OK or right
direction button to display Input lock menu, then press
the up or down direction button to select a certain
external source you want to Lock, and press the OK
button to lock. To unlock, use the same operation.
Note: When the current input is locked, you can press
OK and enter the password to enter.
Change password: this option allows you to change the
password. Press the OK or right direction button to enter,
then press the number button to enter the new password
twice.
Clear all: this option allows you to unlock all locked
channels. Press OK to confirm.
Front panel lock: this option allows you to lock the set's
buttons, press the left or right direction button to select
On to lock the set's buttons.
Lock installation: press the left or right direction button
to select On to prevent access to the Installation menu to
prevent any channels from being set up without your
consent.
Max volume: press the left or right direction button to set
the max volume when watching programme.
Balance: use the left or right direction button to balance
the sound between the left and right speakers.
Bass: Decreases or increases the bass of the TV using
the left or right direction button.
Treble: Decreases or increases the treble of the TV
using the left or right direction button.
Note: when adjusting Balance, Bass or Treble, Sound
preset auto switched to Personal.
Wide stereo: use the left or right direction button to
switch On or Off.
Auto volume control turns on this option to keep the
same sound level for all channels
Sound type select a sound type from the list using the
left or right direction button
Page 12

Advanced Functions
12
The Timer menu allows you to set the time zone on your
TV set, to programme an automatic turn-off or wake-up
timer and to view the calendar.
Display main menu by pressing Menu. Select Timer and
press OK to confirm. The Timer options are as below:
Time zone: Use the left or right direction button to select
the local zone.
Daylight saving: Use the left or right direction button to
choose between Off and On modes.
Clock: press the OK or right direction button to display
its options:
Auto-synchronization: use the left or right direction
button to select On or Off. If On selected, the TV will
get the time automatically from DTV signals, and the
Time item cannot be adjusted. If you select Off, you
should set time at Time item. Highlight Time, use the
left or right direction button to select input space, enter
the current time using the digit keys.
Note: If Off selected, the time set in Time option will not
be memorized when turning on the TV next time, and
the TV 's time will start from the default.
Power on timer: use the left or right direction button to
select On or Off. If you select On, you should set a time
period after which the TV automatically switches to on
at Time item. Highlight Time, use the left or right
direction button to select input space, enter the current
time using the digit keys.
Power off timer: use the left or right direction button to
select On or Off. If you select On, you should set a time
period after which the TV automatically switches to off
at Time item. Highlight Time, use the left or right
direction button to select input space, enter the current
time using the digit keys.
Sleep timer: sets a period of time after which the TV set
goes into standby mode. Use the left or right direction
button to set the period (120 minutes maximum). To
disable this function, select Off.
Setting the Timer
Special Functions
Display main menu by pressing MENU. Select Options
and press OK to confirm.
The Options options are as below:
Subtitle: this enables subtitle for digital TV channels.
Select Subtitle option, press the OK or right direction
button to
display the Subtitle menu. And press the left or right
direction button to select On/Off to turn on/off subtitles.
Then press the up or down direction button to select
Subtitle type and use the left or right direction button to
select Normal or Hearing impaired.
SPDIF type: Highlight the SPDIF type option, then press
the left or right direction button to select a proper sound
type from the list for digital programs.
- If the current program outputs sound in AC3 format, then
either PCM or AC3 can be selected.
- If the current program does not output sound in AC3
format, only PCM can be selected. Otherwise no sound
will be output.
- Select Off to turn off the audio output from the audio
device connected to the SPDIF out.
Note: The options you may choose depend on the
program you are watching.
T-Link: To search for CEC devices connected to the HDMI
sockets in your TV and enable one-touch play and onetouch standby between CEC devices, press the left or
right direction button to select On or Off.
Use one-touch play: One-touch play enables you to
press the play button on, for example, your DVD remote
control. This starts playback on your DVD device and
automatically switches your TV to the correct source,
displaying DVD content.
Use System standby: System standby enables you to
press and hold the button on, for example, your TV
remote control. This switches your TV and all connected
HDMI devices on or to standby mode.
Location: Use the left or right direction button to select
Home or Shop mode. Home mode is the default. If Shop
mode selected, the picture will be displayed in Vivid mode,
E-sticker picture will appear on screen. In Shop mode, you
can adjust the picture mode, but when turning on the TV
next time, the Picture preset will restore to Vivid mode,
and a prompt about Shop mode will appear.
Using the Options menu
Page 13

13
Advanced Functions
Reset: This feature enables you to reset the picture and
sound settings to their predefined factory values, but
maintain the channel installation settings. Press OK to
start to reset the TV to factory settings.
Setting Source labels
You can select the accessory devices you have connected
to the external inputs /outputs.
1. Display the main menu by using the Menu button,
select Setup and press OK to enter the Setup menu.
2. Highlight Source labels, and press the OK or right
direction button to display the Source labels menu.
3. Use the up or down direction button to select a
connector your equipment is connected to, then press
the left or right direction button to select the type of
apparatus attached to this convector.
Setup your favourite channels
You can create a list of up to seven of your favourite TV
channels.
1. Select a channel you want to define as your favourite
channel.
2. Press FAV. to display the Favorite list menu.
3. Press the up or down direction button to select a
position, then press OK to select or unselect this
channel as your favourite channel.
4. Repeat this procedure to setup other favourite
Channels.
USB Functions
Your TV is fitted with a USB connector that enables you to
view pictures, listen to music or watch videos stored on a
USB storage device.
Supported file formats:
Picture: JPEG
Music: MP3
Video coding format: H.264/Xvid/MPEG4/MPEG2/MPEG1
When a USB device is detected, it enters the Media
Center menu directly.
Picture
To display pictures if available.
1. Select Media Center > Picture, then press OK to enter
the main file content browser.
2. In the main file content browser, you can press the
red/green key on the remote control to page up/down.
3. Select an inner file folder, press OK to enter a subfile
content browser. User can also press red/green key to
page up/down in the sub browser in the same way as
mentioned above.
4. Select a picture in either main or sub file content
browser, press OK to watch, and a slide show begins
from the selected picture.
5. Press the colour buttons on the remote control to
perform the available functions shown at the bottom
frame.
Music
To playback music if available.
1. Select Media Center > Music, then press OK to enter
the main file content browser.
2. Press the red/green key to page up/down in either main
or sub file content browser in the same way as in
picture display function.
3. Select a song, press OK to play, and an automatic
playback begins from the selected song.
4. Press:
- the colour buttons on the remote control to perform
the available functions shown at the bottom frame.
- REV , PLAY , , STOP or PAUSE
to perform the related functions.
Video
To watch video if available.
1. Select Media Center > Video, then press OK to enter
the main file content browser.
2. Press the red/green key to page up/down in either main
or sub file content browser in the same way as in
picture display function.
3. Select a video, press OK to watch, and an automatic
playback begins from the selected video.
4. Press:
- the colour buttons on the remote control to perform
the available functions shown at the bottom frame.
- REV , PLAY , , STOP or PAUSE
to perform the related functions.
Page 14

14
Chapter 4
Other Information
Troubleshooting
Most problems you encounter with your TV can be
corrected by consulting the following troubleshooting list.
No picture, no sound
1. Check if the fuse or circuit breaker is working.
2. Plug another electrical device into the outlet to make
sure it is working or turned on.
3. Power plug is in a bad contact with the outlet.
4. Check the signal source.
No color
1. Change the color system.
2. Adjust the saturation.
3. Try another channel. Black-white program may be
received.
Remote control does not work
1. Change the batteries.
2. Batteries are not installed correctly.
3. Main power is not connected.
No picture, normal sound
1. Adjust the brightness and contrast.
2. Broadcasting failure may happen.
Normal picture, no sound
1. Press the Vol+ button to increase volume.
2. Volume is set to mute, press the mute button to restore
sound.
3. Change the sound system.
4. Broadcasting failure may happen.
Unorderly ripples on the picture
It is usually caused by local interference, such as cars,
daylight lamps and hair driers. Adjust the antenna to
minimize the interference.
Blank screen in VGA mode
Perhaps the TV can not recognize the resolution set by
the PC. Suggest to change to the best resolution or other
standard resolutions of the Windows system.
Snowy dots and interference
If the antenna is located in the fringe area of a television
signal where the signal is weak, the picture may be marred
by dots. When the signal is extremely weak, it may be
necessary to install a special antenna to improve the
reception.
1. Adjust the position and orientation of the indoor/outdoor
antenna.
2. Check the connection of antenna.
3. Fine tune the channel.
4. Try another channel. Broadcasting failure may happen.
Ignition
Black spots or horizontal streaks appear, or the picture
flutters or drifts. This is usually caused by interference
from car ignition system, neon lamps, electric drills, or
other electrical appliance.
Ghost
Ghosts are caused by the television signal following two
paths. One is the direct path, the other is reflected from
tall buildings, hills, or other objects. Changing the direction
or position of the antenna may improve the reception.
Radio frequency interference
This interference produces moving ripples or diagonal
streaks, and in some case, loss of contrast in the picture.
Find out and remove the radio interference source.
* Design and specifications are subject to change without
notice.
Page 15

Page 16

 Loading...