

Page 1

CDV-300 Quick Operation Manual
!Do not attempt to dismantle your CDV-300 or drop from height; Keep away from water and other liquids; it’s normal that the unit temperature will rise after
prolonged use, particularly on sunny days. Optimal working temperature: -10~55℃, Use only accessories provided by manufacturer; The CDV-300 supports
up to 32GB MicroSD card, please use 8G (class 10) or above.
This version of the User Guide reflects the initial model released, and may not include features appearing on later models with new specifications.
We recommend Datakam software for the best experience. A link to this free software is available at http://neltronics.com.au/downloads-software/
As this is 3rd party freeware software, we do not offer support for this service.
Always ensure that the mounting location is in an area cleaned by your wiper blades, check the view is not obstructed by mirror mounts or wiper blades before
sticking permanently to the windscreen. In most cases the glue on the mount will not damage any window films but this is not guaranteed, installations should
be assumed to be permanent. Additional power cables & mounting docks are available with or without GPS function for additional vehicles.
Do not mount in a position that may impair your view or distract the driver or potentially cause damage in the event of an accident.
If hard wiring the power do not bypass the electronics in the cigarette lighter head or you will damage the device.
Submit your footage
We are always interested in seeing action from your CDV-300 to showcase the quality & benefits of ownership. Please try to preserve the quality of the
footage & host it on a web site such as dropbox (free from www.dropbox.com) & send us the link to marketing@neltronics.com.au & advise if you would
like credit or anonymity for the footage if used in any of our marketing initiatives. YouTube & Facebook compress the footage so linking to the original file is
preferred.
Page 2
2
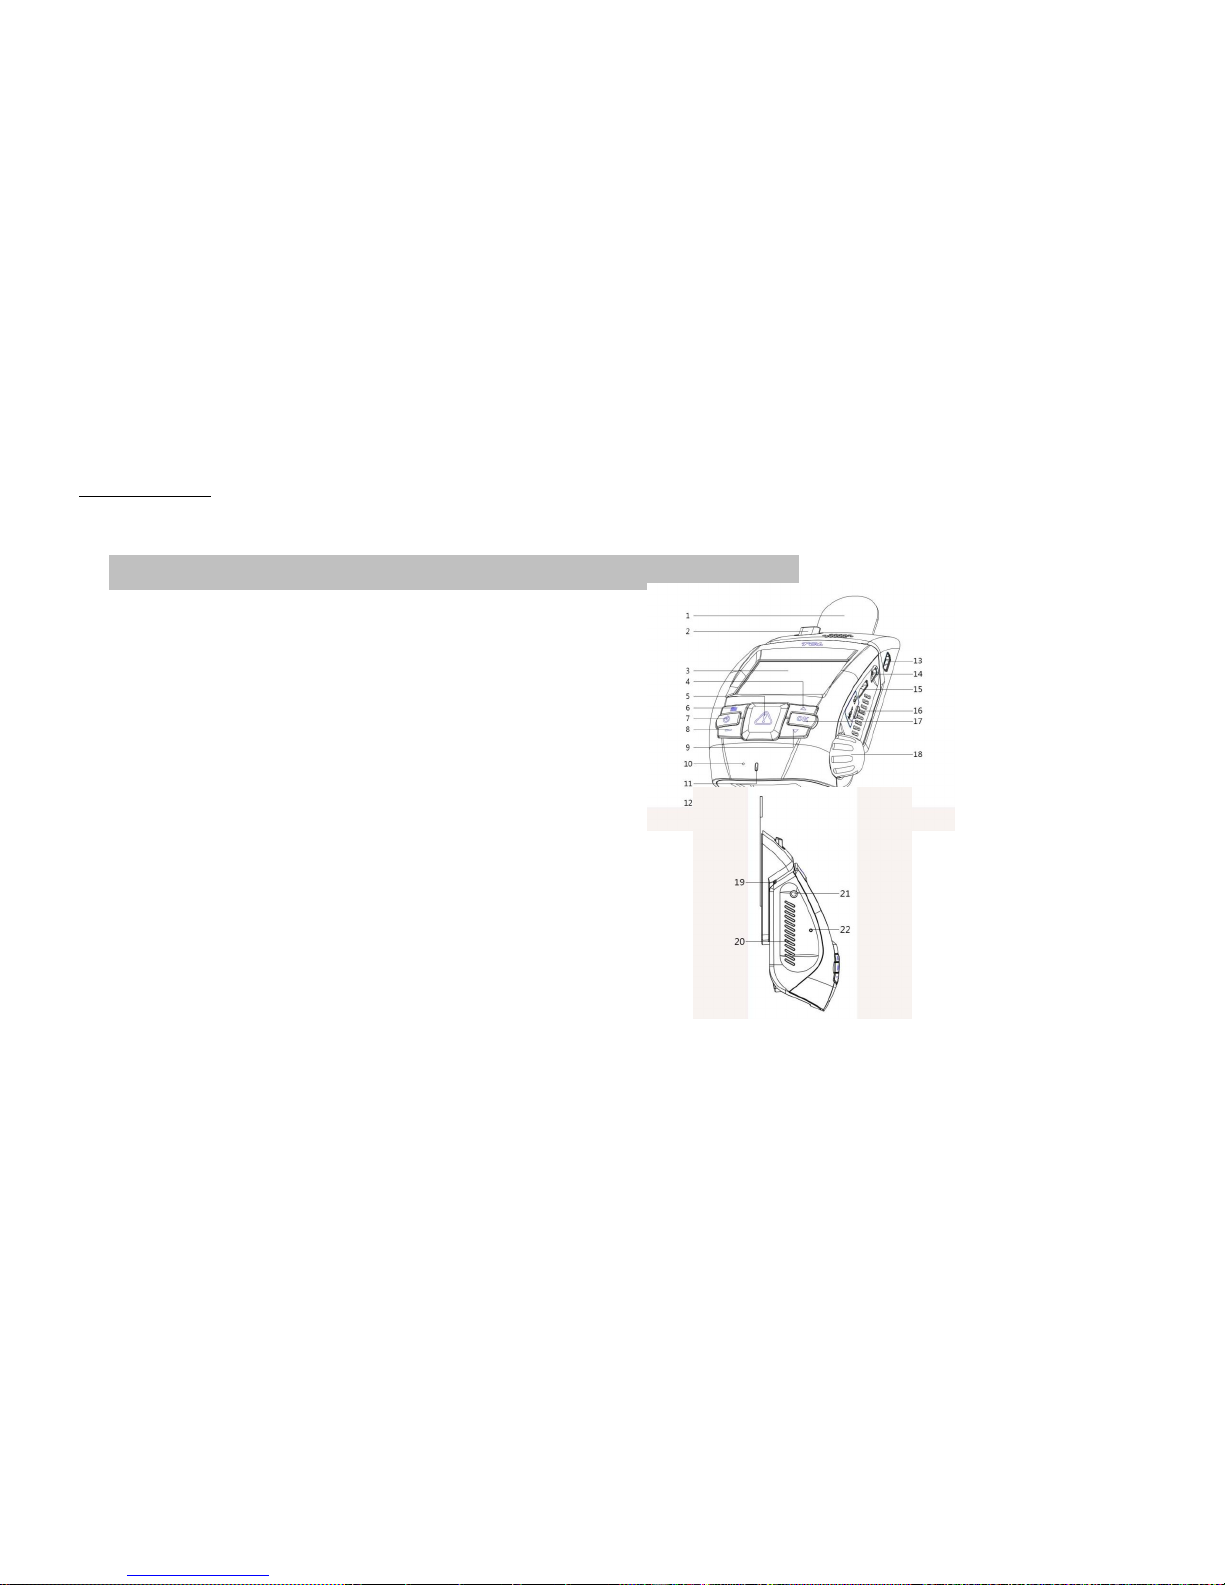
Know your CDV-300
1 Car DVR Parts
1) Car mount sticker
2) Car mount release switch
3) LCD colour display
4) UP Button
5) SOS Button.
6) Menu Button
7) Power Button
8) Mode Button
9) Down Button
10) Microphone
11) Indicator light
12) Lens
13) Car mount USB Interface
14) Car DVR USB Interface
15) HDMI Interface
16) TF Card slot
17) OK button
18) Lens angle adjustment
19) Car mount interface
20) Speaker
21) AV ports
22) Reset button
Page 3
3
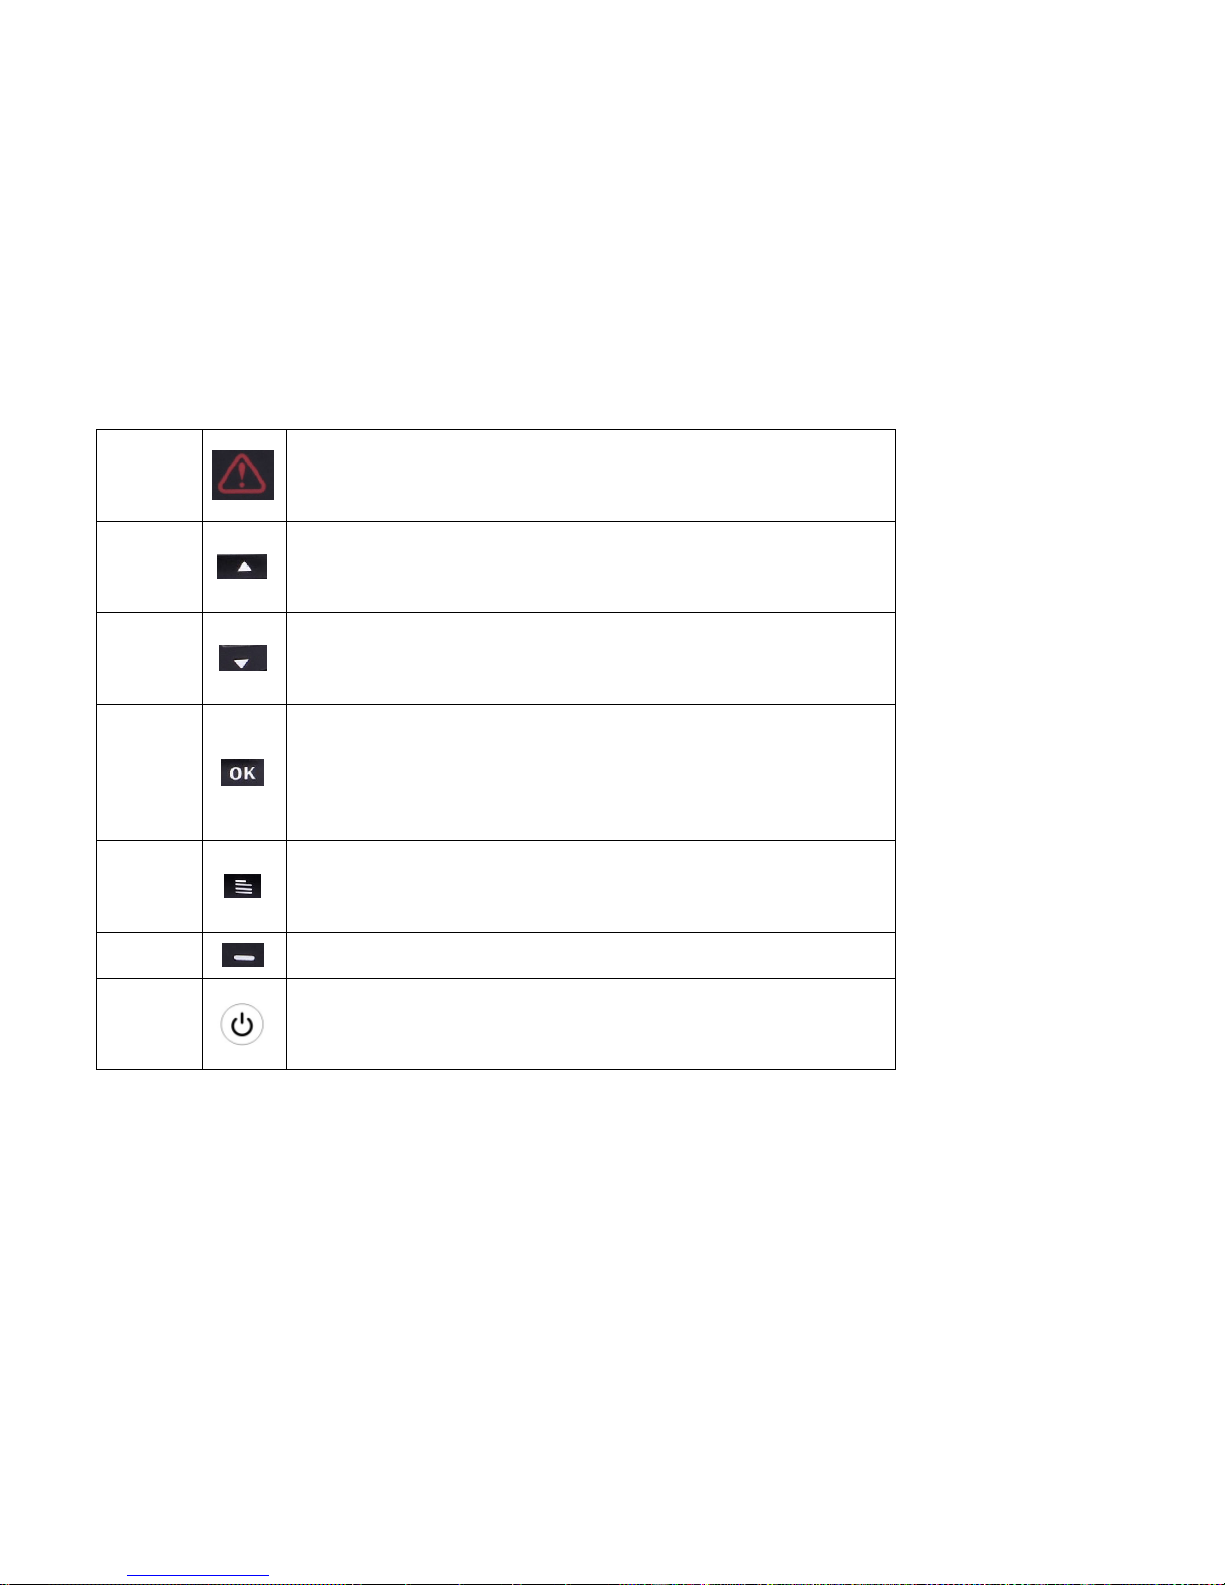
SOS
Short press to protect/unprotect the current and adjacent video files while taking video
(If screen is off, 1 press to wake the screen & 2nd press to save video, 3rd press to unsave)
Up
Mic mute when in recording mode
Scroll when in menus
Down
Parking mode on/off when parking mode is set in the menu (requires live power)
Scroll when in menus
OK
Start/Stop video record or playback
Photo shooting in Photo Mode
Confirm settings in menus
Menu
Enter/Exit menu
Return to previous menu
Mode
Toggles between Video/Time Lapse Shooting/Photo Shooting/Playback mode
Power
Long Press: Device power ON/OFF
Short Press: LCD screen ON/OFF
Page 4

4
3. Battery Charge
1)When docked, press【 】key to turn off the DVR, the indicator light will display red and charging begins.
2)The red indicator will turn off when charge is finished.
NOTE: The internal battery is designed to hold power for a short while during certain modes, it is not intended for portable use of the device.
4. Insert SD Card. – 8~32GB MicroSD Class 10 supported
If you turn on the device without a card, you will see this icon on the left corner display【 】, it will disappear when a card is inserted
5. Power
1) Switch on the device by long press 【 】button or when power is applied from the car cigarette lighter socket.
2) Switch off the Car DVR by Long press【 】above 3 seconds or when power is turned off to the car cigarette lighter socket.
Note: You can set the Delay Power Off time option in the system setting menu.
Page 5

5
Settings
1. Video Settings
Press 【 】button to enter main menu on preview status, select【 option, press【 】button enter into video setting, press【 】/
【 】 button to select setting function, press【 】button to confirm the setting, function setting as follow:
o Full High Definition FHD30 (1920×1080 @30fps)
o High Definition HD30(1280×720 @30fps)、
o WVGA30 (848×480 @30fps)
o Super High Definition - Ultra SHD30(2304×1296 @30fps) – This is the highest resolution setting.
Time-lapse shot interval - you can set one second, 5 seconds, 10 seconds, 30seconds, 1 minute per frame.
Mute – Toggles the microphone ON/OFF in recording mode or video sound on playback.
Time Split – Set the size for each video frame recording to 1, 3 or 5 minutes before starting a new file. OFF will set each file size to 1GB
Record Overwrite:When ON the oldest video files will be overwritten (except saved files) When OFF the recording will end when the card is full.
WDR Image-intensification:Increases video brightness & enhances the image in dark places.
Page 6

6
2. Camera Settings.
Under preview status, press 【 】to enter the main menu, select 【 】 options, press【 】to enter the camera settings, press 【 】/
【 】keys to select the function you want to set, press 【 】to confirm the setting. The following functions can be set:
Photo Resolution: You can set the photo resolution: 16M(4608×3456)、5M(2592×1944)、3M(2048×1536)
Photo quality: set high, medium, and low.
3. System settings:
Under preview status, Press【 】to enter the main menu, select 【 】options, press 【 】to enter the system setup menu, press【 】/
【 】 to select the function you want to set, press 【 】 to confirm the setting. The following functions can be set:
Delay Power Off Time: You can set a delay before the DVR powers off after the key is removed to 3, 10 or 60 seconds. This is useful if you turn your
key on & off frequently or prefer to record yourself leaving the vehicle.
LCD turn off:You can set a delay before the LCD screen powers off to 10, 30 or 60 seconds or never.
Stamp: Choose whether to record the time & date onto the screen.
Page 7

7
G-Sensor sensitivity: Set high, medium, low, and turn off.
G-Sensor calibration: Setting the car DVR initial value of G-Sensor. Note: Park your car on a flat plane in order to ensure accuracy of G-Sensor.
Language settings: You can set the language to simplified Chinese, English, and Russian.
Time Settings: Set your local time using the up/down & OK buttons. Time will display on the footage if selected under Stamp in the menu.
Format: It is recommended that you format any new MicroSD cards in the device before use. Any existing files on the card will be deleted.
Default Setting: Resets all parameters to their initial factory values.
Firmware Version: Shows the firmware release version in the device.
4. Security Settings
Under preview status, Press【 】to enter the main menu, select 【 】options, press 【 】to enter the system setup menu, press【 】/
【 】 to select the function you want to set, press the【 】to confirm the setting, function setting as following:
Playback in password: Sets whether a password is required to enter the playback mode and change the password function, original default
password is: 0000
Fatigue Driving Warning: Set ON to receive a visual & audible driver alert after 4 hours of continuous driving.
Page 8

8
Parking monitor: The parking monitor function requires permanent powering of the device. You can set parking mode ON/OFF. Once this mode is on
video will record at 5 fps unless moving images are detected where the recording frame rate will increase before returning to 5fps after 10 seconds of
no movement.
Low light alert: When set ON the DVR will sound an alert if it senses low light (turn your headlights on)
Using your CDV-300
1. Camera Shot Mode
You can set the camera to shoot time-lapse interval or long shoot videos.
Under preview mode, short press 【 】to switch to camera/time-lapse shooting mode, then press 【 】 to start/stop recording.
2. Photo shooting
Under preview mode, press 【 】to switch to the shoot mode, press 【 】 to take pictures.
3. Playback
In preview mode, press 【 】to switch to playback mode. press【 】/【 】 to select the playback video or photo, Press【 】
Page 9

9
key to enter the playback thumbnail mode. Press【 】/【 】 button to select playback video/photo, press 【 】to start playback, press
【 】key to return to thumbnail playback mode.
4. Playback password settings.
In【security setting】 menu, press【 】/【 】keys to select 【playback password setting】option, press 【 】 key to enter. select
【password setting】 option, Press【 】key to enter, press【 】/【 】key to select number size, press【 】button to confirm the setting.
If you have already set a playback password you can enter password setting or close after you verify the password. If you forgot the password you setting, you
can build a new file in pwd.txt format on TF card root directory. Boot password recovery initial password is “0000”.
5. Mute button
In camera mode, short press【 】 to display【 】 icon, car DVR is on mute status, short press 【 】again to exit mute mode.
6. Playback
In camera mode, short press 【 】, car DVR directly play the final video file.
Page 10

10
7. Emergency recording protection.
When you turn on the G-sensor sensitivity, under rapid acceleration the Emergency Files protection function will auto trigger and protect the related
video file automatically. During video shooting short press【 】button to protect current video files or adjacent files, or long press【 】button to protect
all subsequent video file.
Note: when the video file segments before/after 10 seconds, press 【 】 key to protecting both the front/rear of a video file.
8. Motion detection
Press 【 】 on camera mode, the car DVR will automatically detection when you turn the motion detection, the car DVR will automatically start
video recording when the lens views moving objects. It will automatically stop recording after the objects in the lens view remain static for 10 seconds.
9. Parking Monitoring
When you open the parking monitoring function and the car has a strong vibration, the CDV-300 will automatically turn on and start recording for 1 minute.
Note: This feature requires permanent power to function correctly.
Page 11

11
10. Connecting to your computer
Undock the whole DVR & plug the USB cable to the Car DVR USB port and another terminal connect to computer. The DVR will automatically switch
on and connect to the computer & display【 】icon, the computer displays a removable disk drive, in this mode, you can copy the car DVR file to the
computer.
11. Car DVR connect to TV
Using the specified (HDMI) cable connect the DVR and HDTV. Adjust the TV source to HDMI, power up the DVR to display on the HDTV.
12. Car DVR connect to TV
The AV Port socket (21) is a 2.5” stereo socket. A 2.5” stereo plug to dual RCA adaptor is required for AV out. These are available at most electronics
retailers. The AV connector is not supplied with the device due to low demand.
Page 12

12
13. Car DVR and Base mounting
Remove the gum on the base of the dock tape and paste the base on the window glass. Always ensure that the mounting location is in an area cleaned
by your wiper blades to ensure a clear view. Check the view is not obstructed by mirror mounts or wiper blades before sticking permanently to the windscreen.
In most cases the glue on the mount will not damage any window films but this is not guaranteed therefore installations should be assumed to be permanent.
Additional power cables & mounting docks are available with or without GPS function for additional vehicles from www.shop.neltronics.com.au or from where
you purchased your CDV-300.
Do not mount in a position that may impair your view or distract the driver or potentially cause damage in the event of an accident.
If hard wiring the power do not bypass the electronics in the cigarette lighter head or you will damage the device.
1) Align the DVR’s left and right track with both sides of the base, push up until the DVR locks into place.
2) You can adjust lens angle by pressing & rotating the adjuster on the right hand side of the DVR.
To remove the DVR from the dock press the release button on the top left of the dock & slide the DVR down from the dock.
Distributed in Australia & New Zealand by Neltronics
www.neltronics.com.au
 Loading...