

Page 1
CL多媒体科技控股有限公司
T
制造中心 - 惠州TV工厂 - PE 部
产 品 辅 助设计室(外销订单)
00R
72-I512SI-XAPAA
0D2900A
SI512SP1-AP
0D2900AS
RUSSIA
7-KD290N2P-UR0E
FQ13276O
25
1:1
A5
P S PAPER
0
注:英文在前,俄文在后。
客供俄文,请已业务
签名确认为准。
P
刘牡雄
E
Page 2

LED49D2900S
LED55D2900S
LED40D2900AS
Page 3

Table of Contents
Chapter 1: Introduction
Precautions .........................................................................................................................................
Product .............................................................................................................................................
Power and Plug .................................................................................................................................
Power Cord and Signal Cable ...........................................................................................................
Use Environment ...............................................................................................................................
Cleaning ............................................................................................................................................
Hanging the TV Set on the Wall ........................................................................................................
Important Information
........................................................................................................................
Buttons on the TV
Sockets ................................................................................................................................................
Remote Control Functions .................................................................................................................
Chapter 2: General Operation
Switching on ........................................................................................................................................
Switching off .......................................................................................................................................
First Time Setup
Using Menu System ............................................................................................................................
Auto Scan ............................................................................................................................................
Automatic Update ...............................................................................................................................
Analog Manual Scan
Antenna Manual Installation
Satellite Manual Installation ...............................................................................................................
Cable Manual Installation ...................................................................................................................
Channel Edit.........................................................................................................................................
...............................................................................................................................
..................................................................................................................................
...........................................................................................................................
...............................................................................................................
3
3
3
3
3
3
3
3
4
4
6
7
7
8
8
8
8
9
9
9
9
9
Chapter 3: Advanced Functions
Adjusting the Picture ..........................................................................................................................
Adjusting the Sound ...........................................................................................................................
Selecting a Signal Source... ................................................................................................................
Using the Lock System..
Setup
.....................................................................................................................................................
Time Settings .........................................................................................................................................
USB Functions........................................ ... ... ... ... ... ... ... ... ... ... ... ... .............. ... ... ... ... ... ... ..
PVR. ... ... ... ... ... ... ... ... ... ... ... ... ................. ... ... ... ... ... ... ... ... ... ... ... ... .............. ... ... ... ... ... ... ... .
......................................................................................................................
Chapter 4: Other Information
Troubleshooting ..................................................................................................................................
Base Installation ..................................................................................................................................
2
10
10
11
11
11
12
12
13
15
15
Page 4

Chapter 1
Precautions
Read all of the instructions before operating the set.
Keep these instructions well for future use.
Product
Do not block or cover the ventilation openings on the
back cover.
Do not push objects of any kind into this unit through
the cabinet slots as they could touch current carrying
parts or short-circuit parts, resulting in fire, electric
shock, or damage to the unit.
Do not attempt to open the cabinet
. There are no parts inside you can service by
damage
yourself. Refer all servicing to qualified personnel.
Do not touch the screen surface with fingers as this
may scratch or mark the TV screen.
Do not impact the TV screen with hard pressure as
this may damage the TV screen severely.
The appliance is not intended for use by young children
or infirm persons without supervision. Young children
should be supervised to ensure that they do not play
with the appliance.
Power and Plug
Unplug the set under the following conditions:
- If the set will not be used for a long period of time.
- If the power cord or the power outlet/plug is damaged.
- Follow the instructions to install and adjust the
product. Adjust those controls that are covered in
these operating instructions as improper adjustment
of other controls may result in damage. If this
happens, unplug the set and refer to the service
personnel.
- If the set is subject to impact or has been dropped to
have the cabinet damaged.
Where the mains plug or an appliance coupler is
used as disconnect device, the disconnect device
shall remain readily operable.
Power Cord and Signal Cable
Do not allow anything to rest on or roll over the power
cord and the signal cable.
Protect the power cord and the signal cable from being
trampled.
Do not overload the power cord or the power outlet.
Do not expose the power cord and the signal cable to
moisture.
Use Environment
Do not place the set on an unstable cart, stand, or table.
Place the set on a place that allows good ventilation.
Do not use the set near damp, and cold areas. Protect
the set from overheating.
as this may cause
Introduction
Keep the set away from direct sunlight.
The set shall not be exposed to dripps or splashes
and no objects filled with liquids, such as vases, shall be
placed on the set.
Do not use the set in dusty environments.
Operating Temperature: 5℃ to 45℃(41°F to 113°F)
Operating Humidity: 20% to 80%, non-condensing
Storage Temperature: -15℃ to 45℃(5°F to 113°F)
Storage Humidity: 10% to 90%, non-condensing
Cleaning
Dust the set by wiping the screen and the cabinet with
a soft, clean cloth or some special liquid cleaner.
Do not apply excessive force to the screen when
cleaning.
Do not use water or other chemical cleaners to clean the
screen as this may damage the surface of the TV
screen.
Hanging the TV Set on the Wall
Warning: This operation requires two people.
To ensure a safe installation, observe the following safety
notes:
Check that the wall can support the weight of the TV
set and wall mount assembly.
Follow the mounting instructions provided with the wall
mount.
The TV set must be installed on a vertical wall.
Make sure to use only screws suitable for the material
of the wall.
Make sure that the TV set cables are placed so that
there is not danger of tripping over them.
All other safety instructions about our TV sets are also
applicable here. Wall Mount Bracket not included.
Important Information
If a television is not positioned in a sufficiently stable
location, it can be potentially hazardous due to falling.
Many injuries, particularly to children, can be avoided by
taking simple precautions such as:
Using cabinets or stands recommended by the
manufacturer of the television.
Only using furniture that can safely support the television.
Ensuring the television is not overhanging the edge of
the supporting furniture.
Not placing the television on tall furniture (for example,
cupboards or bookcases) without anchoring both the
furniture and the television to a suitable support.
Not standing the televisions on cloth or other materials
placed between the television and supporting furniture.
Educating children about the dangers of climbing on
furniture to reach the television or its controls.
Note: Graphics contained within this publication
are presentation only.
3
Page 5
Introduction
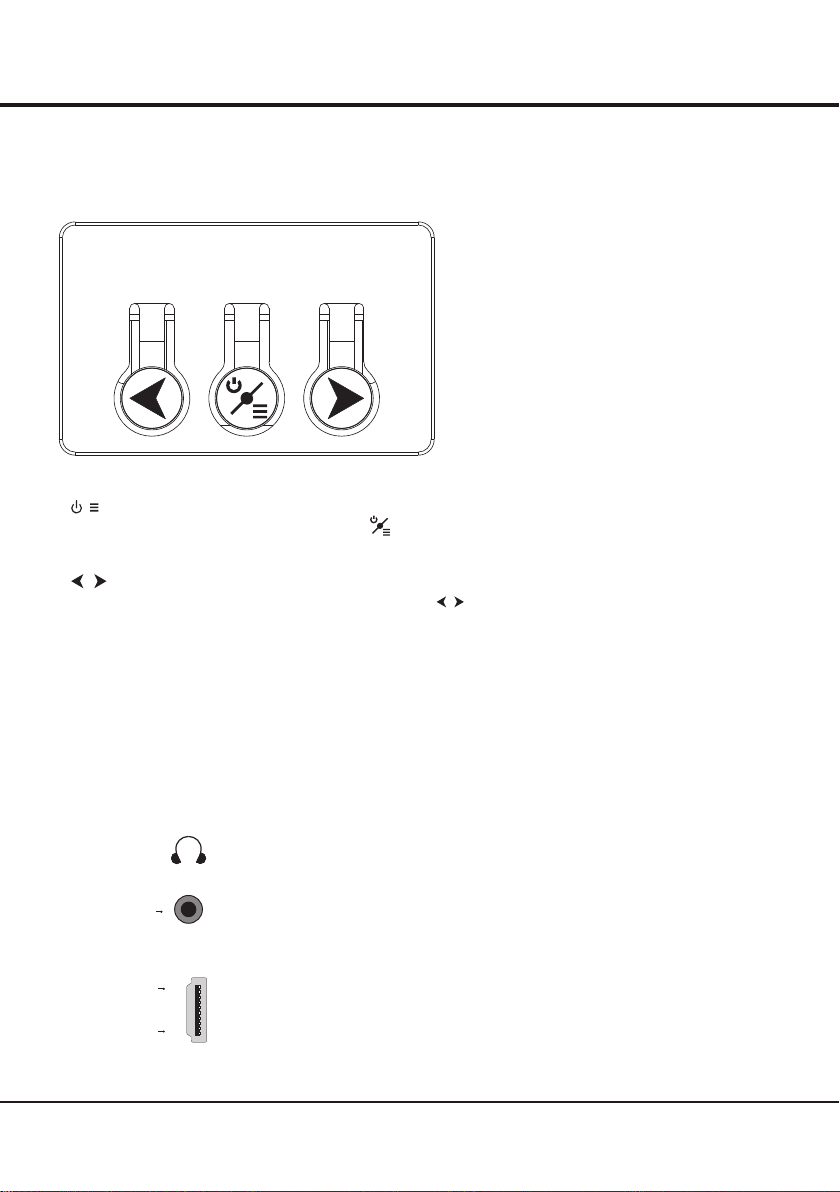
Buttons on the TV
Take a certain model for an example:
1. button /
Turns the TV on or standby. The TV is on, press , brings up function system to select Source, Channel and
Volume. (Only in ATV or DTV mode, Channel can be selected.) , Long press it, TV will be standby.
2
. button
Increases/decreases the volume. In function system, press to select function accordingly.
button
Sockets
SPDIF
HDMI 1
Or
HDMI 2
Note: the location and names of the sockets on the TV may vary according to
TV model, and not all sockets available on all models.
EARPHONE socket (output)
The EARPHONE socket can be used to connect a compatible audio receiver.
SPDIF socket (output)
The SPDIF socket can be used to connect a compatible digital audio receiver.
HDMI 1 or HDMI 2 socket (input)
The HDMI can be used to connect a
blu ray, PC with a compatible video card installed, certain DVD players or a
high-definition compatible digital satellite decoder. This socket p
uncompressed digital connection that carries both video and audio data by way of
an integrated mini-plug cable.
(High-Definition Multimedia Interface) socket
rovides an
4
Page 6
Introduction
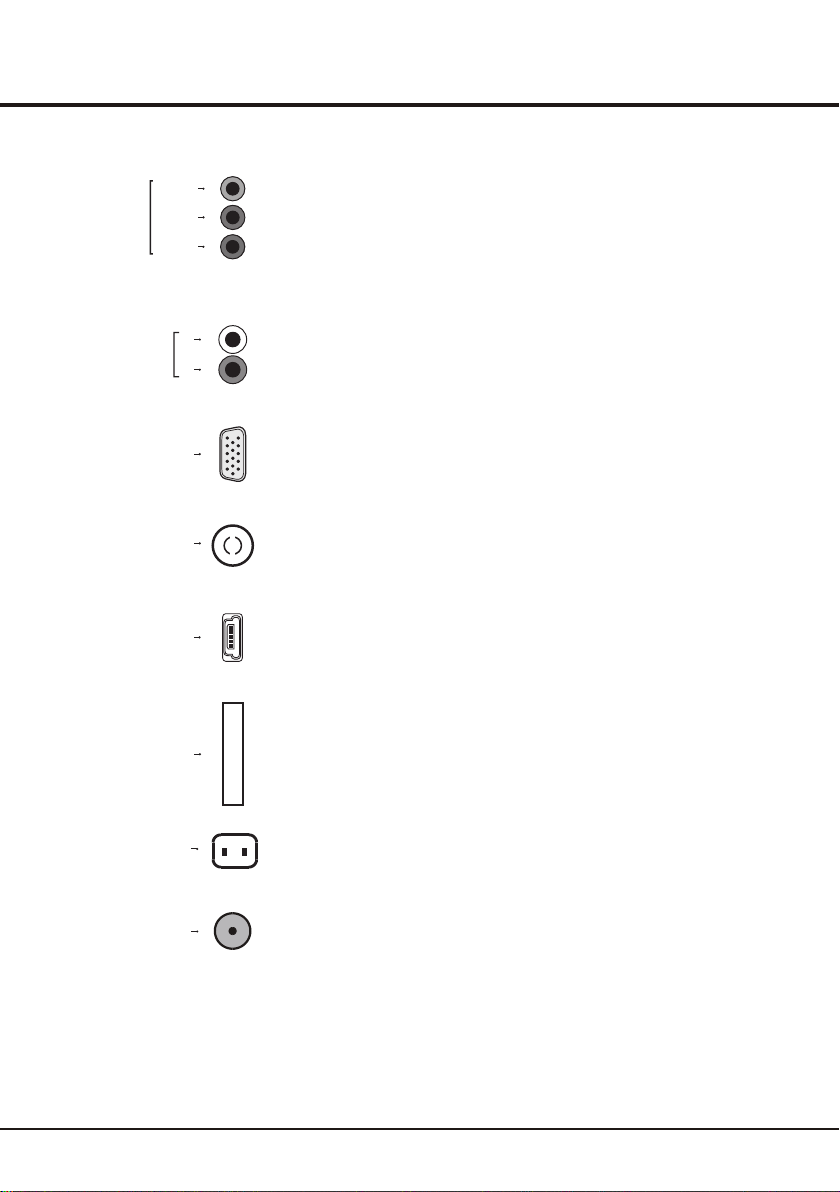
AV/COMPONENT
IN
PC/AV/COMPONENT
AUDIO IN
ANTENNA IN
Y/VIDEO
Pb/Cb
Pr/Cr
VGA
USB
C I
YPbPr/VIDEO component sockets (input)
These Y/VIDEO sockets can be used to connect a device that has component video
sockets, such as a DVD player. The component sockets can recognize if the device
you're connecting to is Y Pb Pr compatible or Y Cb Cr compatible. The component
sockets provide excellent picture quality because the video is separated into three
separate parts.
L
R
PC/ COMPONENT AV/ AUDIO IN
These AUDIO IN L & R sockets can be used to connect a range of equipment,
including video recorders, camcorders, satellite receivers, DVD players, or games
consoles. AUDIO IN sockets are shared by AV, VGA and YPbPr sockets.
VGA socket (input)
This socket can be used to connect a computer.
Note: The VGA is same as the PC .
ANTENNA IN socket (input)
This socket can be used to connect the outside aerial or cable network.
USB socket (input)
These sockets can be used to connect an USB 2.0 device.
Note: the number of USB sockets on the TV may vary according to TV model.
CI socket
This CI socket can be used to put the CI card in to accept the locked programs .
AC IN~
SATELLITE IN
AC In socket (input)
This socket can be used to connect a . AC supply
SATELLITE IN socket (input)
This socket can be used to connect the satellite receiver pot.
5
Page 7
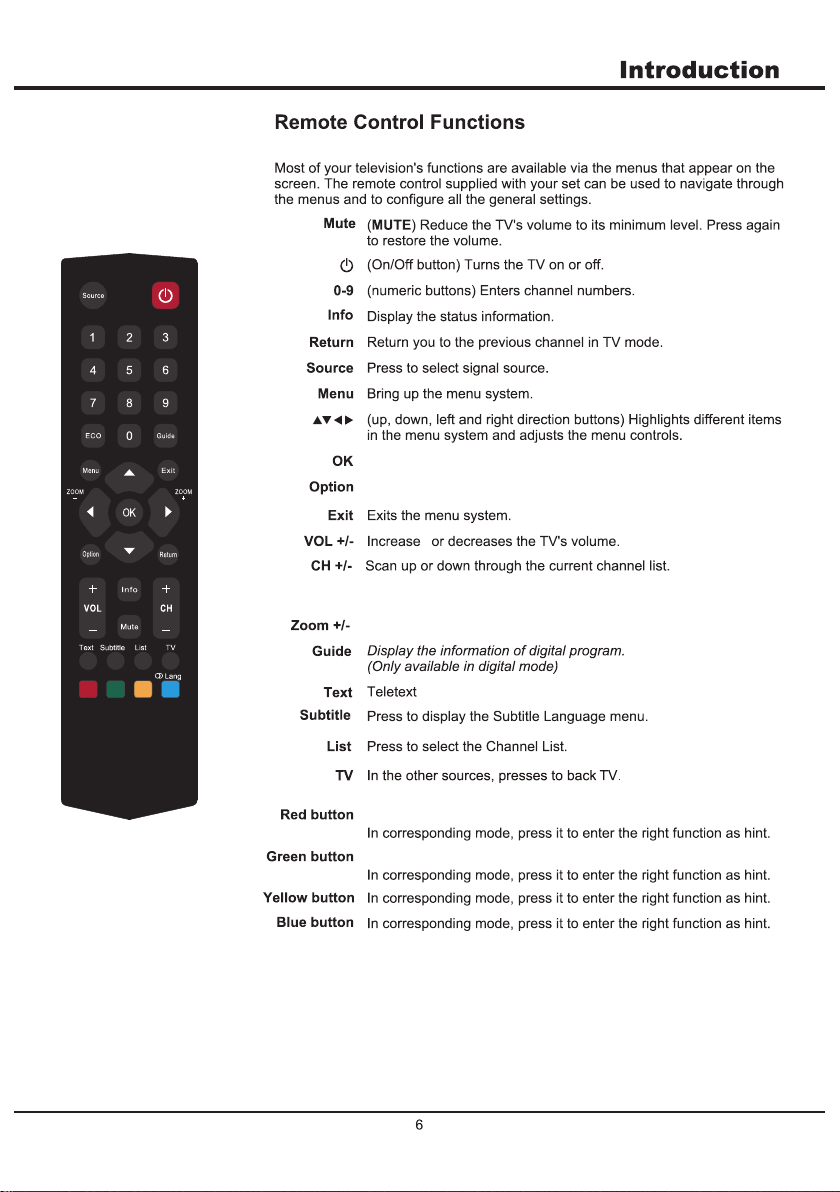
To open th e co rresp on din g su bmenu a nd a cti va te a sett in g menus .
Ente rs t he PVR Se tt ing s.
s
Pres s to e nter Tim e Sh ift m en u. (onl y av ail ab le i n DTV m od e)
ECO
No Fun ct ion
Pres s to s tart PV R di rec tl y.
Pres s to s top PVR .
NOTES
1、Do not mix old and new batteries or different types.
2、When the batteries are to be exhausted, the leakage may occur
and cause the damage to the remote.
3、If the device is not to be used for a long period of time, remove the
batteries to avoid battery leakage.
4、WARNING:The batteries shall not be exposed to excessive heat
such as sunshine, fire or the like.
Page 8

Chapter 2
General Operation
Switching on
Follow the instructions on this page on how to switch on your TV set and the remote
control before going on to following pages describing how to use the channel set-up
procedure.
1. Insert two AAA batteries in the remote control.
Precautions on using batteries:
- Only use the battery types specified.
- Make sure you use the correct polarity.
- Do not mix new and used batteries.
- Do not use rechargeable batteries.
-
Do not expose batteries to excessive heat such as sunshine, fire or the like,
throw them in a fire, recharge them or try to open them, as this could cause
them to leak or explode.
- Remove the batteries from the remote control if you are not using it for a long
period of time.
2. Connect the power cable FIRST to the television, THEN to a mains socket.
Your TV set should only be connected to an AC supply. It must not be connected
to a DC supply. If the plug is detached from the cable, do not, under any
circumstances, connect it to a mains socket, as there is a risk of electric shock.
Note: the figures are for representation only. The location of the power socket at
the back of the television might differ depending on the model.
3. Connect an outside aerial to the ANTENNA IN or SATELLITE IN socket at the back
of the TV set.
The aerial socket (75 OHM - VHF / UHF / cable) can be used for connecting
an external aerial or other equipment fitted.
4. When powered on, the TV will be turned on directly or be in standby mode.
If the TV set is in standby mode, press the button on the remote control or
on the TV set to turn on the TV.
Switching off
To put the TV set into standby mode, press the button on the remote control
or on the TV, the TV set remains powered up, but with low energy consumption.
To switch off the TV set, unplug the mains socket from the mains outlet.
7
Page 9
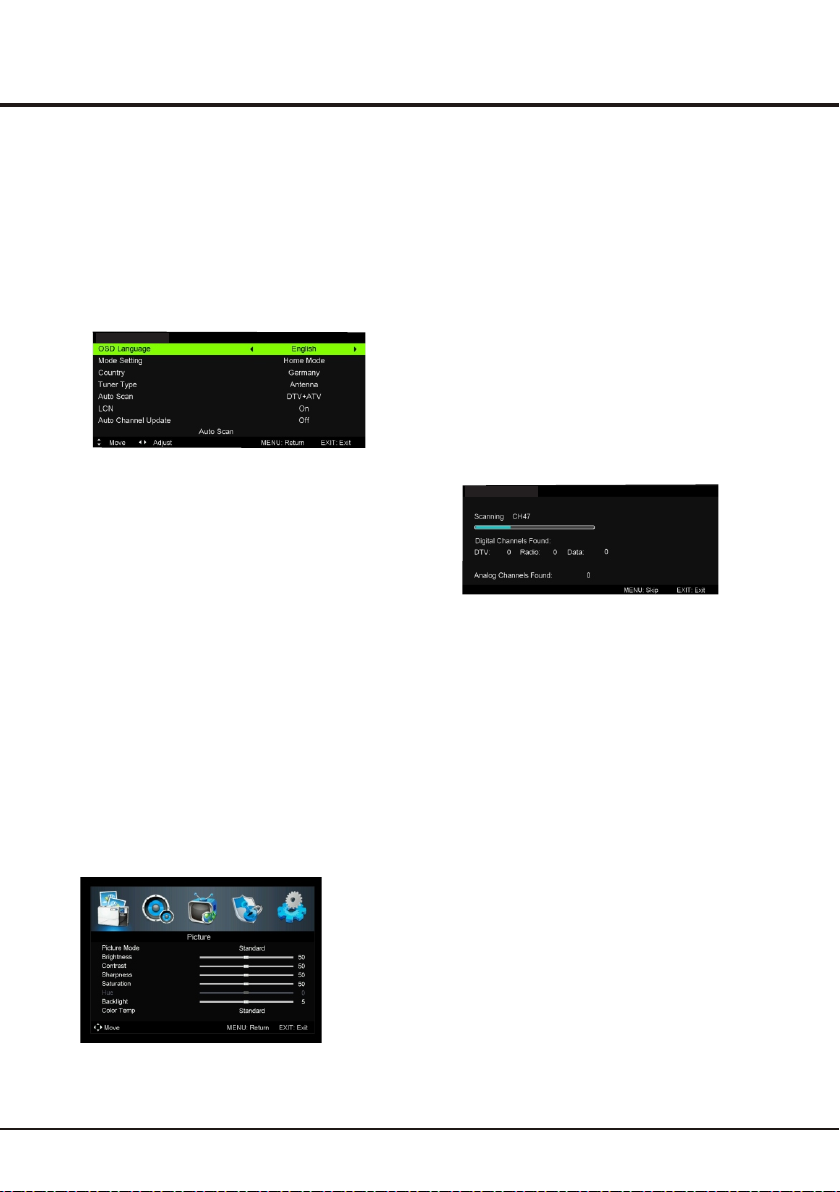
First Time Setup
First Time Setup involves selecting all the settings
required to be able to search for and store all the
channels you can receive. Make sure that the television
is switched on and follow all the steps in turn specified
hereafter.
The first time you switch the set on, the First Time Setup
wizard opens, which guides you through the initial setup
process.
First Time Setup
Press the up or down direction button to select Auto
Scan and press the OK or right direction button to
start the search automatically. All available TV
programmes are stored. This operation takes a few
minutes. The display shows the progress of the search
and the number of programs found.
Note: to prevent the channel setup process from being
interrupted, wait for the message indicating that the
setup is completed.
In this step, you can also select Exit to skip the
channel search progress. But when you turn the TV on
next time, the prompt on the screen will remind you to
do the channel scan first.
Note: the Store mode does not satisfy the MEPS
certification, suggest selecting Home.
Using Menu System
This section explores the menus of your TV. Each menu
is outlined and detailed to help you get the most from
your TV.
Hue
To access the menu system:
1. Press the Menu button to display the main menu.
General Operation
2. Press the left or right direction buttons to select the
desired item, then press the OK button to open the
corresponding submenu.
3. In submenus, use the up or down direction button to
select menu options, use the left or right direction button
to set functions or change values. Use the OK button
to activate a setting. Use the OK or right direction button
to open the corresponding submenu.
4. Press Menu to return to the previous menu or press
Exit to close the menu.
Auto Scan
This option allows the TV to search for, find and store all
the available analog and digital channels.
Follow all the steps in turn specified hereafter.
Auto Scan
1.
Press the Menu button to display the main menu, and
select Channel>Tuner Type(Satellite, Antenna, Cable),
then press the left or right direction button to select the
tuner type.
2.Select Auto Scan, then press the OK or right
direction button to enter.
3. Select DTV & ATV (or DTV or ATV),
then press the up/down direction button to highlight the
Start, press the OK or right direction button to start the
automatic search process.
The search may take a few minutes. During the
process, you can press Menu or Exit to abort halfway.
Automatic Update
This allows you to update all available channels, without
altering the sorting of existing channels. (only available in
DTV mode)
1. Display the Channel menu, press the up or
down direction button to highlight Auto Channel
Update option.
2. Press the left or right direction button to select On/Off
to update the channel.
8
Page 10
Analog Manual Scan
1.
Display the Channel menu, press the up or down
direction button to highlight manual scan, press the
OK or right direction button to enter. Then press the
up or down direction button to highlight Analog
Manual scan. Press the OK or right direction button
to enter.
2. Press the up/down/left/right direction and number
button to set, then press the up or down direction
button to highlight Start. Press the OK or right
direction button to search.
3. Press Menu to return to the previous menu or press
Exit to close the menu.
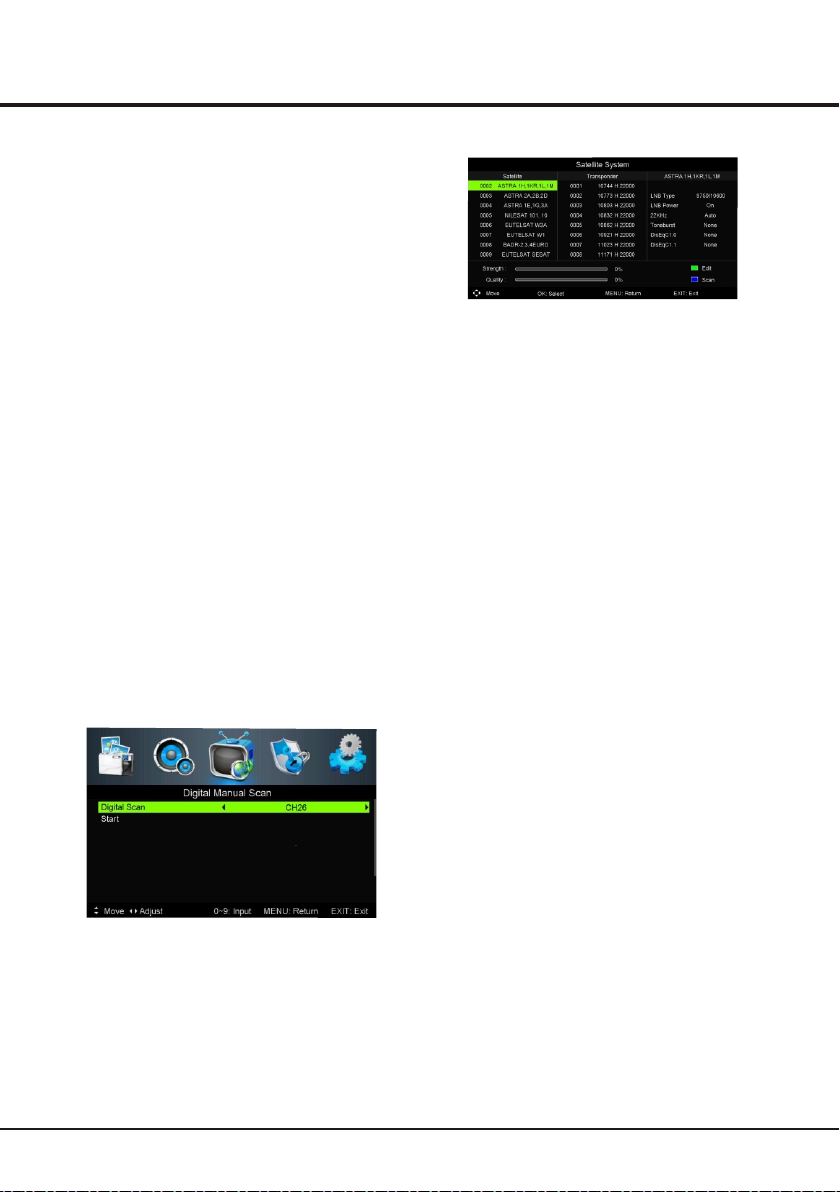
Antenna Manual Installation
Allows you to start manual searching the available
channels from the current frequency or any frequency
you input.(Only for digital channels)
1. Display the Channel menu, press the up or down
direction button to highlight Manual Scan, press the
OK or right direction button to enter. Press the up or
down direction button to highlight Digital Manual
Scan, press the OK or right direction button to enter.
2. Press the left or right direction button to select the
frequency or use the digit key to input a channel,
then highlight Start, press OK or right direction
button to search.
3. When the search is completed, press Menu to return.
Freq uency
Stre ngth
514. 00MHz
0
Satellite Manual Installation
1. Display the Channel menu, press the up or down
direction button to highlight Tuner Type, press the
left or right direction button to select Satellite.
2. Press the up or down direction button to highlight
Satellite System, press the OK or right direction
button to enter. First select a satellite, then press
the right direction button to enter.
General Operation
3. Press the up or down direction button to highlight the
trasponder, press OK to select it. Then press the blue
button and press OK to search.
4. Allows you to add/edit/delete or a transponder below the
note on the OSD.
Common interface: press the right direction button
to select CI card.
Signal Information on DTV channels
1. Select Channel > Signal Information.
2. Press the OK or right direction button to display some
signal information on current digital channel, such as
signal strength, Freq.(MHz), etc..
Cable Manual Installation
1. Display the Channel menu, press the up or down
direction button to highlight Tuner Type, press the
left or right direction button to select Cable.
2. Press the up or down direction button to highlight Manual
Scan, press the OK or right direction button to enter. Press
the up or down direction button to highlight Digital Manual
Scan, press the OK or right direction button to enter.
3. Use the digit key to input a frequency, then highlight Start,
press OK or right direction button to search. When the
search is completed, press Menu to return.
Channel Edit
After the automatic search, channels are arranged in a
preset order. You can skip channels, modify the preset
order and delete channels.
Skip channels: if a channel was stored twice or
its reception is poor, you can simply skip it. The
skipped channels can not be selected by pressing the
PROGRAM UP /DOWN button.
Display the Channel menu, press the up or down
direction button to highlight Channel Edit.
press the OK or right direction button to enter.
Press the up or down direction button to select a
channel and press the green button to skip.
Delete Channels: Press the up or down direction
button to highlight a channel, then press red button
to delete.
9
Page 11

Chapter 3
Advanced Functions
Move Channels: Press the up or down direction
button to highlight a channel, then press blue button
to select it, press the up or down direction button to
move.
Rename Channels: (only in ATV) Press the up or
down direction button to highlight a channel, then
press yellow button to enter. Press the red button to
clear the channel’s name. Then press the up/down/
left/right direction button to highlight the letter, then
press OK to enter.
Adjusting the Picture
The menus for adjusting the picture are used to obtain
the best picture settings according to your preference,
the type of program you are watching and the ambient
lighting.
Display the main menu by pressing Menu and select
Picture, then press the OK button to confirm. The
Picture options are as below:
Note: some options may be not available for certain
signal sources.
Hue
Picture Mode: uses the left or right direction button to
scroll through the picture preset settings: Standard,
Dynamic, Mild, Personal.
Brightness: adjusts the brightness of the picture.
Contrast: adjusts the difference between light and
dark areas of the picture.
Saturation: adjusts the richness of colour.
Sharpness: adjusts the crispness of the edges in the
picture.
Backlight: Users adjust the backlight according to
their own preferences manually , it can adjust the
overall image and grey, does not affect the contrast.
Color Temp: adjusts the color temperature of the
picture. Use the left or right direction button to scroll
through the color settings: Cool for a more blue palette
of picture colors, Standard, and Warm for a more red
palette of picture colors.
Aspect Ratio: uses the left or right direction button to
select the picture size. (Note: You are recommended
to use the full screen mode. Do not use the display
mode with black bars on both sides of the picture (such as
4:3) for long time, otherwise the TV screen may be
damaged permanently.)
Advanced Settings: press the OK or right direction button
to display its submenu.
NR(noise reduction): this setting reduces picture
“static”or any type of interference. This feature is
especially useful for providing a clearer picture in
weak analog signal conditions. Press the left or right
direction button to choose between these options:
Off/Weak/Medium/Strong.
Dynamic Contrast: turns on this option to adjust the
contrast automatically.
button to choose between these options: On/Off.
Note: some options may appear in the next page of
Picture menu, you can press the up or down direction
button to switch.
Press the left or right direction
Adjusting the Sound
Display the main menu by press the Menu button and select
Sound, then press the OK button to confirm. The Sound
menu appears with the following options:
Sound Mode:
- Sound Mode: use the left or right direction button to
select a sound type from the list: Standard, Movie,
Music and Personal.
- Treble and Bass: use the left or right direction
button to adjust the level.
Balance: use the left or right direction button to balance the
sound between the left or right speakers.
Audio Description(only available in DTV mode): Press
the OK or right direction button to display its submenus:
Mode: Press the left or right direction button to set
-
ON/OFF mode.
Volume: Press the left or right direction button to adjust
-
the volume.
Surround Sound: use the left or right direction button to
switch On or Off.
EQ Setting: Highlight the EQ Setting then press OK or right
direction button to enter.
10
Page 12

EQ mode: Off/Pop/Rock/User/Jazz can also use the
left or right direction button to adjust the level of every
frequency.
SPDIF: Use the left or right direction button to select a
format for SPDIF output.
Sound type(only available in DTV mode): use the left
or right direction button to select a sound type from the
list.
AVL : select On mode to reduce the annoying blasts in
volume during commercial breaks and also amplifies
softer sounds in program material. Eliminates the need
to constantly adjust the volume.
Note: the options offered depend on the program you
are watching.
Selecting a Signal Source
Pres s So urce bu tt on on t he r emote c on tro l to
ente r So urce me nu d ire ct ly.
1.Pr es s the up or d ow n dir ec tion bu tt on to s el ec t
your d es ired so ur ce.
No te : Th e avail ab le so ur ce migh t di ffe r
depe nd ing on th e mo del .
2. Pre ss t he OK b ut to n to co nf irm the s el ect io n.
Advanced Functions
Ente r Passw ord --Enab le On
Chan nel Loc ks
Pare ntal Ra ting 5+
Lock K eypad O ff
New Pa sswor d ---Clea r Lock
The Lock options are as below:
Channel Locks: this option allows you to lock a certain
TV channel. Highlight Channel locks, press the OK or
right direction button to display Channel lock menu.
Use the up or down direction button to select a certain
TV channel you want to lock, then press the OK button
to lock. To unlock, use the same operation.
Parental Rating: this option allows you to set a rating
to a program. Highlight Parental rating. Then use the
left or right direction button to adjust.
Lock Keypad: this option allows you to lock the set's
buttons, press the left or right direction button to select
On to lock the set's buttons.
New Password: this option allows you to change the
password. Press the number button to input the new
password twice to set the new password.
Clear Lock: this option allows you to initialize the Lock
System. Press OK or right direction button to initialize
the Lock System.
Lock S ystem
YPbP r
Using the Lock System
This menu can control the special function for TV
channels.
Note: you must enter the password before Entering the
Lock menu.
Display the main menu by pressing Menu and select
Lock System, then press OK to confirm. Then press
the number button to enter the password to enter the
Lock menu. The factory default code is 0000. And the
super password is 8899. If you forget your code, enter
it to override any existing codes.
Setup
OSD La nguag e
Audi o Langu age
Subt ilte
Telete xt
Blue S creen O ff
Mode S ettin g Home Mo de
Time Se tting s
PVR Se tting s
OSD Language: Use the left or right direction to select the
OSD Language.
Audio Languages: use the ok or right direction to enter.
11
Engl ish
Page 13

Advanced Functions
Time Settings
The Setup
your TV set, to program an automatic turn-off timer.
Display main menu by pressing Menu. Select Setup
and press OK to confirm. The Time Settings options
are as below:
OSD Timer: Use the left or right direction button to
select the OSD time.
Sleep Timer: sets a period of time after which the TV
set goes into standby mode. Use the left or right
direction button to set the period (240 minutes
maximum). To disable this function, select Off.
Auto Sleep:
to select the auto standby time.
Time Zone: use the up or down direction button to
select the local time zone.
Time: press the OK or right direction button to
display its options:
Auto Sync: use the left or right direction
to select On or Off. If On selected, the TV will get
the time automatically from DTV signals, and the
Time item cannot be adjusted. If you select Off, you
should set date and time. Highlight Date or Time,
press OK to enter, then use the left/right/up/down
direction button to adjust the time and date.
Power Off Timer: Use the left or right direction
direction button to adjust the time and date.
Subtitle: this enables subtitle for digital TV
Mode: press the left or right direction button
to turn On or Off the subtitles.
menu allows you to set the time zone on
Presses the left or right direction button
button to select On or Off. If you select On, highlight
Time, press OK to enter, use the left or right direction
to select input space, then use the up or down
channels. Select Subtitle option, press the OK or
right direction button to display its submenus:
Subtitle Primary Language and Subtitle Secondary
Language: press the left or right direction button to
select a subtitle type. You can select Hearing Impaired
to display the hearing impaired subtitle with your
selected language.
Mode Setting: use the left or right direction button to
select Home or Store mode. Home mode is the default.
In Store mode, you can adjust the picture mode.
Teletext: press the OK or right direction button to
enter and select the Digital Teletext Language.
Decoding page language: Select a proper type of
language in which Teletext will display.
Reset
To Allow you to reset the TV to factory default settings.
1. Select Setup, then press OK to confirm.
2. Select Reset or press OK or the right direction button to
enter.
3. Press the left or right direction button to select YES or
NO.
Note: Select YES, the TV will reset. Select No, TV
will return to the previous menu.
Blue Screen
Press the left or right direction button to select On or Off.
First Time Setup
Press OK or right direction button to enter.
USB Functions
Your TV is fitted with a USB connector that enables you to
view photos, listen to music or watch videos stored on a
USB storage device.
Supported file formats:
Picture: JPEG
Music: Mp3
Movie: AVC, H.264, MPEG 1/2/4, Divx…
Text: TXT
12
Page 14

Advanced Functions
Note : so me USB ke ys a nd US B pr oduct s li ke
digi ta l camer as o r mob il e phone s ar e not f ul ly
comp at ible wi th U SB 2. 0 st andar d so i t may n ot
work w it h the TV mu lt ime di a playe r. Not a ll U SB
keys o r de vices a re c omp at ible fo r th e USB
func ti on.
When a USB device is detected, it notes “USB Plugged
In”.
To enter the Media manually, press Source on the
remote control and select Media.
Photo Music Movie Text
Photo
To display photos if available.
1. Select Media > Photo, then press OK to enter
the main file content browser.
2. In the main file content browser, use the left/right/up
/down direction buttons to select a photo or an inner
file folder.
3. Select an inner file folder, press OK to enter a sub file
content browser.
4. Use the left/right/up/down direction buttons to select
a photo in either main or sub file content browser.
5. Select a photo, press OK to watch, and a slide show
begins from the selected photo. Press OK to pause
the photo if you want to rotate the paused photo.
Press Yellow Button to dis
the browser mode. You can select Interval Time and
different play mode etc..
6. Press the related buttons on the remote control to
perform the available functions shown on the function
bar at the bottom of the TV screen.
play the Quick Menu in
Music
To playback music if available.
1. Select Media > Music, then press OK to enter
the main file content browser.
2. Use the left/right/up/down direction buttons to
select a song in either main or sub file content
browser in the same way as in photo display
function.
3. Select a song, press OK to play, and an automatic
playback begins from the selected song. Press
Yellow Button to display the music menu in the
browser mode. You can select different play mode.
4. Press the related buttons on the remote control to
perform the available functions shown on the
function bar at the bottom of the TV screen.
Movie
To watch video if available.
1. Select Media > Movie, then press OK to enter
the main file content browser.
2. Use the left/right/up/down direction buttons to select
a video in either main or sub file content browser in
the same way as in photo display function.
3. Select a video, press OK to watch, and an automatic
playback begins from the selected video. Press
Yellow Button to display the video menu in the
browser mode. You can select different play mode
etc..
4. Press the related buttons on the remote control to
perform the available functions shown on the
function bar at the bottom of the TV screen.
Text
To read text if available.
1. Select MEDIA > Text, then press OK to enter
the main file content browser.
2. Use the left/right/up/down direction buttons to select
a text in either main or sub file content browser in
the same way as in photo display function.
3. Select a text, press OK to watch. Press Yellow
Button to display the text menu in the browser
mode. You can select Encode Type.
4. Press the related buttons on the remote control to
perform the available functions shown on the
function bar at the bottom of the TV screen.
PVR (Personal Video Record)
Allows you to record your favourite DTV programme.
Before you use the function, connect a USB memory
device to the set first.
Select Menu> Setup>PVR Settings, then press OK
or right direction button to enter the PVR Settings
content browser.
File Manager: You can preview the video files in the
USB memory device which you recorded. Use the up
or down direction button to select a video file, then
press OK to watch.
13
Page 15

Device List: You can preview the USB memory
device's information.
Scheduled Record: Use the up or down direction
button to select a group, Press OK to enter. You can
select the Frequency, Channel, Start Time, End Time,
Finally, Use the up or down direction button to
highlight Save, Press OK to save the scheduled
record information.
Time shift
Allows you to record the DTV programme so that you
won't miss the favourite part even if you go out.
Before you use the function, connect a USB device to
the TV first. For the first time, you should do the disk
setup for the USB device.
1. Press the ECO button on the remote to enter the
timeshift menu.
2. Press the left or right button to select play
mode, and press OK to confirm.
3. Select the STOP, and press OK to exit the time
shift function.
Notes:
- Only supports USB memory device of FAT32 and
FAT16 format.
- Before you plug the USB memory device to the set,
make sure you have backed up the data in the
device to avoid unusual performance which will
may cause data loss.
- The bigger size of USB memory device for PVR
function, the longer you can record the programme.
- The set cannot play files normally if the parameters
of the file exceed the limitations of the system, the
file format is not supported, the file is damaged , or
the file can not be decoded
- Do not unplug the USB memory device when the
system is reading a file or transmitting data,
otherwise the system or the device may be
damaged.
- We recommend that you use a USB device with at
least 1Gb free space and a disk speed faster than
5.0M/sec.
- If you attempt to channel change during PVR and
time shift, amessage prompts to let you select Yes or
No. You can select Yes to exit the PVR or the time
shift funtion and execute the channel change.
direction
Advanced Functions
14
Page 16

Chapter 4
Troubleshooting
Most problems you encounter with your TV can be
corrected by consulting the following troubleshooting list.
No picture, no sound
1. Check if the fuse or circuit breaker is working.
2. Plug another electrical device into the outlet to make
sure it is working or turned on.
3. Power plug is in a bad contact with the outlet.
4. Check the signal source.
No colour
1. Change the colour system.
2. Adjust the saturation.
3. Try another channel. Black-white program may be
received.
Remote control does not work
1. Change the batteries.
2. Batteries are not installed correctly.
3. Main power is not connected.
No picture, normal sound
1. Adjust the brightness and contrast.
2. Broadcasting failure may happen.
Normal picture, no sound
1. Press the VOLUME + button to increase volume.
2. Volume is set to mute, press the Mute button to
restore sound.
3. Change the sound system.
4. Broadcasting failure may happen.
Unorderly ripples on the picture
It is usually caused by local interference, such as cars,
daylight lamps and hair driers. Adjust the antenna to
minimize the interference.
Other Information
Ignition
Black spots or horizontal streaks appear, or the picture
flutters or drifts. This is usually caused by interference
from car ignition system, neon lamps, electric drills, or
other electrical appliance.
Ghost
Ghosts are caused by the television signal following two
paths. One is the direct path, the other is reflected from
tall buildings, hills, or other objects. Changing the direction
or position of the antenna may improve the reception.
Radio frequency interference
This interference produces moving ripples or diagonal
streaks, and in some case, loss of contrast in the picture.
Find out and remove the radio interference source.
Base Installation
To fix the double support base on the unit by
screws, the installation is completed.
Snowy dots and interference
If the antenna is located in the fringe area of a television
signal where the signal is weak, the picture may be marred
by dots. When the signal is extremely weak, it may be
necessary to install a special antenna to improve the
reception.
1. Adjust the position and orientation of the indoor/outdoor
antenna.
2. Check the connection of antenna.
3. Fine tune the channel.
4. Try another channel. Broadcasting failure may happen.
15
Page 17

ТЕЛЕВИЗОР ЦВЕТНОГО ИЗОБРАЖЕНИЯ
ЖИДКОКРИСТАЛЛИЧЕСКИЙ
РУКОВОДСТВО ПО ЭКСПЛУАТАЦИИ
LED49D2900S
LED55D2900S
LED40D2900AS
Рисунки и иллюстрации в данном Руководстве
Пользователя предусмотрено только для справки
и могут отличаться от внешнего вида устройства.
Дизайн продукта и спецификации могут быть
изменены без предварительного уведомления.
Page 18

.......................................... 3
Изделие ..................................................................... 3
Питание и сетевой шнур ........................................... 3
Шнур питания и сигнальный кабель ......................... 3
Среда использования ................................................ 3
Чистка ......................................................................... 3
Крепление телевизора на стену ............................... 3
Важная информация ................................................. 3
.............................. 5
.......................................... 6
............. 4
...................................................................... 7
................................................................... 7
................................................... 8
.................................. 8
................................... 8
...................................... 8
............................. 9
............................... 9
...................................... 9
.... 9
................................ 9
............................................ 10
..................................................... 10
.......................................... 11
.................... 11
.................................................................. 11
.....................................................12
..............................................................12
PVR .............................................................................. 13
...................... 15
..
4
............... 15
.............................................................. 15
....................................16
2
Page 19

Настоящее руководство по эксплуатации распространяется
на телевизор цветного изображения жидкокристаллический
TCL, предназначенный для приема сигналов вещательного
телевидения и содержит информ3ацию, необходимую
потребителю для правильной и безопасной эксплуатации.
Page 20

Инструкция
Время выдержки телевизора при комнатной температуре до включения питания после транспортирования
или хранения при пониженной температуре окружающей среды должно быть не менее 5 часов.
ВНИМАНИЕ!
При неправильной установке литиевых батарей возможен взрыв.
Батареи заменять батареями того же или аналогичного типа
ПЕРЕЧЕНЬ ПОВРЕЖДЕНИЙ, НЕ ДОПУСКАЮЩИХ ДАЛЬНЕЙШУЮ ЭКСПЛУАТАЦИЮ ТЕЛЕВИЗОРА
• Сетевой шнур или вилка повреждены;
• Экран телевизора поврежден;
• При попадании в телевизор влаги;
• После падения телевизора;
• Если телевизор не работает должным образом после того как Вы обратились в раздел по устранению
неисправностей.
Дисплеи телевизоров TCL со светодиодной подсветкой состоят из множества субпикселей, и его изготовление
требует применения наиболее совершенных технологий. Однако на экране может быть несколько светлых или
темных пикселей. Они не влияют на качество работы изделия. Для получения конкретной информации о
допустимых значениях битых пикселей для вашей модели телевизора просим обращаться в техническую
поддержку через форму обратной связи на сайте http://tcl.com.ru, указав в сообщении модель телевизора
и серийный номер своего устройства.
Кнопки управления на корпусе телевизора
Возьмем для примера некоторые модели:
1.Кнопка
Включает телевизор или переводит в режим ожидания. Телевизор включен, нажмите
кнопку кратковременно, это вызовает системную функцию для выбора Источника входного сигнала, Каналов
и регулировки Громкости. (Только в режиме ATV или DTV, канал может быть выбран.). Длительное нажатик
кнопки переведет телевизор в режим ожидания.
2. Кнопки
Увеличение/уменьшение громкости. В системе функции, нажмите кнопку , чтобы
выбрать функцию, соответственно.
4
Page 21

Примечание: Расположение и названия гнезд на телевизоре может варьироваться в зависимости от
модели телевизора, и не все разъем доступны на всех моделях.
SPDIF
HDMI 1
HDMI 2
USB
SPDIF
Примечание: количество USB гнезд на телевизоре может
варьироваться в зависимости от модели телевизора.
ANTENNA IN
AV
COMPONENT
IN
AUDIO IN
VGA
Y/VIDEO
Pb/Cb
Pr/Cr
CI
RF
Примечание: разъем VGA является таким же, как на ПК.
Y Pb Pr
L
R
CI
AC IN ~
.
DVB-S2 тюнер (вход)
Этот разъем используется для соединения ТВ со спутниковым ресивером.
5
Page 22

Инструкция
Функция кнопок пульта ДУ
Большинство функций вашего телевизора доступны через меню, которые появляются на экране.
Пульт дистанционного управления предназначен для навигации по меню и для настройки всех основных
параметров телевизора.
Примечание: Цифры и иллюстрации в этом руководстве по эксплуатации приведены только для справки
и могут отличаться от фактического. Некоторые функции могут недоступны
в соответствии с источником DTV. И DTV не доступен для определенной модели
MUTE
0-9
Info
Return
Source
Menu
OK
Option
Exit
VOL +/ CH +/ ECO
ZOOM +/ Guide
Text
List
TV
Включение или выключение звука.
Выключение телевизора или перевод телевизора.
в режим ожидания.
Ввод чисел (выбор номера канала).
Отображение информации о текущей программе или входе.
Возврат к предыдущему каналу.
Выбор источника входного сигнала.
Вызов меню.
Кнопки навигации по меню.
Подтверждение выбранной функции или параметров меню.
Настройка функции записи.
Выход из системы меню
Увеличение/уменьшение уровня громкости.
Переключение каналов на следующий или предыдущий.
Нажмите, чтобы войти в меню Time Shift.
(Доступен только в режиме DTV)
Не поддерживается.
Показать информацию цифровой программы
Телетекст---к меню языков.
Отображение списка каналов.
Быстрый переход в режим TV.
.
Цветные кнопки
Красная кнопка
(Red button)
Зеленая кнопка
(Green button)
Желтая кнопка
(Yellow button)
Голубая кнопка
(Blue button)
Включение записи на
При соответствующем режиме, нажмите на нее, чтобы войти в
правильную функцию в виде подсказки.
Выключение записи.
При соответствующем режиме, нажмите на нее, чтобы войти в
правильную функцию в виде подсказки.
Удаление всех ранее записанных программ.
При соответствующем режиме, нажмите на нее, чтобы войти в
правильную функцию в виде подсказки.
Изменение размера изображения.
При соответствующем режиме, нажмите на нее, чтобы войти в
правильную функцию в виде подсказки.
USB носитель.
6
Page 23

Глава 2:
Основные операции
Включение
Следуйте инструкции на этой странице как подготовить на телевизор и пульте дистанционного управления,
прежде чем переходить к следующей странице, которая описывает настройку телевизионных каналов.
1. Вставьте две батареи AAA в пульт дистанционного управления.
Меры предосторожности при использовании батареек:
- Используйте только батареи указанного типа.
- Убедитесь, что вы используете правильную полярность батарей.
- Не смешивайте новые и использованные батареи.
- Не используйте перезаряжаемые батареи.
- Не подвергайте батареи чрезмерному нагреванию под
воздействием солнечных лучей, огня и т. п.), не бросайте их в
огонь, не перезаряжайте и не вскрывайте их, так как это
может привести к вытеканию электролита или взрыву.
- Извлекайте батарейки из пульта ДУ, если Вы не используете его в
течение длительного периода времени.
2. Подключите сетевой шнур сначала к телевизору, затем к
сетевой розетке.
Примечание
если он не подключен к телевизору.
Ваш телевизор должен быть подсоединен только к источнику
переменного тока. Он не должен быть подключен к источнику
постоянного тока. Если нарушена изоляция сетевого шнура,
не подключайте его к сетевой розетке, так как есть риск
поражения электрическим током.
Примечание: цифры представлены только для примера,
расположение разъема питания телевизора может отличаться
в зависимости от модели.
: не подключайте сетевой шнур к сетевой розетке,
3. Подключите кабель наружной антенны к разъему RF на задней
панели телевизора.
Разъем антенны(75 OHM-VHF/UHF кабель) может использоваться
для подключения внешней антенны или другого источника
телевизионного сигнала.
Примечание
антенны или кабельного телевидения, пожалуйста, подключите
коаксиальный кабель к разъему RF на задней панели
телевизора.
4. Если телевизор подключен к сети, то он будет находится либо во
включенном режиме либо находиться в режиме ожидания.
Если индикатор Power светится, телевизор находится в режиме
ожидания. Нажмите кнопку на пульте дистанционного
управления, чтобы включить телевизор.
Выключение
• Для перевода телевизора в режим ожидания, нажмите кнопку на
пульте дистанционного управления. Телевизор остается
включенным, но с низким потреблением энергии.
• Чтобы выключить телевизор, отсоедините сетевой шнур от сетевой
розетки..
: если вы хотите получить сигнал от внешней
7
Page 24

Основные операции
Начальная настройка
Начальная настройка заключается в выборе и установке всех требующихся параметров, для поиска и хранения
всех доступных каналов. Убедитесь, что телевизор включается и выполните все
действия, указанные в дальнейшем.
Первый раз, когда вы включаете телевизор,
включена настройка First Time (Первичная
Настройка), откроется мастер, который проведет вас
через процесс начальной настройки.
Нажмите кнопку вверх или вниз, чтобы выбрать
Автопоиск и нажмите кнопку OK для правильного
направления автоматического поиска. Все
доступные ТВ программы сохраняются. Эта
операция занимает несколько минут. На дисплее
отображается ход поиска и количество
обнаруженных каналов.
Примечание: для того. чтобы предотвратить
прерывание процесса настройки канала, дождитесь
появления сообщения, указывающего, что
настройка завершена.
.
2. Нажмите на левую или правую кнопки со
стрелками, чтобы выбрать нужный пункт, а затем
нажмите кнопку
соответствующее подменю.
3. В подменю используйте кнопки вверх или вниз
для выбора опций меню, используйте кнопки
влево или вправо, чтобы установить функции или
изменения значений. С помощью кнопки
чтобы активировать настройку. С помощью кнопки
OK или вправо, чтобы открыть соответствующее
подменю.
4. Нажмите кнопку Меню для возврата к
предыдущему меню или нажмите выход, чтобы
закрыть меню.
Автоматическое сканирование (поиск)
Эта опция позволяет телевизору искать, находить и
хранить все доступные аналоговые и цифровые
каналы. Выполните все действия, описанные ниже.
OK, чтобы открыть
OK,
На этом шаге вы можете также выбрать команду
Выход, чтобы пропустить процесс поиск канала .
Но когда вы включите телевизор в следующий раз,
подсказка на экране будет напоминать вам сделать
сканирование каналов в первую очередь.
Примечание: Фунция памяти не удовлетворяет
MEPS сертификации, рекомендуют выбрать Home.
Использование системы меню
В этом разделе рассматриваются меню вашего
телевизора. Каждое меню подробно изложено,
чтобы помочь вам получить максимальное
удовлетворение от Вашего телевизора.
Для того, чтобы получить доступ к системе меню:
1. Нажмите кнопку Меню для отображения главного
меню.
1. Нажмите кнопку Меню. чтобы отобразить главное
меню и выберите канал >Тип тюнера (антенна,
кабель), а затем нажмите кнопку влево или
вправо, чтобы выбрать тип тюнера.
2. Выберите
или вправо
3. Выберите пункт DTV и ATV (или DTV или ATV),
затем нажмите кнопку вверх / вниз для
выделения Пуск, нажмите кнопку
чтобы начать автоматический поиск .
Поиск может занять несколько минут. В течение
процесса, вы можете нажать кнопку Menu или Exit
для выхода.
Автоматическое обновление
Это позволяет обновлять все доступные каналы,
не изменяя сортировку существующих каналов.
(Доступен только в Режиме DTV)
1. Откройте меню канала, нажмите вверх или вниз
кнопки, чтобы выделить каналы автоматического
обновления.
2. Нажмите кнопку влево или вправо, чтобы
выбрать Вкл / Выкл для обновления каналов.
Auto Scan, затем нажмите кнопку OK
OK или вправо,
8
Page 25

OK
OK
OK
OK
OK
OK
H H
OK
OK
9
Page 26

Глава 3:
Настройка изображения
Операция Меню
Меню для регулировки изображения используются
для получения оптимального изображения в
соответствии с вашими предпочтениями, типами
программ, которые вы смотрите. Для отображения
главного меню, нажмите кнопку изображение, а
затем нажмите кнопку
Параметры изображения, как показано ниже:
Примечание: некоторые опции могут быть
недоступны для отдельных источников сигнала.
Режим изображения: используют кнопку влево
или вправо для прокрутки предварительных
настроек изображения настроек: стандартный,
динамический, мягкий, личный.
OK для подтверждения.
.
полезна для обеспечения более четкого изображения при слабых уровнях аналогового сигнала.
Нажмите кнопку влево или вправо, чтобы выбрать
один между этими вариантами: Выкл / Слабый /
Средний / Сильный.
Динамическая контрастность: эта опция позволяет
поддерживать контрастность изображения в
автоматическом режиме.включается на эту
опцию, чтобы настроить контраста автоматически.
Нажмите левую или правую кнопку для выбора
между этими вариантами:
Примечание: некоторые опции могут появиться в
следующей странице. Меню изображения, вы
можете нажать кнопку вверх или вниз для
переключения.
Регулировка звука
Для отображения главного меню, нажмите кнопку
Меню и выберите звук, а затем нажмите кнопку OK
для подтверждения. Меню звука появляется со
следующими опциями:
On / Off.
Яркость: регулируют яркость изображения.
Контраст: регулируют разницу между светом и
темными областями изображения.
Насыщенность: регулируют насыщенность цвета.
Четкость: регулируют четкость краев картинки.
Подсветка: Пользователь может настроить
подсветку в соответствии со своими предпочтениями
вручную, он может настроить оттенки серого цвета.
Это не влияет на контрастность изображения.
Цветовая температура: настройка цветовой
температуры картинки. С помощью кнопки влево
или вправо можно установить более теплую или
холодную цветовую температуру.
Формат: использует кнопку влево или вправо для
выбора размеров изображения.
Примечание: рекомендуется использовать
полноэкранный режим. Не используйте режим
отображения с черными полосами по обеим
сторонам изображения (например, 4: 3) в течение
длительного времени, в противном случае на
экране телевизора могут произойти необратимые
изменения цветности изображения.
Начальные настройки: нажмите кнопку
кнопку навигации для вызова подменю.
NR (шумоподавление): эта настройка
уменьшает статические или любого другого вида
помехи на изображении Эта функция особенно
ОК или
Режим звука:
- Режим звука: с помощью кнопки влево или вправо
для выбора типа звука из списка: Стандартный,
Кино, Музыкальный и личный.
- ВЧ и НЧ: использовать влево или вправо кнопку
для регулировки уровня низкочастотных и
высокочастотных составляющих звукового
сопровождения.
Баланс: с помощью кнопки влево или вправо, чтобы
сбалансировать звук между левым и правым
громкоговорителями.
Описание аудио (доступно только в режиме DTV):
Нажмите кнопку OK или кнопку навигации, чтобы
отобразить его подменю:
- Режим: Нажмите кнопку влево или вправо, чтобы
установить включение / выключение режима.
- Громкость: Нажмите кнопку влево или вправо,
чтобы настроить громкость.
Объемный звук: с помощью кнопки влево или
вправо для включения или выключения объемного
звука.
Установка эквалайзера: Выделите настройку
эквалайзера, затем нажмите кнопку
кнопку для входа.
OK или вправо
10
Page 27

Операция Меню
Режим эквалайзера: Off / Поп / Рок / Джаз.
Пользователь может также использовать кнопку влево или
вправо, чтобы настроить уровень каждой частоты.
SPDIF: С помощью кнопки влево или вправо, чтобы
выбрать формат для выхода SPDIF.
Тип звука (доступен только в режиме DTV):
использовать левую или вправо кнопки, чтобы
выбрать тип звука из списка.
AVL: выберите режим Вкл.. Функция позволяет
поддерживать громкость на определенном уровне
при просмотре рекламы и ТВ программ.
Примечание: предлагаемые варианты зависят от
программы, которую вы смотрите.
Выбор источника сигнала
Нажмите кнопку Источник (SOURCE) на пульте ДУ
управлении, войдите в меню Источника напрямую.
1.Нажмите кнопку вверх или вниз, чтобы выбрать
источник по вашему желанию.
Примечание: доступный источник может
отличаться в зависимости от модели.
2. Нажмите кнопку ОК для подтверждения выбора.
.
Варианты блокировки, как показано ниже:
Блокировка каналов: эта опция позволяет
заблокировать определенный телевизионный канал.
Выделите Блокировку каналов, нажмите кнопку
или правую кнопку, чтобы отобразить меню
блокировки канала. С помощью кнопки вверх или
вниз выберите определенный ТВ канал,
который вы хотите заблокировать, затем нажмите
кнопку
Для разблокировки используйте ту же операцию.
Возрастной рейтинг: эта опция позволяет
установить рейтинг к программе. Выделите
Возрастной рейтинг. Затем с помощью кнопки
влево или вправо установите возрастной рейтинг.
OK, чтобы заблокировать.
ОК
Использование системы блокировки
Это меню может контролировать специальную
функцию для каналов телевизора.
Примечание:
входом в блокировку меню.
Войдите в главное меню, нажав кнопку Меню и
выберите систему блокировки, а затем
нажмите кнопку OK для подтверждения. Далее
нажмите цифровые кнопки, чтобы ввести пароль
Для доступа в меню блокировки. Код по умолчанию
0000. И супер пароль 8899. Если вы забыли свой
код, введите это для переопределения
существующих кодов.
необходимо ввести пароль перед
Блокировка кнопок управления ТВ: эта функция
позволяет заблокировать кнопки управления на ТВ,
нажмите кнопку влево или вправо, чтобы
выбрать Вкл.
Новый пароль: эта опция позволяет изменить
пароль. Нажмите цифровые кнопки для ввода
нового пароля дважды, чтобы установить новый
пароль.
Удаление замка (снятие блокировки): эта
функция позволяет инициализировать систему
блокировки. Нажмите OK или кнопку вправо для
инициализации системы блокировки.
Настройка
Язык экранного меню (OSD): Используйте кнопку
влево или вправо, чтобы выбрать язык экранного
меню.
Аудио Языки: использовать ОК или кнопку вправо,
чтобы войти.
11
Page 28

Операция Меню
Установки времени
Меню настройки позволяет установить часовой пояс
на ваш телевизор, чтобы запрограммировать для
автоматического выключения таймера. Для
показания главного меню, нажав Меню. Выберите
настройки и нажмите кнопку OK для подтверждения.
Варианты настройки времени как показано ниже:
Экранный таймер: С помощью кнопки влево или
вправо для установки времени экранного меню.
Таймер сна: задает период времени, по истечении
которого телевизор переходит в режим
ожидания. Используйте влево или вправо кнопки,
чтобы установить период (240 минут максимум)
Чтобы отключить эту функцию, выберите Выкл.
Автовыключение: Нажимает кнопку влево или
вправо, чтобы выбрать время для автоматического
перехода ТВ в режима ожидания.
Часавой пояс: с помощью кнопки вверх или
вниз для направления, выберите местный
часовой пояс.
Время: нажмите кнопку
отображения возможных вариантов.
OK или кнопку вправо для
.
Режим: нажмите кнопку влево или вправо для
включения или выключения субтитров.
Субтитры Основного и Дополнительного языка:
нажмите кнопку влево или вправо, чтобы выбрать
тип субтитров. Для людей с нарушением слуха
вы можете выбрать субтитры на необходимом вам
языке.
Режим настройки: с помощью кнопок влево или
вправо для выбора режима Номе
(Сохранение). Режим
В режиме сохранения, вы можете настроить режим
изображения.
Телетекст: нажмите кнопку OK или вправо
для ыбора Языка цифрового телетекста.
Язык страницы : выберите
правильный тип языка, на котором будет
отображаться телетекст.
Возврат к заводским установкам:
Для того чтобы вернуть настройки ТВ на заводские
установки по умолчанию.
1. Выберите настройки, а затем нажмите кнопку
для подтверждения.
2. Выберите перестановку или нажмите кнопку OK
или кнопку вправо для входа.
3. Нажмите кнопку влево или вправо, чтобы выбрать
ДА или НЕТ.
Примечание: Выберите ДА, телевизор будет
переустановлен на заводские настройки.
Выберите Нет, телевизор вернется в
предыдущее меню.
Синий экран
Нажмите кнопку влево или вправо, чтобы выбрать
значение Вкл.
или Выкл.
Home по умолчанию.
или Store
OK
Автоматическая синхронизация: используйте
кнопки влево или вправо, чтобы выбрать Вкл. или
Выкл.
Если выбран режим Вкл., то ТВ получит и установит
время автоматически из
может быть изменено. При выборе Выкл., вам
следует установить дату и время вручную.
Выделите дату или время, нажмите кнопку OK,
чтобы войти, а затем используйте кнопки навигации
для настройки времени и даты.
Таймер отключения питания: Используйте влево
или вправо кнопку для выбора Вкл или Выкл. При
выборе Вкл, выделите время, нажмите кнопку
чтобы войти, используйте влево или вправо для
выбора входного пространства, а затем
использовать вверх или вниз кнопку для настройки
времени и даты.
Субтитры: эта функция позволяет выбрать
субтитры для каналов цифрового телевидения.
Выбор вариантов субтитров, нажмите кнопку ОК
или кнопку вправо, чтобы отобразить подменю.
DTV сигнала, которое не
OK,
Функции USB
Первоначальная настройка
Нажмите кнопку OK или правую кнопку для выбора
входа.
Ваш телевизор оснащён разъемом USB, который
позволяет вам просматривать фотографии, слушать
музыку или смотреть видео, хранящиеся в USB
устройстве.
Поддерживаемые форматы файлов:
Фото: JPEG
Музыка: Mp3
Кино: AVC, H.264, MPEG 1/2/4, Divx…
Текст: ТХТ
Примечание: некоторые USB устройства, такие
как цифровые камеры или мобильные телефоны не
являются полностью совместимыми со
стандартом USB 2.0, поэтому они не могут
работать с ТВ с функцией мультимедийного
проигрывателя. Не все USB устройства
совместимы с функцией USB фтелевизора.
12
Page 29

Операция Меню
Когда устройство USB обнаружено, ТВ показывает
«USB вставлено». Для выбора носителя вручную
нажмите источник сигнала на пульте ДУ и выберите
Мультимедиа.
.
Фото
Для отображения фотографий :
1. Выберите Мультимедиа > Фото, а затем нажмите
кнопку OK, чтобы войти в основной список файлов.
2. В основном списке файлов,
используйте кнопки навигации, чтобы выбрать
фотографию или внутреннюю папку.
3. Выберите внутреннюю папку, нажмите кнопку OK,
чтобы открыть папку.
4. С помощью кнопок навигации, выберите фото из
содержащихся в папке.
5. Выберите фотографию, нажмите кнопку
OK, чтобы
посмотреть, и слайд-шоу начинается с выбранной
фотографии. Нажмите кнопку
OK, чтобы
приостановить слайд-шоу, если вы хотите
повернуть приостановленную фотографию.
Нажмите жёлтую кнопку, чтобы отобразить
Быстрое меню в режиме просмотра. Вы можете
выбрать интервал времени и другой режим
воспроизведения и т.п..
6. Нажмите соответствующие кнопки на пульте ДУ,
чтобы выполнять доступные функции,
показанные в нижней части экрана телевизора.
Музыка
Для воспроизведения музыки:
1. Выберите Мультимедиа > Музыка, затем
нажмите кнопку
OK, чтобы войти в основное
содержание списка файлов.
2. С помощью кнопок навигации, выберите песню из
содержимого списка таким же образом, как и
функция отображения фото.
3. Выберите песню, нажмите кнопку OK,
автоматическое воспроизведение начинается с
выбранной композиции. Нажмите жёлтую кнопку
для отображения меню музык. Вы можете
выбрать другой режим воспроизведения.
4. Нажмите соответствующие кнопки на пульте ДУ
для выполнения доступных функций, показанных
в нижней части экрана телевизора.
Кино
Для просмотра видео, если доступно:
1. Выберите
кнопку OK, чтобы войти в основное содержание
файлов.
2. С помощью кнопок навигации, выберите видео
из основного списка файлов.
3. Выберите видео, нажмите кнопку
посмотреть, и автоматическое воспроизведение
начинается с выбранного видео. Нажмите
жёлтую кнопку для отображения меню видео.
Вы можете выбрать другой режим
воспроизведения.
4. Нажмите соответствующие кнопки на пульте ДУ
для выполнения доступных функций, показанные
на функции в нижней части экрана телевизора.
Текст
Чтобы прочитать текст, если доступно:
1. Выберите MEDIA > Текст, а затем нажмите
кнопку
списка файлов.
2. С помощью кнопок навигации выберите текст из
списка файлов, точно так же, как и функция
отображения фото.
3. Выберите текст, нажмите кнопку
читать. Нажмите жёлтую кнопку для
отображения меню текста. Вы можете выбрать
тип кодирования.
4. Нажмите соответствующие кнопки на пульте ДУ
для выполнения доступных функции, показанных
в нижней части экрана телевизора.
PVR (Персональный видеорекордер)
Позволяют записывать ваши любимые программы
DTV. Перед тем, как использовать функцию,
подключите запоминающее устройство USB к
телевизору. Выберите
Настройки PVR, затем нажмите кнопку OK или
кнопку вправо для ввода настройки PVR.
Диспетчер файлов.
Вы можете просмотреть видео
файлы в запоминающем устройстве USB, которое
вы записали. С помощью кнопок вверх или вниз для
выбора видеофайла, затем нажмите кнопку
Список устройств: Вы можете просмотреть
информацию в памяти USB.
Записи по расписанию: С помощью кнопок
вверх или вниз для выбора группы, нажмите
кнопку
частоту, канал, время начала, время окончания
записи, затем с помощью кнопок вверх или вниз
выделите функцию Сохранения, нажмите
кнопку
запись программы.
.
медиа > Movie, а затем нажмите
OK, чтобы
OK, чтобы войти в основное содержание
OK, чтобы
Меню> Настройки>
OK.
OK, чтобы войти. Вы можете выбрать
OK, чтобы сохранить запланированную
13
Page 30

Сдвиг по времени :
Функция позволяют записывать программу
цифрового телевидения, и вы не пропустите
любимую программу даже если вы уходите.
Перед тем, как использовать функцию, подключите
устройство USB к телевизору в первую очередь.
Сначала, вы должны сделать установки для
устройства USB.
1. Нажмите кнопку
Shift (Сдвиг по времени).
2. Нажмите кнопку влево или вправо, чтобы выбрать
режим записи, и нажмите кнопку
подтверждения.
3. Выберите STOP, и нажмите кнопку OK, чтобы
выйти из функции Сдвига по времени.
Заметки:
- Поддерживает только запоминающее устройство
USB в файловой системе FAT32 и формате
FAT16.
- Перед тем, как подключить устройство памяти
USB к телевизору, убедитесь, что вы создали
резервную копию данных в устройство, чтобы
избежать случайностей, которые могут
привести к потере данных.
- Чем больше размер запоминающего устройства
USB для PVR функции, тем больше вы можете
записать программ.
- Некоторые файлы не могут воспроизводиться,
как правило, если параметры файла превышают
возможности или формат файла не
поддерживается, файл повреждён, или файл не
может быть декодирован.
- Не отключайте запоминающее устройство USB,
когда система считывает файл или во время
передачи данных, в противном случае система
или устройство может быть повреждено.
- Мы рекомендуем вам использовать
USB-устройство со свободным объемом не
менее 1 Гб, скорость диска более, чем 5.0M /сек.
- При попытке изменения канала во время PVR и
Свига по времени, сразу же получите сообщение,
чтобы выбрать Да или Нет. Вы можете выбрать
Да, чтобы выйти из PVR или Сдвига по времени
и выполнить изменение канала.
ECO на пульте ДУ в Меню Time
.
OK для
Операция Меню
14
Page 31

Глава 4:
Другая информация
Устранение неполадок
Большинство проблем, с которыми Вы можете столкнуться при эксплуатации телевизора, перечислены ниже.
Отсутствие изображение, отсутствие звука
1. Проверьте работу предохранителя или
автоматического выключателя.
2. Подключите к розетке другое устройство для того,
чтобы убедиться в ее исправности.
3. Плохой контакт вилки сетевого шнура и сетевой
розетки.
4. Проверьте источник сигнала.
Отсутствие цвета
1. Измените систему цвета телевидения.
2. Отрегулируйте цветовую насыщенность.
3. Переключите на другой канал. Черно-белое
изображение может транслироваться.
Пульт дистанционного управления не работает
1. Замените элементы питания.
2. Элементы питания установлены ненадлежащим
образом.
Отсутствие изображения, хороший звук
1. Настройте яркость и контраст.
2. Возможны неполадки при трансляции.
Хорошее изображение, отсутствие звука
1. Нажмите кнопку Vol+ для увеличения громкости.
2. Отключен звук. Для включения звука нажмите
кнопку
3. Измените систему звука.
4. Возможны неполадки при трансляции.
Рябь на экране
Как правило, оно вызвано местными помехами –
автомобилями, лампами дневного света и фенами.
Отрегулируйте антенну, чтобы минимизировать
помехи.
MUTE.
Тень
Наличие теней вызвано прохождением
телевизионного сигнала двумя путями. Один
путь – прямой, а другой – отражается от высоких
зданий, холмов или других объектов. Изменение
направления или положения антенны может
улучшить прием сигнала.
Радиочастотные помехи
Данные помехи вызывают движущуюся рябь или
диагональные полосы в некоторых случаях –
потерю контрастности изображения. Необходимо
определить и устранить источник радиоволн.
Примечание:
лучший визуальный обзор, пожалуйста, перед
использованием удалите все этикетки с передней
панели и экрана телевизора .
Для того, чтобы Вы могли получать
Установка основания опоры телевизора
Для того чтобы установить телевизор, закрепите
на корпус телевизора основание опоры (опорные
ножки) винтами, которые прилагаются в комплекте.
Экран снежит, наличие помех
Если антенна находится в зоне неуверенного
телевизионного сигнала, где сигнал очень слабый,
изображение на экране телевизора может быть
ухудшено точками. При крайне слабом
сигнале необходимо установить специальную
антенну для улучшения приема сигнала.
1. Отрегулируйте положение и направление уличной
или комнатной антенны.
2. Проверьте подключение антенны.
3. Точная настройка канала.
4. Переключите на другой канал. Возможны неполадки
при трансляции.
Темные пятна, мерцание, сдвинутое изображение
Появление темных пятен или горизонтальных полос,
мерцающее или сдвинутое изображение. Это, как
правило, вызвано помехами от системы зажигания
автомашин, неоновых ламп, электродрелей или
других электроприборов.
Комплектация
1. ЖК-телевизор ................................................. 1шт.
2. Шнур сетевой .................................................. 1шт.
3. Основание опоры (компл.) ............................. 1шт.
4. Комплект крепежных элементов.................... 1шт.
5. Пульт ДУ ......................................................... 1шт.
6. Элемент питания ............................................ 2шт.
7. Руководство по эксплуатации ....................... 1шт.
8. Талон гарантийный ......................................... 1шт.
15
Page 32

Система звука
принимаемого сигнала
Система цветности
принимаемого сигнала
D/K, B/G, I, NICAM
SECAM, PAL
Model
Screen size
Формат сигнала Format of signal
Brightness
Источник питания
(CR=>10)
Тип шнура питания
Формат экрана
Условия эксплуатации:
- температура воздуха от 15 до 35°С
- относительная влажность воздуха от 45 до 75 %
- атмосферное давление от 86 до 106 кПа (от 650 до 800 мм рт. ст.)
Технические характеристики, функции и комплект поставки могут отличаться от приведенных в настоящей
«Инструкции по эксплуатации» вследствие модернизации телевизоров заводом-изготовителем.
Видеофайлы AVI и MKV могут содержать различные видео и аудио потоки, формат которых
не поддерживается телевизором. В этом случае файл AVI или MKV воспроизводиться не будет.
The power supply
Resolution
Viewing angles
Sound Power
The power cord type
N.Weight
Aspect ratio
LED40D2900AS
40 "
DVB-C/T/T2/S/S2
250 cd/m2
110-240 В~, 50 Гц
110-240 В~, 50 Гц
1920x1080
178°/178°
8 Вт х 2
Несъемный
6.7 кг
16:9
LED49D2900S
"
49
DVB-C/T/T2/S/S2
cd/m2
280
110-240 В~, 50 Гц
110-240 В~, 50 Гц
1920x1080
178°/178°
8 Вт х 2
Съемный
11.5 кг
16:9
LED55D2900S
"
55
DVB-C/T/T2/S/S2
cd/m2
270
100-240 В~, 50 Гц
100-240 В~, 50 Гц
1920x1080
178°/178°
8 Вт х 2
Съемный
13.8 кг
16:9
ТРАНСПОРТИРОВАНИЕ И ХРАНЕНИЕ
Упакованные телевизоры допускается транспортировать всеми
видами транспорта в условиях, соответствующих группе 5 ГОСТ
15150 – 69 при температуре окружающего воздуха от + 50 до – 40°С
и относительной влажности воздуха от 75 до 100 %.
Хранение телевизоров должно осуществляться в условиях группы 1 по ГОСТ 15150 – 69 при температуре
окружающего воздуха от + 5 до + 40°С и отсутствии в воздухе кислотных, щелочных и других
агрессивных примесей.
Информация о наименовании и местонахождении изготовителя (уполномоченного изготовителем лица),
телефон для связи с ним, а также месяц и год изготовления технического средства указаны в гарантийном
талоне.
72-I512SI-XAPAA
 Loading...