

Page 1

User’s Guide
For use with model
visit our website at www.tclusa.com
or call 1-877-300-8837 (for mainland 48 States),
or 1-877-800-1269 (for AK, HI, and Puerto Rico).
: 32B2800
Need assistance?
Figures and illustrations in this User’s Guide are
provided for reference only and may dier from
actual product appearance. Product design and
specications may be changed without notice.
Page 2
Page 3

they exit
is
Page 4

Table of Contents
Important Information..........................................................................................................................1
Important Safety Instructions..............................................................................................................2
Chapter 1: Introduction
Precautions .........................................................................................................................................
Product .............................................................................................................................................
Power and Plug ................................................................................................................................
Power Cord and Signal Cable ..........................................................................................................
Use Environment ..............................................................................................................................
Cleaning ...........................................................................................................................................
Hanging the TV Set on the Wall .......................................................................................................
Buttons on the TV
Sockets ................................................................................................................................................
Remote Control Functions .................................................................................................................
Chapter 2: General Operation
Switching on
Switching off .......................................................................................................................................
Setup Wizard .......................................................................................................................................
S .....................................................................................................................................
Source elect
....................................................................................................................................................
Menu
.................................................................................................................................................
Picture
Chapter 3: Advanced Functions
Sound ..................................................................................................................................................
Time .....................................................................................................................................................
Setup ....................................................................................................................................................
Lock ....................................................................................................................................................
Channel
PC
AV / Component / HDMI
Media
Photo ...................................................................................................................................................
Music ..................................................................................................................................................
................................................................................................................................................
........................................................................................................................................................
....................................................................................................................................................
...............................................................................................................................
.......................................................................................................................................
......................................................................................................................
4
4
4
4
4
4
4
5
5
6
7
7
8
8
9
9
9
10
10
11
13
14
14
14
15
15
Chapter 4: Other Information
Troubleshooting ..................................................................................................................................
..................................................................................................................................Base Installation
............................................................................................Battery Caution & Disposal Information
Care and Cleaning ...............................................................................................................................
....................................................................................................................Television Specifications
Limited Warranty .................................................................................................................................
............................................................................................Legal Statement of TCL ..........................
3
16
16
17
17
17
18
20
Page 5

Chapter 1
Introduction
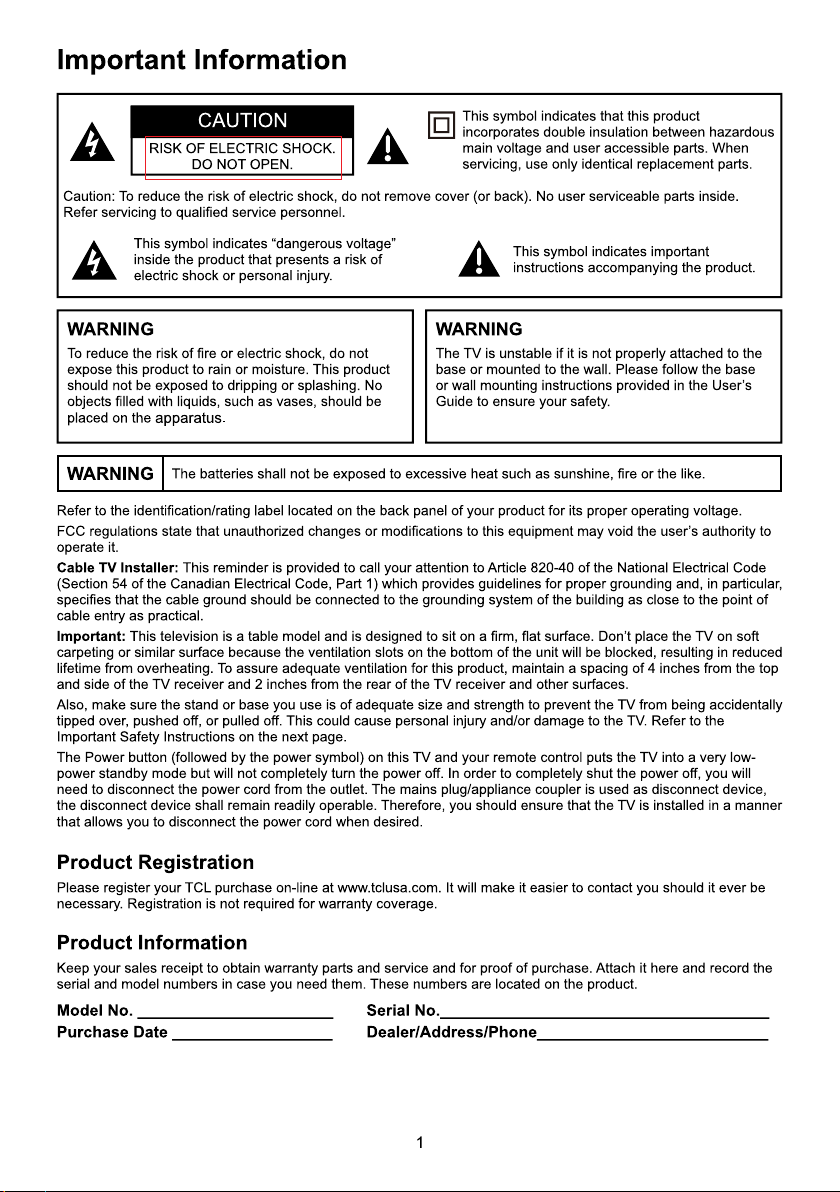
Precautions
Read all of the instructions before operating the set.
Keep these instructions well for future use.
Product
Do not block or cover the ventilation openings on the
back cover.
Do not push objects of any kind into this unit through
the cabinet slots as they could touch the current
carrying parts or short-circuit parts, resulting in fire,
electric shock, or damage to the unit.
Do not attempt to open the cabinet
damage
. There are no parts inside you can service by
yourself. Refer all servicing to qualified personnel.
Do not touch the screen surface with fingers as this
may scratch or mar the TV screen.
Do not impact the TV screen with hard pressure as
this may damage the TV screen severely.
Power and Plug
Unplug the set under the following conditions:
- If the set will not be used for a long period of time.
- If the power cord or the power outlet/plug is damaged.
- Follow the instructions to install and adjust the
product. Adjust those controls that are covered in this
operating instructions as improper adjustment of other
controls may result in damage. If this happens, unplug
the set and refer to the service personnel.
- If the set is subject to impact or has been dropped to
have the cabinet damaged.
Where the mains plug or an appliance coupler is
used as disconnect device, the disconnect device
shall remain readily operable.
(* Where an all-pole mains switch is used as the
disconnect device, the switch shall remain readily
operable.)
Power Cord and Signal Cable
Do not allow anything to rest on or roll over the power
cord and the signal cable.
Protect the power cord and the signal cable from being
trampled.
Do not overload the power cord or the power outlet.
Do not expose the power cord and the signal cable to
moisture.
as this may cause
Use Environment
Do not place the set on an unstable cart, stand, or table.
Place the set on a place that allows good ventilation.
Do not use the set near damp, and cold areas. Protect
the set from overheating.
Keep the set away from direct sunlight.
Apparatus shall not be exposed to dripping or splashing
and no objects filled with liquids, such as vases, shall be
placed on the apparatus.
Do not use the set near dust place.
Cleaning
Dust the set by wiping the screen and the cabinet with
a soft, clean cloth or some special liquid cleaner.
Do not apply excessive force to the screen when
cleaning.
Do not use water or other chemical cleaner to clean the
screen as this may damage the surface of the TV
screen.
Hanging the TV Set on the Wall
Warning: This operation requires two people.
To ensure a safe installation, observe the following safety
notes:
Check that the wall can support the weight of the TV
set and wall mount assembly.
Follow the mounting instructions provided with the wall
mount.
The TV set must be installed on a vertical wall.
Make sure to use only screws suitable for the material
of the wall.
Make sure that the TV set cables are placed so that
there is not danger of tripping over them.
All other safety instructions about our TV sets are also
applicable here.
Note:
Graphics contained within this publication are
presentation only.
Warning: the batteries shall not be exposed
excessive heat such as sunshine, fire or the like.
4
Page 6
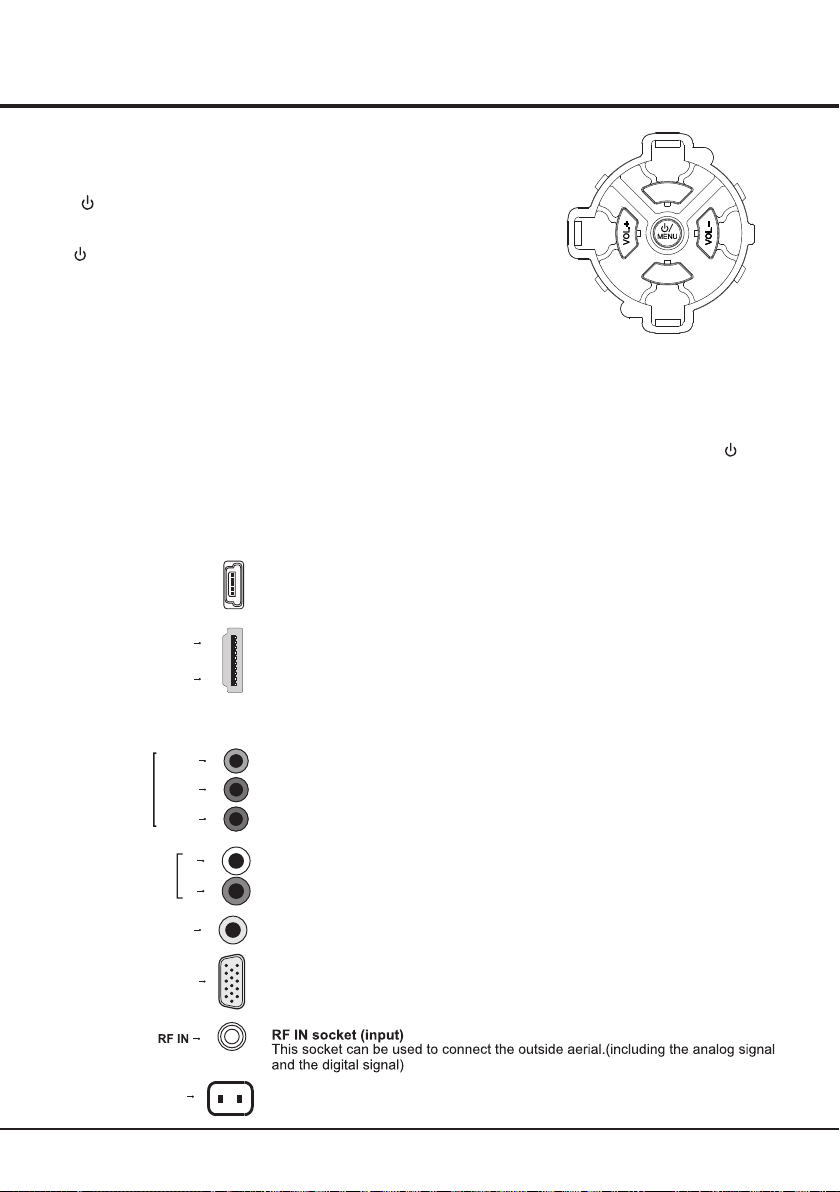
Introduction
Buttons on the TV
Take a certain model for an example:
CH.
1. / button MENU
Turns the TV on or standby.
menu or press to return to the previous menu.Before enter menu, long press
/MENU button for 2 seconds to display Source Select. Long press it for 5
seconds to go to Standby.
2
. VOL. +/- button
Increases/decreases the volume. In the menu system, they act like the right/left
direction buttons on the remote and adjust menu controls. (Note: In some menus,
VOL.+ also acts like the OK button on the remote.)
The TV is on,press it,brings up the main
3. CH. +/- button
Scans up/down through the channel list. In the menu system, they act like the up/down
remote and adjust menu controls.
Note: Under USB condition, CH.+ button acts like INPUT button in remote to select different sources and
can’t work act like up/down direction buttons
can act like the OK button on the remote.
. Press CH.- button to display or cancel the menu at bottom. /Menu button
Sockets
Note: The location and names of the sockets on the TV may vary according to
TV model, and not all sockets available on all models.
USB
USB socket (input)
This socket can be used to connect an USB device.
+
+
-
CH.
direction buttons on the
CH.+/- button
HDMI 1
HDMI 2
( HL)M
Y/VIDEO
COMPONENT / AV
IN
AV &PC&COMPONENT
AUDIO IN
Pb
Pr
SPDIF
AC IN~
or
PC IN
HDMI1 and HDMI2 socket (input)
The HDMI can be used to connect a
PC with a compatible video card installed, certain DVD players or a high-definition
compatible digital satellite decoder. This socket p
connection that carries both video and audio data by way of an integrated mini-plug
cable.
NOTE: HDMI2 support MHL.
(High-Definition Multimedia Interface) socket
rovides an uncompressed digital
AV(VIDEO)/YPbPr component sockets (input)
These AV(VIDEO)/Y sockets can be used to connect a device that has component
video sockets, such as a DVD player. The component sockets can recognize if the
device you're connecting to is Y Pb Pr compatible. The component sockets provide
excellent picture quality because the video is separated into three separate parts.
L
R
AV & PC & AUDIO IN COMPONENT
These AUDIO IN L & R sockets can be used to connect a range of equipment,
including video recorders, camcorders, satellite receivers, DVD players, or games
consoles. AUDIO IN sockets are shared by AV,VGA and YPbPr sockets.
SPDIF/AUDIO sockets (output)
PC socket (input)
This socket can be used to connect a computer.
AC In socket (input)
This socket can be used to connect a . AC supply
5
Page 7
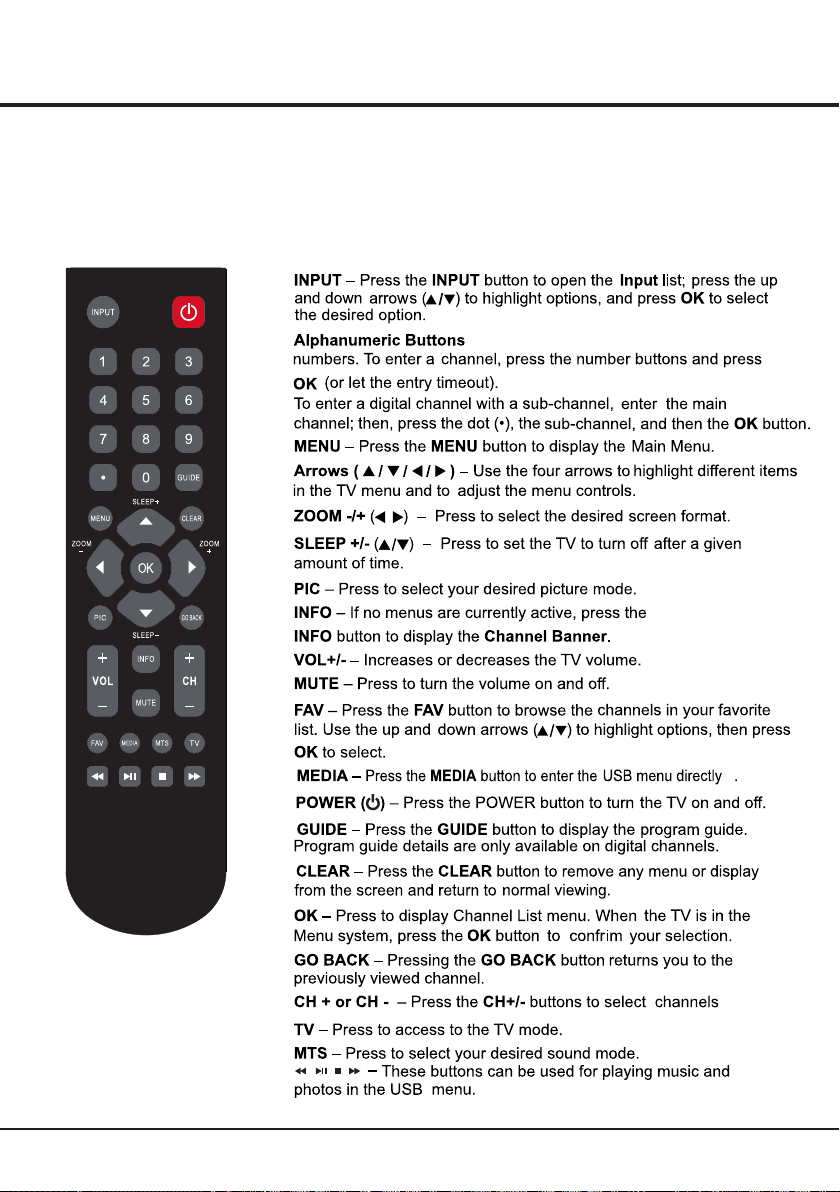
Introduction
Remote Control Functions
Most of your television's functions are available via the menus that appear on the
screen. The remote control supplied with your set can be used to navigate through
the menus and to configure all the general settings.
-In TV source, use these buttons to enter channel
/
6
Page 8

RF IN
long press /MENU button for 5 seconds
7
Page 9

Setup Wizard
Con nec t an RF cable from t he Tv s in put called
“RF- In”an d to your TV Aerial socket.
Sel ect L ang uag e
1. Pr ess / button on th e remote control to sele ct
the language to be us ed fo r menus and mess age .
2. Pr ess / button on th e rem ote control to sele ct
go to next st ep an d pre ss OK/ button to g o.
Setup Wizard
Menu Language
Go to next step
Please select your preferred language
Move Select Clear
Tim e
1. Pr ess / button on th e rem ote control to adju st
tim e zone.
2. Pr ess / button on th e rem ote control to sele ct
the time zone, dayl igh t sav ing t ime and time for mat
you want to.
3. Pr ess / button on th e rem ote control to sele ct
go to next st ep an d pre ss OK/ button to g o.
Setup Wizard
Time Zone
Daylight Saving Time
Time Format
Go to next step
Select the time zone & Daylight saving time
Move Select Return
English
Pacific
Off
12-hour
MENU
MENU
General Operation
Setup Wizard
TV Location
Go to next step
Please select your preferred mode
Move Select Clear
Retail mode
Press ◄/► button on the remote control to select Yes/No.
Note:
If you select Yes, a screen menu will proceed to select the
antanna type.
If you select No, a screen menu will go back to the previous
menu to select Home Mode.
Setup Wizard
Are you sure you select your retail mode
Home mode defaul settings are recommended for
in-home use, ENERGY STAR@ qualified.retail mode is
intended for in-store display
1. Pr ess / button on th e rem ote control to sele ct
the a nte nna type.
2. Pr ess / button on th e rem ote control to sele ct
go to next st ep an d pre ss OK/ button to s tar t auto
sca n.
Setup Wizard
Air/Cable
Go to next step
Select the antenna type then auto scan
Move Select Return
Retail Mode
MENU
MENU
Select Return
Cable
MENU
Setup Wizard
Analog
:
Digital
:
:
RF CH
Total Found
:
7
0
MENU
Clear
TV Loca tion
1. Pres s ◄/► but to n on th e re mote co ntrol t o selec t
Home Mo de or Ret ai l mod e.
2. Pres s ▲/▼ butto n on t he re mo te cont rol to se lect
go to nex t step an d pr ess O K bu tton to g o.
Note: C hoosi ng “ Home Mo de” for t he TV ass igns th e
optim al pict ur e setti ngs for m ost hom e envir onmen ts .
Choos ing “Re ta il mode ”, whic h is not EN ERGY STAR
compl iant, s et s the u ni t up with p redef ined se tting s
for ret ail dis pl ays . In t his set ting, t he powe r
consu mptio n ma y excee d the req uirem ents of t he
ENERG Y STAR ®qual ifica ti on.
Source elect S
Press I NPUT bu tt on to d is play th e input s ource l ist,
Press / b utton t o se lec t th e input s ource .
Press O K butto n to e nte r th e input s ource ,
Press C lear bu tt on to q ui t.
Source Select
TV
AV
Component
HDMI1
HDMI2
PC
Media
8
Page 10

Chapter 3
Advanced Functions
Menu
Pictu re
Sound
1. Press MENU to displa y the main menu or ret urn to the
previous menu or clos e the main menu.
2. Press / to highl ight the desired menu icon.
Setup
Time
Lock
Chann el
Main Menu Operation
Picture
1. Pres s MENU to e nt er th e ma in menu , Press /
butto n to sele ct .
2. Pres s to ente r.
Setup
Pictur e
Picture Mode
Brightness
Contrast
Color
Tint
Sharpness
Color Temperature
Advanced Settings
3.Pre ss / butt on t o sel ec t among P ictur e Mode /
Brigh tness / C on tra st / C olor / Tin t / Sharp ness /
Color Tem perat ure / Adva nced Se tting s.
5.Pre ss / butt on t o adj us t.
6.Pre ss MENU a ga in to e xi t or back t o paren t menu.
Time
Sound
Move Select
【Picture Mode】
Adjust picture mode to change picture appearance.
Press / button to select(Standard / Vivid / Soft / User /
Power Saving).
Standard Produces a highly defined image in a
normally lit room.
Vivid Produces a highly defined image in a
brightly lit room
Soft Produces a highly defined image in a
soft lit room.
User Select to customize picture settings.
Power Saving Under power saving condition, it can
meet “Energy Star” requirement.
“Power Saving”
【Brightness】
Adjust darkness of black sections in the picture.
Press / button to adjust.
【Contrast】
Adjust the white level of the picture.
Press / button to adjust.
User
Normal
Lock
Channe l
50
50
50
50
50
MENU
Return
【Color】
Adjust the color intensity of the picture.
Press button to adjust. /
【Tint】
Adjust the hue(Red,Green) of the picture.
Press button to adjust. /
【Sharpness】
Object edges are enhanced for picture detail.
Press button to adjust. /
【Color Temperature】
Change the overall color cast of the picture.
Normal
Warm
Cool
【Advanced Settings】
Adjust advanced video features to fine tune the picture.
Press OK/ button to enter.
【Aspect Ratio】
Adjust how the picture fills the screen.
Normal
based on TV size and TV program.
Wide
content.
Zoom
button maybe cut off.
Cinema
clear image in the center.
【Noise Reduction】
Set options to reduce video noise.
Off Select to turn off video noise detection.
Low Detect and reduce low video noise.
Medium Detect and reduce moderate video noise.
High Detect and reduce enhanced video noise.
【Dynamic Contrast】
Automatically adjust picture detail and brightness.
Press / button to select (Off/On).
Produces a vivid image.
Produces a red-hued image.
Produces a gentle blue-hued image.
Automatically adjust Aspect Ratio
Use to watch wide screen(16:9)
Expands image to fill screen. Top and
Stretches image at edges but keeps a
【Dynamic Backlight 】
Press / button to select (Off/Low/Hight).
Sound
Press MENU to enter the main menu, Press / button
to select.
Press to enter.
Press MENU again to exit or back to parent menu.
Pictur e
Sound Mode Standard
Bass
Treble
Balance
MTS Stereo
Audio Language
Digital Audio Output
Surround Sound
AVL
9
Sound
Move Select Return
Setup
Time
English
RAW
Off
Off
Lock
Channe l
50
50
0
MENU
Page 11

Advanced Functions
1.Press to enter.
2. Press / button to select among Sound Mode
/ Bass / Treble / Balance / MTS / Audio Language
/ Digital Audio Output /Surround Sound / AVL
3.Press / button to adjust.
4.Press MENU again to exit or back to parent menu.
【MTS】
Configures the multi-track sound. It is only available in ATV.
Press button to select(Mono/Stereo/SAP). /
Mono Sets the sound to mono.
Stereo Sets the sound to stereo when stereo
is not available, the sound is
automatically switched to mono.
SAP Sets the sound to the second audio
program.
【Audio Language】
Select the language supported by the chosen digital
channel. It is available Only in DTV.
Press button to select(English / / ). / French Spanish
【 】Digital Audio Output
Send digital audio to external audio system.
Press button to select. /
PCM Select to output audio in 2-channel
stereo.
RAW Passes through RAW audio sound.
【 】Surround sound
Press / button to select(On / Off).
【AVL】
Set the auto volume control.
Press / button to select(On / Off).
Time
Press M ENU to en te r the m ai n menu, P ress /
butto n to sele ct .
Press t o enter.
Press M ENU aga in t o exi t or b ack to pa rent me nu.
Pictur e
Sound
Sleep Timer
Time Zone
Daylight Saving Time
Time Format
Auto Clock
Clock
Move Select Return
1.Pre ss / butt on t o sel ec t among S leep Tim er /
Time Zon e / Dayli gh t Sav in g Time / Time F ormat /
Auto Cl ock / Clo ck
2.Pre ss / butt on t o adj us t.
3.Pre ss MENU a ga in to e xi t or back t o paren t menu.
【Sleep T imer】
Set a tim er for th e TV to tur n off a utoma ti cally.
Press / b utton t o se lec t( Off / 5 min / 10m in
/ 15min / 3 0min / 60 mi n / 90m in / 1 20min / 1 80min
/240m in).
Time
Setup
Lock
Off
Pacific
Off
12-hour
On
1980/01/06 12:00 AM
Channe l
MENU
【Tim e Zo ne】
Selec t your ti me z one .
Press / b utton t o se lec t( Easte rn / Cent ral /
Mount ain / Pac if ic / Ala sk a / Hawai i / Samoa /
Newfo undla nd / At lanti c).
【 】Dayli ght Sav in g Tim e
Set the d aylig ht s avi ng t ime for y our are a.
Press butto n to sele ct (On / O ff). /
【 】Tim e Fo rmat
Selec t your ti me f orm at .
Press butto n to sele ct (12 -h our / 24- hour) . /
【 】Auto Cl ock
Use to sy nchro ni ze th e di splay a utoma tical ly.
Press butto n to sele ct . /
【 】Clock
Use to ad just ti me m anu al ly.
Press / button t o selec t. / /
Note: when Auto Clock is Off, you may adjust the
clock.
Setup
1.P res s MENU to ent er the main menu, Pres s /
But ton to sele ct.
Pictur e
Sound
Menu Language
Transparent
OSD Timeout
Closed Caption
Input Label
Other Settings
Restore Default
Setup Wizard
Select Move Clear
2.P res s to en ter.
3.P res s / butt on to select amo ng Menu Lan gua ge /
Tran spa ren t / OSD Timeout / Clos ed Captio n /
Inp ut Label / Ot her settings / Restore De fau lt /
Set up Wizard.
4.P res s button to adj ust. /
5. ENU again or ba ck to pa ren t menu. Pre ss M to ex it
【Men u language】
Pre ss button t o select yo ur desired men u
/
lan gua ge( English/Frenc h/S pan ish ).
【Tran sparent】
1.P res s / butt on to adjust.
2. Ad just the tr ans parency of the OSD (on s creen dis pla y)
Men u.
【OSD Ti meO ut】
1.P res s butt on to select. /
2.A dju st the dura tio n of the O SD (on scre en display)
men u.
Setup
Time
English
25%
5 Sec.
Lock
Channe l
MENU
10
Page 12

【Clo sed Capti on】
Adj ust Closed Cap tio nin g setting s. on ly availa ble u nder
TV an d AV sou rce .
Pre ss / but ton to ente r. OK
Close C aptio n
【 】CC Mode
Turn Cl ose d Capt ioning on /off.
Press bu tton to select( CC Off / CC O n / CC /
On Mute).
【 】Ana log CC
Set Close d Caption ing for standar d(a nalog) program.
Pre ss butto n to sel ect(CC1 / CC2 / CC3 / /
CC4 / Text1 / Text2 / Text3 / Text4 ).
【 】Dig ital CC
Set Close d Caption ing for digital p rogram.
Pre ss butto n to sel ect(Off / Se rvice1 / Servic e2 / /
Ser vice3 / Service 4 / Serv ice5 / Service6 ).
Close C aptio n
【 pt ion】O
Adj ust th e digital Closed Caption ing setti ng.
Pre ss OK / bu tton to enter.
【 】Mod e
Set the Mode of digital Closed Cap tioning . Autom atic
use s broa dca ster s style.
Pre ss butto n to sel ect(Def aul t / Custom). /
【 】Fon t Styl e
Sel ect fr om 8 fon t styles.
Pre ss butto n to sel ect(Def aul t / Font 0 / Font 1 / /
Fon t 2 / Font 3 / Font 4 / Font 5 / Font 6 / Font 7).
Advanced Functions
【BG 】Opaci ty
Adjus t the dig it al Clos ed Capt ionin g backg round
trans paren cy.
Press butto n to sele ct (De fa ult / Sol id / /
Flash ing / Tran sl uce nt / ). Tra nspar ent
*Note : All the op ti ons can b e adjus t while t he mode
is Cust om.
【 Label】Inpu t
Press / but to n to ente r. OK
Pictur e
Sound
TV
AV
Component
HDMI1
HDMI2
PC
Media
Move Next Return
【Oth er Set tin gs】
Set the par ameter of audio only.
Pre ss / button to enter.
OK
【Audio Onl y】
Pla y the au dio wi th the picture tu rned off. Wh en you
tur n the Audio Onl y on , the pa nel will be dark; and
except VO L+, VO L-, POWER and MUT E buttons , pres s
any ke y to exi t the Audio Only st atu s.
Pre ss butto n to sel ect(On / Off ). /
Setup
Time
Default
Default
Default
Default
Default
Default
Default
Lock
Channe l
MENU
【Restore D efault】
Res tore the settin gs of us er interf ace to the defaul t.
Pre ss / butt on to en ter. OK
【Setup Wizard】
Set the fir st tim e install ation.
Pre ss / button to enter. OK
For detai l please re fer to page 8.
Lock
1.Pre ss ENU to en ter the m ain men u, P res s M /
butto n to sele ct .
2.Pre ss to ent er.
3.Ent er your 4 -d igi ta l passw ord. De fault p asswo rd i s
0000.
Note: I f you for ge t the p as sword , enter 0 432 to ov errid e
any exi sting c od es.
11
Page 13

Pictur e
Sound
Enter Password
4.Pr ess / butt on to select amon g Chang e Password /
System Lock / Input Block / US Rating / Canada Rat ing /
RRT Setting / Reset RRT.
Press EN U again t o exit or b ack to pa re nt me nu .M
5.
Setup
Time
-----
0-9 To Enter Return
Lock
Channe l
MENU
Lock
Pictur e
Sound
Change Password
System Lock
Input Block
US Rating
Canada Rating
RRT Setting
Reset RRT
Move Select Return
【Chang e Passw or d】
1.Pre ss OK/ butt on to ent er.
2.Ent er a new 4- di gital p asswo rd then r e-ent er it to
confi rm.
【Syste m Lock】
Lock or u nlock t he b utt on s on the TV.
Press butto n to sele ct (Of f / On). /
【Input B lock】
Block o r unblo ck t he in pu t sourc es.
Press O K / b utton t o enter.
Press butto n to sele ct (Un bl ock / Blo ck). /
Pictur e
Sound
TV
AV
Component
HDMI 1
HDMI 2
PC
Media
Move Select Return
【US Rati ng】
Restr ict mov ie a nd TV p rogra ms by US Ra tings .
Only av ailab le w hen "Sy stem Lo ck" is "o n".
Press O K / bu tton to e nt er.
【Canad a Ratin g】
Only av ailab le w hen "Sy stem Lo ck" is "o n".
Press OK/ butto n to ente r.
Restr ict mov ie a nd TV p rogra ms by Can adian R at ings. .
For det ail ple as e ref er t o page 12 .
Setup
Time
Lock
Channe l
On
MENU
Setup
Time
UnBlock
UnBlock
UnBlock
UnBlock
UnBlock
UnBlock
UnBlock
Lock
Channe l
MENU
Advanced Functions
RRT Se tting】【
Displ ay an adv an ce V-Chi p ratin g table f or digi tal
chann els.
The ite m is avai la ble o nl y When cu rrent s tream h as
downl oadab le r ating d ata.
【Res et RRT】
Reset the RRT to defaul t.
The item is availabl e onl y Whe n cur ren t stream has
download abl e rat ing data.
US Ra ting
For the Un ited State s, th e rat ing s ett ing basically
include the follow ing o pti ons: TV, MPAA.
TV
The TV rat ing c omp ose of two aspects: age-b ase d
and content-b ase d.
Pictur e
Sound
ALL
TV-Y
TV-Y7
TV-G
TV-PG
TV-14
TV-MA
: Block
Move Next Return
Age
TV-Y
TV-Y7
TV-G
TV-PG
TV-14
TV-MA
Note: The content ratin gs wi ll in cre ase d epe nding on
the level of th e age -based rating .
For example, a program with a TV-P G V(v iol ence)
rating may contain mode rat e vio len ce, while a TV-1 4 V
(violence) ratin g may c ont ain i nte nse violence.
So lo cking a hi gher level option will au tom ati cally
cause locking the optio ns th at ha s mor e sen sit ive l evel.
MPAA
This sys tem defines the rating control which come from
MPAA rules.
Ratin g
Off
G
PG
PG-13
R
NC-17
X
Setup
Time
TV Rating
FV V S L D
Lock
Press OK to Lock or Unlock
Channe l
MENU
Defin e
Gener al audi en ce
Paren tal gui da nce sug geste d
Paren ts stro ng ly ca ut ioned
Retri cted
No one 17 a nd unde r ad mitte d
Adult a udien ce o nly
Define as
Close
General au dien ce. All ages admitted.
Parental guida nce suggested. So me
material may not be su itable for ch ildr en.
Parents st rong ly cautioned. Som e
material may be inappro pria te for childr en
under 13.
Restricted. Ch ildr en under 17 require
accompanying paren t or adul t guardian.
No one 17 and unde r admitted.
Adult audi ence only.
12
Page 14

Canada
Rating
For Canada, the rating setting include the following options:
Canada English, Canada .
Canada English
These ratings are for programs which are using
English rating system.
Ratin g
Off
C
C8+
G
PG
14+
18+
Canad a
The rat ings ar e fo r pro gr ams whi ch are us ing
Frenc h ratin g sy ste m.
Ratin g
Off
G
8 ans+
13 ans+
16 ans+
18 ans+
Defin ed as
Close
Child ren
Child ren 8 yea rs a nd olde r
Gener al prog ra mming
Paren tal gui da nce
Vie we rs 14 and o lder
Adult p rogra mm ing
Frenc h
Defin ed as
Close
Gener al
Not rec ommen de d for c hi ldren
under a ge 8
Not rec ommen de d for c hi ldren
under a ge 13
Not rec ommen de d for c hi ldren
under a ge 16
This pr ogram i s re str ic ted to ad ults
French
Channel
Press EN U to ente r the mai n menu, P re ss M /
butto n to sele ct .
Pictur e
Sound
Air/Cable
Auto Scan
Favorite
Channel List
Show/Hide
Channel Number
Channel Label
Move Select Clear
Setup
Time
Lock
Channe l
Air
3-0
MENU
Advanced Functions
【Auto Sc an】
Autom atica ll y sea rc h for cha nnels .
Press / b utton t o en ter. OK
Picture
No
Move Select Return
【Favorite】
Add channels to create a favorite list.
Press button to enter.OK /
Setup
Time
Sound
Are you sure to Auto
Scan?
Yes
Lock
MENU
Analog
Channel
Digital
RF CH
Total Found
【Channel List】
Press button to adjust. /
Pictur e
Sound
Channel Channel Label
3-0
Prev Next
MOVE Return
【Show/Hide】
Show or hide the channels in your program list.
Press OK / button to enter.
【Channel Number】
Show the channel number.
Press button to adjust. /
【Channel Label】
Create labels for channels, up to 7 characters.
Setup
Time
1/1
Press OK change
Lock
Channe l
MENU
:
:
:
:
1
4
1
MENU
Return
1.Pre ss t o enter.
2.Pre ss / butt on t o sel ec t among Ai r/Cab le、 Auto
Scan 、Fa vorit e 、Ch ann el L ist、Sho w/Hid e、Chann el
Numbe r、 Chann el L abel.
3.Pre ss but ton to ad ju st. /
4.Pre ss ENU agai n to exit o r back to p ar ent m en u. M
【Air/C able】
Selec t signa l ty pe.
Press butto n to sele ct (Ai r/ Cable ). /
13
Page 15

Advanced Functions
PC
Press to select PC source.INPUT
Press ENU to enter the main menu, Press buttonM /
to select Setup menu.
Press to select PC Settings.
Pictur e
Sound
Menu Language
Transparent
OSD Timeout
Closed Caption
Input Label
Pc Settings
Other Settings
Restore Default
Move Next Return
1.Press OK / to enter.
2.Press / button to select among H-Pos / V-Pos /
Clock / Phase / Auto .
3.Press button to adjust. /
4.Press ENU again to exit or back to parent menu. M
Pictur e
Sound
H-Pos
V-Pos
Clock
Phase
Auto
Move Adjust Return
【H-Pos】
Adjus t the hor iz ont al p ositi on of the p ictur e.
Press butto n to adju st . /
【V-Pos】
Adjus t the ver ti cal p os ition o f the pic ture.
Press butto n to adju st . /
【Clock】
Minim ize ver ti cal str ipes in t he scre en imag e.
Press butto n to adju st . /
【Phase】
Minim ize hor iz ontal d istor tion.
Press butto n to adju st . /
【Auto】
Adjus t to the PC s ig nal t im ing aut omati cally.
Press b utton t o enter. / OK
Notes :
1.Adv anced s et tin gs i n Pictu re menu i s diffe ren t,
other d escri pt ion s ar e the sam e as that f or TV
mode. S elect Ad va nce d se tting s in Pict ure men u,
Aspect R atio ca n se lec t Fu ll 100% o r Point t o Point .
Noise R educt io n and Dyn amic Co ntras t is inva lid.
2.TIM E menu an d de scr ip tion ar e the sam e as that
for mode .TV
3.Clo se Capt io n in SETU P men u is inva lid.
4.US, C anada , RRT Settin g an d Res et R RT in L OCK
menu is i nvali d.
5. mode h as n o CHA NN EL menu.PC
Setup
Time Lock
English
25%
15 Sec.
Setup
Time
Channe l
MENU
Lock
Channe l
50
50
50
25
MENU
AV / COMPONENT / HDMI
1. PICT URE men u an d des cr iptio n are the s ame as
that fo r mod e.TV
2. TI ME m enu and d escri ption a re the sa me as tha t fo r
mode.TV
3.The f uncti on o f Clo se C aptio n is avai lable o nly in
AV/TV m od e.
4.US Ra ting, C an ada R at ing is av ailab le only i n AV
/TV mod e. RRT Setti ng and Re se t RRT in LOC K
menu is i nvali d.
5. mode ha s no CHAN NE L AV / COM PO NENT / HDMI
menu.
Media
Note: Before operating Media menu,Plug in USB device,
then press INPUT button to set the Input Source to Media.
Press / button to select Media in the Source menu,
then press OK button to enter.
USB 2.0
Photo
Music
Press / button to select the option you want to adjust
in the main Media menu, then press OK button to enter.
1/1
C
Return
14
Page 16

Advanced Functions
Photo
Press / button to select PHOTO in the main menu,
then press OK button to enter.
Press / button to select drive disk you want to watch,
then press OK button to enter.
Press / button to select return option to back to the
previous menu.
Press / button to select the file you want to watch in
the file selecting menu, then press OK button to display
picture.
Music
Press / button to select MUSIC in the main menu, then
press OK button to enter.
Press / button to select drive disk you want to watch,
then press OK button to enter.
Press / button to select return option to back to the
previous menu.
Press / button to select the file you want to watch in
the file selecting menu, then press OK button to play.
Press OK button again to display and operate file details.
When highlighting the option you select, the file information
will appear on the right.
Note: Only support JPG format
ON
Press / button to select menu in the bottom you
want to run, then press OK button to operate.
Note: Only support MP3 format
15
Page 17

Chapter 4
Troubleshooting
Most problems you encounter with your TV can be
corrected by consulting the following troubleshooting list.
No picture, no sound
1. Check if the fuse or circuit breaker is working.
2. Plug another electrical device into the outlet to make
sure it is working or turned on.
3. Power plug is in a bad contact with the outlet.
4. Check the signal source.
No color
1. Change the color system.
2. Adjust the saturation.
3. Try another channel. Black-white program may be
received.
Remote control does not work
1. Change the batteries.
2. Batteries are not installed correctly.
3. Main power is not connected.
No picture, normal sound
1. Adjust the brightness and contrast.
2. Broadcasting failure may happen.
Normal picture, no sound
1. Press the Vol+ button to increase volume.
2. Volume is set to mute, press the mute button to restore
sound.
3. Change the sound system.
4. Broadcasting failure may happen.
Unorderly ripples on the picture
It is usually caused by local interference, such as cars,
daylight lamps and hair driers. Adjust the antenna to
minimize the interference.
Blank screen in VGA mode
Perhaps the TV can not recognize the resolution set by
the PC. Suggest to change to the best resolution or other
standard resolutions of the Windows system.
Snowy dots and interference
If the antenna is located in the fringe area of a television
signal where the signal is weak, the picture may be marred
by dots. When the signal is extremely weak, it may be
necessary to install a special antenna to improve the
reception.
Other Information
1. Adjust the position and orientation of the indoor/outdoor
antenna.
2. Check the connection of antenna.
3. Fine tune the channel.
4. Try another channel. Broadcasting failure may happen.
Ignition
Black spots or horizontal streaks appear, or the picture
flutters or drifts. This is usually caused by interference
from car ignition system, neon lamps, electric drills, or
other electrical appliance.
Ghost
Ghosts are caused by the television signal following two
paths. One is the direct path, the other is reflected from
tall buildings, hills, or other objects. Changing the direction
or position of the antenna may improve the reception.
Radio frequency interference
This interference produces moving ripples or diagonal
streaks, and in some case, loss of contrast in the picture.
Find out and remove the radio interference source.
16
Page 18

Chapter 4
Other Information
171819
Page 19

Page 20

Page 21

20
Page 22

Part No.: 72-HB2800-ENA9A
 Loading...