

Page 1
TCL
SERVICE MANUAL
21A71A
1、 Caution………………………………………………………………………2
2、 Specification…………………………………………………………………6
3、 Alignment Procedure……………… ………………………………… …10
4、 Schematic Diagram………………………… ……… ……………………20
5、 IC Brief Introduction………………………………………………………21
6、 PCB Layout…………………………………………………………………37
7、 Explode V iew Diagram………… …………………………………………38
8、 BOM list……………………………………………………………………39
This manual is the latest at the time of printing, and does not
include the modification which may be made after the printing, by
the constant improvement of product
Page 2
CAUTION:
1、
Use of controls, adjustments or procedures other than those specified herein may result in
hazardous radiation exposure.
CAUTION: TO REDUCE THE RISK OF
CAUTION
RISK RISK OF OF ELECTRIELECTRICC
SHOCK SHOCK DO DO NOT NOT OPEN.OPEN.
The lighting flash with arrowhead symbol, with an equilateral triangle is intended to
alert the user to the presence of uninsulated voltage within the products
enclosure that may be of sufficient magnitude to constitute a risk of electric shock to
the person.
The exclamation point within an equilateral triangle is intended to alert the user to the
presence of important operating and maintenance (servicing) instructions in the
literature accompanying the appliance.
ELECTRICAL SHOCK, DO NOT REMOVE
COVER (OR BACK). NO USER SERVICEABLE
PARTS INSIDE. REFER SERVICING TO
QUALIFIED SERVICE PERSONNEL.
dangerous
WARNING: TO REDUCE RISK OF FIRE OR ELECTRIC SHOCK, DO NOT
EXPOSE THIS APPLIANCE TO RAIN OR MOISTURE.
2
Page 3

IMPORTANT SAFETY INSTRUCTIONS
CAUTION:
Read all of these instructions. Save these instructions for later use . Follow all Warnings and
Instructions marked on the audio equipment.
1. Read Instructions- All the safety and operating instructions should be read before the product is operated.
2. Retain Instructions- The safety and operating instructions should be retained for future reference.
3. Heed Warnings- All warnings on the product and in the operating instructions should be adhered to.
4. Follow Instructions- All operating and use instructions should be followed.
FOR YOUR PERSONAL SAFETY
1. When the power cord or plug is damaged or frayed, unplug this television set from the wall outlet and refer servicing to
qualified service personnel.
2. Do not overload wall outlets and extension cords as this can result in fire or electric shock.
3. Do not allow anything to rest on or roll over the power cord, and do not place the TV where power cord is subject to
traffic or abuse. This may result in a shock or fire hazard.
4. Do not attempt to service this television set yourself as opening or removing covers may expose you to dangerous
voltage or other hazards. Refer all servicing to qualified service personnel.
5. Never push objects of any kind into this television set through cabinet slots as they may touch dangerous voltage
points or shor t out parts that could result in a fire or electric shock. Never spill liquid of any kind on the television set.
6. If the television set has been dropped or the cabinet has been damaged, unplug this television set from the wall outlet
and refer servicing to qualified service personnel.
7. If liquid has been spilled into the television set, unplug this television set from the wall outlet and refer servicing to
qualified service personnel.
8. Do not subject your television set to impact of any kind. Be particularly careful not to damage the picture tube surface.
9. Unplug this television set from the wall outlet before cleaning. Do not use liquid cleaners or aerosol cleaners. Use a
damp cloth for cleaning.
10.1. Do not place this television set on an unstable cart, stand, or table. The television set may fall, causing serious injury
to a child or an adult, and serious damage to the appliance. Use only with a car t or stand recommended by the
manufacturer, or sold with the television set. Wall or shelf mounting should follow the manufacturer s instructions, and
should use a mounting kit approved by the manufacturer.
10.2. An appliance and cart combination should be moved with care. Quick stops, excessive force, and uneven surfaces
may cause the appliance and cart combination to overturn.
3
Page 4
PROTECTION AND LOCATION OF YOUR SET
11. Do not use this television set near water ... for example, near a bathtub, washbowl, kitchen sink, or laundry tub, in a
wet basement, or near a swimming pool, etc.
Never expose the set to rain or water. If the set has been exposed to rain or water, unplug the set from the wall
outlet and refer servicing to qualified service personnel.
12. Choose a place where light (artificial or sunlight) does not shine directly on the screen.
13. Avoid dusty places, since piling up of dust inside TV chassis may cause failure of the set when high humidity persists.
14. The set has slots, or openings in the cabinet for ventilation purposes, to provide reliable operation of the receiver, to
protect it from overheating. These openings must not be blocked or covered.
Never cover the slots or openings with cloth or other material.
Never block the bottom ventilation slots of the set by placing it on a bed, sofa, rug, etc.
Never place the set near or over a radiator or heat register.
Never place the set in enclosure, unless proper ventilation is provided.
a built-in
PROTECTION AND LOCATION OF YOUR SET
15.1. If an outside antenna is connected to the television set, be sure the antenna system is grounded so as to provide some
protection against voltage surges and built up static charges, Section 810 of the National Electrical Code, NFPA No.
70-1975, provides information with respect to proper grounding of the mast and supporting structure, grounding of the
lead-in wire to an antenna discharge unit, size of grounding conductors, location of antenna discharge unit, connection
to grounding electrode, and requirements for the grounding electrode.
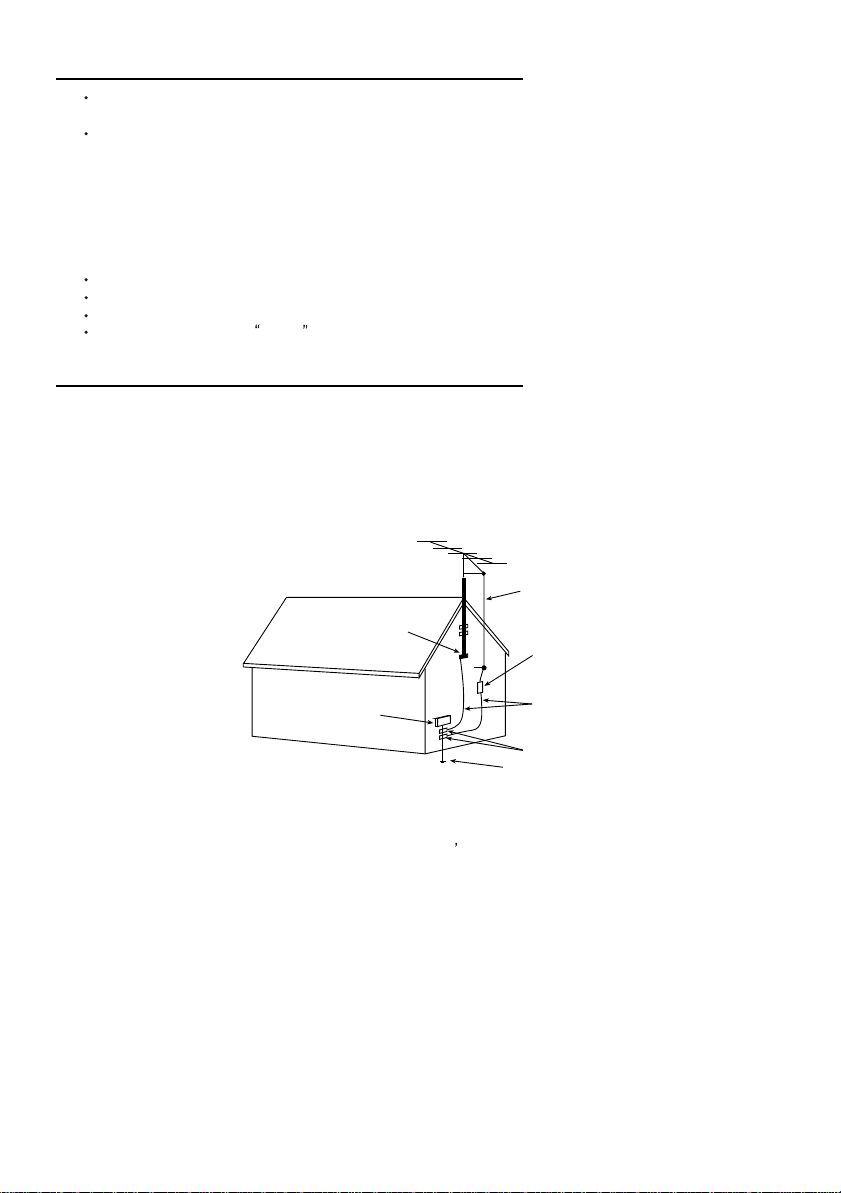
EXAMPLE OF ANTENNA GROUNDING AS PER NATIONAL ELECTRICAL CODE INSTRUCTIONS
EXAMPLE OF ANTENNA GROUNDING AS PER
NATIONALELECTRICAL CODE
ANTENNA
LEAD- INWIRE
GROUND CLAMP
ELECTRIC SERVICE
EQUIPMENT
NEC-NATIONALELECTRICAL CODE
ANTENNA DISCHARGE
UNIT (NEC SECTION
810-20)
GROUNDING
CONDUCTORS
(NECSECTION 810-21)
GROUND CLAMPS
POWER SERVICE GROUNDING
ELECTRODE SYSTEM
(NEC ART 250. PARTH)
15.2. Note to CATV system installer : (Only for the television set with CATV reception)
This reminder is provided to call the CATV system attention to Article 820-40 of the NEC that provides
installer s
guidelines for proper grounding and, in particular, specifies that the cable ground shall be connected to the grounding
system of the building, as close to the point of cable entry as practical.
16. An outside antenna system should not be located in the vicinity of overhead power lines or other electric lights or power
circuits, or where it can fall into such power lines or circuits. When installing an outside antenna system, extreme care
should be taken to keep from touching such power lines or circuits as contact with them might be fatal.
17. For added protection for this television set during a lightning storm, or when it is left unattended and unused for long
periods of time, unplug it from the wall outlet and disconnect the antenna. This will prevent damage due to lightning
and power-line surges.
4
Page 5

OPERATION OF YOUR SET
18.
This television set should be operated only from the type of power source indicated on the marking label. If you are not
sure of the type of power supply at your home, consult your television dealer or local power company. For television
sets designed to operate from battery power, refer to the operating instructions.
19. If the television set does not operate normally by following the operating instructions, unplug this television set from the
wall outlet and refer servicing to qualified service personnel. Adjust only those controls that are covered in the operating
instructions as improper adjustment of other controls may result in damage and will often require extensive work by a
qualified technician to restore the television set to normal operation.
20. When going on a holiday : If your television set is to remain unused for a period of time, for instance, when you go on
a holiday, turn the television set and unplug the television set from the wall outlet.
off
IF THE SET DOES NOT OPERATE PROPERLY
21. If you are unable to restore normal operation by following the detailed procedure in your operating instructions,
do not attempt any further adjustment. Unplug the set and call your dealer or service technician.
22. Whenever the television set is damaged or fails, or a distinct change in performance indicates a need for
service, unplug the set and have it checked by a professional service technician.
23. It is normal for some TV sets to make occasional snapping or popping sounds, particularly when being
turned on or off. If the snapping or popping is continuous or frequent, unplug the set and consult your
dealer or service technician.
FOR SERVICE AND MODIFICATION
24. Do not use attachments not recommended by the television set manufacturer as they may cause hazards.
25. When replacement parts are required, be sure the service technician has used replacement parts specified
by the manufacturer that have the same characteristics as the original part. Unauthorized substitutions
may result in fire, electric shock, or other hazards.
26. Upon completion of any service or repairs to the television set, ask the ser vice technician to perform
routine safety checks to determine that the television is in safe operating condition.
5
Page 6

2、 Specification
Model
Item
Master Data
-Customer ID
-Destination
-Brand
-BOM NO.
-Assembling Way
-Chassis
Reception
-Tuning [Channels Amt.]
-Tuning [Technology]
-Tuning [Indication]
-Frequency Bands
-IF Frequency
-TV Systems (Color+ Sound)
-AV Systems
Picture-Processing
-SCAN
-Wide Screen Switching
-Comb filter
-Picture Enhancement
LTI / CTI
Black Stretch
Blue Stretch
Dynamic Skin
Others
-Picture Control [General]
Brightness
Sharpness
Contrast
Tint
Color
-Picture Control [Special]
Smart Pictures * modes
VM
Color Temperature
Others
-Picture Noise Reduction
Picture – Display
-CRT Type
Normal Flat
Pure Flat
Super Flat
-Deflection system
1Fh 1Fh
2Fh 2Fh
-Tube Technology
Iron
AK
Inver
Black Matrix
Others
-CRT Deflection ( * Deg.)
-CRT Magnetic Field
-Screen Ratio
-Screen Size / Vis. Size
Sound
-Audio Power Consumption
-Surround Sound
-Mono (TV)
-Mono (AV)
-Nicam
-America Stereo (MTS,BTSC,MPS)
内容
主要数据
-顾客ID
-目的地 南美
-牌子
-BOM号
-走货方式
-机芯号
接收
-频道数量
-调谐技术
-搜台指示
-频率波段
-中频频率
-TV制式 (彩色+声音)
-AV制式
图像处理
-扫描方式
-宽屏幕转换
-梳状滤波器
-图像提升
亮度/色度提升电路
黑电平延伸
蓝电平延伸
动态肤色
其他
-图像控制 [普通的]
亮度
清晰度
对比度
色调
色度
-图像控制 [特殊的]
几种图像美化模式
速率调制
色温
其他
-图像降噪
图像显示
-CRT类型
普平
纯平
超平
-偏转系统
-显象管技术(具体看CRT规格书而定)
铁(材料)
AK钢
铟瓦钢
黑色聚阵(关机后CRT屏幕颜色)
其他
-CRT偏转度(90,110...)
-CRT磁场区域
-屏幕比率
-屏幕尺寸/ 视觉尺寸
声音
-伴音功耗
-环绕立体声
-单声道(TV)
-单声道(AV)
-丽音
-美国立体声
Chassis: M123SP(南美)
机型
SOUTH AMERICA
Unit
M123SP
181
PLL
---------
Full-Cable
45.75MHZ
PAL-M,PAL-N,NTSC-M(3.58+4.5)
PAL,NTSC
Standard
X
X
Blue mute
X
X
X
X
X
4
X
X
X
X
90 degr
4:3
21"
5W+5W
Stereo wide
X
Page: 1 of 7
6
Page 7

TCL-Thomson Electronics R D Center (Shen’Zhen Lab)
Model
Item
-America SAP
-Korea Stereo
-Thai Bilingual
-Super Woofer
-AVL
-Sound Control [General]
Volume
Mute
-Sound Control [Special]
Treble
Bass
Balance
Equalizer
Smart Sound * modes
Others
-Speakers Quantity
-Speakers Size
User Interface
-Menu Language
-Features [General]
AT
Auto Sleep
AV Lock
Biological clock
Calendar
Clock
Channel Skip
Channel Swap
Channel Adjustment
Channel Naming
Channel Lock
Child Lock
Favorite Channel
Game
Hotel Mode
High Sensitive
Notebook
On/Off Timer
Panel Lock
Parent Guide
Preset
Programe prearrange
Recall
Rotation
Others
-Features [Special]
V-chip / CCD V-chip / CCD
Teletext *Pages
FM Radio
Others
Tuning Features
-Auto Channel Program
-Auto/Manual Tuning
-Auto/Manual Store
-Fine Tuning
-Factory Mode
-Service Mode
Cabinet
-Cabinet Name
-Front Cabinet Color
-Middle Cabinet Color
-Rear Cabinet Color
内容
-美国SAP
-韩国立体声
-泰国双语
-超重低音
-自动音量平衡
-声音控制(普通的)
音量
静音
-声音控制(特殊的)
高音
低音
平衡
均衡
几种声音美化模式
其他
-喇叭数量
-喇叭尺寸
用户界面
-菜单语言 English, Portuguese, Spanish,french
-特点(普通的)
音响电视
自动睡眠(是指X小时不操作电视,电视自动休眠)
AV锁
生物钟
日历
时钟
频道跳跃
频道互换(两个频道互换位置)
频道互换(1个频道取代另一个)
频道命名
频道锁
童锁
喜爱频道
游戏
宾馆模式
超强接收
记事簿
定时开/关机
按键锁
父母指导
频道预置(宾馆模式中,用户不可调)
节目预置(用户可调)
回看
地磁校正(旋转)
其他
-特点(特殊的)
图文
FM收音机
其他
调谐特点
-自动频道编排
-自动 / 手动搜台
-自动 / 手动存储
-微调
-工厂模式
-维修模式
外壳
-外壳名称
-前壳颜色
-中壳颜色
-后壳颜色
Chassis: M123SP(南美)
机型
X
X
X
X
X
X
4
2
X
X
X
X
X
X
X
X
X
X
X
X
X
X
X
X
X
21A71
Page: 2 of 7
7
Page 8

TCL-Thomson Electronics R D Center (Shen’Zhen Lab)
Model
Item
-Number of Local Control(incl.Mains)
-Number of Indicator Control(incl.Mains)
Local Controls Front
-Mains Switch
-CH+ CH- VOL+ VOL-
-TV/AV
-Menu
-Auto Search
Local Controls Top
-CH+ CH- VOL+ VOL-
-TV/AV
-Menu
-Auto Search
Local Controls Side
-CH+ CH- VOL+ VOL-
-TV/AV
-Menu
-Auto Search
Indicator
-RC Received LED
-Color of RC Received LED
-Standby LED
-Color of Standby LED
Remote Controller
-Type
-Batteries Type
Connectors Rear
-SCART Full (RGB) w/o Y/C
-SCART Full with Y/C
-SCART Single (CVBS)
-Component In (YCbCr) Cinch
-In Y/C+Cinch(CVBS+ Stereo) -In Y/C+Cinch(CVBS+ Stereo)
-In Y/C+Cinch (CVBS+ Mono) -In Y/C+Cinch (CVBS+ Mono)
-In Cinch(CVBS+ Stereo) -In Cinch(CVBS+ Stereo)
-In Cinch (CVBS+ Mono) -In Cinch (CVBS+ Mono)
-Out Cinch(CVBS+ Stereo) -Out Cinch(CVBS+ Stereo)
-Out Cinch(CVBS+ Mono) -Out Cinch(CVBS+ Mono)
-Super Woofer
-Digital Audio Out
-Loudspeakers
-Control Busses
-After Service Slot
-ITV Smart Port
- Antenna in
75 Ohms (IEC Type)
Connectors Front
-In Y/C+Cinch(CVBS+ Stereo) -In Y/C+Cinch(CVBS+ Stereo)
-In Y/C+Cinch (CVBS+ Mono) -In Y/C+Cinch (CVBS+ Mono)
-In Cinch(CVBS+ Stereo) -In Cinch(CVBS+ Stereo)
-In Cinch (CVBS+ Mono) -In Cinch (CVBS+ Mono)
-Out Headphone
Mini-Jack 3.5mm
Connectors Side
-In Y/C+Cinch(CVBS+ Stereo) -In Y/C+Cinch(CVBS+ Stereo)
-In Y/C+Cinch (CVBS+ Mono) -In Y/C+Cinch (CVBS+ Mono)
-In Cinch(CVBS+ Stereo) -In Cinch(CVBS+ Stereo)
-In Cinch (CVBS+ Mono) -In Cinch (CVBS+ Mono)
-Out Headphone
Mini-Jack 3.5mm
Final Equipment
-Packing –Methods
* Colors Printing
内容
-本机控制按键孔数量(包括主开关)
-本机指示灯数量(包括主开关上的灯)
-正面的控制孔数量
电源开关
频道+-,音量+ TV / AV
菜单
自动搜台
-顶部的控制孔数量
频道+-,音量+ TV / AV X
菜单
自动搜台
-侧面的控制孔数量
频道+-,音量+ TV / AV
菜单
自动搜台
-指示灯
遥控接收灯
遥控接收灯颜色
待机灯
待机灯颜色
遥控器
-类型
-电池
后壳端子接口
不含Y/C的SCART
含Y/C的SCART
-单SCART接口(CVBS)
YUV
-超重低音接口
-数字音频输出
-外接喇叭口
-控制总线
-售后维修口
-ITV 通信端口
-天线输入端口
75 ohms (IEC类型)
正面端子接口
-耳机输出端口
袖珍插孔 3.5mm
侧面端子接口
-耳机输出端口
袖珍插孔 3.5mm
出厂资料
-包装方法
几种颜色彩印
Chassis: M123SP(南美)
机型
7
1
X
X
X
X
RED
R
2XAA
X
X
X
X
X
X
Page: 3 of 7
8
Page 9

TCL-Thomson Electronics R D Center (Shen’Zhen Lab)
Model
Item
Carton Color
-Documents and Manuals
Instruction Book
Screen Sticker
Plastic Bag
Warranty Card
Guarantee Doc.
Warning Label
Approbation Label
Others
-Languages Instruction Book
-Indication on BACKOVER
Made-in in family sheet
FCC/Elect Shock Caution Label
CE/Elect Shock Caution Label
Warning Label
Others
Approbation
FCC FCC
FDA FDA
UL/CUL UL/CUL
CB CB
VDE VDE
Others Others
Miscellaneous
-Mains Voltage
-Mains Frequency
-Type Mains Cord
-Type Mains plug
-Power Consumption TV in ON
-Power Consumption TV in Standby
内容
纸箱颜色
-文件和手册
说明书
屏幕贴纸
塑料袋
保修卡
保证书
警告标签
认证标签
其他
-说明书语言
-后壳的标示
制造产地标签
FCC/ Elect 小心警告标签
CE/ Elect 小心警告标签
警告标签
其他
认证
其他的
-电源电压
-电源频率
-电源线类型
-电源插头类型
-开机功耗
-待机功耗
机型
X
X
English
X
X
100v-240v
50/60Hz
Less than 80W
Less than 3W
Chassis: M123SP(南美)
Page: 4 of 7
9
Page 10

3、 Alignment Procedure
Table of Content
Ⅰ. SUMMARIZE...........................................................................................................................5
Ⅱ. ALIGNMENT CONTENTS: ................................................................................................6
ADJUSTMENT OF B+ VOL TAGE
1.
AGC
2.
RF
3.
SCREEN & FOCUS VOLTAGE ADJUSTM ENT
4.
1 ADJUSTMENT OF SUB-CONTRAST, SUB-TINT AND SUB-COLOR FOR
4. 2
WHITE BALANCE ADJUSTMENT
5.
DJUSTMENT OF SUB-BRIGHTNESS
A
PICTURE GEOMETRIC ADJUSTMENT
6.
RAYS OVER VOLTAGE PROTECTING CI RCUIT TEST
7.X
PS LINE POLARTITI ES TEST
8.
9.PS
HIGH VOLTAGE AND IB VALUE LIMIT TEST( RANDOM TEST
10.
11.H
12.
CCD
INITIALIZATION
13.
14.EEPROM
ADJUSTMENT
POWER TEST (RANDOM TEST)
EATER VOLTAGE TEST ( RANDOM TEST
AND
VOL-CHIP
DATA:............................................................................................................. 10
............................................................................................................ 6
.................................................................................................................. 10
................................................................................................ 6
.............................................................................. 7
NSTC
AND
PAL
(NORMAL)................................................................... 8
........................................................................................ 8
........................................................................................ 8
: .............................................................. 8
: ................................................................................................... 9
:........................................................................................... 9
)............................................... 10
)............................................................................ 10
FUNCTION TEST
............................................................................... 10
SIGNAL
Chassis Name
Issued on
Updated on
M123SP 南美软件
2006-04-29
2006-07-29
Serial No.
Page
Version
10
4 of 13
2.0
Page 11

TCL-THOMSON Electronics R&D Center (Shen’Zhen Lab)
M123SP Alignment Procedure
Ⅰ. Summarize
M123SP,is NTSC-PAL system model developed for TCL market specially. In trial run,
burn the software to TMPA8873PSNG IC by OTP method. After the trial run, make the
mask,please take care in production. To solve the probable problems in production, for the
workers participate in alignment, please be familiar with the Alignment Procedure, and be
master of the features.
There are 2 operation modes:user mode and factory mode. You can use the Remote
control or buttons on the panel to operate in user mode, but only Remote control works in
factory mode.
The way to enter factory mode:Press “D-MODE”button on RC, press“OK”and
“CH+”“ CH-”to select the parameter you want to adjust., Press“VOL+”“ VOL-” to
change the parameters. To quit factory mode,press“D-MODE” button(on the right of
SURR button),the factory data changed will be memorized.
A few special modes:
Aging mode — used before the aging before alignment. The aging could start in
factory mode.
Vertical stop mode—used to confirm the screen voltage. Press “INPUT”button in
factory mode to enter Vertical stop mode. Then press “INPUT”
button again to exit.
White balance alignment mode—used for white balance auto alignment. Press“BUS
OFF” button near the left of MTS button to enter White balance
alignment mode.
Factory mode—. Press “SOUND” button in factory mode to initialize the set. The
screen displays“WAIT ”, after the initialization,the screen
displays “OK”,and exit the Factory mode automatically.
Then press “D-MODE”button again,it will not enable you to enter Factory mode if you
want to enter again,you need operate as follows:turn down the volume to 0 press “Volume
down”button on the panel,press“INFO”button on the
RC meantime.
Chassis Name
Issued on
Updated on
M123SP 南美软件
2006-04-29
2006-07-29
Serial No.
Page
Version
11
5 of 13
2.0
Page 12
TCL-THOMSON Electronics R&D Center (Shen’Zhen Lab)
t
Ⅱ. Alignment contents:
1. Adjustment of B+ voltage
Receive Philips standard testing pattern to RF input.
If the VR800 exists in the board, adjust it in STANDARD mode until voltage at following
value:
Model B+ (v)
M123SP
21E10
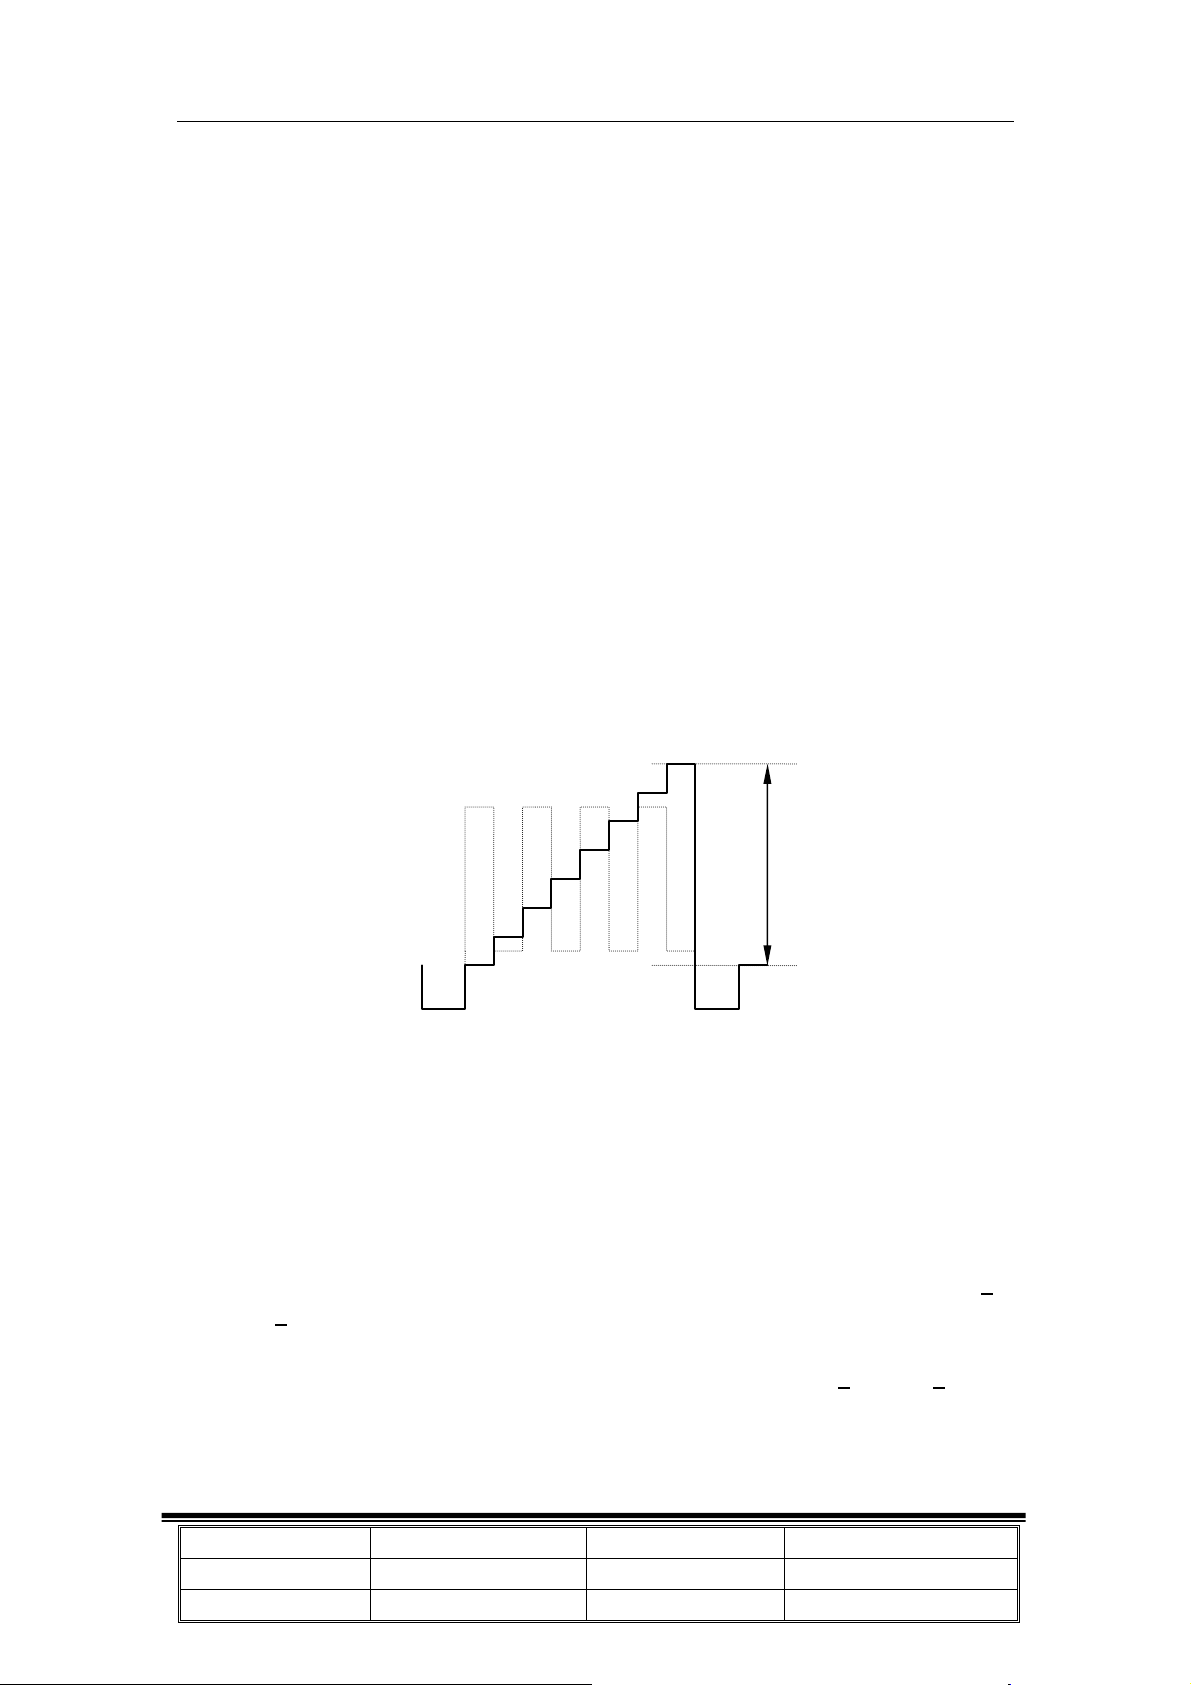
2. RF AGC adjustment
AGC Alignment Procedures:
Apply 8-scale gray signal (80dB), then adjust AGC data in D-mode to get the noise
1)
picture ( snow picture) disappear exactly. Test Pin 1 of TU101 (IF output) and
record the voltage value as V1
P-P.
<Illustrate as Picture A>
2) Apply 8-scale gray signal (80dB), and then adjust AGC data in D-mode until the
synchronization signal distortion appear exactly. Test Pin 1 of TU101 (IF output)
and record the voltage value as V2
3) Calculate the value of V
with the formula: V
P-P
P-P.
Apply 8-scale gray signal (80dB), test Pin 1 of TU101 (IF output), adjust AGC data
until the voltage of Pin 1 of TU101 V
P-P
4) Test three units according to 1),2),3) steps, and record the values of AGC in three
units. Take the average value as benchmark.
110±2.0
110±2.0
<Illustrate as Picture A>
=(V2
P-P
P-P
×V1
=(V2
P-P)
P-P
1/2
×V1
。
P-P)
1/2
Remarks:
Comparing test is necessary due to different probe of Oscilloscope and different Test
Circuit (Picture A).
AGC voltage value should be tested afresh, due to the type/supplier of Tuner
1)
input
or Saw filter changed, or other related components changed.
3P f
IN60
outpu
100KIN60
(Picture A)
Chassis Name
Issued on
Updated on
M123SP 南美软件
2006-04-29
2006-07-29
Serial No.
Page
Version
12
6 of 13
2.0
Page 13
TCL-THOMSON Electronics R&D Center (Shen’Zhen Lab)
A
3. Screen & Focus voltage adjustment
① Apply pattern signal in normal status, enter Factory mode,press“INPUT” button
to stop vertical scan. Note:(the RC/GC/BC is preset to be 40,GD/BD is 40)
Adjust the SCRREEN switch on the flyback transformer to make a horizontal shining ②
line just visible on the screen.
Turn on the vertical output, adjust the “FOCUS” on the flyback transformer to obtain the ③
optimum focus.
4. 1 Adjustment of Sub-contrast, Sub-tint and Sub-color for NSTC and PAL signal
(NORMAL)(Press KEY 5 in D-Mode)
1. connect the probe of Oscilloscope to the conjunction between R201 and P201 (B-out).
2. Apply the Grey-scale/Color-bar (NTSC signal) to the AV\TV input, in STANDARD status.
3. Select CNTC to adjust the contrast, until that the amplitude “A” is 2.0V
4. Select COLC to adjust the color by tuning the amplitude of “a” and “d” to the same.
5. Select TNTCV\T to adjust the tint by tuning the amplitude of “b” and “c” to the same.
6. Apply the Grey-scale/Color-bar (PAL signal) to the AV input, in STANDARD status.
7. Select COLP to adjust the sub-color by tuning the amplitude of “a”, “b”, “c” and “d” to the
same.
4.2 White balance adjustment (NORMAL)
1) Apply the black and white pattern in normal status;
2) Alignment of normal color temperature
① Change Color Temperature to normal status
② Use a color analyzer to measure the black side of the screen. By changing the value
of RC, GC and BC, set the reading of the color analyzer to standard, x=285+
y=294+
③
Use a color analyzer to measure the white side of the screen. By changing the value
of GD, BD, set the reading of the color analyzer to standard, x=285+
④ Separately set the brightness and contrast from min. to max., repeat the step 2 and 3
until the reading of the color analyzer is correct.
Note: Provided the production line is equipped with the self- White balance adjusting
8.
as shown below.
P-P
8, y=294+8.
8,
Chassis Name
Issued on
Updated on
M123SP 南美软件
2006-04-29
2006-07-29
Serial No.
Page
Version
13
7 of 13
2.0
Page 14

TCL-THOMSON Electronics R&D Center (Shen’Zhen Lab)
equipment, white balance can be adjusted automatically as following: Press “BUS OFF”
button under factory mode, the TV set will adjust automatically.
standard:
Warm X=310+
Cool X=278+
Remark:
1) Provided the production line is equipped with the self- White balance adjusting
equipment, white balance of M123SP chassis can be adjusted automatically as following:
Press “I2C BUS” button under factory mode, the TV set will adjust automatically.
2) Free-alignment of warm and cool temperature by presetting the value of RC-W,
GC-W, BC-W, GD-W, BD-W (for warm temperature) / RC-C,GC-C,BC-C,GD-C,BD-C(for
cool temperature ) into memory
5. Adjustment of Sub-brightness
Apply the Grey-scale/Color bar (NTSC signal) to the AV input, in normal status. Enter
factory alignment menu 8, Select BRTS to adjust the sub-brightness, until that the 2
bar of 8 level Grey scale just can be seen.
6. picture geometric adjustment
1. Apply the Philips standard testing pattern NTSC (PAL-N) in normal status, then
enter menu 3, adjusting the following data to get the min-distortion.
HPOS6(HPOS5)(Horizontal Center)
2. Apply the Philips standard testing pattern in normal status, then enter menu 2,
adjusting the following data to get the min-distortion.
HIGH6 (HIGH5) (Height)
VLIN6(VLIN5)(Linearity)
VSC6(VSC5)(Vertical-S Correction)
VCEN6(VCEN5)(Vertical Center)
8, Y=314+8
8, Y=282+8
nd
dark
7.X rays over voltage protecting circuit test :
TV enter working mode,apply more than 26V DC voltage between two ends of C431,
the set should enter protecting mode,or check X rays protecting circuit.
Chassis Name
Issued on
Updated on
M123SP 南美软件
2006-04-29
2006-07-29
Serial No.
Page
Version
8 of 13
2.0
14
Page 15
TCL-THOMSON Electronics R&D Center (Shen’Zhen Lab)
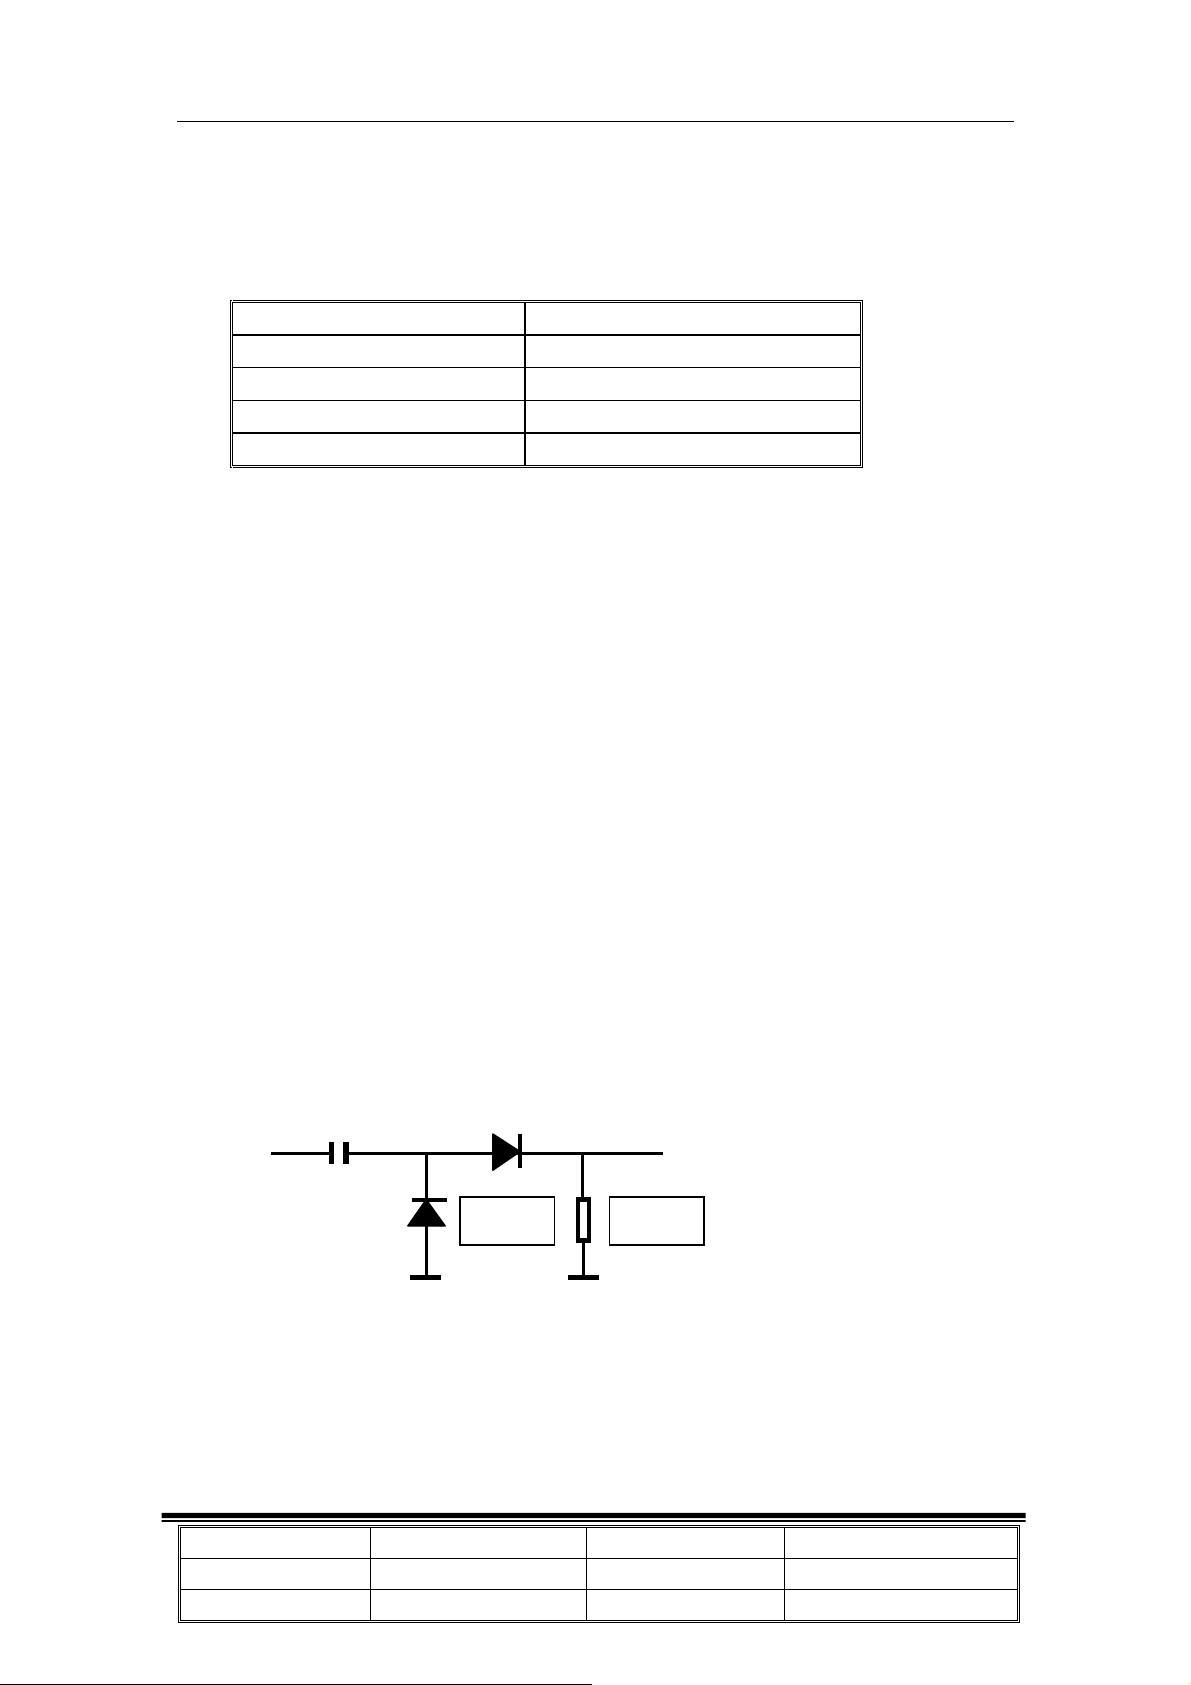
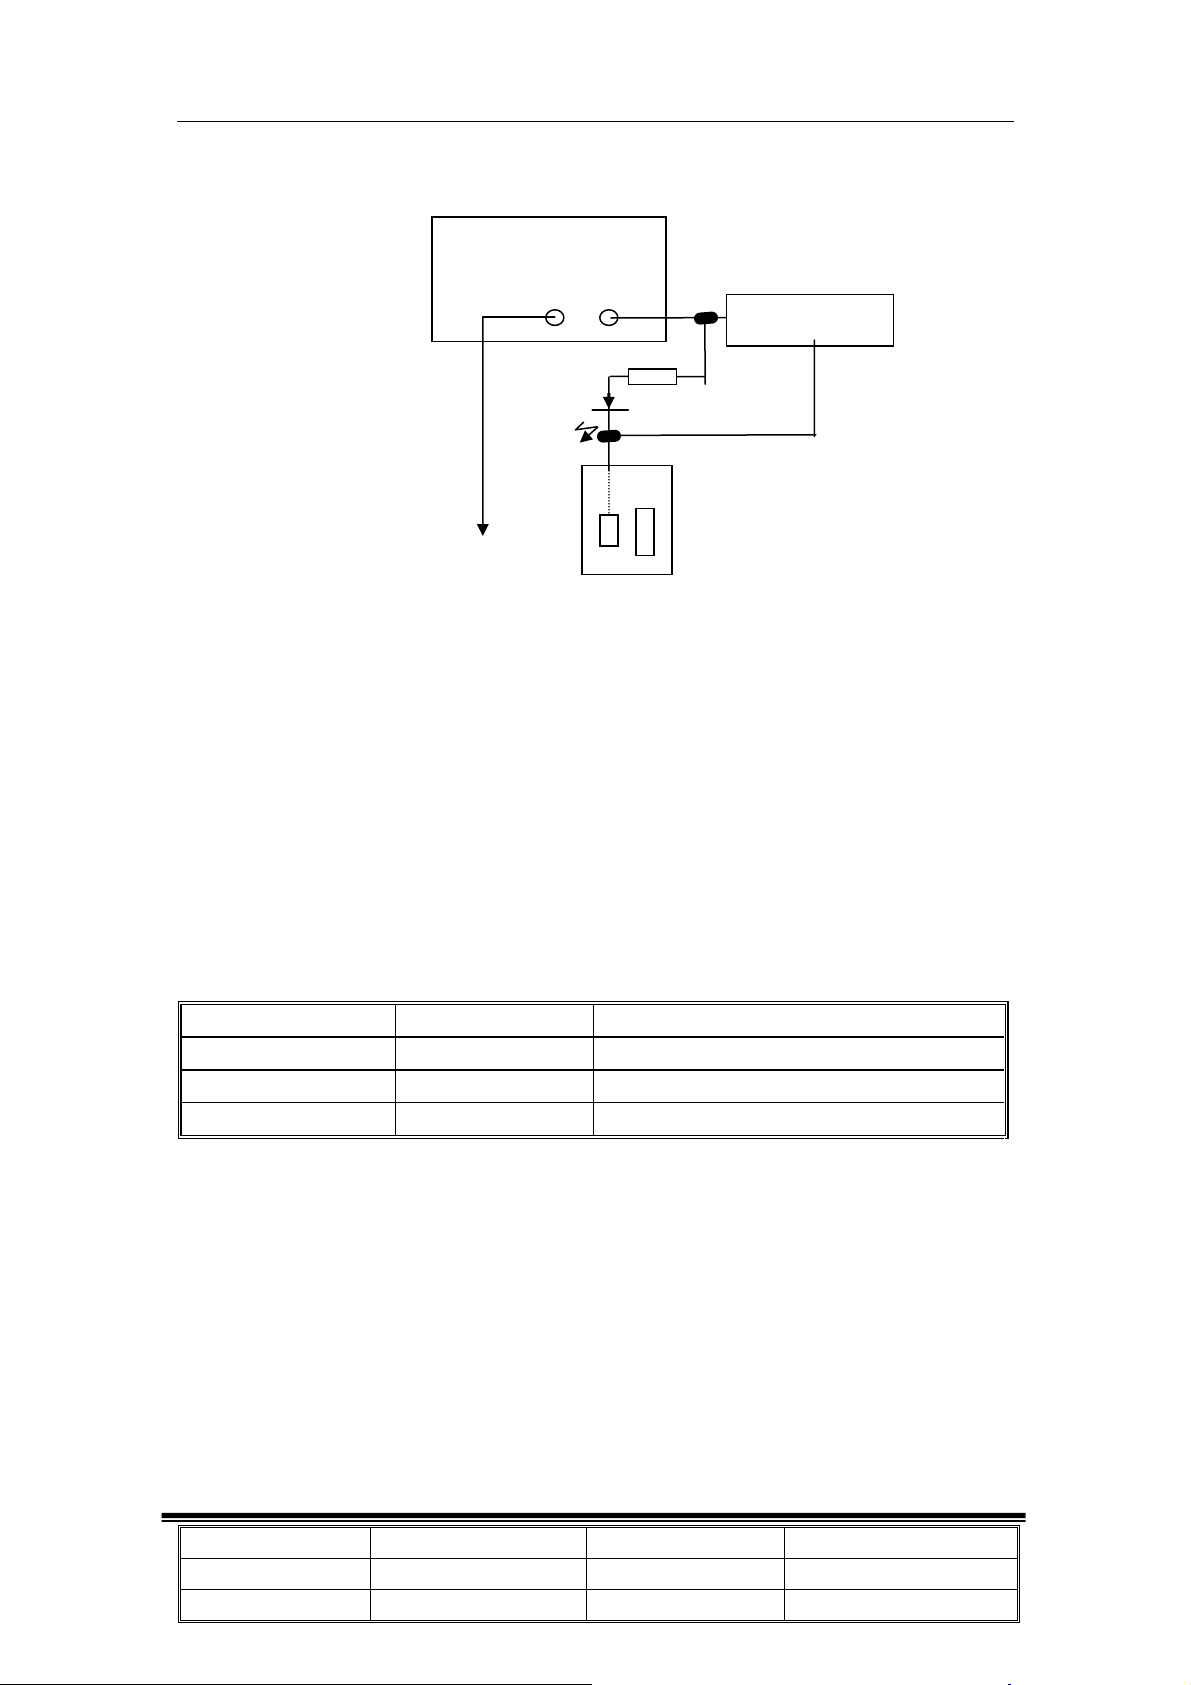
8. PS line polartities test :
Connect follow the graphic below:
DC PS
9V
- +
Sound reminder
DX 2.2k
TO F801
Plug the PS line onto the PS socket M, then touch any pin of F801 with the probe, the LED
DX will shine at the moment, with sound reminder, or it is disqualification.
9.PS power test (Random test) :
Instruments: Power meter.
Input signal pattern: Color bar,Sound 1KHZ ,100% modulation.
Input signal intensity: ≥60dBuv (1 Mv rms)
Test points: find the graphic below
Test means: Set the Brightness, CR to the highest, adjust the volume to make
the sound output to be 0.5W. Connect the power meter to test the
power consumption. Transfer the set to be standby, and test the
power consumption at the moment, which should meet the
requirements below:
PS socket M
Model Power
M123SP
M123SP
Chassis Name
Issued on
Updated on
≤80W <3W
≤80W <3W
M123SP 南美软件
2006-04-29
2006-07-29
Standby power (110V~220V)
Serial No.
Page
Version
9 of 13
2.0
15
Page 16
TCL-THOMSON Electronics R&D Center (Shen’Zhen Lab)
10. High voltage and Ib value limit test( random test )
Instruments: High voltage meter, Ib meter.
Input signal pattern: White vertical
Input signal intensity: 60dBuv (1 Mv rms)
Test means:Connect High voltage meter and Ib meter. Test voltage of different
Ib separately, It should meet the requirements below:
Anode high voltage (Kv)
Model Ib, Ib scope
Value Diff.
11.Heater voltage test ( random test )
Instruments :RMS voltage meter
Input signal pattern : Philips test graphic
Input signal intensity :1 mVrms(60dBuV)to 50 mVrms
Connect the RMS voltage meter to the 2 ends of CRT glowers,test the heater voltage of
highest CR and Brightness, It should meet:6.3±0.3Vrms
12. CCD and VOL-CHIP function test
VOL-CHIP and CCD function test,please find the service manual in detail.
13. Initialization
Under the factory mode,press“SOUND”button,the screen displays“WAIT”,
when the screen displays “OK”, the initialization finished. You can enter the next
working procedure.
14.EEPROM DATA:
Note:the items with * are adjustable,the items with BLUE COLOR are work in CRT
parameter, other items are not, pls do not adjust them;
Use
TMPA8873*SANG(
Use TMPA8873*SBNG(13-PA8873-PSPB),D-Mode\ G2_FLAG04 posit 40
13-PA8873-PSP),D-Mode\
Ib=50µA
Scope:
50µA&1200µA
28.0±2.5
G2_FLAG04 posit 00
21”
<2
Data
Model
南美 M123SP
20E10
Model
南美 M123SP
20E10
南美 M123SP
20E10
Data
Chassis Name
Issued on
Updated on
RC*
40 40 40
40 40 40
HIGH6*
HIGH5*
M123SP 南美软件
2006-04-29
2006-07-29
26 00 0E 19 00 2A
26
26
24 06 0B 16 00 24
GC*
VP60
VP50
00
06
BC*
VLIN6*
10
VLIN5*
0B
Serial No.
Page
Version
16
FAC 01
FAC 02
GD*
VSC6*
17
VSC5*
17
40
40
10 of 13
2.0
BD*
VBLK6 VCEN6*
00
VBLK5 VCEN5*
00
40
40
21
2D
Page 17
TCL-THOMSON Electronics R&D Center (Shen’Zhen Lab)
FAC 03
Model
南美 M123SP
20E10
Data
HPOS6* HPOS5
11 0D 08 08 08 06 00 02
11 0D 08 08 08 06 00 02
U
BLACK*V BLACK*
*
STRAP F0SIF FREQ
STRAP
HL QG
PIF FREQ
Data
Model
南美 M123SP
20E10
Data
Model
南美 M123SP
20E10
Data
Model
南美 M123SP
20E10
Data
Model
CNTX CNTN BRTX BRTN COLX COLN TNTX TNTN
7F 10 20 1B 7F 0E 2C 30
7F 10 20 1B 7F 0E 2C 30
BRTC COLC COLP SCOL SCNT CNTC TNTCT TNTCV
48 37 00 07 0F 36 45 3D
48 37 00 07 0F 45 45 3D
ST3 SV3 SV4 SVD ASSH SHPX SHPN
1B 1B
1B
1B
1B
1B 1B
1B
MOD1 MOD2 MOD3 OPT OPTM1 OPTM2 HDCNT HSTOP
FAC 04
FAC 05
FAC 06
FAC 07
07 1A 1A
07 1A 1A
南美 M123SP
20E10
Data
Model
南美 M123SP
20E10
Data
Model
南美 M123SP
20E10
Chassis Name
Issued on
Updated on
60 F3 88 37 C2 83 09 FF
60 F1 88 37 C2 83 09 FF
FAC 08
RF AGC* BRTS* OSD OSDF CCD OSD CCD OSDF TXCN RGCN
25 00 21 53 4A 65 10 09
25 00 21 53 4A 65 10 09
V01
38 41 48 59 65 6A 6D 70 32
38 41 4B 63 6D D73 75 78 32
V05
V10 V25 V50 V75 V90 V100 VOLMAX
M123SP 南美软件
2006-04-29
2006-07-29
FAC 09
Serial No.
Page
Version
11 of 13
2.0
17
Page 18

TCL-THOMSON Electronics R&D Center (Shen’Zhen Lab)
FAC 10 Data
Model
南美 M123SP
20E10
CURTCEN VOLX PWTM MODE4 MODE5 MODE6 MODE7 MODE8 MODE9
A5 7F 08
A5 7F 08
FF 7F 61 D7 2D CA
FF 7F 61 D7 2D CA
Data
Model
南美 M123SP
20E10
Data
Model
南美 M123SP
20E10
Data
Model
南美 M123SP
20E10
Data
Model
南美 M123SP
20E10
FAC 11
CON1 CON2 CON3 STSADJ ALI 1 ALI 2 ALI3
06 06 02 00 0A 0A 03
06 06 02 00 0A 0A 03
FAC 12
SVM SVM1 OSD2 OSDF2 PYNX PYNN PYXS PYNS
10 10 20 64 28 18 22 10
10 10 20 64 28 18 22 10
CLTM CLVO CLVS ABL DCBS FLG0 FLG1
04 03 03 27 14 82 0C
04 03 03 27 14 82 0C
HAFC AGCC NOIS ONTM NSHP PVLVL PLMT
09 1C 01 08 1A 80 80
09 1C 01 08 1A 80 80
FAC 13
FAC 14
Data
Model
南美 M123SP
20E10
Data
Model
南美 M123SP
20E10
Data
Model
南美 M123SP
20E10
Chassis Name
Issued on
Updated on
RC-C GC-C BC-C GD-C BD-C YUV-RC YUV-RC YUV-RC
10 0D 06 01 10 00 00 00
-- -- -- -- -- -- -- --
RC-W GC-W BC-W GD-W BD-W YUV-RC YUV-RC
10 08 0D F3 E3 00 00
-- -- -- -- -- -- --
FAC 17
D-COL D-BRI D-CON D-SHP
32 32 5A 32
32 32 5A 32
M123SP 南美软件
2006-04-29
2006-07-29
FAC 15
FAC 16
Serial No.
Page
Version
12 of 13
2.0
18
Page 19

TCL-THOMSON Electronics R&D Center (Shen’Zhen Lab)
Data
Model
南美 M123SP
20E10
Data
Model
南美 M123SP
20E10
Data
Model
南美 M123SP
20E10
Data
Model
南美 M123SP
20E10
FAC 18 FAC 19
S-COL S-BRI S-CON S-SHP M-COL M-BRI M-CON M-SHP
32 32 32 32 32 32 1E 32
32 32 32 32 32 32 1E 32
SEG-POINT1 SEG-POINT2DATA-VLDATA-VHDATA-UF SPE-POS1 SPE-DATA1 SENSI-ONSENSI-OFF
173 407 01 02 08 06 05 00 00
173 407 01 02 08 06 05 00 00
THEATER-BAS
2D 4A 38 3E 19 2C
2D 4A 38 3E 19 2C
THEATER-TRE
CONCERT-BASCONCERT-TRE BROCAST-BAS BROCAST-TRE
VOL_MAI GATE VOL-OUT AV GAIN OPTM3
03 2A 75 2D 40
03 2A 75 2D 40
FAC 21
FAC 22
FAC 20
Data
Model
南美 M123SP
20E10
Chassis Name
Issued on
Updated on
FAC 25
G2_FLAG00 G2_FLAG01 G2_FLAG02 G2_FLAG03 G2_FLAG04 G2_FLAG05
30 06 00 02 40 00
30 06 00 02 40 00
M123SP 南美软件
2006-04-29
2006-07-29
Serial No.
Page
Version
13 of 13
2.0
19
Page 20

M123SP
Page 21

5、 IC Brief Introduction
TOSHIBA Int egr ated Circuit
TMPA8873PSNG
TMPA8873CMNG /CPNG /CRNG /CSNG
MCU and Signal Processor for a PAL/NTSC TV
The TMPA8873CPNG is an integrated circuit for a PAL/NTSC
TV. A MCU and a TV signal processor are integrated in a 64-pin
shrink DIP package. The MCU contains 8-bit CPU, ROM, RAM,
I/O ports, timer/counters, A/D converters, an on-screen display
controller, remote control interfaces, IIC bus interfaces and the
Closed Caption decoder. The TV signal processor contains PIF, SIF,
Video, multi-standard chroma, Sync, RGB proce ssors.
Mask ROM: TMPA8873CMNG (ROM size: 32k)
Mask ROM: TMPA8873CPNG (ROM size: 48k)
Mask ROM: TMPA8873CRNG (ROM size: 56k)
Mask ROM: TMPA8873CSNG (ROM size: 64k)
OTP ROM: TMPA8873PSNG (ROM size: 64k)
Weight: 8.85 g (typ.)
21
2005/03/29
Page 22

Con
fidential
TMPA8873
PSNG /
CMNG /CPNG /CRNG /CSNG
Features
MCU
• High speed 8-bit CPU (TLCS-870/X series)
• Instruction execution time: 0.5 µs (at 8 MHz)
• (TMPA8873CPNG)
48-Kbytes ROM, 2-Kbytes RAM
• ROM correction
• 12 I/O ports
• 14-bit PWM output 1 ch for a voltage synthesizer
• 7-bit PWM output 1 channel
• 8-bi t A/D converter 3 ch for a touch-key input with
key ON wake-up CIRCUIT
• Remote control signal preprocessor
• Two 16-bit internal timer/counter 2 ch
• Two 8-bit internal timer/ counter 2 ch
• Time base timer, watchdog timer
• 16 interrupt sources: external 5, inte rnal 11
• IIC bus interface (multi-master)
• STOP and IDLE power saving modes
TV Processor
IF
• Inte grated PIF VCO aligned automatically
• Negative demodulation PIF
• Multi-frequency SIF demodulator without external
Tank-coil
• SIF BPF built-in
• SIF Trap filter built in
Video
• Integrated chroma traps
• Black stretch
• Y-gamma
Chroma
• Integrated chroma BPFs
• PAL/NTSC demodulation
CCD Decoder
• Digital data slicer for NTSC
OSD
• Clock generation for OSD display
• Font ROM characters: 384 characters
• Characters display: 32 columns × 12 lines
• Composition: 16 × 18 dots
• Size of character: 3 (line by line)
• Color of character: 8 (character by character)
• Display position: H 256/V 512 steps
• BOX function
• Fringing, smoothing, Italic, underline function
• Conform to CCD REGULATION
• Jitter elimination
RGB/Base-Band
• Integrated 1 H base-band delay line
• Base-band TINT control
• Internal OSD interface
• Half-tone and transparent for OSD
• External YCbCr interface for DVD
• RGB cut-off/drive controls by bus
• ABCL (ABL and ACL combined)
Sync.
• Integrated fH × 640 VCO
• DC coupled vertical ramp output (single)
• Sync output
AV Switch
• 2 for video
• 2 for audio(mono)
or 1 for audio (Stereo, 2ch ATT), controlled by IIC bus
• ALC (Auto-Audio Level Control)
22
2005/03/29
Page 23

Con
fidential
TMPA8873
PSNG /
CMNG /CPNG /CRNG /CSNG
Block Diagram
10 I/O port
14-bit PWM x1
7-bit PWM x1
8-bit ADC Ext.x3
Int.x1
Romote preprocessor
16-bit int.timer x2
8-bit int.timer x2
Watchdog timer
Interrupt
Ext.x5 Int.x11
IIC bus interfece
1 765432 8 14131211109 15 212019181716 22 282726252423 32313029
P61/LED1/ADC8bit P63/LED2
Ext.x1 Int.x1
P60/ADC8bit P30/Int3/RXIN
P53/ADC8bit/TC1/Int2
uP DVss
8MHz
TEST
uP DVDD 5V
uP VVss
TV DEF GND
FBP
SCP
Hout
HAFC 1
Vsaw
Vout
A Vcc 8V
TV AGND
Cb input
Y input
I/O
RAM:2kB
ROM correction
ROM:48kB
870X CPU core
STOP/IDLE mode
XO
Font:16 x 18
Display:32C x 12L
Color:8
Character:384
Half-tone
Transparent
OSD R/G/B/Ys/I
+
CCD
Sync.sepa
Hor.VCO HAFC-1
HAFC-2 H-shift
Hor.Proc.
TINT
1H DL Int/Ext switch
Color Uni-co lor
RGB Matrix
Brightness
Half-tone
Transparent
Base Band Proc.
V.C/D
V.ramp
V.geometry
+
+
+
V.Drive
Vert.Proc.
C-Trap
Black stretch
Y gamma
Sharpness
Y Proc.
VM
RGB switch
C-BPF
PAL/NTSC
Cut-off
Drive
Chroma Proc.
P31/Int4/TC3
P20/Int5/Stop
P40/PWM14bitReset
P50/PWM7bit/TC2/Int0
P51/SCL
P52/SDA
56 5052535455 49 434445464748 42 363738394041 35 333464 585960616263 57 51
P56
+
uP AVdd 5V
uP MPAGND
TV Dig GND
Bout
Gout
Rout
+
DVcc
Sync out / H/L out
+
YC Vcc 5V
+
APC Fil
Monitor /VM out
+
Cr input
EXT AU 1
V2 CVBS/Y
ALC filter
V1 IN 1Vpp
ABCL
-6dB
AU out 1
AU out 2
TVout 2Vpp
H/Lout / SIF out
EXT AU 2
Cin
+
Black Det
+
(on/off)
AGC
De-emp
AGC
DEMO
IF
Reg.
FM
SW
+
+
+
DET
ALC
ATTATT
Sound
TRAP
BPF
+
PAL/ NTSC demod
Auto.VCO
alignment
PIF Proc.
AFT
33
RF AGC
SAW
IF IN
IF GND
+
IF AGC
AU Monitor out
+
S-Reg.F
+
IF Vcc 5V
+
PIF PLL
+
DC NF
H.correction
/2nd SIF in
2005/03/29
Page 24

Con
fidential
TMPA8873
PSNG /
CMNG /CPNG /CRNG /CSNG
Basic Structure
1. Internal Connections
TMPA8873 has two pieces of IC chip in one package, using Multi-Chip-Package (MCP) technology. One is a
micro controller (MCU) and the other one is a signal processor (SP) for a colo r TV. There are some internal
connections between these two ICs for handling below signals.
Signal Name Direction Description
1 SCL M to S Internal IIC bus SCL
2 SDA Bi-direction Internal IIC bus SDA
3 OSD R M to S OSD signal connection
4 OSD G M to S OSD signal connection
5 OSD B M to S OSD signal connection
6 OSD Y/BL M to S OSD display control
7 OSD I, CS OUT M to S OSD half-tone control/Test pattern si gnal
8 C-Video S to M Composite video signal from internal video switch, for CCD
9 C-Sync S to M Composite sync. signal from sync. Separator, for CCD
10 HD S to M Horizontal timing pulse regenerated from FBP, for OSD
11 VD S to M Vertical timing pulse from sync. Separator, for OSD
12 CLK M to S 8 MHz c l ock
13 AVDD M to S Reference voltage for C-Video interface
14 ADC S to M A/D converter monitoring RF-AGC, R-Y and B-Y
Functions of SP from MCU are controllable through the IIC bus of the internal connections.
2. Power Supply
TMPA8873 has some power supplies and GND pins. Power supplies related MCU must be applied at the
first. Power supplies for H.V
The other power supplies are the last, which are recommended to be supplied from a regulator circuit using
FBP.
3. Crystal Resonator
TMPA8873 requires only one crystal resonator, in stead that a conventional two-chip solution requires two
resonators at least, one for MCU and the other one for SP. An oscillation clock with the crystal resonator of
TMPA8873 is supplied for MCU operation, PIF VCO automatic alignment, alignment free AFT, chroma
demodulation and horizontal oscillation. The oscillation frequency is very important so that those of functions
work properly, so that designing the oscillation freque ncy accurately is required. The spec of crys tal is
recommended to be within
f
: 8 MHz +/−20 ppm
osc
ftemp: 8 MHz +/−40 ppm (−20°C to +65°C)
While RESET of MCU is active, the MCU function stops. Hardware and software initialization sequence
including power suppli es control is required, because status of any hardware after the RESET period is
unknown especially horizontal oscillator which is a very basic timing generator of SP operation.
and TV D.VCC are the second with at least 100 ms delay after MCU power ON.
CC
24
2005/03/29
Page 25

Con
fidential
TMPA8873
PSNG /
CMNG /CPNG /CRNG /CSNG
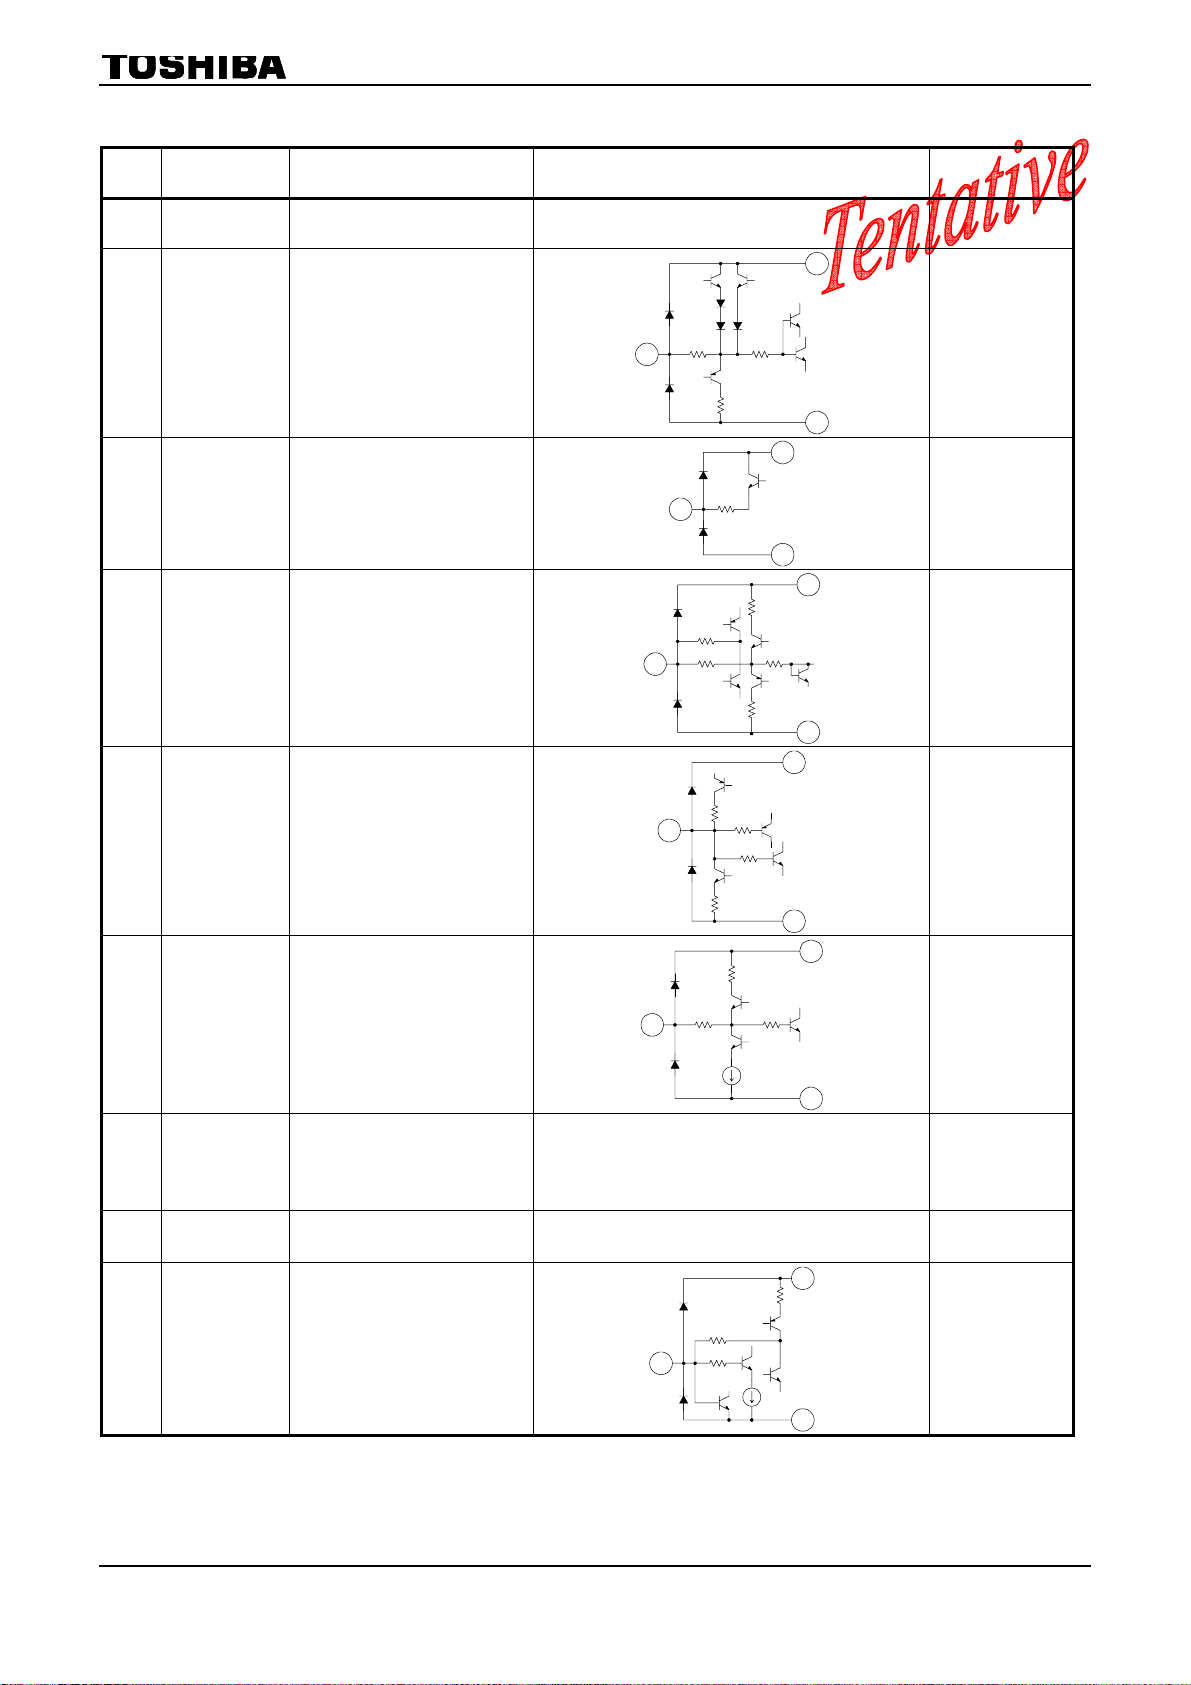
TERMINAL INTERFACE
MCU BLOCK
Pin
No.
Pin Name I/O Function Interface Circuit
1
P61
(/KWU5)
(AIN5)
(LED1)
I/O
(Input)
(Input)
(Output)
Key on wake up input
A/D converter analog input
LED output
Disable
9
4
9
Key‑on
Wake‑up
5kΩ
1kΩ
5kΩ
22pF
Initial"Hi‑Z"
Key‑on
Wake‑up
1
P60
2
(/KWU4)
(AIN4)
P53
(/KWU0)
(AIN0)
3
(TC1)
(INT2)
(SCK1)
4 up DVss
I/O
(Input)
(Input)
I/O
(Input)
(Input)
(Input)
(Input)
(I/O)
Power
Supply
5 Reset I/O
Key on wake up input
A/D converter analog input
Key on wake up input
A/D converter analog input
Timer/counter input
External interrupt input
SIO serial clock input / output
GND
Reset signal input or watchdog
timer output
Address trap reset output
System clock reset output
1kΩ
22pF
2
Initial"Hi‑Z"
Disable
4
9
5kΩ
1kΩ
22pF
Key‑on
Wake‑up
Initial"Hi‑Z"
3
Disable
4
⎯
9
220kΩ
5
1kΩ
25
4
2005/03/29
Page 26

Con
fidential
TMPA8873
PSNG /
CMNG /CPNG /CRNG /CSNG
Pin
No.
Pin Name I/O Function Interface Circuit
6 7 Xout
Xin
Output
Input
X’tal connecting pins
8 TEST Input Test pin for out-going test
9 up DVdd
10 up VVss
54 up AGND
55 up AVdd
Power
Supply
Power
Supply
Power
Supply
Power
Supply
Vdd
Supply 5V
GND for Slicer circuit
GND for Oscillator circuit
Vdd for Oscillator circuit
Supply 5V
9
Osc.enable
6
500Ω
fc
7
1.2MΩ
4
9
8
9
-
1kΩ
CPUcore
Digtalcurcuit
Slicer
4
⎯
⎯
⎯
56 P56 I/O
57
P52
(SDA)
(SO1)
I/O
(I/O)
(Output)
IIC bus serial data input / output
SIO serial data output
56
57
5kΩ
1kΩ
1kΩ
22pF
Key‑on
Wake‑up
Initial"Hi‑Z"
Initial"Hi‑Z"
Opendrain
outputenable
Disable
Disable
9
4
9
4
26
2005/03/29
Page 27

Con
fidential
TMPA8873
PSNG /
CMNG /CPNG /CRNG /CSNG
Pin
No.
58
59
Pin Name I/O Function Interface Circuit
P51
(SCL)
(SI1)
P50
(/PWM8)
(TC2)
(INT0)
I/O
(I/O)
(Input)
I/O
(Output)
(Input)
(Input)
IIC bus serial clock input / output
SIO serial data input
7-bit D/A conversion (PWM)
output
Timer/Counter input
External interrupt input
1kΩ
58
1kΩ
59
Initial"Hi‑Z"
Opendrain
outputenable
Disable
Initial"Hi‑Z"
Disable
9
4
9
4
60
61
P40
(/PWM0)
P20
(/INT5)
(/STOP)
I/O
(Output)
I/O
(Input)
(Input)
14/12-bit D/A conversion (PWM)
output
External interrupt input
STOP mode release signal input
60
61
1kΩ
1kΩ
Initial"Hi‑Z"
Disable
9
4
9
4
9
P31
62
(INT4)
(TC3)
I/O
(Input)
(Input)
External interrupt input
Timer/Counter input
27
62
1kΩ
Initial"Hi‑Z"
Disable
4
2005/03/29
Page 28

Con
fidential
TMPA8873
PSNG /
CMNG /CPNG /CRNG /CSNG
Pin
No.
63
64
Pin Name I/O Function Interface Circuit
P30
(INT3)
(RXIN)
P63
(LED2)
I/O
(Input)
(Input)
I/O
(Output) LED output
External interrupt input
Remote control signal
preprocessor input
63
1kΩ
1kΩ
64
Initial"Hi‑Z"
Disable
Initial"Hi‑Z"
Disable
9
4
9
4
28
2005/03/29
Page 29
Con
fidential
TMPA8873
PSNG /
CMNG /CPNG /CRNG /CSNG
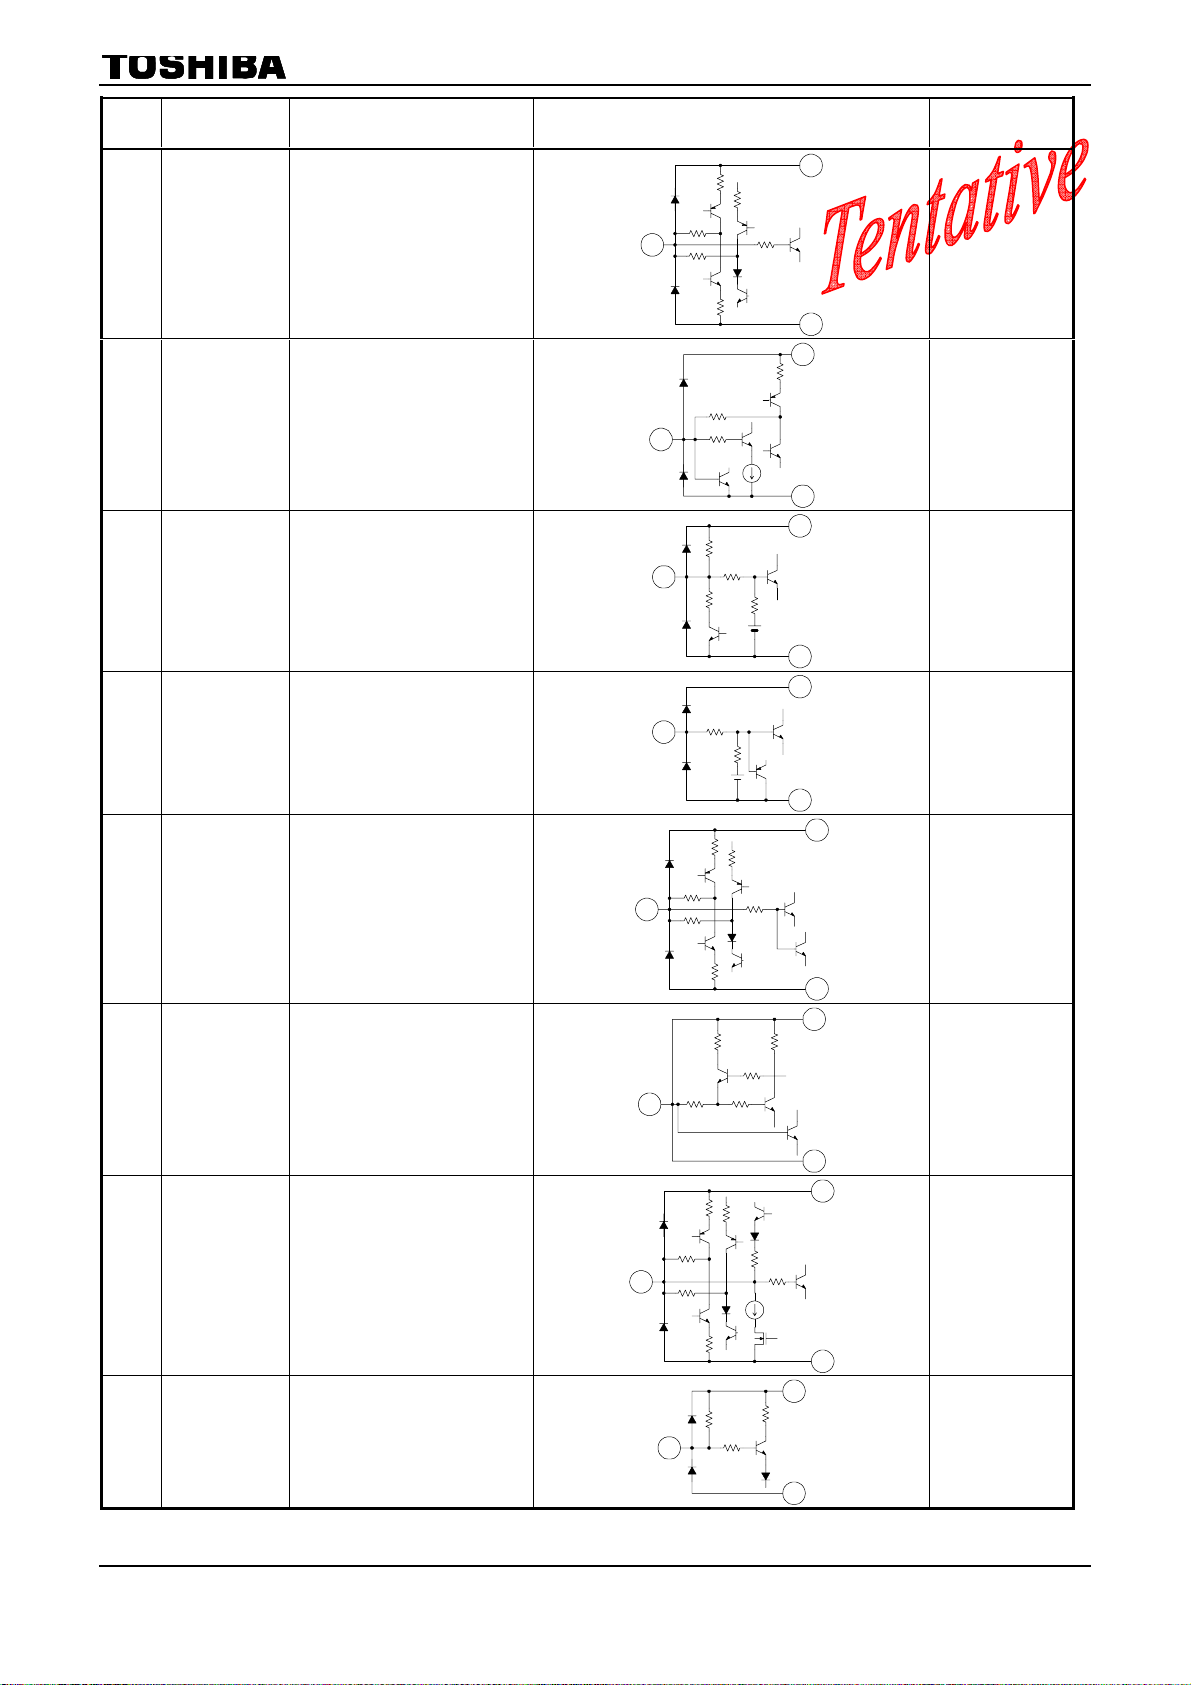
SIGNAL PROCESSOR BLOCK
Pin
No.
11
Pin Name Function Interface Circuit I/O Signal
TV DEF
AGND
GND terminal for TV DEF
block.
⎯ ⎯
17
12 FBP in Input terminal for FBP.
13 H out
Output terminal for
Horizontal driving pulse.
Terminal to be connected
14 HAFC 1
capacitor for H AFC filter.
This terminal voltage
controls H VCO frequency.
Terminal to be connected
capacitor to generate V saw
15 V saw
signal.
V saw amplitude is kept
constant by V AGC
function.
16 V out
Output terminal for Vertical
driving pulse.
12
14
15
16
200Ω 10kΩ
50Ω
13
100Ω
300Ω
1kΩ
6kΩ
200Ω
200Ω
5kΩ
33kΩ
7.5kΩ
17
11
17
11
11
17
11
17
Vcc terminal for DEF, RGB,
17 AVcc 8V
Audio out and PIF out
circuit.
Supply 8V.
18 TV A GND GND terminal for TV block. ⎯ ⎯
19 Cb in Input terminal for Cb signal.
29
19
11
⎯ ⎯
47
5kΩ
5kΩ
18
2005/03/29
Page 30
Con
fidential
TMPA8873
PSNG /
CMNG /CPNG /CRNG /CSNG
Pin
No.
Pin Name Function Interface Circuit I/O Signal
20 Y in Input terminal for Y signal.
21 Cr in Input terminal for Cr signal.
22 Ext Au1
Input terminal for Audio
signal 1.
20
21
22
1.5kΩ
11kΩ
5kΩ200Ω
5kΩ
5kΩ
35kΩ
1.5kΩ
35kΩ
17
18
47
47
18
47
18
23 C in
24 V2 in
25 ALC filter
26 V1 in
Input terminal for Chroma
signal.
Input terminal for Video
signal.
Terminal to be connected
capacitor for ALC (Audio
Level Control).
Input terminal for Video
signal.
(Input level = 1 Vp-p)
24
26
23
25
1.5kΩ
1.5kΩ
11kΩ
200Ω 5kΩ
1.5kΩ
11kΩ
40kΩ
1.5kΩ
1.5kΩ
18
17
18
47
18
47
27 ABCL
Input terminal for ABL/ACL
control.
30
27
31kΩ
2kΩ
47
18
18
2005/03/29
Page 31
Con
fidential
TMPA8873
PSNG /
CMNG /CPNG /CRNG /CSNG
Pin
No.
Pin Name Function Interface Circuit I/O Signal
28 Au out 1
29 Au out 2
30 TV out
1bit DAC
31
/SIF out
Output terminal 1 for Audio
signal.
Output terminal 2 for Audio
signal.
Output terminal for detected
PIF signal.
Output terminal for 1bit
DAC or detected SIF signal.
17
28
18
17
29
40
17
30
18
36
31
32 Ext Au2 in
H correc /
33
SIF in
34 DC NF
35 PIF PLL
36 IF Vcc 5V
Input terminal for Audio
signal 1.
Input terminal for H
correction and 2nd SIF.
Terminal to be connected
capacitor for DC Negative
Feedback from SIF Det
output.
Terminal to be connected
with loop filter for PIF PLL.
This terminal voltage is
controlled PIF VCO
frequency.
Vcc terminal for IF circuit.
Supply 5V.
33
35
34
32
500Ω
40
17
5kΩ200Ω
35kΩ
35kΩ
18
36
30kΩ
40
17
20kΩ
18
36
4kΩ
40
2kΩ
70kΩ
6pF
30kΩ
500Ω
3kΩ
30pF
2kΩ15kΩ 500Ω
⎯
31
2005/03/29
Page 32

Con
fidential
TMPA8873
PSNG /
CMNG /CPNG /CRNG /CSNG
Pin
No.
Pin Name Function Interface Circuit I/O Signal
37 Reg Fil
AUDIO
38
Monitor out
39 IF AGC
Terminal to be connected
capacitor for stabilizing
internal bias.
Output terminal for External
audio signal or TV audio
signal selected by BUS
(Audio SW).
Terminal to be connected
with IF AGC filter.
39
37
38
6kΩ
100Ω
20kΩ
1.2kΩ 1.2kΩ
500Ω
5kΩ
5kΩ
17
18
17
18
36
2kΩ
40
40 IF GND GND terminal for IF circuit. ⎯
36
1.4kΩ
1.4kΩ
41
42
IF in
Input terminals for IF
signals.
Pin41 and Pin42 are both
input poles of differential
41
42
50kΩ
20pF
20pF
50kΩ
amplifier.
40
36
43 RF AGC
Output terminal for RF AGC
control level.
43
200Ω 2kΩ
40
47
Terminal to be connected
with Black Det filter for
4kΩ
44 Black Det
black stretch.
44
4kΩ
17
18
Output terminal for monitor
45
SVM /
Monitor
function. Also output
terminal for SVM signal.
Selectable through IIC bus
45
200Ω
500Ω
18
47
Terminal to be connected
with APC filter for Chroma
46 APC filter
demodulation.
This terminal voltage
46
500Ω
500Ω
152kΩ
controls frequency of
VCXO.
18
32
2005/03/29
Page 33

Con
fidential
TMPA8873
PSNG /
CMNG /CPNG /CRNG /CSNG
Pin
No.
47 YC Vcc 5V
48 Sync out
49 DVCC
50 R out
51 G out
52 B out
53 TV DGND
Pin Name Function Interface Circuit I/O Signal
Vcc terminal for Y/C circuit.
Supply 5V.
Output terminal for Sync
pulse.
A pull up resister is required
because of its open
collector output.
(Pull up resister: minimum
4.7kohm)
Vcc terminal for Digital
block.
This terminal voltage is
clipped about 3.3V by
regulator circuit.
Supply DVCC voltage from
A VCC 8V(#17) voltage via
270Ω.
Output terminal for R signal.
Output terminal for G
signal.
Output terminal for B signal.
GND terminal for digital
block.
48
⎯ ⎯
17
5kΩ
100Ω
11
⎯ ⎯
17
50
100Ω
51
52
18
⎯ ⎯
33
2005/03/29
Page 34

Con
fidential
TMPA8873
PSNG /
CMNG /CPNG /CRNG /CSNG
Signal Processor Descriptions
AFT Center
1. Tank-Coil-Less PIF VCO
TMPA8873 adopts a tank-coil-less PIF VCO circuit, which has advantages of cost, performance of weak IF
input and easy to design PCB layout. The PIF PLL system has self-alignment circuit, so that the micro
controller needs only to order the PIF PLL system to start self-alignment through the IIC bus. The
self-alignment finishes within 50 ms.
2. Buil t- I n Sound Band Pass Filter
A sound band pass filter is integrated on the chip for multi frequency SIF systems. The 1st SIF demodulator
multiplies PIF input signa l and regenerated PIF carrier from VCO with 90° angle, and gets multi-frequency
SIF signal as 6.5 MHz, 6.0 MHz, 5.5 MHz and 4.5 MHz according to the SIF system.
3. Buil t- I n Sound Trap Filter
A sound trap filter is integrated on the chip for multi frequency SIF systems. The sound trap filter
characteristics are changed by WRITE BUS register setting. It is better that the setting data is had for each
SIF frequency.
4. AFT
A recent IF system adopts a digital AFT circuit. But analog DC voltage is used as interface between an IF
system and a micro controller in the AFT control loop. TMPA8873 adopts a digital interface through IIC bus
shown as below.
f0 = 38.0 MHz
166.68 kHz
AFT Window
Narrow
AFT Window
Wide
1 0 0
41.67 kHz
5. Non-Standard IF Signals
TMPA8873 prepares ways for non-standard IF inputs. The OVER MOD switch is available for
over-modulated PIF signals in the condition of more than 87.5% modulation at 100 IRE, which is the
maximum modulation Standard of PAL and NTSC. In addition, TMPA8873 has capability to modulate more
than 400% over-modulated SIF signal without undesired voltage turning over also.
1 0 0
41.67 kHz 41.67 kHz
500.04 kHz
41.67 kHz
0 1
41.67 kHz
34
2005/03/29
Page 35

Con
fidential
TMPA8873
PSNG /
CMNG /CPNG /CRNG /CSNG
6. AV Switch
The audio switch has two inputs for an external audio, and one for internal demodulated audio signal. The
two external audio inputs can use as audio stereo input. The switched audio signal goes into the audio
attenuator, which has controllability of audio gain from 0dB to –80dB or less with near log curve
characteristic.
The video switch has one input for an external CVBS or S-VHS signal, the other for the de modulated TV
video signal and the last for an external YCbCr signal, mainly coming form a DVD player. The CIN terminal
for the external S-VHS sign al has capability to detect DC level of the input signal, and the micro controller
can read the result as ‘CIN DC’ through the IIC bus. This function may prepare a way for automatic switching,
when inserting S-VHS connection, by means of software control.
A monitor output is available with the selected video signal. In the case of selecting S-VHS input, Y and C
signals are mixed for the moni tor output. This output is useful for signal detecting by the TC3 counting of the
micro controller through an external LPF circuit for strict signal detecting performance.
7. Asymmetric Sharpness
External analog circuits are likely to generate ‘over-shoot’ signal. The asymmetric sharpness circuit is
provided to compensate this undesired signal. It is possible to get more gain of pre-shoot than over-shoot by
using the asymmetric sharpness, instead of that a conventional sharpness function generates both pre-shoot
and over-shoot symmetrically.
8. Scan Velocity Modulation (SVM)
The SVM output is available for a large screen size TV. The SVM or the monitor output is selectable at pin
45 through the IIC bus. The SVM gain and timing is also selectable to match an external SVM drive circuit.
9. Chroma Demodulator
The PAL/NTSC chroma demodulator is integrated with the automa tic color system detection. The 1 H-delay
line is integrated on the ch ip for PAL chroma demodul ation. The 1 H-delay line can acts as a chroma comb
filter on NTSC chroma system.
10. Base Band Color System
TMPA8873 features a base band color system for a YCbCr inputs capability for a DVD and a SDTV signals.
Those signals are demodulated out side of TMPA8873, so that color signals (Cb, Cr) has different color level ,
different demodulation angle and different relative amplitude fro m the color signals demodulated by the
internal chroma demodu lator of TMPA8873. The base band color system is requi red to have control functions
of color saturation, TINT and relative amplitude, and TMPA8873 has all of these functions in it. Because of
base band TINT function, TMPA8873 has capability to control PAL TINT, which is basically hard to control on
a conventional signal processor IC. Of course the control software can inhibi t the PAL TINT function.
11. Transparent OSD Interface
TMPA8873 provides a transparent OSD capability. A conventional OSD system provides a half-tone
function for OSD interface, by reducing the gain of a main picture signal during high period of ‘Ym’ signal
from the micro controller. TMPA8873 has one more control line as ‘I’ for OSD from the micro controller, which
enables to put a color on the same area of half-tone, so that software can achieve a see-through color menu by
using the transparent OSD.
12. Noise Level Detection
The Noise detector is integrated. The noise detection leve l is set by WRITE BUS register. The result can be
read through the IIC bus. Accordi ng to the result, the micro controller can adjust level of some controls in the
signal processor. For example,
(1) When a noisy signal comes in, horizontal synchronization is influenced and the picture on the screen
looks bad. Selecting less H-AFC gain makes the picture looks better.
(2) When a very noisy signal comes in, the vertical frequency detector sometimes makes miss-dete ction, and
causes vertical jittering. Selecting the auto-50 Hz mode or auto-60 Hz mode, according to the vertical
frequency information just before, may solves the vertical jittering.
35
2005/03/29
Page 36

Con
fidential
TMPA8873
PSNG /
CMNG /CPNG /CRNG /CSNG
13. Signal Detection Flags
There are some flags on the READ BUS registers. They indicate that a certain signal is detected at the
moment. But reliability of a detection result is not so accurate if checking only one flag, so that confirming
several flags, which means similar result by each other, at the same time is recommended.
14. Control the Signal Processor
The signal processor is connected with the micro controller by means of internal wiring. All functions of the
signal processor can be controlled through IIC bus, which is a part of the internal connections.
15. Thai mono-bilingual system
Thai mono-bilingual system requires two external sound BPFs(for S1/ S2 carriers) and SW.
Refer to following block diagram. Because two SIF frequencies are very near to each other.
SIF out
S1 carrier
BPF
BPF31
S2 carrier
2nd SIF in
33
36
2005/03/29
Page 37

6、 PCB Layout
Page 38

Page 39

PART NO. SEPC QTY UNIT LOCATION
76-002091-0AT CARTON BOX LWH 624X384X556MM 0.006 PC
76-326350-01A CARTON SHEET 61X37X0.3CM 0.062 PC
11-0BC337-0BX TRANSISTOR (NPN) BC337-40 1 PC Q1501
13-C73C03-02B IC SC73C0302 1 PC IC1501
14-IRE05B-XX0 IR EMITTING DIODE TSAL6200 1 PC D1501
18-CB0221-JNX RES. C.F. 220 OHM 1/6W +/-5% 1 PC R1502
18-CB0229-JNX RES. C.F. 2.2 OHM 1/6W +/-5% 1 PC R1501
25-HBB479-M1X CAP. ELEC 4.7 UF 10V +/-20% 1 PC C1504
26-EBP101-JCS CAP. CER 100 PF 50V +/-5% 1 PC C1502
26-EBP101-JCS CAP. CER 100 PF 50V +/-5% 1 PC C1501
26-EBP104-ZFS CAP. CER 0.1UF 50V +80%/-20% 1 PC C1503
40-UOCASR-RMB1XG P.C.B. REMOTE HANDSET BD 1 PC
41-WJ0120-B00 WIREBAREJUMPER12MM 1 PC J1501
45-COS455-KY1 CERAMIC RESONATOR 455KHZ 1 PC X1501
49-HS36R1-00X9A RUBBER PAD KEYS 1 PC
55-HS36RB-1HA5F LOWER CASE - REMOTE HANDSET 1 PC
55-HS36RD-0HA5F BATT. DOOR - REMOTE HANDSET 1 PC
55-HS36RT-1HACQ RREMOTE HANDSET-FRONT CABINET 1 PC
58-HS36R3-2UI9A INLAY REMOTE HANDSET 1 PC
67-X38064-0E2 BATTERY SPRING (+/-) 1 PC
67-X38065-0E2 BATTERY SPRING (+) 1 PC
67-X38066-0E2 BATTERY SPRING (-) 1 PC
74-007026-60C POLYBAG (70MMX260MMX0.06MM) 1 PC
02-IRR001-XX1 IR RECEIVER MODULE HRM380017 0.005 PC
07-457FF5-NA9G TUNER F07GP-4ND-E 0.01 PC
10-0FR104-FBX DIODE FR104 (FAST RECTIFIER) 0.005 PC
10-0FR104-FBX DIODE FR104 (FAST RECTIFIER) 0.005 PC
10-0FR104-FBX DIODE FR104 (FAST RECTIFIER) 0.005 PC
10-0FR104-FBX DIODE FR104 (FAST RECTIFIER) 0.005 PC
10-0FR104-FBX DIODE FR104 (FAST RECTIFIER) 0.005 PC
10-0FR104-FBX DIODE FR104 (FAST RECTIFIER) 0.005 PC
10-0FR104-FBX DIODE FR104 (FAST RECTIFIER) 0.005 PC
10-0FR104-FBX DIODE FR104 (FAST RECTIFIER) 0.005 PC
10-0FR104-FBX DIODE FR104 (FAST RECTIFIER) 0.005 PC
10-0RL255-EBX DIODE RL255 OR RL206(POWER RECTIFIER) 0.005 PC
10-0RL255-EBX DIODE RL255 OR RL206(POWER RECTIFIER) 0.005 PC
10-0RL255-EBX DIODE RL255 OR RL206(POWER RECTIFIER) 0.005 PC
10-0RL255-EBX DIODE RL255 OR RL206(POWER RECTIFIER) 0.005 PC
10-0RU3AM-FBX HIGH EFFICIENCY RECTIFIER RU3AM 0.005 PC
10-0RU4YX-F0X DIODE GRU4YX (FAST RECOVERY) 0.005 PC
10-1N4002-EBX DIODE 1N4002 (RECTIFIER) 0.005 PC
10-1N4002-EBX DIODE 1N4002 (RECTIFIER) 0.005 PC
10-1N4004-EBX DIODE IN4004 (RECTIFIER) 0.005 PC
10-1N4148-ABX DIODE 1N4148 (SWITCHING) 0.005 PC
10-1N4148-ABX DIODE 1N4148 (SWITCHING) 0.005 PC
10-1N4148-ABX DIODE 1N4148 (SWITCHING) 0.005 PC
10-1N4148-ABX DIODE 1N4148 (SWITCHING) 0.005 PC
10-1N4148-ABX DIODE 1N4148 (SWITCHING) 0.005 PC
10-1N4148-ABX DIODE 1N4148 (SWITCHING) 0.005 PC
10-1N4148-ABX DIODE 1N4148 (SWITCHING) 0.005 PC
10-1N4148-ABX DIODE 1N4148 (SWITCHING) 0.005 PC
10-1N4148-ABX DIODE 1N4148 (SWITCHING) 0.005 PC
10-1N4148-ABX DIODE 1N4148 (SWITCHING) 0.005 PC
10-1N4148-ABX DIODE 1N4148 (SWITCHING) 0.005 PC
10-1N4148-ABX DIODE 1N4148 (SWITCHING) 0.005 PC
Page 40

10-1N4148-ABX DIODE 1N4148 (SWITCHING) 0.005 PC
10-1N4148-ABX DIODE 1N4148 (SWITCHING) 0.005 PC
10-1N4148-ABX DIODE 1N4148 (SWITCHING) 0.005 PC
10-1N4148-ABX DIODE 1N4148 (SWITCHING) 0.005 PC
10-1N4148-ABX DIODE 1N4148 (SWITCHING) 0.005 PC
10-1N4148-ABX DIODE 1N4148 (SWITCHING) 0.005 PC
10-79C18V-DBX DIODE ZENER 18V 1/2W 5% 0.005 PC
10-79C3V9-DBX DIODE ZENER 3V9 1/2W 5% 0.005 PC
10-79C3V9-DBX DIODE ZENER 3V9 1/2W 5% 0.005 PC
10-79C5V1-DBX DIODE ZENER 5V1 1/2W 5% 0.005 PC
10-79C5V1-DBX DIODE ZENER 5V1 1/2W 5% 0.005 PC
10-79C6V2-DBX DIODE ZENER 6V2 1/2W 5% 0.005 PC
10-79C7V5-DBX TCL10-79C7V5-DBX= DIODE ZENER 7V5 1/2W 5 0.005 PC
10-79C8V2-DBX DIODE ZENER 8V2 1/2W 5% 0.005 PC
10-CW574C-DJX DIODE CW574CD 0.005 PC
11-4508DZ-0CX TRANSISTOR BU450DZ 0.005 PC
11-C144ES-0BX TCL11-C144ES-0BX= TRANSISTOR PDTC144ES ( 0.005 PC
11-CA8550-DBX TRANSISTOR 8550D-TO-92(PNP) 0.005 PC
11-KTD863-0BX TRANSISTOR KTD863 0.005 PC
11-SA1015-YBX TRANSISTOR ST2SA1015Y (PNP) 0.005 PC
11-SA1015-YBX TRANSISTOR ST2SA1015Y (PNP) 0.005 PC
11-SC1815-YBX TRANSISTOR 2SC1815-Y (NPN) 0.005 PC
11-SC1815-YBX TRANSISTOR 2SC1815-Y (NPN) 0.005 PC
11-SC1815-YBX TRANSISTOR 2SC1815-Y (NPN) 0.005 PC
11-SC1815-YBX TRANSISTOR 2SC1815-Y (NPN) 0.005 PC
11-SC1815-YBX TRANSISTOR 2SC1815-Y (NPN) 0.005 PC
11-SC1815-YBX TRANSISTOR 2SC1815-Y (NPN) 0.005 PC
11-SD2012-0CX TRANSISTOR 2SD2012 0.005 PC
11-SK2645-0AX TRANSISTOR 2SK2645-01MR (POWER 0.005 PC
11-TC3207-0BX TRANSISTOR KTC3207 0.005 PC
11-TC3207-0BX TRANSISTOR KTC3207 0.005 PC
11-TC3207-0BX TRANSISTOR KTC3207 0.005 PC
13-000TL4-31T IC TL431ACLP 0.005 PC
13-0HPC92-2CP PHOTO COUPLER HPC922-C 0.005 PC
13-24LC08-BNB IC EEPROM 24LC08BN(WRITE) 0.005 PC
13-HCF405-3BB IC HCF4053BM1 0.005 PC
13-LD1117-50B 5.0V IC LD1117S50TR 0.005 PC
13-LD1117-50B 5.0V IC LD1117S50TR 0.005 PC
13-MSP342-5GB IC MSP 3425G 0.005 PC
13-TDA486-4AS IC TDA4864AJ 0.005 PC
13-TEA150-6TB IC TEA1506T/N1 118 0.005 PC
13-TEA202-5BP IC TEA2025B2X2W 0.005 PC
13-TSM123-05M01 MCU TMPA8873CSBNG 0.005 PC
18-EF0229-JGX RES. FUS. 2.2 OHM 1W +/-5% 0.005 PC
18-EF0478-JGX RES. FUS. 0.47 OHM 1W +/-5% 0.005 PC
22-PTC909-3A5 PTC 9 OHM 0.005 PC
25-BLA100-M1X CAP. ELEC 10 UF 250V +/-20% 0.005 PC
25-BLA100-M1X CAP. ELEC 10 UF 250V +/-20% 0.005 PC
25-BMJ151-M1X CAP. ELEC 150 UF 400V +/-20% 0.005 PC
26-AIC221-KBX CAP. CER 220 PF 500V +/-10% B 0.005 PC
26-AIC391-KBX CAP. CER 390 PF 500V +/-10% B 0.005 PC
26-AIC391-KBX CAP. CER 390 PF 500V +/-10% B 0.005 PC
26-AIC391-KBX CAP. CER 390 PF 500V +/-10% B 0.005 PC
26-AIL103-KBX CAP.CER 10NF 500V +/-10% 0.005 PC
26-AIL103-KBX CAP.CER 10NF 500V +/-10% 0.005 PC
Page 41

26-AKA221-KRX CAP. CER 220 PF 1KV +/-10% 0.005 PC
26-AKM221-KRX CAP. CER 220 PF 1KV +/-10% 0.005 PC
26-AMM102-KBX CAP. CER 1000 PF 2KV +/-10% B 0.005 PC
26-AMM561-KRX CAP. CER 560PF 2KV +/-10% 0.005 PC
26-APK222-MEX CAP. CER 2200PF 400VAC+/-20% E 0.005 PC
26-APK471-KBX CAP. CER 470PF 400VAC +/-10% B 0.005 PC
26-APK471-KBX CAP. CER 470PF 400VAC +/-10% B 0.005 PC
26-AQK472-ZFX CAP. CER 4700PF 250VAC +80%-20% F 0.005 PC
26-AQK472-ZFX CAP. CER 4700PF 250VAC +80%-20% F 0.005 PC
37-FBAT04-CAA1A FBT BSC25-0252T 0.01 PC
42-51208D-XX1G SPEAKER 8 OHM 5W (52MMX120MM) 0.01 PC
42-51208D-XX1G SPEAKER 8 OHM 5W (52MMX120MM) 0.01 PC
45-FIL4M5-0Y3 CER.FILTER LT4.5MH 0.005 PC
45-OSC18M-4Y20A CRYSTAL 18.432MHZ(CL=12PF) 0.005 PC
45-OSC8M0-0Y0 CRYSTAL 8.0MHZ 0.005 PC
45-SAWF18-590 SAW FILTER F1859 0.005 PC
47-CRT022-NX0G CRT SOCKET GZS10-2-DD2 (DQ5) 0.01 PC
48-POW001-AX0G SWITCH POWER 0.005 PC
50-03150D-1GS1G TCL50-03150D-1GS1G= FUSE 3.15AT 250VAC 5 0.01 PC
51-DC0220-0QN01G POWER CORD CS-016+H03VVH2-F 0.005 PC
55-DA71FC-0CN9M FRONT CABINET 0.03 PC
55-DA71RC-0CN5F REAR CABINET 0.01 PC
76-002091-0AT CARTON BOX LWH 624X384X556MM 0.001 PC
T8-HS36R3-M123A M123SP REMOTE HANDSET ASS'Y(W/MSP) 0.01 PC
74-100100-8CD POLYBAG (100CMX100CM) 0.03 PC FOR FRONT CABINET
74-120120-8CD POLYBAG (120CMX120CM) 0.004 PC FOR REAR CABINET
74-279070-50C EPE BOARD (580MMX440MMX5MM) 0.004 PC FOR REAR CABINET
74-344780-50C EPE BOARD (900MMX400MMX5MM) 0.021 PC FOR REAR CABINET
76-001497-0AF CARTON BOX LWH 640X460X360MM 0.001 PC FOR OTHER
76-00DA71-0AF CARTON BOX 0.015 PC FOR FRONT CABINET
76-00DA71-0AR CARTON BOX 0.004 PC FOR REAR CABINET
76-346740-01A CARTON SHEET LWH 440X620X3MM 0.002 PC FOR OTHER
77-120120-6WC RAW BAG POLYBAG -- 00 00 R=N 0.015 PC FOR FRONT CABINET
76-002091-0AT CARTON BOX LWH 624X384X556MM 0.05 PC
76-326350-01A CARTON SHEET 61X37X0.3CM 0.1 PC
11-0BC337-0BX TRANSISTOR (NPN) BC337-40 1 PC Q1501
13-C73C03-02B IC SC73C0302 1 PC IC1501
14-IRE05B-XX0 IR EMITTING DIODE TSAL6200 1 PC D1501
18-CB0221-JNX RES. C.F. 220 OHM 1/6W +/-5% 1 PC R1502
18-CB0229-JNX RES. C.F. 2.2 OHM 1/6W +/-5% 1 PC R1501
25-HBB479-M1X CAP. ELEC 4.7 UF 10V +/-20% 1 PC C1504
26-EBP101-JCS CAP. CER 100 PF 50V +/-5% 1 PC C1501
26-EBP101-JCS CAP. CER 100 PF 50V +/-5% 1 PC C1502
26-EBP104-ZFS CAP. CER 0.1UF 50V +80%/-20% 1 PC C1503
40-UOCASR-RMB1XG P.C.B. REMOTE HANDSET BD 1 PC
41-WJ0120-B00 WIREBAREJUMPER12MM 1 PC J1501
45-COS455-KY1 CERAMIC RESONATOR 455KHZ 1 PC X1501
49-HS36R1-00X9A RUBBER PAD KEYS 1 PC
55-HS36RB-1HA5F LOWER CASE - REMOTE HANDSET 1 PC
55-HS36RD-0HA5F BATT. DOOR - REMOTE HANDSET 1 PC
55-HS36RT-1HACQ RREMOTE HANDSET-FRONT CABINET 1 PC
58-HS36R3-2UI9A INLAY REMOTE HANDSET 1 PC
67-X38064-0E2 BATTERY SPRING (+/-) 1 PC
67-X38065-0E2 BATTERY SPRING (+) 1 PC
67-X38066-0E2 BATTERY SPRING (-) 1 PC
74-007026-60C POLYBAG (70MMX260MMX0.06MM) 1 PC
Page 42

T8-HS36R3-M123A M123SP REMOTE HANDSET ASS'Y(W/MSP) 1 PC
10-CW574C-DJX DIODE CW574CD 1 PC D101
11-4508DZ-0CX TRANSISTOR BU450DZ 1 PC Q402
13-TDA486-4AS IC TDA4864AJ 1 PC IC301
13-TEA202-5BP IC TEA2025B2X2W 1 PC IC601
18-EE0109-JS2 RES. FUS. 1 OHM 1/2W +/-5% 1 PC R405
18-EE0109-JS2 RES. FUS. 1 OHM 1/2W +/-5% 1 PC R409
18-EE0109-JS2 RES. FUS. 1 OHM 1/2W +/-5% 1 PC R418
18-EF0478-JGX RES. FUS. 0.47 OHM 1W +/-5% 1 PC R403
18-EG0109-JHX RES. FUS. 1 OHM 2W +/-5% 1 PC R421
18-FF0102-JSX RMOF 1W +-5% 1KΩ 1 PC R408
18-FF0103-JGX RES. M.O. 10K OHM 1W +/-5% 1 PC R309
18-FF0120-JGX RES. M.O. 12 OHM 1W +/-5% 1 PC R429
18-FF0122-JAX RES. M.O. 1200 OHM 1W +/-5% 1 PC R411
18-FF0123-JGX RES. M.O. 12K OHM 1W +/-5% 1 PC J405
18-FF0221-JSX RES.M.O.F 1.0W 1.0W 220 OHM +/-5% 1 PC R412
18-FF0221-JSX RES.M.O.F 1.0W 1.0W 220 OHM +/-5% 1 PC R336
18-FF0569-JGX RES. M.O.F 5.6 OHM 1W +/-5% 1 PC R304
18-FG0221-JHX RES. M.O. 220 OHM 2W +/-5% 1 PC R307
18-RF0828-JGX RES. WIRE ROUND 0.82 OHM 1W +/-5% 1 PC R312
25-BDA471-M1X CAP. ELEC 470 UF 25V +/-20% 1 PC C415
25-BDA471-M1X CAP. ELEC 470 UF 25V +/-20% 1 PC C308
25-BLA100-M1X CAP. ELEC 10 UF 250V +/-20% 1 PC C408
25-PJG101-M1X CAP.CELE 100UF/160V/+/-20% 1 PC C411
26-AMM331-JZX CAP. CER 330 PF 2KV +/-5% SL 1 PC C402
27-AGR334-JSX CAP. M.PP 0.33 UF 250V +/-5% 1 PC C421
27-ALR123-J0X CAP. M PP 0.012 UF 1.6KV +/-5% 1 PC C406B
27-LCA104-J0X CAP. P.E. 0.1UF 100V +/-5% 1 PC C234
36-HDR029-XX0 TRANSFORMER HOR. DRIVE BCT-1012A 1 PC T401
36-LIN580-XX1 COIL LINEARITY 58 UH 1 PC L412
36-WID960-XX1 COIL WIDTH 96 UH 1 PC L411
37-FBAT04-CAA1A FBT BSC25-0252T 1 PC T402
45-OSC8M0-0Y0 CRYSTAL 8.0MHZ 1 PC X001
45-SAWF18-590 SAW FILTER F1859 1 PC Z101
46-12866W-02XG PIN BASE *2 S11-02Y 1 PC P604
46-20598W-04XG PIN BASE *4 TJC1-4A 1 PC
46-33079W-02XG PIN BASE *2 TJC3-2A 1 PC P603
46-33079W-04XG PIN BASE *4 TJC3-4A 1 PC P003
64-P30080-104G M/C SCREW P 3 X 8 1 PC FOR IC301
64-P30080-104G M/C SCREW P 3 X 8 1 PC FOR Q402
65-Z30050-23MG NUT M 3 1 PC FOR IC301
67-387190-1A0 HEAT SINK 1 PC FOR IC601
67-H27292-2A0 HEAT SINK 1 PC FOR Q402
67-H30752-3A0 HEAT SINK 1 PC FOR IC301
45-FIL4M5-0Y3 CER.FILTER LT4.5MH 1 PC X1002
45-OSC18M-4Y20A CRYSTAL 18.432MHZ(CL=12PF) 1 PC X1001
10-0RU3AM-FBX HIGH EFFICIENCY RECTIFIER RU3AM 1 PC D833
10-0RU4YX-F0X DIODE GRU4YX (FAST RECOVERY) 1 PC D841
11-SD2012-0CX TRANSISTOR 2SD2012 1 PC Q843
11-SK2645-0AX TRANSISTOR 2SK2645-01MR (POWER 1 PC Q815
13-000TL4-31T IC TL431ACLP 1 PC IC803
13-0HPC92-2CP PHOTO COUPLER HPC922-C 1 PC IC802
18-DF0334-JGX1 METAL FILM FIXED RESISTOR 1WS 330KΩ 1 PC R804
18-EF0229-JGX RES. FUS. 2.2 OHM 1W +/-5% 1 PC R843
18-FG0229-JHX RES. M.O. 2.2 OHM 2W +/-5% 1 PC R852
P400 FOR DY
COMMECTOR
Page 43

18-KF0825-JHX RES. GLASS GLAZE 8.2M OHM 1W 1 PC R829
18-RG0108-JHX RES. WIRE ROUND 0.1 OHM 2W +/-5% 1 PC R815
22-NTC479-XX0 NTC 4.7 OHM +/-18% NTC4.7D2-14 1 PC R803
22-PTC909-3A5 PTC 9 OHM 1 PC RT801
25-BDA222-M1S CAP. ELEC 25V/2200UF/+/-20% 1 PC C843
25-BMJ151-M1X CAP. ELEC 150 UF 400V +/-20% 1 PC C806
25-PJG101-M1X CAP.CELE 100UF/160V/+/-20% 1 PC C835
26-AIL103-KBX CAP.CER 10NF 500V +/-10% 1 PC C826
26-AIL103-KBX CAP.CER 10NF 500V +/-10% 1 PC C805
26-AKA221-KRX CAP. CER 220 PF 1KV +/-10% 1 PC C833
26-AKM221-KRX CAP. CER 220 PF 1KV +/-10% 1 PC C809
26-AMM561-KRX CAP. CER 560PF 2KV +/-10% 1 PC C815
26-APK222-MEX CAP. CER 2200PF 400VAC+/-20% E 1 PC C829
26-APK471-KBX CAP. CER 470PF 400VAC +/-10% B 1 PC C804
26-APK471-KBX CAP. CER 470PF 400VAC +/-10% B 1 PC C803
26-AQK472-ZFX CAP. CER 4700PF 250VAC +80%-20% F 1 PC C807
26-AQK472-ZFX CAP. CER 4700PF 250VAC +80%-20% F 1 PC C808
27-AQT474-MV3 CAP.M.PP0.47UF275VAC+/-20% 1 PC C801
27-MHM104-K0X CAP. M.P.E 0.1 UF 400V +/-10% 1 PC C802
34-R101K2-1BX COIL CHOKE 100 UH +/-10% 1 PC L834
34-R220K2-1BX COIL CHOKE 22 UH +/-10% 1 PC L843
35-392170-00X FERR.COIL BF-I35050C-683 1 PC L833
36-LIF010-AX1 LINE FILTER 1 PC T801
36-TRF198-AX0
46-10962W-02XG PIN BASE *2 TJC2-2A 1 PC P803
50-03150D-1GS1G TCL50-03150D-1GS1G= FUSE 3.15AT 250VAC 5 1 PC F801
63-B30100-AB4G S/T SCREW B 3 X 10 AB 1 PC FOR Q815
64-P30080-104G M/C SCREW P 3 X 8 1 PC FOR Q843
66-20516X-0B0 FUSE HOLDER 2 PC FOR F801
67-H10918-4M2 HEAT SINK 1 PC FOR Q843
67-H41341-2A0 HEAT SINK 1 PC FOR Q815
67-M40068-1E4 CRT BRACKET 1 PC FOR Q815
71-270870-0A9 LABEL 1 PC
71-DYP000-WX2 LABEL 1 PC STICK ON HEAT SINK
90-0DSTG1-SR1U HEAT SINK DSTG-1 0.001 G
47-SVI002-XX0 Y/C SOCKET VERTICAL TYPE 1 PC P902
47-RCA040-XX0G RCA SOCKET AV-3.2-9W-H 1 PC P903
36-DEG210-BX3 DEGAUSSING COIL 2500MM 1 PC
41-GND021-XX0 CRT GROUND BRAIDS 1 PC
42-51208D-XX1G SPEAKER 8 OHM 5W (52MMX120MM) 1 PC W602
42-51208D-XX1G SPEAKER 8 OHM 5W (52MMX120MM) 1 PC W601
44-21RFLW-TS2A CRT A51ELD031X006 0 PC
46-14026H-02XG HS 2P 2468#22 570MM S11-2Y/7MM 1 PC P601H FOR M. BD P603
46-27688H-04X02G HS 4PIN TCL1711 1 PC
46-35196H-02XG HS 2P22 570/7 TJC3-2Y 1 PC P602H FOR M. BD P604
54-113970-0U0 PVC TUBE AWG NO.5 0.32 M
54-114000-00X FELT TAPE (150MMX19MMX0.3MM) 4 PC MTG CRT
54-205140-000 SPACER CRT MOUNTING T=2MM 4 PC MTG CRT
54-314740-0X0 CRT FIBRE SHEET (22MMX22MMX0.8MM) 4 PC FOR CRT
54-415400-000 RUBBER PAD 2 PC
57-10654X-00F TWIST TIE NY66 15 PC
57-DA71CM-CX19B TOUCH BUTTON DPT-TP05110184-K 1 PC
TCL36-TRF198-AX0= TRANSFORMER CONV.
BCK3
1 PC T803
P400 FOR DY
CONNECTOR (MAIN
BD)
FOR L & R SPEAKING
WIRE
Page 44

57-FGPA71-XX2 SHINE AUREOLE 1 PC
59-312160-000 SPEAKER RUBBER CUSHION 8 PC MTG SPK
63-B30100-AB4G S/T SCREW B 3 X 10 AB 4 PC
63-B30100-AB4G S/T SCREW B 3 X 10 AB 2 PC MTG KEY BD & F. CAB.
63-B40150-AB4G S/T SCREW B 4 X 15 AB 12 PC
63-W30080-AB4G S/T SCREW W 3 X 8 AB 1 PC
63-W30100-AB4G S/T SCREW W 3 X 10 AB 2 PC MTG MAIN PCB
63-W30100-AB4G S/T SCREW W 3 X 10 AB 2 PC
63-W30120-AB4G S/T SCREW W 3 X 12 AB 4 PC
63-Z30100-AB4G S/T SCREW 3.0 X 10 2 PC
65-A60180-20EG EXT. TOOTH WASHTER 6 X 18 X 2 4 PC FOR CRT
65-Z60100-50EG NUT M 6.0 X 1.0 4 PC FOR CRT
67-325570-2E0 CRT BRACKET 4 PC
67-X12668-0E0 SPRING CRT 6MMX40MMX0.5MM 1 PC
67-X41381-0E2 POWER KNOB SPRING 1 PC
71-RADIOV-SCR9X TV PRI LABEL 21A71 BLACK WHITE RED R=N 1 PC
72-DA71GP-X499B TV IB OPERATION MANUAL R=N 1 PC
74-022032-6WE1A POLYBAG 1 PC
74-120120-80H1A POLYBAG 1 PC
77-050010-6WC BUBBLE BAG 1 PC
58-DA41RI-CUI9F TV DEC OVERLAY REAR AV -- 12 00 R=N 1 PC
58-DA71SI-2UI9K TV PRI OVERLAY SIDE AV 21A71 BK 02 00 R= 1 PC
63-B40200-AB2G S/T SCREW B 4 X 20 AB 7 PC
63-F30100-BT3G S/T SCREW F 3 X 10 BT 2 PC
63-W30100-AB4G S/T SCREW W 3 X 10 AB 2 PC
63-W30100-AB4G S/T SCREW W 3 X 10 AB 2 PC MTG SIDE AV BD
18-FG0153-JHX RES. M.O. 15K OHM 2W +/-5% 1 PC R512
18-FG0153-JHX RES. M.O. 15K OHM 2W +/-5% 1 PC R511
18-FG0153-JHX RES. M.O. 15K OHM 2W +/-5% 1 PC R510
25-BLA100-M1X CAP. ELEC 10 UF 250V +/-20% 1 PC C504
26-AMM102-KBX CAP. CER 1000 PF 2KV +/-10% B 1 PC C500
26-EBP103-ZF1 CAP CER 50V 2.5MM 10nF -20%+80% 1 PC C514
35-139730-00X FERR. BEAD BF60 2 PC
46-10967W-01XG PIN BASE *1 TJC1-1A 1 PC P504
46-29355H-04XG HS 4P24 450 2(N) SCN-4Y 1 PC
46-29356H-05XG HS 5P24 450 F/W 2* SCN-5Y 1 PC FROM P501 TO P201
47-CRT022-NX0G CRT SOCKET GZS10-2-DD2 (DQ5) 1 PC P531
46-28246H-04XG HS 4P 2468#24 200 TJC3-4Y/JC25-4Y 1 PC
46-39626W-07XG CONNECTOR 1 PC
46-32535H-04XG TCL46-32535H-04XG= HS 4P24 550 TJC3-4Y/S 1 PC
47-RCA002-XX0G RCA SOCKET AV-8.4-6 (WHITE) 1 PC P1102
MTG KEY BD & PUSH
BUTTON
MTG CRT METAL &
FRONT CABINET
MTG LENS & FRONT
CABINET
MTG LIGHT BD & F.
CAB.
MTG SPK & FRONT
CABINET
MTG POWER BD & F.
CAB.
MTG FRONT & REAR
CAB.
MTG RCA JACK &
REAR CABINET
MTG SUPPORT0R &
R.CAB.
FOR C514 (L505 &
L506)
FROM P502 TO M.BD
P402
P1002 FOR PWR SW.
BD P1101E
P1001 FOR FILM
SWITCH
P904A R - VAGAINST
SILK-SCREEN FOR
M.BD P904
Page 45

47-RCA003-XX0G RCA SOCKET AV-8.4-6 (YELLOW) 1 PC P1101
47-RCA017-XX0G RCA JACK RED (RCA-101P) (THREE FEET) 1 PC P1103
02-IRR001-XX1S TCL02-IRR001-XX1S= 02-IRR001-XX1S = IR R 1 PC IR1101
46-31788H-02XG HS 2P22 350 TJC3-2Y/SCN-2Y 1 PC
46-33079W-04XG PIN BASE *4 TJC3-4A 1 PC
46-33079W-04XG PIN BASE *4 TJC3-4A 1 PC
46-35063W-03XG PIN BASE *3 VH-3A 1 PC
46-35063W-03XG PIN BASE *3 VH-3A 1 PC P802
46-35144H-04XG HS 4P 2468#24 350 TJC3-4Y/SNC-4Y 1 PC
46-KK025T-03FG HS 3PIN Y0605115.4 1 PC
48-POW001-AX0G SWITCH POWER 1 PC SW801
07-457FF5-NA9G TUNER F07GP-4ND-E 1 PC TU101
13-TSM123-05M01 MCU TMPA8873CSBNG 1 PC IC201
46-33079W-02XG PIN BASE *2 TJC3-2A 1 PC
46-33079W-04XG PIN BASE *4 TJC3-4A 1 PC P904(PIN(4)-PIN(7))
46-33079W-04XG PIN BASE *4 TJC3-4A 1 PC
46-35063W-03XG PIN BASE *3 VH-3A 1 PC
51-DC0220-0QN01G POWER CORD CS-016+H03VVH2-F 1 PC
70-271510-00A SERVICE CARD 1 PC
71-270870-0A9 LABEL 2 PC
90-0DSTG1-SR1U HEAT SINK DSTG-1 1 G FOR Q801
90-269080-ZU0U CLEAN COATING TC-131L 14KG/BARREL 0.1 G
10-0FR104-FBX DIODE FR104 (FAST RECTIFIER) 1 PC D401
10-0FR104-FBX DIODE FR104 (FAST RECTIFIER) 1 PC D301
10-0FR104-FBX DIODE FR104 (FAST RECTIFIER) 1 PC D402
10-0FR104-FBX DIODE FR104 (FAST RECTIFIER) 1 PC D403
10-0FR104-FBX DIODE FR104 (FAST RECTIFIER) 1 PC D404
10-0FR104-FBX DIODE FR104 (FAST RECTIFIER) 1 PC D405
10-0FR104-FBX DIODE FR104 (FAST RECTIFIER) 1 PC D406
10-1N4002-EBX DIODE 1N4002 (RECTIFIER) 1 PC D424
10-1N4002-EBX DIODE 1N4002 (RECTIFIER) 1 PC D425
10-1N4148-ABX DIODE 1N4148 (SWITCHING) 1 PC D002
10-1N4148-ABX DIODE 1N4148 (SWITCHING) 1 PC D601
10-1N4148-ABX DIODE 1N4148 (SWITCHING) 1 PC D302
10-1N4148-ABX DIODE 1N4148 (SWITCHING) 1 PC D012
10-1N4148-ABX DIODE 1N4148 (SWITCHING) 1 PC D303
10-1N4148-ABX DIODE 1N4148 (SWITCHING) 1 PC D602
10-1N4148-ABX DIODE 1N4148 (SWITCHING) 1 PC D603
10-1N4148-ABX DIODE 1N4148 (SWITCHING) 1 PC D600
10-1N4148-ABX DIODE 1N4148 (SWITCHING) 1 PC D412
10-1N4148-ABX DIODE 1N4148 (SWITCHING) 1 PC D413
10-1N4148-ABX DIODE 1N4148 (SWITCHING) 1 PC D307
10-1N4148-ABX DIODE 1N4148 (SWITCHING) 1 PC D305
10-1N4148-ABX DIODE 1N4148 (SWITCHING) 1 PC D206
10-79C3V9-DBX DIODE ZENER 3V9 1/2W 5% 1 PC D304
10-79C3V9-DBX DIODE ZENER 3V9 1/2W 5% 1 PC D411
P1101C FOR M. BD
P001
P1101E FOR KEY BD
P1002
D1101 FOR 57-FGPA71XX2
P801 FOR POWER
CORD
P1101B FOR M. BD
P002
FOR PWR SW.
BD(P802) & PARTS
P001 P2 - P3AGAINST
SILK-SCREEN
P002 P2 - P5 FOR PWR
SW. BD P1101B
P802 FOR POWER
CORD
FOR PRODUCTION
USE
Page 46

10-79C5V1-DBX DIODE ZENER 5V1 1/2W 5% 1 PC D216
10-79C6V2-DBX DIODE ZENER 6V2 1/2W 5% 1 PC D207
10-79C8V2-DBX DIODE ZENER 8V2 1/2W 5% 1 PC
11-KTD863-0BX TRANSISTOR KTD863 1 PC Q401
18-CB0101-JNX RES. C.F. 100 OHM 1/6W +/-5% 1 PC R009
18-CB0102-JNX RES. C.F. 1K OHM 1/6W +/-5% 1 PC R415
18-CB0102-JNX RES. C.F. 1K OHM 1/6W +/-5% 1 PC R007
18-CB0103-JNX RES. C.F. 10K OHM 1/6W +/-5% 1 PC R012
18-CB0103-JNX RES. C.F. 10K OHM 1/6W +/-5% 1 PC R406
18-CB0121-JNX RES. C.F. 120 OHM 1/6W +/-5% 1 PC R401
18-CB0222-JNX RES. C.F. 2.2K OHM 1/6W +/-5% 1 PC J921
18-CB0272-JNX RES. C.F. 2.7K OHM 1/6W +/-5% 1 PC R607
18-CB0333-JNX RES. C.F. 33K OHM 1/6W +/-5% 1 PC R612
18-CB0470-JNX RES. C.F. 47 OHM 1/6W +/-5% 1 PC C404
18-CB0472-JNX CARBON RES. C.F. 4.7K OHM 1/6W +/-5% 1 PC R601
18-CB0472-JNX CARBON RES. C.F. 4.7K OHM 1/6W +/-5% 1 PC R602
18-CB0473-JNX RES. C.F. 47K OHM 1/6W +/-5% 1 PC R930
18-CB0561-JNX RES. C.F. 560 OHM 1/6W +/-5% 1 PC R238
18-CB0569-JNX RES.C.F 5.6 OHM 1/6W +/-5% 1 PC R317
18-CD0100-JNX RES. C.F. 10 OHM 1/4W +/-5% 1 PC R407
18-CD0122-JNX RES. C.F. 1.2K OHM 1/4W +/-5% 1 PC R311
18-CD0820-JNX RES. C.F. 82 OHM 1/4W +/-5% 1 PC R298
18-CE0332-JNX RES. C.F. 3.3K OHM 1/2W +/-5% 1 PC R410
18-DB0243-FNX RES. M.F. 24K OHM 1/6W +/-1% 1 PC R303
18-DB0682-FNX RES. M.F. 1/6W 6.8K OHM +/-1% 1 PC R244
25-BCB100-M1X CAP. ELEC 10 UF 16V +/-20% 1 PC C907
25-BCB100-M1X CAP. ELEC 10 UF 16V +/-20% 1 PC C242
25-BCB100-M1X CAP. ELEC 10 UF 16V +/-20% 1 PC C901
25-BCB100-M1X CAP. ELEC 10 UF 16V +/-20% 1 PC C908
25-BCB100-M1X CAP. ELEC 10 UF 16V +/-20% 1 PC C952
25-BCB100-M1X CAP. ELEC 10 UF 16V +/-20% 1 PC C953
25-BCB100-M1X CAP. ELEC 10 UF 16V +/-20% 1 PC C004
25-BCB100-M1X CAP. ELEC 10 UF 16V +/-20% 1 PC C016
25-BCB100-M1X CAP. ELEC 10 UF 16V +/-20% 1 PC C023
25-BCB100-M1X CAP. ELEC 10 UF 16V +/-20% 1 PC C025
25-BCB101-M1X CAP. ELEC 100 UF 16V +/-20% 1 PC C311
25-BCB101-M1X CAP. ELEC 100 UF 16V +/-20% 1 PC C609
25-BCB101-M1X CAP. ELEC 100 UF 16V +/-20% 1 PC C612
25-BCB101-M1X CAP. ELEC 100 UF 16V +/-20% 1 PC C617
25-BCB101-M1X CAP. ELEC 100 UF 16V +/-20% 1 PC C607
25-BCB101-M1X CAP. ELEC 100 UF 16V +/-20% 1 PC C101
25-BCB101-M1X CAP. ELEC 100 UF 16V +/-20% 1 PC C211
25-BCB101-M1X CAP. ELEC 100 UF 16V +/-20% 1 PC C603
25-BCB101-M1X CAP. ELEC 100 UF 16V +/-20% 1 PC C906
25-BCB101-M1X CAP. ELEC 100 UF 16V +/-20% 1 PC C602
25-BCB101-M1X CAP. ELEC 100 UF 16V +/-20% 1 PC C921
25-BCB101-M1X CAP. ELEC 100 UF 16V +/-20% 1 PC C903
25-BCB221-M1X CAP. ELEC 220 UF 16V +/-20% 1 PC C613
25-BCB221-M1X CAP. ELEC 220 UF 16V +/-20% 1 PC C610
25-BCB221-M1X CAP. ELEC 220 UF 16V +/-20% 1 PC C232
25-BCB470-M1X CAP. ELEC 47 UF 16V +/-20% 1 PC C202
25-BCB470-M1X CAP. ELEC 47 UF 16V +/-20% 1 PC C081
25-BCB471-M1X CAP. ELEC 470 UF 16V +/-20% 1 PC C307
25-BCB471-M1X CAP. ELEC 470 UF 16V +/-20% 1 PC C606
25-BCB471-M1X CAP. ELEC 470 UF 16V +/-20% 1 PC C217
+TO GND,""-""TO
J405&R406"
Page 47

25-BDB102-M1X CAP.ELEC 1000UF 25V+/-20%13*22 1 PC C413
25-BDB470-M1X CAP. ELEC 47 UF 25V +/-20% 1 PC C419
25-BEB100-M1X CAP. ELEC 10 UF 35V +/-20% 1 PC C441
25-BEB101-M1X CAP. ELEC 100 UF 35V +/-20% 1 PC C302
25-BFB101-M1X CAP. ELEC 100 UF 50V +/-20% 1 PC C106
25-BFB109-M1X CAP. ELEC 1 UF 50V +/-20% 1 PC C916
25-BFB109-M1X CAP. ELEC 1 UF 50V +/-20% 1 PC C915
25-BFB109-M1X CAP. ELEC 1 UF 50V +/-20% 1 PC C911
25-BFB109-M1X CAP. ELEC 1 UF 50V +/-20% 1 PC C909
25-BFB109-M1X CAP. ELEC 1 UF 50V +/-20% 1 PC C616
25-BFB109-M1X CAP. ELEC 1 UF 50V +/-20% 1 PC C203
25-BFB229-M1X CAP. ELEC 2.2 UF 50V +/-20% 1 PC C214
25-BHB100-M1X CAP. ELEC 10 UF 100V +/-20% 1 PC C420
25-BHB100-M1X CAP. ELEC 10 UF 100V +/-20% 1 PC C406
25-MFB228-K1X CAP.ELEC 0.22UF 50V +/-10% 1 PC C205
25-MFB478-K1X CAP.ELEC 50V 0.47UF +/-10% 1 PC C236
25-MFB478-K1X CAP.ELEC 50V 0.47UF +/-10% 1 PC C218
25-RCB100-M1X TCL25-RCB100-M1X= CAP.ELEC 10 UF 16V +/- 1 PC C220
25-RCB100-M1X TCL25-RCB100-M1X= CAP.ELEC 10 UF 16V +/- 1 PC C227
25-RCB100-M1X TCL25-RCB100-M1X= CAP.ELEC 10 UF 16V +/- 1 PC C231
25-RFB479-M1X CAP.ELEC 4.7 UF 50V +/-20% 1 PC C310
25-RFB479-M1X CAP.ELEC 4.7 UF 50V +/-20% 1 PC C104
25-RFB479-M1X CAP.ELEC 4.7 UF 50V +/-20% 1 PC C304
25-RFB479-M1X CAP.ELEC 4.7 UF 50V +/-20% 1 PC C216
26-AIC391-KBX CAP. CER 390 PF 500V +/-10% B 1 PC C412
26-AIC391-KBX CAP. CER 390 PF 500V +/-10% B 1 PC C403
26-AIC391-KBX CAP. CER 390 PF 500V +/-10% B 1 PC C409
26-EBP680-JZX CAP. CER 68PF 50V +/-5% SL TUBE 1 PC FOR J405
27-MBC104-J0X CAP. M.P.E 0.1 UF 63V +/-5% 1 PC C305
27-MBC223-J0X CAP. M.P.E 0.022UF 63V +/-5% 1 PC C401
27-MBC224-J0X CAP. M.P.E 0.22UF 63V +/-5% 1 PC C611
27-MBC224-J0X CAP. M.P.E 0.22UF 63V +/-5% 1 PC C608
27-MBC224-J0X CAP. M.P.E 0.22UF 63V +/-5% 1 PC C620
27-MBC224-J0X CAP. M.P.E 0.22UF 63V +/-5% 1 PC C618
27-MBC473-K0X CAP. M.PE 47NF 63V +/-10% 13076040 1 PC C309
27-MCC104-J0X CPM 100N0F +5% 100.0V R=N 1 PC C410
27-MCC562-J0X CAP. M.P.E 0.0056UF 100V+/-20% 1 PC C422
27-PBC222-J0X CAP. P.E 0.0022UF 63V +/-5% 1 PC C306
34-A220K0-1IX COIL PL - 22UH +/-10% LGA0305-220K 1 PC L080
34-A220K0-1IX COIL PL - 22UH +/-10% LGA0305-220K 1 PC L208
34-A330K0-1IX COIL CHOKE 33UH +/-10% 1 PC L202
34-A330K0-1IX COIL CHOKE 33UH +/-10% 1 PC L102
34-R100J2-0EX COIL PL - 10 UH +/-5% 1 PC L002
40-M123SP-MAK1XG P.C.B MAIN BD 1 PC
41-WJ0075-B00 WIREBAREJUMPER7.5MM 1 PC J924
41-WJ0075-B00 WIREBAREJUMPER7.5MM 1 PC J020
41-WJ0075-B00 WIREBAREJUMPER7.5MM 1 PC J206
41-WJ0075-B00 WIREBAREJUMPER7.5MM 1 PC J101
41-WJ0075-B00 WIREBAREJUMPER7.5MM 1 PC J314
41-WJ0075-B00 WIREBAREJUMPER7.5MM 1 PC J202
41-WJ0075-B00 WIREBAREJUMPER7.5MM 1 PC J301
41-WJ0075-B00 WIREBAREJUMPER7.5MM 1 PC J303
41-WJ0075-B00 WIREBAREJUMPER7.5MM 1 PC J416
41-WJ0075-B00 WIREBAREJUMPER7.5MM 1 PC J312
41-WJ0075-B00 WIREBAREJUMPER7.5MM 1 PC J208
41-WJ0075-B00 WIREBAREJUMPER7.5MM 1 PC J901
Page 48

41-WJ0075-B00 WIREBAREJUMPER7.5MM 1 PC J903
41-WJ0075-B00 WIREBAREJUMPER7.5MM 1 PC J913
41-WJ0075-B00 WIREBAREJUMPER7.5MM 1 PC J920
41-WJ0075-B00 WIREBAREJUMPER7.5MM 1 PC J201
41-WJ0075-B00 WIREBAREJUMPER7.5MM 1 PC J005
41-WJ0075-B00 WIREBAREJUMPER7.5MM 1 PC J021
41-WJ0075-B00 WIREBAREJUMPER7.5MM 1 PC J911
41-WJ0075-B00 WIREBAREJUMPER7.5MM 1 PC J203
41-WJ0075-B00 WIREBAREJUMPER7.5MM 1 PC J604
41-WJ0075-B00 WIREBAREJUMPER7.5MM 1 PC J313
41-WJ0075-B00 WIREBAREJUMPER7.5MM 1 PC J017
41-WJ0075-B00 WIREBAREJUMPER7.5MM 1 PC J207
41-WJ0075-B00 WIREBAREJUMPER7.5MM 1 PC J018
41-WJ0075-B00 WIREBAREJUMPER7.5MM 1 PC J006
41-WJ0100-B00 WIREBAREJUMPER10MM 1 PC J028
41-WJ0100-B00 WIREBAREJUMPER10MM 1 PC J211
41-WJ0100-B00 WIREBAREJUMPER10MM 1 PC J1008
41-WJ0100-B00 WIREBAREJUMPER10MM 1 PC J401
41-WJ0100-B00 WIREBAREJUMPER10MM 1 PC J311
41-WJ0100-B00 WIREBAREJUMPER10MM 1 PC J309
41-WJ0100-B00 WIREBAREJUMPER10MM 1 PC R299
41-WJ0100-B00 WIREBAREJUMPER10MM 1 PC JP912
41-WJ0100-B00 WIREBAREJUMPER10MM 1 PC J606
41-WJ0100-B00 WIREBAREJUMPER10MM 1 PC J033
41-WJ0100-B00 WIREBAREJUMPER10MM 1 PC J414
41-WJ0100-B00 WIREBAREJUMPER10MM 1 PC J909
41-WJ0100-B00 WIREBAREJUMPER10MM 1 PC J912
41-WJ0100-B00 WIREBAREJUMPER10MM 1 PC J011
41-WJ0100-B00 WIREBAREJUMPER10MM 1 PC J916
41-WJ0100-B00 WIREBAREJUMPER10MM 1 PC J305
41-WJ0100-B00 WIREBAREJUMPER10MM 1 PC J016
41-WJ0100-B00 WIREBAREJUMPER10MM 1 PC J022
41-WJ0100-B00 WIREBAREJUMPER10MM 1 PC J026
41-WJ0100-B00 WIREBAREJUMPER10MM 1 PC J902
41-WJ0100-B00 WIREBAREJUMPER10MM 1 PC J907
41-WJ0100-B00 WIREBAREJUMPER10MM 1 PC J602
41-WJ0100-B00 WIREBAREJUMPER10MM 1 PC J027
41-WJ0125-B00 WIREBAREJUMPER12.5MM 1 PC D409
41-WJ0125-B00 WIREBAREJUMPER12.5MM 1 PC J032
41-WJ0125-B00 WIREBAREJUMPER12.5MM 1 PC J304
41-WJ0125-B00 WIREBAREJUMPER12.5MM 1 PC J009
41-WJ0125-B00 WIREBAREJUMPER12.5MM 1 PC J012
41-WJ0125-B00 WIREBAREJUMPER12.5MM 1 PC J607
41-WJ0125-B00 WIREBAREJUMPER12.5MM 1 PC J204
41-WJ0125-B00 WIREBAREJUMPER12.5MM 1 PC J010
41-WJ0125-B00 WIREBAREJUMPER12.5MM 1 PC J914
41-WJ0125-B00 WIREBAREJUMPER12.5MM 1 PC J015
41-WJ0125-B00 WIREBAREJUMPER12.5MM 1 PC J213
41-WJ0125-B00 WIREBAREJUMPER12.5MM 1 PC J923
41-WJ0125-B00 WIREBAREJUMPER12.5MM 1 PC J014
41-WJ0125-B00 WIREBAREJUMPER12.5MM 1 PC J216
41-WJ0125-B00 WIREBAREJUMPER12.5MM 1 PC J302
41-WJ0125-B00 WIREBAREJUMPER12.5MM 1 PC JP103
41-WJ0125-B00 WIREBAREJUMPER12.5MM 1 PC R619
41-WJ0125-B00 WIREBAREJUMPER12.5MM 1 PC J029
41-WJ0150-B00 WIREBAREJUMPER15MM 1 PC J007
Page 49

41-WJ0150-B00 WIREBAREJUMPER15MM 1 PC R027
41-WJ0150-B00 WIREBAREJUMPER15MM 1 PC J008
41-WJ0150-B00 WIREBAREJUMPER15MM 1 PC J102
41-WJ0150-B00 WIREBAREJUMPER15MM 1 PC J215
41-WJ0150-B00 WIREBAREJUMPER15MM 1 PC J412
41-WJ0150-B00 WIREBAREJUMPER15MM 1 PC J908
41-WJ0150-B00 WIREBAREJUMPER15MM 1 PC J1002
41-WJ0150-B00 WIREBAREJUMPER15MM 1 PC JP402
41-WJ0150-B00 WIREBAREJUMPER15MM 1 PC L402
41-WJ0150-B00 WIREBAREJUMPER15MM 1 PC J031
41-WJ0175-B00 WIREBAREJUMPER17.5MM 1 PC J922
41-WJ0175-B00 WIREBAREJUMPER17.5MM 1 PC J919
41-WJ0175-B00 WIREBAREJUMPER17.5MM 1 PC J918
41-WJ0175-B00 WIREBAREJUMPER17.5MM 1 PC J025
41-WJ0175-B00 WIREBAREJUMPER17.5MM 1 PC J024
41-WJ0175-B00 WIREBAREJUMPER17.5MM 1 PC J013
41-WJ0200-B00 WIREBAREJUMPER20MM 1 PC J023
41-WJ0200-B00 WIREBAREJUMPER20MM 1 PC J214
66-343730-0B0 HOLLOW RIVET 1.6MMX3.0MMX3.2MM 2 PC FOR L411
66-343730-0B0 HOLLOW RIVET 1.6MMX3.0MMX3.2MM 2 PC FOR L412
66-343730-0B0 HOLLOW RIVET 1.6MMX3.0MMX3.2MM 2 PC FOR C421
66-343730-0B0 HOLLOW RIVET 1.6MMX3.0MMX3.2MM 2 PC FOR C406B
66-343730-0B0 HOLLOW RIVET 1.6MMX3.0MMX3.2MM 1 PC FOR Q402
66-343730-0B0 HOLLOW RIVET 1.6MMX3.0MMX3.2MM 4 PC FOR T402
18-CB0101-JNX RES. C.F. 100 OHM 1/6W +/-5% 1 PC R1010
18-CB0333-JNX RES. C.F. 33K OHM 1/6W +/-5% 1 PC R1003
25-BCB100-M1X CAP. ELEC 10 UF 16V +/-20% 1 PC C1015
25-BCB100-M1X CAP. ELEC 10 UF 16V +/-20% 1 PC C1013
25-BCB100-M1X CAP. ELEC 10 UF 16V +/-20% 1 PC C1009
25-BCB220-M1X CAP. ELEC 22 UF 16V +/-20% 1 PC C1042
25-BCB470-M1X CAP. ELEC 47 UF 16V +/-20% 1 PC C1038
25-BFB229-M1X CAP. ELEC 2.2 UF 50V +/-20% 1 PC C623
25-BFB229-M1X CAP. ELEC 2.2 UF 50V +/-20% 1 PC C622
25-BFB339-M1X CAP. ELEC 3.3 UF 50V +/-20% 1 PC C1010
34-A109K0-1IX COIL CHOKE 1 UH +/-10% 1 PC L1003
34-A109K0-1IX COIL CHOKE 1 UH +/-10% 1 PC L1008
34-A220K0-1IX COIL PL - 22UH +/-10% LGA0305-220K 1 PC L1001
34-R220J2-0EX COIL PL - 22 UH +/-5% 1 PC L1002
41-WJ0075-B00 WIREBAREJUMPER7.5MM 1 PC J1024
41-WJ0075-B00 WIREBAREJUMPER7.5MM 1 PC J1027
41-WJ0075-B00 WIREBAREJUMPER7.5MM 1 PC J1025
41-WJ0075-B00 WIREBAREJUMPER7.5MM 1 PC J1023
41-WJ0075-B00 WIREBAREJUMPER7.5MM 1 PC J1022
41-WJ0100-B00 WIREBAREJUMPER10MM 1 PC J1026
41-WJ0125-B00 WIREBAREJUMPER12.5MM 1 PC J1015
41-WJ0125-B00 WIREBAREJUMPER12.5MM 1 PC J1011
41-WJ0150-B00 WIREBAREJUMPER15MM 1 PC J1002
41-WJ0175-B00 WIREBAREJUMPER17.5MM 1 PC J1006
41-WJ0200-B00 WIREBAREJUMPER20MM 1 PC J1001
10-0FR104-FBX DIODE FR104 (FAST RECTIFIER) 1 PC D812
10-0FR104-FBX DIODE FR104 (FAST RECTIFIER) 1 PC D820
10-0RL255-EBX DIODE RL255 OR RL206(POWER RECTIFIER) 1 PC D801
10-0RL255-EBX DIODE RL255 OR RL206(POWER RECTIFIER) 1 PC D802
10-0RL255-EBX DIODE RL255 OR RL206(POWER RECTIFIER) 1 PC D803
10-0RL255-EBX DIODE RL255 OR RL206(POWER RECTIFIER) 1 PC D804
10-1N4148-ABX DIODE 1N4148 (SWITCHING) 1 PC D805
Page 50

10-1N4148-ABX DIODE 1N4148 (SWITCHING) 1 PC D814
10-1N4148-ABX DIODE 1N4148 (SWITCHING) 1 PC D819
10-79C18V-DBX DIODE ZENER 18V 1/2W 5% 1 PC D821
10-79C7V5-DBX TCL10-79C7V5-DBX= DIODE ZENER 7V5 1/2W 5 1 PC D844
11-CA8550-DBX TRANSISTOR 8550D-TO-92(PNP) 1 PC Q846
11-SA1015-YBX TRANSISTOR ST2SA1015Y (PNP) 1 PC Q801
18-CB0103-JNX RES. C.F. 10K OHM 1/6W +/-5% 1 PC R853
18-CB0222-JNX RES. C.F. 2.2K OHM 1/6W +/-5% 1 PC R847
18-CD0101-JNX RES. C.F. 100 OHM 1/4W +/-5% 1 PC R813
18-CD0102-JNX RES. C.F. 1K OHM 1/4W +/-5% 1 PC R845
18-CD0222-JNX RES. C.F. 2.2K OHM 1/4W +/-5% 1 PC R817
18-CD0479-JNX RES. C.F. 4.7 OHM 1/4W +/-5% 1 PC R820
18-CD0560-JNX RES. C.F. 56 OHM 1/4W +/-5% 1 PC R801
18-CE0479-JNX RES. C.F. 4.7 OHM 1/2W +/-5% 1 PC R823
18-CE0561-JNX RES. C.F. 560 OHM 1/2W +/-5% 1 PC R851
18-DE0823-FNX RES. M.F. 82K OHM 1/2W +/-1% 1 PC R839
18-KE0105-JN3 RES. H.VOLT. CC 1M OHM 1/2W +/-5% 1 PC R802
25-BCB101-M1X CAP. ELEC 100 UF 16V +/-20% 1 PC C423
25-BCB221-M1X CAP. ELEC 220 UF 16V +/-20% 1 PC C418
25-BCB471-M1X CAP. ELEC 470 UF 16V +/-20% 1 PC C845
25-BCB471-M1X CAP. ELEC 470 UF 16V +/-20% 1 PC C832
25-BDB220-M1X CAP. ELEC 22 UF 25V +/-20% 1 PC C819
25-BDB220-M1X CAP. ELEC 22 UF 25V +/-20% 1 PC C850
25-BDB470-M1X CAP. ELEC 47 UF 25V +/-20% 1 PC C820
25-BFB109-M1X CAP. ELEC 1 UF 50V +/-20% 1 PC C847
26-AIC221-KBX CAP. CER 220 PF 500V +/-10% B 1 PC C841
35-LB1005-0IX FERR BEAD H75 (3.5X1X5) 1 PC L840
35-LB1005-0IX FERR BEAD H75 (3.5X1X5) 1 PC L815
41-WJ0075-B00 WIREBAREJUMPER7.5MM 1 PC J806
41-WJ0075-B00 WIREBAREJUMPER7.5MM 1 PC J811
41-WJ0075-B00 WIREBAREJUMPER7.5MM 1 PC JP805
41-WJ0100-B00 WIREBAREJUMPER10MM 1 PC
41-WJ0100-B00 WIREBAREJUMPER10MM 1 PC J809
41-WJ0100-B00 WIREBAREJUMPER10MM 1 PC J802
41-WJ0100-B00 WIREBAREJUMPER10MM 1 PC J821
41-WJ0100-B00 WIREBAREJUMPER10MM 1 PC J820
41-WJ0100-B00 WIREBAREJUMPER10MM 1 PC J819
41-WJ0100-B00 WIREBAREJUMPER10MM 1 PC J818
41-WJ0100-B00 WIREBAREJUMPER10MM 1 PC J817
41-WJ0100-B00 WIREBAREJUMPER10MM 1 PC J816
41-WJ0100-B00 WIREBAREJUMPER10MM 1 PC J815
41-WJ0100-B00 WIREBAREJUMPER10MM 1 PC J810
41-WJ0100-B00 WIREBAREJUMPER10MM 1 PC J822
41-WJ0125-B00 WIREBAREJUMPER12.5MM 1 PC J805
41-WJ0150-B00 WIREBAREJUMPER15MM 1 PC J801
41-WJ0150-B00 WIREBAREJUMPER15MM 1 PC R810
66-343730-0B0 HOLLOW RIVET 1.6MMX3.0MMX3.2MM 4 PC FOR T803(1,8,9,16)
66-343730-0B0 HOLLOW RIVET 1.6MMX3.0MMX3.2MM 3 PC FOR RT801
66-343730-0B0 HOLLOW RIVET 1.6MMX3.0MMX3.2MM 1 PC FOR Q815
66-343740-0B0 HOLLOW RIVET (2.3MMX4.0MMX3.5MM) 2 PC FOR P803
66-343740-0B0 HOLLOW RIVET (2.3MMX4.0MMX3.5MM) 2 PC FOR C806
10-79C5V1-DBX DIODE ZENER 5V1 1/2W 5% 1 PC D204
41-WJ0100-B00 WIREBAREJUMPER10MM 1 PC J209
41-WJ0100-B00 WIREBAREJUMPER10MM 1 PC J925
41-WJ0125-B00 WIREBAREJUMPER12.5MM 1 PC J915
FOR T803 (15) & C835()
Page 51

41-WJ0075-B00 WIREBAREJUMPER7.5MM 1 PC J917
10-1N4004-EBX DIODE IN4004 (RECTIFIER) 1 PC D504
10-1N4148-ABX DIODE 1N4148 (SWITCHING) 1 PC D501
10-1N4148-ABX DIODE 1N4148 (SWITCHING) 1 PC D502
11-SA1015-YBX TRANSISTOR ST2SA1015Y (PNP) 1 PC Q510
11-TC3207-0BX TRANSISTOR KTC3207 1 PC Q503
11-TC3207-0BX TRANSISTOR KTC3207 1 PC Q502
11-TC3207-0BX TRANSISTOR KTC3207 1 PC Q501
18-CE0100-JNX RES. C.F. 10 OHM 1/2W +/-10% 1 PC R530
18-CE0105-JNX RES. C.F. 1M OHM 1/2W +/-5% 1 PC R529
18-CE0152-JNX RES. C.F. 1.5K OHM 1/2W +/-5% 1 PC R531
18-FE0272-JNX RES. M.O. 2.7K OHM 1/2W +/-5% 1 PC R514
18-FE0272-JNX RES. M.O. 2.7K OHM 1/2W +/-5% 1 PC R516
18-FE0272-JNX RES. M.O. 2.7K OHM 1/2W +/-5% 1 PC R515
25-BCB100-M1X CAP. ELEC 10 UF 16V +/-20% 1 PC C512
25-BCB221-M1X CAP. ELEC 220 UF 16V +/-20% 1 PC C508
41-WJ0075-B00 WIREBAREJUMPER7.5MM 1 PC J508
41-WJ0075-B00 WIREBAREJUMPER7.5MM 1 PC J503
41-WJ0100-B00 WIREBAREJUMPER10MM 1 PC J502
41-WJ0100-B00 WIREBAREJUMPER10MM 1 PC J509
41-WJ0100-B00 WIREBAREJUMPER10MM 1 PC J507
41-WJ0150-B00 WIREBAREJUMPER15MM 1 PC J501
11-C144ES-0BX TCL11-C144ES-0BX= TRANSISTOR PDTC144ES ( 1 PC Q1002
11-SC1815-YBX TRANSISTOR 2SC1815-Y (NPN) 1 PC Q1025
11-SC1815-YBX TRANSISTOR 2SC1815-Y (NPN) 1 PC Q1027
11-SC1815-YBX TRANSISTOR 2SC1815-Y (NPN) 1 PC Q1026
11-SC1815-YBX TRANSISTOR 2SC1815-Y (NPN) 1 PC Q1024
11-SC1815-YBX TRANSISTOR 2SC1815-Y (NPN) 1 PC Q1023
11-SC1815-YBX TRANSISTOR 2SC1815-Y (NPN) 1 PC Q1022
18-CB0102-JNX RES. C.F. 1K OHM 1/6W +/-5% 1 PC R1021
18-CB0103-JNX RES. C.F. 10K OHM 1/6W +/-5% 1 PC R1032
18-CB0103-JNX RES. C.F. 10K OHM 1/6W +/-5% 1 PC R1027
18-CB0103-JNX RES. C.F. 10K OHM 1/6W +/-5% 1 PC R1028
18-CB0103-JNX RES. C.F. 10K OHM 1/6W +/-5% 1 PC R1029
18-CB0103-JNX RES. C.F. 10K OHM 1/6W +/-5% 1 PC R1030
18-CB0103-JNX RES. C.F. 10K OHM 1/6W +/-5% 1 PC R1031
18-CB0152-JNX RES. C.F. 1.5K OHM 1/6W +/-5% 1 PC R1022
18-CB0182-JNX RES. C.F. 1.8K OHM 1/6W +/-5% 1 PC R1023
18-CB0272-JNX RES. C.F. 2.7K OHM 1/6W +/-5% 1 PC R1024
18-CB0432-JNX RES. C.F. 4.3K OHM 1/6W +/-5% 1 PC R1025
18-CB0471-JNX RES. C.F. 470 OHM 1/6W +/-5% 1 PC R1004B
18-CB0471-JNX RES. C.F. 470 OHM 1/6W +/-5% 1 PC R1004A
18-CB0682-JNX RES. C.F. 6.8K OHM 1/6W +/-5% 1 PC R1026
40-29A71T-KEB1XG P.C.B KEY BD 1 PC
41-WJ0060-B00 WIREBAREJUMPER6MM 1 PC J1001
41-WJ0060-B00 WIREBAREJUMPER6MM 1 PC J1002
41-WJ0065-B00 1 R=N 1 PC J1003
40-21A71H-SIA1XG P.C.B. SIDE AV BD 1 PC
41-WJ0060-B00 WIREBAREJUMPER6MM 1 PC J1102
18-CB0221-JNX RES. C.F. 220 OHM 1/6W +/-5% 1 PC R1104
18-CB0470-JNX RES. C.F. 47 OHM 1/6W +/-5% 1 PC R1101
25-BCB220-M1X CAP. ELEC 22 UF 16V +/-20% 1 PC C1101
40-21A71H-SWB1XG P.C.B SWITCH BD 1 PC
41-WJ0060-B00 WIREBAREJUMPER6MM 1 PC J1103
41-WJ0060-B00 WIREBAREJUMPER6MM 1 PC J1106
Page 52

41-WJ0060-B00 WIREBAREJUMPER6MM 1 PC R1103
41-WJ0060-B00 WIREBAREJUMPER6MM 1 PC R1115
41-WJ0090-B00 WIRE BARE JUMPER 9MM 1 PC J1105
66-382330-0B7 RIVET 2.0X3.7X3.5 2 PC FOR P802
66-382330-0B7 RIVET 2.0X3.7X3.5 2 PC FOR P801
41-WJ0080-B00 WIREBAREJUMPER8MM 1 PC JP801
41-WJ0080-B00 WIREBAREJUMPER8MM 1 PC JP802
71-BAR004-XX0 BAR CODE LABEL 102X51 MM 1 PC FOR PMC
74-015010-42C PLASTIC BAG 15CMX10CM 0.07 PC FOR PMC
74-025070-40F PLASTIC BAG 250X700X0.04 0.013 PC FOR PMC
74-036017-30D PLASTIC BAG 35.5CMX16.5CM 0.1 PC FOR PMC
74-036052-40C POLYBAG 0.013 PC FOR PMC
74-038024-40C PLASTIC BAG 38CMX23.5CM 0.07 PC FOR PMC
74-045045-40F POLYBAG W/ANTISTATIC MAIN PCB 0.002 PC FOR PMC
75-401460-C00 POLYFOAM 0.1 PC FOR PMC
75-401690-C00 POLYFOAM 0.1 PC FOR PMC
76-002135-0AP CARTON BOX 0.05 PC FOR PMC
09-38B3V9-DTX SMD. DIODE BZX384B3V9 0 PC D001
09-55C8V2-DTX SMD.DIODE BZV55-C8V2 0 PC D218
09-55C8V2-DTX SMD.DIODE BZV55-C8V2 0 PC D217
12-BC847A-0BX SMD TRANSISTOR BC847A (NPN) 0 PC Q602
12-BC847A-0BX SMD TRANSISTOR BC847A (NPN) 0 PC Q601
12-BC847A-0BX SMD TRANSISTOR BC847A (NPN) 0 PC Q006
12-BC847A-0BX SMD TRANSISTOR BC847A (NPN) 0 PC Q907
12-BC847A-0BX SMD TRANSISTOR BC847A (NPN) 0 PC Q605
12-BC847A-0BX SMD TRANSISTOR BC847A (NPN) 0 PC Q208
12-BC857A-0BX SMD TRANSISTOR BC857A (PNP) 0 PC Q003
12-BC857A-0BX SMD TRANSISTOR BC857A (PNP) 0 PC Q207
12-BC857A-0BX SMD TRANSISTOR BC857A (PNP) 0 PC Q210
12-BC857A-0BX SMD TRANSISTOR BC857A (PNP) 0 PC Q603
12-BC857A-0BX SMD TRANSISTOR BC857A (PNP) 0 PC Q604
13-24LC08-BNB IC EEPROM 24LC08BN(WRITE) 0 PC IC001
13-HCF405-3BB IC HCF4053BM1 0 PC IC901
13-LD1117-50B 5.0V IC LD1117S50TR 0 PC IC002
19-AA0512-JTX RES.SMD 5.1K 1/16W +/-5% 0603 0 PC R306
19-AB0000-JTX RES SMD 0 OHM 1/10W +/-5% 0603 0 PC R917
19-AB0000-JTX RES SMD 0 OHM 1/10W +/-5% 0603 0 PC J019
19-AB0000-JTX RES SMD 0 OHM 1/10W +/-5% 0603 0 PC R227
19-AB0000-JTX RES SMD 0 OHM 1/10W +/-5% 0603 0 PC JP401
19-AB0000-JTX RES SMD 0 OHM 1/10W +/-5% 0603 0 PC J906
19-AB0000-JTX RES SMD 0 OHM 1/10W +/-5% 0603 0 PC J324
19-AB0100-JTX RES SMD 10 OHM 1/10W +/-5% 0 PC R231
19-AB0100-JTX RES SMD 10 OHM 1/10W +/-5% 0 PC R005
19-AB0100-JTX RES SMD 10 OHM 1/10W +/-5% 0 PC R001
19-AB0101-JTX RES SMD 100 OHM 1/10W 0603 0 PC R103
19-AB0101-JTX RES SMD 100 OHM 1/10W 0603 0 PC R102
19-AB0101-JTX RES SMD 100 OHM 1/10W 0603 0 PC R047
19-AB0101-JTX RES SMD 100 OHM 1/10W 0603 0 PC R028
19-AB0101-JTX RES SMD 100 OHM 1/10W 0603 0 PC R249
19-AB0101-JTX RES SMD 100 OHM 1/10W 0603 0 PC R208
19-AB0101-JTX RES SMD 100 OHM 1/10W 0603 0 PC R604
19-AB0101-JTX RES SMD 100 OHM 1/10W 0603 0 PC R603
19-AB0101-JTX RES SMD 100 OHM 1/10W 0603 0 PC R207
19-AB0102-JTX RES SMD 1K OHM 1/10W 0603 0 PC R954
19-AB0102-JTX RES SMD 1K OHM 1/10W 0603 0 PC R953
19-AB0102-JTX RES SMD 1K OHM 1/10W 0603 0 PC R902
Page 53

19-AB0102-JTX RES SMD 1K OHM 1/10W 0603 0 PC R901
19-AB0102-JTX RES SMD 1K OHM 1/10W 0603 0 PC R609
19-AB0102-JTX RES SMD 1K OHM 1/10W 0603 0 PC R920
19-AB0102-JTX RES SMD 1K OHM 1/10W 0603 0 PC R922
19-AB0102-JTX RES SMD 1K OHM 1/10W 0603 0 PC R013
19-AB0102-JTX RES SMD 1K OHM 1/10W 0603 0 PC R606
19-AB0103-JTX RES SMD 10K OHM 1/10W 0603 0 PC R006
19-AB0103-JTX RES SMD 10K OHM 1/10W 0603 0 PC R912
19-AB0103-JTX RES SMD 10K OHM 1/10W 0603 0 PC R010
19-AB0103-JTX RES SMD 10K OHM 1/10W 0603 0 PC R1018
19-AB0103-JTX RES SMD 10K OHM 1/10W 0603 0 PC R011
19-AB0103-JTX RES SMD 10K OHM 1/10W 0603 0 PC R030
19-AB0103-JTX RES SMD 10K OHM 1/10W 0603 0 PC R051
19-AB0103-JTX RES SMD 10K OHM 1/10W 0603 0 PC R315
19-AB0103-JTX RES SMD 10K OHM 1/10W 0603 0 PC R052
19-AB0103-JTX RES SMD 10K OHM 1/10W 0603 0 PC R913
19-AB0103-JTX RES SMD 10K OHM 1/10W 0603 0 PC R008
19-AB0104-JTX SMD. RES 100K OHM 1/10W 0603 0 PC R031
19-AB0104-JTX SMD. RES 100K OHM 1/10W 0603 0 PC R232
19-AB0105-JTX RES SMD 1M OHM 1/10W 0603 0 PC R221
19-AB0152-JTX SMD. RES 1.5K OHM 1/10W +/-5% 0603 0 PC R218
19-AB0152-JTX SMD. RES 1.5K OHM 1/10W +/-5% 0603 0 PC R222
19-AB0154-JTX SMD. RES 150K 1/10W +/-5% 0603 0 PC R245
19-AB0183-JTX SMD. RES 18K OHM 1/10W +/-5% 0603 0 PC R302
19-AB0221-JTX RES SMD 220 OHM 1/10W 0603 0 PC R203
19-AB0221-JTX RES SMD 220 OHM 1/10W 0603 0 PC R228
19-AB0221-JTX RES SMD 220 OHM 1/10W 0603 0 PC R201
19-AB0221-JTX RES SMD 220 OHM 1/10W 0603 0 PC R202
19-AB0222-JTX RES SMD 2.2K OHM 1/10W 0603 0 PC R015
19-AB0223-JTX SMD. RES 22K OHM 1/10W +/-5% 0603 0 PC R215
19-AB0224-JTX SMD RES 220K OHM 1/10W 0603 0 PC R206
19-AB0271-JTX SMD. RES 270 OHM 1/10W +/-5% 0603 0 PC R217
19-AB0272-JTX RES SMD 2.7K OHM 1/10W 0603 0 PC R461
19-AB0272-JTX RES SMD 2.7K OHM 1/10W 0603 0 PC R610
19-AB0272-JTX RES SMD 2.7K OHM 1/10W 0603 0 PC R608
19-AB0273-JTX SMD. RES 27K OHM 1/10W +/-5% 0 PC R216
19-AB0332-JTX SMD RES 3.3K OHM 1/10W 0603 0 PC R209
19-AB0332-JTX SMD RES 3.3K OHM 1/10W 0603 0 PC R617
19-AB0332-JTX SMD RES 3.3K OHM 1/10W 0603 0 PC R616
19-AB0333-JTX RES. SMD 33K OHM 1/10W 0603 0 PC R205
19-AB0470-JTX RES SMD 47 OHM 1/10W +/-5%0603 0 PC R002
19-AB0471-JTX SMD. RES 470 OHM 1/10W +/-5% 0 PC R924
19-AB0472-JTX RES SMD 4.7K OHM 1/10W 0603 0 PC R029
19-AB0472-JTX RES SMD 4.7K OHM 1/10W 0603 0 PC R003
19-AB0472-JTX RES SMD 4.7K OHM 1/10W 0603 0 PC R004
19-AB0473-JTX SMD. RES 47K OHM 1/10W 0603 0 PC R928
19-AB0473-JTX SMD. RES 47K OHM 1/10W 0603 0 PC R931
19-AB0473-JTX SMD. RES 47K OHM 1/10W 0603 0 PC R932
19-AB0473-JTX SMD. RES 47K OHM 1/10W 0603 0 PC R937
19-AB0473-JTX SMD. RES 47K OHM 1/10W 0603 0 PC R926
19-AB0473-JTX SMD. RES 47K OHM 1/10W 0603 0 PC R927
19-AB0473-JTX SMD. RES 47K OHM 1/10W 0603 0 PC R936
19-AB0510-JTX RES SMD 51 OHM 1/10W 0603 0 PC R923
19-AB0820-JTX SMD. RES 82 0HM 1/10W +/-5% 0603 0 PC R929
19-AB0820-JTX SMD. RES 82 0HM 1/10W +/-5% 0603 0 PC R903
19-AB0822-JTX SMD. RES 8.2K OHM 1/10W +/-5% 0603 0 PC R237
Page 54

28-AB0101-JCX SMD. CAP 100 PF 50VDC +/-5% 0 PC C002
28-AB0101-JCX SMD. CAP 100 PF 50VDC +/-5% 0 PC C103
28-AB0101-JCX SMD. CAP 100 PF 50VDC +/-5% 0 PC C107
28-AB0101-JCX SMD. CAP 100 PF 50VDC +/-5% 0 PC C001
28-AB0102-KBX SMD. CAP 1000 PF 50V +/-10% B 0 PC C219
28-AB0103-KBX SMD. CAP 0.01 UF 50V +/-10% 0603 0 PC C105
28-AB0103-KBX SMD. CAP 0.01 UF 50V +/-10% 0603 0 PC C102
28-AB0103-KBX SMD. CAP 0.01 UF 50V +/-10% 0603 0 PC C082
28-AB0103-KBX SMD. CAP 0.01 UF 50V +/-10% 0603 0 PC C005
28-AB0103-KBX SMD. CAP 0.01 UF 50V +/-10% 0603 0 PC C233
28-AB0103-KBX SMD. CAP 0.01 UF 50V +/-10% 0603 0 PC C020
28-AB0103-KBX SMD. CAP 0.01 UF 50V +/-10% 0603 0 PC C917
28-AB0103-KBX SMD. CAP 0.01 UF 50V +/-10% 0603 0 PC C201
28-AB0103-KBX SMD. CAP 0.01 UF 50V +/-10% 0603 0 PC C212
28-AB0103-KBX SMD. CAP 0.01 UF 50V +/-10% 0603 0 PC C221
28-AB0103-KBX SMD. CAP 0.01 UF 50V +/-10% 0603 0 PC C228
28-AB0103-KBX SMD. CAP 0.01 UF 50V +/-10% 0603 0 PC C239
28-AB0103-KBX SMD. CAP 0.01 UF 50V +/-10% 0603 0 PC C019
28-AB0103-KBX SMD. CAP 0.01 UF 50V +/-10% 0603 0 PC C024
28-AB0103-KBX SMD. CAP 0.01 UF 50V +/-10% 0603 0 PC C017
28-AB0104-ZFX CAP. SMD 0.1UF 50V +80%~-20% F 0 PC C285
28-AB0104-ZFX CAP. SMD 0.1UF 50V +80%~-20% F 0 PC C451
28-AB0222-KBX CAP.SMD 2200PF 50V +/-10% 0603 0 PC C213
28-AB0222-KBX CAP.SMD 2200PF 50V +/-10% 0603 0 PC C407
28-AB0222-KBX CAP.SMD 2200PF 50V +/-10% 0603 0 PC C014
28-AB0224-ZFX CAP.SMD 0.22UF 50V +80-20%0603 0 PC C614
28-AB0270-JCX SMD. CAP 27 PF 50V +/-5% 0603 0 PC C011
28-AB0300-JCX SMD CAP. 30 PF 50V +/-5% 0603 0 PC C022
28-AB0300-JCX SMD CAP. 30 PF 50V +/-5% 0603 0 PC C021
28-AB0472-KBX CAP.SMD 4700PF 50V +/-10% 0603 0 PC C619
28-AB0472-KBX CAP.SMD 4700PF 50V +/-10% 0603 0 PC C621
28-AB0821-JCX CAP.SMD 820PF 50V +/-5% 0603 0 PC C204
28-AB0822-KBX SDM. CAP 8200 PF 50V +/-10% 0603 0 PC C235
12-BC847A-0BX SMD TRANSISTOR BC847A (NPN) 0 PC Q1006
12-BC847A-0BX SMD TRANSISTOR BC847A (NPN) 0 PC Q1005
12-BC847A-0BX SMD TRANSISTOR BC847A (NPN) 0 PC Q1001
13-MSP342-5GB IC MSP 3425G 0 PC IC1001
19-AB0101-JTX RES SMD 100 OHM 1/10W 0603 0 PC R1011
19-AB0101-JTX RES SMD 100 OHM 1/10W 0603 0 PC R1002
19-AB0101-JTX RES SMD 100 OHM 1/10W 0603 0 PC R1001
19-AB0102-JTX RES SMD 1K OHM 1/10W 0603 0 PC R1015
19-AB0102-JTX RES SMD 1K OHM 1/10W 0603 0 PC R1014
19-AB0102-JTX RES SMD 1K OHM 1/10W 0603 0 PC R1016
19-AB0102-JTX RES SMD 1K OHM 1/10W 0603 0 PC R1017
19-AB0103-JTX RES SMD 10K OHM 1/10W 0603 0 PC R1040
19-AB0103-JTX RES SMD 10K OHM 1/10W 0603 0 PC R1018
19-AB0103-JTX RES SMD 10K OHM 1/10W 0603 0 PC R1041
19-AB0391-JTX SMD RES 390 OHM 1/10W 0603 0 PC R1012
28-AB0102-KBX SMD. CAP 1000 PF 50V +/-10% B 0 PC C1019
28-AB0102-KBX SMD. CAP 1000 PF 50V +/-10% B 0 PC C1018
28-AB0102-KBX SMD. CAP 1000 PF 50V +/-10% B 0 PC C1020
28-AB0102-KBX SMD. CAP 1000 PF 50V +/-10% B 0 PC C1041
28-AB0102-KBX SMD. CAP 1000 PF 50V +/-10% B 0 PC C1040
28-AB0102-KBX SMD. CAP 1000 PF 50V +/-10% B 0 PC C1021
28-AB0103-KBX SMD. CAP 0.01 UF 50V +/-10% 0603 0 PC C1043
28-AB0103-KBX SMD. CAP 0.01 UF 50V +/-10% 0603 0 PC C1034
Page 55

28-AB0103-KBX SMD. CAP 0.01 UF 50V +/-10% 0603 0 PC C1033
28-AB0103-KBX SMD. CAP 0.01 UF 50V +/-10% 0603 0 PC C1031
28-AB0103-KBX SMD. CAP 0.01 UF 50V +/-10% 0603 0 PC C1011
28-AB0104-KBX SMD. CAP 50VDC 0.1UF +/-10% 06 0 PC C1012
28-AB0104-KBX SMD. CAP 50VDC 0.1UF +/-10% 06 0 PC C1008
28-AB0104-KBX SMD. CAP 50VDC 0.1UF +/-10% 06 0 PC C1006
28-AB0104-KBX SMD. CAP 50VDC 0.1UF +/-10% 06 0 PC C1037
28-AB0104-KBX SMD. CAP 50VDC 0.1UF +/-10% 06 0 PC C1039
28-AB0152-KBX SMD. CAP 1500 PF 50V +/-10% B 0 PC C1007
28-AB0220-JCX CAP. SMD 22PF 50V +/-5% C 0 PC C1036
28-AB0220-JCX CAP. SMD 22PF 50V +/-5% C 0 PC C1035
28-AB0222-KBX CAP.SMD 2200PF 50V +/-10% 0603 0 PC C1005
28-AB0339-CCX SMD.CAP. 50V 3.3PF +/-0.25PF 0 PC C1001
28-AB0339-CCX SMD.CAP. 50V 3.3PF +/-0.25PF 0 PC C1002
28-AB0471-JCX CAP.SMD 470PF 50V +/-5% 0603 0 PC C1025
28-AB0560-JCX SMD CAP. 56 PF 50V +/-5% 0603 0 PC C1004
09-BAS316-ATX SMD.DIODE BAS316 115 0 PC D840
12-BC847A-0BX SMD TRANSISTOR BC847A (NPN) 0 PC Q844
12-BC847A-0BX SMD TRANSISTOR BC847A (NPN) 0 PC Q841
12-BC847A-0BX SMD TRANSISTOR BC847A (NPN) 0 PC Q802
12-BC847A-0BX SMD TRANSISTOR BC847A (NPN) 0 PC Q847
12-BC847A-0BX SMD TRANSISTOR BC847A (NPN) 0 PC Q845
13-LD1117-50B 5.0V IC LD1117S50TR 0 PC IC402
13-TEA150-6TB IC TEA1506T/N1 118 0 PC IC801
19-AB0000-JTX RES SMD 0 OHM 1/10W +/-5% 0603 0 PC R824B
19-AB0100-JTX RES SMD 10 OHM 1/10W +/-5% 0 PC R814
19-AB0102-JTX RES SMD 1K OHM 1/10W 0603 0 PC R844
19-AB0103-JTX RES SMD 10K OHM 1/10W 0603 0 PC R841
19-AB0103-JTX RES SMD 10K OHM 1/10W 0603 0 PC R825
19-AB0122-JTX SMD. RES 1.2K OHM 1/10 J 0603 0 PC R811
19-AB0202-FTX SMD. RES 2K OHM 1/10W +/-1% 0603 0 PC R838
19-AB0222-JTX RES SMD 2.2K OHM 1/10W 0603 0 PC R848
19-AB0223-JTX SMD. RES 22K OHM 1/10W +/-5% 0603 0 PC R831
19-AB0223-JTX SMD. RES 22K OHM 1/10W +/-5% 0603 0 PC R846
19-AB0223-JTX SMD. RES 22K OHM 1/10W +/-5% 0603 0 PC R832
19-AB0272-JTX RES SMD 2.7K OHM 1/10W 0603 0 PC R835
19-AB0274-JTX SMD. RES 270K OHM 1/10W +/-5% 0603 0 PC R819
19-AB0332-JTX SMD RES 3.3K OHM 1/10W 0603 0 PC R812
19-AB0333-JTX RES. SMD 33K OHM 1/10W 0603 0 PC R818
19-AB0333-JTX RES. SMD 33K OHM 1/10W 0603 0 PC R837
19-AB0394-JTX SMD. RES 390K OHM 1/10W +/-5% 0 PC R822
19-AB0471-JTX SMD. RES 470 OHM 1/10W +/-5% 0 PC R821
19-AB0472-JTX RES SMD 4.7K OHM 1/10W 0603 0 PC R836
19-AB0683-JTX RES SMD 68K OHM 1/10W 0603 0 PC R826
28-AB0102-KBX SMD. CAP 1000 PF 50V +/-10% B 0 PC C839
28-AB0103-KBX SMD. CAP 0.01 UF 50V +/-10% 0603 0 PC C842
28-AB0103-KBX SMD. CAP 0.01 UF 50V +/-10% 0603 0 PC C831
28-AB0103-KBX SMD. CAP 0.01 UF 50V +/-10% 0603 0 PC C844
28-AB0103-KBX SMD. CAP 0.01 UF 50V +/-10% 0603 0 PC C425
28-AB0103-KBX SMD. CAP 0.01 UF 50V +/-10% 0603 0 PC C417
28-AB0104-KBX SMD. CAP 50VDC 0.1UF +/-10% 06 0 PC C814
28-AB0104-KBX SMD. CAP 50VDC 0.1UF +/-10% 06 0 PC C837
28-AB0221-JCX CAP.SMD 220PF 50V C 0603 +/-5% 0 PC C821
28-AB0224-ZFX CAP.SMD 0.22UF 50V +80-20%0603 0 PC C818
28-AB0471-KBX SMD.CAP. 470PF 50V +/-10% 0 PC C813
28-AB0471-KBX SMD.CAP. 470PF 50V +/-10% 0 PC C816
Page 56

28-AB0473-KBX SMD CAP 0.047UF 50V +/-10%0603 0 PC C811
12-BC847A-0BX SMD TRANSISTOR BC847A (NPN) 0 PC Q951
19-AB0103-JTX RES SMD 10K OHM 1/10W 0603 0 PC R911
19-AB0103-JTX RES SMD 10K OHM 1/10W 0603 0 PC R952
19-AB0472-JTX RES SMD 4.7K OHM 1/10W 0603 0 PC R900
28-AB0102-KBX SMD. CAP 1000 PF 50V +/-10% B 0 PC C951
19-AB0101-JTX RES SMD 100 OHM 1/10W 0603 0 PC R916
19-AB0101-JTX RES SMD 100 OHM 1/10W 0603 0 PC R915
19-AB0820-JTX SMD. RES 82 0HM 1/10W +/-5% 0603 0 PC R921
19-AB0820-JTX SMD. RES 82 0HM 1/10W +/-5% 0603 0 PC R905
28-AB0104-ZFX CAP. SMD 0.1UF 50V +80%~-20% F 0 PC C910
28-AB0104-ZFX CAP. SMD 0.1UF 50V +80%~-20% F 0 PC C912
0.001 ST 58-DA71MP-0UI
19-AB0101-JTX RES SMD 100 OHM 1/10W 0603 0 PC R501
19-AB0101-JTX RES SMD 100 OHM 1/10W 0603 0 PC R504
19-AB0101-JTX RES SMD 100 OHM 1/10W 0603 0 PC R507
19-AB0102-JTX RES SMD 1K OHM 1/10W 0603 0 PC R522
19-AB0272-JTX RES SMD 2.7K OHM 1/10W 0603 0 PC R524
19-AB0471-JTX SMD. RES 470 OHM 1/10W +/-5% 0 PC R525
19-AB0471-JTX SMD. RES 470 OHM 1/10W +/-5% 0 PC R526
19-AB0471-JTX SMD. RES 470 OHM 1/10W +/-5% 0 PC R527
19-AB0472-JTX RES SMD 4.7K OHM 1/10W 0603 0 PC R508
19-AB0472-JTX RES SMD 4.7K OHM 1/10W 0603 0 PC R505
19-AB0472-JTX RES SMD 4.7K OHM 1/10W 0603 0 PC R502
19-AB0561-JTX RES SMD 560 OHM 1/10W 0603 0 PC R523
19-AB0751-JTX SMD. RES 750 OHM 1/10W 0603 0 PC R503
19-AB0751-JTX SMD. RES 750 OHM 1/10W 0603 0 PC R506
19-AB0751-JTX SMD. RES 750 OHM 1/10W 0603 0 PC R509
28-AB0103-KBX SMD. CAP 0.01 UF 50V +/-10% 0603 0 PC C507
28-AB0681-JCX SMD. CAP 680 PF 50V +/-5% 0603 0 PC C503
28-AB0681-JCX SMD. CAP 680 PF 50V +/-5% 0603 0 PC C502
28-AB0681-JCX SMD. CAP 680 PF 50V +/-5% 0603 0 PC C501
19-AB0393-FTX SMD.RES 39K OHM 1/10W +/-1% 0 PC R842
19-AB0912-JTX RES. SMD 9100 OHM 1/10W 0 PC R414
74-100100-8CD POLYBAG (100CMX100CM) 1 PC FOR FRONT CABINET
74-120120-8CD POLYBAG (120CMX120CM) 1 PC FOR REAR CABINET
74-279070-50C EPE BOARD (580MMX440MMX5MM) 0.333 PC FOR REAR CABINET
74-344780-50C EPE BOARD (900MMX400MMX5MM) 0.667 PC FOR REAR CABINET
76-001497-0AF CARTON BOX LWH 640X460X360MM 0.018 PC FOR OTHER
76-00DA71-0AF CARTON BOX 0.5 PC FOR FRONT CABINET
76-00DA71-0AR CARTON BOX 0.333 PC FOR REAR CABINET
76-346740-01A CARTON SHEET LWH 440X620X3MM 0.055 PC FOR OTHER
77-120120-6WC RAW BAG POLYBAG -- 00 00 R=N 0.5 PC FOR FRONT CABINET
55-DA71FC-0CN9M FRONT CABINET 1 PC
56-DA71LE-0HC5Z LENS 1 PC
56-DA71PK-0HA5C POWER KNOB 1 PC
59-130460-00X RUBBER PAD (25MMX7MM) 2 PC
62-395050-0UN MAIN BD RAIL (SMALL) 2 PC
62-406210-0UN TRACK 2 PC
62-413280-0HN5C BRACKET 1 PC
55-DA71RC-0CN5F REAR CABINET 1 PC
62-314340-0UN FBT SUPPORTER HIPS-KINGFA 113 (VO) 1 PC
62-388180-0HA POWER SW.ADAPTER 1 PC
62-227680-0UA BRACKET ABS-KINGFA 606 (UO) 1 PC
62-227680-1UA FBT BRACKET 1 PC
STICK ON F.
CAB.(FOOTING)
 Loading...