

TC electronic SDN BHD GUITAR User Manual
G-Force
GUITAR EFFECTS PROCESSOR
USER’S MANUAL

a
1 Read these instructions.
2 Keep these instructions.
3 Heed all warnings.
4 Follow all instructions.
5 Do not use this apparatus near water.
6 Clean only with dry cloth.
7 Do not block any ventilation openings. Install in
accordance with the manufacturer's instructions.
8 Do not install near any heat sources such
as radiators, heat registers, stoves, or other
apparatus (including amplifiers) that produce heat.
9 Do not defeat the safety purpose of the polarized
or grounding-type plug. A polarized plug has two
blades with one wider than the other. A grounding
type plug has two blades and a third grounding
prong. The wide blade or the third prong are
provided for your safety. If the provided plug does
not fit into your outlet, consult an electrician for
replacement of the obsolete outlet.
10 Protect the power cord from being walked
on or pinched particularly at plugs, convenience
receptacles, and the point where they exit from the
apparatus.
11 Only use attachments/accessories specified by the
manufacturer.
12 Unplug this apparatus during lightning storms or
when unused for long periods of time.
Use only with the cart, stand, tripod, bracket, or
table specified by the manufacturer, or sold with
the apparatus. When a cart is used, use
caution when moving the cart/apparatus
combination to avoid injury from tip-over.
13 Refer all servicing to qualified service
personnel. Servicing is required when the
apparatus has been damaged in any way,
such as power-supply cord or plug is damaged,
liquid has been spilled or objects have fallen into
the apparatus, the apparatus has been exposed to
rain or moisture, does not operate normally, or has
been dropped.
• This equipment should be installed near the socket
outlet and disconnection of the device should be easily
accessible.
• To completely disconnect from AC mains, disconnect
the power supply cord from the AC receptable.
• The mains plug of the power supply shall remain
readily operable.
• Do not install in a confined space.
• Do not open the unit - risk of electric shock inside.
Caution:
You are cautioned that any change or modifications not
expressly approved in this manual could void your authority
to operate this equipment.
Service
• There are no user-serviceable parts inside.
• All service must be performed by qualified personnel.
Warning!
• To reduce the risk of fire or electrical shock, do not
expose this equipment to dripping or splashing and
ensure that no objects filled with liquids, such as vases,
are placed on the equipment.
• This apparatus must be earthed.
• Use a three wire grounding type line cord like the one
supplied with the product.
• Be advised that different operating voltages require the
use of different types of line cord and attachment plugs.
• Check the voltage in your area and use the
correct type. See table below:
Voltage Line plug according to standard
110-125V UL817 and CSA C22.2 no 42.
220-230V CEE 7 page VII, SR section
107-2-D1/IEC 83 page C4.
240V BS 1363 of 1984.
Specification for 13A fused
plugs and switched and
unswitched socket outlets.
The lightning flash with an arrowhead symbol
within an equilateral triangle, is intended to alert
the user to the presence of uninsulated "dan-
gerous voltage" within the product's enclosure that may
be of sufficient magnitude to constitute a risk of electric
shock to persons.
The exclamation point within an equilateral triangle
is intended to alert the user to the presence of
important operating and maintenance (servicing)
instructions in the literature accompanying the product.
IMPORTANT SAFETY INSTRUCTIONS

b
Certificate Of Conformity
TC Electronic A/S, Sindalsvej 34, 8240 Risskov, Denmark,
hereby declares on own responsibility that following
product:
G-Force - Guitar Effects Processor
That is covered by this certificate and marked with CE-label
conforms with following standards:
EN 60065 Safety requirements for mains
(IEC 60065) operated electronic and related
apparatus for household and similar
general use
EN 55103-1 Product family standard for audio,
video, audio-visual and entertainment
lighting control apparatus for
professional use.
Part 1: Emission.
EN 55103-2 Product family standard for audio,
video, audio-visual and entertainment
lighting control apparatus for
professional use.
Part 2: Immunity.
With reference to regulations in following directives:
73/23/EEC, 89/336/EEC
Issued in Risskov, May 1997
Anders Fauerskov
Managing Director
EMC / EMI.
This equipment has been tested and found to comply with
the limits for a Class B Digital device, pursuant to part 15 of
the FCC rules.
These limits are designed to provide reasonable protection
against harmful interference in residential installations. This
equipment generates, uses and can radiate radio
frequency energy and, if not installed and used in
accordance with the instructions, may cause harmful
interference to radio communications. However, there is no
guarantee that interference will not occur in a particular
installation. If this equipment does cause harmful
interference to radio or television reception, which can be
determined by turning the equipment off and on. The user
is encouraged to try to correct the interference by one or
more of the following measures:
• Reorient or relocate the receiving antenna.
• Increase the separation between the equipment and
receiver.
• Connect the equipment into an outlet on a circuit
different from that to which the receiver is connected.
• Consult the dealer or an experienced radio/TV
technician for help.
For the customers in Canada:
This Class B digital apparatus complies with Canadian
ICES-003.
Cet appareil numérique de la classe B est conforme à la
norme NMB-003 du Canada.
IMPORTANT SAFETY INSTRUCTIONS

3
TABLE OF CONTENTS
WELCOME
FROM THE USERS POINT OF VIEW
QUICK REFERENCE
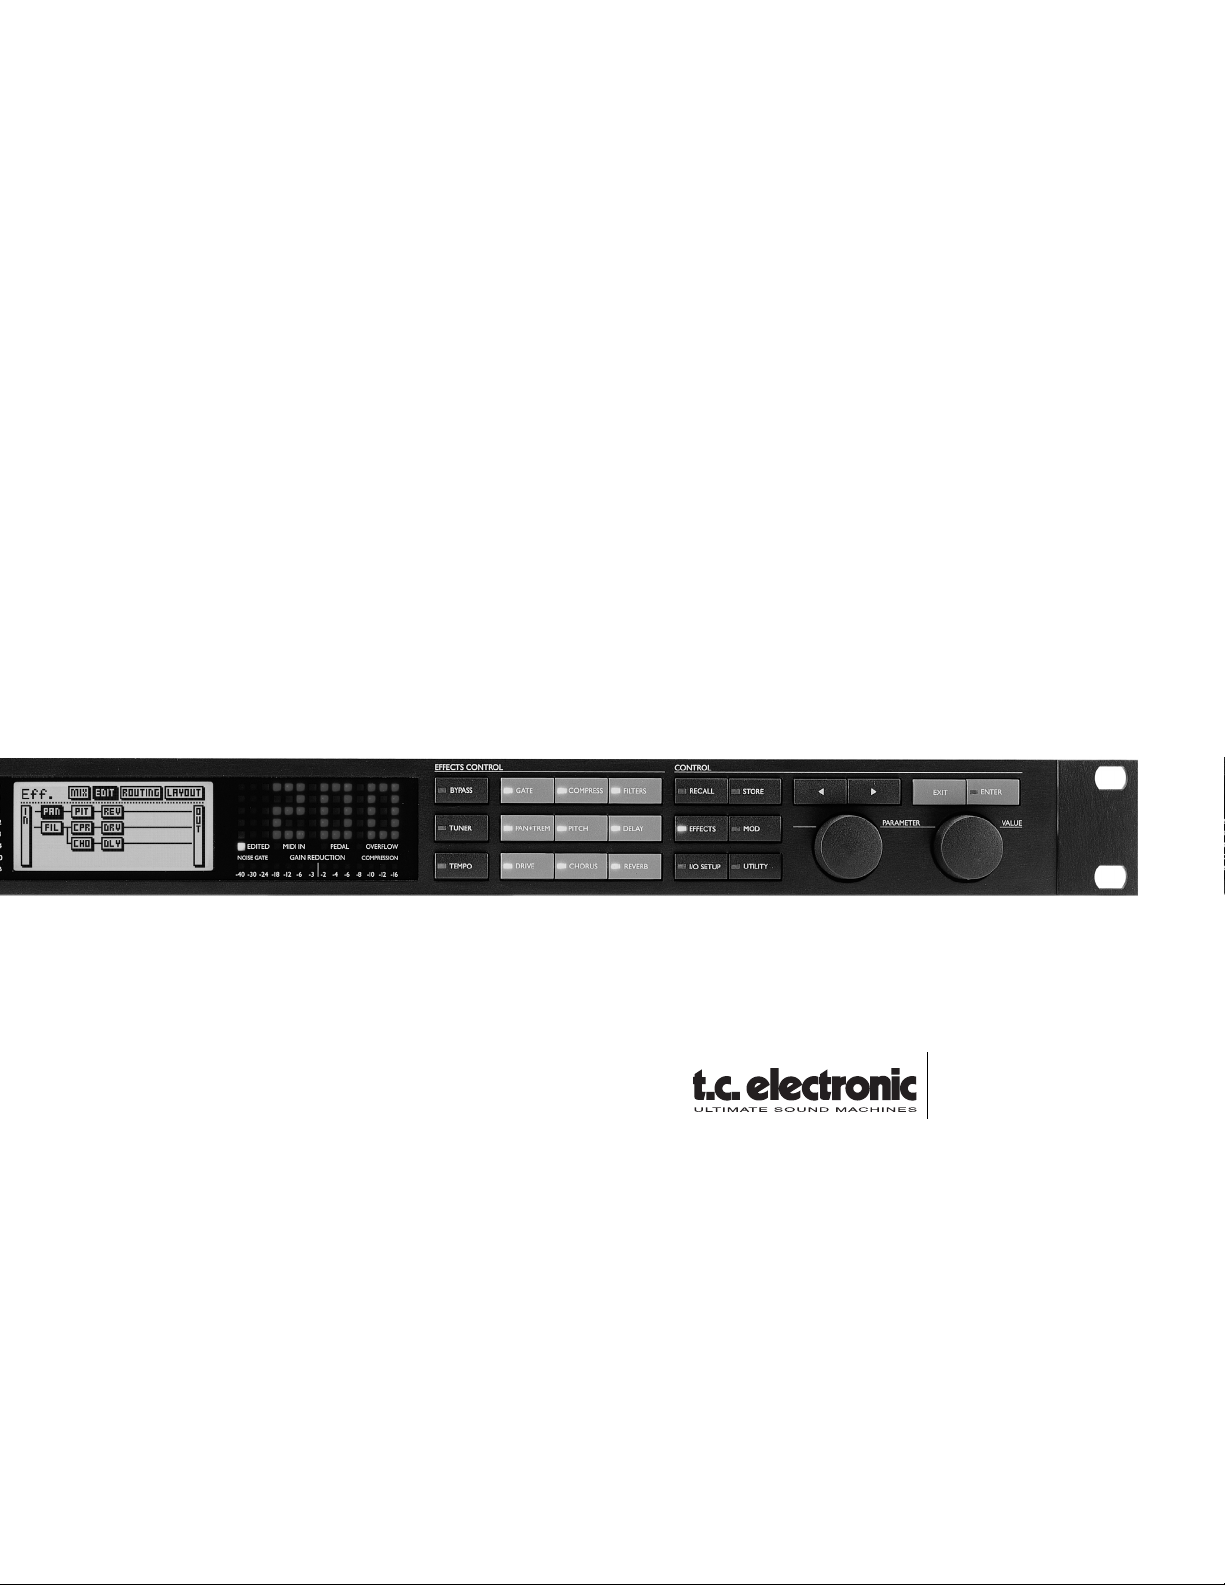
THE FRONT PANEL
THE REAR PANEL
THE SIGNAL FLOW
HOW TO…
SETUPS
RECALL
STORE
EFFECTS
I/O MENU
MODIFIERS
UTILITY
TEMPO
TUNER
THE BLOCKS
THE RESET PAGE
TECHNICAL SPECIFICATIONS
TROUBLE SHOOTING
MIDI IMPLEMENTATION CHART
SELF TEST
PRESET LIST
About this Manual
Foreword by Palle Schultz
Buttons, Knobs, Controllers and other functions
Inputs, Outputs
build a User Preset, connect the Modifiers, setup an Expression Pedal etc.
Recalling a Preset, Factory/User presets, Memory card
Store a new preset, The Letterbox
I/O, Input selector, Sample Rate, Mix, MIDI setup
System parameters, Billboard settings
5
6
7
8
10
11
12
16
17
18
29
21
25
29
31
32
33
48
49
50
51
52
54
TC Electronic, Sindalsvej 34, DK-8240 Risskov - tcdk@tcelectronic.com
Rev 1.01 - SW - V 2.04
Prod No: 606055012

Congratulations
Congratulations on the purchase of your new G-Force.
We hope that you have as much pleasure using it as
we had making it.
The G-Force is carefully designed to produce the ultimate
guitar effects. To achieve this, we supplied you with eight
un-compromised, simultaneous effects. This means that
the G-Force has the power to run all eight effects without
losing sound quality. You can route the effect blocks in any
combination you like, and the 24 bit resolution converters
make it possible to run your guitar straight through without
a line-mixer, while preserving your original guitar tone.
Check out the Modifier Matrix and discover a powerful tool
for real-time external and internal control of the many
parameters of the G-Force.
About this Manual
Many people in the music business (and elsewhere) have
an aversion to reading manuals. We understand that. So if
you feel like starting without reading the whole manual,
simply get going. You can always use the manual for
checking out areas that you have questions about, or if you
want to dig deeper into the unit. Refer to the Table of
Contents for further information.
On the other hand, you might want to know a little more
about the G-Force before you start pressing keys. The
manual will take you step by step through all of the GForce functions. If you want to read about a specific
function, please refer to the Table of Contents.
WELCOME
5

FROM A USERS POINT OF VIEW
6
Foreword by Palle Schultz, a guitar player with 10 years experience.
From a users point of view
If you ditch your beloved stomp boxes and invest your money in a
multi- effects unit, you'll most likely lose the simplicity and flexibility of
your pedal arrangement. You'll often have to deal with phone book
sized manuals and interfaces made by and for computer experts.
These circumstances often drive creative people and musicians away
from such space-age machinery.
I've owned several different effect units, that each had their own
version of a hostile user interface so I've been waiting a long time for
someone to develop a multi-effect that doesn't clash with ones creative
state of mind. The fact that those "someone" are the people of TC
Electronic guaranties the quality of the entire product.
The G-FORCE is a very flexible machine which is very easy to
approach. You have the choice of simply using it as a linear chain of
effects or you can go beyond the use of any known multi-effect unit,
and explore the countless combinations and control possibilities within
the G-FORCE.
After a short while of using the G-Force, I changed my whole approach
towards the creation of effects for my guitar. From simple use of
standard effects like delay, chorus and reverb connected in a straight
line, I now find myself thinking up a non-existing effect like say; a
tremolo that only kicks in when you play on the high notes, while the
level of a phased distorted dark delay is controlled by your old volume
pedal that you calibrated for use with your G-FORCE.
If you are totally new to digital machinery like the G-FORCE, and are a
hard-core knob turner but get frustrated dealing with scroll bars, LCDdisplays and strange technical terms, then you have ended up buying
the right product. The TC Electronic G-FORCE is so easy to use that
it’s a bit ridiculous that this manual even exists. When you cruise
around the G-FORCE, and want a certain thing to happen and have a
feeling that this particular parameter is the right one to adjust, then
you're most probably right. The way you learn this machine is by using
it, don't be afraid of tweaking anything to its maximum, the edges are
the learning spot and from there you either take a fall or a step back.
The cool thing about the G-FORCE is that you won't hurt yourself, if
you go over the edge, but you might end up with the strangest or
coolest new effect you ever heard.
One very pleasing side effect of owning a G-FORCE is the dramatically
lighter rack you'll end up with. Mine certainly slimmed down to a tiny
Formula One sized powerhouse.
Palle Schultz

QUICK REFERENCE
7
General Control
General control of the G-Force is accomplished by dialing the Parameter wheel to change
parameters, and the Value wheel to change values. In many of the displays you can select
different menus by pressing the < > Arrow keys e.g., in the Effects display you can select
between Mix, Edit, Routing and Layout. Press Enter to carry out an action (for example,
when recalling a preset).
Recall
Press Recall (if you are not already there). Be sure that the cursor is placed on “Preset”, and
dial the Value wheel to scroll through the presets. Press Enter to load the new preset.
Quick Store
If you want to store a preset with the same name, press Store to access the Store menu,
and press Enter to confirm. The G-Force will now automatically store your preset in the first
free User space, using the current name. When you try to restore an existing User preset,
the G-Force will default to the same User preset number.
Editing
Press Effects and select the Edit display using the < > Arrow keys. Double click the bypass
key of the block you want to edit.
Setting up your MIDI board
Press I/O Setup and select MIDI using the < > Arrow keys. Adjust the MIDI basic channel so
it matches the one of your foot controller. Be sure that Program Change is enabled. Your
foot controller should now be able to change presets on the G-Force. If you want to recall
User presets via MIDI, scroll down to Mapping Mode and select “into User bank” by turning
the Value wheel.
Setting up an Expression Pedal
Connect your pedal with a mono guitar cable to the External Control In. Press I/O Setup and
select Control using the < > Arrow keys.
In this list there are a number of things that can be controlled by an Expression pedal. Let’s
set up control of the Main volume. Place the cursor on “Main Vol” - Press Enter (for
Learning) and move your pedal. The G-Force will now automatically detect your pedal.
The functions of Ext. 1-8 are set up in the Modifiers Matrix.
Input/Output
Use the Input/Output knobs in the upper left corner of the front panel to adjust the levels of
the G-Force. If you are using the G-Force in a mono setup, you should select L-only in the
I/O setup, Audio menu. This menu will also provide I/O gain information.
The Killdry function should be On if you are using the G-Force in a parallel setup i.e. in
combination with a line mixer.
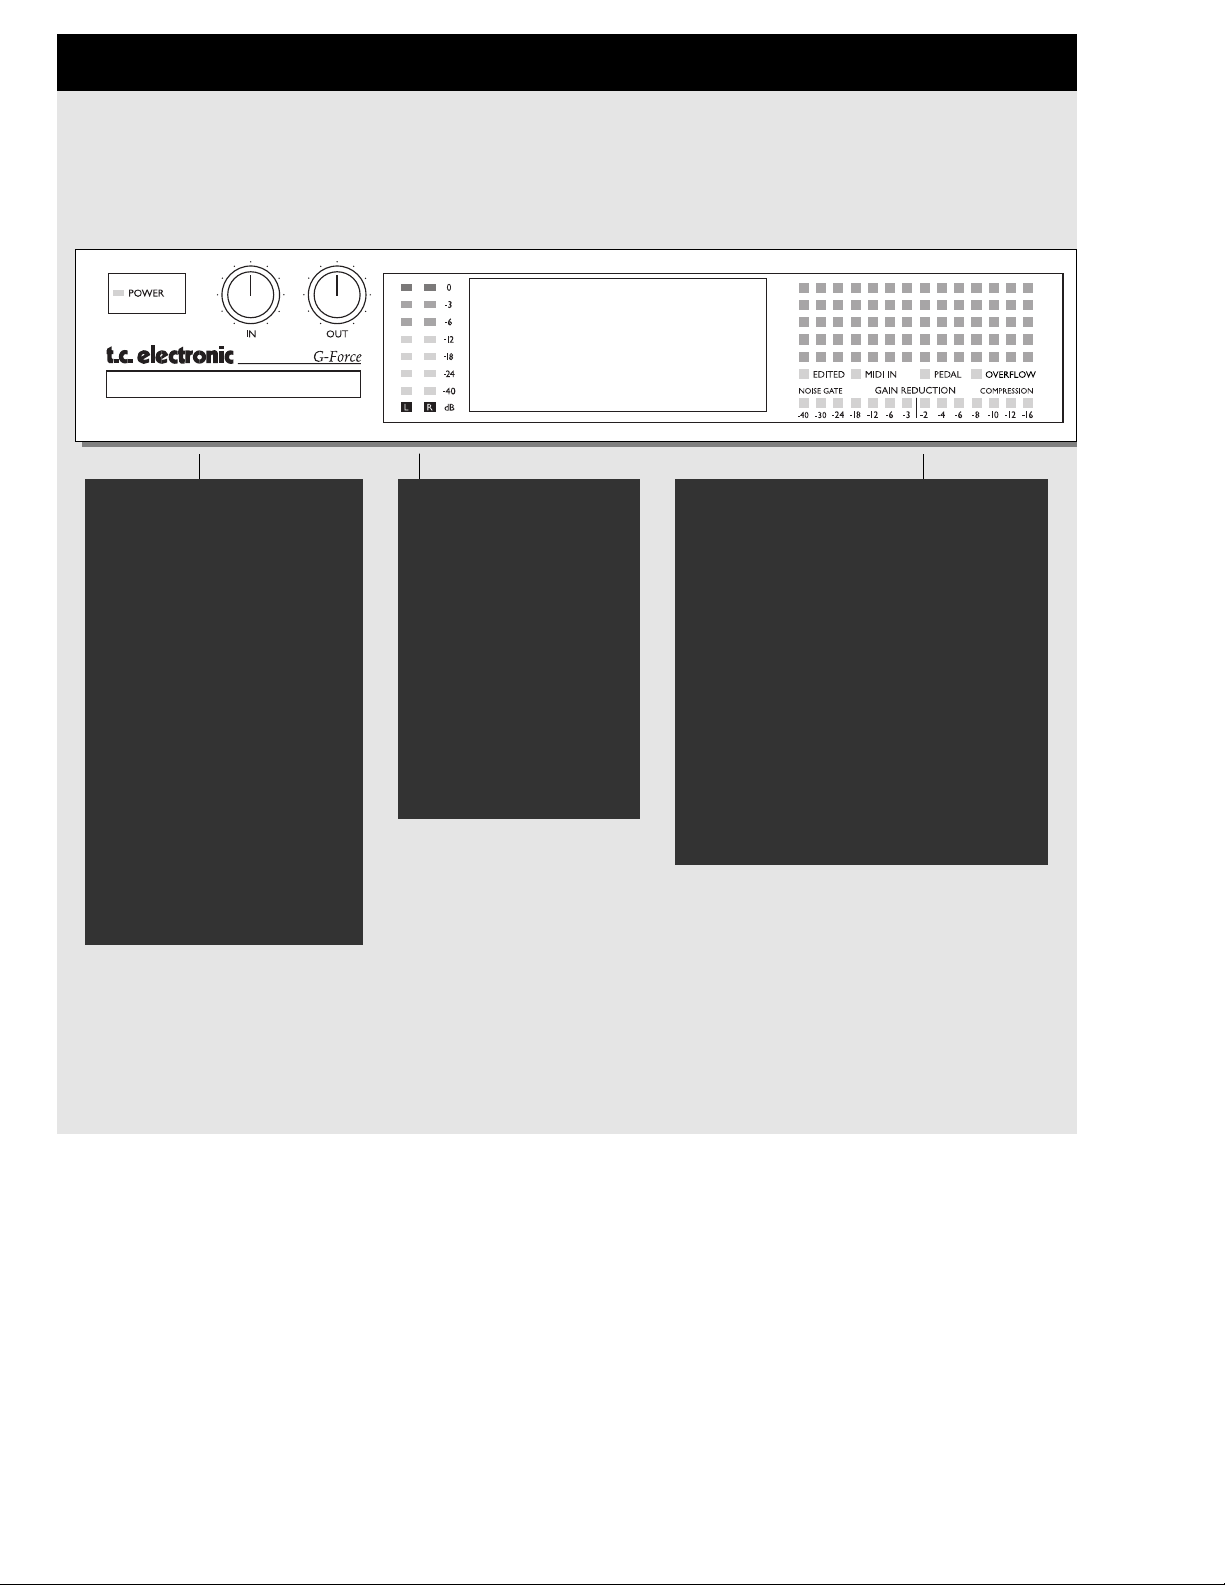
POWER
Press and hold the Power
switch for about 3 seconds,
then release to power off.
IN/OUT KNOBS
The overall Input level is
adjusted via the knob in the
upper left corner of the GForce. The Input should average approx. -3 to -6 dB
on the Input meters.
Set your output level using the
Output knob.
CARD SLOT
The PCMCIA slot can be used
for storing and loading presets.
Use Type 1 PC Cards with a
minimum 64 KBytes of SRAM.
BILLBOARD
The Billboard of the G-Force is capable of
showing preset number and name, Tempo
and a global message that you can write
into the G-Force (refer to Billboard in the
Utility section). Both Tuner and Tempo use
the Billboard to display information as well.
Beneath the Billboard you will find four
indicators, displaying: Preset Edited,
incoming MIDI information, incoming Pedal
information and internal Overflow.
The two lower meters will indicate gain
reduction in the Compressor and Noise
Gate, but are also used as tuner indicators
when Tuner is active.
METERS
These meters indicate the
level of Left and Right
inputs.
The Input level of the GForce automatically optimizes the signal to noise
ratio via a small relay in
the input section. You will
see a prompt on the display and may hear a small
click when the input gain
range is changed.
THE FRONT PANEL
8
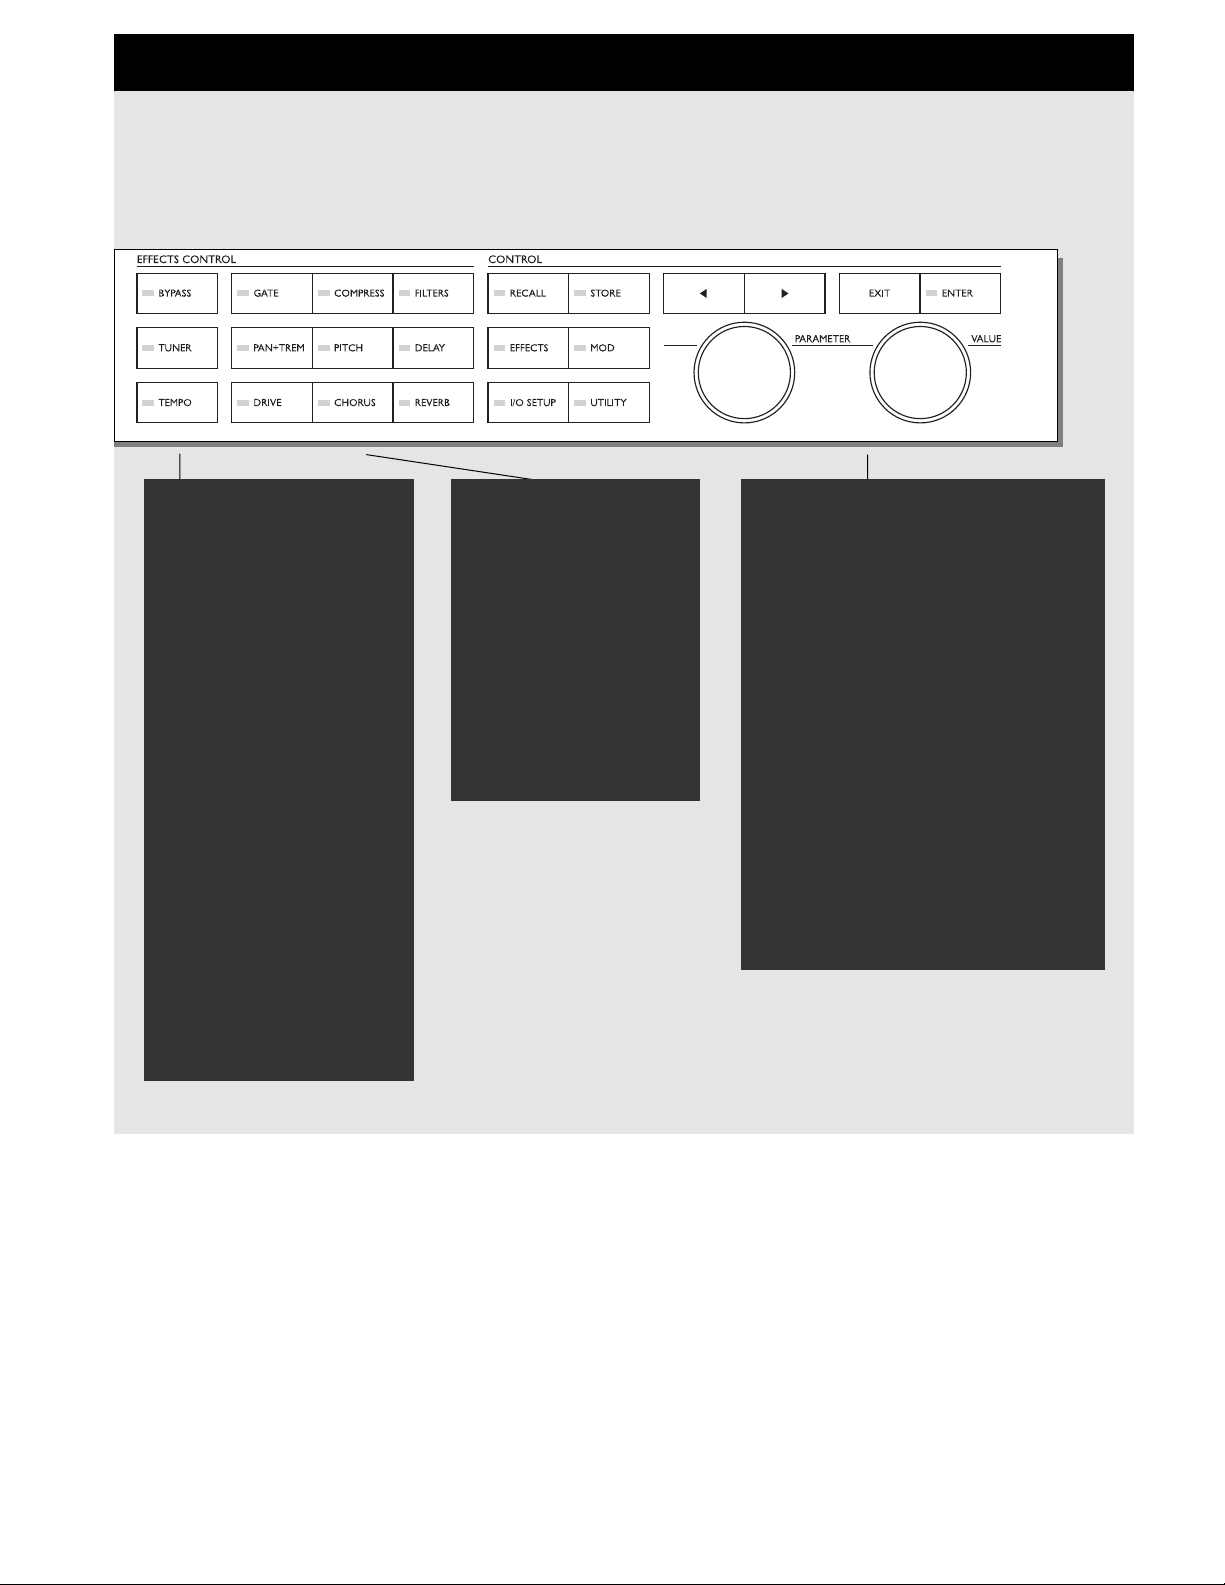
OVERALL BYPASS
The Bypass key in the upper
left corner is the overall
bypass. With this key you can
bypass all effects in the
G-Force simultaneously.
Note: If the Killdry function (in
the I/O Setup Audio menu) is
active, the G-Force will be
muted. This means that no
sound will pass through.
TUNER
Press this key to enter Tuner
mode.
TEMPO
Tap the global tempo using
the Tempo key. Note: this
may affect the current preset.
Pressing the Tempo key will
enable the Tempo pop-up
menu. This menu will disappear after a few seconds.
The Tempo key will indicate
the global tempo by blinking.
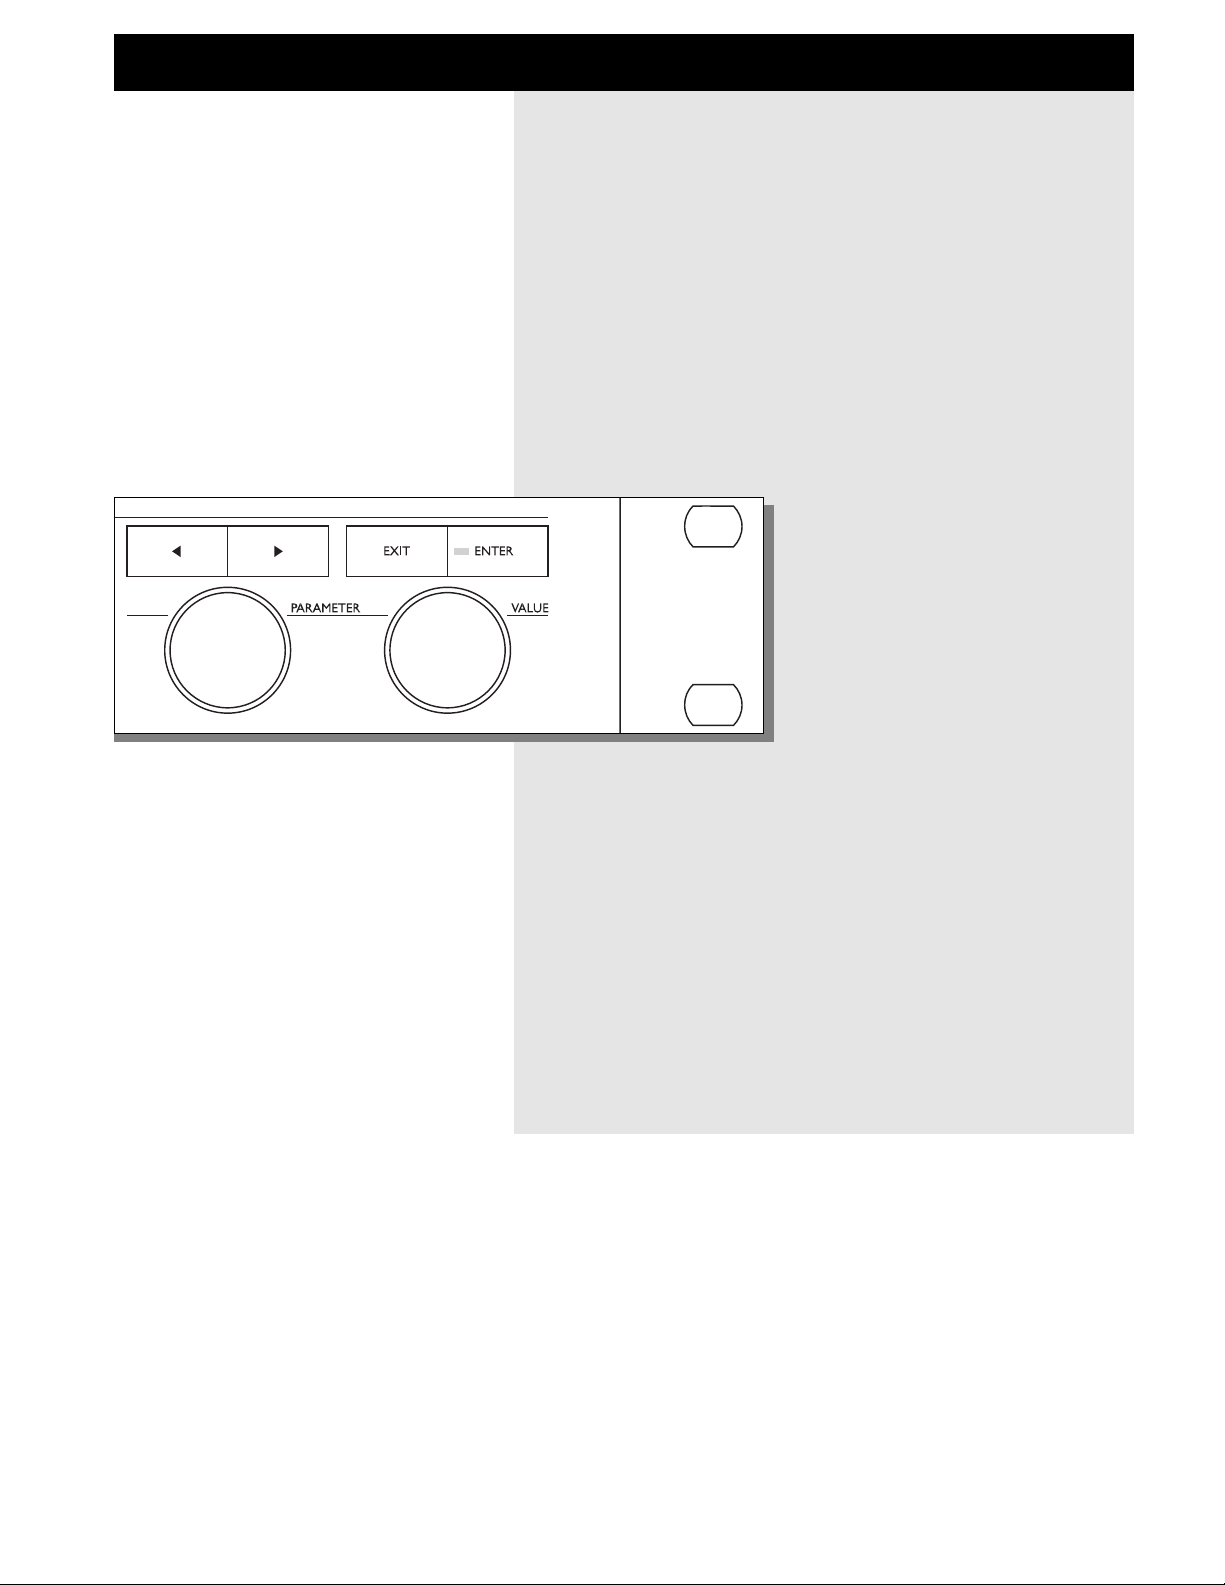
ARROW KEYS
In many of the displays you can select
different menus by pressing the Arrow
keys, i.e. in the Effects display you can
select between Mix, Edit, Routing, and
Layout.
THE PARAMETER WHEEL
Use the Parameter wheel to change position of the cursor in the display
THE VALUE WHEEL
Use the Value wheel to change the values of a parameter.
ENTER, EXIT
The Enter key is used to confirm actions,
or for accessing into a block. The Enter
key will blink when the G-Force needs
you to confirm. The Exit key is normally
used to exit a menu, or to cancel an
action.
9
EFFECT BYPASS
The nine effect keys are
dedicated to bypassing
any of the eight effects
and the Noise Gate.
These keys can bypass an
effect block at any time,
no matter what display
you are working in.
When you are in the
Effects Edit display, double click for fast access to
the Edit parameter menu
Main
Power
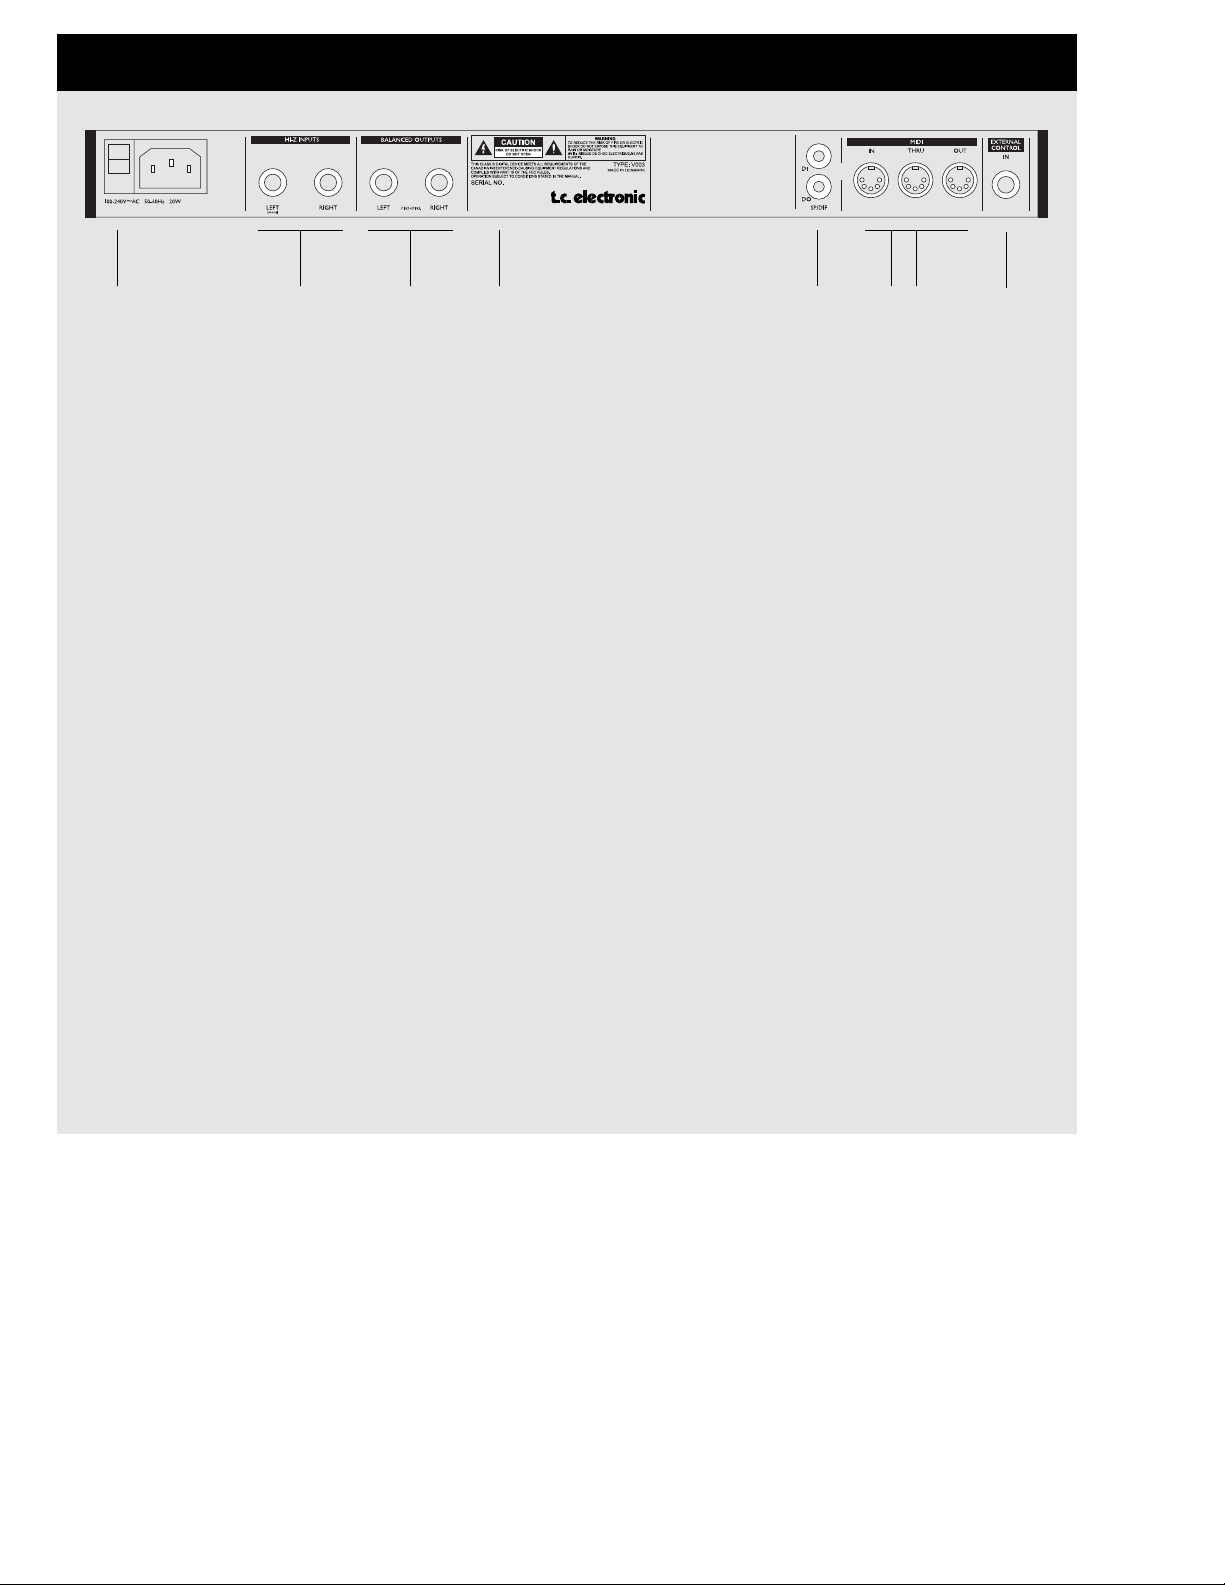
Switch
Hi-Z
Unbalanced
Inputs
Balanced
Outputs
Serial no.
S/PDIF
Digital
In/Out
MIDI
In,Thru,Out
External
Control
Input
Notes:
The G-Force Input jacks are unbalanced. The Output jacks are balanced.
If you are connecting the Outputs via stereo jacks to unbalanced equipment, you must tie ring and sleeve
together in the cable ends away from the G-Force.
You can always use standard mono guitar cables to connect G-Force.
External control input can use momentary, alternating and continuous type pedals.
The G-Force power supply is capable of operating at any line voltage from 100-240 Volts, 50-60Hz.
THE REAR PANEL
10
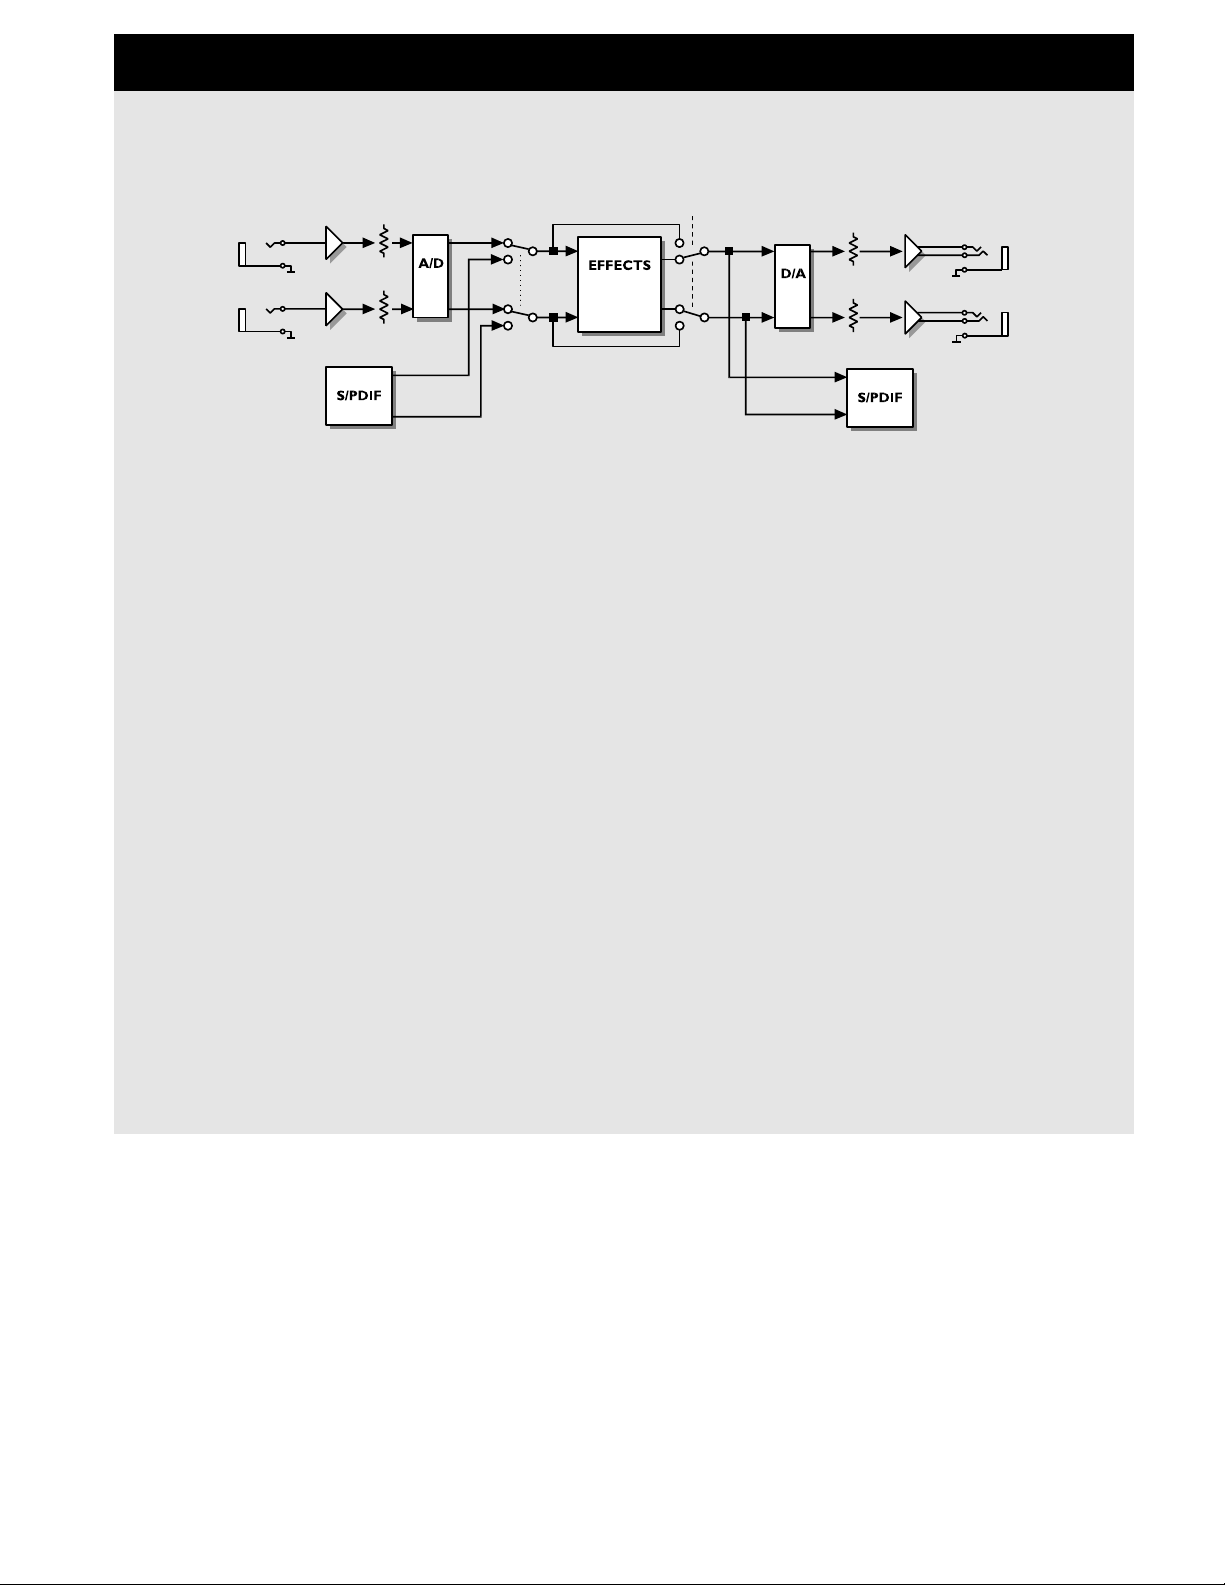
Notes regarding the signal flow:
Signal is always present at both the Analog and Digital outputs.
G-Force is limited to 44.1kHz sample rate at both Analog and Digital inputs.
The Input level of the G-Force automatically optimizes the signal to noise ratio via a small relay in the input
section. You will see a prompt on the display and may hear a small click when the input gain range is
changed.
Digital
input
Analog
input
Input
gain
Input
selector
Bypass Output
gain
Digital
output
Analog
output
(balanced)
THE SIGNAL FLOW
11

How to build a User preset
This is a step by step guide to some of the main functions
used when building your own presets.
S
tart by Recalling factory preset #225 called “Empty
Routing”:
- Press Recall.
- Dial the Value wheel until you see preset 225.
- Press Enter to recall the current preset.
Setting up an Effect
There are two ways of inserting an effect. Let’s start by
setting up a Reverb.
- Press the Effects key.
- Use the < > Arrow keys to select the Routing display.
- Use the Parameter wheel to place the cursor inthe third
position of the first column.
- Double click on the Reverb bypass key to insert the
Reverb.
And the other way:
- Press the Effects key.
- Use the < > Arrow keys to select the Routing display.
- Dial the Value wheel until you see “REV” and press Enter
to insert the Reverb in the Routing.
Editing an effect
There are two ways of getting into the Edit parameter
display. Here is the first and easiest - after pressing the
Ef
fects key:
- Use the < > Arrow keys to access the Edit display.
- Double click on the Reverb bypass key.
- Use the Parameter wheel to scroll up and down,
and the Value wheel to change values.
And the other way - af
ter pressing the Effects key:
- Use the < > Arrow keys to access the Edit display.
- Dial the Parameter wheel to move the cursor to the
Reverb block.
- Press Enter to access the Edit parameter display.
- Use the Parameter wheel to scroll up and down, and the
Value wheel to change values.
- Press Exit to leave the Edit parameter display
or double click the Reverb bypass key again.
HOW TO
12
If you want to Edit another effect you can just
double click the current block bypass key right
away, and the G-Force will exit the first and then
open the second.
How to set the level of a preset:
There are a couple of different ways to set the level of a
preset, but in any case you should consider reserving a bit
of headroom for the preset you want to be the loudest. One
method is to lower the Input (or Output) level of the last
block in the routing. That means that if you have blocks in
a parallel combination, you will have to change the level
equally to keep the same relationship between the current
effects.
Another way is to use the Level in the In section. That
particular level is placed after the Noise Gate but before
anything else. This In Level is also present in the Modifier
Matrix which means that you can control it via an
expression pedal.
How to add a block to the Routing
Now we have a Reverb, but we would like a Delay as well.
You need to decide whether you want the Delay in parallel
or series as opposed to the Reverb. Let’s try parallel, from
the Routing menu:
- Place the cursor in the second position, first column,
using the Parameter wheel.
- Double click on the Delay bypass key to insert the
Delay block.
If you run blocks in parallel, you should consider your mix
strategy. It may be wise to run all effects but one at 100%
mix and use the In/Outlevel to balance the level of the
effects relative to each other.
How to change a sub-algorithm
The Delay that you just inserted is a Stereo Delay that uses
the same delay time in both left and right channels. Let’s
try to find a delay with different times in left and right:
- Move the cursor to the Delay block using theparameter
wheel.
- Press Enter to dive into the Edit parameter display.
- Use the < Arrow left key to step to the sub-algo list.
- Dial the cursor to “Dual” using the Parameter wheel and
press Enter to change the sub-algorithm.
You now have a Dual delay algorithm, where you are able
to set different delay times in left and right channels
(remember to set the panning of the two delay times).

HOW TO
13
Moving all blocks using the Layout
It suddenly comes to my mind that we need a Compressor
in front of the Delay and Reverb. Let’s try to move the
Delay and Reverb block:
- Press the > Arrow right to move to the Layout display.
- Dial the Value wheel to “Move R”.
- Dial the Parameter wheel fully counter clockwise
and press Enter to move the two blocks to the right.
- Press the < Arrow left key once to select the Routing
display.
- Place the cursor in the second position, first
column and double click the Compressor bypass key.
There you go, a Compressor in front of the Delay and
Reverb blocks.
How to Delete or Replace a block
If you want to remove a block from a routing or just want to
replace it e.g. change the Reverb into a Chorus, here is
what you do:
- Press the Effects key.
- Press > Arrow right key to access the Routing display.
- Move the cursor to the block you want to remove, using
the Parameter wheel.
- Dial the Value wheel counter clockwise until the block
is black or until you see the new block you want, and
press Enter. You could also just double click on the
desired block.
The Block is now removed or replaced.
How to Store your new preset
Now that we built a preset with Compressor, Delay and
Reverb, it is time to Store. You can store very quickly using
the same name or Store with a new name. This is the fast way:
- Press the Store key.
- Dial the Value wheel to select a storing space
(G-Force defaults to the first empty User preset).
- Press Enter to Store with the same name.
Here is what you should do after you found the right storing
space, if you want to it store with a new name:
- Dial the Parameter wheel to the name line.
- Dial the Value wheel and press Enter to select a letter.
- When you finish the name, go to “Done” using the Value
wheel and press Enter to Store.
How to obtain spillover at preset change
Spillover from one preset to another can be obtained by
using the same sub-algorithm and the right Mute mode in
two following presets.
Example:
You want the tail Delay from one preset to ring
out when you change to a none Delay preset, here is what
you do:
- Enter the Edit Parameter display of the Delay in the first
preset.
- Scroll down to “Mute mode” and select “FX In”.
- Store that as preset 1.
- Use the exact same Delay setting and Mute mode in
the next preset, but bypass the Delay block.
- Store that as preset 2.
You are now able to change from preset 1 to preset 2 with
the Delay ringing out.
How to connect the Modifiers
The G-Force has a number of extra internal modifiers that
can create extra functions and make your presets play
along with you, e.g. Envelope follower, ADSR, Pitch
detector, etc. Here are a couple of examples and how to
set them up. The starting point is the preset we just built in
the above, or ROM preset #21.
Creating a ducking Delay
Right now you have a constant level of Delay, wouldn’t it
be nice if the Delay only popped up in pauses where you
do not play. Let’s try that:
- Press the Mod key to select the Matrix display.
- Scroll horizontal using the Value wheel until you see
“ENV” (Envelope) in the top line.
- Scroll vertical using the Parameter wheel until you hit
the point where “ENV” and Delay Outlevel meets.
- Press Enter to link the two parameters.
Now you will hear the Delay follow the level of the Input,
i.e. when you play, the Delay plays. But it would be more
usable if the Delay played when you didn’t play, so let’s do
that:
- Place the cursor on the connection spot (if it is not
already there) and press Enter to dive into the link
display.

HOW TO
14
- Change the curve by setting the three input parameters.
If you want the Delay to stay down while you play, Low
input should be 100%, and High input should be 0%.
Experiment with these values.
Press Exit to leave the Link display. If you want remove the
link simply press Exit again.
If you want to remove all links of the Matrix, press
Exit twice and you will see a pop up box asking you
to confirm with Enter or abort with Exit.
Creating an Autopanning Delay via Modifiers
If you want the Delays to autopan you could of course,
place the Pan/Tremolo block after the Delay, but you can
also use one of the extra LFO’s that are in the Modifier
Matrix.
- Press the Mod key to select the Matrix.
- Connect the LFO1 output 1 to Delay Pan 1 and Pan 2
by pressing the Enter key.
- Press > Arrow right key to enter the Modifiers display,
scroll down to LFO1 and press Enter to dive into the
settings of the LFO1.
- Set the Speed, Depth, Curve etc. of LFO1 and listen
to your Delay Panning.
Right now the two Delays are panning left and right
together, but it would be nice if they panned opposite of
each other.
- Press Exit to leave the LFO edit display.
- Press the left < Arrow key to get back to the Matrix
display.
- Scroll down to the connection between LFO1 and
Delay Pan1 and press Enter to access the link display.
- Change Low input to 100%, and High Input to 0%.
Your delays are now panning opposite of each other.
How to set up an Expression pedal
The G-Force has several control possibilities that can make
your presets a lot more flexible and interesting. These
functions can be realtime controlled by more than eight
external pedals or MIDI controllers.
Connecting
Your Expression pedal can be connected in two ways,
either directly to the “External control” jack on the back
panel of the G-Force, or via a MIDI board.
How to calibrate and choose Pedal type
The G-Force can be controlled by various types of pedals.
The type of pedal that you are using is set up in the Utility
display, by the “Pedal type” parameter. When you are using
Expression pedals, you should select “Alternating”.
When you connect your expression pedal to the “External
control” jack, you should make sure that the G-Force is
calibrated for that particular pedal. That is done in the
Utility display:
- Press Utility.
- Scroll down to “Pedal calibration”, using the Parameter
wheel.
- Press Enter and follow the instructions in the display.
You have now calibrated your expression pedal, and are
ready to setup the function of it.
The function of the Pedal
The basic idea is that your pedal should be connected to
one of the eight virtual handles called Ext1-8. That is done
in the I/O Setup, Control display:
- Press the I/O Setup key.
- Press the > Arrow right key to select the Control display.
- Scroll down to “Ext1” using the Parameter wheel.
- Press Enter to activate the Learn function and move
your pedal to get it detected.
Your pedal should now be detected whether using the 1/4”
jack on the back panel of the G-Force, or a MIDI controller.
The pedal could also control the Main volume, the overall
bypass, the Tuner, the Tempo or one of the other seven
external controllers.
Now that you have your pedal setup for Ext1, we will move
on to getting it connected to a parameter:
- Recall ROM preset #17 “Stereo Harmony C-maj”. That is
a preset that will add a third, and a fifth to your lead play
as long as you stay in C-major.
- Press the Mod key to access the Modifier Matrix.

HOW TO
15
- Scroll horizontal until you see Ext1 in the top line of
the display, using the Value wheel.
- Scroll vertically using the Parameter wheel until the
cursor is placed on the line where Pitch “In level” and
“Ext1” meet.
- Press Enter to connect the two parameters.
You now have your pedal connected to the In level of the
Pitcher, which means that you can control the amount of
pitch with your foot. The function of the pedal is stored with
the preset.
A lot of the ROM presets are setup for various pedal
functions, they are all using Ext1 as Modifier.
How to set up my MIDI board
The G-Force is capable of using a lot of the existing boards
on the market for standard program change. Here is what
you do to set your board up with the G-Force:
- Connect your board to the MIDI In socket on the back
panel of the G-Force.
- Press the I/O Setup key.
- Use the < > Arrow keys to select the MIDI display.
- Set the “Basic channel” to the same as your MIDI board.
Your board is now be able to change ROM presets on the
G-Force.
How to change User presets using my MIDI board
If you want to change User presets in the G-Force via your
board this is what you should do:
- Enter the I/O Setup, MIDI display again.
- Scroll down to “Mapping mode” using the Parameter wheel.
- Select “Into User bank” using the Value wheel.
Your board should now be able to change the User presets
(given that you made some) of the G-Force.
How to use some of the extra functions of my board
with the G-Force
A lot of boards on the market have the possibility of
performing MIDI on/off functions, MIDI bypass etc. The GForce has a list of board defaults that makes it possible to
setup these boards really fast. These are the boards in the
list:
ADA MXC
ART X-15 Ultrafoot
DMC Ground Control
Rocktron All Access
Roland FC-200
Custom Audio Electronics RS-10
TC Electronic G Minor
Lexicon MXP R1
If you own one of these boards here is what to do to set it up:
- Enter the I/O Setup, Control display.
- Scroll down to “Model” using the Parameter wheel.
- Select your board and press Enter to load the settings.
The G-Force is now setup to respond to the default
settings of the current board.
If your board is not in the list, here is what to do to setup
some of extra functions anyway:
- Enter the I/O Setup, Control display.
- Scroll down to the function you want to control.
- Press Enter to activate the Learn function.
- Press the switch or pedal you want to use for the
current function.
You can perform this Learn function on all the parameters
in the Control display.
How to Recall a single block from
an existing preset
The G-Force have a possibility of Recalling a single block
from one preset into another. Try to Recall ROM preset #
23, called “Stereo Touchwah”. Now we will Recall the Filter
block from ROM preset # 12, called “Mono Farout Phaser”.
- Press Recall.
- Dial the Parameter wheel to place the cursor on “Select”.
- Dial the Value wheel until the matrix cursor is placed on
“FIL”.
- Move the cursor back to “Preset” using the Parameter
wheel.
- Select preset 12 and press Enter to load the Filter block
into the current Routing.
The Filter block of preset 12 is now loaded into preset 23.
This partial Recall function can of course Recall blocks
from ROM, User and Card presets.
SETUPS
16
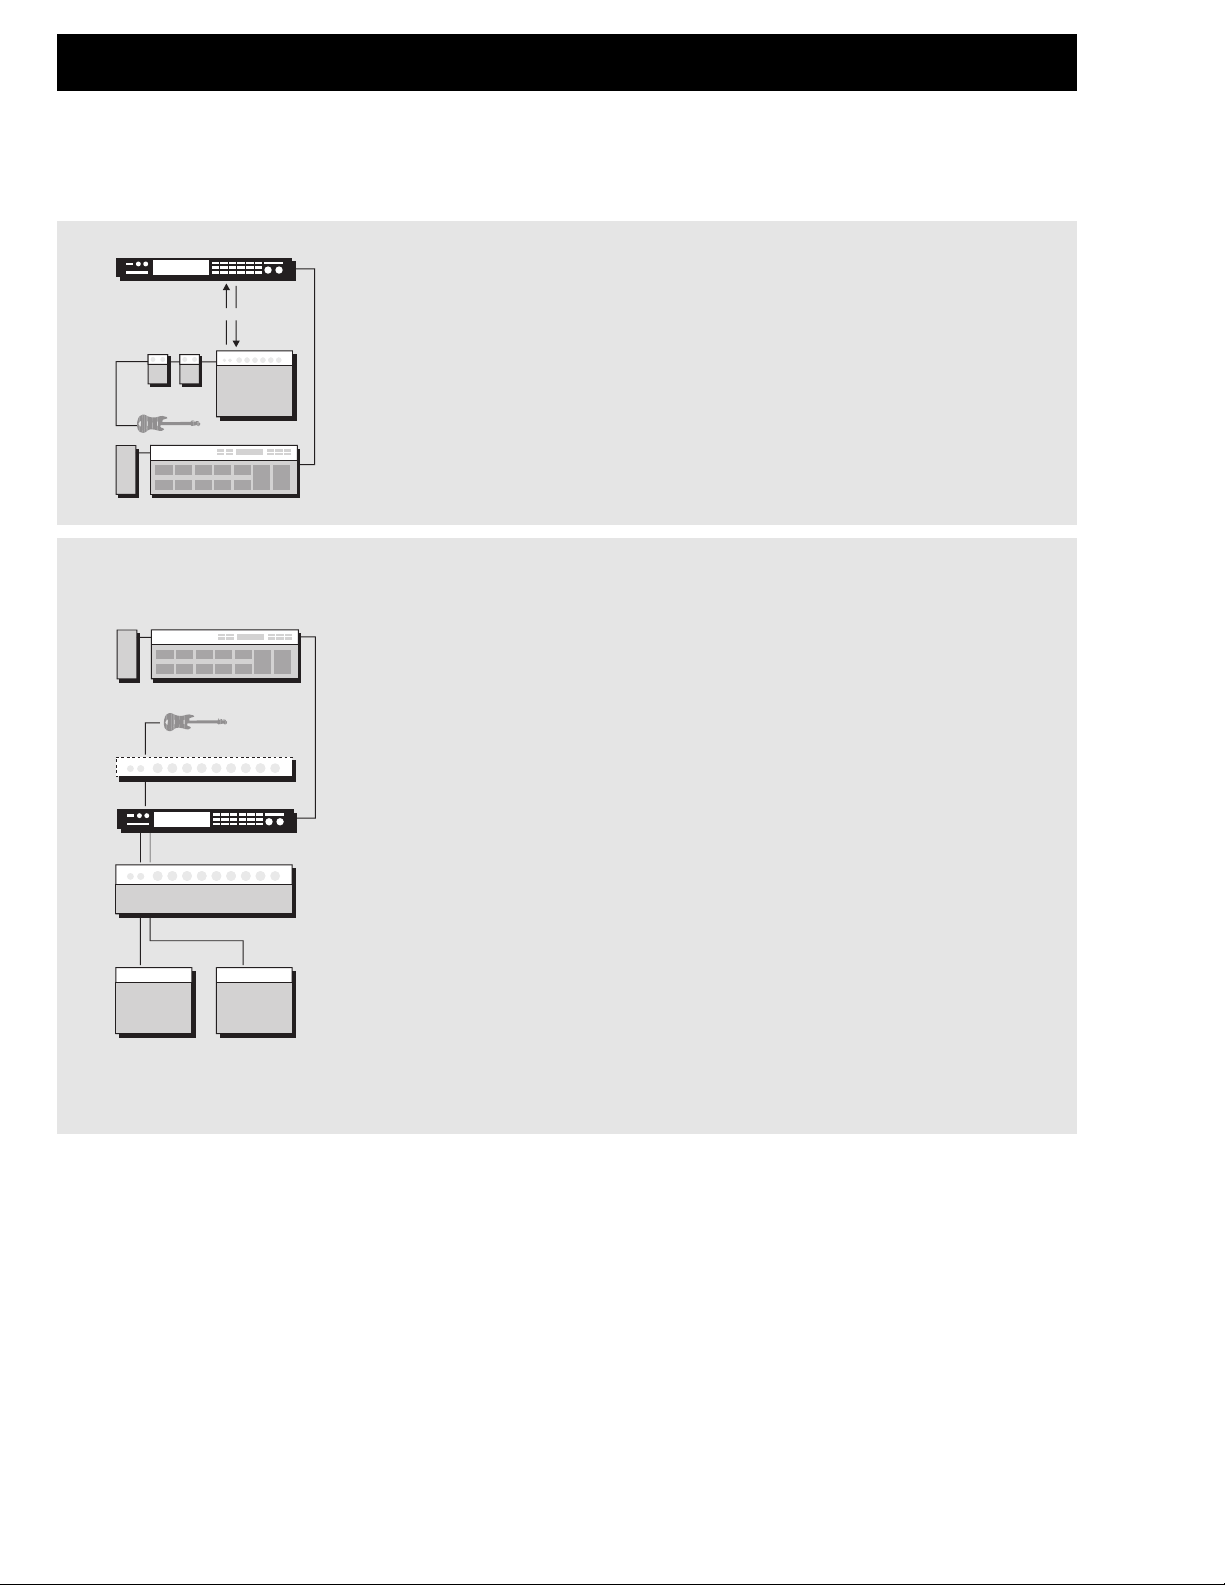
The Stereo Guitar System
In a setup with a couple of Combo amps or a stereo stack, you get full advantage of
the stereo effects in the G-Force. Place the G-Force after your pre-amp or in the
effect loops.
Serial setup
This is the ultimate setup for the G-Force. The high quality 24 bit converters makes it
possible to use the G-Force without a line mixer. The serial setup utilizes the power
of the G-Force to its full extent. Remember, the G-Force gives you the possibility to
make the effect blocks parallel internally.
Parallel setup
Using the G-Force in combination with a line mixer. Remember to use the killdry
function, to avoid any direct guitar signal through the G-Force.
The Connections
The G-Force input jacks are unbalanced and the outputs are balanced. This means
that you can use standard guitar cables to connect the G-Force to unbalanced
equipment, and stereo cables to connect the G-Force to balanced equipment.
Input/Output
Set the Input level of the G-Force using the In knob in the upper left corner of the
front panel. To get maximum quality from the 24 bit AD converter, the input meter
should show approximately -6 to -3 dB. Adjust the output level of the G-Force using
the Output knob. In addition to the Output knob there is a MIDI/Pedal controllable
master level placed in the Out section (Effects Edit display).
G-Force Setup
The G-Force is carefully designed to perform all the basic effects needed in a guitar setup.
Because the G-Force can be used in a number of applications we propose a few different setups.
Be sure that your amplifiers are turned off while connecting the G-Force. Turn on the G-Force before your amplifiers.
MIDIBOARD
Guitar
Pedals
Combo
G-Force
Insert
The Mono Guitar System
In a setup with a Combo amp or a mono stack you must use the Left input and
output (remember to select L-only, in the I/O Setup Audio display) You can either
place the
G-Force in the effect loop or after the pre-amp, (this could also mean after your
Distortion stomp box).
PREAMP
POWERAMP
MIDIBOARD
GUITAR
Cabinet Cabinet
G-Force
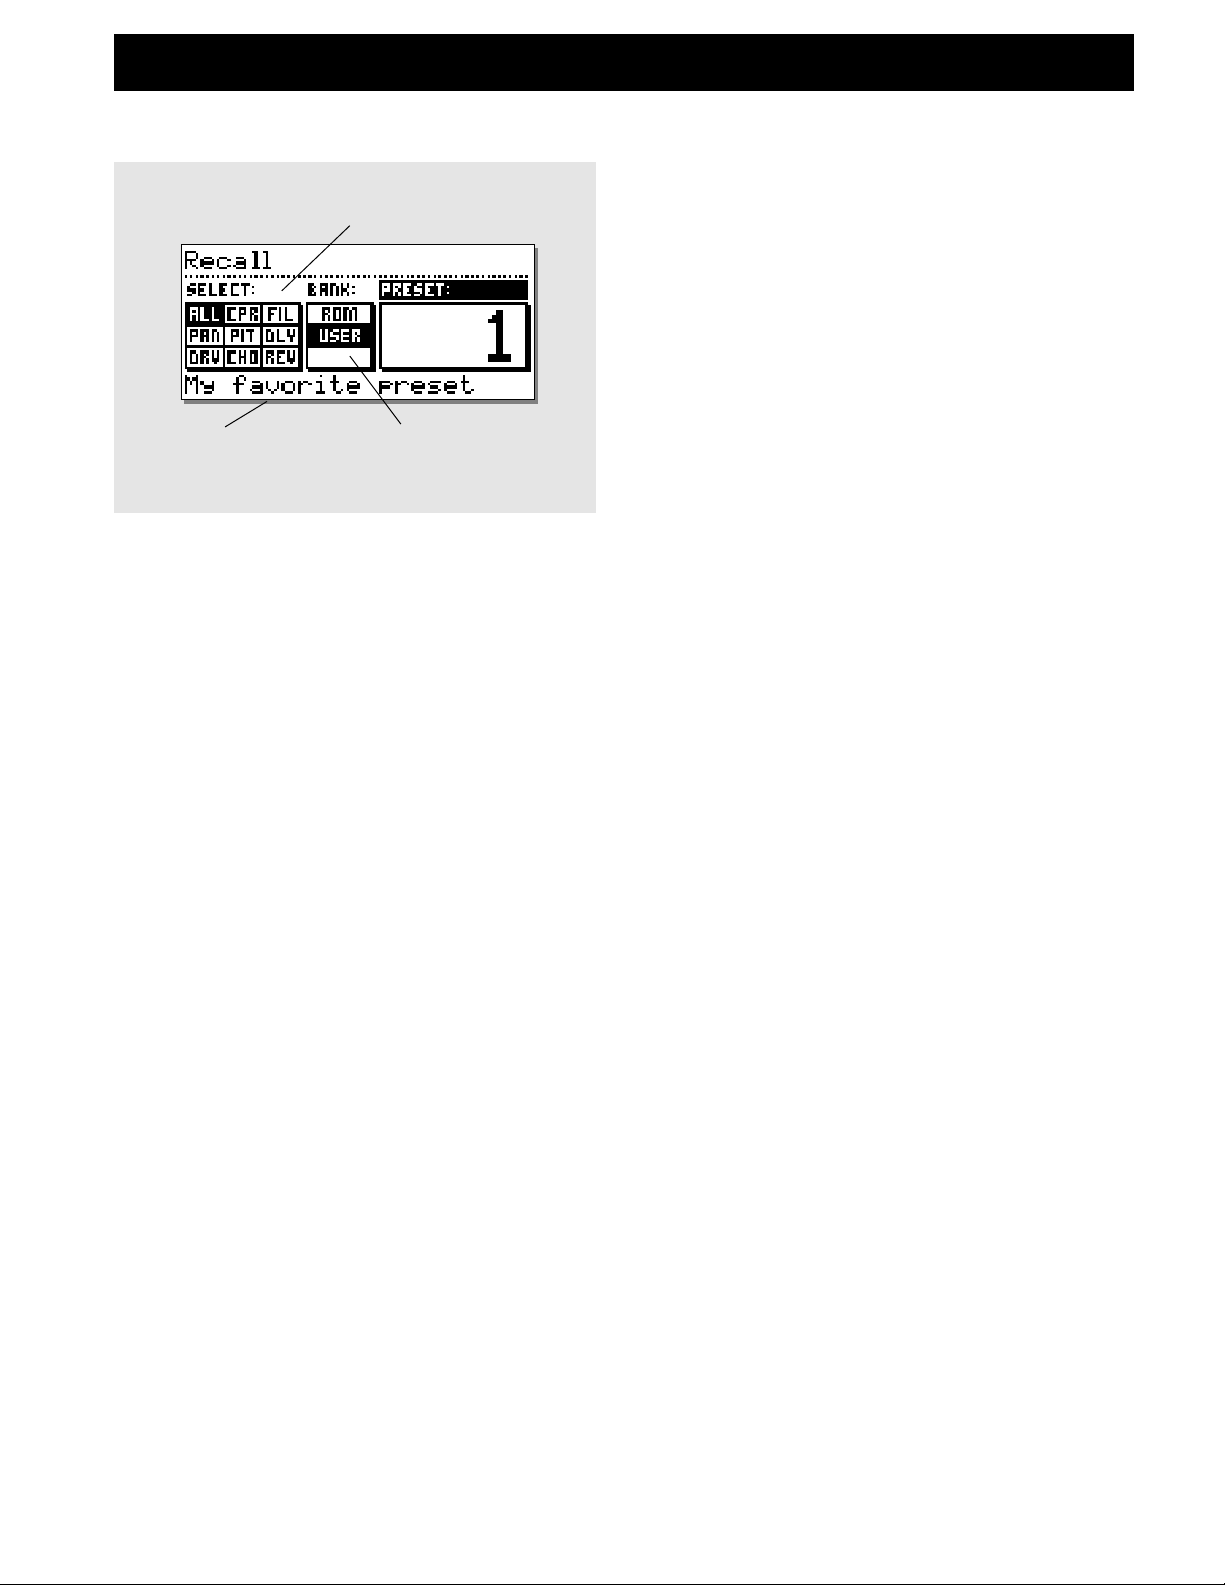
RECALL
17
The Recall Display
Select which blocks will be
loaded from new preset
Preset name
ROM/USER/CARD
bank selector
General
Select section
Is used to point to a certain block that you want to recall
alone. Should be set to “All” when you want to recall a
complete preset. (default setting)
Bank
Is used to select which bank you would like to recall from,
ROM (factory presets), User, or Card (only available when
a pc-card is inserted).
Preset
Dial the Value wheel to preview the presets. Press ENTER
to recall.
Recalling a Preset
• Set cursor at “Bank” section using the PARAMETER
wheel.
• Select which bank to recall from using the VALUE wheel.
• Select “Preset” section using the PARAMETER wheel
(see illustration above)
• Select which preset to recall using the PARAMETER
wheel.
• Press ENTER.
Preserving the tail of Reverbs and Delays at preset
change
Spillover from one preset to another can be obtained by
using the same sub-algorithm, and combination of Mute
mode = “Fx In” and bypassing the current block.
Example: If you want to leave a Delay tail hanging over a
preset change, you must be sure to keep the same subalgorithm in both presets. In addition to that you should
select the “Fx In” Mute mode and just bypass the Delay
block in the second preset.
NOTE: Changing parameters like the Feedback or Mix over
a preset change can kill the Delay.
Optimal preset change
Since the change from one preset to another can contain
drastic changes in level and Routing, artifacts may occur if
the preset is changed while playing.
To obtain the best preset change while playing, you should
keep Routings as even as possible.
Example: When changing from a preset containing Reverb
and Delay, to a preset containing only Reverb you should
just bypass the Delay block instead of removing it (that will
also enable you to obtain spillover from the Delay block)
Recalling a single effect
It is possible to load a single effect setting into an
existing Routing, e.g. if you are building a new preset
and have come up with a really nice Reverb and Delay
but would like to add that Chorus sound you designed
last week. Here is what you do:
Press Recall, and move the cursor to the Select parameter
using the Parameter wheel.
Now use the Value wheel to point to “CHO” (Chorus). Move
the cursor back to the Preset parameter and use the Value
wheel to scroll through the presets (remember to set the
bank, you wish to Recall from).
NOTE: the G-Force will now scroll through only presets
containing the desired effect.
Press Enter to Recall the desired effect. The G-Force will
now update your current preset with the new effect, and
return to the current preset.
 Loading...