

Page 1
1
USER MANUAL
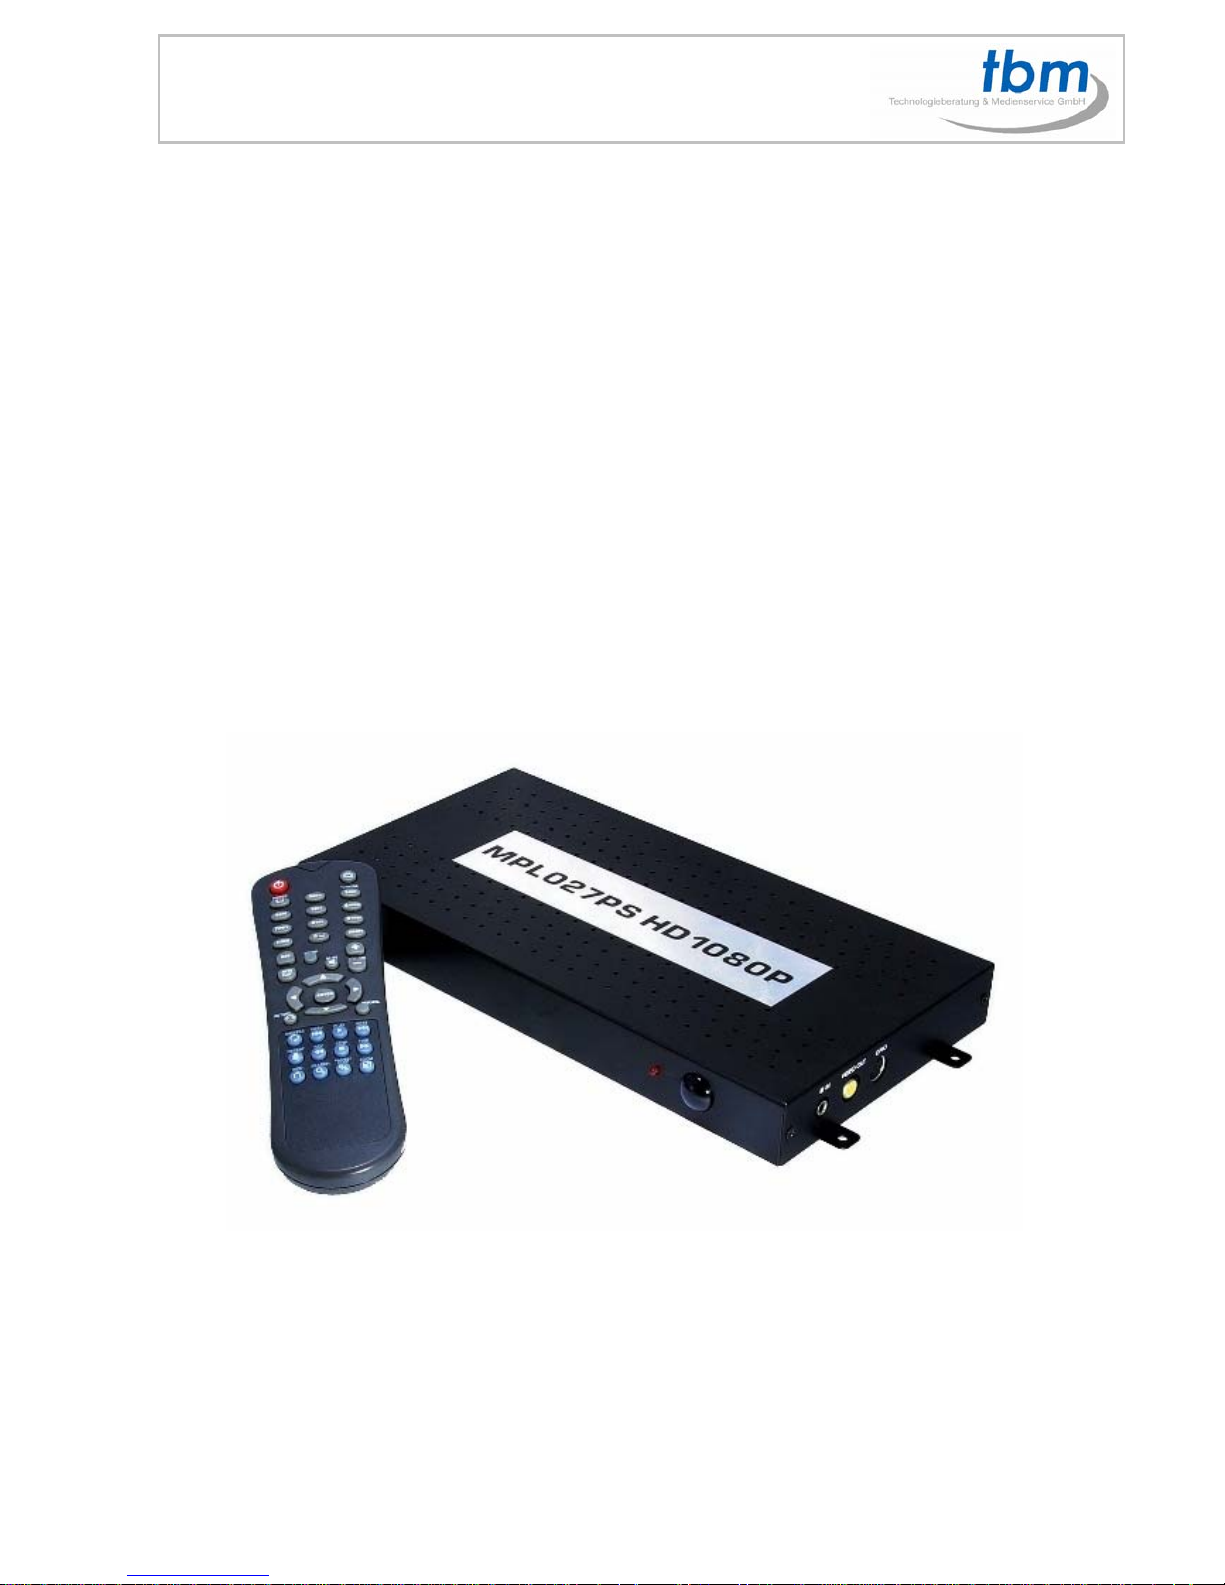
MPL027P
MPL027P PS
MPL027P PT
Page 2

2
Content
1.0 Package Contents
2.0 Introduction
3.0 Features
4.0 Hardware Overview
5.0 Remote Control
5.1 Entering Text or IP Address
6.0 Start the MPL027P
7.0 Setting Up
7.1 Network Setup
7.2 FTP Setup
8.0 Download Function
8.1 Manual Download Function
8.2 Automatic Download Function
8.3 Download Pause - Resume
8.4 Download/ Upload Media Files
9.0 HTTP Command Function
9.1 Player Control
9.2 Network Setup
9.3 Timer Setup
10.0 RS232 Function
11.0 PC/ Windows Media Player 11
12.0 Video Setup
12.1 Other Setup
13.0 Using the MPL027P
13.1 Play Media Files on the CF Card
13.2 Using the Remote Control during Playback
14. Function ONLY MPL027PS / PT
14.1 Schedule Function
14.2 Install the Schedule Software
14.3 Setup the Schedule Software
14.4 Basic Schedule
14.5 Advance Schedule
14.6 Warning Message
14.7 Apply the Schedule on the MPL027PS/PT
15.0 MPL027PT Multiple Display Zones
16.0 PLAY-BUTTON BOX (BB36 Button Box)
17.0 PIR Sensor (PIR)
17.1 Using the PIR Sensor
Page 3

3
1.0 Package Content
1. MPL027P / PS / PT
2. Remote Control
3. Audio Cable
4. Y.Pb.Pr Cable
5. S-Video Cable
6. Power Adapter
7. User Manual
8. Schedule Software MPL027PS/PT
2.0 Introduction
The MPL027P is a digital media player that plays different media files (supports WMV9 format) from CF
memory card without a computer. The MPL027P supports High Definition movie hardware decode
acceleration, it supports high resolution video output such as 1080P / 1080i / 720P for movie theater
quality video on a big screen. By connecting to Video, S-Video, Y.Pb.Pr, VGA (resolution up to 1360 x
768), HDMI (1920 x 1080P) and Audio, you can play media files on any display device. Supports CF
memory cards, (Suggest using the high speed (150X) CF card)
The MPL027P can connect to a wired network at speed up to 100Mbps. This function provides you with
maximum throughput for sharing and transferring digital media.
The MPL027PS supports “Schedule Function” with RCT on board
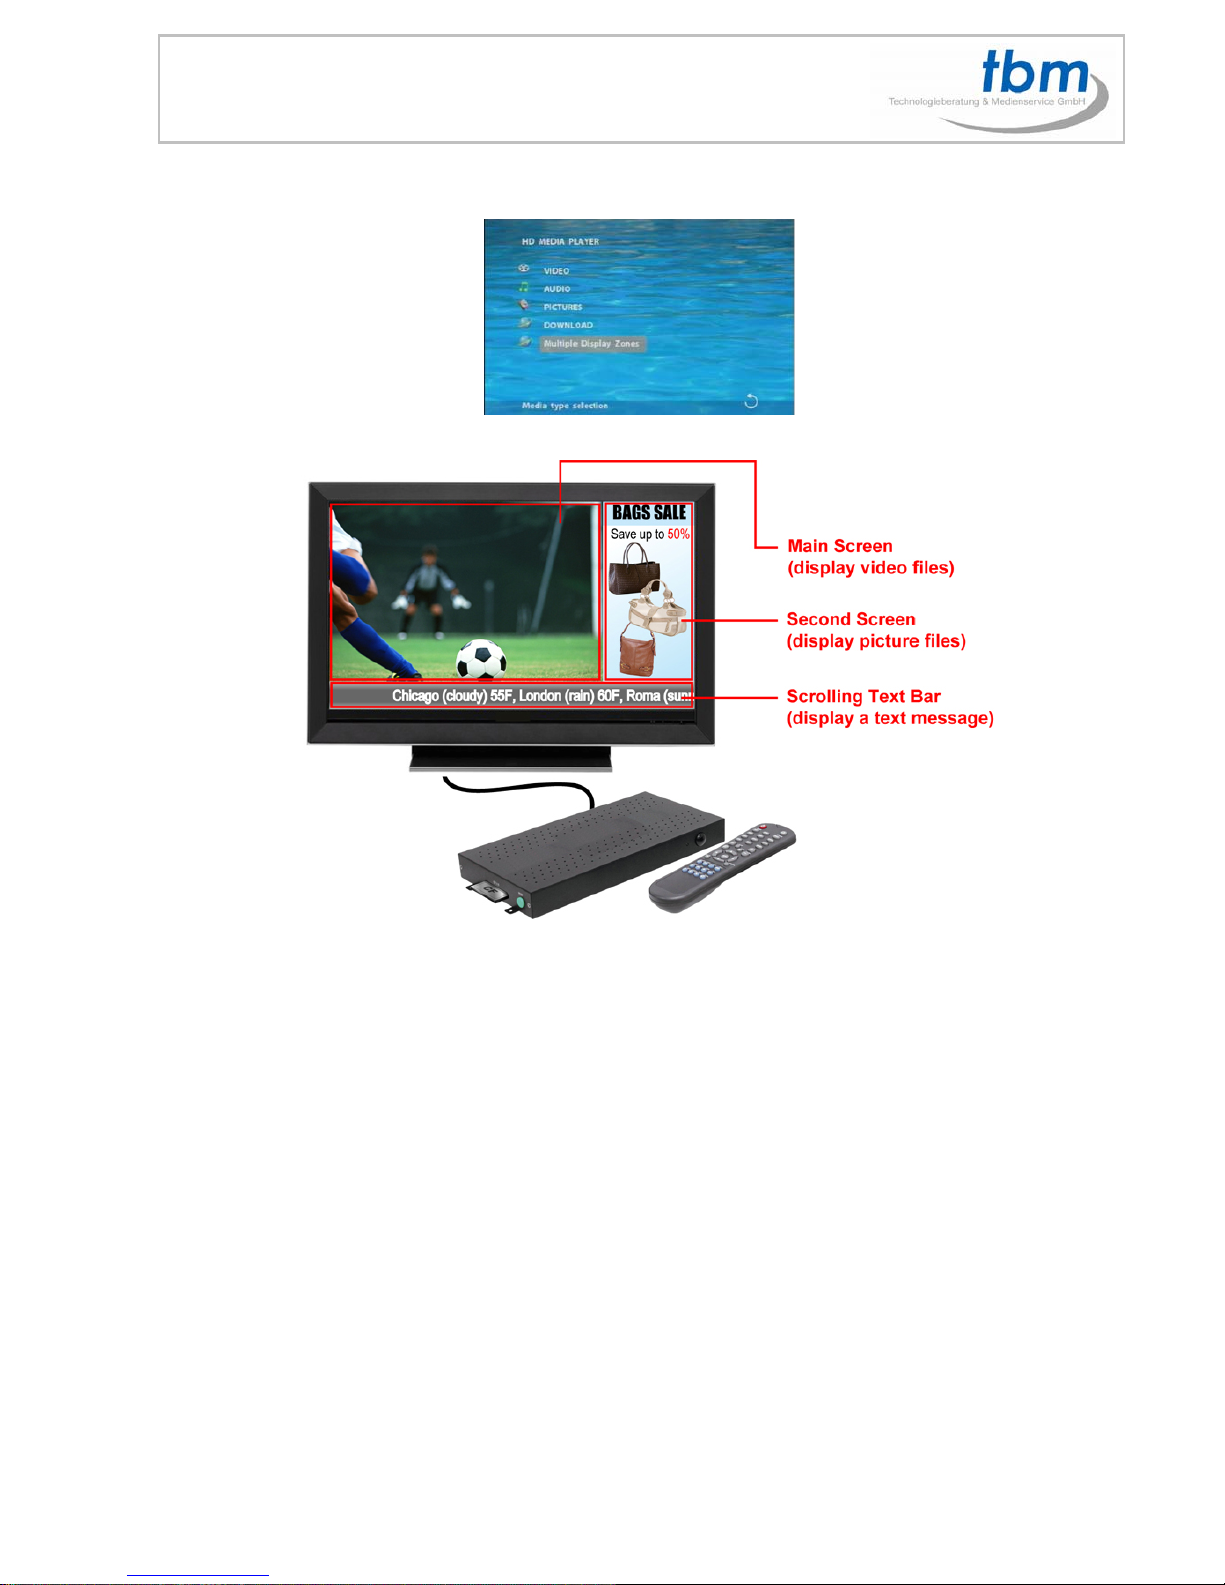
The MPL027PT supports multiple display zones; you can play movie, picture and scrolling text on the
screen simultaneously. The scrolling text displays an animated text message on a bar on bottom of your
screen.
3.0 Features
Supports multiple video formats: HD WMV9, AVI, MPEG1/2/4, Xvid, Divix, HD-MPEG
Supports multiple audio formats: MP3, WMA, LPCM, WAV, AAC
Supports photo format: Jpeg
Video outputs: Composite, S-Video, Y.Pb.Pr, HDMI, VGA
Audio output: Stereo Chinch
HD Y.Pb.Pr output supports resolution: NTSC Mode(60Hz): 480P/ 720P/ 1080i.
PAL Mode(50Hz): 576P/ 720P/ 1080i.
HDMI Output: 480P/ 720P/ 1080i/ 1080P.
VGA output supports resolution: 640x480/ 800x600/ 1024x768/ 1280x1024/ 1360x768.
- Supports Multiple Display Zones, supports two display modes:
Mode 1: Display demo files with scrolling text. (Video and .txt file)
Mode 2: Display demo files (Video in main screen), Pictures (PNG 150x450 in second screen)
and scrolling text (.txt file) simultaneously.
- The second screen (display picture files) can be repositioned to left or right of the main screen.
- The display speed of scrolling text can be adjusted, and scrolling text supports multi language
(English/ Latin/ Japanese).
BB36 Button Box Function (optional)
PIR (Moving Sensor) Sensor Function (optional)
- After sensing approaching subjects, the MPL027P will play the files automatically.
- Sensing distance is up to 3 meters with an angle of 45.
Schedule Function: The MPL027P will auto play the designated file (only supports video files) at
the designated date.
Supports SLIDE SHOW Function (interval time with 10/ 15/ 30/ 60 seconds).
Page 4
4
Exports the Configuration Value: You can export the configuration value to the CF card. The
configuration can be modified on your PC, and can be applied to the MPL027P or others.
Compatible with Windows Media Player 11: Play media files stored in a network computer.
Supports RS-232 port for computer control with ASCII command (play, stop, pause…etc).
Connect using an Ethernet network cable at up to 100Mbps.
Supports HTTP command function.
Supports FTP Auto Download Function: Connect to Remote FTP server and download data to the
CF card automatically.
Supports Download Pause / Resume Function: Continue unfinished downloads upon next session.
Embedded FTP Server.
Supports NTP Network (G..M.T) Timer.
Supports Universal Plug and Play (UPnP) and DHCP.
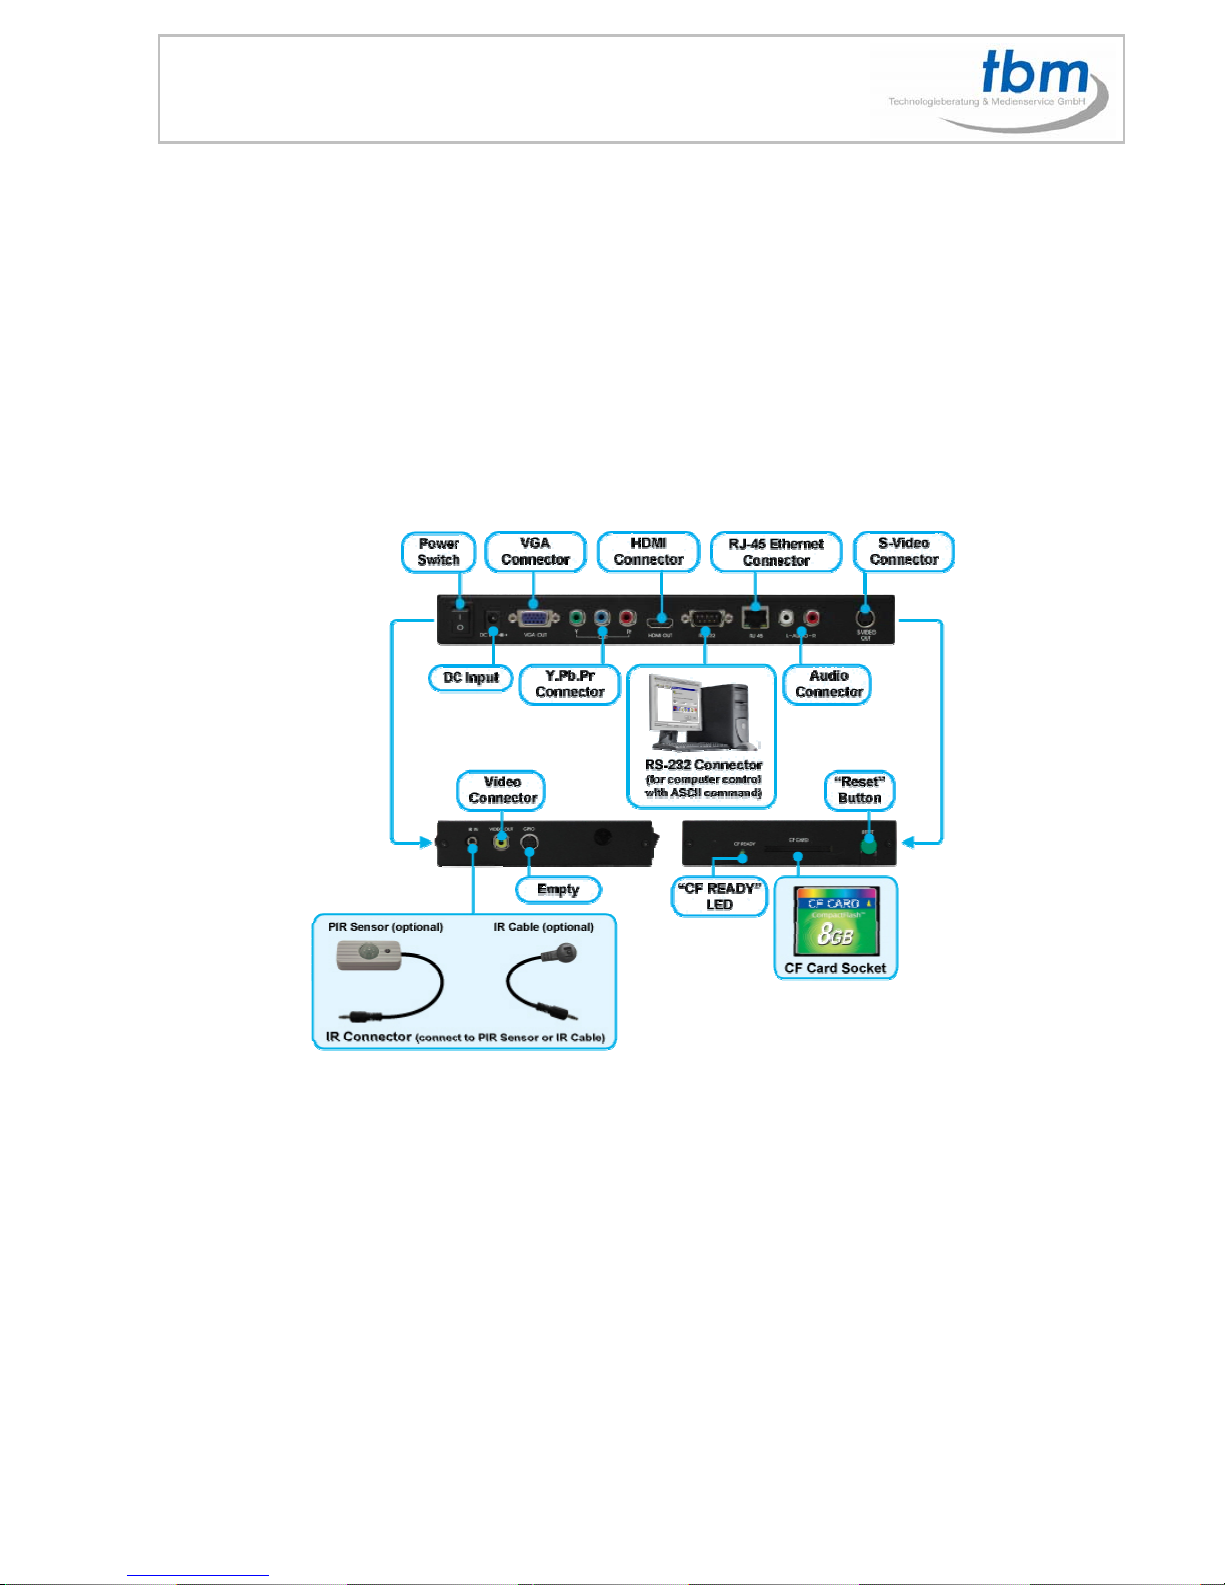
4.0 Hardware Overview
Power Switch: Toggle between main power on & off.
DC Input: For the power adapter. (DC 12V / 1.5A)
VGA Connector: Connects to devices that support VGA input.
Y.Pb.Pr Connector: Connects to devices that support Y.Pb.Pr input.
HDMI Connector: Connects to devices that support HDMI input.
RS-232 Connector: Used for computer control with ASCII command.
RJ-45 Ethernet Connector: Connects to router or PC by RJ-45 Cable.
Audio Connector: Connects to sound input.
S-Video Connector: Connects to devices that support S-Video input.
IR IN: Connects to PIR Sensor (optional) or IR Cable (optional).
Video Connector: Connects to device that support Video input.
“CF READY” LED: Steady green confirms that the CF card is inserted correctly.
CF Card Socket: For CF memory card.
“RESET” Button: To restart the MPL027P / PS / PT.
Page 5
5
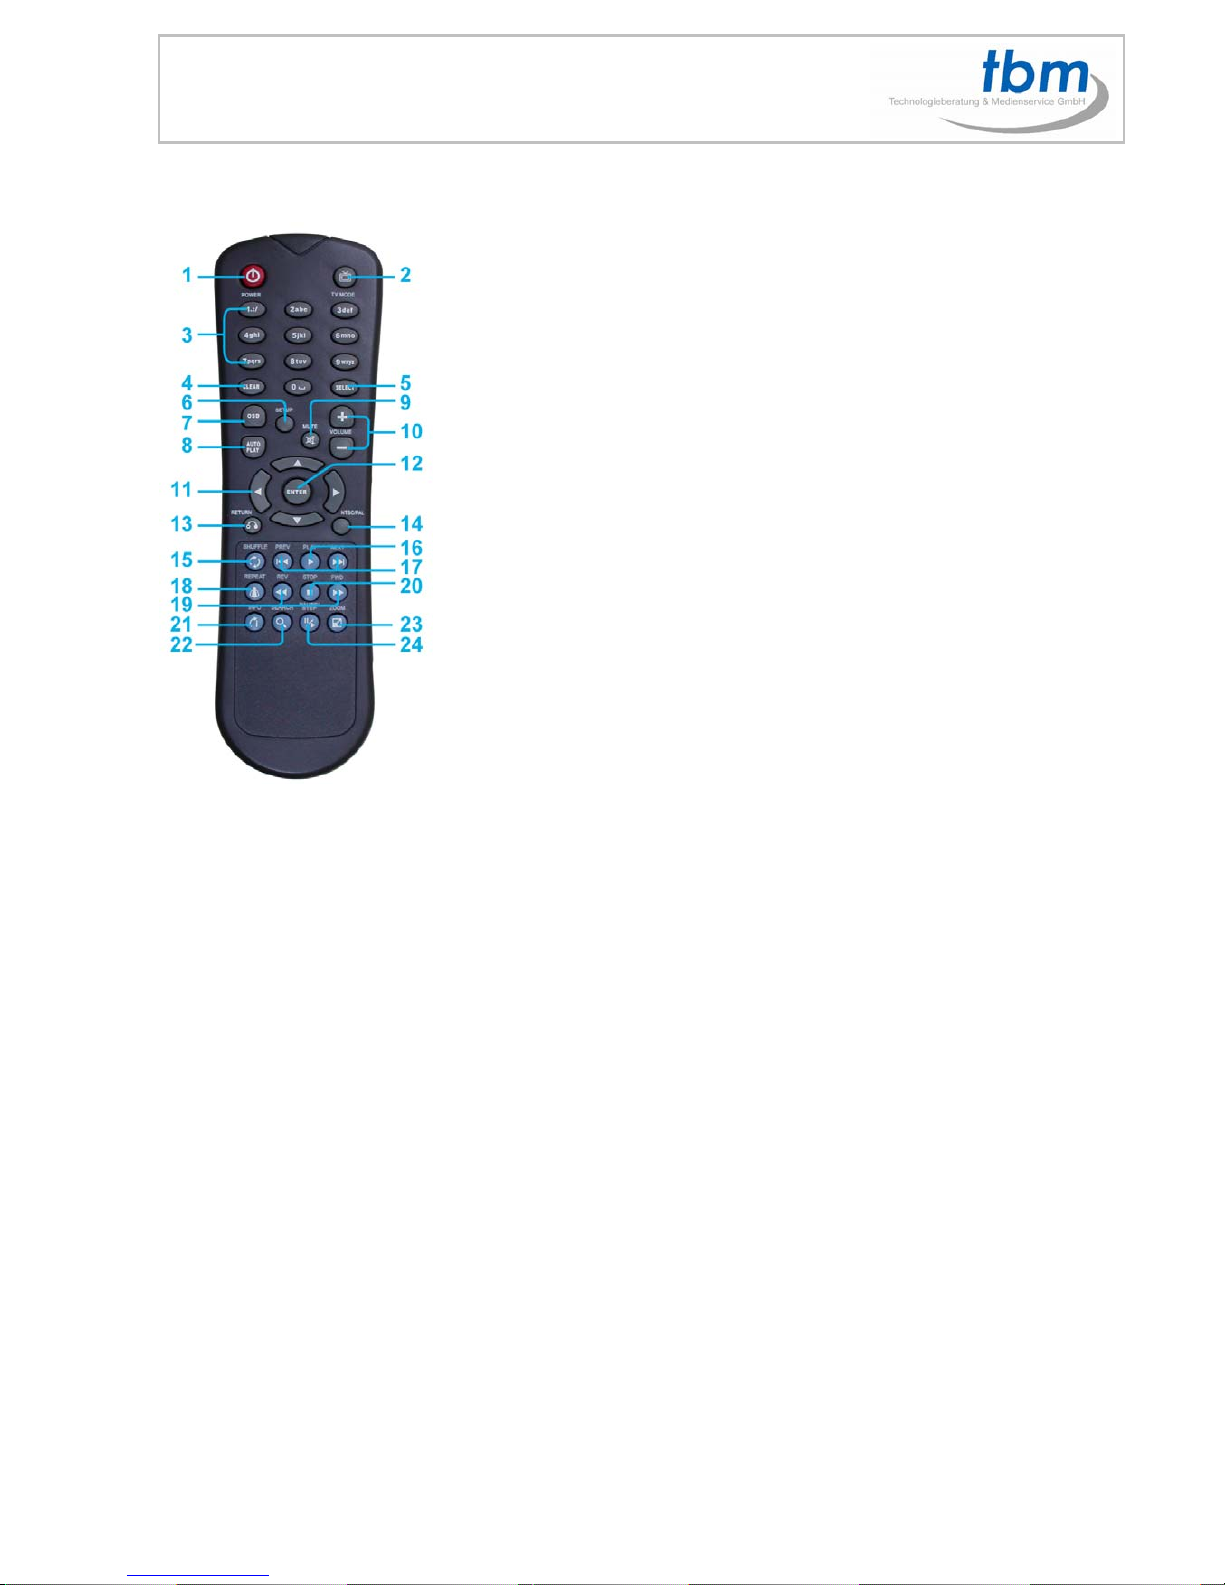
5.0 Remote Control
1
2
3
4
5
6
7
8
9
10
11
12
13
14
15
16
17
18
19
20
21
22
23
24
Power on/ off
Select the output mode
Numeric Key
Delete last entry
Select a function or to play the selected file
Open the setup menu Mute sound
OSD display function on/ off
Auto-play function on/ off
Mute sound
Volume up/ down
Move the cursor
Confirm the selection/ entry
Go back one layer
Select the TV type (NTSC/ PAL)
Shuffle on & off
Play the file selected
View the previous/ next file
Play the previous/ next file if in playback
Select the repeat mode
Rewind/ forward movie or music files
Stop playback
Show the information of the file selected
Search video (movie) timeframe
Zoom in/ out on the movie or picture
Pause the playback or play frame by frame
5.1 ENTERING TEXT OR IP ADDRESS
Keys need to be pressed multiple times to enter the letter corresponding to that key.
For Example: To enter the letter “a”. you would press the “2” button twice.
Enter The IP Address
For Example: To enter the IP address”192.168.100.100”
Step 1: Press “1” once, then “1” is displayed, and the color of “1” is orange.
Step 2: When the color of “1”turns white, press “9” once, then “9” is displayed.
Step 3: Repeat steps 1 and 2 to enter and complete the IP address.
6.0 Start the MPL027P / PS / PT
Power On
z Insert the CF memory card that has Picture, Music, Movie or WMV9 files.
z Press the “POWER” button to power on the MPL027P, it takes ca 30 sec. to start,
then press the “TV MODE” button to select the output mode.
Status After Power On
z Status 1: If the “AUTOPLAY (Movie, Picture or MultiLayer)” function is enabled and there are
movie or picture files in the CF card, the MPL027P will auto play movie or picture files on the CF
card after power on.
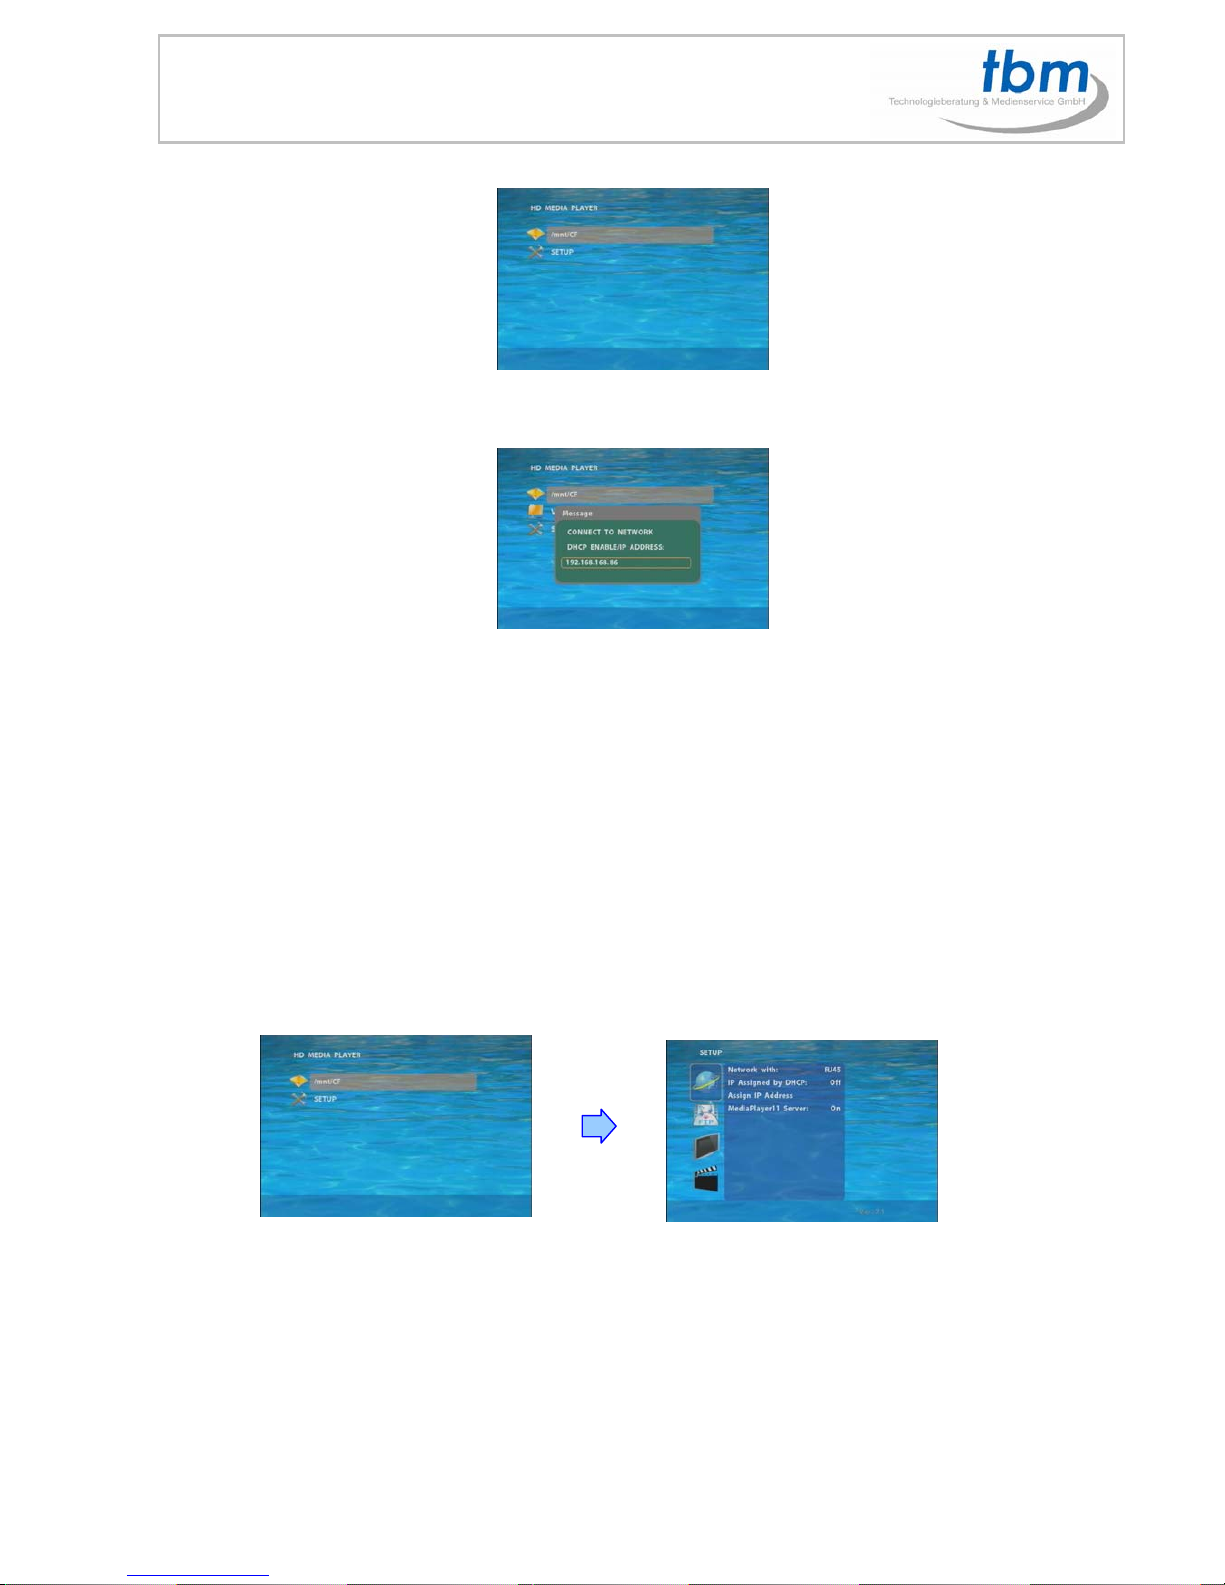
z Status 2: If the “AUTOPLAY” function is disabled, after power on the main menu will appear as
shown in the following figure. There are two groups in the main menu (“/mnt/CF” and “SETUP”).
Page 6
6
NOTE: The pop-up window that shows the IP address will appear later, if DHCP mode is selected when
the MPL027P is turned on.
Power Off: Press the “POWER” button again to power off.
7.0 SETTING UP
In the main menu, using the “▼” button on remote control to select the “SETUP” item, and then
press the “ENTER” button. You will be presented with the MPL027P settings screen.
You can also press the “SETUP” button on remote control to directly open the settings screen. (If
there is file that is being play, please stop first.)
There are four groups of sub-menu in the main menu (“Network Setup”, “FTP Setup”, “Video Setup”
and “Other Setup”).
In the settings screen, you can use the “▲、▼、
▲、▼
” buttons to select an item, and press the
“ENTER” button to confirm the selection.
Press the “SETUP” button on remote control to save and quit the settings screen.
Page 7
7
7.1 NETWORK SETUP
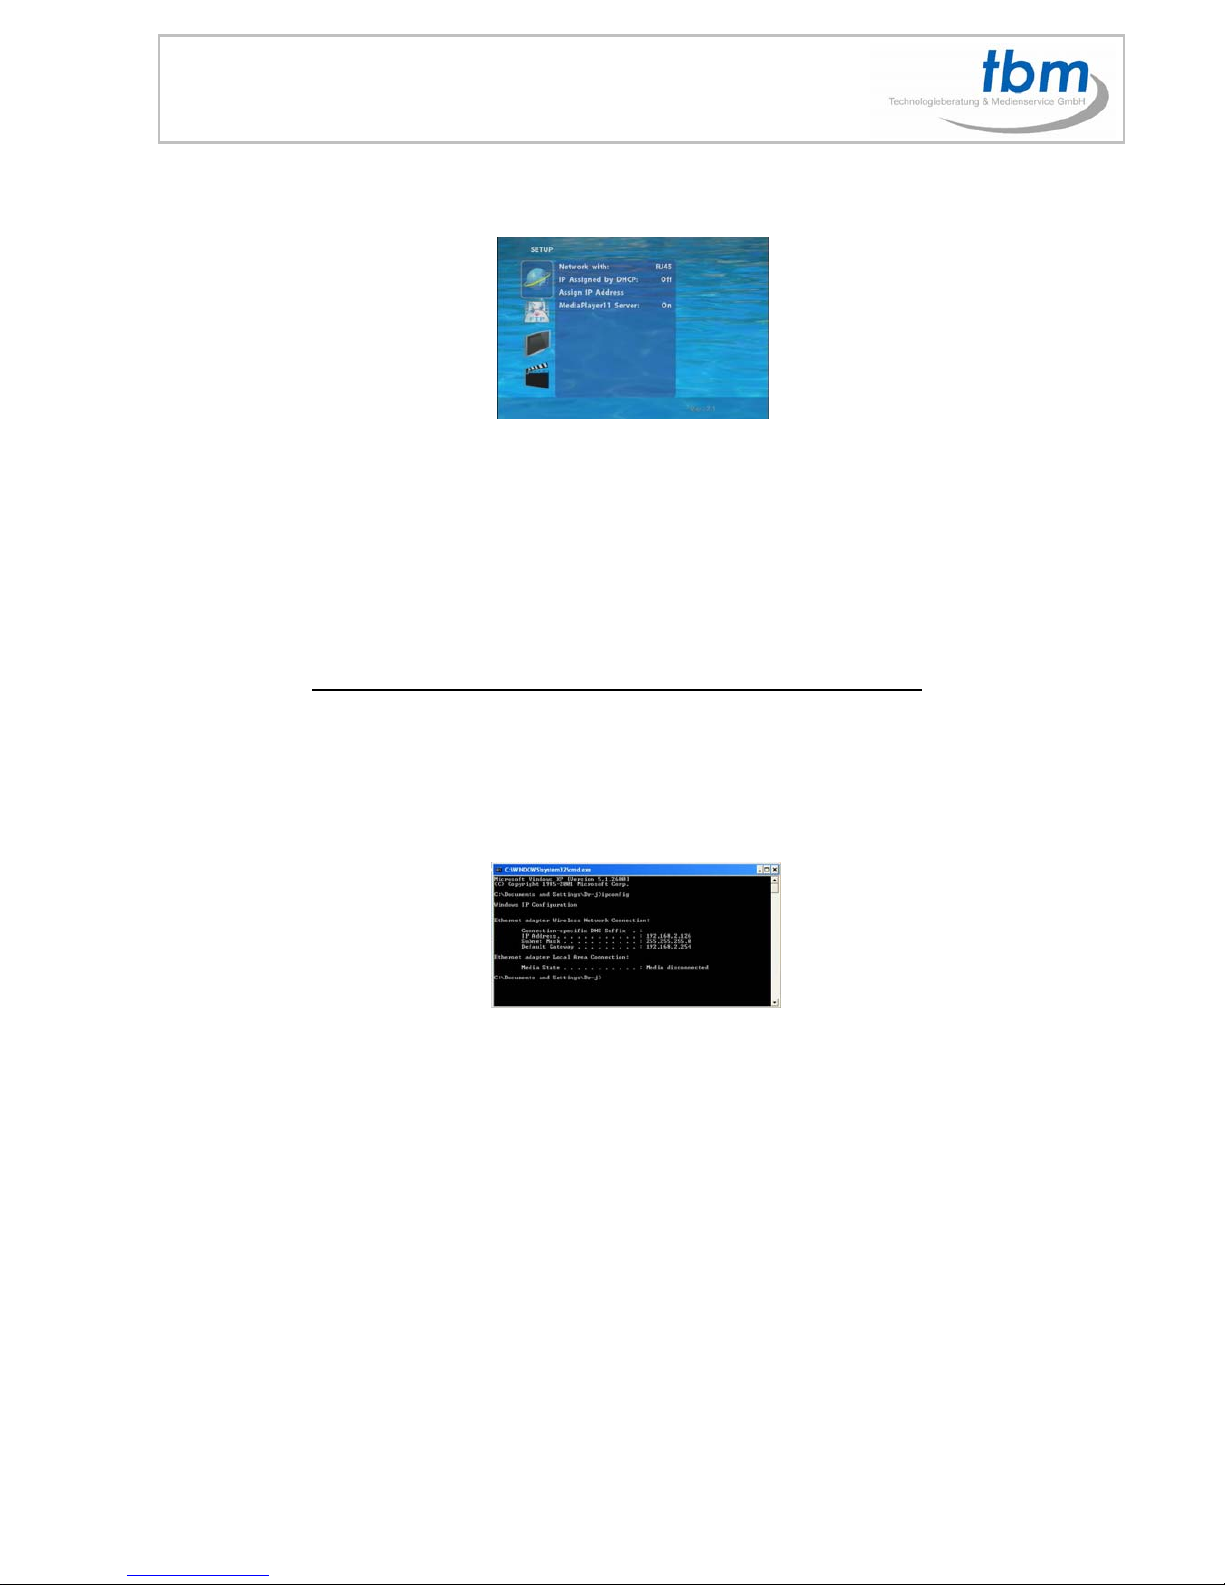
Network with: Select your network connection Disable/ RJ45.
IP Assigned by DHCP: If you have a DHCP-enabled router, please select “On”, then the router will
automatically assigns an IP address to the MPL027P. If you don’t have a DHCP –enabled router,
select “Off” and type the network information in “Assign IP Address”.
Assign IP Address: If the MPL027P is connected to a network without a DHCP server or you want
to use Local FTP Server function, enter the fixed IP address, Mask, Gateway and DNS for the
MPL027P. PS. Refer to 4.1 for how to enter IP address by remote control.
NOTE: Before setting the IP address, Mask, Gateway and DNS, check the network information of your
PC. Please follow the steps below to get the network information of your PC.
Step 1: Click on “Start” → “Run” and type in “command”, then press “ENTER”.
The MS-DOS window will appear, type in “ipconfig” and then press “ENTER” to get the network
information.
Step 2: Assign IP Address, Mask (Subnet Mask) and Gateway (Default Gateway) for the MPL027P.
Enter the same values of the Subnet Mask and Gateway, and be careful not to enter the values of IP
address that are already used by other devices on the network.
Media Player 11 Server: Enable/ disable the Media Player 11 server.
Page 8
8
7.2 FTP SETUP
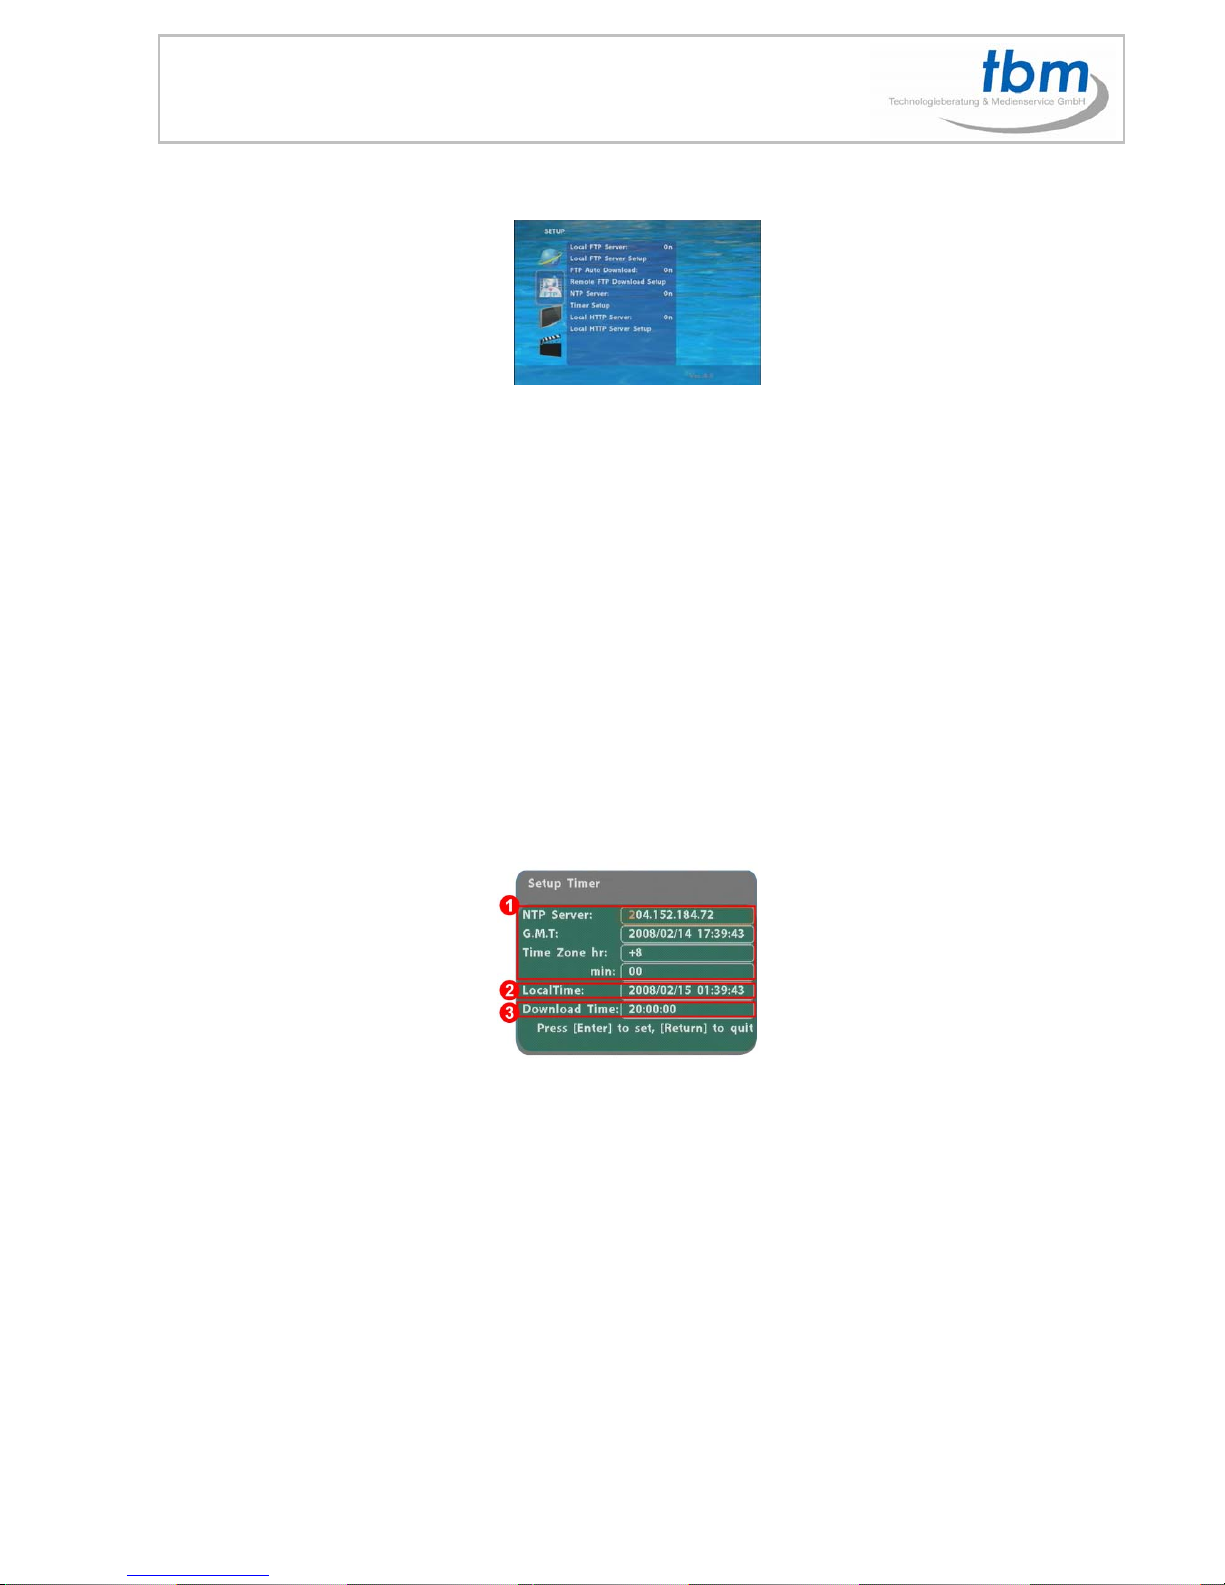
Local FTP Server: Turn on/ off the MPL027P server.
(If you use the MPL027P server, please disable the DHCP function and input a fixed IP address,
Mask, Gateway and DNS of the MPL027P)
Local FTP Server Setup: Set the “Port”, “User ID” and “Password” of the MPL027P.
(The Default Port: 21, User ID: root, Password: admin)
FTP Auto Download: Enable/ Disable the FTP auto download function.
Remote FTP Download Setup
- Server IP: Enter the domain name or IP address of the FTP as was given to you by your Web
hosting provider.
- Port: The default port for FTP is 21. In most cases you should not change this number, if the FTP
site uses a port other than 21, you should enter the correct port.
- User ID: Enter the user name of the Remote FTP server.
- Password: Enter the Password of the Remote FTP server.
- FTP Path: Enter the folder path that you want to share.
NTP Server: Enable/ Disable the NTP server function. (if the MPL027P isn’t connect to internet,
please disable the NTP Server function)
Time Setup: Set the NTP Server, Local Time and Auto Download Time here.
NTP Server (the MPL027P must be already connected to the network)
- NTP Server: Enter the NTP server IP address like: 204.152.184.72.
- G.M.T: After MPL027P get the time from NTP server, it will update the G.M.T field.
- Time Zone: Use the Volume +, - and Numeric Key to set the time zone of
- Your location. (time zone must be set properly for the Auto-Download and Schedule functions)
Page 9
9
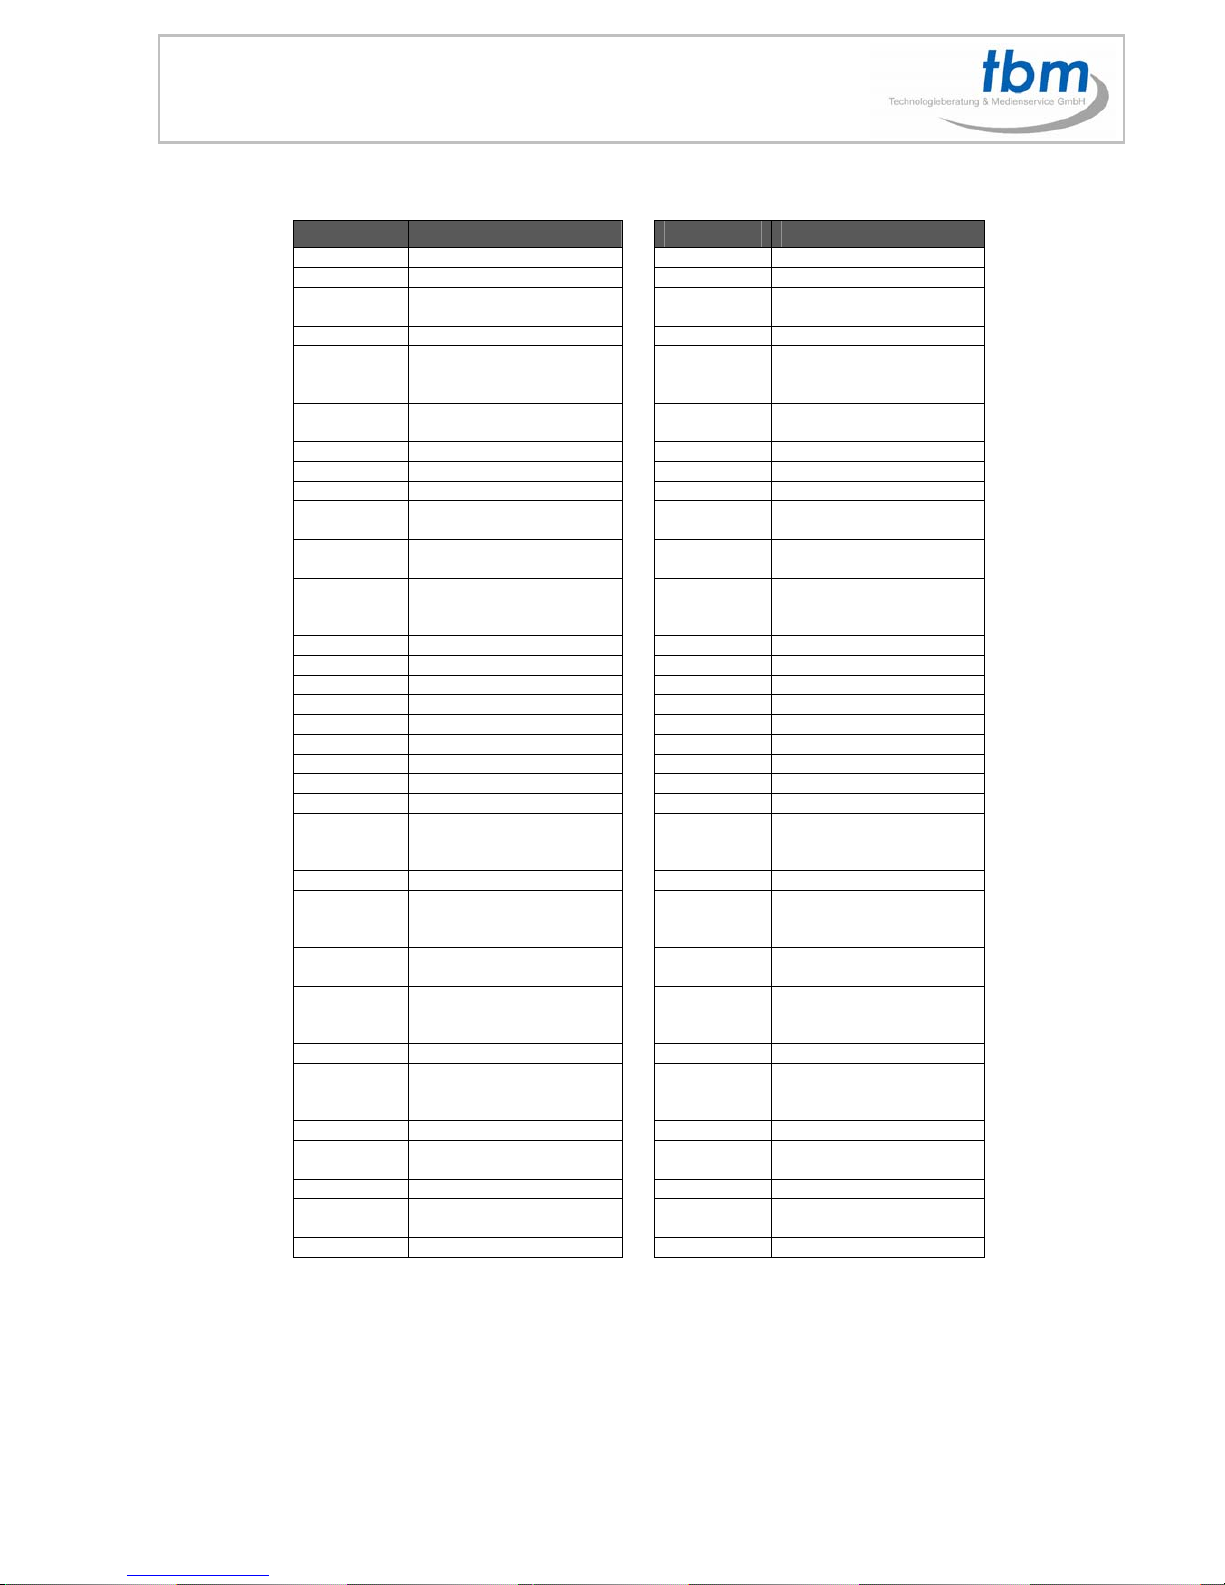
NOTE: GMT and applied regions
Time Zone Region Time Zone Region
(GMT-12:00) Eniwetok, Quazalen (GMT+02:00) Helsinki, Riga, Tallinn
(GMT-11:00) Midway, Ireland, Samoa (GMT+03:00) Nairobi
(GMT-10:00) Hawaii
(GMT+03:00)
Moscow, Saint Petersburg,
Volgograd
(GMT-09:00) Alaska (GMT+03:00) Baghdad
(GMT-08:00)
Pacific GMT (U.S. &
Canada);
Tijuana
(GMT+03:00) Kuwait, Raid
(GMT-07:00)
Continental GMT (U.S. &
Canada)
(GMT+03:30) Tehran
(GMT-07:00) Arizona (GMT+04:00) Baku, Tbilisi, Ere van
(GMT-06:00) Mexico city (GMT+04:00) Abu Dhabi, Muscat
(GMT-06:00) Saskatchewan (GMT+04:30) Kabul
(GMT-06:00)
Eastern Coast GMT (U.S. &
Canada)
(GMT+05:00) Yekaterinburg
(GMT-06:00) Indiana (Eastern Coast)
(GMT+05:00)
Islamabad, Karachi,
Tashkent
(GMT-04:00) Atlantic GMT (Canada)
(GMT+05:30)
Calcutta, Chennai, Mumbai,
New
Delhi
(GMT-04:00) Santiago (GMT+05:45) Katmandu
(GMT-04:00) Caracas, La Paz (GMT+06:00) Sri Jayewardenepura Kotte
(GMT-04:00) Newfoundland (GMT+06:00) Astana, Dakar
(GMT-03:00) Greenland (GMT+08:00) Irkutsk, Ulan Bator
(GMT-03:00) Buenos Aires, Georgetown (GMT+08:00) Kuala Lumpur, Singapore
(GMT-03:00) Brasilia (GMT+08:00) Taipei
(GMT-02:00) Mid-Atlantic (GMT+08:00) Perth
(GMT-01:00) Capo Verde Is. (GMT+09:00) Seoul
(GMT-01:00) Azores (GMT+09:00) Yakutsk
(GMT-00:00) Greenwich GMT; Dublin,
Edinburgh, Lisbon, London
(GMT+09:00) Osaka, Sapporo, Tokyo
(GMT-00:00) Casablanca, Monrovia (GMT+09:30) Darwin
(GMT+01:00)
Beograd, Bratislava,
Budapest,
Ljubljana, Prague
(GMT+09:30) Adelaide
(GMT+01:00)
Brussels, Copenhagen,
Madrid, Paris
(GMT+10:00) Guam, Port Moresby
(GMT+01:00)
Sarajevo, Skopje, Sofia,
Vilnius,
Warsaw, Zagreb
(GMT+10:00) Brisbane
(GMT+01:00) Midwest Africa (GMT+10:00) Vladivostok
(GMT+01:00)
Amsterdam, Berlin, Bern,
Rome,
Stockholm, Vienna
(GMT+10:00)
Canberra, Melbourne,
Sydney
(GMT+02:00) Bucharest (GMT+10:00) Hobart
(GMT+02:00) Athens, Istanbul, Minsk
(GMT+11:00)
Magadan, Solomon Is., New
Caledonia
(GMT+02:00) Jerusalem (GMT+12:00) Auckland, Wellington
(GMT+02:00) Cairo
(GMT+12:00)
Fiji, Kamchatka Pen.,
Marshall Is.
(GMT+02:00) Harare, Pretoria (GMT+13:00) Nuku'alofa
Local Time: Set the system time manually.
NOTE: If the NTP Server and Local Time have been set, the NTP Server will be the first priority (the
MPL027P is already connected to the network).
Download Time: Set the FTP auto-download time.
Local HTTP Server: Enable/ Disable the HTTP command function.
Local HTTP Server Setup: To set the “Port”, “User ID” and “Password” of the MPL027P. (The
Default Port: 80, User ID: root, Password: admin)
NOTE: Press the “SETUP” button on the remote control to save the settings, and it will auto exit
the settings screen, then restart the MPL027P.
Page 10
10
8.0 DOWNLOAD FUNCTION
Before it downloading files from the FTP server, MPL027P will delete all contents on CF card except the
file on the CF card and the FTP server are THE SAME.
8.1 Manual Download Function
Please confirm that the MPL027P is already connected to the network. (Refer to 7.1 Network Setup)
Please use the“▼”button to select the “DOWNLOAD” item, and press “ENTER” button. The MPL027P
will connect to the FTP server and download files automatically.
Before download files, MPL027P will delete all contents on CF card first.
The pop-up window that shows the status of download and the screen saver will appear while the
MPL027P is downloading files. After finishing downloading files, the MPL027P will display the files
automatically.
Screen Saver
8.2 Auto Download Function
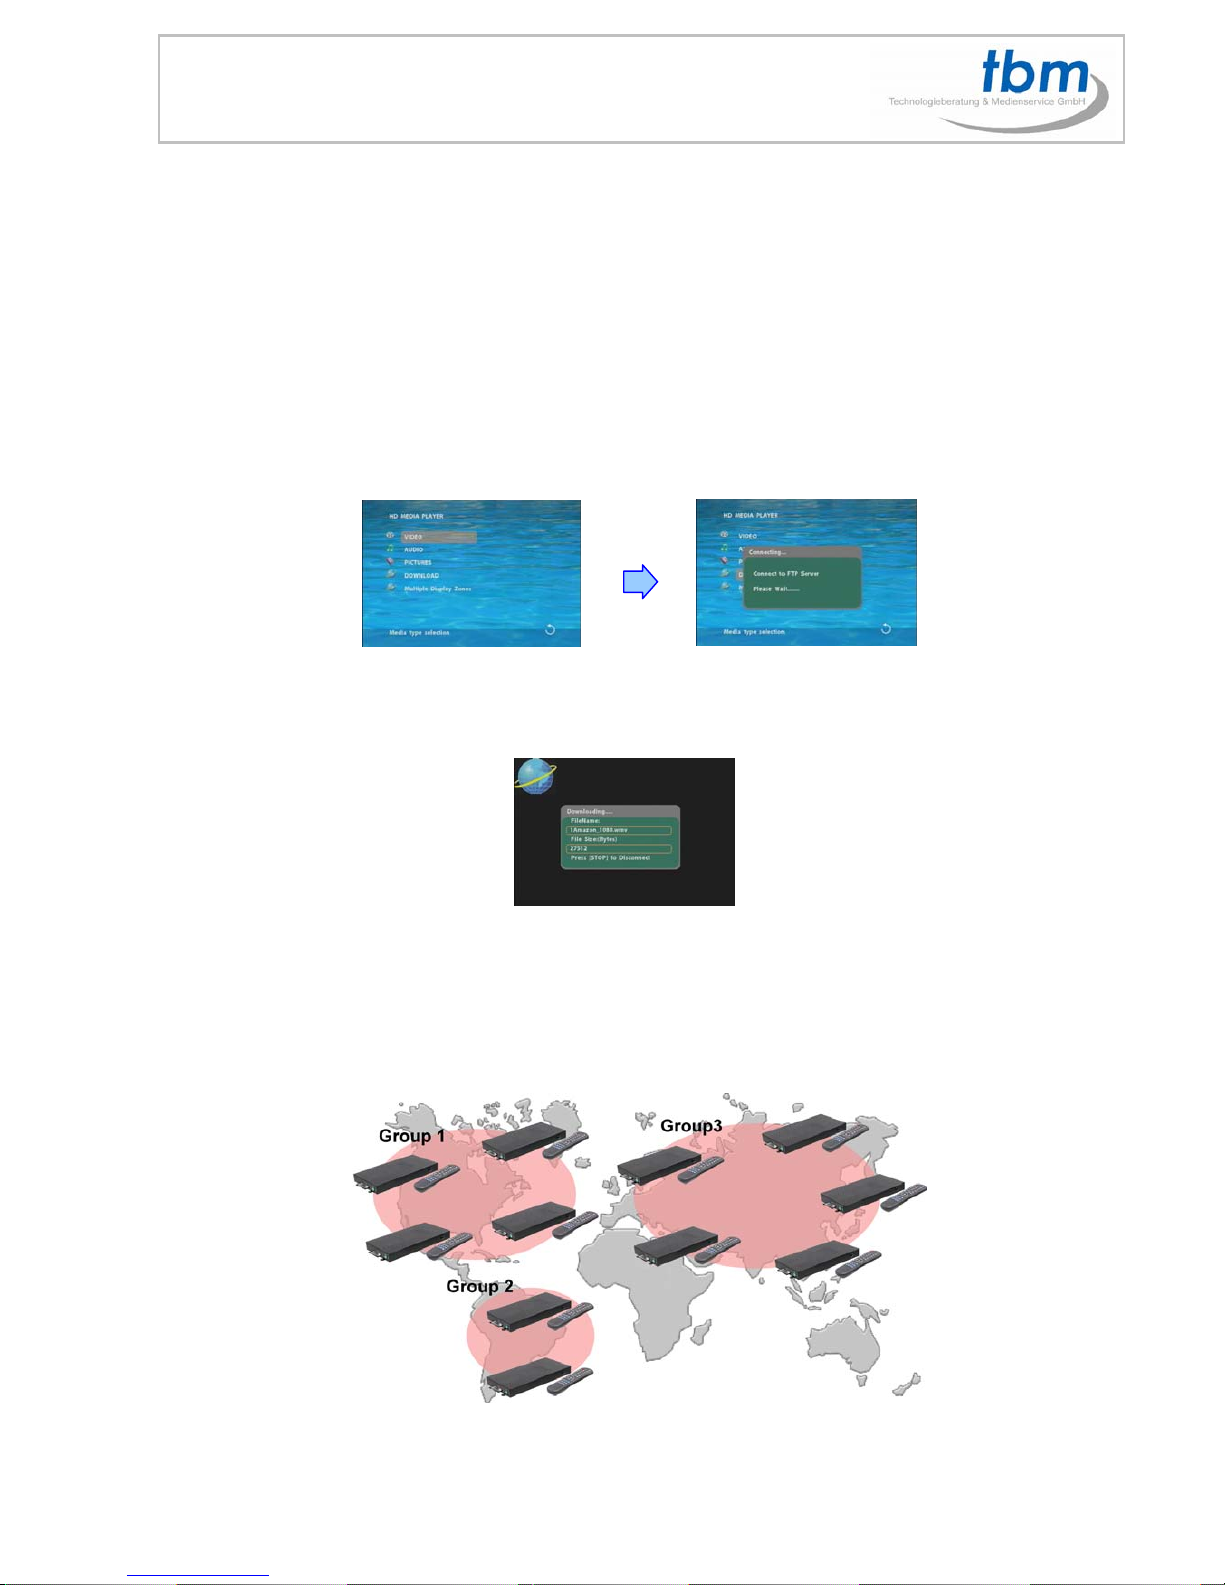
If there are more than one MPL027P is, you can use ftp tools to divide them into different regional
group.
Page 11
11
For example:
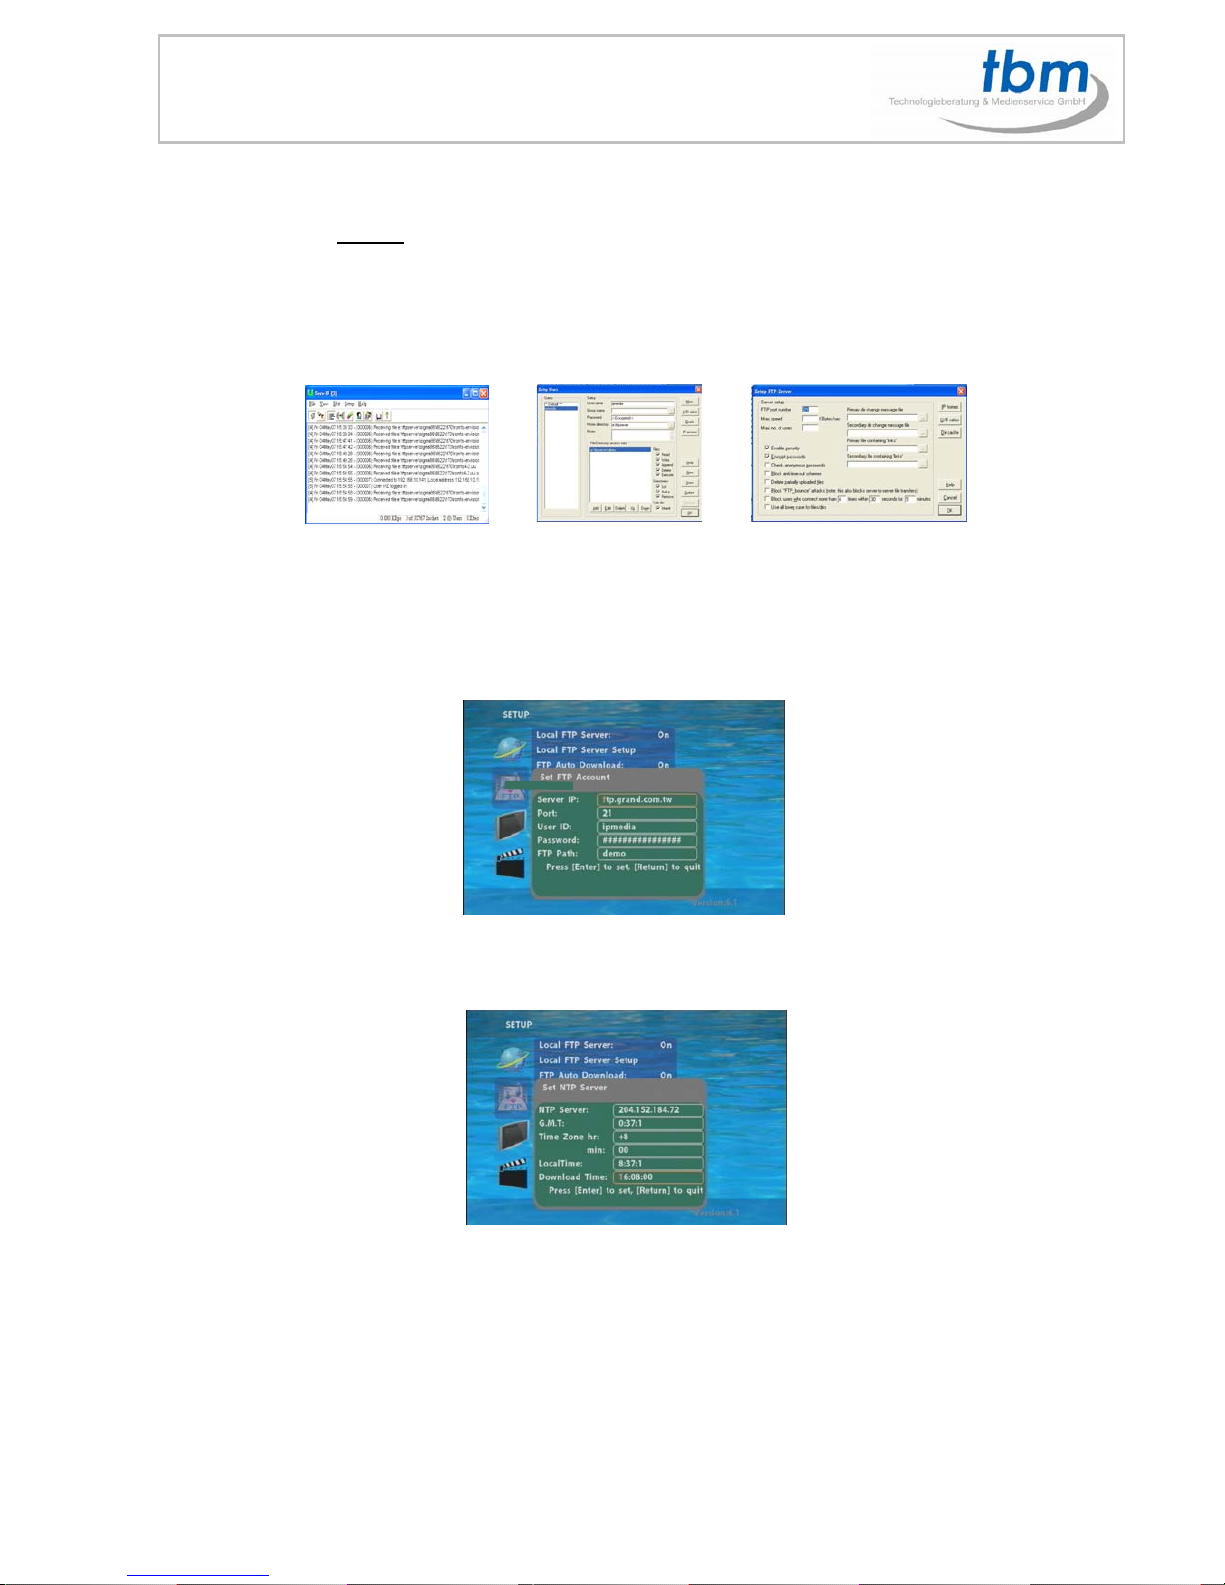
- Use the ftp tool “Serv-U
” to divide into three groups, and setup the “User name”, “Password” and “FTP
port number” of three groups for login ftp server.
Group 1: User name: ipmedia/ Password: 0000/ FTP port number: 21
Group 2: User name : i pm e d i a2 / P as s wo r d : 1111/ F TP po r t n um b e r: 2 1
Group 3: User name: ipmedia3/ Password: 2222/ FTP port number: 21
FTP Tool : Serv-U Setup”User Name” “Password and FTP port number”
Enter the “Remote FTP Download Setup” window of MPL027P, and then type the same “User
name (User ID)”, “Password” and “Port”. The MPL027P in group 1, please type the “User ID:
ipmedia”, “Password: 0000” and “Port: 21”.“Port:21”.
Please enter the “Network Timer NTP” window of MPL027 PS, and set up the “Download Time”,
then the MPL027 PS will download all the files from the FTP server at the designated time.
NOTE: The filename of the media files in FTP server cannot have any spaces.
Page 12
12
8.3 Download Pause / Resume
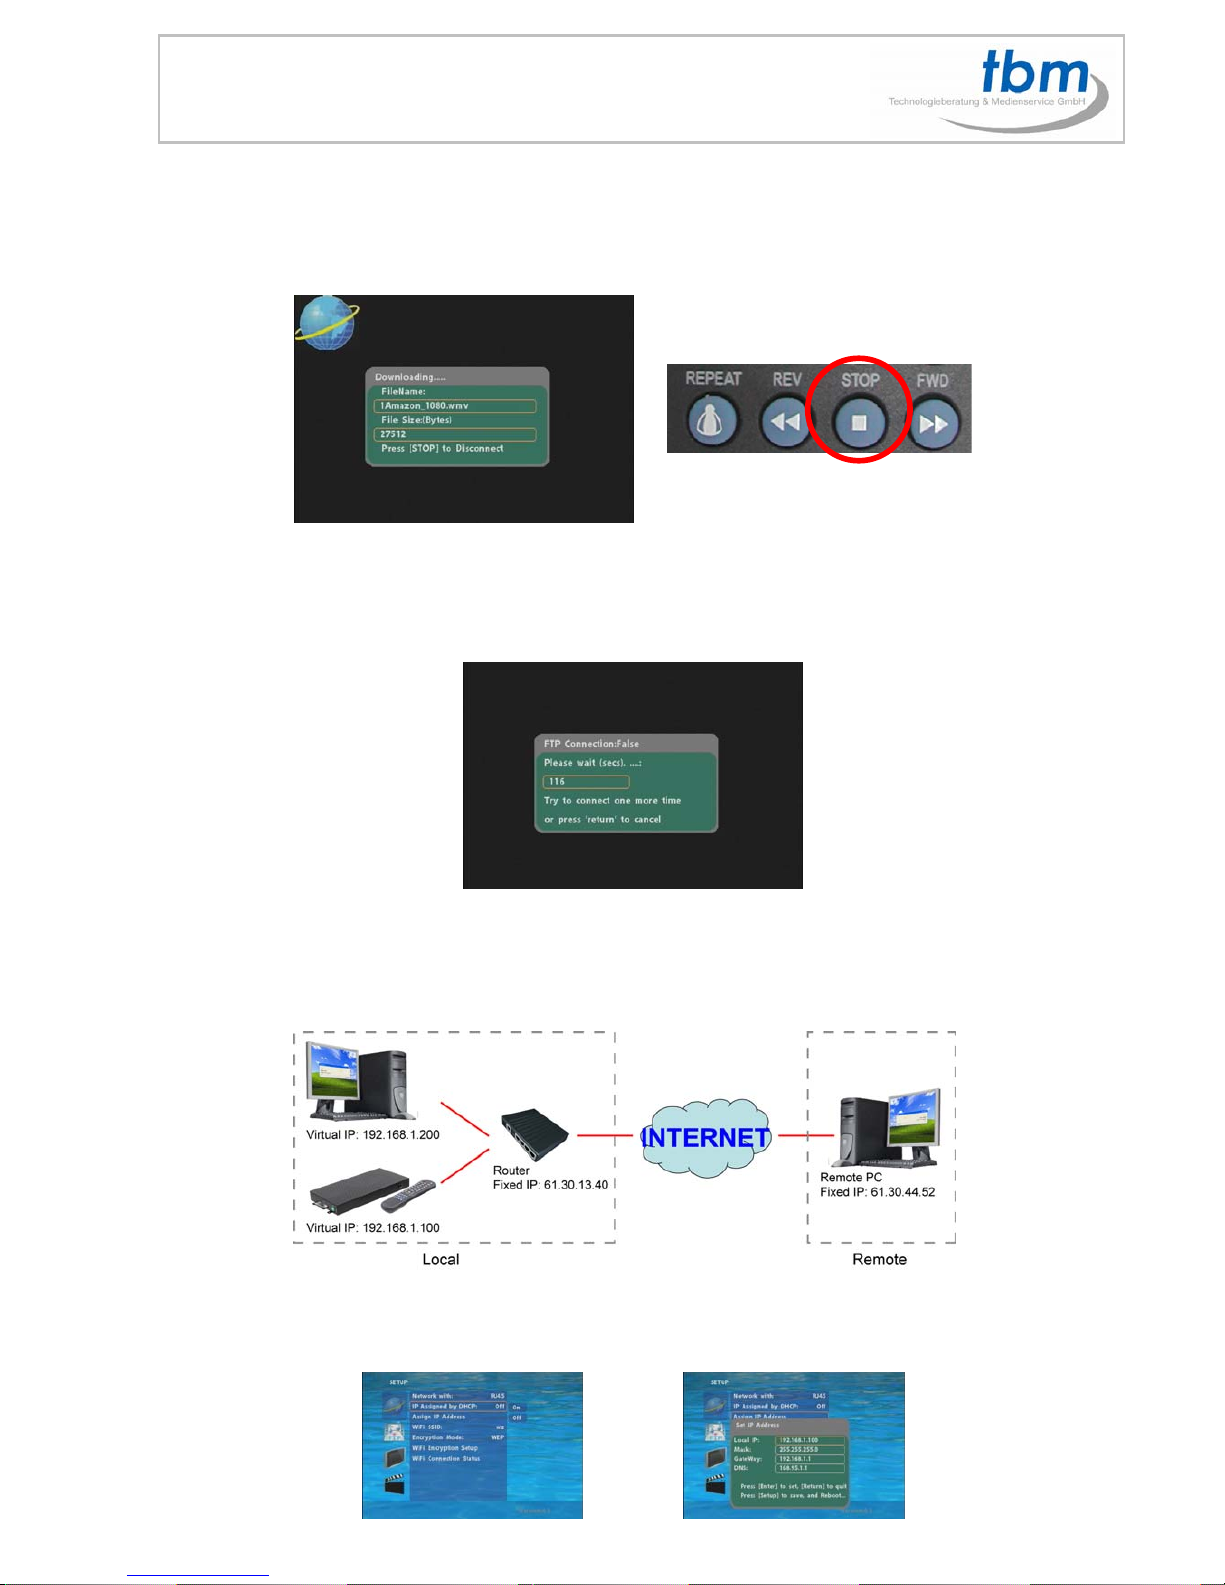
MPL027P supports download pause/resume. You can press the “STOP” button to pause downloading
media files. The MPL027P can continue unfinished downloads upon next session.
NOTE:If the network connection is unstable or broken a pop-up window will appear as shown below.
The MPL027P will attempt to resume downloading in 2 minutes. The user can terminate the download by
pressing the “RETURN” button.
8.4 DOWNLOAD / UPLOAD MEDIA FILES
Method 1:Connect by IE Browser
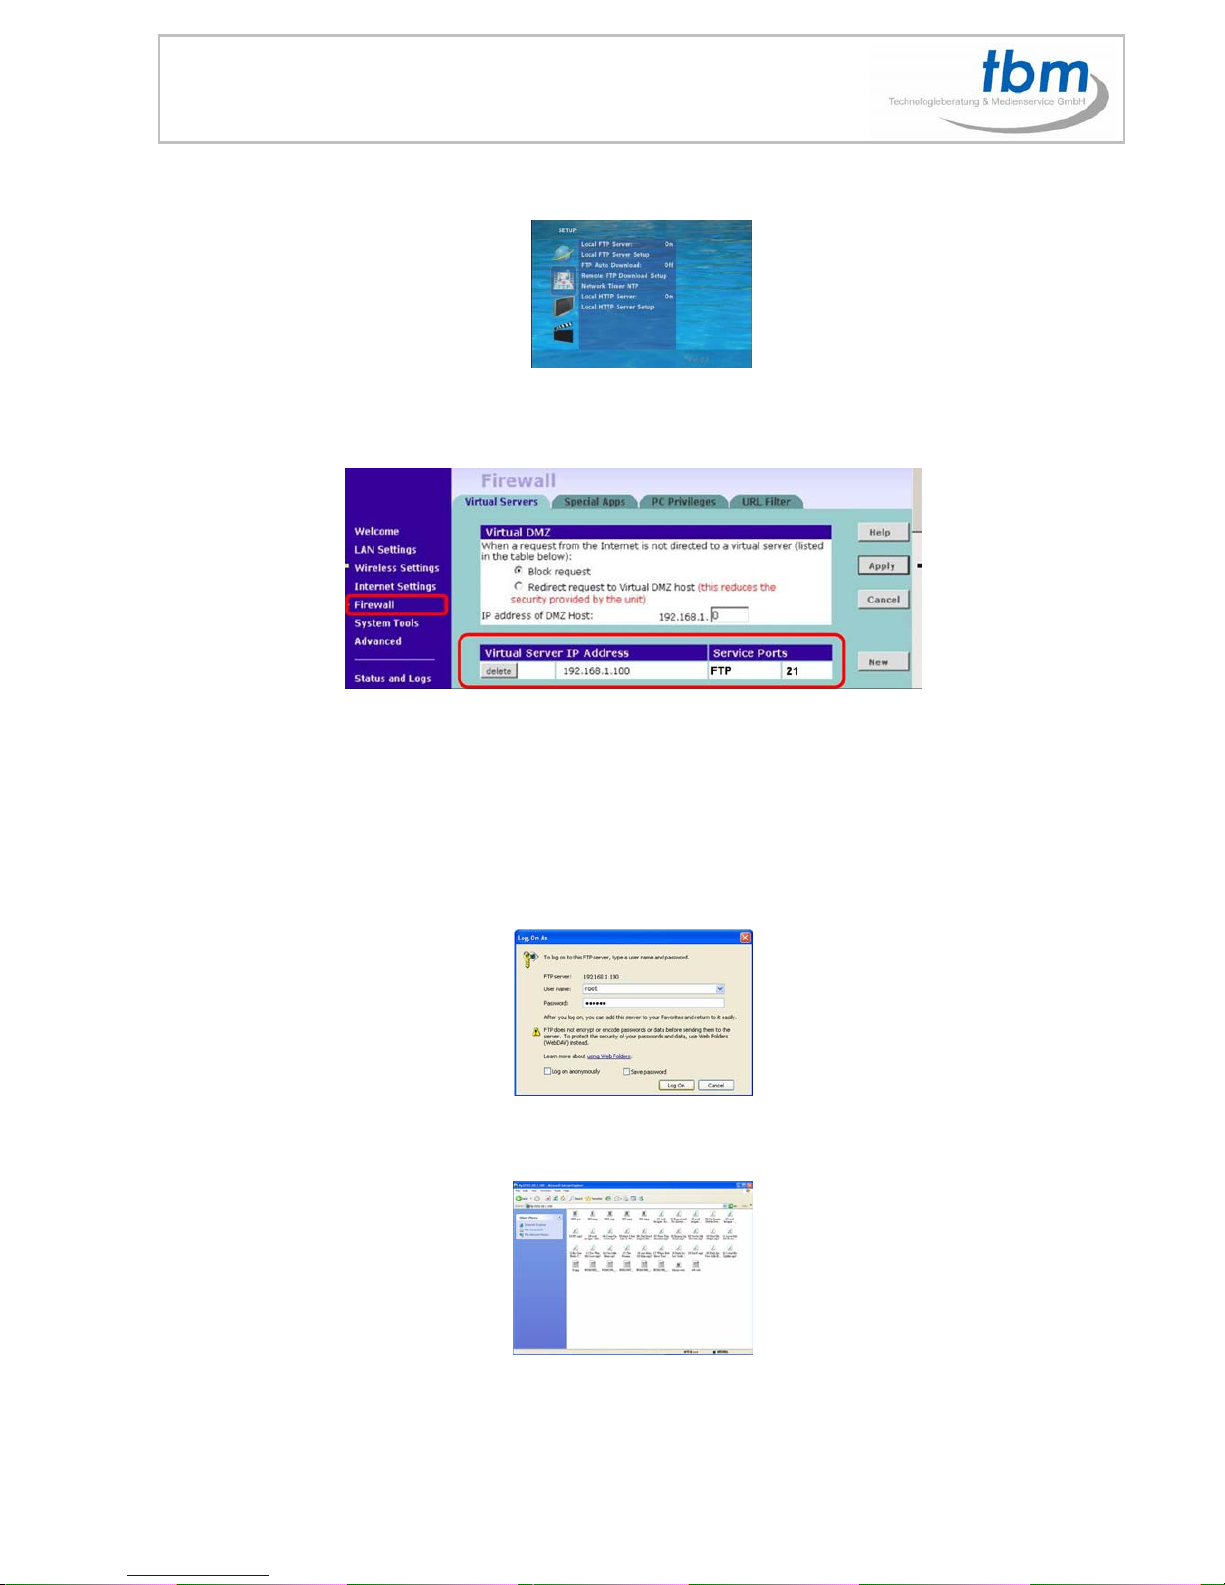
Step 1:Confirm the “IP Assigned by DHCP” has been disabled, then enter the “ NSetup” item, and type
IP Address (example. 192.168.1.100), Mask and Gateway for the MPL027P (refer to 7.1).
Page 13
13
Step 2:Confirm the “Local FTP Server” function has been enabled (refer to 7.1).
Step 3:Please setup your router or firewall, and open a port 21 for the MPL027P.
The following figure is an example, please refer to your user’s manual of router for opening ports.
Step 4:Start IE on PC and type the FTP site or IP:
In the local PC, please type “ftp://192.168.1.100”.
In the remote PC, please type “ftp://61.30.13.40:21”.
Step 5:Then type the “User Name” and “Password” and click “Log On” to log on to the
MPL027P Server. (Default User Name: root Default Password:admin)
Step 6:After logging on, all the media files in the CF card on the MPL027P will be
listed. You can download and upload the media files between CF card and your PC.
NOTE: After file being download/ upload will stop playing. After downloading files, the MPL027P
will display the movie files automatically.
Page 14
14
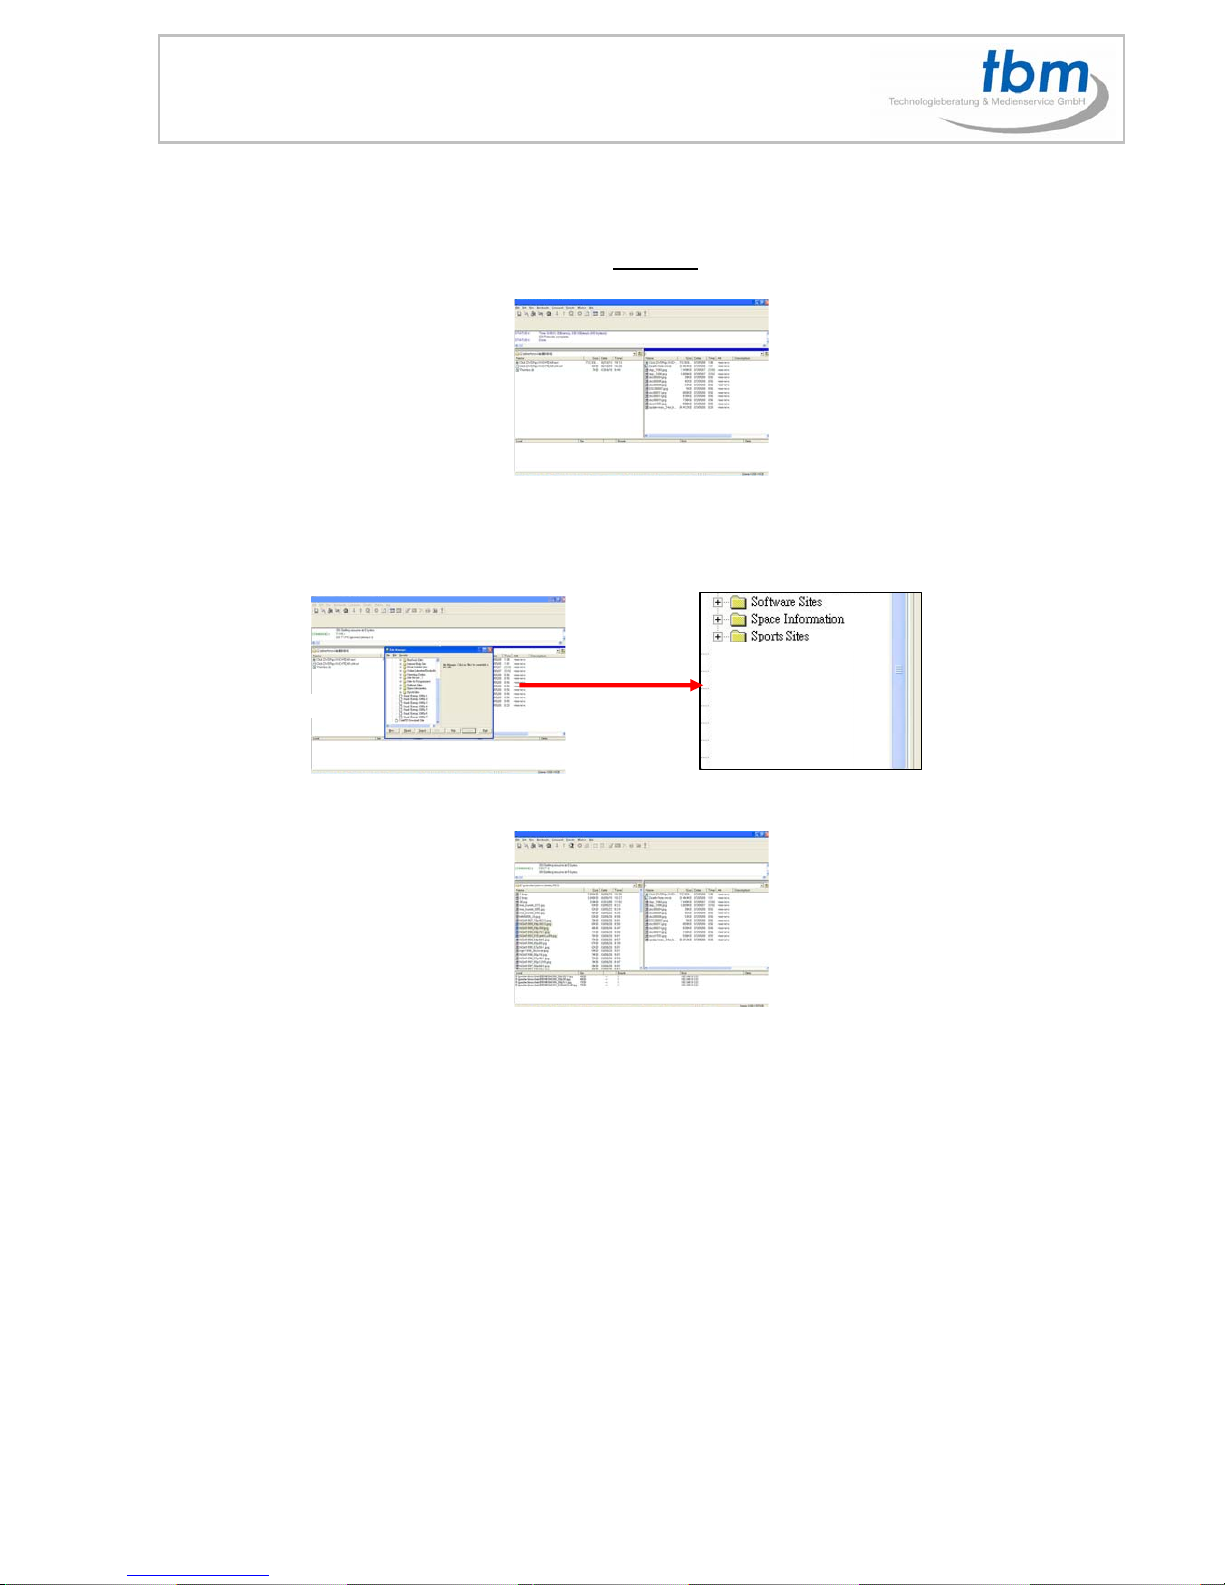
Method 2:Connect by FTP Tools
For example.
- If there are multiple MPL027P, you can use the “CuteFTP
” tool to connect and manage files easily.
CuteFTP
You can create all the MPL027 PS, and only select the MPL027 PS that you want to connect in the list.
- Select the files you want upload to the MPL027P, or download the files to your PC.
NOTE:After file being download/ upload will stop playing. After downloading files, the MPL027P
will display the movie files automatically.
MPL027 HD 1080p
MPL027 HD 1080p
MPL027 HD 1080p
MPL027 HD 1080p
MPL027 HD 1080p
MPL027 HD 1080p
Page 15
15
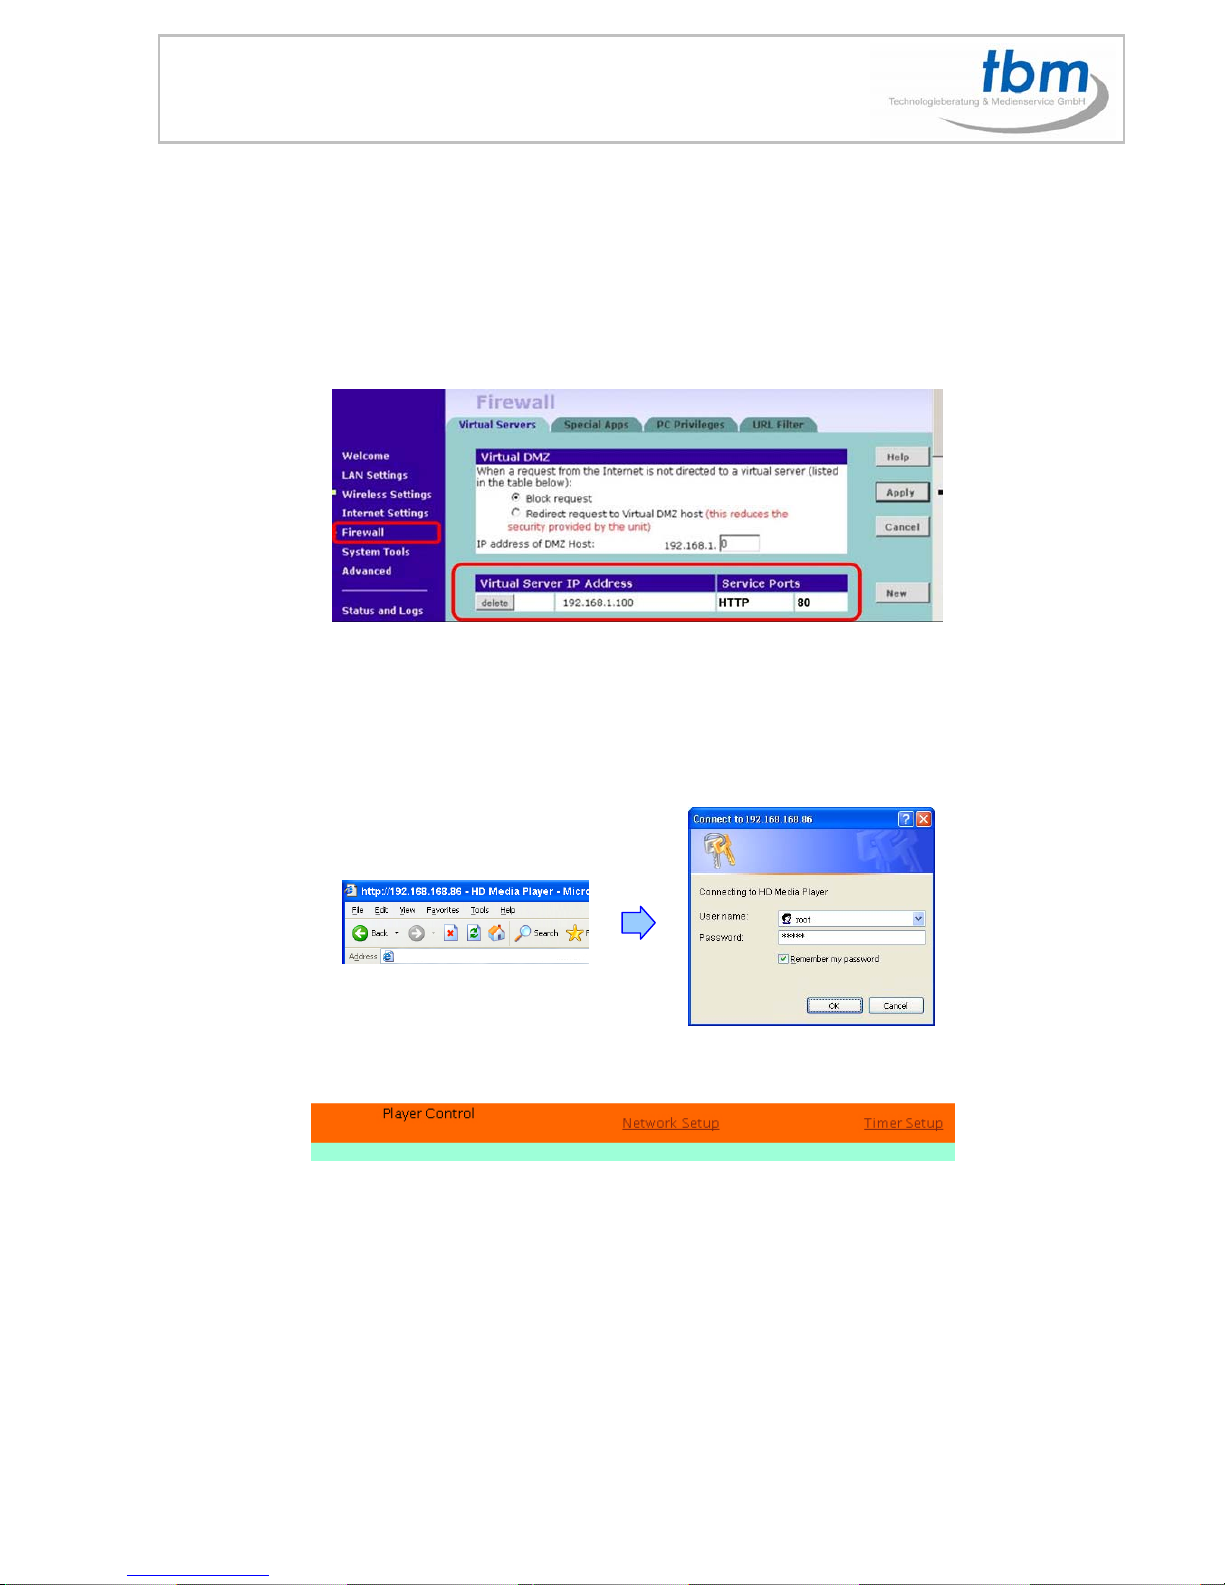
9.0 HTTP COMMAND FUNCTION
Confirm that the MPL027P is already connected to the network. (Refer to 6.1)
Confirm the “Local HTTP Server” function has been enabled, and the “Local HTTP Server Setup”
set has been completed (refer to 6.2).
Set your router or firewall, and open a port 80 for the MPL027P. The following figure is an example,
please refer to your user’s manual of router for opening ports.
Start IE on PC and type the HTTP site or IP:
In the local PC, please type “http://192.168.1.100”.
In the remote PC, please type “http://61.30.13.40:80”.
Type the “User Name”, “Password” and click “OK” to log on.
(Default User Name: root Default Password: admin)
There are three items: “Player Control”, “Network Setup” and “Timer Setup” in the window.
Page 16
16
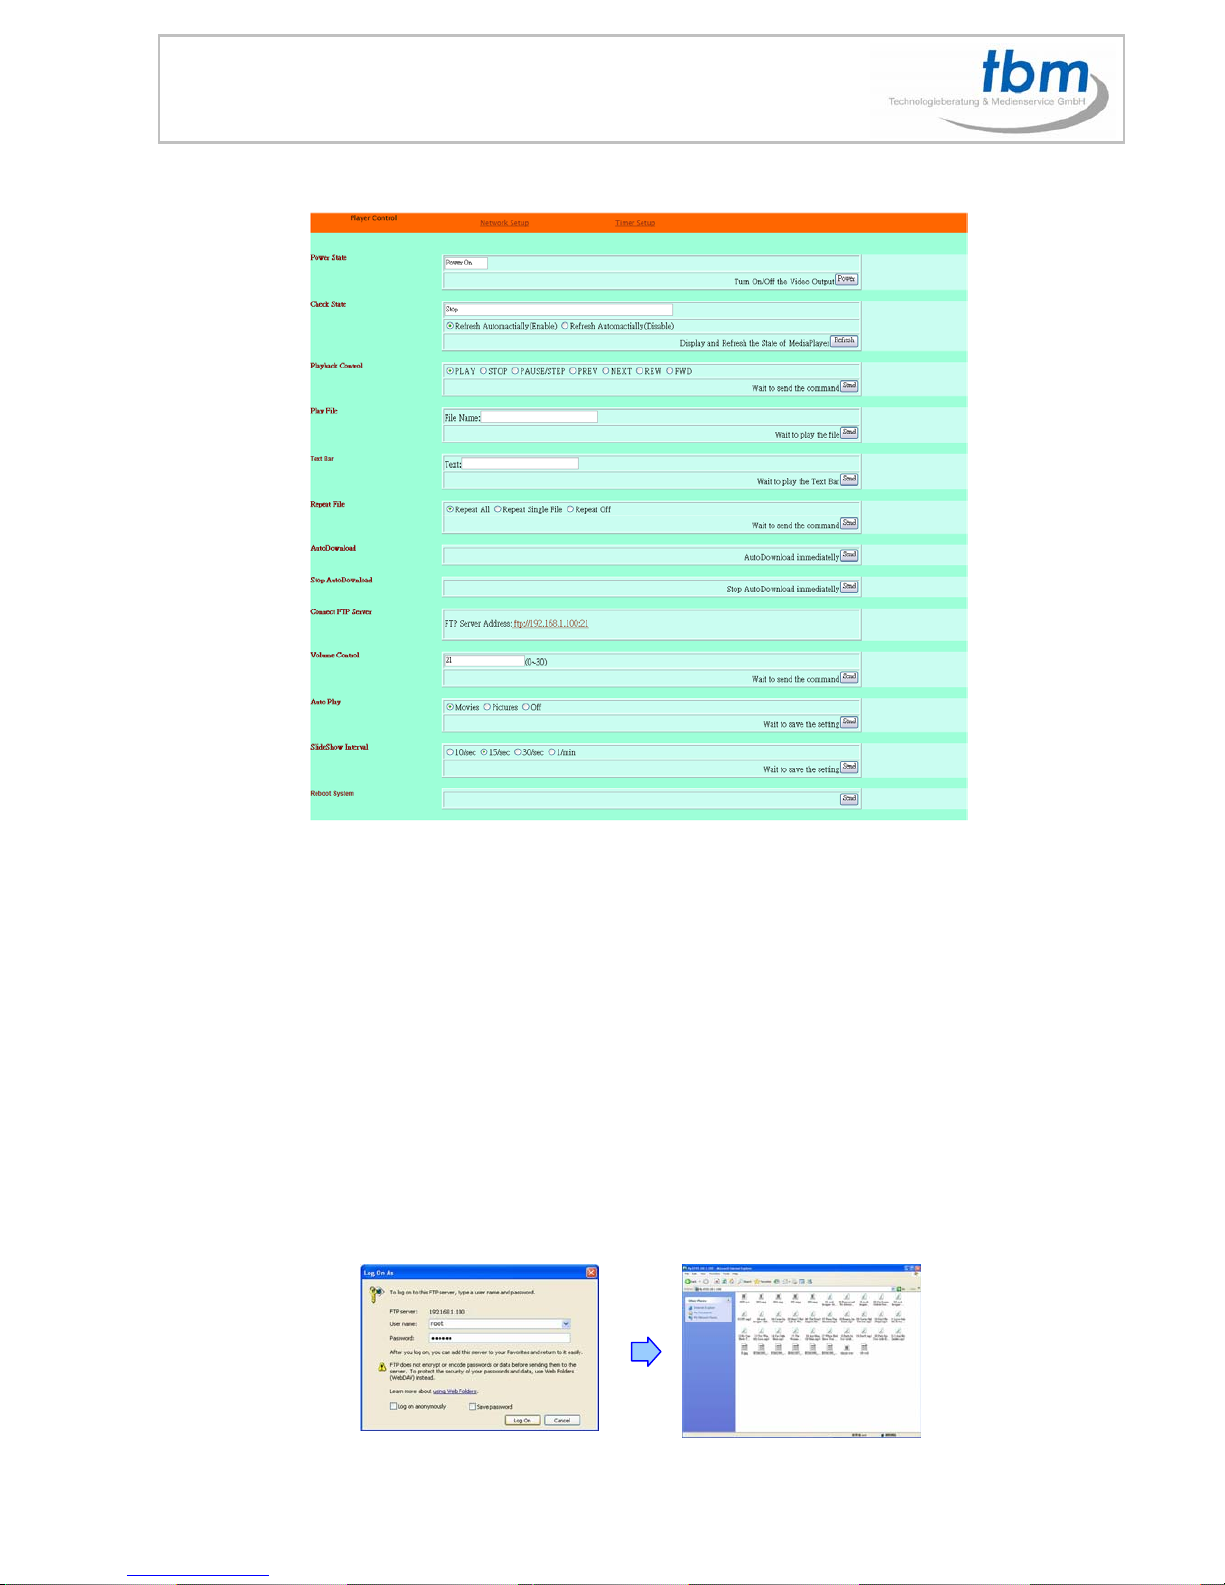
9.1 PLAYER CONTROL
Power State: Turn on/ off the MPL027P.
Check State: Check the current state of MPL027P.
Playback Control: Control the MPL027P to play file/ stop playback/ pause the playback/ play the
previous file/ play the next file/ rewind movie/ forward movie.
Play File: Enter the file name that you want play, and click “Send” to play the file immediately.
Text Bar: Enter the message that you want to display, and press “Send” to display the scrolling text
message on the screen immediately. (the message you entered through the http function will not be
stored on CF card.)
Repeat File: Select the repeat mode.
Auto Download: Click “Send” to execute the auto download function immediately.
Note: The “FTP Auto Download” function must be turned on and completed set.
Stop Auto Download: Click “Send” to stop the auto download function immediately.
Connect FTP Server: Click the FTP server address to connect to the MPL027P, and enter the user
name and password (Default User Name: root, Default Password: admin) to log on. After logging on
all the media files in the CF card on the MPL027P will be listed. You can download and upload the
media files between CF card and your PC.
Volume Control: Enter the value for volume (0-30).
Auto Play: Select the auto play mode (movies/ pictures/ off).
Reboot System: Click “Send” to reboot the MPL027P immediately.
Page 17
17
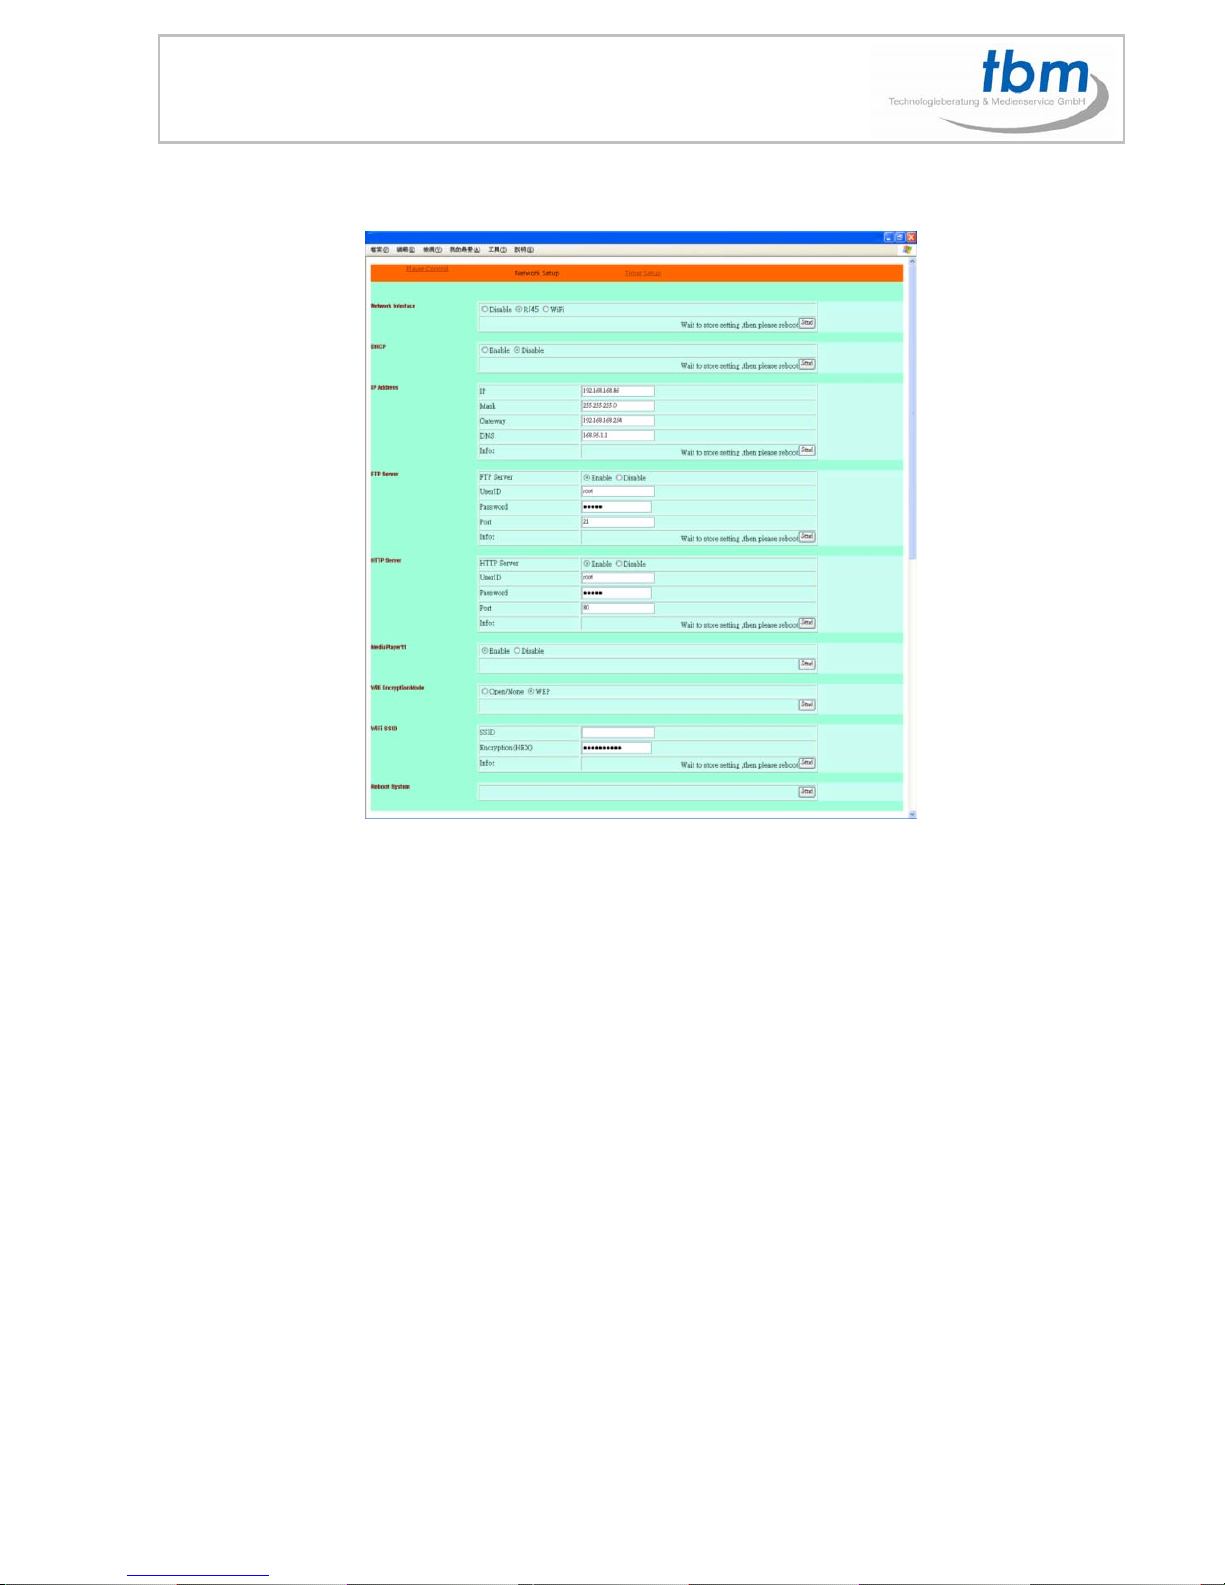
9.2 NETWORK SETUP
Network Interface: Select your network connection Disable/ RJ45
(Wi-Fi function only for MPL027PW).
DHCP: Enable/ Disable the DHCP function.
IP Address: Enter the fixed IP address, Mask, Gateway and DNS for the MPL027P.
FTP Server: Enable/ Disable the FTP Server function. You can also change the
User ID, Password and port of the FTP Server.
HTTP Server: Enable/ Disable the HTTP Server function. You can also change
the User ID, Password and port of the HTTP Server.
Media Player 11: Enable/ disable the Media Player 11 server.
The “WiFi Encryption Mode” and “WiFi SSID” items only for B1080PW.
Reboot System: After setting, click “Send” to reboot the MPL027P.
Page 18
18
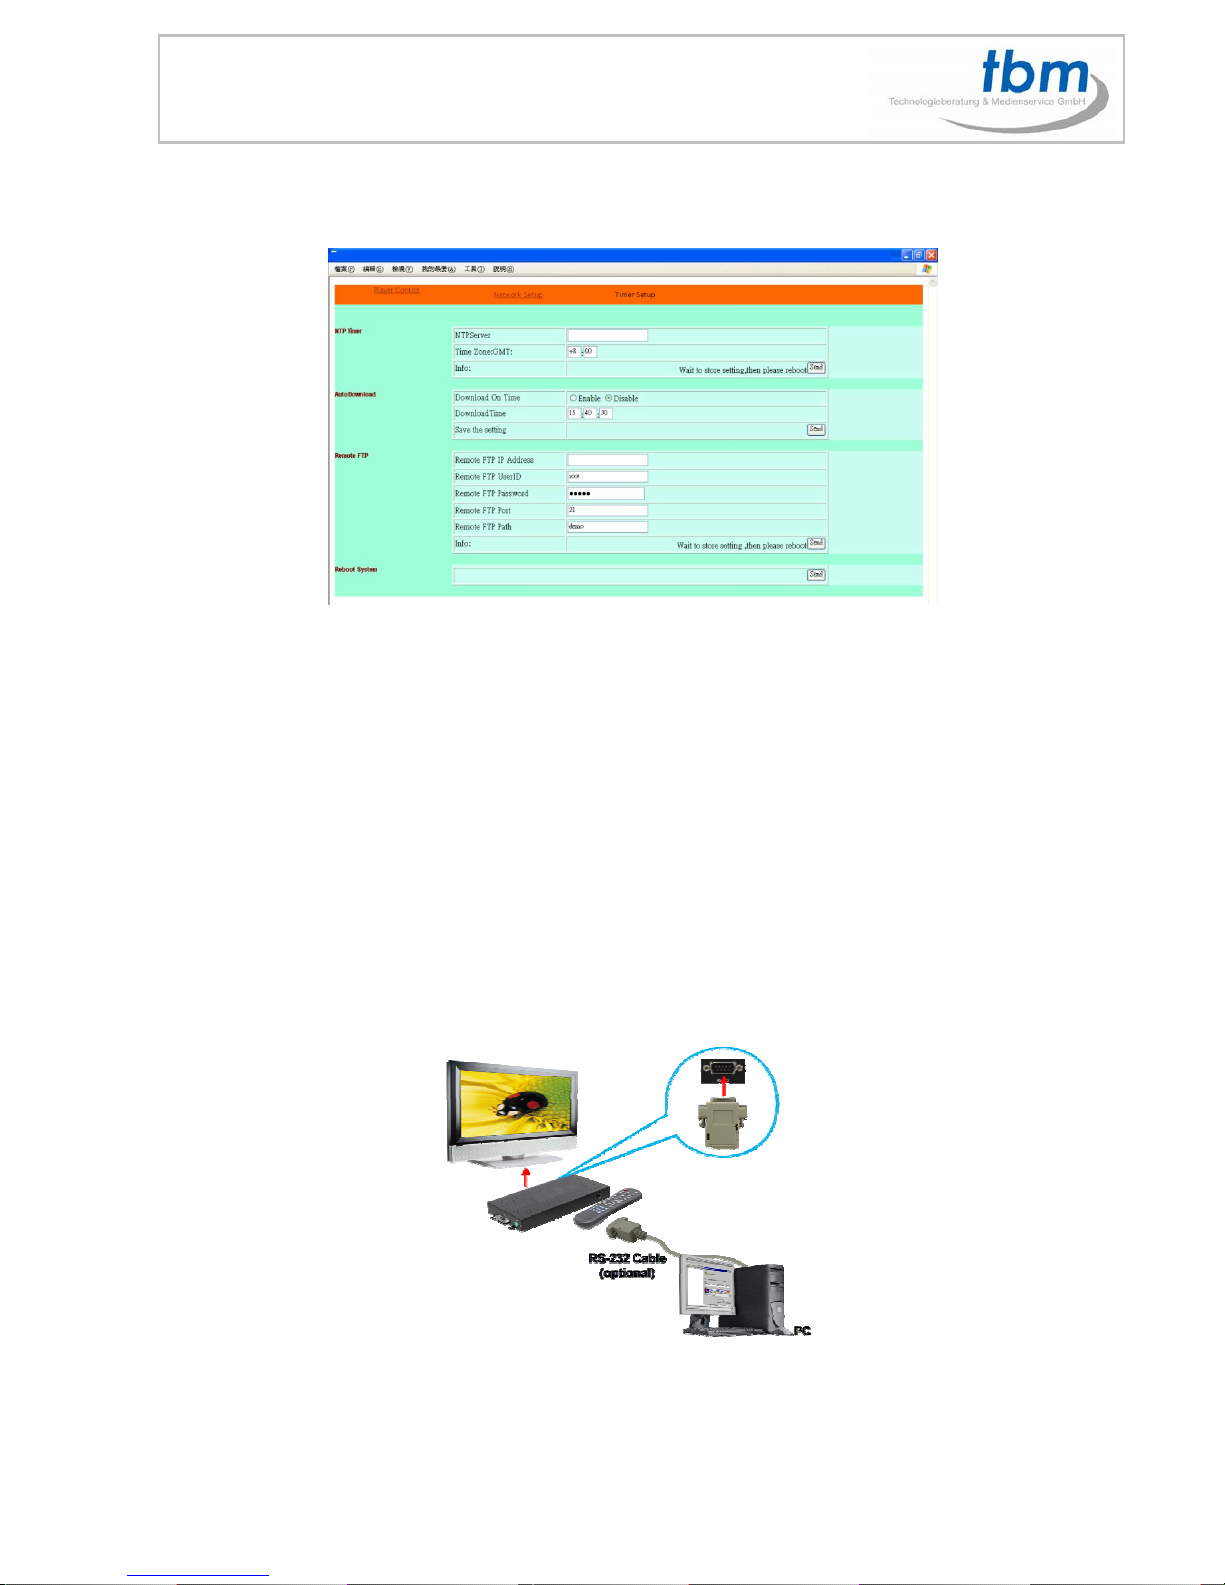
9.3 TIMER SETUP
NTP Server: Set the NTP Server.
Auto Download: Set the auto download time.
Remote FTP: Set the Remote FTP Server.
Reboot System: After setting, click “Send” to reboot the MPL027 PS.
10.0 RS-232 FUNCTION
Use the tool “Hyper Terminal” or other tools to control the MPL027P with ASCII command.
1. Baud Rates:
- Firmware Updating: Set up the baud rate as “115200”.
- ASCII Command: The available baud rates are:
- 38400 Vers.8.4.3
- 19200 Vers.8.4.3.1tbm.
. -The reaction time of MPL027P is around two seconds.
Page 19
19
Keyboard Layout
q:POWER -:VOL - w:SLOW
R:RETURN *:MUTE >:NEXT
!:REPEAT S:SELECT <:PREW
~:SETUP A:Auto Download u:UP
#:TV MODE p:PLAY d:DOWN
%:AutoPlay P:PAUSE/STEP l:LEFT
i:INFO x:STOP r:RIGHT
m:NTSC/PAL f:FFW s:ENTER
$:SEARCH b:REW C:CLEAR
+:VOL +
(XXXXX.XXX):Play The File (xxxxx.xxx is the file name)
NOTE:Must include the round brackets.
[Number]: Play the file by index. (numbers < upper case letters < lowercase letter)
Pin Assignment
D Sub 9Pin Female D Sub 9Pin Female
Pin 1 Pin 4
Pin 2 Pin 3
Pin 3 Pin 2
Pin 4 Pin 1
Pin 5 Pin 5
Pin 6 Pin 6
Pin 7 Pin 8
Pin 8 Pin 7
Pin 9 Pin 9
11.0 PLAY THE MEDIA FILES ON THE PC
Using Windows Media Player Version 11 ( Windows XP/ Vista only )
Step 1:Please download and install Windows Media Player Version 11 on your PC first.
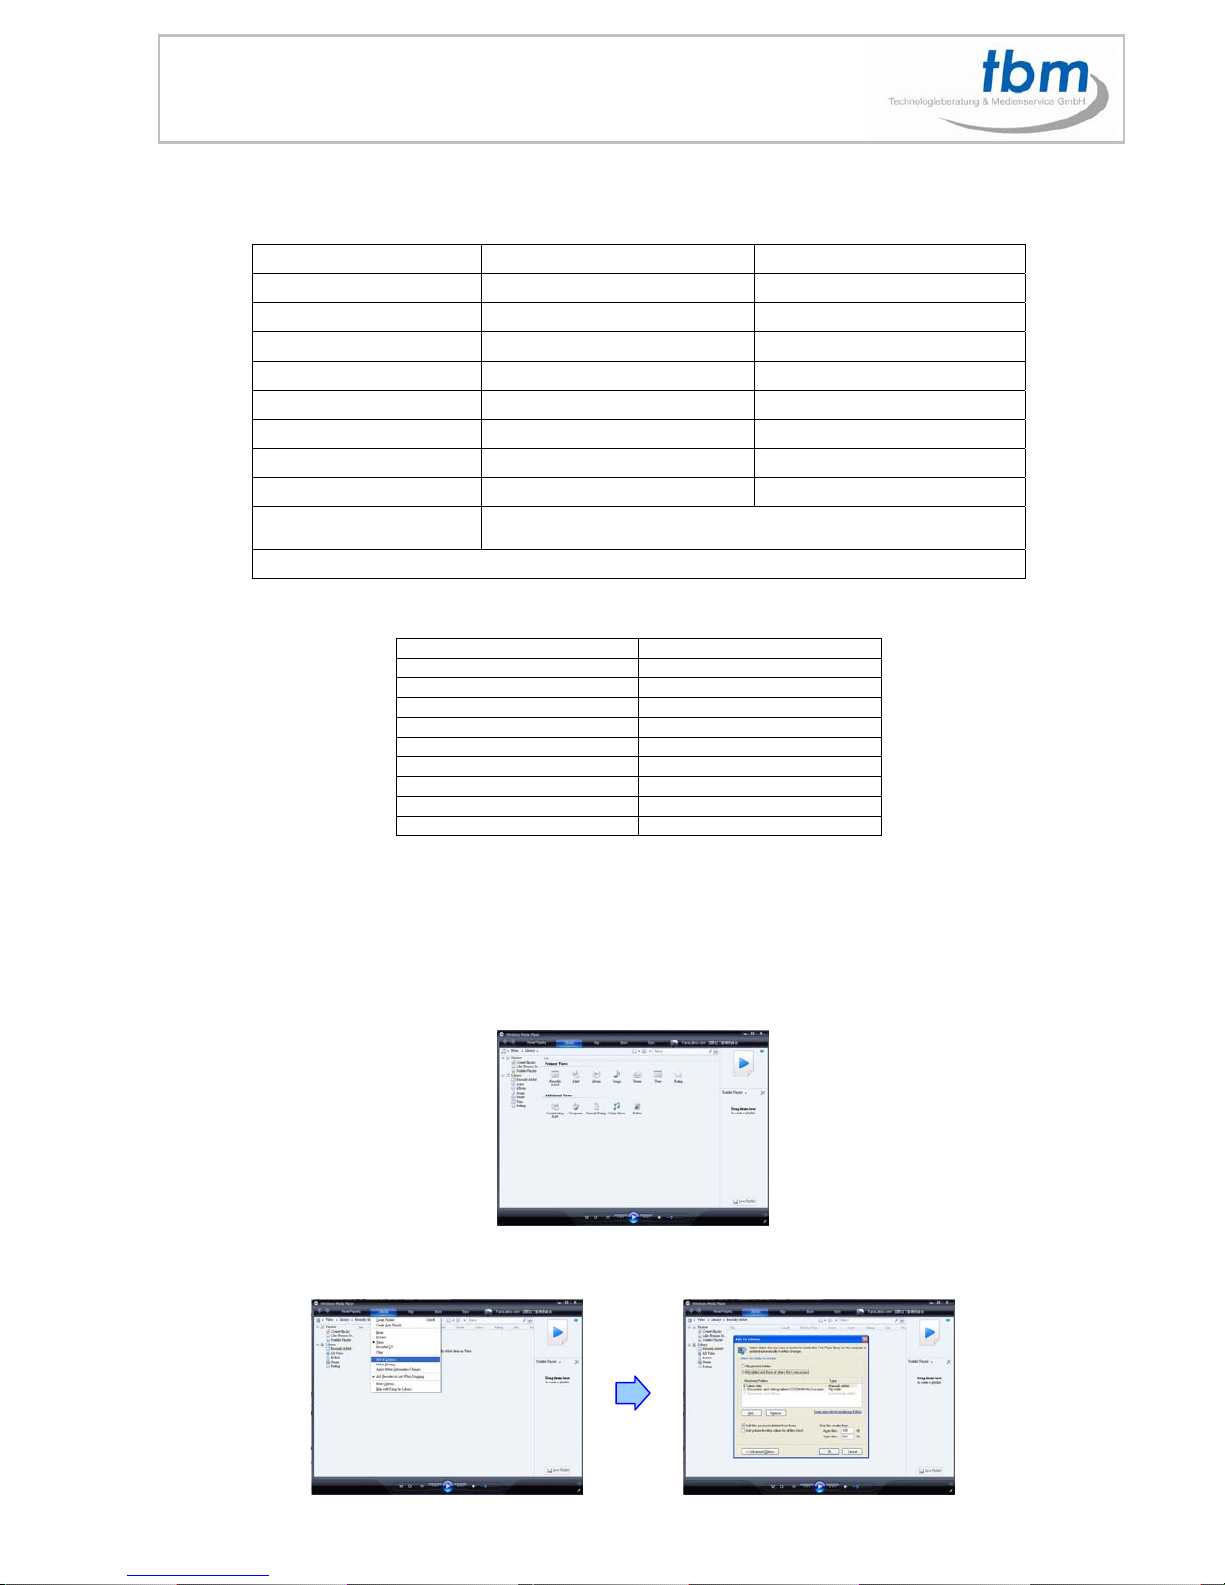
Step 2:Launch the Windows Media Player Version 11 and the window below will appear.
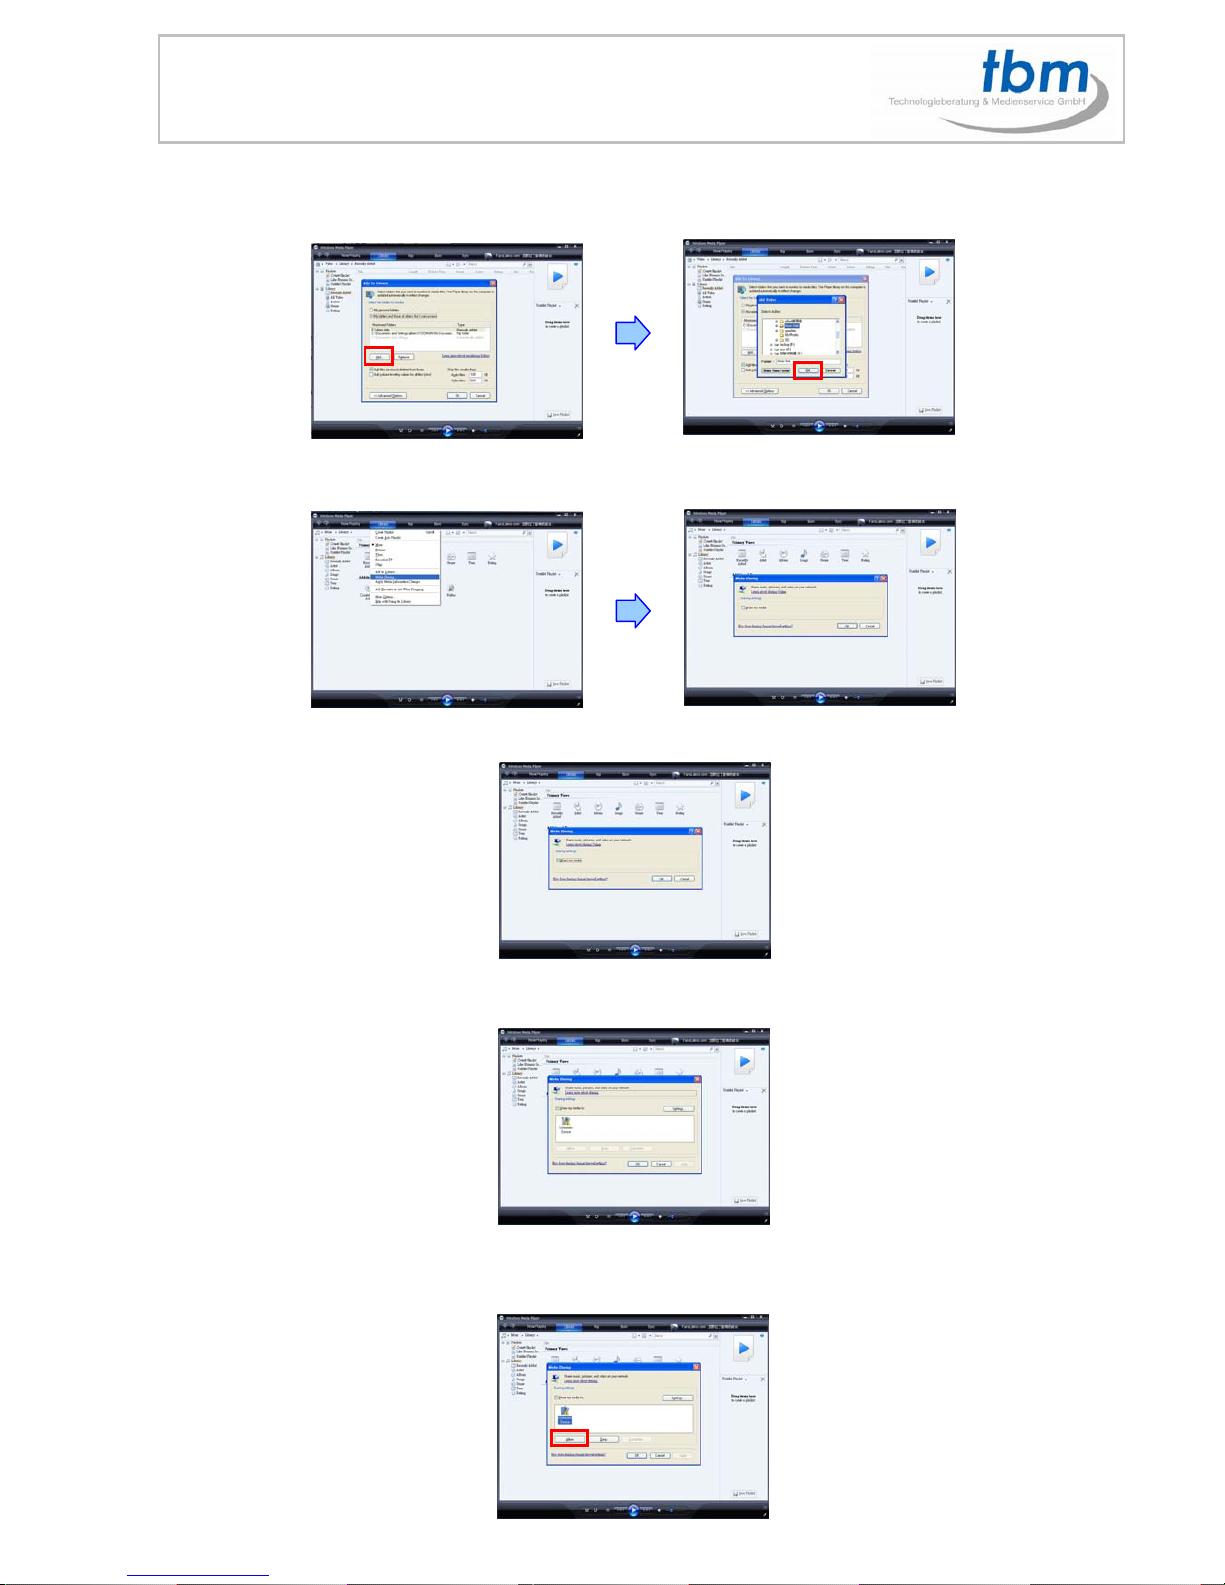
Step 3:Click the “Library” tab, and then click “Add to Library”.
Page 20
20
Step 4:Click “Add” and select the folder containing the media files you want to share, then click “OK”.
Step 5:Click the “Library” tab, and then click “Media Sharing”.
Step 6:Select the “Share my media”, and click “OK”.
Step 7:In the Media Sharing dialog box, select the “Share my media” check box.
Step 8:Confirm that the MPL027P is connected to the network. In the list of devices below the
“Share my media to” check box, select the device (MPL027P), and click “Allow” to share the media files.
Page 21
21
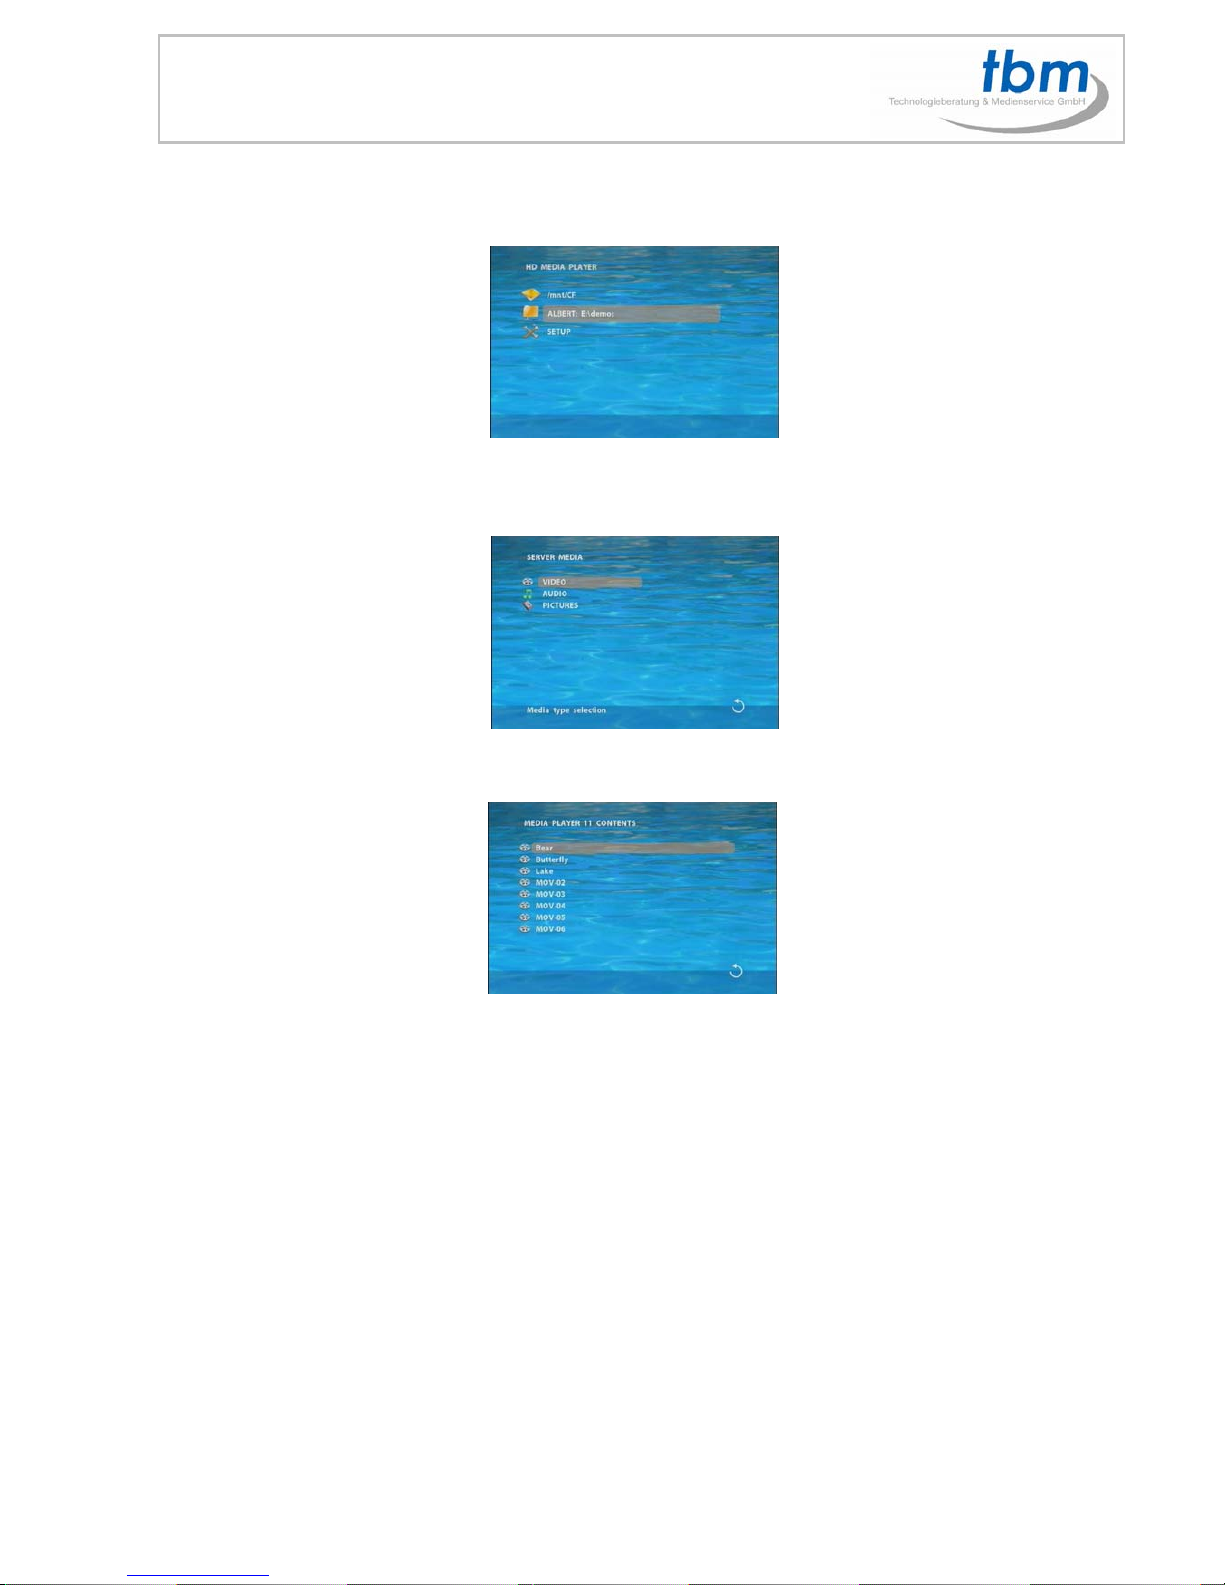
Step 9:The shared folder will appear on the screen of the MPL027P. Select the
folder and click the “ENTER” button on remote control to go into the folder.
Step 10:Please select the type of data (VIDEO/ AUDIO/ PICTURES) you want to play, and then
press the “ENTER” button on remote control.
Step 11:Select the file you want to play, and press “ENTER” or “PLAY” button on the remote
control to play the file.
NOTE
:
If the media files shared from PC are not listed on screen, restart your PC.
Page 22
22
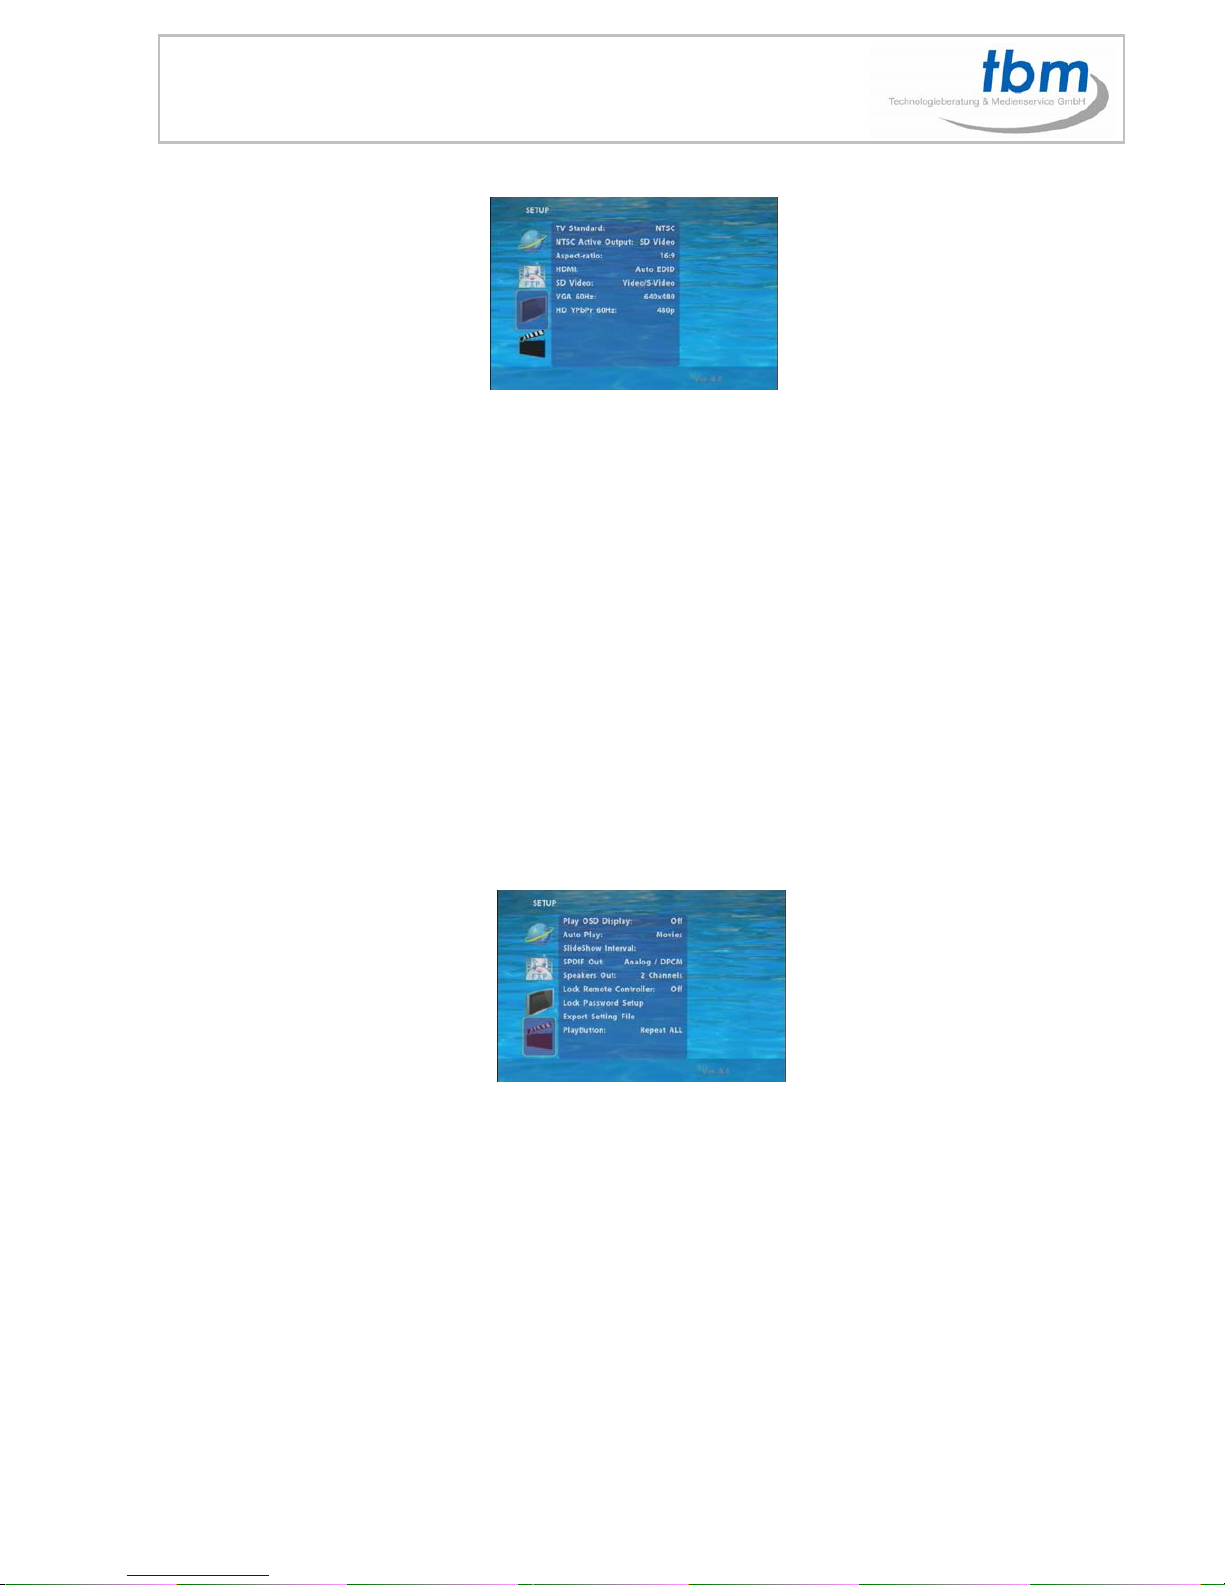
12.0 VIDEO SETUP
TV Standard: Select the output TV video format (NTSC / PAL).
NTSC Active Output:
- Select the output mode. (HDMI/ SD Video/ VGA/ HD Y.Pb.Pr)
- You can also press directly the “TV MODE” button on the remote control to select output mode.
Aspecl-ratio: Select TV mode 4:3 or 16:9.
HDMI: Select the HDMI output resolution among 480i / 480p/ 720p / 1080i/ 1080p.
Select the “Auto EDID”, the MPL027P will scan the display device connected and set the
correct resolution automatically.
SD Video: Select the SD output mode. (“Video/ S-Video” or “Y.Cb.Cr”)
VGA 60Hz: Select the VGA output resolution.
(640*480 / 800*600/ 1024*768/ 1280*1024/ 1360*768)
HD Y.Pb.Pr 60Hz: Select the Y.Pb.Pr output resolution among 480p / 720p / 1080i.
12.1 OTHER SETUP
Play OSD Display: Enable or disable the OSD display.
Auto Play
- Movies: Auto play movie files on the CF card after power on.
- Pictures: Auto play picture files on the CF card after power on (slideshow function).
- MultiLayer: Directly execute Multiple Display function after power on.
- Off: Turn off the Auto Play function.
SlideShow Interval: Set the time each photo is shown to 10, 15, 30 or 60 seconds.
Lock Remote Controller: Enable/ disable the auto key lock function. (The MPL027P will auto lock
when there is no further input for 1 minute.)
Page 23
23
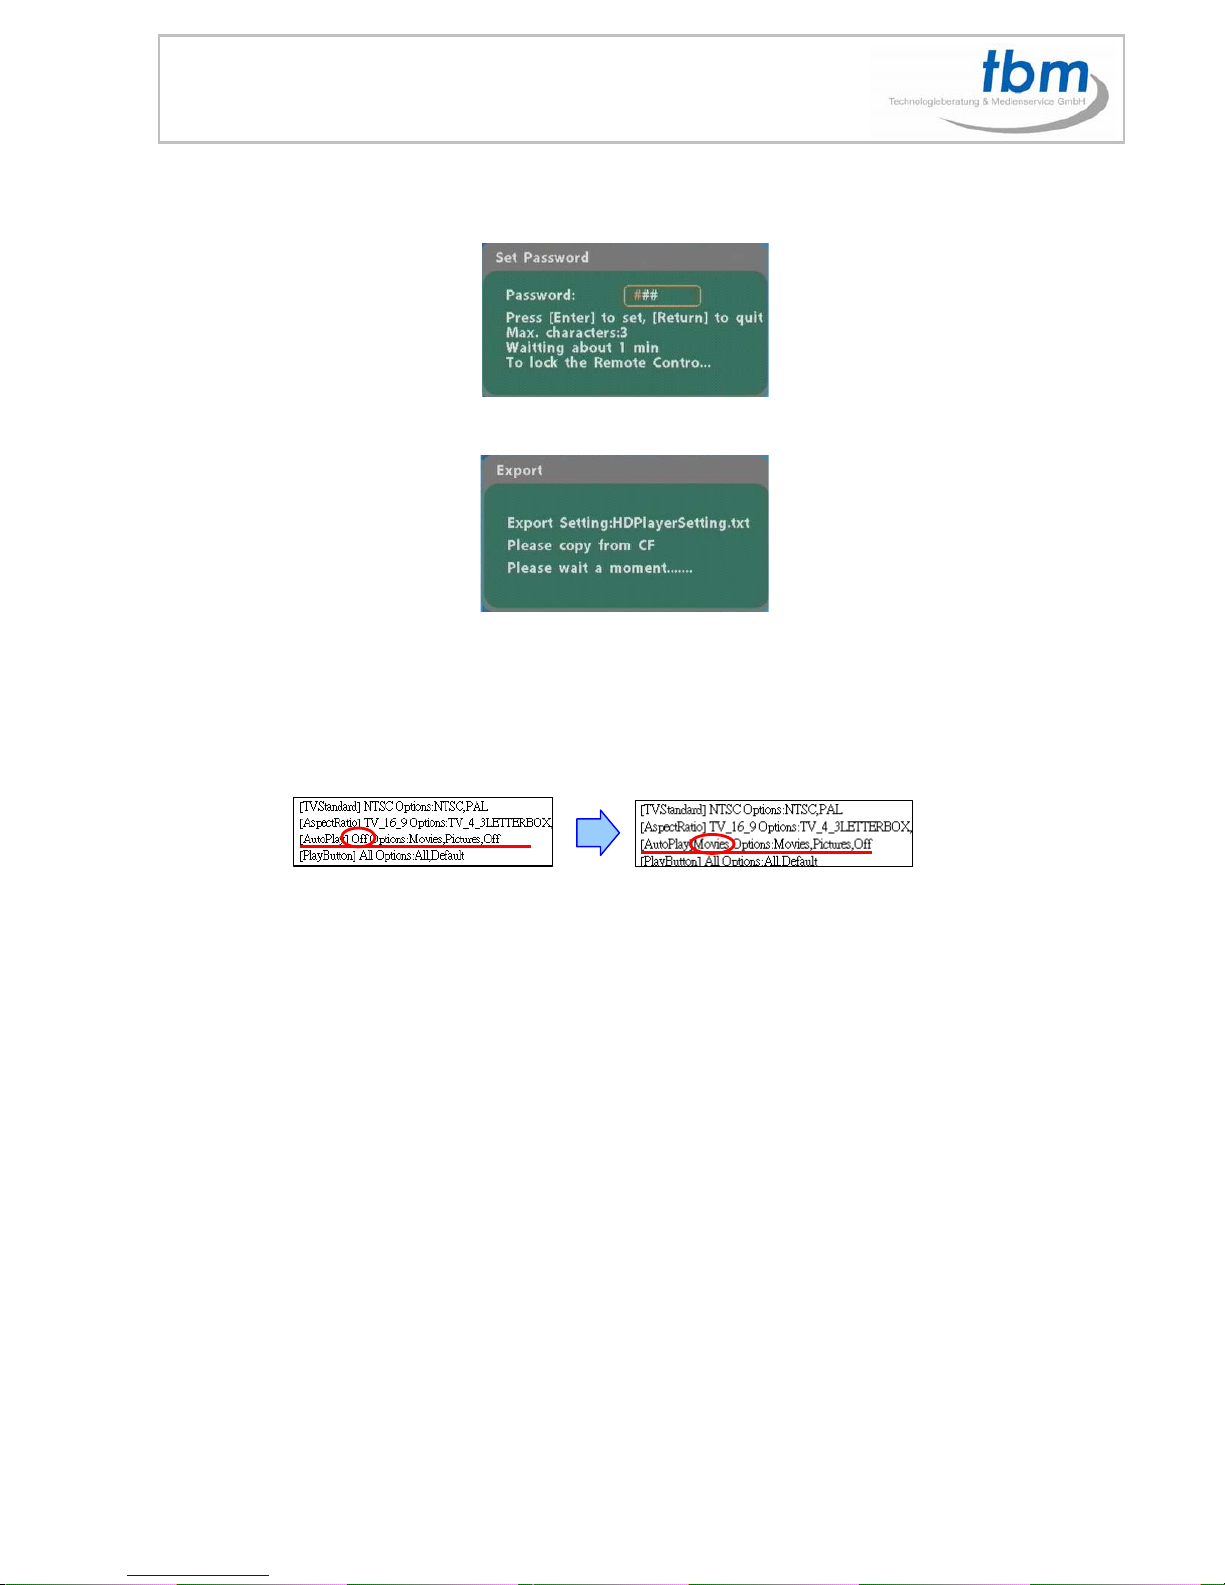
Lock Password Setup: Press the “Enter” button to open the “Set Password” window. Enter the
password with numeric buttons and press the “Enter” button to save the new password (The default
password: 123).
Export Setting File: Press the “Enter” button to export the configuration value to the CF card.
Copy the file “HDPlayerSetting.txt” on CF card to your PC. Use the “Wordpad” to open the file, and you
can see all the configuration value of MPL027P.You can modify directly the configuration value on your
PC.
Example. [AutoPlay] Off Options: Movies, Pictures, Off
The “Auto Play” function is turned off, you can change directly the mode to Movies or Pictures.
Copy the completed file “HDPlayerSetting.txt” from PC to CF card. Insert the CF card to the MPL027P,
the MPL027P will apply the new settings automatically.
Play Button: Only for used with play buttons. The MPL027P/PS supports two options (Repeat Default /
Repeat All) when the demo file finishes playing.
Repeat Default. The first i.e. 00.WMV will play in a loop until one button is pressed.
When that file is finished, automatically the default film starts in a loop.
Repeat All Standard setting to play all files of the CF Card in a permanent loop. When you press a button,
the selected -film start, when it is finished the next file will play.
Page 24
24
13.0 Using the MPL027
13.1 PLAY MEDIA FILES ON THE CF CARD
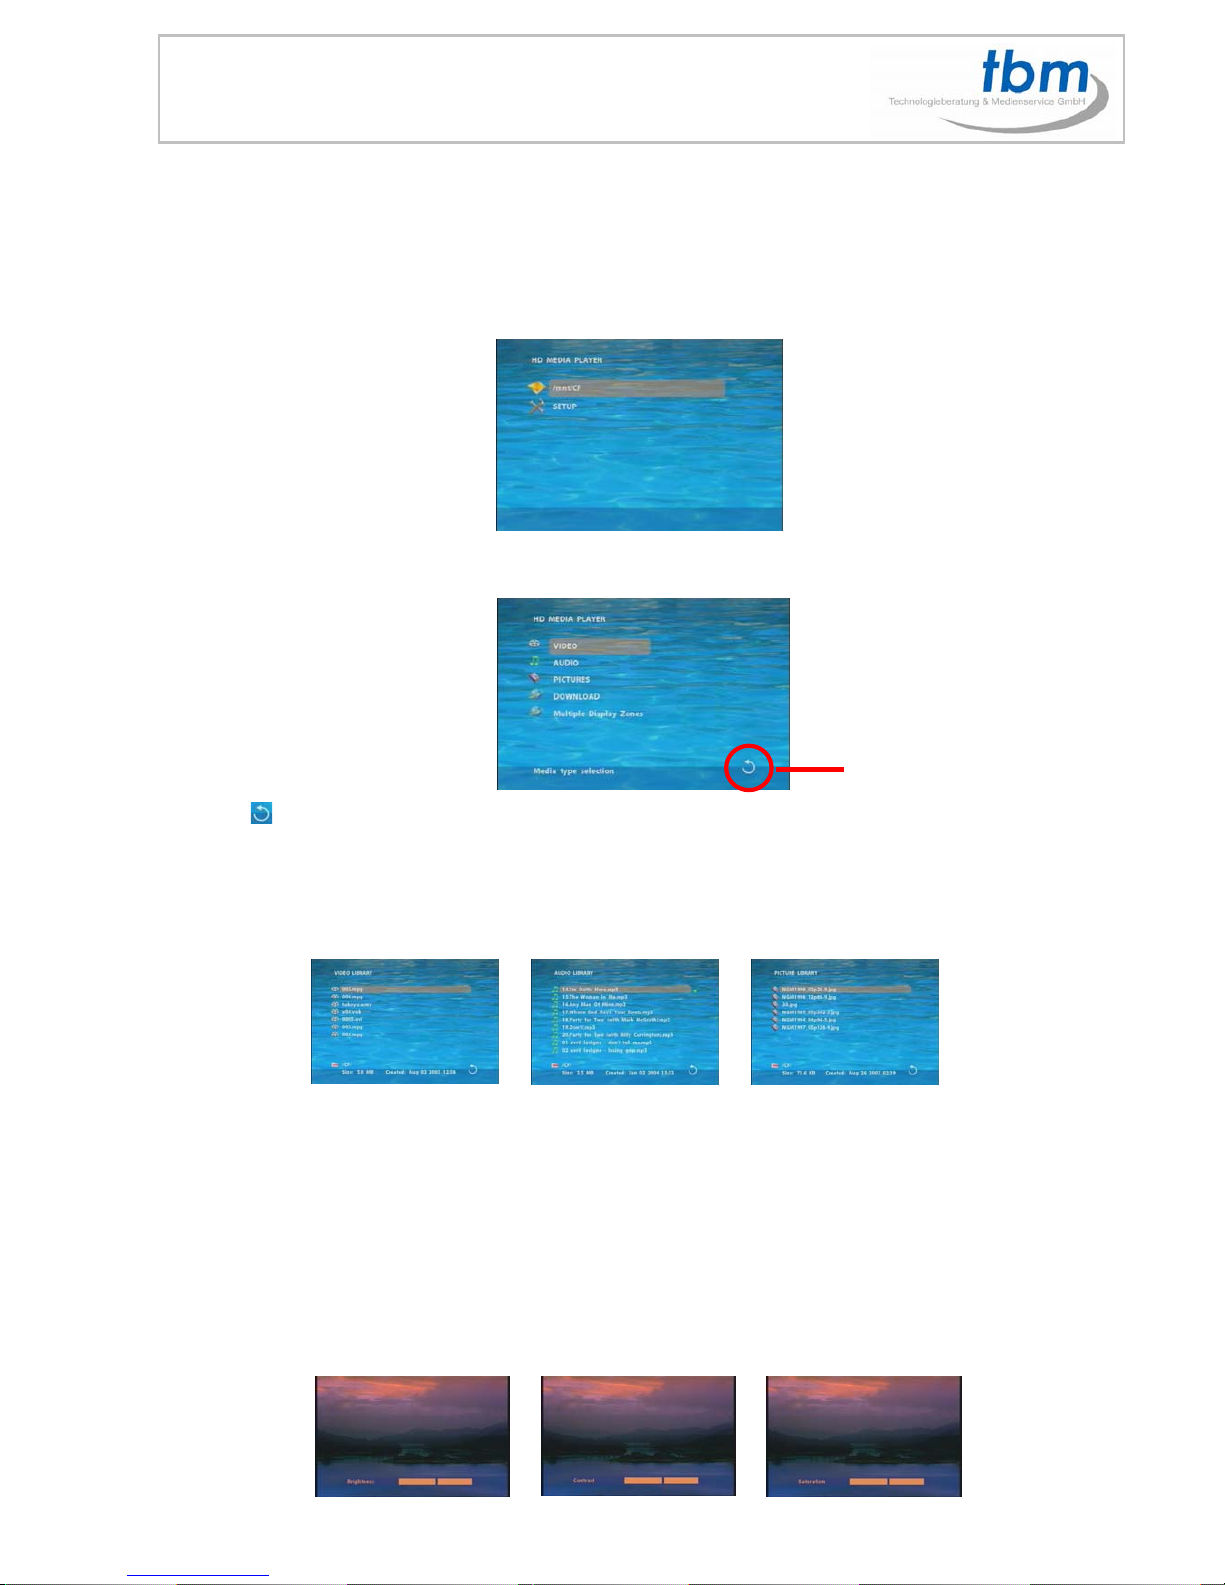
Step 1: Insert the CF card with media files (picture, music, movie), then turn on the
MPL027P and press the “ENTER” button on the remote control when “’mnt/CF” is highlighted to take you
into the CF card.
Step 2: Select the type of data (VIDEO/ AUDIO/ PICTURES) you want to play, and then press the
“ENTER” button on remote control to take you into the “VIDEO LIBRARY”, “AUDIO LIBRARY” or
“PICTURE LIBRARY”.
PS. If the symbol (return) appears on the screen, you can use “RETURN” button of
the remote control to go back one layer.
Step 3: Select the file you want to play, and press “ENTER” or “PLAY” button on the remote
control to play the file.
VIDEO LIBRARY AUDIO LIBRARY PICTURE LIBRARY
13.1.1 Using the Remote Control When Media File Is Playing
SETUP: Press the button to adjust the brightness, contrast or saturation while the movie or picture is
playing. With the “+ VOLUME –” button.
- First Press: Adjust the brightness.
- Second Press: Adjust the contrast.
- Third Press: Adjust the saturation.
Brightness Contrast Saturation
RETURN
Page 25
25
MUTE: Mute the sound while the movie or music is playing.
+ VOLUME -: Increase/ decrease the volume while the movie or music is playing.
SHUFFLE: Turn on/ off the shuffle function.
PREV / NEXT: Play the previous/ next file.
REPEAT: Select the repeat mode.
REV / FWD: Rewind/ forward movie or music file.
STOP: Stop playing, and go back one layer.
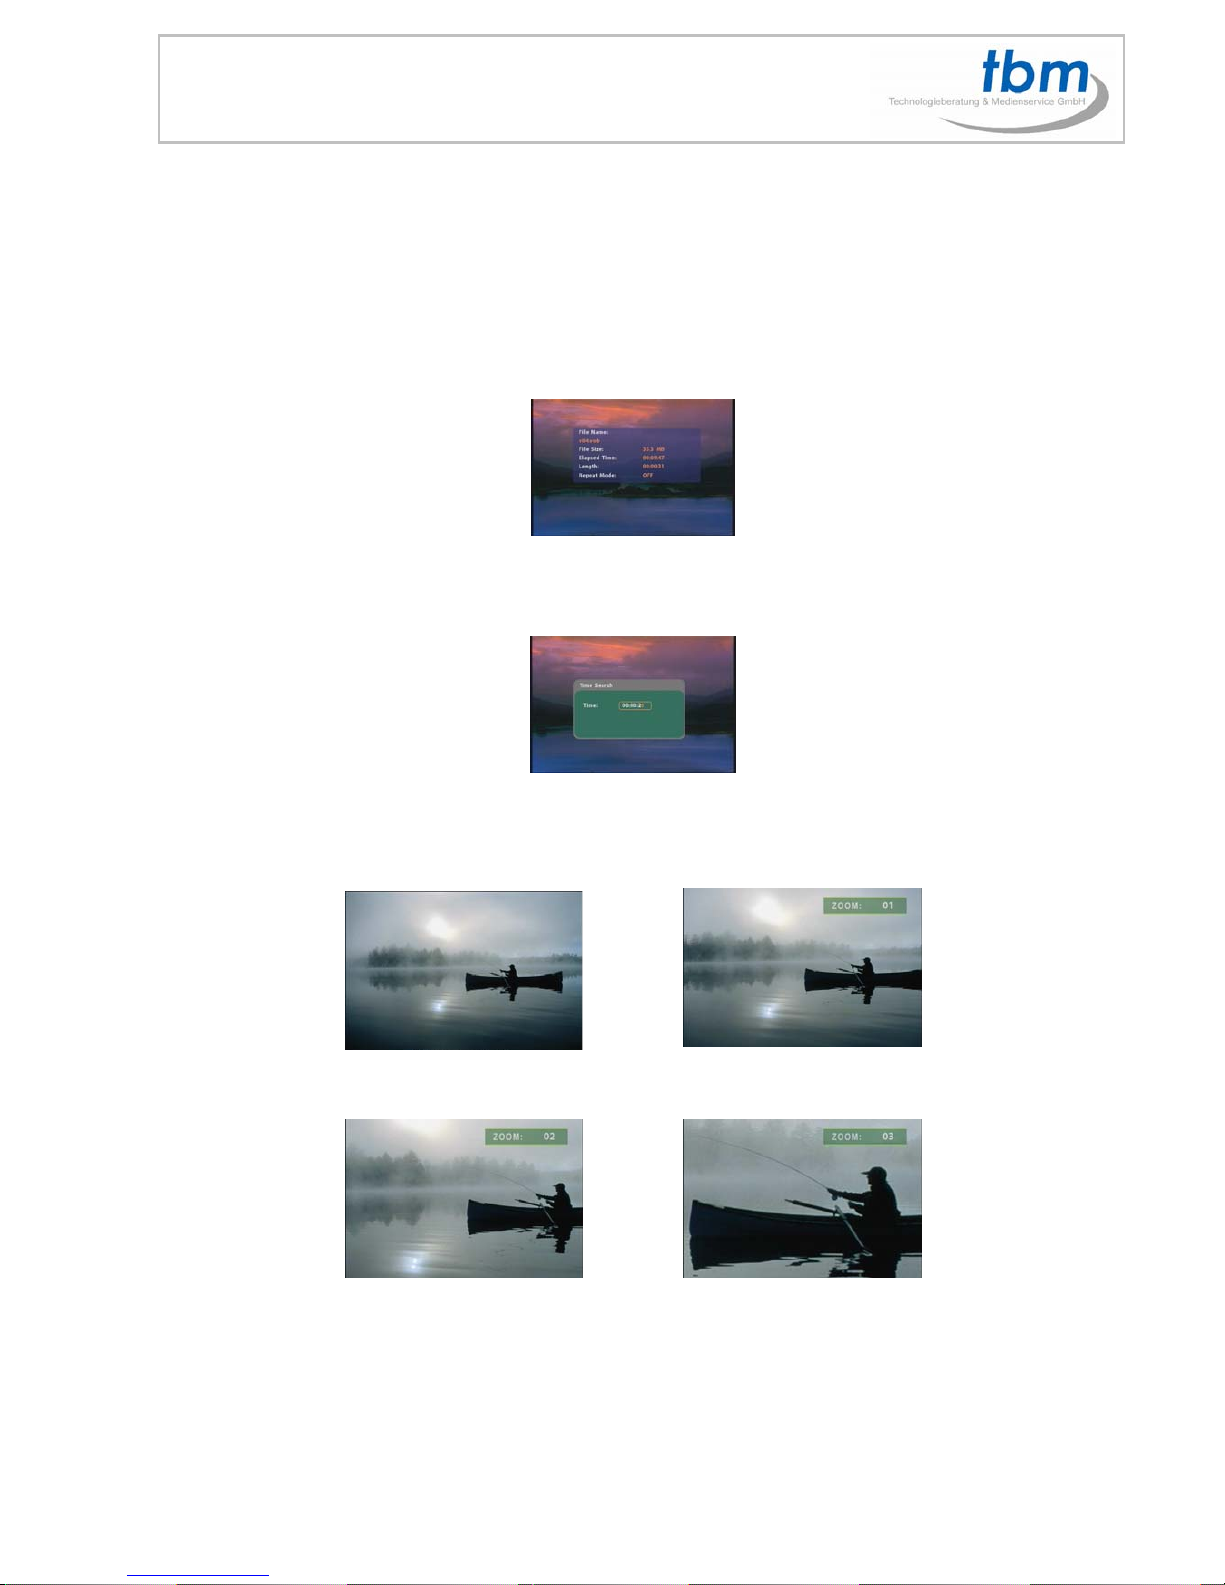
INFO: Display the file information.
File Information
SERACH: Search video (movie) timeframe.
Press the “SEARCH” button, and enter the initial time that you want to start at, then press the
“ENTER” button to play.
PAUSE/STEP: Pause the playback or play frame by frame.
ZOOM: Zoom in/ out on the movie or picture.
Original Size First Press:ZOOM 01
Second Press: ZOOM 02 Third Press: ZOOM 03
Page 26
26
14.0 ONLY MPL027PS / PT
14.1.MPL027PS / PT SCHEDULE FUNCTION
NOTE: The “NTP Server” or “Local Time” must be set before using the Schedule Function.
(refer to 9.3) The Schedule Function is ONLY for Video
14.2 INSTALL THE SCHEDULE SOFTWARE
Execute “setup.exe” to install the Schedule software in the CD driver, and finish the installation procedure
in accordance with the instructions.
14.3 SET UP THE SCHEDULE SOFTWARE
Execute the program “ Display” to open the “ Schedule Generator” window on your PC.
<Start> → <Programs> → < Display> → < Schedule Generator >
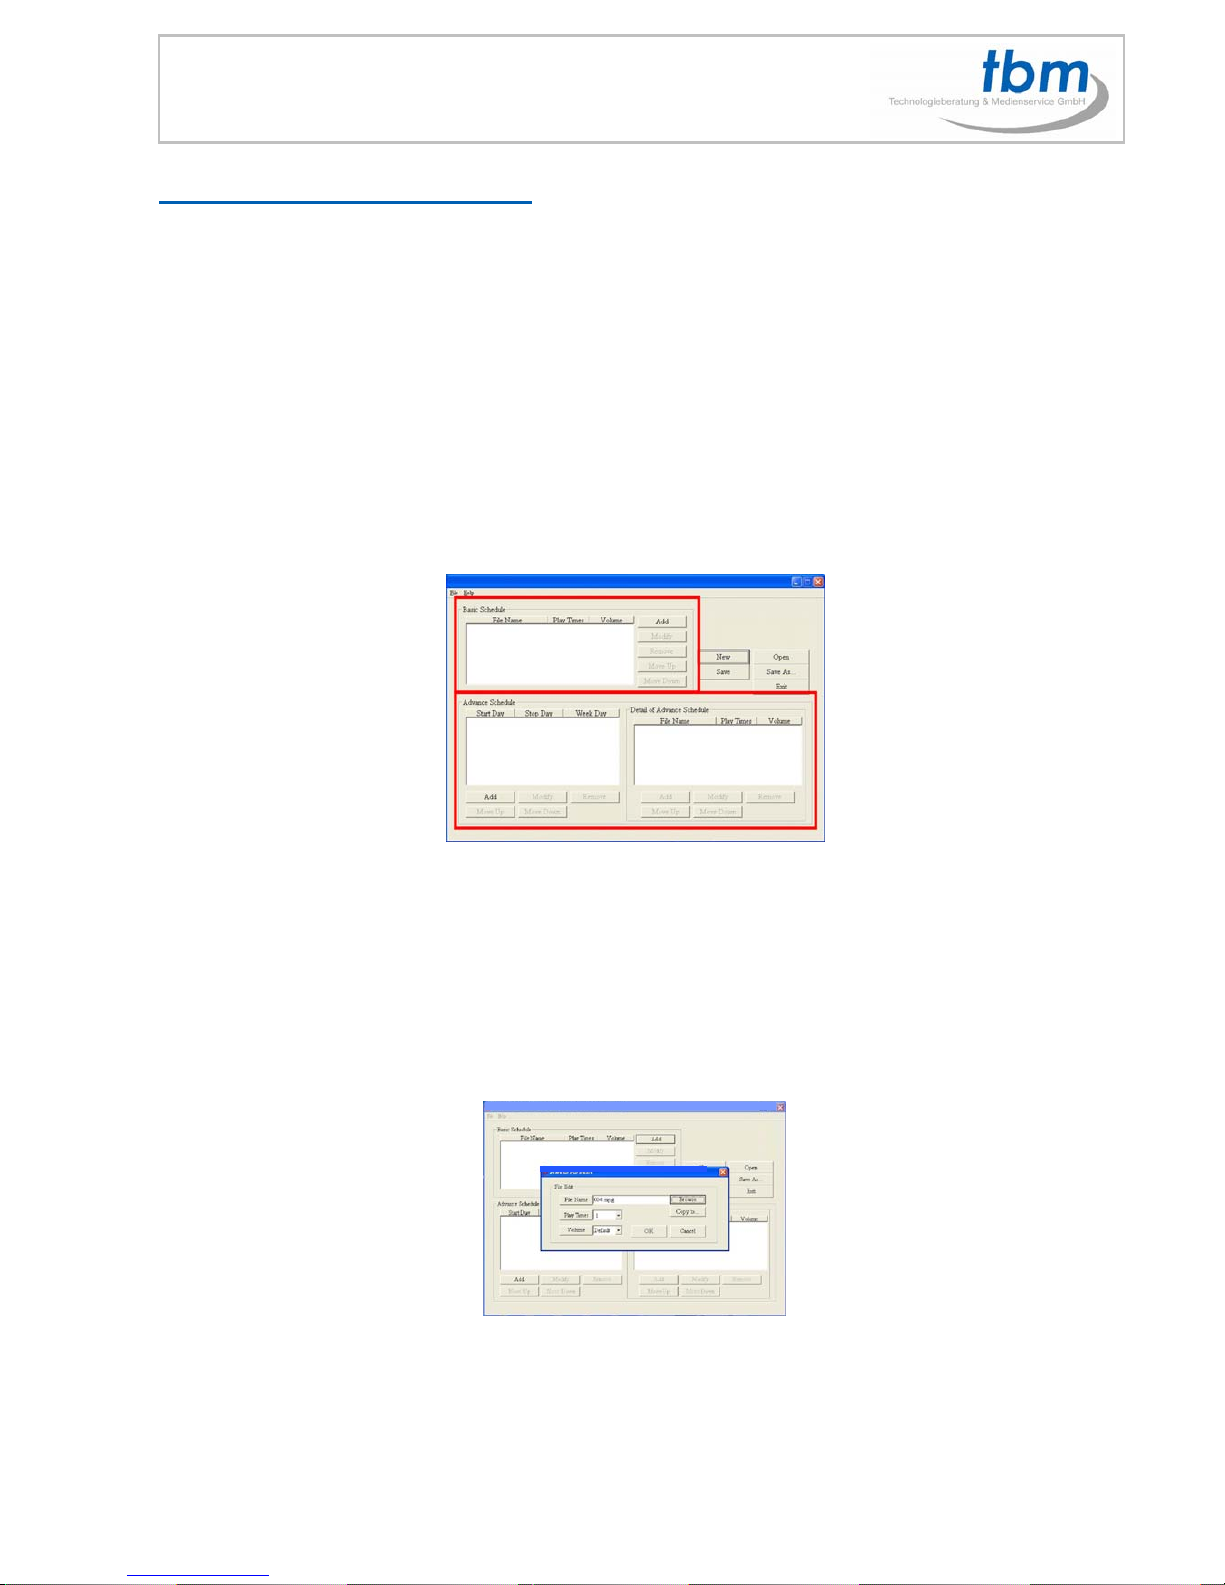
There are two parts: “Basic Schedule” and “Advance Schedule” in the window.
14.4 Basic Schedule
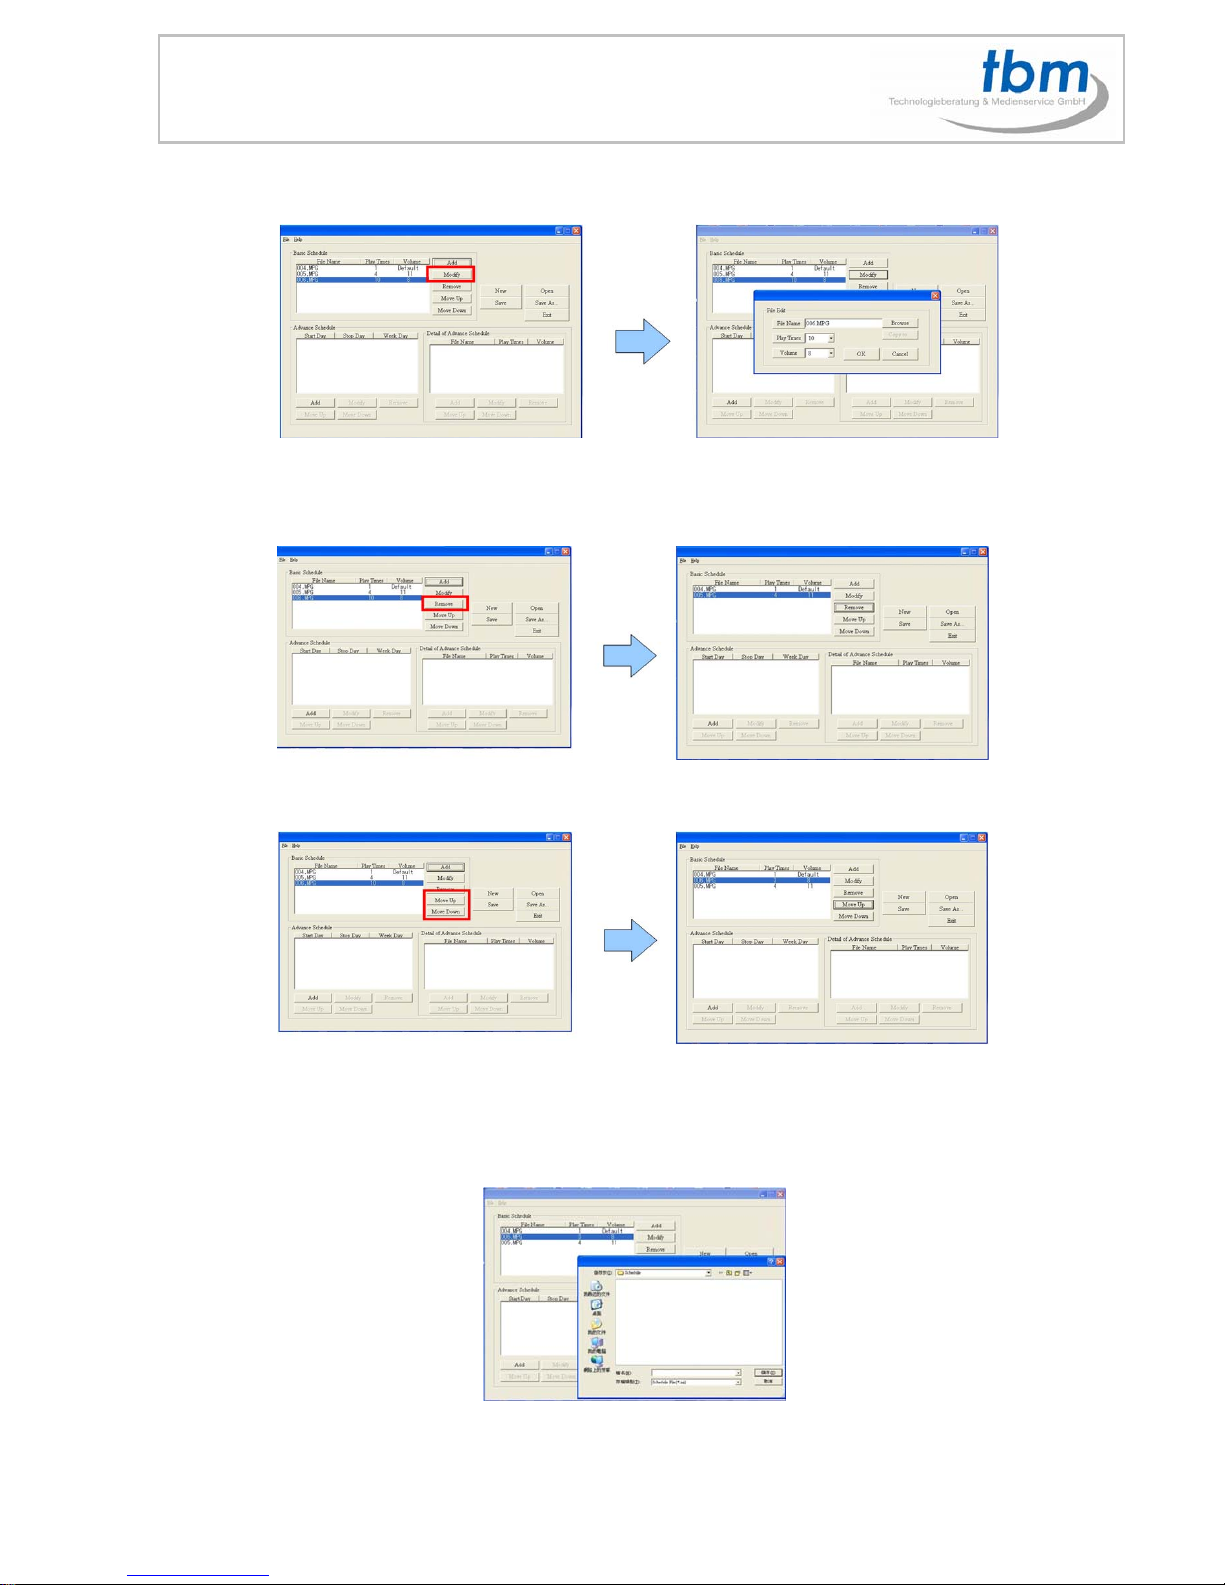
In the “Basic Schedule” mode, you can select files that you want to play and set up the volume and the
play times of each file.
Add:Click this button to add a file. The following diagram appears:
z Click the “Browser” button to search for files that you want to add. You can also set up the “Play
Times” and “Volume” of the file in the window. Click the “OK” button to complete the setup.
z Click the “Add” button again to add other file.
z COPY Function:Click the “Copy to…” button to copy directly the added file to the memory card.
Page 27
27
Modify:Click this button to modify the file in the list.
z Select the file that you want to modify in the list, and press the “Modify” button.
Remove:Click this button to remove the file from the list.
z Select the file that you want to remove from the list, and press the “Remove” button to delete.
Move Up / Move Down:Click these buttons to change the order that the files are played.
After the setup, press the “SAVE” button, and a pop-up window will appear. Select the path, then click
the “SAVE” button to save your setup.
NOTE:Do not rename the file (schedule.ini), otherwise theMPL027 PS/PT will not be able to read the file.
Page 28
28
14.5 Advance Schedule
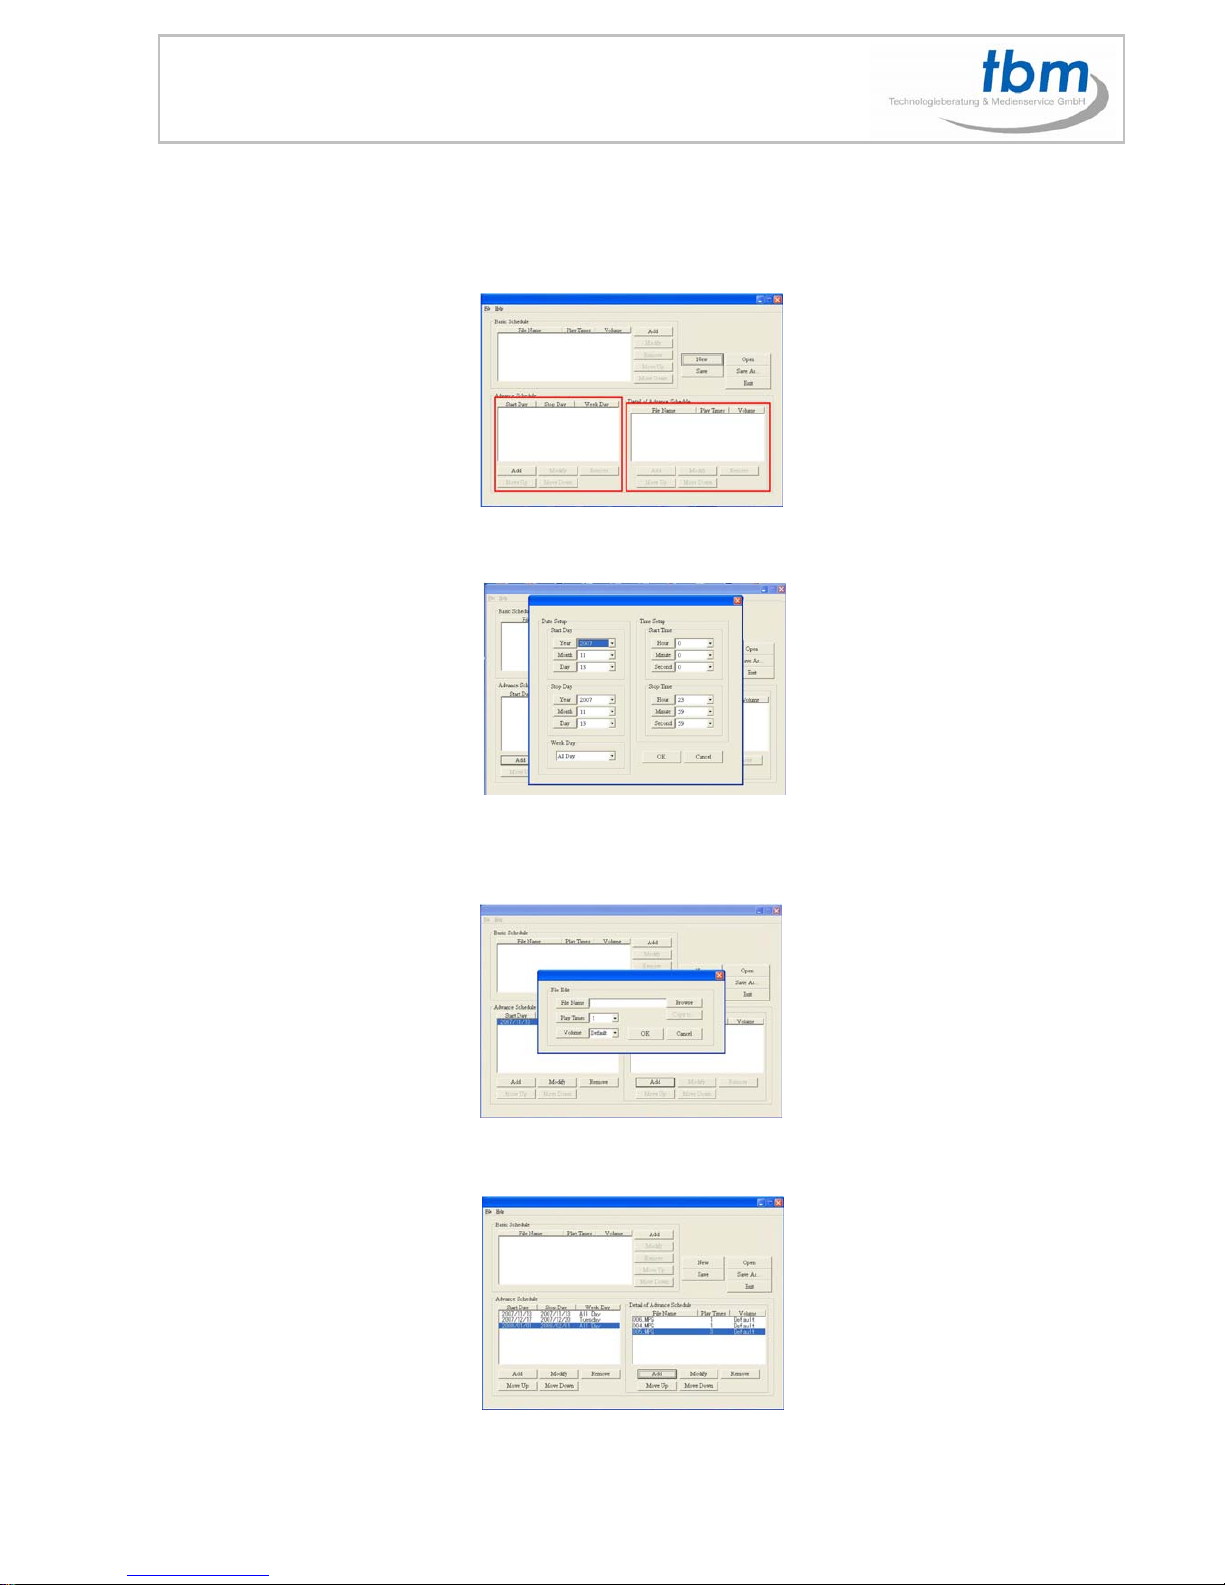
In the “Advance Schedule” mode, you can select files that you want to play, and can also set up the
volume, the play times, and the initial and end time of each file. There are “Time Setup “ and “File Setup”
in the “Advance Schedule”.
Step 1:Click the “Add” button in the “Time Setup” section to open the “Advance Schedule Editor” window.
Set up the Start and Stop Date, Start and Stop Time and the Week Day, then click “OK” to quit the window.
Step 2:Click the “Add” button in the “File Setup” section to open the “Schedule File Editor” window. Click
the “Browser” button to select a file that you want to play. You can also set up the “Play Times” and
“Volume” of the file in the window. Click the “OK” button to complete the setup.
Step 3:Repeat the steps 1〜2 to add other files.
Step 4:After finishing all setup, press the “SAVE” button, and a pop-up window will appear. Select the
path, then click the “SAVE” button to save.
Page 29
29
NOTE:Do not rename the file (schedule.ini), otherwise theMPL027 PS/ PT will not be able to read the file.
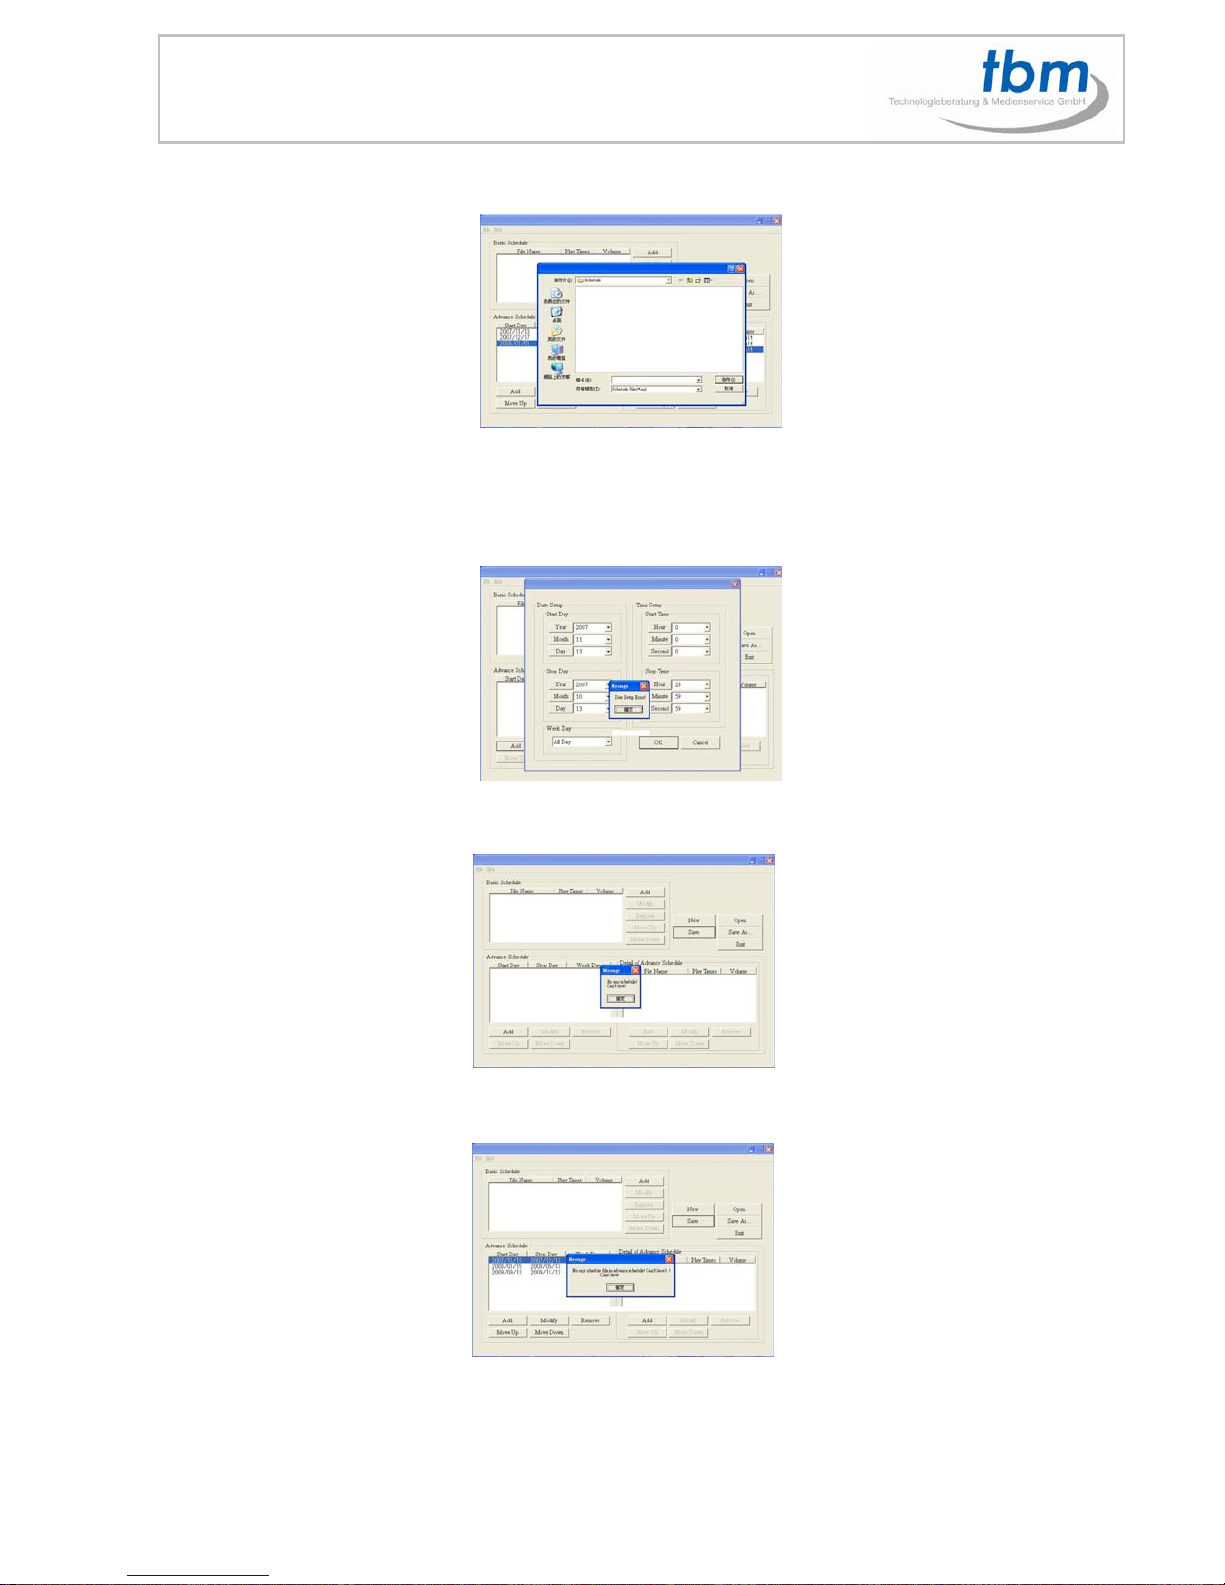
14.6 Explanation of the Warning Message
No any schedule!Can’t Save!
There is no schedule file in the “Basic Schedule” or “Advance Schedule” can be saved. Please add and
edit a new schedule file first.
Date Setup Error!
There are some errors in the “Advance Schedule”. Check the date/ time of the schedule for conflict or
error.
No any schedule file in advance schedule!Can’t Save!
There is no schedule file in the advance schedule. Please add files that you want to play in the advance
schedule.
14.7 APPLY THE SCHEDULE ON THE MPL027PS / PT
Put the “schedule.ini” file and the associated media files on the memory card, and insert the memory card
to the MPL027PS / PT. The MPL027PS / PT will auto play the files at the designated time.
(MPL027PT Movies only)
Page 30
30
15. MPL027PT MULTIPLE DISPLAY ZONES
15.1 Setup
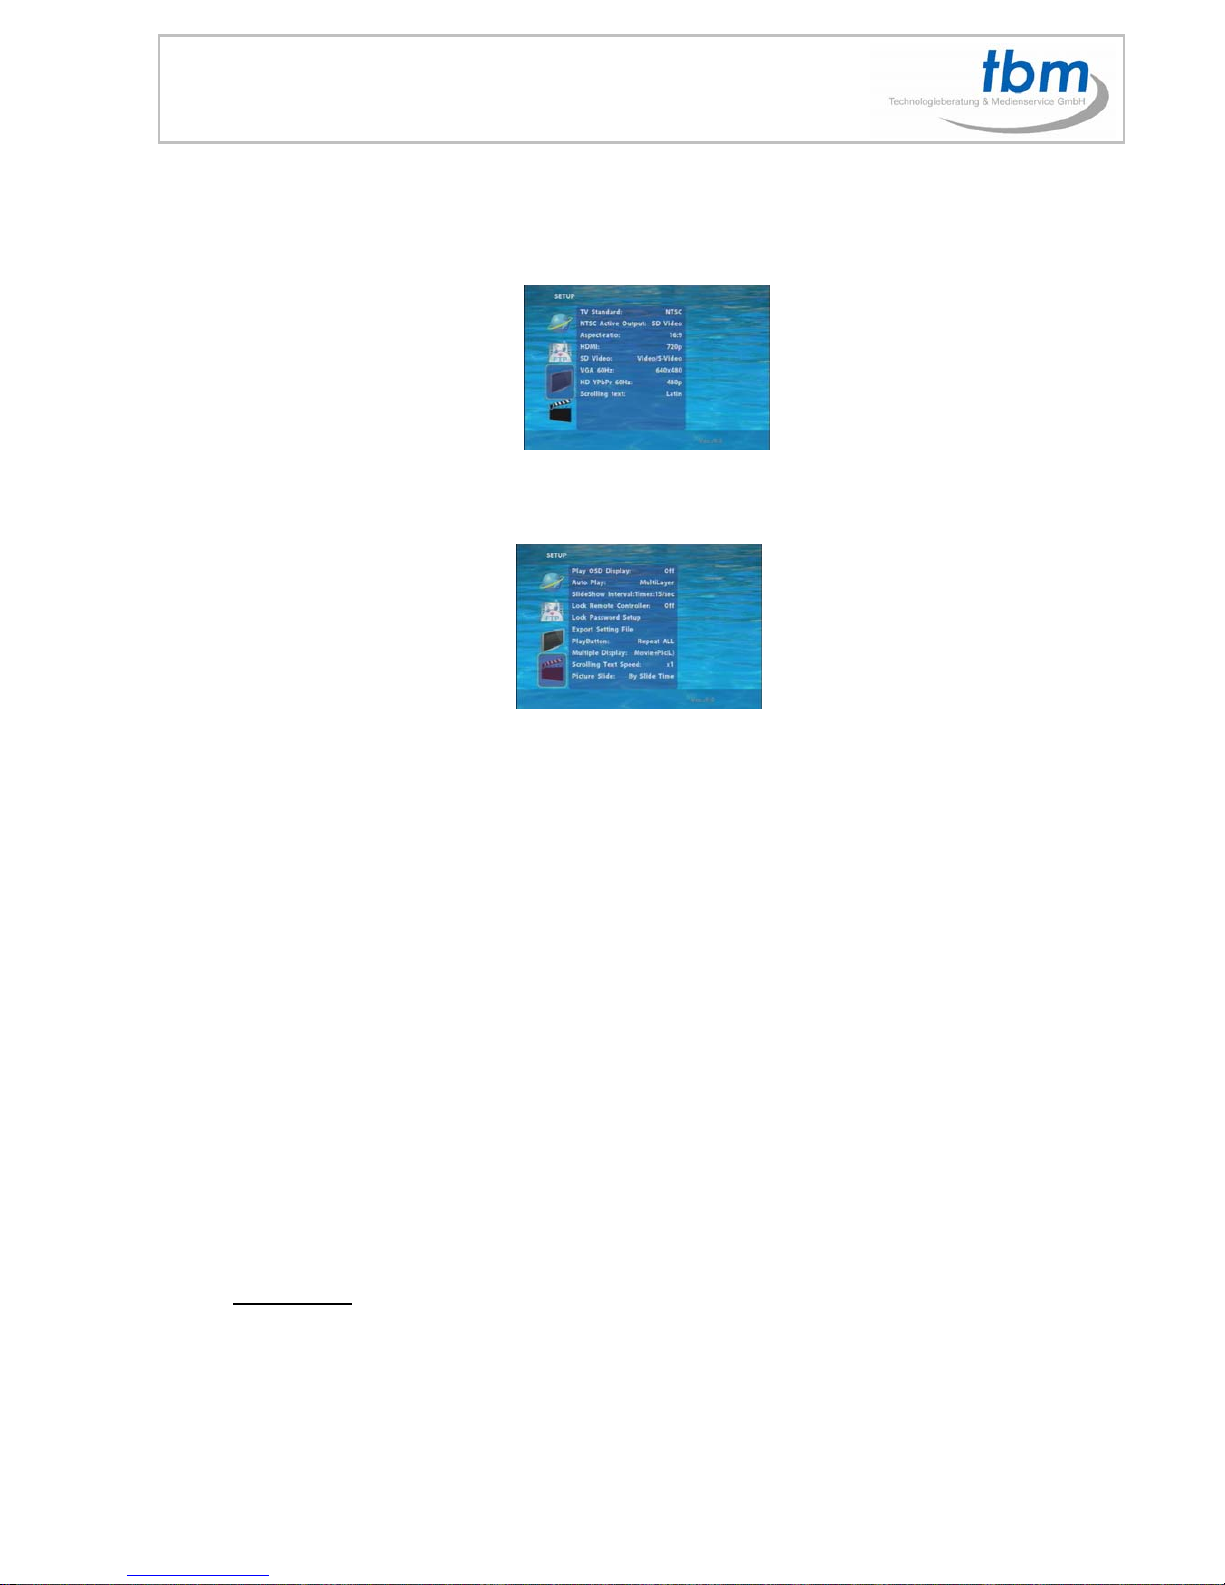
Scrolling text: Select the language of scrolling text: Latin (English)/ Japanese.
Auto Play
- MultiLayer: Directly execute Multiple Display function after power on.
Multiple Display:
- Movie: Display movies with scrolling text.
- Movie + PIC (L): Display movies and pictures with scrolling text, and the pictures are on the left.
- Movie + PIC (R): Display movies and pictures with scrolling text, and the pictures are on the right.
Scrolling Text Speed: Select the display speed of the scrolling text.
Picture Slide: Set the mode of picture slideshow (By Slide Time/ Match Video).
Step 1: Put movies, pictures (only supports PNG format) and text file on CF card.
- Movies: MPEG 2/4/HD, WMV,AVI, Divix,Xvid
- Pictures: PNG Format 150 x 400 pixel
- Scrolling Text: .txt File
Picture Files
If you select the “By Slide Time” item of the picture slide mode; please name the picture files 0.png ~
9.png.
If you select the “Match Video” item of the picture slide mode, the file name of the picture must be the
same of the corresponding movie file.
Text File
Use the “Notepad” to create a text file on your PC. Enter the message that you want to display and named
the file “message.txt
”.
Page 31
31
Step 2: Select the Multiple Display Zones item to display the movies and pictures with scrolling text
immediately.
Page 32
32
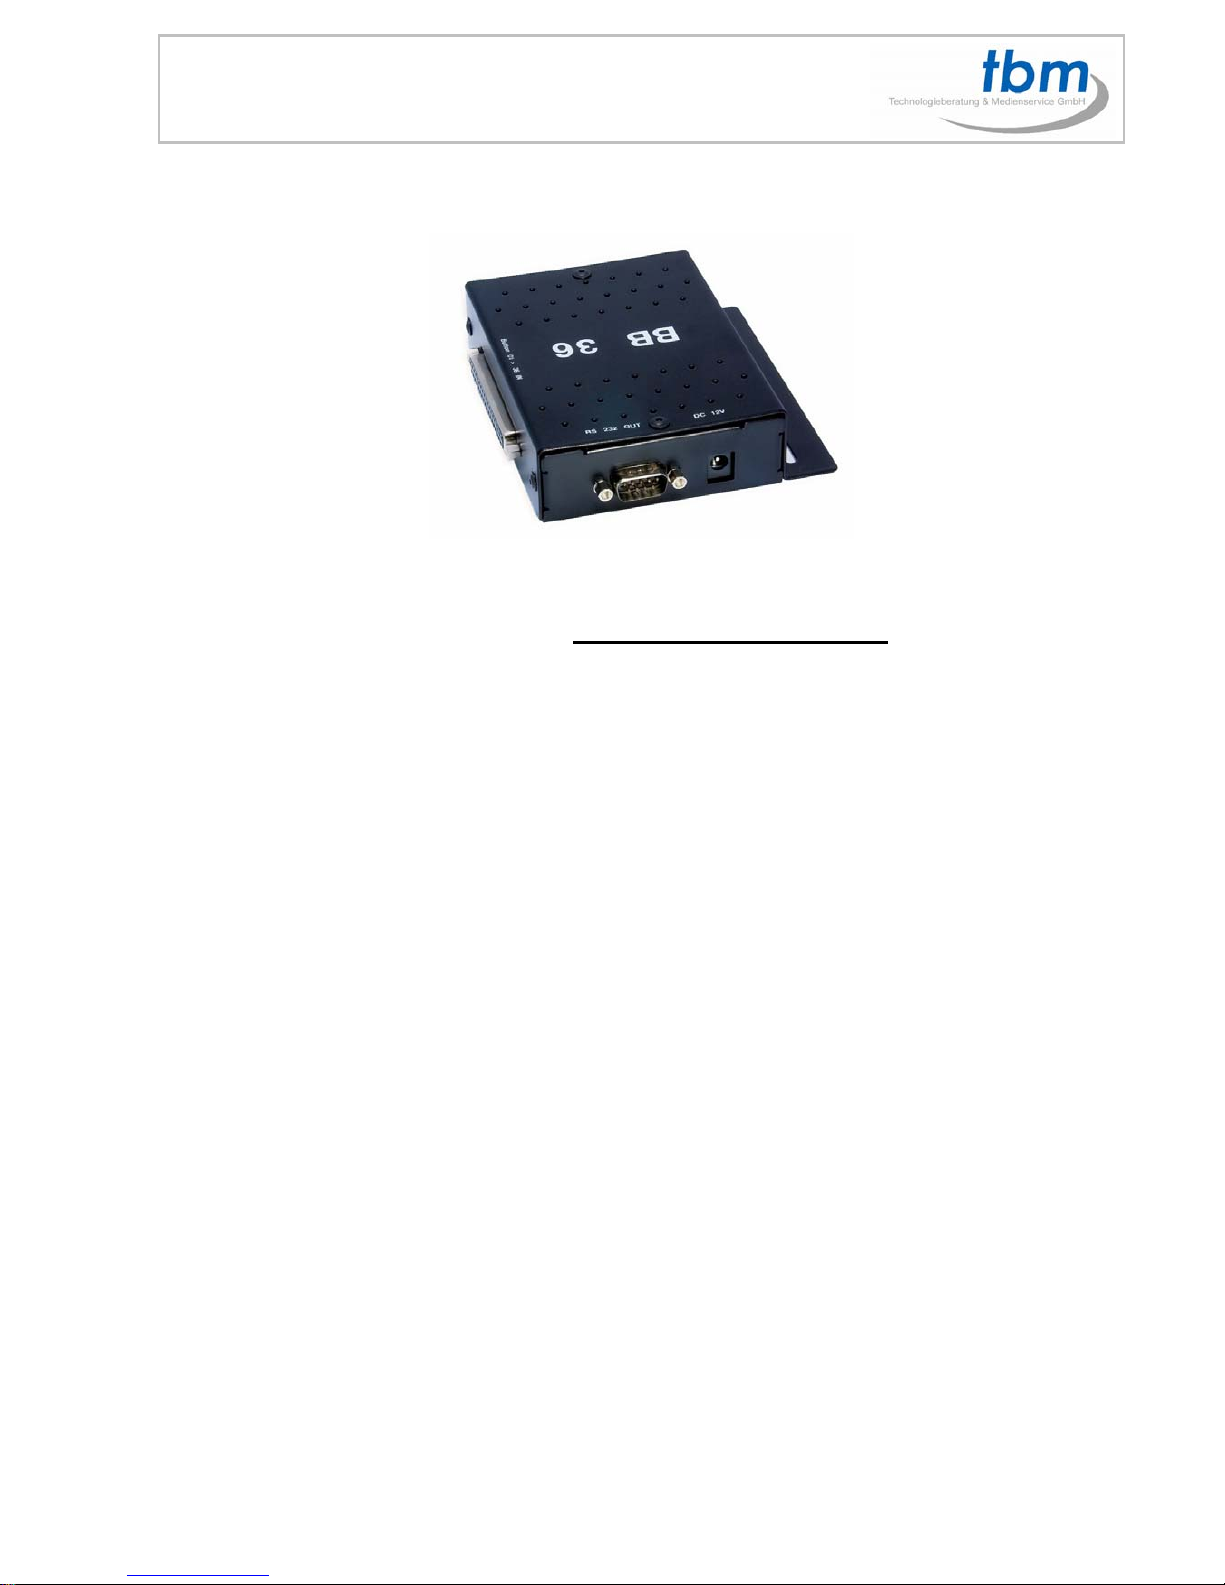
16.0 PLAY-BUTTON BOX (BB36 Button Box)
Play the Media File By the Play-Button (supports up to 36 play buttons)
Step 1:Put >min. 3 max. 37 demo files on CF card. (1 default file and 36 demo files)
NOTE:The files are sorted by filename in ascending order alphanumerically (numbers < upper case
letters < lowercase letter). Each button is mapped to a file by this order.
For Example:
00.wmv Defaulf
01.wmv Button 1
02.mpg Button 2
---------“ “ -----------
036.wmv Button 36
Step 2:Insert the CF card to the MPL027P/PS, and the MPL027P/PS will play the default file
automatically while powered on.
Step 3:Press one of the buttons 1-36 to play the corresponding demo file.
Step 4:The MPL027P supports two options (Repeat Default / Repeat All) when the demo file finishes
playing.
The functions can be set in the setup menu. (Other Setup → Play Button)
- Repeat Default:MPL027P will automatically play the default file when the demo
file finishes playing.
Repeat All:MPL027P will automatically play all the demo files when the demo file
finishes playing.
Page 33
33
17.0 PIR SENSOR
(PIR)
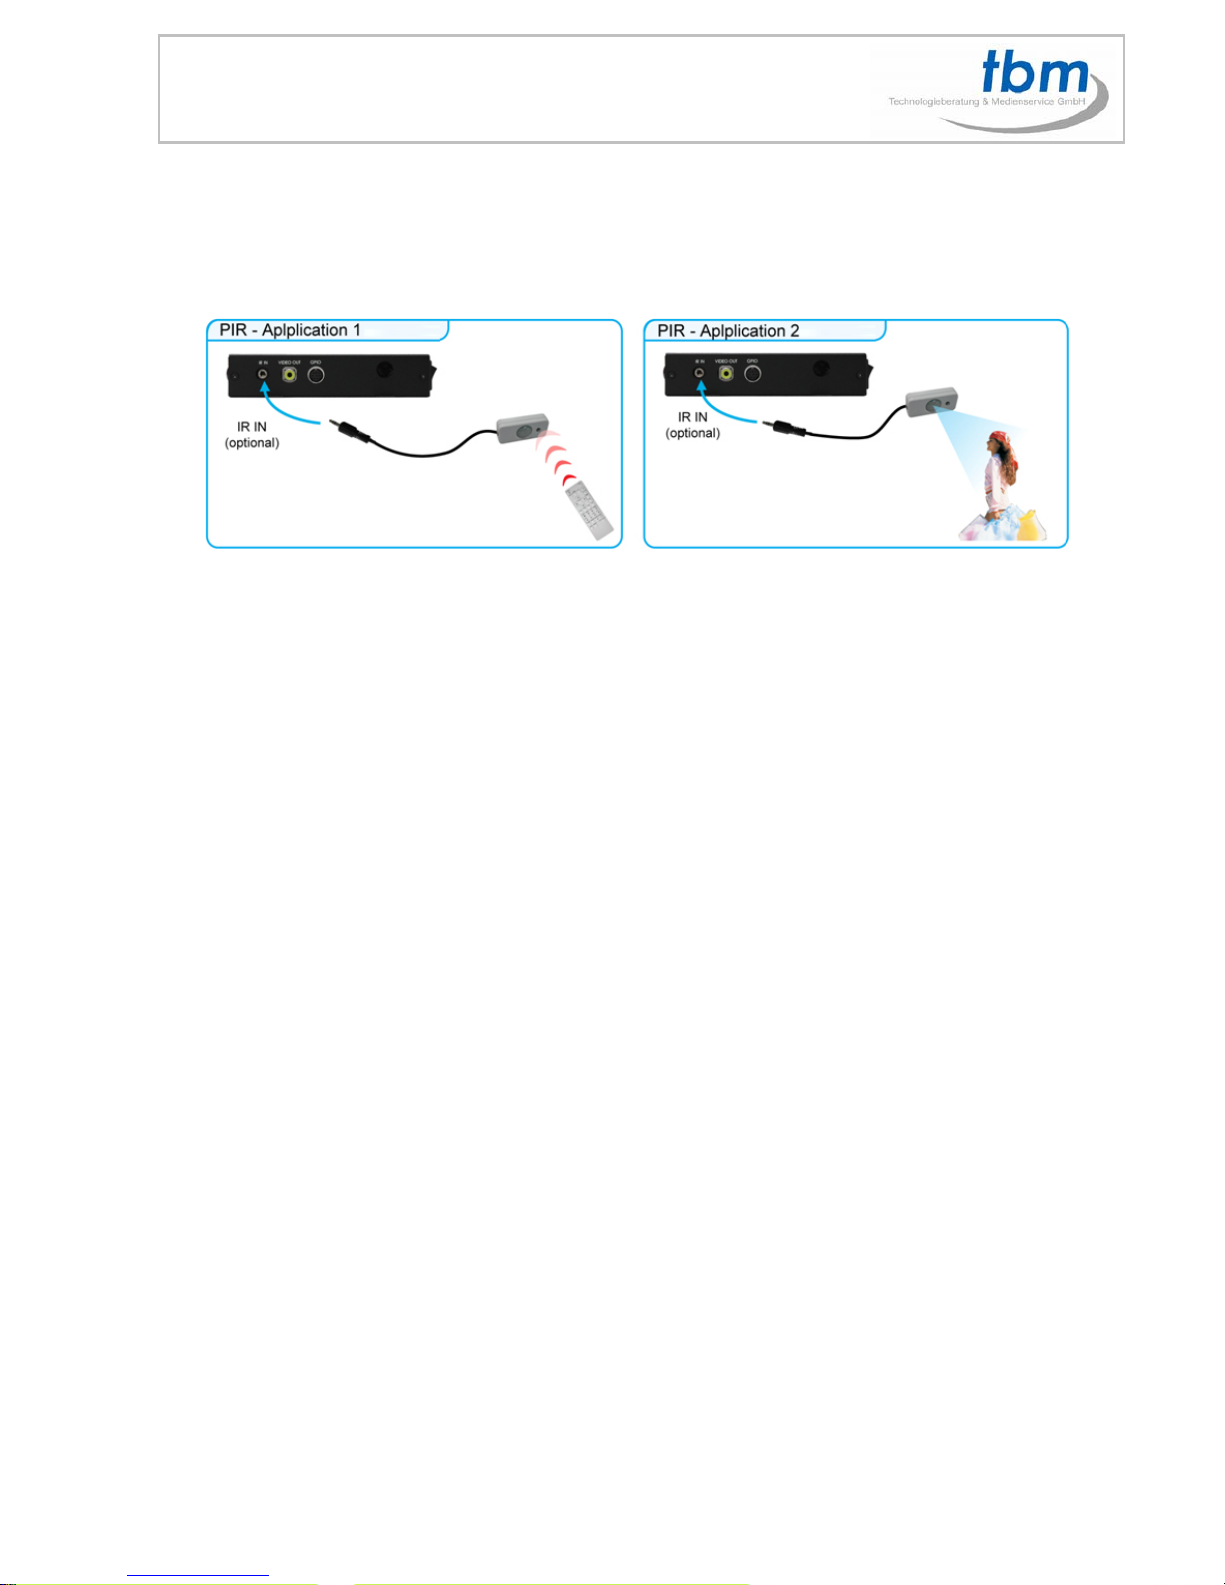
Application 1: The PIR is an external remote control receiver.
Application 2: The PIR is a motion detector.
17.1 Using the PIR Sensor
Step 1:Insert the CF card to the MPL027P, and the MPL027P will play the default file automatically while
powered on.
Step 2:After sensing approaching subjects, the MPL027P will play the first demo file.
#
Step 3:The MPL027P supports two options (Repeat Default / Repeat All) when the demo file finishes
playing. The functions can be set in the setup menu. (Other Setup → Play Button)
- Repeat Default:MPL027P will automatically play the default file when the demo file finishes playing.
- Repeat All:MPL027P will automatically play all the demo files when the demo file finishes playing.
 Loading...