

Page 1
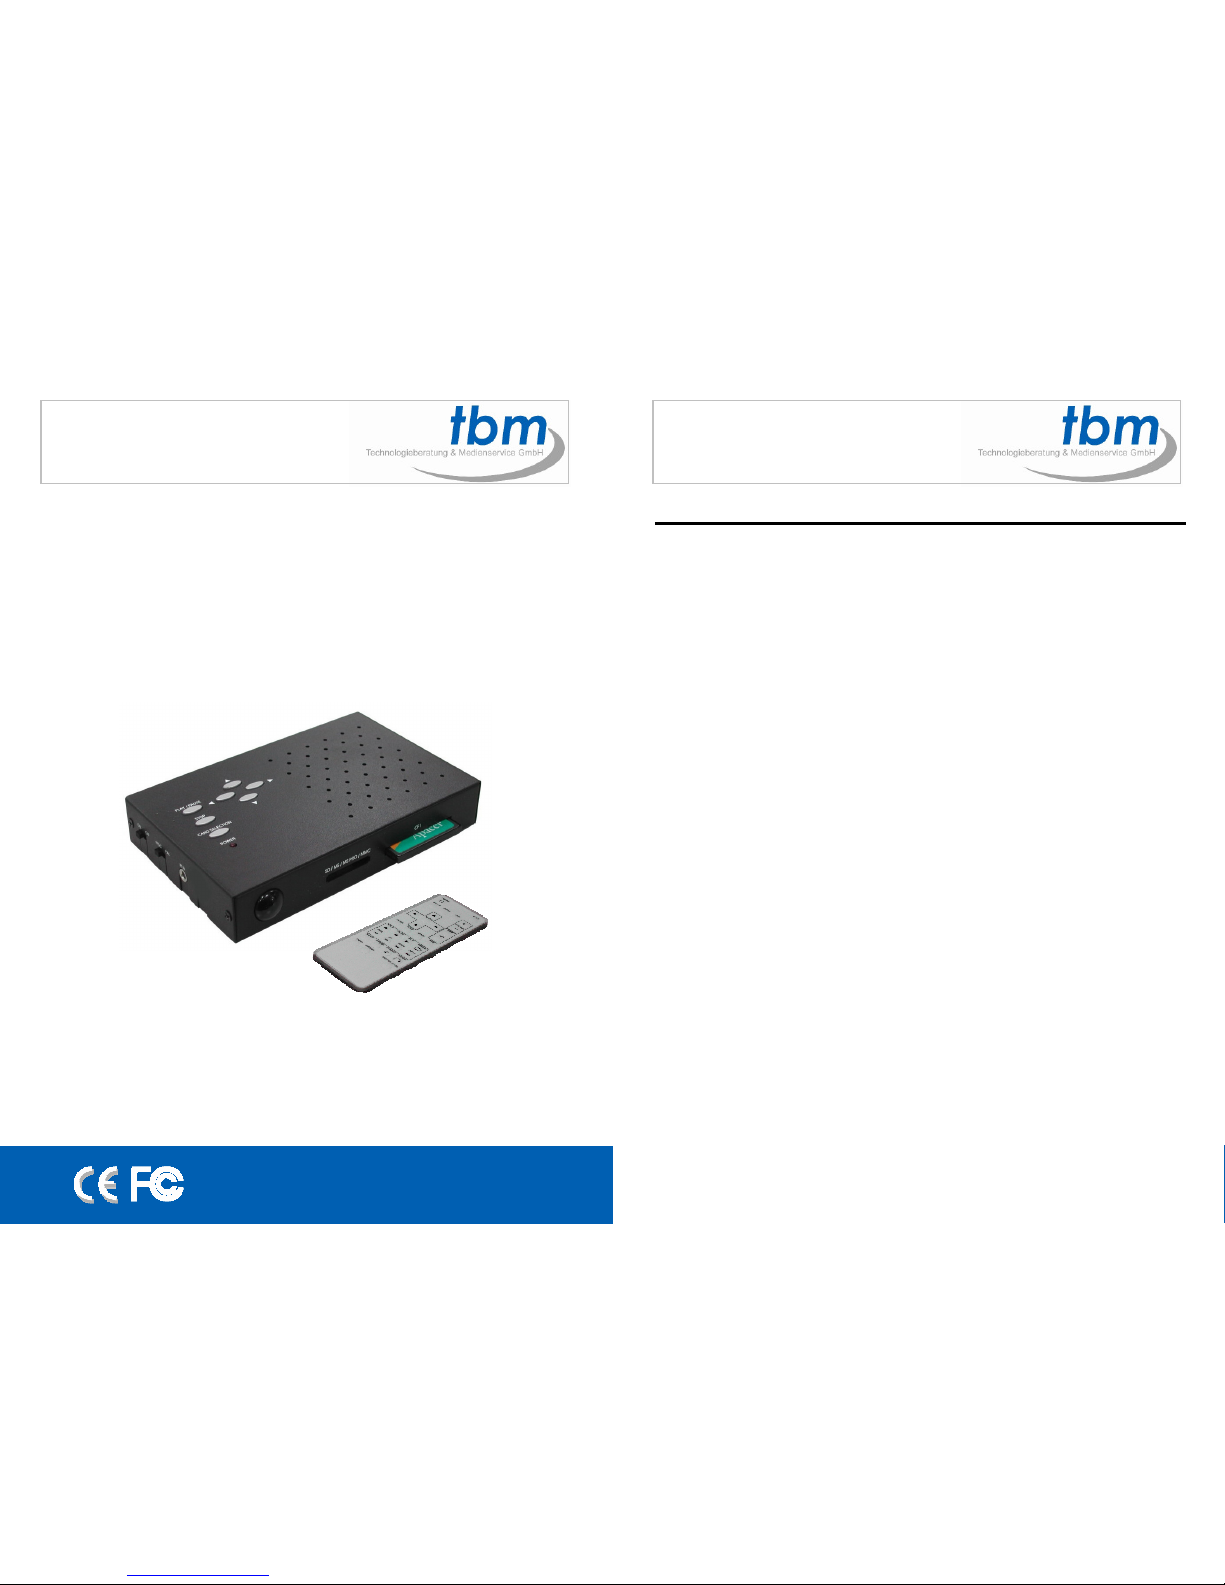
MPL020 - CF MediaPlayer
USER MANUAL
1. Package Contents……………………..…………………….. 1
2. In t roduct i on……… … …………… … ……….… … … ……... 1
3. Fe ature s … …………… … … …… ………. . … … …… …… … 2
4. Hardware Overview…………………………….…………... 2
5. Remo te Contr ol…… …………… ………… … ………… … .. 3
6. Set ting Up… … ……………… ……………… ..…….. … … .. 4
6.1 S L I DE SETU P……… … … ………… … … ……… . . … . 4
6 . 2 MU S IC S E TU P… … … … … .… … …… … …… … …… 4
6. 3 MOV I E S E TU P… … … …… . …… … …… … ……… … 4
6. 4 SL IDESH O W SETUP……… …….…… … ……………. 5
6.5 P R E FER E N CE… … … ……… . … ……… … … ……… … 5
7. Us i ng the MP L 020…… …………… … …………… ……... 6
7.1 Play Picture File…………………………… ………..…. 6
7.2 Play Music File… …….… …………… ………… ……… 7
7.3 Play Movie File……………..………………………..… 8
7.4 File Libr a ry……………… … … … …….…….… … … . … 9
7.5 Hot Ke y… … … .… …… … … …… … …… … …… .… … . . 9
8. Troubleshooting…………….…………………………..…. 10
CONTENTS
Page 2
1
1. MPL020 7. Power Adapter (DC 5V, 2A)
2. User Manual 8. Schedule Software (optional)
3. Remote Control 9. IR Cable (optional)
4. S-Video Cable 10. PIR Sensor & Cable (optional)
5. Audio Cable 11. Laser Scanner & Cable (optional)
6. USB Cable
The MPL020 is a palm-size digital player that plays picture, music and video without a
computer. It uses media files from CF, SD, MMC, MS (Pro) memory card. By connecting
Video, S-Video, VGA and Audio, you can play media files on any display device.
By connecting the USB 2.0/1.1 bus interface, you can download/ upload media f iles
between PC and the memory card. With the portable MPL020-S, you can play the shows
on TV or any big screen for advertising, presentations, training, and other media
applications.
2. INTRODUCTION
1. PACKAGE CONTENT
2
Supports multiple file formats:Music, Picture and Movie.
Supports CF, SD, MMC and MS (Pro) memory card.
Supports Video, S-Video, VGA (640x480) and Audio output.
Supports USB 2.0/ 1.1 interface.
Supports Laser Scanner and PIR Sensor connectors (optional).
Supports NTSC and PAL format.
Includes a full-function infrared remote control.
Multi-Language OSD:English, French, German, Italian, Portuguese, Spanish,
Netherlands, Japanese and Chinese.
Supports SLIDE SHOW Function: With 14 kinds of transition effects.
Supports SLIDE TIME (INTERVAL) Mode:Interval time with 1, 3, 5, 10, 30, 60
seconds.
Supports MUSIC SLIDE Show:Music and pictures play at the same time.
Supports ZOOM IN (ON) 4x & PAN, ROTATE, MIRROR, PREVIEW and REPEAT.
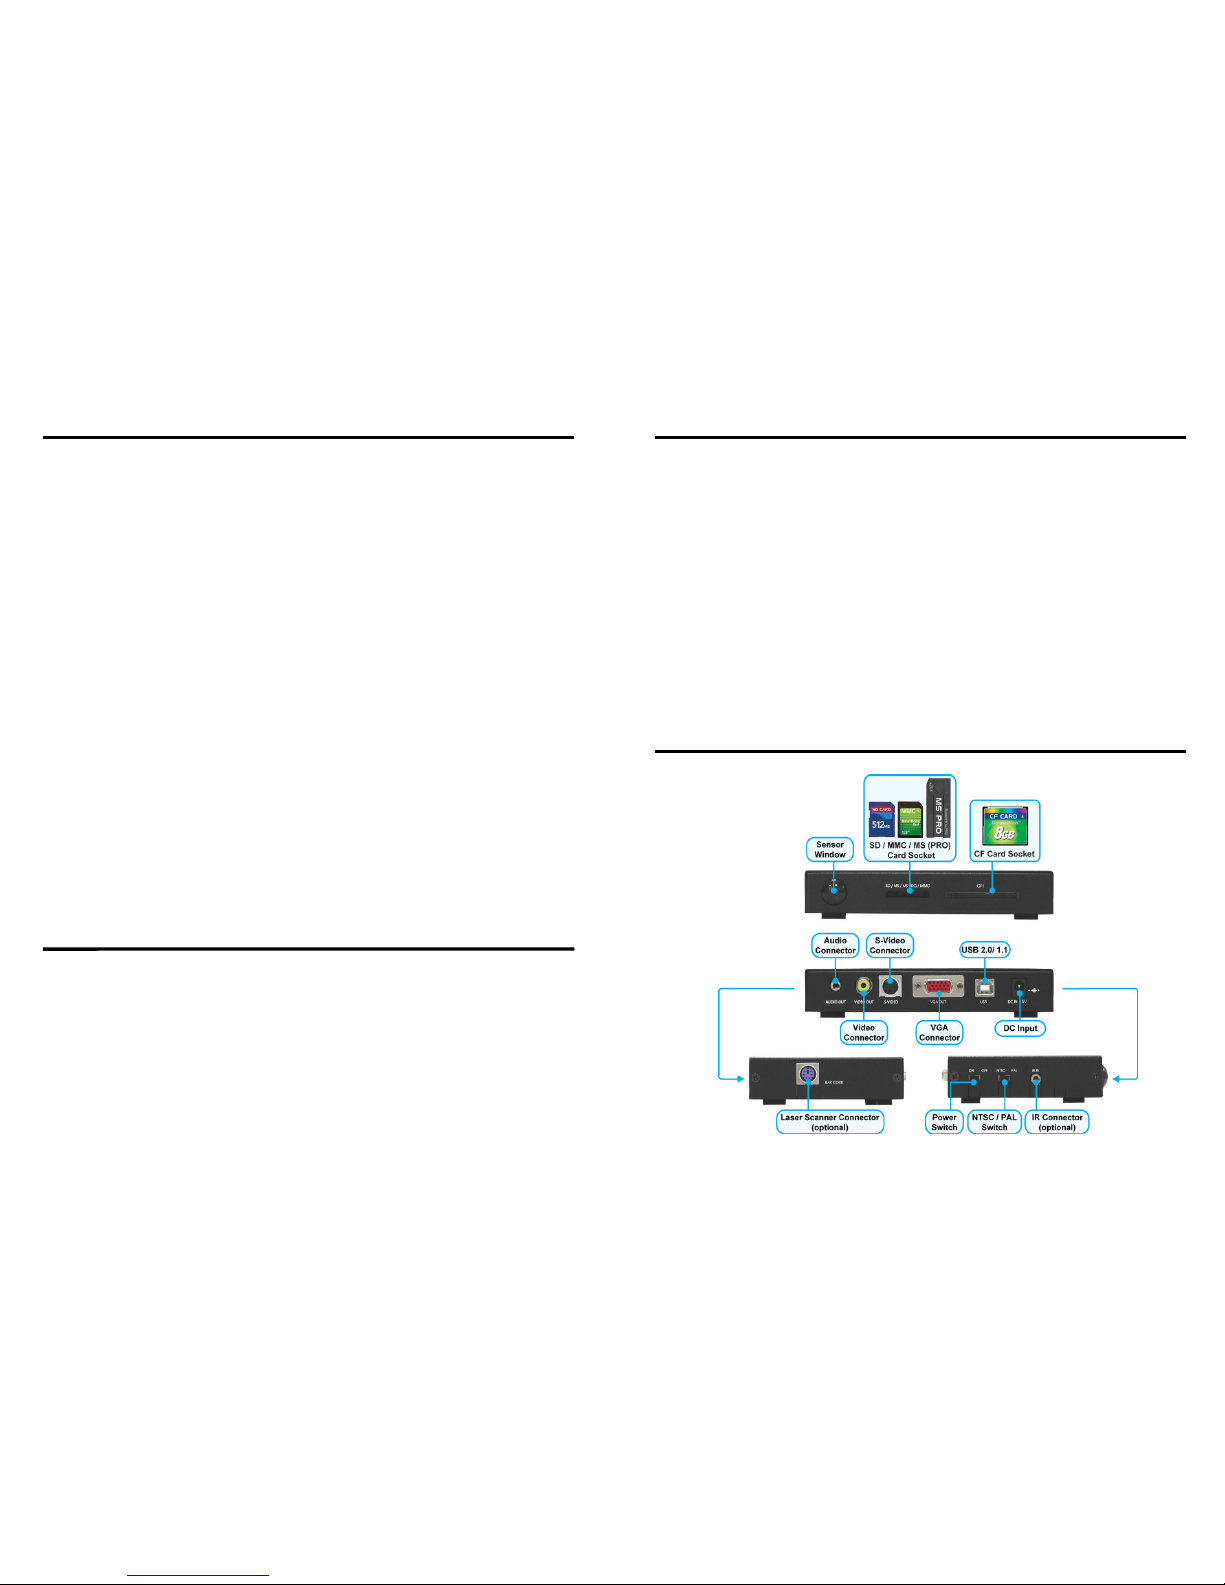
4. HARDWARE OVERVIEW
3
. FEATURES
Page 3
3
1
2
3
4
5
6
7
8
9
10
11
12
13
14
15
16
17
18
19
20
21
22
23
24
25
26
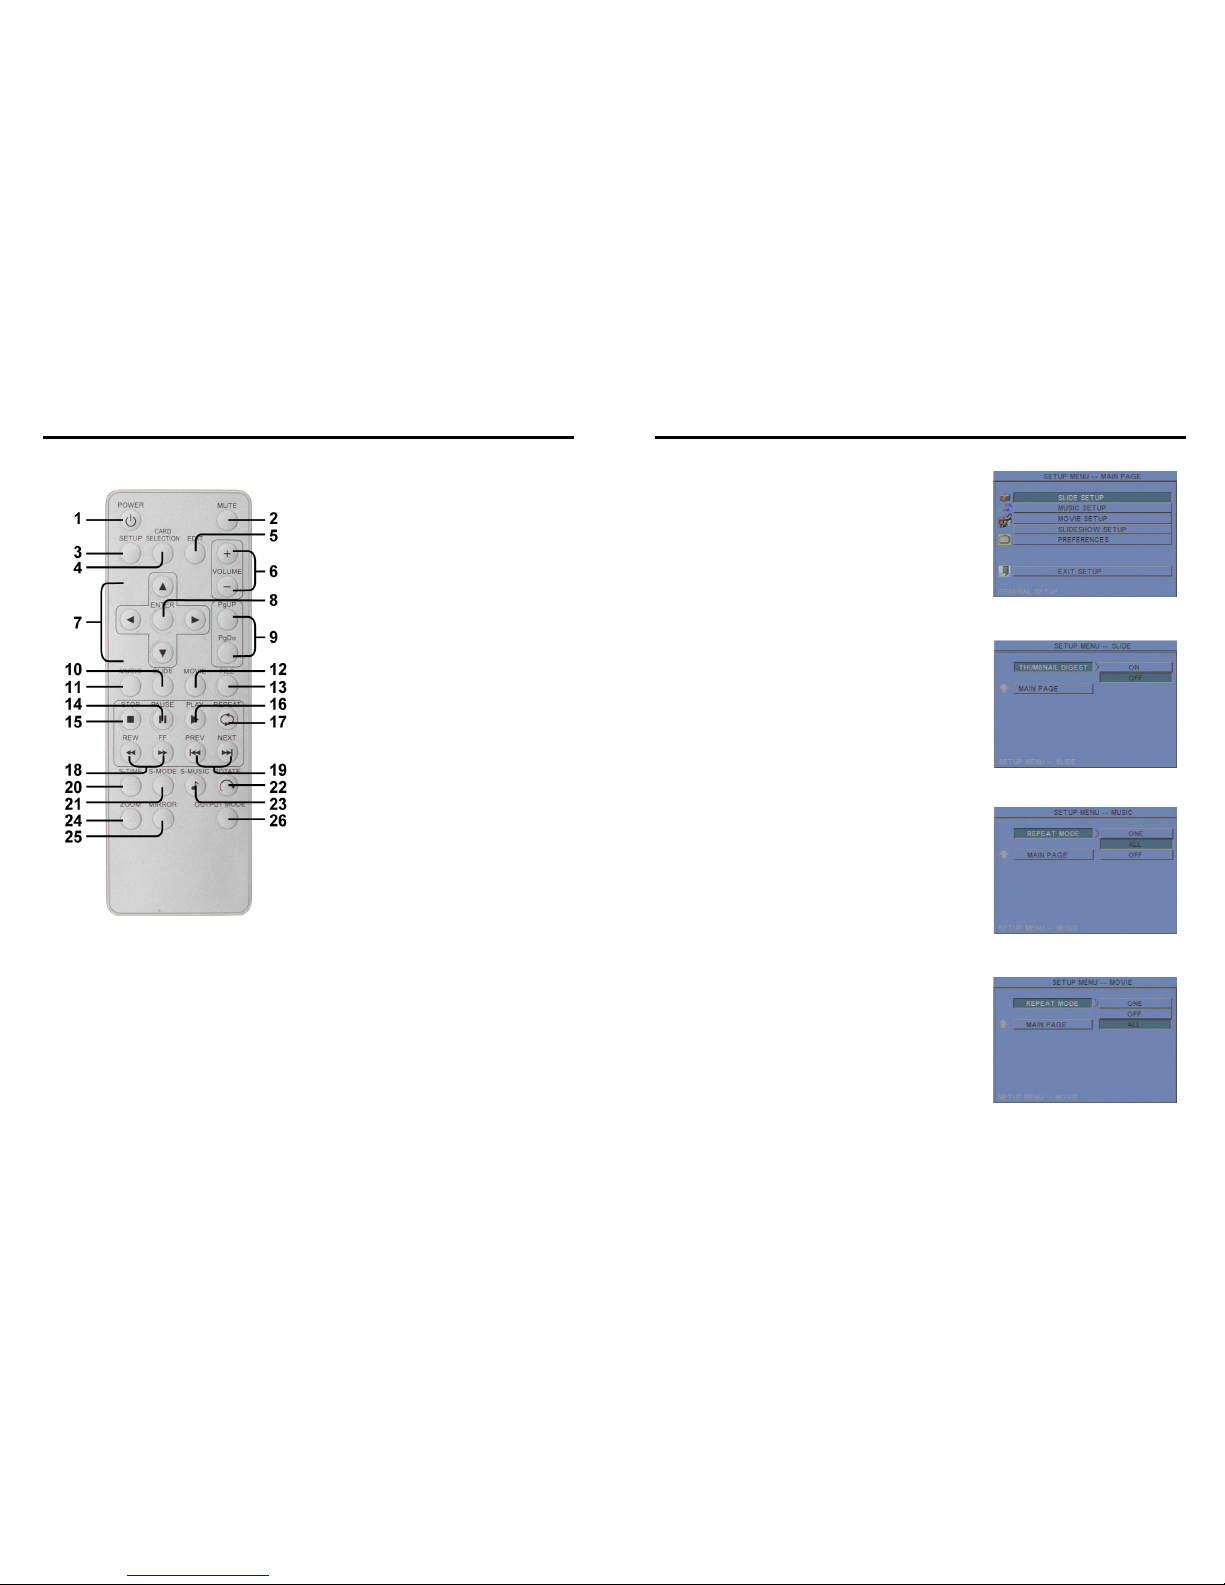
Power on/ off
Mute sound
Open the setup menu
Memory card selection
Show information of the file selected
Timer Setup (only for timer function)
Volume up/ down
Move the cursor
Confirm the selection/ entry
Go to the previous/ next page or image
Display all photo files
Display all music files
Display all movie files
Go to file library (all files)
Pause/ resume playback
Stop playback
Play the selected file
Select the repeat mode
Rewind/ forward movies
View the previous/ next file
Play the previous/ next file if in playback
Set the slideshow interval to 1, 3, 5, 10,
30, 60 seconds
Set the transition effect
Rotate photo 90 degrees clockwise on
the screen
Play music and pictures at the same time
Zoom in the image up to 4x
magnification
Mirror the image horizontally
Select the output mode
5. REMOTE CONTROL
4
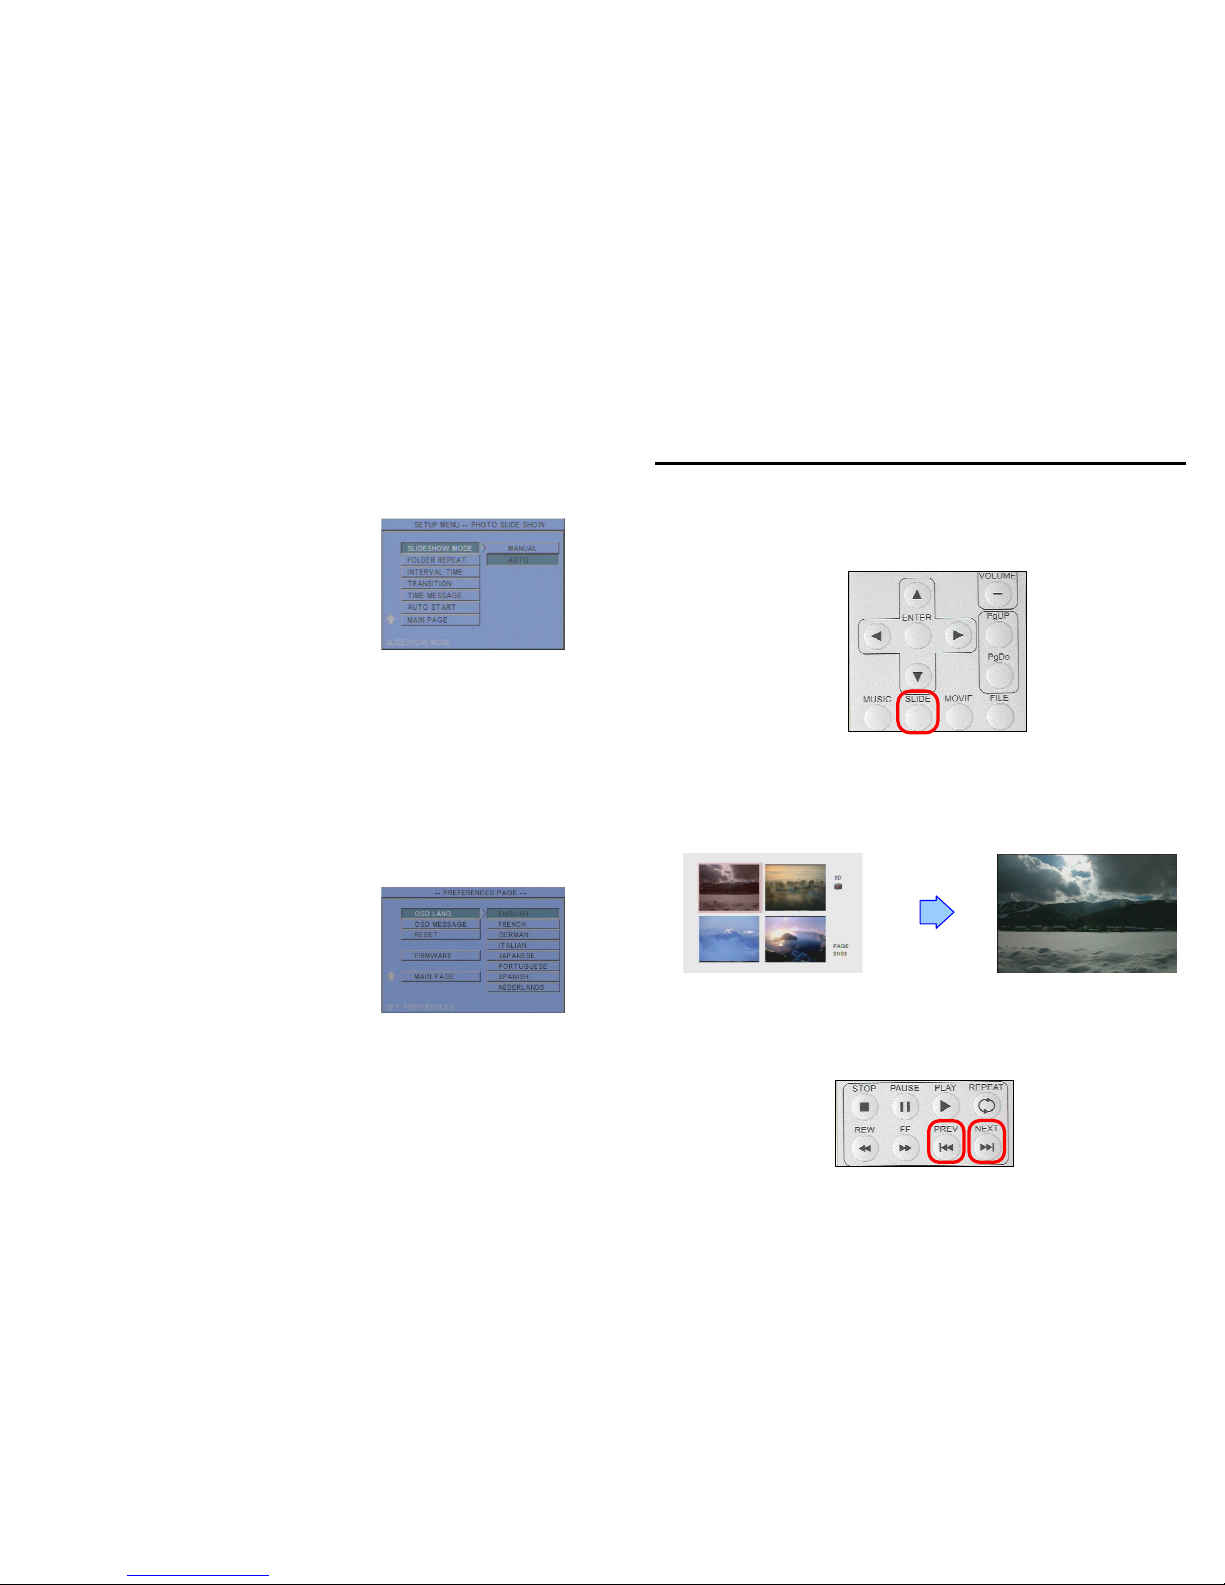
Press the “SETUP” button on the remote control to
open the “SETUP MENU – MAIN PAGE” shown in the
following figure. There are five groups of sub-menu
in the setup menu.
Use the “▲、▼、▲、▼” buttons to select an item
or to adjust values, and use the “ENTER” button to
go into the function or to confirm the command.
6.1 SLIDE SETUP
THUMBNAIL DIGEST::::Thumbnails load faster and
allow you to browse photos easily.
6.2 MUSIC SETUP
REPEAT MODE
• ONE::::Repeat the selected song.
• ALL::::Repeat all the songs on the memory card.
• OFF::::Turn off the repeat function.
6.3 MOVIE SETUP
REPEAT MODE
• ONE::::Repeat the selected movie.
• OFF::::Turn off the repeat function.
• ALL::::Plays all the movies on the memory card.
6. SETTING UP
Page 4
5
6.4 SLIDESHOW SETUP
SLIDESHOW MODE::::Set the slideshow to start automatically.
FOLDER REPEAT::::Set all files (picture, music or
movie) in the folder to show only once or
continuously (loop).
INTERVAL TIME::::Set the time each photo is
shown to 1, 3, 5, 10, 30 or 60 seconds.
TRANSITION (EFFECT)::::Set the transition effect
and auto slide with sequential or random playback.
TIME MESSAGE (only for timer function)::::Set the time message is shown on the
screen.
AUTO START::::Enable/ disable auto playing media files on the memory card when the
device is turned on.
6.5 PREFERENCE
OSD LANG: Select the OSD language (ENGLISH, FRENCH, GERMAN, ITALIAN,
JAPANESE, PORTUGUESE, SPANISH and NEDERLANDS).
OSD MESSAGE: Turn the OSD message function on/ off.
RESET: Reset all settings to the original (factory)
settings.
FIRMWARE : New F/W can upgraded from the
memory card.
• EDITION : Show the F/W versions.
• UPDATE : Used to update the F/W.
6
Copy files (music, picture and movie) to the memory card first.
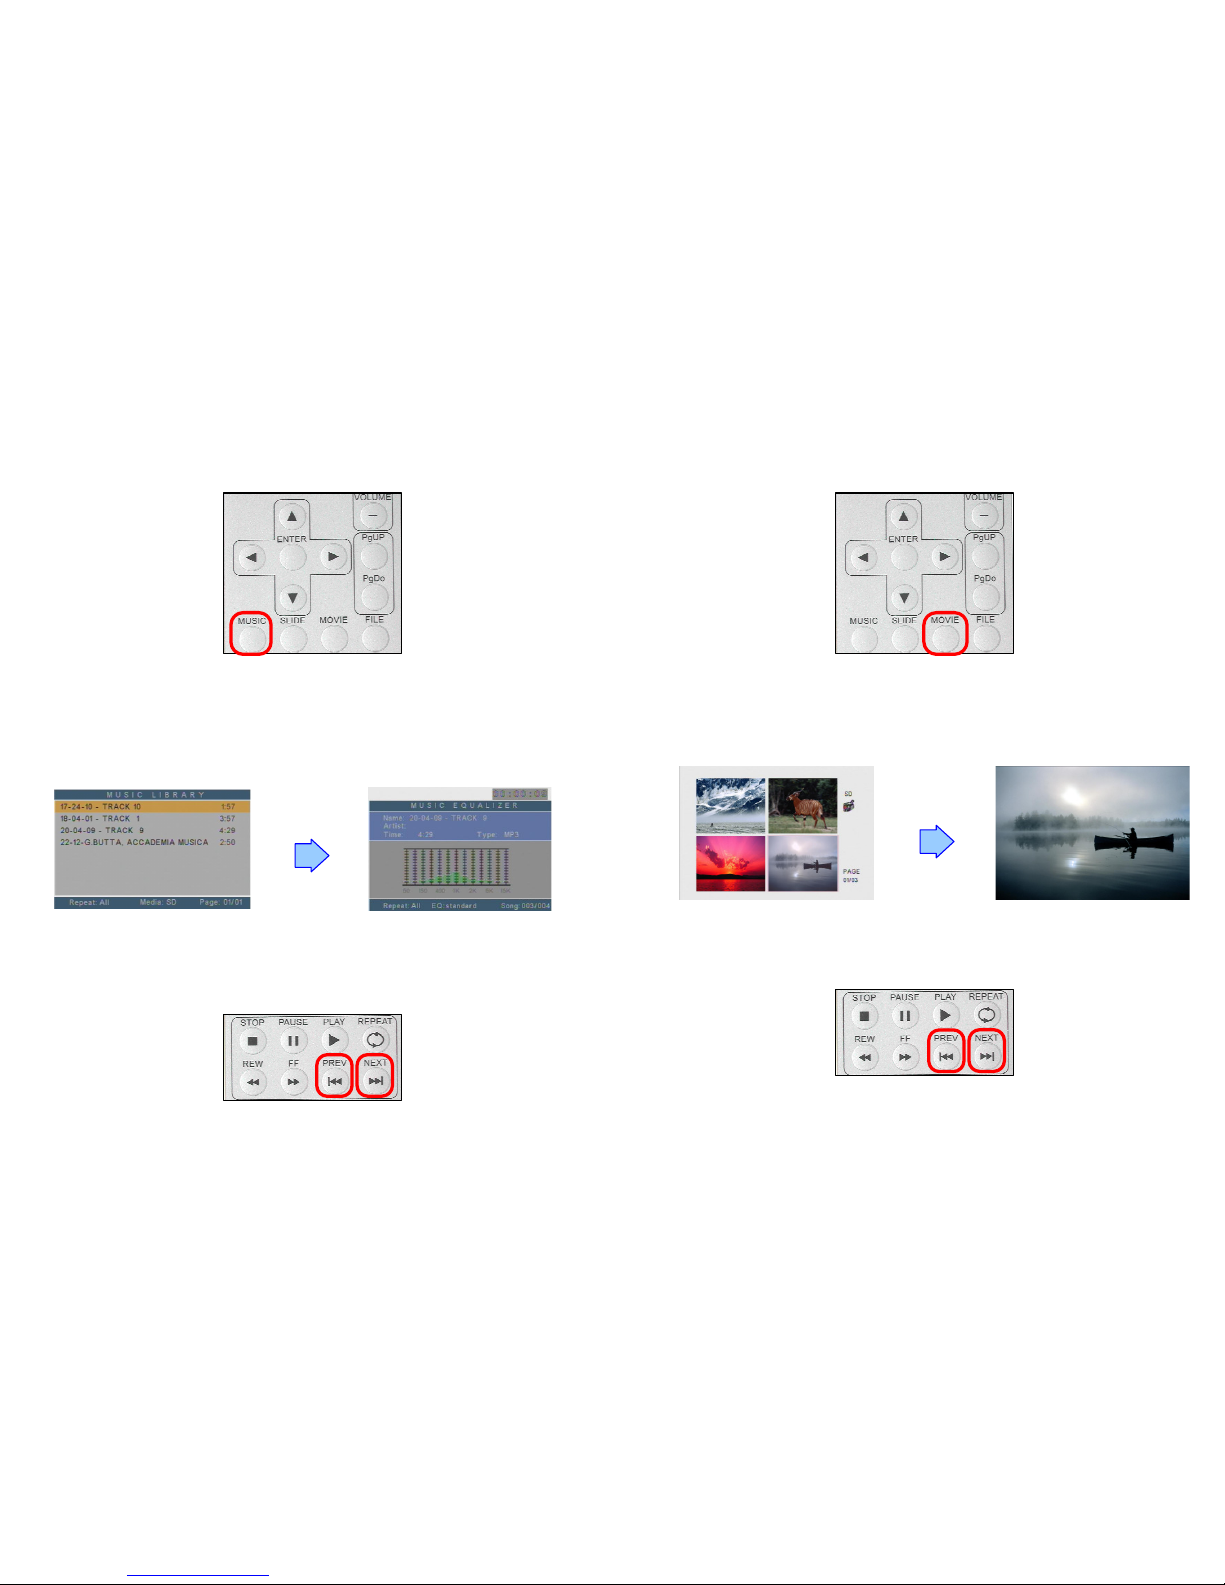
7.1 PLAY PICTURE FILE
Step 1: Press the “SLIDE” button on the remote control from any menu.
Step 2: The preview mode will show all the picture files on the memory card.
Use the “▲、▼、▲、▼” buttons to select the picture file, and press the “ENTER”
button to play the picture file.
Step 3: If the “SLIDESHOW MODE” is disabled, press the “NEXT” button to play the next
picture file, the “PREV” button to play the previous file.
7. USING THE
MPL020
Page 5
7
7.2 PLAY MUSIC FILE
Step 1: Press the “MUSIC” button on the remote control from any menu.
Step 2: The “MUSIC LIBRARY” will show all the music files on the memory card.
Use the “▲、▼” buttons to select the music file, and press the “ENTER”
button to play the music file.
Step 3: Press the “NEXT” button to play the next music file, the “PREV” button to play the
previous file.
8
7.3 PLAY MOVIE FILE
Step 1: Press the “MOVIE” button on the remote control from any menu.
Step 2: The preview mode will show all the video files on the memory card.
Use the “▲、▼、▲、▼” buttons to select the movie file, and press the “ENTER”
button to play the movie file.
Step 3::::Press the “NEXT” button to play the next movie file, the “PREV” button to play the
previous file.
Page 6
9
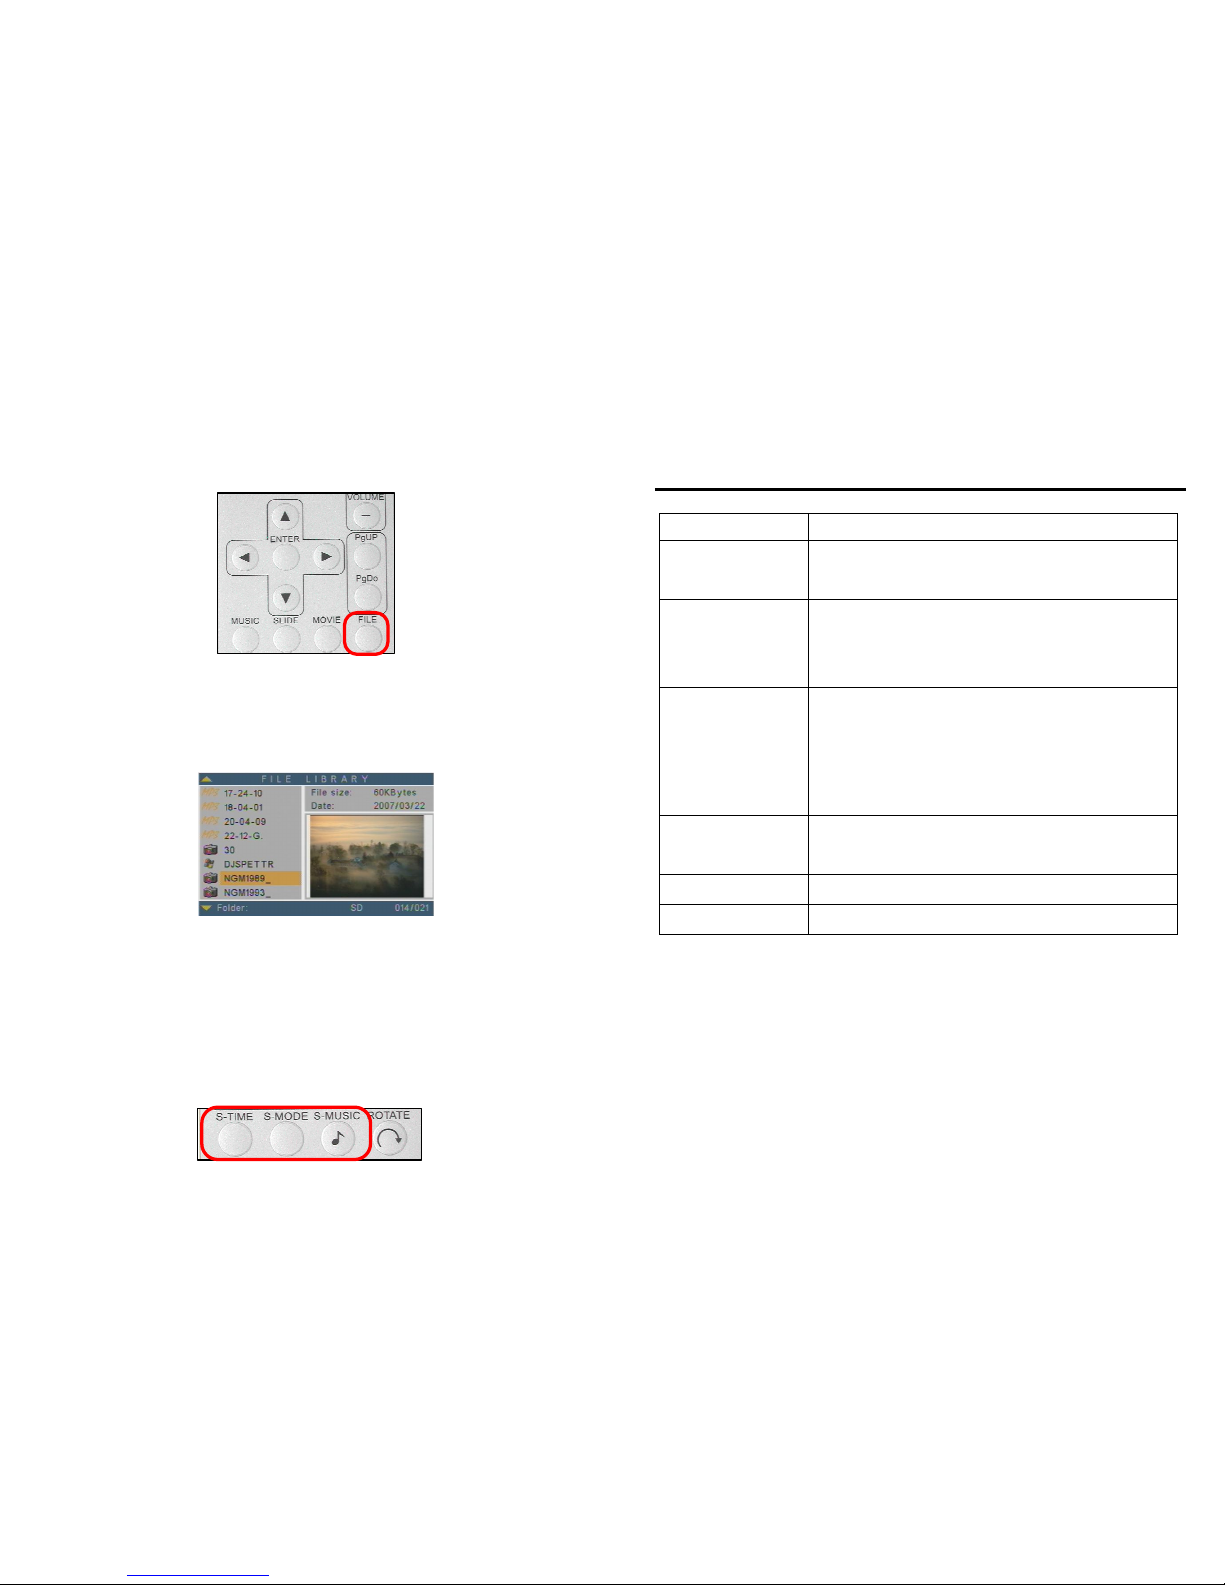
7.4 FILE LIBRARY
Step 1::::Press the “FILE” button on the remote control from any menu.
Step 2::::You can see all the files (including picture, music and movie) on the left panel of the
“FILE LIBRARY”. Press the “▲、▼” buttons to select a file, and the information of the file will
be shown on the right panel.
7.5 HOT KEY
You can use the “S-TIME”, “S-MODE” or “S-MUSIC” hot key on the remote control without
selecting from the “Setup Menu”. (These functions are only used for playing picture files.)
S-TIME::::Interval time with 1, 3, 5,10, 30, 60 seconds.
S-MODE::::With sequential, random auto slide shows etc 14 kind of selections
S-MUSIC::::Play the picture and music files at the same time.
10
Situation Check Point
No Picture
1. Check if the power supply is connected.
2. Make sure the MPL020S is turned on.
No response from
the remote
control
1. Make sure there is a clear view between the remote
control and the device.
2. Change the remote control’s batteries.
Memory card
1. Push cards gently and securely.
2. If the card does not insert easily, check the direction.
3. Confirm format of the card.
MPL020 supports CF, SD, MMC and MS (Pro) memory card.
No sound
1. Check if the mute function is on.
2. Check if the volume is turned up.
. TROUBLESHOOTING
 Loading...