User Guide
English

2
English
User Guide
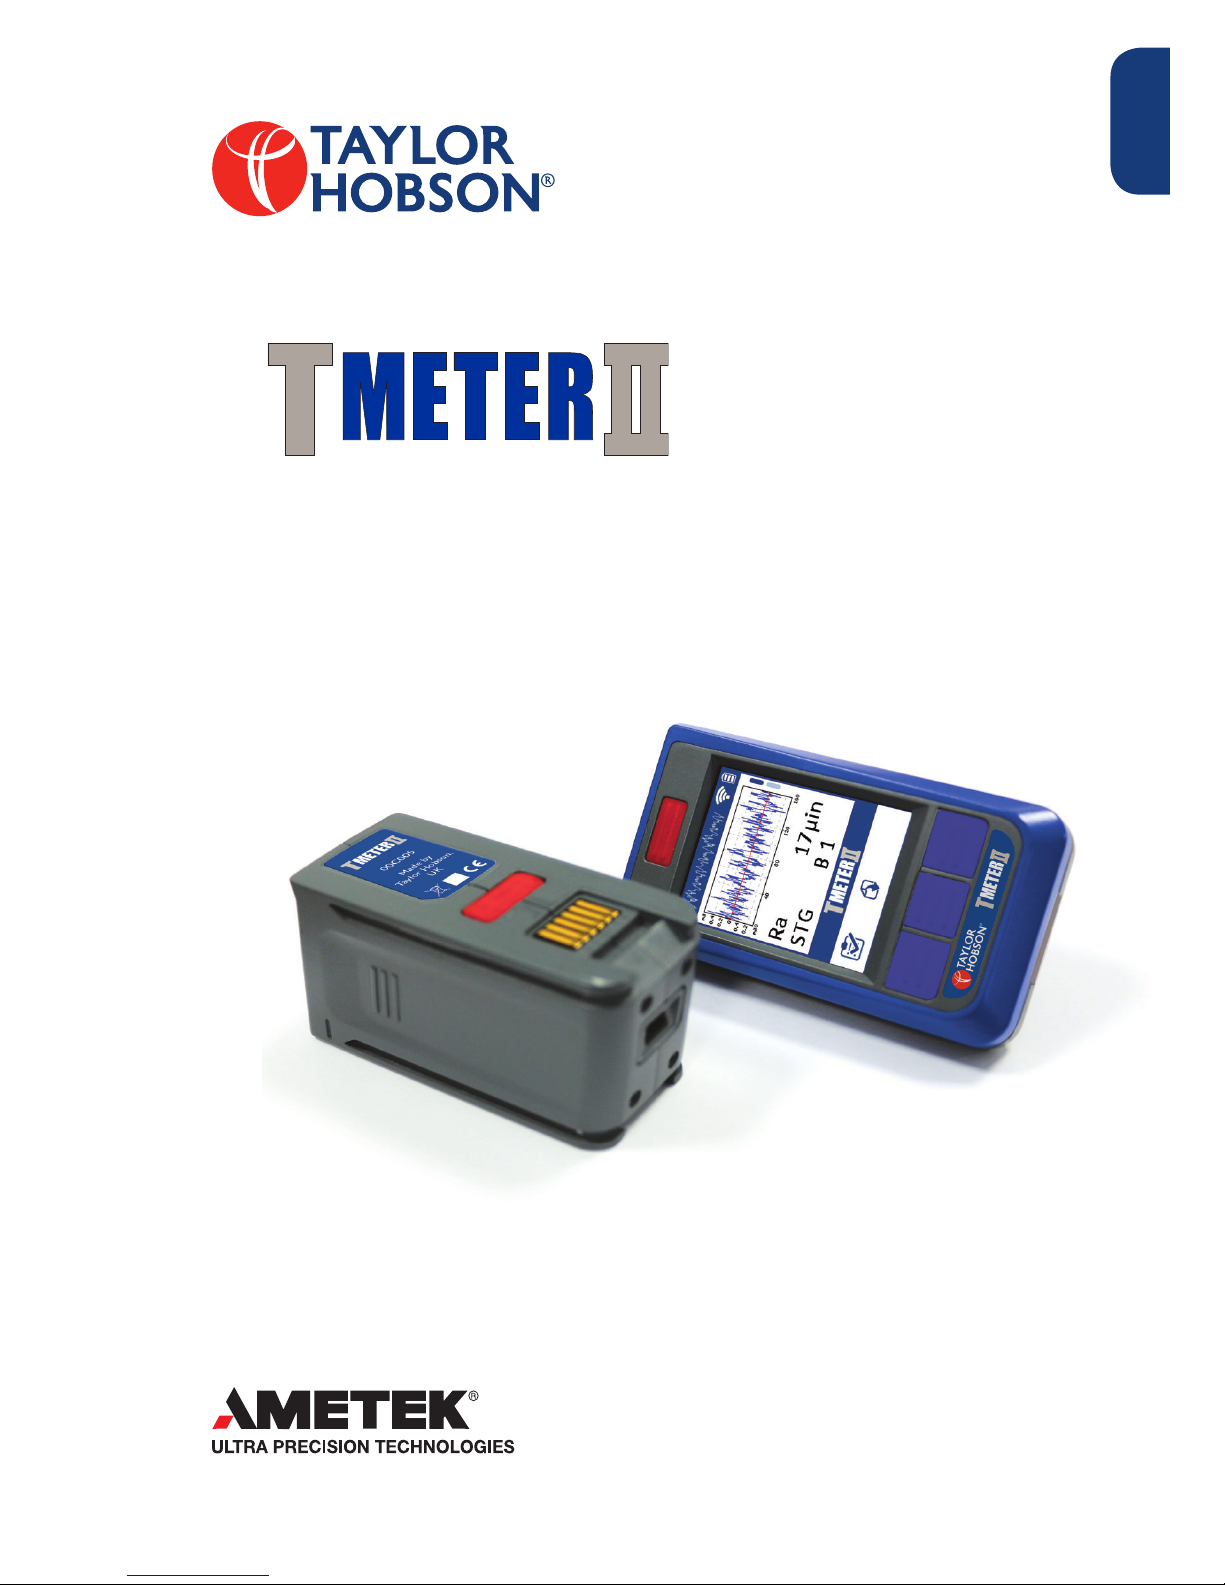
This is Taylor Hobson’s User Guide for
the T-Meter II.
All the specifications in this document are correct at
time of production and are subject to change. Please
contact Taylor Hobson for further information.
K505-600

3
English
Contents
T-Meter II overview .................................................................... 4
T-Meter II accessories ................................................................ 9
System & safety information ...................................................10
General system information .....................................................................10
CE marking .........................................................................................................11
Declaration of conformity .........................................................................12
Environmental legislation ............................................................................13
T-Meter II dimensions ..............................................................14
Quick start guide ......................................................................16
Using the instrument ................................................................ 18
Overview .............................................................................................................18
Function buttons .............................................................................................19
Device icons.......................................................................................................20
Charging ...............................................................................................................21
Calibration...........................................................................................................22
Factory reset ......................................................................................................24
Error codes .........................................................................................................25

4
English
T-Meter II overview
What it does
The T-Meter II is a superior portable surface finish classifier that
measures concrete surface finish with a 1 button click. Parameters Ra
and its derived parameters STG, CSP & Ft are displayed on a brightly
lit intuitive 2.4” LCD colour display. Its rechargeable battery operation
makes it a convenient way of performing fast, easy and precise onthe-spot measurements in almost any environment.
How it does it
The hard-wearing diamond stylus is drawn across the surface with a
precision motorised traverse mechanism to ensure that the correct
horizontal distance is travelled. Vertical movement of the stylus is
detected by a high quality piezo-electric pick-up as it travels across
peaks and valleys which converts mechanical movement into electrical
signals. The electrical signal is digitised and sent to a microprocessor
for instant calculation of parameters using standardised algorithms.
Charging
The mini USB port can be used for charging with the included mains
charger (or with any standard USB charger).

5
English
Keeping it simple
Taylor Hobson philosophy keeps the process simple. T-Meter II is the
perfect tool for an inspector to classify and evaluate the surface finish.
Standards and traceability
The reference standard supplied can be used both to calibrate the
instrument and check for stylus wear to ensure the most accurate
results are always being achieved.
UKAS calibration and testing
Taylor Hobson provides full certification for artefacts and instruments
in our purpose built ISO graded clean room UKAS facility. Our
UKAS laboratory is able to measure all of the parameters associated
with surface texture, including French, German, USA and Japanese
derivatives.
Measurement Best capability
Roughness standards (Ra) ±(2% + 0.1575 µin)
Workpiece or component
surface texture (Ra)
±3% of measured value per
trace

6
English
Prole graph
Clear detailed graph showing measurement
area – excellent for visually identifying defects.
Simple button
navigation
Easy and instant
access to features.
Measure
Tactile measurement
button great for challenging
orientations.
Bluetooth technology
Quick, reliable communication
between traverse and display unit.
Separates
Splits into a display unit
and traverse unit via a
slide and lock mechanism.
USB mini
charging port
Charge from mains
or any standard
USB charging port.
Rubberised moulding
Enhanced durability and improved
grip provides unbeatable protection
in harsh environments.
Li-Poly battery
Most advanced rechargeable
battery technology for unrivalled
reliability and battery life.
Diamond stylus and
piezoelectric pick-up
The hard wearing, robust piezoelectric
pick-up stylus with diamond tip
assures very reliable measurement.

7
English
Fast and reliable
Simply press the measurement button and in a few seconds a full set
of traceable measurement results including a detailed profile graph is
displayed.
Built to last, by design
Impact resistant rubberised mouldings surround a recessed, Mylar
protected high durability screen making the unit robust enough for
even the most demanding environments.
InstantOn
By utilising InstantOn technology these instruments are ready to
measure in less than 5 seconds from switching on!
In situ measurements
Monitors surface texture on the concrete surface to achieve the right
surface texture grade and correct concrete surface profile.
User-friendly, not user-hostile!
The T-Meter II is as simple and easy-to-use as any SmartPhone. Users
have the advantage of the intuitive quick access navigation buttons
and its crisp 2.4” daylight readable industrial colour LCD screen.
Bluetooth connectivity
This next generation bluetooth technology boasts super efficient
connectivity allowing wireless communication between the display
unit and traverse unit.
Built for power…
Powered by heavy duty reliable Li-Poly technology, the T-Meter II
operates 24/7 with over 10,000 measurements from a single charge.

8
English
Parameters
Qualifying surface texture grade
Qualifying concrete surface prole
STG
Comparative industry averages
Produced
nish
Surface
grade
Gloss reading DOI
*
A-1 Finish by Design Spec. Ultimate Finish Ultimate Finish
A-2 Finish by Design Spec Super Finish Super Finish
A-3 75-80 80 & up 3000 Grit High Polish
B-1 65-75 70 & up 1500 Grit Medium Polish
B-2 40-65 50 & up 800 Grit Low Polish
B-3 30-40 20 & up 400 Grit Honed Smooth
C-1 25 and less N/A 200 Grit Honed
C-2 15 and less N/A 100 Grit Ground
C-3 5 and less N/A 50 Grit Heavy Texture
ISO 4287
CSDA ST115I
(Concrete Sawing and
Drilling Association)
ICRI
(International Concrete
Repair Institute)
-
Ra
Arithmetic mean
deviation
STG
Surface Texture
Grade
CSP
Concrete
Surface Profile
Ft
Flooring texture
CSP Ft (µin)
C-Lo ≤ 125
CSP .1 > 125, ≤ 175
CSP .2 > 175, ≤ 225
CSP .3 > 225, ≤ 350
CSP .4 > 350, ≤ 475
CSP .5 > 475, ≤ 650
CSP .6 > 650, ≤ 850
C-Hi > 850
* DOI - Distinction of Image

9
English
T-Meter II accessories
Portable hybrid solar rechargeable
power bank** - Code SC-15
• Por table power bank for charging the
T-Meter II on the go. Can be charged
by USB, mains AC or sunlight.
USB charger - Code SC-10
• Mini USB charger 5V 1A 110-240 VAC
50/60 Hz with international adapters.
Hard transport case - Code SA-55
• Air and water tight case that provides
the T-Meter II with extra protection for
safe storage and/ or transportation.
Calibration standard - Code CS-20
• For calibrating and checking the T-Meter
II instrument. Ra 229 µin (5.81 µm).
** Not supplied as standard with T-Meter II

10
English
System & safety information
General system information
Instrument performance
Gauge Resolution 0.4 µin
Measurement
Range (Ra) Up to 1600 µin
Range
(Rz, Rv, Rp, Rt)
Up to 7800 µin
Repeatability 2 % of value + noise
Accuracy 5 % of reading + 4 µin
Noise 4 µin
Calibration
Process Automatic software calibration
Standard
Able to calibrate to ISO 4287
Roughness Standards
Parameters
ISO 4287 Ra
CSDA ST115 STG
ICRI CSP
- Ft
Technical
Data output On-screen
Up to 2 results per page, along with
profile graph
Battery
Charger
Mini USB 5V 1A 110-240 VAC 50 /
60 Hz
Charging time 4 hours
Power
Battery life > 10,000 measurements per charge
Standby time 5,000 Hours
InstantOn
Max 5 sec from standby to ready to
measure
Auto-sleep
function
5 minutes

11
English
CE marking
Taylor Hobson products conform with all applicable legal
requirements of the European Union (EU) for CE marking.
The CE Mark on the product label indicates that
Taylor Hobson has checked that products meet all
applicable EU Essential Requirements, Standards
and Directives as declared on the ‘Declaration of
Conformity’ included with the product.
Instrument capability
Pick-up
assembly
Pick-up type Piezoelectric
Stylus type Diamond, Radius 200 µin (5 µm)
Gauge
Gauge force 200 mg
Measurement
type
Skidded
Filter
Filter type Gaussian
Filter cut-off 0.03 in (0.8 mm)
Traverse
Traverse
length
0.2 in (5 mm)
Traverse
Speed
0.08 in/sec (2 mm/sec)
Display Units µin
Environmental / physical
Physical
specications
Weight
0.4 Kg (14 oz)
Power source Li-Poly rechargable battery
Operating
conditions
Temperature 5 - 40 °C (41 - 104 °F)
Humidity 0 - 80 % non-condensing
Storage
conditions
Temperature 0 - 50 °C (32 - 122 °F)
Humidity 0 - 80 % non-condensing

12
English
Declaration of conformity

13
English
Environmental legislation
Waste Electrical and Electronic Equipment (WEEE) -
Directive 2012/19/EU
Taylor Hobson equipment is marked with the “wheelie bin” symbol
indicating that it must NOT be disposed of in landfill or with general
waste.
The symbol indicates that a product is not to be
disposed of with household waste, according to
the Directive and each country’s national law.
The product should be handed in at a designated collection point or to
an authorised collection site for recycling waste electrical and electronic
equipment (EEE). Improper handling of this type of waste could have a
possible negative impact on the environment and human health due to
potentially hazardous substances that are generally associated with EEE.
At the same time, the correct disposal of this product will contribute to
the effective use of natural resources.
End-users in the UK and Republic of Ireland
As the manufacturer, Taylor Hobson is responsible for the safe disposal
of equipment at “end of life”. Taylor Hobson are registered with the UK
Environment Agency and have a unique Producer Registration Number
WEE/GK0048TZ. Taylor Hobson are members of B2B Compliance
(membership number 5010601) who discharge our liabilities under the
UK regulations. Note that Taylor Hobson are only responsible for the
safe disposal of Taylor Hobson equipment sold after July 2006 or when
replacing “like for like” equipment pre 2006.
End-users in European Union States (EEC)
Each member state has its own implementation of the Directive. If
you wish to dispose of Taylor Hobson equipment please refer to your
countries national laws regarding disposal of waste electrical equipment.
End-users in the Rest of the World (RoW)
If the user wishes to dispose of equipment at end of life then they must
refer to their own countries national legislation and local regulations for
the disposal of Waste Electrical and Electronic Equipment.

14
English
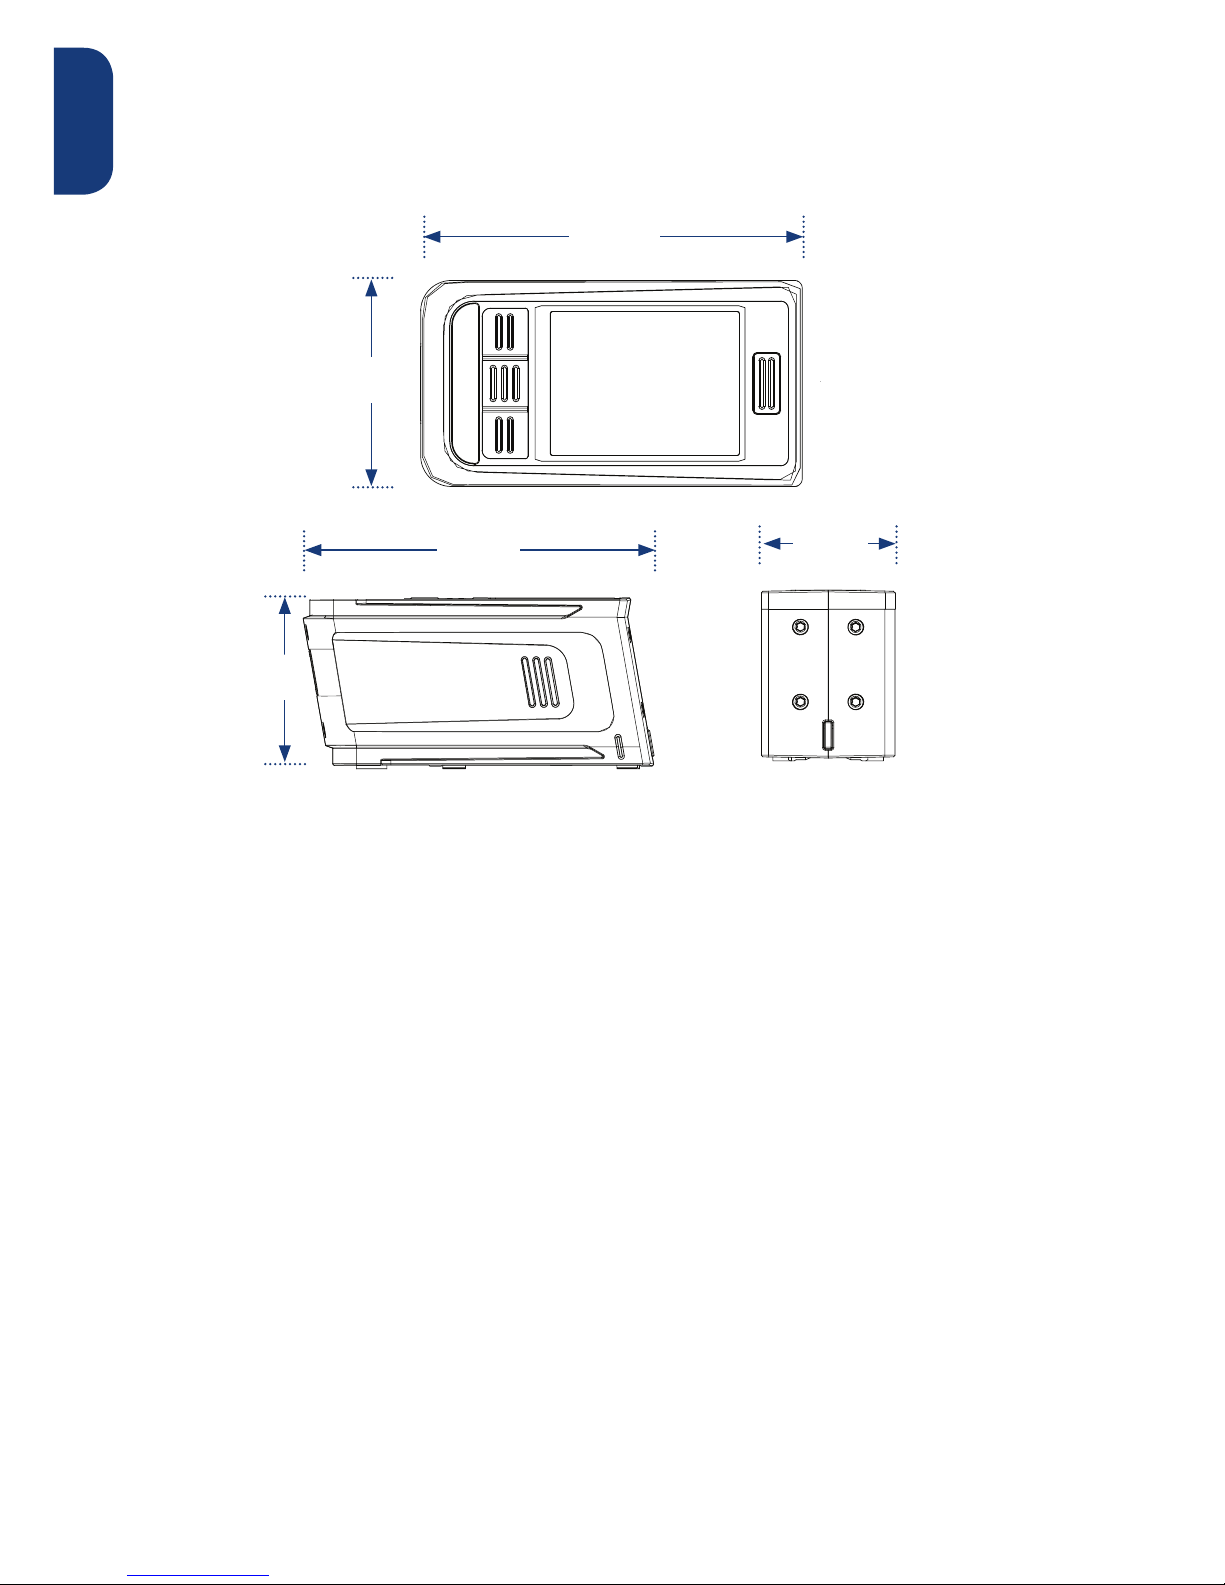
T-Meter II dimensions
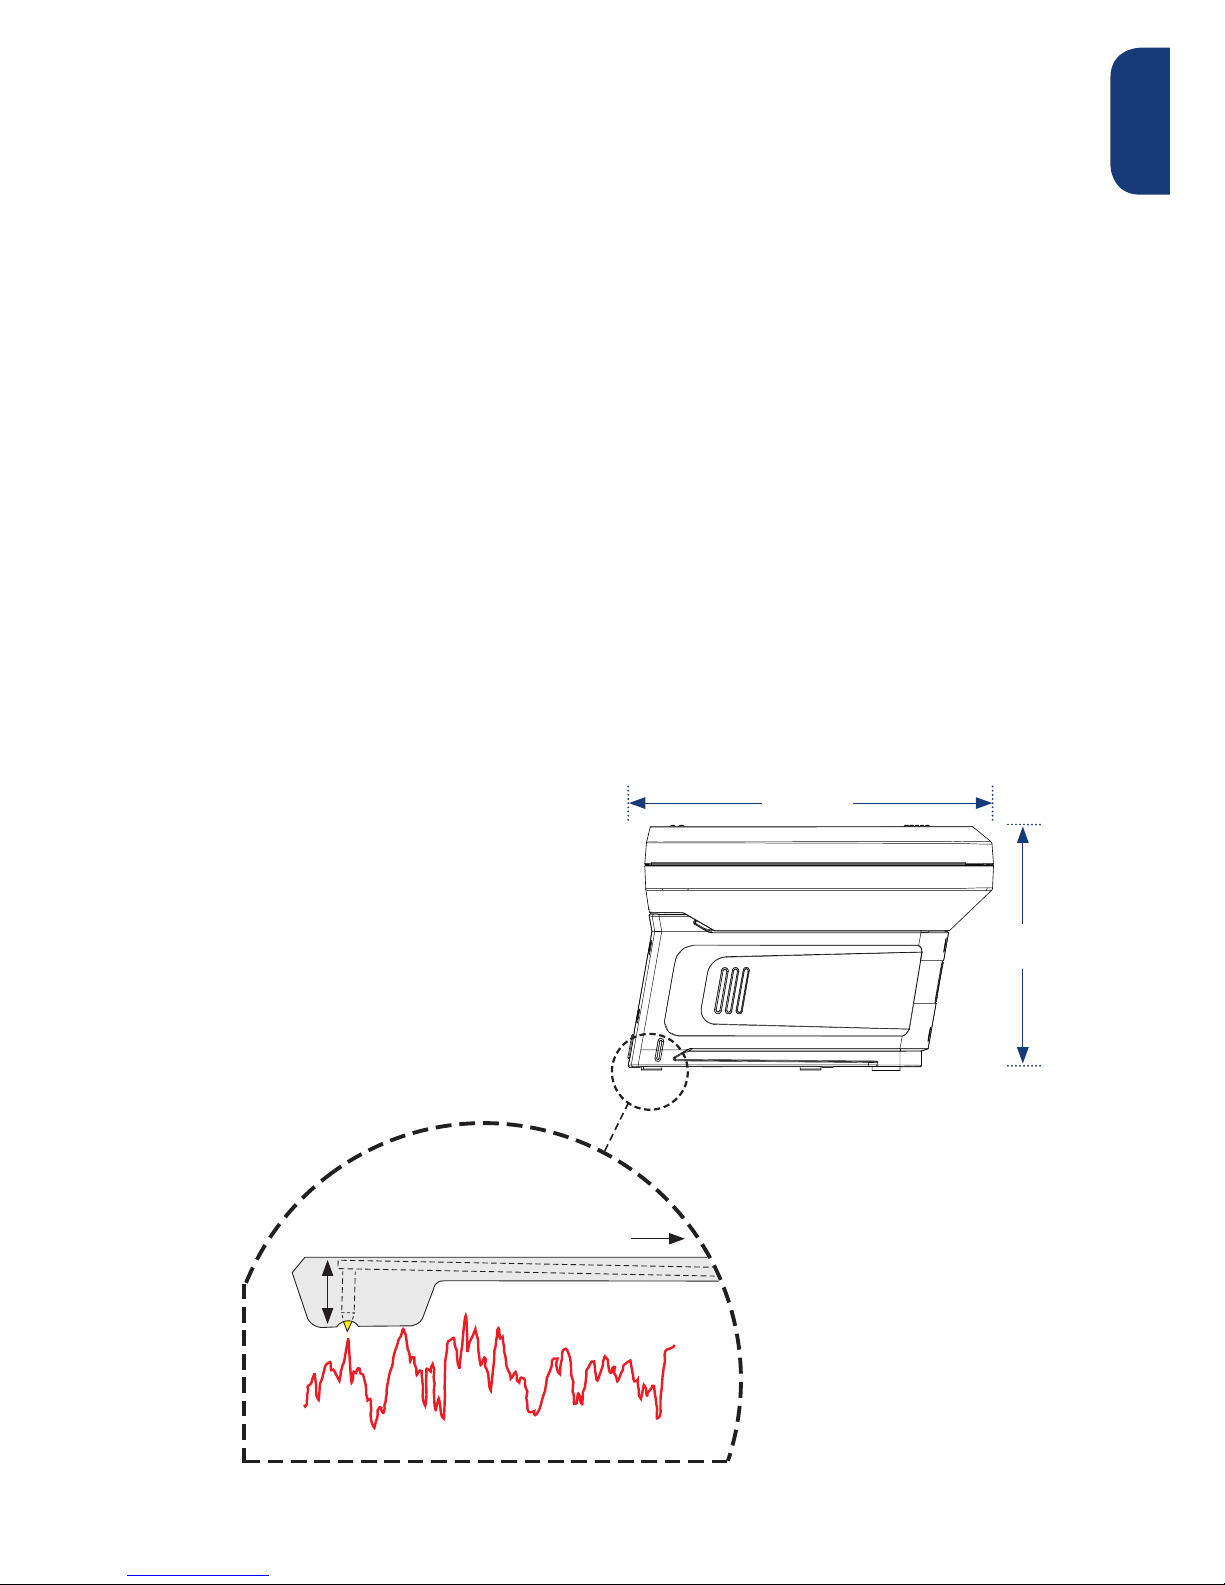
What is a skid?
T-Meter II is a skidded device. The skid guides the pick-up along the
surface, with the surface itself forming the datum for measurement.
This method usually eases set-up by reducing the need for leveling. It
also reduces the effects of vibration due to a much smaller measuring
loop.
The skid is an integral part of the gauge and has a radius large enough
to prevent movement in and out the roughness characteristics of the
surface. The stylus and the skid are independent in their height (Z)
movement but move together in the measurement direction. Surface
deviations are recorded as the difference between the stylus and the
skid movement in the Z direction.
The skid will act as a mechanical filter, taking out much of the general
form of the surface. Also, wavelengths greater than the diameter of
the skid will not register.
35
92
35
54
105
1.38 in
(35 mm)
3.62 in
(92 mm)
3.94 in
(100 mm)
2.13 in
(54 mm)
1.77 in
(45 mm)

15
English
How much difference does the stylus tip size make?
These instruments use a 200 µin (5 µm) stylus tip radius. This suits
their purpose as a portable tool for checking roughness in three ways:
• Durability – It is less likely to be damaged even when subjected
to mishandling.
• Maintenance – It is easier to remove dirt and oil that collects on
the tip during use.
• Suitability – It acts as a filter to remove the highest surface
frequencies that are more reliably measured in a controlled
environment.
Other Taylor Hobson instruments use a stylus with a tip radius of 80 µin
(2 µm). This smaller radius coupled with an inductive gauge head
having low contact force enables analysis of even the smallest surface
imperfections.
54
70
105
45
4.13 in
(105 mm)
2.76 in
(70 mm)
2
4
1
3
1 Stylus tip
2 Skid
3 Stylus movement (Z)
4 Measurement direction (X)
Note: roughness profile not drawn to scale

16
English
Quick start guide
2
1 3
2
1 3

17
English

18
English
Using the instrument
Overview
T-Meter II Operation mode
Navigation
buttons
Pick up &
Stylus
USB Charging
port
Traverse unit
power button
Status
LED
Display unit power
/ Measure button
Colour
Screen
‘Connected’ mode ‘Separated’ mode
Slides
apart

19
English
T-Meter II Storage/Charging mode
Function buttons
Unit power/Measure button - Seperated mode
Power
• Both the display unit and traverse unit will need to be powered
On individually. There is no specific order of preference. Hold the
red power button for 3 seconds or more to switch On / Off.
Measure
• Press the red button on the display unit to take a measurement.
‘Connected’ mode ‘Storage / Charging’
mode
Slides
apart

20
English
Unit power/ Measure button - Connected mode
Power
• Both the display unit and traverse unit can be switched On / Off
when the display unit power button is pressed. Hold the red
power button for 3 seconds or more to switch On / Off.
Measure
• Press the red button on the display unit to take a measurement.
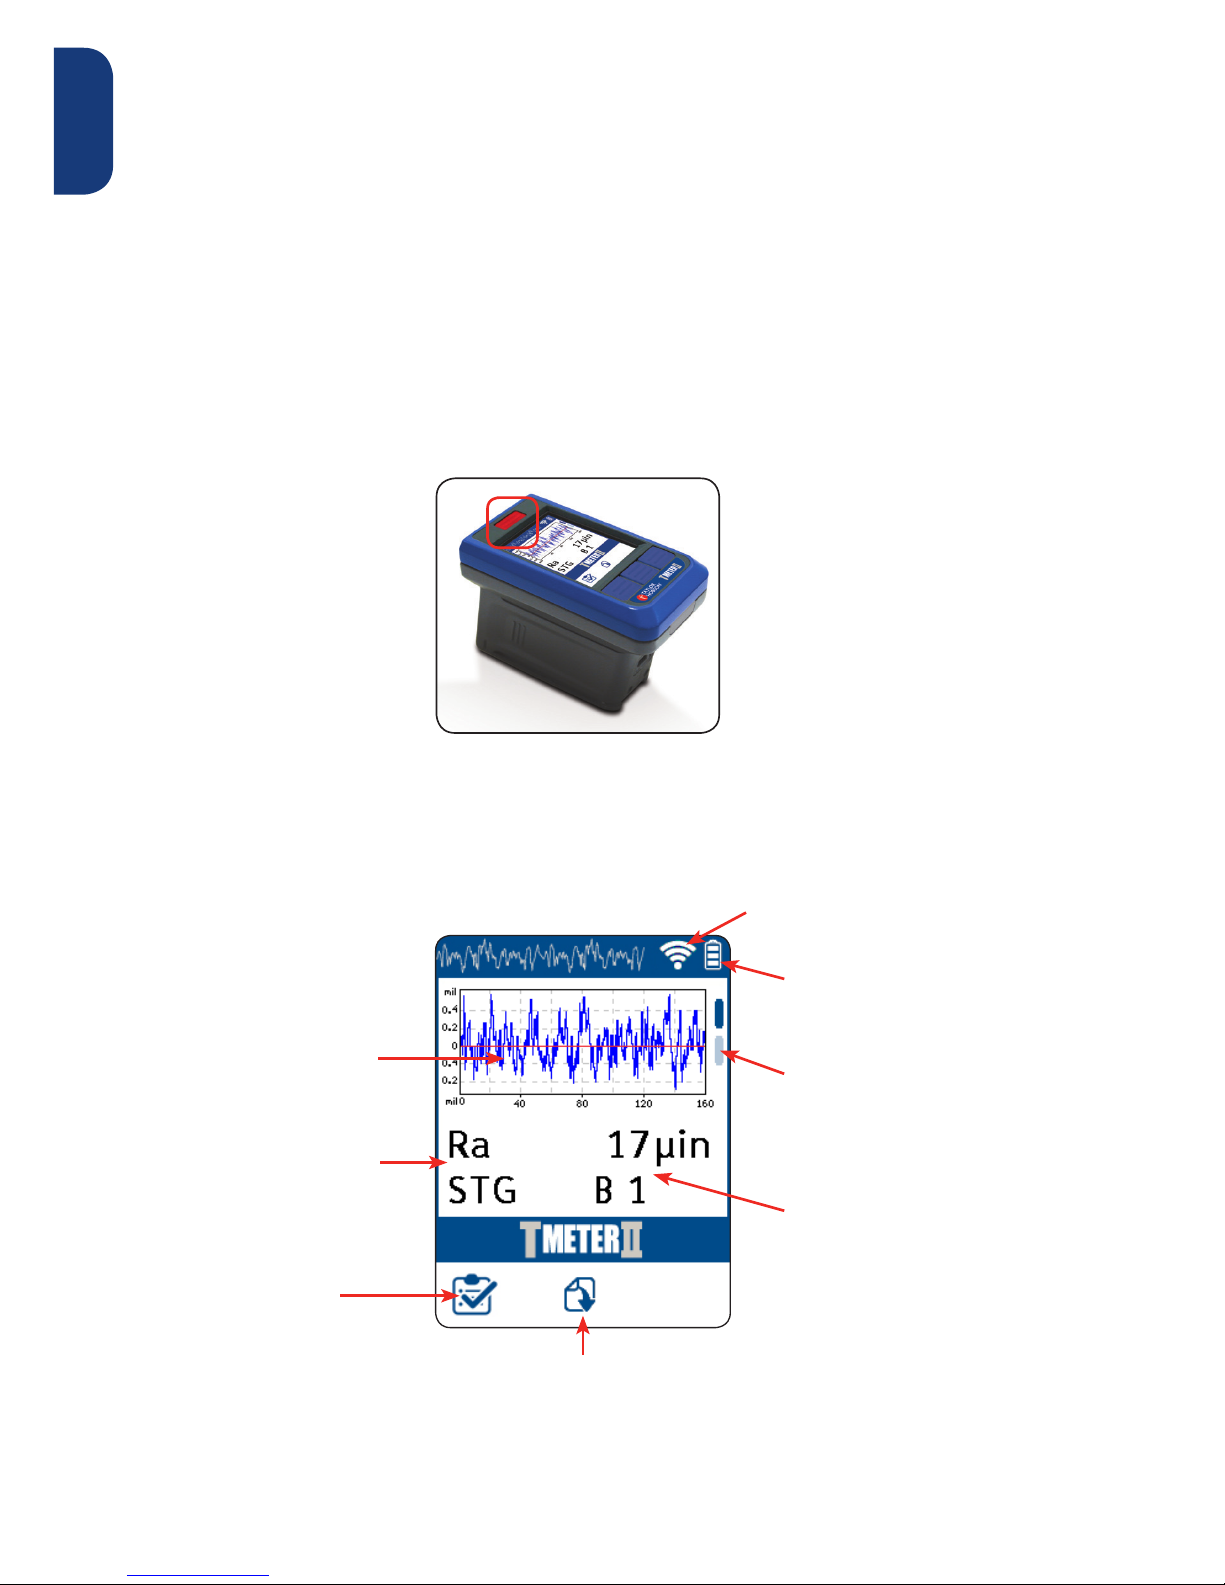
Device icons
Page down
Connectivity status
Calibration
menu
Measurement
parameters
Measurement
profile graph
Page tabs
Battery level/
Charging indication
Measurement
results

21
English
Charging
The mini USB port can be used for charging with the included mains
charger or with a standard USB Charger.
The T-Meter II must be charged in Storage/Charging mode. Avoid
taking measurements while charging.
It is strongly recommended that the unit be plugged in to charge for
at least 4 hours, when the following critically low battery indications
are observed;
• Battery icon on display unit flashes when powered up.
• The measure button is disabled.
• Traverse unit flashes Red LED, and will not accept measure
command.
• Display and traverse units power down after 10 seconds of being
switched On.
• Neither of the units will power up
Note
The T-Meter II uses the latest Lithium Polymer battery technology. As
with any other Lithium Polymer based device, leaving the T-Meter II at
a critically low battery level for an extended period may permanently
reduce the battery capacity.
For optimal battery life it is advised to charge the T-Meter II at least
once every month even if it is not in use.
T-Meter II storage/
charging mode

22
English
Calibration
To calibrate the instrument, a certified calibration standard is
required. A reference specimen is supplied with the instrument and
is recommended for use in the calibration procedure. Press the
calibration button to enter the calibration screen.
In the calibration screen, the default or last saved calibration Ra
value will be displayed. To change this calibration value, press the
settings icon. Then use the up (+) and down (-) buttons to adjust the
calibration Ra value to the desired number. The Ra value should be
set to 229 µin when using the reference calibration standard provided
with the instrument. Press the back button to accept the value and
return to the calibration screen.

23
English
Place the T-Meter II on the calibration standard provided with the unit.
Press the measure button to take a measurement on the calibration
standard.
The measured Ra value will be displayed at the end of the
measurement. To accept and complete the calibration, press the tick
button.
At any time, press the cross (x) button to exit the calibration menu.
If the calibration error is more than 10% then a warning is shown. To
complete and accept the calibration, press this icon.
Calibration
complete
Calibration
complete

24
English
Factory reset
To reset the T-Meter II to factory settings, hold the right-hand
navigation button for about 3 seconds.
Press the delete settings button.
In the reset screen, press the tick button to do a factory reset or the
cross (x) button to exit and return to the main results screen.
Press the back arrow at any time to exit and return to the results
screen.
In the factory reset menu, the battery percentages of both the display
unit and the traverse unit will be displayed along with their Bluetooth
address.
The factory reset function works only when the T-Meter II is paired
(either via Bluetooth or in connected mode).

25
English
Error codes
The following are the T-Meter II error codes and their meanings:
• E1 – Motor failure/ Sensor always obscured
• E2 – Motor misaligned/ Sensor never obscured
• E3 – Motor speed setting failure
• E4 – Traverse unit reset to default settings
• E5 – Traverse unit battery monitor failed to respond
• E6 – Display unit battery monitor failed to respond
• E7 – Display unit reset to default settings
• E8 – Failed to store display unit configuration data
If any of the above errors are observed, press the back button to
clear the error and continue. If the errors persist, please contact Taylor
Hobson Help Desk: Thhelp@ametek.com
Note
Example of error screen shown above (Error E1).

26
English
 Loading...