

Page 1

®
TTi
Colorimeter Series
User’s Manual
Taylor Technologies, Inc.
800-TEST KIT (837-8548)
www.taylortechnologies.com
Page 2

Page 3

®
TTi
Colorimeter Series User’s Manual
Page 4
Page 5

®
TTi
Colorimeter Series User’s Manual
First Edition
last revision to this edition 6/12/2017
Taylor Technologies, Inc. Sparks, Maryland
Page 6

Taylor Technologies, Inc., Sparks, Maryland 21152
© 2012 Taylor Technologies, Inc.
All rights reserved. First edition published online 2012
For ready reference by the reader, the date of the last revision
to the manual is posted on the title page. The latest revision
date for each chapter or subsection is posted in parentheses
after its title in the table of contents. Check these periodically
to make sure your file copy is up to date.
Page 7

TABLE OF CONTENTS
PART 1 GENERAL INFORMATION
Safety and General Precautions (4/21/15 ) .............................................................................................1-3
Colorimeter Description ........................................................................................................................1-3
Features (10/19/12) ....................................................................................................................... 1-3
Optional Chemical Forms (4/19/13) ................................................................................................1-4
Components and Optional Accessories (6/12/17) ...................................................................................1-5
Colorimeter Reagent Packs (6/12/17) ....................................................................................................1-5
Supplementary Testing Supplies (4 /7/15 ) ...............................................................................................1-7
Registration (10/19/12) ........................................................................................................................1-7
Contacting Taylor Technologies (4 / 21/15) ..............................................................................................1-8
PART 2 TESTING PRIMER
Introduction to Colorimetric Absorption Analysis (10/19/12) ..................................................................... 2-3
Best Practices .....................................................................................................................................2-3
Sampling (10/19/12) ......................................................................................................................2-4
Filtering Samples (10/19/12) ..........................................................................................................2-4
Diluting Samples (10/19/12) ...........................................................................................................2-4
Pretreating Samples (4/14/16) ........................................................................................................2-5
Adding and Mixing Reagents (10/19/12) ..........................................................................................2-6
Storing Reagents (10/19/12) ..........................................................................................................2-6
Inserting and Aligning Sample Cells (4/ 2/13 ) ...................................................................................2-7
Performing a Test (10/19/12) .........................................................................................................2-8
Cleaning Sample Cells (10/19/12) ...................................................................................................2-8
PART 3 COLORIMETER OPERATION
The PC App (10/19/12) ........................................................................................................................3-3
Guide to Operating Parts and Controls (10/19/12) ..................................................................................3-3
Battery Installation/Connection to a Power Supply (10/19/12)..................................................................3-4
Keypad (10/19/12) ............................................................................................................................... 3-5
Display (10/19/12) ...............................................................................................................................3-6
Screen Format and Navigation (10/19/12) ..............................................................................................3-6
Icons and Symbols (10/19/12) ..............................................................................................................3-8
Main Menu (10/19/12) .........................................................................................................................3-9
Test Menus (10/19/12) .........................................................................................................................3-10
Initial Start-Up (10/19/12) .....................................................................................................................3-11
vTTi® Colorimeter User’s Manual
Page 8

PART 3 COLORIMETER OPERATION (cont’d)
Start Test ............................................................................................................................................3 -12
How to Perform a Test (10/19/12) ...................................................................................................3-12
Test Alerts (10/19/12) ....................................................................................................................3 -17
Test Timers and Auto-Read Option (10/19/12) .................................................................................3-17
Adjust Calibration (10/19/12) .......................................................................................................... 3-21
Access Test Data (10/19/12) ................................................................................................................3-24
Edit Favorites (10/19/12) ......................................................................................................................3-26
Edit Series (10/19/12) ..........................................................................................................................3-29
How to Perform a Series Test (10/19/12) ............................................................................................... 3-32
Tools ................................................................................................................................................... 3-35
Data Transfer (10/19/12) ................................................................................................................3-36
User Timer (10/19/12) ...................................................................................................................3-37
Settings (10/19/12) ..............................................................................................................................3-38
Absorbance and Transmittance Tests (10/19/12) ....................................................................................3-42
User-Developed Tests ...........................................................................................................................3-45
Program and Transfer a User-Developed Test (4/19/13) ....................................................................3-45
Edit a User-Developed Test (4/15/13) .............................................................................................. 3-48
Delete a User-Developed Test (4/15/13) ..........................................................................................3-48
Test Instruction Example (4 / 2/13 ) .........................................................................................................3-48
PART 4 USING THE PC APP
Transferring Test Data (4/15/13) ...........................................................................................................4-3
Maintaining a Customer Database (4 / 2/13 ) ...........................................................................................4-4
Updating the PC App, Firmware, and Test Files (4/15/13) ....................................................................... 4-5
Creating User-Developed Tests (4/19/13) ..............................................................................................4-6
Accessing Helpful Links (4 /2 / 13 ) .........................................................................................................4-6
PART 5 MAINTENANCE
Accuracy Check (10/19/12) ..................................................................................................................5-3
Routine Care (4 / 2/13 ) ..........................................................................................................................5-3
Waste Disposal (4 / 21/15) ..................................................................................................................... 5-3
Warranty Information (10/19/12) ........................................................................................................... 5-4
PART 6 BEFORE YOU CALL FOR SERVICE
Error Codes (10/19/12) ........................................................................................................................6-3
Return Policy (10/19/12) ......................................................................................................................6-5
vi TTi® Colorimeter User’s Manual
Page 9

PART 7 COLORIMETER SPECIFICATIONS
Specifications Summary (4/19/13) ........................................................................................................7-3
PART 8 COMPLIANCE SYNOPSIS
Certification (10/19/12) ........................................................................................................................8-3
Information to the User (10/19/12) ........................................................................................................8-3
viiTTi® Colorimeter User’s Manual
Page 10

1
Page 11

Part 1 General Information
Part 1
General
Information
1-1T Ti® Colorimeter User’s Manual
Page 12

Page 13

Part 1 General Information
SAFETY AND GENERAL PRECAUTIONS
he TTi® Colorimeter Series User’s Manual and actual test instruction(s) should be read in their entirety
T
before performing the initial setup, running any tests, or customizing the Colorimeter. We recommend
printing a hard copy of this manual for your files. The preprinted Quick-Start Guide supplied with the Colorimeter
summarizes key points in the User’s Manual and is intended to travel with the device for ready reference.
Observe the following precautions:
• Chemical safety:
Reagents for use with the instrument can be hazardous. Read and observe all information printed on reagent
labels and corresponding Safety Data Sheets (SDSs) prior to use. To view or print reagent SDSs, visit the
Product Info/Documents area of our website, www.taylortechnologies.com. You will need to know the
five-character product number signified by “R-XXXXX” on the reagent label and the test instruction. We
recommend printing file copies of the SDSs for all your reagents.
• Keep all reagents out of reach of children.
• Use only Taylor reagents for preprogrammed tests for operator safety and to avoid damage to the instrument.
• Operational requirements:
During operation place the instrument on a stable surface that is reasonably level, or hold in a horizontal
position if used as a handheld device.
• Environmental conditions:
Do not use or store the instrument in environments of extreme temperature or humidity.
Operational temperature range: 32°F–122°F (0°C–50°C)
Operational humidity limit: 90% @ 122°F (50°C) non-condensing
Do not immerse the instrument in water or use or store the instrument in environments with excessive
dust. The instrument has an IP67 environmental protection rating signifying that it is dust-tight and can
survive an accidental immersion in water of up to 1 meter for 30 minutes.
Do not leave the instrument exposed to direct sunlight for a prolonged period.
When not in use, keep the instrument stored in its carrying case.
• Voltage symbol indicates DC voltage. See instrument label.
COLORIMETER DESCRIPTION
The TTi® Colorimeter, manufactured by Taylor Technologies, Inc., is a handheld, multiwavelength,
microprocessor-controlled, menu-driven, direct-readout instrument that employs light-emitting diodes (LEDs)
as light sources. The instrument design combines technical performance with an intuitive user-interface, the
functional attributes most sought by water analysts, and durability. Its portability and data-logging capabilities
make it well suited for use in the field in addition to the laboratory.
FEATURES
• High performance spectral optics:
LEDs are durable and ideally suited for use in portable instruments.
Wavelength filters are used to narrow the bandpass of light emitted from LEDs to obtain accurate,
repeatable results. The instrument contains 6 wavelength filters (420, 470, 520, 570, 620, and 660 nm).
Wavelength filters are specified to provide a wavelength accuracy of ±1 nm and a wavelength bandwidth
of 10 nm ±1 nm. In addition, all filters are manufactured using a process that provides enhanced thermal,
environmental, and spectral stability.
1-3TTi® Colorimeter User’s Manual
Page 14
Part 1 General Information
• Preprogrammed tests for each model cover the most common tests sought by water analysts.
• Automatic wavelength selection for preprogrammed and user-developed tests.
• Integrated test timers (includes up to 4 preprogrammed test timers with AUTO-Read option) and 1 user
timer for general purposes.
• Test results displayed in concentration units (ppm, ppb, ppt, mg/L, µg/L, g/L), absorbance (ABS), or
transmittance (% T).
• Test results displayed in optional chemical forms (available for most preprogrammed tests).
• ADJUST CALIBRATION option allows adjustment of preprogrammed calibrations.
• Intuitive, easy to navigate user-interface.
• FAVORITES menu allows for a customized test menu to be created and edited.
• SERIES feature allows a group of selected tests to be chosen and performed consecutively in any order.
• Data storage and recall for 100 test results with time and date stamps.
• User-developed test capability allows users to program up to 8 proprietary tests of 12 data points each.
• Free PC App allows users to transfer test results, download test files and firmware, create user-developed
tests, and access helpful links.
• Custom graphical liquid crystal display (LCD) with anti-glare coating provides excellent contrast and
readability.
• Adjustable backlighting permits use in low-light environments; a timeout feature conserves battery life.
• Custom 8-button, silicone rubber keypad combines a soft, tactile feel with superior durability.
• Portable, rugged design that is waterproof and dust-tight.
• Powered by 4 AA batteries or an AC power adapter for connecting to a wall outlet, or a USB cable for
connecting to a PC or laptop (all power supply options are included with the instrument).
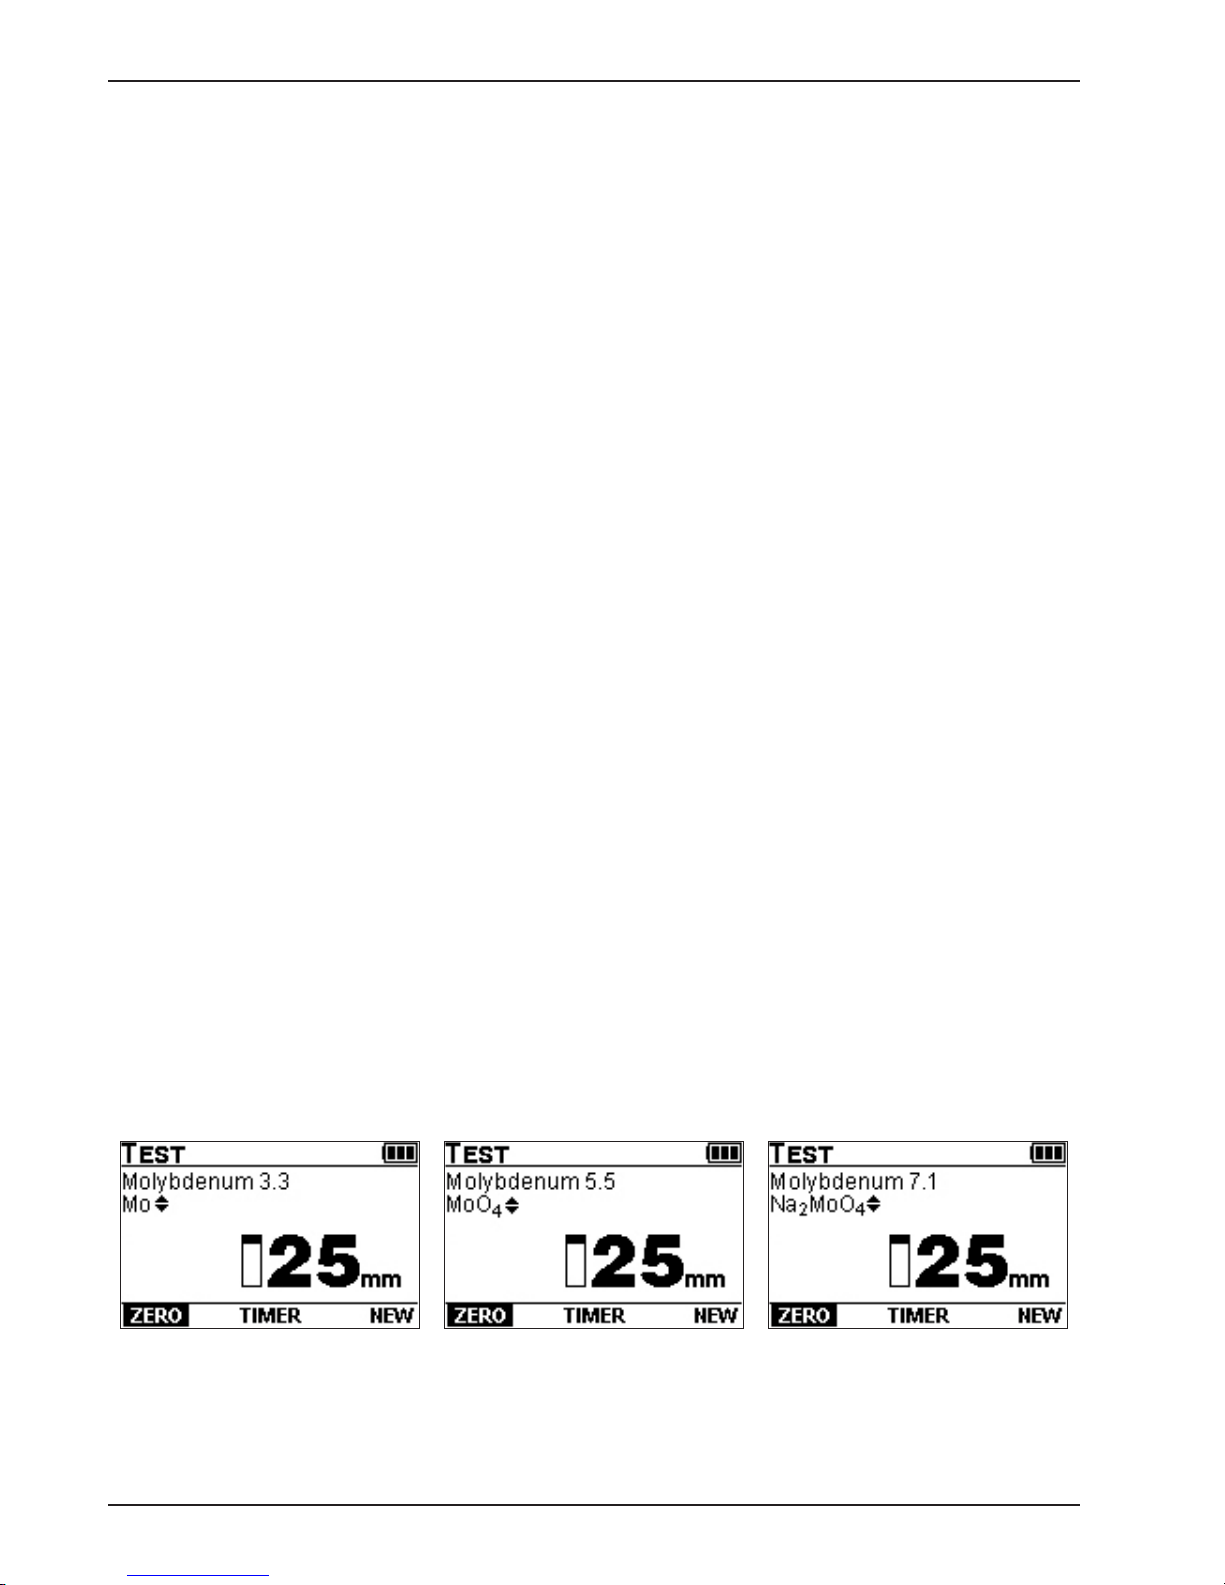
OPTIONAL CHEMICAL FORMS
Optional chemical forms for expression of test results are available for most tests. If available, will appear
to the right of the chemical form. When an optional chemical form is selected within a test, the range (or range
upper limit) on the test screen will change to correlate with the selected chemical form, and all subsequent test
results and stored test data will be expressed in terms of the selected chemical form. The selected chemical
form will remain the default for that test until changed by the user.
NOTE: If a new Taylor test file is downloaded using the PC App, the optional chemical forms for all
tests will reset to the default chemical form.
Illustration of optional chemical forms available for testing molybdenum
1-4 TTi® Colorimeter User’s Manual
Page 15

Part 1 General Information
COMPONENTS AND OPTIONAL ACCESSORIES
Your meter purchase includes the following components:
Quantity Part Number Description
1 M-XXXX TTi® Colorimeter (model number on instrument faceplate)
1 5543 Quick-Start Guide
4 6105 AA Alkaline Battery
1 6535 AC Power Adapter
1 6551 Dilution Vial, 50 mL w/ cap
1 6552 USB Cable
4 6649 Foam Brush
2 9601 Sample Cell, 25 mm w/ cap
2 9602 Sample Cell, 15 mm w/ cap
The following optional accessories, viewable on www.taylortechnologies.com, may be purchased separately:
Part Number Description
K-8000 TTI® Colorimeter Series Accuracy Check Kit
714 6 Soft Carrying Case, gray (for use with TTi® 2000 or 3000), 11"w x 7"d x 4.625"h
7203 Replacement Foam Insert (for 7146)
9502 Hard Carrying Case, gray (for use with TTi® 3000), 20"w x 15.625"d x 5.5"h
9504 Hard Carrying Case, blue (for use with TTi® 2000), 20"w x 15.625"d x 5.5"h
9506 Hard Carrying Case, gray (for use with TTi® 2000), 10.75"w x 9"d x 7"h
All components and optional accessories, excluding batteries, as well as reagent packs (see next section), are
available directly from Taylor Technologies or authorized distributors. To order from Taylor, call toll-free
800-TEST KIT (837-8548).
COLORIMETER REAGENT PACKS
Currently available reagent packs for the TTi® 2000 Colorimeter are listed below. Each pack contains
an instruction and all the reagents needed to run the specified test, housed in a snap-fit kit of ABS plastic.
Instructions and kits are sized to fit securely in the optional Hard Carrying Case (#9504 or #9506).
Alternatively, the contents of the reagent packs may be transferred to your existing carrier.
Part Number Description
K-8001 Reagent Pack, Colorimeter, Chlorine (free/total), DPD (powder), 0-4.00, 0-8.0, or 0-10.0 ppm
K-8002 Reagent Pack, Colorimeter, Bromine (total), DPD (powder), 0-10.00 or 0-20.0 ppm
K-8005 Reagent Pack, Colorimeter, Phosphate, 0-3.00 ppm (20-3000 ppb)
K-8009 Reagent Pack, Colorimeter, Iron, 0-4.00 ppm
K-8012 Reagent Pack, Colorimeter, Copper, 0-3.00 ppm
K-8020 Reagent Pack, Colorimeter, Hydrogen Peroxide, 0-2.00 ppm
K-8023 Reagent Pack, Colorimeter, Sodium Chloride (Salt), 0-80 ppm
K-8024 Reagent Pack, Colorimeter, Alkalinity (total), 0-250 ppm
K-8027 Reagent Pack, Colorimeter, pH, 6.50-8.50
K-80 27AB Reagent Pack, Colorimeter, pH (with Acid & Base Demand), 6.50-8.50
K-8029 Reagent Pack, Colorimeter, Hardness (total), 0-500 ppm
K-8030 Reagent Pack, Colorimeter, Hardness (calcium), 0-800 ppm
K-8031 Reagent Pack, Colorimeter, Monopersulfate, 0-10.0 ppm
1-5TTi® Colorimeter User’s Manual
Page 16
Part 1 General Information
Colorimeter Reagent Packs (cont’d)
K-8032 Reagent Pack, Colorimeter, Cyanuric Acid, 7-120 ppm
K-8034 Reagent Pack, Colorimeter, Manganese, 0-0.80 ppm
K-8035 Reagent Pack, Colorimeter, Nitrate, 0-44 ppm
K-8040 Reagent Pack, Colorimeter, Biguanide, 0-70 ppm
Currently available reagent packs for the TTi® 3000 Colorimeter are listed below. Each pack contains an
instruction and all the reagents needed to run the specified test, housed in a snap-fit kit of ABS plastic.
Instructions and kits are sized to fit securely in the optional Hard Carrying Case (#9502). Alternatively, the
contents of the reagent packs may be transferred to your existing carrier.
Part Number Description
K-8001 Reagent Pack, Colorimeter, Chlorine (free/total), DPD (powder), 0-4.00, 0-8.0, or 0-10.0 ppm
K-8002 Reagent Pack, Colorimeter, Bromine (total), DPD (powder), 0-10.00 or 0-20.0 ppm
K-8003 Reagent Pack, Colorimeter, Molybdenum, 0-3.30 ppm
K-8004 Reagent Pack, Colorimeter, Phosphate, 0-70.0 ppm
K-8005 Reagent Pack, Colorimeter, Phosphate, 0-3.00 ppm (20-3000 ppb)
K-8006 Reagent Pack, Colorimeter, Polymer, 0-20 or 20-500 ppm
K-8007 Reagent Pack, Colorimeter, Silica, 0-60.0 ppm
K-8008 Reagent Pack, Colorimeter, Silica, 0-4.00 ppm
K-8009 Reagent Pack, Colorimeter, Iron, 0-4.00 ppm
K-8 010 Reagent Pack, Colorimeter, Iron (ferrous), 0-3.00 ppm
K- 8 011 Reagent Pack, Colorimeter, Iron (total), 0-0.300 ppm
K-8012 Reagent Pack, Colorimeter, Copper, 0-3.00 ppm
K-8013 Reagent Pack, Colorimeter, Copper (free), 0-0.200 ppm
K-8014 Reagent Pack, Colorimeter, Phosphonate, 0-30.0 ppm
K-8014-A C Reagent Pack w/ accessories, Colorimeter, Phosphonate, 0-30.0 ppm
K-8015 Reagent Pack, Colorimeter, Hydrazine, 0-1.50 ppm
K-8 016 Reagent Pack, Colorimeter, Oxygen Scavenger, 0-1.000, 0-0.700, 0-2.450, 0-2.000, 0-3.000 ppm
K-8017 Reagent Pack, Colorimeter, Manganese, 0-30.0 ppm
K-8018 Reagent Pack, Colorimeter, Boron, 0-2.00 ppm
K-8019 Reagent Pack, Colorimeter, Zinc, 0-3.00 ppm
K-8020 Reagent Pack, Colorimeter, Hydrogen Peroxide, 0-2.00 ppm
K-8021 Reagent Pack, Colorimeter, Nitrite, 0-150 ppm
K-8022 Reagent Pack, Colorimeter, Hardness (total), 0-4.00 ppm
K-8023 Reagent Pack, Colorimeter, Sodium Chloride (Salt), 0-80 ppm
K-8024 Reagent Pack, Colorimeter, Alkalinity (total), 0-250 ppm
K-8025 Reagent Pack, Colorimeter, Sulfide, 0-1.00 ppm
K-8026 Reagent Pack, Colorimeter, Hardness (calcium), 0-4.00 ppm
K-8027 Reagent Pack, Colorimeter, pH, 6.50-8.50
K-80 27AB Reagent Pack, Colorimeter, pH (with Acid & Base Demand), 6.50-8.50
K-8028 Reagent Pack, Colorimeter, Molybdenum, 0-60.0 ppm
K-8029 Reagent Pack, Colorimeter, Hardness (total), 0-500 ppm
K-8030 Reagent Pack, Colorimeter, Hardness (calcium), 0-800 ppm
K-8031 Reagent Pack, Colorimeter, Monopersulfate, 0-10.0 ppm
1-6 TTi® Colorimeter User’s Manual
Page 17
Part 1 General Information
Colorimeter Reagent Packs (cont’d)
K-8032 Reagent Pack, Colorimeter, Cyanuric Acid, 7-120 ppm
K-8033 Reagent Pack, Colorimeter, Azole, 0-25.0 ppm
K-8033-AC Reagent Pack w/ accessories, Colorimeter, Azole, 0-25.0 ppm
K-8034 Reagent Pack, Colorimeter, Manganese, 0-0.80 ppm
K-8035 Reagent Pack, Colorimeter, Nitrate, 0-44 ppm
K-8036 Reagent Pack, Colorimeter, Turbidity, 10-400 FAU
K-8038 Reagent Pack, Colorimeter, Ammonia-Nitrogen, 0-1.00 ppm
K-8039 Reagent Pack, Colorimeter, Chlorine Dioxide, DPD, 0-8.0 ppm
K-8040 Reagent Pack, Colorimeter, Biguanide, 0-70 ppm
K-8041 Reagent Pack, Colorimeter, BlueTrace (6120), 0-10 mg/L
SUPPLEMENTARY TESTING SUPPLIES
4029 Pipet, Calibrated (0.5 & 1.0 mL), plastic
4078 Pipet, Graduated (3 mL w/ 0.5 mL div), plastic
9198 Sample Tube, Graduated (25 mL) w/ cap, plastic
96 01-3 Sample Cell, 25 mm, 3-pack
9602-3 Sample Cell, 15 mm, 3-pack
6649-4 Foam Brush, 4-pack
6656 UV Light, SteriPEN® (use with all tests requiring UV digestion)
9803 Syringe Filter Start-Up Pack (no filter discs), 60 mL, plastic (contains 6247, 6249, and instruction)
6247 Syringe Filter (no filter disc holder or filter discs), 60 mL, plastic
6260 Syringe Filter (no filter disc holder or filter discs), 30 mL, plastic
6249 Filter Disc Holder, 25 mm, Millipore™, (fits 6247 or 6260) use with filter discs 6261, 6248, 6257
6086-10
6261
6248
6257
6551 Dilution Vial, 50 mL w/ cap, plastic
Filter Discs (w/ individual filter disc holders), 0.45 µm, Millipore™, 10-pack
Filter Discs, 25 mm diameter, 0.45 µm, Millipore™, 100/box
Filter Discs, 25 mm diameter, 5.0 µm, Millipore™, 100/box
Filter Discs, 25 mm diameter, 2.5 µm, Whatman™, 100/box
REGISTRATION
To have full use of the TTi® Colorimeter’s features, you must first register as the owner of record. To begin the
process, go to www.taylorsoftwaresupport.com and enter the site through the TTi® Colorimeter portal. Be
prepared to enter the following information:
• Colorimeter serial number (S/N) - found on the product label on the bottom of the meter
• Owner’s (contact’s) name
• Business name
• Business mailing address
• Contact’s telephone number
• Contact’s e-mail – for notification about important news related to your meter model (e-mail addresses are
not shared with third parties)
Upon completion of the registration process, you will be able to download the TTi® Colorimeter Series PC App to
your computer. For complete information about this software, see Part 3, The PC App, and Part 4 in its entirety.
1-7TTi® Colorimeter User’s Manual
Page 18

CONTACTING TAYLOR TECHNOLOGIES
General Office: 410-472-4340
Our business hours are 8:00 a.m.–4:45 p.m. (Eastern Time), Monday through Friday,
except major holidays.
Customer Service: 800-TEST KIT (837-8548)
Customer service representatives are available 8:00 a.m.–5:00 p.m. for applicationspecific advice, to open an account, place an order, inquire about order status, or
report a problem with a shipment. If you require more advanced technical assistance,
your call or e-mail will be forwarded to the appropriate resource. You may also leave
us a voice-mail or e-mail message at anytime.
Exchanges and credits are only considered within 30 days of shipment. Please check
your order upon receipt and notify us immediately if there is any problem. To
assure the quality of our chemistries, we do not resell reagents returned to us. For this
reason they cannot be returned for credit, unless the reagents were shipped in error
by Taylor or their quality was compromised before they were shipped. To apply for an
exchange or credit under these mitigating circumstances, you will need to know the
lot number located on the lower left-hand corner of the reagent label.
Part 1 General Information
Technical 800-TEST KIT (837-8548)
Assistance: General assistance for TTi® Colorimeter owners is available Monday through Friday
from 8:00 a.m. – 4:45 p.m. Eastern Time, except major holidays, from Taylor Technologies’ customer service group by calling 800-TEST KIT (837-8548). Outside normal
business hours you may record a message for us by using the same toll-free number,
or you can leave an e-mail message using customerservice@taylortechnologies.com.
877-TEST KIT (837-8548)
Help specifically related to the TTi® Colorimeter Series PC App is available
9:00 a.m.–5:00 p.m. (Pacific Time), Monday through Friday (except major holidays),
from Taylor Technologies’ programmers. Online guidance may be found at
www.taylorsoftwaresupport.com. Enter through the TTi® Colorimeter portal.
E-mail: customerservice@taylortechnologies.com
Fax: 410-771-4291
Mailing Address: Taylor Technologies, Inc.
31 Loveton Circle
Sparks, Maryland 21152
USA
Corporate Website: www.taylortechnologies.com
Here you will find product descriptions, including test instructions, potential interferences, and Safety Data Sheets; video product demonstrations; high- and low-resolution
product photography; and articles of interest to water analysts. While online, you may
apply for an open-terms account, place an order, or post a question for our staff.
Software Website: www.taylorsoftwaresupport.com
This site is dedicated to supporting Taylor software products only. Enter through the
TTi® Colorimeter portal.
1-8 TTi® Colorimeter User’s Manual
2
Page 19

Part 2 Testing Primer
Testing Primer
Part 2
2-1T Ti® Colorimeter User’s Manual
Page 20

Page 21
Part 2 Testing Primer
INTRODUCTION TO COLORIMETRIC ABSORPTION ANALYSIS
Colorimetric absorption analysis, as used in this manual, refers to a technique for determining the concentration of various constituents of a water sample by adding reagents that selectively react with the substance being
analyzed to produce a color then measuring the absorbance of the resulting color to determine the substance
concentration.
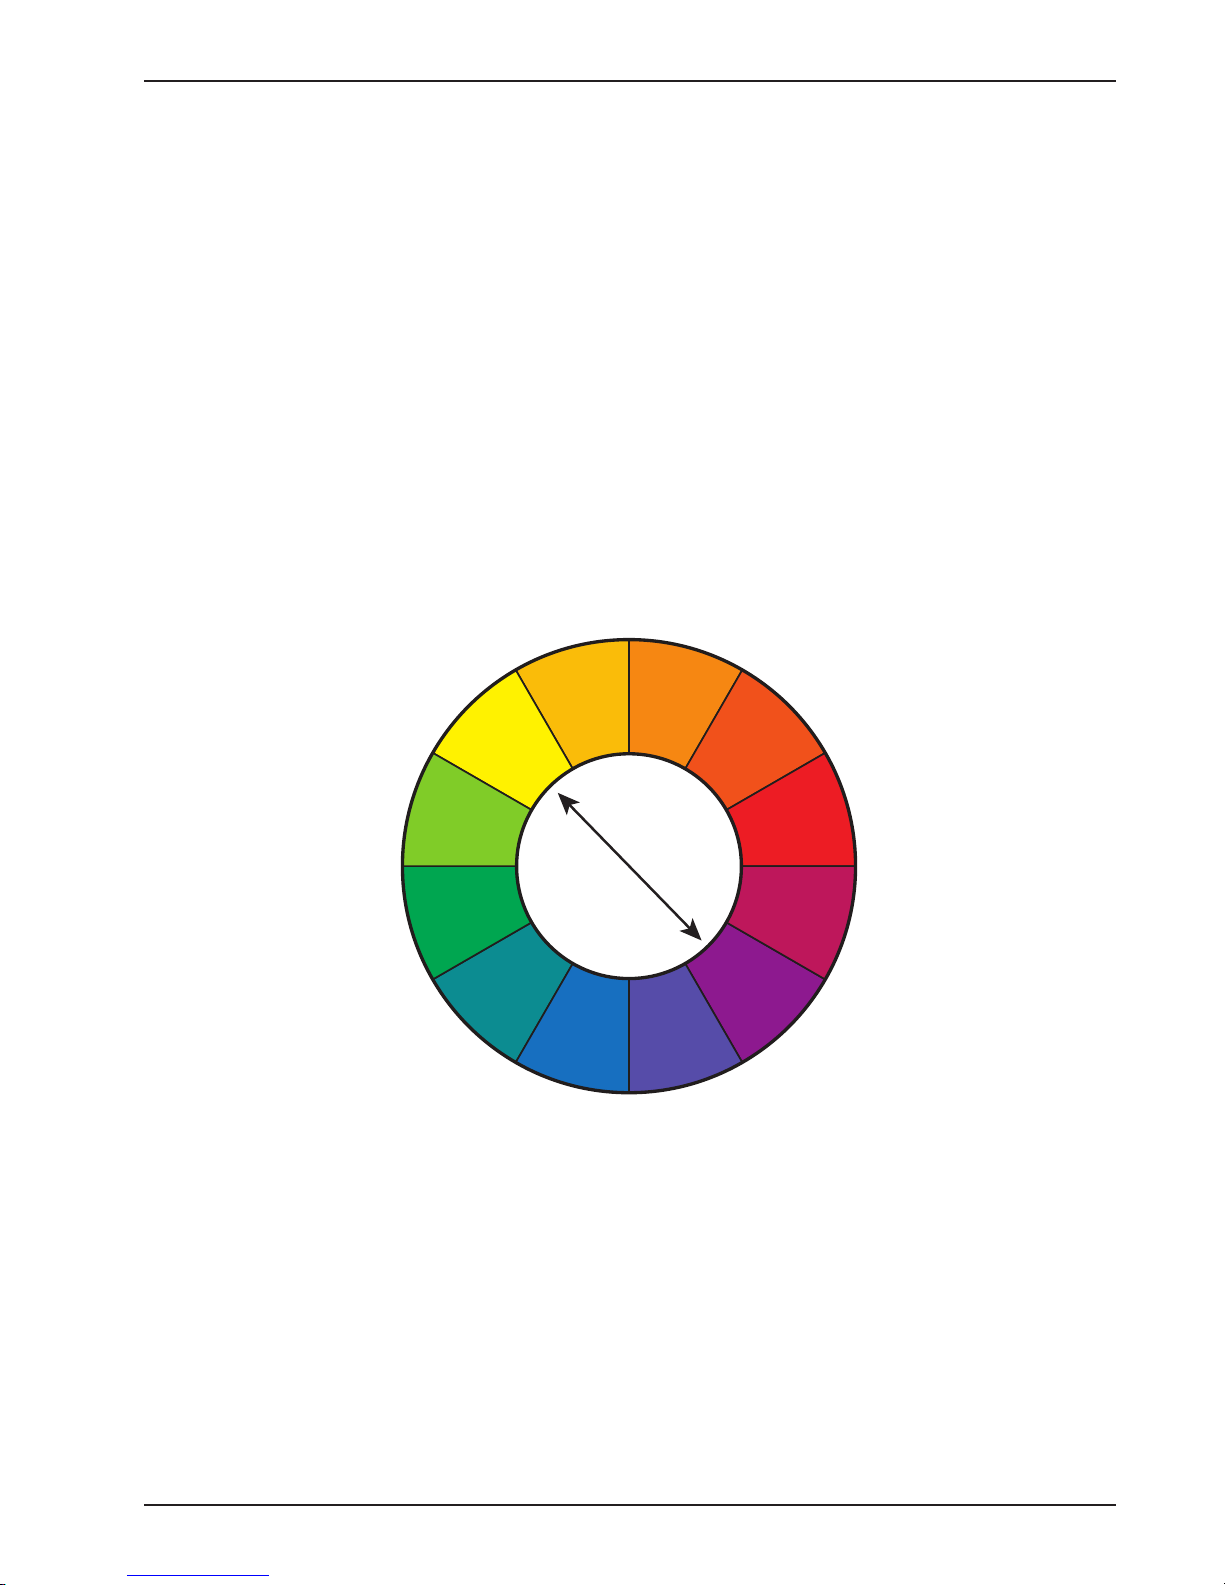
Visible light (as opposed to ultraviolet, infrared, etc.) is a type of electromagnetic radiation that can be seen
by the human eye. It consists of wavelengths ranging from approximately 400 to 700 nm. When visible light
passes through a colored solution, certain wavelengths are selectively and strongly absorbed while other
wavelengths pass through without being absorbed. This principle of absorption provides a means for quantification based on the Beer-Lambert Law, which states the concentration of a substance in solution is directly
proportional to both the absorbance and viewdepth of the solution. It is interesting to note the wavelengths
strongly absorbed by a colored solution correspond to colors which are complementary to the color of the
solution. For example, a yellow solution strongly absorbs violet wavelengths, a blue solution strongly absorbs
orange wavelengths, and a red solution strongly absorbs green wavelengths. Many substances in water samples
are colorless, so reagents must be added that selectively react with the analyte to produce a color that will
absorb specific wavelengths of visible light.
Illustration of complementary colors on a color wheel
YELLOW
GREEN
GREEN
YELLOW
BLUE
GREEN
YELLOW
ORANGE
BLUE
ORANGE
BLUE
VIOLET
RED
ORANGE
VIOLET
RED
RED
VIOLET
Taylo r’s T Ti® Colorimeter is an optical instrument for colorimetric absorption analysis which incorporates
light-emitting diodes (LEDs) to produce visible light, wavelength filters to isolate narrow bands of light that
pass through the sample, photoelectric detectors to convert light that passes through the sample into a useable
signal, a signal processor, and software to determine the concentration of a sample. In general, to perform an
instrumental absorption analysis, the instrument is first ZEROED with a blank (usually a sample containing
no reagents) to compensate for inherent color in the sample. Next, a sample containing all necessary reagents
is READ and the concentration is computed and displayed.
BEST PRACTICES
Proper technique is essential for obtaining accurate results when performing a water test. False test results can
lead the analyst into making an incorrect evaluation of the condition of the water, thereby applying the wrong
corrective actions to a system. The following practices will help you obtain reliable test results.
2-3TTi® Colorimeter User’s Manual
Page 22

Part 2 Testing Primer
SAMPLING
• Use dedicated sample bottles. These bottles should be labeled as such and not used for another purpose.
• Use a sample bottle of sufficient size. If too small, you will not have enough water to perform multiple
tests.
• Rinse the sample bottle and cap well (we recommend three times) with deionized water, distilled water, or
sample water.
• Take a sample that is representative of conditions in the whole system:
Closed Systems - Let the sample stream flow at a constant velocity for at least five minutes before beginning the collection process. If you blow out the line with a higher-than-normal flow, subsequently be sure
to reduce the flow to the normal rate for five minutes before proceeding with sampling.
Open Systems - Chemistry at the surface is atypical as the water is interacting with the air above and
oils and debris may be present. Samples taken near return lines, makeup water inlets, chemical feeders,
or in corners also can be different than in the body-at-large since the water may not have experienced the
same mixing action as in open areas. A sample taken downstream from a tributary or pollution source
will be different from a sample taken upstream. With these considerations in mind, select a representative
location, immerse the sample container bottomside up to about elbow depth, and then turn the container
upright to fill.
• Fill the sample bottle to overflowing. Do not leave any room for air in the bottle.
• Avoid contaminating the sample once collected. Immediately cap the bottle tightly to avoid contamination.
• Do not put any probe into a bottle of sample water that will be used for multiple tests.
• Do not let the sample sit before testing, or it may change its character. Boiler water samples that should be
at room temperature when beginning the test should be promptly cooled in a cold water bath to between
80°F– 90°F (27°C–32°C).
• Dispense sample water into the sample cell until the lowest point of the meniscus sits on the correct fill
mark when viewed at eye level.
• After a sample cell has been filled and capped, hold it by the cap and then wipe off any moisture or
fingerprints on the glass using a clean, lint-free cloth.
FILTERING SAMPLES
Unless otherwise specified, test methods are designed to determine dissolved substances in water samples.
If samples are turbid they may contain suspended solids, algae, or other substances that may interfere in the
test procedure. We recommend using a 0.45 µm membrane filter disc in a syringe-type filter to remove these
substances prior to testing.
DILUTING SAMPLES
Some test procedures specify diluting a sample to adjust the concentration of the analyte to fit the range of
the test. In such cases, the instruction will provide all details for performing the procedure with the dilution
vial supplied with the kit. When a test sample is diluted, the result displayed must be multiplied by a factor
to obtain the concentration of the undiluted analyte. This multiplication factor will be specified in the test
instruction.
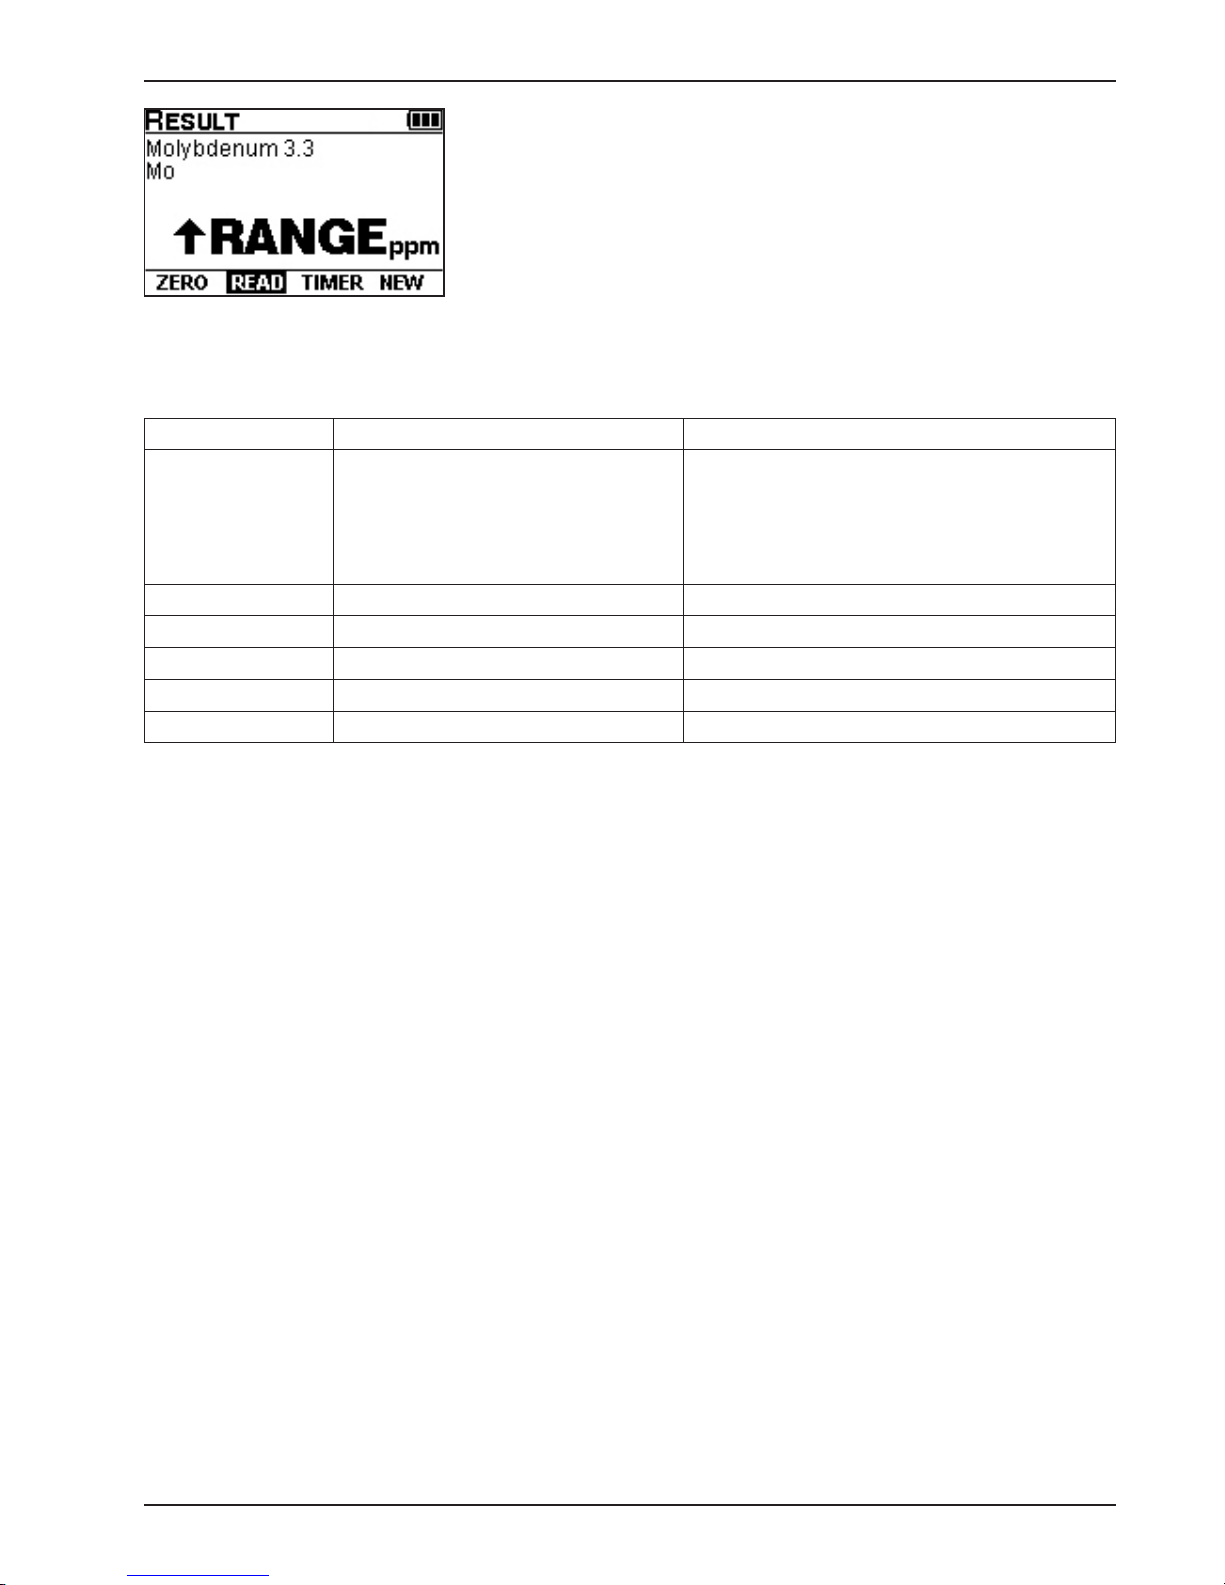
Sample dilution also may be required even if a this procedure is not specified in the test instruction. When the
test result is above RANGE, the sample must be diluted using high-purity water and the dilution vial supplied
with the kit. See example display, following.
2-4 TTi® Colorimeter User’s Manual
Page 23
Part 2 Testing Primer
Illustration of above RANGE alert signaling dilution is necessary
Start with a small dilution and continue to increase the dilution as necessary to bring the concentration of the
analyte into the range of the test. (NOTE: Sample dilution should not be performed when testing pH or after
reagent addition, only before reagent addition.) The following table can be used as a guide.
Sample High-Purity Water Multiplication Factor
Add this volume of
sample to the dilution vial
33 mL 17 mL 1.5
25 mL 25 mL 2
10 mL 40 mL 5
5 mL 45 mL 10
2 mL 48 mL 25
Add this volume of high-purity water to the
dilution vial, cap, and mix thoroughly. Retest this
diluted sample according to the test instructions.
If the test result is now within the range of the test, multiply the result by the multiplication factor listed below to
determine the concentration of the analyte in the undiluted
sample. If the test result is still above RANGE, increase the
dilution and retest.
PRETREATING SAMPLES
Some samples may require digestion in order to test for total metals. To perform a digestion, rst
reduce the sample volume by gently heating and then reuxing to ensure all organometallic bonds
have been broken. Allow the sample to cool and then dilute to a specied volume with deionized
water. Sample digestion will require the following materials:
• ASTM Type I water
• Beaker, 250 mL
• Graduated cylinder, 100 mL
• Hotplate or steam bath
• Hydrochloric acid (high-purity grade)
• Hydrochloric acid solution 1:1
Add 50 mL hydrochloric acid (high-purity grade) to 40 mL ASTM Type I water. Dilute to 100 mL with
ASTM Type I water.
• Nitric acid (high-purity grade)
• Nitric acid solution 1:1
Add 50 mL nitric acid (high-purity grade) to 40 mL ASTM Type I water. Dilute to 100 mL with
ASTM Type I water.
• Ribbed watch glass, 75 mm
• Volumetric flask, 100 mL
• Watch glass, 75 mm
2-5TTi® Colorimeter User’s Manual
Page 24

Part 2 Testing Primer
Procedure:
1. Acidify entire sample using nitric acid solution 1:1 to a pH of less than 2.0. Mix well and let sit for 16
hours. Do not filter sample to remove insoluble materials.
2. Transfer 100 mL of acidified sample water to 250 mL beaker.
3. Working inside a fume hood, add 2 mL nitric acid solution 1:1 and 1 mL hydrochloric acid solution 1:1.
4. Place beaker on hotplate inside a fume hood and cover with ribbed watch glass.
5. Turn on hotplate and evaporate sample to approximately 20 mL being careful not to allow sample to
boil. (This step should take approximately 2 hours.)
6. Carefully remove ribbed watch glass and replace with smooth watch glass.
7. Continue heating and gently reflux sample for 30 minutes. Slight boiling may occur, but avoid vigorous
boiling.
8. After 30 minutes turn off hotplate, carefully remove beaker, and allow beaker to cool to room temperature.
9. Quantitatively transfer sample to 100 mL volumetric flask and dilute to the mark with ASTM Type I
water. Mix well. If insoluble materials remain, the sample may be filtered being careful not to introduce
contamination to the sample.
10. The sample is now ready for testing.
ADDING AND MIXING REAGENTS
A reagent is added to sample water using a dropper bottle with a precisely bored tip, a pipet, or a dipper spoon.
To assure the correct amount of liquid reagent is added to the sample when using a dropper bottle, hold it vertically when dispensing, not at a slant. If static builds up at the dropper tip making the drop size progressively
smaller, eliminate the static by wiping around the tip with a clean, damp cloth or paper towel. When using
a pipet, fill the pipet to the correct mark; then be sure to dispense the entire contents into the sample. When
using a dipper spoon, a gentle tapping action against the rim of the sample cell may be required to dislodge all
the powdered reagent. Cap the sample cell and then swirl the contents, using wrist action, to assure thorough
mixing. Do not shake or invert the sample cell unless specified in the test instruction.
Observe the following precautions:
• To prevent contamination, cap reagents tightly immediately after use and be careful not to exchange bottle
caps.
• Do not substitute another manufacturer’s reagents for Taylor’s.
• Replace reagents that are more than a year old.
• Wipe off spills and soil on the Colorimeter’s exterior with a soft, damp cloth as soon as possible.
• Remove stray fluid from the sample cell compartment with a clean cotton swab.
STORING REAGENTS
Reagents are perishables. The chemicals used with the TTi® Colorimeter will degrade over time, even under
optimum conditions. The process of deterioration speeds up when storage conditions are not ideal. Extremes
of heat and cold, as well as prolonged exposure to air, sunlight, humidity/moisture, and volatile treatment
chemicals, will diminish their useful life.
To preserve freshness, make sure reagent containers are kept tightly closed. When in storage, reagents do best
in a cool, dark place away from drums and bags of treatment chemicals, especially chlorine and bromine. If
you must choose between a hot warehouse (or vehicle trunk) and the refrigerator, opt for the latter for longerterm storage. Keeping reagents in the refrigerator will prolong shelf life; however, once they are taken out, they
2-6 TTi® Colorimeter User’s Manual
Page 25
Part 2 Testing Primer
should be used because subjecting them to constant fluctuations in temperature will cause them to degrade
faster. Ideal storage temperatures are between 36°F–85°F (2°C–29°C), preferably in an environment without
big temperature swings.
Generally speaking, a reagent’s suitability for testing is suspect if it is over one year old, if it is not its usual
color, if there are floating particles that do not dissolve when shaken, if it has begun to stain its container, or if
it has crusted around the tip of the dropper bottle.
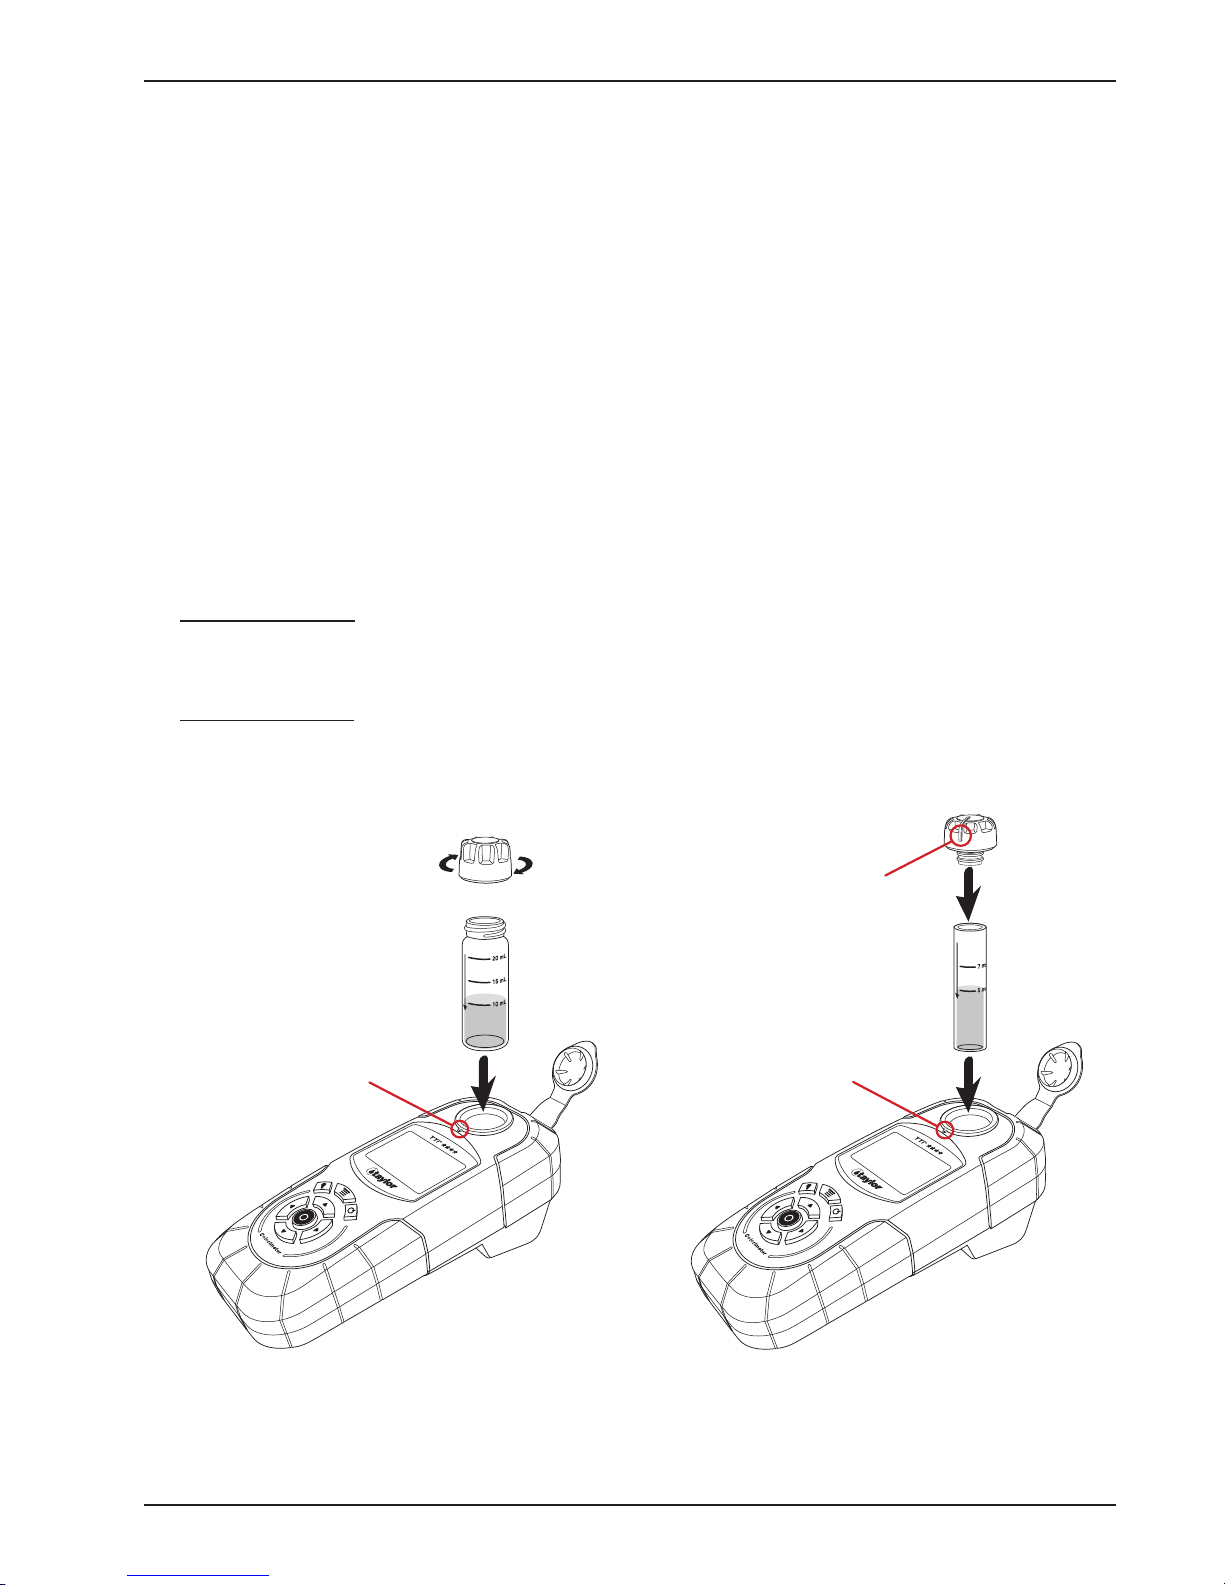
INSERTING AND ALIGNING SAMPLE CELLS
Taylor test procedures use either a 25 mm or 15 mm viewdepth sample cell, depending on which provides the
best combination of sensitivity and useable range. The 25 mm sample cell has greater viewdepth and employs
a screw thread cap. The 15 mm sample cell has less viewdepth and employs a plug cap. Test instructions specify
which sample cell to use.
For the most accurate result, align the sample cell correctly when inserting it in the sample cell compartment.
High-quality sample cells are supplied for use with the instrument but even minor variations in wall thickness
or diameter can cause slight variations in results if sample cells are not inserted in a consistent manner. Use the
following techniques to insert and align the 25 mm and 15 mm sample cells into the sample cell compartment:
25 mm Sample Cell - Partially insert the sample cell into the sample cell compartment. Align the arrow
on the sample cell with the notch on the meter; then gently push the sample cell down (without rotating)
until it rests on the base of the sample cell compartment.
15 mm Sample Cell - Align the raised line on the sample cell cap with the arrow on the sample cell. Insert
the sample cell into the sample cell compartment and align the raised line on the sample cell cap with the
notch on the meter.
raised line
25 mm Sample Cell
notch
15 mm Sample Cell
notch
2-7TTi® Colorimeter User’s Manual
Page 26

Part 2 Testing Primer
PERFORMING A TEST
• Carefully read test instructions before beginning a test. Instructions may change from time to time so it is
particularly important to review the procedure each time a reagent pack is purchased.
• Follow procedure exactly.
• For proper sample volume, be sure the low point of the meniscus sits on the correct fill mark when viewed
at eye level.
• Hold reagent bottles vertically when dispensing liquids.
• Add the precise amount of reagent specified.
• Before inserting a sample cell into the sample cell compartment, hold the sample cell by the cap and wipe
off any moisture or fingerprints on the glass using a clean, lint-free cloth.
• During operation, place the TTi® Colorimeter on a stable surface that is reasonably level. When using it as
a handheld device, keep the meter horizontal.
• Compare your results with the previous results from the sampling location. Do the results make sense?
If you get an inexplicable result, take a new sample and retest. We recommend graphing your data with
statistical process control software to facilitate comparisons.
CLEANING SAMPLE CELLS
Sample cells must be clean inside and out as well as scratch-free to prevent optical interference in the test
procedure.
• Use the foam brush (supplied) or a soft, nonabrasive cloth and water or mild detergent. Rinse thoroughly
with deionized or distilled water. NOTE: Test methods may recommend additional cleaning procedures.
• At least once a week, clean all sampling containers and sample cells with a 1:1 solution of hydrochloric
acid (Taylor reagent R-1305J) and high-purity water.
• Upon completing a test, flush out the sample cell with fresh sample water to avoid having residual
contaminate the next test.
2-8 TTi® Colorimeter User’s Manual
3
Page 27

Part 3 Colorimeter Operation
Part 3
Colorimeter
Operation
3-1TTi® Colorimeter User’s Manual
Page 28

Page 29
Part 3 Colorimeter Operation
THE PC APP
To use the TTi® Colorimeter to the fullest extent possible, it is necessary to install a special free software
application on your computer. This TTi® Colorimeter Series PC App is required to perform the following
functions:
• Transfer test results from the meter to the customer database you maintain on your PC or laptop
• Keep the meter’s operating software (i.e., firmware) up to date
• Obtain new and improved test files to add to your meter’s capabilities
• Access helpful links for further information and assistance
• Create proprietary (i.e., user-developed) test files
See Part 1, Registration, and Part 4 for complete information.
GUIDE TO OPERATING PARTS AND CONTROLS
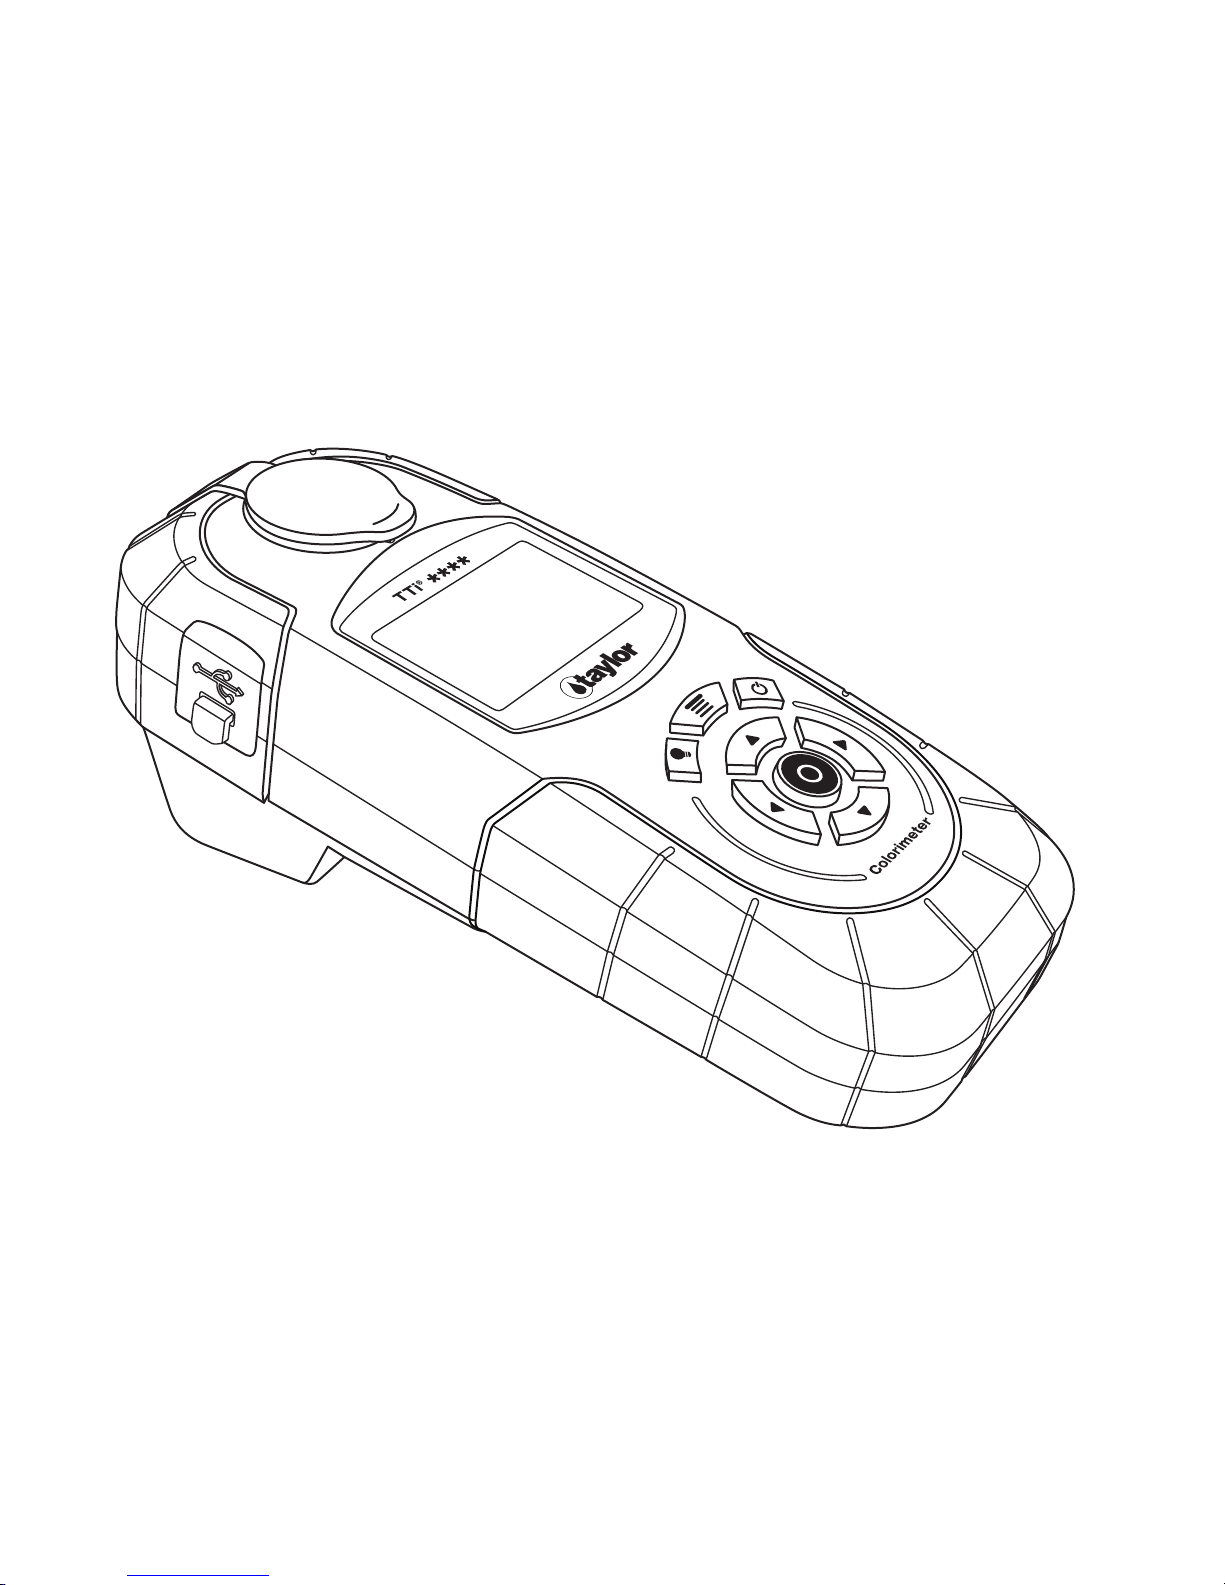
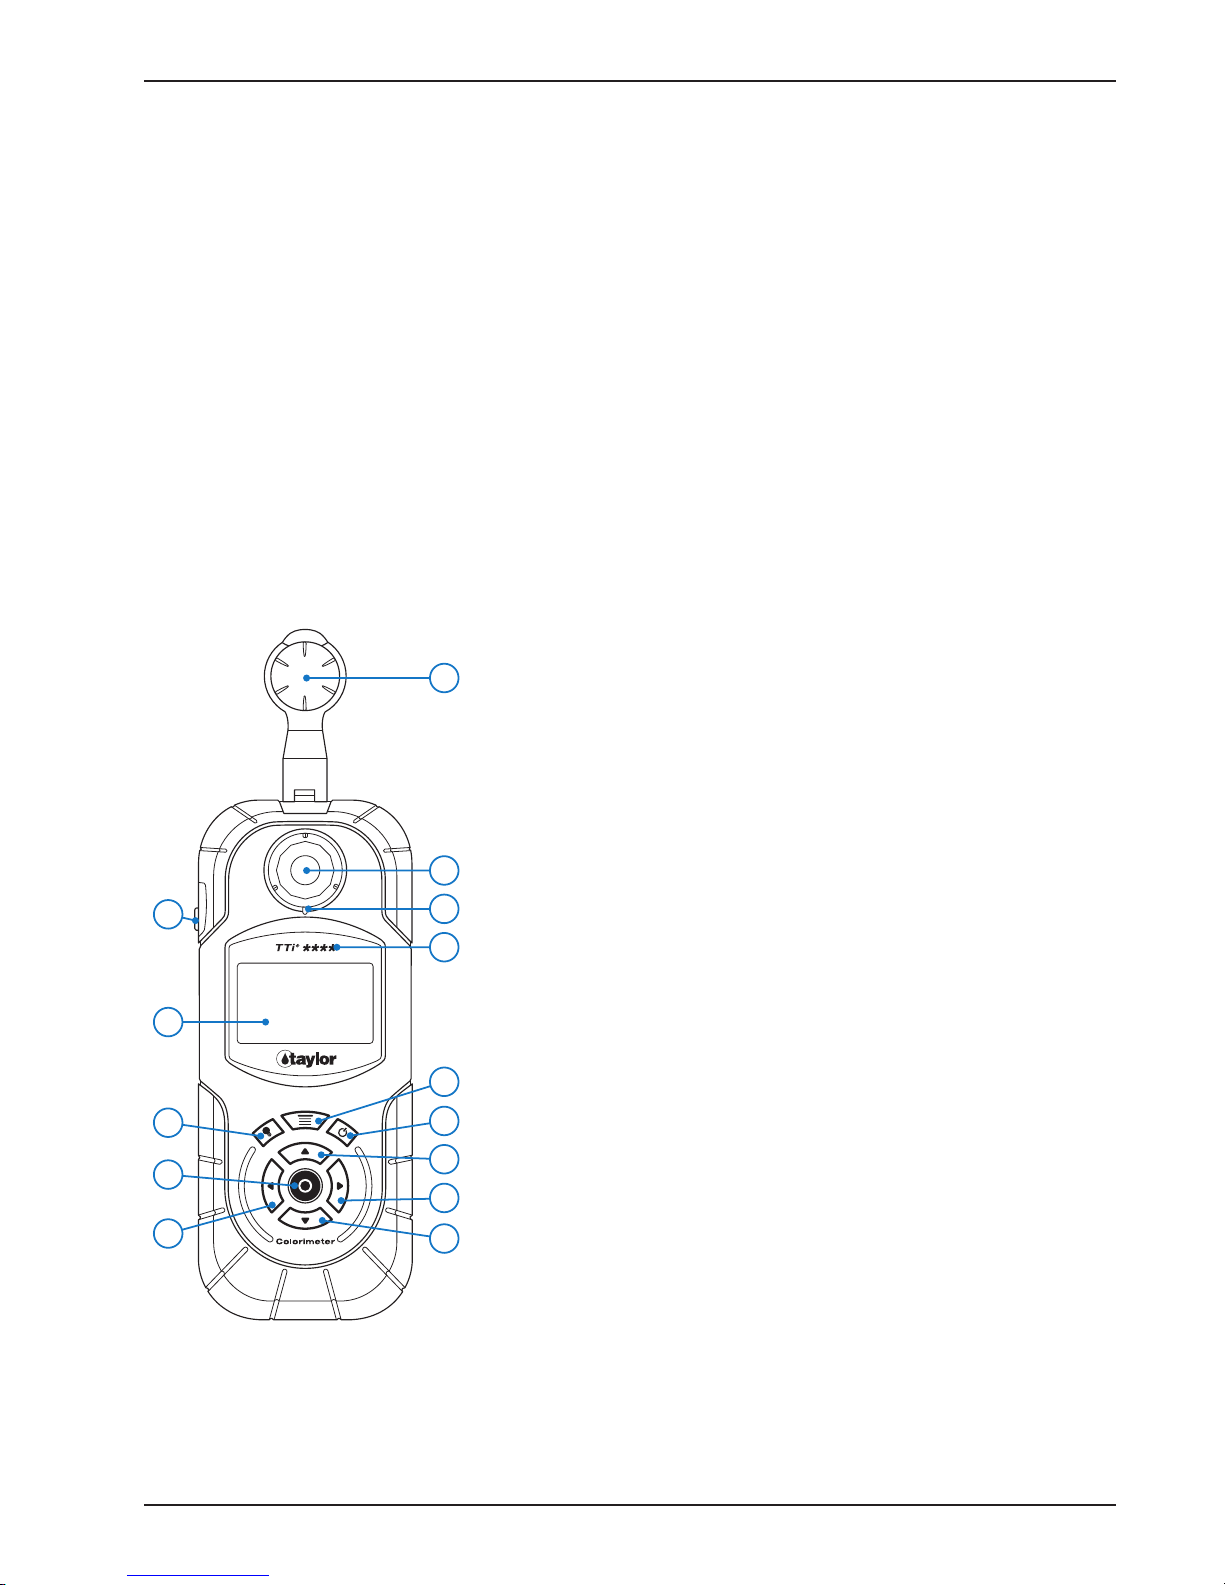
Review the following illustrations to become familiar with parts and operating controls.
10
Top Vi ew
Top View
1. Power Button
14
2. Main Menu Button
3. Backlight Button
4. Enter Button, to enter the highlighted function
5. Scroll Up Arrow
6. Scroll Down Arrow
7. Scroll Right Arrow
12
13
11
8. Scroll Left Arrow
9. Liquid Crystal Display
10. USB Port Cover
11. Model Number
9
12. Sample Cell Compartment (shown open)
13. Alignment Notch
2
3
4
1
5
7
14. Sample Cell Compartment Cover
8
6
3-3TTi® Colorimeter User’s Manual
Page 30

Part 3 Colorimeter Operation
Bottom View
7
6
Side View
1
2
Bottom View
1. Product Label, shows model, part, and serial
3
numbers.
2. Timer Buzzer Opening
4
3. Battery Compartment Door Screw, total of 4
4. Battery Compartment Door
5
5. Battery Compartment (shown open)
Side View
6. USB Port (shown open)
7. USB Port Cover
BATTERY INSTALLATION/CONNECTION TO A POWER SUPPLY
The instrument can be powered by batteries, an AC power adapter, or a USB cable, described respectively as
Options A, B, and C below. Use Option A to replace the batteries, as well.
Option A - Battery Installation/Replacement
Turn the instrument off. Remove the battery compartment door and insert 4 AA alkaline (supplied) or lithium
batteries by matching the + and – ends on the batteries to the markings inside the battery compartment.
Replace the battery compartment door.
Replace batteries when the battery status icon indicates a low-battery status or when directed by an error code.
The battery status icon is displayed in the title bar on all screens when the instrument is powered by batteries.
To conserve battery life, adjust the following settings (see Part 3, Settings) to the lowest acceptable option:
• Device Timeout
• Backlight Timeout
• Backlight Level
• Adjust Contrast
3-4 TTi® Colorimeter User’s Manual
Page 31

Part 3 Colorimeter Operation
Option B - AC Power Adapter
Turn the instrument off. Connect the AC power adapter (supplied) to the USB port (located under the USB
port cover); then plug the AC power adapter into a 120V AC wall outlet. Always turn the instrument off
before disconnecting the AC power adapter.
Option C - USB Cable
Turn the instrument off. Connect the USB cable (supplied) to the USB port (located under the USB port cover);
then connect the USB cable to the corresponding USB port on a PC or laptop. Always turn the instrument
off before disconnecting the USB cable.
Option BOption A Option C
Colorimeter
Wall
USB Port
AC Power
Adapter
PC or Laptop
Colorimeter
USB Cable
KEYPAD
The 8-button keypad is designed for intuitive, rapid navigation. Silicone rubber enhances the user’s touch
perception. A custom coating provides resistance to chemical swelling and wear in a wide variety of environments.
Button Function
2
Keypad
3
4
8
1. Power Button Turns instrument On/Off
2. Main Menu Button Accesses Main Menu at any time
1
during operation
3. Backlight Button Turns display backlight On/Off
4. Enter Button Enters highlighted function on
5
display
5. Scroll Up Arrow Scrolls up through menus, selected
7
options, and data
6. Scroll Down Arrow Scrolls down through menus,
selected options, and data
7. Scroll Right Arrow Scrolls right through title bar, main
6
window, and footer options.
8. Scroll Left Arrow Scrolls left through title bar, main
window, and footer options.
3-5TTi® Colorimeter User’s Manual
Page 32

Part 3 Colorimeter Operation
DISPLAY
Display
The graphical liquid crystal display (LCD) provides excellent
viewing contrast and readability. An integrated backlight can
be set at either a 50% or 100% brightness level to provide easy
reading in low-light or no-light environments, and an adjustable
timeout feature can be utilized to conserve battery life. The
LCD is covered by a protective plastic window. An abrasion- and
chemical-resistant coating combined with an anti-glare coating
provide superior wear and chemical resistance while minimizing
surface glare.
NOTE: The protective plastic window has a temporary film
covering to provide additional scratch protection during
transit. Upon first use, this film should be gently peeled off
to provide maximum viewing clarity.
SCREEN FORMAT AND NAVIGATION
There are three designated sections of the screen where icons, menus, symbols, options, etc., are displayed.
These sections include the title bar (located at the top of the screen), the main window (located in the middle
of the screen), and the footer (located at the bottom of the screen). Screens may or may not contain all three
sections.
Screen navigation is simple and intuitive. The MAIN MENU button and the , and arrows are
used to access and navigate through all screens. The ENTER button is used to enter highlighted functions.
SCREEN SECTIONS
Title Bar
Identifies each screen, displays active icons and options. The
arrows on the keypad are used to scroll between options in the title
bar.
Main Window
Displays menus (lists), test information, symbols, and options. The
, and arrows on the keypad are used to scroll through
menus and between options in the main window.
Footer
Displays options. The arrows on the keypad are used to scroll
between options in the footer.
Title Bar
Icons
Main Window
Footer
Following are examples of various screen formats displayed when using the instrument. NOTE: Symbols for
directional arrows and and the ENTER button appear in test instructions, too.
3-6 TTi® Colorimeter User’s Manual
Page 33

Part 3 Colorimeter Operation
EXAMPLE 1
Title Bar + Main Window Sections
The title bar shows the screen name (ALL TESTS). Use the
arrows to scroll between options in the title bar. The battery status
icon is displayed.
The main window shows tests that are available in the ALL TESTS
screen. Use in combination with the highlight on the display to
select a test. All main window menus use a continuous scroll to
the end of the menu. When scrolling, the highlight starts at the top
of the menu and travels to the bottom. The highlight then remains
at the bottom as the menu travels up the screen. At the end of the
menu, the screen pages back to the beginning of the menu with
the first item highlighted. NOTE: You can access the bottom of a
list by scrolling up on any initial screen.
EXAMPLE 2
Title Bar + Main Window + Footer Sections
The title bar shows the screen name (TEST). The AC (Adjust
Calibration), timer, and battery status icons are displayed.
The main window shows test information (test name and upper
range, chemical form, test result, and units).
The footer shows four test options (ZERO, READ, TIMER, NEW).
Use the arrows on the keypad to scroll between options or to
access more options.
EXAMPLE 3
Title Bar +Main Window Sections
The title bar shows the screen name (TEST). The battery status
icon is displayed.
The main window shows a test procedure transition. This
animated graphic is displayed during a test procedure when the
instrument is zeroed. This type of screen format is used for
transitions, warnings, and errors. Text is displayed in the main
window, often with accompanying graphics. An animated graphic
is used when ZEROING the instrument and READING samples.
3-7TTi® Colorimeter User’s Manual
Page 34

EXAMPLE 4
Title Bar + Main Window + Footer Sections
The title bar shows the SET DATE screen. The battery status icon
is displayed.
The main window shows the date format and SET DATE prompt.
Use the , arrows on the keypad to set the date. This type
of screen format is used for setting the date and time. The left and
right scroll arrows move to the next unit, while the up and down
scroll arrows select the character. The numbers are highlighted
upon entering the screen.
The footer shows the OK option. After setting the date, OK is
selected.
ICONS AND SYMBOLS
ICONS
Part 3 Colorimeter Operation
AC (Adjust Calibration)
Displayed in the title bar when the test result has been adjusted to agree with a prepared standard. The adjusted calibration
icon will remain on for that specific test unless turned off by the user. The next time that specific test is selected from the
test menu, the adjust calibration icon will remain on.
Timer
Displayed in the title bar when the timer is started in a Taylor- or user-developed test. While the timer is running, the icon
will flash. When the timer expires, the icon will remain solid until a key is pressed, at which point it will be turned off. This
icon is not enabled or disabled by the User Timer, located in Tools.
Battery Status
Displayed in the title bar when the instrument is powered by batteries. Informs user how much power is remaining (3 bars
indicate a full charge; 0 bars indicate a very low charge).
USB
Displayed in the title bar when the instrument is powered by USB.
SYMBOLS
Action
Information
Indicates an action operation
Indicates relevant information
Error
Warning (flashing)
Sample Cell
3-8 TTi® Colorimeter User’s Manual
Indicates an operational error
Indicates an operational warning
Indicates sample cell viewdepth used in a test
Page 35

Part 3 Colorimeter Operation
MAIN MENU
The MAIN MENU contains six top-level options. It can be accessed anytime during operation by
pressing the MAIN MENU button on the keypad.
TOP LEVEL OPTIONS
Start Test
Select to access FAVORITES, RECENT TESTS, or ALL TESTS
menus. After initial start-up, the program will always open on the
current test menu.
Access Test Data
Select to recall or erase test data. The instrument will store the
results of the last 100 tests performed.
Edit Favorites
Select to create or edit (add, remove, sort) a Favorites menu to
establish a testing shortcut and save time when selecting tests.
A total of 120 Favorite tests can be created and arranged in any
order.
Edit Series
Select to create or edit (add, remove, sort) a Series test that allows
selected tests to be performed in rapid succession. A total of 10
Series tests can be created and arranged in any order. Each series
can encompass as many as 25 individual tests.
Too ls
Select to transfer data to a PC or laptop, update firmware and test
files, create user-developed tests using the TTi® Colorimeter
Series PC App, and to access the user timer to set an audible timer
for general purposes. The user timer beep can be distinguished
from the test timer beep. Both timers can run simultaneously.
Settings
Select to access About (displays current Firmware, Test File, and
Bootloader Versions), or to modify instrument settings (Format
Date, Set Date, Format Time, Set Time, Device Timeout, Backlight
Timeout, Backlight Level, Adjust Contrast, Language, and Factory
Restore).
3-9TTi® Colorimeter User’s Manual
Page 36

Part 3 Colorimeter Operation
TEST MENUS
Three separate test menus are available in the test mode (Start Test), namely ALL TESTS, RECENT TESTS,
and FAVORITES. Details are provided below. Use to select between menus. Menu priority is FAVORITES,
RECENT TESTS, and then ALL TESTS as long as one test resides in a menu. After initial start-up, the program
will always open in the current test menu.
THREE KINDS OF TEST MENUS
ALL TESTS
The ALL TESTS Menu contains all preprogrammed Taylor tests including absorbance and transmittance. In addition, all series tests,
user-developed tests, and test file updates will be stored in the ALL
TESTS Menu.
ALL TESTS GROUPING
• Preprogrammed Taylor tests in alphanumeric order
• Series tests in numeric order (see Part 3, Edit Series)
• Reserved tests (Absorbance and Transmittance; see Part 3,
Absorbance and Transmittance Tests)
• User-developed tests in alphanumeric order (see Part 3, UserDeveloped Tests)
RECENT TESTS
The RECENT TESTS menu contains the 10 most recent tests
performed.
RECENT TESTS GROUPING
The last test performed is moved to the top of the menu.
RECENT TESTS EMPTY
Displayed when the RECENT TESTS Menu is empty. This menu
can only be emptied by performing a Factory Restore (see Part 3,
Settings).
3-10 TTi® Colorimeter User’s Manual
Page 37
Part 3 Colorimeter Operation
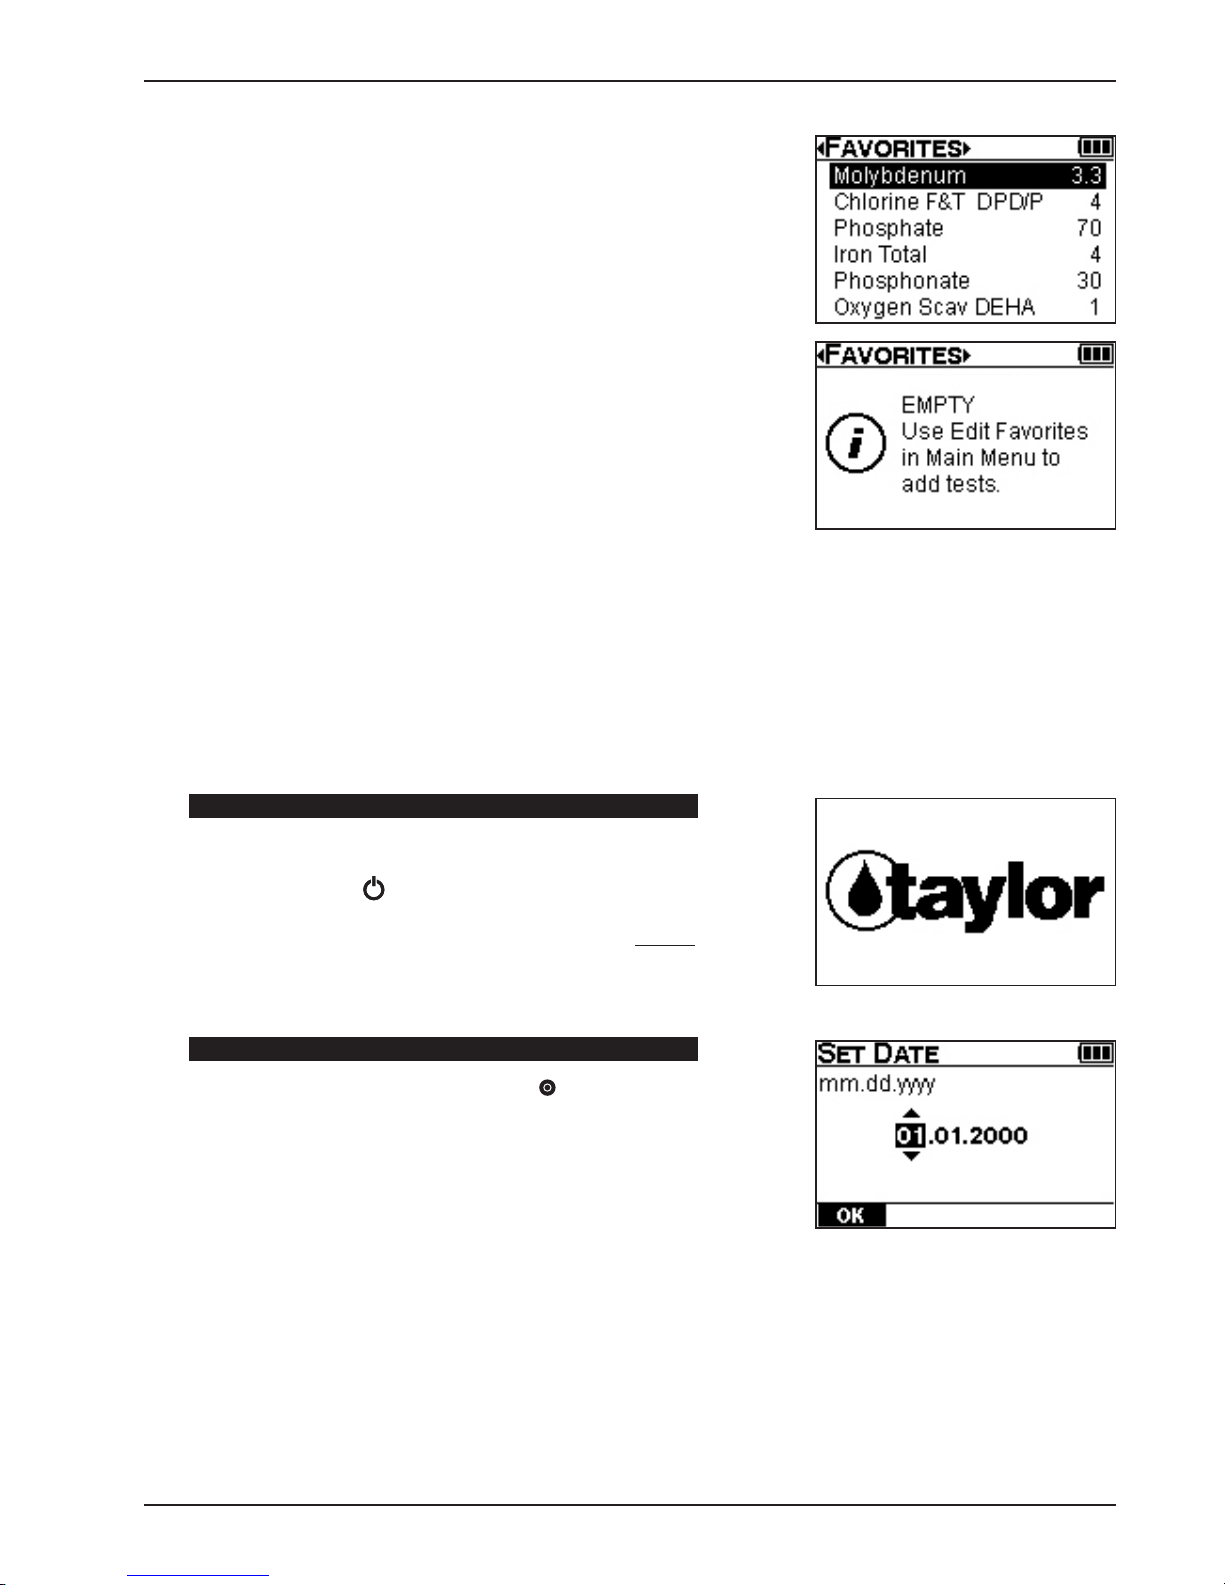
FAVORITES
The FAVORITES menu contains only tests added by the user (see
Part 3, Edit Favorites). A maximum of 120 favorites can be added.
FAVORITES GROUPING
Tests may be arranged in any order.
FAVORITES EMPTY
Displayed when the FAVORITES menu is empty.
INITIAL START-UP
Initial start-up consists of setting the date and time to allow the instrument to store, recall, and transfer test
data with the correct date and time stamps. It is performed the first time the instrument is turned on and after
a factory restore (see Part 3, Settings). Before initial start-up is performed, install the batteries or connect the
instrument to a power supply (see Part 3, Battery Installation/Connection to a Power Supply).
STEP 1
Turn on the Colorimeter.
Press POWER button for approximately 0.5 seconds.
The Taylor logo is displayed while the instrument performs start-up
tasks.
STEP 2
Set Date using , ; then press ENTER .
The default format for the date is mm.dd.yyyy. To change to
dd.mm.yyyy format, see Part 3, Settings.
Footer Option: OK
Accepts changes. Goes to the SET TIME screen.
3-11TTi® Colorimeter User’s Manual
Page 38

STEP 3
Set Time using , ; then press ENTER .
The default time is 12-Hour format. To change to 24-Hour format,
see Part 3, Settings.
Footer Option: OK
Accepts changes. Goes to the MAIN MENU screen.
Initial start-up completed.
The MAIN MENU screen is displayed.
Part 3 Colorimeter Operation
START TEST
Select Start Test to access the ALL TESTS, RECENT TESTS, and FAVORITES test menus and begin testing.
Instructions supplied with Taylor’s reagent packs provide all the information required to perform the particular
test. In general, the following steps are required:
• Select a test menu (ALL TESTS, RECENT TESTS, or FAVORITES) that contains the test to be
performed.
• Select the test from the test menu.
• Confirm test selection and sample cell size, and select a chemical form for expression of test results.
• Prepare a blank and ZERO the Colorimeter.
• Prepare sample and observe any timing steps.
• READ the sample.
HOW TO PERFORM A TEST
The following example provides detailed information about test screens and test options while showing you
how to perform a test.
STEP 1
Select Start Test from the MAIN MENU using ; then press
ENTER .
NOTE: After initial start-up has been performed, the program will
skip the MAIN MENU and open in the current test menu when the
instrument is turned on.
3-12 TTi® Colorimeter User’s Manual
Page 39

Part 3 Colorimeter Operation
Select a Test Menu (ALL TESTS, RECENT TESTS, or FAVORITES)
containing the test to be performed using .
STEP 2
Select the test from the test menu using ; then press
ENTER .
STEP 3
Confirm test name and range, and sample cell size.
The test name, range, and sample cell size will be displayed.
Test name and range (or range upper limit).
Sample cell size (sample cell graphic, size, and unit).
AND
Select a chemical form for expression of test results using .
Optional chemical forms are available for most tests and can only
be selected on this screen. If available, will appear to the right
of the chemical form displayed. The test range (or range upper
limit) will change to correlate with the selected chemical form. The
selected form will remain the default for that test until changed
again by the user.
3-13TTi® Colorimeter User’s Manual
Page 40

STEP 4
Prepare blank.
A blank is used to ZERO the instrument and establish a reference
point for reading samples. A blank may or may not contain reagents
depending on specific test requirements. Instructions supplied with
each test will describe how to prepare the blank.
Here is a typical procedure for preparing a blank:
• Rinse and fill 25 mm sample cell to 10 mL mark with sample;
then cap.
• Insert sample cell into sample cell compartment. Align marks.
STEP 5
Part 3 Colorimeter Operation
Align ar row on
sample cell with
notch on meter.
Zero the Colorimeter.
Select ZERO using ; then press ENTER .
The ZEROING transition graphic will be displayed; then zero (0.00
for this example) will be displayed.
This zero reference point will be stored for all subsequent readings
until the test is exited. The instrument can be re-zeroed at any time
during the test procedure.
3-14 TTi® Colorimeter User’s Manual
Page 41
Part 3 Colorimeter Operation
STEP 6
Prepare sample.
Sample preparation varies for each test. Samples may need to be
filtered to remove turbidity or diluted to adjust the concentration
into a range that can be analyzed by the instrument. There may be
specific techniques or timing steps required for reagent addition.
Instructions supplied with each test specifically describe how to
prepare samples.
Here is a typical procedure for preparing a sample:
• Remove sample cell from sample cell compartment; then remove
cap.
• Add test reagents. Replace cap and swirl to mix thoroughly.
• Insert sample cell into sample cell compartment. Align marks.
Align
arrow on
sample
cell with
notch on
meter.
STEP 7
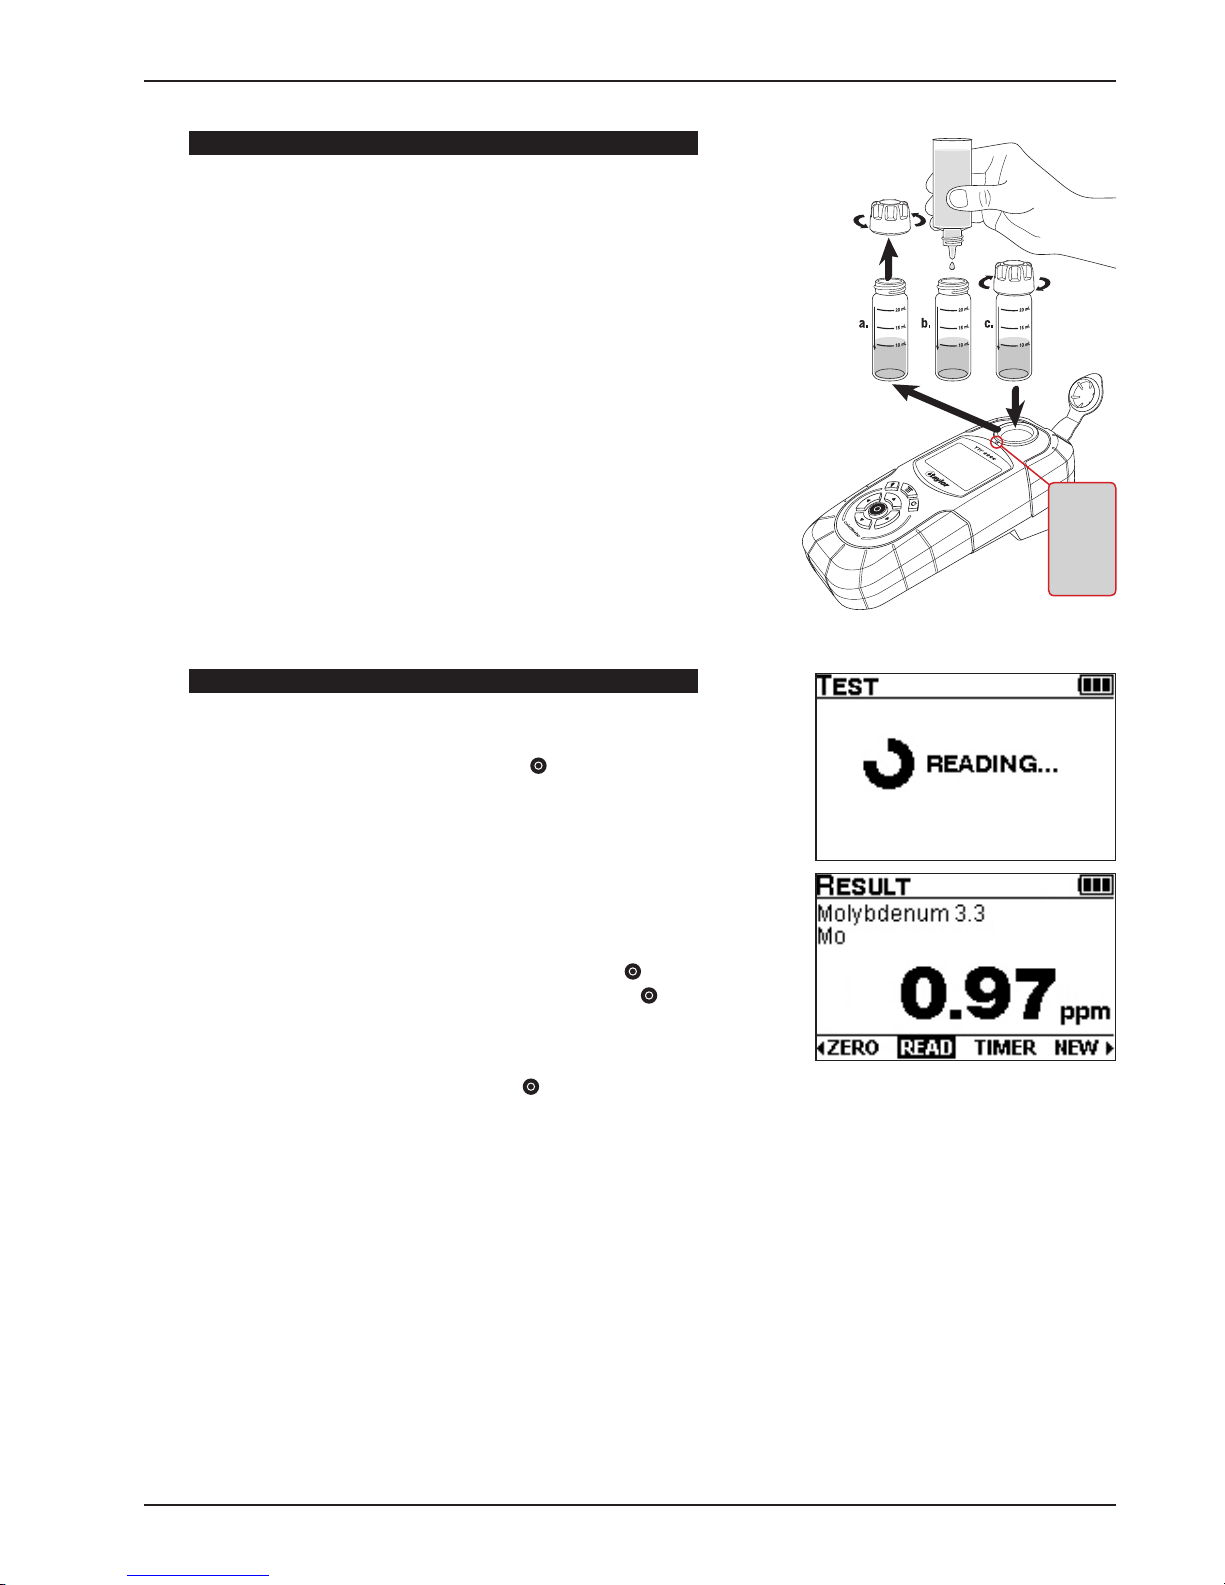
Read the sample.
Select READ using ; then press ENTER .
The READING transition graphic will be displayed and the instrument
will read the sample and display the result.
RESULT will be displayed in terms of the selected chemical form.
Re-zero/read more samples:
Select ZERO using ; insert blank; then press ENTER .
Select READ using ; insert sample; then press ENTER .
Return to current test menu:
Select NEW using ; then press ENTER .
3-15TTi® Colorimeter User’s Manual
Page 42

Result above or below range of test:
When the result is above or below the range of the test, either
↑
RANGE or ↓ RANGE will be displayed (see Part 3, Test Alerts).
Footer Options: Select using ; then press ENTER .
ZERO
Zeros the instrument on a blank and displays zero.
Part 3 Colorimeter Operation
READ
Reads the sample and displays a result.
TIMER
Goes to a preprogrammed timer if specified in the test procedure.
Goes to a nonprogrammed timer that can be set by the user if a
timing step is not specified in the test procedure. (See Part 3, Test
Timers and Auto-Read Option.)
NEW
Ends test and returns to the current test menu.
AC
Goes to the Adjust Calibration screen and turns on the Adjust
Calibration feature (see Part 3, Adjust Calibration).
AC/OFF
Turns off the Adjust Calibration feature. Only available if AC is
currently on (see Part 3, Adjust Calibration).
NEXT
Continues to the next test in a Series Test (see Part 3, How to
Perform a Series Test).
PREV
Returns to the previous test in a Series Test (see Part 3, How to
Perform a Series Test).
WL
Returns to the wavelength selection screen when in the
Absorbance and % Transmittance modes (see Part 3, Absorbance
and Transmittance Tests).
3-16 TTi® Colorimeter User’s Manual
Page 43

Part 3 Colorimeter Operation
TEST ALERTS
Test alerts are noncritical messages displayed during normal operation when certain test mode parameters are
not met. If a test alert is triggered, refer to the table below to determine the cause and appropriate response.
Display Message Cause User Response
↑
RANGE and result
alternately flash
↑
RANGE Sample concentration greatly exceeds upper
↓
RANGE and result
alternately flash
↓
RANGE Sample concentration greatly exceeds lower range
↑
LIMIT The Adjust Calibration upper limit has been reached. Make sure the concentration of the calibration
↓
LIMIT The Adjust Calibration lower limit has been reached. Make sure the concentration of the calibration
ZERO ? A zero was not performed before starting the
↑
LIGHT Too much ambient light. Retest. Make sure the sample cell is capped and
Sample concentration exceeds upper range of
the test. An approximate result is calculated and
displayed.
range of the test. An approximate result cannot be
calculated.
Sample concentration exceeds lower range of
the test. An approximate result is calculated and
displayed.
of the test. An approximate result cannot be
calculated.
timer’s auto-read feature.
Dilute the sample. Retest; then multiply result by
the dilution factor (see Part 2, Diluting Samples for
Test Procedures).
Dilute the sample. Retest; then multiply result by
the dilution factor (see Part 2, Diluting Samples for
Test Procedures).
Clean the sample cells and retest to verify. Make
sure the sample cells are capped and correctly
aligned in the sample cell compartment.
Clean the sample cells and retest to verify. Make
sure the sample cells are capped and correctly
aligned in the sample cell compartment.
standard (prepared standard of known concentration) is between 70%–80% of the upper test range
provided in the test instruction. (See Part 3, Adjust
Calibration.)
standard (prepared standard of known concentration) is between 70%–80% of the upper test range
provided in the test instruction. (See Part 3, Adjust
Calibration.)
Retest. Zero before the timer expires when using
the auto-read feature. (See Part 3, Test Timers and
Auto-Read Option.)
correctly aligned in the sample cell compartment.
TEST TIMERS AND AUTO-READ OPTION
Test timers are included in the test screen footer for all tests. Test timers are either preprogrammed or
nonprogrammed. Preprogrammed timers are used when a test requires timing steps between addition of
reagents or to assure full color development of reagents. Up to four preprogrammed timers may be used in a
test. Preprogrammed timers can be accessed and edited at any time during the test procedure. Test instructions
will inform the user when to use a preprogrammed timer. If a preprogrammed timer is not required in a test, a
nonprogrammed (general use) timer will be available in the footer. When a test timer expires, the device emits
three sets of beeps. Each set consists of one long beep followed by two short beeps. The timer icon remains
solid until a key is pressed.
The timer will count down as long as the user does not exit the test or move to the next test in a series. It will
continue to count down during ZERO and READ operations.
AUTO-Read Option: The final preprogrammed timer in a test will include the AUTO-Read option in the
test screen footer. When this option is selected, the device will automatically READ the sample when the
timer countdown expires. The AUTO-Read option is not available for nonprogrammed timers.
3-17TTi® Colorimeter User’s Manual
Page 44

STEP 1
Select TIMER using ; then press ENTER .
The TIMER 1 screen will be displayed.
The timer will open to the preprogrammed time, even if the timer
was previously set to a different time.
If multiple timers are used in a test, will appear to the right of
each timer. Use to scroll between timers. All preprogrammed
timers can be accessed and edited at any time during a test. If a
test does not require a timed step, a nonprogrammed timer will be
available for use.
Part 3 Colorimeter Operation
Footer Options: Select using ; then press ENTER .
START
Starts the timer. The timer icon will be enabled and flash in the title
bar until the timer countdown expires.
EXIT
Returns to the previous test screen:
• When the timer is exited while it is stopped, the timer resets to
the preprogrammed time.
• When the timer is exited while it is running, the timer will
continue to count down when the timer screen is reentered.
• When the timer is exited (using either AUTO or EXIT) and a ZERO
has already been performed, the display returns to the test
screen with READ highlighted.
• When the timer is exited (using either AUTO or EXIT) and a ZERO
has not been performed, the display returns to the test screen
with ZERO highlighted.
SET
Goes to editing mode (see Timer Edit below).
RESET
Resets the timer to the preprogrammed time. When the timer is
RESET while it is running, the timer stops and then resets to the
preprogrammed time.
3-18 TTi® Colorimeter User’s Manual
Page 45

Part 3 Colorimeter Operation
STEP 2
St art timer.
Select START using ; then press ENTER .
Footer Options: Select using ; then press ENTER .
EXIT
Returns to the previous test screen:
• When the timer is exited while it is stopped, the timer resets to
the preprogrammed time.
• When the timer is exited while it is running, the timer will
continue to count down when the timer screen is reentered.
STOP
Stops the timer.
RESET
Resets the timer to the preprogrammed time. When the timer is
RESET while it is running, the timer stops and then resets to the
preprogrammed time.
STEP 3
Proceed with timer countdown.
After START is selected, the timer will begin the countdown. When
the countdown expires, the device will beep. Select a preferred
option to proceed.
When the timer is exited, it will continue to count down until the
countdown expires, the timer is stopped, or the test is exited.
When the timer expires before the TIMER screen is exited, the
timer remains on the TIMER screen and resets to the preprogrammed time.
3-19TTi® Colorimeter User’s Manual
Page 46

NOTE: If the timer is the final preprogrammed timer in a test
(TIMER 2 in this example), AUTO will be available in the footer
after starting the timer.
Select AUTO using ; then press ENTER .
AUTO
Enables the AUTO-read option and returns to the previous test
screen; the timer icon will flash.
The display returns to the previous test screen and the timer icon
continues to flash. The device will automatically READ the sample
when the timer countdown expires.
Part 3 Colorimeter Operation
• When AUTO is selected and ZERO has not been performed,
ZERO? will be displayed. A ZERO will need to be performed
before the sample can be read.
• To see the timer countdown when AUTO has been selected,
select TIMER using ; then press ENTER . The display will
return to the timer screen and the device will automatically READ
the sample when the timer countdown expires.
• When AUTO is selected and the test is exited, the timer will stop
and reset to the preprogrammed time. No AUTO-read will occur.
3-20 TTi® Colorimeter User’s Manual
Page 47
Part 3 Colorimeter Operation
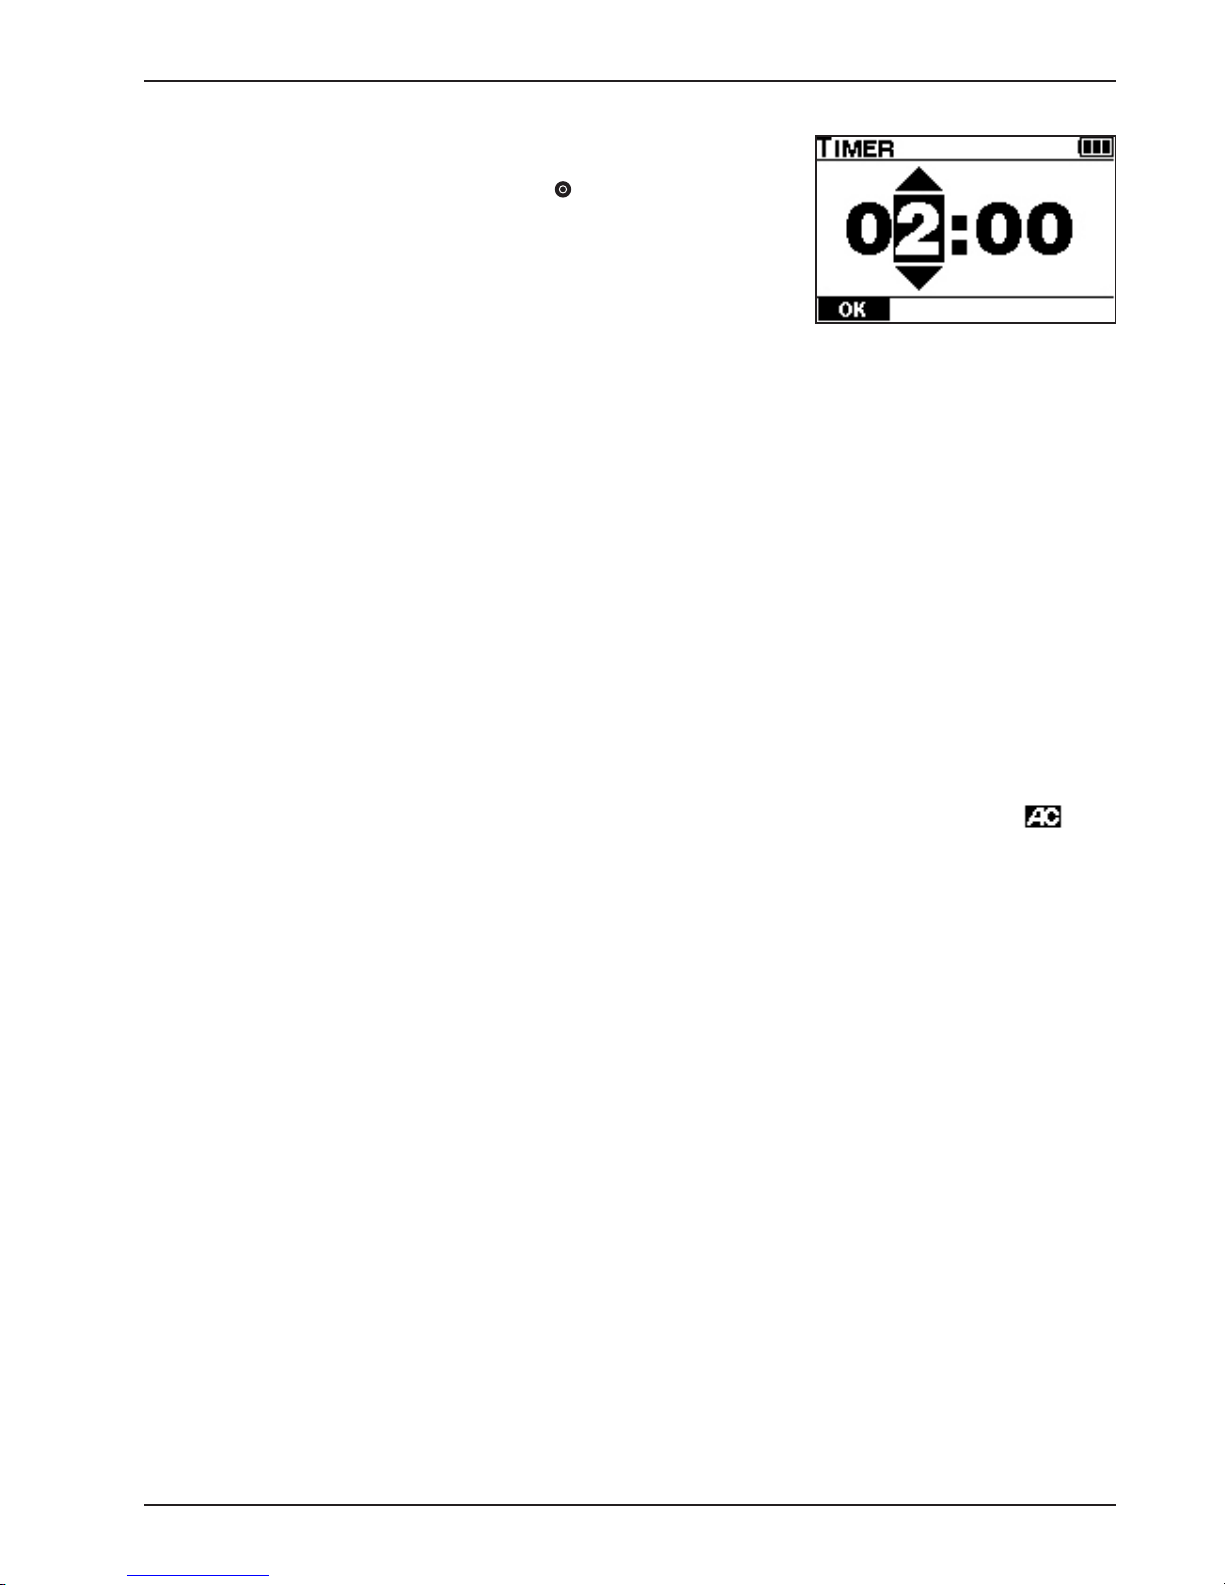
To edit the timer:
Edit Timer using , ; then press ENTER .
The upper limit of the timer is 99:59 minutes.
Footer Option: OK
Saves changes and returns to TIMER screen.
ADJUST CALIBRATION
The Adjust Calibration option can be used to adjust preprogrammed calibrations when required by regulations,
quality control protocol, or in rare circumstances where all samples show a consistent bias. This option is
allowed for most, but not all, preprogrammed tests and there is a limit to the allowed adjustment. This option
is not available for absorbance and transmittance tests.
An Adjust Calibration is performed by analyzing a prepared standard of known concentration (calibration
standard). If the concentration displayed on the instrument differs from the calibration standard, the concentration displayed on the instrument is adjusted to agree with the calibration standard. The magnitude of
the adjustment is used to calculate an adjustment factor that is applied to all subsequent test results until the
feature is disabled. The same adjustment factor will be applied to all chemical forms selected for that particular test. If a preprogrammed calibration is adjusted for a particular test, then the range, estimated detection
limit, and precision provided in the test instruction may not apply to the adjusted calibration. After performing
an Adjust Calibration, the acceptability of the adjusted calibration should be determined by testing several
standards of known concentration at various intervals covering the range of the test.
When an Adjust Calibration is performed and entered for a specific test, the Adjust Calibration icon will
be enabled and displayed in the title bar on all test screens for that test. The AC icon indicates test results are
being calculated using the adjust calibration factor, not the preprogrammed calibration. The Adjust Calibration
option and the AC icon will remain enabled until disabled by the user.
To adjust the calibration of a test, prepare a standard of known concentration (calibration standard) which is
between 70%–80% of the upper test range provided in the test instruction. Using the calibration standard as
the sample, follow the test instruction to obtain a result. If the displayed result does not equal the concentration
of the calibration standard, use the adjust calibration option to adjust the displayed result to agree with the
concentration of the calibration standard.
The following example shows how to use the Adjust Calibration option to adjust the preprogrammed calibration of the Chlorine F&T DPD/P 4 test. Since the range of this test is 0–4.00 ppm Cl2, a calibration standard
is prepared with a concentration of 3.00 ppm Cl2 (i.e., between 70%–80% of the upper test range). A test is
performed following the Chlorine F&T DPD/P 4 test instruction using the calibration standard as the sample.
The result displayed is 2.90 ppm Cl2.
3-21TTi® Colorimeter User’s Manual
Page 48

STEP 1
Select AC using ; then press ENTER .
STEP 2
Adjust the displayed result (2.90 ppm Cl2) to the known
concentration of the calibration standard (3.00 ppm Cl2) using
; then press ENTER . The numbers will continuously scroll
when arrows are held down.
Part 3 Colorimeter Operation
The display will return to the RESULT screen and the displayed
result will agree with the concentration of the calibration standard
(3.00 ppm Cl2). The AC icon will be displayed in the title bar and
all test results for this test will now be calculated using the
Adjust Calibration factor until the Adjust Calibration option is
turned off.
Limit Alert: If the result is adjusted to a value beyond a predeter-
mined limit, either ↑ LIMIT or ↓ LIMIT will be displayed. Reversing
the scroll direction will return the display to a numeric value.
3-22 TTi® Colorimeter User’s Manual
Page 49

Part 3 Colorimeter Operation
To turn off Adjust Calibration option/AC icon:
Select AC/OFF using ; then press ENTER .
The Adjust Calibration option and the AC icon will be disabled.
All test results for this test will now be calculated using the
preprogrammed calibration.
NOTE: The AC/OFF option is only available when AC is currently on.
Footer Options: Select using ; then press ENTER .
AC
Turns on the Adjust Calibration option. Goes to ADJUST CAL
screen.
AC/OFF
Option only available if AC is currently on. Turns off Adjust
Calibration option. Disables AC icon.
OK
Accepts changes. Returns to previous screen with adjusted result.
Enables AC icon.
BACK
Cancels changes. Returns to previous screen with original result.
The AC icon is not enabled unless it was on before entering the
Adjust Calibration screen.
3-23T Ti® Colorimeter User’s Manual
Page 50
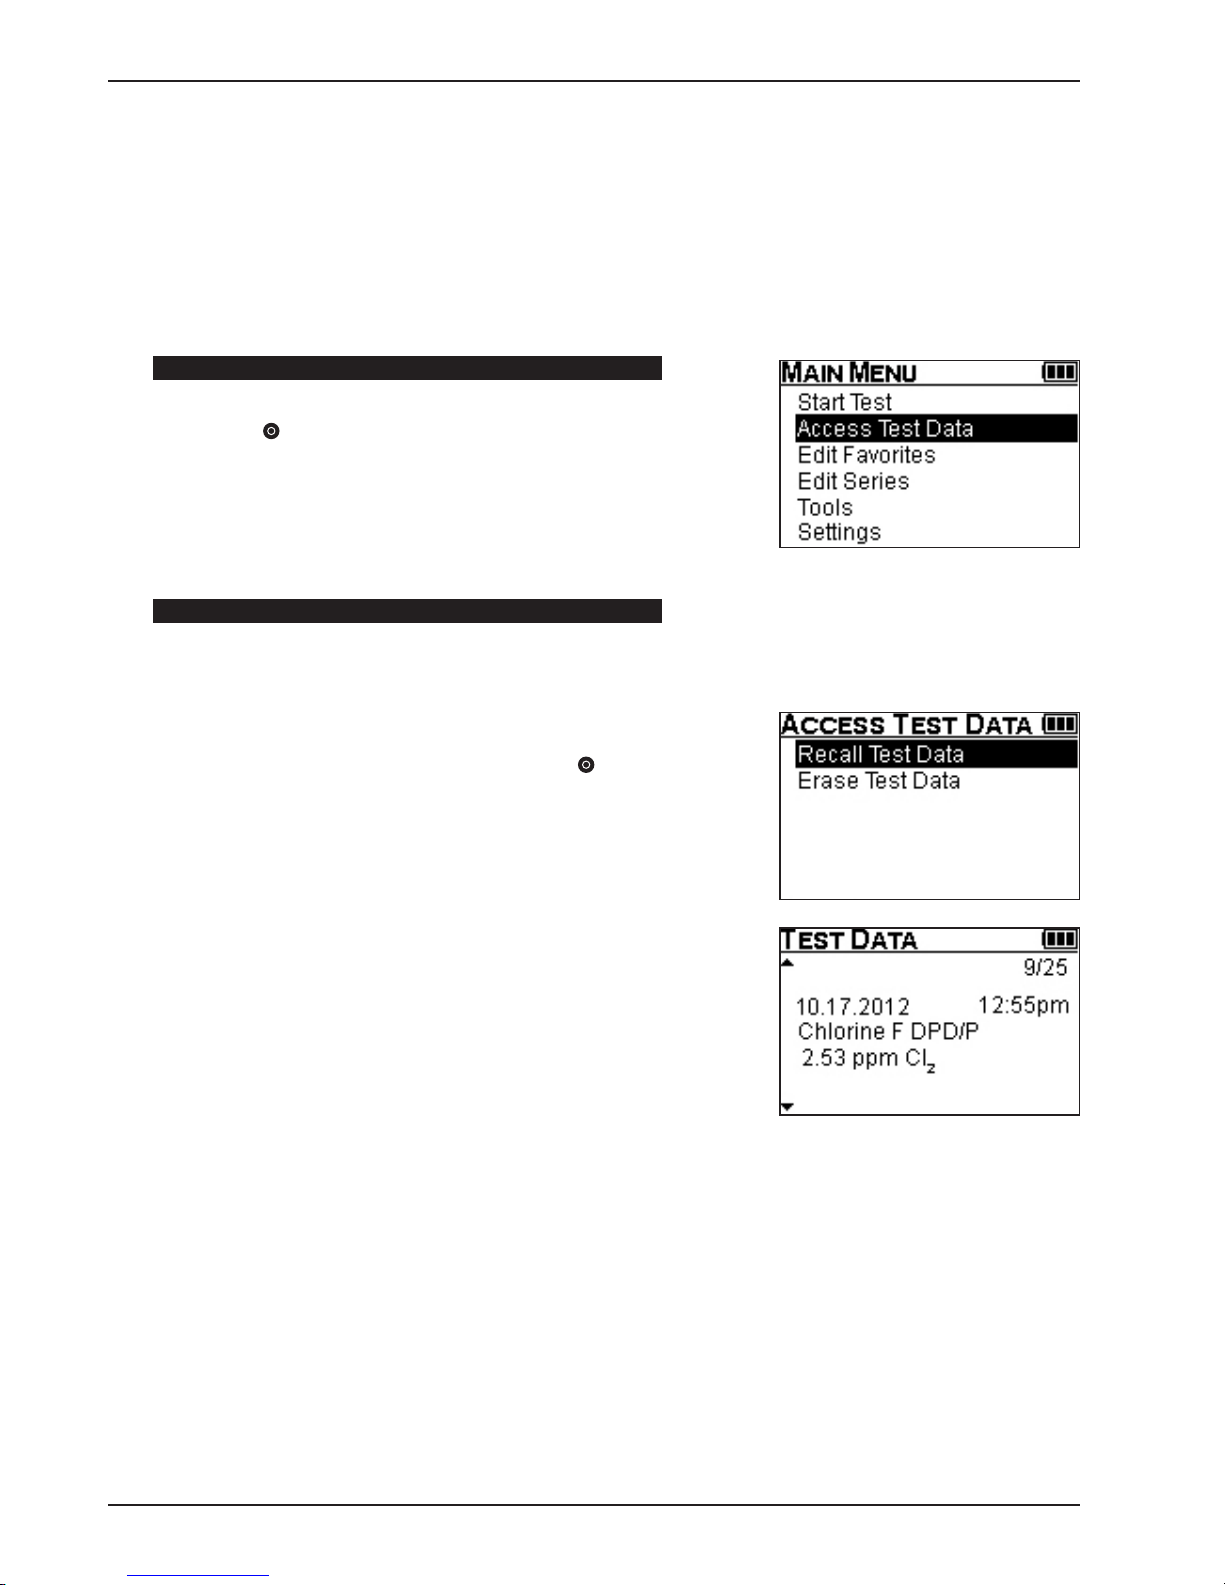
Part 3 Colorimeter Operation
ACCESS TEST DATA
To recall or erase test data, select Access Test Data. Data for the last 100 tests performed are stored and sorted
from newest to oldest. Test data for Series tests are stored and sorted in the order performed. If a test was
performed using an optional chemical form, stored test data will show the original test name, the optional
chemical form, and the result in terms of the optional chemical form. Test data can be transferred to a PC or
laptop using the TTi® Colorimeter Series PC App. (See Part 1, Registration; Part 3, The PC App; and Part 4 in
its entirety.)
STEP 1
Select Access Test Data from the MAIN MENU using ; then
press ENTER .
STEP 2
The ACCESS TEST DATA menu contains two options: Recall Test
Data and Erase Test Data.
Recall test data.
Select Recall Test Data using ; then press ENTER . Scroll
between test results using .
Each TEST DATA screen displays one test and contains four or five
lines:
First Line
The numerical position of the currently displayed test in the
result list, followed by the total number of stored test results,
both right-justified.
Second Line
The date (left-justified) and time (right-justified) of the result is
recorded. The date and time are displayed according to the current format settings. If date and time settings are modified, the
format will change for all results in the list.
Third Line
The test name is displayed.
Fourth Line
The test result, test units, and selected chemical form are
displayed.
3-24 TTi® Colorimeter User’s Manual
Page 51

Part 3 Colorimeter Operation
If the result is outside the test range but within a predetermined
limit of the test range (i.e., ↑ RANGE or ↓ RANGE alternately
displayed with the calculated approximate value), the test result
will be prefixed with a question mark (i.e., ? 4.25 ppm Cl2).
If the result is well outside the test range and an approximate
value cannot be calculated, the result will be replaced by a question mark (i.e., ? ppm Cl2). For Absorbance and Transmittance
tests, the chemical form will be replaced with the wavelength
used in the test.
Fifth Line
If the test result is within the test range, this line will remain
blank. If the test result is outside of the test range, RESULT OUT
OF RANGE will be displayed.
If there is no stored test data, EMPTY will be displayed.
OR
Erase test data.
Select Erase Test Data using .
WARNING: The Erase Test Data option is used to erase all test
data stored in the Colorimeter. To prevent accidental erasure
of stored data, the user must select the YES option in the footer
before the Colorimeter will erase the stored test data from memory.
Footer Options: Select using ; then press ENTER .
YES
All stored test data will be erased from memory. After data is
erased, the Colorimeter will return to the MAIN MENU.
NO
Returns to the ACCESS TEST DATA menu.
3-25T Ti® Colorimeter User’s Manual
Page 52

Part 3 Colorimeter Operation
EDIT FAVORITES
Use to create or edit (add, remove, or sort) a FAVORITES menu establishing a shortcut to selected tests. A
total of 120 favorite tests can be added to the FAVORITES menu and arranged in your order of preference.
Once created, the FAVORITES menu will become the first test menu displayed in Start Test.
STEP 1
Select Edit Favorites from the MAIN MENU using ; then press
ENTER .
STEP 2
The EDIT FAVORITES screen will be displayed. The main window
will be empty unless tests have been added previously.
Footer Options: Select using ; then press ENTER .
ADD
Select ADD using ; then press ENTER .
Tests residing in the ALL TESTS menu will be displayed in the
EDIT FAVORITES main window. If a test has already been added to
the FAVORITES menu, a marker will appear to the left of that test
name. A test can be added to the FAVORITES menu only once.
Footer Options: Select using ; then press ENTER .
ADD
Select the test to be added using ; then press ENTER . A
marker will be placed to the left of the selected test. Repeat until
all choices are selected. A selection can be cancelled at any time.
(See CANCEL below.)
CANCEL
Select the test to be cancelled using ; then press ENTER .
The marker will be removed and the test selection will be cancelled.
BACK
Press ENTER to save selected tests and to return to the EDIT
FAVORITES screen. Tests will be displayed in the order selected.
3-26 TTi® Colorimeter User’s Manual
Page 53

Part 3 Colorimeter Operation
REMOVE
Select REMOVE using ; then press ENTER .
Each test residing in the FAVORITES menu will be displayed in the
EDIT FAVORITES main window.
Footer Options: Select using ; then press ENTER .
REMOVE
Select the test to be removed using ; then press ENTER
. The selected test will be removed from the EDIT FAVORITES
screen.
BACK
Press ENTER to return to the EDIT FAVORITES screen.
SORT
Select SORT using ; then press ENTER .
Each test residing in the FAVORITES menu will be displayed in the
EDIT FAVORITES main window.
Footer Options: Select using ; then press ENTER .
MOVE
Select the test to be moved using ; then press ENTER . The
footer options will change to PLACE and CANCEL.
3-27TTi® Colorimeter User’s Manual
Page 54

PLACE
Use to move the selected test to the desired location and
press ENTER . The selected test will be saved in its new location in
the FAVORITES menu. The footer options will return to MOVE and
BACK.
CANCEL
The selected test will return to its previous position in the FAVORITES menu. The footer options will return to MOVE and BACK.
BACK
Returns to the EDIT FAVORITES screen.
BACK
Select BACK using ; then press ENTER . Returns to MAIN
MENU screen.
Favorites is full.
Displayed when the FAVORITES menu is full. A maximum of 120
tests can be added.
Part 3 Colorimeter Operation
Footer Option: BACK
Returns to EDIT FAVORITES screen.
3-28 TTi® Colorimeter User’s Manual
Page 55

Part 3 Colorimeter Operation
EDIT SERIES
Select to create or edit (add, remove, or sort) a Series Test which will allow individual tests within this grouping
to be performed in rapid succession without having to exit between tests to select a new test from another menu.
A total of 10 series can be created. These will be stored in the ALL TESTS menu and can be added to the
FAVORITES menu. Each series can contain as many as 25 individual tests arranged in any preferred order.
STEP 1
Select Edit Series from the MAIN MENU using ; then press
ENTER .
STEP 2
The EDIT SERIES screen will be displayed. The main window will
show Series 1 through Series 10. If a series already contains tests,
a marker will appear to the left of that series name. The 10 series
can be selected and populated in any order.
Footer Options: Select using ; then press ENTER .
SELECT
Select the series to be created or edited using ; then press
ENTER .
BACK
Returns to MAIN MENU screen.
STEP 3
ADD
Select ADD using ; then press ENTER .
Tests residing in the ALL TESTS menu will be displayed in the EDIT
SERIES main window. Tests can be selected and placed in the
series in any preferred order. An individual test can be placed in the
same series more than once.
3-29TTi® Colorimeter User’s Manual
Page 56

Footer Options: Select using ; then press ENTER .
ADD
Select the test to be added using ; then press ENTER .
A marker will be placed to the left of the selected test. Repeat until
all choices are selected. A selection can be cancelled at any time.
(See CANCEL below.)
CANCEL
Select the test to be cancelled using ; then press ENTER .
The marker will be removed from the left of the selected test and
the test selection will be cancelled.
BACK
Press ENTER to save selected tests and to return to the EDIT
SERIES screen. Tests will be displayed in the order selected.
Part 3 Colorimeter Operation
REMOVE
Select REMOVE using ; then press ENTER .
Each test residing in the series will be displayed in the EDIT SERIES
main window.
Footer Options: Select using ; then press ENTER .
REMOVE
Select the test to be removed using ; then press ENTER .
The selected test will be removed from the SERIES menu.
BACK
Press ENTER to return to the EDIT SERIES screen.
3-30 TTi® Colorimeter User’s Manual
Page 57

Part 3 Colorimeter Operation
SORT
Select SORT using ; then press ENTER .
Each test residing in the series will be displayed in the EDIT SERIES
main window.
Footer Options: Select using ; then press ENTER .
MOVE
Select the test to be moved using ; then press ENTER .
The footer options will change to PLACE and CANCEL.
PLACE
Use to move the selected test to the desired location and
press ENTER . The selected test will be saved in its new location
in the SERIES menu. The footer options will return to MOVE and
BACK.
CANCEL
The selected test will return to its previous position in the SERIES
menu. The footer options will return to MOVE and BACK.
BACK
Returns to the EDIT SERIES screen.
BACK
Select BACK using ; then press ENTER .
Returns to MAIN MENU screen.
Series is full.
Displayed when the SERIES menu is full. A maximum of 25 tests
can be added to one series.
Footer Option: BACK
Returns to EDIT SERIES screen.
3-31TTi® Colorimeter User’s Manual
Page 58
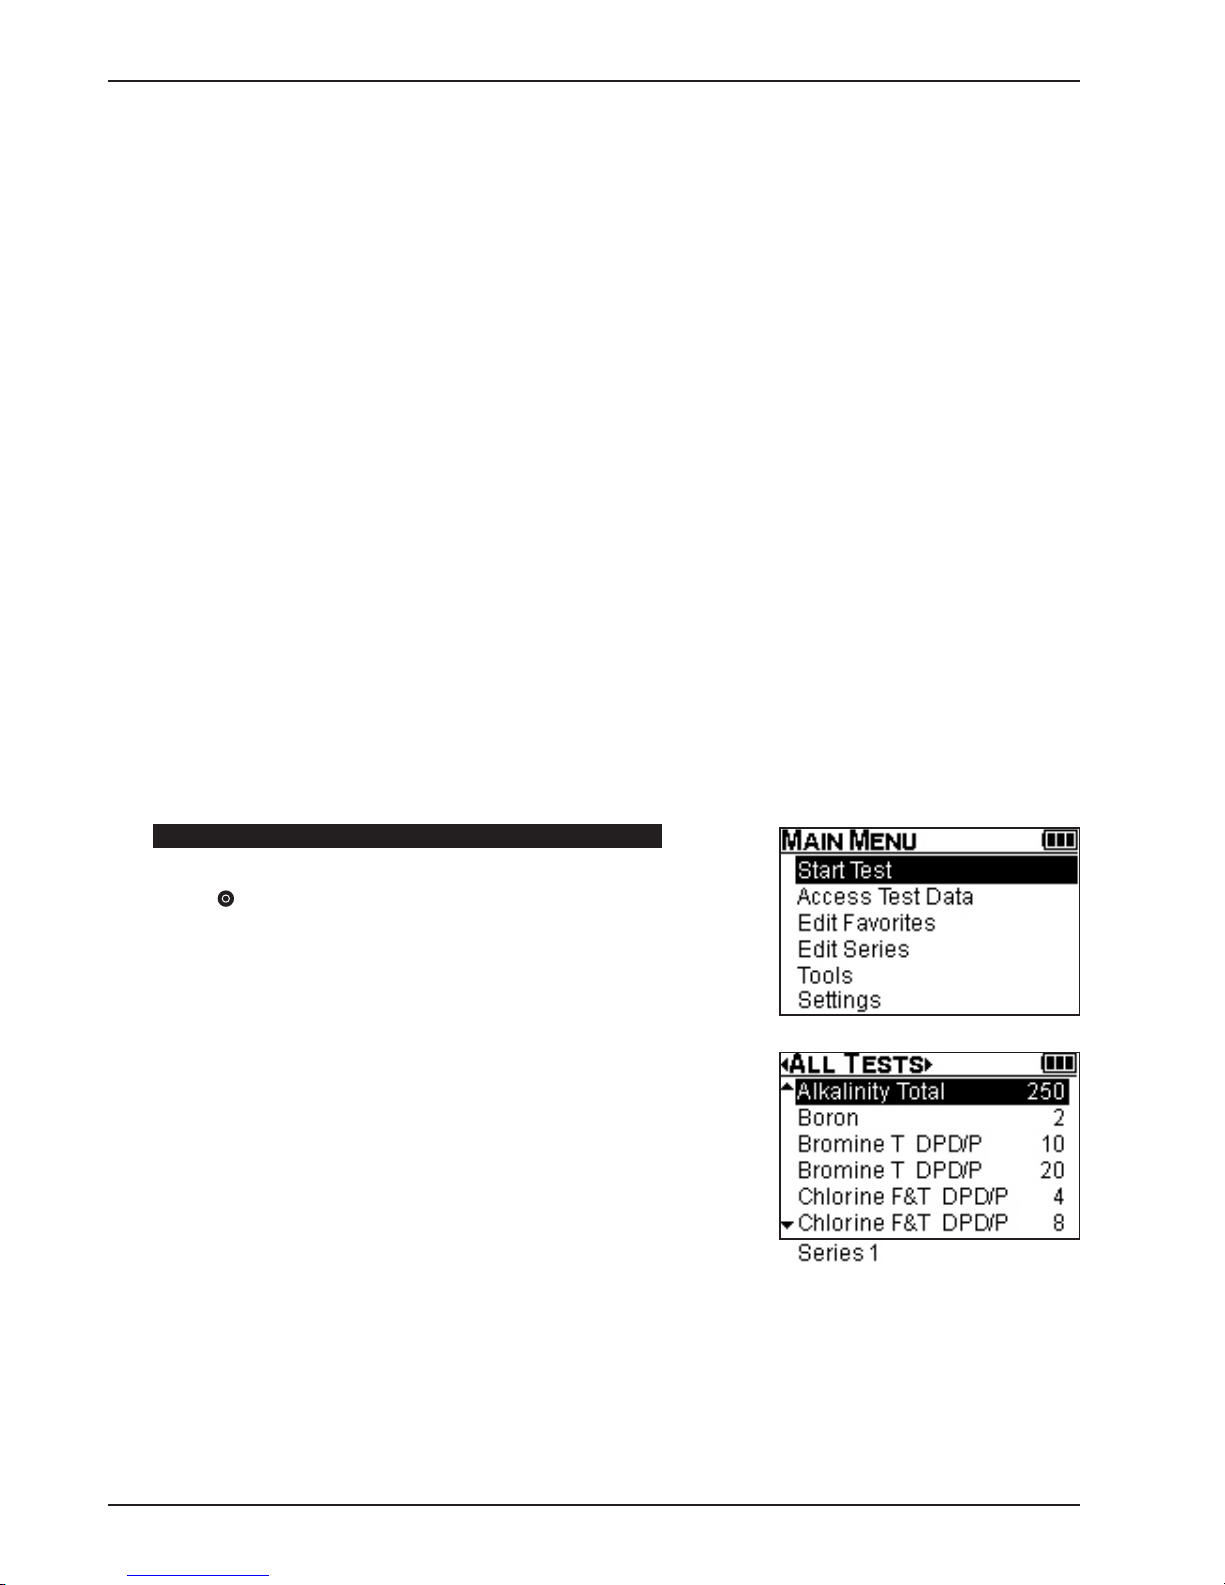
Part 3 Colorimeter Operation
HOW TO PERFORM A SERIES TEST
Creating a series allows individual tests within this grouping to be performed in rapid succession without
having to exit between tests to select a new test from another menu. A total of 10 series can be created. These
will be stored in the ALL TESTS menu and can be added to the FAVORITES menu. Each series can contain
as many as 25 individual tests arranged in any preferred order. For detailed information about creating and
editing a series of tests, see Part 3, Edit Series.
In general, the steps required to perform a Series Test are the same as for an individual test with a few exceptions:
• Select a test menu (ALL TESTS, RECENT TESTS, or FAVORITES) that contains the series to be
performed.
• Select the series number (1–10) from the test menu.
• Confirm the series selection.
• Confirm the first individual test selection and sample cell size, and select a chemical form for expression
of test results.
• Prepare a blank and ZERO the Colorimeter.
• Prepare the sample and observe any timing steps.
• READ the sample.
• Continue to the next test in the series.
The following example provides detailed information about test screens and test options while showing you
how to perform tests in a series.
STEP 1
Select Start Test from the MAIN MENU using ; then press
ENTER .
Select a test menu (ALL TESTS, RECENT TESTS, or FAVORITES)
containing the series to be performed using .
3-32 TTi® Colorimeter User’s Manual
Page 59

Part 3 Colorimeter Operation
STEP 2
Select the series number from the test menu using ; then
press ENTER .
STEP 3
Confirm Series Test selection.
After a series is selected, a confirmation screen is displayed which
allows the user to see the tests in the series.
Footer Options: Select using ; then press ENTER .
OK
Proceed to Test Screen to begin the test.
BACK
Returns to current test menu.
STEP 4
Confirm test selection and sample cell size.
The individual test name and range, sample cell size, and test
number within the series will be displayed.
Test name and range (or range upper limit).
Sample cell size (sample cell graphic, size, and unit).
Test number - 1 of X (example: 1 of 5) is displayed below the
chemical form to notify the user which test in the series is being
performed.
AND
Select a chemical form for expression of test results using .
Optional chemical forms are available for most tests and can only
be selected on this screen. If available, will appear to the right
of the chemical form displayed. The test range (or range upper
limit) will change to correlate with the selected chemical form. The
selected form will remain the default for that test until changed
again by the user.
3-33TTi® Colorimeter User’s Manual
Page 60

STEP 5
Prepare blank.
Follow procedure in test instruction.
AND
Zero the Colorimeter.
Select ZERO using ; then press ENTER .
STEP 6
Prepare sample.
Follow procedure in test instruction.
AND
READ the sample.
Part 3 Colorimeter Operation
Select READ using ; then press ENTER .
RESULT
Displayed in terms of the selected chemical form.
Select NEXT using ; then press ENTER to continue to the
next test.
OR
Select PREV using ; then press ENTER to return to the
previous test.
Return to current test menu:
Select NEW using ; then press ENTER .
WARNING: To prevent accidental exit from the series, this warning
will be displayed when NEW is selected or when the MAIN MENU
button is pressed.
Footer Options: Select using ; then press ENTER .
YES
Returns to current test menu or the MAIN MENU.
NO
Returns to the previous test screen.
3-34 TTi® Colorimeter User’s Manual
Page 61

Part 3 Colorimeter Operation
Footer Options: Select using ; then press ENTER .
ZERO
Zeros the instrument on a blank and displays zero.
READ
Reads the sample and displays result.
TIMER
Goes to a preprogrammed timer if specified in the test procedure.
Goes to a nonprogrammed timer that can be set by the user if a
timing step is not specified in the test procedure. (See Part 3, Test
Timers and Auto-Read Option.)
NEW
Ends test and returns to the current test menu.
AC
Goes to the Adjust Calibration screen and turns on the Adjust Calibration feature (see Part 3, Adjust Calibration).
AC/OFF
Turns off the Adjust Calibration feature. Only available if AC is currently on (see Part 3, Adjust Calibration).
NEXT
Continues to the next test in a Series Test.
PREV
Returns to the previous test in a Series Test.
WL
Returns to the wavelength selection screen when in the Absorbance and % Transmittance modes (see Part 3, Absorbance and
Transmittance Tests).
TOOLS
Select TOOLS to access the Data Transfer and the User Timer modes. The Data Transfer mode allows the
instrument to communicate with a PC or laptop using the TTi® Colorimeter Series PC App. The PC App will
prompt the user when to select Data Transfer.
The user timer is a general-purpose timer that can be used for any reason. When the user timer expires, four
sets of five short beeps each will be heard. (NOTE: The user timer beep can be distinguished from the test
timer beep. When a test timer expires, the device emits three sets of beeps. Each set consists of one long beep
followed by two short beeps.)
3-35TTi® Colorimeter User’s Manual
Page 62
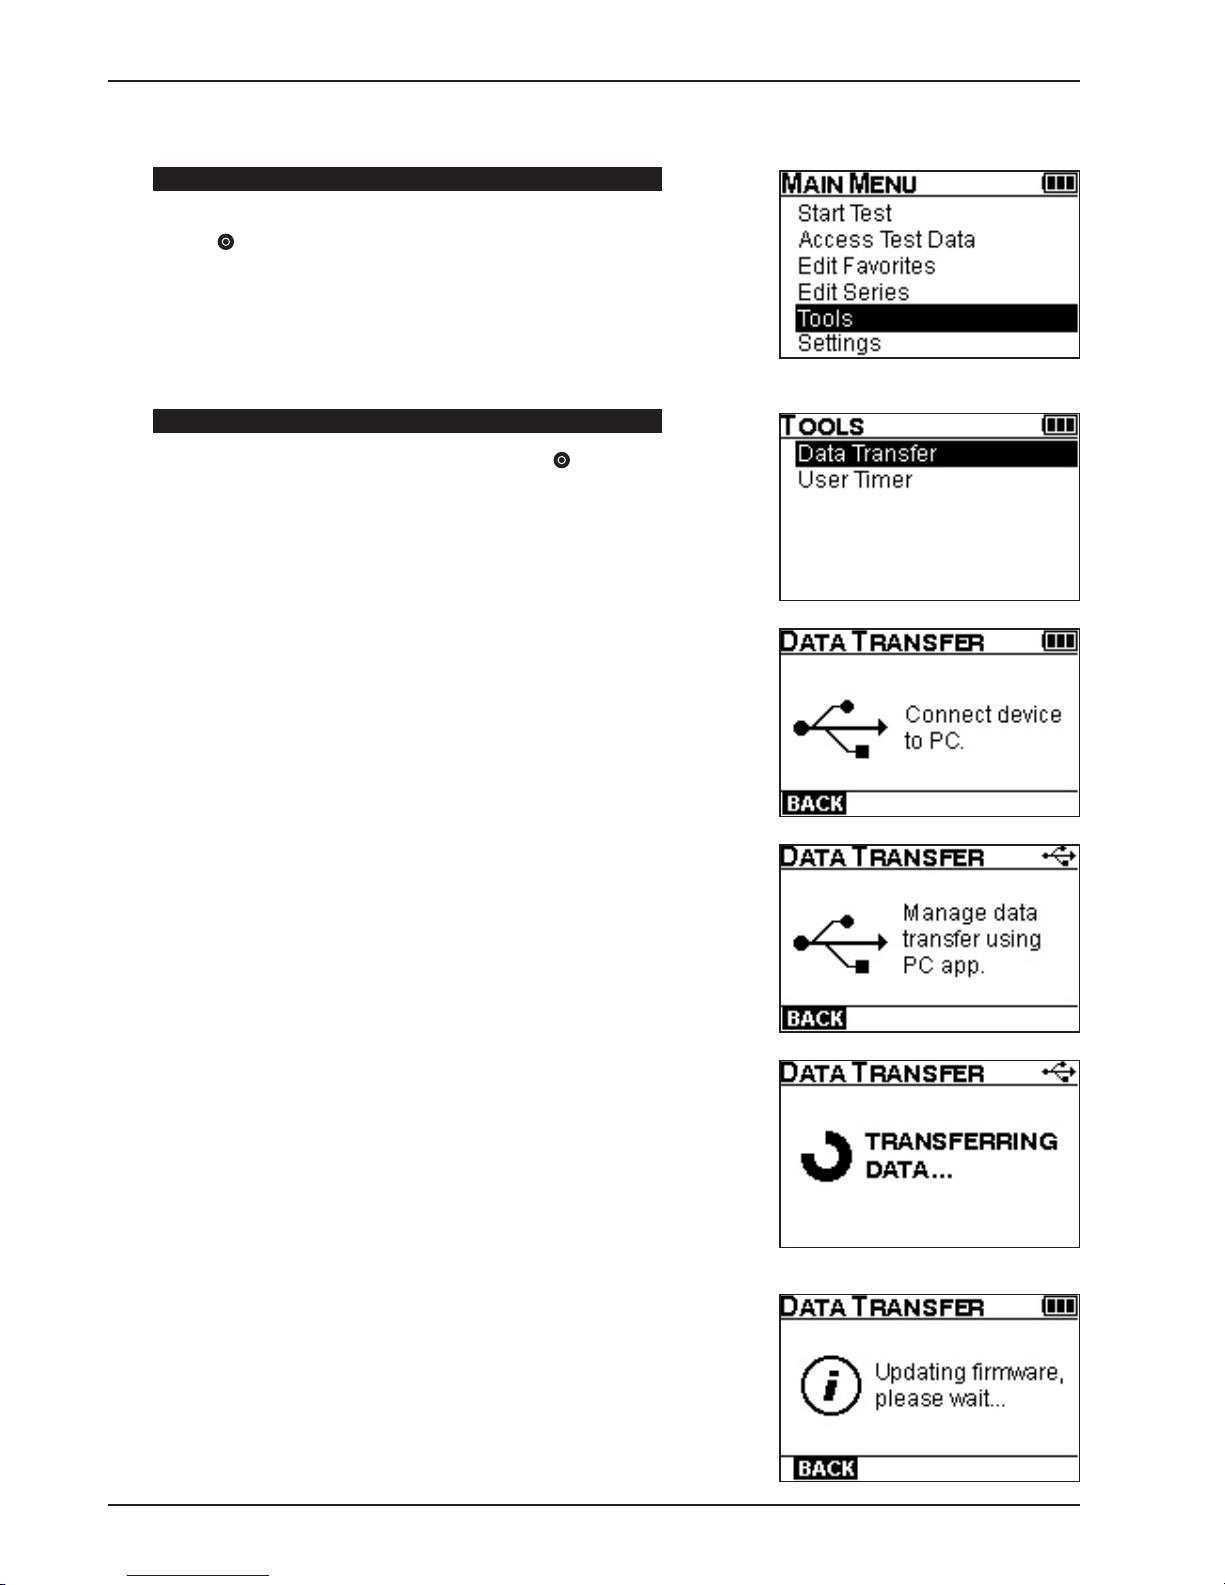
DATA TRANSFER
STEP 1
Select Tools from the MAIN MENU using ; then press
ENTER .
STEP 2
Select Dat a Transfer using ; then press ENTER .
Connect the device to the computer using the USB cable (supplied).
Part 3 Colorimeter Operation
The USB symbol and “Manage data transfer using PC app” will be
displayed in the main window. The USB icon will be displayed in the
title bar. The device is now ready to transfer data using the TTi®
Colorimeter Series PC App (see Section 4, Using the PC App ).
When the transfer of data begins, the action symbol and
“TRANSFERRING DATA…” will be displayed.
When a data transfer has been completed, the display returns to
the “Manage data transfer using PC app.”
When multiple data transfers are performed, the display will cycle
between “Manage data transfer using PC app” and “TRANSFERRING
DATA…”.
When the meter’s operating software (firmware) is updated, the
information symbol and “Updating firmware, please wait…” will be
displayed.
Footer Option: BACK
Returns to the Tools menu.
3-36 TTi® Colorimeter User’s Manual
Page 63

Part 3 Colorimeter Operation
USER TIMER
STEP 1
Select tools from the MAIN MENU using ; then press
ENTER .
STEP 2
Select User Timer using ; then press ENTER .
The USER TIMER screen will be displayed.
Footer Options: Select using ; then press ENTER .
SET
Goes to the edit mode.
EXIT
Returns to the Tools menu.
STEP 3
Set user timer.
Set Time using , ; then press ENTER .
Footer Option: OK
Continues to User Timer Start.
3-37TTi® Colorimeter User’s Manual
Page 64

STEP 4
Start user timer.
Select START using ; then press ENTER .
Footer Options: Select using ; then press ENTER .
SET
Goes to User Timer Set.
START
Begins timer countdown. When the countdown expires, the device
beeps. If the timer is exited, it will continue to count down until the
countdown expires or until the timer is stopped.
EXIT
Returns to the Tools menu.
STEP 5
Stop user timer.
Part 3 Colorimeter Operation
Select STOP using ; then press ENTER .
Footer Options: Select using ; then press ENTER .
SET
If timer has been started, stops the timer. Goes back to User
Timer Set.
STOP
Stops timer. Goes to User Timer Start
EXIT
Returns to the Tools menu.
SETTINGS
Select SETTINGS to access About (displays current Firmware, Test File, and Bootloader versions), or to
modify instrument settings (Format Date, Set Date, Format Time, Set Time, Device Timeout, Backlight
Timeout, Backlight Level, Adjust Contrast, Language, and Factory Restore).
Select Settings from the MAIN MENU using ; then press
ENTER .
3-38 TTi® Colorimeter User’s Manual
Page 65

Part 3 Colorimeter Operation
The SETTINGS screen will be displayed showing menu options in
the main window.
Select Option using ; then press ENTER .
ABOUT
Display shows manufacturer name and telephone number plus
current Firmware, Test File, and Bootloader versions installed on
the instrument.
Footer Option: BACK
Returns to SETTINGS screen.
FORM AT DATE
A marker will appear to the left of the selected format. The default
format is month, then date, then year, namely mm.dd.yyyy.
Select format using ; then press ENTER
Footer Options: Select using ; then press ENTER .
SELECT
Selects preferred choice and saves changes.
BACK
Returns to SETTINGS screen.
SET DATE
Set today’s date using , ; then press ENTER .
Footer Option: OK
Saves changes and returns to SETTINGS screen.
3-39TTi® Colorimeter User’s Manual
Page 66
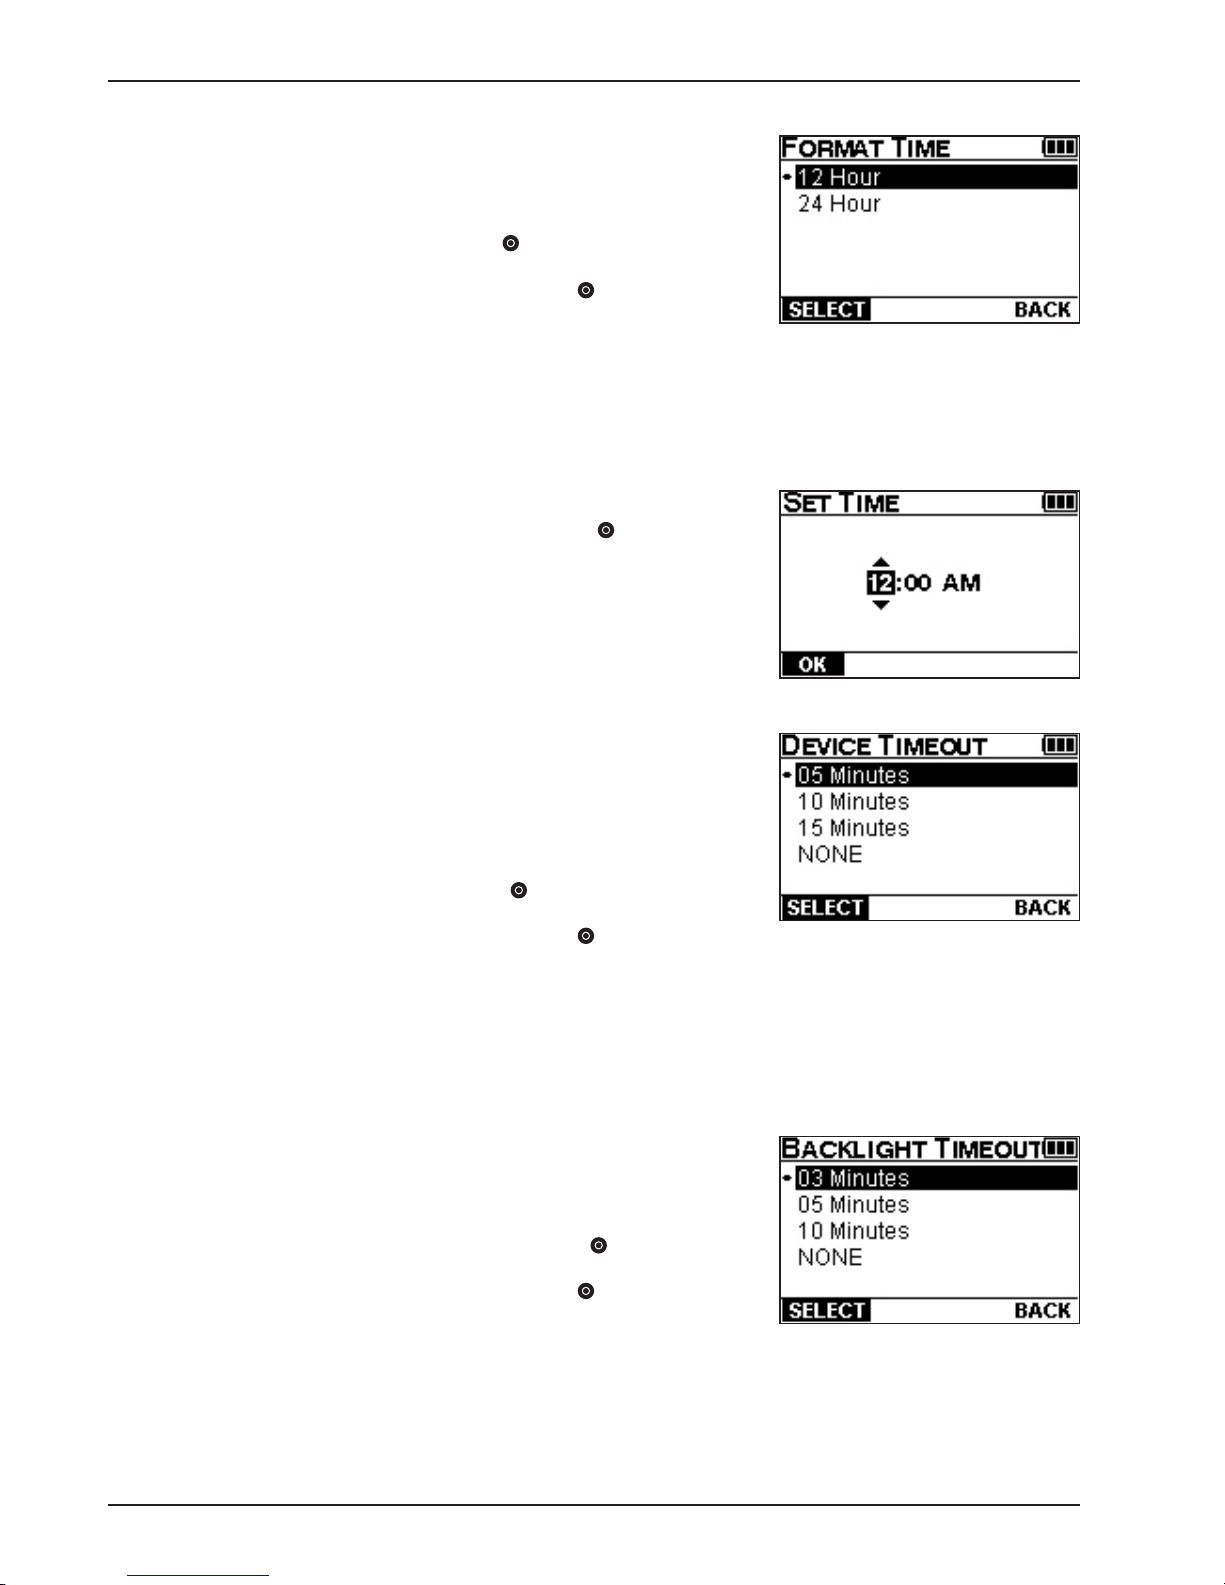
FORM AT TIME
A marker will appear to the left of the selected format. The default
format is 12 Hour.
Select format using ; then press ENTER .
Footer Options: Select using ; then press ENTER .
SELECT
Selects preferred choice and saves changes.
BACK
Returns to SETTINGS screen.
SET TIME
Set the current time using , ; then press ENTER .
Footer Option: OK
Saves changes and returns to SETTINGS screen.
Part 3 Colorimeter Operation
DEVICE TIMEOUT
A marker will appear to the left of the selected device timeout. The
default timeout is 5 minutes. The timeout countdown starts after
any running timers expire or, if no timers are running, after the
most recent button press.
Select timeout using ; then press ENTER .
Footer Options: Select using ; then press ENTER .
SELECT
Selects preferred choice and saves change.
BACK
Returns to SETTINGS screen.
BACKLIGHT TIMEOUT
A marker will appear to the left of the selected backlight timeout.
The default timeout is 3 minutes.
Select backlight timeout using ; then press ENTER .
Footer Options: Select using ; then press ENTER .
SELECT
Selects preferred choice and saves change.
BACK
Returns to SETTINGS screen.
3-40 TTi® Colorimeter User’s Manual
Page 67

Part 3 Colorimeter Operation
BACKLIGHT LEVEL
A marker will appear to the left of the selected backlight-intensity
level. The default level is 50%.
Select intensity level using ; then press ENTER .
Footer Options: Select using ; then press ENTER .
SELECT
Selects preferred choice and saves change.
BACK
Returns to SETTINGS screen.
ADJUST CONTRAST
An arrow will appear above the selected contrast setting. The
default setting is 0.
Select contrast setting using ; then press ENTER .
Footer Option: OK
Save change and returns to SET TINGS screen.
LANGUAGE
A marker will appear to the left of the selected language. The
default language is English. Other options may become available in
the future.
Footer Options: Select using ; then press ENTER .
SELECT
Selects preferred choice and saves change.
BACK
Returns to SETTINGS screen.
FACTORY RESTORE
WARNING: Choosing the Factory Restore option will erase all
device data (including test data) and restore all settings (including
optional chemical forms) to the factory default.
Footer Options: Select using ; then press ENTER .
YES
Erases all device data, restores factory settings, and restarts
device.
NO
Returns to SETTINGS screen.
3- 41T Ti® Colorimeter User’s Manual
Page 68

Part 3 Colorimeter Operation
ABSORBANCE AND TRANSMITTANCE TESTS
Absorbance and transmittance tests are available in the ALL TESTS menu. These tests can be used in conjunction with user-developed methods to analyze samples and obtain results in terms of absorbance (ABS) or
percent transmittance (% T), or to prepare user calibration curves. Wavelength choices are 420, 470, 520, 570,
620, and 660 nm. Sample cell viewdepth choices are 15 and 25 mm. A nonpreprogrammed timer is available
as a footer option. In general, the following steps are required to perform absorbance and transmittance tests:
• Select Absorbance or Transmittance from the ALL TESTS menu.
• Select a wavelength.
• Confirm test name and wavelength.
• Prepare a blank and ZERO the Colorimeter.
• Prepare sample and READ the sample.
The following example shows how to perform an absorbance test with results expressed in terms of ABS. The
same procedure is used to perform a transmittance test with results expressed in terms of % T.
STEP 1
Select Start Test from the MAIN MENU using ; then press
ENTER .
Select ALL TESTS menu using ; then press ENTER .
STEP 2
Select Absorbance using ; then press ENTER .
3-42 TTi® Colorimeter User’s Manual
Page 69

Part 3 Colorimeter Operation
STEP 3
Select wavelength using ; then press ENTER .
STEP 4
Confirm test name and wavelength.
The test name and wavelength will be displayed.
Tes t name.
Wavelength.
STEP 5
Prepare blank.
Follow the user-developed method.
AND
Zero the Colorimeter.
Select ZERO using ; then press ENTER .
STEP 6
Prepare sample.
Follow the user-developed method.
AND
Read the sample.
Select READ using ; then press ENTER .
RESULT will be displayed in terms of absorbance (ABS).
3-43TTi® Colorimeter User’s Manual
Page 70

Re-zero or read more samples:
Select ZERO using ; insert a blank; then press ENTER .
Select READ using ; insert a sample; then press ENTER .
Select new wavelength:
Select WL using ; then press ENTER .
Return to current test menu:
Select NEW using ; then press ENTER .
FOOTER OPTIONS: Select using ; then press ENTER .
ZERO
Zeros the instrument on a blank and displays 0.000 ABS in the
absorbance mode and 100.0 % T in the transmittance mode.
READ
Reads the sample and displays result.
Part 3 Colorimeter Operation
TIMER
Goes to a nonprogrammed timer that can be set by the user if a
timing step is not specified in the test procedure. (See Part 3, Test
Timers and Auto-Read Option.)
WL
Ends test and returns to the wavelength selection screen.
NEW
Ends test and returns to the current test menu.
3-44 TTi® Colorimeter User’s Manual
Page 71

Part 3 Colorimeter Operation
USER-DEVELOPED TESTS
A total of 8 user-developed tests can be programmed and transferred to the instrument using the TTi®
Colorimeter Series PC App. When transferred to the instrument, user-developed tests are stored in the ALL
TESTS menu and can be added to the FAVORITES test menu or incorporated into a Series Test. Navigation
and available options are the same as preprogrammed tests.
PROGRAM AND TRANSFER A USER-DEVELOPED TEST
Four actions are required to program and transfer a user-developed test to the Colorimeter.
• prepare a calibration curve
A calibration curve is prepared by measuring the absorbance of reacted standards (e.g., standards containing
the substance to be measured plus test reagents) at various known concentrations. These absorbance vs.
concentration data pairs (up to 12 data pairs for each test) are then entered into a table in the PC App and a
graph of the calibration curve is automatically generated. The calibration curve can be linear or nonlinear with
either a positive or negative slope. If the calibration curve is linear, only two data pairs are required (the lowest
and highest concentration standard) to obtain accurate results throughout the range of the test. If the calibration curve is nonlinear, more data pairs may be needed in the area of nonlinearity to obtain accurate results
throughout the range of the test.
When preparing a calibration curve, do not exceed 2.5 absorbance (ABS) units. For positive-sloped calibration
curves, this will be the highest concentration standard. For negative-sloped calibration curves, this will be the
lowest concentration standard. If the absorbance reading exceeds 2.5 ABS, try using the shorter sample cell
viewdepth (15 mm). A sample dilution technique using a multiplication factor may also be incorporated into
the test procedure for tests with a positive-sloped calibration curve. If the sample cannot be diluted or the ABS
readings using the 15 mm sample cell still exceed 2.5 ABS, then the useable range of the test will need to be
decreased for positive-sloped calibration curves. Negative-sloped calibration curves will require a modification
to the test procedure that uses a lower indicator concentration, which may result in a decreased range for the test.
Prepare at least five or six standards from the lowest (usually 0 concentration) to the highest concentration in
increments that cover the anticipated range of the test. For instance, if the anticipated range is 0–10 ppm, then
prepare standards at 0, 2, 4, 6, 8, and 10 ppm.
Procedure
1. Turn on the Colorimeter.
2. Select a test menu (ALL TESTS, RECENT TESTS, or FAVORITES) containing Absorbance using .
3. Select Absorbance using ; then press ENTER .
4. Select the best wavelength for the test using ; then press ENTER .
5. Rinse and fill a 25 mm sample cell to the 10 mL mark with deionized water; then cap.
6. Insert the sample cell into the sample cell compartment. Align marks.
7. Select ZERO using ; then press ENTER . Zero will be displayed.
8. Remove the sample cell from the sample cell compartment.
9. Rinse and fill a 25 mm sample cell to the 10 mL mark with the lowest concentration standard (usually
0 concentration).
10. Follow your test procedure for reagent addition, etc.; then cap and swirl to mix thoroughly.
11. Insert the sample cell into the sample cell compartment. Align marks.
12. Select READ using ; then press ENTER . Result will be displayed.
13. Record the ABS and concentration data pairs.
14. Repeat steps 9–13 for each concentration standard.
3-45TTi® Colorimeter User’s Manual
Page 72

Part 3 Colorimeter Operation
• enter test information and calibration curve data pairs into the user-developed test file located in the PC App
Procedure
1. Open the TTi® Colorimeter Series PC App
and click on Add in the User-Developed Tests
section.
(Note: If this is your first User-Developed Test,
click on “Test 1” and then click Edit.)
2. The User-Developed Test File/Add New Test
screen will be displayed.
3. Enter all test information and calibration curve data pairs. NOTE: Calibration curve data pairs must
be entered in a particular order in the table. Begin at the left with the results from the lowest
concentration standard (Standard #1) and move through each succeeding increment, entering the
results from the highest concentration standard last.
User-Developed Test File Fields Description
Tes t Name Any English name can be entered (number of characters may be limited).
Subscripts cannot be entered. Colorimeter display will show exactly what is typed.
Chemical Form Any chemical form, name, acronym, or abbreviation can be entered (number of
characters is limited). An underscore is used to prefix a subscript ; e.g., H_2O will
be displayed on the screen as H2O. Superscripts cannot be entered.
Units Units in which test results will be expressed. Choices are ppm, ppb, ppt, mg/L,
µg/L, g/L, and no units.
Sample Cell Viewdepth The sample cell viewdepth that will be used for the test. Choices are 15 and 25 mm
for the TTi 2000 and TTi 3000 models.
Wavelength The wavelength that will be used for the test. Choices are 420, 470, 520, 570,
620, and 660 nm for the TTi 2000 and TTi 3000 models.
Resolution The number of decimal places used to display test results. Choices are 0, 0.0,
0.00, and 0.000.
Timers (Wait Time #1, #2, #3, #4) The wait time in minutes and seconds (up to four timers can be preprogrammed
for the test).
Calibration Curve Data Pairs Absorbance (ABS) and Concentration data pairs used to prepare the calibration
curve. Absorbance values can be entered in the table in increasing or decreasing
order but must be sequential and cannot exceed 2.5 ABS. Concentration values
must be entered in the table in increasing order (from lowest concentration
standard to highest concentration standard, moving left to right) and cannot
exceed 9999.
3-46 TTi® Colorimeter User’s Manual
Page 73

Part 3 Colorimeter Operation
4. Click SAVE. The calibration curve will be displayed. Continue below.
• use the AUTO-GRAPH feature to view the calibration curve and determine whether additional data pairs
are required
A graph of the calibration curve will be generated automatically. Examine the calibration curve. If the curve
is linear, additional data pairs are not required. If the curve is slightly nonlinear, additional data pairs may be
needed in the area of nonlinearity to obtain best results. Up to 12 data pairs may be entered.
• save and transfer the test to the Colorimeter
Procedure
1. Click to exit to the User-Developed Test File screen.
2. Click on the next to User-Developed Tests to update the Colorimeter with the new test.
3. Follow screen prompts to continue.
3- 47T Ti® Colorimeter User’s Manual
Page 74

Part 3 Colorimeter Operation
EDIT A USER-DEVELOPED TEST
To edit a user-developed test, click on the test to be edited; then click on Edit in User-Developed Tests. Edit
test information and SAV E. Click on the icon next to User Developed Test to transfer the updated user-
developed test file to the instrument.
DELETE A USER-DEVELOPED TEST
To delete a user-developed test, click on the test to be deleted; then click on Delete in User-Developed Tests.
A warning that the selected test is about to be permanently deleted will appear on the screen.
Click on DELETE and transfer the updated user-developed test file to the instrument.
TEST INSTRUCTION EXAMPLE
FRONT
Alkalinity Total 250
Range(s): 0-250 ppm CaCO3, 0-305 ppm HCO
Procedure
Interferences
Test Method
Estimated
Detection Limit
Precision
BACK
Application
Ordering Info
1. Turn on the Colorimeter.
2. Select a test menu (ALL TESTS, RECENT TESTS, or
FAVORITES) containing Alkalinity Total 250 using
.
3. Select Alkalinity Total 250 using ; then press
ENTER
.
4. Select a chemical form (CaCO
expression of test results using .
The following analytes were tested to the levels listed and
found not to cause any interference up to the specified
values:
Bromocresol Green
Bromocresol green, a pH-dependent indicator, is used to determine concentrations of alkalinity. Differing concentrations of alkalinity alter the pH and therefore change the color of the
bromocresol green. This color change is proportional to the concentration of alkalinity in a sample.
2 ppm total alkalinity as CaCO
Using two lots of reagent and an alkalinity standard solution of 100 ppm total alkalinity as CaCO3 an individual analyst obtained a standard deviation with the instrument of ± 1 ppm total
alkalinity as CaCO3.
Recreational Water
Reagent Pack
K-8024 Alkalinity Total 250
Formulated for exclusive use with Taylor’s TTi™ Colorimeter.
Reagent Pack Components
R-8024A Alkalinity Total 250 - Reagent A
R-8024B Alkalinity Total 250 - Reagent B
-
3
, HCO3, CO3) for
3
3
Colorimeter Series
, 0-150 ppm CO
2-
3
5. Rinse and fill 25 mm sample cell to 10 mL mark with
6. Insert sample cell into sample cell compartment. Align
7. Select ZERO using ; then press ENTER
8. Remove sample cell from sample cell compartment;
Biguanide – 50 ppm
Bromine – 10 ppm
Chlorine – 10 ppm
Copper – 0.5 ppm
sample; then cap.
marks per User’s Manual.
will be displayed
then remove cap.
Instruction #5078
9. Add 1 drop Alkalinity Total 250 - Reagent A; then
swirl to mix thoroughly.
10. Add 1 mL Alkalinity Total 250 - Reagent B; then cap
and swirl to mix thoroughly.
. Zero
11. Insert sample cell into sample cell compartment. Align
marks.
12. Select READ using ; then press ENTER
instrument will read the sample and the result will be
displayed.
Cyanuric Acid – 200 ppm
Hardness, Calcium (CaCO
Iron, Ferric – 0.5 ppm
Iron, Ferrous – 0.5 ppm
) – 1000 ppm
3
Instruction #5078
. The
(over)
01/13
3-48 TTi® Colorimeter User’s Manual
31 Loveton Circle, Sparks, MD 21152 U.S.A.
800-TEST KIT (837-8548) • 410-472-4340
customerservice@taylortechnologies.com
4
Page 75

Part 4 Using the PC App
Part 4
Using the
PC App
4-1TTi® Colorimeter User’s Manual
Page 76

Page 77

Part 4 Using the PC App
TRANSFERRING TEST DATA
To maintain an up-to-date customer database on your PC or laptop, it will be necessary to transfer test data
from the Colorimeter on a regular basis.
Click on the Transfer Test Data from Colorimeter icon on the main screen of the TTi® Colorimeter Series
PC App. (This software was installed upon registration as the owner of record. See Part 1, Registration.)
You will be prompted to connect the Colorimeter to your computer with the USB cable provided. Click
PROCEED to transfer the test data stored on the Colorimeter to the PC App and assign the records to a
customer in the customer database. Test data that is not cleared from the Colorimeter will remain available for
assignment (along with any new tests) the next time you transfer test data. Note: A customer must appear in
the customer database before a test record can be assigned to their file. See the next section for how to add a
customer to the customer database.
4-3TTi® Colorimeter User’s Manual
Page 78

Part 4 Using the PC App
MAINTAINING A CUSTOMER DATABASE
To access the database containing customer information and test records, click on the Customer Data/Test
History icon on the main screen of the PC A pp. Here you can add, edit, and delete customer profiles. To
view a customer’s test records, select the customer and then click the View Test History button. You can also
manually add, edit, and delete test records from the Test History screen.
4-4 TTi® Colorimeter User’s Manual
Page 79
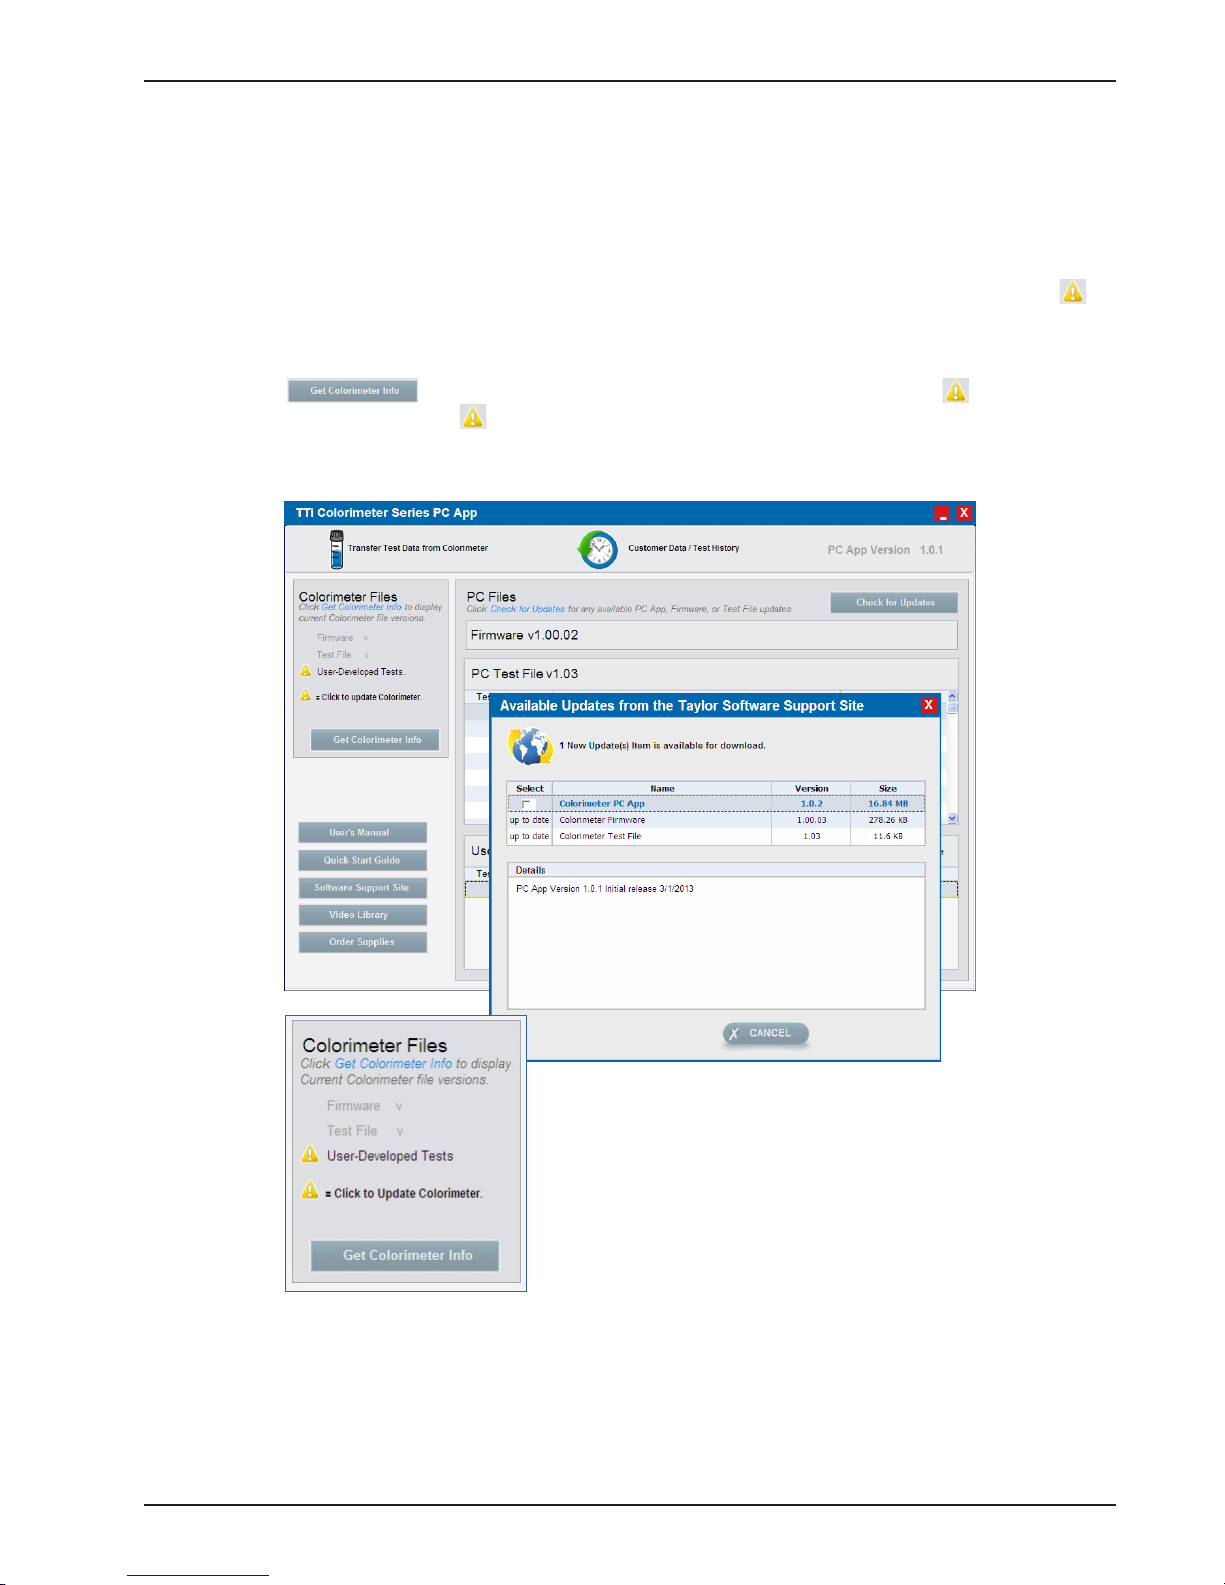
Part 4 Using the PC App
UPDATING THE PC APP, FIRMWARE, AND TEST FILES
You should occasionally check for updates to the PC App, Colorimeter firmware, and test files.
Click Check for Updates on the main screen of the PC App. The program will determine whether updates
are available. These will be displayed in the Updates window, where you can review and download the files at
your option. When updated Colorimeter firmware or an updated test file has been downloaded to the PC App,
you will be prompted to install the file to the Colorimeter. Colorimeter files are installed by clicking the
symbol in the Colorimeter Files section of the PC App.
The PC App can be used to update firmware, Taylor tests, and user-developed tests on multiple Colorimeters.
When you click , the attached Colorimeter’s file versions are shown and the symbol appears
for files to be updated. Click on the symbol to update the Colorimeter file(s).
Note: New test files for a particular meter model are supplied free of charge to the registered owner.
4-5TTi® Colorimeter User’s Manual
Page 80

Part 4 Using the PC App
CREATING USER-DEVELOPED TESTS
In addition to the preprogrammed tests installed on the Colorimeter, a total of 8 user-developed (proprietary)
tests can be programmed and transferred to the instrument using the TTi® Colorimeter Series PC App. (See
Part 3, User-Developed Tests, for how to proceed.)
ACCESSING HELPFUL LINKS
The TTi® Colorimeter Series PC App contains links to digital editions of the User’s Manual and Quick-Start
Guide; plus a link to the PC App support website, www.taylorsoftwaresupport.com; and a link to the main
Taylor website, www.taylortechnologies.com, where you can access a video library of Colorimeter test
procedures as well as order testing supplies.
4-6 TTi® Colorimeter User’s Manual
5
Page 81

Part 5 Maintenance
Part 5
Maintenance
5-1TTi® Colorimeter User’s Manual
Page 82

Page 83

Part 5 Maintenance
ACCURACY CHECK
To verify instrument performance, an accuracy check should be performed at regular intervals using the
K-8000 TTi® Colorimeter Series Accuracy Check Kit (available as an optional accessory). The kit contains
five secondary absorbance standards. An accuracy check is performed using the Absorbance test, located in
the ALL TESTS menu. The absorbance of each secondary standard is measured at specified wavelengths
and the measured absorbance must fall within specific tolerances (provided with the kit) to verify instrument
performance.
ROUTINE CARE
Do not use chemicals, solvents, or abrasives to clean or dry any part of the instrument. Clean and dry the
enclosure, display, sample cell compartment, and sample cells after use or when needed as follows:
• Enclosure – Use a soft, nonabrasive cloth and water or mild detergent.
• Display – Be careful not to scratch the display. Use a soft, nonabrasive cloth or lens tissue and water or
mild detergent.
• Sample Cell Compartment – Be careful not to scratch the sample cell compartment. Use the foam brush
(supplied); a soft, nonabrasive cloth or lens tissue; and water or mild detergent.
• Sample Cells – Be careful not to scratch the sample cells. Use the foam brush (supplied) or a soft,
nonabrasive cloth and water or mild detergent. Rinse thoroughly with deionized or distilled water.
WASTE DISPOSAL
As a chemical manufacturer, Taylor Technologies is required to prepare a Safety Data Sheet (SDS) for every
reagent we produce. The Hazard Communication Standard promulgated by the U.S. Department of Labor’s
Occupational & Safety Health Administration (OSHA) specifies what information must be included in an
SDS to provide workers and emergency personnel with procedures for handling the chemical in a safe manner,
including disposal considerations. You may request an SDS for each of the reagents in your purchase at the
time the order is placed. SDSs may also be printed from our corporate website, www.taylortechnologies.com.
They can be found under the Product Info button; from the drop-down menu, select “Documents” then “SDSs.”
Please note that, beyond adding any new information within three months of awareness of a change affecting
the content of a Safety Data Sheet, there currently is no specified time required by OSHA between revisions
and/or updates to SDSs.
In Canada, our master distributor holds responsibility for Workplace Hazardous Materials Information System
(WHMIS) compliance. Contact them directly, as follows:
Lowry & Associates
5-1151 Gorham Street
Newmarket, ON L3Y 8Y1
Phone: 905-836-0505
Fax: 905-895-4539
E-mail: info@lowryassociates.ca
It is the user’s responsibility to abide by any local and state/provincial waste disposal requirements that supersede
federal guidelines. Consult with a regulatory agency in your area to be certain you are in compliance with
prevailing hazardous waste disposal guidelines. This Environmental Protection Agency website link may be
helpful in locating these resources in the U.S.:
http://www.epa.gov/wastes/wyl/stateprograms.htm
5-3TTi® Colorimeter User’s Manual
Page 84

Part 5 Maintenance
WARRANTY INFORMATION
Instruments in the TTi® Colorimeter Series found to be defective within five years from the date of purchase
will be repaired or replaced at the option of Taylor Technologies for any registered owner. The warranty does
not cover batteries, nor damage caused by operator negligence or use of test chemistries not manufactured by
Taylor or unauthorized repair work, nor the transportation and insurance costs to return the unit to our factory.
The cost of all parts, labor, and return shipping to the owner will be borne by Taylor Technologies within the
warranty period. All other warranties, express or implied, including warranties of merchantability and fitness
for a particular purpose, are excluded.
There are no user-serviceable parts of the Colorimeter besides the batteries. Should your meter display an
Error Code message directing you to “Contact Tech Support” (see Part 6, Error Codes), or you have any other
concerns about the device, please contact Taylor’s customer service group at 800-TEST KIT (837-8548). A
representative will work with you to determine whether it is appropriate to return the Colorimeter for servicing.
If so, a Return Authorization number and shipping label will be provided. You are responsible for insuring the
unit and shipping it by a traceable means back to Taylor.
5-4 TTi® Colorimeter User’s Manual
6
Page 85

Part 6 Before You Call for Service
Before You Call
Part 6
for Service
6-1TTi® Colorimeter User’s Manual
Page 86

Page 87

Part 6 Before You Call for Service
ERROR CODES
Error codes are displayed when the instrument detects misuse or failure of software, hardware, or batteries.
When an Error Code message is displayed, use the table below to determine the likely cause and user action.
DO NOT attempt to service the instrument yourself, other than the User Action described in the table.
There are no user-serviceable parts other than the batteries. Any attempt to open the instrument will void the
war r a nt y.
To contact Tech Support, call 800-837-8548 between 8:00 a.m.–4:45 p.m. (Eastern Time), Monday through
Friday, except major holidays.
Display Message Likely Cause User Action
Error: 001
420 nm error.
See User’s Manual.
Error: 002
470 nm error.
See User’s Manual.
Error: 003
520 nm error.
See User’s Manual.
Error: 004
570 nm error.
User’s Manual.
Error: 005
620 nm error.
See User’s Manual.
Error: 006
660 nm error.
See User’s Manual.
Obstruction in the sample cell compartment
during initialization.
420 nm LED or detector error.
Obstruction in the sample cell compartment
during initialization.
470 nm LED or detector error.
Obstruction in the sample cell compartment
during initialization.
520 nm LED or detector error.
Obstruction in the sample cell compartment
during initialization.
570 nm LED or detector error.
Obstruction in the sample cell compartment
during initialization.
620 nm LED or detector error.
Obstruction in the sample cell compartment
during initialization.
660 nm LED or detector error.
Check for a sample cell or foreign object in
the sample cell compartment. Remove; then
restart device.
Press any key to override and allow testing at
other wavelengths.
Contact Tech Support if necessary.
Check for a sample cell or foreign object in
the sample cell compartment. Remove; then
restart device.
Press any key to override and allow testing at
other wavelengths.
Contact Tech Support if necessary.
Check for a sample cell or foreign object in
the sample cell compartment. Remove; then
restart device.
Press any key to override and allow testing at
other wavelengths.
Contact Tech Support if necessary.
Check for a sample cell or foreign object in
the sample cell compartment. Remove; then
restart device.
Press any key to override and allow testing at
other wavelengths.
Contact Tech Support if necessary.
Check for a sample cell or foreign object in
the sample cell compartment. Remove; then
restart device.
Press any key to override and allow testing at
other wavelengths.
Contact Tech Support if necessary.
Check for a sample cell or foreign object in
the sample cell compartment. Remove; then
restart device.
Press any key to override and allow testing at
other wavelengths.
Contact Tech Support if necessary.
6-3TTi® Colorimeter User’s Manual
Page 88

Part 6 Before You Call for Service
Display Message Likely Cause User Action
Error: 007
System error.
Hardware or software malfunction. Turn off device.
Contact Tech Support.
Contact Tech Support.
Error: 008
Replace batteries or check
power supply.
See User’s Manual.
Error: 009
System error.
Low power supply. As applicable, replace batteries or check the
AC power adapter or USB cable for faulty
connection or function.
Contact Tech Support if problem persists.
Hardware malfunction. Turn off device.
Contact Tech Support.
Contact Tech Support.
Error: 010
System error.
Hardware or software malfunction. Turn off device.
Contact Tech Support.
Contact Tech Support.
Error: 011
System error.
Memory failure. Turn off device.
Contact Tech Support.
Contact Tech Support.
Error: 012
Check USB cable &
connections.
See User’s Manual.
USB communication failure. Check USB cable for damage. Verify that the
USB cable connections to the device and
computer are secure.
(NOTE: Problem may be computer-related.)
Contact Tech Support if problem persists.
Error: 013
Replace batteries or check
power supply.
See User’s Manual.
Error: 015
Procedure or System error.
Contact Tech Support.
Low power supply. As applicable, replace batteries or check the
AC power adapter or USB cable for faulty
connection or function.
Contact Tech Support if problem persists.
Sample cell may have been inserted or removed from sample cell compartment during
the measurement process.
or
Hardware malfunction.
Retest. Make sure sample cell is properly
aligned in the sample cell compartment before
pressing ZERO or READ. Wait until result is
displayed before removing sample cell.
Turn off device and contact Tech Support if
problem persists
Error: 016
System error.
Hardware malfunction. Turn off device.
Contact Tech Support.
Contact Tech Support.
Error: 017
Invalid date.
See User’s Manual.
Error: 018
Replace batteries or check
power supply.
See User’s Manual.
Invalid date entered. Enter correct date under MAIN MENU/
SETTINGS/SET DATE.
Contact Tech Support if problem persists.
Low power supply. As applicable, replace batteries or check the
AC power adapter or USB cable for faulty
connection or function.
Contact Tech Support if problem persists.
6-4 TTi® Colorimeter User’s Manual
Page 89

Part 6 Before You Call for Service
RETURN POLICY
Should your meter display an Error Code message directing you to “Contact Tech Support,” or you have any
other concerns about the device, please contact Taylor’s customer service group at 800-TEST KIT (837-8548).
A representative will work with you to determine whether it is appropriate to return the Colorimeter for
servicing. Please be prepared to supply the Colorimeter serial number (S/N), found on the product label on the
bottom of the meter, and proof of purchase. (You may have attached your proof of purchase to the Quick-Start
Guide and filed it for future reference, as suggested in the guide.) Should a return be necessary, a Return
Authorization number and shipping label will be provided. You are responsible for insuring the unit and
shipping it by a traceable means back to Taylor.
6-5TTi® Colorimeter User’s Manual
Page 90

Page 91

Part 7 Colorimeter Specifications
Specifications
Part 7
Colorimeter
7-1TTi® Colorimeter User’s Manual
Page 92

Page 93

Part 7 Colorimeter Specifications
SPECIFICATIONS SUMMARY
General Description
Instrument Type The TTi® Colorimeter is a portable, multiwavelength, micro-
processor-controlled, menu-driven, direct- readout instrument
that employs light-emitting diodes (LEDs) as light sources and
offers data-logging capabilities. It is well suited for performing
multiparameter water analyses in the field or in the laboratory.
Number of Preprogrammed Test Methods
(as of 10/19/2012)
Performance
Photometric Range 0–2 ABS
Readout Units
Photometric Accuracy ±0.005 ABS @ 1.0 ABS nominal
Photometric Linearity ±0.002 ABS (0–1 ABS)
Repeatability ±0.005 ABS (0–1 ABS)
Resolution 0.001 ABS (0–1 ABS)
Wavelength Filters 420, 470, 520, 570, 620, 660 nm (filters manufactured using
Wavelength Selection Automatic for preprogrammed and user-developed tests
Wavelength Accuracy ±1 nm
Wavelength Bandwidth 10 nm ±1 nm
Stray Light < 1.0%
Physical Description
Source Lamp LED (light-emitting diode)
Detector Silicon photodiode
Sample Cell Chamber Accommodates 15 to 25 mm diameter round cells
USB Cable Type A male to mini B male
AC Power Adapter Wall adapter w/ mini B male – USB
Dimensions 3.5" W x 8.5" D x 3.5"H
Weight (w/ batteries) 21 oz. (595 g)
Functionality & User Interface
Data Storage/Recall 100 date- and time-stamped test results
Data Transfer Mode Transfer test results to and file updates from PC or laptop
User-Developed Test Capability 8 tests (comprising up to 12 data points each)
Keypad 8-button silicone rubber
Display/Resolution Custom graphical LCD (liquid crystal display) w/ anti-glare
Backlight 2 adjustable brightness levels and 4 timeout settings
Timers Up to 4 preprogrammed test timers and 1 general-use timer
Adjust Calibration Capability Adjust calibration curve of preprogrammed tests
Favorites Menu Feature Create and edit a preferred test list
Series Test Feature Create and edit a group of tests to be performed consecutively
TTi® 2000 for pool/spa waters: 12
TTi® 3000 for commercial/industrial waters: 30+
ABS, % T, and concentration (ppm, ppb, ppt, mg/L, µg/L, g/L)
a process that provides enhanced thermal, environmental, and
spectral stability)
screen and 160 x 100 resolution
7-3TTi® Colorimeter User’s Manual
Page 94

Part 7 Colorimeter Specifications
Specifications Summary (cont’d)
Instrument Rating
Power Source 4 x AA 1.5V alkaline or lithium batteries, AC power adapter, or
USB cable
Battery Life (w/o backlight) 4 months (typical use, 12 tests/day, 5 days/week)
w/ low battery indicator 90% RH @ 122°F/50°C (non-condensing)
Max Current 100 mA @ 5VDC
AC Power Adapter Input 100–240 VAC, 50/60 Hz
Input and Output Connections Mini-B female USB port for data transfer and connection to
AC power adapter or USB cable
Environmental Conditions Operational temperature range: 32°F–122°F (0°C–50°C)
Operational Humidity Limit 90% RH @ 122°F/50°C (noncondensing)
Dust and Water Ingress Protection IP67: No ingress of dust; immersion in water of up to 1 meter
for 30 minutes
7-4 TTi® Colorimeter User’s Manual
8
Page 95
Part 8 Compliance Synopsis
Part 8
Compliance
Synopsis
8-1TTi® Colorimeter User’s Manual
Page 96

Page 97

Part 8 Compliance Synopsis
CERTIFICATION
The TTi® Colorimeter Series is certified to the following instrumentation Directives and Standards:
• Directive 2004/108/EC, Electromagnetic Compatibility Directive
• Directive 2006/95/EC, Low Voltage Directive
• FCC, Radio Frequency Devices, Unintentional Radiators, 47 CFR Part 15, Subpart B
• UL 61010-1 - Safety Requirements for Electrical Equipment for Measurement, Control, and Laboratory
Use - Part 1: General Requirements
• ICES-003 - Issue 4 February 2004 - Spectrum Management and Telecommunications Policy -
Interference-Causing Equipment Standard - Digital Apparatus
• CSA C22.2 No. 61010-1 - Safety Requirements for Electrical Equipment for Measurement, Control, and
Laboratory Use - Part 1: General Requirements
• EN 61326-1:2006 - Electrical Equipment for Measurement, Control and Laboratory Use -
EMC Requirements – Part 1: General Requirements
• EN 61010-1:2001 - Safety Requirements for Electrical Equipment for Measurement, Control, and
Laboratory Use - Part 1: General Requirements
• IEC 61010-1 - Safety Requirements for Electrical Equipment for Measurement, Control, and Laboratory
Use - Part 1: General Requirements
INFORMATION TO THE USER
The user is cautioned that if the instrument is used in a manner not specified by Taylor Technologies, Inc., the
protection provided by the instrument may be impaired.
This device complies with Part 15 of the FCC Rules. Operation is subject to the following two conditions:
(1) This device may not cause harmful interference, and
(2) This device must accept any interference received, including interference that may cause undesired
operation.
The user is cautioned that changes or modifications not expressly approved by Taylor Technologies, Inc., could
void the user’s authority to operate this equipment.
NOTE: This equipment has been tested and found to comply with the limits for a Class B digital device,
pursuant to Part 15 of the FCC Rules. These limits are designed to provide reasonable protection against
harmful interference in a residential installation. This equipment generates, uses, and can radiate radio
frequency energy and, if not installed and used in accordance with the instructions, may cause harmful
interference to radio communications. However, there is no guarantee that interference will not occur in a
particular installation. If this equipment does cause harmful interference to radio or television reception,
which can be determined by turning the equipment off and on, the user is encouraged to try to correct the
interference by one or more of the following measures:
• Reorient or relocate the receiving antenna
• Increase the separation between the equipment and receiver
• Connect the equipment into an outlet on a circuit different from that to which the receiver is connected
• Consult the dealer or an experienced radio/TV technician for help
8-3TTi® Colorimeter User’s Manual
Page 98

Part 8 Compliance Synopsis
This Class B digital apparatus complies with Canadian ICES-003. (Cet appareil numérique de la classe B est
conforme à la norme NMB-003 du Canada.) The CE mark indicates compliance with the following directives:
• Directive 2004/108/EC, Electromagnetic Compatibility Directive
• Directive 2006/95/EC, Low Voltage Directive
8-4 TTi® Colorimeter User’s Manual
Page 99

Page 100

Part #5547
 Loading...