

TAXAN U7-137SF User Manual
U7-137SF User’s Manual
Image Viewer / Network
· Wireless Presenter-to-Go and Presenter-to-Go are trade marks and registered trademarks of MARGI Systems, Inc.,
U.S.A.
· CompactFlash is a registered trademark of SanDisk Corporation, U.S.A. and has been licensed to the CompactFlash
Association (CFA).
· Microsoft®, Windows®, PowerPoint®, and MS-DOS® are either registered trademarks or trademarks of Microsoft Corporation in the United States and/or other countries.
· IBM and PC/AT are registered trademarks and trademarks of International Business Machines Corporation, U.S.A.
· Pentium is a registered trademark of Intel Corporation.
■ IMPORTANT NOTICES
• PLUS VISION CORPORATION SHALL NOT BE LIABLE TO YOU OR ANYONE ELSE
FOR ANY DIRECT, INCIDENTAL, INDIRECT OR CONSEQUENTIAL DAMAGES ARISING OUT OF THE USE OR INABILITY TO USE THIS PRODUCT EVEN IF ADVISED
OF THE POSSIBILITY OF SUCH DAMAGES.
• UNDER NO CIRCUMSTANCES SHALL PLUS VISION CORPORATION BE LIABLE
FOR ANY DAMAGE TO, OR LOSS OF, DATA THAT MAY RESULT IN THE OPERATION OF THIS PRODUCT.
1
1

INTRODUCTION
This manual contains detailed information on Data Projector U7-137SF’s Image Viewer / Network
capabilities. Refer to the User’s Manual [Projector] for information about other features and functions of other projector.
This manual includes the descriptions of:
Image Viewer
The Image Viewer application incorporated in your projector allows you to make stand-alone presentations without
a PC by using a CompactFlash memory card (“CF memory card” or “CF card”) and USB memory that contains presentation data (slides) prepared on a PC.
Network
The Network application incorporated in your projector has the following two facilities:
● Network Presentation
The Presentation transfers screen displays of the document currently open on a PC to your projector ‘as is’ through
a LAN and projects them on the spot. You can make stand-alone presentations without connecting the PC via Network.
This facility also allows transfer of images on display on a booted PC screen to the projector through a wireless LAN
for your presentations on the spot.
● Web-based Control
The Web-based Control allows you to operate your projector and edit its network settings from a PC connected to
a LAN or other TCP/IP based network. A web browser such as Internet Explorer is used to remote-control the projector.
Using this facility in combination with the Network Presentation, you can make effective stand-alone presentations
on the projector placed in a showroom, for example, while operating the projector and sending desired images from
your PC in the office.
● Remote Controller
The projector can be partly controlled by a remote controller. In addition, Network and Image Viewer cannot be
partly operated with buttons attached to the main unit, so use the remote controller in such cases. Be careful not
to lose the remote controller.
2

TABLE OF CONTENTS
INTRODUCTION ...........................................2
TABLE OF CONTENTS ................................ 3
Instructions on Using Wireless LAN Cards
Gather Everything You Need before Getting Started
....4
..6
Software Installation and Setup ..................7
System Requirements ...................................... 7
Required Software ............................................ 7
Software License Agreement ........................... 8
Software Installation .......................................10
Uninstalling the Software ............................... 14
Connecting the LAN Cable and CF card
and Setting the USB Memory.......... 15
RUNNING THE IMAGE VIEWER APPLICATION
..... 17
Presentation Procedure .............................18
Preparing Slides and Embedding
Required Fonts ................................ 19
Slides Preparing Guide ................................... 19
Supported CF Memory Cards and
Data Formats.......................................... 19
How to Embed PowerPoint File Fonts ........... 20
Functiond of Font Transfer Utility .................20
When Embedding Fonts Automatically ........ 20
When Embedding Fonts Manually ............... 21
Creation of PDB files for presentations ..........21
Operating the Image Viewer ......................22
Selecting the List View Mode .........................22
Names and Functions of the List
View Mode Components ........................ 22
How to Select a Slide from the List of Folders ....
How to Select a Slide from the List of Slides ......
Operating Slides .............................................24
Displaying a Slide on the Screen ................. 24
Select a Slide .............................................. 24
Rotate a Slide ............................................. 24
Quit a Slide ................................................. 24
Exiting the Image Viewer ................................25
Setting Slideshow Options .............................25
How to Set Viewer Options ......................... 25
23
23
Configuring the Wireless LAN Settings
on Your PC for Connection
with the Projector ............................ 33
Network Setup on Windows XP Run PC ........ 33
Option 1: Use Windows XP’s Wireless
LAN Setting Items .................................. 33
Option 2: Use the Wireless Presenter ..........34
Network Setup on Windows 2000 Run PC .... 35
Option 1: Use the Wireless Presenter ..........35
Option 2: Use Wireless LAN Manufacturer’s
Setup Utility ............................................ 35
Starting and Network Presentations .........36
Start the Presentation..................................... 36
Quit the Presentation ...................................... 37
Optional connection to the Projector ............. 38
Advanced Options ...................................... 38
Quick Selection of Projector ........................ 38
Controlling the Projector ................................ 39
Features of the Projector Control Window ...39
Controlling Projector Access ....................... 40
Appendix: Overview of Presenter-to-Go for
Pocket PC/Palm Handhelds ...................... 42
Using the Web-basedControl Facility .......43
Connect the Projector to Web Access ...........43
How to Change the Projector Configuration .. 44
How to Change the Projector’s Wireless
LAN Settings ..............................................45
How to Change the Projector’s Wired LAN
settings ...................................................... 46
Control the Projector ...................................... 47
How to Use the USB Mouse ......................48
Specifications ............................................. 49
Wireless LAN Card ......................................... 49
USB Interface Standard ................................. 49
TROUBLESHOOTING ................................ 50
GLOSSARY ................................................. 51
RUNNING THE NETWORK APPLICATION
... 27
Network Presentation Procedure ..............28
Configuring the Network
Settings on the Projector.................29
Selecting Setting Items and Entering Characters
Network Settings and Selection Table .......... 30
Registering and Cancelling Network Password ...
Register Network Password ........................ 31
How to Access the Password-protected
Wireless Network Setup Screen ............. 32
How to Cancel the Network Password ........ 32
.. 29
31
3

Instructions on Using Wireless LAN Cards
■ Security Issues
Wireless LANs are connected by radio rather than by cables to perform information exchanges and communications between a
PC and a (wireless) access point, therefore they provide the benefit of relatively free LAN connections within the reach of radio
waves. On the other hand, however, radio waves can propagate everywhere beyond obstacles (such as walls) within a certain
range, therefore, security is an important concern for wireless LANs. A wireless LAN with security vulnerabilities may undergo the
following risks:
• Surreptitious glance of your data by third parties
Your data being sent via a vulnerable wireless LAN may be maliciously intercepted by an ill-willed third party who could steal
your secret data such as ID, password, credit card No. and other personal information, and email messages.
• Illegal access or break-ins
Ill-willed third parties may break in or have illegal access to your company’s intranets or your personal network. Such third parties could steal your company’s secret information or your personal data (information leak); send wrong or false information under the disguise of a particular individual (impersonation); alter the intercepted messages into false ones (falsification); let computer viruses intrude into your computer and/or network system for malicious destruction of your IT system/data (data destruction); and could do similar wrongful acts.
Wireless LAN cards and wireless access points are usually provided with security protections against these problems, so you can
minimize the risks as mentioned above if the security management of your wireless LAN system is solid.
It is recommended that you recheck the security system of your wireless LAN products at your own discretion and on your own
responsibility before starting the use of this product.
■ CAUTION (ON FREQUENCY BANDWIDTH)
The working frequency band of this product is the same as that used for microwave ovens and other industrial, laboratory
or medical equipment. In addition, it coincides with the one that is currently being used for local radio stations (these require the competent authority’s license) and special small power radio stations (these do not require the competent
authority’s license), both of which are usually in service for mobile identification at manufacturing sites.
1. Before starting the use of this equipment, make sure that there is no local radio station or special small power radio
station for mobile identification working nearby.
2. In the event of any radio interference between this equipment and a local radio station for mobile identification,
promptly change the working frequency band of the equipment, or immediately stop its radio wave emission and contact us at the telephone number below (we can suggest you protective measures from radio interference such as installation of partitions).
3. For protections of the equipment from radio interference with a special small power radio station for mobile identification as well as any further information on this matter, please contact our authorized distributor in your location where
you have bought it.
4

Instructions on Using Wireless LAN Cards
■ Handling Precautions
No license for radio station is required when using wireless LAN cards, but the user should fully understand the following:
● DO NOT USE a wireless LAN card in the neighborhood of other radio equipment.
Data communications may be disabled or may slow down due to radio interference if you use the card near the following equipment as they may belong to the same radio frequency bandwidth as that used for your equipment:
· Microwave ovens
· Industrial, laboratory and medical equipment
· Local radio stations for mobile identification usually in use in manufacturing lines
· Special small power radio stations
● Avoid using a cellular phone or switching TV or radio on in proximity of a wireless LAN card as
far as you can.
Since the radio frequency bandwidths used for cellular phones, TV and radio are different from that used for the wireless LAN
cards for your equipment, data communications are not affected but voice and images may be affected by noise interference.
● Reinforced concrete, metal and concrete block radio waves from the wireless LAN cards.
Radio waves used for the wireless LAN cards for your equipment can pass through wooden and glass walls and floors (except
metal-meshed glass panes/panels), but not through those made of reinforced concrete, concrete and metal.
Bringing a wireless LAN card into a country other than the designated country is prohibited, and may infringe upon the wireless telegraphy laws of that country.
Specific Absorption Rate
Power Output listed is Conducted. The antenna used for this transmitter must not be co-located or operating in
conjunction with any other antenna or transmitter. End-users and installers must be provided with antenna installation instructions and transmitter operating conditions for satisfying RF exposure compliance. The SAR data in this
filing is applicable to demonstrate compliance for a final or similar host product as shown in this filing. The maximum
SAR value is:Body; 0.4W/kg
5
Gather Everything You Need before Getting Started
The following are required for using the Image Viewer and Network applications:
To use the Image Viewer
When using CF memory card
Recording media
Requirements at
the PC end
A CFA-specified CF memory card available in the market (For more information see page 19 of this
manual.)
CF slot or PC card slot (CF card adaptor is required)
* The associated utility software must be installed if you need to use PowerPoint file fonts. Installation of
the Wireless Presenter-to-Go will automatically and simultaneously install the Font Transfer Utility.
· See page 10 for installation procedure.
· See page 20 on how to use the Font Transfer Utility.
* “CF” or “CF card” is short for “CompactFlash” in this manual.
When using USB memory
Recording media
Requirements at
the PC end
A USB1.1 USB memory available in the market
USB port conforming to USB1.1 standard
* The associated utility software must be installed if you need to use PowerPoint file fonts. Installation of
the Wireless Presenter-to-Go will automatically and simultaneously install the Font Transfer Utility.
· See page 10 for installation procedure.
· See page 20 on how to use the Font Transfer Utility.
To use the Network Presentation
When using wired LAN
Connection cable
Requirements at
the PC end
(Software)
10/100BASE-T LAN cable (straight type) available in the market
Install “Wireless Presenter-to-Go” software attached to the projector.
· See page 10 for installation procedure.
When using wireless LAN
Reuirement at the
projector end
Requirements at
the PC end
(Hardware)
Requirements at
the PC end
(Software)
A dedicated wireless LAN card (accompanying the projector)
· For stand-alone presentations (Ad Hoc Mode): A wireless LAN card that complies with IEEE802.11b
standard (or a personal computer with built-in wireless LAN)
· For wired presentations: You need a wireless access point. (Consult your LAN administrator.)
Install the Wireless Presenter-to-Go Utility that has come with the projector.
· See page 10 for installation procedure.
To use the Web-based Control
Requirement at
the PC end
Microsoft Internet Explorer or other web browser is required.
NOTE
Be sure to connect the PC-side wireless LAN connectable with the projector’s wireless LAN card as well as the access point to
Wi-Fi Certified products. (Wi-Fi Alliance has been organized to promote wireless LANs and certify their interoperability.)
6

Software Installation and Setup
System Requirements
In order to run the associated utility software your system must meet the following requirements:
OS Windows 2000 Professional or XP (Home, Professional and Tablet PC Editions)
PC PC installed with the above-specified OS
CPU Pentium 2 or later version processor
Memory 32 MB or larger
HD space capacity 50 MB or larger
Display resolution 1024 x 768
Color depth 24 or 32 bits
Peripherals CD-ROM drive (required for installation of the associated software)
Network environment
Network application)
Required Software
● Wireless Presenter-to-Go:
Wireless image transfer utility
CF slot or PC card slot, or USB port (required for viewer data recording)
LAN supporting TCP/IP
LAN port (RJ-45) or IEEE802.11b wireless LAN card adapter(required when using the
● Font Transfer Utility:
Font transfer utility (This program is automatically installed in conjunction with the Wireless Presenter-to-Go.)
● Presenter-to-Go (Ver.3):
Utility to convert PowerPoint and other application’s files into viewer files (in PDB file format*)
See page 21 for detail.
* Mobile presentation file
● PDA Presenter-to-Go:
Utility to convert PowerPoint and other application’s files into PDB files
(For information on how to operate this software, see page 42 of this manual.)
7

Software Installation and Setup
Software License Agreement
<<Read this license agreement carefully before you begin to install the associated software.>>
SOFTWARE PRODUCT: PLUS VISION CORP. Drivers and associated Applications
SOFTWARE LICENSE AGREEMENT FOR PLUS VISION CORP. PRODUCTS:
IMPORTANT READ CAREFULLY: This PLUS Vision Corp. Software License Agreement (“SLA”) is a legal agreement between you (either an individual or a single entity) and PLUS Vision Corp. for the software product identified
above, which includes computer software and associated media and printed materials, and may include “online” or electronic documentation (“SOFTWARE PRODUCT” or “SOFTWARE”). By installing, copying, or otherwise using the
SOFTWARE PRODUCT, you agree to be bound by the terms of the SLA.
SOFTWARE PRODUCT LICENSE:
The SOFTWARE PRODUCT is protected by copyright laws and international copyright treaties, as well as other intellectual
property laws and treaties. The SOFTWARE PRODUCT is licensed, not sold.
GRANT OF LICENSE
This SLA grants you the rights to install, use, access, run, or otherwise interact with (“RUN”) ONE copy of the SOFTWARE
on the computer which it is designed to work with.
The SOFTWARE PRODUCT may not be installed, accessed, displayed, run, shared or used concurrently on or from different computers, including workstations, terminal or other digital electronic device.
DESCRIPTION OF OTHER RIGHTS AND LIMITATIONS
(a) You may not modify, reverse engineer, decompile, or disassemble the SOFTWARE PRODUCT.
(b) The SOFTWARE PRODUCT is licensed as a single product. Its components parts may not be separated for use.
(c) You may not sub-license, rent or lease the SOFTWARE PRODUCT.
(d) Notwithstanding any other provisions of this SLA, you may permit persons belonging to the same company or the same
office (“Internal Users”) to duplicate and/or use the SOFTWARE PRODUCT only to the extent necessary for using PLUS
VISION projector(s) associated with such SOFTWARE PRODUCT. In such case, Internal Users shall use the SOFTWARE PRODUCT solely for PLUS VISION projector(s), and you agree to cause Internal Users to comply with such obligation and other obligations under this SLA. Further, you agree that such duplication is permitted only if you do not
make any modifications to the said SOFTWARE PRODUCT.
TERMINATION
Without Prejudice to any other rights PLUS VISION CORP. may terminate this SLA if you fail to comply with the terms and
conditions of this SLA. In such event, you must destroy all copies of the SOFTWARE PRODUCT (including
those held by Internal Users) and all of its components parts.
COPYRIGHT
All rights, title and interest, including all copyrights and other intellectual property and proprietary rights, in and to the
SOFTWARE PRODUCT (including but not limited to any images, photographs, animations, video, audio, music, text, and
“applets,” incorporated into the SOFTWARE PRODUCT), the accompanying printed materials, and any copies of the
SOFTWARE PRODUCT, are owned by PLUS VISION CORP. or its suppliers. The SOFTWARE PRODUCT is protected by
copyright laws and international treaty provisions. Therefore, you must treat the SOFTWARE PRODUCT like any other
copyrighted material. You may not copy SOFTWARE or the printed materials accompanying the SOFTWARE.
LIMITED WARRANTY
PLUS VISION CORP. warrants that the SOFTWARE PRODUCT will perform substantially in accordance with the accompanying written materials for a period of ninety (90) days from the date of receipt. This limited warranty shall not be applicable
with respect to duplicates of SOFTWARE PRODUCT.
8

Software Installation and Setup
CUSTOMER REMEDIES
PLUS VISION CORP’s and its suppliers’ entire liability and your exclusive remedy for any non-conformity of the SOFTWARE PRODUCT with the limited warranty set forth above shall be, at Plus Vision’s option, either repair or replacement of
such non-conforming SOFTWARE PRODUCT. In order to receive such repair or replacement warranty, you will be required
to present a copy of your receipt for Plus Vision Projector associated with the SOFTWARE PRODUCT. The limited warranty described above is void if failure of the SOFTWARE PRODUCT has resulted from accident, abuse,
misapplication or modification. Any replacement SOFTWARE PRODUCT will be warranted for the remainder of the original
warranty period or thirty (30) days, whichever is longer.
NO OTHER WARRANTIES
TO THE MAXIMUM EXTENT PERMITTED BY APPLICABLE LAW, PLUS VISION CORP. AND ITS SUPPLIERS DISCLAIM
ALL OTHER WARRANTIES, EITHER EXPRESS OR IMPLIED, INCLUDING, BUT NOT LIMITED TO, IMPLIED WARRANTIES
OF MERCHANTABILITY AND FITNESS FOR A PARTICULAR PURPOSE, AS WELL AS ANY STATUTORY LIABILITY FOR
DEFECTS, WITH REGARD TO THE SOFTWARE PRODUCT.
NO LIABILITY FOR DAMAGES
TO THE MAXIMUM EXTENT PERMITTED BY APPLICABLE LAW, IN NO EVENT SHALL PLUS VISION CORP. OR ITS
SUPPLIERS BE LIABLE FOR ANY DIRECT, SPECIAL, INCIDENTAL, INDIRECT, CONSEQUENTIAL OR PUNITIVE DAMAGES WHATSOEVER (INCLUDING, WITHOUT LIMITATION, DAMAGES FOR LOSS OF BUSINESS PROFITS, BUSINESS
INTERRUPTION, LOSS OF BUSINESS INFORMATION, OR ANY OTHER PECUNIARY LOSS) ARISING OUT OF THE USE
OF OR INABILITY TO USE THE SOFTWARE PRODUCT. EVEN IF PLUS VISION CORP. HAS BEEN ADVISED OF
THEPOSSIBILITY OF SUCH DAMAGES.
IF THE FOREGOING LIMITATION IS HELD TO BE UNENFORCEABLE FOR WHATEVER
REASON AND PLUS VISION CORP. SHALL BE HELD LIABLE TO YOU FOR ANY MATTER
ARISING OUT OF OR RELATING TO YOUR USE OF THE SOFTWARE, WHETHER BASED
IN CONTRACT, TORT, STRICT LIABILITY OR OTHERWISE, PLUS VISION CORP.’S
MAXIMUM LIABILITY TO YOU FOR ALL EVENTS, ACTS OR OMISSIONS SHALL NOT
EXCEED, IN THE AGGREGATE, AN AMOUNT EQUAL TO TEN (10) PERCENT OF THE FEES PAID
BY YOU FOR PLUS VISION PROJECTOR ASSOCIATED WITH THE SOFTWARE PRODUCT.
9
Software Installation and Setup
Software Installation
• The following procedure is described based on Windows 2000.
●Before starting the installation steps:
1. Check and verify that your PC meets the required operating conditions. (See page 7.)
2. Close all other applications being run.
NOTE ON INDEX SCREEN -PDF
The software is dedicated for Windows 2000 Professional or XP, and does not support Macintosh or other OS.
If you boot up the INDEX (PDF) screen on a Macintosh OS, no “Software Installation” button will appear on the
display.
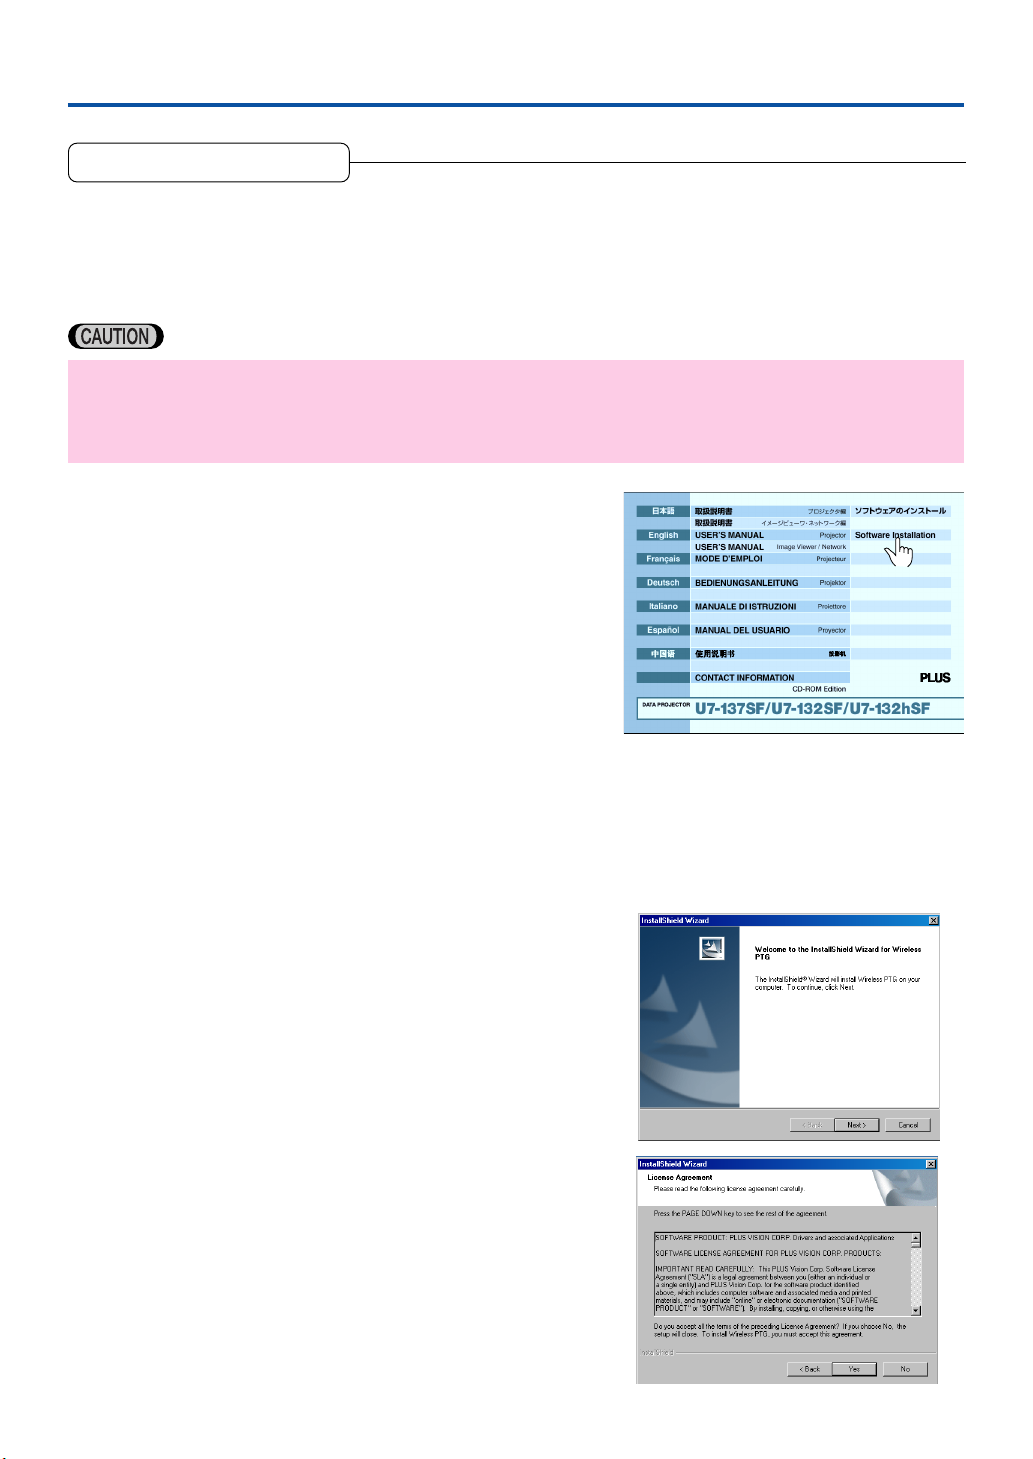
1. Open the installer.
● When you open the installer from the PDF User’s Manual
(Windows)
This lets you open the installer from the PDF User’s Manual
you are viewing on your PC screen.
Return to the Index screen.
Click on the “Software Installation” button displayed on the
Index screen, and the Installer screen will appear. Leave
the Installer screen as is and quit Adobe Acrobat Reader.
● When you open the installer directly
Insert the accompanying CD into the CD-ROM drive of
your PC.
Select the corresponding CD designation using Windows
Explorer. Double-click “WirelessPresenter2.01.1175.exe”.
The Installer screen appears on the display.
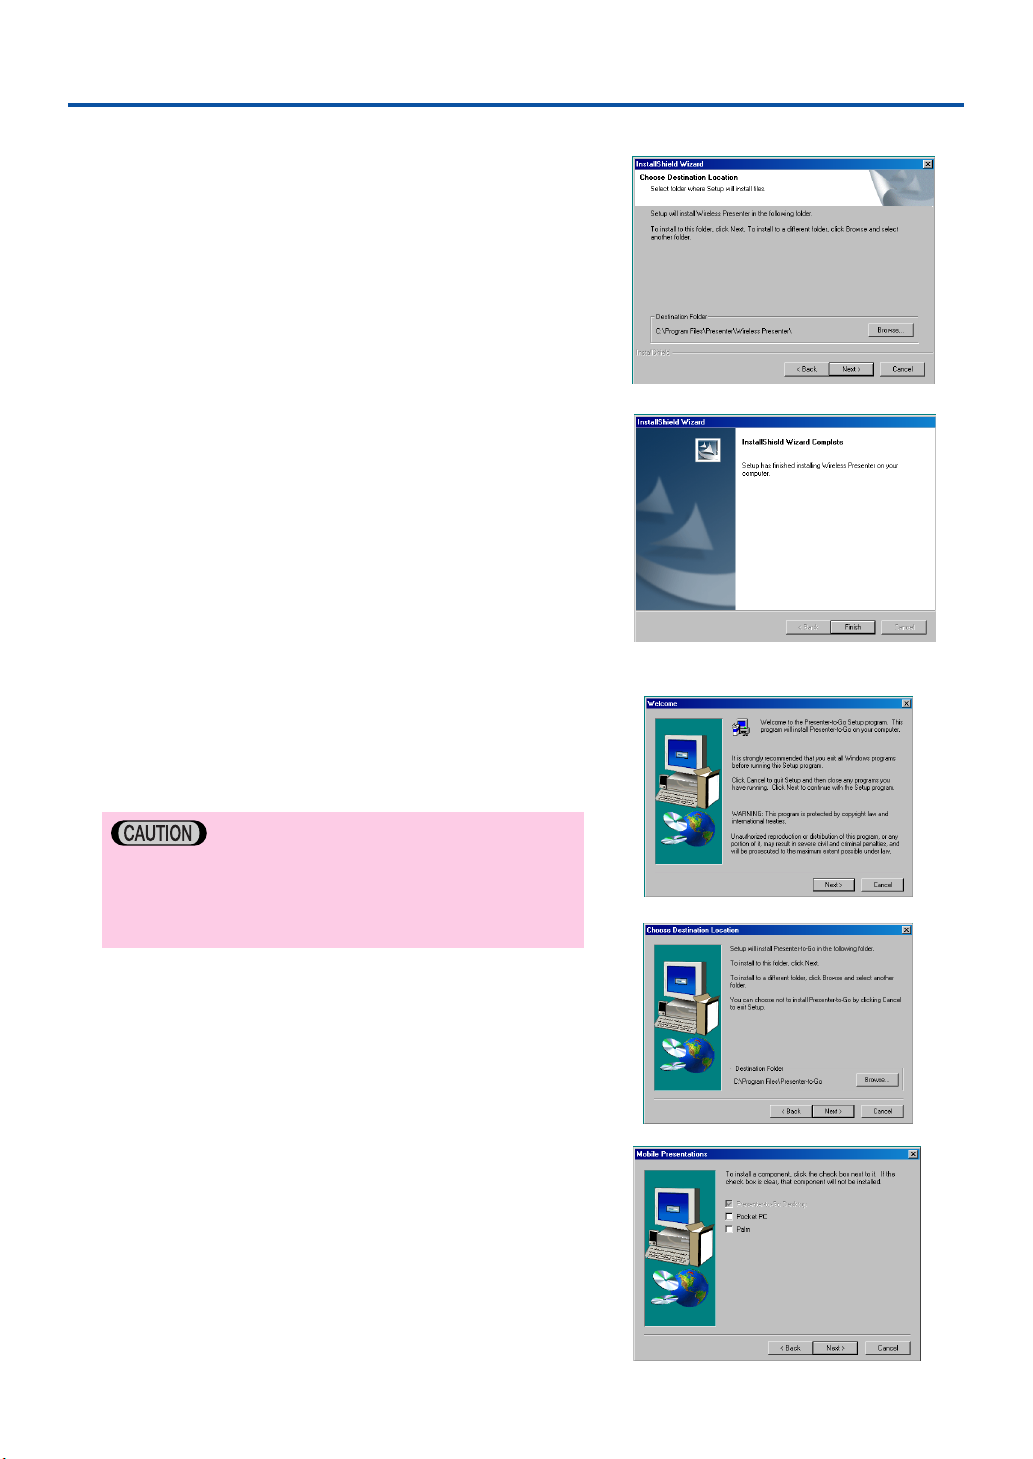
2. Proceed to install the program following the
InstallShield Wizard instructions.
When you click the “Yes” button, the Software License Agreement
appears on the screen. Carefully read the terms and conditions set
forth in the agreement.
10
Software Installation and Setup
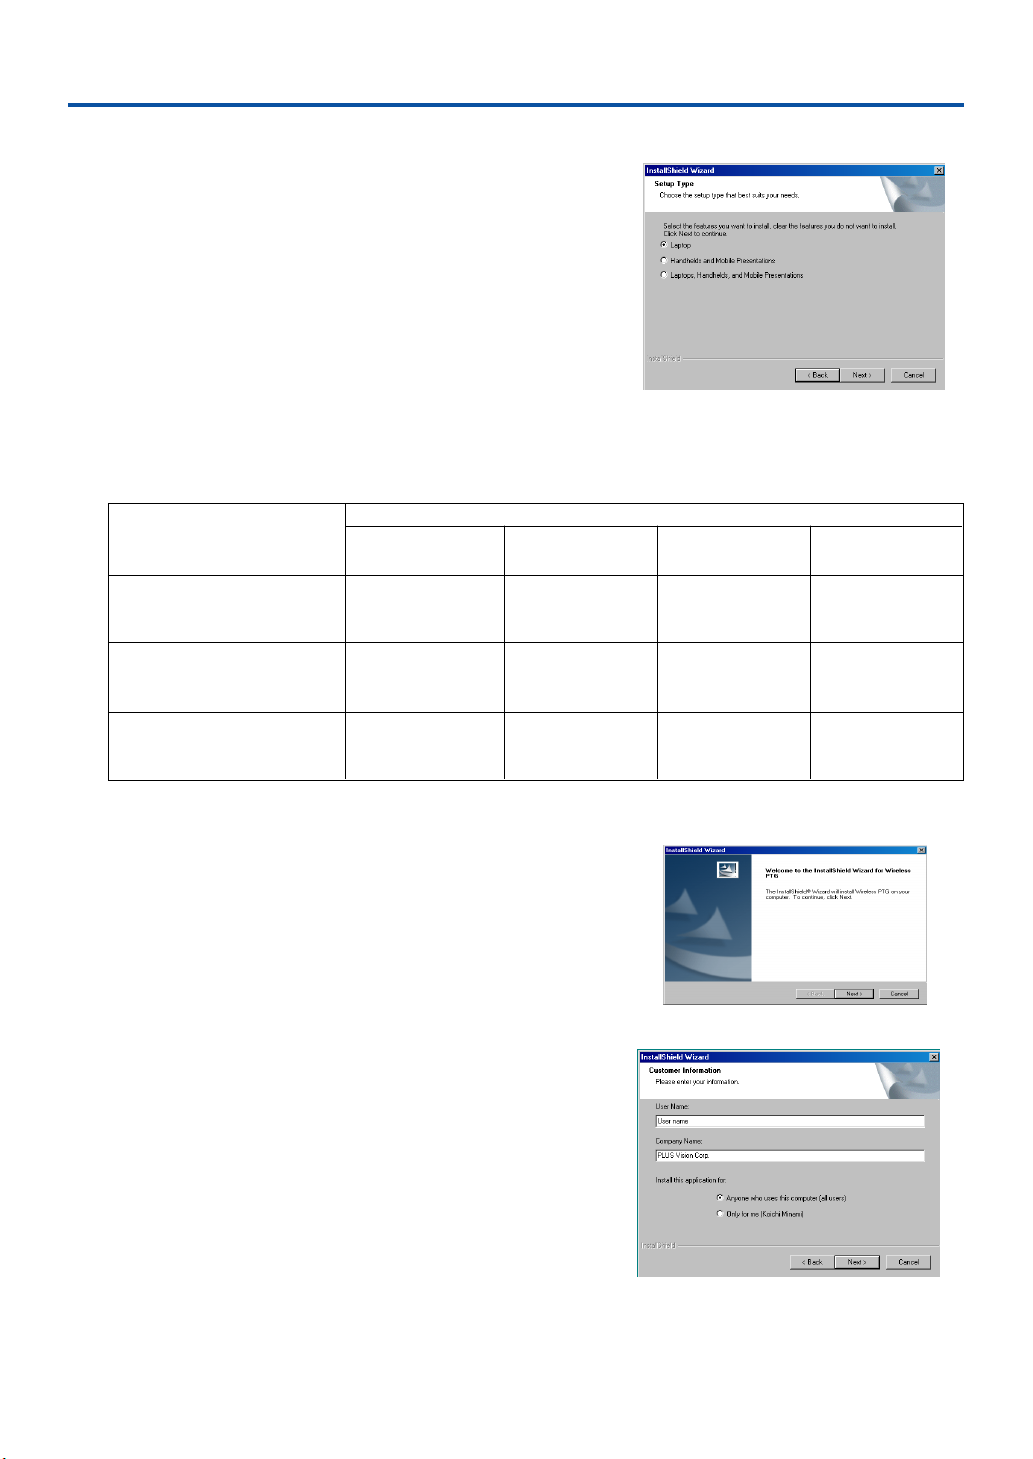
3. On the Setup Type screen, select the device in
which you desire to install the program.
Programs to be installed and applicability
Installation device(s)
Wireless
Presenter-to-Go
Pocket PC/Palm
Presenter-to-Go
Programs to be installed
Presenter-toGo
(ver.3)
Font Transfer
Utility
Laptop
Handhelds Mobile
Presentations
Laptops, Handhelds, and
Mobile Presentations
o
o
—
o
: Can be installed —: Cannot be installed
4. The Installer screen appears on the display.
Illustrated on the right is the Installer screen when you select
“Laptops, Handhelds, and Mobile Presentations.”
· If you select “Handhelds Mobile Presentations” the screen as
shown in step 8 appears. Jump ahead to step 8.
5. Enter the required data before starting installation.
—
o
o
—
o
o
o
—
o
11
Software Installation and Setup
6. The program is installed in the previously
specified folder within the Program File Folder.
If you need to install it in another directory, click “Browse” at
this step and specify a desired directory.
7. Installation of the Wireless Presenter-to-Go is
complete.
Click on the “Finish” button.
· If you have selected Laptop as device, your PC will restart.
8. If you have selected “Laptops, Handhelds, and
Mobile Presentations” as device(s), the Presenter-to-Go Setup screen appears immediately after step 8 is complete.
The Presenter-to-Go is a nonwarranted, unprotected
program. After you consent to the terms and conditions
described in the Software License Agreement, you may
use it for an indefinite period.
9. The program is installed in the previously
specified folder within the Program File Folder.
If you need to install it in another directory, click “Browse” at
this step and specify a desired directory.
10. From the Mobile Presentations screen, select
the program you need to install.
If you want to install the Presenter-to-Go program into your
pocket PC and/or palm handheld, check the checkbox next
to the program you need to install.
Click the “Next>” button to begin installation.
12
Software Installation and Setup
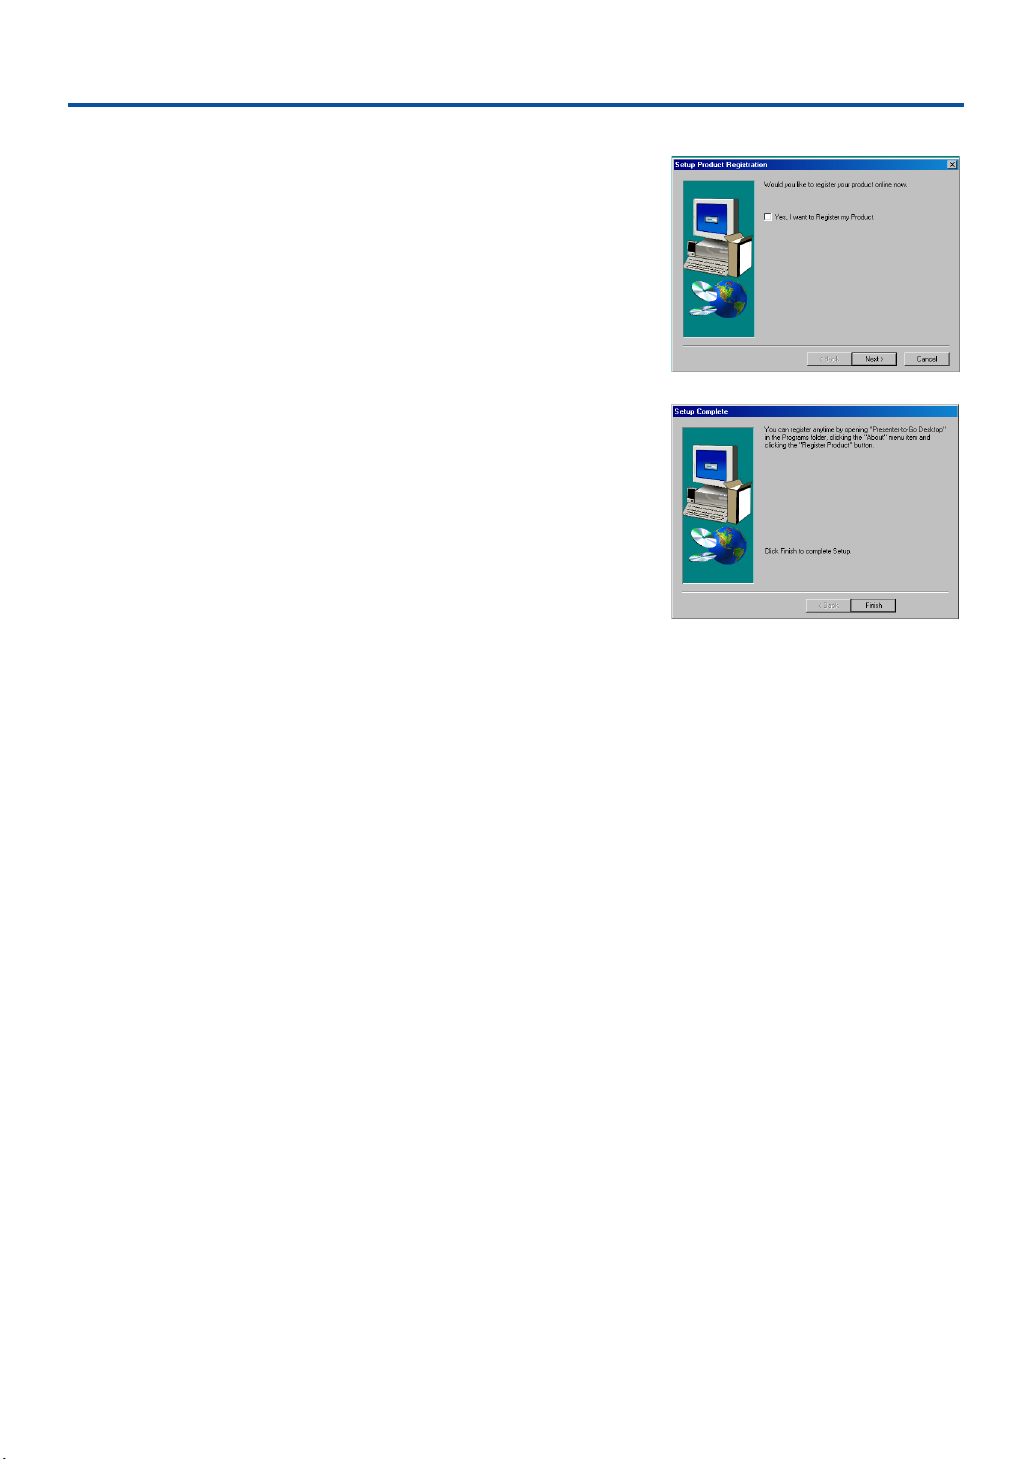
11. The Setup Product Registration window appears on the screen.
You cannot register the Presenter-to-Go as it is a
nonwarranted, unprotected program.
Click the checkbox at the head of this option (“Yes, I want to
Register my Product”) to deselect it (the checkbox must remain empty), and then click “Next>”.
12. Click “Finish” to exit the Setup Product Regis-
tration window.
13

Software Installation and Setup
Uninstalling the Software
■ Uninstall the Wireless Presenter-to-Go program driver following the steps be-
low.
It is a good idea to delete any previously installed Wireless Presenter-to-Go software before installing an update. (This is optional,
but recommended.)
1. From the Control Panel menu, select and open “Add or Remove Programs”.
2. Click on “Add or Remove Programs” to select the old Wireless Presenter-to-Go pro-
gram version you are going to delete. Click the “Delete” button.
3. Click the “Delete” button in the Wireless Presenter-to-Go popup window to delete the
old version program.
4. Click on “Add or Remove Programs”, or the “Delete” button.
5. Click “Yes, I want to restart my computer” to restart your PC. Before restart, quit all
applications being run.
6. Click “Finish” to close the window.
■ Uninstall the Wireless Presenter-to-Go program following the steps below.
1. From the Control Panel menu, select and open “Add or Remove Programs”.
2. Click on “Add or Remove Programs” to select the old Wireless Presenter-to-Go pro-
gram version you are going to delete.
3. Click the “Delete” button in the Wireless Presenter-to-Go popup window to delete the
old version program.
4. Click on “Add or Remove Programs”, or the “Delete” button.
5. After the old version program is deleted by Uninstall Shield, click on the “OK” button.
6. Uninstallation of the old version program is now complete.
■ Uninstall Presenter-to-Go program.
Follow the same procedure as described above.
14
Connecting the LAN Cable and CF card and Setting the USB Memory
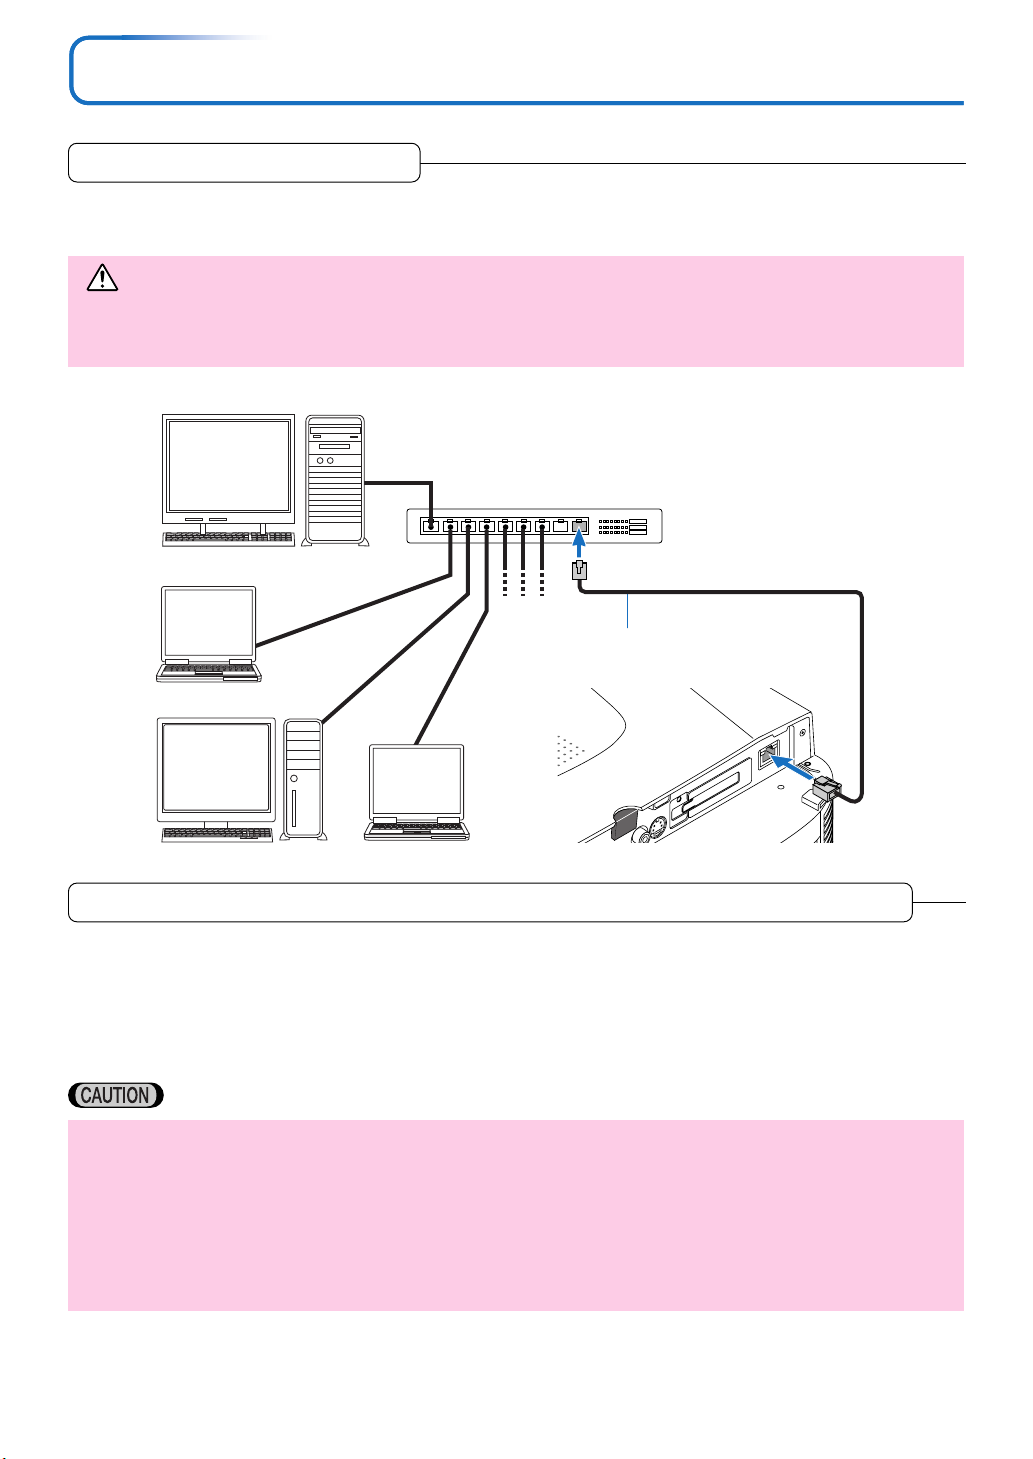
Connecting the LAN Cable
The LAN cable is connected with the wired LAN network (for TCP/IP) to use the network function. Purchase a
10/100BASE-TX LAN cable (straight type) available in the market and connect it to the LAN port (RJ-45).
CAUTION
• Connect the LAN port of the projector to the network to which no overcurrent may be applied. Any overcurrent
applied to the LAN port may result in electric shock.
• Do not connect to a telephone line.
Server
HUB
LAN cable (available in the market)
PRESS
TO OPEN
X
-T
E
-T
S
E
A
S
A
B
0
B
0
0
1
1
D
R
A
C
F
C
Setting and Removing the CF Card (wireless LAN or CF memory) and USB Memory
The CF card slot built in the projector unit is designed for loading 11 Mbps wireless LAN card and CF memory
card. Set either card according to your operation requirement each time. You can use one of the two features,
Image Viewer or Network, at a time as follows:
CF memory card ........... Is used to store slides (presentation data) for the Image Viewer application. (Available on the market)
Wireless LAN card ........ A radio device for the Network application. (Dedicated device for the projector, included in the prod-
uct package)
• Be sure to turn the projector power off before setting and removing the wireless LAN card.
• DO NOT use any wireless LAN card other than the one that has come with the product package.
• The enclosed wireless LAN card is protected with an antistatic cover. DO NOT remove it.
• Make sure to remove the wireless LAN card and USB memory from the slot before moving the equipment
from one place to another and putting it in the carrying case.
• Orientation of the cards and USB memory when inserting:
The cards have a determinate orientation of insertion and are designed to protect them from wrong insertion. Wrong insertion
by force could damage your equipment. For information on proper orientation, see the manual for the cards if available.
15
O
Software Installation and Setup
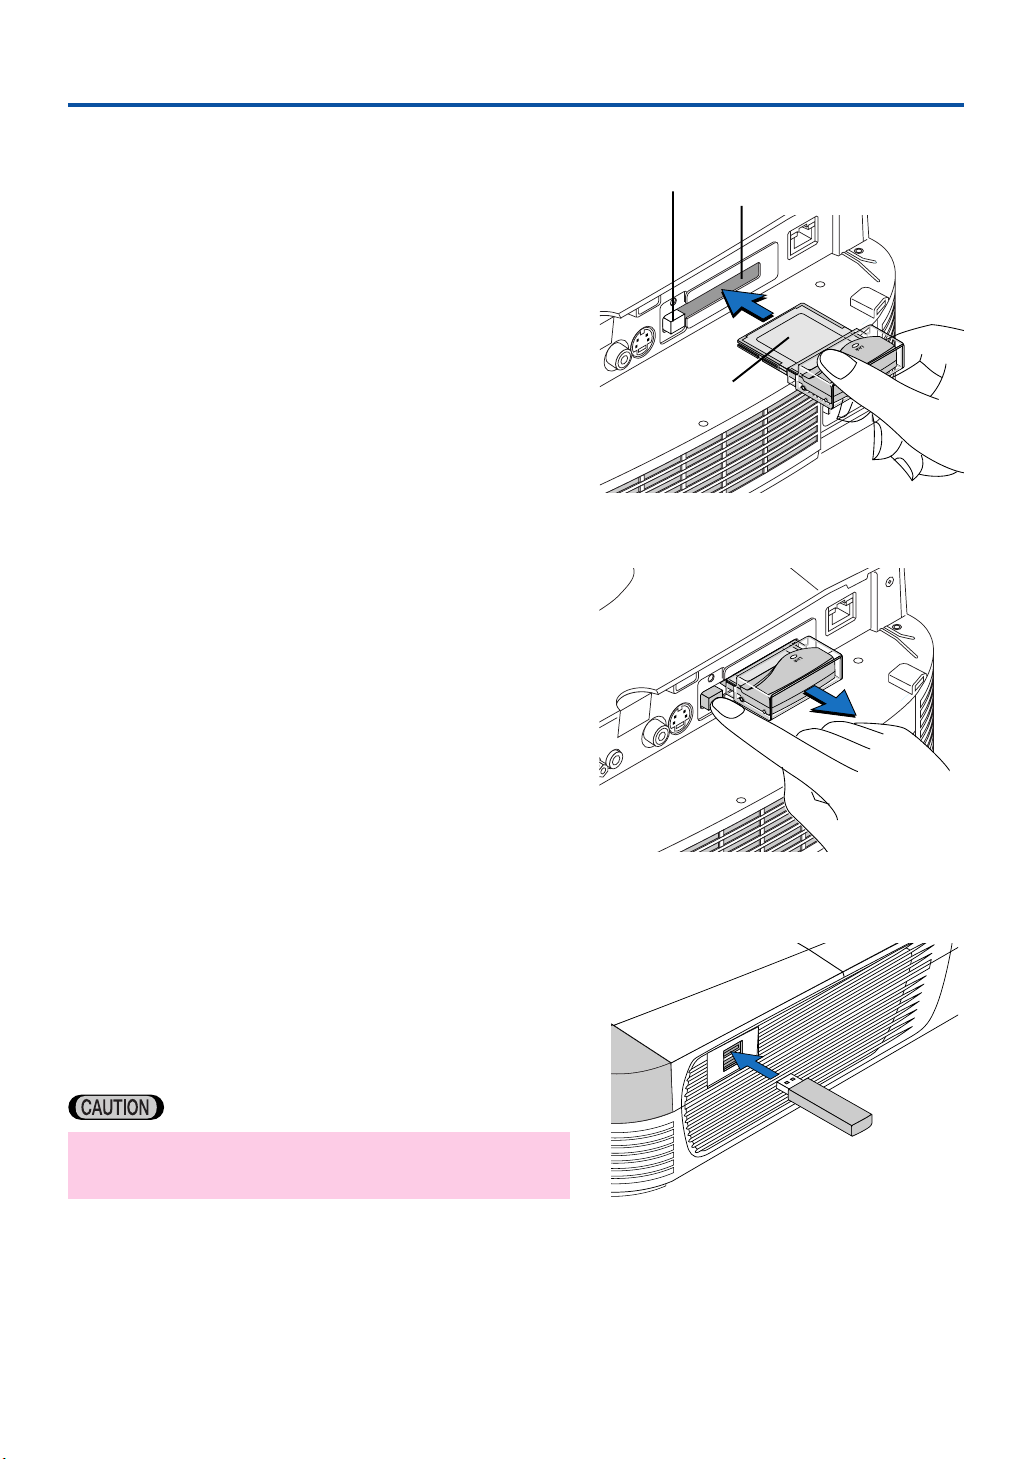
● Setting the Cards
Wireless LAN Card:
1. Turn the projector power off.
2. Holding the card with its front face up, insert it gently
until it cannot go more.
When the card has been inserted fully to the back, the CF card
unload button will pop up.
CF Memory Card:
1. Holding the card with its front face up, insert it gently
until it cannot go more.
When the card has been inserted fully to the back, the CF card
unload button will pop up.
● Removing the Cards
Wireless LAN Card:
1. Turn the projector power off.
2. Press the CF card unload button, and the card will pop
up from the slot partially. Hold its sides to remove.
CF Memory Card:
1. Press the CF card unload button, and the card will pop
up from the slot partially. Hold its sides to remove.
CF card unload
button
O
E
-VID
S
O
E
VID
VIDEO
AUDIO
Card
S-VIDEO
CF card slot
RD
A
C
CF
CF CARD
100 B
10 BA
PRESS
TO OPEN
E-TX
-T
S
E
A
S
100 BASE-TX
10 BASE-T
Illustrated above is the wireless LAN card.
● Setting the USB Memory
This USB compatible memory (available in the market) is used
to record the slide data (Presentation document) when utilizing
the Viewer function.
Insert the USB memory gently to the USB port to the utmost.
• Two USB memories cannot be used at the same time.
The other port is for the USB mouse. (See page 48.)
16
 Loading...