

Page 1

Digital Pen and Mouse
User's Guide
Digital Pen and Mouse
User's Guide
Version 3.04
Page 2

Preface
ii
Digital Pen and Mouse User’s Guide
Page 3

Preface
iii
Preface
Digital Pen and Mouse User’s Guide
Welcome to the Digital Pen User’s Guide. This guide describes the
operation and usage of the Digital Pen and Mouse.
The guide includes the following chapters:
Chapter 1, Introducing the Digital Pen and Mouse, page 1,
introduces the Digital Pen and Mouse and describes its basic features
and components.
Chapter 2, Installing Digital Pen and Mouse Software, page 7,
describes the device’s package contents and system requirements, as
well as the process for installing the Digital Pen and Mouse software.
Chapter 3, Using the Digital Pen and Mouse, page 15, describes the
basic operation of the Digital Pen and Mouse, as well as how to
maintain it. It also presents a simple tutorial for getting started with the
Digital Pen and Mouse.
Chapter 4, Using the Pen&Ink Editor Application, page 37,
describes how to use the Digital Pen with the Pen&Ink Editor
application.
Chapter 5, Using the SnapShot Application, page 80, describes how
to use the SnapShot application to capture screens and edit images.
Chapter 6, Using the Digital Pen and Mouse with Other
Applications, page 93, describes how to use the Digital Pen with otherapplications.
Chapter 7, Configuring Device Properties, page 101, describes how
to customize the Digital Pen’s device settings to control various aspects
of its operation.
Appendix A, Troubleshooting, page 113, describes the most common
issues or problems that you may encounter when working with your
Digital Pen and how to resolve them.
Page 4

Table of Contents
iv
Table of Contents
Digital Pen and Mouse User’s Guide
Conventions Used in this Guide ....................................................................................... vii
Chapter 1: Introducing the Digital Pen and Mouse ............................. 1
Overview ............................................................................................................................ 2
Digital Pen ...................................................................................................................... 2
Receiver .......................................................................................................................... 3
Working with the Digital Pen ............................................................................................ 4
Chapter 2: Installing Digital Pen and Mouse Software ........................ 7
Package Contents ............................................................................................................... 8
System Requirements ........................................................................................................ 8
Installing the Software ....................................................................................................... 9
Chapter 3: Using the Digital Pen and Mouse...................................... 15
Getting Started ................................................................................................................ 16
Step 1: Familiarize Yourself with the Digital Pen ........................................................... 16
Step 2: Install the Software ............................................................................................ 17
Step 3: Clip the Receiver to a Sheet of Paper .................................................................. 17
Step 4: Working as a Pen or a Mouse ............................................................................. 18
The Wheel ........................................................................................................................ 23
Supported Vista Functionality ......................................................................................... 25
Digital Pen and Mouse Device Properties in Vista .......................................................... 30
Writing Using the Digital Pen in Vista ........................................................................... 31
Working with Office 2007 in Windows Vista ................................................................. 32
Page 5

Table of Contents
v
Digital Pen and Mouse User’s Guide
Maintaining the Digital Pen ............................................................................................ 34
Inserting the Digital Pen’s Batteries............................................................................... 34
Inserting the Pen Tip ..................................................................................................... 36
Chapter 4: Using the Pen&Ink Editor Application ........................... 37
Pen&Ink Editor Main Window....................................................................................... 39
Menu Bar...................................................................................................................... 40
Toolbars ....................................................................................................................... 43
Pages Pane ................................................................ .................................................... 47
Writing Area ................................................................................................................. 48
Editing ............................................................................................................................. 51
Editing Ink Properties ................................................................................................... 51
Editing Page Properties ................................................................................................. 55
More Options for Customizing Your Documents ........................................................... 62
Navigating........................................................................................................................ 73
Moving from Page to Page Within a Document ............................................................. 73
Saving .............................................................................................................................. 75
Printing ............................................................................................................................ 77
Emailing a Document ...................................................................................................... 78
Exporting a Document .................................................................................................... 79
Chapter 5: Using the SnapShot Application ...................................... 80
Overview .......................................................................................................................... 81
SnapShot Toolbar ............................................................................................................ 82
Capturing an Image ........................................................................................................ 84
Writing on an Image ....................................................................................................... 87
Page 6

Table of Contents
vi
Digital Pen and Mouse User’s Guide
Editing the Pen/Marker Settings ..................................................................................... 88
Changing the Pen Line Width .................................................................................. 88
Changing the Marker Width .................................................................................... 89
Erasing .................................................................................................................... 89
Changing the Line Color ......................................................................................... 90
Using the Undo and Redo Buttons ........................................................................... 91
Chapter 6: Using the Digital Pen and Mouse with Other
Applications .......................................................................................... 93
Microsoft Office Applications ................................................................ .......................... 94
Inactive Zone ................................................................ ................................................ 95
Editing .......................................................................................................................... 95
Graphics Applications ..................................................................................................... 99
Games Applications ....................................................................................................... 100
SpaceCrushers Game ................................................................................................... 100
Chapter 7: Configuring Device Properties ....................................... 101
Overview ........................................................................................................................ 102
Configuring Receiver Settings ....................................................................................... 104
Configuring Mouse Motion Speed Settings .................................................................. 106
Configuring Custom Wheel Applications ...................................................................... 108
Appendix A: Troubleshooting ........................................................... 113
Installation ..................................................................................................................... 114
Digital Pen Operation .................................................................................................... 115
SnapShot ........................................................................................................................ 116
Microsoft Office ................................ ............................................................................. 116
Page 7

Conventions Used in this Guide
vii
Conventions Used
in this Guide
NOTE:
This is a note
!
IMPORTANT:
Important Information
TIP:
This is a tip providing useful suggestions and information.
Digital Pen and Mouse User’s Guide
Page 8

Conventions Used in this Guide
viii
Digital Pen and Mouse User’s Guide
System Support
Minimal System Requirements:
Processor: 1 GHz processor and above
Available hard disk space: 200MB
RAM: 256MB (recommended 512MB)
USB connector: USB 1.1/2.0 to connect the Receiver
Operating Systems support:
Windows Vista (32bit versions): Home Basic, Home Premium,
Ultimate, Enterprise, Business
Windows XP - Home and Pro versions
Windows 2000 - workstation version
MS Office Support:
Office XP: Word, PowerPoint
Office 2003: Word, PowerPoint
Office 2007: Word, PowerPoint
.
Page 9
Introducing the Digital Pen and Mouse
1
4Chapter 1
Introducing the
Digital Pen and
Mouse
About This Chapter
Digital Pen and Mouse User’s Guide
This chapter introduces the Digital Pen and Mouse and describes its basic
features and components. It contains the following sections:
Overview, page 2, introduces the Digital Pen and Mouse and provides
an overview of its key components.
Working with the Digital Pen, page 4, describes how the Digital Pen
and Mouse can be used.
Page 10
Introducing the Digital Pen and Mouse
2
Digital Pen and Mouse User’s Guide
Overview
The Digital Pen and Mouse is the ultimate wireless PC peripheral tool. You
can use it to capture and display handwritten notes on a computer, enjoy
full mouse functionality and draw and share sketches via email and
messaging applications – all without the need for special paper or a tablet.
The Digital Pen and Mouse can be used by anyone of any age, in any
environment – at home, school or in the office.
The Digital Pen and Mouse enables you to write freely on any paper in real
time on your computer. The product can also be used as a mouse.
The pen comes with two main components – the pen itself and a receiver.
Digital Pen
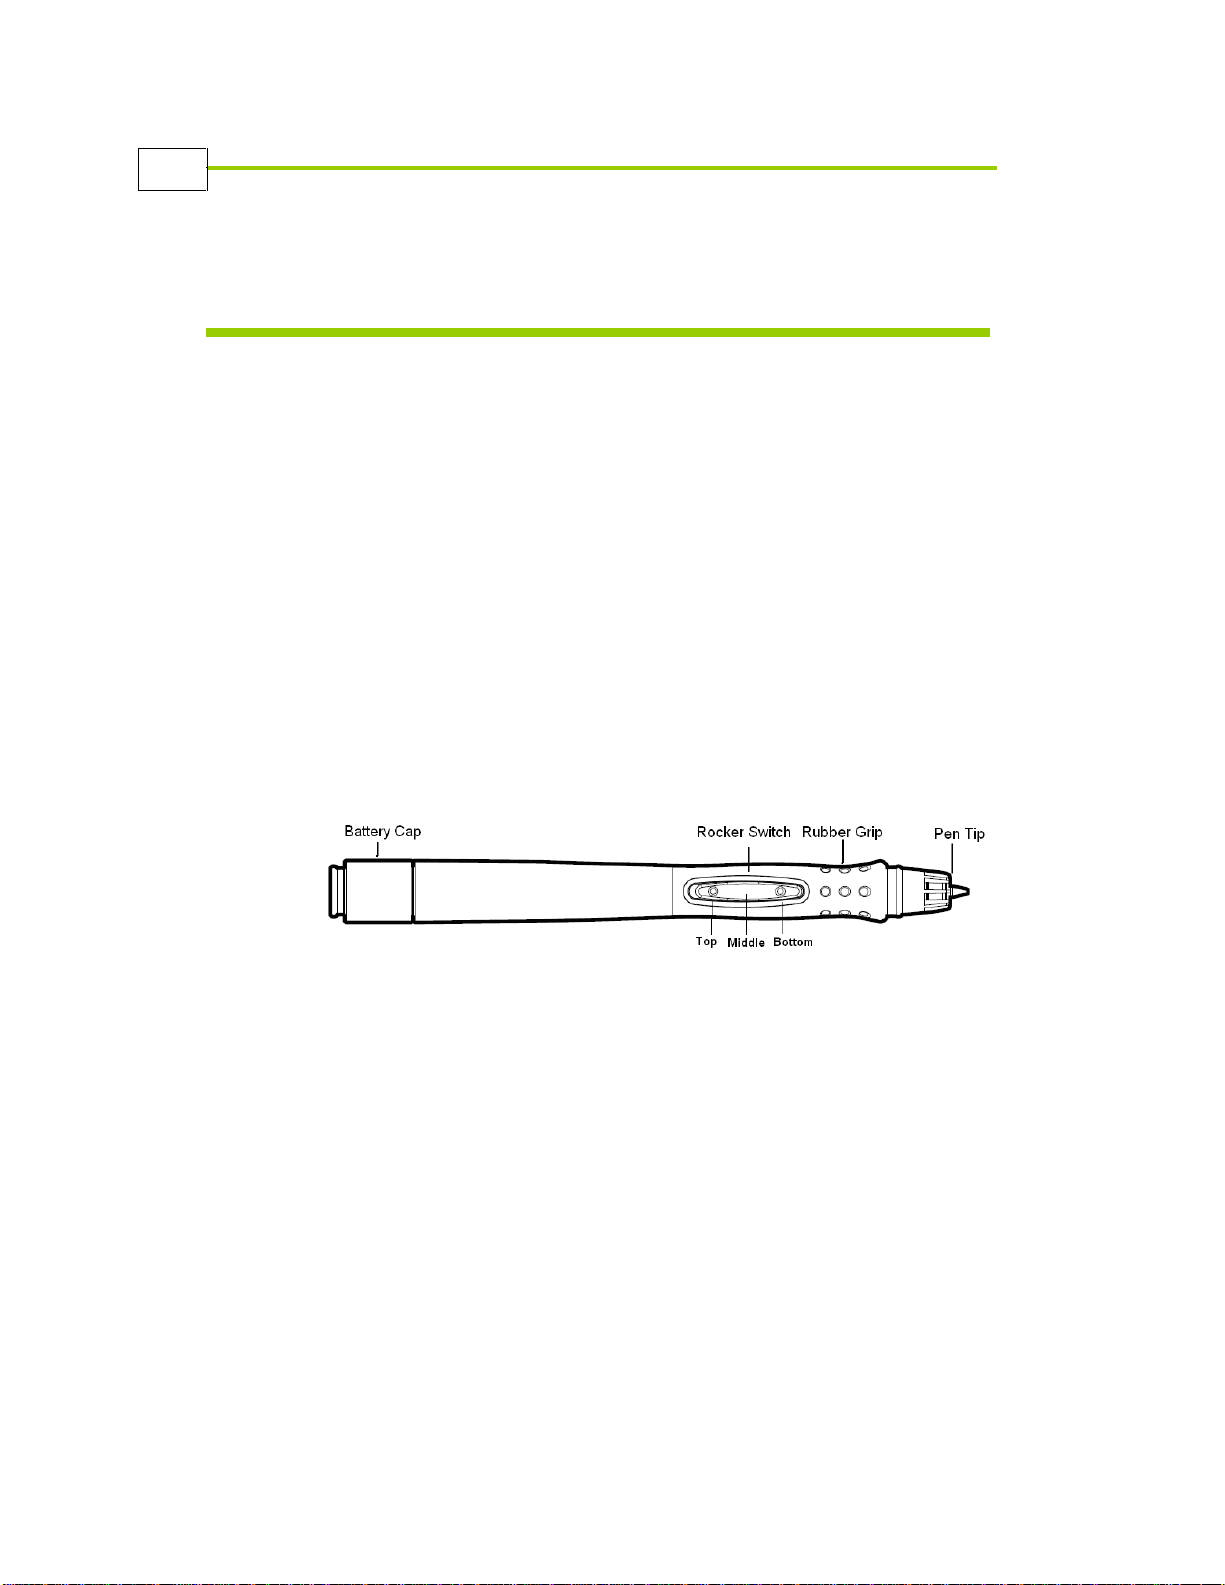
Take a moment to familiarize yourself with the various parts of the pen,
especially the rocker switch.
The Digital Pen works by transmitting its position to the Receiver, which in
turn sends the data to the PC. Written or drawn information is displayed in
real time on the screen, where it can be converted to text using standard
handwriting recognition software.
The pen works with any standard mini-ballpoint pen ink cartridge. Its
rubber grip ensures that the pen is easy to hold and handle.
One simple click of a button and the pen instantly becomes a fully
functional ergonomic mouse. Point, click, scroll and drag-and-drop items
on screen, as with any regular mouse.
Page 11
Introducing the Digital Pen and Mouse
3
Digital Pen and Mouse User’s Guide
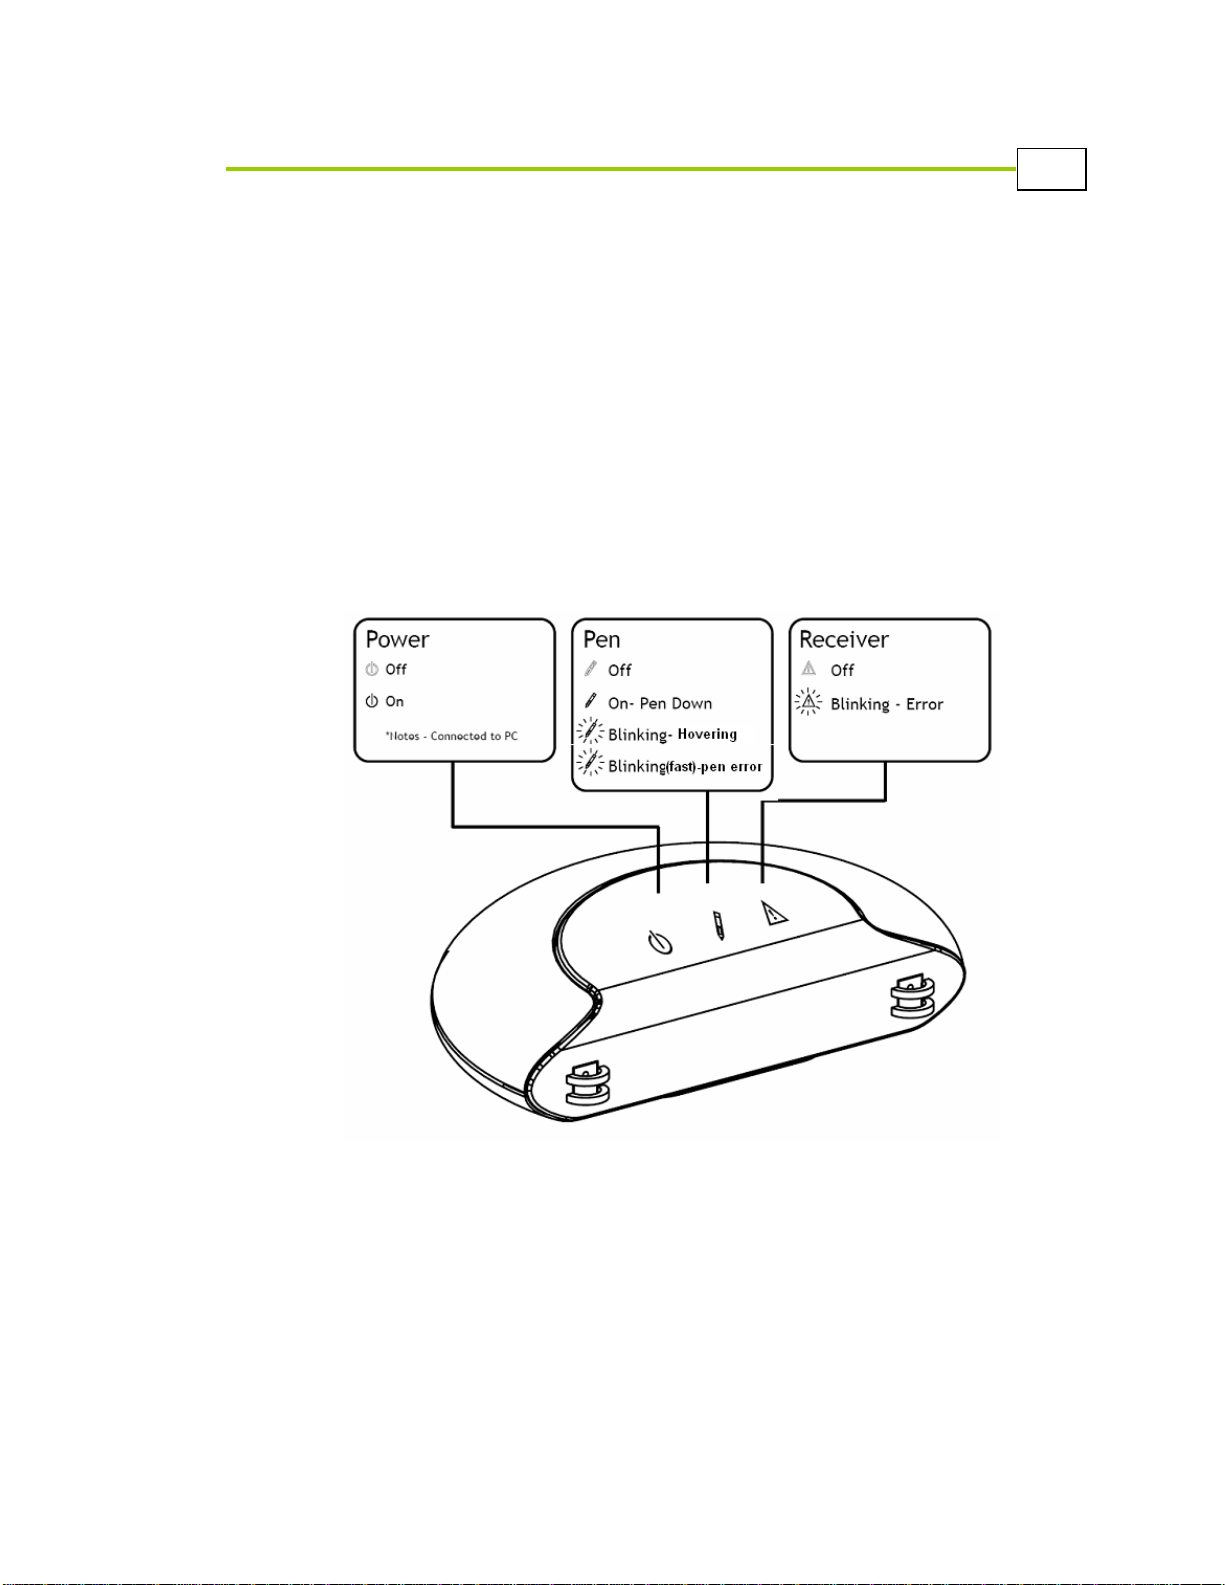
Receiver
The Receiver interprets the pen’s live actions and displays them on the
screen. It can be attached to any paper, with a coverage area up to an A4
size page. The Receiver connects to your PC easily and simply via a
standard USB connector.
Image resolution with the Receiver is between 300-900 dpi.
The Receiver has several indicator lights that communicate the device’s
status and report any errors that may occur (as outlined below).
Page 12

Introducing the Digital Pen and Mouse
4
Digital Pen and Mouse User’s Guide
Working with the Digital Pen
The Digital Pen and Mouse features enable you to:
Write and sketch on any paper.
Transfer notes and sketches to a computer in real time.
View and edit pages with Pen&Ink software.
Use the device as a mouse, with full point-and-click functionality.
Personalize documents with handwritten notes and signatures.
Capture and display handwritten notes on your PC.
Draw and share sketches digitally via email and instant messaging.
Transform written notes into text.
The Digital Pen and Mouse enables you to work within a variety of
applications, including Digital-Pen-compliant applications, as well as other
applications. Digital-Pen-compliant applications include:
Pen&Ink Editor (supplied with the product; see Chapter 4, Using the
Pen&Ink Editor Application)
SnapShot (supplied with the product; see Chapter 5, Using the
SnapShot Application)
Microsoft Office applications, such as Word and PowerPoint (see
Chapter 6, Using the Digital Pen and Mouse with Other Applications)
SpaceCrushers game (supplied with the product; see Chapter 6, Using
the Digital Pen and Mouse with Other Applications)
Page 13

Introducing the Digital Pen and Mouse
5
Digital Pen and Mouse User’s Guide
For more information about working with applications other than those
listed above, see Chapter 6, Using the Digital Pen and Mouse with Other
Applications, page 93 and Configuring Custom Wheel Applications,
page 108.
For a quick start that provides instructions for getting started with your
Digital Pen and Mouse, see Getting Started, page 16.
Page 14

Introducing the Digital Pen and Mouse
6
Digital Pen and Mouse User’s Guide
This page is intentionally left blank.
Page 15
Installing Digital Pen and Mouse Software
7
5Chapter 2
Installing Digital
Pen and Mouse
Software
About This Chapter
Digital Pen and Mouse User’s Guide
This chapter describes the device’s package contents and system
requirements, as well as the process for installing Digital Pen and Mouse
software. It contains the following sections:
Package Contents, page 8, describes the components contained in
your Digital Pen and Mouse package.
System Requirements, page 8, describes the system requirements for
the Digital Pen and Mouse.
Installing the Software, page 9, describes how to install the Digital
Pen and Mouse software.
Page 16

Installing Digital Pen and Mouse Software
8
Digital Pen and Mouse User’s Guide
Package Contents
Before you begin the installation process, take a moment to verify that all
of the following components are included in the package contents:
Digital Pen
Receiver
Mini USB-to-USB cable
Installation CD
Quick Start User Guide
System Requirements
The Digital Pen and Mouse has the following system requirements:
Operating system: Windows 2000, Windows XP, Windows Vista
Processor: 1GHz processor and above
Available hard disk space: 200 MB
RAM: 256 MB (recommended 512 MB)
USB connector: USB 1.1/2.0 to connect to the Receiver
Page 17

Installing Digital Pen and Mouse Software
9
Digital Pen and Mouse User’s Guide
Installing the Software
Before you can begin using the Digital Pen and Mouse, you first need to
install its software and drivers.
To install the Digital Pen and Mouse software:
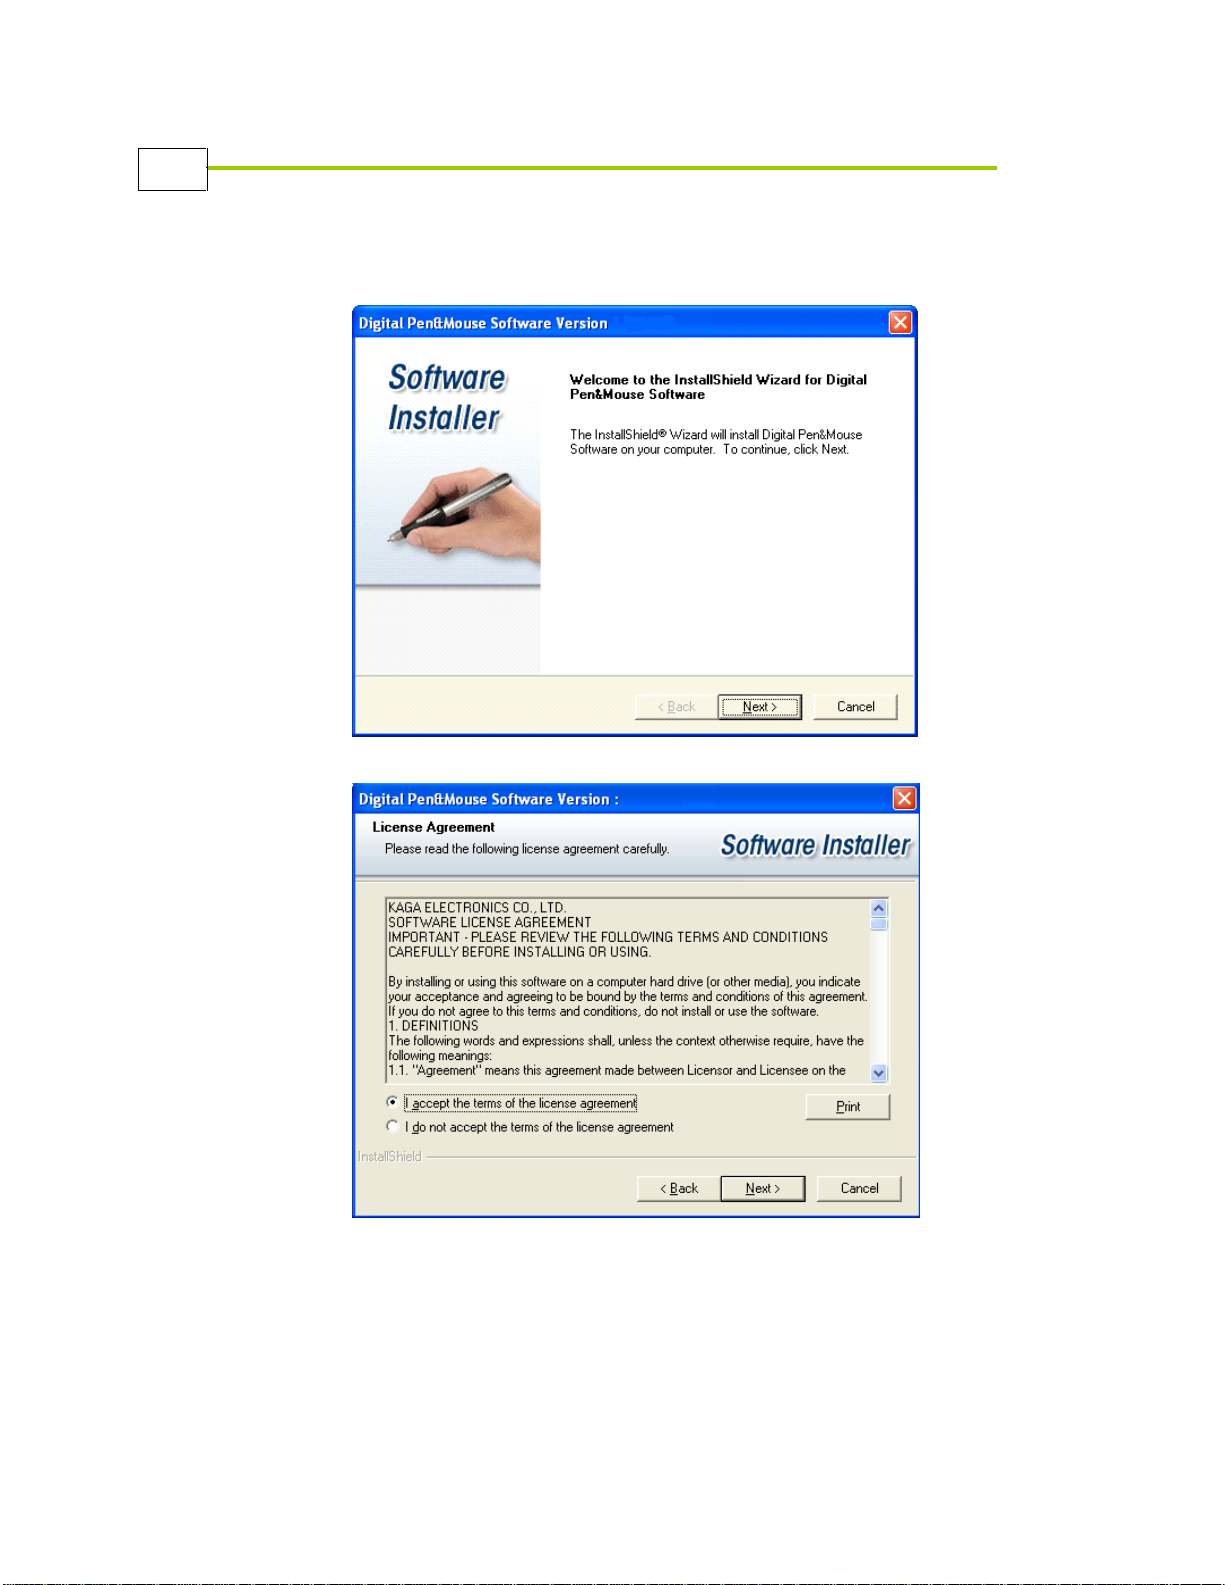
1 Insert the installation CD into your CD-ROM drive. The Digital Pen
and Mouse Install Shield Wizard Welcome window opens
automatically:
Page 18
Installing Digital Pen and Mouse Software
10
Digital Pen and Mouse User’s Guide
2 Select the Install Digital Pen & Mouse option. The following window
opens:
3 Click Next. The License Agreement window opens:
Page 19
Installing Digital Pen and Mouse Software
11
Digital Pen and Mouse User’s Guide
4 Read the license agreement and then select the I accept the terms of
the license agreement radio button.
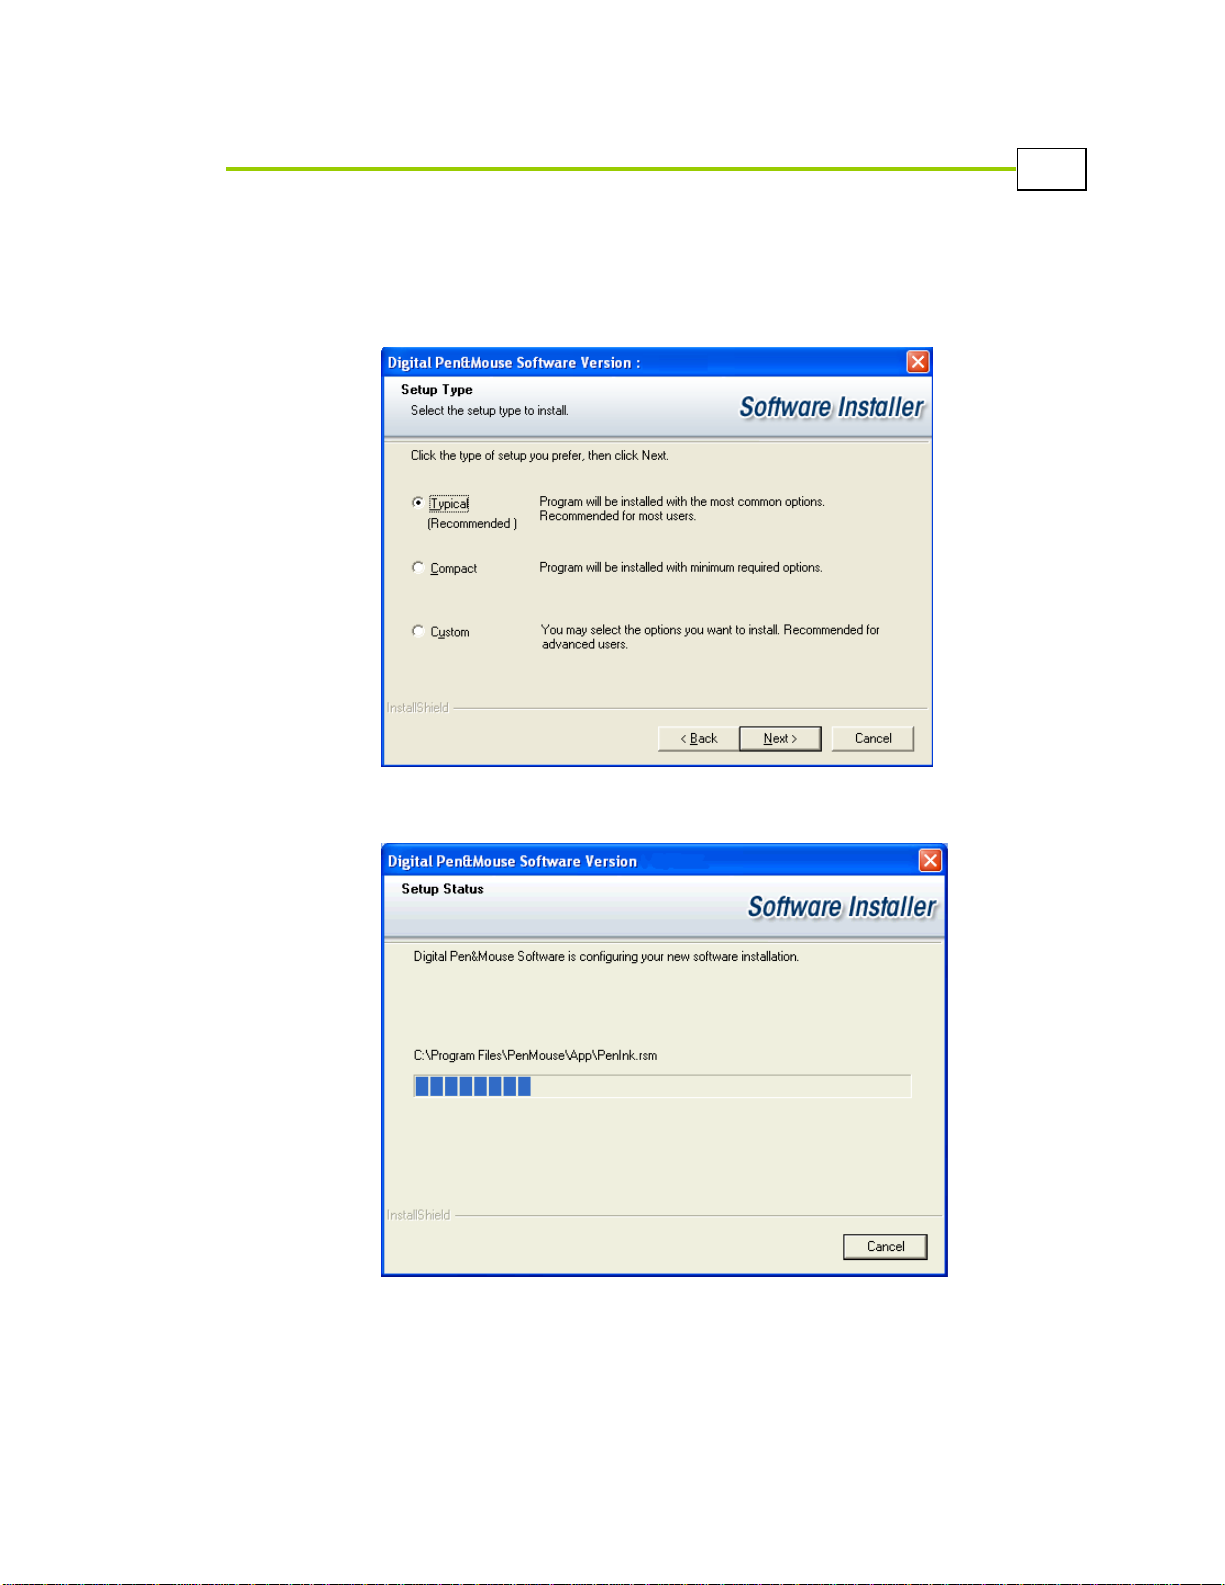
5 Click Next. The Setup Type window opens:
6 Select the Typical radio button and then click Next. This is the
recommended option. The Setup Status window opens:
Page 20
Installing Digital Pen and Mouse Software
12
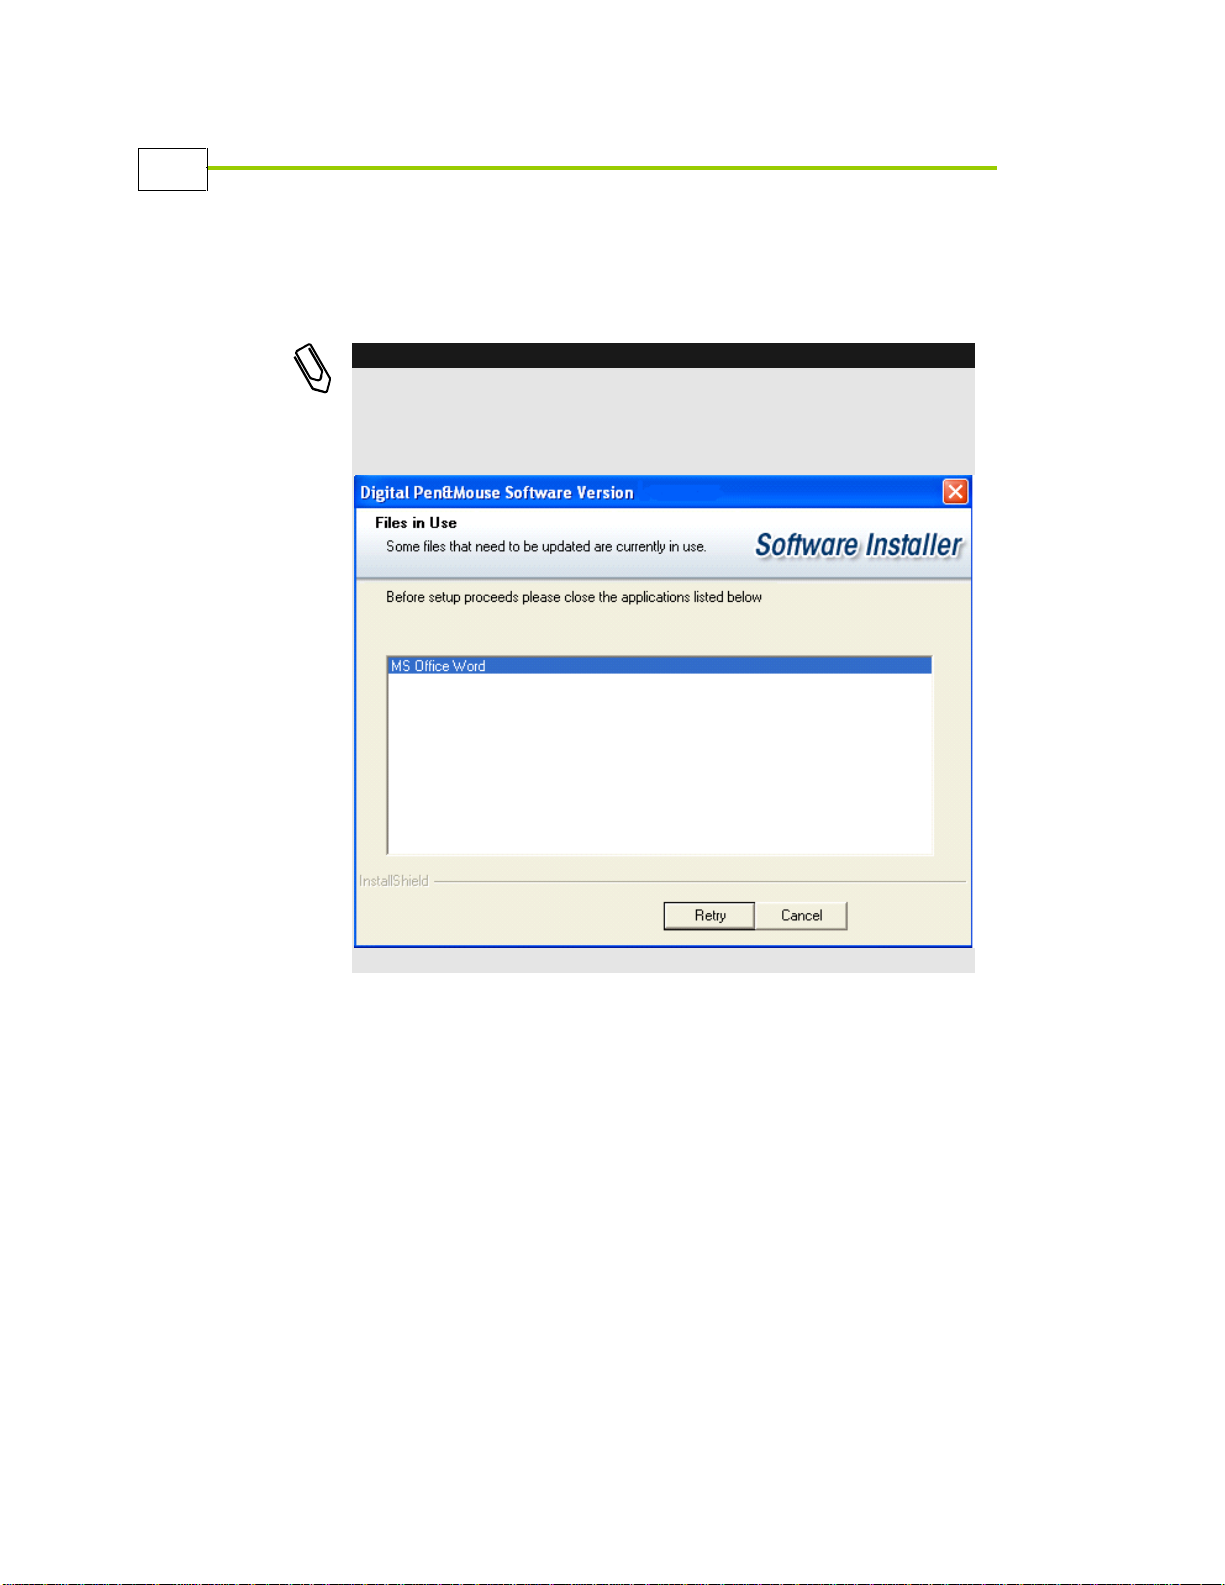
NOTE:
If there are open files that need to be closed, the following window will open
before the Setup Status window. You must close all Microsoft Windows
applications for the installation process to continue. Close any open Microsoft
Windows applications you have open and click Retry.
Digital Pen and Mouse User’s Guide
The setup process begins automatically. A progress bar displays the
status of the installation process. In Windows XP you may get a Found
New Hardware Message, please ignore this message
Page 21
Installing Digital Pen and Mouse Software
13
Digital Pen and Mouse User’s Guide
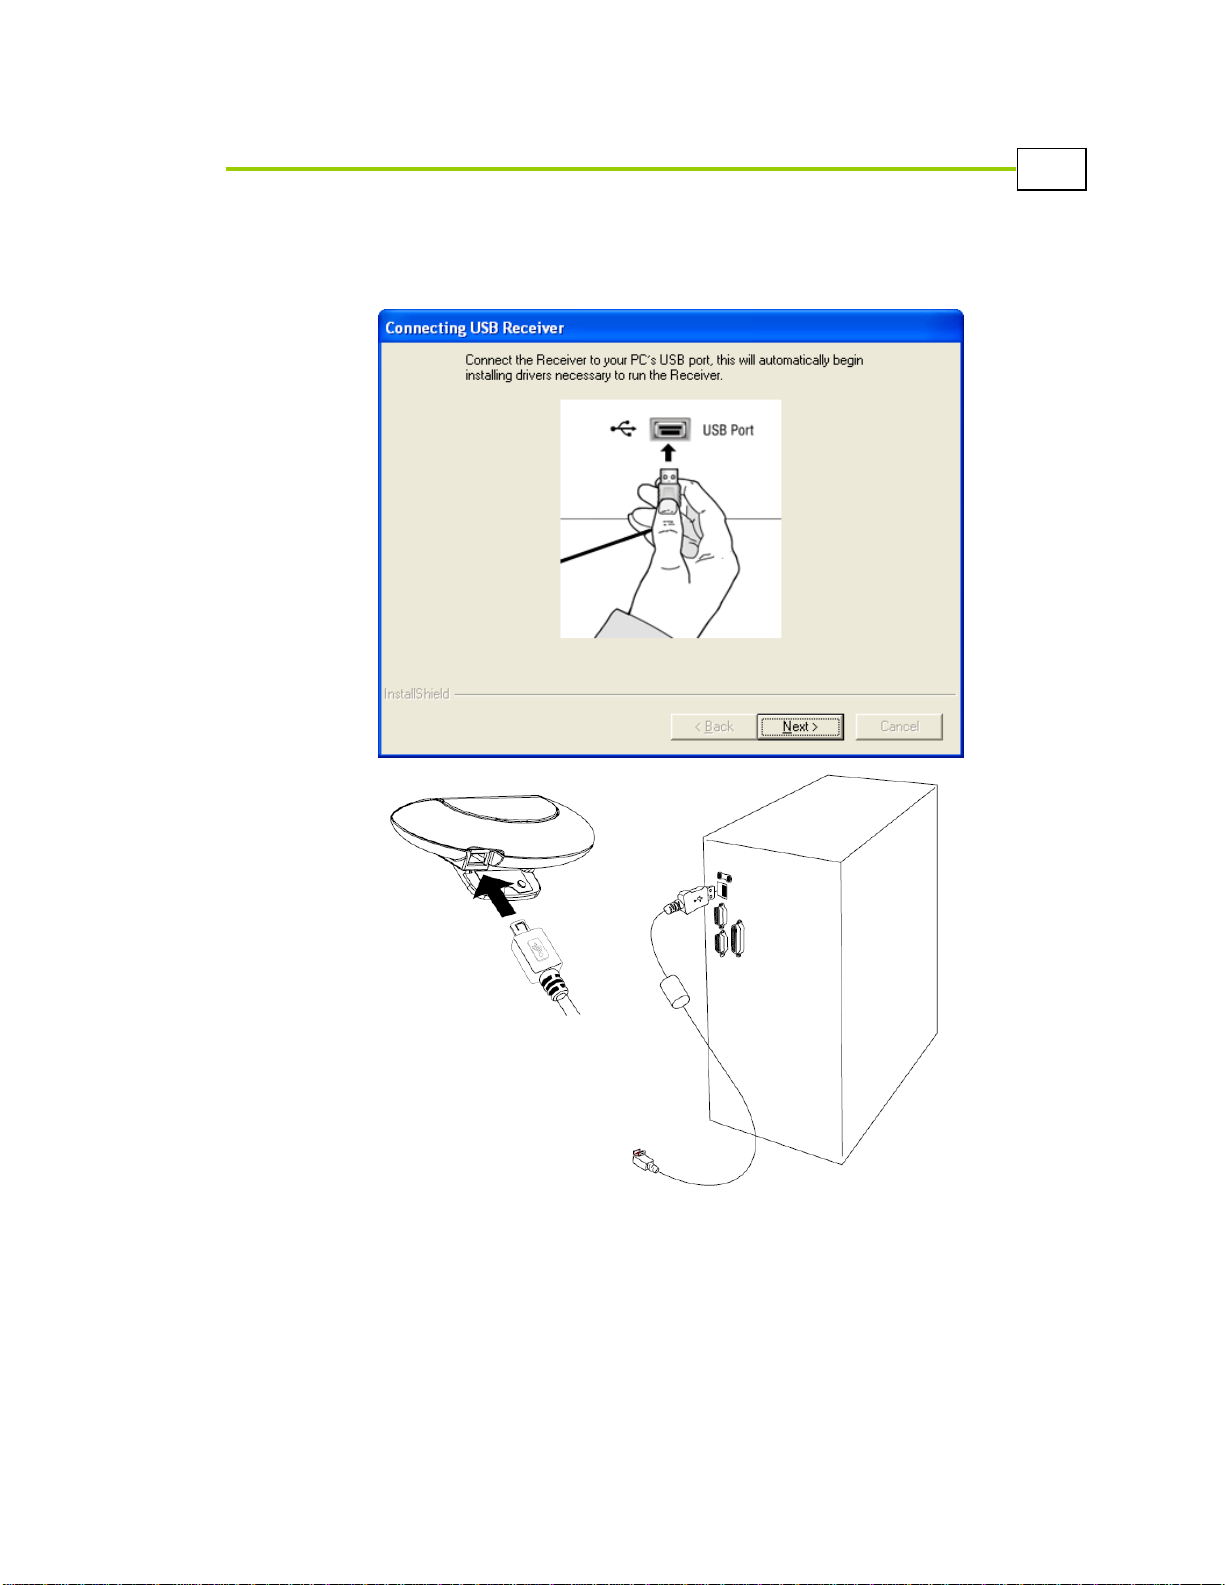
7 When prompted (see the window below), connect the Receiver to your
PC’s USB port using the Mini USB to USB cable Receiver.
Page 22
Installing Digital Pen and Mouse Software
14
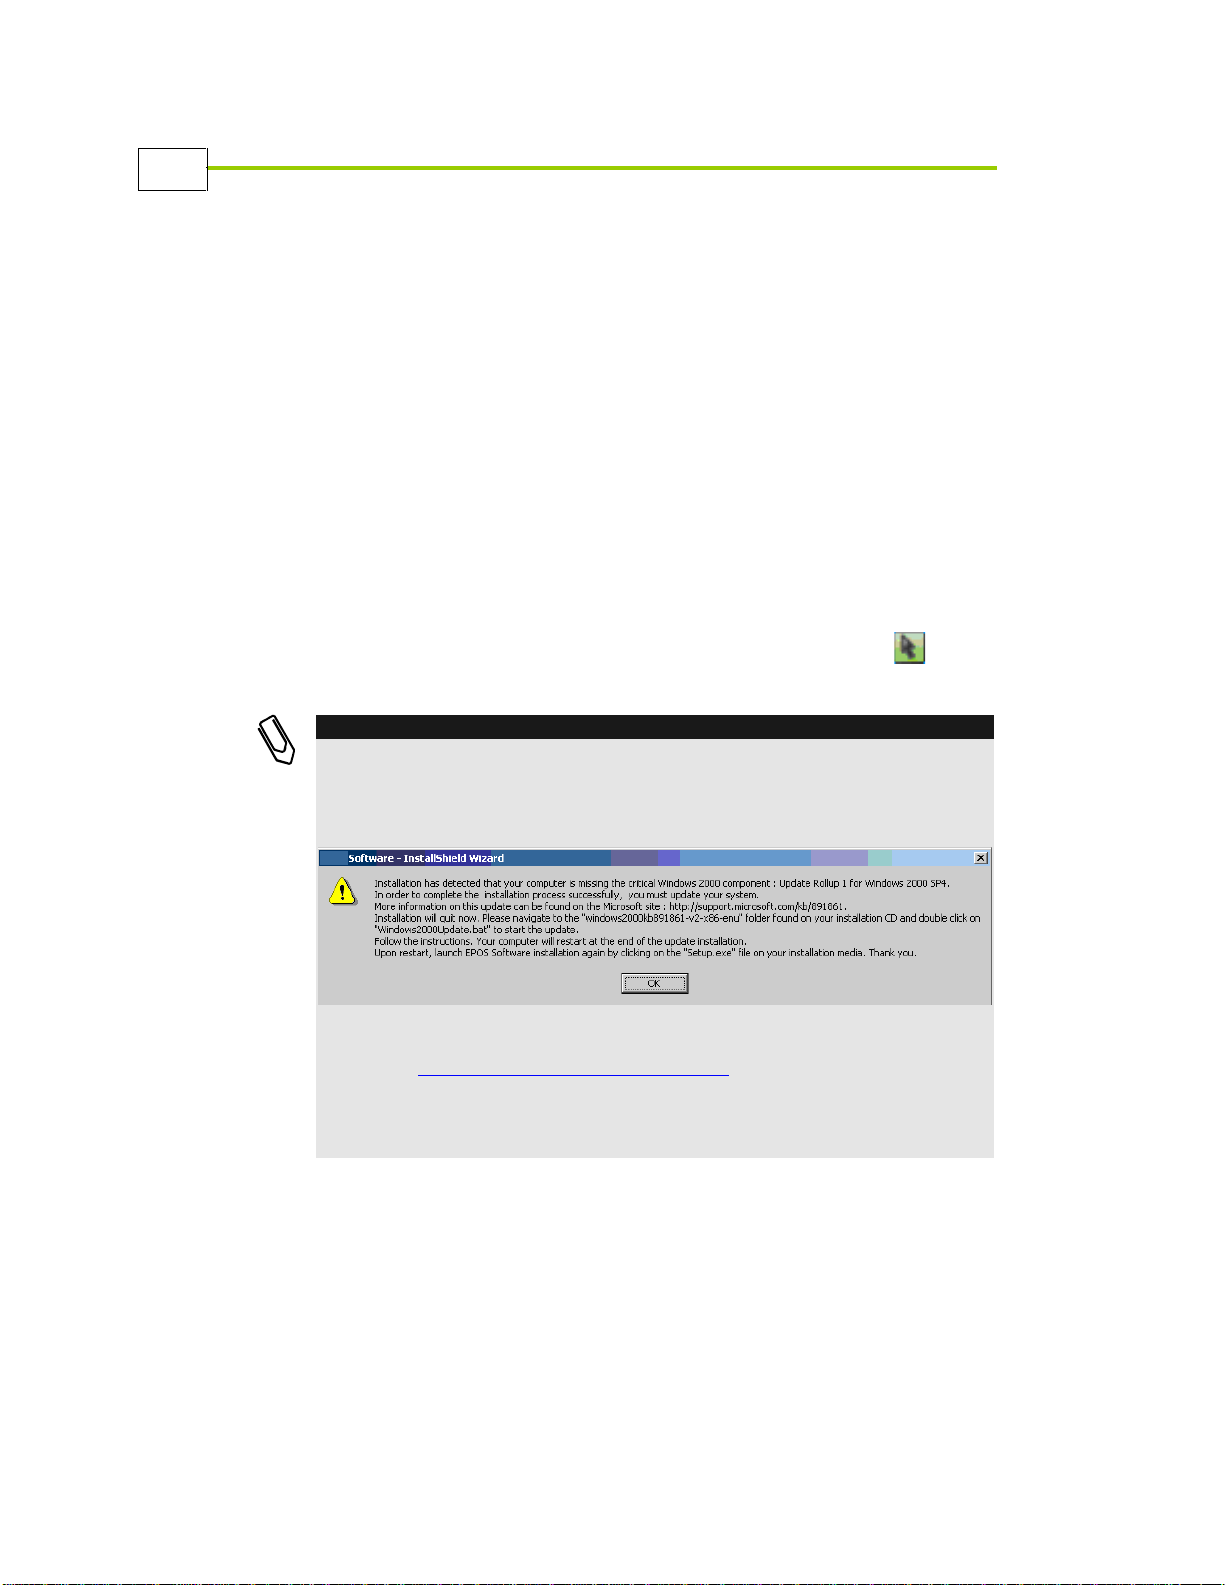
NOTES:
To install the software on Windows 2000 Professional, the PC must have the latest
updates, including Service Pack 4 and the Update Rollup 1 for Windows 2000 SP4.
If these updates are not installed on your PC, you will be notified during the
installation process.
If you receive the message shown above, please read it carefully and follow the
instructions in the message. Visit the Microsoft Support Web site for more
information: http://support.microsoft.com/kb/891861.
If you do not have MSI Installer already installed on your computer, this component
is automatically installed during the installation process. In this case, you will be
prompted to restart your computer.
Digital Pen and Mouse User’s Guide
8 Click Next to the connecting USB receiver Screen. When Installation is
complete , click Finish.
9 The Installation wizard gives you the link to install the Microsoft
Tablet Recognizer by direct you to Microsoft website (For Windows
XP Pro, Windows 2000 users). This option will enable you to convert
handwriting to text
Software installation is now complete. The Digital Pen and Mouse icon
now appears in the Task bar at the lower-right of the desktop . Your
Digital Pen and Mouse is now properly installed and ready to use.
Page 23
Using the Digital Pen and Mouse
15
6Chapter 3
Using the Digital
Pen and Mouse
About This Chapter
Digital Pen and Mouse User’s Guide
This chapter describes the how to get started and how to use the Digital Pen
and Mouse, as well as how to maintain it. It contains the following sections:
Getting Started, page 16, walks you through a typical example of
getting started and using the Digital Pen and Mouse.
The Wheel, page 23, describes the Digital Pen and Mouse Wheel,
which provides easy access to a variety of applications in which you
can write, as well as to games and to device configuration options.
Supported Vista Functionality, page 25, describes the advantages of
using the Digital Pen and Mouse on a Windows Vista system, and the
additional Digital Pen functionality supported in the Vista environment.
Maintaining the Digital Pen, page 34, describes basic procedures for
maintaining your Digital Pen, such as how to install its batteries and
pen tip.
Page 24

Using the Digital Pen and Mouse
16
Install the Software
Step 1
Step 2
Clip the Receiver to a Sheet
of Paper
Step 3
Working as a Pen or a
Mouse
Step 4
Familiarize Yourself with
the Digital Pen
Digital Pen and Mouse User’s Guide
Getting Started
To illustrate the ease of use and flexibility of the Digital Pen and Mouse,
this section presents a typical example of how to get started using it both as
a mouse and as a pen.
Step 1: Familiarize Yourself with
the Digital Pen
Before you start working with the Digital Pen and Mouse, you should
familiarize yourself with the pen and its components. See Digital Pen,
page 2, for a complete description of the pen.
If the batteries are not already installed, install the pen’s batteries, as
described in the Activating the Digital Pen’s Batteries section on page 34.
Page 25
Using the Digital Pen and Mouse
17
NOTE:
If you want to position the clip in a different location on the page, you must modify
the device properties for the pen. See Configuring Receiver Settings, page 104,
for more details about how to do this.
Digital Pen and Mouse User’s Guide
Step 2: Install the Software
Before using the Digital Pen and Mouse, you must install its software, as
described in Chapter 2, Installing Digital Pen and Mouse Software on
page 7.
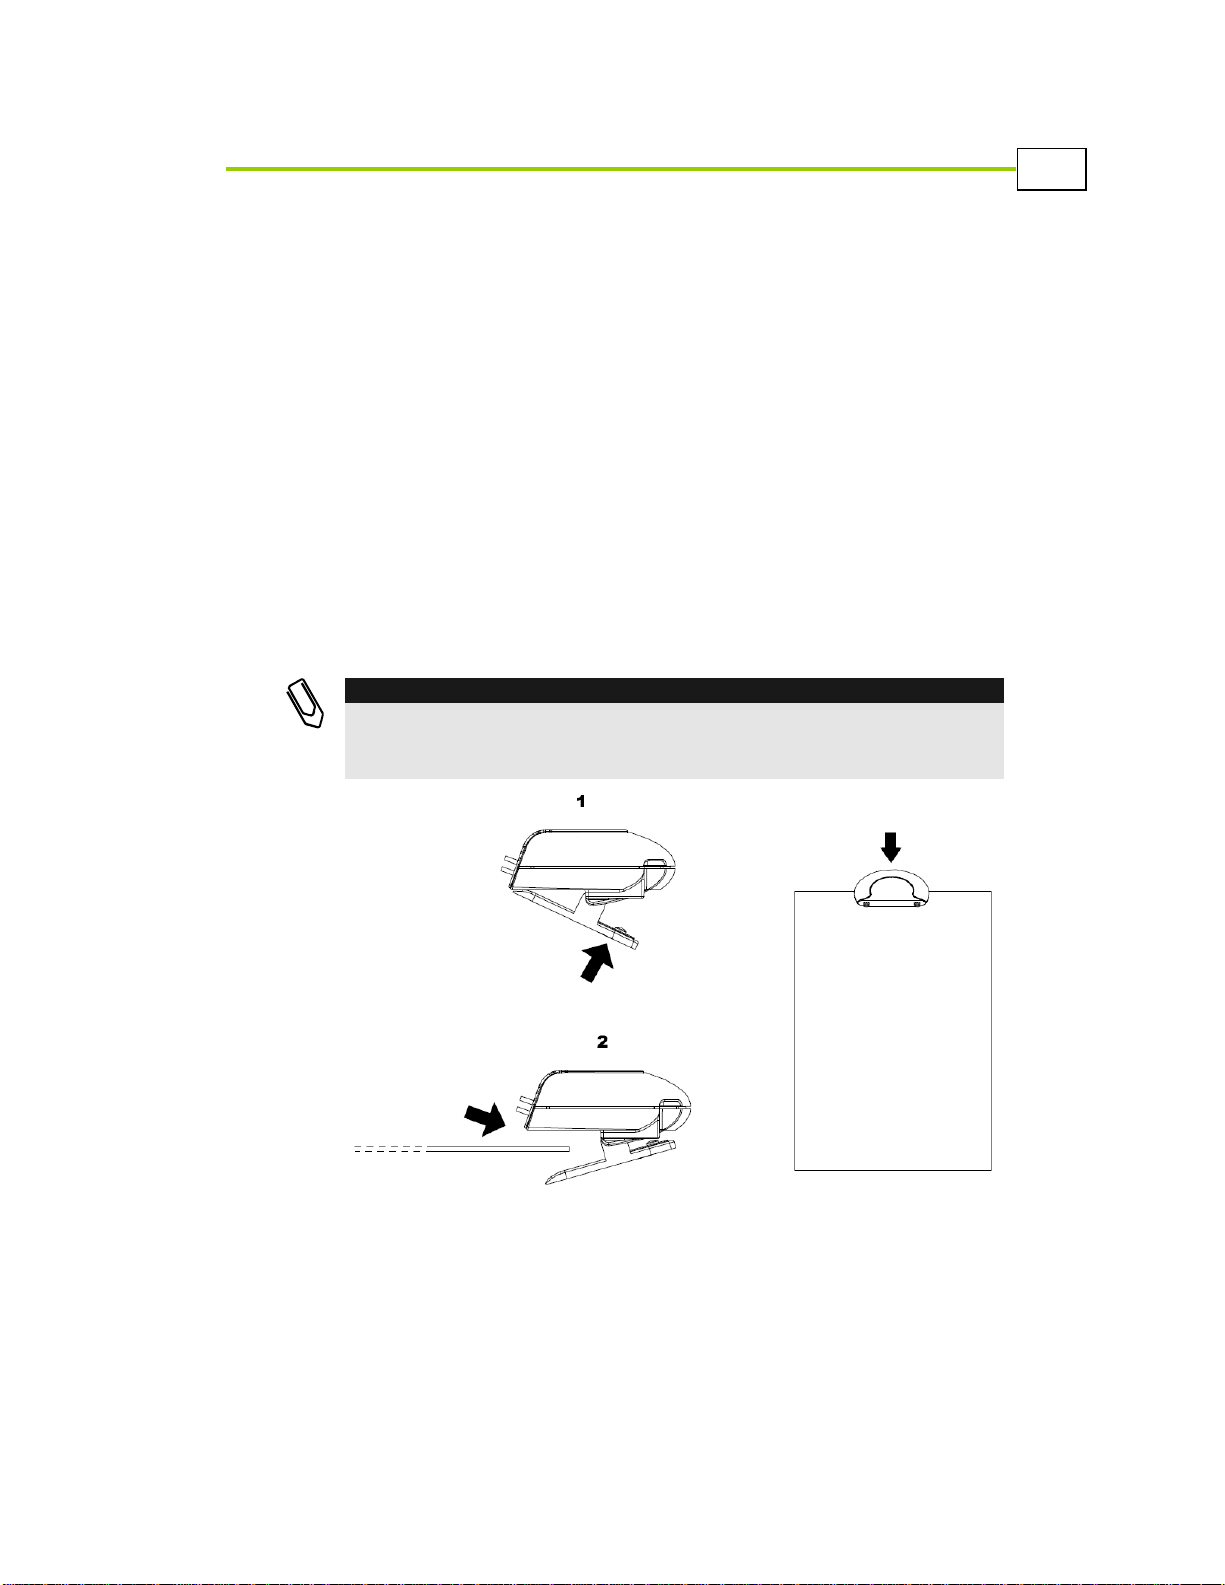
Step 3: Clip the Receiver to a
Sheet of Paper
The Receiver’s default position is on the top middle of an A4, legal or
letter-sized piece of paper in portrait position. You can use any paper size
(letter or legal) and either orientation (portrait or landscape). The Digital
Pen’s range is approximately the dimensions of an A4 page.
Page 26

Using the Digital Pen and Mouse
18
Digital Pen and Mouse User’s Guide
Make sure that the Receiver is connected to the USB port of your
computer, just as it was during software installation. See Step 6 on page 13
for more details.
The Power LED on the Receiver lights when the device is properly
connected.
Step 4: Working as a Pen or a
Mouse
What is Pen Mode and Mouse Mode?
The Digital Pen and Mouse can operate either as a pen or as a mouse.
Depending on your preference, you can easily switch back and forth
between modes at the click of a button.
The Digital Pen can operate in the following modes:
Mouse mode: In Mouse mode, the pen functions just like a mouse.
Move the pen about and watch how it controls the mouse arrow icon. A
conventional mouse responds as you glide it across a flat surface, such
as a mouse pad. The Digital Pen not only responds when you glide it
across a flat surface, but even copies your movements accurately onto
the PC if you write or sketch in the air, as long as it is within the
Receiver’s range.
You can modify the settings for the mouse to meet your personal needs.
For example, you can change the mouse speed. See Configuring Mouse
Motion Speed Settings, page 106, for more details.
Pen mode: In this mode, you use the Digital Pen as a pen in supported
applications. In Pen mode, as you write on a sheet of paper attached to
the Receiver, a matching image appears on the screen. The list of
supported applications is provided on page 23.
Page 27

Using the Digital Pen and Mouse
19
When the pen image briefly appears on your screen, it
indicates that the Digital Pen is now functioning as a pen.
When the mouse image briefly appears on your screen, it
indicates that the Digital Pen is now functioning as a mouse.
Display Location
Mouse
Pen
On the screen
In the Task Bar
TIP:
You can toggle between Pen and Mouse mode at any time by clicking the middle
rocker button of the pen.
Digital Pen and Mouse User’s Guide
You can easily toggle back and forth between Pen and Mouse modes by
pressing the middle button on the rocker switch. An image of a pen or a
mouse appears briefly on the screen, and then fades away, indicating the
current mode.
The Task Bar also shows the relevant icon, as shown below:
After you clip the Digital Pen and Mouse to a piece of paper, as described
in the previous step, it starts functioning as a mouse (meaning that it is in
Mouse mode).
Using the Digital Pen as a Mouse
You can now use it as you would any standard mouse:
Double-click (like with a mouse) by double-clicking on the paper
Left-click (like with a mouse) by clicking on the paper or pressing the
bottom button on the pen’s rocker switch
Right-click (like with a mouse) by pressing the top button on the rocker
switch
Page 28
Using the Digital Pen and Mouse
20
TIP:
If one of the applications supported by the Digital Pen and Mouse is open, such
as Microsfot Word, you can write in it any time that you are in Pen mode.
Digital Pen and Mouse User’s Guide
Double-click an application on the desktop (like with a mouse) to open
it. Use the pen to navigate through the application, just as you would
with a standard mouse.
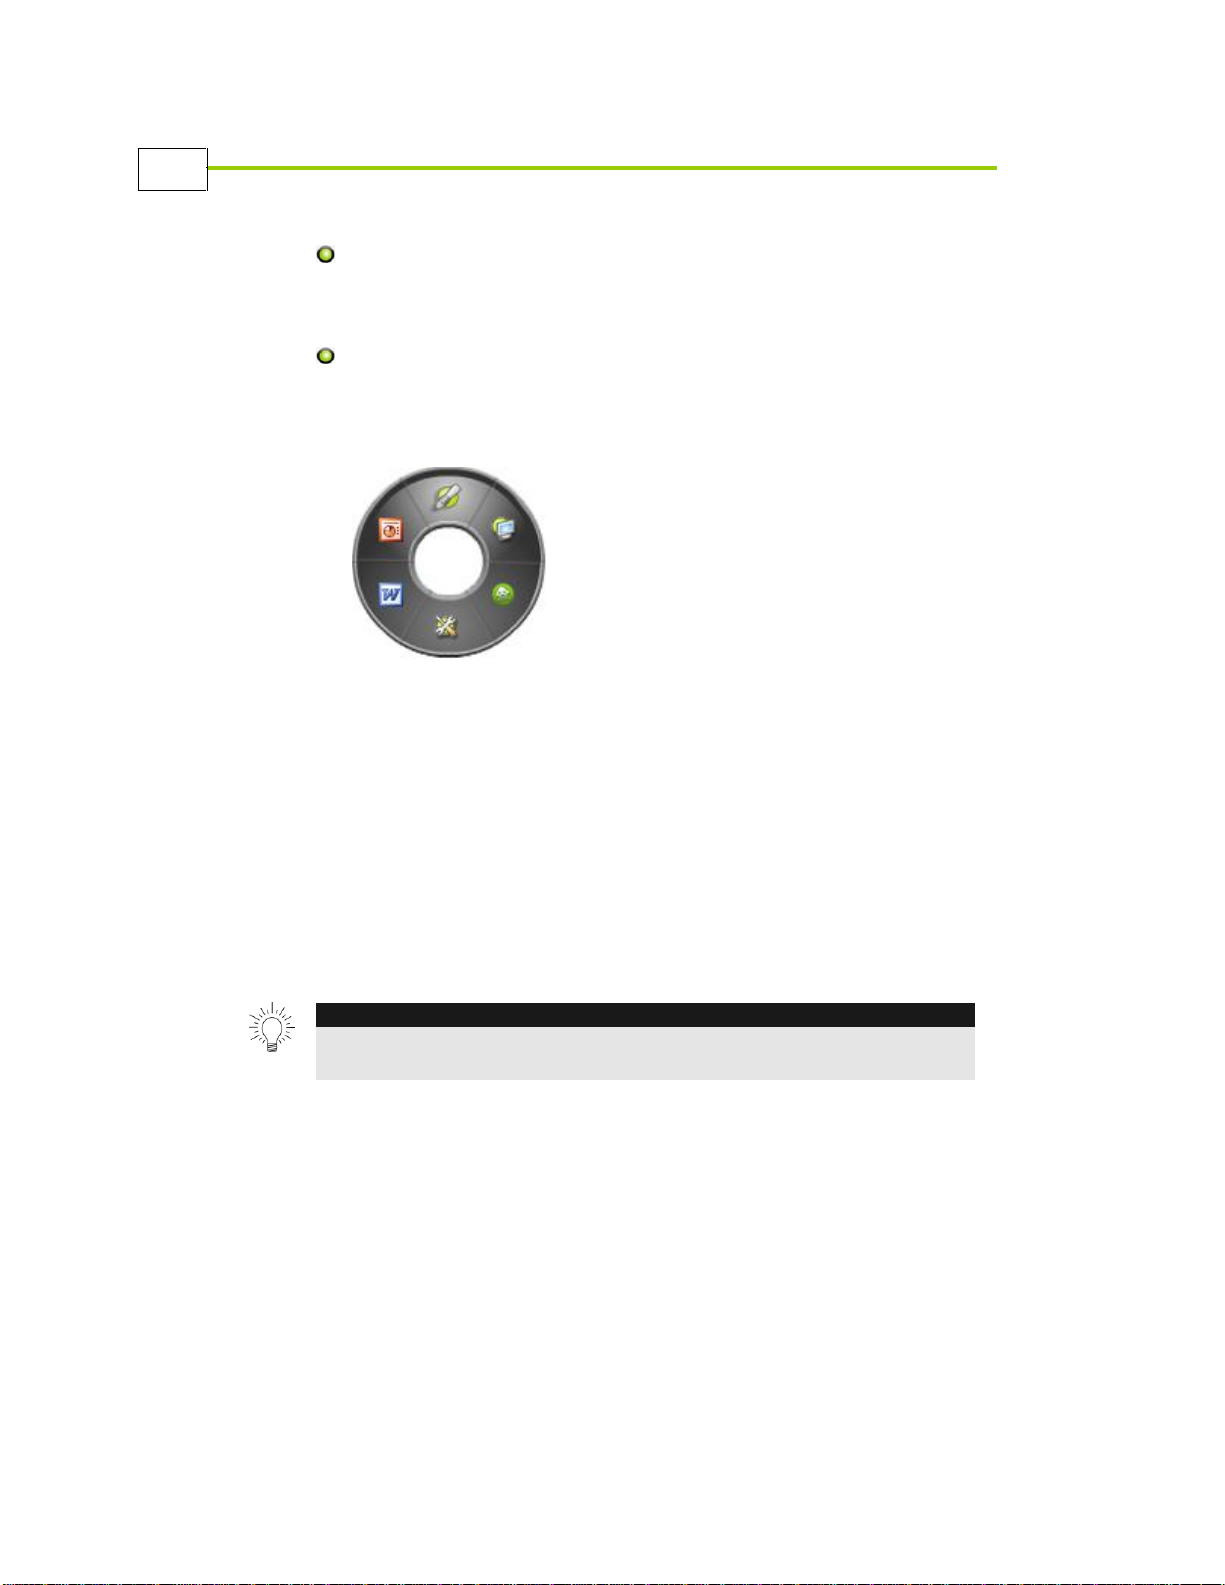
Open the Wheel by pressing and holding down the middle button on
the rocker switch. The Wheel, shown below, displays on the desktop,
from which you can select one of the applications supported by the pen
in which you want to work.
You may refer to page 23 for more information about the Wheel.
Using the Digital Pen as a Pen
The Digital Pen instantly transforms your PC into a virtual notebook. You
can capture and display handwritten notes and sketches, draw and share
sketches digitally via email and messaging applications and personalize
documents with handwritten notes and signatures.
To use the Digital Pen and Mouse as a pen, click the middle button on the
pen’s rocker switch to change to Pen mode. The following will walk you
through two examples of using your Digital Pen as a pen.
Page 29
Using the Digital Pen and Mouse
21
Digital Pen and Mouse User’s Guide
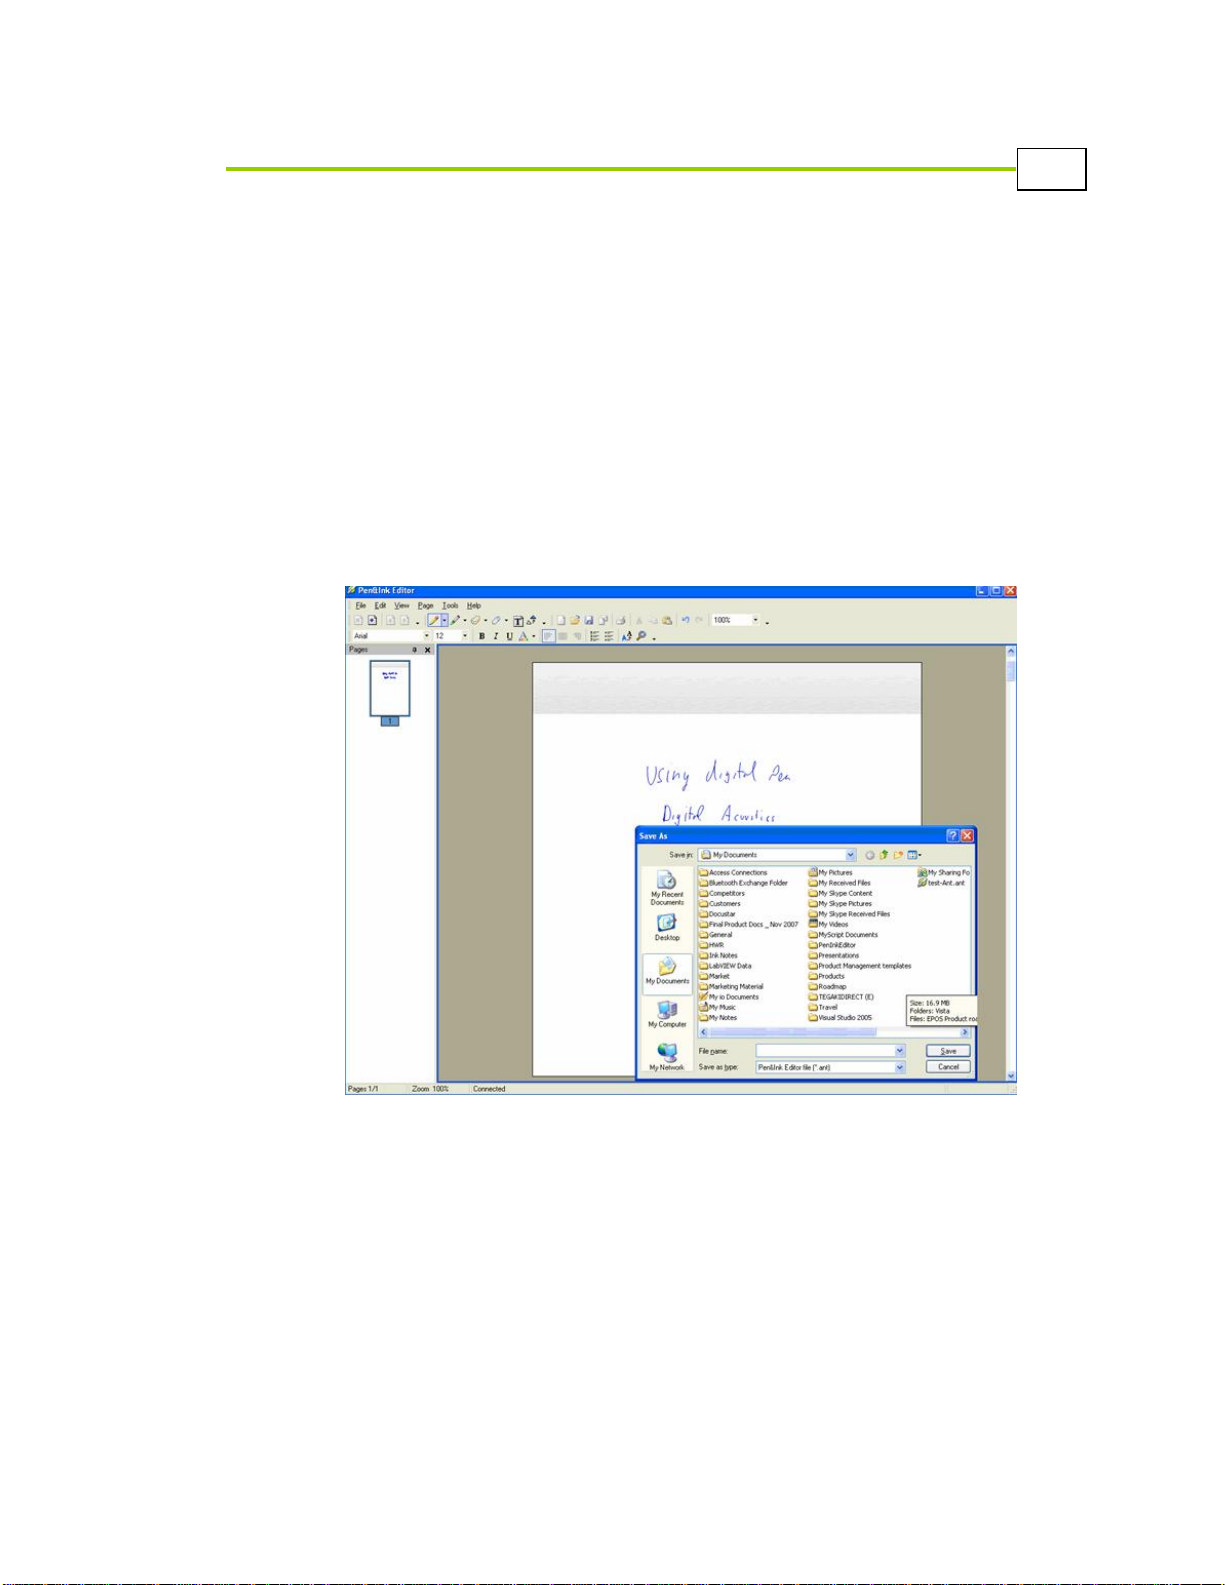
Example 1
Open the Pen&Ink Editor application using the Wheel.
In the Pen&Ink Editor main window, begin writing. As you write on your
piece of paper, see how your work appears on the screen.
To draw straight lines, keep the pen at the same angle and move your hand.
Make sure that you do not block the pen’s line of sight to the Receiver.
Now toggle the middle button on the rocker switch to change to Mouse
mode. Save your writing by clicking the Save icon in the window’s toolbar.
Pages saved in this manner have a *.ant extension.
Page 30
Using the Digital Pen and Mouse
22
TIP:
You can save your document using standard Microsoft methods, or toggle the
Digital Pen’s rocker switch to access Mouse mode, and then save the document by
clicking the Save icon in the Word toolbar.
Written using
the Digital Pen
Pen&Ink Editor
toolbar
Digital Pen and Mouse User’s Guide
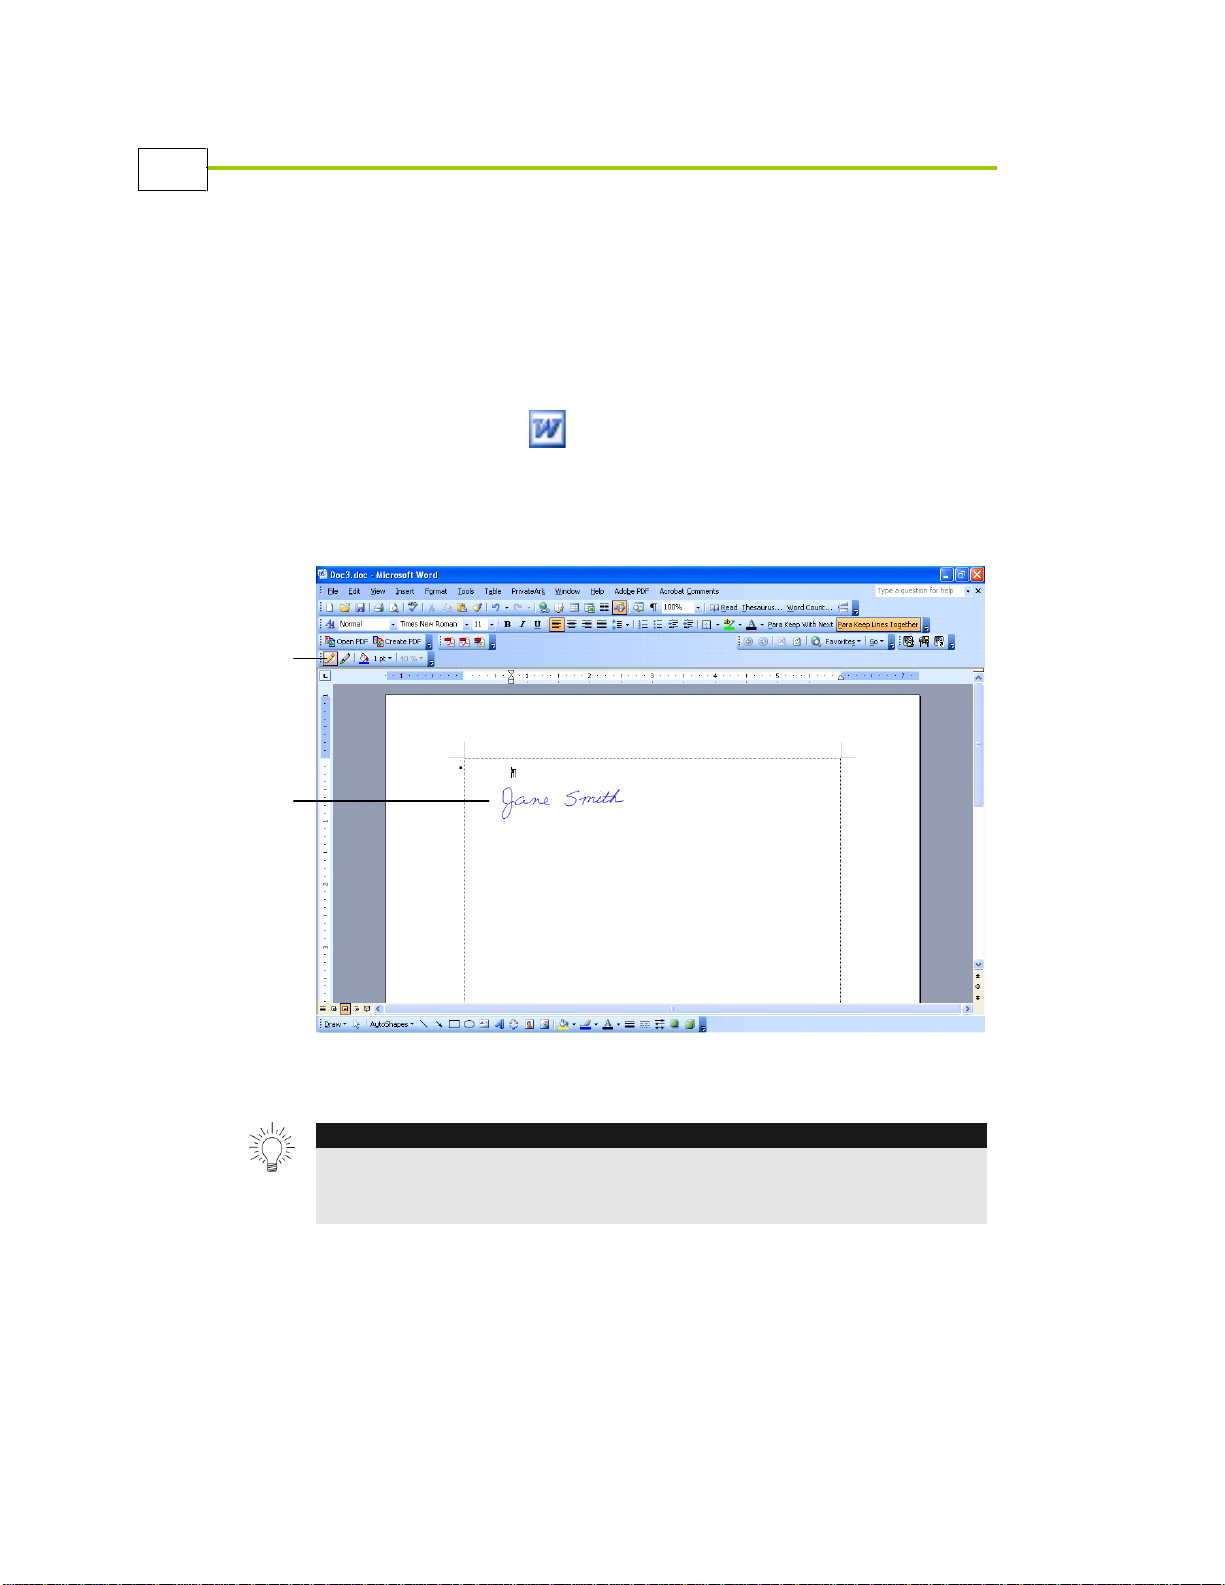
Example 2
If you are in Mouse mode, press the middle button of the pen to open the
Wheel and choose one of several applications in which you can write. From
the wheel, you can open any Digital pen-compliant applications, such as
Snapshot and Microsoft Office applications (Word and PowerPoint).
Click on the Word icon to open its respective application. Notice that
the Pen&Ink Editor toolbar also displays in the Word file.
After Word opens, write something in the document, such as your
signature.
Now, save your document using whatever method you prefer. The file is
saved in *.doc format.
The save operation saves the file’s original contents plus whatever
text/drawings you added using the Digital Pen and Mouse.
Page 31

Using the Digital Pen and Mouse
23
Digital Pen and Mouse User’s Guide
The Wheel
The Digital Pen and Mouse Wheel provides easy access to a variety of
applications in which you can write, to games and to device configuration
options.
To access the Wheel, press and hold down the center button of the rocker
switch, which causes the Wheel to appear on the desktop.
You can launch the following directly from the Wheel:
Pen&Ink Editor (see Chapter 4, Using the Pen&Ink Editor
Application)
SnapShot (see Chapter 5, Using the SnapShot Application)
Microsoft Word (see Microsoft Office Applications, page 94)
PowerPoint (see Microsoft Office Applications, page 94)
SpaceCrushers (see SpaceCrushers Game, page 100)
Device Properties (see Chapter 7, Configuring Device Properties,
page 101)
Page 32

Using the Digital Pen and Mouse
24
NOTE:
You can add or remove applications on the Wheel to meet your personal needs.
See Configuring Custom Wheel Applications, page 108, for more details.
From
the
desktop:
From
the
Start
menu:
From
the
Task
bar:
Digital Pen and Mouse User’s Guide
To launch an application from the Wheel:
Continue holding down the middle button on the pen’s rocker switch
and then move the mouse cursor over an icon on the Wheel to open its
respective application.
The applications that are accessible from the Wheel can also be accessed in
other ways, as follows:
Page 33

Using the Digital Pen and Mouse
25
Digital Pen and Mouse User’s Guide
Supported Vista Functionality
The Digital Pen and Mouse can be used with all Windows Vista versions.
Once Vista is installed, it enables the Digital Pen and Mouse to work as a
Tablet PC digitizer, mouse and pen.
Installing the Digital Pen and Mouse product turns your computer into a
fully functional tablet PC. The Digital Pen’s tablet PC functionality is only
available when the pen is installed on a Windows Vista operating system.
The Tablet PC Input Panel, shown below, is available and visible once you
install the Digital Pen and Mouse and log in to Vista.
Page 34

Using the Digital Pen and Mouse
26
Digital Pen and Mouse User’s Guide
The Tablet PC Input Panel enables you to enter text without using a
standard keyboard. For the Digital Pen and Mouse, the panel captures
the pen’s input on the computer and performs handwriting recognition. For
example, the first figure below shows handwritten text entered using the
Digital Pen and Mouse. The second figure shows that same text after
handwriting recognition is performed and you click Insert, which inserts
the converted text into the application of your choice (in this case,
Notepad).
Page 35

Using the Digital Pen and Mouse
27
Digital Pen and Mouse User’s Guide
For more information about working with the Tablet PC Input Panel and
the Vista operating system, consult the Vista help.
Page 36

Using the Digital Pen and Mouse
28
Digital Pen and Mouse User’s Guide
The Vista system tray contains the Pen Flick icon. This icon enables
you to control the behavior of a pen and input device. Click this icon to
open the Pen and Input Devices window:
Refer to the Vista help for details about defining the settings in this
window.
Page 37

Using the Digital Pen and Mouse
29
Tablet PC
Digital Pen and Mouse User’s Guide
Once you install the Digital Pen and Mouse, the computer’s programs list
contains an entry called Tablet PC. The Tablet PC entry provides access to
information about handwriting recognition and pen usage on Vista.
Page 38

Using the Digital Pen and Mouse
30
Digital Pen and Mouse User’s Guide
Digital Pen and Mouse Device
Properties in Vista
The Pen&Mouse Device Properties window in Vista differs slightly from
that in other Windows operating systems:
In Vista, this window contains an additional tab – Tablet PC Settings. This
tab contains a series of links that provide quick access to all functionality
related to the digital pen. Simply click a link to open the relevant window
to define the required settings.
Page 39

Using the Digital Pen and Mouse
31
Digital Pen and Mouse User’s Guide
Writing Using the Digital Pen in
Vista
When using the Digital Pen and Mouse in Vista, whenever you place the
cursor in a text box in any program, the icon is displayed. Simply
tap on this icon to open a window, such as the one below, in which you can
write using the pen.
This field is context sensitive and automatically determines the application
you are using. In this case, the Internet Explorer address bar.
Page 40

Using the Digital Pen and Mouse
32
Start
Inking
toolbar
Digital Pen and Mouse User’s Guide
Working with Office 2007 in
Windows Vista
When both Microsoft Office 2007 and the Digital Pen and Mouse are
installed on Vista, there are several additional features available beyond
those described above.
For example, the Start Inking button is provided in all Microsoft
Office applications. When you click this button, another toolbar is
displayed that provides quick access to tools for handling handwritten
information, such as a highlighter and eraser. Consult the Vista help for
more details about these options.
Page 41

Using the Digital Pen and Mouse
33
NOTE:
The Digital Pen plug-ins are used by default to enable Microsoft Word and
PowerPoint. These plug-ins cannot be used simultaneously with the
Vista-provided Start Inking feature when the pen operates in Pen mode. The
Vista Start Inking feature can only work with the Digital Pen when the pen
operates in Mouse mode.
NOTE:
The Start Inking button may appear in different locations in each Microsoft Office
application. It is accessed from the Review menu when working in Microsoft
Word.
Digital Pen and Mouse User’s Guide
The Digital Pen and Mouse can be used in any Microsoft Office
application.
To access the Start Inking feature, click Review in menu bar to display the
tool on the right-side of the window.
Page 42

Using the Digital Pen and Mouse
34
Digital Pen and Mouse User’s Guide
Maintaining the Digital Pen
At some point, you may need to install or replace the Digital Pen’s batteries
or pen tip. The subsections that follow describe how to do so when
necessary.
Activating the Digital Pen’s
Batteries
The Digital Pen comes complete with two regular 393 watch batteries.
These batteries are typically already installed when you receive your
Digital Pen and Mouse package. The batteries must be activated in the pen
before you can use the pen.
Page 43

Using the Digital Pen and Mouse
35
NOTES:
Do not disassemble the Digital Pen in any way not described in this guide.
Improper use may damage the pen and cause it to cease functioning.
The Digital Pen enters power-save mode automatically after 30 seconds.
Digital Pen and Mouse User’s Guide
To activate the Digital Pen batteries:
1 Unscrew the top of the pen.
2 Remove isolation sheet.
3 Screw the pen top back on.
Page 44

Using the Digital Pen and Mouse
36
NOTES:
If the ink supply runs out, you can replace the pen tip with any standard writing
tip.
Alternatively, you can replace it with a stylus to use the pen only as a mouse.
Extra refills are optional and are not included with the pen by default. You can
purchase them from any big office store.
Digital Pen and Mouse User’s Guide
Inserting the Pen Tip
The Digital Pen comes with a standard mini-ballpoint tip for writing.
To replace the plastic tip with a pen tip or vice versa:
1 Pull the pen tip out of the Digital Pen.
2 Insert the replacement pen tip into the Digital Pen.
Page 45

Using the Pen&Ink Editor Application
37
7Chapter 4
Using the
Pen&Ink Editor
Application
About This Chapter
Digital Pen and Mouse User’s Guide
This chapter describes how to use the Digital Pen and Mouse with the
Pen&Ink Editor application. Pen&Ink Editor software is automatically
installed as part of the Digital Pen installation process. This chapter
contains the following sections:
Pen&Ink Editor Main Window, page 39, describes the application’s
main window and its components.
Editing, page 51, describes how to perform various editing functions in
the application, such as moving a line, deleting a line, adding a picture,
changing colors and so on.
Navigating, page 73, describes the navigation methods provided to
maneuver within the Pen&Ink Editor application.
Saving, page 75, describes the options provided for saving Pen&Ink
Editor information.
Printing, page 77, describes how to print the current document.
Page 46

Using the Pen&Ink Editor Application
38
Digital Pen and Mouse User’s Guide
Emailing a Document, page 78, describes how to email a document by
attaching it to an email message as a PDF file.
Exporting a Document, page 79, describes how to export to PDF
format.
Page 47

Using the Pen&Ink Editor Application
39
Digital Pen and Mouse User’s Guide
Pen&Ink Editor Main Window
The Pen&Ink Editor main window, shown below, is comprised of several
areas, including the:
Menu bar (see page 40)
Toolbars (see page 43)
Pages pane (see page 47)
Writing area (see page 48)
Page 48

Using the Pen&Ink Editor Application
40
TIP:
Most application options are accessible from both the menu bar and the toolbars.
See the relevant toolbar sections in this chapter for more details about available
application options.
File
The File menu has the following options:
▪ New: Opens a new document
▪ Open: Opens an existing document
▪ Save: Saves the current document
▪ Save As: Saves the current document with a
new name
▪ Export: Exports the current document
▪ Email As PDF: Emails the current
document as a PDF
▪ Print: Prints the current document
▪ Recent Files: Shows a list of the five most
recent files opened in the application
▪ Exit: Closes the application
Digital Pen and Mouse User’s Guide
Menu Bar
The main menu provides easy access to Pen&Ink Editor application
functionality.
The following menu options are available:
Page 49

Using the Pen&Ink Editor Application
41
Edit
The Edit menu has the following options:
▪ Undo: Cancels/removes the last action
performed
▪ Redo: Cancels Undo step by step
▪ Cut: Cuts the selected area of the document
▪ Copy: Copies the selected area of the
document
▪ Paste: Pastes the selected area of the
document
▪ Delete: Removes the selected area of the
document
▪ Find: Locates text within the document
▪ Find Next: Locates the next occurrence of
the text string specified in the Find window
▪ Rotate Ink: Rotates text and drawings in the
document
▪ Convert To Text: Converts the selected
handwriting to text
▪ Insert Picture: Inserts an image file into the
document
▪ Insert Hyperlink: Adds a hyperlink to the
document
Digital Pen and Mouse User’s Guide
Page 50

Using the Pen&Ink Editor Application
42
View
The View menu has the following options:
▪ Zoom: Resizes the view to the
specified percentage
▪ Grid: Adds grid lines to the document
▪ Margin: Adds a margin guide to the
document
▪ Toolbars: Enables you to show/hide
the application’s four toolbars
▪ Pages Thumbnails: Toggles to
show/hide the Pages pane
Page
The Page menu has the following options:
▪ Insert Page: Inserts a new page into
the document
▪ Delete Page: Deletes the current page
in the document
▪ Save Page As: Saves the current page
as a JPEG image
▪ Page Setup: Opens the Preferences
window in which you define page
setup options
Tools
The Tools menu has the following options:
▪ Preferences: Opens the Preferences
window in which you define page
setup options
▪ Select Language: Enables you to
select the language to be used in the
application
Digital Pen and Mouse User’s Guide
Page 51

Using the Pen&Ink Editor Application
43
Help
The Help menu has the following options:
▪ Help Contents: Opens a file
containing help information for the
Pen&Ink Editor application
▪ About: Displays version information
for the Pen&Ink Editor application
TIP:
Most application options are accessible from both the menu bar and the toolbars.
NOTES:
You can show or hide the various toolbars by right-clicking in the menu bar and
then selecting the toolbar you want to hide/show.
You can also hide/show a toolbar by selecting View Toolbars, and then
selecting the required toolbar in the dropdown list.
Both of these actions toggle to show/hide toolbars.
Digital Pen and Mouse User’s Guide
Toolbars
The Pen&Ink Editor application contains several toolbars for quick access
to application functionality.
Toolbars include the:
Pages toolbar (page 44)
Standard toolbar (see page 44)
Design toolbar (see page 45)
Formatting toolbar (see page 46)
Page 52

Using the Pen&Ink Editor Application
44
Icon
Name
Shortcut
Function
Delete Page
Ctrl+D
Deletes the page
Insert Page
Ctrl+I
Adds a new page after the
current page
Previous Page
Page Up
Moves to the previous page
Next Page
Page Down
Moves to the next page
Toolbar Options
Enables you to show or hide
icons on this toolbar
Icon
Name
Shortcut
Function
New Blank
Document
Ctrl+N
Opens a new blank document
Open
Ctrl+O
Opens a file
Save
Ctrl+S
Saves the file
E-mail
Emails the document through
your default email program as
a PDF attachment
Print
Ctrl+P
Prints the document
Cut
Ctrl+X
Cuts a selected area of the
document
Digital Pen and Mouse User’s Guide
Pages Toolbar
The Pages toolbar contains the following icons:
Standard Toolbar
The Standard toolbar contains the following icons:
Page 53

Using the Pen&Ink Editor Application
45
Icon
Name
Shortcut
Function
Copy
Ctrl+C
Copies a selected area of the
document
Paste
Ctrl+V
Pastes the cut or copied portion
of the document
Undo
Ctrl+Z
Cancels/removes the last action
performed
Redo
Ctrl+Y
Cancels Undo step by step
Zoom
Resizes the view to the
specified percentage
Toolbar
Options
Enables you to show or hide
icons on this toolbar
Icon
Name
Shortcut
Function
Pen
Selects the Pen tool
Marker
Selects the Marker (highlighter)
tool
Eraser
Erases the selected portion of the
page (what was written with the
digital pen)
Colors
Changes the current tool color
(Pen/Marker)
Text
Acts as a text tool, enabling you
to type text directly into your
document
Digital Pen and Mouse User’s Guide
Design Toolbar
The Design toolbar contains the following icons:
Page 54

Using the Pen&Ink Editor Application
46
Icon
Name
Shortcut
Function
Shape
Recognizer
Acts as a pattern recognizer to
complete and refine a shape you
draw
Toolbar
Options
Enables you to show or hide
icons on this toolbar
Icon
Name
Shortcut
Function
Font
Selects the font
Font Size
Selects the font size from prefixed list
Bold
Ctrl+B
Changes the font to bold
Italic
Ctrl+I
Changes the font to italics
Underline
Ctrl+U
Underlines the font
Text Color
Changes the font color or items
in the selected area
Align Left
Aligns the text to the left
Align
Center
Centers the text
Digital Pen and Mouse User’s Guide
Formatting Toolbar
The Formatting toolbar contains tools that enable you to format text in a
document. In this context, this means text that you type directly into your
document or handwriting that has been converted to text using the Convert
to Text tool. See Converting Handwriting to Text, page 65, for more details
about this option.
The Formatting toolbar contains the following icons:
Page 55

Using the Pen&Ink Editor Application
47
Icon
Name
Shortcut
Function
Align
Right
Aligns the text to the right
Numbering
Numbers paragraphs of text
Bullets
Adds bullets to the text
Convert
To Text
Converts the selected
handwriting to text. Enabled only
if Microsoft Tablet recognizer is
installed
Find
Opens the Find window,
enabling you to search for
specific text
Toolbar
Options
Enables you to show or hide
icons on this toolbar
Button
Result When Clicked
and
Toggles to show or hide the Pages pane
Displays the Pages pane
Closes the Pages pane
Digital Pen and Mouse User’s Guide
Pages Pane
The left side of the Pen&Ink Editor main window contains a Pages pane
with several buttons. This area is used to manage the pages in the document
and to display thumbnails for each page.
The following buttons are available in this pane:
Page 56

Using the Pen&Ink Editor Application
48
Digital Pen and Mouse User’s Guide
Writing Area
You can change the default page color (white) of the Writing Area, as well
as add grid lines and a margin guide to this area.
To set the page color in Pen&Ink Editor:
1 In the menu bar, select Page Page Setup or Tools Preferences.
The Preferences window opens:
2 Modify the page color by selecting a color in the dropdown list.
3 Click OK to save your settings.
Page 57

Using the Pen&Ink Editor Application
49
Digital Pen and Mouse User’s Guide
Margins and Grids
Like a physical sheet of paper, you can set up the Pen&Ink Editor page to
have both grids (or lines) and margins.
To set up the page grid:
1 In the menu bar, select View Grid.
2 Select the required grid setting. You can select from the following
options:
None (the default). No grid lines are displayed.
Legal: Displays only a horizontal grid on the page.
5 x 5: Displays both a horizontal and vertical grid on the page.
Page 58

Using the Pen&Ink Editor Application
50
Digital Pen and Mouse User’s Guide
To set up a page margin:
1 In the menu bar, select View Margin.
2 Select the required margin setting. You can select from the following
options:
None (the default): No margin guide is displayed.
Left: Displays a margin guide on the left margin of the page.
Right: Displays a margin guide on the right margin of the page.
Page 59

Using the Pen&Ink Editor Application
51
Digital Pen and Mouse User’s Guide
Editing
The Digital Pen lets you customize text and drawings. For example, you
can move a line, delete a line, add a picture, change colors and so much
more. In addition, you can convert handwriting to text, when handwriting
recognition is supported on your computer. Pen&Ink Editor lets you
customize your documents quickly and easily, by the line or by the page.
Editing Ink Properties
You can customize the following ink properties and perform the following
operations for line/text ink:
Line color (see page 52)
Line width (see page 53)
Marker width (see page 53)
Move a line and/or text (see page 54)
Erase a line and/or text (see page 54)
Delete a line and/or text (see page 55)
Page 60

Using the Pen&Ink Editor Application
52
Digital Pen and Mouse User’s Guide
Changing the Line Color
Use this tool to determine the color of the lines that you will draw. The
default line color is blue, but can easily be changed to one of many colors.
To change the line color:
1 Click the Color
button dropdown arrow. The following
window is displayed, showing the current line color within a box:
2 Click the color of your choice. The color you selected is now marked
by a box. The ink color for the Pen and Marker tools now uses the
selected color.
Page 61

Using the Pen&Ink Editor Application
53
Digital Pen and Mouse User’s Guide
Changing the Line Width
Use this tool to determine the width of the lines that you will draw. By
default, the line width is set to one pixel. You can easily modify this setting
to make the line narrower or wider.
To change the line width:
1 Click the Pen dropdown arrow to display a list of line width options.
2 Select the line width.
Changing the Marker Width
Use this tool to highlight information on the page. By default, the Marker
tool’s width is set to one pixel. You can easily modify this setting to make
it narrower or wider.
To change the marker width:
1 Click the Marker dropdown arrow to display a list of marker width
options.
2 Select the marker width. The marker now highlights according to your
new width setting.
Page 62

Using the Pen&Ink Editor Application
54
TIP:
For large areas, it is easier to select an area using the mouse and then use the
Delete function to erase its contents.
Digital Pen and Mouse User’s Guide
Moving Lines and Text
Pen&Ink Editor combines the free-flowing ease of writing on a page with
the versatility of being a digital image. This is perhaps most apparent in the
way you can move a portion of a page’s content from one place to another.
To move lines and text:
While holding down the left button on your mouse, draw a selection
box around the line(s) and/or text you want to move. A icon
appears. Move the selection area to a new location on the page.
Erasing Lines and Text
Pen&Ink Editor has an eraser function that enables you to easily erase
items on a page. The eraser largest width erases full strokes, the other acts
as a standard eraser. The eraser can be used with conventional mouse as
well. The eraser can erase what was written with the digital pen, for other
items on the page you can use select and delete.
To erase lines and text:
1 Click the Eraser dropdown arrow to select the eraser width.
2 Move the eraser icon over the line or area you want to erase. The
information is erased.
Page 63

Using the Pen&Ink Editor Application
55
TIP:
If you unintentionally erase an area, select Edit Undo or use the Ctrl+Z
shortcut to undo the erasure.
Digital Pen and Mouse User’s Guide
Deleting Lines and Text
Pen&Ink Editor lets you easily delete any lines you have drawn or text.
To delete a line or text:
1 With a mouse, select the area containing the line(s) and/or text you
want to delete.
2 Press Delete on your keyboard or select Edit Delete in the main
menu.
Editing Page Properties
Page-property options enable you to modify the properties of an entire
page. You can customize the following page properties and perform the
following page-related actions:
Page color (see page 56)
Page size (see page 56)
Page orientation (see page 56)
Insert a new page (see page 61)
Delete the current page (see page 61)
Page 64

Using the Pen&Ink Editor Application
56
Digital Pen and Mouse User’s Guide
Changing the Page Color
This option enables you to determine the color of the page. The default
page color is white. This means that each time you open a new file, the
background color is white unless you change the page color. You can
change the color to a number of basic colors.
To change the page color:
1 In the menu bar, select Page Page Setup or Tools Preferences.
The Preferences window opens:
Page 65

Using the Pen&Ink Editor Application
57
Digital Pen and Mouse User’s Guide
2 Click the Page Color dropdown arrow and select a color.
3 Click OK to save your settings.
Page 66

Using the Pen&Ink Editor Application
58
Digital Pen and Mouse User’s Guide
Changing the Page Size
This option enables you to determine the size of the page. The default page
size is A4. This means that each time you open a new file, Page size is A4
unless you change the page size. You can change the page size to letter or
to a custom size.
To set the page size in Pen&Ink Editor:
4 In the menu bar, select Page Page Setup or Tools Preferences.
The Preferences window opens:
Page 67

Using the Pen&Ink Editor Application
59
Digital Pen and Mouse User’s Guide
5 Modify the page size by selecting from the dropdown list.
Available size: A4 (default), Letter, Custom size. For custom size
option you can change page width and height.
6 Measurements units can be changed per request - millimeters (default)
or inches.
7 Click OK to save your settings.
Page 68

Using the Pen&Ink Editor Application
60
Digital Pen and Mouse User’s Guide
Changing the Page Orientation
This option enables you to determine the orientation of the page. The
default page orientation is Portrait. This means that each time you open a
new file, the page orientation is portrait unless you change it. You can
change the orientation to landscape.
To set the page orientation in Pen&Ink Editor:
8 In the menu bar, select Page Page Setup or Tools Preferences.
The Preferences window opens:
Page 69

Using the Pen&Ink Editor Application
61
Digital Pen and Mouse User’s Guide
9 Modify the page orientation size by selecting from the dropdown list.
Available orientation: Portrait (default) or Landscape
10 Click OK to save your settings.
Inserting a New Page
You can easily add more pages to your Pen&Ink Editor document when
needed.
To insert a new page:
Click the Insert New Page button on the toolbar or select Page
Insert Page in the menu bar. This operation inserts a page after the
current page.
Deleting the Current Page
Pen&Ink Editor enables you to remove the current page of a document.
You can repeat this process as needed to remove several pages, one after
another.
To delete the current page:
Be sure that the page you want to remove is selected in the Page pane.
Then, click the Delete Current Page button. The selected page is
removed.
Page 70

Using the Pen&Ink Editor Application
62
Digital Pen and Mouse User’s Guide
More Options for Customizing
Your Documents
Pen&Ink Editor provides a variety of other options for customizing your
documents, in addition to those available that affect ink and page
characteristics and formatting. You can perform the following operations to
further customize your documents:
Insert an image (see page 63)
Move and resize an image (see page 64)
Delete an image (see page 64)
Convert handwriting to text (see page 65)
Rotate all handwritten information on the page (see page 66)
Insert a hyperlink (see page 68)
Find text within the document (see page 69)
Draw shapes using the Shape Recognizer tool (see page 69)
Move and resize a shape (see page 69)
Delete a shape (see page 69)
Page 71

Using the Pen&Ink Editor Application
63
Digital Pen and Mouse User’s Guide
Inserting an Image
Pen&Ink Editor enables you to add an image(s) to a page. The image may
be subtle and give the look and feel of stationary, or it can be a scanned
image that you can mark up.
To insert an image:
1 In the menu bar, select Edit Insert Picture. The Open window
opens:
2 Select the image file you want to use and click Open. The image now
appears on the page. You can resize or move the image as needed. See
Moving or Resizing an Image, page 64, for more details.
Page 72

Using the Pen&Ink Editor Application
64
Digital Pen and Mouse User’s Guide
Moving or Resizing an Image
Inserted images can be resized and moved on the page, as needed.
To move or resize an image:
1 Double-click the image to select it. The image is marked with eight
anchors, which you can use for resizing.
2 To resize the image, drag in or out using one of the anchors until the
required image size is achieved.
3 To move the image, click anywhere in the image and then drag it to a
new location.
Deleting an Image
You can easily remove an image, when needed.
To delete an image:
Double-click the image to be removed and then press Delete on your
keyboard or select Edit Delete. The image is deleted from the page.
Page 73

Using the Pen&Ink Editor Application
65
Digital Pen and Mouse User’s Guide
Converting Handwriting to Text
Pen&Ink Editor enables you to easily convert handwriting to text, when
handwriting recognition support is available on your PC. See System
Requirements, page 8, for more details about handwriting recognition
requirements.
For example, the following figures show handwritten information before
and after its conversion to text.
Original Handwriting After Conversion to Text
To convert handwriting to text:
1 Do one of the following to select the information to be converted to
text:
Use your mouse to draw a selection box around the information to
be converted.
If you don't select with selection box, all area will be selected
when pressing the convert to text button
2 Click the Convert To Text tool on the toolbar. The selected
information is converted to text, overwriting what was there before.
Page 74

Using the Pen&Ink Editor Application
66
Digital Pen and Mouse User’s Guide
Rotating Information in a Document
Pen&Ink Editor enables you to rotate handwritten information contained in
the current document using the Rotate Ink option. For example, the figures
below show a page’s original content (text only, in this case) and that same
text after rotating it 45° degrees:
Original Text Text After Rotating 45°
Page 75

Using the Pen&Ink Editor Application
67
Digital Pen and Mouse User’s Guide
To rotate drawings and text in the current document:
1 In the menu bar, select Edit Rotate Ink. The Rotate Ink window
opens:
2 In the Rotate area, specify the value for the number of degrees for
rotating the drawings/text.
3 In the Page Range area, select one of the following radio buttons:
All: Rotates the drawings/text in all pages of the document.
Current Page: Rotates drawings/text only on the current page in
the document.
Pages: Rotates drawings/text only on the specific pages you
designate. Be sure to separate page numbers and page ranges by
commas.
4 Click OK. The information is rotated as specified.
Page 76

Using the Pen&Ink Editor Application
68
Digital Pen and Mouse User’s Guide
Inserting a Hyperlink
Hyperlinks can be easily added to your documents. Once a hyperlink is
defined in a document, simply click the link to open the specified Web
page or file.
To insert a hyperlink:
1 In the menu bar, select Edit Insert Hyperlink. The Insert
Hyperlink window opens:
2 In the Text to Display field, enter the text to be shown in the document
for the link.
3 In the File Path or Internet Address field, enter the relevant Internet
address or click Browse to specify a file and its file path. When
specifying an Internet address, the specified Web page automatically
opens when you click the link within the document. When specifying a
file name, the designated file opens when you click the link.
4 Click OK to save your settings.
Page 77

Using the Pen&Ink Editor Application
69
Digital Pen and Mouse User’s Guide
Finding Text in a Document
Pen&Ink Editor provides a Find feature that enables you to search for
specific text within a document. This option can only be used to locate text
in a document, and does not apply to handwriting (unless it is first
converted to text).
To find text in a document:
1 In the menu bar, select Edit Find or click the Find icon in the
toolbar. The Find window opens:
2 In the Find what box, enter the text for the search and click Find Next.
The specified text is highlighted on the page. To find the next
occurrence of this text, click Find Next again or select Edit Find
Next in the menu bar.
Drawing Shapes Using the Shape Recognizer
The Shape Recognizer tool enables you to quickly and easily add
common shapes to your document. The tool acts as a pattern recognizer,
which means that you can draw even a crude drawing of a shape, and the
application uses its pattern-recognition technology to add this shape in an
improved form.
For example, let’s say you want to add a triangle to your document. To do
so, click the Shape Recognizer tool in the toolbar and then start to
draw the triangle. Be sure to hold down the left mouse button while
drawing the shape. Notice that the cursor changes to a small circle while
you draw.
Page 78

Using the Pen&Ink Editor Application
70
Digital Pen and Mouse User’s Guide
Complete your triangle and let go of the mouse button. Once you release
the mouse button, the shape displays in the document in the position where
you drew it. You do not even need to totally complete the drawing. The
Shape Recognizer’s intuitive nature detects the shape and completes it.
Your Drawing Shape Recognizer Drawing
Page 79

Using the Pen&Ink Editor Application
71
Digital Pen and Mouse User’s Guide
Moving or Resizing a Shape
Shapes drawn using the Shape Recognizer tool can be resized and
moved on the page, as needed.
To move or resize a shape:
1 Using your mouse, draw a selection box around the shape to be moved
or resized. The shape is marked with eight anchors, which you can use
for resizing.
2 To resize the shape, click and hold the cursor on an anchor and drag it.
3 To move the shape, click anywhere in the shape and while holding
down the left mouse button, drag it to a new location.
Page 80

Using the Pen&Ink Editor Application
72
Digital Pen and Mouse User’s Guide
Deleting a Shape
You can easily remove a shape drawn using the Shape Recognizer
tool, when needed.
To delete a shape:
Using your mouse, draw a selection box around the shape to select it
and then press Delete on your keyboard or select Edit Delete. The
shape is deleted from the page.
Page 81

Using the Pen&Ink Editor Application
73
Digital Pen and Mouse User’s Guide
Navigating
There are several levels of navigation within Pen&Ink Editor:
Within the page
Within the document
Between documents
Each of these levels is described in the sections that follow.
Moving from Page to Page Within
a Document
There are two ways to jump from one page to another:
Previous Page and Next Page buttons: Use these buttons in
the toolbar to jump to the previous and next pages in the document,
respectively.
Thumbnails in Pages pane: The Pages pane contains a thumbnail for
each page in the document. Simply click a thumbnail to jump to the
corresponding page in the document.
Page 82

Using the Pen&Ink Editor Application
74
Digital Pen and Mouse User’s Guide
Opening a New or Existing Document
When you open Pen&Ink Editor, the application opens displaying an empty
main window. You must open a document within the application to view
and/or modify its contents. You can also create a new document directly
within the application, which is blank until you add content to it, or you can
open a previously saved document.
To open a new document:
Click the New Blank Document button. A new document opens. If
you click the New button while working in an unsaved document, you
are prompted to first save your current file. If you click Yes, you are
prompted to give your current document a name and to specify its file
location. If you click No, a new file opens and the old one is lost.
To open an existing document:
1 Click the Open button. The Open window opens:
2 Browse to select the file you want to open and click Open. The
document you selected now appears in the Writing Area in the window.
Page 83

Using the Pen&Ink Editor Application
75
Digital Pen and Mouse User’s Guide
Saving
Multiple ways are available for saving your Pen&Ink Editor documents.
You can save documents using the following methods:
Save: Saving in this manner saves the document with a *.ant extension.
Save As: Saving the file in this manner saves the document with a *.ant
extension.
Save Page As: This option only saves the current page as an image file
(JPEG, GIF, PNG or BMP). If you have a multi-page document and
you want to save each page as a picture, you must repeat the relevant
procedure for each page. See page 76 for more details.
To save the document:
Click the Save button in the toolbar or select File Save in the
menu bar. In the window that opens, specify a filename and location for
the file and click Save.
To save the document with a new name:
1 In the menu bar, select File Save As. The Save As window opens.
2 Specify a filename and location for the file and click Save.
Page 84

Using the Pen&Ink Editor Application
76
Digital Pen and Mouse User’s Guide
To save the current page as an image:
1 In the menu bar, select Page Save Page As. The Save an Image File
window opens:
2 In the File name field, enter a name for the picture.
3 In the Save as type field, select the file type for the file. You can select
one of the following options:
JPEG File Interchange Format: Saves the file as a JPEG image
(*.jpg). This is the default.
Graphics Interchange Format: Saves the file as a GIF image
(*.gif).
Portable Network Graphics: Saves the file as a PNG image
(*.png).
Windows Bitmap: Saves the file as a bitmap image (*.bmp).
4 Click Save.
Page 85

Using the Pen&Ink Editor Application
77
Digital Pen and Mouse User’s Guide
Printing
You can print a hard copy of a Pen&Ink Editor file, when needed.
To print a file:
1 Click the Print button in the toolbar or select File Print in the
menu bar. The Print window opens.
2 Set up the print job as needed and click OK.
Page 86

Using the Pen&Ink Editor Application
78
Digital Pen and Mouse User’s Guide
Emailing a Document
Pen&Ink Editor simplifies the process of emailing a document by
automatically attaching it to an email message. Emailed documents are
always sent in PDF format. It is used with default Email client as was
defined in your computer as: Outlook, Outlook Express.
Note: One way to set your default email - go to Internet Explorer-ToolsInternet Options-Programs tab and select the default email client. Click
OK.
To email a document:
1 Click the E-mail button in the toolbar or select File Email as
PDF in the menu bar. This automatically opens an email window from
your default email program. The Pen&Ink Editor document is
automatically attached as a PDF file.
2 Select or enter the intended recipients. You can add a subject and
message as you would when sending a regular email message.
3 Click Send. Your email program automatically sends the message.
Page 87

Using the Pen&Ink Editor Application
79
Digital Pen and Mouse User’s Guide
Exporting a Document
Pen&Ink Editor can export your document in several different formats. To
export, you must first open the file in Pen&Ink Editor before doing the
export.
To export a document:
1 In the menu bar, select File Export. The Export Document As
window opens:
2 In the File name field, enter a name for the file.
3 In the Save as type field, select one of the following options:
Portable Document Format: Exports the file in PDF format
(*.pdf). This is the default.
Rich text: Exports the document in RTF format (*.rtf). It will
convert written file to text, assuming conversion to text software is
available
Plain text: Exports the document in text-only format (*.txt). It will
convert written file to text, assuming conversion to text software is
available
4 Click Save. The file is exported in the specified format.
Page 88

Using the SnapShot Application
80
8Chapter 5
Using the
SnapShot
Application
About This Chapter
Digital Pen and Mouse User’s Guide
This chapter describes how to use the SnapShot application to capture
screens and edit images. It contains the following sections:
Overview, page 81, describes the primary operations that can be
performed using the SnapShot application.
SnapShot Toolbar, page 82, describes the SnapShot toolbar and its
options.
Capturing an Image, page 84, describes the three methods available
for capturing an image using SnapShot.
Writing on an Image, page 87, describes how to annotate and mark up
images before capturing them using SnapShot.
Editing the Pen/Marker Settings, page 88, describes how to modify
Pen and Marker settings for the SnapShot application.
Page 89

Using the SnapShot Application
81
Digital Pen and Mouse User’s Guide
Overview
SnapShot gets its name from what it does. It takes a snapshot of your
screen, which you can then mark up and annotate with your Digital Pen. In
SnapShot, there are three main functions:
Capturing the image (see page 84)
Writing on the image (see page 87)
Editing the Pen/Marker settings (see page 87)
Page 90

Using the SnapShot Application
82
Icon
Name
Function
Capture
Captures a screen and saves it as a JPEG image.
Pen
Selects the Pen tool, which can be used to annotate a
screen capture.
Marker
Selects the Marker (highlighter) tool, which can be
used to highlight a screen capture.
Colors
Changes the current Pen/Marker tool color
Eraser
Erases the selected lines drawn using the Pen or
Marker tool.
Copy
Copy snapshot. Can be paste into other application
Undo
Cancels/removes the last action performed.
Redo
Cancels Undo step by step
Selected
area
Selects part of the snapshot
Print
Prints the screen capture.
Digital Pen and Mouse User’s Guide
SnapShot Toolbar
The SnapShot application toolbar, shown below, provides quick, easy
access to application functionality. The toolbar contains the following
buttons:
Page 91

Using the SnapShot Application
83
Icon
Name
Function
E-mail
Emails the screen capture through your default email
program as a JPEG image.
Save as
Saves snapshot as
Tools
Enables you to select the language to be used by the
application.
Help
Provides access to help and version information for
the application.
Close
Exits the application.
Digital Pen and Mouse User’s Guide
Page 92

Using the SnapShot Application
84
Captures a screen and saves it as a JPEG image.
Selects part of the snapshot
Emails the screen capture through your default email program
as a JPEG image
Digital Pen and Mouse User’s Guide
Capturing an Image
A screen snapshot is also called a screen capture. There are two
snapshot-capturing options:
To capture a screen image:
1 Set up the image on the screen as you want it to be captured. This may
include closing windows or repositioning certain elements on the
screen.
2 Click the Capture button.
Page 93

Using the SnapShot Application
85
Digital Pen and Mouse User’s Guide
3 Click in case you want to Select part of the snapshot. Drag your
mouse from the top left corner of the image to be captured down to the
right, creating a rectangle.
4 Click to save the picture. The Save As window opens:
5 Browse to select the directory where you want to save the file.
6 Enter a name for the file in the File name field and then click Save.
The screen capture is saved in the designated location.
To capture and email a screen image:
1 Set up the image on the screen as you want it captured. This may
include closing windows or repositioning certain elements on the
screen.
2 Click the Email button.
Page 94

Using the SnapShot Application
86
Digital Pen and Mouse User’s Guide
3 This opens an email window from your default email program, with
the screen capture attached as a JPEG image.
4 Select or enter the intended recipient(s). You can add a subject and
message as you would when sending a regular email message.
5 Click Send. Your email program automatically sends the message.
Page 95

Using the SnapShot Application
87
Digital Pen and Mouse User’s Guide
Writing on an Image
SnapShot can be used to annotate and mark up images before capturing
them using the application.
To write on an image:
1 Set up the image on the screen as you want it captured. This may
include closing windows or repositioning certain elements on the
screen.
2 Use the Pen, Marker and Eraser tools as needed to annotate the image
to be captured.
3 Do one of the following:
Click the Email button and then follow the procedure on
page 85.
Click the Save as button to save the updated image
Page 96

Using the SnapShot Application
88
Digital Pen and Mouse User’s Guide
Editing the Pen/Marker Settings
There are several ways that you can edit your annotations within SnapShot.
You can customize the following properties and perform the following
operations for the Pen/Marker in SnapShot:
Line width (see below)
Marker width (see page 90)
Erase information (see page 90)
Line color (see page 91)
Undo and redo operations (see page 92)
Changing the Pen Line Width
By default, the pen line width is set to one pixel. You can easily modify this
setting to make lines narrower or wider.
To change the line width:
1 Click the Pen dropdown arrow in the toolbar.
2 Select the line width you want. The pen now draws lines according to
your new width setting.
Page 97

Using the SnapShot Application
89
Digital Pen and Mouse User’s Guide
Changing the Marker Width
By default, the marker line width is set to seven pixels. You can easily
modify this setting to make the marker line narrower or wider.
To change the marker width:
1 Click the Marker dropdown arrow.
2 Select the marker width. The marker now highlights according to your
new width setting.
Erasing
If you make a mistake while drawing, you can simply undo the drawn
section or erase it.
To erase a portion of your drawing:
1 Click the Eraser button in the toolbar.
2 Move the eraser icon to the area you want to erase.
3 Click and drag the eraser icon over the area to be erased, thus erasing
that section.
Page 98

Using the SnapShot Application
90
Digital Pen and Mouse User’s Guide
Changing the Line Color
The default line color is blue, but can be changed to one of many colors.
To change the line color:
1 Click the Color button dropdown arrow. The following window
is displayed, showing the current line color within a box:
2 Click the color of your choice. The color you selected is now displayed
within a box. Any lines you draw now appear using that color.
Page 99

Using the SnapShot Application
91
Digital Pen and Mouse User’s Guide
Using the Undo and Redo
Buttons
SnapShot stores your actions, thereby enabling you to undo an action when
necessary, such as a drawn line. You can also redo an action, which cancels
Undo step by step. For example, if you draw a line and then click Undo to
remove that line, you can click Redo to have the line reappear.
To undo an action:
Click the Undo button or use the Ctrl + Z shortcut.
To redo an action:
Click the Redo button or use the Ctrl + Y shortcut.
Page 100

Using the SnapShot Application
92
Digital Pen and Mouse User’s Guide
This page is intentionally left blank.
 Loading...