

Taurus TF-ROW-X Assembly And Operating Instructions Manual

Rowing machine
ROW X
Assembly and operating instructions
Art. No.: TF-ROW-X
TFROWX01.02

ROW X
2

3
Dear Customer,
Thank you for deciding for a high-quality training equipment of the brand Taurus, the brand that
makes athlete‘s hearts beat faster. Taurus oers a wide range of home tness equipment like elliptical
cross trainers, ergometers, treadmills and rowing machines. Taurus equipment is the optimal
equipment for all those who want to train at home independent of goals and tness level. For further
information please visit www.sport-tiedje.com or www.taurus-tness.de.
SAFETY NOTICE
Please read all of the instructions carefully before assembly and rst use. These instructions are
intended to ensure speedy assembly and explain safe usage. Make sure that all people exercising with
the equipment (in particular children and persons with limited physical, sensory, mental or motor
capabilities) are informed about these instructions and its content in advance.
In case of doubt, a responsible person must supervise the use of the equipment.
This equipment has been manufactured according to the latest safety knowledge.
As far as possible, potential safety hazards which could cause injury have been
eliminated. Make sure to follow the instructions carefully and that all parts are
securely in place. If required, read through the instructions again to correct any mistakes.
Please pay close attention to the safety and maintenance instructions given here. The contract
partner cannot be held liable for damage to health, accidents or damage to the equipment when it
is not used in accordance with these instructions.
The equipment is suitable for home use, semi-professional use (e. g., hospitals, clubs, hotels, schools,
etc.) as well as for commercial or professional use (e. g., commercial gyms).
Retain these instructions in a safe place for future reference, maintenance or when ordering
replacement parts.

ROW X
4
CONTENTS
1 GENERAL INFORMATION 5
1.1 Technical data 5
1.2 Personal safety 6
1.3 Electrical safety 7
1.4 Set-up place 8
2 ASSEMBLY INSTRUCTIONS, MAINTENANCE AND CARE 9
2.1 General instructions 9
2.2 Maintenance and service calendar 10
3 ASSEMBLY 11
3.1 Package contents 11
3.2 Assembly instructions 12
3.3 Settings / setting up the rowing machine 14
4 OPERATING INSTRUCTIONS 17
4.1 Console display 17
4.2 Button functions 18
4.3 Operation 19
4.3.1 Programmes 20
4.3.2 High Intensity Interval Training (HIIT) 21
4.4 Heart rate measuring 24
4.5 Notes for correct rowing 26
5 WARRANTY INFORMATION 29
6 DISPOSAL 31
7 ORDERING ACCESSORIES 31
8 ORDERING SPARE PARTS 32
8.1 Service hotline 32
8.2 Serial number and model name 32
8.3 Part list 33
8.4 Exploded drawing 35

5
1 GENERAL INFORMATION
1.1 Technical data
LCD display of
+ strokes, strokes per minute
+ training time in min
+ distance in m
+ time/500 m: average / current
+ calories burnt in kcal
+ heart rate (when using a chest strap)
+ Watt
+ resistance level
Resistance system: combined air/magnet brake system
Resistance level: 16
Total number of training programs: 10
Weight and dimensions:
Article weight (gross, including packaging): 53.2 kg
Article weight (net, without packaging): 44.3 kg
Packaging dimensions (L x W x H): approx. 1245 mm x 1055 mm x 420 mm
Set-up dimensions (L x W x H): approx. 2500 mm x 628 mm x 1240 mm
User weight: 150 kg/330 lbs

ROW X
6
1.2 Personal safety
+ Before you start using the equipment, you should consult your physician that this type of
exercise is suitable for you from a health perspective. Particularly aected are persons who: have
a hereditary disposition to high blood pressure or heart disease, are over the age of 45, smoke,
have high cholesterol values, are overweight and/or have not exercised regularly in the past year.
+ Please note that working out excessively can seriously damage your health. Please also be aware
that heart rate monitoring systems might be imprecise.
+ The equipment may only be used for its intended purpose; that means for whole body training
by adults.
+ Any other usage is prohibited and potentially dangerous. The contract partner cannot be held
liable for damage resulting from improper use.
+ The equipment is strictly for use by one person at a time.
+ Children should not be allowed unsupervised access to the equipment.
+ Before starting your training, make yourself familiar with all of the equipment‘s functions and
setting options. Have an expert explain the correct usage of the product to you.
+ Make sure that nobody is in the range of motion of the equipment while exercising.
+ Keep your hands, feet and other body parts, hair, clothing, jewelry and other objects well clear of
moving parts.
+ During use, wear suitable sports clothing rather than loose or baggy clothing. When selecting
sports shoes, think about the suitability of the sole – preferably this should be made of rubber or
other non-slip materials. Shoes with heels, leather soles, studs or spikes are not suitable. Never
work out in bare feet.
+ At the rst signs of weakness, nausea, dizziness, pain, diculty in breathing or other abnormal
symptoms, stop your workout immediately and, if necessary, consult your physician.
+ Without prior agreement from your authorized contract partner, opening the equipment is
prohibited.
+ Be careful when you get on or o the equipment.

7
1.3 Electrical safety
+ The equipment requires a 220 - 230V / 50 Hertz mains power supply.
+ The equipment should be connected directly to a grounded plug socket only by means of the
power cable supplied. The use of multi-socket adapters or similar is not recommended. Extension
leads must comply with local electrical safety guidelines. Always fully unwind the power cable.
+ The outlet should be secured with a fuse with a minimum value of „16 amperes, slow“.
+ In order to reduce the risk of an electric shock, always unplug the equipment from the mains
socket immediately after your workout, before assembly or dismantling, and before maintenance
or cleaning. Do not pull on the cable.
+ When plugged in, do not leave the equipment unattended at any time. To avoid use by anyone
unfamiliar with the operating instructions, the power cable should be removed when the
equipment is not in use.
+ Keep the power cable away from heat, oil and sharp edges. Do not route the power cable
underneath the equipment or under a carpet or rug, and do not place any objects on top of it.
+ Make no modications to either the power cable or the mains plug.
+ If the power cable or the plug are damaged or defective, contact your authorized contract
partner. Do not use the equipment in the meantime.
+ Do not keep electrical devices (e. g., mobile phones) in close proximity to the console or the
control electronics, otherwise display values (e. g., pulse measuring) could be inaccurate.
ROW X
8
1.4 Set-up place
+ The equipment should only be used indoors, in a suciently heated and dry area (ambient
temperature between 10°C and 35°C). The equipment should not be used outdoors or in rooms
with high humidity (over 70%) like swimming pools. The equipment should only be stored in
surroundings with an ambient temperature between 5°C and 45°C.
+ The training room should be well ventilated during training and not be exposed to any
draughts.
+ Always keep the power cable away from hot surfaces and grounds and make sure that the
cable is not stuck somewhere or becomes a „trip hazard“.
+ No objects of any type should be inserted into the openings of the equipment.
+ The equipment should be placed on a level and solid surface, any unevenness in the oor
should be leveled out.
+ A oor protective mat / equipment underlay can help to protect high-quality oor coverings
(parquet, laminate, cork, carpets) from dents and sweat and can help to level out slight
unevenness.
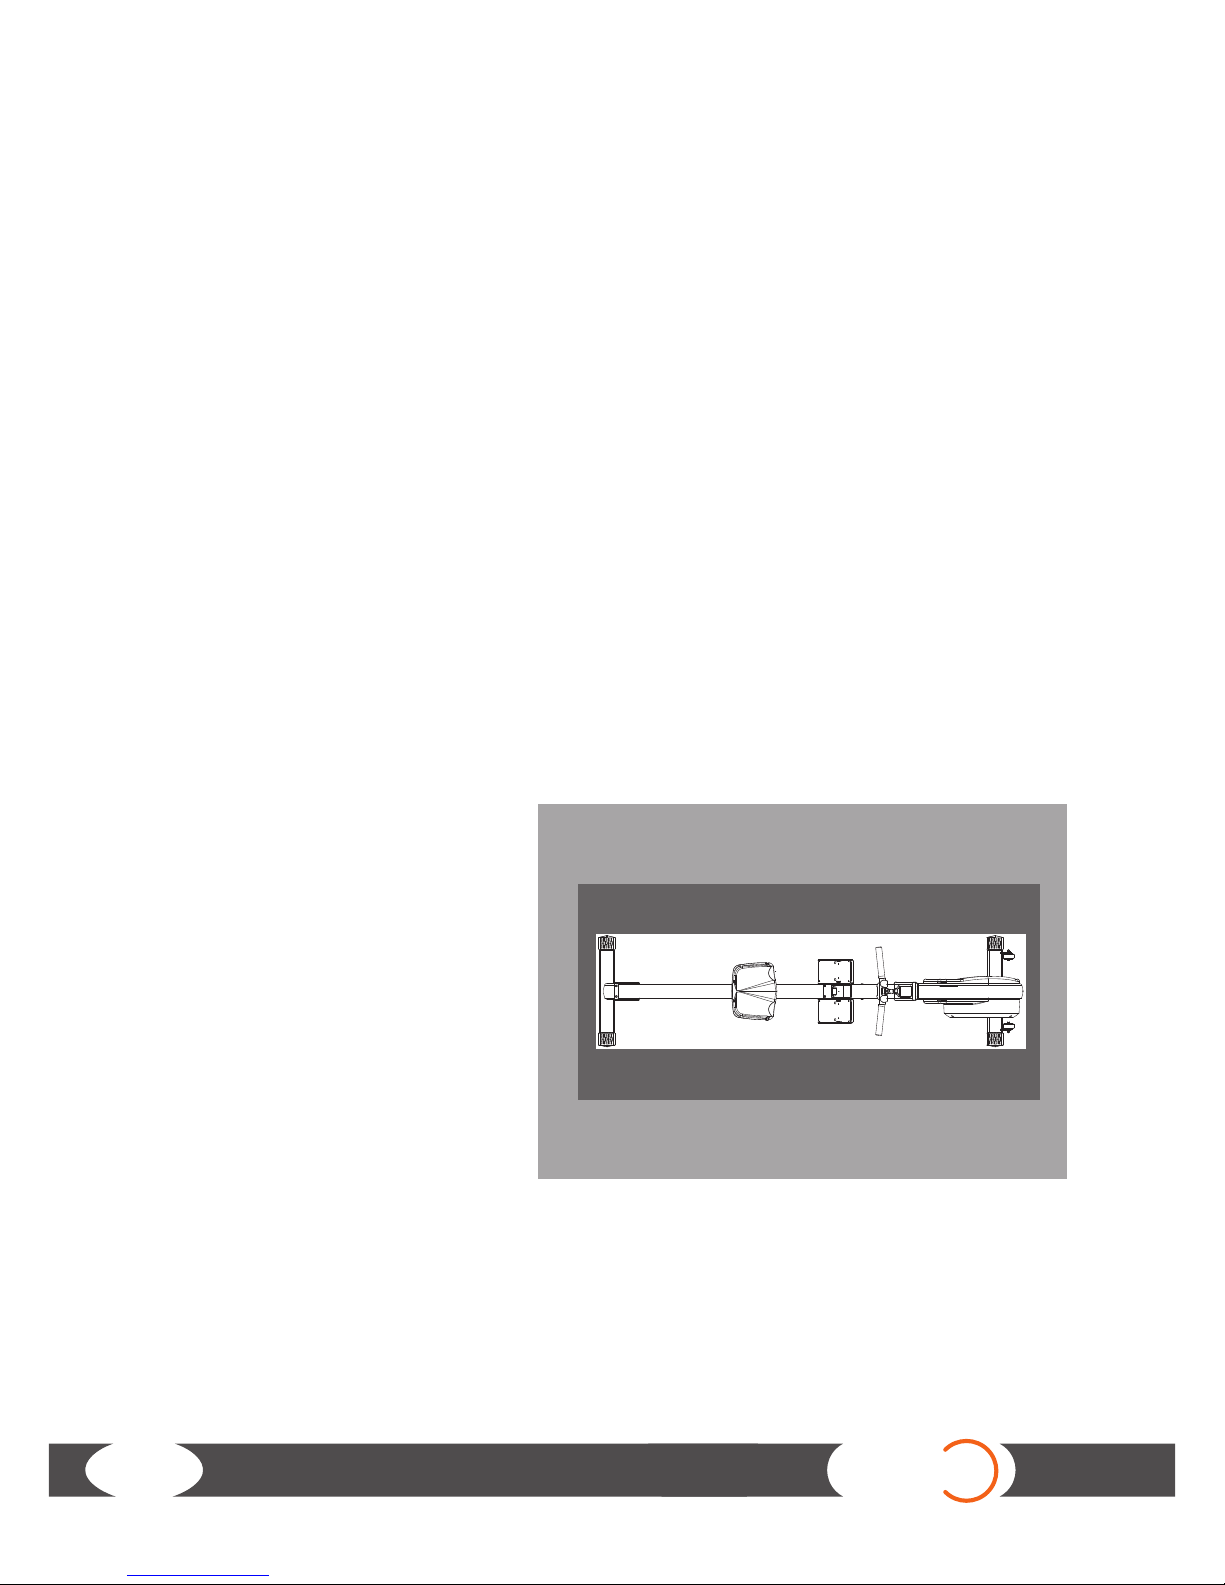
+ Choose a location in which to place the equipment such that there is enough free space/
clearance to the front, the rear and to the sides of the equipment. Make sure that you leave
at least 30 cm on each side of the equipment and at least 15 cm in front of and behind the
equipment as a training zone. This is the minimum required area in order to safely use the
equipment.
The recommended free zone around the equipment should be at least 60 cm on each side and
45 cm in front of and behind the equipment.
Furthermore, the equipment should not be set up in main entrances or on escape routes.
Training zone
Recommended free zone

9
2 ASSEMBLY INSTRUCTIONS, MAINTENANCE AND CARE
2.1 General instructions
+ Please check if all parts and tools belonging to the equipment are included in the delivery and if
there is any transport damage. If there are any complaints, please contact your contract partner
directly.
+ Some of the nuts and bolts to be used in assembly are already pre-mounted in order to make
set-up as easy as possible.
+ The equipment must be assembled by adults. In case of doubt, ask for assistance from another
person with technical skills.
+ Keep children away from the equipment during assembly, because small parts are included in
the delivery and may be swallowed.
+ Make sure that you have enough space (at least 1.50 m) in every direction during assembly.
+ Do not leave any tools and packaging materials like plastic sheeting laying around to avoid
danger of suocation for children.
+ Assemble the equipment on an underlay mat or on the cardboard packaging in order to avoid
damage to the equipment and to the oor (scratches).
+ Before starting assembly, all individual parts should be placed on the oor next to each other.
+ Read the assembly instructions carefully and assemble the equipment according to the
illustrations. Proceed carefully and cautiously.
+ First loosen all parts and check for their correct tting. Then tighten the screws using a tool.
+ Modications to the design or improper repairs may pose a hazard to the user and should not be
carried out. The product warranty may be void as a result.
+ Only authorized service technicians are permitted to carry out all servicing and/or repairs – it
excludes maintenance and care.
+ Damaged or worn components may impair your safety and the lifespan of the equipment.
You should therefore immediately replace damaged or worn components. Please contact your
contract partner in such a case. The equipment should no longer be used until it has been
repaired. When needed, only use original Taurus spare parts.
+ Check the tightness of all screw connections once a month.
+ In order to be able to guarantee the constructively dened safety level of this equipment, we
recommend having the equipment regularly maintained (at least once a year) by specialists
(service technicians of your contract partner).
+ The equipment may be cleaned of dust, dirt and sweat using a damp cloth. The use of solvents
should be strictly avoided. Also, make sure that no liquids (e. g. sweat) get into the openings of
the equipment (e. g. console).
+ It is recommended to have a safety check before each training session and to examine the
equipment for wear or damage. If you determine damaged or defective parts, the equipment
should not be used until it is repaired. Please contact the contract partner for the repair.
+ Manufacturer note: The pull strap is equipped with a return spring so that the pull strap is
automatically wound up again. The return spring is equipped with the lowest possible power.
The reason for the light return spring is to give the user a better training eect for the rear thigh
muscles. These muscles are stressed when the user moves the seat forward. If the return power is
strong, the person using the equipment would be pulled.
ROW X
10
Lubrication of the chain
Lubricate the chain at least every six months or even better after approx. 50 operating hours. Use a
non-fraying cloth as well as 20W motor or multi-purpose oil. Drop approx. one teaspoon of the oil on
the cloth. Then pull out carefully the chain on the handle to the fence. Wipe along the chain with the
cloth several times. Then remove the remaining oil with a dry cloth.
Cleaning the rail
Before the training, wipe the rail with a damped cloth to remove any dust.
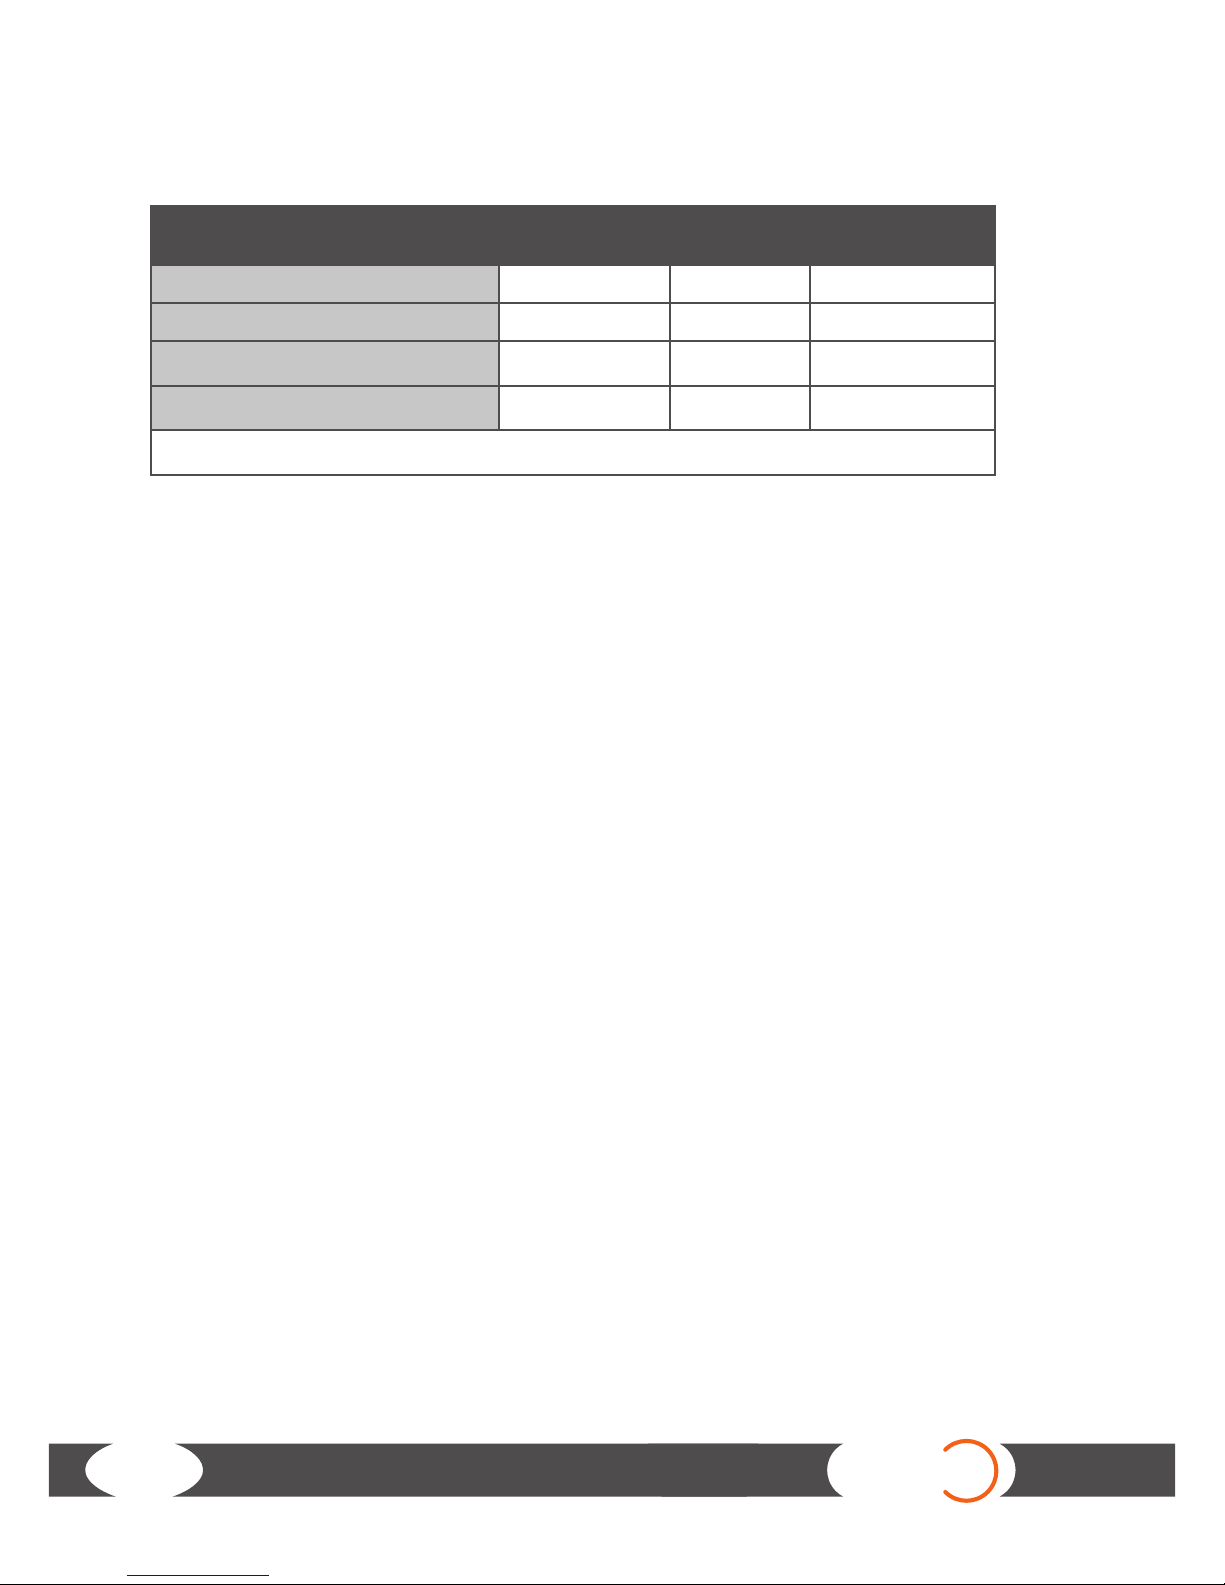
Part Weekly Monthly Twice a year
Display console C I
Lubricating mobile parts I
Plastic cover
C I
Screws & cable connections
I
Legend: C = Clean; I = Inspect
2.2 Maintenance and inspection calendar
The following routine work needs to be done in the given intervals:
11
3 ASSEMBLY
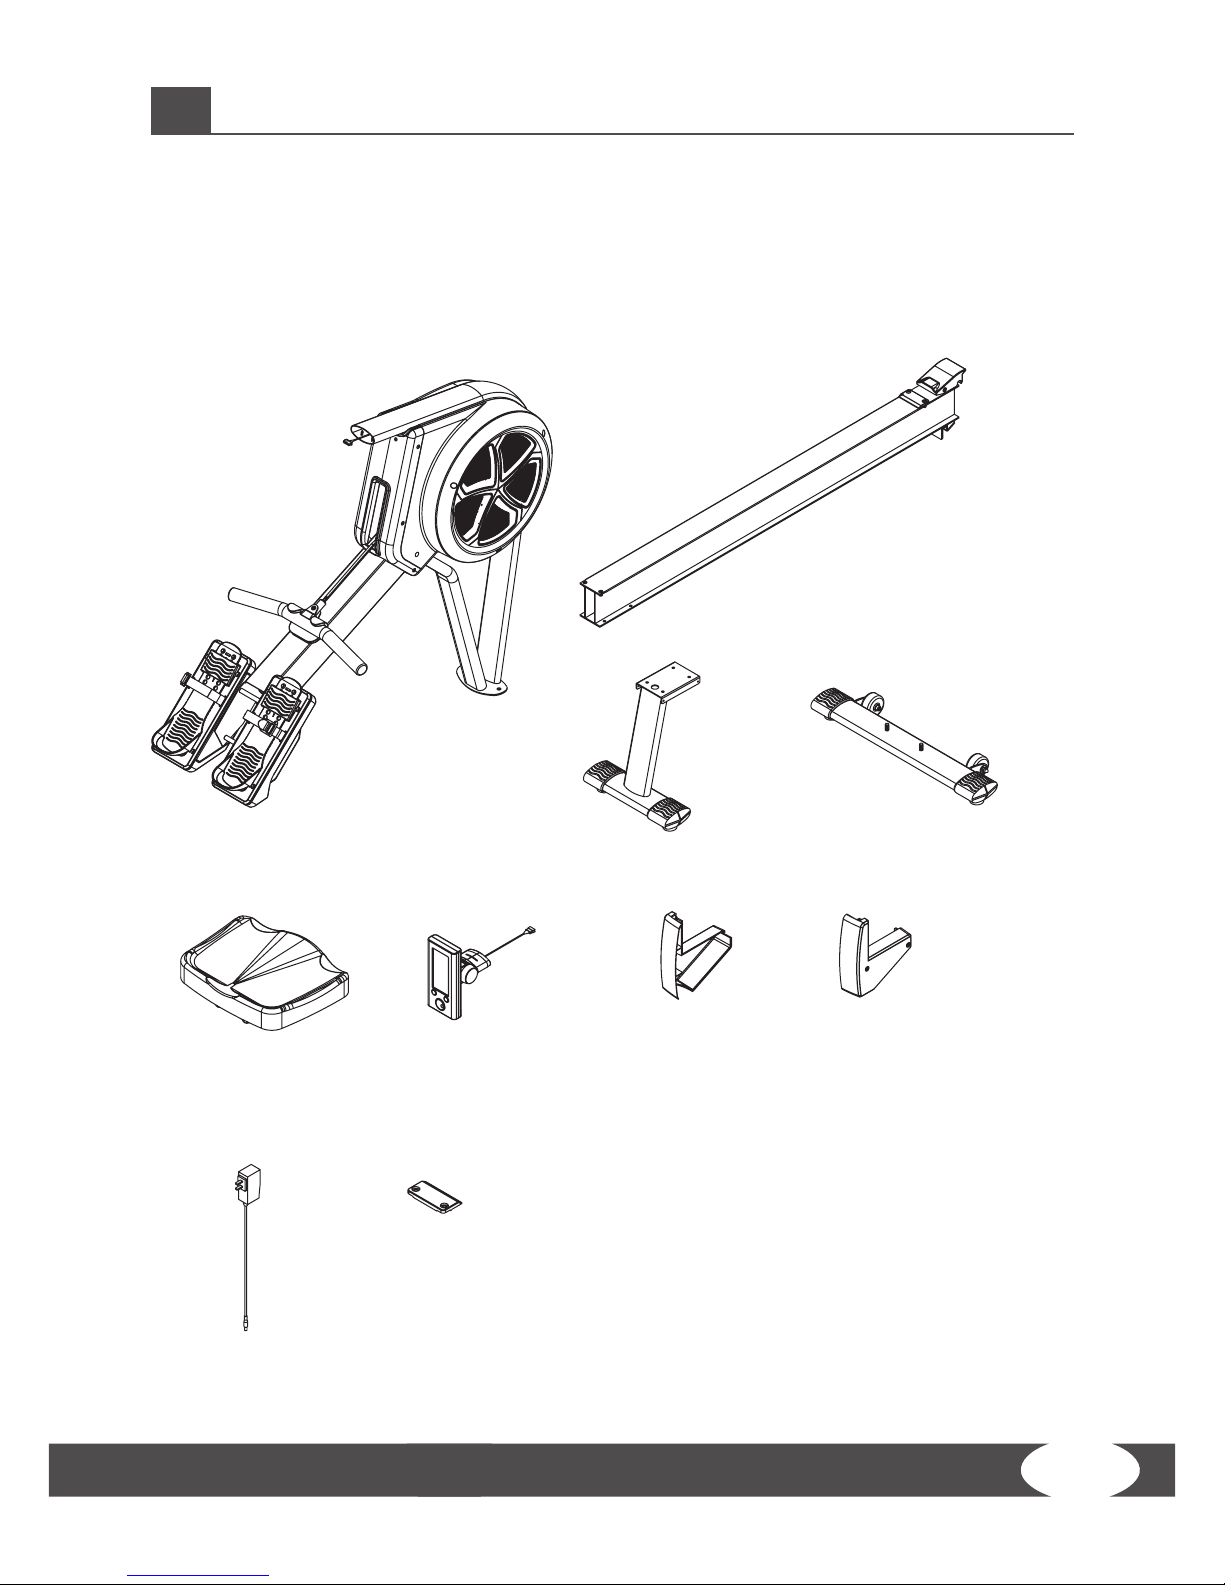
3.1 Package contents
The package contains the parts represented in the illustration, including a power cable with mains
plug. If one of the illustrated parts is missing, please contact your contract partner.
(3) MA IN FRAME A SSEMB LY
(1) REAR STABI
L
IZER (5) FRONT STABILIZER
(29) SEAT PAD(32) COMPUTER SET
(30L) REAR
LEFT COVE R
(30R) REAR
RIGHT COVER
(47) BUMP ER
(45) POWER
ADAPTER
(2) MO NORAIL
ASSEMBLY
ROW X
12
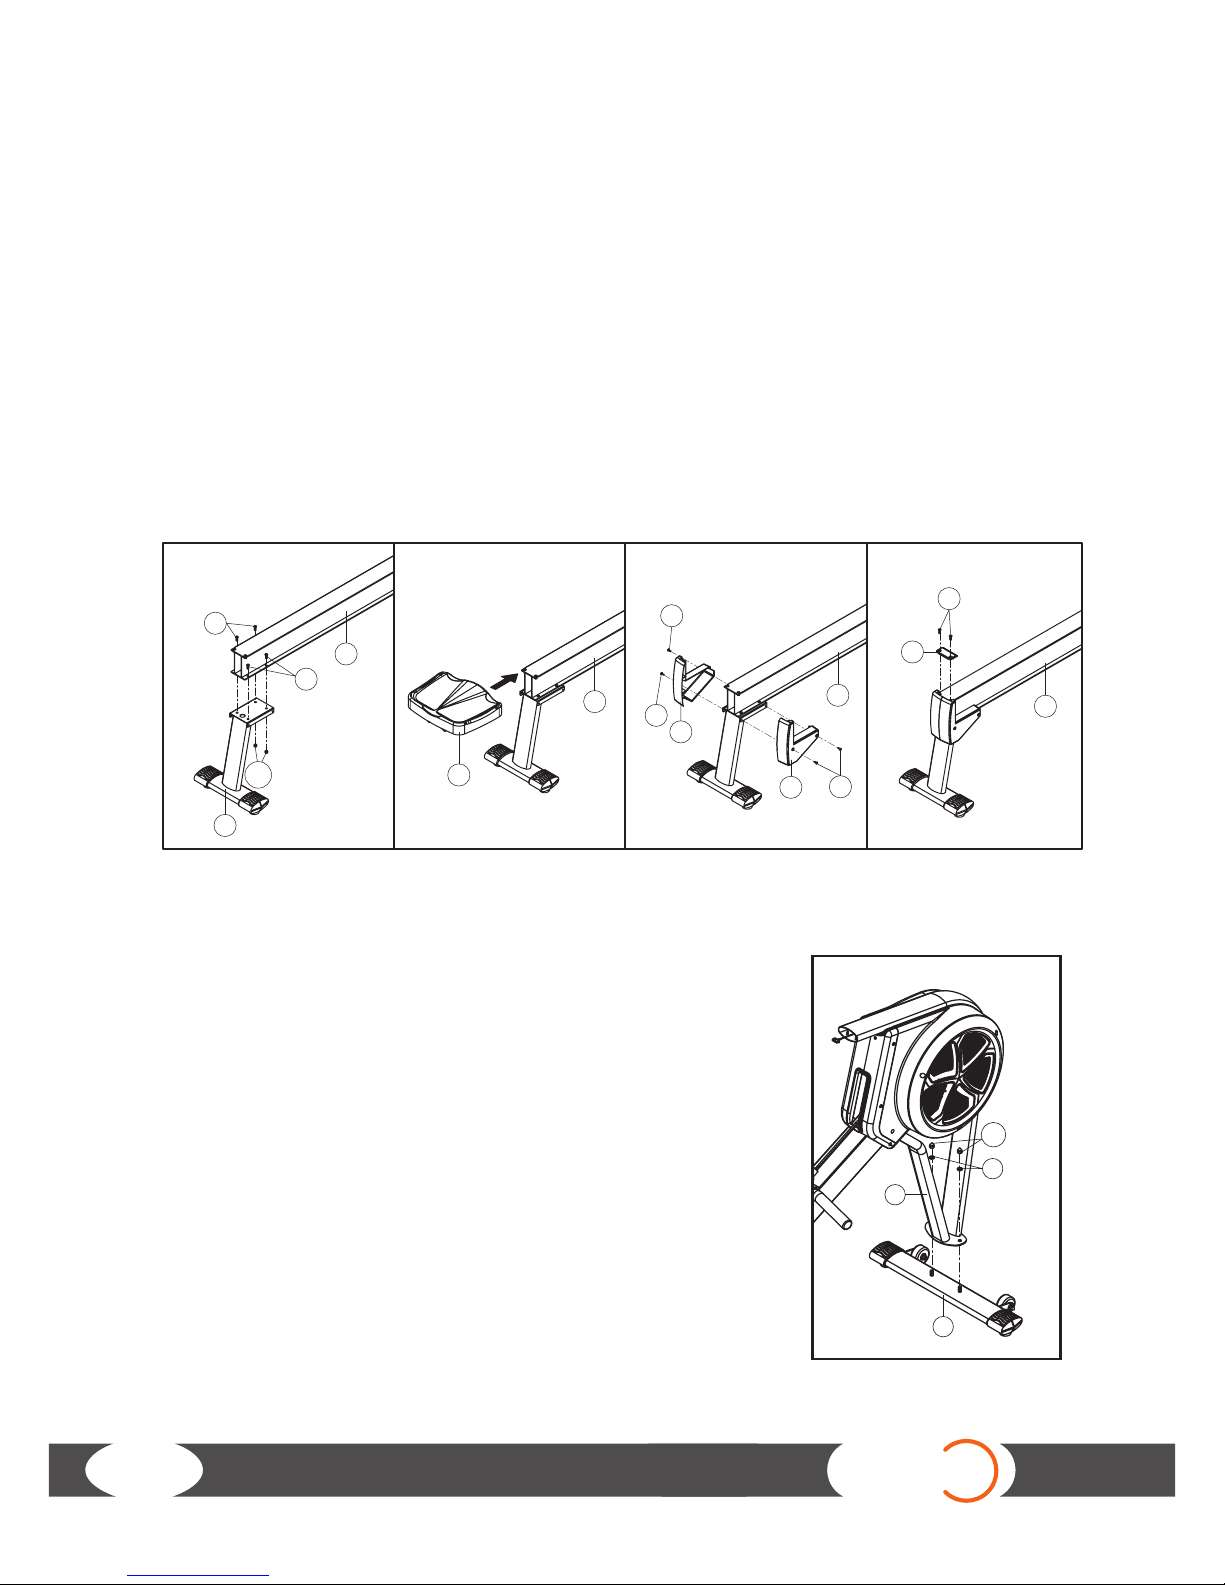
3.2 Assembly instructions
Look carefully at all the illustrated assembly steps before the assembly and do the assembly according
to the given order.
Step 1: Rear base & mono rail
A1. Mount the rear base (1) on the mono rail (2) with M6 X 16L hexagon screws (80) and two M6
Nylon nuts (101). Tighten the screws.
A2. Slide the seat pad (29) on the mono rail (2).
A3. Mount the left (30L) and right rear cover (30R) with four M4 X 12L screws (90).
A4. Mount the bumper (47) on the mono rail (2) with two M6 X 16L hexagon screws (80). Please pay
attention to that the left (30L) & right rear cover (30R) are correctly positioned. Then tighten all
screws.
Step 2: Front base & computer assembly
B1. Mount the front base (5) on the front frame (4) with two 3/8“
spring washers (94) and two 3/8“ caps for nuts (103). Tighten all
screws.
101
80
80
90
30R
30L
90
90
2
2
2
2
29
1
47
80
A1 A2 A3 A4
B1
B2
5
4
103
94
32
4
87
 Loading...