

Taurus Aspiradora Liquidos 948160 English Manual
Aspiradora Liquidos
complies with
INTERNATIONAL
IEC60335
SAFETY SPECIFICATIONS
1600W
PLEASE READ ALL INSTRUCTIONS BEFORE USE
Model:
948160
ENGLISH / AFRIKAANS
ENGLISH MANUAL
Dear customer,
Thank you for choosing to purchase a Taurus brand
product. Thanks to its technology, design and operation and the fact that it exceeds the strictest quality
standards, a fully satisfactory use and long product
life can be assured.
1
2
4 4
5
8
3
6
7
19
20
9
10
10
11
12
14
13
21
22
23
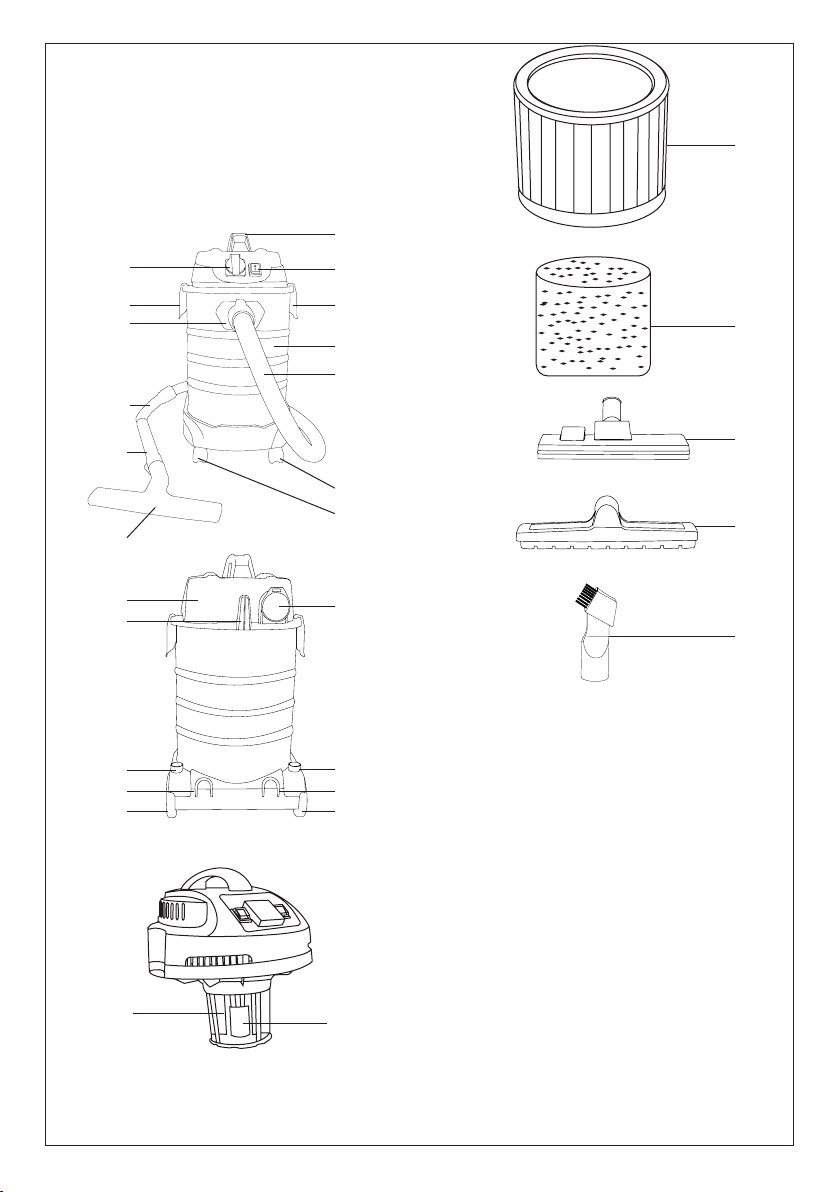
1. Parts description
1. Handle
15
15
16
15
15
16
2. External Power outlet
3. Power switch
4. Tank locking clamp
5. Hose Inlet
6. 30L drum
7. Flexible hose
8. Suction regulator
9. Stainless steel telescopic pipe
10. Front wheels
11. Floor tool
12. Cover
17
18
13. Blower exhaust outlet
14. Cord storage hook (top)
15. Onboard accessory storage
16. Back wheels
17. Filter basket
18. Float switch
19. Microparticle filter

20. Foam filter
21. Dual mode floor tool
22. Wet and dry floor tool
23. 2 in 1 crevice tool/brush
2. Safety advice and warnings!
Read these instructions carefully before switching
on the appliance and keep them for future reference.
Failure to follow and observe these instructions
could lead to an accident. Clean all the parts of the
product as indicated in the cleaning section, before
use.
2.1. Use or working environment:
2.1.1. This appliance is designed solely for domestic
use and for the designated purpose.
2.1.2. Do not use the appliance outdoors (unless it
has been specifically designed for outdoor use)
2.1.3. Use the appliance in a well ventilated area.
2.1.4. Do not subject the appliance to heat, direct
sunshine or very high moisture (e.g. Rain)
2.1.5. Never immerse the appliance in liquids and be
aware of sharp edges that may damage it.
2.1.6. Never use the appliance with wet or damp
hands. Unplug it immediately if the becomes wet or
damp when it is running.
2.1.7. The appliance is designed to vacuum up
materials that are not hazardous to your health and
that are not flammable.
2.1.8. Never hold the connectors in front of your
face (especially your eyes, ears, etc) Never direct
the nozzle towards persons or animals.
2.1.9. Keep children and bystanders away when
using this appliance.
2.1.10. Do not vacuum up ash, hot coals, large fragments of glass and sharp objects.
2.1.11. Do not vacuum up any toner dust, which is
used in printers and copies for example, because it
is electrically conductive. In addition, it is possible
that it will not be completely filtered out by the filter
system of the wet and dry vacuum cleaner and can
be released in the air via the exhaust fan.
2.1.12. Do not place flammable material near the
appliance.
2.1.13. Do not use the appliance in association with
a programmer, timer or other device that automatically switches it on.
2.1.14. Do not use the appliance if the cable or plug
is damaged.
2.1.15. Ensure that the voltage indicated on the
rating label matches the mains power supply voltage
before plugging in the appliance.
2.1.16. Connect the appliance to the mains power
supply with an earth socket withstanding a minimum
of 16 amperes.
2.1.17. The appliance’s plug must fit into the mains
power supply socket properly. Do not alter the plug.
2.1.18. If using a multi plug check ratings carefully
as the current used by several appliances could easily exceed the rating of the multi plug.
2.1.19. If any of the appliance casings breaks, immediately disconnect the appliance from the mains
power supply to prevent the possibility of an electric
shock.
2.1.20. Do not use the appliance if it has fallen on
the floor or if there are visible signs of damage.
2.1.21. Do not force the power cord. Never use the
power cord to lift up, carry or unplug the appliance.
2.1.22. Do not wrap the power cord around the
appliance.
2.1.23. Do not clip or crease the power cord.
2.1.24. Do not allow the power cord to hang or
to come into contact with the hot surfaces of the
appliance.
2.1.25. Check the state of the power cord. Damaged
or tangled cables increase the risk of electric shock.
2.1.26. The appliance is not suitable for outdoor use.
2.1.27. Power cord should be regularly examined
for signs of damage, and if the cord is damaged, the
appliance must not be used.
2.1.28. Do not touch the plug with wet hands.
2.2. Personal safety:
2.2.1. CAUTION: Do not leave the appliance unattended during use as there is a risk of an accident.
2.2.2. Do not touch the heated parts of the appliance, as it may cause serious burns.
2.2.3. This appliance is only for domestic use, not
for industrial or professional use. It is not intended to
be used by guests in hospitality environments such
as bed and breakfast, hotels, motels, and other types
of residential environments, even in farm houses,
areas of the kitchen staff in shops, offices and other
work environments.
2.2.4. This appliance is not intended for use by
persons (including children) with reduced physical,
sensory or mental capabilities, or lack of experience
and knowledge, unless they have been given supervision or instruction concerning use of the appliance

by a person responsible for their safety.
2.2.5. This appliance is not a toy. Children should be
supervised to ensure that they do not play with the
appliance.
2.3. Use and care:
2.3. Use and care:
2.3.1. Fully unroll the appliance’s power cable before
each use.
2.3.2. Do not use the appliance if the parts or accessories are not properly fitted.
2.3.3. Do not use the appliance when full.
2.3.4. Do not turn the appliance over while it is in
use or connected to the mains power supply.
2.3.5. Do not block the inlet or outlet ports.
2.3.6. Unplug the appliance from the mains power
supply when not in use and before undertaking any
cleaning task.
2.3.7. This appliance should be stored out of reach
of children.
2.3.8. Do not store the appliance if it is still hot.
2.3.9. Never leave the appliance unattended when in
use and keep out of the reach of children.
2.3.10. Do not vacuum any sharp-edged, hot or
incandescent material
2.3.11. The appliance should not be exposed to heat.
2.3.12. Unplug the appliance from the mains supply
socket after use and before every cleaning. Pull the
plug, not the mains cable, in order to disconnect the
appliance from the mains.
2.3.13. Ensure that blockages are removed.
2.3.14. Do not use the vacuum cleaner without dust
container or dust filter in place.
2.3.15. Do not vacuum any flour, cement etc, in
order to avoid the overloads.
2.3.16. If, for some reason, the appliance were to
catch fire, disconnect the appliance from the mains
power supply and DO NOT USE WATER TO PUT THE
FIRE OUT.
2.4. Service:
2.4.1. Make sure that the appliance is serviced only
by suitably qualified technician, and that only original
spare parts or accessories are used to replace existing parts/accessories.
2.4.2. If the power cord is damaged, the manufacturer or its service agent or a similarly qualified
person must
replace it in order to avoid a hazard.
2.4.3. Any misuse or failure to follow the instructions for use renders the guarantee and the manufacturer’s liability null and void.
3. Instructions for use
3.1. Before use:
3.1.1. Remove the appliance’s protective film(if
applicable).
3.1.2. Before you start the appliance, make sure that
the dust filter is in place before dry vacuuming.
3.1.3. Before you start the appliance, make sure that
the hose assembly is in the position.
3.1.4. Unwind the power cord.
3.2. Use and care:
3.2.1. Vacuuming dry materials:
This vacuum comes with both a non woven dust bag
and a microparticle filter. Either can be used when
vacuuming dry materials.
3.2.1.1. Ensure the foam filer is clean and dry and
installed over the the filter basket.
3.2.1.2. Install the non woven dust back. Make sure
it is securely placed inside the drum.
3.2.1.3. Secure the upper part of the vacuum back
onto the tank.
3.2.1.4. Attach the flexible hose to the suction inlet .
3.2.1.5. Attach your choice of floor tool or telescopic
tube to the end of the hose.
3.2.1.6. Turn on the vacuum and start vacuuming.
3.2.1.7. When you have finished vacuuming, turn
the vacuum off and remove the plug from the mains
socket.
3.2.2. Vacuuming up water and liquids:
3.2.2.1. Ensure that the tank is free of dust and dirt.
3.2.2.2. Remove the dust bag and only leave the
foam filter over the filter basket.
3.2.2.3. Secure the upper part of the vacuum back
onto the tank.
3.2.1.4. Attach the flexible hose to the suction inlet .
3.2.1.5. Attach your choice of floor tool or telescopic
tube to the end of the hose.
3.2.1.6. Turn on the vacuum and start vacuuming.
3.2.1.7. When you have finished vacuuming, turn
the vacuum off and remove the plug from the mains

socket.
TIPS:
- If you want to vacuum up a large quantity of liquid
from a sink or tank, please don't put the entire suction nozzle inthe liquid; rather leave a little space so
that some air can also be drawn in along with the
liquid.
- The appliance is equipped with a float switch that
will stop the vacuuming when the tank is full.
- Be aware that the full tank can be very heavy.
IMPORTANT:
•After wet vacuuming, switch off the appliance and
unplug it. Empty the tank and clean/dry it inside and
outside before putting it away. Do not store the appliance with water inside the tank.
•Please note the maximum water capacity is 15
Litres.
3.2.3. Using the microparticle filter
3.2.3.1. When using the microparticle filter, no dust
bag is needed.
3.2.3.2. Place the microfilter on the filter basket from
the top, turn the filter cap to secure it in place.
3.2.3.4. After each use, clean the microparticle filter
by tapping or brushing the dust out.
3.2.4. Operating the vaccum:
3.2.4.1. Unwind the power cord from the cord storage and plug into the mains power socket.
3.2.3.2. Switch the vacuum cleaner ON by pressing
the ON/OFF switch.
3.2.4.3. A suction regulator can be found on the
hose handle. To activate simply slide the regulator
open to reduce the level of suction required.
3.2.4.4. The suction power will reduce and stop as
the drum fills up. It is recommended to empty the
drum on a regular basis.
3.2.4.5. To switch the vacuum OFF depress the ON/
OFF switch again and then remove from remove the
plug from the mains power socket.
OFF switch again and then remove from remove the
plug from the mains power socket
3.3 Once you have finished using the appliance:
3.3.1. Allow appliance to cool down.
3.3.2. Unplug the appliance from the mains power
supply.
3.3.3. Clean the appliance as described in the cleaning section.
4. Cleaning
4.1. Disconnect the appliance from the mains power
supply before undertaking any cleaning task.
4.2. Open the tank.
4.3. Take out the dust filter.
4.4. Empty the tank.
4.5. Wash off the dust filter with clean water.
4.6. Ensure the dust filter dries completely.
4.7. Clean the outer parts of the appliance with a
damp cloth with a few drops of washing-up liquid
and then dry. CAUTION! Do not immerse electrical
parts of the appliance in any liquid.
4.8. Do not use solvents, or products with an acid
or base pH such as bleach, or abrasive products, for
cleaning the appliance.
4.9. Never submerge the appliance in water or any
other liquid or place it under running water.
5. Anomalies and repair
5.1. Take the appliance to an authorised support
centre if product is damaged or other problems
arise.
5.2. If the connection to the mains has been damaged, it must be replaced and you should proceed as
you would in the case of damage.
3.2.5. Using the blower function.
3.2.5.1. Unwind the power cord from the cord storage.
3.2.5.2. Attach the flexible hose to the blow outlet.
3.2.5.3. Switch the vacuum cleaner ON by pressing
the ON/OFF switch.
3.2.5.4. To switch the vacuum OFF depress the ON/
 Loading...