

Page 1

GUIDA ALL’INSTALLAZIONE
INSTALLATION GUIDE
INSTALLATIONSANLEITUNG
NOTICE D’INSTALLATION
GUÍA PARA LA INSTALACIÓN
GUIA DE INSTALAÇÃO
K126MA
Quadro di comando per un motore 18/24V
con encoder per cancelli scorrevoli
18/24V Control panel for one Sliding gate motor with encoder
Steuerplatine für einen 18/24V Motor mit Encode für Schiebetore
Logique de commande pour un moteur 18/24V
avec encodeur pour portails coulissants
Panel de mandos para un motor 18/24V con encoder para cancelas correderas
Quadro de comando para um motor de 18/24V
com encoder para ortões de correr
D-MNL0K126MA 19-09-2016 - Rev.13
IT - Istruzioni originali
Via Enrico Fermi, 43 - 36066 Sandrigo (VI) Italia
Tel +39 0444 750190 - Fax +39 0444 750376
info@tauitalia.com - www.tauitalia.com
K126MA
1
Page 2
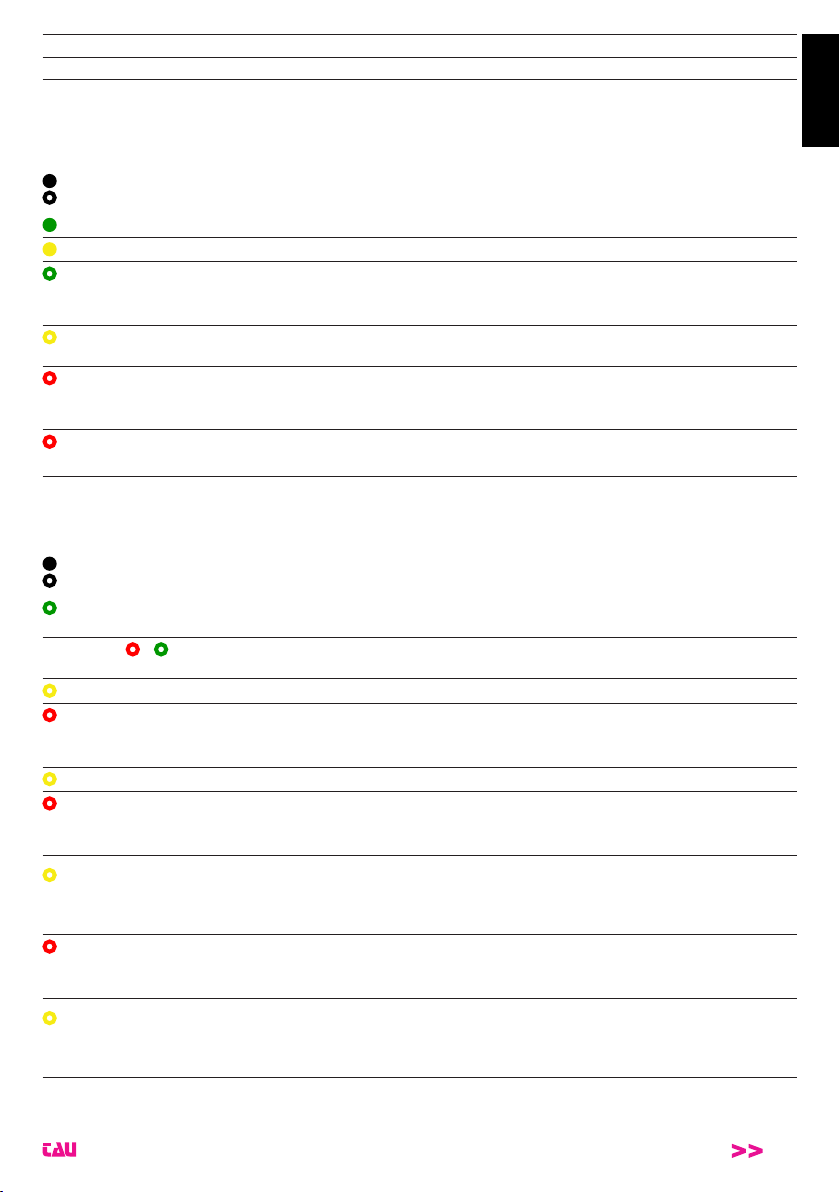
SCHEMA CABLAGGIO K126MA / K126MA WIRING DIAGRAM / SCHALTPLAN DER K126MA
TRASF
1
2
3
4
5
6
7
8
9
10
11
12
13
14
15
16
17
18
19
20
21
22
MASTER18QR
MASTER-R
Dip-switchesON
1 2 3 4 5 6 7 8 9 10 11 12
M
or
+5V
GND
ENC
-
+
+-
FR
+-
TCA
+-
DL6
FIXED SAFETY EDGE
DL5
EXT. PHOTO
DL4
INT. PHOTO
DL3
STOP
DL2
OPEN/CLOSE
DL1
PEDESTRIAN
DL8
ERRORS
DL7 BATT
-
23242526272829303132
(NOT USED)
ENC
-
M2
+
M1
+5V
+5V
ENC
GND
+
-
GND
+
23242526272829303132
J4
1 2 3 4 5 6 7 8 9 10 11 12
FR
TCA
K126MA
J3
J7
External
power supply /
MASTER-R
T-ONE8BR
Power supply
by transformer
DL6
DL5
DL4
DL3
DL2
DL1
DL8
DL7
F5
10A
F4
16A
PROG
CH1
CH2
F3
2A
J6
2
K126MA
Page 3
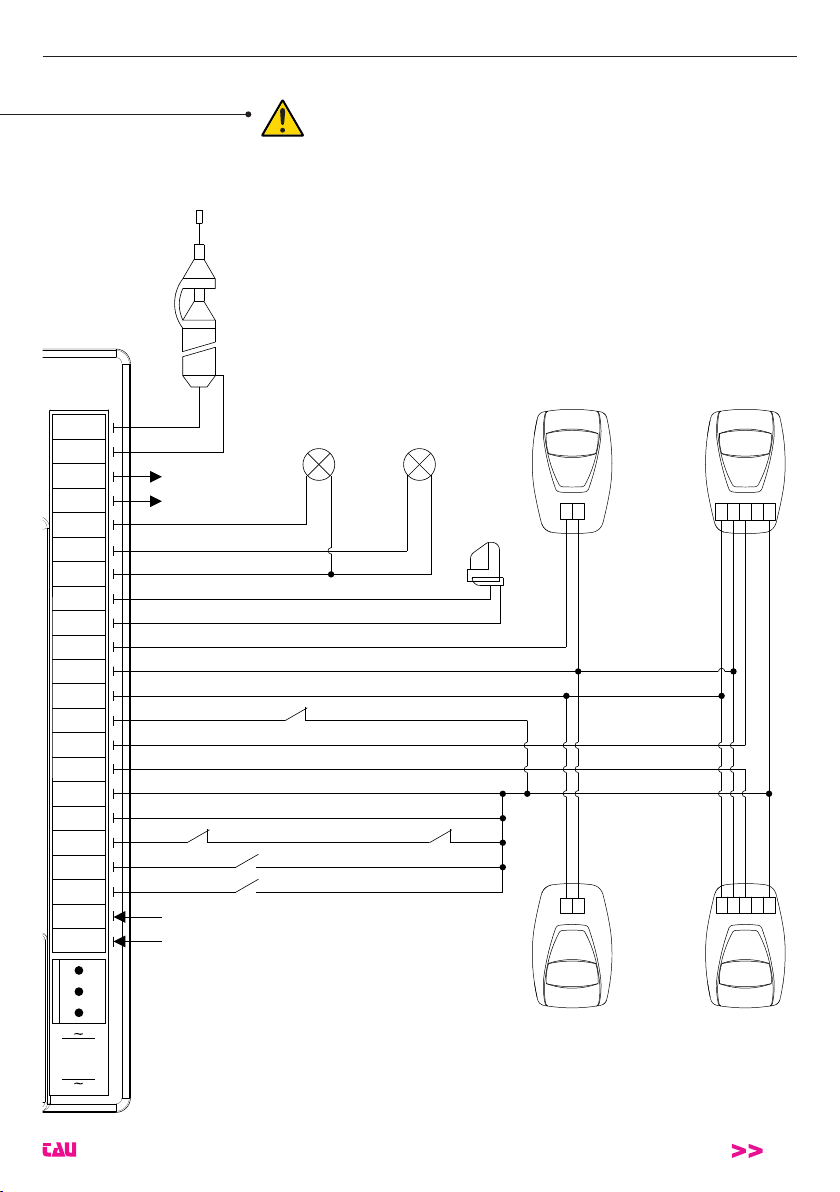
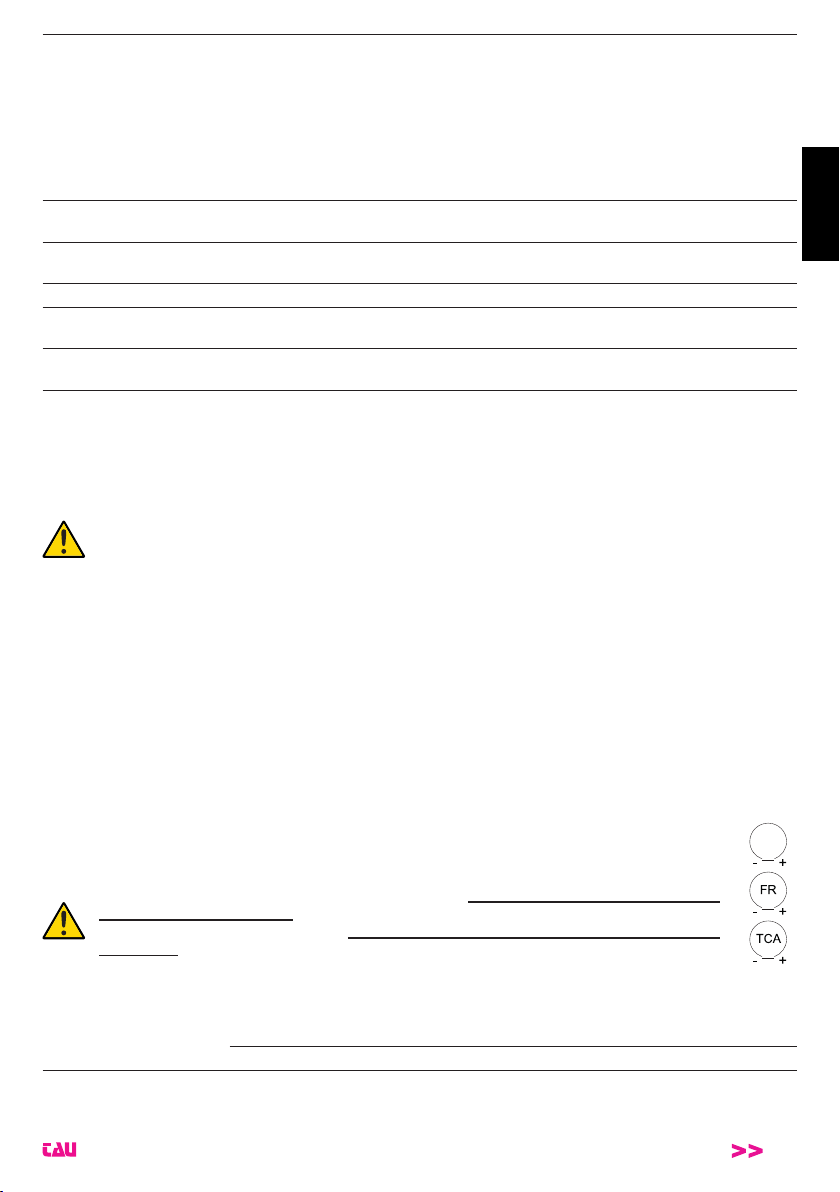
SCHÉMA CÂBLAGE K126MA / ESQUEMA DEL CABLEADO K126MA / ESQUEMA DE LIGAÇÕES K126MA
- Morsetti 1 - 2: Attenzione a NON invertire la polarità.
- Se il jumper J6 non è inserito, verrà attivata la modalità basso consumo e, al termine
di ogni manovra, le uscite 11-12, 12-13, 14-15, 16-17 e 16-18 verranno spente.
- Terminals 1 – 2: Careful NOT to invert polarity.
- If Jumper J6 is not plugged in, energy saving mode will be activated and, at the end
of each manouvre, outputs 11-12, 12-13, 14-15, 16-17 and 16-18 will be switched off.
- Klemmen 1 - 2: Achtung: Nicht verpolen.
Aerial
- Wenn der Jumper J6 nicht eingesteckt ist, wird die Modalität Energiespar aktiviert und am
Ende jedes Manövers werden die Ausgänge 11-12, 12-13, 14-15, 16-17 und 16-18 abgeschaltet.
- Etaux 1 - 2: Assurez-vous de NE PAS inverser la polarité.
- Si el puente J6 no está insertado, se activará el modo de bajo consumo y, al nal de cada
maniobra, las salidas 11-12 , 12-13 , 14-15 , 16-17 y 16-18 se desconectarán.
- Bornes 1 - 2: Tenga cuidado en NO invertir la polaridad.
- Si le cavalier J6 n’est pas inséré, la fonction modalité consommation réduite sera
activée et, à la n de chaque manœuvre, les sorties 11-12, 12-13, 14-15, 16-17 e
16-18 seront désactivées.
- Terminais 1 – 2: Cuidado NÂO inverter a polaridade.
- Se o jumper J6 não está conectado, ele irá alternar para o modo de baixo consumo de energia
e, ao nal de cada manobra, as saídas 11-12, 12-13, 14-15, 16-17 e 16-18 serão desligados.
22
21
20
19
18
17
16
15
14
13
12
11
10
9
8
7
6
5
4
3
2
1
TRASF
Courtesy light
18V 3W max.
2nd radio
channel
+ 18 V
+ 18 V
1
+ 18V
Fixed safety edge
Ext. Photocell
Int. Photocell
Common
Common
Common
Stop Release safety microswitch
Open/Close
Pedestrian
- Photovoltaic system input
+ Photovoltaic system input
-
BATT
+
FS1
FS2
Gate open
warning light
max. 3W
Flashing
light
18V DC
max. 20W
TX
External
Photocells
1 2
1 2
Internal
Photocells
TX
1
24V per MASTER-R / 24V for MASTER-R /
24V für MASTER-R / 24V pour MASTER-R /
24V para MASTER-R / 24V para MASTER-R
RX
1 2 3 4 5
1 2 3 4 5
RX
K126MA
3
Page 4

DICHIARAZIONE DI INCORPORAZIONE DEL COSTRUTTORE
(ai sensi della Direttiva Europea 2006/42/CE AlI. II.B)
ITALIANO
Fabbricante: TAU S.r.l.
Indirizzo: Via E. Fermi, 43
Dichiara sotto la propria responsabilità che il prodotto: Centrale di comando
realizzato per il movimento automatico di: Cancelli scorrevoli
per uso in ambiente: Residenziale / Condominiale / Industriale
completo di: Radioricevente e scheda carica batteria
Modello: K126MA
Tipo: K126MA
Numero di serie: vedi etichetta argentata
Denominazione commerciale: Quadro di comando per 1 motoriduttore 12/24V
È realizzato per essere incorporato su una chiusura (cancello scorrevole) o per essere assemblato con altri dispositivi
al ne di movimentare una tale chiusura per costituire una macchine ai sensi della Direttiva Macchine 2006/42/CE.
Dichiara inoltre che questo prodotto è conforme ai requisiti essenziali di sicurezza delle seguenti ulteriori direttive
CEE:
- 2006/95/CE Direttiva Bassa Tensione
- 2004/108/CE Direttiva Compatibilità Elettromagnetica
ed, ove richiesto, alla Direttiva:
- 1999/5/CE Apparecchiature Radio e apparecchiature terminali di telecomunicazione
Dichiara inoltre che non è consentito mettere in servizio il macchinario no a che la macchina in cui sarà
incorporato o di cui diverrà componente sia stata identicata e ne sia stata dichiarata la conformità alle condizioni
della Direttiva 2006/42/CE.
36066 Sandrigo (Vi)
ITALIA
Si impegna a trasmettere, su richiesta adeguatamente motivata delle autorità nazionali, informazioni pertinenti sulle
quasi-macchine.
Sandrigo, 27/11/2014
Il Rappresentante Legale
_________________________________________
Nome e indirizzo della persona autorizzata a costituire la documentazione tecnica pertinente:
Loris Virgilio Danieli - via E. Fermi, 43 - 36066 Sandrigo (Vi) Italia
4
K126MA
Loris Virgilio Danieli
Page 5

AVVERTENZE
Il presente manuale è destinato solamente al personale tecnico qualicato per l’installazione. Nessuna
informazione contenuta nel presente fascicolo può essere considerata d’interesse per l’utilizzatore
nale. Questo manuale è allegato alla centralina K126MA; non deve pertanto essere utilizzato per
prodotti diversi!
Avvertenze importanti:
Togliere l’alimentazione di rete alla scheda prima di accedervi.
La centralina K126MA è destinata al comando di un motoriduttore elettromeccanico in corrente
continua per l’automazione di cancelli, porte e portoni.
Ogni altro uso è improprio e, quindi, vietato dalle normative vigenti.
È nostro dovere ricordare che l’automazione che state per eseguire, è classicata come “costruzione
di una macchina” e quindi ricade nel campo di applicazione della direttiva europea 2006/42/CE (Di-
rettiva Macchine).
Questa, nei punti essenziali, prevede che:
- l’installazione deve essere eseguita solo da personale qualicato ed esperto;
- chi esegue l’installazione dovrà preventivamente eseguire “l’analisi dei rischi” della macchina;
- l’installazione dovrà essere fatta a “regola d’arte”, applicando cioè le norme;
- inne dovrà essere rilasciata al proprietario della macchina la”dichiarazione di conformità”.
Risulta chiaro quindi che l’installazione ed eventuali interventi di manutenzione devono essere effettuati solo da personale professionalmente qualicato, in conformità a quanto previsto dalle leggi,
norme o direttive vigenti.
Nella progettazione delle proprie apparecchiture, TAU rispetta le normative applicabili al prodotto (ve-
dere la dichiarazione di conformità allegata); è fondamentale che anche l’installatore, nel realizzare
gli impianti, prosegua nel rispetto scrupoloso delle norme.
Personale non qualicato o non a conoscenza delle normative applicabili alla categoria dei “cancelli e
porte automatiche” deve assolutamente astenersi dall’eseguire installazioni ed impianti.
Chi non rispetta le normative è responsabile dei danni che l’impianto potrà causare!
Si consiglia di leggere attentamente tutte le istruzioni prima di procedere con l’installazione.
ITALIANO
INSTALLAZIONE
Prima di procedere assicurarsi del buon funzionamento della parte meccanica. Vericare
che il cancello scorra liberamente su un piano orizzontale. Vericare inoltre che il gruppo
motoriduttore sia stato installato correttamente seguendo le relative istruzioni. Eseguiti questi
controlli, assicurarsi che il motoriduttore abbia un assorbimento adeguato. La scheda dalla
ver. 5.17 dispone di una funzione che permette la visualizzazione dello sforzo richiesto durante
la movimentazione (vedi il paragrafo FUNZIONE DI VISUALIZZAZIONE SFORZO MOTORE).
L’INSTALLAZIONE DELL’APPARECCHIATURA DEVE ESSERE EFFETTUATA “A REGOLA D’ARTE”
DA PERSONALE QUALIFICATO COME DISPOSTO DALLA LEGGE 37/08.
NB: si ricorda l’obbligo di mettere a massa l’impianto nonché di rispettare le normative sulla
sicurezza in vigore in ciascun paese.
LA NON OSSERVANZA DELLE SOPRAELENCATE ISTRUZIONI PUÒ PREGIUDICARE IL BUON
FUNZIONAMENTO DELL’APPARECCHIATURA E CREARE PERICOLO PER LE PERSONE,
PERTANTO LA “CASA COSTRUTTRICE” DECLINA OGNI RESPONSABILITÀ PER EVENTUALI
MAL FUNZIONAMENTI E DANNI DOVUTI ALLA LORO INOSSERVANZA.
K126MA
5
Page 6

QUADRO DI COMANDO PER 1 MOTORIDUTTORE 18/24V CON ENCODER
• FUNZIONE DI VISUALIZZAZIONE SFORZO MOTORE
• STATO DEGLI INGRESSI VISUALIZZATO DA LEDs
• CIRCUITO DI LAMPEGGIO INCORPORATO
ITALIANO
• SENSORE AD ENCODER PER AUTOAPPRENDIMENTO DELLA CORSA
• RADIO RICEVITORE 433,92 MHz INTEGRATO A DUE CANALI (CH)
• SCHEDA CARICA BATTERIA INTEGRATA
• DIAGNOSTICA DEL DIFETTO FUNZIONE VISUALIZZATO DA LED
• POSSIBILITÀ DI FUNZIONAMENTO IN BASSO CONSUMO
ATTENZIONE:
- non utilizzare cavi unilari (a conduttore unico), es. quelli citofonici, al ne di evitare interruzioni sulla linea e falsi contatti;
- non riutilizzare vecchi cavi preesistenti;
INTRODUZIONE
La scheda K126MA può funzionare in due modalità differenti, selezionabili tramite il ponticello J6 (vedi
schema cablaggio).
J6 Ponticellato: modalità standard, ossia la centrale è sempre alimentata;
J6 Non ponticellato: modalità basso consumo, ossia la centrale si “spegne” al termine di ogni
manovra e spegne anche tutti i dispositivi ausiliari. La centrale si riaccenderà
ad ogni comando (modalità per l’eventuale alimentazione da altre fonti di
energia, es. batterie caricate da pannello fotovoltaico).
A collegamento ultimato, in modalità basso consumo, premere brevemente il pulsante PROG:
• I Leds verdi devono essere tutti accesi (corrispondono ciascuno ad un ingresso Normalmente
Chiuso). Si spengono solo quando sono interessati i comandi ai quali sono associati.
• I Leds rossi devono essere tutti spenti (corrispondono ciascuno ad un ingresso Normalmente
Aperto) si accendono solo quando sono interessati i comandi ai quali sono associati.
CARATTERISTICHE TECNICHE
Alimentazione scheda 13,5V1 AC - 50 Hz
Potenza max. motore c.c. 300VA - 18V2 DC
Fusibile rapido protezione alimentazione ingresso 13,5V AC (F4 - 5x20) F 16A
Fusibile rapido protezione caricabatteria (F5 - 5x20) F 10A
Fusibile rapido protezione ausiliari 18V2 DC (F3 - 5x20) F 2A
Tensione circuiti alimentazione motore 18V2 DC
Tensione alimentazione circuiti dispositivi ausiliari 18V2 DC
Tensioni alimentazioni circuiti logici 5V DC
Temperatura di funzionamento -20 °C ÷ +55 °C
1
18V per MASTER-R e T-ONE8BR
2
24V per MASTER-R e T-ONE8BR
COLLEGAMENTI ALLA MORSETTIERA
Morsetti Funzione Descrizione
ingresso alimentazione scheda 13,5V (18V per MASTER-R e T-
FS1 - FS2 ALIMENTAZIONE
ONE8BR) AC - Alimentato dal trasformatore toroidale e protetto
da fusibile sull’alimentazione 230V AC.
6
K126MA
Page 7

1 - 2
PHOTOVOLTAIC
SYSTEM INPUT
3 - 6 PEDONALE
4 - 6 APRE/CHIUDE
5 - 6 STOP
7 - 8
7 - 9
7 - 10
FOTOCELLULE
INTERNE
FOTOCELLULE
ESTERNE
BORDO
SENSIBILE
11 - 12 ** AUX
12 - 13 ** TX FOTOCELLULE
14 - 15 ** LAMPEGGIANTE
16 - 17* **
16 - 18* **
SPIA CANCELLO
APERTO
LUCE DI
CORTESIA
ingresso alimentazione esterna (es. sistema fotovoltaico 12V DC).
Nota: se si utilizza questo ingresso, ponticellare opportunamente J7 (vedi schema cablaggio).
ATTENZIONE: ALIMENTANDO LA CENTRALE DA UNA SORGENTE ESTERNA, TUTTE LE ALTRE USCITE +18V (+24V per
MASTER-R) DC ASSUMONO IL VALORE DELLA TENSIONE
DI ALIMENTAZIONE DELLA SORGENTE STESSA.
ingresso N.A. pulsante PEDONALE - Comanda l’apertura e la
chiusura parziale dell’automazione per 1/3 di corsa ed è regolato
nel funzionamento dai dip-switches 2 e 4.
(3= PED - 6= COM)
ingresso N.A. pulsante APRE/CHIUDE - Comanda l’apertura e la
chiusura dell’automazione ed è regolato nel funzionamento dai
dip-switches 2 e 4. (4= A/C - 6= COM)
ingresso N.C. pulsante STOP - Arresta l’automazione dovunque
si trovi, inibendo temporaneamente la chiusura automatica, se
programmata. (5= STOP - 6= COM)
Nota: al pulsante STOP è collegato un microinterruttore di sicurezza sblocco. Se l’ingresso STOP rimane aperto per più di
5 secondi, la successiva manovra sarà di RIALLINEAMENTO
(vedi “Ripristino funzionamento automatico”). Il microinterrutore va collegato in serie ad altri eventuali pulsanti di STOP.
ingresso FOTOCELLULE O DISPOSITIVI DI SICUREZZA INTERNI all’automazione (contatto Normalmente chiuso). Il loro intervento, in fase di apertura, provoca l’arresto temporaneo dell’automazione no a rimozione dell’ostacolo rilevato; in fase di chiusura
provoca l’arresto seguito dalla totale riapertura dell’automazione.
Ponticellare i morsetti se non utilizzati. (7= COM - 8= FOT)
ingresso FOTOCELLULE O DISPOSITIVI DI SICUREZZA
ESTERNI all’automazione (contatto Normalmente chiuso). Il loro
intervento, efcace solo in fase di chiusura, provoca l’arresto seguito dalla totale riapertura dell’automazione. Ponticellare i mor-
setti se non utilizzati.
(7= COM - 9= FOT)
Nota: il trasmettittore della fotocellula deve sempre essere
alimentato dai morsetti nr 12 e nr 13, in quanto su di esso si
effettua la verica del sistema di sicurezza (Fototest). Senza
questo collegamento, la centralina non funziona. Per eliminare la verica del sistema di sicurezza, o quando non si usano
le fotocellule, porre il dip-switch nr 6 in OFF.
ingresso BORDO SENSIBILE (Bordo sensibile resistivo o costa
ssa); Funziona solo durante la fase di apertura e provoca la fer-
mata temporanea del cancello e una parziale richiusura dello stesso
per circa 20 cm. liberando così l’eventuale ostacolo. Ponticellare i
morsetti se non utilizzati.
(7= COMUNE - 10= BORDO SENSIBILE)
uscita ausiliari 18V1 DC max. 15 W per fotocellule, ricevitori, etc...
(11= NEGATIVO - 12= POSITIVO)
uscita 18V1 DC fotocellula trasmittente -fototest- max. nr. 1 tra-
smettitore fotocellule.
(12= POSITIVO - 13= NEGATIVO)
uscita 18V1 DC max. 20W alimentazione lampeggiante, lampeggio
fornito dalla centrale, veloce in chiusura e lento in apertura.
(14= POSITIVO - 15= NEGATIVO)
uscita per SPIA CANCELLO APERTO 18V1 DC, max. 3 W; duran-
te l’apertura dell’automazione la spia lampeggia lentamente, ad
automazione aperta resta accesa e durante la chiusura lampeggia
a velocità doppia.
(16= POSITIVO - 17= NEGATIVO)
uscita luce di cortesia ausiliaria 18V1 DC max. 15 W;
Si accende all’impulso di comando e rimane accesa oltre il termine
della manovra per un tempo impostabile tramite TAUPROG (di
default sono 2 sec.)
(16= POSITIVO - 18= NEGATIVO)
K126MA
7
ITALIANO
Page 8
uscita 2° canale radio - per comandare un’altra automazione o
accendere luci, etc... (contatto pulito N.A.)
Nota: per il collegamento di altri dispositivi al 2° canale radio, quali accensione luci, comando pompe o carichi importanti, utilizzare un relè ausiliario di potenza con portata
ITALIANO
19 - 20* 2° CH RADIO
21 - 22 ANTENNA
23 - 24 MOTORE (M2)
adeguata ai dispositivi da collegare, altrimenti si potrebbero
avere malfunzionamenti dovuti a disturbi indotti (vedi nota
alla ne del paragrafo).
ATTENZIONE: l’uscita di default è monostabile attiva 2 sec.
Per commutarla in bistabile attiva oppure per modicare il
tempo di attivazione è necessario operare tramite programmatore palmare TAUPROG (vedi istruzioni relative).
ingresso antenna radioricevente ad innesto solo per ricevitori
433,92 MHz. (21= MASSA - 22= SEGNALE)
uscita alimentazione motore (M2) 18V DC max 300 VA.
(23= POSITIVO - 24= NEGATIVO) Vedi nota sotto.
25 - 26 - 27 ENCODER (M2) Non utilizzato.
28 - 29 MOTORE (M1)
30 - 31 - 32 ENCODER (M1)
1
24V per MASTER-R e T-ONE8BR
uscita alimentazione motore (M1) 18V DC max 300 VA.
(28= POSITIVO - 29= NEGATIVO)
alimentazione e ingresso encoder (30= BIANCO segnale - 31=
BLU negativo - 32= MARRONE positivo)
* Le uscite sono congurabili tramite TAUPROG (vedi istruzioni relative). In tabella è riportata la
congurazione standard.
** Se il jumper J6 non è inserito, verrà attivata la modalità basso consumo e, al termine di ogni ma-
novra, le uscite 11-12, 12-13, 14-15, 16-17 e 16-18 verranno spente.
La morsettiera relativa al motore 2 (23-24) è da utilizzarsi in appoggio a quella del mo-
tore 1 (MASTER18QR / MASTER-R), oppure in caso di avaria/guasto di quella relativa al
motore 1 (28-32), vedi schema cablaggio a pag 2-3.
IMPORTANTE:
• non alimentare relè ausiliari o altri dispositivi all’uscita 18V (24V per MASTER-R e T-ONE8BR)
DC (morsetti 11 - 12) della centrale, onde evitare di pregiudicarne il buon funzionamento.
Utilizzare in alternativa alimentatori/trasformatori esterni;
• non collegare in prossimità dell’automazione degli alimentatori switching o apparecchiature
similari che potrebbero essere fonte di disturbi.
REGOLAZIONI LOGICHE
Effettuare le regolazioni logiche.
NOTA: agendo su qualsiasi regolazione del quadro di comando (trimmer o dip-switches) è necessario effettuare una manovra completa (apertura e chiusura) dell’automazione per rendere
attive le nuove impostazioni.
TRIMMER
T.C.A. regolazione Tempo di Chiusura Automatica: da 1 a 120 secondi ca. (vedi dip-switch
nr. 1);
FR. regolazione sensibilità rilevamento ostacoli.
NOTA: ruotando il TRIMMER FR. in senso orario si diminuisce la sensibilità
del motoriduttore sull’ostacolo e quindi aumenta la forza di spinta; viceversa,
ruotandolo in senso antiorario, aumenta la sensibilità del motoriduttore sull’ostacolo e diminuisce la forza di spinta.
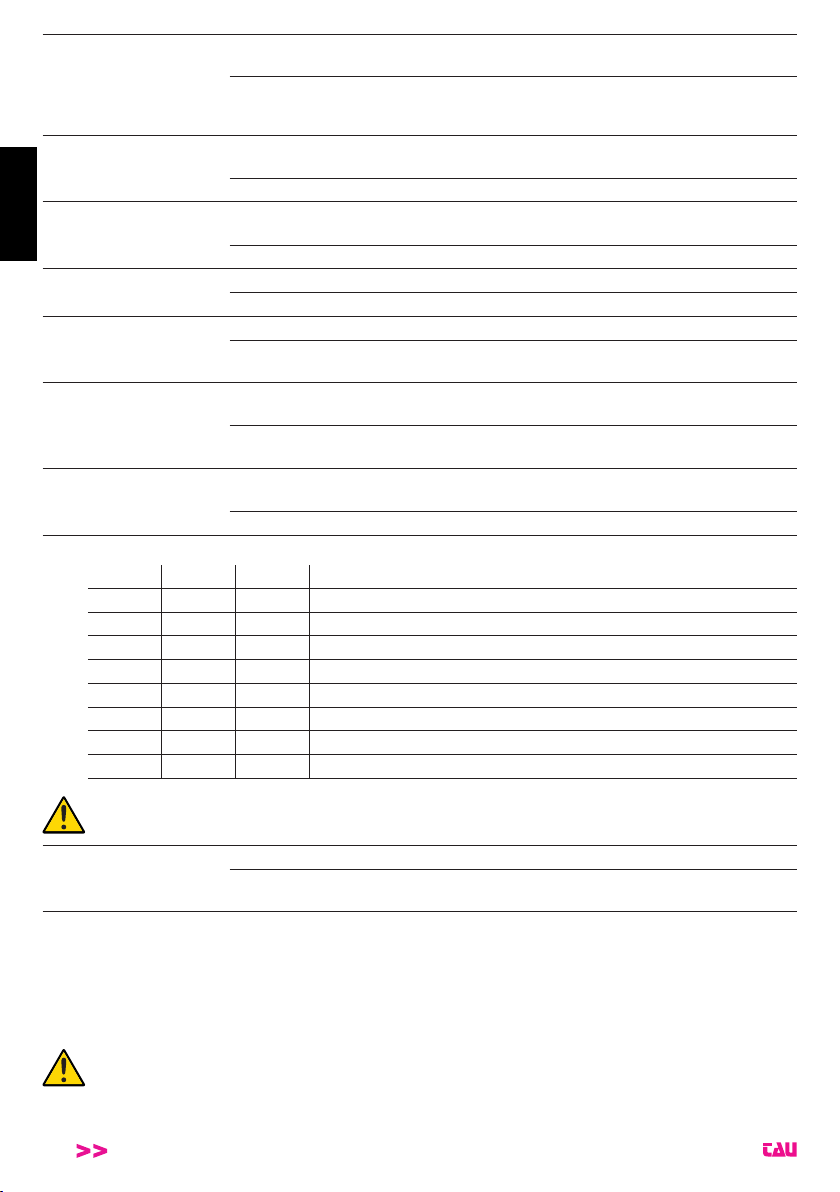
Dip switch
ad apertura completata, la chiusura dell’automazione è automatica
1
8
CHIUSURA
AUTOMATICA
On
trascorso un tempo impostato sul trimmer T.C.A.
Off la chiusura necessita di un comando manuale.
K126MA
Page 9
ad automazione funzionante, una sequenza di comandi di apertura/
On
chiusura induce l’automazione ad una APERTURA-CHIUSURA-
2 2 / 4 TEMPI
3
4 NO REVERSE
5
6 FOTOTEST
7
8
9-10-11 Selezione tipologia automazione
12
RICHIUDE
DOPO
FOTOCELLULA
PRE-
LAMPEGGIO
MASTER /
SLAVE
BACK
JUMP
Dip 9 Dip 10 Dip 11 Automazione
Off Off Off TONE-5B
On Off Off TONE-10B
Off On Off TONE-8BR (24v)
On On Off MASTER-R (24V velocità apertura = velocità chiusura)
Off Off On MASTER18QR
On Off On MASTER-R (24V)
Off On On CANTILEVER (leggeri)
On On On CANTILEVER (pesanti)
IMPORTANTE: la tipologia di automazione viene caricata durante il setup SOLO la prima
volta che si esegue la procedura (led DL8 lampeggio rosso/verde alternato). Per cambiare
tipologia è necessario effettuare, prima di una nuova procedura di setup, un “RESET DI
FABBRICA” (vedi pag. 14).
BORDO
SENSIBILE
APERTURA-CHIUSURA, etc.
nelle stesse condizioni, la stessa sequenza di comandi induce l’auto-
Off
mazione ad una APERTURA-STOP-CHIUSURA-STOP-APERTURASTOP, etc. (funzione passo-passo) (vedi anche dip switch 4).
in seguito all’intervento del contatto fotocellula (ingresso 7 - 9), l’auto-
On
mazione si chiude automaticamente dopo 5 secondi.
Off funzione disinserita.
On l’automazione ignora i comandi di chiusura durante l’apertura e il tempo di pausa.
Off l’automazione si comporta come stabilito dal dip switch nr. 2.
On la funzione prelampeggio è inserita.
Off la funzione prelampeggio è disinserita.
On la funzione “verica delle fotocellule” è inserita.
la funzione “verica delle fotocellule” è disinserita.
Off
Nota: da utilizzare quando non si usano le fotocellule.
abilita la modalità MASTER nella congurazione master/slave (vedi
On
istruzioni T-COMM).
abilita la modalità SLAVE nella congurazione master/slave (vedi istru-
Off
zioni T-COMM), oppure il funzionamento standard (motore singolo).
raggiunta la battuta della manovra (apertura o chiusura), l’automazione
On
fa un leggero movimento in senso contrario, per evitare impuntamenti
tra pignone e cremagliera.
Off funzione disattivata.
On BORDO SENSIBILE RESISTIVO (morsetto nr 10).
COSTA FISSA (contatto NC - morsetto nr 10).
Off
Nota: lasciare in OFF se non utilizzato.
ITALIANO
PROCEDURA DI MEMORIZZAZIONE
ATTENZIONE: dopo aver alimentato il quadro di comando attendere 2 sec. prima di iniziare a
svolgere le manovre di regolazione.
NOTA: i fermi meccanici dell’automazione devono necessariamente essere regolati sia in apertura che in chiusura (vedi istruzioni motore).
Terminata l’installazione dell’automazione:
Vericare la posizione dei dip 9, 10 e 11. Devono essere settati in base al modello di
automazione utilizzata (vedi tabella dip 9-10-11, sez. “Regolazioni logiche”).
È preferibile iniziare la procedura con il cancello a 0,5 m ca. dal fermo meccanico di chiusura.
K126MA
9
Page 10

Premere e tenere premuto il tasto PROG no a che il led DL8 inizia a lampeggiare (giallo):
- l’automazione comincia ad aprire lentamente alla ricerca del necorsa in apertura;
Se l’automazione chiude anzichè aprire, fermare la corsa del cancello (tramite fotocellule
o premendo il tasto STOP), invertire la polarità del motore, portare il cancello in posizione
ITALIANO
chiusa (sul fermo meccanico) e riprendere la procedura dall’inizio.
Nota: se l’automazione rimane ferma, controllare i collegamenti degli ingressi. Tutti i led
verdi DL6, DL5, DL4 e DL3 devono essere accesi ssi.
- raggiunta la battuta in apertura, l’automazione inizia a chiudere alla ricerca della battuta in chiusura
(in questa fase la centrale acquisisce tutti i parametri relativi alla corsa);
- l’automazione esegue un’apertura completa per l’ottimizzazione della forza motore in apertura;
- dopo una piccola pausa, l’automazione esegue una chiusura completa per l’ottimizzazione della
forza motore in chiusura.
ATTENZIONE:
- La procedura può essere interrotta premendo il tasto STOP.
- Durante le varie fasi dell’operazione, un intervento delle fotocellule interrompe la memorizzazione. Per far ripartire la procedura dall’inizio (con led DL8 giallo lampeggiante), usare
il comando AP/CH, il tasto del radiocomando (se programmato), o premere brevemente il
tasto PROG.
Si ricorda che la presenza di un ostacolo durante la procedura di memorizzazione è
interpretata come necorsa meccanico (il sistema non interviene attuando movimenti
di sicurezza, ma solo fermando i motori).
Accertarsi pertanto di non sostare nelle vicinanze dell’automazione durante la procedura
di memorizzazione.
CARATTERISTICHE DELLA K126MA
APERTURA E CHIUSURA COMANDATA DA OROLOGIO
É possibile comandare l’apertura e la chiusura dell’automazione mediante un orologio digitale che in
uscita disponga di un contatto pulito N.A. (relè).
Sarà sufciente collegarlo ai morsetti 4 - 6 (pulsante APRE/CHIUDE) e programmarlo in modo che, all’ora
di apertura desiderata, il contatto relè dell’orologio si chiuda sino all’ora di chiusura voluta (momento
in cui il contatto relè dell’orologio si apre nuovamente, permettendo così la richiusura automatica).
Nota: la richiusura automatica deve essere inserita (Dip-switch nr. 1 in ON).
SCHEDA CARICA BATTERIA (INTEGRATA)
Se si collega la batteria, in assenza di rete l’automazione risulta comunque funzionante. Nel caso la
tensione scenda sotto gli 11,3V DC, l’automazione cessa di funzionare (il quadro di comando rimane
alimentato); quando, invece, scende sotto i 10,2V DC, la scheda sgancia completamente la batteria
(il quadro di comando non è più alimentato). Durante il funzionamento in batteria si attiva la modalità
di basso consumo e al termine di ogni manovra le uscite 11-12, 12-13, 14-15, 16-17 e 16-18 verranno
spente. Per collegare la batteria alla centrale serve l’apposito connettore che di solito viene fornito
insieme alla stessa.
Nota: Quando interviene il funzionamento in batteria si attiva la modalità basso consumo quindi
le uscite ausiliarie vengono disattivate. (Per uso di ricevitori esterni,gsm, etc. alimentare in
parallelo all’ingresso batteria).
RILEVAMENTO OSTACOLI
La funzione di rilevamento ostacoli (regolabile tramite trimmer FR) intervenendo in fase di apertura
dell’automazione provoca una richiusura della stessa di 20 cm ca., mentre in fase di chiusura provoca
un’apertura totale.
ATTENZIONE: la logica del quadro di comando può interpretare un attrito meccanico
come un eventuale ostacolo.
LED DI DIAGNOSI
DL1 - Rosso led di segnalazione pulsante PEDONALE
DL2 - Rosso led di segnalazione pulsante APRE/CHIUDE
DL3 - Verde led di segnalazione pulsante di STOP
DL4 - Verde led di segnalazione FOTOCELLULE INTERNE
10
K126MA
Page 11
DL5 - Verde led di segnalazione FOTOCELLULE ESTERNE
DL6 - Verde led di segnalazione BORDO SENSIBILE
LED - DL7
Il led DL7, oltre ad indicare la presenza della batteria, segnala eventuali errori con una serie di lampeggi
predeniti di diversi colori:
Legenda:
led acceso sso;
led lampeggiante;
sempre acceso (Verde):
sempre acceso (Giallo):
1 lampeggio ogni 4 sec:
(Verde)
batteria carica, tensione di rete presente;
batteria in carica;
batteria carica, tensione di rete assente;
Controllare l’alimentazione di rete;
1 lampeggio ogni 4 sec:
(Giallo)
1 lampeggio ogni 2 sec:
(Rosso)
alimentazione esterna, caricabatteria disattivato;
batteria scarica;
Caricare la batteria, sostituire la batteria;
lampeggio veloce (Rosso):
batteria guasta;
Sostituire la batteria;
LED - DL8
Il led DL8 segnala eventuali avvisi/errori della logica della scheda con una serie di lampeggi predeniti
di diversi colori:
Legenda:
led acceso sso;
led lampeggiante;
1 lampeggio ogni 4 sec:
(Verde)
lampeggio / alternato:
(Rosso/Verde)
lampeggio (Giallo) veloce:
1 lampeggio (Rosso):
funzionamento regolare;
memorizzazione da eseguire;
memorizzazione in corso;
errore fototest
Disabilitare fototest (dip-switch 6 in OFF), vericare funzionamento fotocellule e loro collegamento;
1 lampeggio (Giallo):
2 lampeggi (Rosso):
stato sconosciuto, prossima manovra RIALLINEAMENTO;
presenza ostacolo per il motore 1;
Controllare l’assenza di ostacoli lungo la corsa del cancello e la
scorrevolezza dello stesso;
2 lampeggi (Giallo):
presenza ostacolo per il motore 2 (in caso di avaria/guasto
della morsettiera del motore 1 e con dip 10 in ON);
Controllare l’assenza di ostacoli lungo la corsa del cancello e la
scorrevolezza dello stesso;
3 lampeggi (Rosso):
assenza segnale encoder motore 1;
Controllare cablaggio, vericare encoder tramite TEST-ENCODER (opzionale);
3 lampeggi (Giallo):
assenza segnale encoder motore 2 (in caso di avaria/guasto
della morsettiera del motore 1 e con dip 10 in ON);
Controllare cablaggio, vericare encoder tramite TEST-ENCODER (opzionale);
ITALIANO
K126MA
11
Page 12

4 lampeggi (Rosso):
4 lampeggi (Giallo):
ITALIANO
5 lampeggi (Rosso):
5 lampeggi (Giallo):
6 lampeggi (Rosso):
6 lampeggi (Giallo):
8 lampeggi (Rosso):
8 lampeggi (Giallo):
assenza segnale motore 1;
Controllare cablaggio, vericare che il motore giri liberamente
alimentato direttamente dalla batteria, vericare fusibile F5;
assenza segnale motore 2 (in caso di avaria/guasto della
morsettiera del motore 1 e con dip 10 in ON);
Controllare cablaggio, vericare che il motore giri liberamente
alimentato direttamente dalla batteria, vericare fusibile F5;
superamento limite max. di corrente motore 1;
Picco di eccessivo assorbimento del motoriduttore, controllare
l’assenza di ostacoli lungo la corsa dell’automazione, vericare
l’assorbimento di corrente del motore a vuoto e applicato alla
chiusura;
superamento limite max. di corrente motore 2 (in caso di
avaria/guasto della morsettiera del motore 1 e con dip 10
in ON);
Picco di eccessivo assorbimento del motoriduttore, controllare
l’assenza di ostacoli lungo la corsa dell’automazione, vericare
l’assorbimento di corrente del motore a vuoto e applicato alla
chiusura;
chiusura automatica disattivata dopo 5 interventi consecutivi falliti;
È necessario un impulso di comando per effettuare la chiusura;
errore comunicazione master/slave;
Vericare il cablaggio tra le centrali, vericare l’efcienza della centrale slave (fusibili), vericare l’efcienza delle schede di
interfaccia;
errore memoria Eeprom esterna;
Sostituire il modulo di memoria esterna;
errore dati in Eeprom (interna/esterna);
Eseguire procedura di RESET MEMORIA RADIO;
Oltre agli avvisi/errori della parte logica, il led DL8 indica anche lo stato della centrale durante la memorizzazione dei radiocomandi.
sempre acceso (Verde):
lampeggio veloce (Verde):
sempre acceso (Giallo):
lampeggio veloce (Giallo):
lampeggio (Verde):
sempre acceso (Verde):
lampeggio (Giallo):
sempre acceso (Giallo):
canale CH1 in attesa di programmazione;
memoria canale CH1 piena;
canale CH2 in attesa di programmazione;
memoria canale CH2 piena;
canale CH1 in attesa di cancellazione;
canale CH1 in cancellazione;
canale CH2 in attesa di cancellazione;
canale CH2 in cancellazione;
I led DL7 e DL8, quando lampeggiano simultaneamente, hanno la funzione di segnalare:
lampeggio + :
(Rosso + Rosso)
lampeggio + :
(Giallo + Giallo)
procedura reset di fabbrica in attesa di conferma;
attesa cancellazione totale dei canali radio;
L’indicazione di più errori viene eseguita con una pausa di 2 sec. tra una segnalazione e l’altra.
Nel caso di intervento (durante la manovra di chiusura) da parte dell’encoder (rilevazione ostacolo), la
centrale inverte il moto ed entra in fase di corsa rallentata alla ricerca della battuta in apertura, bloccando
12
K126MA
Page 13

la chiusura automatica. Al successivo impulso di comando, viene ripristinata la chiusura automatica.
Nel caso di 5 interventi consecutivi (durante la stessa manovra di chiusura) da parte dei sistemi di
sicurezza, la centrale incrementa progressivamente il tempo della chiusura automatica. Una volta
terminata la chiusura, alla manovra successiva il funzionamento torna ad essere quello programmato.
VISUALIZZAZIONE SFORZO MOTORE (solo dalla versione 5.17)
Questa funzione permette di visualizzare lo sforzo del motore durante il funzionamento per individuare
eventuali situazioni di lavoro gravoso.
Per attivare la funzione premere contemporaneamente e mantenere premuti per circa 2 secondi i tre
tasti Ch1, Ch2 e PROG, quindi azionare il motore con telecomandi, pulsante prog o selettore ecc..
CH2
CH1
PROG
L’indicazione dello sforzo è codicato secondo lo schema della seguente tabella:
Livello DL7 DL8
(Spento) (Spento)
(Verde) (Spento)
(Verde) (Verde)
(Verde) (Giallo)
(Giallo) (Verde)
(Giallo) (Giallo)
(Giallo) (Rosso)
(Rosso) (Giallo)
(Rosso) (Rosso)
ITALIANO
Dopo 5 minuti di inattività la scheda ritornerà alla visualizzazione classica (per tornare manualmente alla visualizzazione classica ripremere contemporaneamente i tre tasti).
RIPRISTINO FUNZIONAMENTO AUTOMATICO
Qualora si renda necessario movimentare manualmente la chiusura o l’apertura del cancello, azionare
lo sblocco manuale. Per ripristinare il normale funzionamento (in automatico), occorre specicare:
• se il ripristino avviene successivamente ad un black-out (la scheda resta priva di alimentazione
per un certo tempo) oppure dopo un intervento manuale (senza interruzioni all’alimentazione della
scheda per un tempo superiore a 5 sec.), l’automazione entrerà in fase di corsa rallentata alla
ricerca della battuta di apertura (manovra di RIALLINEAMENTO).
RADIO RICEVITORE 433,92 MHz INTEGRATO
Il radio ricevitore può apprendere no ad un max di 86 codici rolling code (BUG2R, BUG4R, K-SLIM-
RP, T-4RP) da impostare liberamente su due canali.
Il primo canale comanda direttamente la scheda di comando per l’apertura dell’automazione; il secondo
canale comanda un relè per un contatto pulito N.A. in uscita ai morsetti nr 19 e 20 (max 24V AC, 1 A).
Il terzo canale comanda direttamente la scheda di comando per l’apertura pedonale dell’automazione.
K126MA
13
Page 14

APPRENDIMENTO RADIOCOMANDI
CH1 = 1° canale (solo APRE/CHIUDE)
CH2 = 2° canale
CH3 = 3° canale (solo PEDONALE)
1_ premere brevemente il tasto CH1 se si desidera associare un radiocomando alla funzione APRE/
ITALIANO
CHIUDE;
2_ il led DL8 (verde) si accende sso per indicare la modalità di apprendimento dei codici (se non viene
immesso nessun codice entro 10 secondi, la scheda esce dalla modalità di programmazione);
3_ premere il tasto del radiocomando che si desidera utilizzare;
4_ il led DL8 (verde) si spegne per segnalare l’avvenuta memorizzazione e si riaccende subito in attesa
di altri radiocomandi (se ciò non accade, provare a ritrasmettere oppure attendere 10 secondi e
riprendere dal punto 1);
5_ se si desidera memorizzare altri radiocomandi, premere il tasto da memorizzare sugli altri dispo-
sitivi entro 2-3 sec. Passato questo lasso di tempo (il led DL8 si spegne) è necessario ripetere la
procedura dal punto 1 (no ad un massimo di 86 trasmettitori);
6_ se si desidera effettuare la memorizzazione sul 2° canale, ripetere la procedura dal punto 1 utiliz-
zando il tasto CH2 anzichè il tasto CH1 (in questo caso il led DL8 si accende con colore giallo);
7_ se si desidera effettuare la memorizzazione sul 3° canale, ripetere la procedura dal punto 1 utiliz-
zando contemporaneamente i tasti CH1 e CH2 (in questo caso il led DL8 si accende con colore
rosso);
8_ se si desidera uscire dalla modalità di apprendimento senza memorizzare un codice, premere
brevemente il tasto CH1 o il tasto CH2.
Nel caso di raggiungimento del nr massimo di radiocomandi (nr 86), il led DL8 lampeggia
per circa 3 secondi senza però eseguire la memorizzazione.
PROGRAMMAZIONE REMOTA TRAMITE T-4RP e K-SLIM-RP (V 4.X)
Con la versione di software V 4.X è possibile eseguire l’apprendimento remoto con i radiocomandi T4RP e K-SLIM-RP (V 4.X), ossia senza agire direttamente sui tasti di programmazione della ricevente.
Sarà sufciente disporre di un radiocomando già programmato nella ricevente per poter aprire la
procedura di programmazione remota dei nuovi radiocomandi. Seguire la procedura riportata sulle
istruzioni del radiocomando T-4RP e K-SLIM-RP (V 4.X).
CANCELLAZIONE RADIOCOMANDI
1_ tenere premuto per 3 secondi ca. il tasto CH1 al ne di cancellare tutti i radiocomandi ad esso
associati;
2_ il led DL8 inizia a lampeggiare lentamente per indicare che la modalità di cancellazione è attivata;
3_ tenere premuto nuovamente il tasto CH1 per 3 secondi;
4_ il led DL8 si spegne per 3 secondi ca. per poi riaccendersi sso ad indicare l’avvenuta cancellazione;
5_ riprendere la procedura dal punto 1 utilizzando il tasto CH2 per cancellare tutti i radiocomandi ad
esso associati;
6_ riprendere la procedura dal punto 1 utilizzando contemporaneamente i tasti CH1 e CH2 per can-
cellare tutti i radiocomandi associati al 3° canale;
7_ se si desidera uscire dalla modalità di cancellazione senza memorizzare un codice, premere bre-
vemente il tasto CH1 o il tasto CH2.
MEMORIA CODICI
È possibile espandere la memoria dei codici da 86* a 126, 254 o 1022, utilizzando le schede di memoria come indicato (innestandole nel connettore J3, vedi schema cablaggio a pag. 2-3):
126 codici Art. 250SM126
254 codici Art. 250SM254
1022 codici Art. 250SM1022
* Le centrali, di serie, hanno una memoria di 86 codici. La scheda per la maggiorazione deve essere
ordinata a parte.
ATTENZIONE: nel momento in cui si innesta/toglie una scheda di memoria, la centrale
deve essere spenta.
IMPORTANTE: se si utilizza una scheda di memoria, quella interna alla centrale da 86
codici viene disabilitata.
14
K126MA
Page 15

RESET MEMORIA RADIO:
- tenere premuti i tasti CH1 e PROG no a che i led DL7 e DL8 iniziano a lampeggiare velocemente
entrambi in giallo. A questo punto, rilasciare i tasti e premerli nuovamente no a che i led si spengono, a conferma che l’operazione è terminata (se non vengono premuti e si resta in attesa, la
scheda ritorna in funzionamento normale dopo circa 12 secondi).
RESET DI FABBRICA (impostazioni di fabbrica):
- tenere premuti i tasti CH2 e PROG no a che i led DL7 e DL8 iniziano a lampeggiare velocemente entrambi in rosso. A questo punto, rilasciare i tasti e premerli nuovamente no a che i led si
spengono (reset in corso), a conferma che l’operazione è terminata (se non vengono premuti e si
resta in attesa, la scheda ritorna in funzionamento normale dopo 12 secondi). Alla ripartenza, sarà
necessario eseguire la procedura di memorizzazione.
Effettuando un reset di fabbrica la memoria radio rimane invariata, pertanto i radiocomandi esistenti rimangono memorizzati.
MALFUNZIONAMENTI: POSSIBILI CAUSE E RIMEDI
L’automazione non parte
a- Vericare con lo strumento (Multimetro) la presenza dell’alimentazione 230 V AC.
b- Vericare, in modalità standard, che i contatti N.C. della scheda siano effettivamente normal-
mente chiusi (4 led verdi accesi).
c- Impostare il dip 6 (fototest) su OFF.
d- Aumentare il trimmer FR al massimo.
e- Controllare con lo strumento (Multimetro) che i fusibili siano integri.
Il radiocomando ha poca portata
a- Controllare che il collegamento della massa e del segnale dell’antenna non sia invertito.
b- Non eseguire giunzioni per allungare il cavo dell’antenna.
c- Non installare l’antenna in posizioni basse o in posizioni nascoste dalla muratura o dal pila-
stro.
d- Controllare lo stato delle pile del radiocomando.
L’automazione si apre al contrario
Invertire tra loro i collegamenti del motore sulla morsettiera, morsetti 28 - 29 e morsetti 23 - 24
(se utilizzati).
ITALIANO
GARANZIA: CONDIZIONI GENERALI
La garanzia della TAU ha durata di 24 mesi dalla data di acquisto dei prodotti (fa fede il documento
scale di vendita, scontrino o fattura).
La garanzia comprende la riparazione con sostituzione gratuita (franco sede TAU: spese di imballo e
di trasporto sono a carico del cliente) delle parti che presentano difetti di lavorazione o vizi di materiale
riconosciuti dalla TAU.
In caso di intervento a domicilio, anche nel periodo coperto da garanzia, l’utente è tenuto a corrispondere il “Diritto sso di chiamata” per spese di trasferimento a domicilio, più manodopera.
La garanzia decade nei seguenti casi:
• Qualora il guasto sia determinato da un impianto non eseguito secondo le istruzioni fornite
dall’azienda all’interno di ogni confezione.
• Qualora non siano stati impiegati tutti componenti originali TAU per l’installazione dell’automa-
tismo.
• Qualora i danni siano causati da calamità naturali, manomissioni, sovraccarico di tensione,
alimentazione non corretta, riparazioni improprie, errata installazione, o altre cause non impu-
tabili alla TAU.
• Qualora non siano state effettuate le manutenzioni periodiche da parte di un tecnico specia-
K126MA
15
Page 16

lizzato secondo le istruzioni fornite dall’azienda all’interno di ogni confezione.
• Usura dei componenti.
La riparazione o la sostituzione dei pezzi durante il periodo di garanzia non comporta un prolungamento del
termine di scadenza della garanzia stessa.
ITALIANO
In caso di utilizzo industriale o professionale oppure in caso di impiego simile, tale garanzia ha validità 12 mesi.
16
K126MA
Page 17

MANUFACTURER’S DECLARATION OF INCORPORATION
(in accordance with European Directive 2006/42/EC App. II.B)
Manufacturer: TAU S.r.l.
Address: Via E. Fermi, 43
36066 Sandrigo (Vi)
ITA LY
Declares under its sole responsibility, that the product: Electronic control unit
designed for automatic movement of: Sliding gates
for use in a: Residential / Communities / Industrial
complete with: Radioreceiver and battery charger board
Model: K126MA
Type: K126MA
Serial number: see silver label
Commercial name: Control panel for one 12/24V motor with encoder
Has been produced for incorporation on an access point (sliding gate) of for assembly with other devices used
to move such an access point, to constitute a machine in accordance with the Machinery Directive 2006/42/EC.
Also declares that this product complies with the essential safety requirements of the following EEC directives:
- 2006/95/EC Low Voltage Directive
- 2004/108/EC Electromagnetic Compatibility Directive
and, where required, with the Directive:
- 1999/5/CE Radio equipment and telecommunications terminal equipment
Also declares that it is not permitted to start up the machine until the machine in which it is incorporated or of
which it will be a component has been identied with the relative declaration of conformity with the provisions of
Directive 2006/42/EC.
ENGLISH
The manufacturer undertakes to provide, on sufciently motivated request by national authorities, all information
pertinent to the quasi-machinery.
Sandrigo, 27/11/2014
Legal Representative
_________________________________________
Name and address of person authorised to draw up all pertinent technical documentation:
Loris Virgilio Danieli - via E. Fermi, 43 - 36066 Sandrigo (Vi) Italy
K126MA
Loris Virgilio Danieli
17
Page 18

WARNINGS
This manual is designed to assist qualied installation personnel only. It contains no information that
may be of interest to nal users. This manual is enclosed with control unit K126MA and may therefore
not be used for different products!
ENGLISH
Important warnings:
Disconnect the mains power supply to the board before accessing it.
The K126MA control unit has been designed to control an electromechanical gear motor for automat-
ing gates and doors of all kinds.
Any other use is considered improper and is consequently forbidden by current laws.
Please note that the automation system you are going to install is classi ed as “machine construction”
and therefore is included in the application of European directive 2006/42/EC (Machinery Directive).
This directive includes the following prescriptions:
- Only trained and qualied personnel should install the equipment;
- the installer must rst make a “risk analysis” of the machine;
- the equipment must be installed in a correct and workmanlike manner in compliance with all the
standards concerned;
- after installation, the machine owner must be given the “declaration of conformity”.
This product may only be installed and serviced by qualied personnel in compliance with current,
laws, regulations and directives.
When designing its products, TAU observes all applicable standards (please see the attached declaration of conformity) but it is of paramount importance that installers strictly observe the same standards when installing the system.
Unqualied personnel or those who are unaware of the standards applicable to the “automatic gates
and doors” category may not install systems under any circumstances.
Whoever ignores such standards shall be held responsible for any damage caused by the
system!
Do not install the unit before you have read all the instructions.
INSTALLATION
Before proceeding, make sure the mechanical components work correctly. Make sure the gate
runs freely on a at surface. Then make sure that the power consumption of the gear motor is
not greater than 3A (otherwise the control panel may not work properly). Havig followed the
previous points, now make sure the motor has a proper absorption. The K126 board starting
from V5.17 release integrates a function to verify the absorption on the complete gate journey
(Check paragraph ABSORPTION CHECK FUNCTION).
THE EQUIPMENT MUST BE INSTALLED “EXPERTLY” BY QUALIFIED PERSONNEL AS REQUIRED BY LAW.
Note: it is compulsory to earth the system and to observe the safety regulations that are in
force in each country.
IF THESE ABOVE INSTRUCTIONS ARE NOT FOLLOWED IT COULD PREJUDICE THE PROPER
WORKING ORDER OF THE EQUIPMENT AND CREATE HAZARDOUS SITUATIONS FOR PEOPLE. FOR THIS REASON THE “MANUFACTURER” DECLINES ALL RESPONSIBILITY FOR ANY
MALFUNCTIONING AND DAMAGES THUS RESULTING.
18
K126MA
Page 19

CONTROL PANEL FOR ONE 18/24V MOTOR WITH ENCODER
• ABSORPTION CHECK FUNCTION
• STATUS OF INPUTS SIGNALLED BY LEDs
• INCORPORATED FLASHING CIRCUIT
• ENCODER SENSOR FOR SELF-LEARNING OF TRAVEL
• 433.92 MHz 2 CHANNEL BUILT-IN RADIO RECEIVER (CH)
• BATTERY CHARGER BOARD (INTEGRATED)
• DIAGNOSTICS OF MALFUNCTIONS SIGNALLED BY LED
• POSSIBILITY OF ENERGY SAVING OPERATION
ATTENTION:
- do not use single cables (with one single wire), ex. telephone cables, in order to avoid
breakdowns of the line and false contacts;
- do not re-use old pre-existing cables;
- we recommend to use the TAU cable code M-03000010C0 to connect the motors to the
control board.
INTRODUCTION
The K126MA board has two working modes, selectable through the J6 jumper (see wiring diagram).
J6 Jumped: standard mode, i.e. the control unit is powered all the time;
J6 Not jumped: low consumption mode, at the end of each maneuver the board automatically switches
OFF itself and all the auxiliary devices connected. The board will automatically switch
ON again activating the OP/CL contact or pressing the remote (mode where power is
supplied by other energy sources, ex. batteries charged by a photovoltaic panel).
Once the connection is achieved, in low-energy mode, press the PROG button briey:
• All the green LEDs must be on (each of them corresponds to a Normally Closed input). The go off
only when the controls to which they are associated are operated.
• All the red LEDs must be off (each of them corresponds to a Normally Open input). The light up
only when the controls to which they are associated are operated.
TECHNICAL CHARACTERISTICS
Board power supply 13,5V1 AC - 50 Hz
Max motor power DC 300VA - 18V2 DC
Fast acting fuse for protection of input power supply 13,5V AC (F4 - 5x20) F 16A
Fast acting fuse for battery charger protection (F5 - 5x20) F 10A
Fast acting fuse for protection of auxiliary circuits 18V2 DC (F3 - 5x20) F 2A
Motor power supply circuits voltage 18V2 DC
Auxiliary device circuits supply voltage 18V2 DC
Logic circuits supply voltages 5V DC
Operating temperature -20 °C ÷ +55 °C
1
18V for MASTER-R and T-ONE8BR
2
24V for MASTER-R and T-ONE8BR
ENGLISH
CONNECTIONS TO TERMINAL BOARD
Terminals Function Description
13,5V (18V for MASTER-R and T-ONE8BR) AC control unit pow-
FS1 - FS2 POWER SUPPLY
er supply input – Fed by the toroidal transformer and protected
by the fuses on the 230V AC power supply.
external power input (ex. Photovoltaic system 12V DC).
Note: if this input is used, jump J7 appropriately (see wiring
diagram).
1 - 2 AUX INPUT
ATTENTION: POWERING THE CONTROL UNIT WITH AN EXTERNAL SOURCE, ALL THE OTHER 18V (24V for MASTERR) DC OUTPUTS BECOME THE SAME AS THE OUTSIDE
VOLTAGE.
K126MA
19
Page 20

3 - 6 PEDESTRIAN
4 - 6 OPEN/CLOSE
ENGLISH
5 - 6 STOP
7 - 8
7 - 9
7 - 10
INTERNAL
PHOTOCELLS
EXTERNAL
PHOTOCELLS
SENSITIVE
EDGE
11 - 12 ** AUX
12 - 13 ** TX PHOTOCELLS
14 - 15 **
16 - 17* **
16 - 18* **
20
FLASHING
LIGHT
GATE OPEN
LIGHT
COURTESY
LIGHT
N.O. input for PEDESTRIAN button - Controls prtial opening and
closing (1/3 of the complete journey) and it is subject to the setting
of DIP SW 2 and 4.
(3= PED - 6= COM)
OPEN/CLOSE button N.O. input – Controls the opening and clos-
ing of the automation and is regulated based on the function of
dip-switches 2 and 4. (4= O/C - 6= COM)
STOP button N.C. input – Stops the automation in any position, tempo-
rarily preventing the automatic closure, if programmed.
(5= STOP - 6= COM )
NOTE: A safety micro-switch is connected to the STOP pushbutton. In case the STOP input remains open for more than 5 seconds, the operator will perform a cycle at a slow speed to reset the
operating parameters to the values originally saved (see “Restoring
automatic operation”). The micro-switch should be connected in
series to further STOP push-buttons where present.
PHOTOCELL OR SAFETY DEVICE input INSIDE the gate (Normally Closed contact). When these devices trigger during the
opening phase, they temporarily stop the gate until the obstacle
has been removed; during the closing phase they stop the gate
and then totally open it again. Bridge the connectors if not used.
(7= COM - 8= CLOSE)
PHOTOCELL OR SAFETY DEVICE input OUTSIDE the gate
(Normally Closed contact). Then these devices trigger during the
closing phase, they stop the gate and then totally open it again.
Bridge the connectors if not used. (7= COM - 9= FOT)
Note: the photocell transmitter must always be supplied by
terminals no. 12 and no. 13, since the safety system test
(phototest) is carried out on it. Without this connection, the
control unit does not work. To override the testing of the
safety system, or when the photocells are not used, set dipswitch no. 6 to OFF.
SENSITIVE EDGE input (resistive sensitive edge or xed safety
edge); Works only when the gate is opening; temporarily stops
the gate and partially closes it by about 20 cm in order to allow
the obstacle to be removed. Bridge the connectors if not used.
(7= COMMON - 10= SENSITIVE EDGE)
auxiliary circuits output 18V1 DC max. 15 W for photocells, receivers, etc... (11= NEGATIVE - 12= POSITIVE)
If the jumper J6 is not plugged in, at the end of each maneuver
this output (11 and 12) will be switched off (energy saving mode).
18V1 DC output for transmitter photocell – phototest - max. no. 1
photocell transmitters. (12= POSITIVE - 13= NEGATIVE)
18V1 DC max. 20W output for ashing light supply, ashing sig-
nal supplied by the control unit, rapid for closing, slow for open-
ing. (14= POSITIVE - 15= NEGATIVE)
Output for OPEN GATE LIGHT 18V1 DC, 3 W max; while the bar
opens the light ashes slowly, when the bar is open it stays on
and while closing it ashes at twice the speed.
(16= POSITIVE - 17= NEGATIVE)
18V1 AC, 15 W Output for auxiliary courtesy light.
It comes on with the control pulse and stays ON until after the
manoeuvre for a time settable through TAUPROG (default = 2 sec.)
(16=POSITIVE - 18= NEGATIVE)
K126MA
Page 21
2nd radio channel output - for control of an additional automation
or for switching on lights, etc... (N.O. clean contact)
Warning: to connect other devices to the 2nd Radio Channel
(area lighting, pumps, etc.), use an additional auxiliary relay
19 - 20* 2nd CH RADIO
(see note at end of paragraph).
WARNING: the default outlet is active monostable 2 sec. To
switch it to active bistable or to modify the activation time
it is necessary to use the TAUPROG hand-held programmer
(see relative instructions).
21 - 22 AERIAL
23 - 24 MOTOR (M2)
plug-in radio-receiver aerial input , for 433.92 MHz receivers
only. (21= GROUND - 22= SIGNAL)
motor (M2) supply output 18V DC max. 300 VA.
(23= POSITIVE - 24= NEGATIVE) See note below.
25 - 26 - 27 ENCODER (M2) Not in use
28 - 29 MOTOR (M1)
30 - 31 - 32 ENCODER (M1)
1
24V for MASTER-R and T-ONE8BR
motor (M1) supply output 18V DC max. 300 VA.
(28= POSITIVE - 29= NEGATIVE)
encoder supply and input (30= WHITE signal - 31= BLUE negative - 32= BROWN positive)
* The outlets can be congured using the TAUPROG (see relative instructions). The standard con-
guration is shown in the table.
** If Jumper 6 is not plugged in, energy saving mode will be activated and, at the end of each man-
ouvre, outputs 11-12, 12-13, 14-15, 16-17 and 16-18 will be switched off.
The terminal board for motor 2 (23-24) is to be used in support of the one for motor 1
(MASTER18QR / MASTER-R), or in case of fault/failure of the one for motor 1 (28-32),
see wiring diagram page 2-3.
IMPORTANT:
• do not power up auxiliary relays o other devices through the 18V output (24V for MASTER-
R) DC output (terminals 11 – 12) to avoid malfunctions of the control unit. Use separated
power supply / transformers instead;
• do not connect switching feeders or similar apparatus close to the automation that may be
a source of disturbance.
ENGLISH
LOGIC ADJUSTMENTS
Make the logic adjustments.
Note: when any adjusting devices (trimmers or dip-switches) on the control panel are operated,
a complete manoeuvre must be carried out in order for the new settings to take effect.
TRIMMER
T.C.A. Automatic Closing time adjustment: from about 1 to 120 seconds (see dip-switch
no. 1);
FR. obstacle detection sensitivity adjustment.
Note: by rotating the TRIMMER FR. clockwise the sensitivity of the gearmotor
to obstacles diminishes and therefore the thrust force increases; vice-versa, by
rotating it counter-clockwise, the sensitivity of the gearmotor to obstacles
increases and therefore the thrust force diminishes.
Dip switch
when completely open, closure is automatic after the set time on the
1
AUTOMATIC
CLOSING
On
T.C.A. trimmer has past.
Off the closing manoeuvre requires a manual command.
K126MA
21
Page 22
when the automation is operating, a sequence of opening/closing com-
On
mands causes the automation to OPEN-CLOSE-OPEN-CLOSE, etc.
2 2 / 4 STROKE
CLOSES AGAIN
3
ENGLISH
4 NO REVERSE
5
6 FOTOTEST
7
8
9-10-11 Automation type selection
12
AFTER THE
PHOTOCELL
PRE-
FLASHING
MASTER/
SLAVE
BACK
JUMP
Dip 9 Dip 10 Dip 11 Automation
Off Off Off TONE-5B
On Off Off TONE-10B
Off On Off TONE-8BR (24v)
On On Off MASTER-R (24V Opening speed = Closing speed)
Off Off On MASTER18QR
On Off On MASTER-R (24V)
Off On On CANTILEVER (light)
On On On CANTILEVER TONE10B (heavy)
IMPORTANT: In case the automation type change, a new setting of the dips # 9, 10 and
11 will be required. Before the new setup, however, it is necessary to proceed to a HARD
RESET (see pag. 25) of the controller.
SENSITIVE
EDGE
in the same conditions, the same sequence of commands causes the
Off
automation to OPEN-STOP-CLOSE-STOP-OPEN-STOP, etc . (step-by
step function) (see also dip switch 4).
after the photocell is activated (input 7 - 9), the automation closes
On
automatically after 5 seconds.
Off function off.
the automation ignores the closure command during opening and
On
auto-close time
Off the automation responds as established by dip switch No. 2.
On the pre-ashing function is enabled.
Off the pre-ashing function is disabled.
On the “photocell test” function is enabled.
the “photocell test” function is disabled.
Off
Note: to be used when the photocells are not used.
enables the MASTER mode in the master/slave conguration (see T-
On
COMM instructions).
enables the SLAVE mode in the master/slave conguration (see T-
Off
COMM instructions), or standard operation (single motor).
once reached the mechanical stop (either while opening or closing) the
On
operator will reverse slightly to avoid jamming between pinion and rack.
Off function not activated.
On RESISTIVE SENSITIVE EDGE (terminal No. 10).
FIXED EDGE (NC contact – terminal No. 10).
Off
Note: if not used, keep the DIP in the OFF position.
MEMORIZATION PROCEDURE
WARNING: After powering the control panel, wait 2 seconds before you start performing the
adjustment operations.
Note: the mechanical stops of the automation must be regulated both in opening and in closing [see motor instructions].
When you have completed the installation procedures:
Check the position of dip-switches 9, 10 and 11. Dip-switches must be set according to
the automation model (see table of dip-switches 9-10-11, “Logic adjustments” section).
It is recommended to start the learning process with the gate at 0,5 m from closing mechanical stop.
Press without releasing the PROG button till the DL8 LED starts ashing (yellow):
22
K126MA
Page 23
- the automation starts to open slowly looking for the opening limit stop;
If the automation closes instead of opening, stop the run of the gate (by cutting the photocells or closing the STOP contact), invert the polarity of the motor, take the gate in the
closed position (on the mechanical stop) and restart the procedure from the beginning.
Note: if the automation does not work, check the input connections. The DL6, DL5, DL4
and DL3 green LEDS must be on.
- once the limit stop is reached, the automation starts closing looking for the closing limit stop (in
this phase the control unit gathers all the parameters regarding the run);
- the automation carries out one complete opening to optimize the opening power;
- after a short pause, the automation carries out one complete closure to optimize the closing power.
WARNING:
- The procedure can be stopped by pressing the STOP button.
- During the various stages of the operation, if the sensor is activated saving is stopped. To
restart the procedure from the beginning (with the DL8 yellow LED ashing), use the AP/
CH control, the remote control (if programmed) or press the PROG button briey.
Please remember that an obstacle during saving is interpreted as a mechanical limit stop
(the system does not start any safety operation, it just stops the motors).
Make sure you don’t stand near the automation during saving.
K126MA CHARACTERISTICS
TIMER-OPERATED OPENING AND CLOSING CYCLES
The opening/closing of the automation can be controlled by means of a timer that has a free N.O.
output contact (relay). The timer must be connected to terminals 4 - 6 (OPEN/CLOSE button) and can
be programmed so that, at the desired opening time, the relay contact closes until the desired closing
time (when the timer’s relay contact opens, enabling the automatic closing of the gate).
Note: the automatic closing function must be enabled by setting Dip-switch no. 1 to ON).
BATTERY CHARGER BOARD (INTEGRATED)
If the battery is connected the automation will operate in any case if there is no mains power supply. If the voltage drops below 11.3 Vdc, the automation ceases to operate (the control unit remains
fed); whereas, when the voltage drops below 10.2 Vdc, the card completely disconnects the battery
(the control panel is no longer fed). During battery operation, LOW CONSUMPTION MODE will be
automatically activated. At the end of each maneuver 11-12, 12-13, 14-15, 16-17 and 16-18 will be
powered off. In order to connect the battery to the control board, it is required a specic connector
supplied along with the battery.
Note: when the battery-mode is activated the system switches in low-power mode therefore the
auxiliary outputs (11-12) are disabled. (For use of external receivers, Gsm, etc. connect these
in parallel to the battery).
ENGLISH
OBSTACLE DETECTION
If the obstacle detection function (adjustable through FR trimmer) is activated during an opening manoeuvre, the gate closes approx. 20 cm., if it is activated during a closing manoeuvre, the gate opens
all the way .
WARNING: the control panel logics may interpret mechanical friction as an obstacle.
DIAGNOSTICS LED
DL1 - Red PEDESTRIAN button LED signal
DL2 - Red OPEN/CLOSE button LED signal
DL3 - Green STOP button LED signal
DL4 - Green INTERNAL PHOTOCELLS LED signal
DL5 - Green EXTERNAL PHOTOCELLS LED signal
DL6 - Green SENSITIVE EDGE LED signal
K126MA
23
Page 24
LED - DL7
Apart from highlighting the presence of the battery, LED DL7 displays any mistakes with a series of
pre-set ashes in various colours:
Key:
led always on;
led ashing;
always on (green):
always on (yellow):
1 ash every 4 seconds (green):
ENGLISH
fully-charged battery, main voltage present;
battery charging;
fully-charged battery, no main voltage;
Check the main voltage;
1 ash every 4 seconds (yellow):
1 ash every 2 seconds (red):
external power, charger disabled;
low battery;
Charge the battery, replace the battery;
fast ashing (red):
faulty battery;
Replace the battery;
LED - DL8
The DL8 LED indicates mistakes in the board logic with a series of pre-set ashes in different colours:
Key:
led always on;
led ashing;
1 ash every 4 seconds (green):
/ alternate ashing:
(red/green)
fast (yellow) ashing:
1 (red) ash:
normal operation;
saving to be performed;
saving in progress;
phototest error
Disable phototest (dip-switch 6 OFF), check the operation of
the photocells and their connection;
1 (yellow) ash:
2 (red) ashes:
unknown status, next operation REALIGNMENT;
obstacle for motor 1;
Make sure there are no obstacles across the path of the gate
and that it slides smoothly;
2 (yellow) ashes:
obstacle for motor 2 (in case of failure of motor 1 wire terminal and with dip # 10 set in ON);
Make sure there are no obstacles across the path of the gate
and that it slides smoothly;
3 (red) ashes:
no motor 1 encoder signal;
Check wiring, check encoder by TEST-ENCODER (optional);
3 (yellow) ashes:
no motor 2 encoder signal (in case of failure of motor 1 wire
terminal and with dip # 10 set in ON);
Check wiring, check encoder by TEST-ENCODER (optional);
4 (red) ashes:
no motor 1 signal;
Check wiring, check the motor rotates freely and is powered
directly by the battery, check fuse F5;
4 (yellow) ashes:
no motor 2 signal (in case of failure of motor 1 wire terminal
and with dip # 10 set in ON);
Check wiring, check the motor rotates freely and is powered
directly by the battery, check fuse F5;
24
K126MA
Page 25

5 (red) ashes:
5 (yellow) ashes:
6 ashes (red):
6 ashes (yellow):
8 (red) ashes:
8 (yellow) ashes:
Apart from the logic mistakes, the DL8 LED indicates also the status of the control unit during the
saving of the radio controls.
always on (green):
fast ashing (green):
always on (yellow):
fast ashing (yellow):
max current limit for motor 1 exceeded;
Excessive absorption peaks of the gearmotor, check there are
no obstacles on the automation path, check the current absorption of the motor when in a no-load condition and when applied
to the gate,
max current limit for motor 2 exceeded (in case of failure of
motor 1 wire terminal and with dip # 10 set in ON);
Excessive absorption peaks of the gearmotor, check there are
no obstacles on the automation path, check the current absorption of the motor when in a no-load condition and when applied
to the gate
auto-close failed after 5 unsuccessful attempts;
A command input is necessary to perform closing operation;
master/slave communication error;
Check wiring between the controllers, efciency of slave controller (fuses), efciency of interface boards;
Eeprom external memory fault;
Replace the external memory module;
Eeprom data error (internal/external);
Perform procedure RADIO MEMORY RESET;
channel CH1 waiting to be saved;
CH1 channel memory full;
channel CH2 waiting to be saved;
CH2 channel memory full;
ENGLISH
ashing (green):
always on (green):
ashing (yellow):
always on (yellow):
When LEDs DL7 and DL8 ash at the same time they indicate:
ashing + (red + red):
ashing + (yellow + yellow):
Multiple errors are signalled by a 2-second pause between signals.
Should the encoder (obstacle detection) activates while closing, the controller will reverse the direction
and slowly open until the laef reaches its fully opened position. Auto Close function will be deactivated
until a further command pulse is given. In case of 5 consecutive safety interventions the controller will
progressively increase the Auto Close delay. Once the closing has been succesfully achieved, the Auto
Close delay will go back to standard setting.
CH1 channel waiting to be cancelled;
cancelling of channel CH1 in progress;
CH2 channel waiting to be cancelled;
cancelling of channel CH2 in progress;
factory reset procedure waiting for conrmation;
waiting for total cancellation of the radio channels;
ABSORPTION CHECK FUNCTION (from 5.17 release onwards)
This function allows to monitor the absorption during a complete cycle in order to value the motor stress.
To activate this function press and hold for 2 seconds simultaneously CH1, PROG, CH2 and them start
the motor (OP/CL contact, remote, PROG button).
K126MA
25
Page 26

CH2
CH1
PROG
The absorption registered is shown according to the following diagram:
Level DL7 DL8
(Off) (Off)
(Green) (Off)
ENGLISH
(Green) (Green)
(Green) (Yellow)
(Yellow) (Green)
(Yellow) (Yellow)
(Yellow) (Red)
(Red) (Yellow)
(Red) (Red)
After 5 minutes from the function activation, the board automatically resumes to the standard LED
visualization (to resume manually press simultaneously CH1, PROG and CH2).
RESTORING AUTOMATIC OPERATION
Should the Bar need to be operated manually, use the release system. After the manual operation:
• after a Mains Power Failure, such as a black-out (controller remains disconnected for a certain
time) or after a manual release (without power shortage to the controller for more than 5 seconds),
the automation will be moving slowly to allow the Controller to establish its Limits (REALIGNMENT
procedure).
433.92 MHz BUILT-IN RADIO RECEIVER
The radio receiver can learn up to a maximum of 86 rolling codes (BUG2R, BUG4R, K-SLIM-RP, T-
4RP) which can be set on the two channels as required.
The rst channel directly commands the control board for opening the automatic device; the second
channel commands a relay for a N.O. no-voltage output contact (terminals 19 - 20, max. 24V AC, 1 A)
and the third channel controls directly the pedestrian opening from the controller.
LEARNING SYSTEM FOR RADIO CONTROL DEVICES
CH1 = 1st channel (only OPEN/CLOSE)
CH2 = 2nd channel
CH3 = 3rd channel (only PEDESTRIAN)
1_ press button CH1 briey to associate a radio control device with the OPEN/CLOSE function;
2_ the (green) DL8 LED is ON to indicate the code learning mode has been activated (if no code is
entered within 10 seconds the board exits the programming function);
3_ press the button of the relative radio control device;
4_ the (green) DL8 LED turns off to indicate saving is complete and then on again immediately wait-
ing for other radio control devices (if this is not the case, try to re-transmit or wait 10 seconds and
restart from point 1);
5_ to memorise codes to other radio control devices, press the key to be stored on other devices
within 2-3 sec. After this time (DL8 LED turns off) must repeat the procedure from point 1 (up to a
maximum of 86 transmitters);
6_ if you wish to save on the 2nd channel, repeat the procedure from point 1 using the CH2 key instead
26
K126MA
Page 27

of CH1 (in this case the DL8 LED is yellow);
7_ to program transmitters into the third channel, repeat procedure from point 1 using CH1 and CH2
buttons at the same time (DL8 will turn on red);
8_ to exit the learning mode without memorising a code, press button CH1 or CH2 briey.
If the maximum number of radio controls is reached (86), DL8 LED blinks for approx 3
seconds without starting the learning process.
REMOTE PROGRAMMING BY MEANS OF T-4RP and K-SLIM-RP (V 4.X)
With the new version of software V 4.X it is possible to carry out the remote self-learning of the new
version of transmitters T-4RP and K-SLIM-RP (V 4.X), that is without pressing the receiver’s program-
ming buttons.
It will be sufcient to have an already programmed transmitter in the receiver in order to start the procedure of remote programming of the new transmitters. Follow the procedure written on the instruc-
tions of the transmitter T-4RP and K-SLIM-RP (V 4.X).
CANCELLING CODES FROM RADIO CONTROL DEVICES
1_ keep button CH1 pressed for 3 seconds in order to cancel all the associated radio control devices;
2_ LED DL8 ashes slowly to indicate that the cancellation mode has been activated;
3_ press button CH1 again for 3 seconds;
4_ LED DL8 turns off for approx. 3 seconds and then remains steady to indicate that the code has
been cancelled;
5_ repeat the procedure from point 1 using button CH2 to cancel all the associated radio control devices;
6_ repeat procedure from point 1 using CH1 and CH2 buttons at the same time to erase all transmit-
ters programmed into the third channel;
7_ to exit the learning mode without memorising a code, press button CH1 or CH2 briey.
MEMORY CAPACITY
The code memory capacity* of the K126MA can be expanded from 86 to 126, 254 or 1022 codes (trans-
mitters) by replacing the memory cards as follows
on page 2-3)
:
(plug them onto J3 connector, refer to wiring diagram
126 codes Art. 250SM126
254 codes Art. 250SM254
1022 codes Art. 250SM1022
ENGLISH
* Control units are supplied with a standard built-in 86-code memory. The memory card for enhancing the
code memory capacity must be ordered separately.
WARNING: Control unit must be turned OFF to insert / remove a memory card.
IMPORTANT: when a memory card is used, the control unit’s built-in 86 codes memory
is disabled.
RADIO MEMORY RESET:
- press without releasing keys CH1 and PROG till LEDs DL7 and DL8 start ashing quickly with a
yellow light. At this point release the keys and press them again till the LEDs go off conrming the
operation is complete (if they are not pressed the board reverts to normal operation after about 12
seconds).
HARD RESET (factory setting):
- press without releasing keys CH2 and PROG till LEDs DL7 and DL8 start ashing quickly with a
red light. At this point release the keys and press them again till the LEDs go off (reset in progress),
conrming the operation is complete (if they are not pressed the board reverts to normal operation
after about 12 seconds); When the unit starts again saving will be required.
K126MA
27
Page 28

In case of Hard Reset the memory of the radio receiver will not be erased: all existing
transmitters remain programmed.
MALFUNCTIONS: POSSIBLE CAUSES AND SOLUTION
The automation does not start
a- Check there is 230V AC power supply with the multimeter.
b- Check, in the standard mode, that the NC contacts on the board are really normally closed (4
green LEDs on).
c- Set dip-switch 6 (phototest) OFF.
d- Increase the FR trimmer to the limit.
ENGLISH
e- Check that the fuses are intact with the multimeter.
The radio control has very little range
a- Check that the ground and the aerial signal connections have not been inverted.
b- Do not make joints to increase the length of the aerial wire.
c- Do not install the aerial in a low position or behind walls or pillars.
d- Check the state of the radio control batteries.
The gate opens the wrong way
Invert the motor connections on the terminal block, terminals 28 - 29 and terminals 23 - 24 (if
used).
GUARANTEE: GENERAL CONDITIONS
TAU guarantees this product for a period of 24 months from the date of purchase (as proved by the
sales document, receipt or invoice).
This guarantee covers the repair or replacement at TAU’s expense (ex-works TAU: packing and
transport at the customer’s expense) of parts that TAU recognises as being faulty as regards work-
manship or materials.
For visits to the customer’s facilities, also during the guarantee period, a “Call-out fee” will be charged
for travelling expenses and labour costs.
The guarantee does not cover the following cases:
• If the fault was caused by an installation that was not performed according to the instructions
provided by the company inside the product pack.
• If original TAU spare parts were not used to install the product.
• If the damage was caused by an Act of God, tampering, overvoltage, incorrect power supply,
improper repairs, incorrect installation, or other reasons that do not depend on TAU.
• If a specialised maintenance man does not carry out routine maintenance operations accord-
ing to the instructions provided by the company inside the product pack.
• Wear of components.
The repair or replacement of pieces under guarantee does not extend the guarantee period.
In case of industrial, professional or similar use, this warranty is valid for 12 months.
28
K126MA
Page 29

INTEGRIERUNGSERKLÄRUNG DES HERSTELLERS
(gemäß der Europäischen Richtlinie 2006/42/EG Anl. II.B)
Hersteller: TAU S.r.l.
Adresse: Via E. Fermi, 43
36066 Sandrigo (Vi)
ITA LY
Erklärt unter seiner Haftung, dass das Produkt: Elektronische Steuerung
für die automatische Bewegung von: Schiebetore
für eine Anwendung: Privat / Gewerbe / Industrie
Einschließlich: Empfänger und Batterieladekarte
Modell: K126MA
Typ: K126MA
Seriennummer: siehe Silberetikette
Handelsbezeichnung: Steuerplatine für einen 12/24V Motor mit Enco-
der
ausgeführt wurde, um in einen Verschluss integriert zu werden (Schiebetore) oder um mit anderen Vorrichtungen
kombiniert zu werden, um diesen Verschluss zu bewegen, und somit gemäß der Maschinenrichtlinie 2006/42/EG
eine Maschine darstellt.
Außerdem erklärt er, dass dieses Produkt den grundsätzlichen Sicherheitseigenschaften der folgenden Richtlinien EWG entspricht:
- 2006/95/EG Niederspannungsrichtlinie
- 2004/108/EG Richtlinie für elektromagnetische Kompatibilität
Und wo gefordert, der Richtlinie:
- 1999/5/CE Radio equipment and telecommunications terminal equipment
Außerdem wird erklärt, dass es nicht zugelassen ist, die Vorrichtung in Betrieb zu setzen, bis die Maschine, in
die sie integriert wird oder deren Bestandteil sie sein wird, identiziert und die Konformität gegenüber dem Inhalt
der Richtlinie 2006/42/EG erklärt wurde.
DEUTSCH
Er verpichtet sich, auf ausdrücklichen Wunsch der nationalen Behörden, Informationen über die Fastmaschinen
zu übersenden.
Sandrigo, 27/11/2014
Der gesetzliche Vertreter
_________________________________________
Name und Adresse der beauftragten Person zur Vorlegung der zugehörigen technischen Unterlagen:
Loris Virgilio Danieli - via E. Fermi, 43 - 36066 Sandrigo (Vi) Italy
K126MA
Loris Virgilio Danieli
29
Page 30

HINWEISE
Das vorliegende Handbuch ist nur für technisches, zur Installation qualiziertes Personal bestimmt.
Die im vorliegenden Heft enthaltenen Informationen sind für den Endbenutzer nicht interessant. Diese Anleitung liegt der Steuerung K126MA bei und darf daher nicht für andere Produkte verwendet
werden!
Wichtige Hinweise:
Vor Eingriffen an der Steuerkarte die Netzstromversorgung abtrennen.
Die Steuerung K126MA dient zum Steuern eines elektromechanischen Getriebemotors für die Automatisierung von Türen und Toren.
Jeder andere Einsatz ist unsachgemäß und daher laut gültiger Vorschriften verboten.
Unsere Picht ist, Sie daran zu erinnern, dass die Automatisierung, die Sie ausführen werden, als
DEUTSCH
„Maschinenkonstruktion“ klassiert ist und daher zum Anwendungsbereich der Europäischen Richtlinie
2006/42/CE (Maschinenrichtlinie) gehört.
Nach den wichtigsten Punkten dieser Vorschrift:
- darf die Installation ausschließlich von erfahrenem Fachpersonal ausgeführt werden;
- muss jener, der die Installation ausführt, vorher eine „Risikoanalyse“ der Maschine machen;
- muss die Installation “fachgerecht” bzw. unter Anwendung der Vorschriften ausgeführt sein;
- muss dem Besitzer der Maschine die „Konformitätserklärung” ausgehändigt werden.
Es ist daher offensichtlich, dass Installation und eventuelle Wartungseingriffe nur von beruich qualiziertem Personal in Übereinstimmung mit den Verordnungen der gültigen Gesetze, Normen und
Vorschriften ausgeführt werden dürfen.
Bei der Planung ihrer Apparaturen hält sich TAU an die für das Produkt anwendbaren Vorschriften
(siehe anliegende Konformitätserklärung); von grundlegender Wichtigkeit ist, dass sich auch der Installateur bei der Durchführung der Anlage genauestens an die Vorschriften hält.
Personal, das nicht qualiziert ist oder die Vorschriften nicht kennt, die für die Kategorie “automatische Türen und Tore” anwendbar sind, darf Installationen und Anlagen keinesfalls ausführen.
Wer sich nicht an die Vorschriften hält, haftet für die Schäden, die von der Anlage verursacht
werden können.
Vor der Installation bitte alle Anweisungen genau lesen.
INSTALLATION
Bevor man weitermacht, den korrekten Betrieb des mechanischen Teils überprüfen und konrollieren, ob der Getriebemotor richtig nach den jeweiligen Anweisungen installiert ist. Prüfen,
daß das Schiebetor frei auf einem waagerechten Plan läuft. Nach dem diese Kontrollen ausgefürt sind, muß sichergestellt werden, daß der Getriebemotor eine angemessene Absorption
hat Die Platine von Ver. 5.17 ab verfügt über eine Funktion, die die erforderliche Beanspruchung während der Bewegung anzeigt (siehe Abschnitt FUNKTION ANZEIGE DER MOTORBEANSPRUCHUNG).
DAS GERÄT MUSS GEMÄß GESETZ FACHGERECHT VON QUALIFIZIERTEM PERSONAL INSTALLIERT WERDEN.
Anmerkung: Bitte beachten Sie, dass die Erdung der Anlage und die Einhaltung der in jedem
Land gültigen Sicherheitsvorschriften Picht ist.
DAS NICHTEINHALTEN DER OBEN ANGEFÜHRTEN ANLEITUNGEN KANN DEN EINWANDFREIEN BETRIEB DES GERÄTS BEEINTRÄCHTIGEN UND GEFAHREN FÜR PERSONEN HERVORRUFEN. DER HERSTELLER HAFTET DAHER NICHT FÜR BETRIEBSSTÖRUNGEN UND SCHÄDEN, DIE AUF DAS NICHTEINHALTEN DER ANLEITUNGEN ZURÜCKZUFÜHREN SIND.
30
K126MA
Page 31

STEUERPLATINE FÜR EINEN 18/24V MOTOR MIT ENCODER
• FUNKTION ANZEIGE DER MOTORBEANSPRUCHUNG
• STATUSANZEIGE DER EINGÄNGE DURCH LEDs
• EINGEBAUTER BLINKKREISLAUF
• ENCODERSENSOR ZUR SELBSTERLERNUNG DES LAUFS
• 433,92 MHz FUNKEMPFÄNGER, EINGEBAUT, 2 KANÄLE (CH)
• BATTERIELADEKARTE (EINGEBAUT)
• STÖRUNGSDIAGNOSE MIT LED-ANZEIGE
• MÖGLICHKEIT DES BETRIEBS MIT NIEDRIGEM VERBRAUCH
ACHTUNG:
- Verwenden Sie keine Leitungen mit Einzeldraht wie z. B. bei den Sprechanlagen, um Unterbrechungen auf der Linie und zu vermeiden;
- Verwenden Sie keine alte vorhandene Verkabelung;
- TAU empfehlt den Sonderkabel M-03000010CO für den Anschluss von Antrieben zur Steuerung.
EINFÜHRUNG
Die Karte K126MA kann mit zwei verschiedenen Betriebsweisen arbeiten, wählbar mit dem Jumper
6 (siehe Verkabelungsplan).
J6 Gebrückt: Modalität Standard, das heißt, das Steuergerät ist immer gespeist;
J6 Nicht gebrückt: Modalität mit geringem Verbrauch, das heißt, das Steuergerät schaltet sich am
Ende jedes Manövers ab und schaltet auch alle Hilfsvorrichtungen ab. Es wird
sich bei jedem Befehl einschalten (Modalität für die eventuelle Speisung mit
anderen Energiequellen, zum Beispiel Batterie geladen über Fotovoltaikpaneel).
Drücken Sie nach dem Anschließen in der Modalität mit geringem Verbrauch kurz die Taste PROG:
• müssen alle grünen LEDs leuchten (jede LED entspricht einem gewöhnlich geschlossenen Eingang). Sie schalten erst ab, wenn die Steuervorrichtungen aktiviert sind, mit denen sie kombiniert
sind.
• müssen alle roten LEDs abgeschaltet sein (jede LED entspricht einem gewöhnlich geöffneten Eingang). Sie leuchten erst auf, wenn die Steuervorrichtungen aktiviert sind, mit denen sie kombiniert
sind.
TECHNISCHE MERKMALE
Versorgung der Steuerkarte 13,5V1 AC - 50 Hz
Höchstleistung des Gleichstrommotors 300VA - 18V2 DC
Schnellsicherung zum Schutz der Eingangsversorgung 13,5 V AC (F4 - 5x20)
F 16A
Flinke Sicherung zum Schutz der Ladegerät (F5 - 5x20) F 10A
Schnellsicherung zum Schutz der Hilfskreise 18V2 DC (F3 - 5x20) F 2A
Spannung der Versorgungskreise des Motors 18V2 DC
Spannung der Versorgungskreise der Hilfsvorrichtungen 18V2 DC
Versorgungsspannungen der logischen Kreisläufe 5V DC
Betriebstemperatur -20 °C ÷ +55 °C
1
18V für MASTER-R und T-ONE8BR
2
24V für MASTER-R und T-ONE8BR
DEUTSCH
ANSCHLÜSSE AM KLEMMENBRETT
Klemmen Funktion Beschreibung
FS1 - FS2 VERSORGUNG
1 - 2
PHOTOVOLTAIC
SYSTEM INPUT
Eingang der 13,5V (18V für MASTER-R und T-ONE8BR) AC
Versorgung der Steuerkarte – versorgt vom Ringtransformator
und geschützt durch Sicherung in der 230V AC Versorgung.
Eingang externe Stromversorgung (z. B. Fotovoltaiksystem 12V
DC).
Anmerkung: J7 in geeigneter Weise überbrücken, wenn dieser Eingang verwendet wird (siehe Verkabelungsplan).
ACHTUNG: BEI SPEISUNG DES STEUERGERÄTES ÜBER
EINE EXTERNE QUELLE NEHMEN ALLE ANDEREN AUSGÄNGE 18V (24V für MASTER-R) DC DEN WERT DER
SPANNUNG DER EXTERNEN QUELLE AN.
K126MA
31
Page 32

3 - 6 GEHFLÜGEL
4 - 6 ÖFFNET/SCHLIEßT
5 - 6 STOP
DEUTSCH
7 - 8
7 - 9
INNEN
FOTOZELLEN
AUSSEN
FOTOZELLEN
7 - 10 TASTLEISTE
11 - 12 ** AUX
12 - 13 **
SENDER
FOTOZELLEN
14 - 15 ** BLINKLEUCHTE
16 - 17* **
KONTROLLLEUCHTE TOR OFFEN
16 - 18* ** HOFLICHT
32
NO-Eingang für GEHFLÜGELTASTE – Er steuert die Teilöffnung
und –schließung des Tors für 1/3 Lauf; seine Funktionsweise
wird über die Dip-Switches 2 und 4 eingestellt.
(3= ÖFFNET - 6= GEM.)
NO-Eingang Taste ÖFFNET/SCHLIEßT – verursacht die Öffnung
und Schließung der Automatisierung und wird über die Dip-
Switches 2 und 4 geregelt. (4= ÖFFNET/SCHLIEßT - 6= GEM.)
NC-Eingang, Taste STOPP – hält die Automatisierung unabhängig
von seiner Position an; stellt die automatische Schließung vorübergehend ab, falls programmiert. (5= STOP - 6= GEM.)
Anmerkung: An die Taste STOPP ist ein Sicherheitsmikroschalter Entriegelung angeschlossen. Wenn der Eingang
STOPP für mehr als 5 Sekunden offen bleibt, wird das nachfolgende Manöver VERLANGSAMT (siehe “Rückstellung
automatischer Betrieb”). Der Mikroschalter wird in Reihe an
eventuelle Tasten STOPP angeschlossen.
Eingang für FOTOZELLEN oder SICHERHEITSVORRICHTUNGEN AUF DER INNENSEITE DES TORS (normal geschlossener Kontakt). Ihr Ansprechen verursacht in Öffnung das vorübergehende Anhalten des Tors, bis das wahrgenommene Hindernis
beseitigt ist, und in Schließung das Anhalten gefolgt von der voll-
ständigen Öffnung des Tors. Falls nicht benutzt, die Klemmen
überbrücken. (7= GEM. - 8=SCHLIEßT)
Eingang für FOTOZELLEN oder SICHERHEITSVORRICHTUNGEN
AUF DER AUSSENSEITE des Tors (normal geschlossener Kontakt).
Ihr Ansprechen verursacht in Schließung das Anhalten gefolgt von der
vollständigen Öffnung des Tors. Falls nicht benutzt, die Klemmen überbrücken. (7= GEMEIN - 9= FOT)
Anmerkung: der Fotozellensender muss immer von den Klemmen Nr. 12 und Nr. 13 gespeist sein, da die Überprüfung des Sicherheitssystems (Fotozellentest) an ihm erfolgt. Ohne diesen
Anschluss funktioniert die Steuerung nicht. Um das Sicherheitssystem nicht zu überprüfen bzw. wenn keine Fotozellen benutzt
sind, muss der Dip-Switch Nr. 6 auf OFF gestellt werden.
Eingang TASTLEISTE (Widerstandsschaltleiste oder feste
Schaltleiste); Funktioniert nur in Öffnung und verursacht das vorübergehende Anhalten des Tors und ein teilweises Wiederschließen um ca. 20 cm, wodurch ein eventuelles Hindernis frei wird.
Falls nicht benutzt, die Klemmen überbrücken.
(7= GEMEIN - 10= TASTLEISTE)
18V1 DC Ausgang für Hilfskreise max. 15 W für Fotozellen, Empfänger, usw. (11= MINUS - 12= PLUS)
18V1 DC Ausgang für Senderfotozelle – Fotozellentest max. Nr.
1 Fotozellensender. (12= PLUS - 13= MINUS)
Wenn der Jumper J6 nicht eingefügt ist, wird diese Ausgang (11 und
12) an dem Ende jedes Manövers abgeschaltet (Modalität Energiespar).
18V1 DC Ausgang für die Versorgung der Blinkleuchte max. 20W.
Das Blinken wird von der Steuerung bestimmt; Langsamblinken
in Öffnung und Schnellblinken in Schließung.
(14= PLUS - 15= MINUS)
Ausgang für KONTROLLLEUCHTE TOR OFFEN max. 18V1 DC.
3 W; während der Öffnung der Automatisierung blinkt die Kon-
trollleuchte langsam, bei offener Automatisierung bleibt sie an
und während der Schließung blinkt sie mit doppelter Geschwindigkeit. (16= PLUS - 17= MINUS)
Ausgang für die zusätzliche 18V1 AC max. 15 W Hoicht;
Leuchtet beim Steuerungsimpuls auf und bleibt für eine Zeit über
das Ende des Manövers hinaus an, die mit TAUPROG eingestellt
werden kann (Default 2 Sek.)
(16= PLUS - 18= MINUS)
K126MA
Page 33

Ausgang 2. Funkkanal – zum Steuern einer anderen Automatisierung
oder zum Einschalten von Lichtern usw. ... (potentialfreier NO-Kontakt).
Achtung: für die Lichtsteuerung (oder andere Belastungen) mit
dem 2. Kanal des Funkempfängers entsprechend stärkere Hilfsre-
19 - 20* 2. FUNKKANAL
lais unbedingt verwenden (siehe Hinweis am Ende des Absatzes).
ACHTUNG: Der Default-Ausgang ist monostabil an für 2 Sek.
Zur Umschaltung auf bistabil aktiv oder zur Änderung der
Aktivierungszeit muss die Programmierung mit dem Handprogrammiergerät TAUPROG vorgenommen werden (siehe
entsprechende Anweisungen).
21 - 22 ANTENNE
23 - 24 MOTOR (M2)
Eingang für steckbare Funkempfängerantenne, nur für 433,92
MHz Empfänger. (21= MASSE - 22= SIGNAL)
Ausgang Motorversorgung 18 V DC max. 300 VA.
(23= PLUS - 24= MINUS) Siehe Hinweis unten
25 - 26 - 27 ENCODER (M2) Nicht benutzt.
28 - 29 MOTOR (M1)
30 - 31 - 32 ENCODER (M1)
1
18V für MASTER-R und T-ONE8BR
Ausgang Motorversorgung 18 V DC max. 300 VA.
(28= PLUS - 29= MINUS)
Versorgung und Encodereingang (30= Weiß Signal - 31= BLAU
minus - 32= BRAUN plus)
* Die Ausgänge können mit TAUPROG konguriert werden (siehe entsprechende Anweisungen). In
der Tabelle werden die Standardkongurierungen angegeben.
** Wenn der Jumper 6 nicht eingesteckt ist, wird die Modalität Energiespar aktiviert und am Ende
jedes Manövers werden die Ausgänge 11-12, 12-13, 14-15, 16-17 und 16-18 abgeschaltet.
Die Klemmleiste für Motor 2 (23-24) wird als Unterstützung für Motor 1 (MASTER18QR /
MASTER-R), oder bei Störungen derjenigen für Motor 1 (28-32) verwendet, siehe Schaltplan auf Seite 2-3.
WICHTIG:
• kein Hilfsrelais oder andere Vorrichtungen an den 18V Ausgang anschließen (24V für
MASTER-R und T-ONE8BR) DC Ausgang (Klemme Nr. 11 – 12) anschließen, um den korrekten Betrieb der Steuerung nicht zu beeinträchtigen. Dafür lieber einen separaten Trafo
verwenden;
• in der Nähe der Automatisierung keine Switching-Speisegeräte oder ähnliche Apparaturen
anschließen, die Störungen verursachen könnten.
DEUTSCH
EINSTELLUNG DER LOGIK
Die Logik einstellen.
Anmerkung: wenn eine Einstellung der Steuertafel verändert wird (Trimmer oder Dip-Switches)
muss die Automatisierung eine vollständige Bewegung (Öffnung und Schließung) durchführen,
damit die neuen Einstellungen aktiviert werden.
TRIMMER
T.C.A. Einstellung der automatischen Schließzeit: von 1 bis ca. 120 Sekunden (siehe
Dip-Switch Nr. 1);
FR. Einstellung des Ansprechvermögens bei der Wahrnehmung von Hindernissen.
Anmerkung: durch Drehung des TRIMMERS FR. im Uhrzeigersinn verringert
sich das Ansprechvermögen des Getriebemotors gegenüber einem Hindernis
und daher erhöht sich die Schubkraft; umgekehrt, durch Drehung gegen den Uhrzeigersinn erhöht sich das Ansprechvermögen des Getriebemotors gegenüber
einem Hindernis und die Schubkraft verringert sich.
K126MA
33
Page 34

Dip-Switch
AUTOMATISCHE
1
2 2 / 4 TAKT
3
DEUTSCH
4
5
6 FOTOTEST
7
8
9-10-11 Automatisierungstyp Selektion
12 TASTLEISTE
SCHLIEßUNG
ERNEUT
SCHLIESSEN
NACH
FOTOZELLE
KEIN
REVERSE
VORWARN-
FUNKTION
MASTER /
SLAVE
BACK
JUMP
Dip 9 Dip 10 Dip 11 Automatisierungstyp
Off Off Off TONE-5B
On Off Off TONE-10B
Off On Off TONE-8BR (24v)
On On Off MASTER-R (24V Öffnungsgeschwindigkeit = Schließgeschwindigkeit)
Off Off On MASTER18QR
On Off On MASTER-R (24V)
Off On On CANTILEVER (licht)
On On On CANTILEVER TONE10B (schwer)
WICHTIG: Falls die Automatisierungstyp sich ändern sollte, dann muß die Einstellung
der DIP-Switches # 9, 10 und 11 entsprechend korrigiert werden.
GANZ WICHTIG: vor der Einstellung ist ein HARD-RESET (siehe Seite 36) erforderlich.
On nach beendeter Öffnung ist die Schließung der Automatisierung nach
Ablauf einer an Trimmer T.C.A. eingestellten Zeit automatisch.
Off für das Schließen ist ein manueller Steuerbefehl erforderlich.
On bei funktionierender Automatisierung, verursacht eine Auf/Zu Befehls-
sequenz eine ÖFFNUNG-SCHLIESSUNG-ÖFFNUNG-SCHLIESSUNG
usw. der Automatisierung.
Off unter denselben Bedingungen verursacht die gleiche Befehlssequenz
eine ÖFFNUNG-STOPP-SCHLIESSUNG-STOPP-ÖFFNUNG-STOPP
usw. der Automatisierung (Funktion Schrittbetrieb) (siehe auch DipSwitch 4).
On Nach dem Einsetzen des Fotozellenkontaktes (Eingang 7-18) schließt
sich die Automatisierung automatisch nach 5 Sekunden.
Off Funktion deaktiviert.
On die Automatisierung ignoriert die Schließbefehle während des Öffnens
und der Pausenzeit.
Off der Automatisierung verhält sich wie durch Dip-Switch Nr. 2 festgelegt.
On die Vorwarnfunktion ist eingeschaltet.
Off die Vorwarnfunktion ist abgeschaltet.
On die Funktion „Fotozellentest“ ist eingeschaltet.
Off die Funktion „Fotozellentest“ ist abgeschaltet.
Anmerkung: nur verwenden, wenn die Fotozellen benutzt sind.
On aktiviert die Modalität MASTER der Kongurierung Master/Slave (sie-
he Anweisungen T-COMM).
Off aktiviert die Modalität SLAVE der Kongurierung Master/Slave (siehe Anwei-
sungen T-COMM), oder die Standardfunktionsweise (einzelner Motor).
On Bei Erreichung des Anschlags des Manövers (Öffnung oder Schließung)
führt die Automatisierung eine kleine Bewegung in Gegenrichtung aus,
um Spannungen zwischen Ritzel und Zahnstange zu vermeiden.
Off Funktion deaktiviert.
On FESTE LEISTE MIT WIDERSTAND (Klemme Nr. 10).
Off FESTE LEISTE (Ausschaltglied – Klemme Nr. 10).
Hinweis: wenn nicht verwendet, DIP schalter bleibt auf OFF.
SPEICHERVERFAHREN
ACHTUNG: Nach der Versorgung der Schalt- und Steuertafel, vor Beginn der Einstellverfahren
ca. 2 Sekunden warten.
HINWEIS: die mechanischen Endanschläge der Automatisierung müssen sowohl in Öffnung
als auch in Schließung eingestellt sein [siehe Anweisungen von Motor].
34
K126MA
Page 35

Nach der Installation der Automatisierung:
Überprüfen Sie die Position der DIP-Switches 9, 10 und 11: Die Einstellung erfolgt nach
Automatisierungstyp (siehe Tabelle Dip 9-10-11 bei der “Einstellung der Logik”).
Das Verfahren sollte vorzugsweise mit dem Tor auf ungefähr 0,5 m vom mechanischen Anschlag in
Schließung begonnen werden.
Drücken Sie die Taste PROG und halten Sie sie gedrückt, bis die LED DL8 (gelb) zu blinken beginnt:
- Die Automatisierung beginnt, sich langsam auf der Suche des Endschalter Öffnung zu öffnen;
Halten Sie die Bewegung des Tors an (mit den Fotozellen oder durch Schließung des
Kontakts STOP), vertauschen Sie die Polarität der Motor, das Tor in geschlossene Position
bringen (auf mechanischen Anschlag) und das Verfahren vom Beginn wiederholen, wenn
sich das Tor schließt, statt sich zu öffnen.
Anmerkung: Kontrollieren die Anschlüsse der Eingänge, falls die Automatisierung stehen
bleibt. Alle grünen LEDs DL6, DL5, DL4 und DL3 müssen ununterbrochen an sein.
- Nach Erreichen des Anschlags Öffnung, beginnt die Automatisierung mit Schließung auf der Suche nach
dem Anschlag Schließung (in dieser Phase erfasst das Steuergerät alle Parameter für die Bewegung);
- Die Automatisierung führt eine vollständige Öffnung durch, um die Kraft des Motor bei der Öffnung
zu optimieren;
- nach einer kleinen Pause führt die Automatisierung eine vollständige Schließung aus, um die Kraft
bei der Schließung zu optimieren.
ACHTUNG:
- Das Verfahren kann durch Drücken der Taste STOPP unterbrochen werden.
- Während der verschiedenen Phasen der Operation unterbricht ein Eingreifen der Fotozellen
die Abspeicherung. Verwenden Sie zum Neustarten des Verfahrens von Anfang an (mit blinkender gelber LED DL8) den Befehl AP/CH, die Taste der Fernsteuerung (falls programmiert)
oder drücken Sie kurz die Taste PROG.
Das Vorhandensein eines Hindernisses während des Abspeicherungsverfahrens wird als
Anschlag interpretiert (das System greift aus Sicherheitsgründen nicht ein, aber die Motoren
bleiben stehen).
Halten Sie sich daher während des Abspeicherungsverfahrens nicht in der Nähe der Automatisierung auf.
DEUTSCH
MERKMALE DER SCHALT- UND STEUERTAFEL K126MA
ÖFFNUNG UND SCHLIEßUNG MIT ZEITUHR
Die Öffnung und Schließung der Automatisierung kann über eine digitale Uhr gesteuert werden, die im
Ausgang über einen potentialfreien NO-Kontakt (Relais) verfügt. Es genügt, diesen an den Klemmen
4 - 6 (Taste ÖFFNET/SCHLIEßT) anzuschließen und so zu programmieren, dass sich der Relaiskontakt
der Zeituhr zur gewünschten Öffnungszeit schließt und zur gewünschten Schließzeit wieder öffnet, so
dass das Tor automatisch geschlossen wird.
Anmerkung: das erneute automatische Schließen muss eingestellt werden (Dip-Switch Nr. 1 auf ON).
BATTERIELADEKARTE (EINGEBAUT)
Wenn man die Batterie anschließt, funktioniert die Automatisierung auch bei Netzstromausfall. Wenn
die Spannung unter 11,3 Vdc sinkt, wird die Automatisierung nicht mehr funktionieren (die Steuertafel
bleibt jedoch gespeist); wenn die Spannung dagegen unter 10,2 Vdc sinkt, schaltet die Karte die Batterie
ganz ab (die Steuertafel ist nicht mehr gespeist). Während des Batteriebetriebs wird die Modalität mit
geringem Verbrauch betaetigt und am Ende jedes Manöver werden die Ausgänge 11-12, 12-13 14-15
16-17 und 16-18 abgeschaltet. Um die Batterie an die Steuerung anzuschliessen, braucht man den
Steckverbinder, der normalerweise zusammen mit der Steuerung geliefert wird.
Note: Wenn der Batteriebetrieb einsetzt, wird auf die Betriebsart mit niedrigem Verbrauch
gewechselt, daher werden die Hilfsausgänge deaktiviert.
(Zum Einsatz von externen Empfängern, GSM, usw. parallel zum Batterieeingang versorgen)
WAHRNEHMUNG VON HINDERNISSEN
Wenn die Funktion Wahrnehmung von Hindernissen (Einstellbar mittels Trimmer FR) in der Öffnungsphase der Automatisierung eingreift, verursacht sie das erneute Schließen des Tors um ca. 20 cm;
wogegen sie in der Schließphase eine vollständige Öffnung verursacht.
ACHTUNG: die Logik der Steuertafel kann eine mechanische Reibung als eventuelles
Hindernis ausdeuten.
K126MA
35
Page 36

DIAGNOSE-LEDs
DL1 - Rote LED für Taste GEHFLÜGEL
DL2 - Rote LED für Taste ÖFFNET/SCHLIEßT
DL3 - Grüne LED für Taste STOPP
DL4 - Grüne LED für INNEN FOTOZELLEN
DL5 - Grüne LED für AUSSEN FOTOZELLEN
DL6 - Grüne LED für SICHERHEITSLEISTE
LED - DL7
Die LED DL7 zeigt das Vorhandensein der Batterie sowie außerdem eventuelle Fehler durch Aufblinken
in verschiedenen Farben an:
Zeichenerklärung:
Immer an LED;
Aufblinken LED;
DEUTSCH
Immer an (grün):
Immer an (gelb):
1 Aufblinken alle 4 Sekunden:
(grün)
1 Aufblinken alle 4 Sekunden:
(gelb)
1 Aufblinken alle 2 Sekunden:
(rot)
Schnelles Aufblinken (rot):
Batterie geladen, keine Netzspannung vorhanden;
Batterie wird geladen;
Batterie geladen, Netzspannung vorhanden;
Kontrollieren Sie die Netzstromversorgung;
Externe Stromversorgung, Batterieladegerät deaktiviert;
Batterie leer;
Batterie laden, Batterie ersetzen;
Batterie defekt;
Batterie ersetzen;
LED - DL8
Die LED DL8 zeigt eventuelle Störungen der Logik der Karte durch Aufblinken in verschiedenen
Farben an:
Zeichenerklärung:
Immer an LED;
Aufblinken LED;
1 Aufblinken alle 4 Sekunden:
(grün)
Aufblinken abwechselnd / :
(rot/grün)
Schnelles Aufblinken (gelb):
1 Aufblinken (rot):
1 Aufblinken (gelb):
2 Aufblinken (rot):
2 Aufblinken (gelb):
36
Ordnungsgemäßer Betrieb;
Abspeicherung muss vorgenommen werden;
Abspeicherung läuft;
Fehler Fototest
Fototest deaktivieren (DIP-Switch 6 OFF), Betrieb der Fotozelle und ihren Anschluss überprüfen;
Status unbekannt, nächstes Manöver VERLANGSAMUNG;
Vorhandensein Hindernis für den Motor 1
Prüfen, dass keine Hindernisse entlang des Torlaufs vorhanden sind und kontrollieren, ob das Tor gut gleitet;
Vorhandensein Hindernis für den Motor 2 (bei Havarie/
Störung der Klemmleiste des Motors 1 und DIP 10 auf ON);
Prüfen, dass keine Hindernisse entlang des Torlaufs vorhanden sind und kontrollieren, ob das Tor gut gleitet;
K126MA
Page 37

3 Aufblinken (rot):
3 Aufblinken (gelb):
4 Aufblinken (rot):
4 Aufblinken (gelb):
5 Aufblinken (rot):
5 Aufblinken (gelb):
6 Aufblinken (rot):
6 Aufblinken (gelb):
8 Aufblinken (rot):
8 Aufblinken (gelb):
Kein Signal Encoder Motor 1;
Kontrollieren Sie die verkabelung, überprüfen Sie den Encoder
mit TEST-ENCODER (Option);
Kein Signal Encoder Motor 2 (bei Havarie/Störung der
Klemmleiste des Motors 1 und DIP 10 auf ON);
Kontrollieren Sie die verkabelung, überprüfen Sie den Encoder
mit TEST-ENCODER (Option);
Kein Signal Encoder Motor 1;
Kontrollieren Sie die Verkabelung, stellen Sie sicher, dass sich
der Motor ungehindert dreht, wenn er direkt von der Batterie
gespeist wird, überprüfen Sie die Sicherung F5;
Kein Signal Encoder Motor 2 (bei Havarie/Störung der
Klemmleiste des Motors 1 und DIP 10 auf ON);
Kontrollieren Sie die Verkabelung, stellen Sie sicher, dass sich
der Motor ungehindert dreht, wenn er direkt von der Batterie
gespeist wird, überprüfen Sie die Sicherung F5;
Überschreitung der max. Stromaufnahme von Motor 1;
Zu hohe Stromaufnahme des Getriebemotors, stellen Sie
sicher, dass keine Hindernisse auf dem Weg der Automatisierung vorhanden sind, überprüfen Sie die Stromaufnahme
der Motors im Leerlauf und angebracht an die Tor;
Überschreitung der max. Stromaufnahme von Motor 2;
(bei Havarie/Störung der Klemmleiste des Motors 1 und
DIP 10 auf ON);
Zu hohe Stromaufnahme des Getriebemotors, stellen Sie
sicher, dass keine Hindernisse auf dem Weg der Automatisierung vorhanden sind, überprüfen Sie die Stromaufnahme
der Motors im Leerlauf und angebracht an die Tor;
automatische Schließung deaktiviert nach 5 fehlgeschlagenen Eingriffen in Folge;
Für die Schließung ist ein Steuerimpuls erforderlich;
Kommunikationsfehler Master/Slave;
Überprüfen Sie die Verkabelung zwischen den Steuergeräten, die Funktionstauglichkeit des Steuergeräts Slave (Sicherungen) und die Funktionstauglichkeit der Schnittstellenkarten;
Fehler externe Eeprom-Speicher;
Ersetzen Sie das externe Speichermodul;
Datenfehler in Eeprom (intern/extern);
Führen Sie das Verfahren RESET SPEICHER FUNK;
DEUTSCH
Außer Hinweisen/Fehlern der Logik zeigt die LED DL8 auch den Status des Steuergerätes während
der Abspeicherung der Fernsteuerungen an.
Immer an (grün):
Schnelles Aufblinken (grün):
Immer an (gelb):
Schnelles Aufblinken (gelb):
Aufblinken (grün):
Immer an (grün):
Kanal CH1 wartet auf Programmierung;
Speicher Kanal CH1 voll;
Kanal CH2 wartet auf Programmierung;
Speicher Kanal CH2 voll;
Kanal CH1 wartet auf Löschung;
Kanal CH1 wird gelöscht;
K126MA
37
Page 38

Aufblinken (gelb):
Immer an (gelb):
Das gleichzeitige Aufblinken der LEDs DL7 und DL8 zeigt an:
Aufblinken + (rot + rot):
Aufblinken + (gelb + gelb):
Die Anzeige mehrerer Fehler erfolgt mit einer Pause von 2 Sekunden zwischen einer Anzeige und
der nächsten.
Wird eine Person/Hindernis während der Schließbewegung erkannt, so öffnet die Schranke langsam
komplett. Automatischer Zulauf wird deaktiviert bis auf weiteren Befehl.
im Falle von fünf Auslösungen während derselben Schließbewegung, erhöht die Steuerungsplatine
die Zeit des automatischen Zulaufs. Nach eine erfolgreichen Schließbewegung wird der automatiche
Zulauf wieder normal.
Kanal CH2 wartet auf Löschung;
Kanal CH2 wird gelöscht;
Verfahren Reset Werkseinstellungen wartet auf Bestätigung;
Warten vollständiges Löschen der Funkkanäle;
DEUTSCH
FUNKTION ANZEIGE DER MOTORBEANSPRUCHUNG
Diese Funktion erlaubt die Motorbeanspruchung während des Betriebs zu veranschaulichen, um
eventuelle Situationen von schwerer Arbeit zu bestimmen.
Um die Funktion zu betätigen, die drei Tasten Ch1, Ch2 und PROG gleichzeitig drücken und sie für
etwa 2 Sekunden gedrückt halten, dann den Motor mittels Handsender betätigen.
CH2
Die Angabe der Beanspruchung wird nach dem Schema der folgenden Tabelle kodiert:
CH1
PROG
Niveau DL7 DL8
(aus) (aus)
(Grün) (aus)
(Grün) (Grün)
(Grün) (Gelb)
(Gelb) (Grün)
(Gelb) (Gelb)
(Gelb) (rot)
(rot) (Gelb)
(rot) (rot)
Nach 5 Minuten Untätigkeit wird die Steuerung zur klassischen Veranschaulichung zurückkehren (um zur
klassischen Veranschaulichung manuell zurückzukehren, die drei Tasten gleichzeitig wieder drücken).
RÜCKSTELLUNG AUTOMATISCHER BETRIEB
Betätigen Sie die manuelle Entsperrung, wenn es erforderlich ist, die Schließung oder die Öffnung
der Automatisierung von Hand auszuführen. Bei der Wiederherstellung der normalen (automatischen)
Betriebsweise muss das Folgende beachtet werden:
• Bei der Wiederherstellung nach einem Stromausfall (die Karte bleibt für eine gewisse Zeit ohne
Stromversorgung) oder nach einem Eingriff von Hand (ohne Unterbrechung der Stromversorgung
der Karte für eine Zeit von mehr als 5 Sekunden) wechselt die Automatisierung bei der Suche des
Anschlags Öffnung zur verlangsamten Phase (Manöver VERLANGSAMUNG).
38
K126MA
Page 39

EINGEBAUTER 433,92 MHz FUNKEMPFÄNGER
Der Funkempfänger kann bis zu max. 86 Rolling Codes (BUG2R, BUG4R, K-SLIM-RP, T-4RP) erlernen,
die beliebig an den beiden Kanälen einzustellen sind.
Der erste Kanal steuert die Steuerkarte zur Öffnung der Automatisierung direkt, der zweite Kanal
steuert ein Relais für einen im Ausgang potentialfreien NO-Kontakt (Klemmen Nr. 19 - 20, max. 24V
AC, 1 A) und der dritte Kanal steuert direkt die Karte für die Fußgängeröffnung der Automatisierung an.
ERLERNUNG DER FUNKSTEUERUNGEN
CH1 = 1. Kanal (Nur ÖFFNET/SCHLIEßT)
CH2 = 2. Kanal
CH3 = 3. Kanal (nur GEHFLÜGEL)
1_ kurz auf Taste CH1 drücken, wenn man einer Funksteuerung die Funktion ÖFFNET/SCHLIEßT
zuordnen will;
2_ Die LED DL8 (grün) leuchtet ununterbrochen auf, um das Lernen der Codes anzuziegen (falls
innerhalb von 10 Sekunden kein Code eingegeben wird, wechselt die Karte zur Modalität Programmierung);
3_ auf die Taste der Funksteuerung drücken, die man benutzen will;
4_ Die LED DL8 (grün) geht aus, um die Abspeicherung anzuzeigen, dann leuchtet wieder und war-
tet auf weitere Handsender (falls die LED nicht leuchtet, nochmals einen Befehl geben oder das
Verfahren ab Punkt 1 wiederholen);
5_ wenn man andere Handsender speichern will, innerhalb von 2-3 Sekunden auf die Tasten des
Handsenders. Nach dieser Zeit (die LED DL8 geht aus) das Verfahren ab Punkt 1 wiederholen
(bis zu max. 86 Sendern);
6_ Widerholen Sie das Verfahren ab Punkt 1 und verwenden Sie die Taste CH2 anstelle der Taste CH1,
falls Sie die Abspeicherung auf dem zweiten Kanal vornehmen möchten (in diesem Fall leuchtet
die LED DL8 gelb auf);
7_ Widerholen Sie das Verfahren ab Punkt 1 und verwenden Sie gleichzeitig die Tasten CH1 und CH2,
falls Sie die Abspeicherung auf dem dritten Kanal vornehmen möchten (in diesem Fall leuchtet die
LED DL8 rot auf);
8_ wenn man den Erlernungsmodus ohne Speichern eines Codes verlassen will, kurz auf Taste CH1
oder CH2 drücken.
Beim Erreichen der max. Anzahl der Fernsteuerungen (86) blinkt die Led DL8 für ca.
drei Sekunden aber ohne die Abspeicherung vorzunehmen.
DEUTSCH
FERNPROGRAMMIERUNG MITTELS T-4RP und K-SLIM-RP (V 4.X)
Mit der neuen Version von Software V 4.X ist es möglich, die Fernselbstlernung der neuen Version
von Handsendern T-4RP und K-SLIM-RP (V 4.X) auszuführen, d.h. ohne der Programmierungstasten
des Empfängers zu drücken.
Es wird genügend sein, einen schon programmierten Handsender im Empfänger zu haben, um die
Fernprogrammierung der neuen Handsender zu starten. Die auf den Anleitungen von Handsender
T-4RP und K-SLIM-RP (V 4.X) geschriebene Prozedur folgen.
LÖSCHEN VON FUNKSTEUERUNGEN
1_ ca. 3 Sekunden lang auf Taste CH1 drücken, um alle ihr zugeordneten Funksteuerungen zu löschen;
2_ die LED DL8 beginnt ein langsames Blinken, um anzuzeigen, das der Modus Löschen aktiviert ist;
3_ Taste CH1 3 weitere Sekunden gedrückt halten;
4_ die LED DL8 erlischt ca. 3 Sekunden und leuchtet dann wieder fest auf, um anzuzeigen, dass das
Löschen ausgeführt ist;
5_ das Verfahren ab Punkt 1 an Taste CH2 wiederholen, um alle ihr zugeordneten Funksteuerungen
zu löschen;
6_ wiederholen Sie das Verfahren von Punkt 1 und drücken Sie gleichzeitig die Tasten CH1 und CH2,
um alle Fernsteuerungen zu löschen, die dem dritten Kanal zugeordnet sind;
7_ wenn man den Löschmodus ohne Löschen eines Codes verlassen will, kurz auf Taste CH1 oder
CH2 drücken.
K126MA
39
Page 40

CODE-SPEICHER
Auf der Steuerplatine K126MA kann der Speicher* von 86 bis zu 126, 254 oder 1022 Codes (Handsender) erweitert werden, indem die Speicherkarten wie angegeben ersetzt wird (Speicherkarte in
den dafür vorgesehenen Slot J3 einstecken – siehe Kabelplan, siehe Kabelplan auf Seite 2-3):
126 Codes Art. 250SM126
254 Codes Art. 250SM254
1022 Codes Art. 250SM1022
* Die Steuerplatine haben serienmäßig einen Speicher für 86 Handsender. Die Speicherkarten für
mehr Handsender (Option) muss extra bestellt werden.
ACTUNG: Vor dem Einstecken/Ausstecken des Moduls die Stromversorgung zur Steuerplatine unterbrechen.
WICHTIG: wenn man ein Speichermodul verwendet, wird der Innenspeicher des 86-CodesSteuerplatine abgeschaltet.
RESET SPEICHER FUNK:
DEUTSCH
- Halten Sie die Tasten CH1 und PROG gedrückt, bis die LEDs DL7 und DL8 beiden schnell gelb
zu blinken beginnen. Lassen Sie dann die Tasten los und drücken Sie sie erneut, bis die LEDs zur
Bestätigung der Operationen ausgehen (falls sie nicht gedrückt werden und gewartet wird, kehrt
die Karte nach ca. 12 Sekunden zum normalen Betrieb zurück).
HARD-RESET (Werkseinstellungen):
- Halten Sie die Tasten CH2 und PROG gedrückt, bis die LEDs DL7 und DL8 beiden schnell rot zu
blinken beginnen. Lassen Sie dann die Tasten los und drücken Sie sie erneut, bis die LEDs zur
Bestätigung der Operationen ausgehen (Reset läuft) (falls sie nicht gedrückt werden und gewartet
wird, kehrt die Karte nach ca. 12 Sekunden zum normalen Betrieb zurück); Beim Neustart muss
das Abspeicherungsverfahren durchgeführt werden.
Beim Hard Reset ist die Funkempfänger-Speicher nicht betroffen: die eingelernten
Handsender bleiben erhalten.
BETRIEBSSTÖRUNGEN: MÖGLICHE URSACHEN UND ABHILFEN
Kein Start der Automatisierung
a- Mit einem Multimeter prüfen, ob die 230 V AC Versorgung vorhanden ist.
b- Stellen Sie bei der Modalität Standard sicher, dass die Ausschaltglieder der Karte wirklich
normalerweise geschlossen sind (4 Grüne LEDs an).
c- Stellen Sie DIP 6 (Fototest) auf OFF.
d- Trimmer FR auf das Maximum stellen.
e- Die Sicherungen mit dem Multimeter kontrollieren.
Funksteuerung mit wenig Reichweite
a- Prüfen, dass der Anschluss der Masse und des Antennesignals nicht umgekehrt ist.
b- Zur Verlängerung des Antennekabels keine Verbindungen ausführen.
c- Die Antenne nicht zu niedrig oder durch Mauern oder Pfeiler versteckt installieren.
d- Den Zustand der Batterien in der Funksteuerung überprüfen.
Das Tor öffnet sich umgekehrt
Die Anschlüsse des Motors am Klemmenbrett untereinander umkehren, Klemmen 28 - 29 und
Klemmen 23 - 24 (falls verwendet).
GARANTIE: ALLGEMEINE BEDINGUGEN
Die Garantie der Firma TAU hat 24 Monate Gültigkeit ab Kaufdatum (das Datum muss durch eine
Quittung oder Rechnung belegt sein).
Die Garantie schließt die Reparatur mit kostenlosem Ersatz (ab Werk der Firma TAU: Verpackungsund Transportkosten gehen zu Lasten des Kunden) jener Teile ein, die von TAU anerkannte Fabrika-
tions- oder Materialfehler aufweisen.
Im Falle von Eingriffen am Standort des Kunden, auch in der Garantiezeit, hat der Kunde ein “feste
40
K126MA
Page 41

Abrufgebühr” für die Reisekosten zum Standort des Kunden und die Arbeitskraft zu zahlen.
Die Garantie wird in folgenden Fällen ungültig:
• wenn der Defekt durch eine Installation verursacht ist, die nicht nach den in jeder Packung
enthaltenen Herstelleranweisungen erfolgte.
• wenn für die Installation der Vorrichtung auch andere Teile als Original-TAU-Komponenten
verwendet wurden.
• wenn die Schäden durch Naturkatastrophen, Handhabungen, Spannungsüberlasten, unkor-
rekte Versorgung, unsachgemäße Reparaturen, falsche Installation oder sonstiges, für das
die Firma TAU keine Verantwortung hat, verursacht sind.
• wenn die regelmäßigen Wartungsarbeiten nicht durch einen Fachtechniker nach den in jeder
Packung enthaltenen Herstelleranweisungen ausgeführt worden sind.
• Verschleiß den Komponenten.
Reparatur oder Ersatz von Teilen während der Garantiezeit führt zu keiner Verlängerung derselben.
Bei industrieller, beruicher oder ähnlicher Nutzung hat diese Garantie eine Gültigkeit von 12 Mona-
ten.
DEUTSCH
K126MA
41
Page 42

DÉCLARATION D’INCORPORATION DU FABRICANT
(conformément à la Directive européenne 2006/42/CE Annexe II.B)
Fabricant : TAU S.r.l.
Adresse : Via E. Fermi, 43
Déclare sous sa propre responsabilité que le produit : Logique électronique de commande
réalisé pour le mouvement automatique de : Portails Coulissants
pour l’utilisation en milieu : Résidentiel / Intensif / Industriel
muni de : Récepteur et carte chargeur de batterie
Modèle : K126MA
Type : K126MA
Numéro de série : voir étiquette argentée
Appellation commerciale : Logique de commande pour un moteur 12/24V
FRANÇAIS
est réalisé pour être incorporé sur une fermeture (portail coulissant) ou pour être assemblé avec d’autres dispositifs
an de manœuvrer cette fermeture pour constituer une machine au sens de la Directive Machines 2006/42/CE.
Déclare d’autre part que ce produit est conforme aux exigences essentielles de sécurité des directives CEE sui-
vantes :
- 2006/95/CE Directive Basse Tension
- 2004/108/CE Directive Compatibilité Électromagnétique
et, si requis, à la Directive:
- 1999/5/CE Équipements hertziens et équipements terminaux de télécommunication
Le Fabricant déclare également qu’il n’est pas permis de mettre en service l’appareil tant que la machine dans
laquelle il sera incorporé ou dont il deviendra composant n’a pas été identiée et que sa conformité aux conditions
de la Directive 2006/42/CE n’a pas été déclarée.
avec encodeur
36066 Sandrigo (Vi)
ITA LY
Il s’engage à transmettre, sur demande dûment motivée des autorités nationales, des informations pertinentes sur
les quasi-machines.
Sandrigo, 27/11/2014
Le Représentant légal
_________________________________________
Nom et adresse de la personne autorisée à constituer la documentation technique pertinente :
Loris Virgilio Danieli - via E. Fermi, 43 - 36066 Sandrigo (Vi) Italy
42
K126MA
Loris Virgilio Danieli
Page 43

RECOMMENDATIONS GÉNÉRALES
Le présent manuel est destiné exclusivement au personnel technique qualié pour l’installation. Aucune information contenue dans ce fascicule ne peut être considérée comme intéressante pour l’utilisateur nal. Ce manuel est joint à la logique de commande K126MA, il ne doit donc pas être utilisé
pour des produits différents !
Recommandations importantes :
Couper l’alimentation électrique de la carte avant d’y accéder.
La logique de commande K126MA est destinée à la commande d’un motoréducteur électromécanique
pour l’automatisation de portails et de portes.
Toute autre utilisation est impropre et donc interdite par les normes en vigueur.
Nous nous devons de rappeler que l’automatisation que vous vous apprêtez à exécuter est classée
comme “construction d’une machine” et rentre donc dans le domaine d’application de la Directive
Européenne 2006/42/CE (Directive Machines).
Cette directive, dans ses grandes lignes, prévoit que :
- l’installation doit être exécutée exclusivement par du personnel qualié et expert ;
- qui effectue l’installation devra procéder au préalable à “l’analyse des risques” de la machine;
- l’installation devra être faite dans les “règles de l’art”, c’est-à-dire en appliquant les normes;
- l’installateur devra remettre au propriétaire de la machine la ”déclaration de conformité”.
Il est donc clair que l’installation et les éventuelles interventions de maintenance doivent être effectuées exclusivement par du personnel professionnellement qualié, conformément aux prescriptions
des lois, normes ou directives en vigueur.
Dans le projet de ses appareils, TAU respecte les normes applicables au produit (voir la déclaration
de conformité jointe) ; il est fondamental que l’installateur lui aussi, lorsque qu’il réalise l’installation,
respecte scrupuleusement les normes.
Tout personnel non qualié ou ne connaissant pas les normes applicables à la catégorie des “portails
et portes automatiques” doit absolument s’abstenir d’effectuer des installations.
Qui ne respecte pas les normes est responsable des dommages que l’installation pourra causer!
Nous conseillons de lire attentivement toutes les instructions avant de procéder à l’installation.
FRANÇAIS
INSTALLATION
Avant de procéder, s’assurer du bon fonctionnement de la partie mécanique. Vérier que le
portail coule librement sur un étage horizontal. Vérier en outre que le groupe opérateur a été
correctement installé en suivant les instructions correspondantes. Une fois que ces contrôles
ont été effectués, s’assurer que l’absorption de l’opérateur soit adequat. A partir de la ver. 5.17,
la platine dispose d’une fonction qui permet la visualisation de l’effort demandé pendant la
movimentation (voir paragraphe FONCTION DE VISUALISATION EFFORT MOTEUR).
L’INSTALLATION DE L’EQUIPEMENT DOIT ETRE REALISEE “SELON LES REGLES DE L’ART”
PAR LE PERSONNEL COMPETENT AYANT LES QUALITES REQUISES PAR LA LOI.
Note: nous rappelons l’obligation de mettre l’installation à la terre et de respecter les normes
de sécurité en vigueur dans le pays d’installation.
LA NON OBSERVATION DES INSTRUCTIONS POURRAIT COMPROMETTRE LE BON FONCTIONNEMENT DE L’APPAREILLAGE ET CREER UN DANGER POUR LES PERSONNES, PAR
CONSEQUENT LA MAISON DECLINE TOUTE RESPONSABILITE POUR D’EVENTUELLES DETERIORATIONS DUES A UNE UTILISATION NON APPROPRIEE OU NON CONFORME AU MODE
D’EMPLOI.
K126MA
43
Page 44

LOGIQUE DE COMMANDE POUR UN MOTEUR 18/24V AVEC ENCODEUR
• FONCTION DE VISUALISATION EFFORT MOTEUR
• ÉTAT DES ENTRÉES VISUALISÉ PAR LEDS
• CIRCUIT DE CLIGNOTEMENT INCORPORÉ
• CAPTEUR À ENCODEUR POUR AUTO-APPRENTISSAGE DE LA COURSE
• RÉCEPTEUR RADIO 433,92 MHz INTÉGRÉ À 2 CANAUX (CH)
• CARTE CHARGEUR DE BATTERIE (INTÉGRÉE)
• DIAGNOSTIC DU DÉFAUT FONCTION VISUALISÉ PAR LED
• POSSIBILITE DE FONCTIONNEMENT A BASSE CONSOMMATION
ATTENTION :
- ne pas utiliser les câbles unilaires (à conducteur unique), par exemple ceux des interphones,
an d’éviter les coupures sur la ligne et les faux contacts ;
- ne pas réutiliser les anciens câbles préexistants;
- on conseille d’utiliser le câble TAU réf. M-03000010CO pour la connexion des moteurs aux
centrales de commande.
INTRODUCTION
La che K126MA peut fonctionner en deux modalités différents, sélectionnables par pontet J6 (voir
schéma de câblage).
J6 pontés: modalité standard, c’est à dire le l’unité de commande est alimenté en tout temps;
J6 non pontés: modalité basse consommation d’énergie, c’est à dire que l’unité de commande «
FRANÇAIS
s’éteint » à la n de chaque manoeuvre et elle éteint aussi tous les dispositifs auxiliaires. La centrale se rallumera à chaque commande (modalité pour l’éventuelle
alimentation par autres fonts d’énergie par exemple batteries chargées par un
panneau photovoltaïque).
Lorsque la connexion est établie, en modalité basse consommation, appuyez brièvement sur la touche
PROG:
• Les Leds vertes doivent toutes être allumées (elles correspondent chacune à une entrée Norma-
lement Fermée). Elles ne s’éteignent que lorsque les commandes auxquelles elles sont associées
sont actives.
• Les Leds rouges doivent être toutes éteintes (elles correspondent chacune à une entrée Normalement Ouverte). Elles ne s’allument que lorsque les commandes auxquelles elles sont associées
sont actives.
CARACTÉRISTIQUES TECHNIQUES
Alimentation carte 13,5V1 AC - 50 Hz
Puissance max. moteur en c.c. 300VA - 18V2 DC
Fusible rapide protection alimentation entrée 13,5V AC (F4 – 5x20)
F 16A
Fusible rapide protection chargeur de batterie (F5 – 5x20) F 10A
Fusible rapide protection auxiliaires 18V2 DC (F3 – 5x20) F 2A
Tension circuits d’alimentation moteur 18V2 DC
Tension d’alimentation circuits dispositifs auxiliaires 18V2 DC
Tension d’alimentation circuits logiques 5V DC
Température de fonctionnement -20 °C ÷ +55 °C
1
18V pour MASTER-R et T-ONE8BR
2
24V pour MASTER-R et T-ONE8BR
CONNEXIONS AU BORNIER
Terminals Fonction Description
entrée alimentation carte 13,5V (18V pour MASTER-R et T-ONE-
FS1 - FS2 ALIMENTATION
8BR) AC - Alimentée par le transformateur toroïdal et protégée
par fusible sur l’alimentation 230V AC.
44
K126MA
Page 45

1 - 2
PHOTOVOLTAIC
SYSTEM INPUT
3 - 6 PIÉTON
4 - 6 OUVRE/FERME
5 - 6 STOP
7 - 8
7 - 9
PHOTOCELLULES
INTERNES
PHOTOCELLULES
EXTERNES
7 - 10 BORD SENSIBLE
11 - 12 ** AUX
12 - 13 **
ÉMETTEUR
PHOTOCELLULES
14 - 15 ** CLIGNOTANT
Entrée d’alimentation externe (ex. Système photovoltaïque 12V DC).
Remarque: Si vous utilisez cette entrée, ponter opportunément J7 (voir schéma de câblage).
ATTENTION : EN ALIMENTANT LA CENTRALE AVEC UNE
SOURCE EXTERIEURE, TOUTES LES AUTRES SORTIES 18V
(24V pour MASTER-R) DC PRENNENT LA VALEUR DE LA
TENSION D’ALIMENTATION DE LA SOURCE MEME.
entrée N.O. touche PIÉTON - Commande l’ouverture et la fermeture partielles de l’automation pour 1/3 de course et il est réglé
dans le fonctionnement par les dip-switches 2 et 4.
(3= PIET. - 6= COM)
entrée N.O. touche OUVRE/FERME – Commande l’ouverture et
la fermeture de l’automatisme et est réglée dans le fonctionnement
par les dip-switchs 2 et 4. (4= O/F - 6= COM)
Entrée N.F. touche STOP – Arrête l’automatisme quelle que soit sa
position, en inhibant momentanément la fermeture automatique, si
elle est programmée. (5= STOP - 6= COM)
Note: un microrupteur de sécurité déverrouillage est branché au
bouton STOP. Si l’entrée STOP reste ouverte pendant plus de 5
secondes, la prochaine opération sera de REPOSITIONNEMENT
(voir «Remise fonctionnement automatique”). Le micro-interrupteur est branché en série avec d’ autre boutons STOP.
entrée PHOTOCELLULES ou DISPOSITIFS DE SÉCURITÉ
INTERNES au portail (contact Normalement Fermé). Leur inter-
vention, en phase d’ouverture, provoque l’arrêt temporaire du
portail jusqu’à l’élimination de l’obstacle détecté ; en phase de
fermeture, elle provoque l’arrêt suivi de la réouverture totale du
portail. Mettre en pont les bornes si non utilisées.
(7= COM - 8= FERM.)
entrée PHOTOCELLULES ou DISPOSITIFS DE SÉCURITÉ
EXTERNES au portail (contact Normalement Fermé). Leur intervention, efcace seulement en phase de fermeture, provoque
l’arrêt suivi de la réouverture totale du portail. Mettre en pont les
bornes si non utilisées.
(7= COM - 9= PHOT)
Note : l’émetteur de la photocellule doit toujours être alimenté par les bornes n° 12 et n° 13, dans la mesure où c’est
sur lui que s’effectue le contrôle du système de sécurité
(phototest). Sans cette connexion, la logique de commande
ne fonctionne pas. Pour éliminer le contrôle du système de
sécurité ou quand on n’utilise pas les photocellules, mettre
le dip-switch n° 6 sur OFF.
entrée BORD SENSIBLE (bord sensible résistif ou barre palpeuse
xe) ; Fonctionne seulement durant la phase d’ouverture du portail
et provoque l’arrêt momentané du portail et une refermeture partielle
de ce dernier d’environ 20 cm, en libérant ainsi l’éventuel obstacle.
Mettre en pont les bornes si non utilisées.
(7= COMMUNE - 10= BORD SENSIBLE)
sortie auxiliaires 18V1 DC max. 15 W pour photocellules, récepteurs, etc. (11= NÉGATIF - 12= POSITIF).
Si le cavalier J6 n’est pas inséré, à la n de chaque manoeuvre cette
sortie (11 et 12) sera désactivée (modalité consommation réduite).
sortie 18V1 DC émetteur photocellule -phototest- max. 1 émetteurs
photocellules. (12= POSITIF - 13= NÉGATIF)
sortie 18V1 DC max. 20 W alimentation clignotant, clignotement
fourni par la logique de commande, rapide en fermeture et lent
en ouverture. (14= POSITIF - 15= NÉGATIF)
FRANÇAIS
K126MA
45
Page 46

sortie pour VOYANT GRILLE OUVERT 18V1 DC, max. 3 W, pen-
16 - 17* **
VOYANT GRILLE
OUVERT
dant l’ouverture de l’automatisme, le voyant clignote lentement, à
automatisme ouverte reste allumé et pendant la fermeture clignote
à double vitesse.
(16= POSITIF - 17= NEGATIF)
Sortie éclairage automatique auxiliaire 18V1 DC max 15 W.
Elle s’allume commandée par impulsion et reste allumée au-delà
16 - 18* ** ÉCLAIRAGE
du temps de la manœuvre pour une durée réglable avec TAUPROG (par défaut 2 secondes)
(16= POSITIF - 18= NEGATIVE)
sortie 2e canal radio - pour commander un autre automatisme ou
allumer des lumières, etc. (contact à vide N.O.)
Note : pour le branchement d’autres dispositifs au deuxième
canal du récepteur radio (éclairage de zone, actionnement de
pompes ou des charges lourdes), utilisez un relais auxiliaire
19 - 20* 2e CANAL RADIO
(consultez la note à la n du paragraphe).
ATTENTION : la sortie par défaut est monostable active 2
sec. Pour la commuter en bistable active ou bien pour modi-
er le temps d’activation il est nécessaire d’actionner avec
le programmateur de poche TAUPROG (voir instructions
relatives).
21 - 22 ANTENNE
FRANÇAIS
23 - 24 MOTEUR (M2)
entrée antenne radioréceptrice embrochable seulement pour
récepteurs 433,92 MHz. (21= MASSE - 22= SIGNAL)
sortie alimentation moteur (M2) 18 V DC max. 300 VA ;
(23= POSITIF - 24= NEGATIVE) Voir la note ci-dessous men-
tionnée.
25 - 26 - 27 ENCODEUR (M2) pas utilisé.
sortie alimentation moteur (M1) 18 V DC max. 300 VA ;
28 - 29 MOTEUR (M1)
(28= POSITIF - 29= NEGATIVE) Voir la note ci-dessous men-
tionnée.
30 - 31 - 32 ENCODEUR (M1)
1
24V pour MASTER-R et T-ONE8BR
alimentation et entrée encodeur (30= BLANC signal - 31= BLEU
négatif - 32= MARRON positif)
* Les sorties sont congurables avec TAUPROG (voir instructions relatives). Le tableau indique les
congurations standards.
** Si le cavalier J6 n’est pas inséré, la fonction modalité consommation réduite sera activée et, à la
n de chaque manœuvre, les sorties 11-12, 12-13, 14-15, 16-17 e 16-18 seront désactivées.
La barrette de connexion du moteur 2 (23 à 24) doit être utilisé à l’appui de celle relative
au moteur 1 (MASTER18QR / MASTER-R), ou en cas de panne / défaillance de celle
relative au moteur 1 (28-32), voir schéma câblage à la page 2-3.
IMPORTANT :
• ne pas alimenter relais auxiliaires ou autres dispositfs à la sortie 18V (24V pour MASTER-
R et T-ONE8BR) DC (bornes 11 – 12) de la centrale de commande an d’éviter de ne pas
compromettre le bon fonctionnement. Comme alternative, il faut utiliser les alimentateurs/
transformateurs extérieurs ;
• ne pas connecter à proximité de l’automatisme des systèmes d’alimentation à découpage
ou appareils similaires qui pourraient être une source de parasites.
RÉGLAGES LOGIQUES
Effectuer les réglages logiques.
Note : quand on agit sur un dispositif de réglage quelconque de la logique de commande
(trimmer ou dip-switchs) il faut effectuer une manœuvre complète (ouverture et fermeture) de
l’automatisme pour rendre actifs les nouveaux réglages.
46
K126MA
Page 47

TRIMMERS
T.C.A. réglage Temps de Fermeture Automatique : de 1 à 120 secondes env. (voir
dip-switch n. 1) ;
FR. réglage sensibilité détection obstacles.
Note : en tournant le TRIMMER FR. dans le sens des aiguilles d’une montre, on
diminue la sensibilité du motoréducteur sur l’obstacle et donc la force de pous-
sée augmente ; vice versa, en le tournant dans le sens contraire, on augmente
la sensibilité du motoréducteur sur l’obstacle et la force de poussée diminue.
Dip-switchs
quand l’ouverture a été complétée, la fermeture de l’automatisme est
1
FERMETURE
AUTOMATIQUE
On
automatique après l’écoulement du temps réglé sur le trimmer T.C.A.
Off la fermeture nécessite une commande manuelle.
quand l’automatisme fonctionne, une séquence de commandes d’ouver-
On
ture/fermeture induit l’automatisme à une OUVERTURE-FERMETURE-
2 2 / 4 TEMPS
OUVERTURE-FERMETURE, etc.
dans les mêmes conditions, la même séquence de commandes amène
Off
l’automatisme à une OUVERTURE-STOP-FERMETURE-STOP-OUVERTURE-STOP, etc. (fonction pas à pas) (voir aussi dip switch 4).
suite à l’intervention du contact de la photocellule (entrée 7-9), l’auto-
FERME APRÈS
3
PHOTOCELLULE
4 NO REVERSE
5
PRE-
CLIGNOT.
On
mation se ferme automatiquement après 5 secondes.
Off Hors fonction.
l’automatisme
On
l’ouverture et le temps de pause.
l’automatisme se comporte conformément au réglage établi par le dip
Off
switch n. 2.
ne reconnaît pas les commandes de fermeture pendant
On la fonction préclignotement est activée.
Off la fonction préclignotement est désactivée.
On la fonction «contrôle des photocellules» est activée.
6 FOTOTEST
7
MASTER /
SLAVE
la fonction «contrôle des photocellules» est désactivée. N.B. : à
Off
employer quand on n’utilise pas les photocellules.
active la modalité MASTER dans la conguration maitre/esclave (voir
On
instructions T-COMM)
active la modalité SLAVE dans la conguration maitre/esclave (voir
Off
instructions T-COMM) ou bien le fonctionnement standard (un moteur)
quand il atteint la butée de manoeuvre (ouverture ou fermeture),
On
8
BACK
JUMP
l’automatisme se déplace légèrement dans le sens opposé pour éviter
le blocage du pignon avec la crémaillère.
Off fonction désactivée.
9-10-11 Sélection du type d’automatisation
Dip 9 Dip 10 Dip 11 Automatisation
Off Off Off TONE-5B
On Off Off TONE-10B
Off On Off TONE-8BR (24v)
On On Off MASTER-R (24V ouverture de la vitesse = vitesse de fermeture)
Off Off On MASTER18QR
On Off On MASTER-R (24V)
Off On On CANTILEVER (lumière)
On On On CANTILEVER TONE10B (lourd)
FRANÇAIS
K126MA
47
Page 48

IMPORTANT: Le type d’automatisation est chargé pendant la mise en marche SEULEMENT
la première fois qu’on fait la procédure (led DL8 qui clignote rouge/vert en alternance).
Pour modier le type d’automatisation, il faut effectuer, avant une nouvelle procédure
de mise en marche, une “RÉGLAGES DE FABRIQUE“ (voir page 47).
12
BORD
SENSIBLE
On BORD SENSIBLE RESISTIF (étau n ° 10).
CÔTE FIXE (contact NC - étau n ° 10).
Off
Remarque: s’il n’est pas utilisé, maintenir le dip sur OFF.
PROCÉDURE DE MÉMORISATION
ATTENTION : Après avoir alimenté la logique de commande, attendre 2 secondes avant de
commencer les manœuvres de réglage.
Note : les butées mécaniques de l’automatisme doivent être obligatoirement réglés aussi bien
en ouverture qu’en fermeture [voir instructions moteur].
Après avoir terminé l’installation de l’automatisme :
Vérier la position des dip 9, 10 et 11. Les dip-switchs doivent être réglé selon le modèle
d’automatisation (voir tableau dip 9-10-11, section «Réglages logiques»).
Il est préférable de commencer la procédure avec le portail à environ 0,5 m de l’arrêt mécanique de
fermeture.
Appuyez et maintenez enfoncé le bouton PROG jusqu’à ce que le LED DL8 clignote (jaune):
- L’automation commence lentement la recherche de la n course en ouverture;
FRANÇAIS
Si l’automatisme ferme au lieu de ouvrir, il est nécessaire d’arrêter la course du portail (au
moyen des photocellules ou au moyen du contact STOP), inverser la polarité du moteur,
déplacer le portail en position fermée (de butée mécanique) et répétez la procédure.
Remarque: Si l’automatisme est arrêté, vériez les connexions d’entrée. Toutes les LED
vertes DL6, DL5, DL4 et DL3 doit être allumé en permanence.
- Obtenu le temps d’ouverture, l’automation commence la recherche du temps de fermeture (à ce
stade, l’unité de commande acquiert tous les paramètres liés à la course);
- L’automation effectue une ouverture complète pour l’optimisation de la force motrice en ouverture;
- Après une courte pause, l’automation peut effectuer un arrêt complet pour l’optimisation de la force
motrice en fermeture.
ATTENTION:
- La procédure peut être interrompue en appuyant sur le bouton STOP.
- Pendant les différentes phases de l’opération, les cellules photoélectriques arrêtent l’enregistrement. Pour faire partir la procédure du début (avec LED DL8 jaune clignotant), utilisez
la commande AP/CH, le bouton du radiocommande (si programmée), ou appuyez brièvement
sur le bouton PROG.
Il faut noter que la présence d’un obstacle pendant la procédure d’enregistrement est
interprété comme une n de course mécanique (le système n’intervient pas avec des
mouvements de sécurité, mais seulement avec l’arrêt du moteur). Par conséquent, assu-
rez-vous de ne pas rester au prés de l’automatisme pendant la procédure de stockage.
CARACTÉRISTIQUES DE LA K126MA
OUVERTURE ET FERMETURE COMMANDÉE PAR UNE HORLOGE
Il est possible de commander l’ouverture et la fermeture de l’automatisme avec une horloge numérique disposant en sortie d’un contact N.O. sans potentiel (relais).
Il sufra de la connecter aux bornes 4 - 6 (touche OUVRE/FERME) et de la programmer de manière
qu’à l’heure d’ouverture désirée, le contact relais de l’horloge se ferme jusqu’à l’heure de fermeture
voulue (moment où le contact relais de l’horloge s’ouvre de nouveau en permettant ainsi la refermeture
automatique).
Note : la refermeture automatique doit être activée (dip-switch n. 1 sur ON).
CARTE CHARGEUR DE BATTERIE (INTÉGRÉE)
Si la batterie est connectée, en cas de coupure de courant l’automatisme fonctionne quand même. Si
la tension descend en dessous de 11,3 Vcc, l’automatisme cesse de fonctionner (l’armoire de com-
48
K126MA
Page 49

mande reste alimentée) ; quand, par contre, elle descend en dessous de 10,2 Vcc, la carte déconnecte
complètement la batterie (l’armoire de commande n’est plus alimentée). Pendant le fonctionnement
en batterie on active la modalité de basse consommation et à la n de chaque manoeuvre les sorties
11-12, 12-13, 14-15, 16-17 et 16-18 viendront éteintes. Pour connecter la batterie à la centrale il faut
le connecteur spécial qui vient fourni d’habitude avec la batterie.
Note: En cas de fonctionnement au moyen des batterie de secours, la centrale de commande
active le mode basse consommation. Par conséquent, les sorties auxiliaries sont débranchées.
En présence de récepteurs radio extérieurs, systèmes GSM etc., il est nécessaire de les alimenter directement sur la batterie.
DÉTECTION DES OBSTACLES
La fonction de détection des obstacles (reglable par le trimmer FR) intervenant en phase d’ouverture
de l’automatisme provoque une manœuvre de fermeture d’environ 20 cm tandis qu’en phase de fer-
meture elle provoque une ouverture totale.
ATTENTION : la logique de commande peut interpréter un frottement mécanique comme
un éventuel obstacle.
LEDS DE DIAGNOSTICS
DL1 - Rouge led de signalisation touche PIÉTON
DL2 - Rouge led de signalisation touche OUVRE/FERME
DL3 - Verte led de signalisation touche STOP
DL4 - Verte led de signalisation PHOTOCELLULES INTERNES
DL5 - Verte led de signalisation PHOTOCELLULES EXTERNES
DL6 - Verte led de signalisation BARRE PALPEUSE
LED - DL7
Le led DL7, qu’indique la présence de la batterie, signale les erreurs avec une série prédéterminée
de clignotement de couleurs différentes:
Légende:
led toujours allumé;
led clignotement;
toujours allumé (vert):
toujours allumé (jaune):
1 clignotement (vert) toutes les 4 sec:
1 clignotement toutes les 4 sec:
(jaune)
1 clignotement toutes les 2 sec:
(rouge)
clignotement rapide (rouge):
batterie chargé, présence de tension d'alimentation
du réseau;
batterie en charge;
batterie chargé, de tension d'alimentation réseau
absente;
Vériez l’alimentation du réseau;
alimentation externe, chargeur de batterie désactivé;
batterie déchargé;
Charger la batterie, remplacez la batterie
batterie défectueuse;
Remplacez la batterie;
FRANÇAIS
LED - DL8
Le led DL8 signale des avertissements/erreurs de la logique de la che avec une série prédénie de
clignotements de différents couleurs:
Légende:
led toujours allumé;
led clignotement;
1 clignotement toutes les 4 secondes:
(vert)
fonctionnement normal;
K126MA
49
Page 50

/ clignotant alternativement:
(rouge / vert)
Clignotant (jaune) rapide:
1 clignotement (rouge):
1 clignotement (jaune):
2 clignotement (rouge):
2 clignotement (jaune):
3 clignotement (rouge):
FRANÇAIS
3 clignotement (jaune):
4 clignotement (rouge):
4 clignotement (jaune):
5 clignotement (rouge):
5 clignotement (jaune):
6 clignotement (rouge):
mémorisation doit être exécuté;
Mémorisation en course;
erreur phototest
Désactiver phototest (dip-switch 6 sur OFF), vérier le
fonctionnement photocellules et leurs linkage
état inconnu, prochaine manœuvre REALIGNEMENT;
présence obstacle pour le moteur 1
Contrôler l’absence d’obstacles le long de la course du
portail et son coulissement uide.
présence obstacle pour le moteur 2 (en cas de défaillance / anomalie de la borne du moteur 1 et avec le
dip-switch 10 sur ON);
Contrôler l’absence d’obstacles le long de la course du
portail et son coulissement uide.
absence signale encoder moteur 1;
Vérier le câblage, vériez Encoder avec TEST-ENCODER
(facultatif);
absence signale encoder moteur 2 (en cas de défaillance / anomalie de la borne du moteur 1 et avec le
dip-switch 10 sur ON);
Vérier le câblage, vériez Encoder avec TEST-ENCODER
(facultatif);
absence signale moteur 1;
Vérier le câblage, vérier que le moteur tourne librement
alimenté directement par la batterie, vériez le fusible F5;
absence signale moteur 2 (en cas de défaillance /
anomalie de la borne du moteur 1 et avec le dip-switch
10 sur ON);
Vérier le câblage, vérier que le moteur tourne librement
alimenté directement par la batterie, vériez le fusible F5;
dépassée limite max. de courant moteur 1;
Absorption excessive du motoréducteur, vérier tous les
obstacles le long de l’automatisme, vérier la consom-
mation de courant du moteur à vide et appliquée à la
fermeture;
dépassée limite max. de courant moteur 2 (en cas de
défaillance / anomalie de la borne du moteur 1 et avec
le dip-switch 10 sur ON);
Absorption excessive du motoréducteur, vérier tous les
obstacles le long de l’automatisme, vérier la consommation de courant du moteur à vide et appliquée à la
fermeture;
fermeture automatique désactivée après 5 interventions consécutives infructueuses;
Pour effectuer la fermeture est nécessaire de donner une
impulsion de commande;
50
K126MA
Page 51

6 clignotement (jaune):
8 clignotement (rouge):
8 clignotement (jaune):
En outre des avertissements/erreurs de la partie logique, le led DL8 indique également l’état de la
centrale pendant la mémorisation des radiocommandes.
toujours allumé (vert):
clignotement rapide (vert):
toujours allumé (jaune):
clignotement rapide (jaune):
erreur de transmission master/slave (maître/esclave);
Vérier le câblage entre les centrales de commande,
le fonctionnement de la centrale esclave (fusibles) et le
fonctionnement des cartes d’interface;
erreur de mémoire EEPROM externe
Substituer le module de mémoire externe;
erreur de données dans l’EEPROM (interne / externe);
Effectuez une RÉINITIALISATION DE LA MÉMOIRE DE
LA RADIO;
chaine CH1 en attente de programmation;
mémoire chaine CH1 plaine;
chaine CH2 en attente de programmation;
mémoire chaine CH2 plaine;
clignotement (vert):
toujours allumé (vert):
clignotement (jaune):
toujours allumé (jaune):
Les led DL7 DL8 quand ils clignotent simultanément, ont la fonction de signaler:
clignotement + (rouge + rouge):
clignotement + (jaune + jaune):
L’indication de plusieurs erreurs est effectuée avec une pause de 2 secondes entre une signalisation
et la suivante.
Dans le cas d’une intervention par l’encodeur (détection d’obstacle) pendant la phase de fermeture, le
centrale de commande inverse le mouvement et il commence la phase de ralentissement de la course
en ouverture, avec l’arrêt de la fermeture automatique. Lors de la prochaine impulsion de commande,
la fermeture automatique est rétablie.
Dans le cas de 5 interventions consécutives (pendant le même cycle de fermeture) par les systèmes de
sécurité, la centrale de commande augmente progressivement le temps de la fermeture automatique.
Une fois la fermeture terminée, lors du prochain cycle le fonctionnement revient à celui programmé.
chaine CH1 en attente d’effacement;
chaine CH1 en effacement;
chaine CH2 en attente d’effacement;
chaine CH2 en effacement;
procédure de réinitialisation de fabrique à conrmer;
en attente effacement total des chaînes de radio;
VISUALISATION EFFORT MOTEUR (seulement à partir de la version 5.17)
Cette fonction permet de visualiser l’effort du moteur pendant le fonctionnement pour identier situations éventuelles de travail lourd.
Pour activer la fonction appuyer en même temps et maintenir pressé pour environ 2 secondes les
trois touches Ch1, Ch2 et PROG, depuis actionner le moteur par des télécommandes, bouton prog
ou sélecteur etc..
CH2
CH1
PROG
FRANÇAIS
K126MA
51
Page 52

L’indication de l’effort est codiée selon le schéma du tableau suivant:
Niveau DL7 DL8
(de) (de)
(vert) (de)
(vert) (vert)
(vert) (jaune)
(jaune) (vert)
(jaune) (jaune)
(jaune) (rouge)
(rouge) (jaune)
(rouge) (rouge)
Après 5 minutes d’inactivité la platine reviendra à la visualisation classique (pour retourner manuellement à la visualisation classique appuyer de nouveau les trois touches en même temps.
REMISE FONCTIONNEMENT AUTOMATIQUE
Lors qu’il devient nécessaire de gérer manuellement la fermeture ou l‘ouverture de l’automatisation, il
FRANÇAIS
faut actionner le déblocage manuel. An de rétablir le fonctionnement normal (automatique), veuillez
prendre bonne note de ce qui suit:
• si la remise a lieu suite à une panne de courant (la centrale de commande donc n’est plus alimentée
pendant un certain temps) ou après une intervention manuelle (pas d’interruption d’alimentation
à la carte pendant un temps plus long que 5 secondes), l’automation entre dans une phase de
course lente à la recherche de la butée de ouverture (manœuvre de REALIGNEMENT).
RÉCEPTEUR RADIO 433,92 MHz INTÉGRÉ
Le récepteur radio peut apprendre jusqu’à un max. de 86 codes rolling code (BUG2R, BUG4R, K-
SLIM-RP, T-4RP) à paramétrer librement sur deux canaux.
Le premier canal commande directement la carte de commande pour l’ouverture de l’automatisme ;
le deuxième canal commande un relais pour un contact à vide N.O. en sortie (bornes 19 - 20, max.
24V AC, 1 A) et le troisième canal active directement la fonction passage piétons de l’automatisme.
APPRENTISSAGE ÉMETTEUR
CH1 = 1e canal (seulement OUVRE/FERME)
CH2 = 2e canal
CH1 = 3e canal (seulement PIÉTON)
1_ presser rapidement la touche CH1 si l’on souhaite associer un émetteur à la fonction OUVRE/
FERME ;
2_ le led DL8 (vert) s’allume en continu pour indiquer la modalité apprentissage des codes (si aucun
code n’est pas introduit dans 10 secondes, la che quitter la modalité de programmation) ;
3_ presser la touche de l’émetteur que l’on souhaite utiliser ;
4_ DL8 LED (vert) s’éteint pour indiquer que la mémorisation est complète puis rallumez immédiatement
en attendant d’autres émetteurs (si ce n’est pas le cas, essayer de retransmettre ou attendez 10
secondes et recommencez du point 1) ;
5_ si l’on souhaite mémoriser d’autres émetteurs, presser la touche d’autres dispositifs à l’intérieur
2-3 sec. Après cette période de temps (DL8 LED s’éteint) il faut répéter la procédure à partir du
point 1 (jusqu’à un maximum de 86 émetteurs) ;
6_ si vous souhaitez effectuer la mémorisation sur la 2ème chaîne, répétez la procédure depuis le
point 1 en utilisant le bouton CH2 au lieu du bouton CH1 (dans ce cas, le LED DL8 s’allume de
couleur jaune) ;
7_ si on souhaite effectuer la mémorisation sur le 3ème canal, il faut répéter la procédure depuis
l’étape 1 en utilisant simultanément les touches CH1 et CH2 (dans ce cas le voyant DL8 s’allume
en rouge);
52
K126MA
Page 53

8_ si l’on souhaite sortir du mode d’apprentissage sans mémoriser un code, presser brièvement la
touche CH1 ou la touche CH2.
Dans le cas de obtention du numéro maximal de radiocommandes (n ° 86), le led DL8
clignote pour environ 3 secondes sans cependant exécuter la mémorisation.
PROGRAMMATION RECULÉ PAR T-4RP et K-SLIM-RP (V 4.X)
Avec la nouvelle version de logiciel V 4.X il est possibile d’effectuer l’apprentissage reculé de la dernière
version des émetteurs T-4RP et K-SLIM-RP (V 4.X), c’est-à-dire sans appuyer sur les poussoires de
programmation du récepteur.
Il faudra seulement utiliser un émetteur déjà programmé sur le récepteur pour pouvoir ouvrir la procédure de programmation reculée des nouveaux émetteurs. Suivre la procédure mentionnée sur les
notices techniques concernant l’émetteur T-4RP et K-SLIM-RP (V 4.X).
EFFACEMENT ÉMETTEURS
1_ maintenir enfoncée pendant environ 3 secondes la touche CH1 pour effacer tous les émetteurs
qui lui sont associés ;
2_ la led DL8 commence à clignoter lentement pour indiquer que le mode d’effacement est activé ;
3_ maintenir de nouveau la touche CH1 enfoncée pendant 3 secondes ;
4_ la led DL8 s’éteint pendant environ 3 secondes puis se rallume sans plus s’éteindre pour indiquer
que l’effacement a été fait ;
5_ reprendre la procédure à partir du point 1 en utilisant la touche CH2 pour effacer tous les émetteurs
qui lui sont associés ;
6_ répéter la procédure à partir de l’étape 1 en utilisant simultanément les touches CH1 et CH2 an
d’effacer toutes les télécommandes associées au 3ème canal ;
7_ si l’on souhaite sortir du mode d’effacement sans mémoriser un code, presser brièvement la touche
CH1 ou la touche CH2.
MÉMOIRE DES CODES
Pour les logiques de commande K126MA, il est possible d’augmenter la mémoire des codes* (émetteurs) de 86 à 126, 254 ou 1022 en remplaçant les cartes de mémoire de la manière indiquée (il faut
les brancher dans le connecteur J3, voir schéma câblage à pag. 2-3):
126 codes Art. 250SM126
254 codes Art. 250SM254
1022 codes Art. 250SM1022
FRANÇAIS
* Les logiques de commande sont équipés de série d’une mémoire de 86 codes. La carte de mé-
moire pour l’extension des codes doit être commandée à part.
ATTENTION: lors qu’on fait le branchement/débranchement d’une carte de mémoire, la
centrale doit entre désactivée.
IMPORTANT: En cas d’utilisation d’une carte de mémoire, la mémoire de 86 codes de la
logique de commande est désactivée.
RÉINITIALISATION DE LA MÉMOIRE DE LA RADIO:
- Maintenez enfoncée les boutons CH1 et PROG jusqu’à ce que les led DL7et DL8 commencent
à clignoter rapidement tout les deux en jaune. À ce stade, relâchez les boutons et les presser à
nouveau jusqu’à ce que les led s’éteint, indiquant que l’opération est terminée (si ils ne sont pas
pressée et on reste en attente, la che renvoie à un fonctionnement normal après environ 12
secondes).
RÉGLAGES DE FABRIQUE (réglages de fabrique):
- Maintenez enfoncée les boutons CH2 et PROG jusqu’à ce que les led DL7 et DL8 commencent
à clignoter rapidement tout les deux en rouge. À ce stade, relâchez les boutons et les presser à
nouveau jusqu’à ce que les led s’éteint (remise à zéro en course), indiquant que l’opération est
terminée (si ils ne sont pas pressée et on reste en attente, la che renvoie à un fonctionnement
normal après environ 12 secondes). À la relance, vous devez effectuer la procédure de mémori-
sation.
Si on fait un RÉGLAGES DE FABRIQUE, la mémoire du récepteur radio reste inchan-
gée, et par conséquent les télécommandes existantes restent mémorisées.
K126MA
53
Page 54

PROBLÈMES DE FONCTIONNEMENT : CAUSES POSSIBLES ET REMÈDES
L’automatisme ne démarre pas
a- Vérier avec l’instrument (Multimètre) la présence de l’alimentation 230 V AC.
b- Vérier, en modalité standard, que les contacts N.C. de la che sont effectivement normale-
ment fermés (4 LED verts).
c- Positionner le dip-6 (phototest) sur OFF.
d- Tourner le trimmer FR sur le maximum.
e- Contrôler avec l’instrument (Multimètre) que les fusibles sont intacts.
La portée de la radiocommande est faible
a- Contrôler que la connexion de la masse et du signal de l’antenne n’est pas inversée.
b- Ne pas effectuer d’épissures pour prolonger le câble de l’antenne.
c- Ne pas installer l’antenne dans des positions basses ou cachées par la maçonnerie ou par le
pilier.
d- Contrôler l’état des piles de la radiocommande.
Le portail s’ouvre dans le sens contraire
Intervertir les connexions du moteur sur le bornier, bornes 28 - 29 et bornes 23 - 24 (en cas
d’usage).
GARANTIE: CONDITIONS GÉNÉRALES
La garantie TAU a une durée de 24 mois à compter de la date d’achat des produits (le document
scal de vente, ticket de caisse ou facture).
FRANÇAIS
La garantie comprend la réparation avec remplacement gratuit (départ usine TAU: frais d’emballage
et de transport à la charge du client) des parties qui présentent des défauts de fabrication ou des
vices de matériau reconnus par TAU.
En cas d’intervention à domicile, y compris dans la période couverte par la garantie, l’utilisateur est
tenu de verser le “Forfait d’intervention” correspondant au coût du déplacement à domicile, plus la
main d’œuvre.
La garantie n’est plus applicable dans les cas suivants :
• Si la panne est provoquée par une installation qui n’a pas été effectuée suivant les instructions
fournies par le constructeur et présentes à l’intérieur de chaque emballage.
• Si l’on n’a pas utilisé que des pièces originales TAU pour l’installation de l’automatisme.
• Si les dommages sont causés par des calamités naturelles, des actes de malveillance, une
surcharge de tension, une alimentation électrique incorrecte, des réparations impropres, une
installation erronée ou d’autres causes non imputables à TAU.
• Si l’automatisme n’a pas été soumis aux maintenances périodiques de la part d’un technicien
spécialisé selon les instructions fournies par le constructeur à l’intérieur de chaque emballage.
• Usure des composants.
La réparation ou le remplacement des pièces durant la période de garantie ne comporte pas le pro-
longement de la date d’expiration de la garantie en question.
Dans le cas d’un usage industriel ou professionnel ou similaire, la garantie est valable 12 mois.
54
K126MA
Page 55

DECLARACIÓN DE INCORPORACIÓN DEL FABRICANTE
(de acuerdo con la Directiva Europea 2006/42/CE Adj. II.B)
Fabricante: TAU S.r.l.
Dirección: Via E. Fermi, 43
36066 Sandrigo (Vi)
ITA LY
Declara bajo su propia responsabilidad que el producto: Central electrónica de control
fabricado para el movimiento automático de: Puertas Correderas
para uso en ambiente: Residencial / Comunidades / Industrial
equipado con: Radioreceptor y tarjeta carga batería
Modelo: K126MA
Tipo: K126MA
Número de serie: véase etiqueta plateada
Denominación comercial: Panel de mandos para un motor 12/24V con
encoder
Se ha realizado para incorporarlo a un cierre (puerta corredera) o para montarlo con otros dispositivos con el obje-
tivo de desplazar el cierre y formar una máquina de acuerdo con la Directiva Máquinas 2006/42/CE.
Declara también que este producto cumple con los requisitos esenciales de seguridad de las siguientes ulteriores
directivas CEE:
- 2006/95/CE Directiva Baja Tensión
- 2004/108/CE Directiva Compatibilidad Electromagnética
y, donde es necesario, con los de la Directiva:
- 1999/5/CE Equipos radioeléctricos y equipos terminales de telecomunicación
Declara además que no está permitido poner en servicio la maquinaria hasta que la máquina en la que se
incorporará o de la que se convertirá en componente se haya identicado y se haya declarado la conformidad a
las condiciones de la Directiva 2006/42/CE.
ESPAÑOL
Se compromete a transmitir, si las autoridades nacionales así lo solicitarán de forma motivada, informaciones
referentes a las casi-máquinas.
Sandrigo, 27/11/2014
El representante legal
_________________________________________
Nombre y dirección de la persona autorizada a entregar la documentación técnica pertinente:
Loris Virgilio Danieli - via E. Fermi, 43 - 36066 Sandrigo (Vi) Italia
K126MA
Loris Virgilio Danieli
55
Page 56

ADVERTENCIAS
El presente manual está destinado sólo al personal técnico cualicado para la instalación. Las informaciones que contiene este fascículo no pueden considerarse de interés para el usuario nal. Este
manual se adjunta a la centralina K126MA, por lo tanto, no debe utilizarse para productos diversos.
Advertencias importantes:
Antes de acceder a la tarjeta es necesario desconectarla de la alimentación de red.
La centralina K126MA está destinada al control de un motorreductor electromecánico de corriente
continua para la automatización de cancelas, puertas y portones.
Cualquier otro uso es considerado inadecuado y, por consiguiente, está prohibido por las normativas
vigentes.
Es nuestro deber recordarle que la automatización que está por realizar está clasicada como «construcción de una máquina» y, por consiguiente, entra dentro del campo de aplicación de la directiva
europea 2006/42/CE (Directiva de máquinas).
Dicha normativa, en los puntos fundamentales, prevé que:
- la instalación debe ser efectuada sólo por personal cualicado y experto;
- la persona que efectúe la instalación deberá analizar preventivamente los riesgos de la máquina;
- la instalación deberá ser hecha según las reglas del arte, es decir aplicando las normas;
- por último, habrá que expedir al dueño de la máquina la «declaración de conformidad».
Por consiguiente, es evidente que la instalación y los posibles trabajos de mantenimiento deben ser
efectuados por personal cualicado, de acuerdo con cuanto previsto por las leyes, normas y directivas vigentes.
Durante el diseño de sus equipos, TAU respeta las normativas aplicables al producto (véase la decla-
ración de conformidad adjunta); también es fundamental que el instalador, al realizar la instalación,
ESPAÑOL
respete escrupulosamente las normas.
Personal no cualicado, o que no conozca las normativas aplicables a la categoría de las «cancelas
y puertas automáticas», debe abstenerse de efectuar instalaciones.
¡Quien no respeta las normativas es responsable de los daños que la instalación podría provocar!
Se aconseja leer con atención todas las instrucciones antes de proceder con la instalación.
INSTALACIÓN
Antes de continuar, asegúrese de que la parte mecánica funcione bien. Averiguar que la
cancela corra libremente sobre un plan horizontal. También controle que el grupo mo-
torreductor esté instalado correctamente siguiendo las instrucciones respectivas. Una
vez concluidos los controles, verique que l’absorción del motorreductor sea adecuada.
La central de la ver. 5.17 dispone de una función que permite la visualización del esfuerzo
requerido durante el movimiento, ves el párrafo FUNCIÓN DE VISUALIZACIÓN ESFUERZO
MOTOR).
LA INSTALACIÓN DEL EQUIPO DEBE SER HECHA CORRECTAMENTE POR PERSONAL QUE
REÚNA LOS REQUISITOS DISPUESTOS POR LA LEY.
Nota: se recuerda que es obligatorio conectar a tierra el equipo y respetar las normas de seguridad vigentes en cada país.
LA INOBSERVANCIA DE LAS INSTRUCCIONES ANTEDICHAS PUEDE PERJUDICAR EL FUNCIONAMIENTO CORRECTO DEL EQUIPO Y CONSTITUIR UN PELIGRO PARA LAS PERSONAS;
EL “FABRICANTE” NO SE CONSIDERA RESPONSABLE POR POSIBLES PROBLEMAS DE FUNCIONAMIENTO Y DAÑOS QUE DE ELLOS SE DERIVEN.
56
K126MA
Page 57

PANEL DE MANDOS PARA UN MOTOR 18/24V CON ENCODER
• FUNCIÓN DE VISUALIZACIÓN ESFUERZO MOTOR
• ESTADO DE LAS ENTRADAS VISUALIZADO POR LEDs
• CIRCUITO DE DESTELLO INCORPORADO
• SENSOR CON CODIFICADOR PARA EL AUTOAPRENDIZAJE DEL RECORRIDO
• RADIORRECEPTOR DE 433,92 MHz INTEGRADO DE 2 CANALES (CH)
• TARJETA CARGA BATERÍA (INTEGRADA)
• DIAGNÓSTICO DEL DEFECTO DE LA FUNCIÓN VISUALIZADO POR EL LED
• POSIBILIDAD DE FUNCIONAMIENTO EN BAJO CONSUMO
ATENCIÓN:
- no utilizen cables monoconductores (como por ejemplo los del interfono) para evitar interrupciones en la linea y falsos contactos;
- no utilizen cables viejos preexistentes;
- se aconseja utilizar el cable TAU para conectar los motores con el cuadro electrico de
mando.
INTRODUCCIÓN
La tarjeta K126MA puede funcionar en dos modos diferentes que se seleccionan con el puente J6
(véase el diagrama de cableado).
J6 Puenteado: modalidad estándar, es decir la central siempre está alimentada;
J6 No puenteado: modalidad bajo consumo, o sea la central „se apaga” al nal de cada maniobra
y también apaga todos los dispositivos auxiliares. La central se encendera con
cada mando (modalidad para la alimentación con otras fuentes de energía, por
ej. baterías cargadas mediante panel fotovoltaico).
Al concluir la conexión, en modalidad bajo consumo, pulse brevemente el pulsador PROG:
• Los Leds verdes tienen que estar todos encendidos (cada uno de ellos corresponde a una entrada Normalmente Cerrada). Se apagan sólo cuando están afectados los mandos a los que están
asociados.
• Los Leds rojos tienen que estar todos apagados (cada uno de ellos corresponde a una entrada
Normalmente Abierta). Se encienden sólo cuando están afectados los mandos a los que están
asociados.
CARACTERÍSTICAS TÉCNICAS
Alimentación tarjeta 13,5V1 AC - 50 Hz
Potencia máx. del motor c.c.. 300 VA - 18V2 DC
Fusible rápido protección alimentación entrada 13,5 Vac (F4 - 5x20)
Fusible
rápido protección
Fusible
rápido protección
carga batería (F5 - 5x20) F 10A
auxiliares 18V2 DC (F3 - 5x20) F 2A
F 16A
Tensión circuitos alimentación motor 18V2 DC
Tensión alimentación circuitos dispositivos auxiliares 18V2 DC
Tensiones alimentaciones circuitos lógicos 5V DC
Temperatura de funcionamiento -20 °C ÷ +55 °C
1
18V per MASTER-R y T-ONE8BR
2
24V per MASTER-R y T-ONE8BR
ESPAÑOL
CONEXIONES AL TERMINAL DE CONEXIONES
Borness Función Descripción
entrada alimentación tarjeta 13,5V (24V para MASTER-R y T-
FS1 - FS2 ALIMENTACIÓN
ONE8BR) AC – Alimentado por el transformador toroidal y protegido por un fusible en la alimentación 230V AC.
entrada de alimentación externa (ej. sistema fotovoltaico 12V DC).
Nota: si se utiliza esta entrada, puentear adecuadamente J7
(véase el diagrama de cableado).
1 - 2 ENTRADA AUX
ATENCIÓN: ALIMENTANDO LA CENTRAL MEDIANTE UNA
FUENTE EXTERNA TODAS LAS DEMÁS SALIDAS DE 18V
(24V para MASTER-R) DC TOMAN EL VALOR DE LA TENSIÓN
DE ALIMENTACIÓN DE LA FUENTE.
K126MA
57
Page 58

3 - 6 PEATONAL
4 - 6 ABRE/CIERRA
5 - 6 STOP
7 - 8
7 - 9
ESPAÑOL
7 - 10
FOTOCÊLULAS
INTERNAS
FOTOCÊLULAS
EXTERNAS
BORDE
SENSIBLE
11 - 12 ** AUX
12 - 13 **
14 - 15 **
TRANSMISOR
FOTOCÊLULAS
LUZ
INTERMITENTE
INDICADOR LUMI-
16 - 17* **
NOSO CANCELA
ABIERTA
16 - 18* **
58
LUZ DE
CORTESÍA
entrada N.A. botón PEATONAL - Controla la apertura y el cierre
parcial de la cancela durante 1/3 de recorrido y su funcionamiento
está controlado por los dip-switches 2 y 4.
(3= PEA - 6= COM)
entrada N.A. botón ABRE / CIERRA – Acciona la apertura y el
cierre del automatismo y su funcionamiento está regulado por los
dip-switches 2 y 4. (4= A/C - 6= COM)
entrada N.C. botón STOP – Detiene el automatismo dondequiera que
se encuentre, inhibiendo momentáneamente el cierre automático,
de haber sido programado. (5= STOP - 6= COM)
Nota: un micro-interruptor de seguridad es conectado al pul-
sador STOP. Si el ingreso STOP queda abierto por más de 5
segundos, el automatismo efectuará una maniobra lenta para
alinearse con los ajustes congurados (véase “Restablecimiento funcionamiento automático”). El micro-interruptor debe ser
conectado en serie con otros pulsadores STOP, si hay.
entrada FOTOCÉLULAS O DISPOSITIVOS DE SEGURIDAD
SITUADOS AL INTERNO respecto de la cancela ( contacto
Normalmente Cerrado). Su accionamiento, durante la apertura,
provoca el paro momentáneo de la cancela hasta que se elimina
el obstáculo detectado; durante el cierre, provoca el paro seguido por la apertura total de la cancela. Hacer un puente entre los
bornes si no se utilizan. (7= COM - 8= CIERRA);
entrada FOTOCÉLULAS O DISPOSITIVOS DE SEGURIDAD
SITUADOS AL EXTERNO respecto de la cancela (contacto Nor-
malmente cerrado). Su accionamiento, durante el cierre, provoca el
paro seguido por la apertura total de la cancela. Hacer un puente
entre los bornes si no se utilizan.(7= COM - 9= FOT)
Nota: el transmisor de la fotocélula tiene que estar alimentado
siempre por los bornes nº. 12 y nº. 13, puesto que la veri-
cación del sistema de seguridad (Fototest) se efectúa sobre
ellos. Sin esta conexión, la centralina no funciona. Para elimi-
nar la vericación del sistema de seguridad, o cuando no se
utilizan las fotocélulas, situar el dip-switch nº. 6 en OFF.
entrada BANDA SENSIBLE (Banda sensible resistiva o borde
jo); Funciona sólo durante la etapa de apertura de la cancela y
provoca la parada momentánea de la cancela y su cierre parcial
por alrededor de 20 cm así liberando el posible obstáculo. Hacer
un puente entre los bornes si no se utilizan.
(7= COM - 10= BORDE SENSIBLE)
salida auxiliares 18V1 DC máx. 15 W para fotocélulas, receptores,
etc... (11= NEGATIVO - 12= POSITIVO).
Si el jumper J6 no está colocado, al nal de cada maniobra de
salida (11 y 12) se debe desactivar (modalidad bajo consumo).
salida 18V1 DC fotocélula transmisión -fototest- máx. nº. 1 transmisores fotocélulas. (12= POSITIVO - 13= NEGATIVO)
salida 18V1 DC máx. 20W alimentación intermitente, destello
procedente de la central, rápido durante el cierre y lento durante
la apertura. (14= POSITIVO - 15= NEGATIVO)
salida para el INDICADOR LUMINOSO CANCELA ABIERTA 18V1
DC, máx. 3 W; durante la apertura del automatismo, el indicador
luminoso destella lentamente, con el automatismo abierto permanece encendido y durante el cierre destella rápidamente. (16=
POSITIVO - 17= NEGATIVO)
salida luz de cortesía auxiliar 18V1 AC max. 15 W;
Se enciende con el impulso de mando y permanece encendida
más allá del nal de la maniobra durante un tiempo que se puede
congurar a través de TAUPROG (por default son 2 seg.)
(16= POSITIVO - 18= NEGATIVO)
K126MA
Page 59

salida 2° canal radio - para controlar otra automatización o encender luces, etc... (contacto limpio N.A.)
Atención: utilizar un relé auxiliar para conectar el mando de la luz u
otras cargas al 2. canal radio (ver nota al nal del párrafo).
19 - 20* 2° CANAL RADIO
ATENCIÓN: la salida por defecto es monoestable activa
2 seg. Para cambiar a biestable activa o para modicar el
tiempo de activación es necesario operar a través del programador portátil TAUPROG (véanse las instrucciones correspondientes).
21 - 22 ANTENA
23 - 24 MOTOR (M2)
entrada antena radiorreceptor de enchufe sólo para receptores
433,92 MHz. (21= MASA - 22= SEÑAL)
salida alimentación motor M2 18 V DC máx. 300 VA.
(23= POSITIVO - 24= NEGATIVO) Ver anotación abajo.
25 - 26 - 27 ENCODER (M2) no utilizado.
28 - 29 MOTOR (M1)
30 - 31 - 32 ENCODER (M1)
1
24V per MASTER-R y T-ONE8BR
salida alimentación motor M1 18 V DC máx. 300 VA.
(28= POSITIVO - 29= NEGATIVO)
alimentación y entrada codicador. (30= BLANCO señal - 31=
AZUL negativo - 32= MARRÓN positivo)
* Las salidas se pueden congurar a través de TAUPROG (véanse instrucciones correspondientes).
En la tabla se reproduce la conguración estándar.
** Si el puente 6 no está insertado, se activará el modo de bajo consumo y, al nal de cada maniobra,
las salidas 11-12 , 12-13 , 14-15 , 16-17 y 16-18 se desconectarán.
La regleta correspondiente al motor 2 (23-24) se debe utilizar en apoyo de la regleta del
motor 1 (MASTER18QR / MASTER-R), o en caso de avería de la regleta del motor 1 (28-
32), véase esquema del cableado en la página 2-3.
IMPORTANTE:
• No conectar relé auxiliares o otras cargas a la salida 18V (24V para MASTER-R y T-ONE8BR)
DC (bornes 11 – 12) par evitar problemas de funcionamiento al cuadro de maniobras. Utilizar
alimentadores / transformadores separados;
• no conecte alimentadores switching ni equipos similares cerca del automatismo porque
podrían crear perturbaciones.
ESPAÑOL
AJUSTES LÓGICOS
Efectúe los ajustes lógicos.
Nota: para activar las nuevas conguraciones es necesario efectuar una maniobra completa
(apertura y cierre) de la automatización accionando uno de los ajustes del tablero de mandos
(trimmer o dip-switches).
TRIMMER
T.C.A. ajuste Tiempo de Cierre Automático: de 1 a 120 segundos aprox. (véase dip-
switch nº. 1);
FR. ajuste sensibilidad detección obstáculos.
Nota: girando el TRIMMER FR. en el sentido de las agujas del reloj se disminuye
la sensibilidad del motorreductor sobre el obstáculo y, por lo tanto, aumenta
la fuerza de empuje; viceversa, girándola en sentido contrario a las agujas del
reloj, aumenta la sensibilidad del motorreductor sobre el obstáculo y disminuye
la fuerza de empuje.
Dip switch
al completarse la apertura, el cierre del automatismo es automático
1
CIERRE
AUTOMÁTICO
On
transcurrido un tiempo congurado en el trimmer T.C.A.;
Off el cierre necesita un comando manual;
K126MA
59
Page 60

con el automatismo en funcionamiento, una secuencia de mandos
On
de apertura/cierre induce el automatismo a una AERTURA-CIERRE-
2 2 / 4 TIEMPOS
3
4 NO REVERSE
5
6 FOTOTEST
7
8
9-10-11 Selección del tipo de automatización
ESPAÑOL
12
CIERRA
DESPUÉS
FOTOCÉLULA
PRE-
DESTELLO
MASTER /
SLAVE
BACK
JUMP
Dip 9 Dip 10 Dip 11 Automatización
Off Off Off TONE-5B
On Off Off TONE-10B
Off On Off TONE-8BR (24v)
On On Off MASTER-R (24V apertura de la velocidad = velocidad de cierre)
Off Off On MASTER18QR
On Off On MASTER-R (24V)
Off On On CANTILEVER (luz)
On On On CANTILEVER TONE10B (pesado)
IMPORTANTE: el ajuste de los Dip switch 9, 10 y 11 depende del tipo de automatización.
En caso de cambio, antes de volver a realizar el nuevo ajuste es necesario efectuar un
HARD RESET (véase pág. 58) del cuadro.
BORDE
SENSIBLE
APERTURA-CIERRE, etc.
en las mismas condiciones, la misma secuencia de mandos induce el
Off
automatismo a una APERTURA-STOP-CIERRE-STOP-APERTURASTOP, etc. (función paso a paso) (véase también dip switch 4);
tras la activación del contacto de la fotocélula (entradas 7 - 9), el auto-
On
matismo se cierra automáticamente después de 5 segundos;
Off función desactivada;
el automatismo ignora los mandos de cierro durante la apertura y el tiempo
On
de pausa.
Off el automatismo se comporta tal como establecido por el dip switch n° 2;
On la función predestello está activada;
Off la función predestello está desactivada;
On la función “vericación de las fotocélulas” está activada;
la función “vericación de las fotocélulas” está desactivada.
Off
N.B.: úsela cuando no se utilizan las fotocélulas;
habilita el modo MASTER en la conguración master/slave (véanse
On
instrucciones T-COMM).
habilita el modo SLAVE en la conguración master/slave (véanse ins-
Off
trucciones T-COMM), o el funcionamiento estándar (un solo motor).
una vez llegado al tope mecánico (tanto de apertura como de cierre)
On
el automatismo hará un pequeño movimiento en sentido contrario para
evitar que piñón y cremallera queden trabados.
Off función no activada.
On BORDE SENSIBLE RESISTIVO (borne n.° 10).
BORDE FIJO (contacto NC - borne n.° 10).
Off
Nota: si no se utiliza, mantenga el DIP en OFF.
PROCEDIMIENTO DE MEMORIZACIÓN
ATENCIÓN: Después de haber alimentado el tablero de control, espere 2 seg. antes de efectuar
las maniobras de ajuste.
Nota: los topes mecánicos del automatismo deben regularse, obligatoriamente, tanto en apertura como en cierre [véanse instrucciones motor].
Cuando haya terminado la instalación de la automatización:
Vericar la posición de los dips 9, 10 y 11. Los dips se deben congurar según el modelo
de automatización (véase tabla dip 9-10-11, sección “Ajustes logicós”).
60
K126MA
Page 61

Es preferible iniciar el procedimiento con la cancela a 0,5 m aprox. de la parada mecánica de cierre.
Pulse y mantenga pulsado el botón PROG hasta que el LED DL8 comience a destellar (amarillo):
- el automatismo comenzará a abrirse lentamente buscando el tope de apertura;
Si el automatismo se cierra en vez de abrirse, terminar la carrera de la cancela (mediante
fotocélulas o cerrando el contacto STOP), invertir la polaridad del motor, llevar el puerta en
posición cerrada (sobre la parada mecánica) y reiniciar el procedimiento desde el principio.
Nota: si el automatismo permaneciera detenido, controle las conexiones de las entradas.
Todos los LED verdes DL6, DL5, DL4 y DL3 deben estar encendido con luz ja.
- al llegar al tope de apertura, el automatismo comenzará a cerrarse buscando el tope de cierre (en
esta fase la central adquiere todos los parámetros relativos a la carrera);
- el automatismo realizará una apertura completa para optimizar la fuerza del motor durante la
apertura;
- después de una pequeña pausa, el automatismo realizará un cierre completo para optimizar la
fuerza del motor durante el cierre.
ATENCIÓN:
- El procedimiento puede interrumpirse pulsando el botón STOP.
- Durante las diferentes fases de la operación, si las fotocélulas se activarán se interrumpirá
la memorización. Para reanudar el procedimiento desde el inicio (con el LED DL8 amarillo
destellante), utilice el mando AP/CH, el botón del emisor (si estuviera programado) o pulse
brevemente el botón PROG.
Recuerde que la presencia de un obstáculo durante la memorización es interpretada
como un tope mecánico (el sistema no interviene realizando movimientos de seguridad, sino solo deteniendo los motores). Por lo tanto, asegúrese de no estar cerca del
automatismo durante el proceso de memorización.
CARACTERÍSTICAS DE LA K126MA
APERTURA Y CIERRE CONTROLADA A TRAVÉS DEL RELOJ
Es posible accionar la apertura y el cierre del automatismo con un reloj digital que disponga en la
salida de un contacto sin tensión N.A. (relé).
Será suciente conectarlo a los bornes 4 - 6 (botón ABRE/CIERRA) y programarlo de forma que, a la
hora de apertura deseada, el contacto relé del reloj se cierre hasta la hora de cierre deseada (el momento
en el cual el relé del reloj se abre de nuevo, permitiendo de esta forma el nuevo cierre automático).
Nota: el cierre automático tiene que estar activado (Dip-switch nº. 1 en ON).
ESPAÑOL
TARJETA CARGA BATERÍA (INTEGRADA)
Si se conecta la batería, en ausencia de red la automatización funciona de todos modos. Si la tensión desciende por debajo de los 11,3 Vdc, la automatización deja de funcionar (el tablero de control
sigue estando alimentado); cuando, en cambio, desciende por debajo de los 10,2 Vdc, la tarjeta se
desconecta completamente de la batería (el tablero de control deja de estar alimentado). Durante el
funcionamiento en batería se activa la modalidad de bajo consumo y al nal de cada maniobra las
salidas 11-12, 12-13, 14-15, 16-17 y 16-18 serán apagadas. Para conectar la batería a la central sirve
el adecuado conector que generalmente es provisto junto a la misma.
Nota: Cuando interviene el funcionamiento en batería, se activa el modo de bajo consumo
por lo que las salidas auxiliares están desactivadas.
(Para el uso de receptores externos, GSM, etc., alimentar en paralelo a la entrada de batería)
DETECCIÓN OBSTÁCULOS
La función de detección de obstáculos (ajustable por el trimmer FR) al intervenir en la fase de apertura
de la automatización provoca un nuevo cierre de aprox. 20 cm, mientras en la fase de cierre provoca
una apertura total.
ATENCIÓN: la lógica del tablero de mandos puede interpretar un roce mecánico como
un eventual obstáculo.
LED DE DIAGNÓSTICO
DL1 - Rojo led de aviso botón PEATONAL
DL2 - Rojo led de aviso botón ABRE/CIERRA
DL3 - Verde led de aviso botón de STOP
K126MA
61
Page 62

DL4 - Verde led de aviso FOTOCÉLULAS INTERNAS
DL5 - Verde led de aviso FOTOCÉLULAS EXTERNAS
DL6 - Verde led de aviso BORDE SENSIBLE
LED - DL7
El LED DL7, además de indicar la presencia de la batería, señala los errores con una serie de destellos
predeterminados de diferentes colores:
Leyenda:
led siempre encendido;
led intermitente;
siempre encendido (Verde):
siempre encendido (Amarillo):
1 destello cada 4 s (Verde):
batería cargada, llegada tensión de red;
batería cargándose.
batería cargada, no llega tensión de red;
Controle la alimentación de red;
1 destello cada 4 s (Amarillo):
1 destello cada 2 s (Rojo):
alimentación externa, cargador de batería desactivado;
batería descargada;
Cargue la batería, sustituya la batería;
destello rápido (Rojo):
batería averiada;
Sustituya la batería;
LED - DL8
El LED DL8 señala los avisos/errores de la lógica de la tarjeta con una serie de destellos predeterminados de diferentes colores:
Leyenda:
led siempre encendido;
led intermitente;
ESPAÑOL
1 destello cada 4 s (Verde):
destello / alternado:
(Rojo/Verde)
destello (Amarillo) rápido:
1 destello (Rojo):
funcionamiento regular;
memorización a realizar;
memorización realizándose;
error fototest
Inhabilite el fototest (dip-switch 6 en OFF), controle el funcionamiento de las fotocélulas y sus conexiones;
1 destello (Amarillo):
2 destellos (Rojo):
estado desconocido, próxima maniobra REALINEACIÓN;
presencia de obstáculo para el motor 1;
Controle la ausencia de obstáculos a lo largo del recorrido de
la cancela y su deslizamiento;
2 destellos (Amarillo):
presencia de obstáculo para el motor 2 (en caso de avería
/ falla de los bornes del motor 1 y con el dip # 10 en ON);
Controle la ausencia de obstáculos a lo largo del recorrido de
la cancela y su deslizamiento;
3 destellos (Rojo):
ausencia de señal encoder motor 1;
Controle el cableado, compruebe el encoder mediante el TESTENCODER (opcional);
3 destellos (Amarillo):
ausencia de señal encoder motor 2 (en caso de avería / falla
de los bornes del motor 1 y con el dip # 10 en ON);
Controle el cableado, compruebe el encoder mediante el TESTENCODER (opcional);
4 destellos (Rojo):
ausencia de señal motor 1;
Controle el cableado, compruebe que el motor gire libremente
alimentado directamente por la batería, controle el fusible F5;
62
K126MA
Page 63

4 destellos (Amarillo):
ausencia de señal motor 2 (en caso de avería / falla de los
bornes del motor 1 y con el dip # 10 en ON);
Controle el cableado, compruebe que el motor gire libremente
alimentado directamente por la batería, controle el fusible F5;
5 destellos (Rojo):
superación del límite máx. de corriente motor 1;
Pico de absorción excesiva del motorreductor, controle la ausencia de obstáculos a lo largo de la carrera de l’automatización,
controle la absorción de corriente del motor en vacío y aquella
aplicada al cierre;
superación del límite máx. de corriente motor 2 (en caso
5 destellos (Amarillo):
de avería / falla de los bornes del motor 1 y con el dip # 10
en ON);
Pico de absorción excesiva del motorreductor, controle la ausencia de obstáculos a lo largo de la carrera de l’automatización,
controle la absorción de corriente del motor en vacío y aquella
aplicada al cierre;
6 destellos (Rojo):
cierre automático desactivado después de 5 intentos seguidos;
Es necesario un pulso de mando para cerrar;
6 destellos (Amarillo):
error de comunicación master/slave;
Comprobar cableado entre los cuadros, la eciencia del cuadro
esclavo (fusibles) y la eciencia de las tarjetas de interfaz;
8 destellos (Rojo):
error memoria Eeprom externa;
Sustituya el módulo de memoria externa;
8 destellos (Amarillo):
error datos en Eeprom (interna/externa);
Realice el proceso de RESET DE LA MEMORIA RADIO;
Además de los avisos/errores de la parte lógica, el LED DL8 también indica el estado de la central
durante la memorización de los emisores.
siempre encendido (Verde):
destello rápido (Verde):
siempre encendido (Amarillo):
destello rápido (Amarillo):
canal CH1 esperando programación;
memoria canal CH1 llena;
canal CH2 esperando programación;
memoria canal CH2 llena;
ESPAÑOL
destello (Verde):
siempre encendido (Verde):
destello (Amarillo):
siempre encendido (Amarillo):
canal CH1 esperando cancelación;
canal CH1 cancelándose;
canal CH2 esperando cancelación;
canal CH2 cancelándose;
Cuando los LED DL7 y DL8 destellan simultáneamente, tienen la función de señalar:
destello + (Rojo + Rojo):
destello + :
(Amarillo + Amarillo)
proceso de reajuste de fábrica esperando conrmación;
espera de cancelación total de los canales radio;
La indicación de que existe más de un error se lleva a cabo con una pausa de 2 seg. entre una señalación y la otra.
Si se produce intervención (durante la maniobra de cierre) por parte de l’encoder (detección de obstáculos), la central invierte el movimiento, entra en la fase de carrera decelerada buscando el tope
de apertura y bloquea el cierre automático. En el impulso de mando sucesivo, se restablece el cierre
automático.
En el caso los sistemas de seguridad interrumpan por 5 veces seguida una maniobra de cierre, el cua-
dro aumenta gradualmente el tiempo del cierre automático. Cuando termina de cerrar, en la siguiente
K126MA
63
Page 64

maniobra el funcionamiento vuelve a ser el programado.
VISUALIZACIÓN ESFUERZO MOTOR (sólo de la versión 5.17)
Esta función permite de visualizar el esfuerzo del motor durante el funcionamiento para localizar
eventuales situaciones de trabajo gravoso.
Para activar la función pulsar al mismo tiempo y mantener pulsadas por aproximadamente 2 se-
gundos las tres teclas Ch1, Ch2 y PROG, después accionar el motor con emisores, botón prog o
selector etc...
CH2
CH1
PROG
La indicación del esfuerzo es codicada según el esquema del siguiente cuadro:
Nível DL7 DL8
(apagado) (apagado)
(verde) (apagado)
(verde) (verde)
(verde) (amarillo)
(amarillo) (verde)
(amarillo) (amarillo)
(amarillo) (rojo)
ESPAÑOL
(rojo) (amarillo)
(rojo) (rojo)
Después de 5 minutos de inactividad la tarjeta volverá a la visualización clásica (para volver
manualmente a la visualización clásica pulsar otra vez simultáneamente las tres teclas).
RESTABLECIMIENTO FUNCIONAMIENTO AUTOMÁTICO
Si fuera necesario operar manualmente l’automatización, utilice el desbloqueo manual. Para volver
al funcionamiento automático:
• después de un apagón (el cuadro de maniobras queda sin alimentación durante cierto tiempo) o
después de un desbloqueo manual (sin interrupción de corriente al cuadro por más de 5 segundos),
el accionador entrará en funcionamento ralentizado en búsqueda del tope de nal de carrera en
apertura (maniobra de REALINEACIÓN).
RADIORRECEPTOR 433,92 MHz INTEGRADO
El radiorreceptor puede aprender hasta un máx. de 86 códigos rolling code (BUG2R, BUG4R, K-SLIMRP) que es posible congurar libremente en dos canales.
El primer canal controla directamente la tarjeta de mando para la apertura de la automatización; el
segundo canal controla un relé para un contacto limpio N.A. en salida (bornes n.º 19 y 20, máx. 24V
AC, 1 A) y el tercero canal controla directamente el cuadro para la apertura peatonal.
APRENDIZAJE DE LOS RADIOCONTROLES
CH1 = 1° canal (sólo ABRE/CIERRA)
CH2 = 2° canal
CH3 = 3° canal (sólo PEATONAL)
1_ pulse brevemente la tecla CH1 si quiere asociar un radiocontrol a la función ABRE/CIERRA;
64
K126MA
Page 65

2_ cuando el LED DL8 (verde) se enciende con luz ja, indica el modo de aprendizaje de los códigos
(si no se introduce ningún código antes de 10 segundos, la tarjeta sale del modo de programación);
3_ pulse la tecla del radiocontrol que se desea utilizar;
4_ el LED DL8 (verde) se apaga para informar que la memorización se ha ejecutado y vuelva a
encenderlo inmediatamente esperando otros radiocontroles (si así no fuera, tratar de volver a
transmitir o espere 10 segundos y reinicie desde el punto 1);
5_ si quiere memorizar otros radiocontroles, pulse la tecla en otros dispositivos dentro de 2-3 segundos.
Después de este periodo de tiempo (el LED DL8 se apaga) debe repetir el procedimiento desde
el punto 1 (hasta un máximo de 86 transmisores);
6_ si se desea realizar la memorización en el 2° canal, repita el proceso desde el punto 1 utilizando
el botón CH2 en lugar del botón CH1 (en este caso el LED DL8 se enciende de color amarillo);
7_ para memorizar emisores en el tercer canal, repetir el procedimiento desde el punto 1, oprimiendo
contemporáneamente los pulsadores CH1 y CH2 (el LED DL8 se prende - rojo);
8_ si desea salir de la modalidad de aprendizaje sin memorizar un código, pulse brevemente la tecla
CH1 o la tecla CH2.
Si se llegara al número máximo de emisores (cant. 86), el LED DL8 destellará rápidamente
durante unos 3 segundos sin ejecutar la memorización.
PROGRAMACIÓN REMOTA TRÁMITE T-4RP y K-SLIM-RP (V 4.X)
Con la nueva versión del software V 4.X es posible hacer l’aprendizaje remoto de la nueva versión
de los radiocontroles T-4RP y K-SLIM-RP (V 4.X), o sea sin obrar directamente sobre las teclas de
programación del receptor.
Será suciente disponer de un radiocontrol ya programado en el receptor, para poder abrir el procedimiento de programación remota de los nuevos radiocontroles. Seguir el procedimiento de programación
en las instrucciónes del radiocontrol T-4RP y K-SLIM-RP (V 4.X).
ELIMINACIÓN DE LOS RADIOCONTROLES
1_ mantenga pulsada durante 3 segundos aprox. la tecla CH1 para eliminar todos los radiocontroles
asociados a ella;
2_ el led DL8 empezará a emitir destellos lentamente para indicar que la modalidad de eliminación
está activada;
3_ mantenga pulsada de nuevo la tecla CH1 durante 3 segundos;
4_ el led DL8 se apagará durante 3 segundos aprox. y luego se encenderá jo para indicar que la
eliminación se ha efectuado;
5_ empezar de nuevo desde el punto 1 utilizando la tecla CH2 para eliminar todos los radiocontroles
asociados a ella;
6_ repetir el procedimiento desde el punto 1, oprimiendo contemporáneamente los pulsadores CH1
y CH2, para borrar todos los emisores memorizados en el tercer canal;
7_ si desea salir de la modalidad de eliminación sin memorizar un código, pulse brevemente la tecla
CH1 o la tecla CH2.
ESPAÑOL
CAPACIDAD MEMORIA
Para los panels de mando K126MA es posible expandir la memoria de los códigos* de 86 a 126,
254 o 1022 utilizando las tarjetas de memoria como se indica (insertándolas en el conector J3, ver
diagrama de conexiones a pág. 2-3):
126 códigos Art. 250SM126
254 códigos Art. 250SM254
1022 códigos Art. 250SM1022
* Los panels de mando de serie tienen una memoria de 86 códigos. La tarjeta de memoria para au-
mentar los códigos puede ser solicitada aparte.
CUIDADO: el cuadro debe estar apagado cuando se inserta o se quita una tarjeta de
memoria.
IMPORTANTE: Si se utiliza una tarjeta de memoria, la memoria interna del panel de
mando (86 códigos) está desactivada.
RESET DE LA MEMORIA RADIO:
- mantenga pulsados los botones CH1 y PROG hasta que los LED DL7 y DL8 comiencen a destellar rápidamente de color amarillo. Entonces, suelte los botones y púlselos de nuevo hasta que
los LED se apaguen, lo cual conrmará que la operación se ha concluido (si no se pulsaran y se
mantiene en espera, la tarjeta vuelve al funcionamiento normal después de unos 12 segundos).
K126MA
65
Page 66

HARD RESET (conguraciones de fábrica):
- mantenga pulsados los botones CH2 y PROG hasta que los LED DL7 y DL8 comiencen a des-
tellar rápidamente de color rojo. Entonces, suelte los botones y púlselos de nuevo hasta que los
LED se apaguen (reajuste ejecutándose), lo cual conrmará que la operación se ha concluido (si
no se pulsaran y se mantiene en espera, la tarjeta vuelve al funcionamiento normal después de
unos 12 segundos); en el reinicio, habrá que realizar el proceso de memorización.
En el caso de un Hard Reset, la memoria del radiorreceptor no se borra: los emisores
existentes se quedan memorizados.
FALLOS: POSIBLES CAUSAS Y SOLUCIONES
La automatización no funciona
a- Verique con el instrumento (Multímetro) la presencia de alimentación 230V AC.
b- Controle en modo estándar que los contactos N.C. de la tarjeta sean efectivamente normal-
mente cerrados (4 LED verdes encendidos).
c- Congure el dip 6 (fototest) en OFF.
d- Aumente el trimmer FR al máximo.
e- Controle con el instrumento (Multímetro) que los fusibles estén intactos.
El radiocontrol tiene poco alcance
a- Controle que la conexión de la masa y de la señal de la antena no esté invertida.
b- No efectúe uniones para alargar el cable de la antena.
c- No instale la antena en posiciones bajas o en posiciones escondidas por la pared o por el
soporte.
d- Controle el estado de las pilas del radiocontrol.
La cancela se abre al contrario
Invierta entre ellas las conexiones del motor en el terminal de conexiones, bornes 28 - 29 y bornes 23 - 24 (si se utilizan).
ESPAÑOL
GARANTÍA: CONDICIONES GENERALES
La garantía de TAU tiene una cobertura de 24 meses a partir de la fecha de compra de los productos
(la fecha válida es la que gura en el comprobante de venta, recibo o factura).
La garantía incluye la reparación con sustitución gratuita (franco fábrica TAU: gastos de embalaje y
de transporte a cargo del cliente) de las piezas que tuvieran defectos de fábrica o vicios de material
reconocidos por TAU.
En el caso de reparación a domicilio, incluso en el período cubierto por garantía, el usuario deberá
hacerse cargo de los gastos de desplazamiento a domicilio, más la mano de obra.
La garantía caduca en los siguientes casos:
• Si la avería ha sido determinada por una instalación realizada sin respetar las instrucciones
dadas por la empresa que se encuentran en el interior de cada embalaje.
• Si no se han utilizado todos los componentes originales TAU para la instalación del automa-
tismo.
• Si los daños han sido causados por catástrofes naturales, modicaciones, sobrecargas de
tensión, alimentación incorrecta, reparaciones inadecuadas, instalación incorrecta u otras
causas no imputables a TAU.
• Si no se han efectuado los trabajos de mantenimiento periódico por parte de un técnico espe-
cializado, según las instrucciones dadas por la empresa que se encuentran en el interior de
cada embalaje.
• Usura de los componentes.
La reparación o sustitución de las piezas durante el período de garantía no implican la extensión de
la garantía.
En caso de utilización industrial o profesional, o empleo similar, dicha garantía vale 12 meses.
66
K126MA
Page 67

DECLARAÇÃO DE INCORPORAÇÃO DO FABRICANTE
(Conforme directiva europeia 2006/42/CE Anexo AII. II.B)
Fabricante: TAU S.r.l.
Endereço: Via E. Fermi, 43
36066 Sandrigo (Vi)
ITALIA
Declara sobre sua responsabilidade que o produto: Unidade de Controlo Electrónico
Concebido para o movimento automático de: Portões de Correr
Para utilização em meio: Residencial / Condomínio / Industrial
Completo com: Rádio receptor e placa de carga bateria
Modelo: K126MA
Tipo: K126MA
Número de série: Ver etiqueta prateada
Denominação comercial: Quadro de comando para um motor de 12/24V
com encoder
Foi produzido para incorporação de um ponto de acesso (portões de correr) ou para a montagem com outros dispo-
sitivos usados para mover tal ponto de acesso, para constituir uma máquina em acordo com a Directiva de Máquinas
2006/24/CE.
Também declara que este produto cumpre com os requisitos essenciais de segurança das seguintes directivas
CEE:
- 2006/95/CE Directiva de Biaxa Voltagem
- 2004/108/CE Directiva de Compatibilidade Electromagnética
e, onde requerido, com a Directiva:
- 1999/5/CE Equipamentos rádio e terminais de telecomunicações rádio
Também declara que não é permitido colocar em serviço o aparelho até que a máquina na qual ele será incor-
porado ou se tornar componente não estiver identicado e que a sua conformidade à Directiva 2006/42/CE não
seja declarada.
PORTUGUÊS
O fabricante compromete-se a fornecer, em requerimento devidamente fundamentado pelas autoridades nacio-
nais, toda a informação pertinente sobre as quase máquinas.
Sandrigo, 27/11/2014
O Representante legal
_________________________________________
Nome e endereço da pessoa autorizada a constituit a documentação técnica pertinente:
Loris Virgilio Danieli - via E. Fermi, 43 - 36066 Sandrigo (Vi) Italia
K126MA
Loris Virgilio Danieli
67
Page 68

ALERTAS
Este manual destina-se sómente a instaladores qualicados. Nenhuma informação contida neste
manual pode ser considerada de interesse para os utilizadores nais. Este manual acompanha a
central K126MA, por conseguinte não pode ser utilizada em qualquer outro tipo de produtos!
Informação importante:
Desligue a alimentação da rede antes de aceder à placa.
A central K126MA foi projectada para controlar um motorredutor electromecânico de corrente contínua para a automatização de cancelas, portas e portões de todos os tipos.
Qualquer outro uso é considerado impróprio e por isso proíbido pelas leis vigentes.
Ter em atenção que a automatização que vai instalar é classicada como “construção de máquina” e
por isso incluída na aplicação da Directiva Europeia 2006/42/CE (Directiva de Máquinas).
Esta directiva inclui as seguintes indicações:
- Sómente pessoal treinado e qualicado deve instalar o equipamento;
- O instalador deve fazer primeiro uma ‘análise de riscos’ da máquina;
- O equipamento deve ser instalado de modo correcto e bem feito em conformidade com todas as
normas aplicáveis e respeitantes;
- Depois da instalação deve ser entregue ao utilizador nal o ‘Certicado de Conformidade’.
Este producto pode unicamente ser instalado e mantido por pessoal qualicado em conformidade
com as actuais leis, normas e directivas.
Ao conceber os seus produtos a TAU cumpre todos as normas aplicáveis ( por favor consulte a declaração de conformidade anexa). É de suprema importância que os instaladores observem escrupulosamente as mesmas normas quando instalam o producto.
Pessoal não qualicado ou outros desconhecedores das normas aplicáveis à categoria “portões e
portas automáticas” não podem instalar o sistema sob quaisquer circunstâncias.
Quem quer que ignore tais normas será responsabilizado por qualquer dano causado pelo
sistema!
Não instale a unidade antes de ler as instruções.
PORTUGUÊS
INSTALAÇÃO
Antes de prosseguir certique-se que todos os componentes mecânicos funcionam correctamente. Verique que o portão deslize livremente sobre um plano horizontal. Verique também
que o motorrredutor foi instalado de acordo com as instruções. Uma vez efectuados estes
controlos, verique que o motor tenha uma absorção adequada. O cartão da ver. 5.17 dispõe
de uma função que permite a visualização do esforço exigido durante a movimentação (veja o
parágrafo FUNÇÃO DE VISUALIZAÇÃO DO ESFORÇO DO MOTOR).
O EQUIPAMENTO DEVE SER INSTALADO ‘SÁBIAMENTE’ POR PESSOAL QUALIFICADO COMO
EXIGIDO POR LEI.
Nota: É compulsório ligar o equipamento à massa e observar as normas de segurança vigentes em cada país.
A INOBSERVÃNCA DAS INSTRUÇÕES ACIMA MENCIONADAS PODE PREJUDICAR O FUNCIONAMENTO CORRECTO DO EQUIPAMENTO E POTENCIAR SITUAÇÕES PERIGOSAS PARA AS
PESSOAS. POR ESSA RAZÃO O ‘FABRICANTE’ DECLINA QUALQUER RESPONSABILIDADE
POR MAU FUNCIONAMENTO OU DANOS RESULTANTES DESTAS.
68
K126MA
Page 69

QUADRO DE COMANDO PARA UM MOTOR DE 18/24V COM ENCODER
• FUNÇÃO DE VISUALIZAÇÃO DO ESFORÇO DO MOTOR
• ESTADO DAS ENTRADAS VISUALIZADAS POR LED’s
• CIRCUITO LUZ INTERMITENTE INCORPORADO
•
SENSOR DE AUTO APRENDIZAGEM DE PERCURSO POR ENCODER
• RECEPTOR 433.92MHz, 2 CANAIS, INCORPORADO
• PLACA DE CARGA BATERIA (INCORPORADA)
• DIAGNÓSTICO DE ERROS ASSINALADO POR LED´S
• POSSIBILIDADE DE FUNCIONAMENTO A BAIXO CONSUMO
ATENÇÂO:
- Não utilizar cabos unilares, ex.: cabos telefónicos, de modo a evitar interrupções na linha
e falsos contactos;
- Não utilizar a cablagem velha pré-existente;
- Recomendamos a utilização do cabo TAU cód. M-03000010CO para aligação do motor à
central de comando.
INTRODUÇÃO
A placa K126MA possui dois modos de operar, seleccionável através do jumper J6 (ver esquema
eléctrico).
J6 Ligado modo padrão, i.e. a unidade de controlo está sempre alimentada;
J6 Não ligado Modo de baixo consumo, i.e. a unidade de controlo desliga-se após cada opera-
ção e desliga também todos os dispositivos auxiliares. A unidade de controlo se
reacenderá após um comando (modo onde a alimentação é fornecida por outra
fonte, por exemplo baterias carregadas por painel fotovoltaico).
Uma vez realizada a ligação, modo baixo consumo, pressione brevemente o botão PROG:
• Todos os LED´s verdes devem estar iluminados (correspondendo cada um deles a uma entrada
N.C. - Normalmente Fechada ). Sómente se apagam quando os comandos a que estão associados
estão activos.
• Todos os LED´s vermelhos devem estar apagados (cada um corresponde a uma entrada N.A. Normalmente Aberta ) sómente se acendem quando os comandos a que estão associados estão
activos. O LED vermelho DL8 deve estar iluminado permanentemente.
CARACTERÍSTICAS TÉCNICAS
Alimentação da placa 13,5V1 AC - 50 Hz
Potência máx. motor DC 300 VA - 18V2 DC
Fusível rápido de protecção linha alimentação 13,5V AC (F4 – 5x20) F 16A
Fusível rápido protecção carregador de bateria (F5 – 5x20) F 10A
Fusível rapido protecção dos circuitos auxiliares 18V2 DC (F3 – 5x20) F 2A
Tensão circuitos alimentação motor 18V2 DC
Tensão alimentação circuitos auxiliares 18V2 DC
Tensão aliemntação circuitos lógicos 5V DC
Temperatura de funcionamento -20 °C ÷ +55 °C
1
18V per MASTER-R e T-ONE8BR
2
24V per MASTER-R e T-ONE8BR
PORTUGUÊS
LIGAÇÕES À RÉGUA DE BORNES
Terminais Função Descrição
Entrada alimentação 13,5V (18V para MASTER-R e T-ONE8BR)
FS1 - FS2 ALIMENTAÇÃO
AC do quadro – alimentada pelo transformador toroidal e protegida
por fusível da alimentação de 230V AC.
Alimentação externa (exp. sistema fotovoltaico 12V DC).
Nota: se esta entrada é utilizada, o jumper J7 tem de estar
1 - 2
ENTRADA
COMPLEMENTAR
conforme (ver esquema eléctrico).
ATENÇÃO: ALIMENTANDO A CENTRAL COM UMA FONTE EXTERNA, TODAS AS OUTRAS SAÍDAS 18V (24V para MASTER-
-R) DC ASSUMEM O VALOR DA TENSÃO DE ALIMENTAÇÃO
DA PRÓPRIA FONTE.
K126MA
69
Page 70

3 - 6 PEDONAL
4 - 6
ABERTURA / FECHO
5 - 6 STOP
7 - 8
7 - 9
7 - 10
11 - 12 ** AUX
PORTUGUÊS
12 - 13 **
FOTOCÉLULAS
INTERNAS
FOTOCÉLULAS
EXTERNAS
BARRA
APALPAÇÃO
EMISSOR
FOTOCÉLULAS
14 - 15 ** PIRILAMPO
16 - 17* ** LUZ DE AVISO
16 - 18* ** LUZ DE CORTESIA
19 - 20* 2º CANAL RÁDIO
70
entrada botão PEDONAL N.A. - Comanda a abertura e o fecho
parcial da automação por 1/3 de percurso e é regulado através
das funções dos dip-switches 2 e 4. (3= PED - 6= COMUM);
Botão DE ABERTURA / FECHO N.A. – Controla a abertura e fecho
da automação e é controlado através das funções dos dip-switch
2 e 4. (4= ABERTURA / FECHO - 6= COMUM);
Entrada botão STOP N.F. – para a automação em qualquer
posição, temporariamente impedindo o fecho automático, se
programado. (5= STOP - 6= COMUM)
Nota: ao botão STOP está ligado um microinterruptor de
segurança de desbloqueio. Se a entrada STOP ca aberta
por mais de 5 segundos, a manobra sucessiva será de
DESACELERAÇÃO (veja “Reposição do funcionamento
automático”). O microinterruptor deve ser ligado em série a
outros eventuais botões de STOP.
Entrada para FOTOCÉLULAS ou DISPOSITIVOS de SEGURANÇA situados na parte interior do portão. O seu acionamento,
durante a abertura, origina a paragem temporária do portão até
que o obstáculo detectado seja removido; durante a fase de fecho
origina paragem seguida de abertura total do portão. Ligar em ponte os bornes que não forem utilizados. (7= COMUM - 8= FECHO);
Entrada para FOTOCÉLULAS ou DISPOSITIVOS de SEGURANÇA situados na parte exterior do portão. O seu acionamento,
durante o fecho, origina paragem seguida de abertura total do
portão. Ligar em ponte os bornes que não forem utilizados. (7=
COMUM - 9= FOTOCÉLULA).
Nota: O emissor das fotocélulas deve estar sempre alimen-
tado pelos bornes 12 – 13, na medida em que é sobre estes
que o sistema efectua a vericação de segurança (fototeste).
Sem esta ligação o sistema não funciona. Para eliminar o
sistema de segurança ou quando não se utiliza fotocélulas
o dip switch 6 tem de estar em OFF.
Entrada barra de apalpação (bordo xo ou bordo sensível resistivo),
contacto normalmente fechado; Funciona sómente durante a abertura; origina a paragem momentânea da automação e fecha parcialmente cerca de 20cm de modo a permitir a remoção do obstáculo.
Ligar em ponte os bornes que não forem utilizados.
(7= COMUM - 10= BORDO SENSÍVEL).
Saída 18V1 DC circuitos auxiliares, máx 15W para fotocélulas,
receptores, etç. (11= NEGATIVO – 12= POSITIVO);
Se o jumper J6 não estiver ligado, esta saída (11 e 12) será
desativada (modo de baixo consumo) no m de cada manobra.
Saída 18V1 DC para emissor fotocélulas – fototeste – máximo 1
fotocélulas emissoras. (13= NEGATIVO – 12= POSITIVO);
18V1 DC. Máx. 20W saída para pirilampo, sinal pirilampo enviado
pelo quadro de controlo, rápido no fecho, lento na abertura (14=
POSITIVO - 15= NEGATIVO);
Saída para luz aviso abertura do portão 18V1 DC, 3W máx.: du-
rante a abertura da automação a luz pisca devagar, quando está
aberta mantém-se xa e no fecho pisca a uma velocidade dupla.
(16= POSITIVO - 17= NEGATIVO).
Saída luz de cortesia auxiliar 18V1 DC, 15W;
Acende-se com o impulso de comando e ca acesa para além do
nal da manobra pelo intervalo de tempo programável através de
TAUPROG (por predenição são 2 seg.)
(16= POSITIVO - 18= NEGATIVO).
Saída para 2º canal de rádio – para controlo de automação adicional ou ligação de luzes, etç. (contacto N.A.).
Aviso : para ligar outros dispositivos ao 2º canal de rádio
(iluminação da área ou outros) adicionar um relé auxiliar
(ver nota nal).
ATENÇÃO: a saída predenida é monoestável ativa 2 seg.
Para comutá-la para biestável ativa ou para modicar o tem-
po de ativação é necessário operar com o programador pal-
mar TAUPROG (veja as relativas instruções).
K126MA
Page 71

21 - 22 ANTENA
23 - 24 MOTOR (M2)
Entrada de antena sómente para receptores 433,92 MHz.
(21= MASSA - 22= SINAL);
Saída alimentação motor 18V DC máx. 50W.
(23= POSITIVO – 24= NEGATIVO); Veja nota a seguir.
25 - 26 - 27 ENCODER (M2) Não utilizado.
28 - 29 MOTOR (M1)
30 - 31 - 32 ENCODER (M1)
1
18V per MASTER-R e T-ONE8BR
Saída alimentação motor 18V DC máx. 50W.
(28= POSITIVO – 29= NEGATIVO);
Conector rápido para a ligação do ENCODER. (30 = BRANCO
sinal - 31= AZUL negativo - 32= CASTANHO positivo);
* As saídas são programáveis mediante TAUPROG (veja as relativas instruções). Na tabela é indi-
cada a conguração standard.
** Se o jumper J6 não está conectado, ele irá alternar para o modo de baixo consumo de energia e,
ao nal de cada manobra, as saídas 11-12, 12-13, 14-15, 16-17 e 16-18 serão desligados.
Os terminais da placa para o motor 2 (23-24) são par ser usados no apoio do motor 1
(MASTER18QR / MASTER-R), ou no caso de falha / avaria do motor 1 (28-32), ver esquema
de ligações a página 2-3.
IMPORTANTE:
• Não alimentar relés auxiliares ou outros dispositivos à saída dos 18V (24V para MASTER-R
e T-ONE8BR) DC (terminais 11 – 12) de modo a evitar mau funcionamento da unidade de
controlo. Use, em separado, alimentação / transformadores;
• Não colocar próximo da automação sistemas de corte ou dispositivos similares que podem
constituir fonte de perturbação / anomalia.
AJUSTES LÓGICOS
Efectue os ajustes lógicos.
Nota: Ao operar um dos dispositivos de ajuste no quadro de controlo (trimmers ou dip-
-switches), uma manobra completa deve ser realizada para que os novos ajustes produzam o
ajuste pretendido.
TRIMMER
T.C.A. Regulação do tempo automático de fecho a partir de 1 a 120 segundos (ver dip-
-switch 1);
FR. Ajuste da sensibilidade à detecção de obstáculos.
Nota: Rodando o trimmer FR no sentido horário a sensbilidade do motorredutor
aos obstáculos diminui e a força de impulso aumenta; pelo contrário rodando no
sentido anti-horário a sensibilidade do motorredutor aos obstáculos aumenta
e a força de impulso diminui.
Dip switch
Depois de abrir, o portão fecha-se automaticamente quando tempo
1
FECHO
AUTOMÁTICO
On
denido no trimmer T.C.A. (Tempo de Abertura e Fecho) expirar.
Off A manobra de fecho requere um comando manual.
Com o fecho automático activado, uma sequência de comandos abrir
On
/ fechar origina no portão a sequência: abertura – fecho – abertura –
2 2/4 CURSO
fecho, etç.
Nas mesmas condições, a mesma sequência de comandos origina
Off
no portão a sequência: abre - pára – fecha – pára - abre – pára (ver
também dip-switch 4).
3
NOVO APÓS FO-
TOCÉLULAS
FECHAR DE
Automação as fotocélulas serem actuadas (entrada 7 – 9), a automa-
On
tização fecha automaticamente após 5 segundos.
Off Função inactiva.
K126MA
PORTUGUÊS
71
Page 72

4 NO REVERSE
5 PRÉ-LAMPEJO
6 FOTOTESTE
7
8
9-10-11 Seleção tipo de automação
PORTUGUÊS
12
MASTER /
SLAVE
BACK
JUMP
Dip 9 Dip 10 Dip 11 Automação
Off Off Off TONE-5B
On Off Off TONE-10B
Off On Off TONE-8BR (24v)
On On Off MASTER-R (24V abertura de velocidade = velocidade de fechamento)
Off Off On MASTER18QR
On Off On MASTER-R (24V)
Off On On CANTILEVER (luz)
On On On CANTILEVER TONE10B (pesado)
IMPORTANTE: o ajuste dos Dips 9, 10 e 11 depende do tipo de automação. No caso
de cambios, antes de farez o novo ajuste e’ necessário fazer um HARD RESET (veja a
pág. 69) do quadro.
BORDO
SENSITIVO
On A automação ignora os comandos de fecho durante a abertura e o tempo de pausa.
Off A automação responde conforme denido no dip-switch nº 2.
On A função pré-lampejo está activa.
Off A função pré-lampejo está inactiva.
On A função ‘teste de fotocélulas’ está activa.
A função ‘teste de fotocélulas’ está inactiva.
Off
Nota: para ser usada quando não se utilizam fotocélulas.
habilita o modo MASTER na conguração master/slave (veja instru-
On
ções T-COMM).
habilita o modo SLAVE na conguração master/slave (veja instru-
Off
ções T-COMM), ou o funcionamento standard (motor individual).
chegando ao batente da manobra (abertura ou fecho), a automação faz
On
um ligeiro movimento no sentido contrário, para evitar o emperramento
entre o pinhão e cremalheira.
Off função desactivada.
On BORDO SENSITIVO RESISTIVO (terminal nº 10).
BORDO FIXO
Off
(Contacto NC – Normalmente Fechado -terminal nº 10).
Nota: se não for usado, mantenha o DIP na posição OFF.
PROCESSO DE MEMORIZAÇÃO
ATENÇÃO: Depois de alimentar o quadro de controlo aguardar 2 segundos antes de iniciar as
funções de ajustamento.
NOTA: Os batentes mecânicos da automação devem ser ambos regulados na abertura e no
fecho (ver instruções motor).
Após completar os procedimentos de instalação:
Vericar a posição dos dip 9, 10 e 11. A posição depende do modelo do automação
(tabela dip 9-10-11, “Ajustes Lógicos”).
É preferível iniciar o procedimento com o portão a 0,5 m do batente mecânico de fecho.
Pressione sem libertar o botão PROG até que o LED DL8 comece a piscar (amarelo):
- a automatização inicia lentamente a abertura na pesquisa do limite nal de abertura;
Se o automatismo se fecha em vez de abrir, interrompa o percurso do portão (através
das fotocélulas ou fechando o contacto STOP), inverter a polaridade do motor, trazer o
portão na posição de fecho (no bloqueio) e repetir o procedimento.
Nota: se a automatização não funciona, verique as ligações de entrada. Os LED’s DL6,
DL5, DL4 e DL3 devem estar acesos.
- uma vez alcançado o limite nal, a automatização inicia o fecho procurando o limite nal de fecho
(nesta fase a unidade de controlo guarda todos os parâmetros relativos ao percurso);
72
K126MA
Page 73

- a autromatização leva a cabo uma abertura completa para optimizar a força requerida na abertura;
- após uma pequena pausa, a automatização realiza um fecho completo para optimizar a força
requerida no fecho.
ATENÇÃO:
- O procedimento pode ser interrompido pressionando o botão STOP.
- Durante as várias fases da operação, se o sensor for activado o processo de memorização
é interrompido. Para reiniciar (com o LED DL8 piscando), use o controlo AP/CH, o comando
remoto (se programado) ou pressione brevemente o botão PROG.
Por favor lembre-se que a presença de um obstáculo durante a memorização é interpretado como um m de curso mecânico ( o sistema não incia nenhuma operação de
segurança, sómente pára os motores).
Certique-se que não está próximo da automação durante a memorização.
CARACTERÍSTICAS DA K126MA
ABERTURA E FECHO CONTROLADOS ATRAVÉS DE TEMPORIZADOR
É possível controlar a abertura e o fecho do automatismo com um relógio digital que possua um
contacto N.A. (Normalmente Aberto) (relé).
Será apenas necessário ligá-lo aos bornes (4 – 6 botão abertura / fecho) e programá-lo de modo, a
que à hora de abertura desejada, o contacto do relógio se feche até à hora pretendida de fecho (momento no qual o relógio do relé se abre de novo permitindo deste modo de novo o fecho automático).
Nota: O novo fecho automático que estar activado (dip-switch nº 1 em ON).
PLACA CARREGADOR BATERIA (INCORPORADA)
Se a bateria estiver ligada a automatização funcionará em qualquer caso em que não haja alimentação principal. Se a tensão cair para um valor abaixo dos 11.3V DC, a automatização deixa de operar
(a unidade de controlo mantém-se alimentada); desde que a tensão baixe para os 10.2V DC a placa
desliga completamente da bateria (o painel de controlo não está mais alimentado). Durante o funcio-
namento com bateria activa-se o modo de baixo consumo e no m de cada manobra as saídas 11-12,
12-13, 14-15, 16-17 e 16-18 serão desligadas. Para ligar a bateria à central serve o conector especial
que normalmente é fornecido juntamente com a mesma.
Nota: Quando envolvido em funcionamento com bateria, o modo de baixo consumo de ener-
gia para que saídas auxiliares estão desativados é ativado.
(Pela utilização de receptores externos, GSM, etc., alimentados em paralelo com a entrada de
bateria)
DETECÇÃO DE OBSTÁCULOS
A função detecção de obstáculos (regulável mediante trimmer FR) activada na fase de abertura do
automatismo origina umfecho de cerca de 20cm da haste da barreira. Se é activado durante a fase
de fecho da barreira esta abre completamente.
ATENÇÃO: A placa de controlo pode interpretar uma fricção mecânica como um obstáculo.
PORTUGUÊS
LED’ s de DIAGNÓSTICO
DL1 - Vermelho Led de aviso botão PEDONAL
DL2 - Vermelho Led de aviso botão de ABERTURA / FECHO
DL3 - Verde Led de aviso botão STOP
DL4 - Verde Led de aviso FOTOCÉLULAS INTERNAS
DL5 - Verde Led de aviso FOTOCÉLULAS EXTERNAS
DL6 - Verde LED do BORDO SENSITIVO / BARRA DE APALPAÇÃO
LED - DL7
Além de sinalizar a presence de bateria, o LED DL7 mostra anomalias com uma série de pré-lampejos
em várias côres:
Indicação:
led sempre aceso;
led piscando;
K126MA
73
Page 74

sempre aceso (verde):
sempre aceso (amarelo):
1 piscar (verde) a cada 4 segundos:
Bateria com plena carga, alimentação principal presente;
Bateria a carregar;
Bateria com plena carga, alimentação principal não
presente;
Verique a alimentação principal;
1 piscar a cada 4 segundos:
(amarelo)
1 piscar a cada 2 segundos:
(vermelho)
alimentação externa, carregador desligado;
carga bateria baixa;
Carregue a bateria, substitua a bateria;
piscar rápido (vermelho):
bateria defeituosa;
Substitua a bateria;
LED - DL8
O LED DL8 indica erros na placa electrónica com uma série de pré-lampejos em difrentes côres:
Indicação:
led sempre aceso;
led piscando;
1 piscar (verde) a cada 4 segundos:
piscar alternativo / :
(verde/ vermelho)
piscar rápido (amarelo):
1 piscar (vermelho):
operação normal;
guarda de dados a ser realizada;
guarda de dados em processo;
erro de fototeste;
Desactive o fototeste (dip-switch 6 em OFF), teste as fotocélulas e as suas ligações;
1 piscar (amarelo):
2 piscar (vermelho):
estado desconhecido, próxima operação REALINHAMENTO;
obstáculo no motor 1;
Controle que não haja obstáculos no percurso do portão
e a uidez do mesmo;
2 piscar (amarelo);
PORTUGUÊS
obstáculo no motor 2 (no caso de avaria/falha da régua
de bornes do motor 1 e com dip 10 em ON);
Controle que não haja obstáculos no percurso do portão
e a uidez do mesmo;
3 piscar (vermelho):
ausência sinal encoder no motor 1;
Verique a cablagem, verique o encoder através de um
TESTADOR de ENCODER’s (opcional);
3 piscar (amarelo):
ausência sinal encoder no motor 2 (no caso de avaria/falha da régua de bornes do motor 1 e com dip 10 em ON);
Verique a cablagem, veriqie o encoder através de um
TESTADOR de ENCODER’s (opcional);
4 piscar (vermelho):
ausência sinal motor 1;
Verique a cablagem, verique se o motor roda livremente e se é actuado directamente pela bateria, vericar
o fusível F5;
4 piscar (amarelo):
ausência sinal motor 2 (no caso de avaria/falha da
régua de bornes do motor 1 e com dip 10 em ON);
Verique a cablagem, verique se o motor roda livremente e
se é actuado directamente pela bateria, vericar o fusível F5;
5 piscar (vermelho):
corrente maxima do motor 1 excedida;
Picos de absorção excessivos do motorredutor, verique
que não existem obstáculos no caminho da automação,
verique a corrente absorvida pelo motor numa condição
de sem carga e quando aplicada à portão.
74
K126MA
Page 75

corrente maxima do motor 2 excedida (no caso de
5 piscar (amarelo):
6 piscar (vermelho):
6 piscar (amarelo):
8 piscar (vermelho):
8 piscar (amarelo):
Além dos erros de lógica, o LED DL8 indica também o estado da unidade de controlo durante a gravação dos rádio comandos:
sempre aceso (verde):
piscar rápido (verde):
sempre aceso (amarelo):
piscar rápido (amarelo):
avaria/falha da régua de bornes do motor 1 e com dip
10 em ON);
Picos de absorção excessivos do motorredutor, verique
que não existem obstáculos no caminho da automação,
verique a corrente absorvida pelo motor numa condição
de sem carga e quando aplicada à portão.
fecho automático desactivado após 5 tentativas consecutivas falhadas;
É necessário um impulso de comando para efetuar o fecho;
erro de comunicação master/slave;
Verique a cablagem entre as centrais, a eciência da
central slave (fusíveis), e a eciência das placas de in-
terface;
Falha memória da Eeprom;
Substitua a módulo de memória externa (Eeprom);
Erro de data da Eeprom (interno/externo);
RESET MEMÓRIA RÁDIO;
Canal CH1 à espera de ser gravado;
Memória do canal CH1 completa;
Canal CH2 à espera de ser gravado;
Memória do canal CH2 completa;
piscando (verde):
sempre aceso (verde):
piscando (amarelo):
sempre aceso (amarelo):
Quando os LED’s DL7 e DL8 piscam em simultâneo indicam:
piscando + (vermelho + vermelho):
piscando + (amarelo + amarelo):
Múltiplos erros são assinalados por um intervalo de 2 segundos entre um lampejo e o seguinte.
Se durante a manobra de fecho o encoder intervém (detecção de obstáculo), o quadro reverte o
movimento e passa ao modo lento até encontrar o m de curso de abertura. O fecho automático ca
desativado até o próximo pulso do comando.
Se o encoder é activado 5 vezes consecutivas durante a manobra de fecho (detecção de obstáculos),
o quadro incrementa progressivamente o tempo do fecho automático. Na manobra seguinte, a unidade
de controlo denirá velocidade reduzida até que encontre o ponto limite de fecho.
Canal CH1 à espera de ser cancelado;
Cancelamento do canal CH1 em progresso;
Canal CH2 à espera de ser cancelado;
Cancelamento do canal CH2 em progresso;
Procedimento de reset de fábrica aguardando por
conrmação;
Aguardando pela anulação total dos canais rádio;
VISUALIZAÇÃO DO ESFORÇO DO MOTOR (apenas a partir da versão 5.17)
Esta função permite visualizar o esforço do motor durante o funcionamento para identicar
eventuais situações de trabalho pesadas.
Para activar a função, pressione simultaneamente e manter pressionadas por cerca de 2 segundos as três teclas CH1, CH2 e PROG, em seguida, accione o motor com controle remoto,
botão prog ou selector, etc.
K126MA
75
PORTUGUÊS
Page 76

CH2
CH1
PROG
A indicação do esforço é codicada segundo o esquema da seguinte tabela:
Nível DL7 DL8
(Fora) (Fora)
(Verde) (Fora)
(Verde) (Verde)
(Verde) (Amarelo)
(Amarelo) (Verde)
(Amarelo) (Amarelo)
(Amarelo) (Vermelho)
(Vermelho) (Amarelo)
(Vermelho) (Vermelho)
Após 5 minutos de inactividade, o cartão irá retornar ao modo de visualização clássico (para
voltar manualmente à visualização clássica, pressione de novo simultaneamente as três teclas).
REPOSIÇÃO DO FUNCIONAMENTO AUTOMÁTICO
A barreira deve ser operada manualmente usando o sistema de desbloqueio. A seguir a operação
manual:
• após uma falha de corrente, tal como um apagão (Controlador permanece desligado por algum
tempo) ou após uma intervenção manual (sem interrupções na alimentação da placa por um
período de tempo superior a 5 seg.), a automatização efectuará um movimento lento de modo a
permitir que o Controlador estabeleça os seus limites (procedimento de REALINHAMENTO).
RECEPTOR RÁDIO INCORPORADO 433,92 MHz
O rádio receptor pode aprender até um máximo de 86 códigos rolling code (BUG2R, BUG4R, SLIM-RP,
PORTUGUÊS
T4-RP) que são possíveis de congurar livremente nos dois canais conforme necessário.
O primeiro canal comanda directamente a placa electrónica de controlo para a abertura da automati-
zação; o segundo canal comanda um relé para um contacto sem potência N.O. (Normalmente Aberto)
– (Bornes 19 - 20, máx. 24 Vac, 1A) e o terceiro canal comanda directamente a placa de comando
para a abertura pedonal da automatização.
SISTEMA DE APRENDIZAGEM RÁDIO COMANDOS
CH1 = 1º canal (apenas ABERTURA/FECHO)
CH2 = 2º canal
CH3 = 3º canal (apenas PORTA DE PEÕES)
1_ Pressione breve o botão CH1 para associar um rádio comando à função ABRIR / FECHAR;
2_ O LED DL8 (verde) está aceso indicando que o modo de aprendizagem está activo (se não intro-
duzir nenhum código no período de 10 segundos, a placa sai do modo de programação).
3_ Pressione a tecla do rádio comando que deseja utilizar.
4_ O LED DL8 (verde) desliga-se indicando que a memorização está completa e volta a ligar na
espera de outros comandos (se isto não acontecer, pressione de novo a tecla do comando que
deseja utilizar o espere 10 segundos e recomece do ponto 1);
5_ Para os códigos dos outros rádio comandos, pressione a tecla dos outros comandos dentro de
2-3 segundos; se não introduzir nenhum código nesse periodo, o LED DL8 (verde) desliga-se. E’
necessário repetir o processo a partir do ponto 1 (até um máximo de 86 emissores);
6_ Para memorizar códigos no 2º canal, repita o processo a partir do ponto 1 utilizando a tecla CH2
em vez da CH1(neste caso o LED DL8 é amarelo).
76
K126MA
Page 77

7_ Se deseja-se efectuar a memorização no 3° canal, repita o procedimento do ponto 1 utilizando ao
mesmo tempo as teclas CH1 e CH2 (neste caso o led DL8 acende-se com cor vermelha).
8_ Para sair do modo de aprendizagem sem a memorização de código, pressione breve o botão CH1
ou CH2.
Se o máximo de rádio comandos (86) for alcançado, o LED DL8 pisca por cerca de 3
segundos sem memorizar o código.
PROGRAMAÇÃO REMOTA ATRAVÉS DO T-4RP e K-SLIM-RO (V 4.X)
Com a nova versão de software V 4.X é possível levar a cabo a aprendizagem remota da nova versão
de emissores T-4RP e K-SLIM-RP (V 4.X), sem pressionar os botões de programação do receptor.
Será suciente possuir um emissor já programado no receptor de modo a iniciar o procedimento de
programação dos novos transmissores. Siga os procedimentos escritos nas instruções do emissor
T-4RP e K-SLI;-RP (V 4.X).
ANULAR CÓDIGOS DOS RÁDIO COMANDOS
1_ Mantenha o botão CH1 pressionado durante 3 segundos de modo a anular todos os rádio coman-
dos associados.
2_ O LED DL8 piscará devagar indicando que o modo de anulação foi activado.
3_ Pressione, de novo, CH1 durante 3 segundos.
4_ O LED DL8 desliga-se aproximadamente por 3 segundos e depois mantem-se iluminado (perma-
nente) indicando que o código foi anulado.
5_ Repita o procediemento a partir do ponto 1 utilizando o botão CH2 para anular todos os rádio
comandos associados.
6_ Repita o procedimento a partir do ponto 1 utilizando contemporaneamente as teclas CH1 e CH2
para anular todos os rádio comandos associados ao 3° canal.
7_ Para sair do modo de programação sem memorização de código pressione breve CH1 ou CH2.
MEMORIA CÓDIGOS
E’ possível aumentar a memória de 86* a 126, 254 ou 1022 códigos utilizando os módulos de memória (conectando os módulos na ranhura J3, veja esquema de cablagem na pág. 2-3):
126 códigos Art. 250SM126
254 códigos Art. 250SM254
1022 códigos Art. 250SM1022
* Os quadros são equipados de origem com memória de 86 códigos. Os módulos de memória podem
ser encomendados separadamente.
ADVERTÊNCIA: desligar o quadro para conectar/desconectar um modulo de memória.
IMPORTANTE: se for utilizado um modulo de memória, a memória de origem de 86
códigos ca desactivada.
RESET MEMÓRIA RÁDIO:
- pressione sem libertar as teclas CH1 e PROG até que os LED’s DL7 e DL8 comecem a piscar
rapidamente com uma luz amarela. Neste momento liberte as teclas e pressione-os de novo até
que os LED’s se apagem conrmando que a operação foi completada (se não forem pressionados
a placa reverte para operação normal após cerca de 12 segundos).
PORTUGUÊS
HARD RESET (Valores de fábrica):
- Pressione sem libertar as teclas CH2 e PROG até que os LED’s DL7 e DL8 comecem a piscar
rapidamente com uma luz vermelha. Neste momento liberte as teclas e pressione-os de novo
até que os LED’s se apagem (reset em progresso), conrmando que a operação foi completada
(se não forem pressionados a placa reverte para operação normal após cerca de 12 segundos);
K126MA
77
Page 78

quando a unidade recomeça é necessário salvar.
O Hard Reset não remove os dados que estão na memoria da radio: os comandos
existentes cam memorizados.
AVARIAS: CAUSAS POSSÍVEIS E SOLUÇÃO
A automatização não funciona
a- Verique com o multímetro a existência da alimentação de 230 V AC.
b- Verique, em modo standard, que os contactos N.C. (Normalmente Fechados) da placa es-
tão efectivamente fechados (4 LED’s verdes ON / iluminados).
c- Coloque o dip-switch 6 (fototeste) em OFF.
d- Regule o trimmer FR para o máximo.
e- Verique com um multímetro que os fusíveis estão intactos.
O rádio comando tem pouco alcance
a- Verique se as ligações massa e sinal da antena não estão invertidas.
b- Não faça uniões para aumentar o cabo de antena.
c- Não instale a antena numa posição baixa ou detrás de um pilar ou muro.
d- Verique o estado das pilhas dos rádio comandos.
O portão abre-se ao contrário
Troque as ligações do motor no terminal de bornes, bornes 28 - 29 e bornes 23 - 24 (se usado).
GARANTIA: CONDIÇÕES GERAIS
A garantia TAU tem uma duração de 24 meses a contar da data de compra dos produtos (o documento
scal de venda, recibo ou factura).
Esta garantia cobre a reparação ou substituição a espensas TAU (à saída da fábrica: embalagem e
transporte por conta do cliente) das peças que que apresentem defeitos de fabrico ou material defeituoso reconhecidos pela TAU. Em caso de reparação ao domicílio, inclusivé no período coberto pela
garantia, despesas de deslocação mais mão-de-obra serão cobradas ao utilizador.
A garantia não se aplica nos seguintes casos:
• Se a avaria for motivada por uma instalação que não respeita as instruções fornecidas pelo
fabricante que se encontram dentro de cada embalagem.
• Se não foram utilizados sómente peças originais TAU para a instalação do automatismo.
PORTUGUÊS
• Se os danos forem causados por calamidades naturais, modicações, sobrecargas de tensão,
alimentação incorrecta, reparações inadequadas, instalação incorrecta ou outros casos não
imputáveis à TAU.
• Se o automatismo não foi submetido às inspecções periódicas por parte do técnico especializa-
do, conforme as instruções fornecidas pelo fabricante no interior de cada embalagem.
• Componentes de desgaste.
A reparação ou substituição das peças no período de garantia não implica a extensão da garantia.
Em caso de utilização industrial ou prossional ou de utilização semelhante, a garantia é válida por 12
meses.
78
K126MA
Page 79

K126MA
79
Page 80

GARANZIA TAU: CONDIZIONI GENERALI
La garanzia della TAU ha durata di 24 mesi dalla data di acquisto dei prodotti (fa fede il documento scale di vendita, scontrino o fattura).
In caso di utilizzo industriale o professionale oppure in caso di impiego simile, tale garanzia ha validità 12 mesi.
La garanzia comprende la riparazione con sostituzione gratuita (franco sede TAU: spese di imballo e di trasporto sono a carico del
cliente) delle parti che presentano difetti di lavorazione o vizi di materiale riconosciuti dalla TAU.
In caso di intervento a domicilio, anche nel periodo coperto da garanzia, l’utente è tenuto a corrispondere il “Diritto sso di chiamata”
per spese di trasferimento a domicilio, più manodopera.
La garanzia decade nei seguenti casi:
• Qualora il guasto sia determinato da un impianto non eseguito secondo le istruzioni fornite dall’azienda all’interno di ogni confezione.
• Qualora non siano stati impiegati tutti componenti originali TAU per l’installazione dell’automatismo.
• Qualora i danni siano causati da calamità naturali, manomissioni, sovraccarico di tensione, alimentazione non corretta, riparazioni improprie, errata installazione, o altre cause non imputabili alla TAU.
• Qualora non siano state effettuate le manutenzioni periodiche da parte di un tecnico specializzato secondo le istruzioni fornite
dall’azienda all’interno di ogni confezione.
• Usura dei componenti.
La riparazione o la sostituzione dei pezzi durante il periodo di garanzia non comporta un prolungamento del termine di scadenza della
garanzia stessa.
ESTENSIONE DI GARANZIA GRATUITA
TAU ti offre 12 mesi di garanzia supplementare oltre alla garanzia legale.
Per attivare gratuitamente 12 mesi di garanzia supplementare collegati al seguente link:
http://www.tauitalia.com/it/estensione-garanzia/
Cerca l’etichetta sul motore (vedi schema esemplicativo), compila i campi richesti entro 4 settimane dalla data di acquisto e allega alla
fattura/scontrino la mail di conferma che riceverai.
Quadri di comando
Quadri di comando con contenitore
Codice
Codice
Esempio:
XXX00000
XX/XX/XX
Nr. Seriale
Data
rev. 01 del 01/09/2016
Via Enrico Fermi, 43
36066 Sandrigo (VI) - Italy
Tel +39 0444 750190
Fax +39 0444 750376
info@tauitalia.com
www.tauitalia.com
 Loading...