

Page 1
4
Page 2

Contents:
CONTENTS: ................................................................................................. I
1.SAFETY AND PRECAUTIONS................................................................ 1
Operating Safety .................................................................................... 1
Repair.....................................................................................................2
Notes for Service Engineers ................................................. 2
Point of use ..................................................................... 3
Environmental conditions ..................................................... 3
Connecting...................................................................... 4
Precautions ............................................................................................5
Important Additional Safety Instructions ................................................ 5
2.INTRODUCTION.......................................................................................6
Service ...................................................................................................6
Performance Characteristics..................................................................6
Included Equipment ............................................................................... 8
3.CONNECTING EXTERNAL DEVICES..................................................... 9
4.CONTROLS AND LOCATION ...............................................................10
English Français
Italiano
Deutsch
5.REMOTE CONTROL .............................................................................. 11
6.SUMMARY OF REMOTE CONTROL BUTTONS..................................12
7.CONNECTIONS & APPLICATIONS ...................................................... 13
8.GENERAL CONTROLS & ADJUSTMENT ............................................ 19
Turning the LCD display On and Off....................................................19
Volume Control..................................................................................... 19
Setting the Sleep Timer........................................................................ 19
Switching PC / HDMI / DVI / VIDEO / TV / SCART Modes...............20
Viewing the Menus and On-Screen Displays....................................... 21
Picture Setting...................................................................................... 22
Sound Adjustment................................................................................25
TV Channel .......................................................................................... 30
Function................................................................................................ 34
PC menu ..............................................................................................39
Español
Nederlands
i
Page 3

NICAM/IGR Broadcast Selection ......................................................... 42
9.TELETEXT .............................................................................................. 43
10.OTHER FUNCTIONS............................................................................ 45
11.TROUBLESHOOTING.......................................................................... 46
12.PC INPUT PRESET TIMING TABLE ...................................................48
13.SPECIFICATIONS ................................................................................ 49
ii
Page 4
S
11..S
Please read through this section carefully and follow the instructions to
maximize the reliable operation and lifetime of your LCD display. Always keep
these instructions handy and close by your LCD display. Keep the instructions
and the packaging so that if you sell or give away your LCD display you can
give them to the new owner.
AAFFEETTYY AANNDD
P
RREECCAAUUTTIIOONNS
P
S
OPERATING SAFETY
• Never open the housing of the LCD display /power
supply! When the housing is open there is a danger of
injury from electric shock!
• Do not insert any objects through the slots and openings of the monitor.
This may lead to an electrical short-circuit or even fire resulting in damage to
your LCD display.
English Français
Italiano
• Slots and openings in the LCD display are for ventilation
purpose. Do not cover these openings, as this may lead
to overheating.
• Do not allow children to play unattended with electrical equipment.
Children may not always correctly recognize danger.
• This LCD display is intended for personal use only. It not intended for
commercial use in a heavy industry environment.
• An injury hazard exists when the display breaks. Wear protective
gloves to pack the broken parts and send them into your service centre
for proper disposal. Then wash your hands with soap, because it is
possible for chemicals to escape.
• Never exert pressure on the display. This could break the monitor.
• Do not touch the display with your fingers or with sharp objects to avoid
damage.
Deutsch
Español
Nederlands
1
Page 5

Contact the Call Centre immediately in any of the following situations. Do
NOT plug in or turn on your display:
♦ if the power cable/power supply overheats or is damaged
♦ if liquid has got into the monitor
♦ if the LCD display is dropped or the housing damaged
REPAIR
• Leave all repairs of your LCD display to authorised and qualified
personnel only.
• Should a repair be necessary, please contact one of our authorized
service partners only.
NOTES FOR SERVICE ENGINEERS
• Before opening the housing, disconnect the product from all power sources
and remove any connecting cables. If the display has not been disconnected
from the power outlet before being opened, there is a danger to life through
electric shock. There is also a risk of damage to the components.
• Internal components of the LCD display may be damaged by electrostatic
discharge (ESD). Carry out repairs in an ESD-protected workshop. If no such
workshop is available, wear an antistatic wrist strap or touch a highly
conductive metal object. We can repair damage sustained by inappropriate
handling for a fee.
• Use only original spare parts.
2
Page 6

POINT OF USE
• Keep your LCD display and all units connected to it away from moisture
and avoid dust, heat and direct sunlight. Failure to observe these
instructions can lead to malfunctions or damage to the LCD display.
• Place and operate all units on a stable, level and vibration-free
surface in order to avoid the LCD display from falling.
ENVIRONMENTAL CONDITIONS
• The LCD display can be operated most reliably at ambient temperatures
between +41°F and +95°F (5° C to 35° C) and at a relative humidity
between 20% and 85% (without condensation).
• When switched off, the LCD display can be stored most reliably between
-4°F and +140°F (-20° C - +60° C), up to the maximum height of 39,000 ft
(12,000 m) above sea level at a relative humidity between 10% and 85%
(without condensation).
• After transporting your LCD display please wait until it has assumed
the ambient temperature before connecting and switching it on.
Extremely high variations in the temperature or humidity may result in
condensation forming on the inside of the LCD display which could
cause an electrical short-circuit.
English Français
Italiano
Deutsch
3
Español
Nederlands
Page 7

CONNECTING
Observe the following instructions to connect your LCD display properly:
POWER SUPPLY
• Do not open the power supply housing. An open housing
presents a lethal hazard from electrical shock. There are no
parts inside to be cleaned or serviced.
• Operate your LCD display only with grounded outlets with AC 100-240V~/ 50-60
Hz. If you are not sure about the power supply at your location, check with your
power company.
• Use only the power supply and power connection cable provided.
• For additional safety we recommend use of a surge protector to protect your
LCD display from damage resulting from voltage surges or lightning.
• To remove the LCD display from the power supply, disconnect the plug from
the AC outlet.
• The power outlet must be in the vicinity of your LCD display and within reach
of the power cables. DO NOT stretch the power cables tightly to reach a
power outlet.
• You should arrange the LCD display cables in a manner that no one can trip
over or step on them.
• To avoid damage of cable do not place any objects or furniture on the
cable.
4
Page 8

PRECAUTIONS
Caution! There are no parts which can be serviced or
cleaned inside of the TV display housing.
You can increase the life of your LCD display by taking the following
precautions:
• Before cleaning always disconnect the power line and all
connection cables.
• Do not use any solvents, caustic or gaseous cleaning agents.
• Clean the display with a soft, lint-free cloth.
• Ensure that no water droplets remain on the screen. Water can cause
permanent discoloration.
English Français
• Do not expose the screen to bright sunlight or ultraviolet radiation.
IMPORTANT ADDITIONAL SAFETY INSTRUCTIONS
When using any electronic equipment, basic safety precautions should always be
taken. Following the guidelines below can reduce the risk of fire, electric shock and
injury to person:
• Do not use this product near water (e.g., near a bathtub, wash bowl, kitchen
sink or laundry tub, in a wet basement or near a swimming pool).
• Avoid using a telephone/modem (other than a cordless type) during an
electrical storm. There may be a remote risk of electric shock from lightning.
• Do not use the telephone/modem to report a gas leak in the vicinity of the
leak.
• Use only the power cord indicated in this manual. Do not dispose of
batteries in a fire. They may explode. Check with local codes for possible
special disposal instructions.
•
Keep batteries away from children at all times.
Italiano
Deutsch
Español
Nederlands
5
Page 9

I
NNTTRROODDUUCCTTIIOONN
22..I
Thank you for purchasing our LCD Multi-display. We thank you for your
confidence in our products and are pleased to greet you as a new customer.
We focused on great features, ease of use and reliability in manufacturing
your LCD display.
SERVICE
Your display comes with a one-year warranty, this is in addition to your
statutory rights.
This manual contains a separate chapter on Troubleshooting on page 46.
PERFORMANCE CHARACTERISTICS
Advantages in relation to CRT (cathode ray tube) displays:
¾ Less space required
¾ Lighter weight
¾ Lower power consumption
6
Page 10

Further features
¾ Multi-sources input included RF IN, D-SUB, HDMI, DVI, SCART 1,
SCART 2, COMPONENT, and VIDEO , S-VIDEO.
¾ Easy-to-use remote control, and OSD (on-screen display) menu.
¾ Experience PIP (picture in picture) and Split Screen.
¾ Aspect Ratio modes include Full, Panoramic, Normal, Zoom 1, Zoom 2.
¾ APC (auto picture control) settings include Movie, Bright, Manual and
Standard.
¾ APS (auto program searching) for automatic TV channel tuning.
¾ Teletext function is available.
¾ Child lock function is available.
¾ Built-in dual channel speakers.
¾ Built-in NICAM/IGR sound decoder for stereo and bilingual listening.
English Français
Italiano
¾ Automatic sleep timer control from 10 to 120 minutes in 10-minute
increments.
¾ Automatic Power Off feature after 10 minutes without a signal.
¾ Provided component video input for high definition TV program (HDTV
ready), resolution up to 720p, 1080i , 1080p .
¾ Provided 6 Equalizer modes for selection.
Deutsch
Español
Nederlands
7
Page 11

INCLUDED EQUIPMENT
Please check that you have received the following items with your LCD unit.
LCD-TV
USER’S MANUAL
User’s Manual
Remote Control &
Batteries(AAA X2)
Power Cord
8
Page 12
A
C
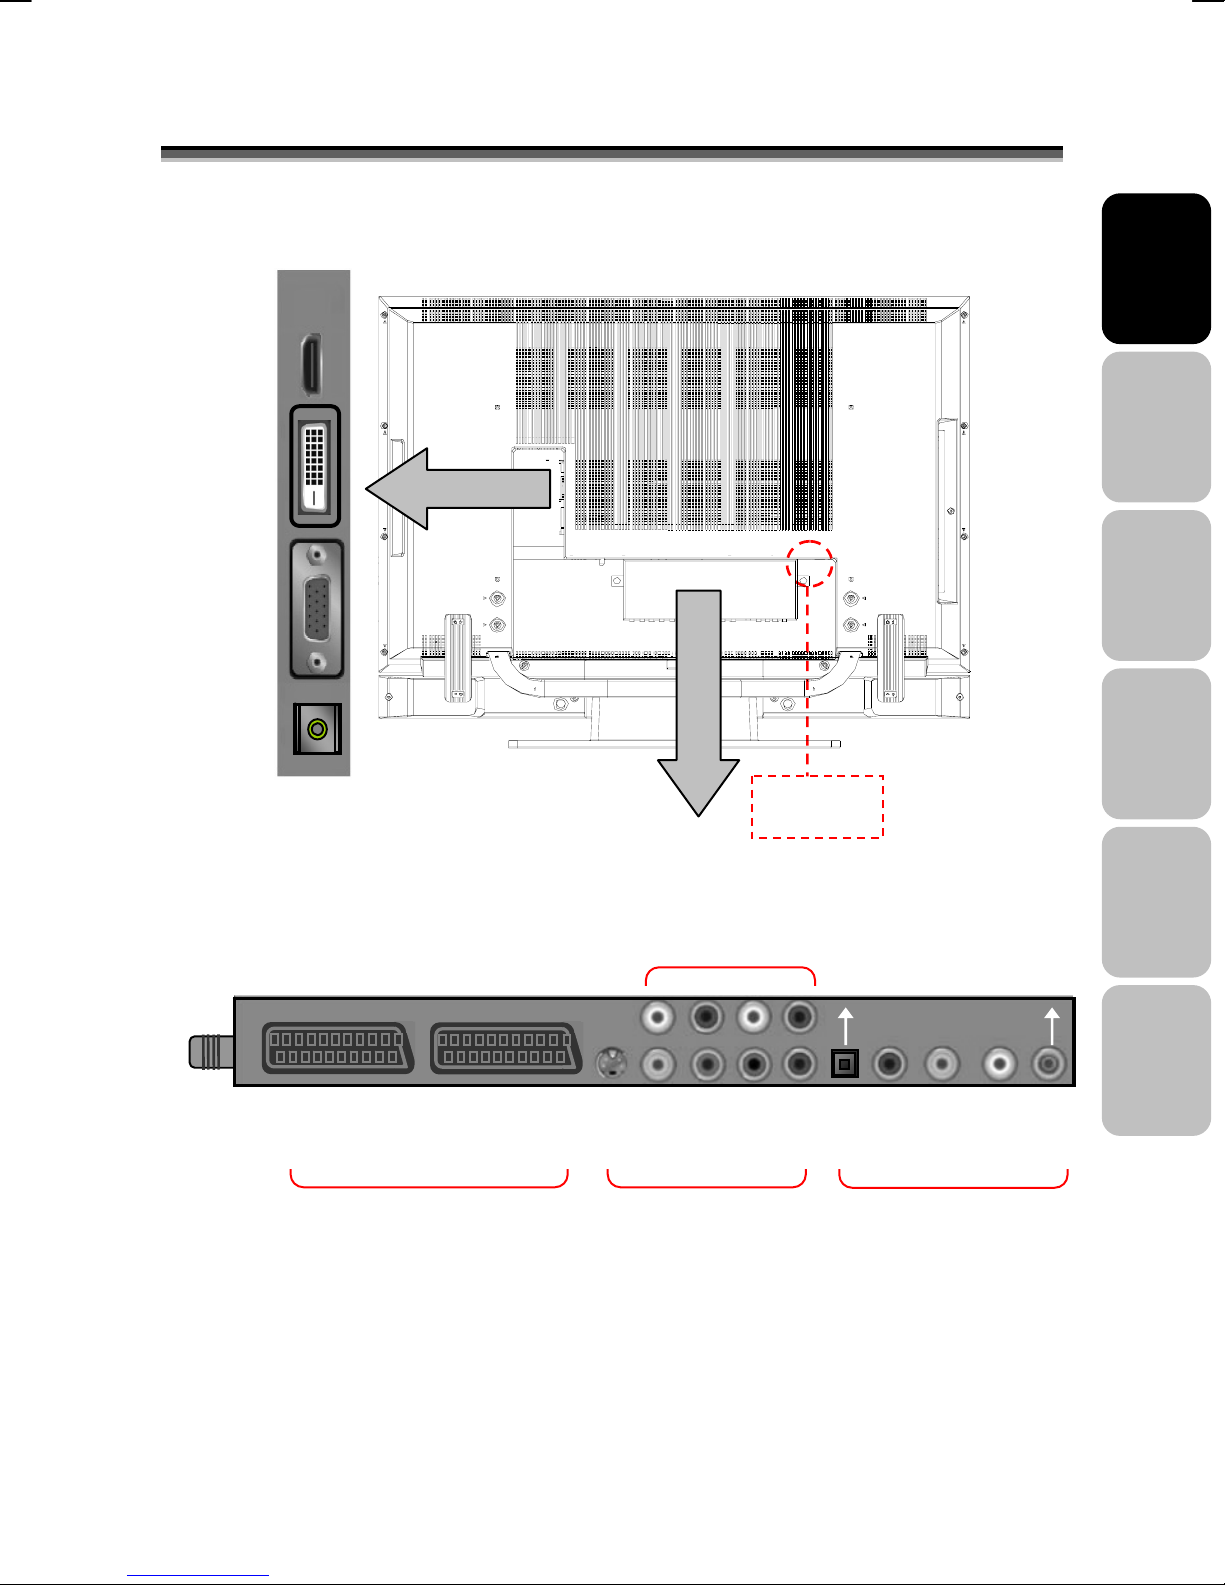
33..C
ANALOG TV
Note: Audio out L/R
The level of audio output cannot be changed using the volume control on your display.
OONNNNEECCTTIINNGG
Interface I
HDMI
DVI
D-SUB
AUDIO IN
RF IN
This connector should be used with an external audio amplifier that can be used to
control the volume.
SCART 1 SCART 2 L1 R1 L2 R2
SV
SCART IN VIDEO IN Video & Audio OUT
E
XXTTEERRNNAALL
E
Interface II VIDEO BOX
D
EEVVIICCEESS
D
AUDIO IN
AV Y Pb Pr AV L R
C POWER
SOCKET
S/PDIF
Subwoofer
English Français
Italiano
Deutsch
Español
Nederlands
9
Page 13
A
V
C
44..C
OONNTTRROOLLSS AANNDD LLOOCCAATTIIOON
N
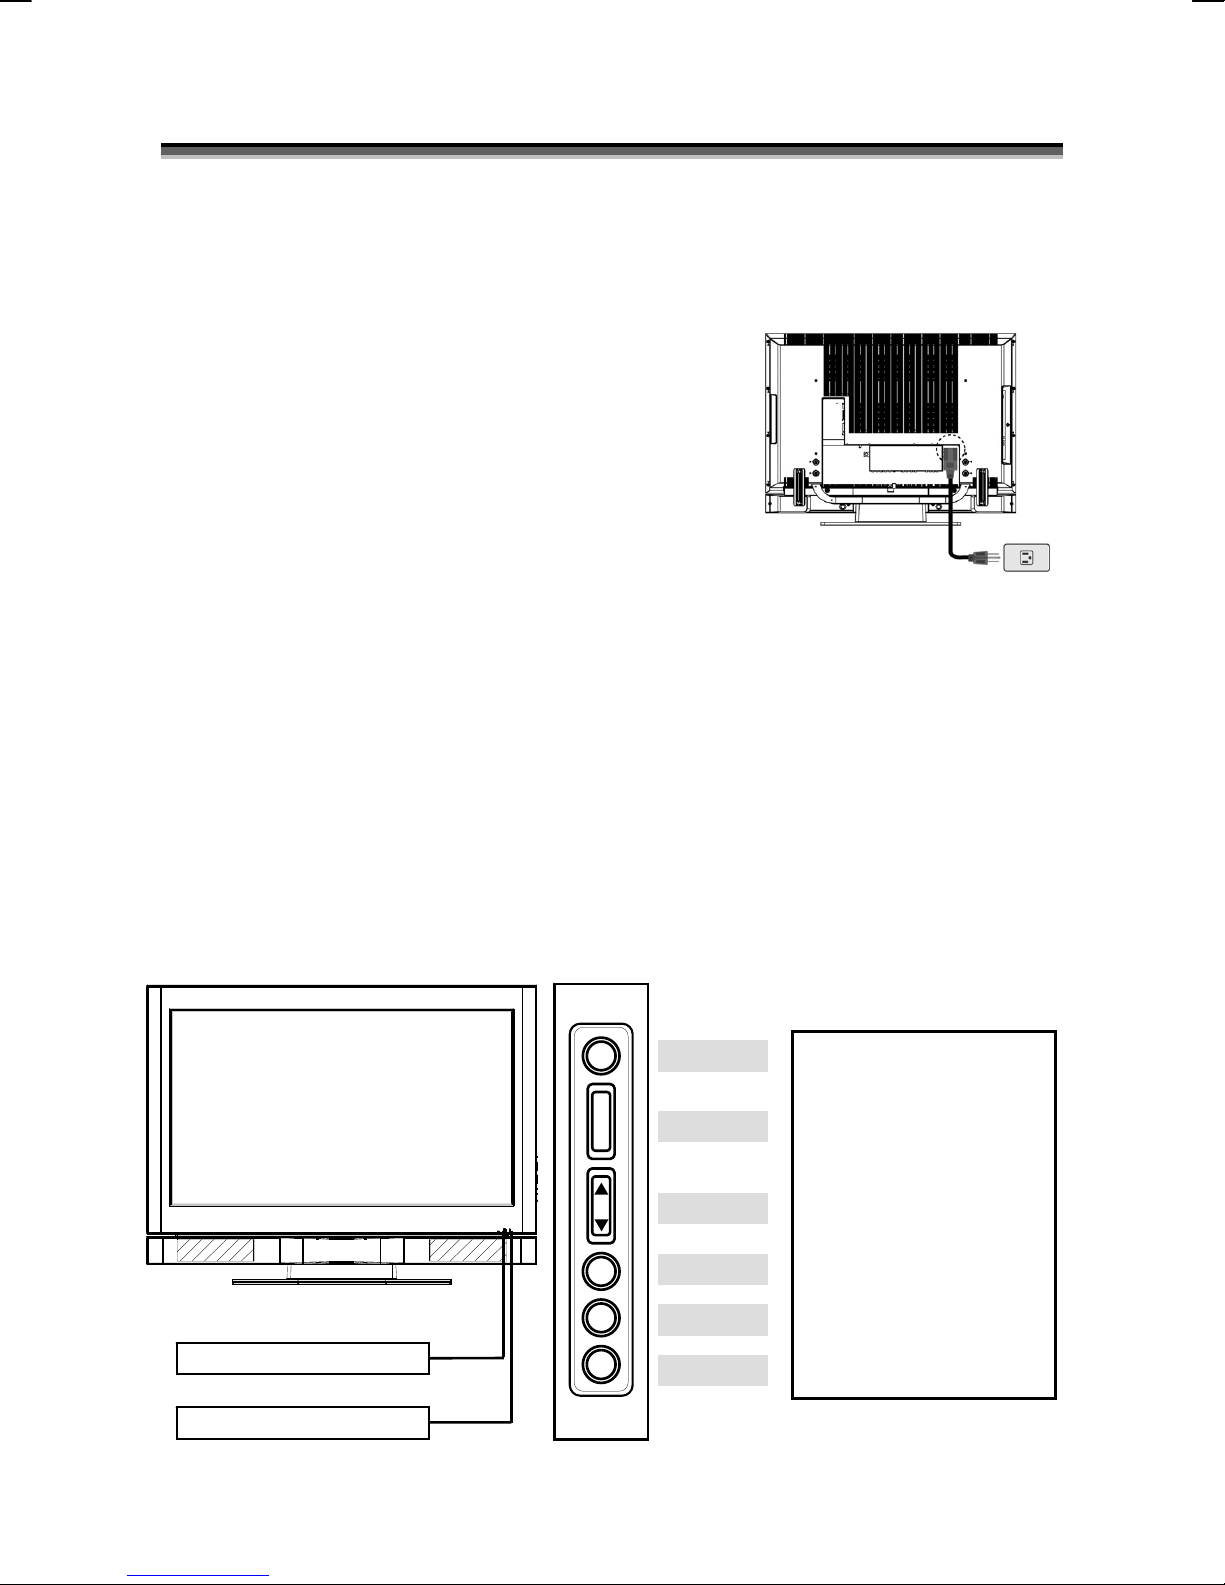
Turn The LCD Display On
Plug the power cable into the AC-in socket located on the left rear of the
LCD TV. Plug the other end into an electrical socket.
Press the power button on the remote control or right side of the TV to turn
the TV on .
Function Key
These buttons control your LCD unit’s basic features, including the
on-screen menu. To use the more advanced features, you must use the
remote control.
POWER : turn on or turn off the LCD unit.
SOURCE : select input source (PC, HDMI, DVI, TV, AV, SV, YPbPr,
SCART 1, SCART 2, SCART 2S).
MENU : display the main menu.
CHANNEL (down/up) : change channels.
VOLUME (-/+) : turn up or turn down the volume.
ARC / EXIT : Set up the aspect ratio of display (TV/Video source:
Panorama, Normal, Full, Zoom1, Zoom2 ; PC source: Full,
Normal) or as exit function if OSD menu appear.
Remote Control Sensor
+
_
RC / EXIT
OLUME
CHANNEL
MENU
SOURCE
POWER
Power indicator:
A green indicator lights
when the power is on and
an amber indicator lights
when in the standby
mode. A red indicator
lights when the power is
off.
Remote sensor window:
Remote control sensor
that receives the remote
control signals.
Power Indicator
10
Page 14
R
55..R
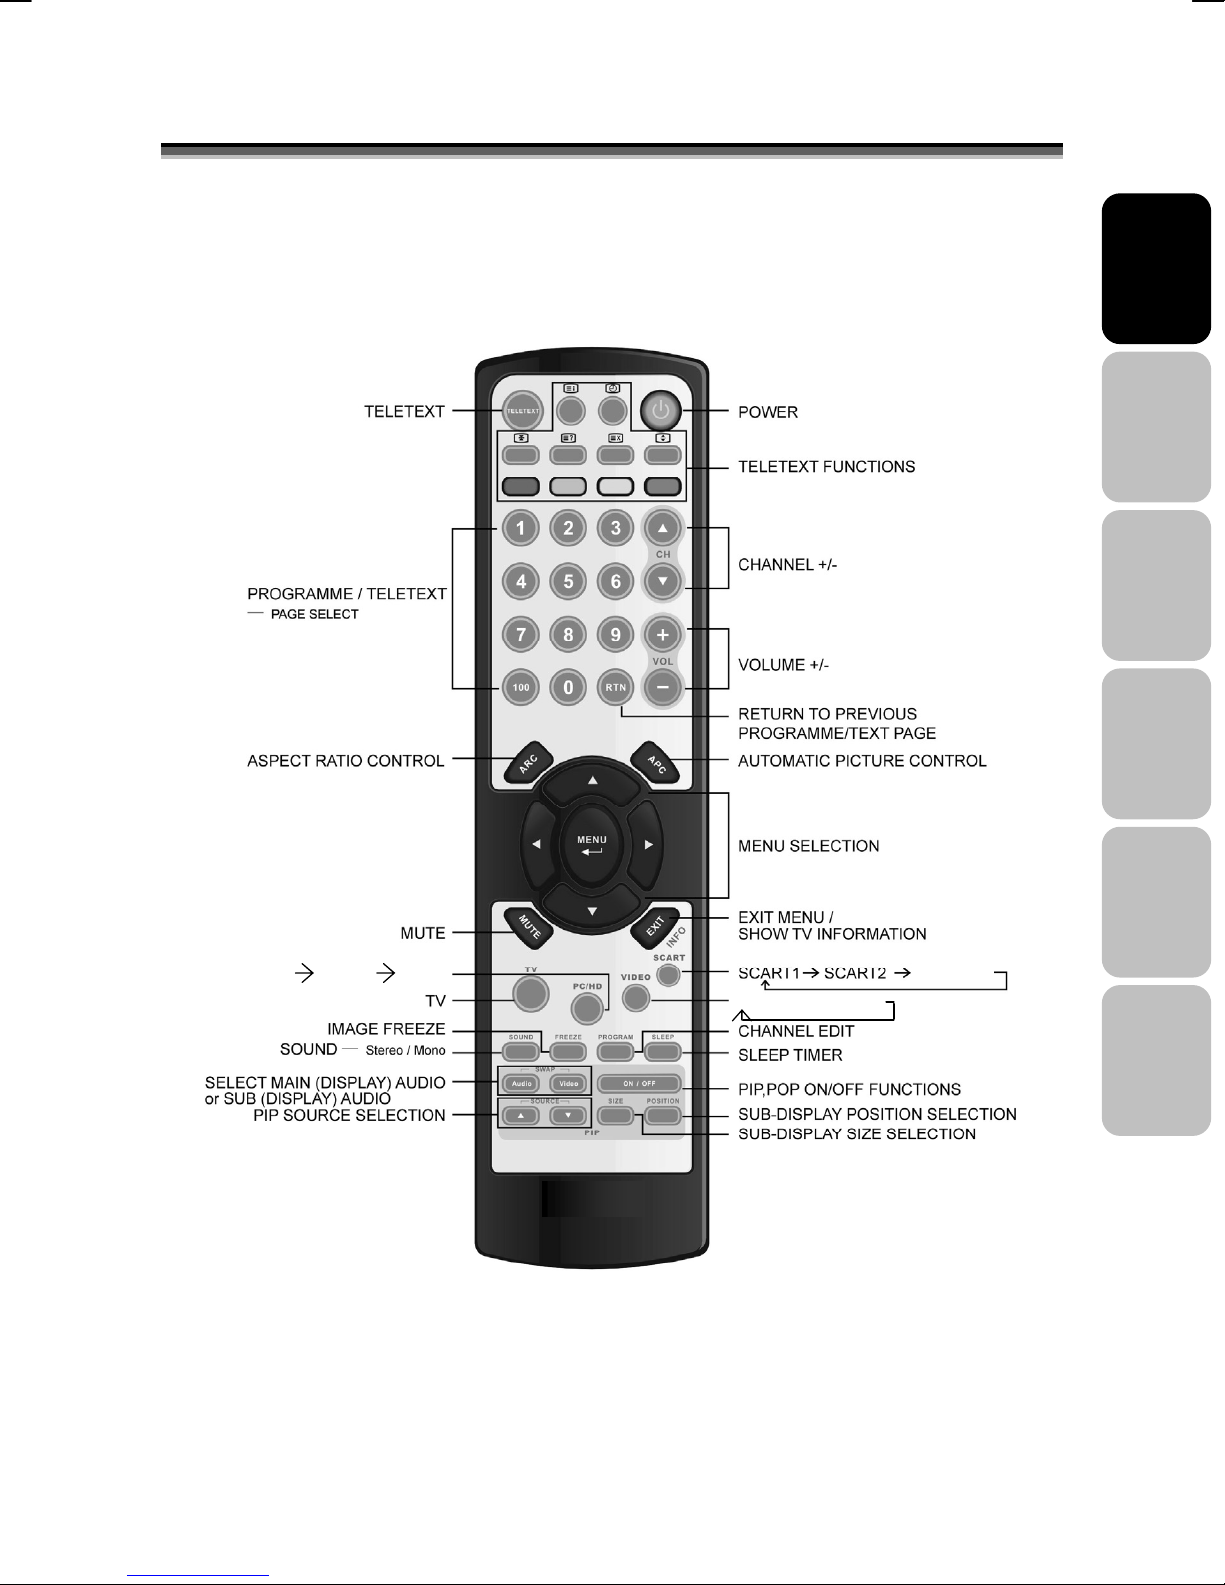
EEMMOOTTEE
C
OONNTTRROOL
C
L
English Français
Italiano
PC HDMI DVI
AV → SV → YPbPr
SCART 2S
Deutsch
Español
Nederlands
11
Page 15

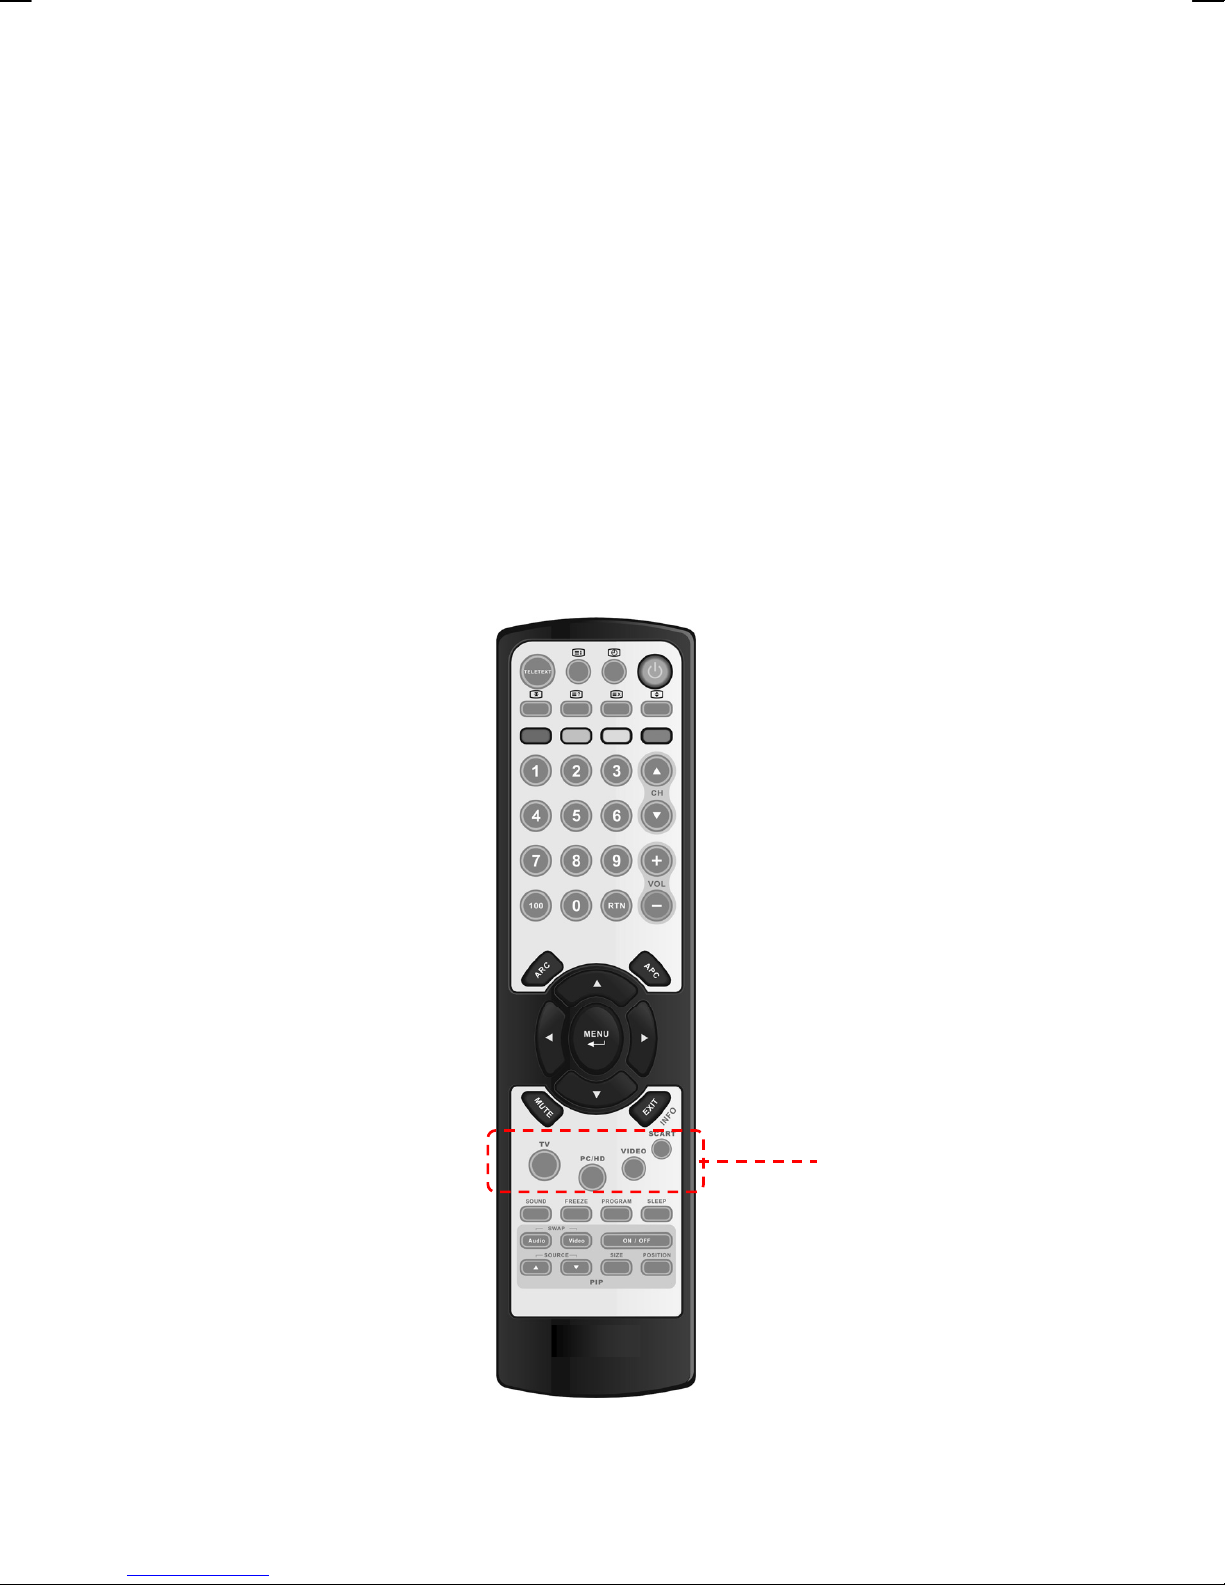
S
66..S
PPoowweerr ccoonnttrrooll
POWER button Turn the TV on or off
Selecting the primary signal source
TV button Switch to TV mode
PC/HD button Switch to PC , HDMI and DVI mode
VIDEO button Switch to AV / S-Video and YPbPr mode
SCART Switch to SCART 1 / SCART 2 and SCART 2S mode
Menu Settings
MENU button Display the on-screen menu
EXIT Exit a menu or sub-menu
△ / ▽ / ◁ / ▷
TV Changing Channels
CH △/▽ button
0~9 ; +100 button To manually select channels
RTN button Return to the previous viewed channel
Sound Control
VOL△/▽ button
MUTE button Temporarily turn off audio
SOUND button Press to choose Stereo, Dual and Mono broadcasts.
PIP Control
PIP ON/OFF button Enable/Disable PIP viewing window
△/▽ button
SIZE button Toggle PIP window size: Small / Middle / Large
Audio/Video button
POSITION button Move the PIP window position
Other Function
INFO button Display current channel/Input source/signal format..
ARC button (Aspect Ratio Control)
APC button (Automatic Picture Control) Toggle screen luminosity between Standard, Movie, Bright, Manual
SLEEP button Select a pre-set time for automatic power down.
FREEZE button Temporary pause current image
Teletext Control
TELETEXT button
UUMMMMAARRYY
INDEX Press "INDEX" button to show the list of teletext contents.
F
OOF
R
EEMMOOTTEE
R
Access menu items
Press Up/DOWN to change the channel
Increase/ Decrease volume level
Toggle PIPmode : PIP → POP → OFF
Select PIP input source: PC→HDMI→DVI→AV→SV→SCART 1→
SCART 2→SCART 2S→YPbPr→PC
Toggle audio/video source between the primary display and the
PIP window
In PC mode:Set the picture mode to Full, Fill aspect, One to one.
In Video mode:Toggle the picture mode between Normal →
Panoramic →Full→Zoom1→Zoom2
Press to show the Teletext Service. Press again to return to TV
Viewing
C
OONNTTRROOLL
C
B
UUTTTTOONNS
B
S
HOLD Press "HOLD" button to stop the automatic page change
INTERRUPT
REVEAL
EXPAND
SUB-PAGE/TIME
12
Press "INTERRUPT" button to switch to TV while waiting for the
next text page.
Press "REVEAL" button to display concealed information, such as
solutions of riddles or a quiz.
Press "EXPAND" button to enlarge the top half or bottom half of the
Teletext page.
Press "SUB-PAGE/TIME" button to access to the sub-page you
required
Page 16

V
C
77..C
(ex. DVD Player or Set-top Box…)
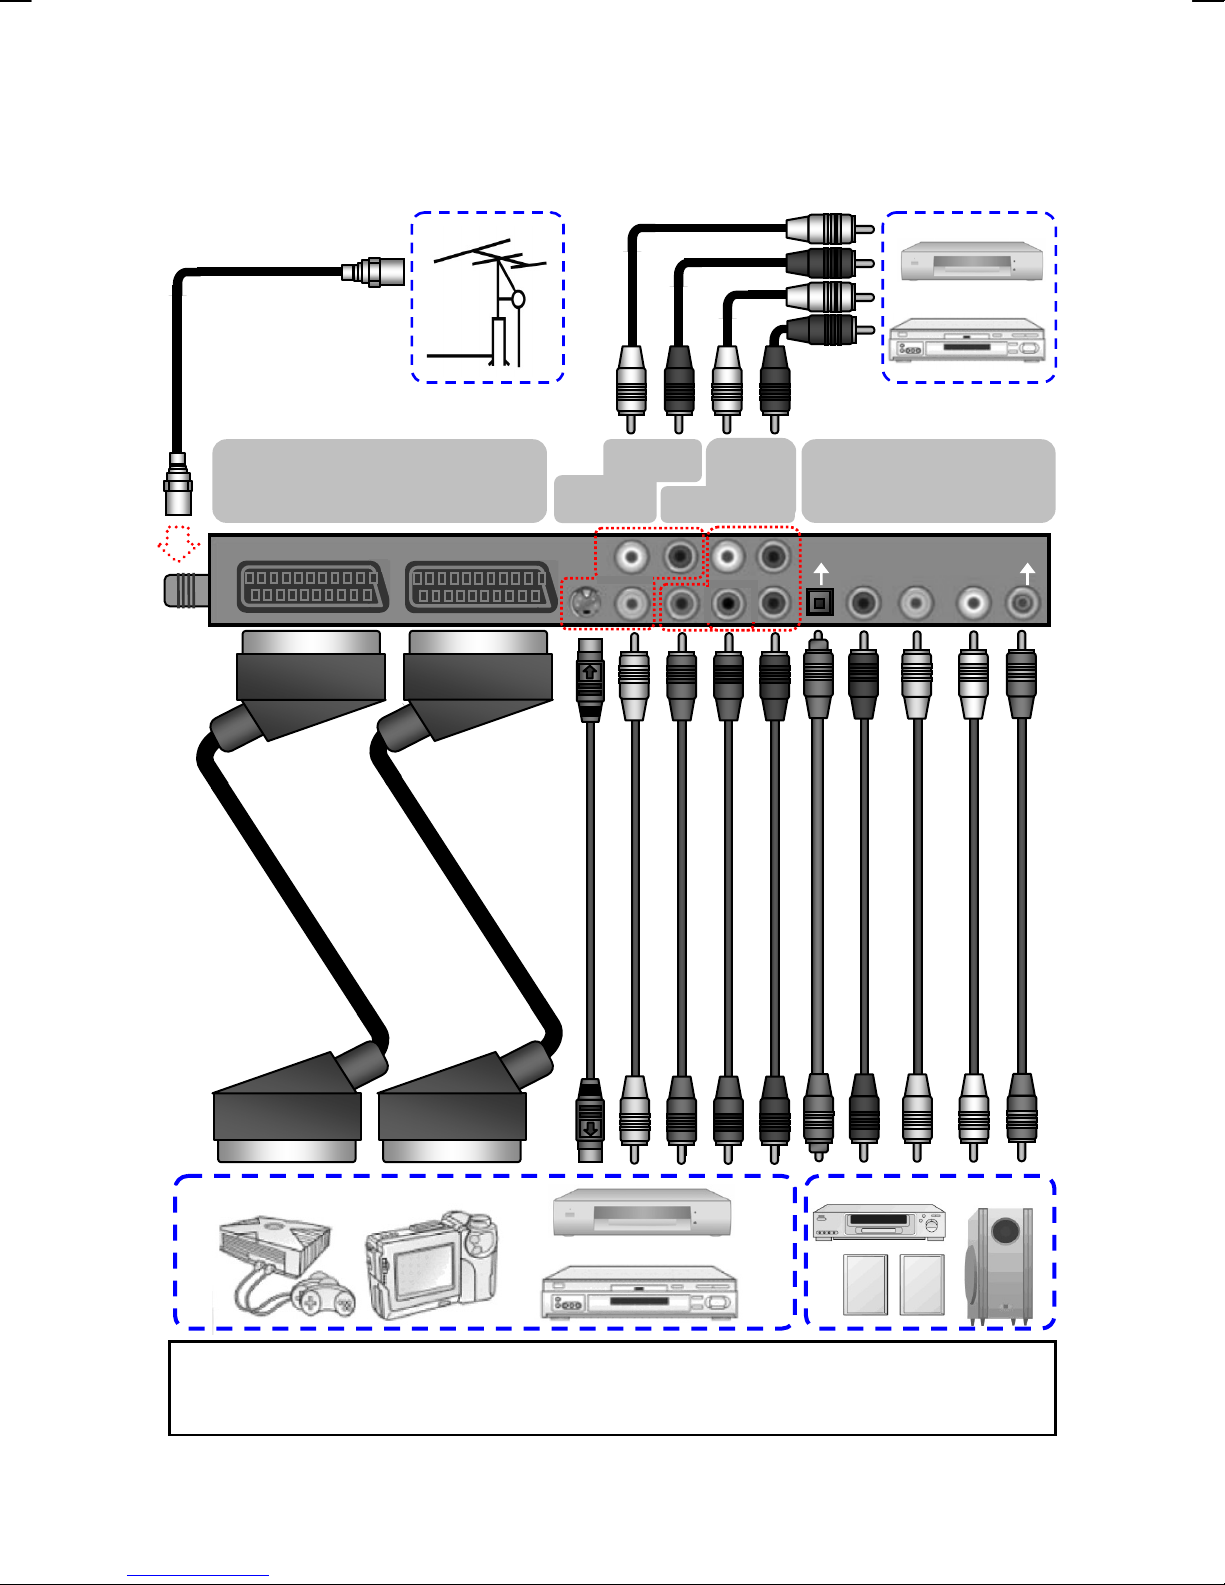
OONNNNEECCTTIIOONNSS
IDEO DEVICE
VIDEO L R HDMI
Y Pb Pr L R
PC
&
&
A
PPPPLLIICCAATTIIOONNS
A
HDMI to HDMI Cable
S
English Français
Interface I
HDMI
DVI
D-SUB
AUDIO
IN
Italiano
Deutsch
Español
Nederlands
13
Page 17
V
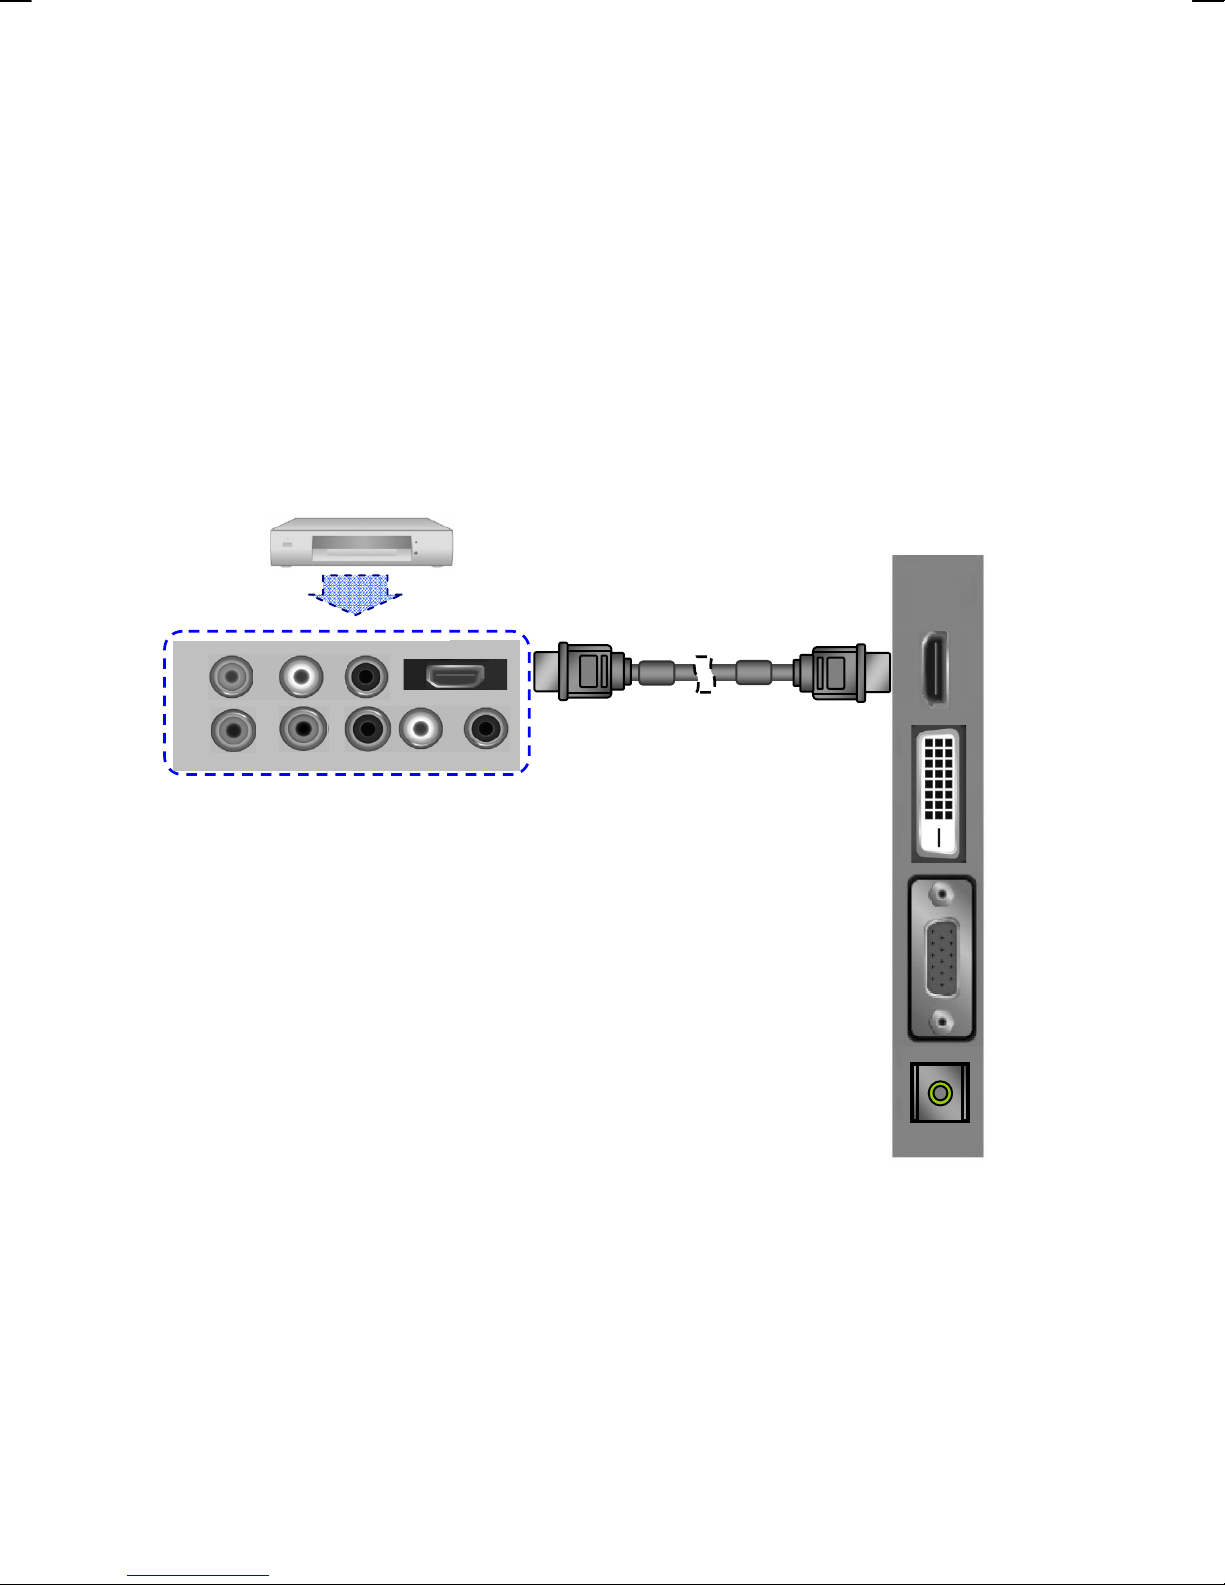
* How do I connect a Video device via HDMI - HDMI ?
This can be applied only if there is the HDMI Output connector on the
external device.
(ex. DVD Player or Set-top Box…)
VIDEO L R HDMI
Y Pb Pr L R
Note: No sound connector is needed for a HDMI to HDMI connection.
IDEO DEVICE
Interface I
HDMI to HDMI Cable
HDMI
DVI
D-SUB
AUDIO
IN
14
Page 18
V
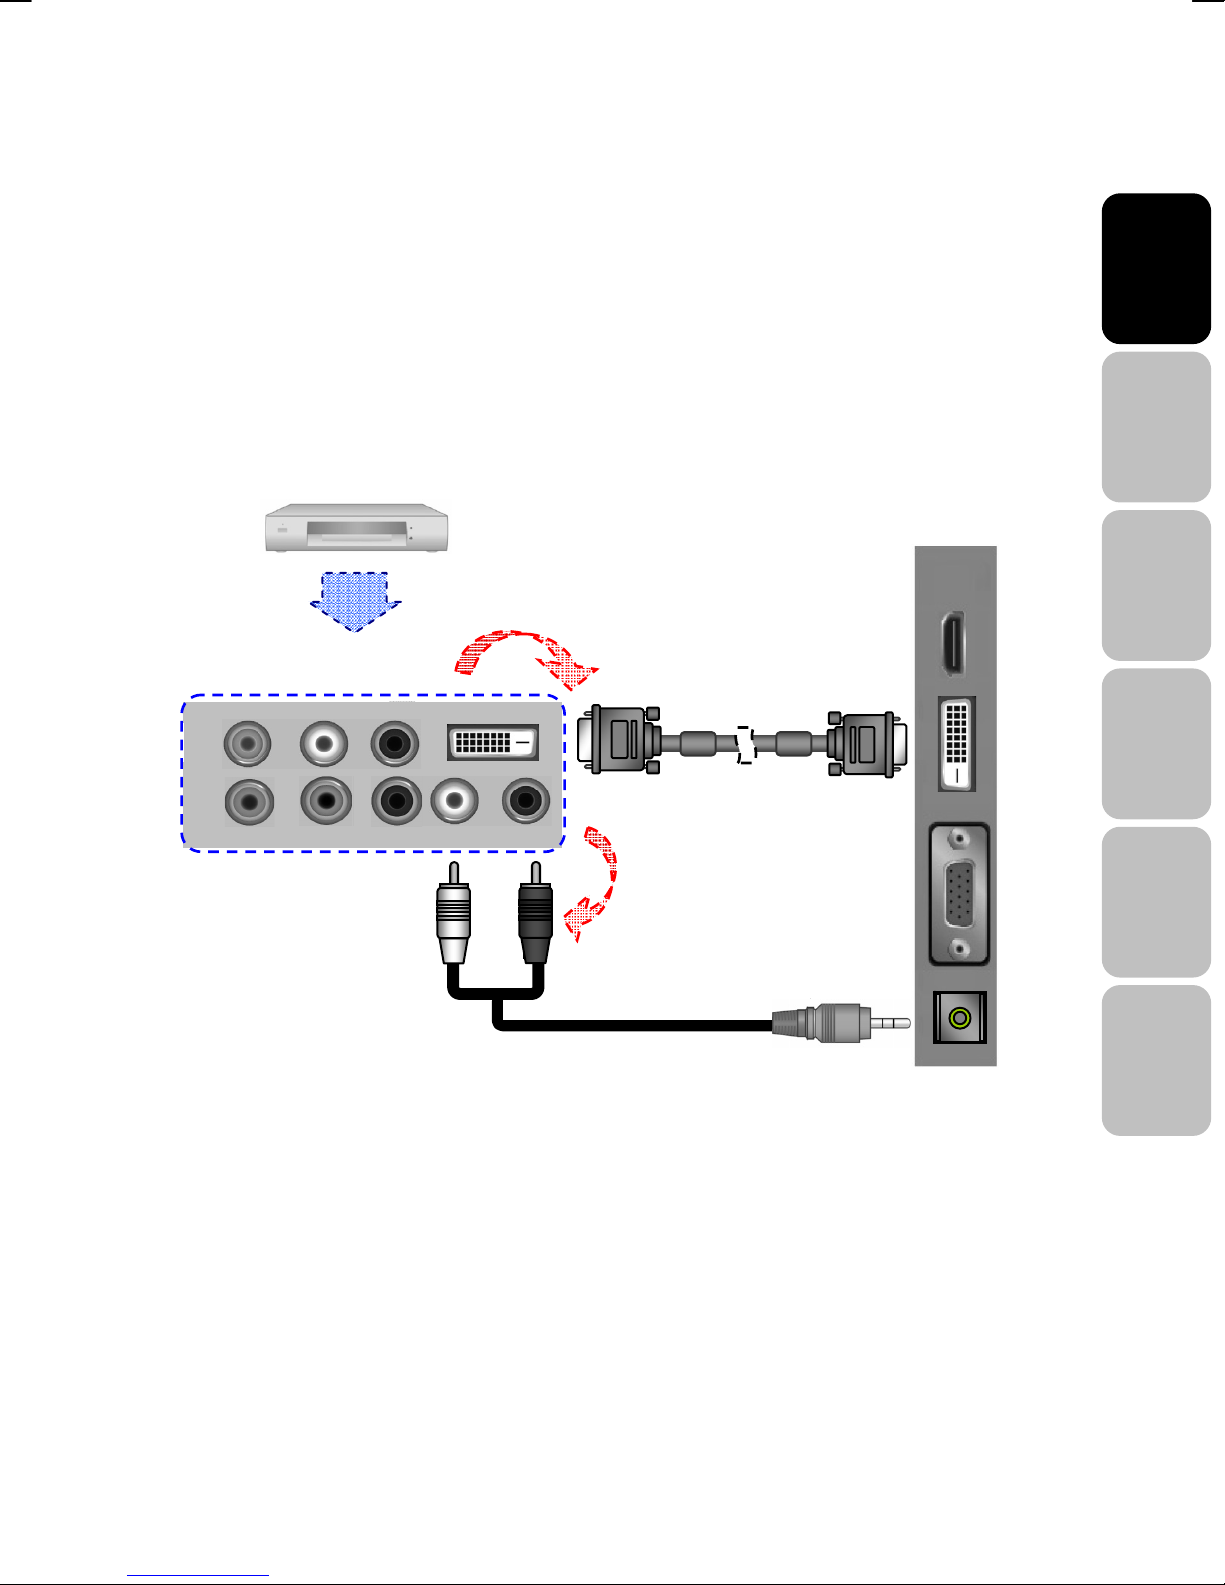
* How do I connect a Video device via HDCP - HDCP ?
This can be done only if there is the HDCP ( DVI ) Output connector on the external
device.
(ex. DVD Player or Set-top Box…)
IDEO DEVICE
VIDEO L R DVI / HDCP
1
HDCP to HDCP Cable
or
DVI to DVI Cable
Y Pb Pr L R
2
1. Connect a HDCP or DVI cable between the DVI connector on the TV and the
HDCP / DVI connector on the DVD player/ Set-top box.
2. Connect an audio cable between the PC AUDIO IN jack on the TV and
AUDIO OUT jack on the DVD player/ Set-top box.
HDMI
DVI
D-SUB
AUDIO
IN
English Français
Italiano
Deutsch
Español
Nederlands
15
Page 19
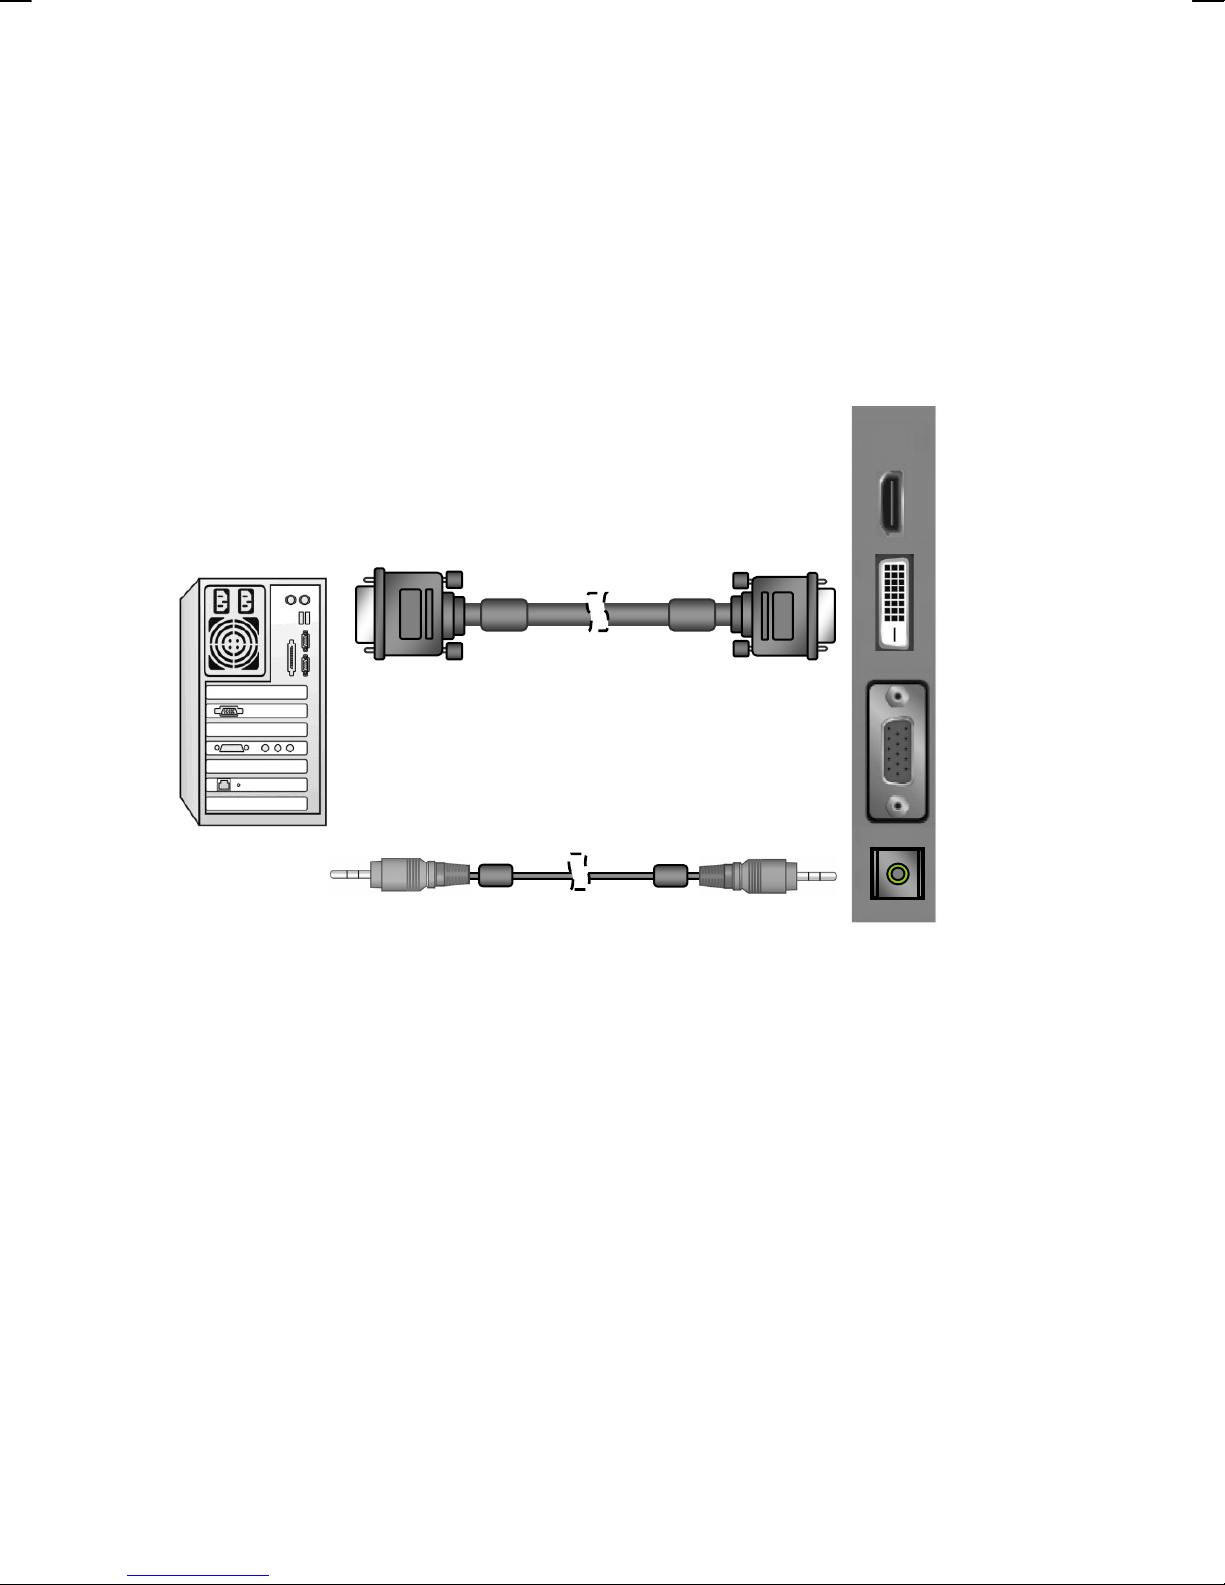
* How do I connect a PC via DVI - DVI ?
DVI to DVI Cable
PC
AUDIO Cable
1. Connect a DVI cable between the DVI connector on the TV and the DVI
connector on PC.
2. Connect an audio cable between the PC AUDIO IN jack on the TV and
AUDIO OUT jack on PC.
TV Set
HDMI
DVI
D-SUB
AUDIO
IN
16
Page 20
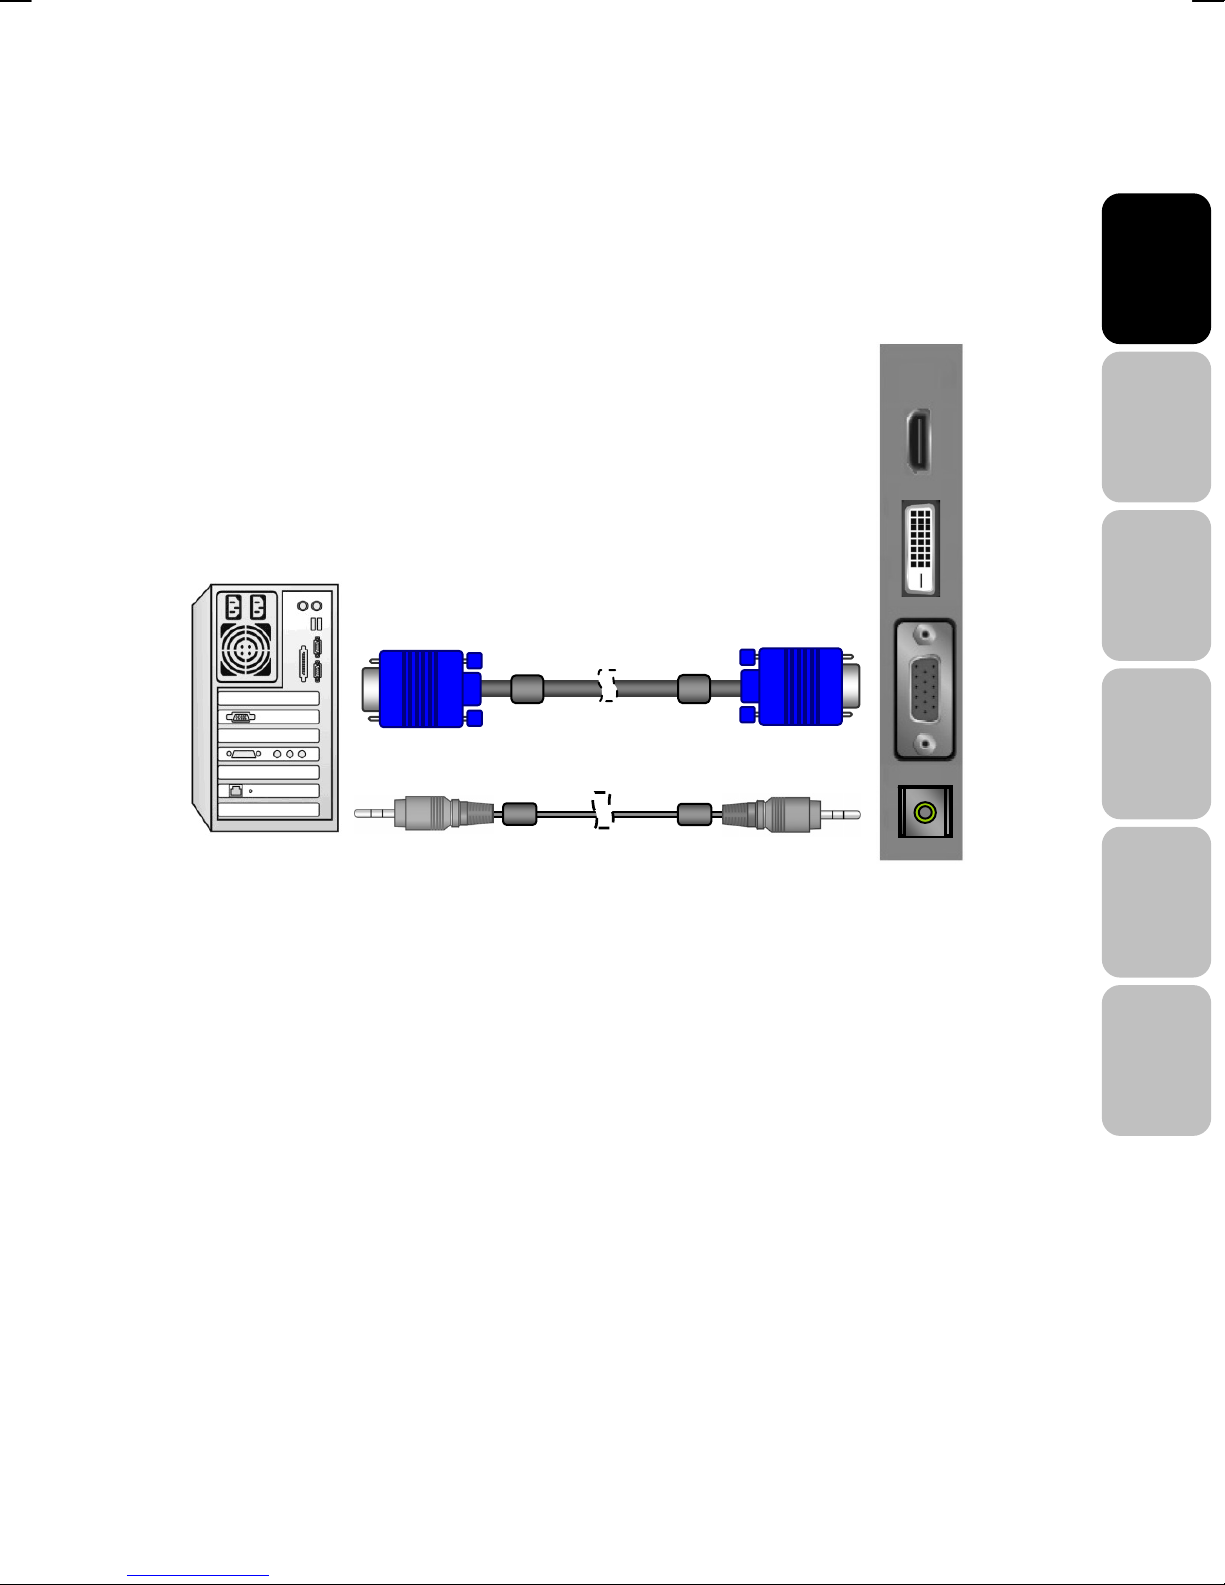
* How do I connect a PC via D-SUB ?
VGA Cable
AUDIO Cable
PC
1. Connect a VGA cable between the D-SUB connector on the TV and the
D-SUB connector on PC.
2. Connect an audio cable between the PC AUDIO IN jack on the TV and
AUDIO OUT jack on PC.
TV Set
HDMI
DVI
D-SUB
AUDIO
IN
English Français
Italiano
Deutsch
Español
Nederlands
17
Page 21
,
* How do I connect a Video device via general cables ?
SCART 1 SCART 2 L1 R1 L2 R2
SV
Interface II VIDEO BOX
AV Y Pb Pr AV L R
S/P DIF
Subwoofer
This TV accept different Video Input, if video device has a connector with better quality,
please connect the better one. The sequence of video quality is Component, Scart,
S-video
Video from the best quality to the normal one.
18
Page 22

G
88..G
EENNEERRAALL
C
OONNTTRROOLLSS
C
&
&
A
DDJJUUSSTTMMEENNT
A
T
TURNING THE LCD DISPLAY ON AND OFF
1. Press the POWER button on the Remote Control.
2. You can also use the POWER button at the bottom of the panel.
VOLUME CONTROL
Using Volume Control
Press VOL▲ / VOL▼ button to turn up or turn down the sound volume.
Using Mute
At any time, users can temporarily turn off the sound
by pressing the MUTE button.
English Français
Italiano
1. Press the MUTE button and the sound cuts off.
2. Press the MUTE again or VOL▲ / VOL▼ button to turn the sound back to
the previous level.
Deutsch
SETTING THE SLEEP TIMER
You can set the Sleep Timer to turn off the TV automatically. The time can
be set from OFF to 120 minutes.
1. Press the SLEEP button to set the Sleep Timer screen.
2. Press the SLEEP button repeatedly to change the sleep time
(in 10 minutes intervals).
Español
Nederlands
19
Page 23
SWITCHING PC / HDMI / DVI / VIDEO / TV / SCART
MODES
1. Turn on the power.
2. Select an input source as described below:
TV button
PC/HD button
VIDEO button
SCART button
switch to TV mode.
switch to PC , HDMI and DVI mode (Analog or Digital)
switch to AV / SV / YPbPr mode
(Composite, Y/C and Component signal)
switch to SCART 1, SCART 2, SCART 2S
Source
button
20
Page 24
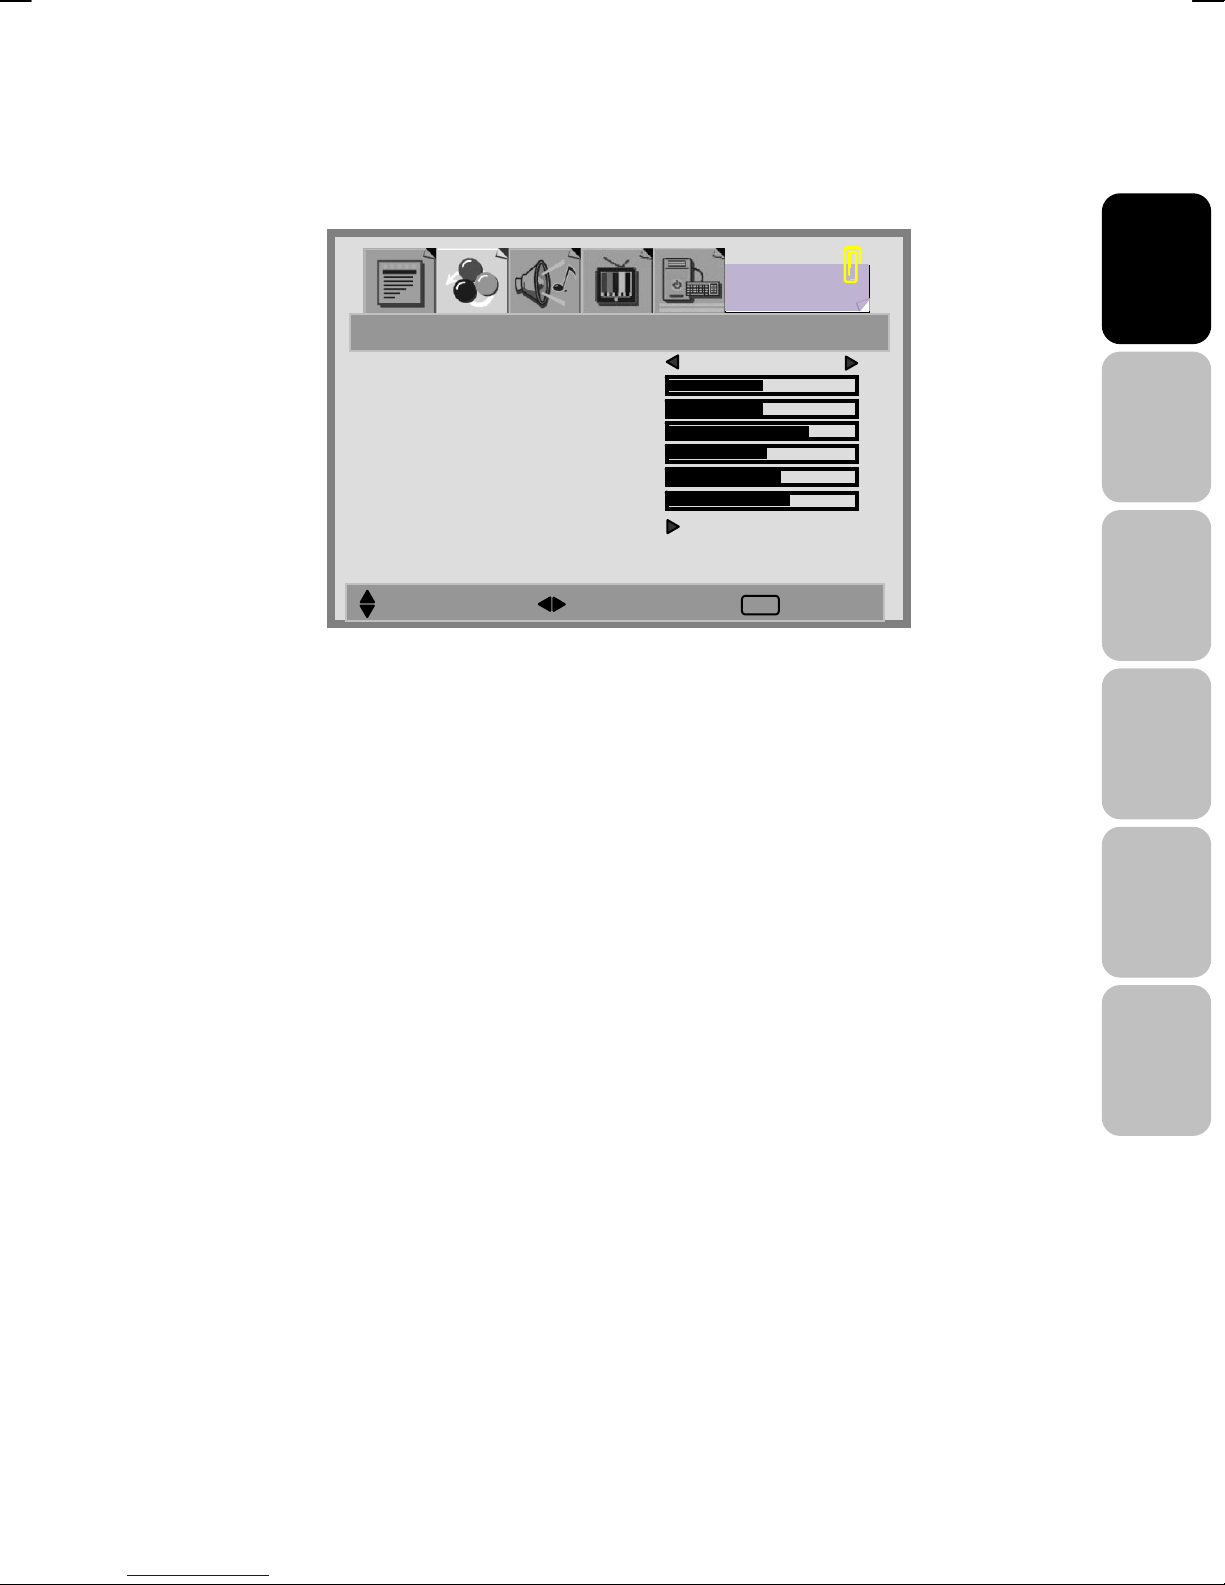
VIEWING THE MENUS AND ON-SCREEN DISPLAYS
1. With the power on, press the MENU button. The main menu appears on
the screen.
PICTURE MODE STANDARD
CONTRAST
BRIGHTNESS
BACKLIGHT
HUE
COLOR
SHARPNESS
COLOR MODE
PICTURE
EXIT
2. Use the W / X button to select one of the menu options, and then press
the S / T button to access the sub-menu.
3. Press the W / X button to make adjustments.
4. Press EXIT/INFO button to exit from the menu.
Note: The menu varies according to which input source is selected.
English Français
Italiano
Deutsch
Español
Nederlands
21
Page 25
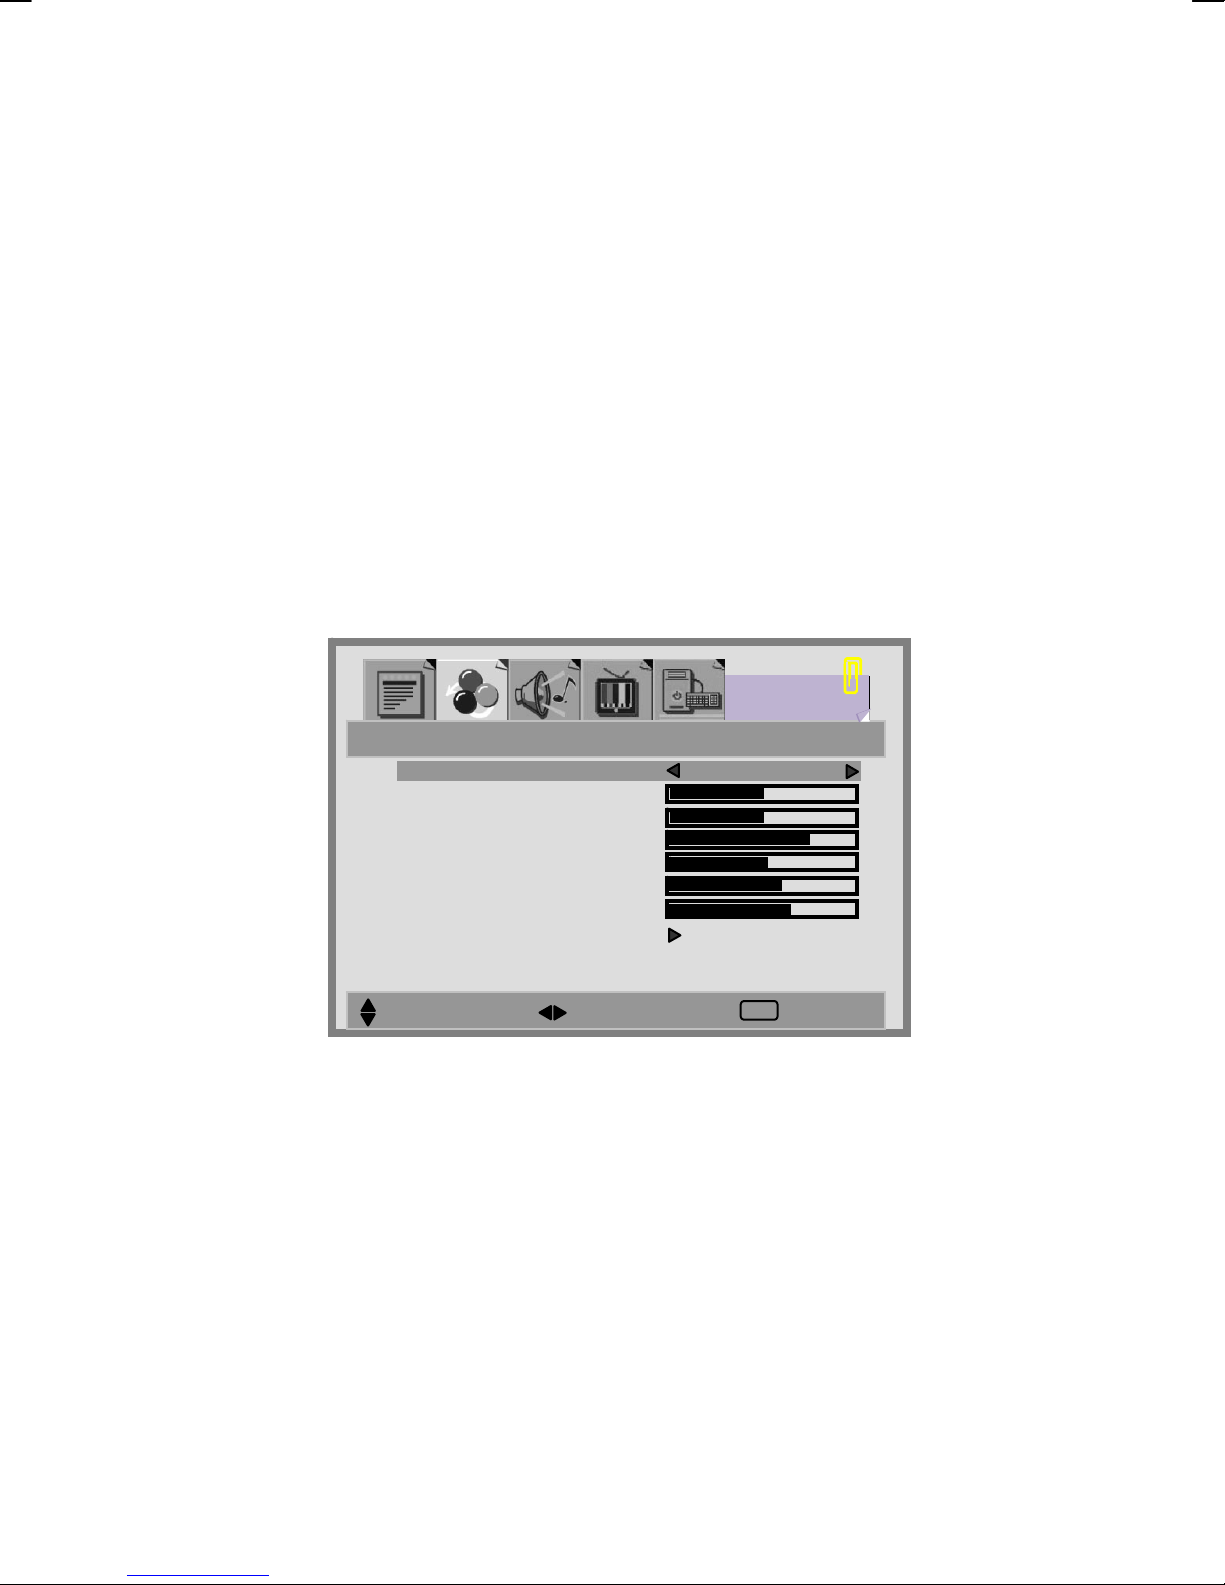
PICTURE SETTING
You may need to perform separate adjustments for brightness and contrast
for the different video modes. Typically, PC mode will be best viewed with
lower brightness and contrast settings than are appropriate for the other
modes.
1. Press the MENU button to display PICTURE from the main menu.
2. Press the S / T button to select the desired item.
3. Press the W / X button to adjust ranges from minimum to
maximum.
4. Press the EXIT/INFO button to return to the previous screen.
PICTURE MODE MANUAL
CONTRAST
BRIGHTNESS
BACKLIGHT
HUE
COLOR
SHARPNESS
COLOR MODE
PICTURE
SELECT MOVE EXIT
EXIT
PICTURE MODES:
[MANUAL]:select this mode if you want to manually adjust each
setting. Adjustments are only available under this mode.
[STANDARD]: standardizes picture adjustment
[MOVIE]: heightens contrast and sharpness
[BRIGHT]: displays a clear and bright picture.
22
Page 26
PICTURE SETTINGS:
CONTRAST: Increase and decrease picture contrast
BRIGHTNESS: Darker and brighter picture brightness
BACKLIGHT: Adjust the back light level of screen
COLOR: Deeper and lighter picture color
SHARPNESS: Softer and sharper image
COLOR MODE:
1. Press the S / T buttons to select COLOR MODE option, and then
press the X button to enter the COLOR TEMP. sub-menu.
PICTURE MODE MANUAL
CONTRAST
BRIGHTNESS
BACKLIGHT
HUE
COLOR
SHARPNESS
COLOR MODE
PICTURE
SELECT MOVE EXIT
EXIT
2. Press the X button to choose the color of picture mode. [NORMAL],
[WARM], [COOL], [MANUAL].
COLOR TEMP. MANUAL
USER – R
USER – G
USER – B
PICTURE
MAIN:TV SUB:OFF
MOVE SELECT EXIT
English Français
Italiano
Deutsch
Español
Nederlands
23
Page 27

3. Press S / T buttons to move USER-R/G/B and then press the X
button to enter the desired setting.
USER-R: adjust color of red rate.
USER-G: adjust color of green rate.
USER-B: adjust color of blue rate.
RECALL:User can reset the picture settings to the original /
normal settings.
24
Page 28
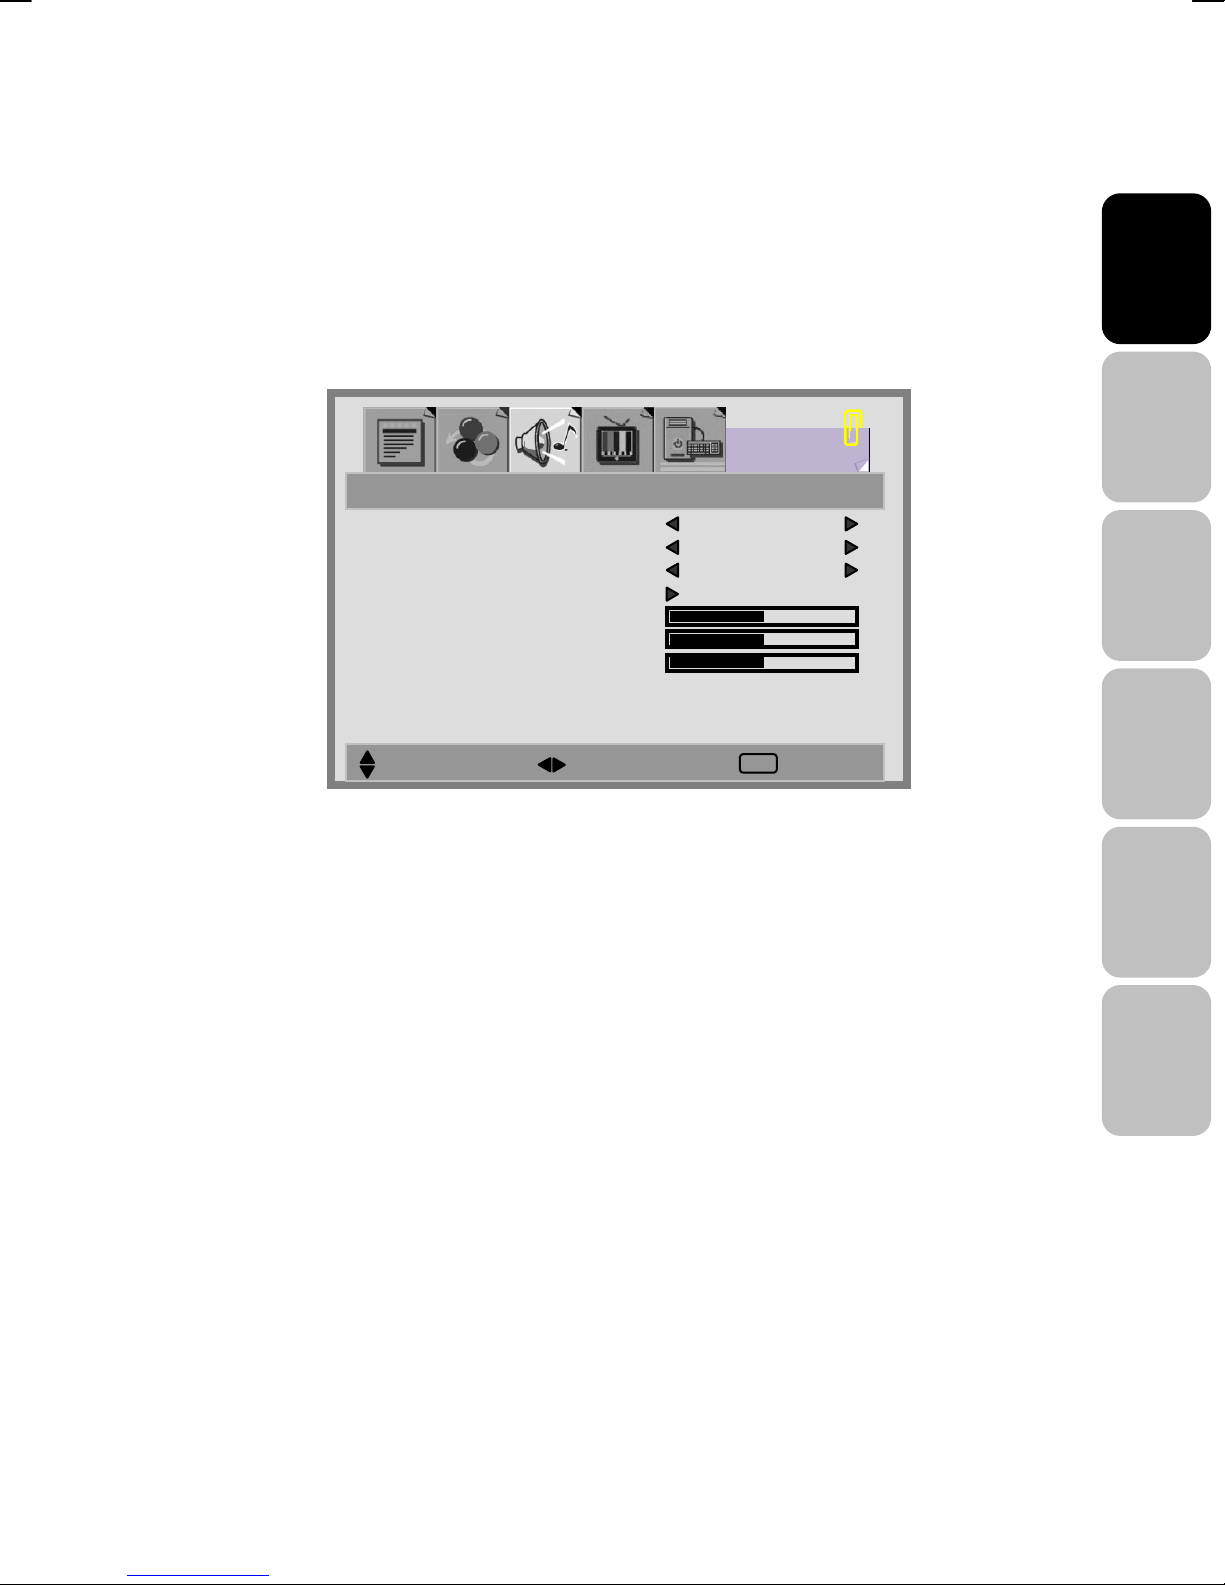
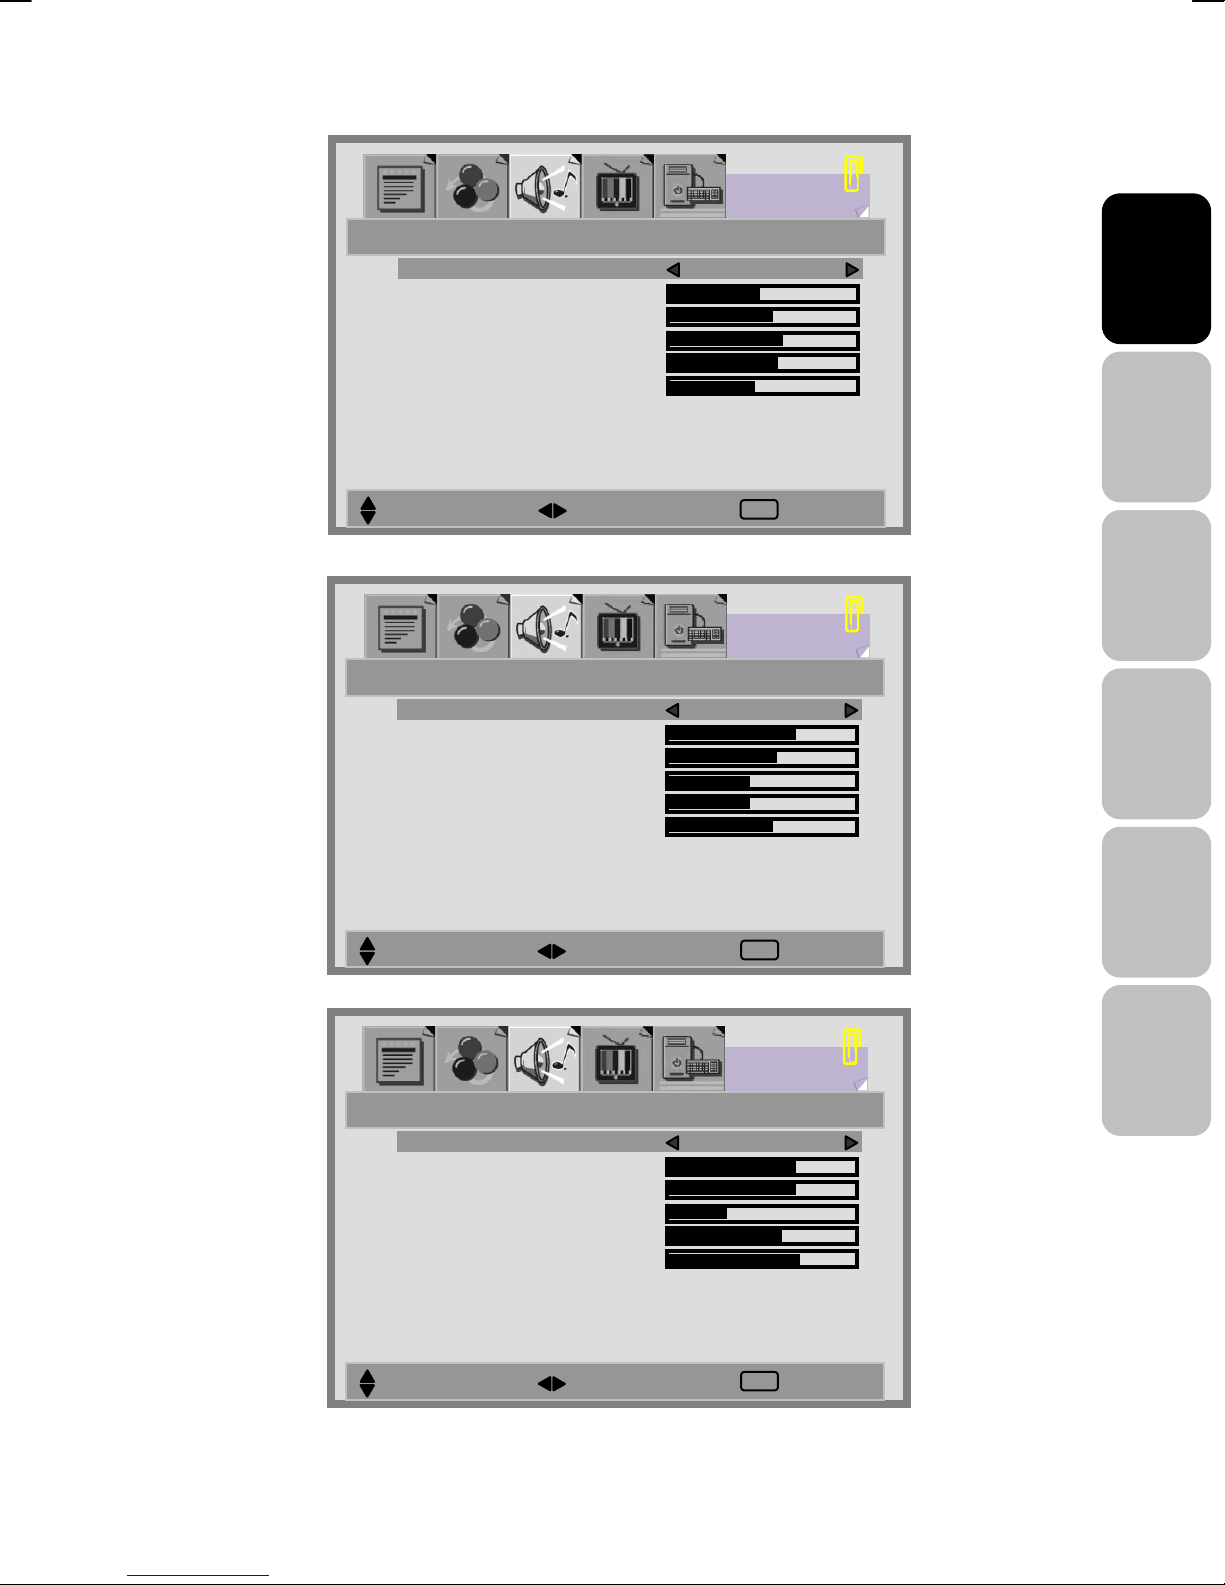
SOUND ADJUSTMENT
1. Press the MENU button to display SOUND from the main menu.
2. Press the S / T button to move to one of the sub-menu options.
3. Press the W / X button to select the settings.
4. Press the EXIT/INFO button to return to the previous screen.
SOURCE MAIN
AVC ON
MODE OFF
EQUALIZER
BASS
TREBLE
BALANCE
SOUND
MAIN:TV SUB:OFF
SELECT MOVE EXIT
EXIT
SOURCE: Choose the sound source from the [MAIN] or [SUB] display.
English Français
Italiano
Deutsch
AVC: You can set AVC(Auto Volume Control ) options to ON or OFF.
[ON]: For general use, like commercial advertisment,AVC can avoid the
sound turns up or down suddenly.
[OFF]: For special sound effect, like opera or symphony, volume can be
performed in accordance with the orginal sound level.
MODE: select the audio mode to [OFF], [EQ].
BASS: Adjust low tone of sound.
TREBLE: Adjust high tone of sound.
BALANCE: Adjust the volume balance between the left and right
speakers.
Español
Nederlands
25
Page 29
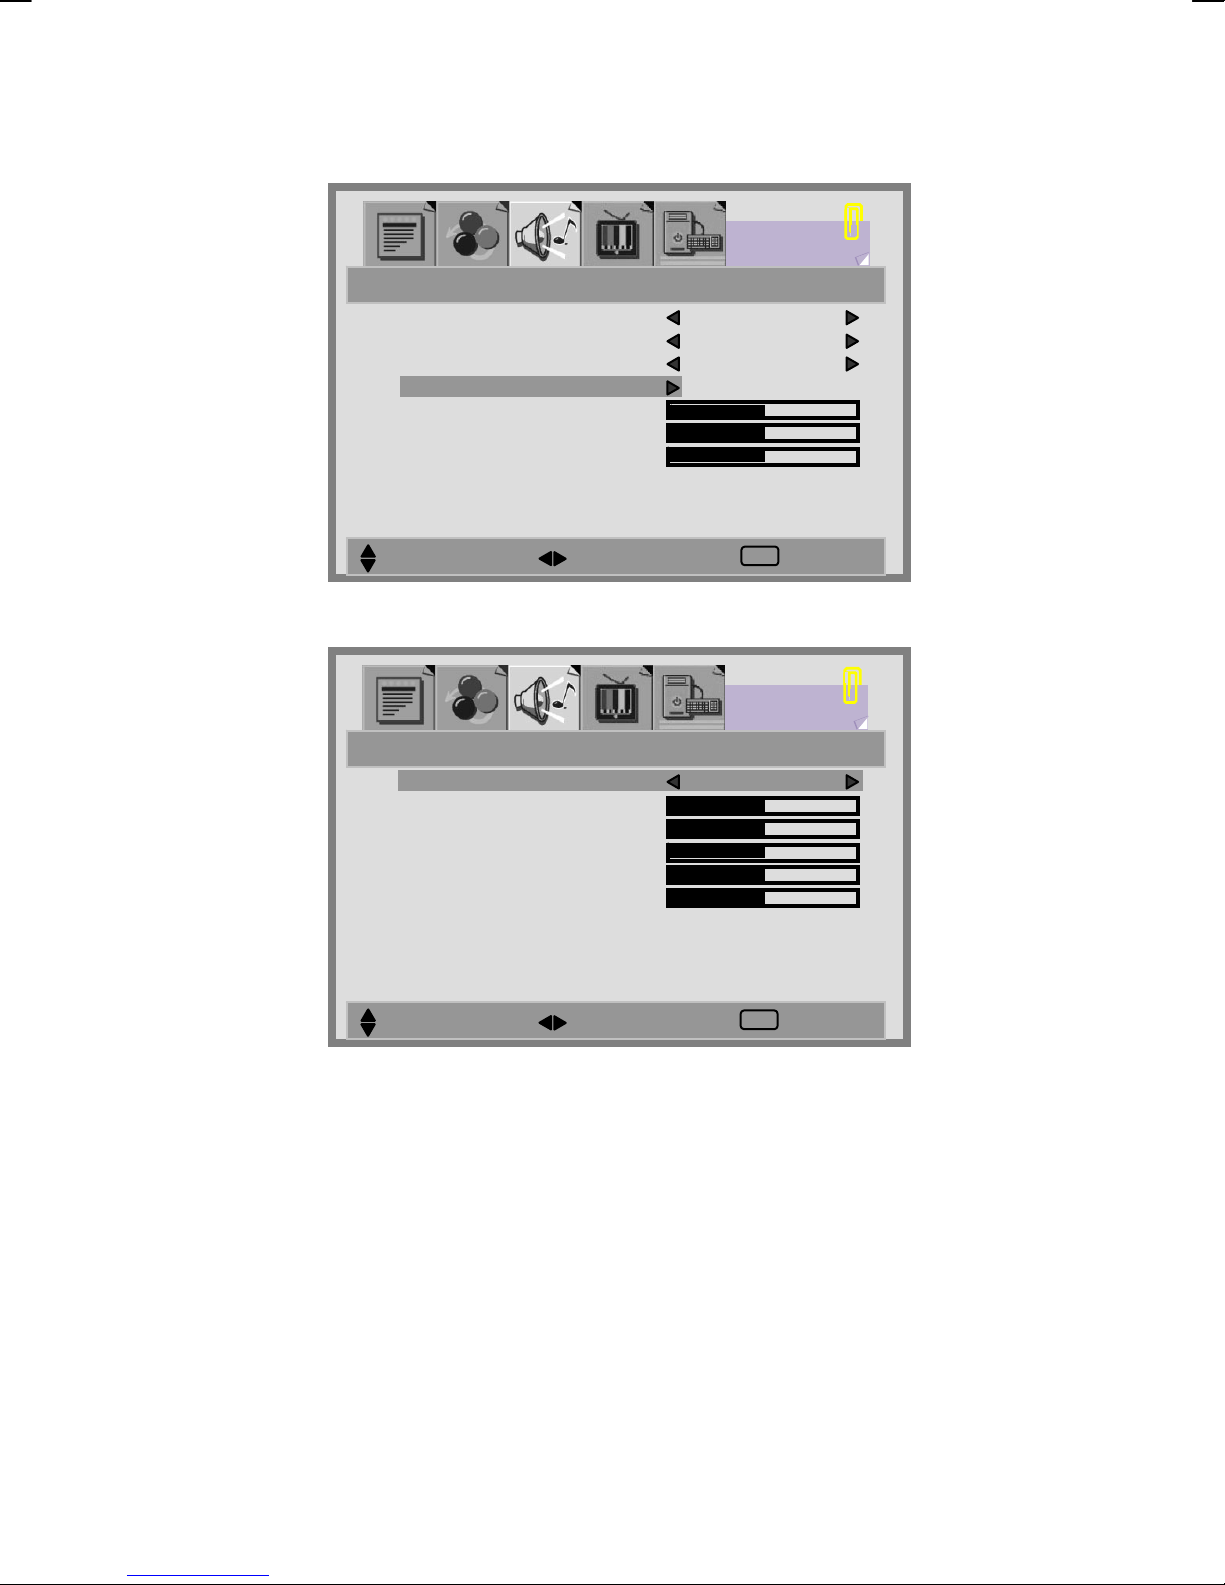
EQUALIZER:
1. Press the S / T button to enter the EQUALIZER menu.
SOURCE MAIN
AVC ON
MODE EQ
EQUALIZER
BASS
TREBLE
BALANCE
SOUND
MAIN:TV SUB:OFF
MOVE SELECT EXIT
EXIT
2. Press the X button to select the EQUALIZER options.
EQUALIZER MANUAL
120 HZ
500 HZ
1.5 KHZ
5 KHZ
10 KHZ
SOUND
MAIN:TV SUB:OFF
MOVE SELECT EXIT
EXIT
3. There are 6 Equalizer modes available: [MANUAL] , [VOICE] , [POP],
[ROCK] , [JAZZ] , [CLASSIC].
4. Settings for VOICE , POP, ROCK , JAZZ and CLASSICAL are
pre-configured. You cannot change these settings. The frequency
responses are as below:
26
Page 30
K
VOICE:
EQUALIZER VOICE
120 HZ
500 HZ
1.5 KHZ
5 KHZ
10 KHZ
MAIN:TV SUB:OFF
MOVE SELECT EXIT
POP:
EQUALIZER POP
120 HZ
500 HZ
1.5 KHZ
5 KHZ
10 KHZ
SOUND
English Français
EXIT
Italiano
SOUND
Deutsch
ROCK:
MOVE SELECT EXIT
EQUALIZER ROC
120 HZ
500 HZ
1.5 KHZ
5 KHZ
10 KHZ
MOVE SELECT EXIT
EXIT
SOUND
EXIT
Español
Nederlands
27
Page 31

A
JAZZ:
CLASSICAL:
SOUND
EQUALIZER JAZZ
120 HZ
500 HZ
1.5 KHZ
5 KHZ
10 KHZ
MAIN:TV SUB:OFF
MOVE SELECT EXIT
EQUALIZER CL
120 HZ
500 HZ
1.5 KHZ
5 KHZ
10 KHZ
EXIT
SOUND
SSIC
MOVE SELECT EXIT
28
EXIT
Page 32

5. In MANUAL mode, use S / T buttons to
move a band and W / X buttons to
select the desired frequency settings.
MANUAL:
EQUALIZER MANUAL
120 HZ
500 HZ
1.5 KHZ
5 KHZ
10 KHZ
SOUND
MAIN:TV SUB:OFF
MOVE SELECT EXIT
EXIT
Note:
When using the PIP feature in PC mode, you are able to listen to the sound of the
[SUB] screen instead of the [MAIN] screen by selecting the AUDIO SWAP button.
AUDIO SWAP
Button
English Français
Italiano
Deutsch
Español
Nederlands
29
Page 33

K
TV CHANNEL
1. Press the MENU button to display TV CHANNEL from the main menu.
2. Press the S / T button to move one of the sub-menu options.
3. Press the W / X button to select the settings.
4. Press the EXIT/INFO button to return to the previous screen.
COUNTRY U
A. P. S
MANUAL
PROGRAM
CHILD LOCK OFF
TV CHANNEL
MOVE SELECT EXIT
EXIT
COUNTRY:[UK],[IRELAND],[DENMARK],[FINLAND],[ITALY],[NORWAY],
[SPAIN],[SWEDEN],[LUXEMBURG],[FRANCE],[CZECH],
[POLAND],[HUNGARY],[AUSTRIA],[GERMANY],
[SWITZERLAND],[BELGIUM], [NETHERLANDS]
A.P.S:
1. Press the S / T button to select A.P.S option and then press
the X button to enter A.P.S (Automatic Programming Search).
2. When the sub menu appears on the screen, press MENU again to start
scanning.
3. After APS has completed, the Program List will appear on the screen. You
can select, rename, delete or insert programs within the Program List.
30
Page 34

A
Programming Manual
88
MANUAL:
1.
Press S / T button to select MANUAL option, and then press number or
W / X button to select the program that the user wants the tuned channels
to store .
English Français
Italiano
2. Press S / T button to select the items, and then press W / X button to
select the setting.
MANUAL
CHANNEL 1
COLOR SYSTEM AUTO
SOUND SYSTEM
SEARCH
FINE TUNING
STORE
UTO
55
25
CHANNEL: choose channels by pressing W / X.
COLOR SYSTEM: choose [AUTO], [PAL], [SECAM] by pressing W / X.
SOUND SYSTEM: choose [AUTO], [B/G], [D/K], [L], [I], [L’] by pressing
W / X.
Deutsch
Español
Nederlands
31
Page 35

SEARCH: press X to search receivable channels by pressing W / X.
FINE TUNING: indicate searching programs by pressing W / X.
STORE: store the found channel by pressing W / X.
3. After searching, press S / T button to select Store, and then press
MENU button to store the searched channel.
4. Press EXIT/INFO button to exit from the menu.
PROGRAM:
Program List is used to display the Program numbers and names. You can
use this list to edit the name, delete, or insert programs.
1. Select channel by pressing the S / T or W / X buttons. Selecting the
program list will display the stored program on the screen.
2. A highlighted gray bar appears on the chosen program. Press the red
button (NAME).
3. Press the S / T buttons to edit name of channel and W / X to move to
next letter.
4. Press the red button (STORE) when you have completed editing. This will
store the program name..
Note: When the channel number changes, the TV channel shown on screen stores the
program.
5. Choose a program and press the green button (INSERT), the program is
highlighted by red bar.
6. Press S / T to select a program you would like to switch with the
highlighted program.
7. Press the green button to store.
8. Choose a program, then press the yellow button (DELETE).
32
Page 36

K
The program is highlighted by a red bar, and then press yellow button
again to erase. To cancel, press blue button.
PROGRAM
00 _ _ _ _ _
01 _ _ _ _ _
02 _ _ _ _ _
03 _ _ _ _ _
04 _ _ _ _ _
05 _ _ _ _ _
06 _ _ _ _ _
07 _ _ _ _ _
08 _ _ _ _ _
09 _ _ _ _ _
NAME
DELETE
10 _ _ _ _ _
11 _ _ _ _ _
12 _ _ _ _ _
13 _ _ _ _ _
14 _ _ _ _ _
15 _ _ _ _ _
16 _ _ _ _ _
17 _ _ _ _ _
18 _ _ _ _ _
19 _ _ _ _ _
20 _ _ _ _ _
21 _ _ _ _ _
22 _ _ _ _ _
23 _ _ _ _ _
24 _ _ _ _ _
25 _ _ _ _ _
26 _ _ _ _ _
27 _ _ _ _ _
28 _ _ _ _ _
29 _ _ _ _ _
INSERT
English Français
Italiano
CHILD LOCK:
1. Press the MENU button to display TV CHANNEL from the main menu.
2. Press the S / T buttons to select CHILD LOCK option.
3. Press the W / X buttons to enable / disable the function key of front cover.
[ON]: Function key is locked.
[OFF]: Function key is active.
COUNTRY U
A. P. S
MANUAL
PROGRAM
CHILD LOCK OFF
TV CHANNEL
Deutsch
Español
Nederlands
MOVE SELECT EXIT
33
EXIT
Page 37

FUNCTION
1. Press the MENU button to display FUNCTION from the main menu.
2. Press the S / T button to move to one of the sub-menu options.
3. Press the W / X button to select the settings.
4. Press the EXIT/INFO button to return to the previous screen.
FUNCTION
MULTI MODE OFF
PIP FUNCTION
LANGUAGE ENGLISH
SCART2 OUTPUT TV
RECALL
SELECT MOVE EXIT
EXIT
MULTI MODE:
1. Press the T button to select MULTI MODE option.
2. Press the W / X button to select the [OFF], [PIP], [POP] mode.
MULTI MODE OFF
PIP FUNCTION
LANGUAGE ENGLISH
SCART2 OUTPUT TV
RECALL
FUNCTION
MOVE SELECT EXIT
34
EXIT
Page 38

[OFF]:Only show the primary source.(No PIP/POP)
[PIP] :Show PIP in a window.
[POP] :Show PIP side by side with the main source.
English Français
Italiano
3. Press the EXIT/INFO button to return to the previous screen.
Deutsch
Español
Nederlands
35
Page 39

PIP FUNCTION:
1. Press the T button to select PIP FUNCTION option.
MULTI MODE PIP
PIP FUNCTION
LANGUAGE ENGLISH
SCART2 OUTPUT TV
RECALL
FUNCTION
MAIN:TV SUB:OFF
MOVE SELECT EXIT
EXIT
2. Press the X button to enter PIP FUNCTION sub-menu.
SUB SOURCE HDMI
SIZE SMALL
H - POSITION
V - POSITION
SWAP
FUNCTION
MAIN:TV SUB:HDMI
MOVE SELECT EXIT
3. Press the S / T button to move to one of the sub-menu items.
4. Press the W / X button to select the settings.
36
EXIT
Page 40

SUB SOURCE: You can select a second source [HDMI],[DVI],[AV],[SV],
[SCART 1], [SCART 2], [SCART 2S], [YPbPr], [PC], as sub-window.
SIZE: Three different PIP sizes. [SMALL], [MIDDLE], [LARGE].
H-POSITION / V-POSITION: Pressing the W / X button can make PIP
window move from corner to corner on the TV screen.
SWAP: To exchange the display of main source and sub-source.
Sub
Main
PC X X X X O O O O O O
HDMI X X X X O O O O O O
DVI X X X X O O O O O O
YPbPr X X X X O O O O O O
PC HDMI DVI YPbPr SV AV TV SCART 1 SCART 2 SCART 2S
English Français
Italiano
Deutsch
SV O O O O X O O O O O
AV O O O O O X O O O O
TV O O O O O O X O O O
SCART 1 O O O O O O O X O O
SCART 2 O O O O O O O O X O
SCART 2S O O O O O O O O O X
Español
Nederlands
37
Page 41

LANGUAGE:
1. Press the T button to select MULTI MODE option.
2. Choose a language. [ENGLISH], [DEUTSCH], [NEDERLANDS],
[ITALIANO], [CASTELLANO], [FRANCAIS], [DANSK], [NORSK],
[SVENSKA], [SUOMI]
MULTI MODE OFF
PIP FUNCTION
LANGUAGE ENGLISH
SCART2 OUTPUT TV
RECALL
FUNCTION
MAIN:TV SUB:OFF
MOVE SELECT EXIT
EXIT
SCART 2 OUTPUT: choose the output. [SCART 1] or [TV].
RECALL: Reset to factory settings.
38
Page 42

PC MENU
1. Press the MENU button to display PC from the main menu.
2. Press the S / T button to move to one of the sub-menu options.
3. Press the W / X button to select the settings.
4. Press the EXIT/INFO button to return to the previous screen.
CONTRAST
BRIGHTNESS
BACKLIGHT
H-POSITION
V-POSITION
CLOCK
PHASE
COLOR MODE
MAIN:PC SUB:OFF
SELECT MOVE EXIT
EXIT
PC
CONTRAST: Increase and decrease picture contrast
BRIGHTNESS: Darker and brighter picture brightness
English Français
Italiano
Deutsch
BACKLIGHT: Adjust the back light level of screen
H POSITION: Adjust picture horizontal position.
Note:Not available in HDMI / DVI source.
V POSITION: Adjust picture vertical position.
Note: Not available in HDMI / DVI source.
CLOCK: Adjust picture width.
Note: Not available in HDMI / DVI source.
PHASE: Adjust picture focus quality.
Note: Not available in HDMI / DVI source.
Español
Nederlands
39
Page 43

COLOR MODE :
1. Press the S / T buttons to select COLOR MODE option, and then press
the X button to enter the COLOR TEMP. sub-menu.
CONTRAST
BRIGHTNESS
BACKLIGHT
H-POSITION
V-POSITION
CLOCK
PHASE
COLOR MODE
MAIN:PC SUB:OFF
MOVE SELECT EXIT
EXIT
PC
2. Press the X button to choose the color of picture mode. [NORMAL],
[WARM], [COOL], [MANUAL].
COLOR TEMP. MANUAL
USER – R
USER – G
USER – B
PC
MAIN:PC SUB:OFF
MOVE SELECT EXIT
3. Press S / T buttons to move USER-R/G/B and then press the X button
to enter the desired setting.
USER-R: adjust color of red rate.
USER-G: adjust color of green rate.
USER-B: adjust color of blue rate.
40
EXIT
Page 44

COLOR TEMP. MANUAL
USER – R
USER – G
USER – B
PC
MAIN:PC SUB:OFF
MOVE SELECT EXIT
EXIT
AUTO: Automatically adjust picture. Press the X button to adjust picture
position automatically. Screen will disappear until it has completed
adjustment.
English Français
Italiano
Deutsch
PC
CONTRAST
BRIGHTNESS
BACKLIGHT
H-POSITION
V-POSITION
CLOCK
PHASE
COLOR MODE
AUTO
MAIN:PC SUB:OFF
MOVE SELECT EXIT
EXIT
Español
Nederlands
41
Page 45

NICAM/IGR BROADCAST SELECTION
Depending on the particular program being broadcast, you can
press the SOUND button to listen to different language
sources.
Under different systems, broadcast function will show differently.
Ⅰ: sends the primary broadcast language to the loudspeakers.
Ⅱ: sends the secondary broadcast language to the loudspeakers.
: sends mono sound
: sends stereo sound
NICAM System
Stereo
Digital
Two Carrier System
Dual
Mono
O
O
Ⅰ
Ⅱ
O
Ⅰ
Stereo
O
O
Analog
Dual
Ⅰ
Ⅱ
Mono O
42
Page 46

99..TTEELLEETTEEXXTT
Teletext is a free service broadcast by some TV stations (dependant upon
country) which gives up-to-the-minute information, news, weather, television
programs, share prices, subtitles, and many other topics.
Note : No OSD adjustment apart from volume control will be available in
teletext mode .
In teletext mode, NUMBER buttons, W / X and RTN buttons are
used for Teletext function.
To operate TELETEXT
* Select a TV station on which Teletext is being transmitted.
* Press the
-Two page numbers, TV station name, date, and time are displayed on the
screen headline. The first page number indicates your selection, while the second
shows the current page being displayed.
TELETEXT button once to make the Teletext screen appear
English Français
Italiano
* Press the
program will reappear.
TELETEXT button again to switch off Teletext. The previous
Teletext Page Selection
1. Enter the required Teletext page as a three digit number.
-The selected page number is displayed at the top left corner of the screen. The
Teletext page counter searches until the selected page number is located, so that
the desired page is displayed on the screen.
2. The
3. Fastext movement by the 4 coloured buttons.
S / T button can be used to select the preceding or following
page.
-Four subject-heading pages can be selected quickly by pressing the
corresponding coloured button Red, Green, Yellow, or Blue on the remote
control handset.
Deutsch
Español
Nederlands
43
Page 47

Useful features for Teletext
INDEX
* Press this button to select the index page that displays the list of Teletext contents.
HOLD
The teletext page you have selected may contain more information than what is on
the screen ; the rest of the information will be displayed after a period of time on a
sub-page.
* Press HOLD button to stop the automatic page change.
-The HOLD symbol will be displayed at the top left-hand corner on the screen and
the automatic page change will be stopped.
* Press HOLD button again to continue.
UPDATE
In the Teletext mode, pressing UPDATE button will switch the screen to the TV mode
while waiting for the next text page.
* Select required page number in Teletext mode.
* Press UPDATE button to switch to TV mode while waiting for the text page. A small
blue box in which “---“ shows appears in the upper left corner .
* When the required text page is found, the required page number appears in the
blue box.
* Press UPDATE button again to revert to Teletext mode.
REVEAL
* Press this button once to display concealed information, such as solutions of riddles,
puzzles, or a quiz.
* Press this button again to conceal the revealed answers.
EXPAND
Select double height text.
* Press this button to enlarge the top half of the page.
* Press this button again to enlarge the bottom half of the page.
* Press this button once more to return to the normal display.
TIME
* While watching a TV program with Teletext transmission press TIME button. The
current time information will be displayed on the upper right corner of the screen.
* The time information will disappear after pressing TIME button again.
44
Page 48

O
1100..O
1. - ARC - Aspect Ratio Control (Modes available are dependant upon the
*
*
*
*
*
TTHHEERR
FULL:
screen. There will be distortion at the centre of the screen as well as the edges.
NORMAL:
will be black bars at either side of the screen.
PANORAMIC:
the image at the edges of the screen. This creates less distortion at the
centre of the screen.
ZOOM 1:
The 14:9 zoom function extends the height to fill the screen.
ZOOM 2 :
little for the subtitle purpose.
This mode expands the width of 4:3 video sources evenly to fill the 16:9
F
UUNNCCTTIIOONNS
F
current source)
This sets the aspect ratio to 4:3 for traditional TV programs. There
Expands 4:3 video sources to fit the 16:9 screen by expanding
Some DVD movies may not fill the top and bottom of the screen.
Same as”16:9 ZOOM”, but the button edge of the screen pulls up a
S
English Français
Italiano
(In PC mode , only have FULL and NORMAL)
APC - Automatic Picture Control
2. –
Press APC button on the remote control repeatedly to cycle through the APC
settings. This is to adjust the brightness and contrast of screen.
* Movie: the contrast is around 0.51 times of standard mode.
* Manual: default brightness is around 0.91 times that of standard mode, and
adjustment is available.
* Standard: the standard settings for the best picture.
* Bright: the contrast is around 1.37 times that of standard mode.
Deutsch
Español
Nederlands
45
Page 49

T
1111..T
RROOUUBBLLEESSHHOOOOTTIINNG
G
Many times, problems have simple causes. We would like to give you some
tips to solve some common problems. Should these tips not help, please
contact your dealer.
There is no picture and sound.
z Make sure the power cord is properly connected.
z Make sure the input mode is set correctly.
z Make sure the main power switch of the main unit is on.
There is no picture.
z Make sure the Contrast/Brightness is properly adjusted.
z Make sure all external devices are connected properly.
There is no sound.
z Make sure the volume is not set to minimum .
z Make sure the sound is not set to mute.
There is no picture or sound, just noise.
z The reception may be weak.
z Make sure the aerial is not disconnected.
Picture is not clear.
z The reception may be weak.
z Make sure the aerial is not disconnected.
Picture is too bright.
z Check the APC function setting.
z Check Contrast/Brightness adjustment.
The picture is too dark.
z Check the APC function setting.
z Check Contrast/Brightness adjustment.
46
Page 50

Remote control does not work.
z Check the batteries in the remote control are not flat.
z Make sure the sensor window of TV set is not under strong lighting.
The picture is not sharp.
z Check the colour adjustment.
z Check the Sharpness adjustment.
The picture is jittery.
z Make sure the TV set isn’t near Microwave Oven or other equipment.
The picture has double or triple image.
z Make sure the aerial is facing the right direction.
z There may be reflected signals from mountains or buildings.
The picture is spotty.
z There may be interference from automobiles,trains, high voltage lines, neon light, etc.
There are stripes on the screen or colours fade.
z Is the unit receiving interference from other devices?
Transmission of radio broadcasting station and transmission of amateur radio and cellular
phones may also cause interference.
z Place the unit as far apart as possible from devices that may cause possible interference.
English Français
Italiano
Deutsch
Español
47
Nederlands
Page 51

C
I
1122..PPC
No.
Mode
Name
1 VGA 640 * 480 31.469 59.940 - - 25.175
2 VGA 640 * 480 37.500 75.000 - - 31.500
3
TEXT
4 STB 768 * 576 31.250 50.000 - - 29.750
5 SVGA 800 * 600 37.879 60.300 + + 40.000
I
US
NNPPUUTT
H-Resolution
V-Resolution
P
RREESSEETT
P
720 * 400 31.472 70.100 - + 28.325
T
IIMMIINNGG
T
Analog Input
H.Freq.
(KHz)
V.Freq.
(Hz)
T
AABBLLE
T
E
H.
Polarity
Polarity
V.
Pixel CLK
(MHz)
6 SVGA 800 * 600 46.875 75.000 + + 49.500
7 XGA 1024 * 768 48.363 60.000 - - 65.000
8 XGA 1024 * 768 56.476 70.000 - - 75.000
9 WSGA 1280 * 768 47.708 60.000 + - 80.150
10 WXGA 1366 * 768 48.54 59.93 + + 80
11 UXGA 1920 * 1080 66.587 59.934 + - 138.50
* The resolution and frequencies displayed on the screen may not exactly
match this list.
48
Page 52

S
1133..S
PPEECCIIFFIICCAATTIIOONNS
S
ITEMS SPECIFICATION
Screen Size 42″ TFT-LCD Panel
Aspect Ratio 16:9
Resolution 1920 x 1080
Display Area (Opening) 930.24 mm x 523.26 mm
Panel
Display colors 16,7M colors (8 bits)
Contrast Ratio 1000 : 1 (typ.)
Brightness (center) 550 cd / m2 (typ.)
Viewing Angle (CR>10) 176o (Hor.) / 176
Response Time (GTG) 6.5 ms (typ.)
Broadcasting System PAL / SECAM
o
( Ver.)
English Français
Italiano
TV Function
Video Input
PC Input
Receiving Channel B / G, D / K, I and L / L’ (Multi-Europe)
Sound System NICAM / A2 (IGR)
Data Broadcasting
Video Colour System PAL / SECAM / NTSC
AV1 (scart) 21-pin SCART (RGB / CVBS / SVHS) x 2
AV2 (composite)
AV3 (component) Y Pb Pr (720p / 1080p , HDTV ready) x 1
AV4 (HDMI) HDMI 19 pin
DVI / HDCP Connection DVI-D 24 pin x 1 (DVI 1.0 / HDCP 1.1)
VGA Connection D-Sub 15 pin x 1
Scanning Frequency f
Teletext 255 pages
Auto Program Searching (APS)
Composite (RCA jack) x 1
S-Video
x 1 (HDMI 1.0/HDCP 1.1)
= 31.5 ~ 75KHz / fV = 56 ~ 75Hz
H
x 1
Deutsch
Español
Nederlands
49
Page 53

ITEMS SPECIFICATION
Audio 1 Scart x 2
Audio Input
Video
Output
Audio
Output
Audio 2
Audio 3 Component x 1
Audio 4 PC x 1
SCART 1 TV x 1
SCART 2 TV / CVBS (SCART 1) x 1
Composite(RCA
jack)
Speaker ( build-in)
Line Out Left / Right / Subwoofer
S/P DIF HDMI loop through
OSD Language
Function Keys
Composite x 1
S – Video x 1
TV x 1
15W+15W (rms) @ THD < 10%
(10W+10W @ THD < 1%)
English, French, German, Spanish, Italian,
Finnish, Swedish, Dutch, Danish, Norwegian
Power, Source, Menu, Up/Down(Channel),
+/-(Volume), ARC/EXIT
Feature
Video Performance
Audio Performance Equalizer, Subwoofer, Auto Volume Control (AVC)
Other Control Sleep Timer, Auto Power Off
Power Supply AC 100V ~ 240V , 50 / 60Hz
Power
Power Consumption 300 W
Dimension W x H x D 1067mm × 815mm × 270 mm
Weight (net) Without Accessories 36.1kg
3D Comb-filter, 3D De-interlace , Canal Plus, Teletext,
Aspect Ratio Control (ARC) ,Auto Picture Control
(APC), Video Enhance,Noise Reduction, Picture in
Picture (PIP), Picture on Picture (POP)
50
Page 54

Contenu:
CONTENU: ................................................................................................... I
1.SÉCURITÉ ET PRÉCAUTIONS ............................................................... 1
Sécurité de mise en oeuvre ...................................................................1
Réparations............................................................................................ 2
Remarques pour les Ingénieurs de maintenance ......................... 2
Conseils d'utilisation........................................................... 3
Conditions environnementales............................................... 3
Connexion ...................................................................... 4
Précautions ............................................................................................5
Importantes instructions complémentaires de sécurité.......................... 5
2.INTRODUCTION....................................................................................... 6
Réparation.............................................................................................. 6
Performances et Caractéristiques.......................................................... 6
Equipements Inclus................................................................................ 8
3. CONNEXIONS DES APPAREILS EXTERNES ...................................... 9
4. LES CONTROLES ET LEUR EMPLACEMENT ................................... 10
English Français
Italiano
Deutsch
5. LA TELECOMMANDE........................................................................... 11
6. RESUME DES BOUTONS DE LA TELECOMMANDE......................... 12
7. CONNEXIONS ET APPLICATIONS...................................................... 13
8. CONTROLES GENERAUX ET REGLAGES ........................................ 19
allumer et éteindre l'affichage LCD ...................................................... 19
Contrôle du volume sonore.................................................................. 19
Régler la minuterie de la mise en veille ............................................... 19
Basculer entre les modes PC / HDMI / VIDEO / TV / SCART ............. 20
Visualisation des menus et de l'affichage sur l'écran........................... 21
Réglage de l’image ..............................................................................22
Réglages de son .................................................................................. 25
TV-Canal .............................................................................................. 29
TV-Canal .............................................................................................. 30
Fonction................................................................................................ 33
Español
Nederlands
i
Page 55

Fonction................................................................................................ 34
menu PC ..............................................................................................39
Sélection de la diffusion NICAM/IGR ................................................... 42
9. TELETEXTE........................................................................................... 43
10.AUTRES FONCTIONS ......................................................................... 45
11. RISOLUZIONE DEI PROBLEMI.......................................................... 46
12. TABLEAU DE FREQUENCES PREDEFINIES POUR ENTREE PC.. 48
13. SPECIFICATIONS ............................................................................... 49
ii
Page 56

S
11..S
Veuillez lire attentivement cette section et suivre les instructions afin
d'optimiser le fonctionnement et la durée de vie de votre écran LCD.
Conservez toujours ces instructions à portée de main et près de votre écran
LCD. Conservez les instructions et l'emballage de sorte que si vous revendez
ou donnez votre écran LCD vous pourrez les communiquer à son nouveau
propriétaire.
ÉÉCCUURRIITTÉÉ EETT PPRRÉÉCCAAUUTTIIOONNS
S
SECURITE DE MISE EN OEUVRE
• Ne jamais ouvrir le logement de l'écran LCD ou de
l'unité d'alimentation électrique ! Lorsque le logement est
• N'insérez aucun objet dans les orifices et ouvertures de l'écran LCD. Cela
risque de causer un court-circuit, voire un incendie, et d'endommager votre
écran LCD.
• Ne pas laisser les enfants jouer sans surveillance avec du matériel
électrique. Les enfants ne sont pas toujours capables d'identifier
correctement le danger.
ouvert, il y a un danger d'électrocution !
• Les orifices et ouvertures de l'écran LCD sont prévus pour
sa ventilation. Ne pas couvrir ces ouvertures, car cela
risquerait de provoquer une surchauffe.
English Français
Italiano
Deutsch
• Cet écran LCD est prévu seulement pour un usage personnel. Il n'est
pas destiné à une utilisation commerciale dans un environnement
industriel exigeant.
• Il y a risque d'accident si l'écran se casse. Portez des gants de
protection pour récupérer les éléments cassés, et envoyez-les à votre
centre de maintenance pour une mise au rebut adéquate. Ensuite,
lavez-vous les mains avec du savon, car il est possible que des produits
chimiques se soient échappés.
• Ne jamais exercer de pression sur l'écran. Cela risquerait de casser
l'écran LCD.
• Ne pas toucher l'écran directement avec vos doigts ou avec des objets
pointus de façon à éviter de l'endommager.
1
Español
Nederlands
Page 57

Dans l'un quelconque des cas suivants, appelez directement le Centre
d'appel. Ne branchez pas, n'allumez pas votre écran :
♦ si le cordon d'alimentation/alimentation électrique surchauffe ou a été
endommagé(e)
♦ si du liquide a coulé dans l'écran LCD
♦ si l'écran LCD est tombé ou si son logement a été endommagé
REPARATIONS
• Faites faire toutes les réparations de votre écran LCD par du
personnel agrée et qualifié exclusivement.
• Si une réparation est nécessaire, veuillez prendre contact avec l'un de
nos partenaires de maintenance agréés exclusivement.
REMARQUES POUR LES INGENIEURS DE MAINTENANCE
• Avant d'ouvrir le logement, déconnectez le produit de toutes les sources
d'alimentation et débranchez tous les câbles de connexion éventuels. Si
l'écran n'est pas débranché de la prise électrique avant d'être ouvert, il y a
risque de décès par électrocution. Il y a également un risque d'endommager
les composants.
• Les composants internes de l'écran LCD peuvent être endommagés par les
décharges électrostatiques(ESD). Effectuez les réparations dans un atelier
avec protection ESD. Si vous n'avez pas d'atelier de ce type disponible,
portez un bracelet antistatique ou touchez un objet en métal très conducteur.
Nous pouvons réparer les dommages causés par une manutention
inappropriée contre le paiement de frais.
• Utilisez exclusivement des pièces détachées d'origine.
2
Page 58

CONSEILS D'UTILISATION
• Gardez votre écran LCD et toutes les unités qui y sont connectées à l'abri
de l'humidité et évitez poussière, chaleur et exposition directe au
soleil. Le non-respect de ces instructions risque de donner lieu à des
dysfonctionnements ou d’endommager l'écran LCD.
• Placez et utilisez toutes les unités sur une surface stable, plane et
sans vibration afin d'éviter que l'écran LCD ne tombe.
CONDITIONS ENVIRONNEMENTALES
• L'écran LCD peut fonctionner de façon très stable à une température
ambiante comprise entre 5°C et 35°C (entre +41°F et +95°F) et à une
humidité relative entre le 20% et 85% (sans condensation).
• Lorsque qu'il est mis hors tension, l'écran LCD peut être stocké sans
problème entre -20°C et +60°C (-4°F à +140°F), jusqu'à une altitude
maximum de 12.000m (39.000 pieds) par rapport au niveau de la mer, à
une humidité relative comprise entre 10% et 85% (sans condensation).
English Français
Italiano
• Après avoir déplacé votre écran LCD veuillez attendre le temps de
prendre la température ambiante avant de le brancher et de mettre
sous tension. Des variations extrêmes de température ou d'humidité
risquent de provoquer de la condensation à l'intérieur de l'écran LCD,
ce qui pourrait causer un court-circuit.
Deutsch
Español
Nederlands
3
Page 59

CONNEXION
Suivez les instructions ci-dessous pour connecter votre écran LCD de façon
correcte:
ALIMENTATION ÉLECTRIQUE
• Ne pas ouvrir le logement de l'alimentation électrique. Un
logement ouvert fait courir un risque de décès par
électrocution. Il n'y a pas à l'intérieur de pièces susceptibles
• Utilisez votre écran LCD exclusivement avec des prises reliées à la terre de type
100-240V CA~/ 50-60 Hz. Si vous n'êtes pas sûr du type d'alimentation électrique
fourni dans votre région, vérifiez auprès de votre compagnie d'électricité.
• Utilisez exclusivement l'unité d'alimentation et le câble d'alimentation fournis.
• Pour plus de sécurité, nous recommandons l'utilisation d'un dispositif de
protection contre les surtensions afin de protéger votre écran LCD contre les
dommages pouvant résulter des surtensions ou de la foudre.
d'être nettoyées ou réparées.
• Pour déconnecter l'écran LCD de l'alimentation électrique, déconnectez la
fiche de la prise du secteur.
• La prise électrique doit se trouver à proximité de l'écran LCD et à portée des
câbles d'alimentation. Ne pas tendre les câbles d'alimentation trop fort
pour atteindre une prise électrique.
• Vous devez disposer les câbles de l'écran LCD de telle sorte que personne
ne risque de trébucher dessus ou de les piétiner.
• Afin d'éviter d'endommager le câble ne placer aucun objet ou meuble sur
le câble.
• Vous pouvez ajuster votre écran LCD au maximum à environ 5° vers le bas
et au maximum à 20° vers le haut. Si vous tentez d'ajuster de force l'écran
plus loin, vous risquez d'endommager votre écran.
4
Page 60

PRECAUTIONS
 Attention ! Il n'y a pas de pièces susceptibles d'êtres
réparées ou nettoyées à l'intérieur du logement de l'écran
LCD.
Vous pouvez augmenter la durée de vie de votre écran LCD en prenant les
précautions suivantes :
• Avant le nettoyage débranchez toujours le cordon d'alimentation
et tous les câbles de connexion.
• N'utilisez aucun solvant, agent de nettoyage caustique ou gazeux.
• Essuyez l'écran avec un chiffon doux et non pelucheux.
• Assurez-vous qu'il ne reste pas de gouttes d'eau sur l'écran. L'eau
risque de causer une décoloration définitive.
• Ne pas exposer l'écran à la lumière directe du soleil ou au
rayonnement ultraviolet.
IMPORTANTES INSTRUCTIONS COMPLEMENTAIRES DE
SECURITE
Lorsque vous utilisez un équipement électronique quelconque, des précautions de
sécurité de base doivent toujours être prises. En suivant les consignes ci-dessous,
vous pourrez réduire les risques d'incendie, d'électrocution ou d'accidents aux
personnes :
English Français
Italiano
Deutsch
Español
• Ne pas utiliser l'appareil près de l'eau (p.ex. près d'une baignoire, d'un
lavabo, d'un évier de cuisine ou d'un bac à linge, dans une cave humide ou
près d'une piscine.
• Evitez d'utiliser un téléphone ou un modem (autre qu'un téléphone sans fil)
pendant une tempête électrique. La foudre fait courir un léger risque
d'électrocution.
• Ne pas utiliser le téléphone pour signaler une fuite de gaz dans le voisinage
immédiat de cette fuite.
• Utilisez exclusivement le cordon d'alimentation indiqué dans le présent
manuel. Ne pas jeter les piles au feu. Elles risquent d'exploser. Vérifiez si la
réglementation locale ne prévoit pas des dspositions spéciales pour leur
mise au rebut.
• Conservez les piles hors de portée des enfants à tout moment.
5
Nederlands
Page 61

I
NNTTRROODDUUCCTTIIOONN
22..I
Merci d'avoir choisi notre écran LCD multimédia. Nous vous remercions de la
confiance que vous accordez à nos produits, et nous sommes très honorés
de vous compter parmi nos nouveaux clients.
Nous avons mis l'accent sur les fonctions, la facilité d'utilisation et la fiabilité
lorsque nous avons fabriqué votre écran LCD.
REPARATION
Votre écran est livré avec une garantie limitée d'un an et un numéro gratuit
pour l'assistance clientèle. Veuillez vous reporter à la carte de garantie
limitée qui accompagne votre écran pour les détails.
Le présent manuel contient un chapitre distinct consacré au Dépannage à la
page 46.
PERFORMANCES ET CARACTERISTIQUES
Les avantages par rapport aux écrans CRT (cathode ray tube : tube
cathodique) :
¾ Moins d'encombrement
¾ Un poids inférieur
¾ Economie d'énergie
6
Page 62

Fonctionnalités supplémentaires
¾ Les terminaux de connexion incluent RF IN , D-SUB, HDMI, DVI,
SCART 1, SCART 2, Composite et Entrée Vidéo/S-Vidéo.
¾ Une télécommande facile d'usage et un menu OSD (affichage sur l'écran).
¾ Une fonctionnalité IDI (image dans l’image) et un découpage d’écran.
¾ Les modes de format de l'image incluent Complet, Panoramique, Normal,
Zoom 1, Zoom 2.
¾ Les réglages CAI (contrôle automatique de l'image) incluent Film,
Luminosité, Manuel et Standard.
¾ Une fonctionnalité RAP (recherche automatique de programmes) pour
un réglage des canaux TV automatique.
¾ Fonction télétexte disponible.
English Français
¾ Fonction de verrouillage pour les enfants disponibles.
¾ Haut-parleurs double canal intégrés.
¾ Décodeur sonore intégré NICAM/IGR pour une écoute stéréo et
bilingue.
¾ Minuterie d'extinction de 10 à 120 minutes, avec des agréments de 10
minutes.
¾ Après 10 minutes sans réception d'un signal, l'unité active l'extinction
automatique.
¾ Fourni avec une entrée vidéo composite pour un contenu en haute -
définition. (Remarque : un boîtier de réglage pour haute-définition sera
nécessaire pour visualiser les contenus haute-définition en diffusion libre)
¾ Avec entrée vidéo composant pour TV HD (compatible TV HD), résolution
jusqu'à 720p, 1080i , 1080p .
¾ 6 modes égaliseurs disponibles
Italiano
Deutsch
Español
Nederlands
7
Page 63

EQUIPEMENTS INCLUS
Veuillez vérifier que vous avez reçu tous les éléments suivants avec votre
unité LCD.
TV LCD
GUIDE DE
L’UTILISATEUR
Guide de l’utilisateur
Télécommande et
Piles (AAA X2)
Cordon d'alimentation
8
Page 64

.
C
33.
OONNNNEEXXIIOONNSS DDEESS AAPPPPAARREEIILLSS EEXXTTEERRNNEES
C
Interface I
HDMI
DVI
D-SUB
. AUDIO
ENT
RF IN
TV ANALOG. TV
SCART 1 SCART 2 L1 R1 L2 R2
SV
ENT. SCART ENT. VIDÉO Vidéo & Audio OUT
Remarque : Sortie Audio G/D
Le niveau de la sortie audio ne peut pas être modifié en utilisant le contrôle de
volume présent sur votre affichage. Ce branchement doit être utilisé avec un
amplificateur audio externe qui peut être utilisé pour contrôler le volume.
PRISE
D’ALIMENTATION
Interface II BOITIER VIDEO
ENT. AUDIO
S/PDIF
AV Y Pb Pr AV L R
S
Caisson de basse
English Français
Italiano
Deutsch
Español
Nederlands
9
Page 65

ARC/
V
44.
.
L
EESS CCOONNTTRROOLLEESS EETT LLEEUURR EEMMPPLLAACCEEMMEENNT
L
T
Allumage de l’écran LCD
Branchez le câble d’alimentation dans la prise entrée CA située sur le côté
gauche, à l’arrière du téléviseur à écran LCD. Branchez l’autre extrémité
dans une prise électrique.
Appuyez sur le bouton de mise en marche situé sur la télécommande ou sur
le côté droit du téléviseur pour allumer ce dernier.
Touches de fonction
Ces boutons contrôlent les fonctionnalités de
base de votre unité LCD, y compris le menu sur l'écran. Pour utiliser les
fonctionnalités avancées, vous devez utiliser la télécommande.
POWER(ALIMENTATION) : allume ou éteint l'unité LCD.
SOURCE : sélectionne une source d'entrée (PC, HDMI, DVI,TV,
AV, SV, YPbPr, SCART 1, SCART 2, SCART 2S).
MENU : affiche le menu principal.
CANAL (BAS/HAUT) : change de canal.
VOLUME (-/+) : augmente ou diminue le volume sonore.
ARC / EXIT
(ARC/QUITTER)
: Configuration du taux d'aspect de l'affichage
(sourceTV/Vidéo: Panorama, Normal, Plein, Zoom1,
Zoom2 ; source PC/DVI : Complet, Normal) ou comme
fonction quitter si le menu OSD apparaît.
Espace capteur télécommande
Indicateur d’alim.
EXIT
+
_
OLUME
CANAL
MENU
SOURCE
POWER
Indicateur d’alim. :
De couleur verte quand
l’appareil est en
marche et de couleur
ambre en mode
attente. De couleur
rouge lorsque éteint.
Espace capteur
télécommande :
capteur qui reçoit les
signaux de la
télécommande.
10
Page 66

55.
.
L
AA TTEELLEECCOOMMMMAANNDDE
L
E
English Français
Italiano
PC HDMI DVI
AV → SV → YPbPr
SCART 2S
Deutsch
Español
Nederlands
11
Page 67

.
R
66.
CCoonnttrrôôllee ddee ll''aalliimmeennttaattiioonn
Bouton POWER (ALIMENTATION) Allume au éteint le téléviseur
Sélection de la source du signal primaire
Bouton TV Bascule en mode TV
Bouton PC / HD Bascule en mode PC et HDMI et DVI
Bouton VIDEO Bascule en mode AV / S-Vidéo et YPbPr mode
SCART Bascule en mode SCART 1 / SCART 2 et SCART 2S
Menu paramétrage
Bouton MENU Affiche le menu à l'écran
EXIT(QUITTER) Quitte un menu ou un sous-menu
△ / ▽ / ◁ / ▷ Accède aux éléments du menu
Changement des canaux TV
Bouton CH(CANAL) △/▽ Appuyez sur Haut/Bas pour changer de canal
Bouton 0~9 ; +100 Pour sélectionner manuellement un canal
Bouton RTN(RETOUR) Revenir au canal précédemment visualisé
Contrôle du niveau sonore
Bouton VOL△/▽ Augmente/diminue le niveau sonore
Bouton MUTE (SILENCE) Coupe temporairement le niveau sonore
Bouton SOUND (SON) Appuyez pour choisir entre les diffusions Stéréo, Double et Mono.
Contrôle de l’IDI
Bouton PIP ON/OFF (PIP
MARCHE/ARRET)
Bouton △/▽ Sélectionne à la source d'entrée IDI :
Bouton SIZE (TAILLE) Bascule entre les tailles de fenêtres IDI : Petite / Moyenne / Grande
Bouton Audio/Video (Vidéo)
Bouton POSITION Déplace la position de la fenêtre IDI
Autres fonctionnalités
Bouton INFO Affiche le canal en cours /la source d'entrée/le format du signal.
Bouton CFI (contrôle du format de
l'image)
Bouton CAI (contrôle automatique de
l'image)
Bouton SLEEP (SOMMEIL) Défini une durée pré-réglée avant l'extinction automatique
Bouton FREEZE (IMMOBILE) Arrête temporairement l'image en cours
Contrôle du télétexte
TELETEXTE Active le service télétexte. Appuyer de nouveau pour revenir en
HOLD
INTERRUPTION
REVELER
ELARGIR]
SOUS-PAGE/HEURE
EESSUUMMEE DDEESS
R
INDEX
B
OOUUTTOONNSS DDEE LLAA
B
Active/désactive la fenêtre IDI
bascule entre les modes: IDI → POP → ARRÊT
PC→HDMI→DVI→AV→SV→SCART 1→SCART 2→SCART 2S
→YPbPr→PC
Bascule la source audio/vidéo entre l'affichage primaire et la
fenêtre IDI
En mode PC : Règle le format de l'image sur Complet, Aspect
remplis, Un pour Un.
En mode Vidéo : bascule le mode de l'image entre Normal →
Panoramique → Complet → Zoom1 → Zoom2
Bascule entre les modes de luminosité de l'écran : Standard, Film,
Lumineux et Manuel
visualisation TV.
Appuyez sur le bouton "INDEX" pour afficher la liste des contenus
télétexte.
Maintenez le bouton "HOLD" pour arrêter le changement de page
automatique
Appuyez sur le bouton "INTERRUPTION" pour revenir à TV durant
l’attente de la page télétexte suivante.
Appuyez sur le bouton "REVELER" pour afficher les informations
masquées, telles que les solutions aux questionnaires.
Appuyez sur le bouton "ELARGIR" pour élargir la moitié haute et
basse de la page télétexte.
Appuyez sur le bouton "SOUS-PAGE/HEURE" pour accéder à la
sous-page désirée
T
EELLEECCOOMMMMAANNDDE
T
E
12
Page 68

.
C
77.
OONNNNEEXXIIOONNSS EETT
C
APPAREIL VIDEO
(ex. Lecteur DVD Player)
VIDEO G D HDMI
Y Pb Pr G D
A
PPPPLLIICCAATTIIOONNS
A
Câble HDMI vers HDMI
S
English Français
Interface I
Italiano
HDMI
DVI
Deutsch
D-SUB
Español
PC
ENT.
AUDIO
Nederlands
13
Page 69

* Comment brancher un appareil vidéo via HDMI -
HDMI ?
Ceci peut être réalisé uniquement s'il existe un connecteur de sortie HDMI sur
l’appareil externe.
APPAREIL VIDEO
(ex. Lecteur DVD Player)
VIDEO G D HDMI
Câble HDMI vers HDMI
Y Pb Pr G D
Remarque : aucun connecteur sonore n'est nécessaire pour un branchement HDMI
vers HDMI.
Interface I
HDMI
DVI
D-SUB
ENT.
AUDIO
14
Page 70

* Comment brancher un appareil vidéo via HDCP -
HDCP ?
Ceci peut être réalisé uniquement s'il existe un connecteur de sortie HDCP (DVI)
sur l’appareil externe.
APPAREIL VIDEO
(ex. Lecteur DVD Player)
VIDEO G G DVI / HDCP
Interface I
1
Câble HDCP vers HDCP
ou
Câble DVI vers DVI
Y Pb Pr G D
2
1. Brancher un câble HDCP (DVI) entre le connecteur DVI sur le téléviseur et
le connecteur HDCP (DVI) sur le lecteur DVD / boîtier décodeur.
2. Brancher un câble audio entre la prise de Jack d’entrée PC AUDIO du
téléviseur et la prise Jack de sortie AUDIO du lecteur DVD / boîtier
décodeur.
HDMI
DVI
D-SUB
ENT.
AUDIO
English Français
Italiano
Deutsch
Español
Nederlands
15
Page 71

* Comment brancher un PC via DVI - DVI ?
Câble DVI vers DVI
PC
Câble AUDIO
1. Brancher un câble DVI entre le connecteur DVI du téléviseur et le
connecteur DVI du PC.
2. Brancher un tableau dur entre eux la prise Jack d’entrée AUDIO de la TV et
la prise Jack de sortie AUDIO du PC.
TV
HDMI
DVI
D-SUB
ENT.
AUDIO
16
Page 72

* Comment brancher un PC via D-SUB ?
Câble VGA
Câble AUDIO
PC
1. Brancher un câble VGA entre le connecteur D-SUB du téléviseur et le
connecteur D-SUB du PC.
2. Brancher un câble audio entre la prise Jack d’entrée PC AUDIO du
téléviseur et la prise Jack de sortie AUDIO du PC.
TV
HDMI
DVI
D-SUB
ENT.
AUDIO
English Français
Italiano
Deutsch
Español
Nederlands
17
Page 73

* Comment brancher un appareil vidéo via les câbles
habituels ?
SCART 1 SCART 2 G1 D1 G2 D2
SV
Ce TV accepte différentes entrées vidéo, si l’appareil vidéo a un connecteur de meilleure
qualité, veuillez connecter le meilleur. La séquence de qualité vidéo est Composant,
Péritel, S-vidéo, Vidéo de la meilleure qualité à celle qui est normale.
Interface II DECODEUR
AV Y Pb Pr AV G D
S/P DIF
Caisson
18
Page 74

.
88.
C
OONNTTRROOLLEESS GGEENNEERRAAUUXX EETT RREEGGLLAAGGEES
C
S
ALLUMER ET ETEINDRE L'AFFICHAGE LCD
1. Appuyer sur le bouton ALIMENTATION de la télécommande.
2. Vous pouvez également utiliser le bouton ALIMENTATION au bas du
panneau.
CONTROLE DU VOLUME SONORE
Utilisation du contrôle du volume
appuyez sur les boutons VOL▲ / VOL▼ pourront augmenter ou diminuer le
volume sonore.
L'utilisation de la fonctionnalité Silence
English Français
Italiano
A tout moment, l'utilisateur peut couper le son en appuyant sur le bouton
SILENCE
1. Appuyer sur le bouton SILENCE pour couper le son.
2. Appuyer sur le bouton SILENCE de nouveau ou sur les boutons VOL▲ /
VOL▼ pour écouter le son à son niveau précédent.
REGLER LA MINUTERIE DE LA MISE EN VEILLE
Vous pouvez régler la minuterie de mise en veille pour éteindre le téléviseur
automatiquement. La durée peut être établie entre ARRÊT et 120 minutes.
1. Appuyez sur le bouton SOMMEIL pour régler l'écran de la minuterie.
2. Appuyez sur le bouton SOMMEIL de manière répétée pour modifier la
durée de la minuterie (par intervalles de 10 minutes).
Deutsch
Español
Nederlands
19
Page 75

BASCULER ENTRE LES MODES PC / HDMI / VIDEO / TV /
SCART
1. Mettre l'appareil sous tension.
2. Choisissez une source d'entrée comme décrit ci-dessous :
TV Bouton pour basculer en mode TV.
PC/HD Bouton pour basculer en mode PC et HDMI et DVI(Analogique
ou Digital)
VIDEO Bouton pour basculer en mode AV / SV / YPBPR
(Composite, Y/C et signal composite)
SCART Bouton pour basculer en SCART 1, SCART 2, SCART 2S
Bouton source
20
Page 76

VISUALISATION DES MENUS ET DE L'AFFICHAGE SUR
L
'ECRAN
1. Une fois l'appareil en marche, appuyez sur le bouton MENU. Le menu
principal apparaît sur l'écran.
MODE IMAGE MANUEL
CONTRASTE
LUMIERE
RÉTROÉCLAIRAGE
TEINTE
COULEUR
NETTETE
MODE COULEUR
PRINCIPAL:TV SECONDAIRE:NON
SELECTIONNER DEPLACER QUITTER
REGLAGE DE L'IMAGE
EXIT
2. Utilisez les boutons W / X pour choisir une des options du menu puis
appuyez sur les boutons S / T pour accéder au sous-menu.
3. Appuyer sur les boutons W / X pour effectuer les réglages.
4. Appuyez sur le bouton EXIT/INFO pour quitter le menu.
Remarque : le menu varie en fonction de la source d'entrée sélectionnée.
English Français
Italiano
Deutsch
Español
21
Nederlands
Page 77

REGLAGE DE L’IMAGE
Il est possible que vous deviez réaliser des réglages séparés pour la
luminosité et le contraste des différents modes vidéo. Typiquement, le
mode PC fournira la meilleure visualisation avec un faible contraste et une
faible luminosité par rapport aux autres modes de visualisation.
1. Appuyez sur le bouton MENU pour afficher REGLAGE DE
l’IMAGE à partir du menu principal.
2. Appuyez sur le bouton S / T pour sélectionner l'élément désiré.
3. Appuyez sur les boutons W / X pour effectuer les réglages.
4. Appuyez sur le bouton EXIT/INFO pour revenir à l'écran précédent.
MODE IMAGE MANUEL
CONTRASTE
LUMIERE
RÉTROÉCLAIRAGE
TEINTE
COULEUR
NETTETE
MODE COULEUR
PRINCIPAL:TV SECONDAIRE: NON
DEPLACER SELECTIONNER QUITTER
REGLAGE DE L'IMAGE
EXIT
MODE IMAGE :
[MANUEL] : sélectionner ce mode si vous désirez régler
manuellement chaque paramètre. Les réglages ne sont effectifs que
pour ce mode.
[NORMAL] : réglages standards de l'image
[DOUX]: augmente le contraste et la netteté
[LUMINEUX]: affiche une image claire et lumineuse.
22
Page 78

REGLAGE DE L’IMAGE :
CONTRASTE : augmente et diminue le contraste de l'image
LUMIERE : augmente ou diminue la luminosité de l'image
RÉTROÉCLAIRAGE : règle le niveau du projecteur de fonds
d'écran
COULEUR : assombri ou éclairci les couleurs de l'image
NETTETE : augmente ou diminue la précision de l'image
MODE COULEUR :
1. Appuyez sur les boutons S / T pour sélectionner l'option MODE
COULEUR, puis appuyez sur le bouton X pour entrer dans le
sous-menu TEMP. COULEURS.
MODE IMAGE MANUEL
CONTRASTE
LUMIERE
RÉTROÉCLAIRAGE
TEINTE
COULEUR
NETTETE
MODE COULEUR
PRINCIPAL:TV SECONDAIRE: NON
DEPLACER SELECTIONNER QUITTER
REGLAGE DE L'IMAGE
EXIT
2. Appuyez sur le bouton X pour choisir le mode de couleur de l'image.
[NORMALE], [CHAUDE], [FROIDE], [MANUEL].
TEMP. COULEURS MANUEL
UTILIS.-R
UTILIS.-V
UTILIS.-B
REGLAGE DE L'IMAGE
English Français
Italiano
Deutsch
Español
Nederlands
PRINCIPAL:TV SECONDAIRE: NON
DEPLACER SELECTIONNER QUITTER
23
EXIT
Page 79

3. Appuyez sur les boutons S / T pour vous déplacer sur
USER-R/V/B puis appuyez sur le bouton X pour saisir le réglage
désiré.
USER-R : règle le niveau de rouge des couleurs.
USER-V : règle le niveau de vert des couleurs.
USER-B : règle le niveau de bleu des couleurs.
RAPPEL : l'utilisateur peut annuler les réglages de l'image et
revenir aux réglages d'origine.
24
Page 80

REGLAGES DE SON
1. Appuyez sur le bouton MENU pour afficher le REGLAGE DU SON à partir
du menu principal.
2. Appuyez sur les boutons S / T pour choisir une des options.
3. Appuyez sur les boutons W / X pour définir les réglages.
4. Appuyez sur le bouton EXIT/INFO pour revenir à l'écran précédent.
SOURCE PRINCIPAL
AVC OUI
MODE NON
ÉGALISEUR
GRAVES
AIGUS
BALANCE
REGLAGE DU SON
PRINCIPAL:TV SECONDAIRE: NON
SELECTIONNER DEPLACER QUITTER
EXIT
SOURCE : choisi la source sonore à partir de l'affichage
[MAIN](PRINCIPAL) ou [SUB].
English Français
Italiano
Deutsch
AVC : Vous pouvez régler les options AVC (Contrôle automatique du
voilume) sur OUI ou sur NON.
[OUI] : Pour l’usage général, par exemple pour les spots de publicité, l’AVC
peut éviter les hausses et baisses de volumes soudaines..
[NON] : Pour les effets audio particuliers, comme opéras ou symphonies,
le volume est produit conformément au niveau de volume
d’origine.
MODE : sélectionne le mode audio entre [NON], [EQ].
GRAVES : règle le niveau des graves.
AIGUS : règle le niveau des aigus.
BALANCE : règle la balance entre les haut-parleurs de droite et de gauche.
Español
Nederlands
25
Page 81

EGALISEUR:
1. Appuyez sur le bouton S / T pour entrer dans le menu EGALISEUR.
SOURCE PRINCIPAL
AVC OUI
MODE EQ
ÉGALISEUR
GRAVES
AIGUS
BALANCE
REGLAGE DU SON
PRINCIPAL:TV SECONDAIRE: NON
DEPLACER SELECTIONNER QUITTER
EXIT
2. Appuyez sur le bouton X pour sélectionner les options de EGALISEUR.
ÉGALISEUR MANUEL
120 HZ
500 HZ
1.5 KHZ
5 KHZ
10 KHZ
REGLAGE DU SON
PRINCIPAL:TV SECONDAIRE: NON
DEPLACER SELECTIONNER QUITTER
EXIT
3. Il existe 6 modes d’égaliseur disponibles : [MANUEL], [VOIX], [BRUIT],
[ROCK], [JAZZ], [CLASSIQUE].
4. Les réglages pour VOIX, BRUIT, ROCK, JAZZ et CLASSIQUE sont
près-configurés. Vous ne pouvez pas modifier ces réglages. Les
réponses de fréquence s'établissent comme ci-dessous :
26
Page 82

K
VOIX :
ÉGALISEUR VOIX
120 HZ
500 HZ
1.5 KHZ
5 KHZ
10 KHZ
PRINCIPAL:TV SECONDAIRE: NON
DEPLACER SELECTIONNER QUITTER
BRUIT :
ÉGALISEUR BRUIT
120 HZ
500 HZ
1.5 KHZ
5 KHZ
10 KHZ
REGLAGE DU SON
English Français
EXIT
Italiano
REGLAGE DU SON
Deutsch
ROCK :
PRINCIPAL:TV SECONDAIRE: NON
DEPLACER SELECTIONNER QUITTER
REGLAGE DU SON
ÉGALISEUR ROC
120 HZ
500 HZ
1.5 KHZ
5 KHZ
10 KHZ
PRINCIPAL:TV SECONDAIRE: NON
DEPLACER SELECTIONNER QUITTER
EXIT
EXIT
Español
Nederlands
27
Page 83

JAZZ :
CLASSIQUE :
REGLAGE DU SON
ÉGALISEUR JAZZ
120 HZ
500 HZ
1.5 KHZ
5 KHZ
10 KHZ
PRINCIPAL:TV SECONDAIRE: NON
DEPLACER SELECTIONNER QUITTER
REGLAGE DU SON
ÉGALISEUR CLASSIQUE
120 HZ
500 HZ
1.5 KHZ
5 KHZ
10 KHZ
EXIT
PRINCIPAL:TV SECONDAIRE: NON
DEPLACER SELECTIONNER QUITTER
EXIT
28
Page 84

5. En mode MANUEL, utiliser les boutons S / T pour changer de bande et
les boutons W / X pour choisir les réglages de fréquence désirés.
MANUEL :
ÉGALISEUR MANUEL
120 HZ
500 HZ
1.5 KHZ
5 KHZ
10 KHZ
PRINCIPAL:TV SECONDAIRE: NON
DEPLACER SELECTIONNER QUITTER
Remarque :
Lors de l’utilisation de la fonction IDI en mode PC, il vous sera possible
d’écouter le son de [SEC.] au lieu de l’écran [MAIN](PRINC.) en appuyant sur
(ECHANGE AUDIO)
Button
AUDIO SWAP
REGLAGE DU SON
EXIT
English Français
Italiano
Deutsch
Español
Nederlands
29
Page 85

K
TV-CANAL
1. Appuyez sur le bouton MENU pour afficher TV CANAL sur le menu
principal.
2. Appuyez sur les boutons S / T pour vous rendre dans les options de
sous-menu.
3. Appuyez sur les boutons W / X pour sélectionner les réglages.
4. Appuyez sur le bouton EXIT/INFO pour revenir à l'écran précédent.
PAYS U
A. P. S
MANUEL
PROGRAMME
VERROUILLAGE E OUI
TV-CANAL
PAYS
:[ROYAUME-UNI],[IRLANDE],[DANEMARK],[FINLANDE],[ITALIE],
PRINCIPAL:TV SECONDAIRE: NON
DEPLACER SELECTIONNER QUITTER
EXIT
[NORVEGE],[ESPAGNE],[SUEDE],[LUXEMBURG],[FRANCE],
[REPUBLIQUETCHEQUE],[POLOGNE],[HONGRIE],[ AUTRICHE],
[ALLEMAGNE],[SUISSE],[BELGIQUE], [PAYS-BAS]
A.P.S :
1. Appuyez sur les boutons S / T pour sélectionner l'option A.P.S puis
appuyez sur le bouton X pour entrer dans A.P.S (recherche automatique
de programmes).
2. Quand le sous-menu apparaît à l'écran, appuyez sur MENU de nouveau
pour débuter la recherche.
3. Une fois A.P.S achevée, la liste des programmes sera affichée à l'écran.
Vous pouvez sélectionner, renommer, supprimer ou insérer des
programmes à l'intérieur de la liste des programmes.
30
Page 86

A
Programmation manuelle
MANUEL :
1. Appuyez sur les boutons S / T pour sélectionner l'option MANUEL, puis
appuyez sur les boutons de numéro ou les boutons W / X pour
sélectionner le programme à enregistrer dans le canal actuel.
English Français
Italiano
2. Appuyez sur les boutons S / T pour sélectionner les éléments, puis
appuyez sur les boutons W / X pour sélectionner le réglage.
MANUEL
CANAL 1
SYSTÉME COULEUR AUTO
SYSTÉME AUDIO
RECHERCHE
RÉGLAGE FIN
ARCHIVE
UTO
55
250
CANAL : choix des canaux en appuyant sur W / X.
SYSTÉME COULEUR : choix entre [AUTO], [PAL], [SECAM] en
appuyant sur W / X.
Deutsch
Español
Nederlands
31
Page 87

SYSTÉME AUDIO : choix entre [AUTO], [B/G], [D/K], [L], [I], [L’] en
appuyant sur W / X.
RECHERCHE : appuyez sur X pour rechercher les canaux qui peuvent
être reçus en appuyant sur W / X.
RÉGLAGE FIN : affine la recherche de programmes en appuyant sur W /
X.
ARCHIVE : enregistre le canal trouvé en appuyant sur W / X.
3. Après la recherche, appuyez sur les boutons S / T pour choisir
Enregistrer, puis appuyez sur le bouton MENU pour enregistrer le canal
recherché.
4. Appuyez sur le bouton EXIT/INFO pour quitter le menu.
PROGRAMME :
La liste des programmes est utilisée pour afficher le nom et le numéro des
programmes. Vous pouvez utiliser cette liste pour éditer un nom ainsi que
supprimer ou insérer des programmes.
1. Choisir le canal en appuyant sur les boutons S / T ou W / X . Le choix
dans la liste de programme affichera le programme enregistré sur l'écran.
2. Une barre grise en surbrillance apparaît pour le programme concerné.
Appuyez le bouton rouge (NOM).
3. Appuyez sur les boutons S / T pour éditer le nom du canal et sur les
boutons W / X pour vous déplacer à la lettre suivante.
4. Appuyez sur le bouton rouge (ARCHIVE) une fois l'édition achevée. Ceci
enregistre le nom du programme.
Remarque : une fois le numéro du canal modifié, le canal affiché à l'écran conserve en
mémoire ce programme.
5. Choisir un programme et appuyez sur le bouton vert (INSERER) et
indiqué en surbrillance par une barre rouge.
6. Appuyez sur les boutons S / T pour choisir un programme que vous
désirez échanger avec le programme mis en surbrillance.
7. Appuyez sur le bouton vert pour enregistrer.
32
Page 88

K
8. Choisir un programme, puis appuyez sur le bouton jaune (EFFACER).
Le programme est mis en surbrillance avec une barre rouge, appuyez
alors sur le bouton jaune de nouveau pour l'effacer. Pour annuler,
appuyez sur le bouton bleu.
PROGRAMME
00 _ _ _ _ _
01 _ _ _ _ _
02 _ _ _ _ _
03 _ _ _ _ _
04 _ _ _ _ _
05 _ _ _ _ _
06 _ _ _ _ _
07 _ _ _ _ _
08 _ _ _ _ _
09 _ _ _ _ _
NOM
EFFACER
10 _ _ _ _ _
11 _ _ _ _ _
12 _ _ _ _ _
13 _ _ _ _ _
14 _ _ _ _ _
15 _ _ _ _ _
16 _ _ _ _ _
17 _ _ _ _ _
18 _ _ _ _ _
19 _ _ _ _ _
20 _ _ _ _ _
21 _ _ _ _ _
22 _ _ _ _ _
23 _ _ _ _ _
24 _ _ _ _ _
25 _ _ _ _ _
26 _ _ _ _ _
27 _ _ _ _ _
28 _ _ _ _ _
29 _ _ _ _ _
INSERER
VERROUILLAGE ENFANT :
1. Appuyez sur le bouton MENU Pour afficher TV-CANAL à partir du menu
principal.
2. Appuyez sur les boutons S / T pour choisir l'option VERROUILLAGE
ENFANT.
3. Appuyez sur les boutons W / X pour activer / désactiver les touches de
fonction du panneau frontal.
[OUI] : Les touches de fonction sont verrouillées.
English Français
Italiano
Deutsch
Español
[NON] : Les touches de fonction sont actives.
33
PAYS U
A. P. S
MANUEL
PROGRAMME
VERROUILLAGE E OUI
PRINCIPAL:TV SECONDAIRE: NON
DEPLACER SELECTIONNER QUITTER
TV-CANAL
EXIT
Nederlands
Page 89

FONCTION
1. Appuyer sur le bouton MENU pour afficher FONCTION sur l'écran
principal.
2. Appuyer sur les boutons S / T pour vous déplacer dans les options de
sous-menu.
3. Appuyer sur les boutons W / X pour choisir les réglages.
4. Appuyer sur le bouton EXIT/INFO pour revenir à l'écran précédent.
MODE MULTI NON
FONCTION PIP
LANGUE FRANÇAIS
PERITEL 2 TV
RAPPEL
FONCTION
PRINCIPAL:TV SECONDAIRE:NON
SELECTIONNER DEPLACER QUITTER
EXIT
MODE MULTI :
1. Appuyer sur le bouton T pour sélectionner l'option MODE MULTI.
2. Appuyer sur les boutons W / X pour sélectionner le mode [NON], [PIP],
[POP].
MODE MULTI NON
FONCTION PIP
LANGUE FRANÇAIS
PERITEL 2 TV
RAPPEL
FONCTION
PRINCIPAL:TV SECONDAIRE:NON
DEPLACER SELECTIONNER QUITTER
34
EXIT
Page 90

[NON]: affiche uniquement à la source primaire. (Pas PIP/POP)
[PIP]: affiche l’ PIP dans une fenêtre.
[POP] : affiche l’ PIP côte à côte avec la source principale.
English Français
Italiano
3. Appuyer sur le bouton EXIT/INFO pour revenir à l'écran précédent.
Deutsch
Español
Nederlands
35
Page 91

FONCTION PIP :
1. Appuyer sur le bouton T pour sélectionner l'option FONCTION PIP.
MODE MULTI PIP
FONCTION PIP
LANGUE FRANÇAIS
PERITEL 2 TV
RAPPEL
FONCTION
PRINCIPAL:TV SECONDAIRE:SCART2
DEPLACER SELECTIONNER QUITTER
EXIT
2. Appuyer sur le bouton X pour entrer dans le sous-menu FONCTION PIP.
FONCTION
SECONDAIRE HDMI
TAILLE PETIT
POSITION H
POSITION V
SWAP
PRINCIPAL:TV SECONDAIRE:HDMI
DEPLACER SELECTIONNER QUITTER
3. Appuyer sur les boutons S / T pour vous déplacer vers un élément du
sous-menu.
4. Appuyer sur les boutons W / X pour définir les réglages.
36
EXIT
Page 92

SECONDAIRE : vous pouvez choisir une source secondaire parmi
[HDMI], [DVI], [AV],[SV], [SCART 1], [SCART 2], [SCART 2S], [YPbPr],
[PC], pour la sous-fenêtre.
TAILLE : trois différentes tailles d’IDI. [PETITE], [MOYENNE],
[GRANDE].
POSITION H / POSITION V : appuyer sur les boutons W / X pour
déplacer la fenêtre d’IDI d'un coin à l'autre de l'écran du téléviseur.
SWAP : pour échanger l'affichage de la source principale et de la
source secondaire.
English Français
Sec.
Princ.
PC X X X X O O O O O O
HDMI X X X X O O O O O O
DVI X X X X O O O O O O
YPbPr X X X X O O O O O O
SV O O O O X O O O O O
AV O O O O O X O O O O
TV O O O O O O X O O O
SCART
1
SCART
2
PC HDMI DVI YPbPr SV AV TV SCART 1 SCART 2 SCART 2S
O O O O O O O X O O
O O O O O O O O X O
Italiano
Deutsch
Español
Nederlands
SCART
2S
O O O O O O O O O X
37
Page 93

LANGUE:
1. Appuyer sur le bouton T pour choisir l'option MODE MULTI.
2. Choisir une langue. [ANGLAIS], [ALLEMAND], [NEERLANDAIS],
[ITALIEN], [CATALAN], [FRANCAIS], [DANOIS], [NORVEGIEN],
[SUEDOIS], [SUOMI].
MODE MULTI OFF
FONCTION PIP
LANGUE FRANÇAIS
PERITEL 2 TV
RAPPEL
FONCTION
PRINCIPAL:TV SECONDAIRE:NON
DEPLACER SELECTIONNER QUITTER
EXIT
PERITEL 2 : choisir une sortie. [SCART 1] ou [TV].
RAPPEL : ré-initialise les réglages d’usine.
38
Page 94

MENU PC
1. Appuyer sur le bouton MENU pour afficher PC à partir du menu principal.
2. Appuyer sur les boutons S / T pour vous déplacer sur une option du
sous-menu.
3. Appuyer sur les boutons W / X pour définir les réglages.
4. Appuyer sur le bouton EXIT/INFO pour revenir à l'écran précédent.
PC
CONTRASTE
LUMIERE
RÉTROÉCLAIRAGE
POSITION H
POSITION V
HORLOGE
PHASE
MODE COULEUR
PRINCIPAL:PC SECONDAIRE: NON
SELECTIONNER DEPLACER QUITTER
EXIT
CONTRASTE: augmente ou diminue le contraste de l'image
LUMINOSITE : augmente ou diminue la luminosité de l'image
English Français
Italiano
Deutsch
RETROECLAIRAGE : règle le niveau du projecteur de fonds d'écran
POSITION H : Ajuste la position horizontale de l’image.
Remarque : non disponible pour une source HDMI / DVI.
POSITION V : Ajuste la position verticale de l'image.
Remarque : non disponible pour une source HDMI / DVI.
HORLOGE : Ajuste la largeur de l’image.
Remarque : non disponible pour une source HDMI / DVI.
PHASE : Ajuste la qualité de la mise au point de l’image.
Remarque : non disponible pour une source HDMI / DVI.
Español
Nederlands
39
Page 95

MODE DE COULEUR:
1. Appuyer sur les boutons S / T pour sélectionner l'option MODE DE
COULEUR, puis appuyer sur le bouton X pour entrer dans le sous-menu
TEMP. DES COULEURS.
CONTRASTE
LUMIERE
RÉTROÉCLAIRAGE
POSITION H
POSITION V
HORLOGE
PHASE
MODE COULEUR
AUTO
PRINCIPAL:PC SECONDAIRE: NON
DEPLACER SELECTIONNER QUITTER
EXIT
PC
2. Appuyer sur le bouton X pour choisir la couleur du mode de l'image.
[NORMALE], [CHAUDE], [FROIDE], [MANUEL].
PC
TEMP. COULEURS MANUEL
UTILIS.-R
UTILIS.-V
UTILIS.-B
PRINCIPAL:PC SECONDAIRE: NON
DEPLACER SELECTIONNER QUITTER
3. Appuyer sur le bouton S / T pour vous déplacer entre
UTILISATEUR-R/V/B puis appuyez sur le bouton X pour définir le
paramètre désiré.
UTIL.-R : ajuste le taux des rouges des couleurs.
UTIL.-V : ajuste le taux des verts des couleurs.
UTIL.-B : ajuste le taux des bleus des couleurs.
40
EXIT
Page 96

TEMP. COULEURS MANUEL
UTILIS.-R
UTILIS.-V
UTILIS.-B
PC
PRINCIPAL:PC SECONDAIRE: NON
DEPLACER SELECTIONNER QUITTER
EXIT
AUTO : Règle automatiquement l'image. Appuyer sur le bouton X pour régler
automatiquement la position de l'image. L'affichage disparaîtra jusqu'à ce qu'il
ait achevé son réglage.
PC
CONTRASTE
LUMIERE
RÉTROÉCLAIRAGE
POSITION H
POSITION V
HORLOGE
PHASE
MODE COULEUR
AUTO
PRINCIPAL:PC SECONDAIRE: NON
DEPLACER SELECTIONNER QUITTER
EXIT
English Français
Italiano
Deutsch
Español
Nederlands
41
Page 97

SELECTION DE LA DIFFUSION NICAM/IGR
En fonction du programme particulier qui est diffusé, vous
pouvez appuyer sur le bouton SON pour écouter différentes
sources de langue.
Dans différents systèmes, la fonction d’émission sera présentée
différemment.
Ⅰ: Envoie le langage d’émission principal vers les haut-parleurs.
Ⅱ: Envoie le langage d’émission secondaire vers les haut-parleurs.
: Envoie le son en mono
: Envoie le son en stéréo
Système NICAM
Stéréo
Numérique
Système double
Double
Mono
O
O
Ⅰ
Ⅱ
O
Ⅰ
Analog
42
Stéréo
Double
Mono O
O
O
Ⅰ
Ⅱ
Page 98

.
T
99.
Le Télétexte est un service gratuit diffusé par la plupart des chaînes de
télévision, qui apporte des informations en temps réel concernant l'actualité,
le temps, les programmes de télévision, les cours de la bourse, les
sous-titres, et autres.
Remarque : Aucun réglage OSD autre que celui du volume ne sera
En mode télétexte, les boutons NUMERIQUES (NUMBER),
EELLEETTEEXXTTE
T
disponible en mode télétexte.
W / X et RTN sont utilisés pour la fonction Télétexte.
E
Pour utiliser le TELETEXTE
*. Sélectionnez une chaîne de télévision sur laquelle le Télétexte est transmis.
* Appuyez une fois sur le bouton TELETEXTE pour afficher l'écran télétexte
English Français
Italiano
-Deux numéros de pages, le nom de la chaîne de télévision, la date et l'heure sont
affichés en haut de l'écran. Le premier numéro de page indique votre sélection,
tandis que le second donne la page actuellement affichée.
* Appuyez de nouveau sur le bouton TELETEXTE pour désactiver le télétexte. La
chaîne précédente réapparaît.
Sélection de la page Télétexte
1. Entrez le numéro de page Télétexte requis ; ce numéro est composé de trois
chiffres.
-Le numéro de page sélectionné est affiché dans le coin supérieur gauche de
l'écran. Le compteur de page Télétexte cherche jusqu'à ce qu'il trouve le numéro
de page sélectionné, puis la page désirée est affichée à l'écran.
2. Le bouton
suivante.
3. Les mouvements Fastext sont contrôlés par les 4 boutons colorés.
-Quatre en-têtes de pages peuvent être rapidement sélectionnés en appuyant sur
le bouton de couleur sélectionné Rouge, Vert, Jaune, ou Bleu sur la
télécommande.
S / T peut être utilisé pour sélectionner la page précédente ou
Deutsch
Español
Nederlands
43
Page 99

Fonctions utiles pour le Télétexte
INDEX
* Appuyez sur ce bouton pour sélectionner la page d'index qui affiche la table des
matières télétexte.
ATTENTE
La page télétexte que vous avez sélectionnée contient peut-être plus d'informations
que ce qui est affiché à l'écran ; le reste des informations sera affiché après un
certain délai dans une sous-page.
* Appuyez sur le bouton ATTENTE pour interrompre le changement automatique de
page.
- Le symbole ATTENTE s'affiche dans le coin supérieur gauche de l'écran et le
changement de page automatique est interrompu.
* Appuyez de nouveau sur le bouton ATTENTE.
MISE A JOUR
En mode Télétexte, appuyez sur le bouton MISE A JOUR pour faire basculer l'écran
sur le mode télévision en attendant la page de texte suivante.
* Sélectionnez le numéro de page voulu en mode Télétexte.
* Appuyez sur le bouton MISE A JOUR pour basculer en mode TV en attendant la
page de texte. Un petit rectangle bleu avec “---“ s'affiche dans le coin supérieur
gauche.
* Lorsque la page de texte demandée est trouvée, son numéro s'affiche dans le
rectangle bleu.
* Appuyez de nouveau sur le bouton MISE A JOUR pour retourner au mode
Télétexte.
REVELER
* Appuyez sur ce bouton une fois pour afficher les informations cachées, comme par
exemple les solutions aux rébus, aux puzzles ou à un quiz.
* Appuyez sur ce bouton à nouveau pour masquer les réponses révélées.
AGRANDIR
Passe le texte en double hauteur.
* Appuyez sur ce bouton pour agrandir la moitié supérieure de la page.
* Appuyez sur ce bouton à nouveau pour agrandir la moitié inférieure de la page.
* Appuyez sur ce bouton une fois de plus pour revenir à l'affichage normal.
TEMPS
* Pendant que vous regardez une chaîne de télévision avec transmission Télétexte,
appuyez sur le bouton HEURE (TIME). Les informations sur l'heure courante
seront affichées dans le coin supérieur droit de l'écran .
* Les informations d'heure disparaissent lorsque vous appuyez de nouveau sur le
bouton HEURE (TIME).
44
Page 100

A
1100..A
1. - ARC - Aspect Ratio Control : Contrôle du rapport d'aspect (Modes
UUTTRREESS FFOONNCCTTIIOONNS
available are dependant upon the current source)
*
PLEIN :
façon à remplir l'écran 16:9 screen. Il y aura une déformation au centre de
l'écran ainsi que sur les bords.
*
NORMAL :
programmes de télévision conventionnels. Il y aura des barres noires de
chaque côté de l'écran.
*
PANORAMIQUE :
l'écran 16:9 en agrandissant l'image sur les bords de l'écran. Cela permet
d'avoir moins de déformation au centre de l'écran.
*
ZOOM 1 :
de l'écran. La fonction 14:9 zoom permet d'agrandir la hauteur de façon à
remplir l'écran.
Ce mode étend de façon uniforme la largeur des sources vidéo 4:3 de
Cela permet de régler le rapport d'aspect sur 4:3 pour les
Agrandit les sources vidéo 4:3 de façon à les ajuster à
Il se peut que certains films DVD ne remplissent pas le haut et le bas
S
English Français
Italiano
*
ZOOM 2 :
pour les besoins du sous-titrage.
(En mode PC, uniquement avec COMPLET et NORMAL)
– APC - Automatic Picture Control (Contrôle automatique de l'image)
2.
Appuyez sur le bouton APC sur la télécommande pour faire défiler les
paramètres APC. Cela permet d' ajuster la luminosité et le contraste de l'écran.
* Film : le contraste est environ 0,51 fois celui du mode standard.
* Manuel: la luminosité par défaut est environ 0,91 fois celle du mode normal, et il
est possible de la régler.
* Standard : la qualité d'image optimale préréglée.
* Brillant : le contraste est environ 1,37 fois celui du mode normal.
Identique à ”16:9 ZOOM”, mais le bouton relève quelque peu l’écran
Deutsch
Español
Nederlands
45
 Loading...