

Page 1
TATUNG
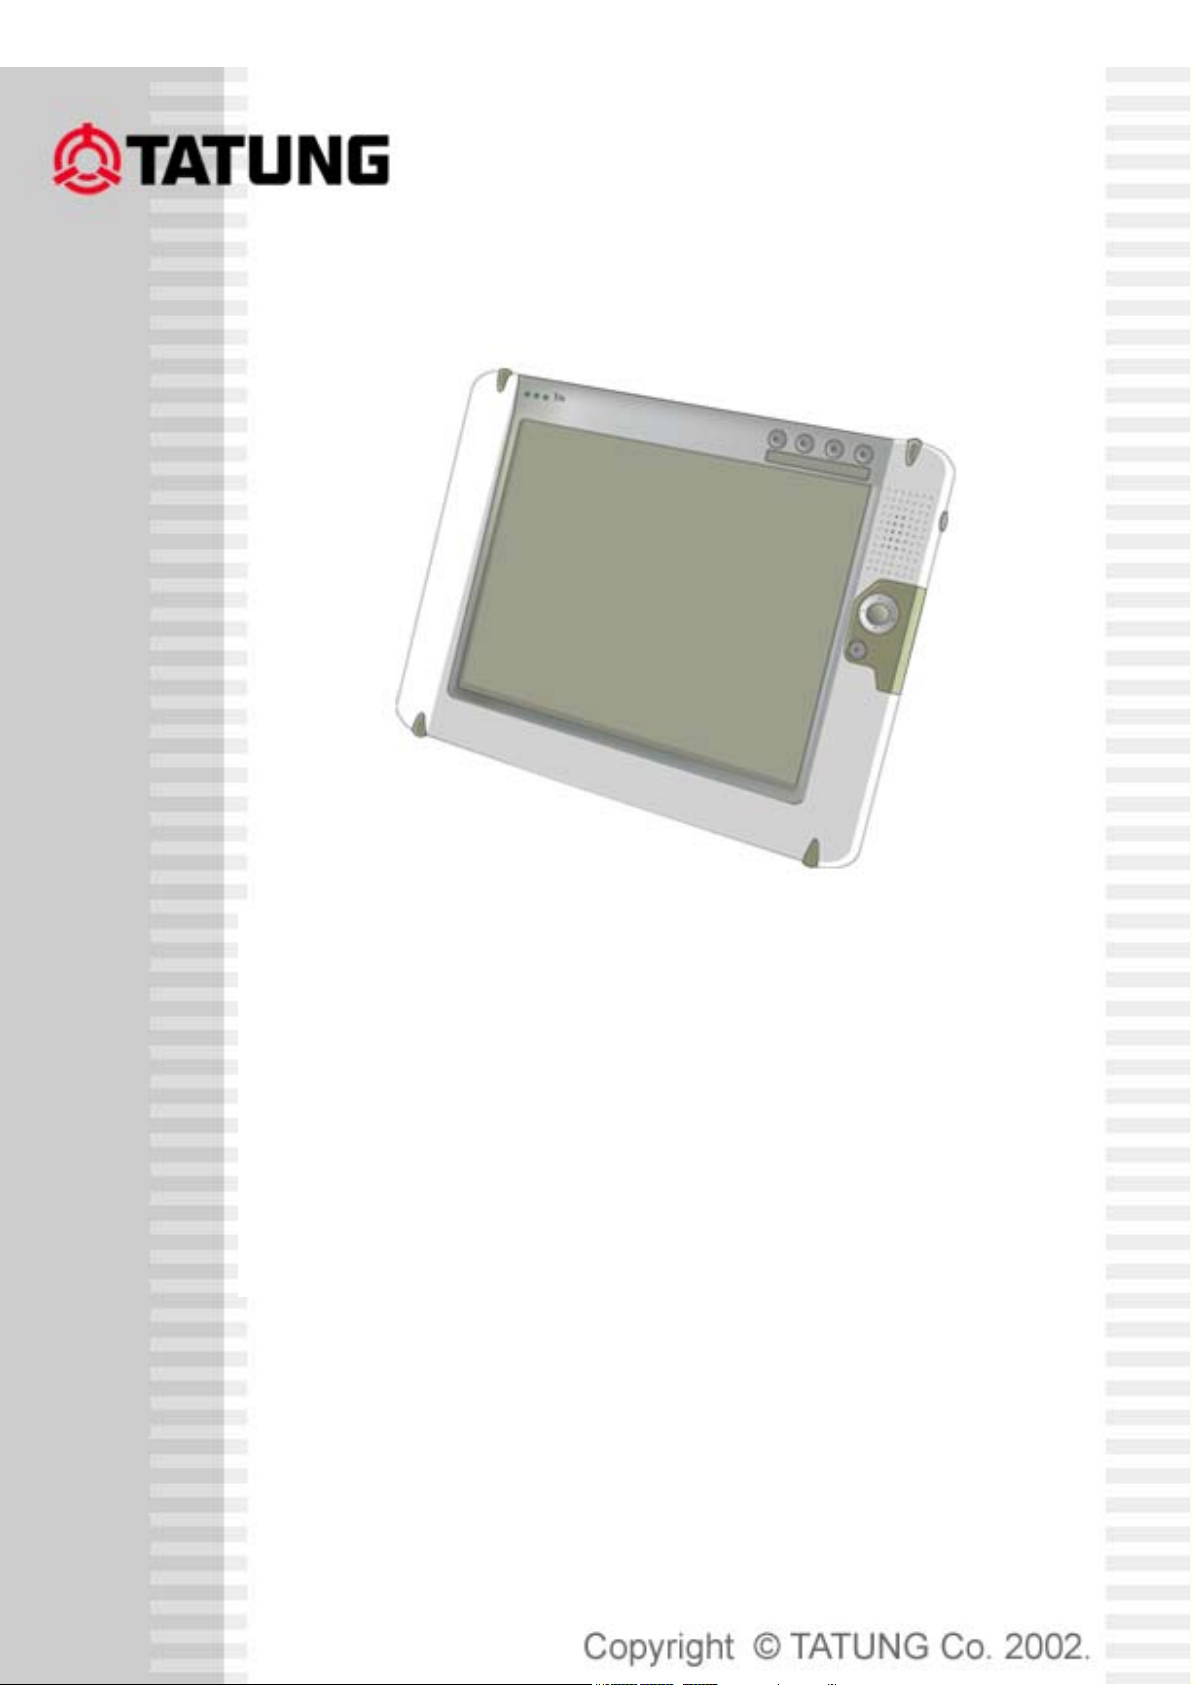
Wireless Thin Client
TWN-5213 CU
2005/6/27 page1
Page 2

Copyright
In the interest of continuing product improvement, TATUNG Co. reserves the right to change product specifications
and information in this document without notice.
TATUNG Co. makes no warranty of any kind with regard to this document, including, but not limited to, the implied
warranties of merchantability and fitness for a particular purpose. TATUNG Co. shall not be liable for any errors
contained herein or for incidental or consequential damages in connection with the furnishing, performance, or use of
this document or the examples herein.
© TATUNG Co. All rights reserved.
This document contains proprietary information that is protected by copyright. All rights are reserved. No part of this
document may be photocopied, reproduced, adapted, or translated to another language without the prior written
consent of TATUNG Co., except as allowed under the copyright laws.
The programs that control this product are copyrighted and all rights are reserved. Reproduction, adaptation, or
translation of those programs without prior written permission of TATUNG Co. is also prohibited.
Tatung is the registered trademark of TATUNG Co.
Microsoft, Windows XP embedded, and the Windows logo are either registered trademarks or trademarks of
Microsoft Corporation in the United States and/or other countries. Microsoft products are licensed to OEMs by
Microsoft Licensing, Inc., a wholly owned subsidiary of Microsoft Corporation.
All other brand names and products names used in this document are trade names, service marks, trademarks, or
registered trademarks of their respective owners.
TATUNG Co.
22 Chungshan North Road, Section 3
Taipei, Taiwan 104
R.O.C.
http://www.tatung.com
TATUNG Wireless Thin Client (TX-2000) User Guide
Page 3

Messages
Messages are used in this document to bring important information to your attention. Different types of messages are
defined as follows:
CAUTION!:
WARNING!: A Warning alert informs you that improper use of equipment or failure to follow safety instructions may
NOTE!:
Safety Instructions
You must read through all safety instructions before using TWN-5213 CU. The following information contains
concepts that you must fully understand in order to avoid property damage or body injury.
CAUTION!
Always use standard battery packs supplied with the TWN-5213 CU. Other battery packs may have different
•
specifications and cause damages to TWN-5213 CU.
• Do not expose the battery pack to other metal objects.
• Do not use or place TWN-5213 CU near sources of heat or expose it to direct sunlight for an extended period of
time. Store it in a cool and dry place.
A Caution alert informs you that improper use of equipment or failure to follow safety instructions may
cause data loss or equipment damage.
cause bodily injury.
A Note is an advice that helps you make the best use of TWN-5213 CU.
Do not push or apply force to the TFT screen.
•
• Do not use pens or sharp objects to write on the screen. Always use the stylus to tap or draw on the TFT screen.
WARNING!
Using worn-out or damaged power cords may result in electric shock or fire.
•
• Avoid keeping a steady position when using TWN-5213 CU for prolonged period of time. Periodic exercises and
breaks are recommended to prevent any physical discomfort.
Always contact an authorized TATUNG service provider for assistance if any repair or adjustment is required.
•
TATUNG Wireless Thin Client (TX-2000) User Guide
Page 4

Table of Contents
1. Overview............................................................................................................................................................ 5
2. Equipment Checklist ........................................................................................................................................ 6
3. TWN-5213 CU Specification............................................................................................................................. 7
4. TWN-5213 CU Features .................................................................................................................................... 8
4.1 Front View of TWN-5213 CU........................................................................................................................................8
4.2 Top View of TWN-5213 CU........................................................................................................................................11
4.3 Left View of TWN-5213 CU........................................................................................................................................11
4.4 Right View of TWN-5213 CU......................................................................................................................................12
4.5 Back View of TWN-5213 CU ......................................................................................................................................13
5. Quick-Start Procedure ................................................................................................................................... 15
5.1 Starting TATUNG TWN-5213 CU...............................................................................................................................15
5.2 Booting Logo..............................................................................................................................................................18
5.3 Device Settings ..........................................................................................................................................................20
5.4 LCD Panel Setting......................................................................................................................................................21
5.7 Recalibrating the Touch-Screen.................................................................................................................................24
5.8 Using the Input Method ..............................................................................................................................................26
5.9 Resetting TWN-5213 CU............................................................................................................................................27
6. Software Applications.................................................................................................................................... 28
7. Restrictions..................................................................................................................................................... 29
8. Troubleshooting ............................................................................................................................................. 30
9. Support and Service....................................................................................................................................... 32
10. Warranty ........................................................................................................................................................ 33
11. Regulatory and Safety Notices ................................................................................................................... 38
TATUNG Wireless Thin Client (TX-2000) User Guide
Page 5

1. Overview ...........................................................................
Welcome to choose TATUNG
building a customizable product for different vertical markets. Both first-time and experienced users can quickly
learn how to operate the TATUNG Wireless Thin Client from this guide.
®
Wireless Thin ClientTM. This wireless device is designed to support customers in
TATUNG Wireless Thin Client (TX-2000) User Guide
Page 6

2. Equipment Checklist........................................................
Carefully unpack the TATUNG Wireless Thin Client from the box. Check to make sure that the following accessories
are included in the box. If you find any accessory missing or damaged, please contact TATUNG representatives
immediately.
TWN-5213 CU
Stylus
AC Adapter
AC Power Cord
Battery Pack
Embedded Accessories
Backup Battery
RTC Battery
CompactFlash Storage Card (512MB)
TATUNG Wireless Thin Client (TX-2000) User Guide
Page 7
3. TWN-5213 CU Product Specification..............................
Items Specification
CPU Transmeta TM5800 733MHz
OS Microsoft Windows XP Embedded Software
Bundle software Trail Soft Keyboard
Memory 256MB DDR-SODIMM
Storage 512MB Compact Flash
Display
Touch panel 10-Bits A/D controller with SMK Touch Screen with Stylus
Button Analog type
Network 802.11b and 10/100BASE-TX(RJ-45)
Audio Internal speaker (Mono) x 1
I/O
Power Li-ion Battery pack, AC adapter
Main battery Type Rechargeable Li-ion battery, 2200mAh, 11.1V
Operation time About 2hrs
Charging time About 2.5hrs
Back up battery
Size, Weight 290 x 220 x 31(Min)mm, About 1.5kg
Type 10.4 inch color LCD
Resolution 1024 x 768 16bit 65536 color
10.4" Toshiba LCD resolution: 1024x768(XGA) and
transmissive display type.
Life time 10,000 hrs (Lamp MTBF Life)
Pen
Internal microphone(Mono) x 1
USB USB2.0 x 2
Card slot PCMCIA Type-II (Card Bus type) x 1
I/O connector 10/100BASE-TX (RJ-45) or RS232C can be used
exclusively with optional cable.
Audio Headphone terminal x 1
Microphone terminal x 1
Type Rechargeable Ni-MH battery, 40mAh, 7.2V
Backup time About 30min ( system in suspend mode)
Charging time About 12hrs
Type Rechargeable Li-battery, 100mAh, 3V RTC battery
Charging time About 50hrs
Operation Temp.:5 to 35 deg. cent., Humidity: 15 to 85% Environment
Storage Temp.:-20 to 60 deg. cent., Humidity:15 to 85%
Terminal FCC, CE,CB, UL Certification
AC adapter Electrical appliance and Material Safety Law
OS Windows XP Embedded
TATUNG Wireless Thin Client (TX-2000) User Guide
Page 8
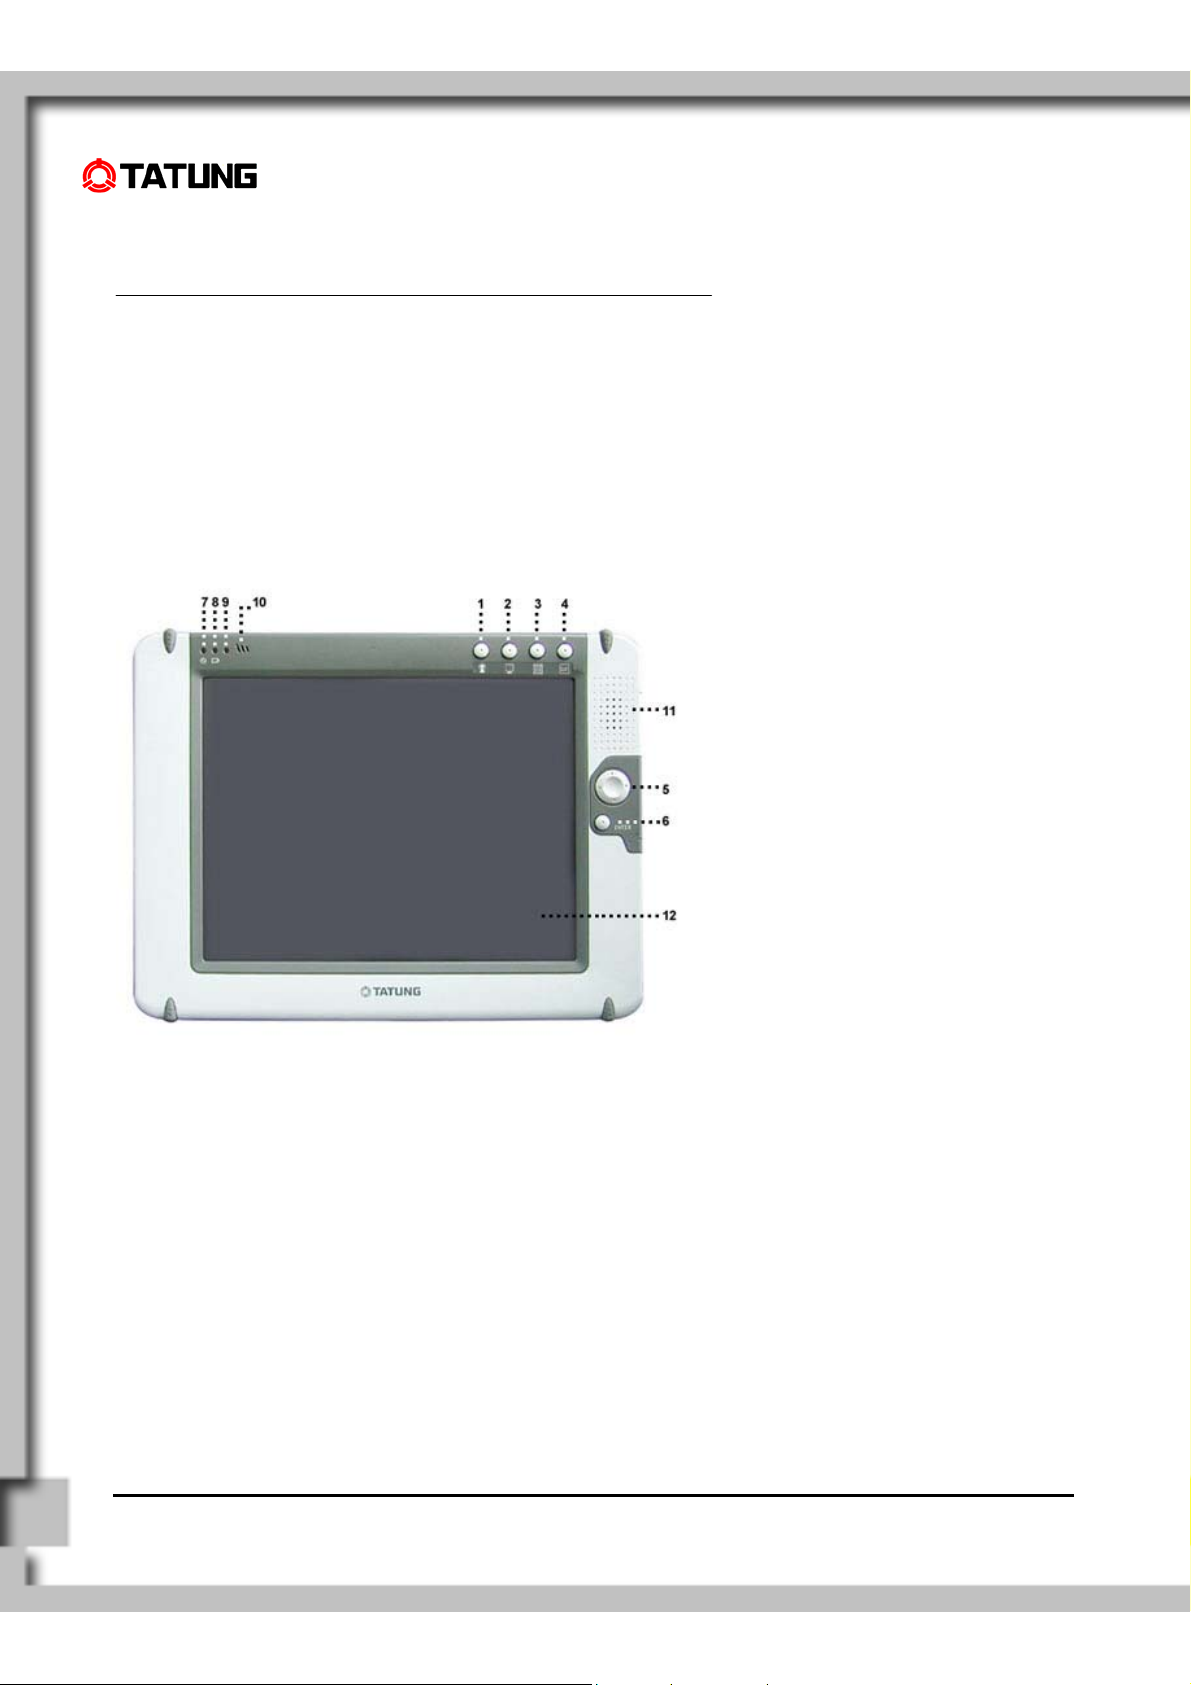
4. TWN-5213 CU Features....................................................
4.1 Front View of TWN-5213
CU
1. Push function key 1, and you can execute “On Screen Keyboard”.
2. Push function key 2, and you can execute “Internet Explorer”.
3. Push function key 3, and you can execute “File Manager”.
4. Push function key 4, and you can execute “Device setting” utility, which is developed by
Tatung. It includes four functions: brightness adduction, double-tap setting, button setting,
and touch panel calibration.
5. Direction Key
6. Enter Key
7. Power LED
8. Battery Charge LED
9. RF Strength LED
10. Built-In Microphone
11. Built-In Speaker
TATUNG Wireless Thin Client (TX-2000) User Guide
Page 9

12. TFT Touch-Screen Panel (Perform operations and input data by tapping and writing directly on
the screen)
TATUNG Wireless Thin Client (TX-2000) User Guide
Page 10
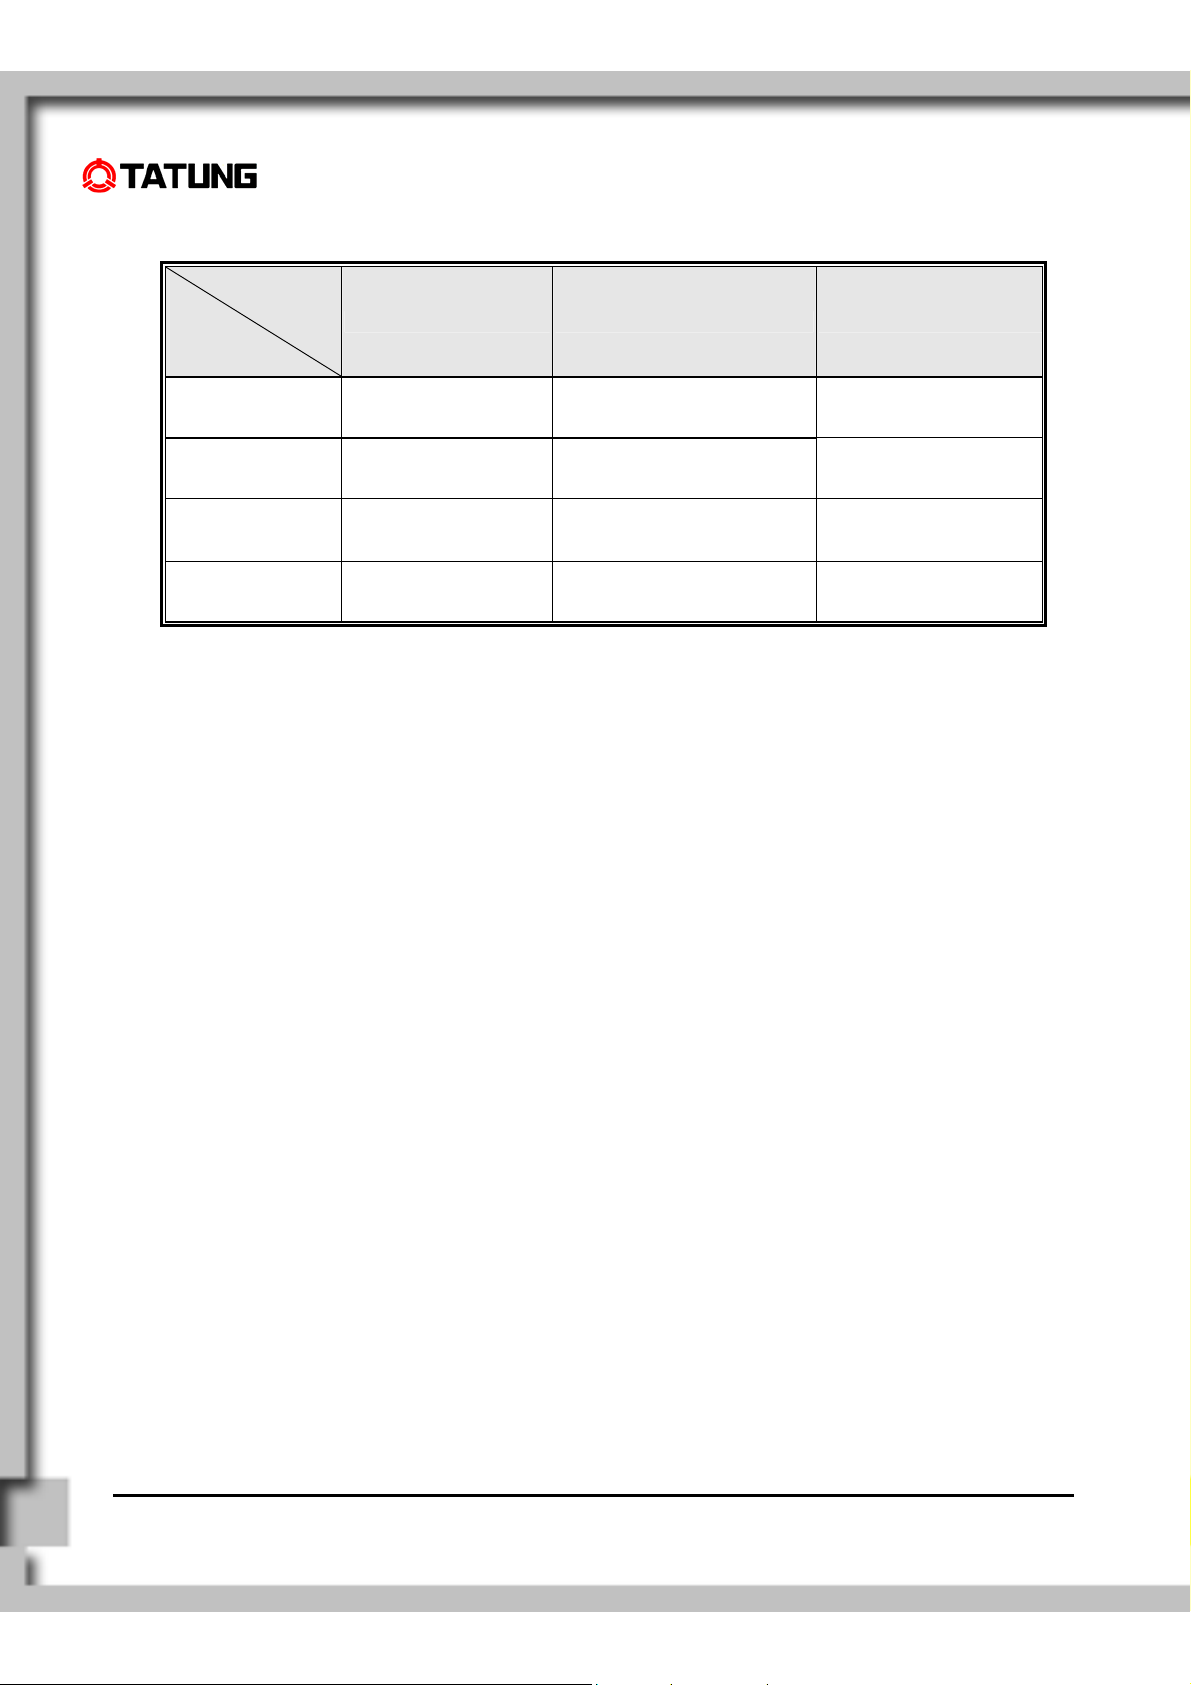
TWN-5213 CU LED indicators display useful information in the battery’s current status and charge level:
LED
Indicator
LED Color
Power LED Battery Charge LED Wireless Signal LED
Off
Green Power On Fully Charged
Amber Low Battery <=8% Charging
Red
Power Off or
Suspend Mode
Extremely Low Battery
(Auto Suspend) <=4%
Not Charging
Charge Error
(Or No Battery Installed)
Signal Strength =0
(No signal)
Signal Strength =4,5
(Excellent)
Signal Strength =2,3
(Good)
Signal Strength =1
(Very Low)
TATUNG Wireless Thin Client (TX-2000) User Guide
Page 11
4.2 Top View of TWN-5213 CU
4. PCMCIA Card Slot
1. I/O Connector
2. Reset Button
3. USB 2.0 Port
4.3 Left View of TWN-5213 CU
1. PC Card Slot (PCMCIA Type II)
2. Headphone Jack
3. Microphone Jack
TATUNG Wireless Thin Client (TX-2000) User Guide
Page 12
4.4 Right View of TWN-5213
CU
1. Power Button
(1) Pressing and holding the power button for more than 4 seconds will power off the system.
(2) Quickly tapping and releasing the power button will put the system into suspend mode. Re-tap the
power button again to resume operation.
2. Stylus
3. USB 2.0 Port
4. DC-In Jack
TATUNG Wireless Thin Client (TX-2000) User Guide
Page 13

4.5 Back View of TWN-5213
CU
1. Battery Connector Cover
2. Battery Pack
3. Battery Latch
4. Battery Release Switch
5. IDE Compact Flash Card Slot Cover
1. Backup Battery and RTC Battery Cover
2. Back Stand / Handle
TATUNG Wireless Thin Client (TX-2000) User Guide
Page 14

TATUNG Wireless Thin Client (TX-2000) User Guide
Page 15

5. Quick-Start Procedure .....................................................
5.1 Starting TATUNG TWN-
5213 CU
TWN-5213 CU has two power sources, battery or AC (using the AC/DC converter).
To operate the device with AC power, perform the following steps:
In order to prevent accidental data lost, we strongly suggest you to insert the battery pack.
(1) Insert the battery pack into the Battery
Slot.
TATUNG Wireless Thin Client (TX-2000) User Guide
Page 16

(2) Lock the battery latch.
NOTE! The system would not power on if the battery latch was not in the locked position.
(3) Plug one end of the AC adapter into the DC-
In jack and plug the other end into an
electrical outlet. The power source can range
from 100 to 240 Volts at 50 or 60 Hz.
TATUNG Wireless Thin Client (TX-2000) User Guide
Page 17

(4) Turn on TWN-5213 CU by pressing the
power button.
(5) The system is turned on.
TATUNG Wireless Thin Client (TX-2000) User Guide
Page 18

5.2 Booting Logo
When the user turns on TWN-5213 CU, the Microsoft Windows XP embedded logo is displayed on the screen while
the system is booting up.
TATUNG Wireless Thin Client (TX-2000) User Guide
Page 19

TATUNG Wireless Thin Client (TX-2000) User Guide
Page 20

5.3 Device Settings
TWN-5213 CU uses the standard Microsoft Windows XP user interface. But we create a new program which will
help you to set the TWN-5213 CU easier.
TATUNG Wireless Thin Client (TX-2000) User Guide
Page 21

5.4 LCD Panel Setting
You can adjust the brightness of the LCD panel by the Device Setting utility program – brightness tab.
(1) Press the function key 4, and you will see the “Device Setting” window (As in the figure).
(2) Please kick the “Brightness” button.
(3) You can adjust the brightness level according to your personal preference.
TATUNG Wireless Thin Client (TX-2000) User Guide
Page 22

5.5 Double-Tap Setting
You can also change the double-tap speed in Device Setting utility program.
(1) Press the function key 1, and you will see the “Device Setting” window (As in the figure).
(2) Please kick the “Double-Tap Setting” tab.
(3) You can adjust the speed and the distance of the double tap according to your personal preference.
TATUNG Wireless Thin Client (TX-2000) User Guide
Page 23

5.6 Button Setting
We provided four function keys. They can help you to quickly launch programs. You can change the setting to suit
your requirements.
(1) Press the function key 1, and you will see the “Device Setting” window.
(2) Please kick the “Botton Setting” button. (As in the figure)
(3) You can change the button setting for your own needs.
NOTE! The default settings of these four function keys were shown as follows:
Button 1: On Screen Keyboard
Button 2: Internet Explorer
Button 3: Windows Explorer
Button 4: Device Setting
TATUNG Wireless Thin Client (TX-2000) User Guide
Page 24

5.7 Recalibrating the Touch-
Screen
If the user finds that TWN-5213 CU is responding bluntly to stylus taps, the user will need to recalibrate his screen.
Follow the instructions below.
(1) Launch the Device Setting Utility program.
(2) Please click the “Calibration” button.
TATUNG Wireless Thin Client (TX-2000) User Guide
Page 25

(3) Screens 1 through 7 of device calibration.
TATUNG Wireless Thin Client (TX-2000) User Guide
Page 26

5.8 Using the Input Method
TWN-5213 CU provides an integrated Soft Keyboard to ease the data input. You can bring up the Soft Keyboard by
pressing the function key 1.
TATUNG Wireless Thin Client (TX-2000) User Guide
Page 27

5.9 Resetting TWN-5213 CU
There are two ways of resetting TWN-5213 CU: Hardware Reset and Software Reset
Hardware Reset
The reset button is located on the top left of
TWN-5213 CU.
Software Reset
You can choose to perform a system cold reset by:
Start -> Turn off Computer -> Restart.
TATUNG Wireless Thin Client (TX-2000) User Guide
Page 28

6. Software Applications .....................................................
Software applications that support Windows® XP operating systems are available to be executed on TWN-5213
CU. You can download some programs by your needs. For details on commercially-available software applications,
contact your local retailer or visit the Microsoft’s Web site at http://www.microsoft.com
NOTE! TWN-5213 CU might not support applications written for MS-DOS or 16-bits application
programs. You should check for compatibility before using the applications.
TATUNG Wireless Thin Client (TX-2000) User Guide
Page 29

7. Restrictions ......................................................................
This section describes the current status of firmware and OS image on this platform by the time when this user
manual was published. Please contact an authorized TATUNG representative to obtain the most recent updates.
1. The system was built with Windows XP Embedded SP1 execution environment.
2. Direct boot is supported and the image is loaded only from an IDE Compact Flash Card. This allows easy
upgrade of the OS image from the host PC or external storage card.
3. A fully-charged battery can last for more than two hours under full operation.
4. OS upgrade function is not supported. We will provide the OS image upgrade function for the next OS image.
5. When you use the ad hoc mode to connect to the Internet, make sure that the name of the NIC does not
contain more than 10 characters.
6. When you plug and remove the PCMCIA card, please press the “Safely Remove Hardware” icon.
7. Suspending the system while your PCMCIA card or hard drive is in operation may cause system crash and
your device may not be bootable again. If your device is no longer bootable, you need to send back your CF
card for repair. Please contact your nearest Tatung service representative for service.
8. When the system is in RDP mode, you may experience degrading performance in audio and video playback.
9. The browser does not currently support XML, Flash or special JavaScript authored Web pages and therefore
Web contents containing such objects may not be displayed correctly.
10. When the system is accessing the PCMCIA storage card, sudden removal of the card may damage it. Please
ensure that all data transactions are fully completed or stopped before removing the card.
TATUNG Wireless Thin Client (TX-2000) User Guide
Page 30

8. Troubleshooting...............................................................
When you experience operational problems, check the following guide for system troubleshooting. If problems
persist, please contact your service provider for technical support.
Battery Operation Problems Action
Replace or recharge the battery as soon as possible.
Plug in the AC-DC adapter in and continue using TWN-5213 CU
Main battery is low.
The battery appears to be
damaged or has reached the
end of its service life.
When the main battery is discharging, the RAM data will be kept since the
memory is powered by the backup battery. If the backup battery power is
low, the data may be totally lost, so please save your data regularly.
Purchase a new battery.
Use the stylus to tap on the screen to check whether the display activates
by your awakening.
TWN-5213 CU powers off
automatically.
TWN-5213 CU cannot be turned
on when not connected to AC
power.
Display Related Problems Action
Screen appears dark
Screen appears blank
Check to see if the system is in suspend mode.
Check to see if the battery power is too low or completely drained.
Replace a charged battery or plug in the AC-DC adapter to charge the
battery.
Make sure the battery switch is in the lock position.
The battery power may be too low to run TWN-5213 CU. Try connect to
AC power again.
Excessive exposure to direct sunlight may cause TWN-5213 CU screen to
temporarily darken. This is a natural phenomenon for LCD screens. It will
not be permanent.
Adjust the LCD display brightness by using the brightness control or
restart TWN-5213 CU.
TATUNG Wireless Thin Client (TX-2000) User Guide
Page 31

System Operation Problems Action
The touch screen is out of
calibration.
Run recalibration from Control Panel/Stylus.
TWN-5213 CU locks up or runs
slowly.
The touch screen is damaged.
TWN-5213 CU runs out of storage
space
To turn off the sound in TWN5213 CU
Network Connection Problem Action
Network connection problems
Close applications that are not in use.
Try to reset the system by pressing reset button.
Contact an authorized TATUNG representative.
Reallocate TWN-5213 CU storage and program memory management by
doing a cold boot (memory initialization).
Disable the volume and notifications functions.
Make sure that the access point is firmly seated and connected to the
proper network jack while it is functioning in the network infrastructure
mode.
Make sure that you have provided the required server information.
Ensure that WEP is enabled and the keys are accepted for both the client
and host devices while exercising the ad hoc mode (peer-to-peer
connection).
You can view the system’s wireless status by checking the Wireless
Signal LED
TATUNG Wireless Thin Client (TX-2000) User Guide
Page 32

9. Support and Service ........................................................
Web site
You may obtain the Tatung Wireless Thin Clients’ product information from http://www.tatungWebPad.com
online service is provided free of charge.
. This
TATUNG Wireless Thin Client (TX-2000) User Guide
Page 33

10. Warranty..........................................................................
Warranty
Important:
Service office for detailed product warranty information.
One-Year Limited Hardware Warranty
Tatung warrants its Wireless Thin Client products to be free from defects in material and workmanship during the
warranty period. If the Wireless Thin Client product proves to be defective in material or workmanship during the
warranty period, Tatung will, at its sole option, repair or replace the product with a like product.
Should Tatung be unable to repair or replace the product within a reasonable amount of time, the customer’s
alternate exclusive remedy shall be a refund of the purchase price upon return of the product.
How long the warranty is effective:
Tatung Wireless Thin Clients are warranted for one (1) year from the date of the first consumer purchase.
What the warranty does not cover:
Warranty terms may be different with the country of purchase; contact Authorized TATUNG Sales and
• Misuses; unauthorized modification; opening for any reason except to perform an official upgrade using an
proper tools/kit
• Operation or storage outside the environmental specifications for the product
•
The battery, or damage caused by this battery
• In-transit damage and improper maintenance
• Physical damage to the unit, such as a cracked or broken screen or defect resulting from use of improper
software, accessories, media, supplies, consumables, or such items not designed for use with the product.
Tatung makes no other express warranty, whether written or oral, with respect to this product. Any implied
warranty of merchantability or fitness for a particular purpose is limited to the one-year duration of this written
warranty.
Some customers do not have limitations on how long an implied warranty lasts, so the above limitation or
exclusion may not apply to you. This warranty gives your specific legal rights, and you may also have other rights
that vary from customer to customer.
TATUNG Wireless Thin Client (TX-2000) User Guide
Page 34

Tatung Software Product License Agreement and Tatung Software Product Limited Warranty
Tatung Wireless Thin Client products contain preinstalled software programs. Please read the following Tatung
Software Product License Agreement before proceeding.
Important: Carefully read this License Agreement and the Limited Warranty statement before operating the
equipment. The rights to the software are licensed, not sold. Tatung or its licensors continue to own all intellectual
property rights to the software, and you will be granted certain rights to use the software upon your acceptance of
this license. Rights in the software are offered only on the condition that you agree to all terms and conditions of
the License Agreement. Operating the equipment indicates your acceptance of these terms and conditions. If you
do not agree to the terms and conditions of the License Agreement, return the complete package for a full refund
now.
Tatung Software Product License Agreement
The Tatung Software Product License Agreement shall govern the use of all software that is provided to you, the
customer, as part of this Tatung product – with the exception of Microsoft’s software and products, which are
licensed to you under the Microsoft End User License Agreement (EULA) contained in the Microsoft
documentation. Any third party software supplier’s warranty terms that may be found online, or in any
documentation or other materials contained in the product packaging, shall govern the use of that third party
software.
The Following License Terms Govern the Use of the Software:
Use
You may only use the software on a single computer. You may not reverse, assemble, or decompile the software.
Transaction in European Union member states: The prohibition against recompilation shall be subject to Directive
91/250/EEC.
Copies and Adaptations
You may make copies or adaptations of the software (a) for archival purposes, or (b) when copying or adaptation
is an essential step in the use of the software with a computer so long as the copies and adaptations are used in
no other manner.
You have no other rights to copy unless you acquire an appropriate license to reproduce which is available from
TATUNG Wireless Thin Client (TX-2000) User Guide
Page 35

Tatung for some software.
You agree that no warranty, free installation or free training is provided by Tatung for any copies or adaptations
made by you.
All copies and adaptations of the software must bear the copyright notice(s) contained in or on the original.
Ownership
You agree that you do not have any title to or ownership of the software, other than ownership of physical media.
You acknowledge and agree that the software is copyrighted and protected under the copyright laws. You
acknowledge and agree that the software or part thereof may have been developed by a third party software
supplier named in the copyright notice(s) included with the software, who shall be authorized to hold you
responsible for any copyright infringement or violation of this or their own License Agreement.
Transfer of Right in Software
You may transfer rights to the software to a third party only as part of the transfer of all your rights and only if you
obtain the prior agreement of the third party to be bound by the terms of this License Agreement. Upon such a
transfer, you agree that your rights to the software are terminated and that you will either destroy all your copies
and adaptations or deliver them to the third party. Transfer to a U.S. government department or agency or to a
prime or lower tier contractor in connection with a U.S. government contract shall be made only upon prior written
agreement to terms required by Tatung.
Sublicensing and Distribution
You may not lease, sublicense the software or distribute copies or adaptations of the software to the public in
physical media, by telecommunication or at all without the prior written consent of Tatung.
Termination
Tatung may terminate this software license for failure to comply with any of these terms, provided Tatung has
requested you to cure the failure and you have failed to do so within thirty (30) days of such notice.
Updates and Upgrades
You agree that the software does not include updates and upgrades that may be available from Tatung under a
separate support agreement.
TATUNG Wireless Thin Client (TX-2000) User Guide
Page 36

Export Clause
You agree not to export or re-export the software or any copy or adaptation in violation of the U.S. Export
Administration regulations or other applicable regulations.
U.S. Government Restricted Rights
The Software and Documentation have been developed entirely at private expense. They are delivered and
licensed as “commercial computer software” as defined in DFARS 252.227-7013 (Oct 1988), DFARS 252.211-
7015 (May) or DFARS 252.227-19 (Jun 1987) (or any equivalent agency regulation or contract clause), whichever
is applicable. You have only those rights provided for such Software and Documentation by the applicable FAR or
DFARS clause or the Tatung standard software agreement for the product involved.
Tatung Software Product Limited Warranty
Important:
as part of the Tatung product, including any operation system software. Any third party software supplier’s
warranty terms that may be found online or in any documentation or other materials contained in the product
packaging shall supersede the Tatung Software Product Limited Warranty with regard to that third party software.
Ninety-Day Limited Software Warranty
Tatung warrants for a period of 90 days from the date of purchase that the software product will execute its
programming instructions when all files are properly installed. Tatung does not warrant that the software will be
uninterrupted or error free. In the event that this software product fails to execute its programming instructions
during the warranty period, your remedy shall be replacement of refund only. Return the media to Tatung for
replacement. Should Tatung be unable to replace the media within a reasonable amount of time, Tatung shall
refund the purchase price upon return of the product and all copies.
Removable Media (If Supplied)
This Tatung Software Limited Warranty shall cover all software that is provided to you, the customer,
Tatung warrants the removable media, if supplied, upon which this product is recorded to be free from defects in
material and workmanship under normal use for a period of 90 days from the date of purchase. In the event the
media proves to be defective during the warranty period, your remedy shall be replacement or refund only. Return
the media to Tatung for replacement. Should Tatung be unable to replace the media within a reasonable amount
TATUNG Wireless Thin Client (TX-2000) User Guide
Page 37

of time, Tatung shall refund the purchase price upon return of the product and destruction of all other non-
removable media copies of the software product.
Notice of Warranty Claims
You must notify Tatung in writing of any warranty claim not later than 30 days after the expiration of the warranty
period.
Limitation of Warranty
Tatung makes no other express warranty, whether written or oral, with respect to this product.
Any implied warranty of merchantability of fitness for a particular purpose is limited to the 90-day duration of this
written warranty.
Limitation of Liability and Remedies
The Remedies provided above are your sole and exclusive remedies. In no event shall Tatung be liable for any
direct, indirect, special, incidental, or consequential damages (including lost profit), whether based on warranty,
contract, tort, or any other legal theory.
In no case shall Tatung’s liability exceed the purchase price for the software and/or product. The limitations set
forth above will apply regardless of whether you accept the software.
TATUNG Wireless Thin Client (TX-2000) User Guide
Page 38

11. Regulatory and Safety Notices .....................................
TWN-5213 CU
FCC ID: BJM-TWN5213BZN
Declaration of Conformity
Model Number: TATUNG Wireless Thin Client
Trade Name: TATUNG CO.
Responsible Party: TATUNG CO.
Address: 22 Chung-Shan N. Rd. Sec. 3, Taipei, Taiwan 104, R.O.C.
Telephone number: + 886-2-2586-7714
This device complies with the following Certifications,
UL 60950
FCC Part 15
TUV-GSCE
TATUNG Wireless Thin Client (TX-2000) User Guide
Page 39

11.1 Federal Communication Commission Interference Statement
TATUNG CO. declares that TWN-5213 ( FCC ID: BJMTWN5213-BZN ) is limited in CH1~CH11 for
2.4GHz by specified firmware controlled in U.S.A.
The Maximum average SAR (1g) for 802.11b is 1.040W/kg.
This equipment has been tested and found to comply with the limits for a Class B digital device, pursuant to Part
15 of the FCC Rules. These limits are designed to provide reasonable protection against harmful interference in a
residential installation. This equipment generates uses and can radiate radio frequency energy and, if not installed
and used in accordance with the instructions, may cause harmful interference to radio communications. However,
there is no guarantee that interference will not occur in a particular installation. If this equipment does cause
harmful interference to radio or television reception, which can be determined by turning the equipment off and on,
the user is encouraged to try to correct the interference by one of the following measures:
Reorient or relocate the receiving antenna.
•
• Increase the separation between the equipment and receiver.
• Connect the equipment into an outlet on a circuit different from that to which the receiver is connected.
Consult the dealer or an experienced radio/TV technician for help.
•
FCC Caution: Any changes or modifications not expressly approved by the party responsible for compliance could
void the user's authority to operate this equipment.
This device complies with Part 15 of the FCC Rules. Operation is subject to the following two conditions: (1) This
device may not cause harmful interference, and (2) this device must accept any interference received, including
interference that may cause undesired operation.
IMPORTANT NOTE:
FCC Radiation Exposure Statement:
This equipment complies with FCC radiation exposure limits set forth for an uncontrolled
environment. This device complies with FCC RF Exposure limits set forth for an uncontrolled environment, under
47 CFR 2.1093 paragraph (d)(2). This transmitter must not be co-located or operating in conjunction with any
other antenna or transmitter.
TATUNG Wireless Thin Client (TX-2000) User Guide
 Loading...