

Page 1

Reference Guide
FIND IT.
WATCH IT.
SHARE IT.
LOVE IT.
Getting
Started
page 4
Remote
Control
Setup 19
Media Sharing
Setup page 10
FAQ
22
Softphone
Setup 16
Page 2

Important Safety Instructions
1) Read these instructions.
2) Keep these instructions.
3) Heed all warnings.
4) Follow all instructions.
Getting Started...................................................................................................................... 4
Hardware Description ............................................................................4
Home Center Description ....................................................................................................................................................... 6
Home Center LED Description ............................................................................................................................................... 7
TV Extender Description ........................................................................................................................................................ 8
TV Extender LED Description ................................................................................................................................................ 9
5) Do not use this apparatus near water.
6) Clean only with dry cloth.
7) Do not block any ventilation openings. Install in accordance with the manufacturer’s
instructions.
8) Do not install near any heat sources such as radiators, heat registers, stoves, or other
apparatus (including ampliers) that produce heat.
9) Do not defeat the safety purpose of the polarized or grounding-type plug. A polarized plug
has two blades with one wider than the other. A grounding type plug has two blades and a third
grounding prong. The wide blade or the third prong are provided for your safety. If the provided
plug does not t into your outlet, consult an electrician for replacement of the obsolete outlet.
10) Protect the power cord from being walked on or pinched particularly at plugs, convenience
receptacles, and the point where they exit from the apparatus.
11) Only use attachments/accessories specied by the manufacturer.
12) Use only with the cart, stand, tripod, bracket, or table specied by the manufacturer, or sold
with the apparatus. When a cart is used, use caution when moving the cart/apparatus
combination to avoid injury from tip-over.
13) Unplug this apparatus during lightning storms or when unused for long periods of time.
Services Setup ......................................................................................10
Install Sharing Manager ....................................................................................................................................................... 10
(Optional) Congure Wireless Network ................................................................................................................................ 12
Access Your Wi-Fi Network .................................................................................................................................................. 13
Congure Home Monitoring ................................................................................................................................................. 14
Install and Congure X-Lite Soft Phone ............................................................................................................................... 16
Congure Media Services .................................................................................................................................................... 18
Congure the Remote Control with a Code ......................................................................................................................... 19
Congure the Remote Control without a Code .................................................................................................................... 20
Remote Control Override Instructions .................................................................................................................................. 21
FAQ ............................................................................................................................................22
Service FAQ ......................................................................................................................................................................... 22
Device FAQ .......................................................................................................................................................................... 24
Appendix ................................................................................................................................ 26
Universal Remote Control Codes......................................................................................................................................... 26
Pair Phone Handset to Basestation ..................................................................................................................................... 37
Universal Remote Control ................................................................................................................................................ Back
14) Refer all servicing to qualied service personnel. Servicing is required when the apparatus
has been damaged in any way, such as power-supply cord or plug is damaged, liquid has been
spilled or objects have fallen into the apparatus, the apparatus has been exposed to rain or
moisture, does not operate normally, or has been dropped.
This product incorporates copyright protection technology that is protected by U.S. patents and other intellectual
property rights. Use of this copyright protection technology must be authorized by Rovi Corporation, and
is intended for home and other limited viewing uses only unless otherwise authorized by Rovi Corporation.
Reverse engineering or disassembly is prohibited.
Copyright
Information and content contained in this document is Copyright © All Rights Reserved.
Cover photos used under Creative Commons license: “Old Bakelite Phone” by Louise Docker; “Neon
Cowboy” by Tracy Byrnes.
PART # 001-00156-001
This device is operation in 5.15 – 5.25GHz frequency range, then restricted in indoor use only.
The availability of some specic channels and / or operational frequency bands are country dependent
and are rmware programmed at factory to match the intended destination. The rmware setting is not
accessible by the end user.
This device is Master equipment, the transmission is disabled in the 5600-5650MHz band.
Page 3
GETTING STARTED
Power through simplicity. Designed to make it easy to stay connected, ROSsm brings it
all together – from Internet TV & RadioTime radio, viewing pictures and video, playing
personal music, to sharing your digital stuff with your friends and family. ROS
peace of mind as well, allowing you access to your media, les, home monitoring
features, and wireless camera feeds from any PC connected to the Internet using the
same security most banks use.
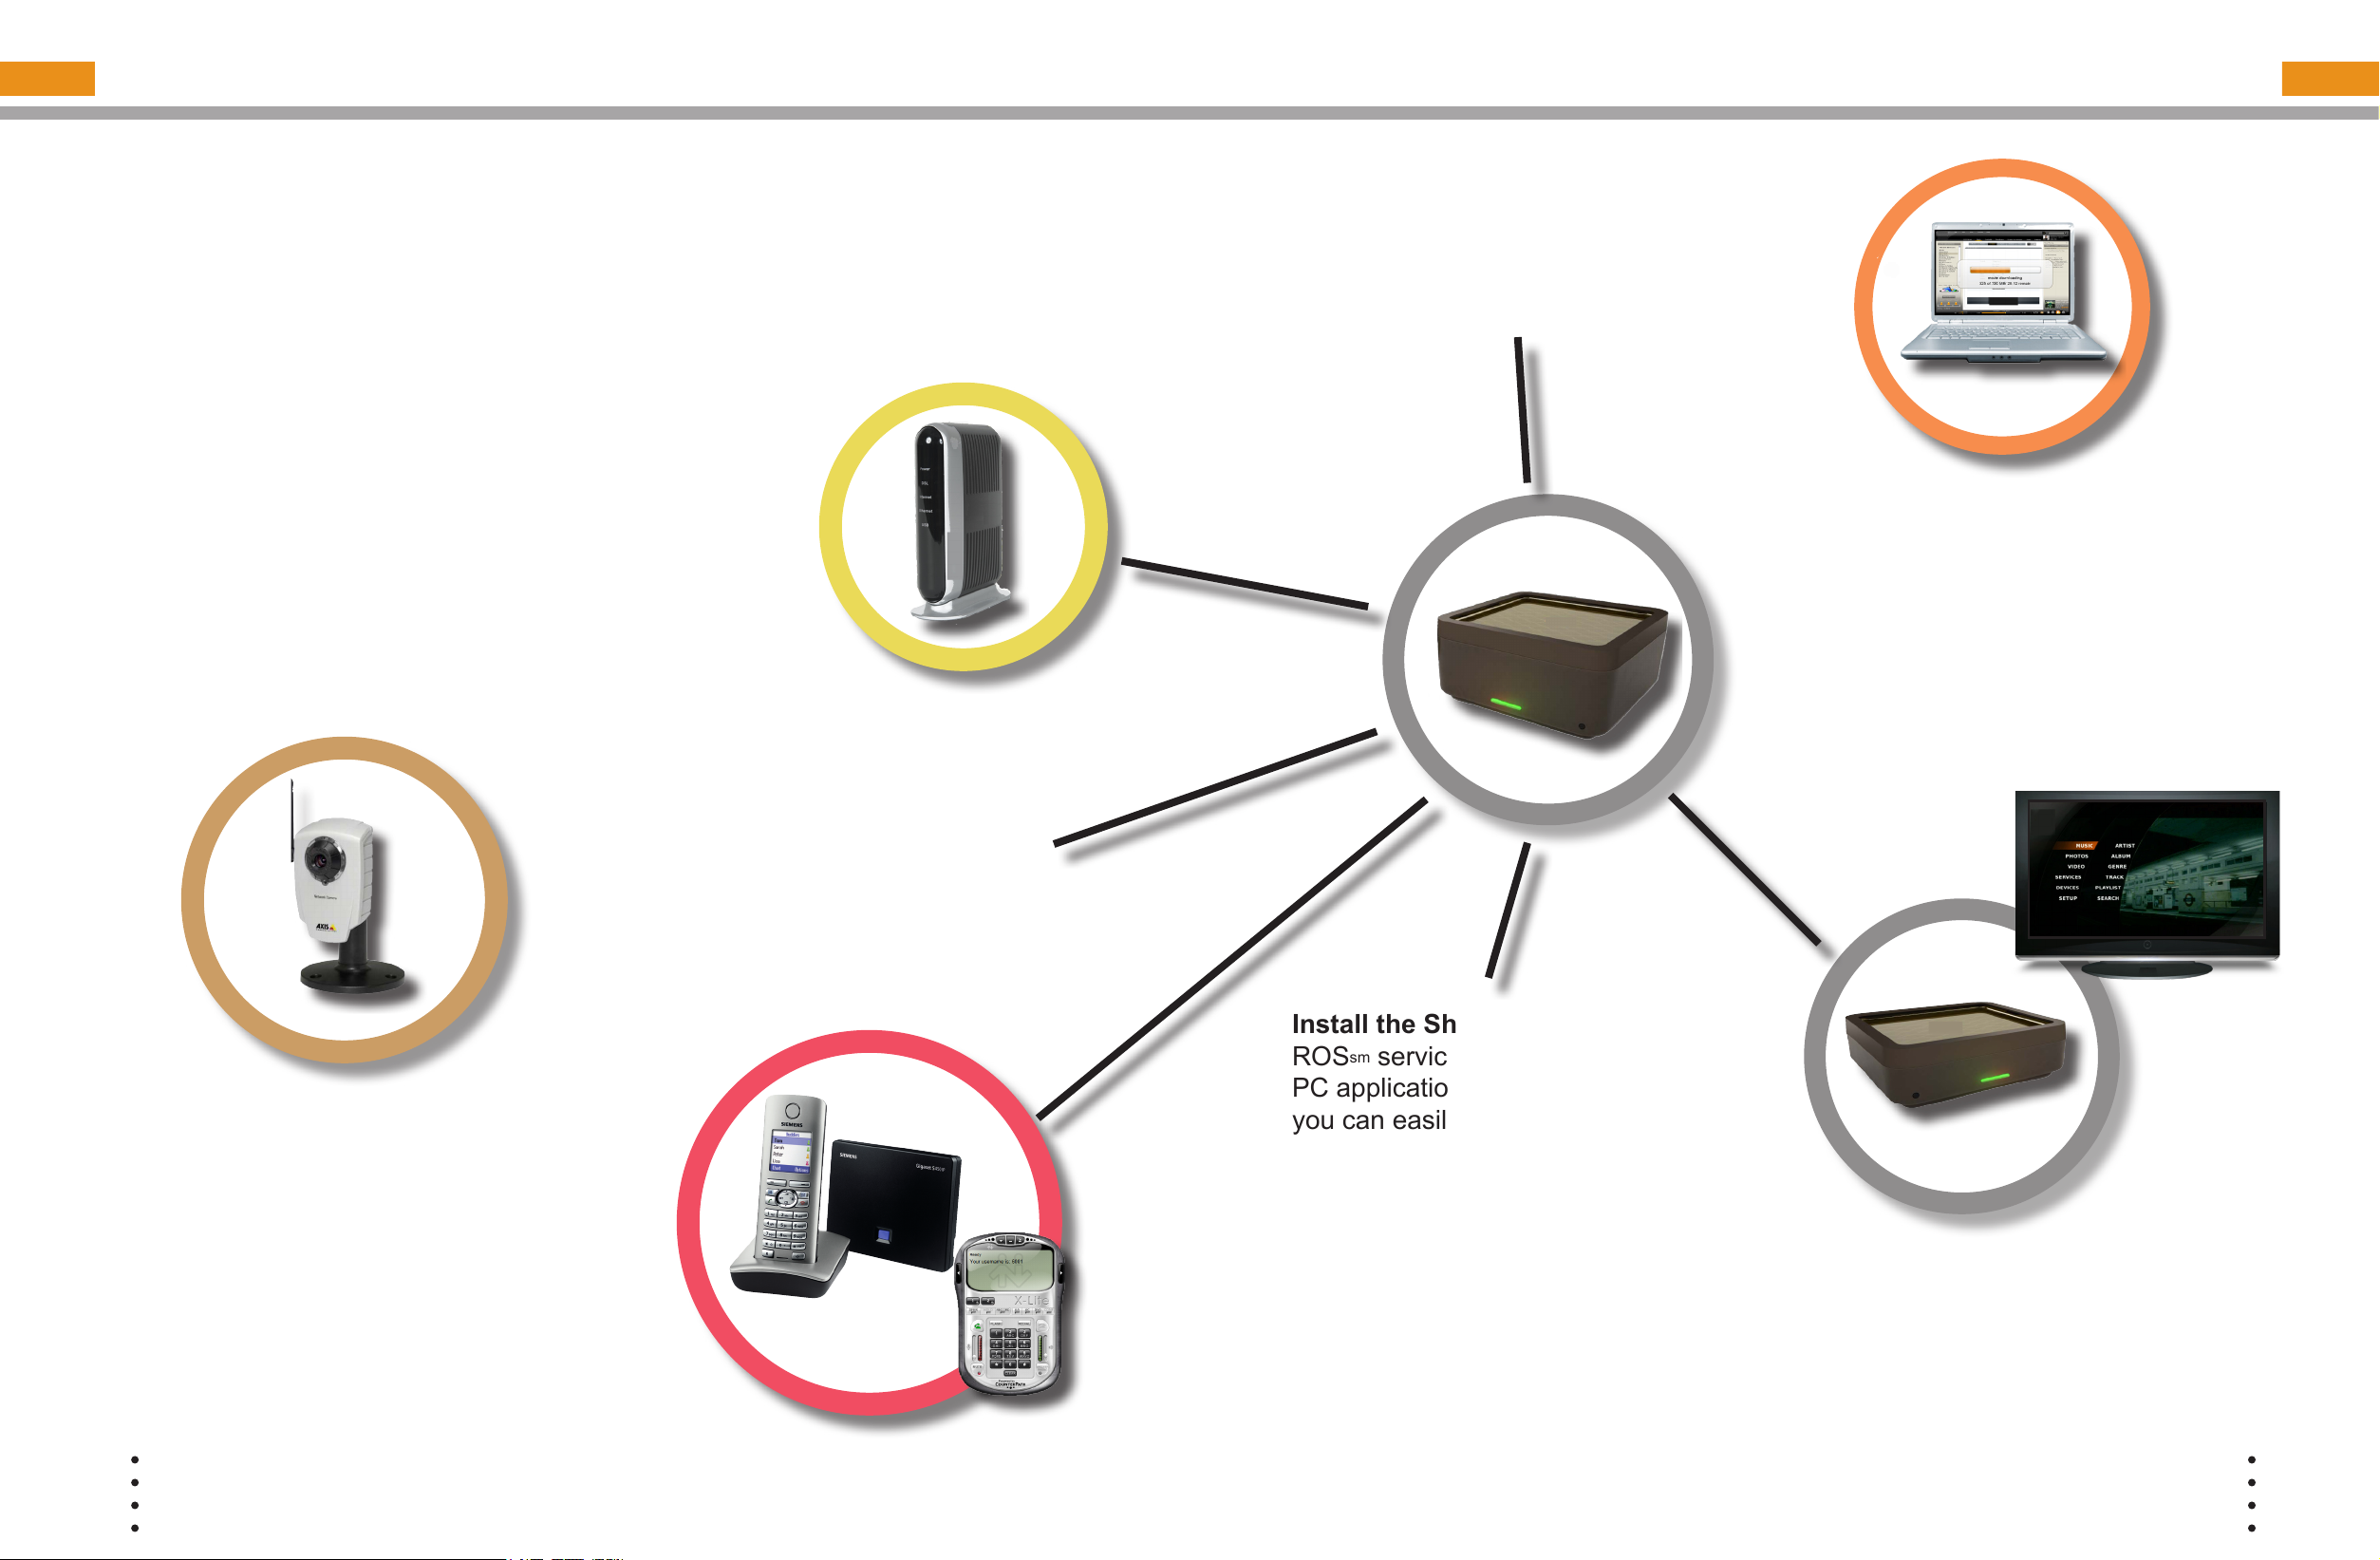
Set up your Home Center. The brains of your ROSsm
services, the Home Center, is a router, manages your
voice and media services, and contains a hard drive to
store your les. Your Home Center connects all of your
devices to your home network and the Internet. For
more about installing your hardware, see the installation
posters that came with your equipment.
Set up home monitoring netcam.
The ROSsm service is compatible with
the Axis 207 W network cameras
(netcams), and the list continues to
grow. See the install sheet that came
with your equipment.
sm
brings
Setup your Wireless network. The Home
Center provides Wi-Fi access to the Internet
for your computers and other network
enabled devices. See the Reference Sheet
that came with your service equipment for
your Wi-Fi network name and password.
Install your TV Extender. Your TV Extender,
is a fully featured high denition media
delivery system allowing you to access
Video on Demand movies, YouTube videos,
RadioTime Internet radio, your personal
media, and more from your TV. See the
installation posters that came with your
equipment.
4
Setup voice service for phone and PC
application. Your ROSsm comes with a
robust, fully featured voice service. See the
phone installation sheet that came with your
equipment and page 14 for information on
setting up the X-Lite PC voice application.
© COPYRIGHT 2006-2008 PRODEA SYSTEMS, INC. ALL RIGHTS RESERVED.
Install the Sharing Manager. Your
ROSsm service includes a Windows
PC application, Sharing Manager, so
you can easily integrate your personal
media (movies, music, and photos) with
your ROSsm service. See page 10 for
Sharing Manager installation and setup
information.
Important: Install your equipment in a clean, well-ventilated,
indoor environment. Do not install your equipment in your attic
or garage unless they are fully air conditioned. We strongly
recommend that you use a surge protector with your service
equipment.
© COPYRIGHT 2006-2008 PRODEA SYSTEMS, INC. ALL RIGHTS RESERVED.
5
Page 4
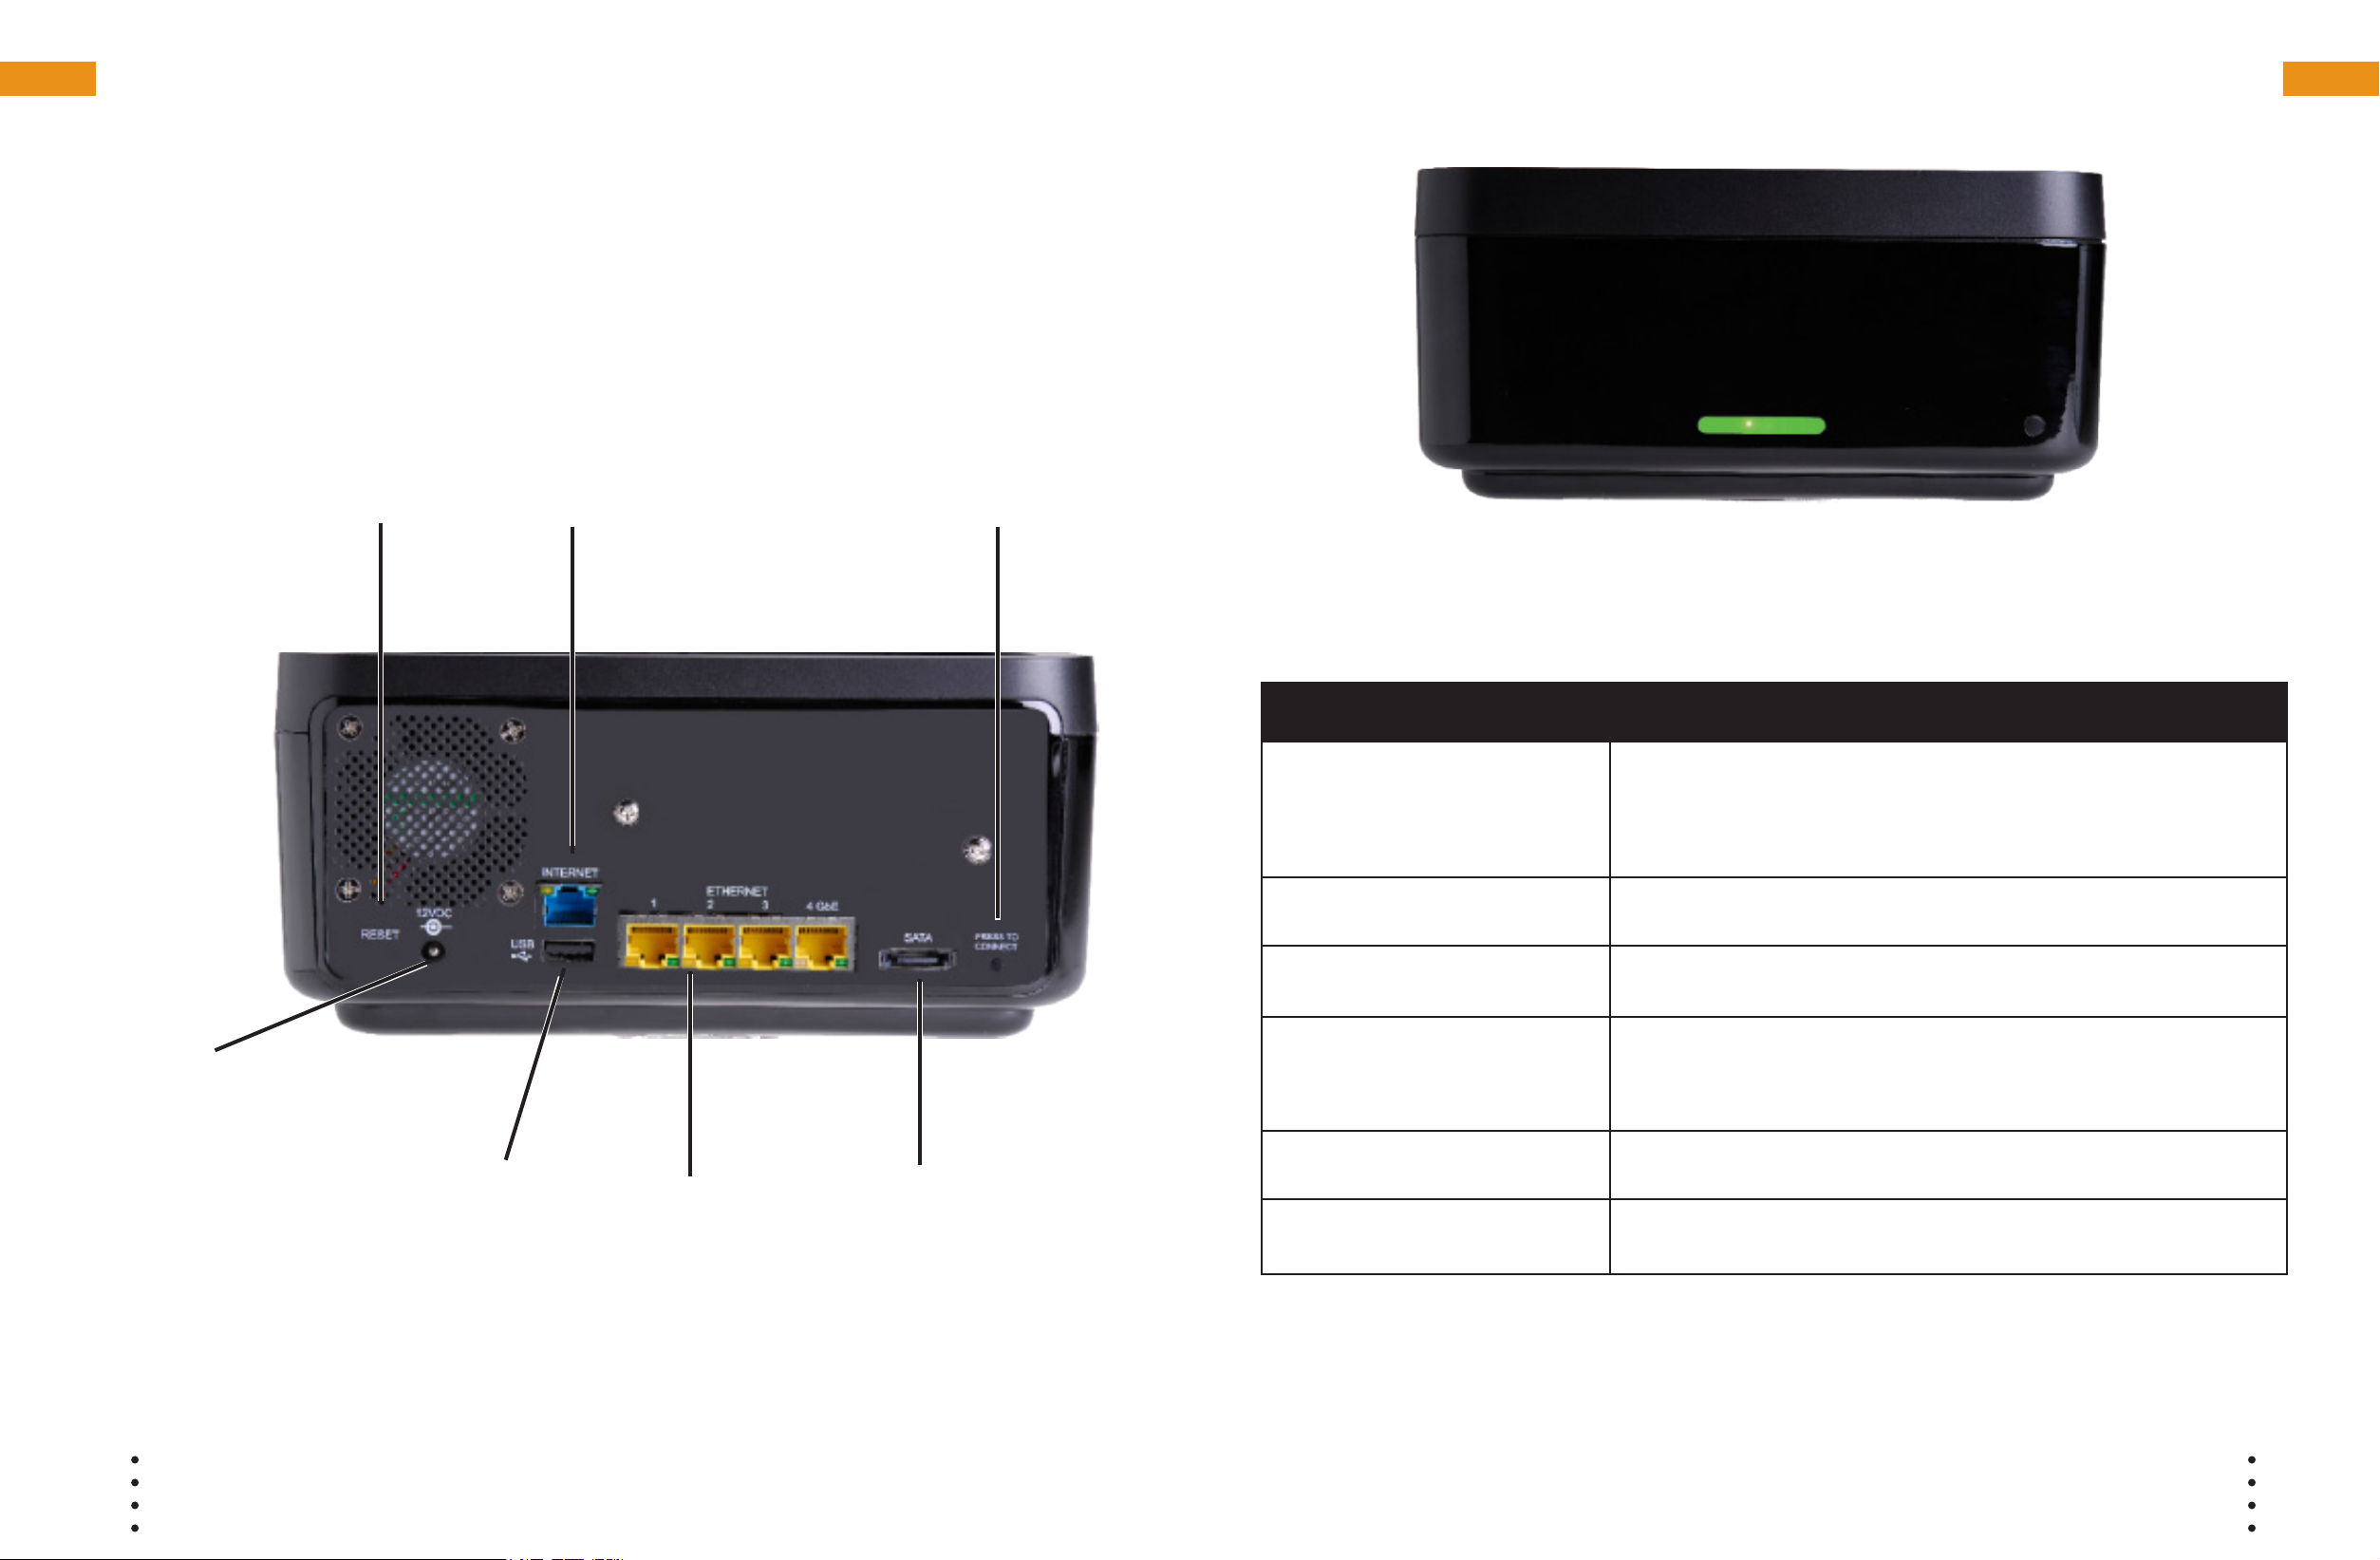
HOME CENTER DESCRIPTION
What is the Home Center? The brains of your ROSsm services, the ROSsm
Home Center, or Home Center, is a router, manages your voice and media
services, and contains a hard drive to store your les. Your Home Center
connects all of your devices to your home network and the Internet, both
wirelessly and using Ethernet cabling, delivering your ROSsm services and
home media to all connected and enabled computers and devices.
PRESS TO CONNECT
RESET
Press for 5 seconds to
restart and 20 seconds
to reset to factory
settings.
INTERNET port
Plug in Internet
connection from
service (modem).
Press to connect your
Home Center via wireless
protected setup (WPS) to
the TV Extender or other
WPS enabled devices.
HOME CENTER LED DESCRIPTION
The Home Center and TV Extender have status indication lights
to let you know at a glance the status of your service during set
up, activation, and usage.
Power port
Plug the
included
AC power
cord into an
outlet.
USB port
Connect a supported
USB device. For a
list of supported
devices, see the
customer portal.
ETHERNET ports
Plug your network
enabled computers
and devices into any
port 1 through 4. Port
4 supports Gigabit
Ethernet.
eSATA
Connect
an eSATA
hard drive
for external
storage.
LED Color Description
Red (solid) When rst powered on, the LED is red during
startup. If the LED is red after activation, check
your Ethernet cabling.
Red (ashing) Indicates there is no Internet connection.
Amber (ashing) Indicates that the Home Center is attempting
activation.
Amber (solid) Indicates service activation failed or that the Press
to Connect button was pressed.
Green (ashing) Indicates the Home Center is activating.
Green (solid) Indicates the Home Center is activated and
operational.
6
7
Page 5
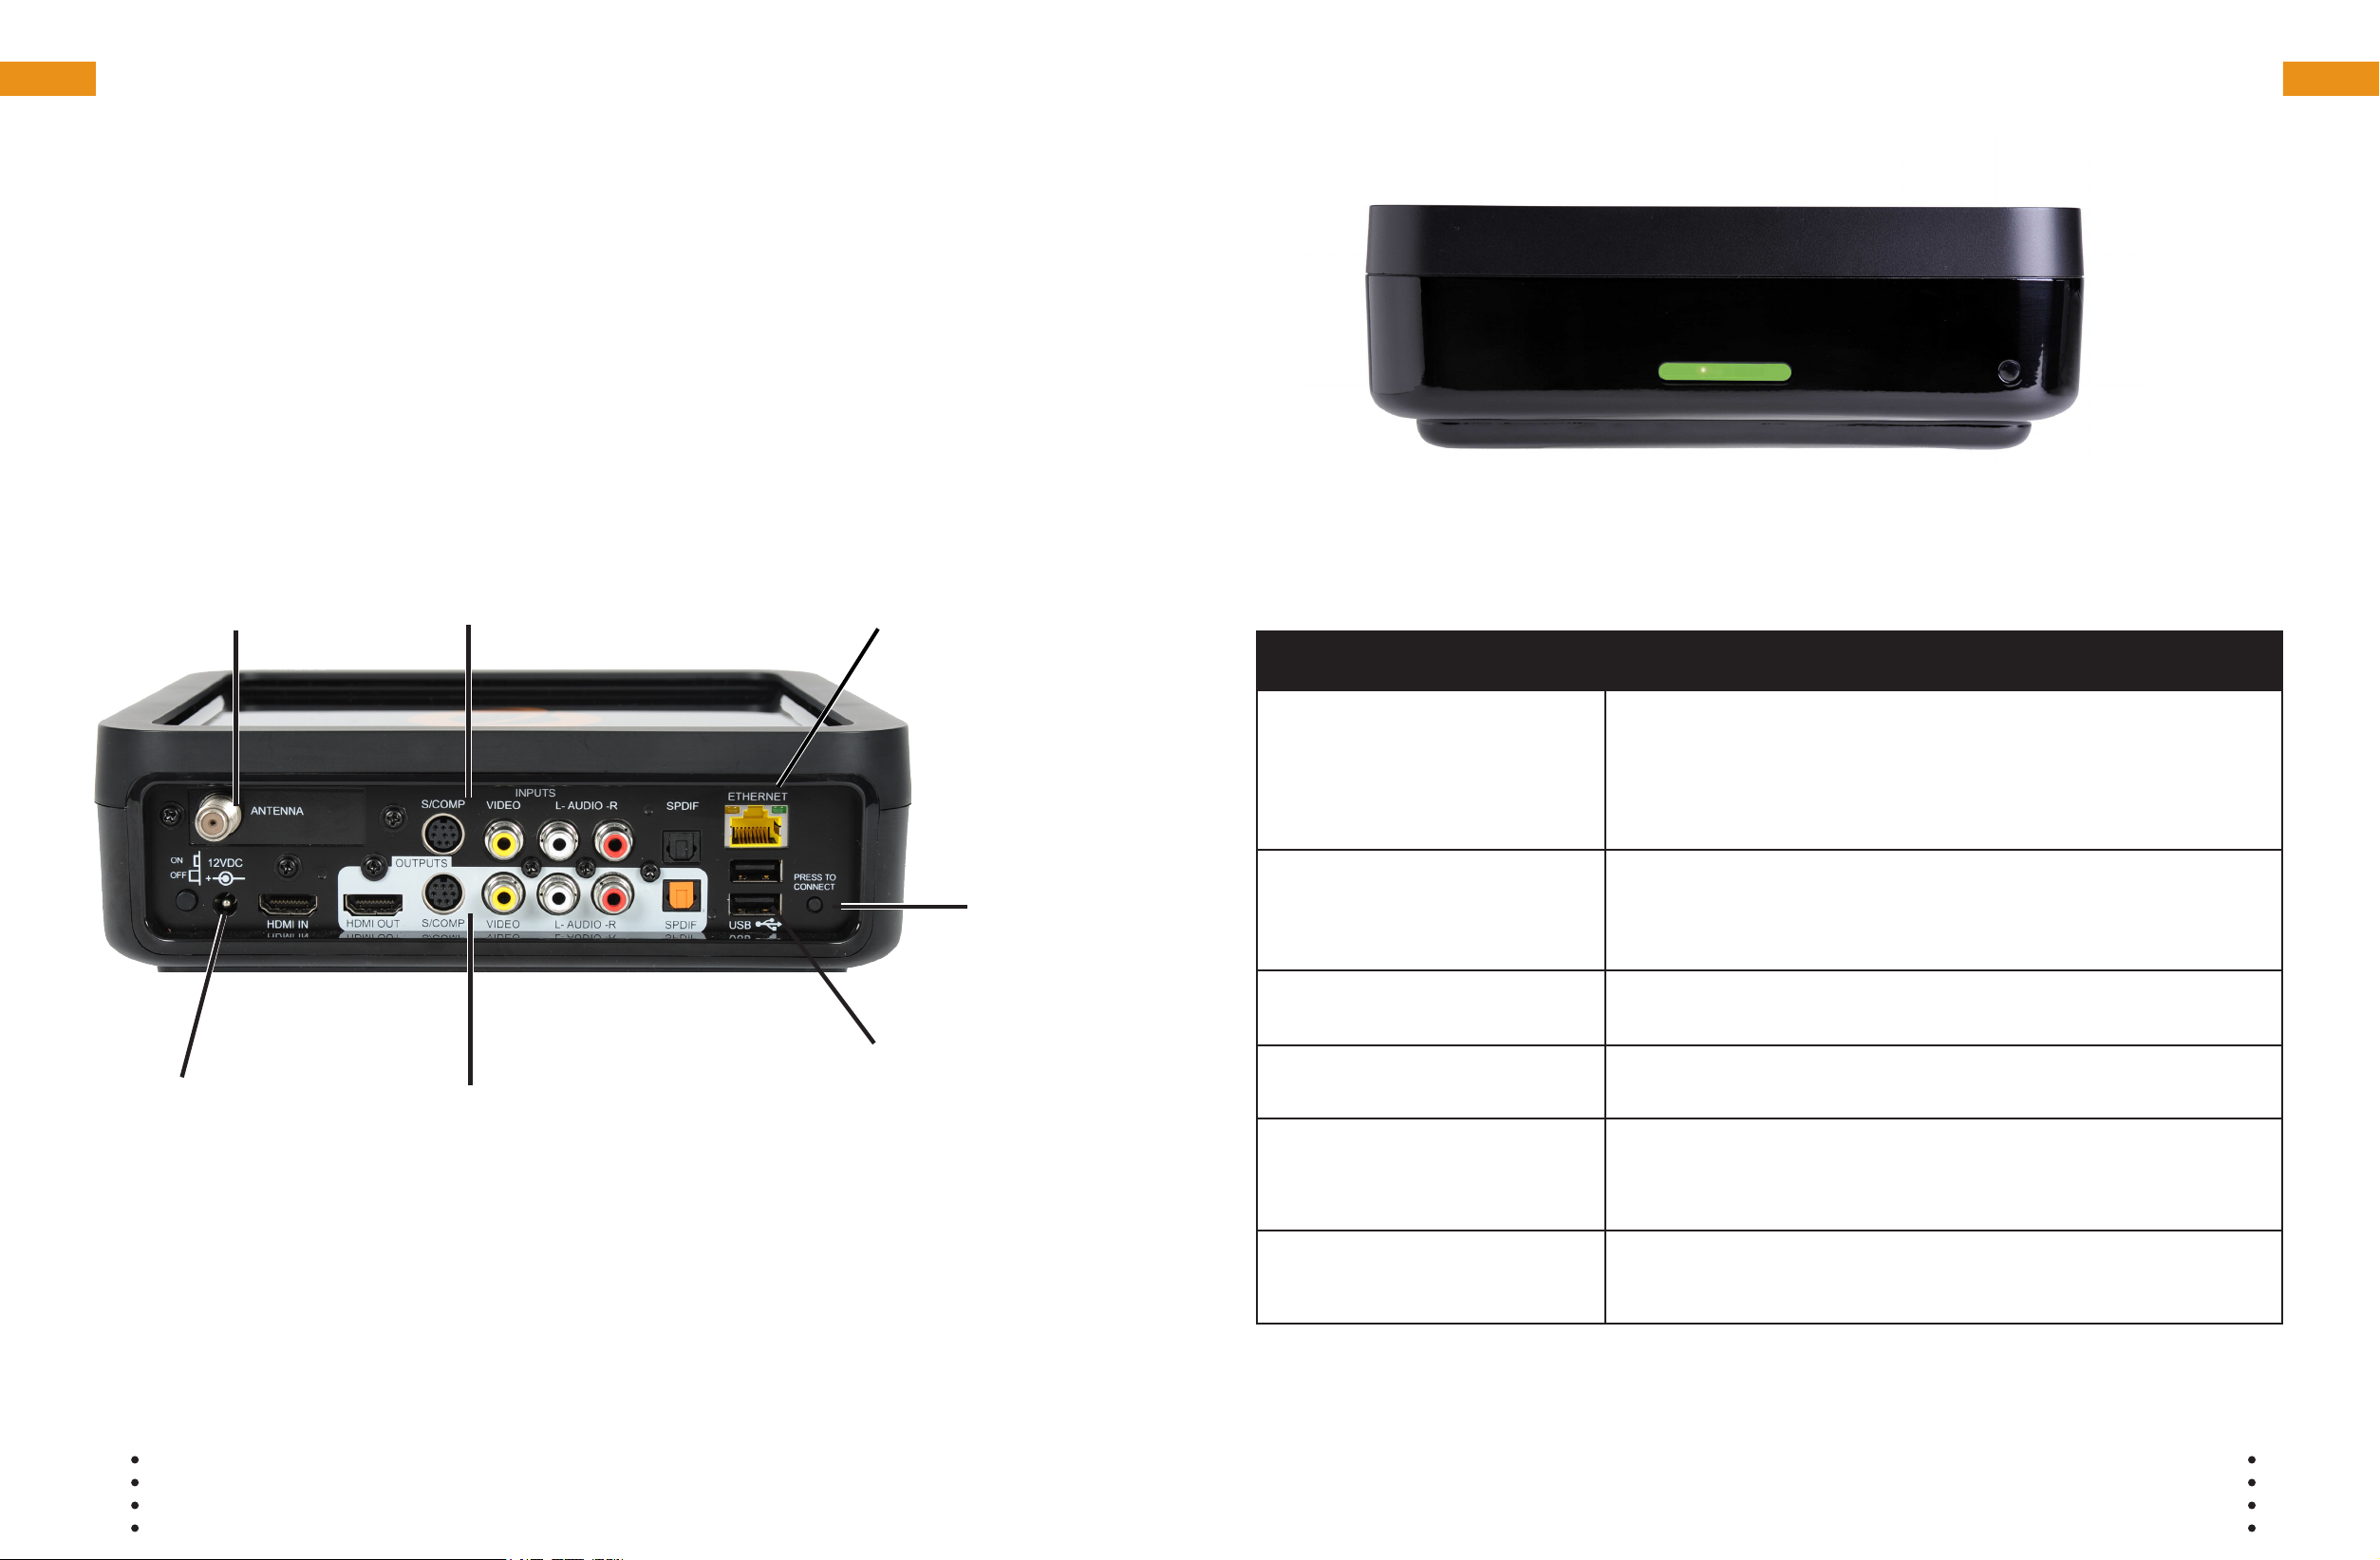
TV EXTENDER DESCRIPTION
What is the TV Extender? The ROSsm Digital Media Adapter, or TV
Extender, is a fully featured high denition media delivery system providing
the TV interface for all ROSsm services and features. Designed to be video
set top box (STB) independent, the ROSsm service displays on your TV
on top of your current cable or satellite programming. The TV Extender
supports HDMI and analog video inputs including a wide range of High
Denition video resolutions: 480, 720, and 1080.
TV EXTENDER LED DESCRIPTION
Antenna
Currently not
supported.
Do not plug in
coaxial cables.
INPUTS
Connect DVD players, VCRs,
gaming consoles, and / or
satellite / cable boxes.
Ethernet port
Connect to your
network using
Ethernet cable.
PRESS TO
CONNECT
Press to
set up a
connection
between
your Home
Center and
TV Extender.
The Home Center and TV Extender have status indication lights to let you
know at a glance the status of your service during set up, activation, and
usage. Note that the TV Extender lights ash when you press the remote
buttons.
LED Color Description
Red (solid) The TV Extender LED is red during start up; if it
remains red, there is a service connectivity issue.
Amber (ashing)
TV Extender is connected to the Home Center, but
there is a service problem.
Amber (solid) Attempting Wi-Fi Protected Setup (WPS).
Power port
Plug the
included AC
power cord
into the ROS
TV Extender.
8
sm
OUTPUTS
Connect to a TV or A/V receiver
to pass through audio / video
programming from your DVD
players, VCRs, gaming consoles,
and / or satellite / cable boxes
and the TV Extender.
USB
Currently not
available. Do
not plug in USB
devices or cables.
Green (ashing) TV Extender is connecting to the Home Center.
Green (solid) TV Extender is connected to the Home Center and
service is available.
Green (quick ashing) Ready to press Press to Connect button on TV
Extender and Home Center to connect for service.
9
Page 6
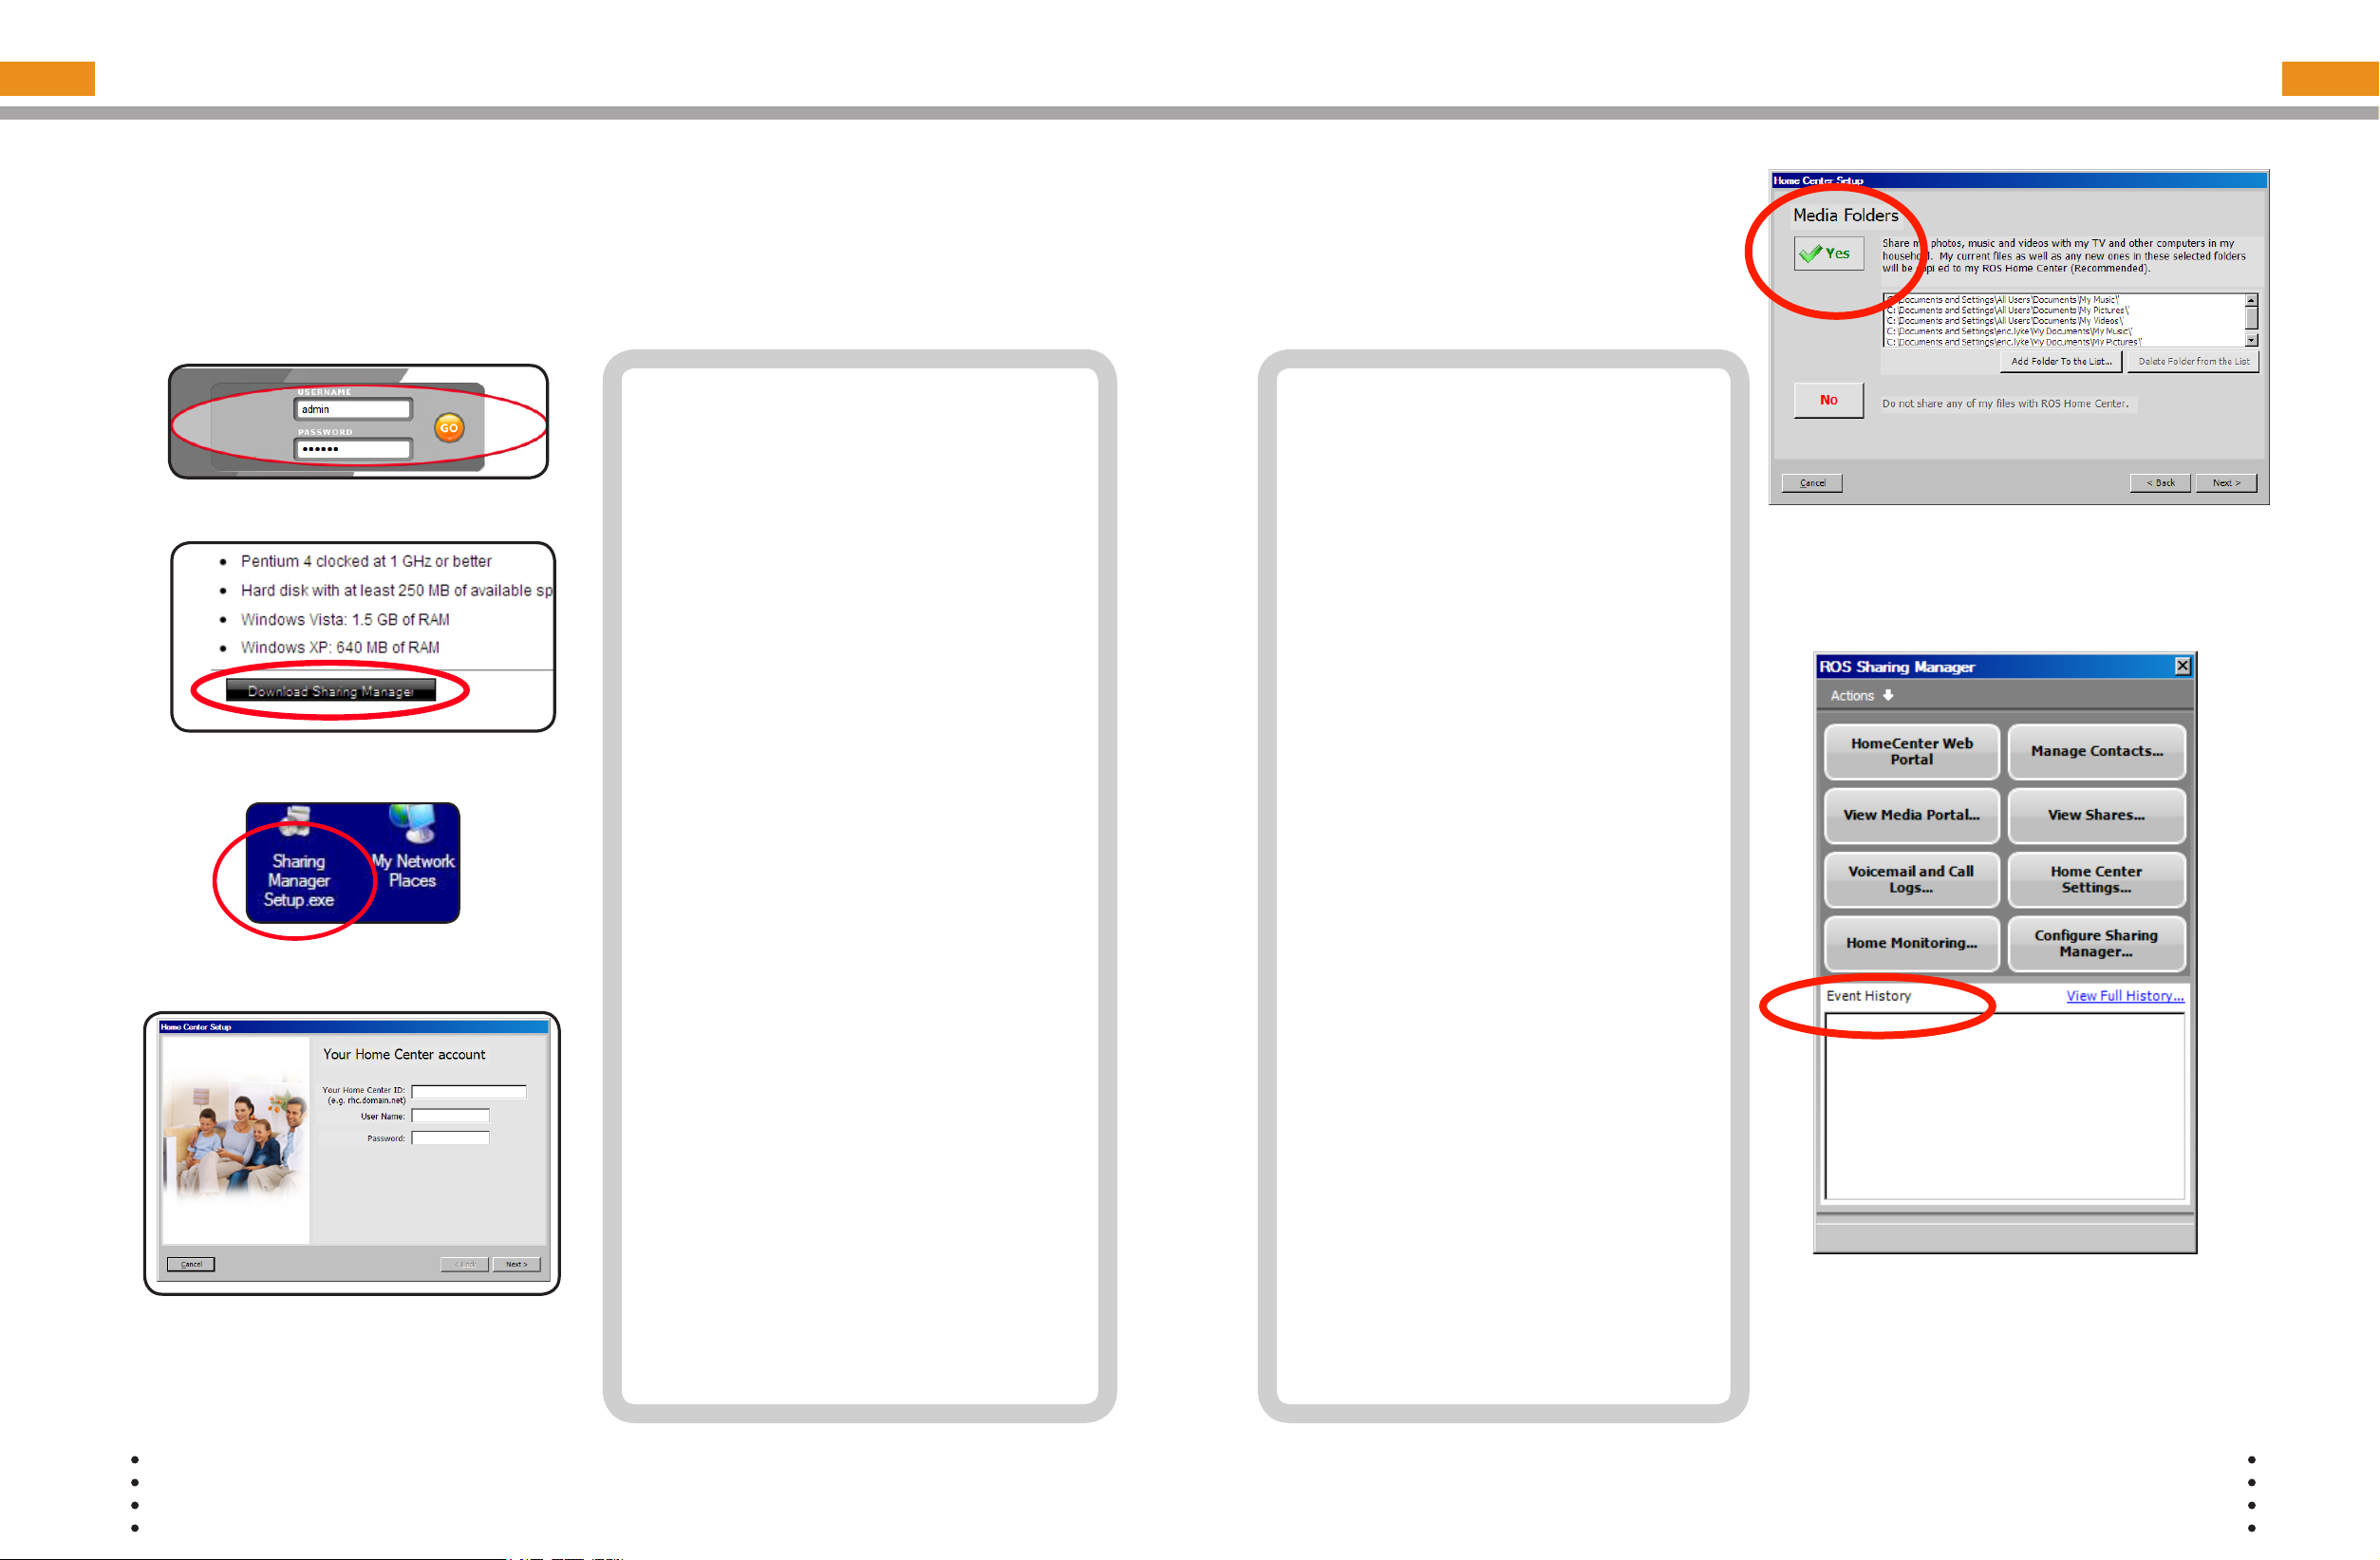
INSTALL SHARING MANAGER
To take advantage of your Home Center media features including playing your music and
viewing photos from your TV, you must rst install the Sharing Manager application on
your PC. The Sharing Manager automatically adds media to your Home Center
so you can access media from anywhere in and out of your home using your TV Extender,
PC, or other compatible device. Complete the following to install the Sharing Manager on
your PC:
SHM Figure 1: ROSsm Login
SHM Figure 2: Sharing
Manager download.
SHM Figure 3: Installer
1 From your computer and connected
sm
directly to your ROS
or LAN (not logged remotely), open
an Internet browser and log into the
Home Center web interface at http://
yourname.yourservice.com (SHM
Figure 1).
2 In Settings > Applications, click
the Download Sharing Manager
Application link at the bottom left
corner of the page (SHM Figure 2).
3 In the File Download - Security
Warning dialog box, click Save.
4 In the Save As window, browse
to Desktop and click Save. The
Download Complete dialog box
displays.
5 Click Close. The Sharing Manager
installer icon is now on your desktop
(SHM Figure 3).
6 Run the Sharing Manager setup
wizard by double-clicking the
SharingManagerSetup.exe icon. If
you receive a security warning dialog
box, click Run. The Sharing Manager
setup wizard opens (SHM Figure 4).
7 Enter your Home Center ID listed on
your Welcome Letter in the following
format yourname.yourservice.com
with admin and ros for your user name
and password.
home network
8 Select the folders you’d like the
Sharing Manager to watch. Whenever
you place media les that the Sharing
Manager recognizes in these folders,
it will automatically add them to
the Home Center so that you can
access them from your TV using a
TV Extender or with other supported
devices. Note that if you delete media
from your computer it will also be
deleted from the Home Center.
9 Once you’ve completed the wizard
and you are logged in, the ROSsm
Sharing Manager will open (SHM
Figure 6). You can see your media
les copied to the Home Center in
the Event History eld as it happens.
You can access other features of the
Home Center using the buttons in the
Sharing Manager window.
NOTE: Depending on how many les you
have, it may take several minutes for
the les to be copied to your Home
Center.
SHM Figure 5: Select your
watched folders
10
SHM Figure 4: Installation
© COPYRIGHT 2006-2008 PRODEA SYSTEMS, INC. ALL RIGHTS RESERVED.
© COPYRIGHT 2006-2008 PRODEA SYSTEMS, INC. ALL RIGHTS RESERVED.
SHM Figure 6: Log into
the Sharing Manager
11
Page 7
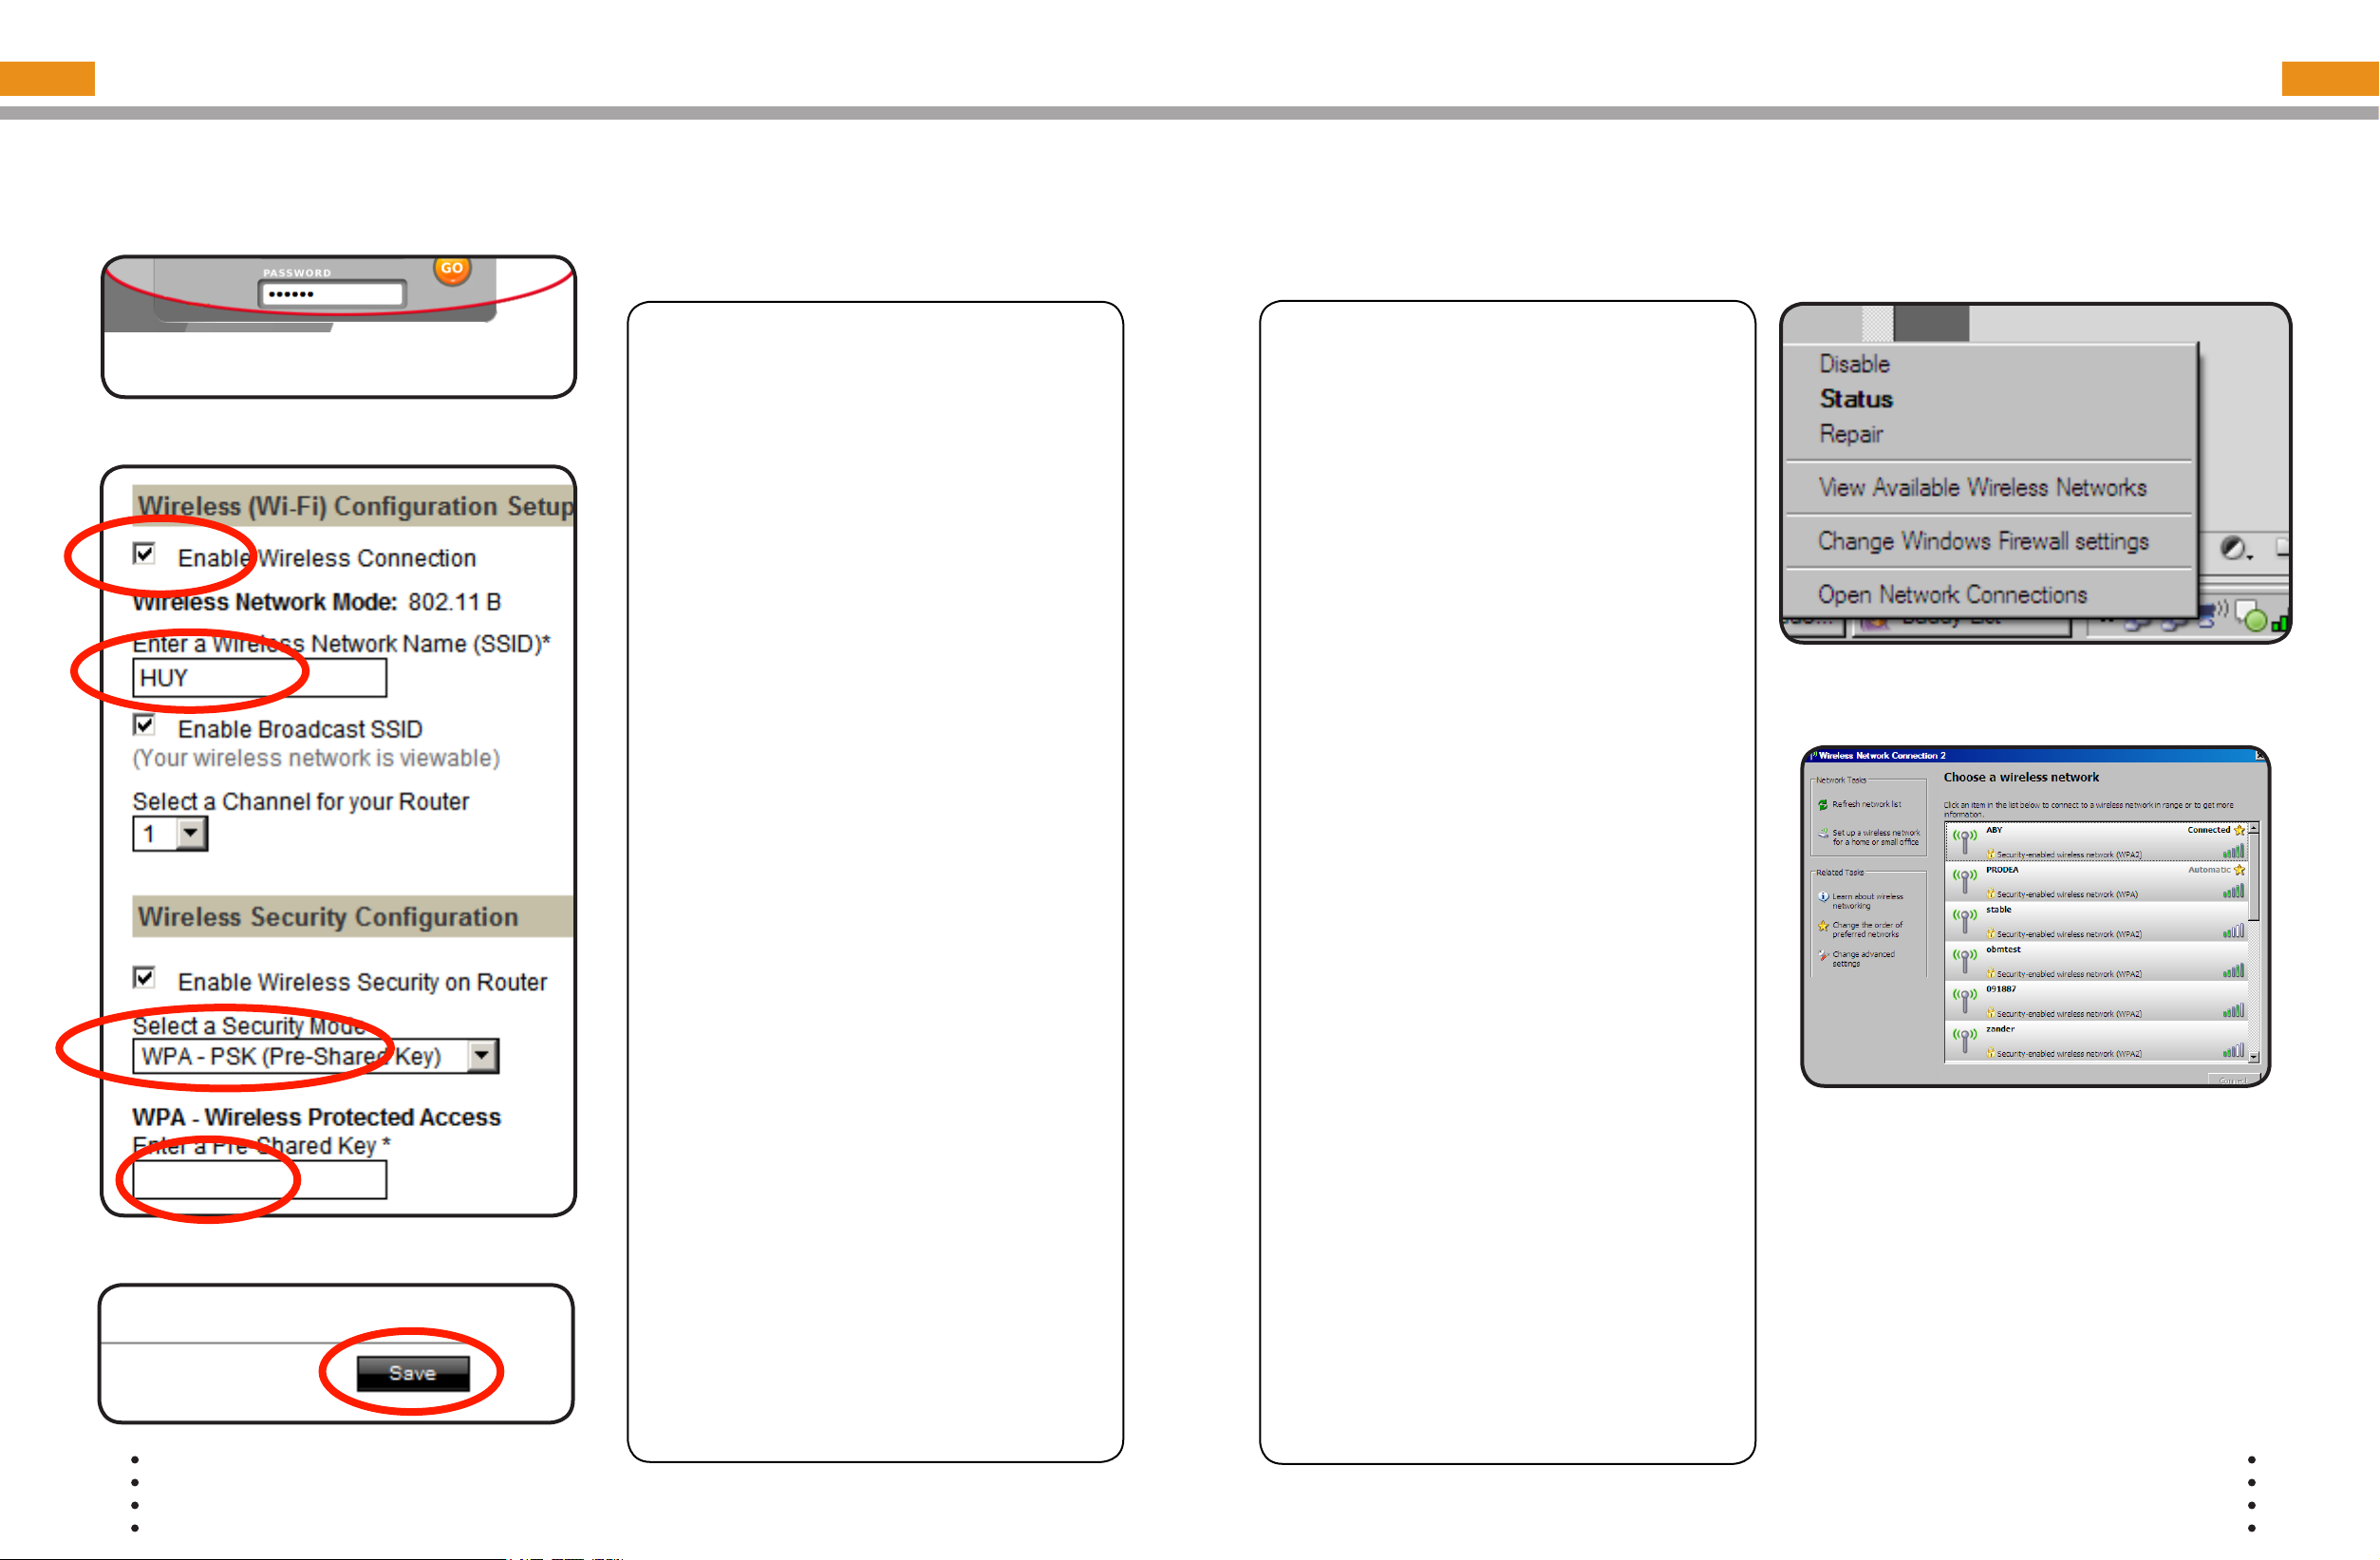
(OPTIONAL) CONFIGURE WIRELESS (Wi-Fi)
ACCESS YOUR Wi-Fi NETWORK
IMPORTANT: By default your wireless is enabled to 802.11 b/g, WPA-2 - AES+TKIP.
Your Wi-Fi network name is the last 6 digits of your MAC address and the key is the serial number
of your Home Center. See the Reference Card for more information on your default settings.
NOTE: Only change your default wireless
information if you know what you are doing
or are instructed by technical support as any
changes to your network may affect your
Wi-Fi Figure 1: ROSsm Login
service.
1 On your computer, log into the ROSsm
(Wi-Fi Figure 1) and select SETTINGS
> NETWORK > WIRELESS
2 Check the Enable Wireless
Connection
2).
3 In the Enter Wireless Network Name
check box (Wi-Fi Figure
(SSID) eld, enter a wireless network
name. Use a simple name containing
no personal information or special
characters, for example, “BILL” (Wi-Fi
Figure 2).
4 If you have a current security setting
such as WEP, WPA PSK, or WPA2 PSK,
select it. Otherwise, select a security
mode from the Select a Security
Mode drop-down list (Wi-Fi Figure 2).
5 Enter a password containing at least
nine characters and at least one
number, for example “sparekey1”. Use
a password that is easy to remember,
but not easily guessed by others (Wi-Fi
Figure 2).
6 Click Save. The ROSsm wireless service
is enabled (Wi-Fi Figure 3).
Your wireless (Wi-Fi) network is already congured. Complete the following to connect to
your new wireless (Wi-Fi) network.
NOTE: Only make changes if instructed
while activating your ROSsm service or by
your service provider.
1 On your PC, right-click the wireless icon
in your system try (Wi-Fi gure 1) and
select View Available Networks.
2 Select the wirless network listed on your
Reference Card (Wi-Fi gure 2).
3 Enter the password listed on your
reference card. You are now connected
to the Home Center wireless network.
Wi-Fi gure 1
Wi-Fi gure 2
Wi-Fi Figure 2: Wireless Settings Fields
Wi-Fi Figure 3: Click Save
12
TIP: If you already have a wireless network,
use your current network name and security
setting (WPA or WEP) and the same
password for an easier transition to ROSsm
routing services.
© COPYRIGHT 2006-2008 PRODEA SYSTEMS, INC. ALL RIGHTS RESERVED.
© COPYRIGHT 2006-2008 PRODEA SYSTEMS, INC. ALL RIGHTS RESERVED.
13
Page 8

CONFIGURE HOME MONITORING
With the Home Monitoring feature, you can view live netcams of your home and property
from any location with Internet access. You can securely monitor your cameras while
watching TV, while at work, or from an Internet café using your PC or your mobile phone.
You can also schedule notications and video or still shots to be sent to your phone or
email account.
HM Figure 1: ROSsm Login
NOTE: You must be a Home Monitoring
subscriber to use this feature and have
netcam(s) setup and congured.
In order to activate and change your home
monitoring notication settings including
phone numbers and email accounts to
receive video and still images, complete the
following:
1 Log into the Home Center and click
Monitoring > Settings. (HM Figure 1).
2 In the System tab, set your Home
Monitoring Mode, either Away or Home
and select the cameras to be monitored
under each mode, and then click Save.
(HM Figure 3).
3 In the Passcode tab, set your 4 digit
numeric passcode and click Save (HM
Figure 4).
4 In the Phone Access tab, click Phone/
SMS/MMS and enter your phone
information and notication settings.
5 Click Email and enter in the email
account to receive notications.
6 Click Save.
7 To view Home Monitoring events, log into
the Home Center and click Monitoring >
Events.
8 In Events, you can scroll to view activity,
used the calendar to select a day, or
enter a search term to nd a specic
event (HM Figure 5).
NOTE: In order to view Home Monitoring
events on your phone, your phone must
have a web browser and an Internet
connection.
HM Figure 4: Set your passcode
14
HM Figure 2: Set your
monitoring mode.
HM Figure 3: Select Monitoring
Mode
© COPYRIGHT 2006-2008 PRODEA SYSTEMS, INC. ALL RIGHTS RESERVED.
© COPYRIGHT 2006-2008 PRODEA SYSTEMS, INC. ALL RIGHTS RESERVED.
HM Figure 5: View Events
15
Page 9

SET UP X-LITE SOFT PHONE
Use your voice services from your PC, whether in your home or on the road. All you need is
a computer with an Internet connection and a microphone and speaker or headset.
Softphone Figure 1: ROS
Softphone Figure 2: Add Extension
sm
Login
Your ROSsm service must be activated
and your computer connected to
your home Home Center network to
complete the following conguration.
1 On your PC, download the X-Lite client
from http://www.counterpath.com/
xlite_download.html for Windows,
accepting all the defaults, and install
on your PC. The application window
appears.
2 Log into the Home Center web interface
with your user name and password
(Softphone Figure 1).
3 In the top navigation bar, click Settings
> Voice Service, click Phone Lines
4 Click Add Extension. (Softphone Figure
2) The Phone Setup-Add Extension
window appears (Softphone Figure 3).
5 Note the extension number, the domain,
and the password listed. You will need
to enter this information into the X-Lite
soft phone settings.
Right click on the X-Lite softphone and
6
select SIP Account Settings (Softphone
Figure 4) and click Add... (Softphone
Figure 5).
7 Enter the following: 1) extension number
in the Display name, User name, and
Authorization user name elds, for
example 6002; 2) the automatically
generated password listed on the Home
Center web page in the Password
eld; 3) domain in the Domain eld, for
example yourname.voice.yourservice.
com; 4) under Domain Proxy, select
domain (Softphone Figure 6).
9 Click Apply then OK. Click Close in the
SIP Accounts window. Your extension
number and “Ready” displays on
the X-Lite application when setup is
complete (Softphone Figure 7).
Softphone Figure 5: X-Lite
Properties
16
Softphone Figure 3: Edit Extension
Softphone Figure 4: Congure
X-Lite
© COPYRIGHT 2006-2008 PRODEA SYSTEMS, INC. ALL RIGHTS RESERVED.
© COPYRIGHT 2006-2008 PRODEA SYSTEMS, INC. ALL RIGHTS RESERVED.
Softphone Figure 6: X-Lite
Conguration
Softphone Figure 7:
X-Lite Softphone
17
Page 10

CONFIGURE MEDIA SERVICES
CONFIGURE TV Extender REMOTE WITH CODES
You can access RadioTime and YouTube without entering account information, but to see
your favorites and saved channels, you will need to enter your account information. Once
your account is created, complete the following procedure to validate and save your account
information (user name and password) on the Home Center.
NOTE: If you change your user name
and password on the services web site,
Media Figure 1: ROSsm Login
Media Figure 2: Media Account
Media Figure 3: Media Pin
you must make account changes on the
Home Center as well.
1 On your PC, log into the Home Center
(Media Figure 1).
2 Select a media service.
3 Enter your service user name and
password and click SAVE. The account
information is validated. If the user name
and password entered on the Home
Center do not match those that on the
service’s web site, an error message
displays. Re-enter the user name and
password and click Validate Account
again.
4 Follow the same procedure for each
media service as needed. Note that
if you log into any of your services
web sites and change your user name
or password, you must re-enter this
information on the Home Center.
5 By default the media access pin to
restrict content is disabled. To enable
the media access PIN, select the
Manage Access tab and check the
Require Media PIN to browse content
check box (Media Figure 3).
6 To change the 4 digit media pin used to
control access to media services, click
Media Pin and enter four numbers.
7 Click Save (Media Figure 4).
Your ROSsm TV Extender remote is automatically programmed to operate the TV Extender.
You can program this remote to operate up to three additional devices like a DVD player,
cable or satellite receiver, or television. This procedure describes how to program the
remote control by entering a specic code for your device. The following steps describe
how to program the remote for a TV, using the TV button. For other devices such as a cable
or satellite receiver or DVD player, follow the same steps, but use the STB or AUX button
instead of the TV button.
1 Refer to the Remote Control Codes
starting in the back of this document
and nd your TV or device code (for
newer televisions, start at the end of the
list of codes for your brand and work
backwards). If more than one code is
available, use the rst 4-digit code listed.
If your device is newer, use the last code
listed and work backward through the
list.
2 Turn on your TV or device that you want
to use with the TV Extender remote. For
this procedure, we will use TV as an
example but this same process will work
with any supported device.
3 On the remote, press and hold the TV
button and the OK button (Remote
Figure 1).
4 Release both buttons. All four MODE
buttons (ROSsm, AUX, TV, and STB)
blink twice
5 Enter the 4-digit code for your TV. The
TV button blinks three times (Remote
Figure 2).
6 To make sure that this is the correct
code, point the remote at your TV and
press the Power button. If the TV turns
off, you have successfully programmed
the remote. If the TV does not turn off,
repeat this procedure using the next
code listed for your TV. If you can turn
the TV on and off, but some of the
remote buttons do not operate the TV
as you would expect, try using the next
code listed for your TV.
NOTE: For more information about your
remote, see the back of this Install Guide.
To reset your remote:
Press and hold the ROSsm key. While
holding down the ROSsm key, press OK.
Release both keys. The device keys blink
twice. Press 9 - 0 - 0. The ROSsm key
blinks three times to indicate that the reset
was successful.
Remote Figure 1: Select the
device and OK buttons
Remote Figure 2: Code Entry
18
© COPYRIGHT 2006-2008 PRODEA SYSTEMS, INC. ALL RIGHTS RESERVED.
© COPYRIGHT 2006-2008 PRODEA SYSTEMS, INC. ALL RIGHTS RESERVED.
19
Page 11

CONFIGURE TV Extender REMOTE WITHOUT A CODE
TV Extender REMOTE OVERRIDE INSTRUCTIONS
You can program this remote to operate up to three additional devices such as a
DVD player, cable or satellite receiver, or television. This procedure describes how
to program the remote control by searching through all of the stored codes for your
device’s code.
1 Turn on your TV or device. For this
procedure, we will use TV as an
example but this process works with
any supported device. Follow the same
steps, but use the STB or AUX button
instead of the TV button.
2 On the remote, press and hold the TV
button and the OK button (Remote
Figure 3).
3 Release both buttons. All four MODE
Remote Figure 3: Press the
device and OK buttons
Remote Figure 4:
Enter 9-2-2
Remote Figure 5:
Press and hold Play
buttons (ROS
blink twice.
4 Enter the numbers 9-2-2 (Remote Figure
4).
5 Point the remote at the TV.
6 Press and hold the PLAY button. The
device button lights up every time a new
code is tried. The TV or device turns off
when you have found the right code.
The remote tries the most common
codes rst. If the TV or device goes off
but you didn’t release the Play button
fast enough to catch the code, press
Rewind to go back to the previous
code. When you have tried all the codes
stored in the remote, the entire remote
ashes twice and returns to normal
operation. You can exit the program at
any time by pressing EXIT.
sm
, AUX, TV, and STB)
Complete the following process to change the default remote control settings for volume,
channel, and / or power functions so that these functions will always be controlled by
specic devices.
1 Using your ROSsm remote control, press
sm
and hold the ROS
2 Release both the ROSsm and OK
buttons. The buttons blink twice.
3 Enter the setup code for the function
reassignment (see below). The ROSsm
button blinks twice.
• Volume reassignment code: 9 – 5
– 5. By default the volume control
passes through to your television,
so when you press the volume
button the volume is lowered at your
television. Use this assignment code
to congure another device to control
the volume.
• Channel reassignment code: 9 – 6 –
6. By default the channel control is
passed through to the television. Use
this assignment code to congure
another device to control the
channels.
• Power reassignment code: 9 – 7 –
7. You can set the Power button to
turn on and off one or more devices
simultaneously
4 Press the device button (ROSsm, TV,
STB and AUX) that you want to control
the function.
NOTE: To reset your remote to factory
settings, press and hold the ROSsm key.
While holding it down, press OK. Release
both keys. The device keys blink twice.
Press 9 - 0 - 0. The ROSsm key blinks
three times to indicate that the reset was
successful.
and OK buttons.
Remote Figure 3: Press the
device and OK buttons
Remote Figure 4:
Enter 9-2-2
.
Remote Figure 5:
Click Play
20
© COPYRIGHT 2006-2008 PRODEA SYSTEMS, INC. ALL RIGHTS RESERVED.
© COPYRIGHT 2006-2008 PRODEA SYSTEMS, INC. ALL RIGHTS RESERVED.
21
Page 12
SERVICE FAQ
Question Answer
I am trying to activate
the Home Center, but
the WAN page appears.
What do I need to do?
The WAN page appears,
and I need to congure a
static IP. What do I need
to do?
The WAN page appears,
and I need to congure
PPPoE. What do I need
to do?
The TV Extender LED
changes to solid red
and/or error information
is displayed on the TV
screen. What do I need to
do?
The WAN page appears when the Home Center cannot
automatically connect to the Internet. This can happen for any of
the following reasons:
• Your broadband modem is not connected to the Internet or
the Home Center is not connected to your modem. Check
the connection status on your modem. Check the connection
between the Home Center and the modem and verify that the
Ethernet cable is plugged in securely.
• You need to congure PPPoE or a static IP address.
• You have another router in your network. Remove the router and
try the activation procedure again.
• You need to enable MAC cloning.
• Your IP address is automatically assigned through DHCP, but
DHCP is not working correctly.
1 On the WAN page, select Static IP from the Internet Connection
Type drop-down list box.
2 Enter the information provided by your ISP, and click Save.
3 Verify the IP address information. If the IP Address is blank,
click Refresh.
The WAN page appears when the Home Center cannot
automatically connect to your service.
1 On the WAN page, select PPPoE from the Internet Connection
Type drop-down list box.
2 Enter the user name and password provided by your ISP, and
click Save.
3 Check the IP Address eld. If an IP Address appears, wait for
the Web browser page to update. If the IP Address is blank, click
Reset.
There are several scenarios that you can check for or remedy:
• The WPS process may have timed out before both Press
to Connect (WPS) buttons were pressed. Once you press
the WPS button on the TV Extender, you have two minutes
to press the WPS button on the Home Center.
• The wireless signal between the TV Extender and Home
Center may be too weak for wireless communications. Try
moving the TV Extender and Home Center to allow more
reliable communications, or use a wired technology such
as Ethernet or HomePlug adapters.
• To try wireless setup again, or to connect through Ethernet
or HomePlug adapters, restart the TV Extender by
pressing the ON/OFF button on the back.
Question Answer
The LED on the front of the
Home Center is off. What do I
need to check?
I entered the activation code
or PIN, but the message
INVALID ACTIVATION CODE
or ACTIVATION CODE or PIN
ERROR appears. What do I do?
The WAN page indicates that
I need to remove my current
router or to set my current router
to bridge mode. What do I need
to do?
All of my devices display as
unusable in the Device list
(Settings > Network and Devices
> Devices). What do I do?
I can see a device in the
Settings > Network and Devices
> Devices list but it has a “No”
under “Usable” and it isn’t
working. What do I do?
My Wi-Fi enabled device cannot
connect to the network.
Slow Internet connection Your new service requires Internet bandwidth for many of its
NOTE: For more information on troubleshooting your Internet connection, see your Internet
service provider documentation.
On the Home Center, verify that all of the cables are plugged
in securely. Make sure that the power adapter is plugged into a
working electrical outlet. When the Home Center is plugged in,
the LED quickly ashes several colors and then changes to solid
red. This indicates that the Home Center is starting up.
Verify the information you received from your service provider
and enter the activation code again. If you know you are using
the correct activation code, then login to the web portal to verify
your account status.
If you have a modem-router combination, you must turn on bridge
mode before installing the Home Center. This makes the modemrouter function as a modem only, so that the Home Center can
perform all router functions. For information about turning on
bridge mode, review the documentation provided with your router.
If a device is not working then delete the device from the list
and power it down (unplug and plug it back in). Then perform
any necessary conguration steps. Or delete all of the devices
from the Device list and then power down the Home Center and
power it back up (unplug and plug it back in). A device that has
been disconnected may still display in the Device list, but there is
nothing that you need to do.
Delete the device from the list and power it down (unplug and
plug it back in). Then perform any necessary conguration steps.
Check the following:
• A 2.4 GHz device such as a phone or microwave may be
interfering with your Internet enabled device.
• Wi-Fi settings may not be supported
• Environmental interference
features. If there is heavy service usage, from movie downloads,
etc. and if you have a low broadband speed connection (<1MB),
your Internet may be slowed. You can wait until bandwidth is
available or request faster Internet service from your ISP.
22
© COPYRIGHT 2006-2008 PRODEA SYSTEMS, INC. ALL RIGHTS RESERVED.
© COPYRIGHT 2006-2008 PRODEA SYSTEMS, INC. ALL RIGHTS RESERVED.
23
Page 13

DEVICE FAQ
Question Answer
I plugged in all of my
devices but I don’t see
any in the Device list.
My device shows up in
the Settings > Network
and Device > Devices
list but has a “No” in
the “Usable” column.
The LED on my Home
Center is green.
Wi-Fi Protected Setup
(WPS) is not working.
What can I check?
My voice calls
experience a lot of
interference.
Reboot the Home Center by powering it down and powering
it back up.
If in the Settings > Network and Device > Devices list your
device does not display or “No” is listed in the “Usable”
column; or you did not receive a test ring (for voice services).
Power down the device. Delete it from the Devices list in the
list. Power up the device The device should show up in the
Device list with a “Yes” in the “Usable” column.
To use WPS, your wireless network security mode must be
set to WPA or WPA2. WPS does not work if your wireless
security mode is WEP.
If the sound on your phone receives a lot of interference.
If you have a cordless phone, try changing your phone’s
channel to regain service.
Question Answer
My device shows up in
the Settings > Network
and Device > Devices
list but has a “No” in
the “Usable” column.
The LED on my Home
Center is green.
My voice calls
experience a lot of
interference.
Voice quality poor
Disconnect the device from the Home Center and delete the
device from the device list. Then reconnect the device to the
Home Center.
If the sound on your phone receives a lot of interference, try the
following.
• Check the connections on your equipment.
• If you have a cordless phone, try changing your phone’s
channel to regain service.
• Stay away from anything that may be causing interference,
such as a microwave oven.
Try walking closer to the basestation or make sure there
is no environmental interference. If the issue persists, try
recalling the number. If applicable, try changing your phone’s
channel.
I did not receive a test
ring.
I plugged in all of my
devices but I don’t see
any in the Device list.
If you have a 2.4 GHz phone, it is possible that the Home
Center Wi-Fi will interfere with the phone service. In this
case, try changing your phone’s channel to regain service.
Reboot the Home Center by powering it down and powering
it back up.
24
© COPYRIGHT 2006-2008 PRODEA SYSTEMS, INC. ALL RIGHTS RESERVED.
© COPYRIGHT 2006-2008 PRODEA SYSTEMS, INC. ALL RIGHTS RESERVED.
25
Page 14

REMOTE CODES
For newer televisions, start at the end of the list of codes for your brand and work
backwards. Additional codes for all supported devices are listed in the online help.
TV Remote Codes
If you have an older or less common TV not
listed here, try the general TV code 2363.
Admiral .............................................................
2010, 2022, 2119, 2145
Advent ..............................................................
2045, 2051, 2058, 2059, 2067
Aiwa .................................................................
2300
Akai ..................................................................
2002, 2007, 2030, 2037, 2055, 2120,2289,
2323, 2351, 2352, 2363, 2364
Apex .................................................................
2159, 2230, 2296
Apex Digital ......................................................
2014, 2043, 2046, 2048, 2082, 2290
Audiovox ..........................................................
2009, 2018, 2021, 2027, 2053, 2081, 2130
Bell & Howell ....................................................
2013, 2119, 2133
Centurion..........................................................
2125, 2363
Citizen ..............................................................
2002, 2007, 2009, 2017, 2123, 2124, 2127,
2130, 2140, 2143, 2307
Colortyme .........................................................
2017, 2123
Crosley .............................................................
2006
Curtis Mathes ...................................................
2002, 2003, 2006,2007, 2010,2011,2013,
2015, 2017,2021, 2023, 2037, 2096, 2106,
2118, 2123, 2133, 2140, 2143
Daewoo ............................................................
2009, 2021, 2027, 2029, 2030, 2114, 2122,
2123, 2127, 2143, 2197, 2214, 2263, 2307,
2363
Denon...............................................................
2011, 2090
Emerson ...........................................................
2013, 2016, 2017, 2018, 2019, 2022, 2027,
2123, 2126, 2128, 2129, 2130, 2131, 2133,
2143, 2149, 2293, 2307, 2308, 2322, 2363
Epson ...............................................................
2062, 2066, 2255
Fisher ...............................................................
2013, 2132, 2133
Fujitsu...............................................................
2032, 2054, 2073, 2131, 2269, 2270, 2272
Funai ................................................................
2016, 2018, 2130,2131, 2303
Gateway ...........................................................
2116, 2117
GE ....................................................................
2003, 2004, 2017, 2021, 2096, 2106, 2109,
2118, 2121, 2123, 2134, 2135, 2155, 2305,
2312, 2326
Goldstar............................................................
2002, 2017, 2122, 2123, 2126, 2143,
2144,2306, 2363
Haier.................................................................
2090
Harley Davidson ...............................................
2303
Harman/Kardon ................................................
2006
Hello Kitty .........................................................
2021
Hewlett Packard ...............................................
2357
Hitachi ..............................................................
2011, 2017, 2123, 2126, 2157, 2162, 2287,
2303, 2363
Hyundai ...........................................................
2071
Innity ...............................................................
2006, 2136
InFocus ............................................................
2237, 2358, 2359
Insignia .............................................................
2016
JBL ...................................................................
2006, 2136
JC Penney........................................................
2017, 2118, 2122, 2123, 2124, 2134, 2135,
2140, 2143, 2144
Jensen..............................................................
2017, 2045, 2058, 2059, 2123
JVC ..................................................................
2005, 2042, 2102, 2126, 2135, 2137, 2186,
2210, 2211, 2215, 2246, 2281, 2282
Kenwood ..........................................................
2002, 2017, 2123
KLH ..................................................................
2046, 2048
LG ....................................................................
2017, 2036, 2075, 2099, 2105, 2122, 2256,
2363
LXI ....................................................................
2003, 2006, 2013, 2014, 2017, 2118, 2123,
2133, 2136
Magnavox.........................................................
2002, 2006, 2017, 2039, 2053, 2103, 2110,
2123, 2124, 2136, 2164, 2172, 2212, 2216,
2303, 2322
Marantz ............................................................
2002, 2006, 2038, 2074, 2097, 2123, 2136,
2363
Matsui...............................................................
2363, 2364
Matsushita ........................................................
2020, 2028
Maxent .............................................................
2116
Memorex ..........................................................
2012, 2013, 2017, 2022, 2119, 2122, 2123,
2133, 2220, 2219, 2302, 2306
MGA .................................................................
2002, 2012, 2017,2122, 2123, 2305
Mitsubishi .........................................................
2010, 2012, 2017, 2064, 2080, 2101, 2122,
2123, 2191, 2205, 2222, 2224, 2277, 2283,
2326, 2363
Montgomery Ward ............................................
2119
Motorola ...........................................................
2010, 2121, 2145
NEC..................................................................
2002, 2017, 2025, 2083, 2115, 2121, 2122,
2123
Nikko ................................................................
2002, 2009, 2017,2123, 2127
Optimus ............................................................
2013, 2015, 2020, 2028, 2147, 2302
Orion ................................................................
2019, 2022, 2111, 2129, 2149, 2204, 2308,
2363
Panasonic ........................................................
2004, 2020, 2028, 2108, 2121, 2135, 2136,
2154, 2156, 2166, 2173, 2177, 2179, 2181,
2184, 2195, 2200, 2206, 2218, 2223, 2225,
2226, 2235, 2242, 2245, 2259, 2262, 2284,
2292, 2297, 2299, 2302, 2313, 2319, 2320,
2321, 2327, 2363
Penney .............................................................
2002, 2003, 2004, 2007, 2014, 2017, 2106,
2305, 2306
Philco ...............................................................
2002, 2006, 2121, 2122, 2123, 2124, 2126,
2136, 2220, 2363
Philips...............................................................
2006, 2035, 2097, 2110, 2121, 2124, 2126,
2136, 2158, 2161, 2176, 2183, 2187, 2199,
2209, 2227, 2231, 2316, 2339, 2362, 2363,
2364, 2365
Philips Magnavox .............................................
2158, 2164, 2183, 2187, 2209, 2339
Pioneer .............................................................
2015, 2031, 2079, 2123, 2147, 2221, 2228,
2267, 2273, 2286, 2363
Polaroid ............................................................
2046, 2078, 2251, 2366
Pulsar ...............................................................
2001, 2017, 2142
Quasar .............................................................
2004, 2020, 2028, 2121, 2135, 2302, 2313
RadioShack ......................................................
2002, 2003, 2013, 2017, 2018, 2133, 2303,
2363
RadioShack/Realistic .......................................
2017, 2118, 2123, 2126, 2130, 2133, 2139,
2143, 2144
Radiola .............................................................
2362, 2363, 2364, 2365
RCA ..................................................................
2003, 2008, 2017, 2031, 2091, 2096, 2100,
2106, 2109, 2112, 2118, 2121, 2122, 2123,
2152, 2163, 2198, 2202, 2232, 2237, 2288,
2291, 2305, 2315, 2317, 2326
Realistic............................................................
2002, 2013, 2017, 2018, 2133
Runco ...............................................................
001, 2002, 2025, 2026, 2142
Sampo ..............................................................
2002, 2017, 2116, 2123, 2143, 2144
Samsung ..........................................................
2002, 2007, 2017, 2037, 2047, 2055, 2057,
26
© COPYRIGHT 2006-2008 PRODEA SYSTEMS, INC. ALL RIGHTS RESERVED.
© COPYRIGHT 2006-2008 PRODEA SYSTEMS, INC. ALL RIGHTS RESERVED.
27
Page 15

2092, 2122, 2123, 2126, 2140, 2143, 2144,
2174, 2208, 2240, 2241, 2247, 2248, 2258,
2266, 2279, 2309, 2363, 2364
Sansui ..............................................................
2022, 2149, 2165, 2204, 2289, 2303, 2308,
2363
Sanyo ...............................................................
2013, 2017, 2052, 2088, 2132, 2133, 2305
Scott .................................................................
2017, 2018, 2019, 2123, 2126, 2129, 2130,
2131, 2354
Sears ................................................................
2003, 2006, 2013, 2014, 2016, 2017, 2118,
2123, 2131, 2132, 2133, 2137, 2148, 2303,
2306
Sharp................................................................
2010, 2017, 2024, 2033, 2034, 2072, 2123,
2126, 2139, 2143, 2145, 2189, 2234, 2238,
2244, 2249, 2253, 2310, 2326
Sony .................................................................
2000, 2063, 2094, 2120,2167, 2185, 2193,
2217, 2229, 2236, 2239, 2254, 2260, 2261,
2265, 2285, 2303
Soundesign ......................................................
2017, 2018, 2123, 2124, 2130, 2131
Sylvania............................................................
2002, 2006, 2016, 2017, 2123, 2124, 2136,
2160, 2209, 2213, 2219, 2250, 2271, 2293,
2298, 2301, 2314, 2322, 2325, 2333, 2339,
2340, 2341, 2349, 2350
Symphonic .......................................................
2016, 2018, 2128, 2130, 2148, 2180, 2303
Tandy................................................................
2010, 2145
Tatung ..............................................................
2117, 2121, 2363
Technics ...........................................................
2004, 2020, 2135
Toshiba .............................................................
2007, 2013, 2014, 2028, 2061, 2069, 2095,
2098, 2104, 2105, 2107, 2113, 2115, 2133,
2140, 2141, 2168, 2169, 2170, 2171, 2175,
2178, 2182, 2188, 2190, 2194, 2196, 2201,
2203, 2207, 2257, 2275, 2276, 2278, 2280,
2289, 2294, 2295, 2311, 2318, 2324
Viewsonic .........................................................
2076, 2077, 2084, 2116, 2252, 2264, 2374
Vizio .................................................................
2077, 2084, 2117, 2368, 2369, 2374
Wards ..............................................................
2002, 2006, 2017, 2079, 2098, 2118, 2119,
2122, 2123, 2128, 2131, 2134, 2136, 2139
Westinghouse ..................................................
2000, 2021, 2084, 2087, 2374
White Westinghouse ........................................
2022, 2027, 2363
Yamaha ............................................................
2002, 2017, 2049, 2062, 2065, 2122, 2123
Zenith ...............................................................
2001, 2009, 2017, 2022, 2105, 2119,
2142, 2151, 2153, 2192, 2233, 2268,
2274, 2303, 2308
Codes for Satellite
and Cable Box
Alphastar ..........................................................
1027
Chaparral .........................................................
1023
DIRECTV .........................................................
1006, 1007, 1008, 1010, 1011, 1014, 1020,
1021, 1022, 1029, 1031, 1032, 1035, 1036,
1038, 1039, 1040, 1041, 1042, 1045, 1046,
1049, 1050, 1051, 1052, 1055, 1056, 1057,
1059, 1061, 1062, 1064, 1065
Dish Network ....................................................
1002, 1003, 1004,1005, 1009, 1012, 1034,
1037, 1054
Dishpro .............................................................
1012, 1034, 1037
Echostar ...........................................................
1009, 1012, 1034, 1037, 1044, 1054
GE ....................................................................
1035, 1064
Hitachi ..............................................................
1038
Hughes .............................................................
1006, 1007, 014,1020, 1036, 1045, 1046,
1056
JVC ..................................................................
1009, 1034, 1037, 1054
LG ....................................................................
1019, 1032, 1063
Magnavox.........................................................
1029
Memorex ..........................................................
1029
Mitsubishi .........................................................
1036, 1046, 1072
Motorola ...........................................................
1013, 1030
Panasonic ........................................................
1071
Philips...............................................................
1006, 1007, 1014, 1029,1036, 1038, 1052
Pioneer .............................................................
1007
Primestar ..........................................................
1026
Proscan ............................................................
1011, 1035, 1055, 1070
RadioShack ......................................................
1030
RCA ..................................................................
1010, 1014, 1015, 1022, 1031, 1035, 1047,
1048, 1049, 1050, 1051, 1053, 1069, 1070,
1073
Realistic............................................................
1025
Samsung ..........................................................
1007, 1014, 1043, 1057, 1060
Sharp................................................................
1074
Sony .................................................................
1008, 1016, 1017, 1039, 1058, 1059
STS ..................................................................
1028
Tivo ..................................................................
1007, 1014
Toshiba .............................................................
1036, 1038, 1061
Zenith ...............................................................
1018, 1040, 1062
Codes for STB
ABC ..................................................................
1075, 1076, 1077, 1084, 1097, 1098, 1115,
1122, 1123, 1130, 1135
Adelphia ...........................................................
1128
AT&T ................................................................
1111
Bell South .........................................................
1104
Citizen ..............................................................
1137
Comcast ...........................................................
1102, 1107, 1113
COX .................................................................
1108
GE ....................................................................
1075, 1076
Gemini ..............................................................
1087, 1099
Goldstar............................................................
1138, 1139
Hitachi ..............................................................
1076
Jasco ................................................................
1099
Magnavox.........................................................
1089
Memorex ..........................................................
1090, 1098
Motorola ...........................................................
1100, 1102, 1105, 1108, 1109, 1111, 1113
Movie Time .......................................................
1091, 1137
NEC..................................................................
1078
Pace .................................................................
1114, 1115, 1116, 1117, 1118, 1119, 1122,
1123, 1125
Panasonic ........................................................
1094, 1096, 1098
Philips...............................................................
1082, 1083, 1089
Pioneer .............................................................
1092, 1114, 1119, 1125, 1126, 1139
Pulsar ...............................................................
1098, 1137
Quasar .............................................................
1098
RadioShack ......................................................
1099, 1103
RCA ..................................................................
1079, 1096
Realistic............................................................
1081
Recoton ............................................................
1101
28
© COPYRIGHT 2006-2008 PRODEA SYSTEMS, INC. ALL RIGHTS RESERVED.
© COPYRIGHT 2006-2008 PRODEA SYSTEMS, INC. ALL RIGHTS RESERVED.
29
Page 16

Samsung ..........................................................
1137, 1138, 1139
Scientic Atlanta ...............................................
1084, 1111, 1114, 1115, 1119, 1120, 1121,
1122, 1123, 1124, 1125, 1126, 1127, 1128,
1130, 1131, 1132, 1133, 1134, 1135, 1136
Sony .................................................................
1106
Time Warner .....................................................
1110
Toshiba .............................................................
1098
Tristar ...............................................................
1103
United Cable ....................................................
1097
Universal ..........................................................
1080, 1081
View Star ..........................................................
1085, 1089, 1091
Zenith ...............................................................
1095, 1098, 1104
Codes for AUX - DVD
Accurian ...........................................................
3084
Advent ..............................................................
3094
Aiwa .................................................................
3018, 3235, 3269
Akai ..................................................................
3025, 3052, 3257, 3326, 3327
Alpine ...............................................................
3208
Apex .................................................................
3104, 3121, 3130, 3217, 3262
Apex Digital ......................................................
3023, 3028, 3032, 3036, 3037, 3038, 3044,
3053, 3054, 3060, 3062, 3065, 3258
Audiovox ..........................................................
3035, 3148, 3216, 3234, 3294
Blaupunkt .........................................................
3028, 3149
BOSE ...............................................................
3282
Coby .................................................................
3095, 3096, 3291
Curtis Mathes ...................................................
3064, 3138
Daewoo ............................................................
3034, 3049, 3073, 3074, 3134
Denon...............................................................
3000, 3017, 3106, 3116, 3160, 3164, 3186,
3190
Disney ..............................................................
3024, 3080
Fisher ...............................................................
3022
Funai ................................................................
3024, 3079, 3241
Gateway ...........................................................
3071, 3222
GE ....................................................................
3003, 3028, 3126, 3196
Go Video ..........................................................
3029, 3030, 3033, 3049, 3058, 3063, 3071,
3091, 3215, 3222, 3236, 3246, 3248
Goldstar............................................................
3029
Grundig ............................................................
3007
Harman/Kardon ................................................
3026, 3192
Hitachi ..............................................................
3011, 3021, 3075, 3136, 3193, 3205, 3215
Insignia .............................................................
3079
JBL ...................................................................
3026, 3292
Jensen..............................................................
3096
JVC ..................................................................
3009, 3013, 3048, 3072, 3113, 3122, 3135,
3140, 3166, 3177, 3197, 3201, 3207, 3230,
3231, 3232, 3233, 3247, 3255, 3300, 3301,
3302, 3304, 3306
Kawasaki ..........................................................
3035
Kenwood ..........................................................
3000, 3006, 3106, 3116, 3195, 3202, 3210,
3211
KLH ..................................................................
3028, 3035, 3054, 3069
Konka ...............................................................
3101, 3310, 3311, 3312, 3313, 3314, 3315,
3316
Koss .................................................................
3020, 3100, 3150, 3289
LG ....................................................................
3012, 3029, 3049, 3163, 3229, 3329
Magnavox.........................................................
3001, 3007, 3019, 3024, 3042, 3079, 3145,
3181
Marantz ............................................................
3007, 3175
Memorex ..........................................................
3025, 3080, 3139
Microsoft...........................................................
3003
Mitsubishi .........................................................
3002, 3089, 3128, 3154, 3161, 3185
Onkyo ...............................................................
3001, 3014, 3158, 3293, 3298
Oritron ..............................................................
3020, 3100
Panasonic ........................................................
3000, 3001, 3027, 3083, 3087, 3088, 3092,
3106, 3107, 3116, 3144, 3147, 3170, 3171,
3173, 3182, 3198, 3218, 3221, 3251, 3259,
3264, 3266, 3267, 3268, 3273, 3274, 3277,
3283, 3284, 3287, 3290, 3334, 3335, 3336
Philips...............................................................
3001, 3007, 3019, 3024, 3046, 3077, 3078,
3082, 3124, 3145, 3153, 3156, 3162, 3167,
3179, 3187, 3189, 3199, 3219, 3223, 3241,
3253, 3271, 3333
Pioneer .............................................................
3004, 3010, 3016, 3115, 3137, 3142, 3159,
3168, 3176, 3194, 3225, 3281, 3297, 3330
Polaroid ............................................................
3054, 3062
Polk Audio ........................................................
3007
Presidian ..........................................................
3024, 3241
Proscan ............................................................
3003, 3119, 3180
RCA ..................................................................
3003, 3010, 3028, 3035, 3043, 3055, 3068,
3108, 3119, 3120, 3126, 3180, 3191, 3226,
3238, 3240, 3245, 3263
Sampo ..............................................................
3031
Samsung ..........................................................
3000, 3011, 3030, 3041, 3052, 3058, 3063,
3110, 3117, 3133, 3141, 3178, 3184, 3204,
3249, 3299, 3322, 3331
Sansui ..............................................................
3025, 3257
Sanyo ...............................................................
3022, 3025
Sharp................................................................
3015, 3024, 3031, 3076, 3123, 3131, 3256,
3276
Sony .................................................................
3005, 3047, 3057, 3085, 3090, 3105, 3109,
3111, 3112, 3114, 3129, 3151, 3152, 3165,
3213, 3220, 3242, 3244, 3279, 3280, 3285,
3286, 3307, 3332
Sylvania............................................................
3024, 3042, 3079, 3139, 3241, 3254, 3265,
3270, 3275, 3278, 3317, 3318, 3319, 3320,
3321, 3323, 3324, 3325
Symphonic .......................................................
3024, 3042, 3241
Teac..................................................................
3035
Technics ...........................................................
3000, 3027, 3116
Toshiba .............................................................
3001, 3025, 3059, 3070, 3103, 3118, 3125,
3127, 3132, 3143, 3155, 3169, 3174, 3224,
3227, 3228, 3237, 3239, 3243, 3252, 3257,
3260, 3261, 3272, 3295
Vizio .................................................................
3337
Xbox .................................................................
3003
Yamaha ............................................................
3000, 3007, 3008, 3106, 3172, 3188, 3200,
3203, 3206, 3209, 3214, 3296, 3303
Zenith ...............................................................
3001, 3012, 3029, 3049, 3103, 3146, 3163,
3183
Codes for AUX Amplier
BOSE ...............................................................
6006
Curtis Mathes ...................................................
6003
30
© COPYRIGHT 2006-2008 PRODEA SYSTEMS, INC. ALL RIGHTS RESERVED.
© COPYRIGHT 2006-2008 PRODEA SYSTEMS, INC. ALL RIGHTS RESERVED.
31
Page 17

Denon...............................................................
6010
GE ....................................................................
6001
Harman/Kardon ................................................
6008
JBL ...................................................................
6013
JVC ..................................................................
6004
Marantz ............................................................
6008, 6011
Optimus ............................................................
6003
Philips...............................................................
6008
Pioneer .............................................................
6000, 6003
Polk Audio ........................................................
6008
RCA ..................................................................
6003
Sony .................................................................
6007
Soundesign ......................................................
6001
Wards ...............................................................
6000, 6001
Yamaha ............................................................
6002, 6005, 6009, 60123
Codes for AUX - REC
Aiwa .................................................................
7002, 7006, 7043, 7046, 7064, 7088,
7089, 7090, 7091, 7101, 7110, 7143,
7152, 7184
Apex Digital ......................................................
7048
Audiotronic .......................................................
7018
Audiovox ..........................................................
7044, 7219
BOSE ...............................................................
7009, 7019, 7020, 7073, 7207
Carver ..............................................................
7006, 7018, 7110
Coby .................................................................
7216
Denon...............................................................
7038, 7076, 7107, 7135, 7136, 7148, 7153,
7154, 7162, 7164, 7169, 7171, 7172, 7173,
7177, 7187
Emerson ...........................................................
7077
Fisher ...............................................................
7070
GE ....................................................................
7109
Harman/Kardon ................................................
7001, 7006, 7012, 7031, 7032, 7100, 7110,
7168
Hitachi ..............................................................
7070
Integra ..............................................................
7003, 7030, 7036
JBL ...................................................................
7001, 7032, 7100, 7217
JVC ..................................................................
7040, 7051, 7092, 7132, 7141, 7157, 7165,
7174, 7180, 7181, 7182, 7195, 7203, 7204
Kenwood ..........................................................
7034, 7060, 7061, 7093, 7120, 7123, 7129,
7131, 7147, 7159
KLH ..................................................................
7044, 7047
Koss .................................................................
7039, 7214
LG ....................................................................
7028
Magnavox.........................................................
7006, 7007, 7018,7024, 7054, 7110
Marantz ............................................................
7006, 7018, 7024, 7027, 7110, 7193
Mitsubishi .........................................................
7045, 7176
Nakamichi ........................................................
7112, 7113
Onkyo ...............................................................
7003, 7011, 7030, 7036, 7056, 7102, 7124,
7133, 7139, 7142, 7158, 7175, 7178, 7179,
7185, 7218
Optimus ............................................................
7007, 7010, 7013, 7015, 7108
Oritron ..............................................................
7039
Panasonic ........................................................
7026, 7033, 7035, 7055, 7057, 7063, 7068,
7069, 7103, 7104, 7140, 7155, 7170, 7189,
7194, 7197, 7198, 7199, 7200, 7202, 7208,
7209, 7210, 7211, 7212, 7215
Philips...............................................................
7006, 7018, 7023, 7024, 7110, 7167, 7214
Pioneer .............................................................
7000, 7004, 7007, 7008, 7013, 7042, 7081,
7082, 7099, 7118, 7119, 7126, 7127, 7149,
7150, 7151, 7160, 7161, 7188, 7206
Polaroid ............................................................
7079
Polk Audio ........................................................
7006, 7027, 7192
RCA ..................................................................
7007, 7013, 7015, 7021, 7044, 7053, 7083,
7094, 7109, 7213
RCA & Dimensia ..............................................
7084, 7085, 7086, 7087, 7109
Samsung ..........................................................
7029, 7052, 7186, 7220
Sansui ..............................................................
7006, 7110
Sanyo ...............................................................
7050, 7070
Sherwood .........................................................
7016, 7106, 7190
Sony .................................................................
7014, 7022, 7049, 7058, 7065, 7066, 7067,
7071, 7080, 7095, 7096, 7105, 7114, 7115,
7116, 7117, 7122, 7125, 7130, 7144, 7145,
7146, 7156, 7183, 7196, 7201, 7205
Soundesign ......................................................
7010
Teac..................................................................
7015, 7044
Technics ...........................................................
7033, 7055, 7103, 7104, 7134, 7138, 7140
Wards ...............................................................
7000, 7006, 7099, 7110
Yamaha ............................................................
7003, 7005, 7017, 7025, 7037, 7041, 7074,
7075, 7078, 7097, 7098, 7099, 7121, 7128,
7163, 7166, 7221
Zenith ...............................................................
7028
Codes for AUX - VCR
Admiral .............................................................
5008
Aiwa .................................................................
5000, 5004, 5043
Akai ..................................................................
5036, 5139
Alienware .........................................................
5033
Apex Digital ......................................................
5092
Audio Dynamics ...............................................
5037
Audiovox ..........................................................
5004, 5040
Bell & Howell ....................................................
5038
Canon...............................................................
5003, 5041
Citizen ..............................................................
5004, 5030, 5039, 5040, 5121
Colortyme .........................................................
5037
Craig.................................................................
5004, 5007, 5039, 5040
Curtis Mathes ...................................................
5003, 5009, 5011, 5024, 5035, 5037, 5039,
5041
Daewoo ............................................................
5006, 5030, 5043, 5070, 5121
Dell ...................................................................
5033
Dimensia ..........................................................
5035
DIRECTV .........................................................
5018
Emerex .............................................................
5001
Emerson ...........................................................
5000, 5004, 5012, 5030, 5031, 5040, 5041,
5043, 5095, 5121, 5122, 5138
Fisher ...............................................................
5007, 5038, 5076
Fuji ...................................................................
5002, 5003, 5036, 5041
Funai ................................................................
5000, 5043, 5047, 5095, 5117
32
© COPYRIGHT 2006-2008 PRODEA SYSTEMS, INC. ALL RIGHTS RESERVED.
© COPYRIGHT 2006-2008 PRODEA SYSTEMS, INC. ALL RIGHTS RESERVED.
33
Page 18

Garrard .............................................................
5000, 5043
Gateway ...........................................................
5033
GE ....................................................................
5003, 5009, 5019, 5024, 5025, 5035, 5039,
5041, 5119, 5126, 5144
Go Video ..........................................................
5085, 5088, 5093, 5101,5103
Goldstar............................................................
5004, 5029,5037, 5040,5120
Harley Davidson ...............................................
5000, 5043, 5117
Harman/Kardon ................................................
5010, 5037
Hewlett Packard ...............................................
5033
Hitachi ..............................................................
5000, 5117
HP ....................................................................
5033
Hughes Network Systems ................................
5018
JC Penney........................................................
5037, 5038, 5039, 5040, 5041
JCL ...................................................................
5041
JVC ..................................................................
5037, 5038, 5057, 5063, 5067, 5068,
5080, 5081, 5082, 5083, 5102, 5112, 5113
KEC ..................................................................
5004
Kenwood ..........................................................
5037, 5038
Kodak ...............................................................
5003, 5004, 5040, 5041
LG ....................................................................
5040, 5079
Linksys .............................................................
5033
Lloyd’s ..............................................................
5000, 5043, 5117
LXI ....................................................................
5004, 5040
Magnavox.........................................................
5000, 5003, 5005, 5010, 5032, 5041, 5064,
5074, 5117, 5132, 5138
Marantz ............................................................
5003, 5010, 5037, 5038, 5041
Matsushita ........................................................
5003, 5011, 5041
Media Center PC..............................................
5033
Memorex ..........................................................
5000, 5003, 5004, 5005, 5007, 5008, 5011,
5029, 5038, 5039, 5040, 5041, 5043, 5046,
5077, 5084, 5120
MGA .................................................................
5119
Microsoft...........................................................
5033
Mitsubishi .........................................................
5019, 5053, 5071, 5144
Motorola ...........................................................
5003, 5008, 5041
NEC..................................................................
5037, 5038
Nikko ................................................................
5004, 5040
Olympus ...........................................................
5003, 5041
Optimus ............................................................
5004, 5008, 5011, 5026, 5040
Orion ................................................................
5012, 5031, 5046, 5122
Panasonic ........................................................
5003, 5011, 5013, 5015, 5024, 5026,
5041,5048,5052, 5058, 5066, 5073, 5094,
5106, 5116, 5127, 5128, 5129, 5135, 5136,
5141, 5142, 5145, 5147, 5148
Penney .............................................................
5003, 5004, 5024, 5029, 5119, 5120
Philco ...............................................................
5003, 5041
Philips...............................................................
5003, 5010, 5016, 5018, 5041, 5055, 5095,
5110, 5132, 5133
Philips Magnavox .............................................
5055, 5064
Polaroid ............................................................
5092
Polk Audio ........................................................
5010
Presidian ..........................................................
5095
Proscan ............................................................
5009, 5025, 5035, 5075
Pulsar ...............................................................
5005
Quasar .............................................................
5003, 5011, 5024, 5041, 5128, 5137
RadioShack ......................................................
5000, 5007, 5040, 5117
RCA ..................................................................
5009, 5019, 5021, 5024, 5025, 5035, 5039,
5041, 5059, 5087, 5100, 5119, 5131, 5144,
5149
Realistic............................................................
5000, 5003, 5004, 5007, 5008, 5038, 5039,
5040, 5041, 5043
Samsung ..........................................................
5006, 5018, 5023, 5039, 5042, 5085, 5089,
5093, 5099, 5104, 5123
Sansui ..............................................................
5000, 5031, 5046, 5084, 5117, 5122
Sanyo ...............................................................
5007, 5038, 5039, 5076, 5119
Scott .................................................................
5006, 5012
Sears ................................................................
5000, 5003, 5004, 5007, 5029, 5038, 5040,
5041, 5117, 5120
Sharp................................................................
5008, 5019, 5049, 5056, 5065, 5115,
5124, 5144
Sony .................................................................
5000, 5001, 5002, 5003, 5017, 5028, 5033,
5036, 5044, 5050, 5051, 5054, 5069, 5090,
5091, 5096, 5098, 5107, 5111, 5117
Sylvania............................................................
5000, 5003, 5010, 5032, 5041, 5043, 5095,
5130, 5138, 5143, 5146
Symphonic .......................................................
5000, 5043, 5047, 5095, 5117
Systemax .........................................................
5033
Tandy................................................................
5038
Teac..................................................................
5000, 5043
Technics ...........................................................
5003, 5011, 5041
Teknika .............................................................
5000, 5003, 5004, 5040, 5041, 5043
Thomas ............................................................
5000, 5117
Tivo ..................................................................
5016, 5017, 5018, 5034
Toshiba .............................................................
5006, 5020, 5022, 5027, 5033, 5034, 5061,
5062, 5086, 5097, 5108, 109, 5114, 5125,
5134, 5140
Totevision .........................................................
5004, 5039, 5040
Viewsonic .........................................................
5033
Wards ...............................................................
5000, 5003, 5007, 5008, 5009, 5010, 5039,
5040, 5041, 5043
White Westinghouse ........................................
5047
Yamaha ............................................................
5037, 5038
Zenith ...............................................................
5000, 5002, 5005, 5031, 5036, 5045, .............
5060, 5072, 5117, 5122
Codes for AUX - PVR
Alienware .........................................................
4007
Dell ...................................................................
4007
DigiFusion ........................................................
4032
DIRECTV .........................................................
4004, 4009, 4010, 4011, 4012, 4013, ............
4018, 4019, 4023, 4027
Dish Network ....................................................
4016, 4017
Dishpro .............................................................
4016
Echostar ...........................................................
4016, 4017
Expressvu ........................................................
4016
Gateway ...........................................................
4007
GO....................................................................
4016
Hewlett Packard (HP).......................................
4007
Quasar .............................................................
5003, 5011, 5024, 5041, 5128, 5137
34
© COPYRIGHT 2006-2008 PRODEA SYSTEMS, INC. ALL RIGHTS RESERVED.
© COPYRIGHT 2006-2008 PRODEA SYSTEMS, INC. ALL RIGHTS RESERVED.
35
Page 19

Hughes .............................................................
4004, 4009, 4010, 4011, 4012, 4013, 4023,
4027
JVC ..................................................................
4016, 4017, 4027
Linksys .............................................................
4007
Media Center PC..............................................
4007
Microsoft...........................................................
4007
Panasonic ........................................................
4001, 4031
Philips...............................................................
4002, 4004, 4013,4021, 4023, 4027, 4029
Pioneer .............................................................
4033
Proscan ............................................................
4018
RCA ..................................................................
4005, 4018, 4019, 4027
ReplayTV .........................................................
4000, 4001, 4020, 4030
Samsung ..........................................................
4004
Sony .................................................................
4003, 4007, 4014,4015, 4022, 4024, 4025,
4028
Tivo ..................................................................
4002, 4003, 4004,4008, 4009, 4010, 4011,
4012, 4014, 4015, 4021, 4022, 4024, 4025,
4026,4027
Toshiba .............................................................
4006, 4007, 4008
Viewsonic .........................................................
4007
Voodoo .............................................................
4007
PAIR PHONE HANDSET TO BASESTATION
The voice system is precongured so you can set up your SIP phone out of the box. Only
complete the following instructions if you received new handsets or need to reset your handsets
and connect them to the basestation, complete the following instructions.
1 Make sure your handset is fully charged
(6 hours), your basestation has power
and is connected to the Home Center
with an Ethernet cable. See the Voice
installation sheet that came with your
service equipment.
2 On the handset, press Menu > Handset
> Register.
3 Enter passcode 0000 Do not change the
passcode. It must be 0000 to work with
your ROS
sm
voice service.
4 Select OK.
5 Press and hold the blue button on the
basestation for 5 seconds (Voice Figure
1). Repeat pressing the blue button
if it doesn’t work the rst time. The
Home Center will need to provision the
handset in its device database. You will
receive a test ring on the phone that the
handset is connected to the basestation
and another one after 1 or 2 minutes to
let you know that the Home Center has
provisioned it for voice service as an
extension.
Please enjoy your new voice services.
Voice Figure 1:
SIP Phone Base Station
36
© COPYRIGHT 2006-2008 PRODEA SYSTEMS, INC. ALL RIGHTS RESERVED.
Page 20

FCC Regulatory Information
This equipment has been tested and found to comply with the limits for a Class B digital device, pursuant
to Part 15 of the FCC Rules. These limits are designed to provide reasonable protection against harmful
interference in a residential installation. This equipment generates, uses, and can radiate radio frequency
energy and, if not installed and used in accordance with the instructions, may cause harmful interference
to radio communications. However, there is no guarantee that interference will not occur in a particular
installation. If this equipment does cause harmful interference to radio or television reception, which can be
determined by turning the equipment off and on, the user is encouraged to try to correct the interference by
one or more of the following measures:
• Reorient or relocate the receiving antenna.
• Increase the separation between the equipment and receiver.
The telephone company may make changes in its facilities, equipment, operations or procedures that could
affect the proper functioning of your equipment. If they do, you will be notied in advance in order for you to
make necessary modications to maintain uninterrupted service.
If trouble is experienced with this unit, for repair or warranty information, please contact customer service at
the address and phone listed below. Ifthe equipment is causing harm to the network, the telephone company
may request that you disconnect the equipment until the problem is resolved.
DO NOT DISASSEMBLE THIS EQUIPMENT. It does not contain any user serviceable components.
We recommend the installation of an AC surge arrester in the AC outlet to which this equipment is connected.
Telephone companies report that electrical surges, typically lighting transients, are very destructive to
customer terminal equipment connected to AC power sources.
• Connect the equipment into an outlet on a circuit different from that to which the receiver is connected.
Consult your service provider, retailer, or an experienced technician for help.
If you cannot eliminate the interference, the FCC requires that you stop using your phone. Changes or
modications not expressly approved may cause interference and void the user’s authority to operate the
equipment.
Product Product Name
Model
ROS
sm
1000, ROSsm 2000
Responsible Party Prodea Systems, Inc.
6101 West Plano Parkway
Suite 210
Plano, Texas 75093
Phone 214.278.1850
This device complies with Part 15 of the FCC Rules. Operation is subject to the following two conditions: (1)
This device may not cause harmful interference, and (2) This device must accept any interference received,
including interference that may cause undesired operation.
This equipment complies with Part 68 of the FCC Rules and the requirements adopted by ACTA. On the back
of this equipment is a label that contains a product identier in the format US:AAAEQ##TXXXX. If requested,
this information must be provided to your telephone company.
Wireless Radio Use
These devices are restricted to indoor use due to its operation in the 2.4 to 5 GHz frequency range
to reduce the potential for harmful interference to co-channel Mobile Satellite systems.
Exposure to Radio Frequency Energy
The radiated output power of these devices is below the FCC radio frequency exposure limits; however, these
devices should be operated with a minimum distance of at least 20 cm between its antennas and a person’s
body, and the antennas used with these transmitters must not be co-located or operated with any other
antenna or transmitter subject to the conditions of the FCC Grant.
A plug and jack used to connect this equipment to the premises wiring and telephone network must comply
with the applicable FCC Part 68 rules and requirements adopted by ACTA. A compliant telephone cord and
modular plug is provided with this product. It is designed to be connected to a compatible modular jack that is
also compliant. See installation instructions for details.
The REN is used to determine the number of devices that may connect to a telephone line. Excessive RENs
on a telephone line may result in the devices not ringing in response to an incoming call. In most but not all
areas, the sum of the RENs should not exceed ve (5.0). To be certain of the number of devices that may
be connected to a line, as determined by the total RENs, contact your local telephone company. For product
approved after July 23, 2001, the REN for this product is part of the product identier that has the format
US:AAAEQ##TXXXX. The digits represented by ## are the REN without the decimal point (e.q., 03 is a REN
of 0.3). For earlier products, the REN is separately shown on the label.
If your DIGITAL VIDEO RECORDER causes harm to the telephone network, the telephone company will
notify you in advance that temporary discontinuance of service may be required. But if advance notice isn’t
practical, the telephone company will notify the customer as soon as possible. Also, you will be advised of
your right to le a complaint with the FCC if you believe it is necessary.
Page 21

UNIVERSAL REMOTE CONTROL
Go into ROSsm mode.
Display ROSsm menu
with TV feed from other
sources in background.
Return to previous
screen and exit ROSsm.
Switch off device.
Control other devices.
Display information
about media.
Display options,
including Delete
Station and Sharing.
Display widgets
Control media feedback.
Enter text
like a cell phone.
Selection buttons to
conrm changes and
other actions.
Display remote help
menu.
Exit ROSsm menu to TV.
Display ROSsm menu
without overlay.
To Replace the Battery: Open the
battery compartment cover on
the back, insert 2 AA batteries,
matching the + and - polarity
symbols inside and replace
cover.
NOTE: When the battery voltage
is low, the feedback LED will
blink 5 times.
Select audio/video inputs
(must be congured).
© COPYRIGHT 2006-2009 PRODEA SYSTEMS, INC. ALL RIGHTS RESERVED.
6101 West Plano Parkway • Plano, TX 75093 • ProdeaSystems.com • 214.278.1850
 Loading...