

Taskit Portux 920t EU SW, Portux-MiniPC, Portux Panel-PC, Panel-Card, MoLUX Linux Guide
...Page 1

Linux Guide taskit GmbH
Linux Guide
for
Portux 920t EU + SW
Portux-MiniPC
Portux Panel-PC
Panel-Card
MoLUX
Stamp
Page 1 of 65 Version 1.26 (2008-04-30)
Page 2

Linux Guide taskit GmbH
taskit GmbH
Seelenbinderstr. 33
D-12555 Berlin
Germany
Tel. +49 (30) 611295-0
Fax +49 (30) 611295-10
http://www.taskit.de
© taskit GmbH, Berlin
All rights reserved. This document and the products referred to herein are copyrighted works
of taskit GmbH. Information in this document is subject to change without notice. No part of this
document may be reproduced or transmitted in any form, without the express written permission of
taskit GmbH. If however, your only means of access is electronic, permission to print one copy is
hereby granted. Neither taskit GmbH nor taskit´s distributors assume any liability arising from the
use of this manual/guide or any product described herein.
Page 2 of 65 Version 1.26 (2008-04-30)
Page 3

Linux Guide taskit GmbH
Table of contents
1. Introduction................................................................................................6
2. Supported products...................................................................................7
3. Mounting MMC or SD-cards......................................................................8
4. Using the bootloader „U-Boot“.................................................................9
4.1. Setting up a TFTP server under Linux...................................................................9
4.2. Description of the bootprocess..............................................................................9
4.3. Reading and writing memory and flash memory................................................10
4.4. Scripts with U-Boot................................................................................................10
4.5. Creating a bootscript..............................................................................................12
4.6. Updating U-Boot.....................................................................................................14
5. Compiling and debugging applications.................................................15
5.1. Setting up a development system........................................................................15
5.1.1. Installing the toolchain on Debian................................................................15
5.2. Mounting the working directory............................................................................16
5.3. Compiling the application sample........................................................................16
5.4. Starting the sample................................................................................................16
5.5. Debugging the sample...........................................................................................17
5.6. Downsizing the binary............................................................................................17
6. Compiling a new linux kernel..................................................................18
6.1. Configuring the kernel...........................................................................................18
6.2. Compiling the kernel..............................................................................................19
6.3. Preparing the kernel...............................................................................................20
6.4. Installing the kernel................................................................................................20
6.5. Resetting to the original state...............................................................................21
7. Creating a new root filesystem...............................................................22
7.1. Overview..................................................................................................................22
7.2. Installing the busybox............................................................................................22
7.3. Installing the MTD-utilities.....................................................................................23
7.4. Creating the initial ramdisk image........................................................................24
Page 3 of 65 Version 1.26 (2008-04-30)
Page 4

Linux Guide taskit GmbH
7.5. Testing the new root filesystem............................................................................25
7.6. Installing the new root filesystem permanently..................................................25
8. Creating a new user data partition.........................................................26
8.1. Overview..................................................................................................................26
8.2. Creating a new JFFS2 image.................................................................................26
8.3. Archiving the JFFS2 partition...............................................................................26
8.4. Restoring the JFFS2 partition...............................................................................27
8.5. Resetting to the original state...............................................................................27
9. The input driver........................................................................................28
9.1. Overview..................................................................................................................28
9.2. Un- / installing the drivers.....................................................................................28
9.3. Customizing the keymap of the matrix keyboard...............................................29
9.4. Customizing the keymap of the infrared interface (optional)............................32
9.5. Getting the input.....................................................................................................33
9.6. Using the touchscreen...........................................................................................33
9.6.1. Calibrating the touchscreen..........................................................................34
9.7. Using the knob........................................................................................................35
10. The display.............................................................................................36
10.1. Un- / Installing the driver.....................................................................................36
10.2. Text based applications.......................................................................................36
10.3. Graphical applications.........................................................................................36
11. Appendix.................................................................................................38
11.1. Memory map..........................................................................................................38
11.1.1. Portux 920t EU + SW, Portux-MiniPC, Portux Panel-PC, Panel-Card,
MoLUX and Stamp....................................................................................................38
11.2. Driversupport........................................................................................................39
11.2.1. Portux Panel-PC............................................................................................39
11.2.2. Panel-Card.....................................................................................................39
11.2.3. MoLUX............................................................................................................39
11.3. U-Boot environment variables............................................................................40
11.3.1. Environment variables for Portux 920t EU + SW, Portux-MiniPC, Portux
Panel-PC and Stamp.................................................................................................40
11.3.2. Environment variables for Panel-Card and MoLUX..................................41
11.4. Product specific kernel settings.........................................................................43
Page 4 of 65 Version 1.26 (2008-04-30)
Page 5

Linux Guide taskit GmbH
11.4.1. Portux 920t EU + SW, Portux-MiniPC.........................................................43
11.4.2. Portux Panel-PC............................................................................................43
11.4.3. Panel-Card.....................................................................................................43
11.4.4. MoLUX............................................................................................................44
11.4.5. Stamp.............................................................................................................45
11.5. Input driver reference...........................................................................................46
11.5.1. struct portuxinputevent................................................................................46
11.5.2. struct matrixentry..........................................................................................46
11.5.3. struct irentry..................................................................................................46
11.5.4. struct calibration...........................................................................................47
11.5.5. struct eeprom_t.............................................................................................47
11.5.6. Defines / Constants......................................................................................48
11.5.7. Ioctl functions................................................................................................49
11.6. U-Boot commands................................................................................................52
11.6.1. Read and write memory and flash memory..............................................53
11.6.2. Load programs and files via the serial interface or Ethernet..................58
11.6.3. Start programs and boot Linux..................................................................61
11.6.4. Set environment variables..........................................................................62
11.6.5. Additional commands.................................................................................63
11.7. Important linux shell commands........................................................................65
Page 5 of 65 Version 1.26 (2008-04-30)
Page 6

Linux Guide taskit GmbH
1. Introduction
Your product is delivered with an customized Linux and the bootloader U-Boot.
This document will describe how to install and customize the operation system and it will
also describe how to handle the drivers for the input and output devices.
Furthermore it will describe how to setup an development system and you will be given
small examples that demonstrate how to compile your own applications and how to use
the input devices and the display in your applications.
Because of the wide variety of existing operating systems taskit can only give support for
the Debian GNU/Linux operating system.
Taskit is utilising the Linux-based operating system Debian (www.debian.org) as
development system because it is one of the most reliable operating systems.
Furthermore it is easy to install additional software on Debian because you only need the
tool apt-get to automatically download software packages that are installed and configured
automatically.
Debian can be downloaded free from the internet and the installation is also very easy
because you only need to download a portion (http://www.uk.debian.org/distrib/netinst)
and the remaining parts will be automatically downloaded and installed from the internet.
A cross-platform toolchain for cross compiling on Debian can be found on the starterkitCD.
Developing on MS Windows is not supported by taskit.
Instructions for the first start-up are located in the QuickStartGuide.
If you want to develop your own drivers or hardware extensions you will have to work the
appropriate Technical Reference and Atmel manual for your product over.
Page 6 of 65 Version 1.26 (2008-04-30)
Page 7

Linux Guide taskit GmbH
2. Supported products
The specifications in this document apply to the following products:
● Portux 920T EU / SW
● Portux-MiniPC
● Portux Panel-PC
● Panel-Card
● MoLUX
● Stamp
All specifications concerning memory addresses are exemplary. The accurate memory
address specifications for your product can be found in the appendix (memory map).
It is possible to skip some chapters of the document, depending on the configuration of
your product. For instance if your product isn't equipped with a display, you can skip the
chapter “The Display”.
Page 7 of 65 Version 1.26 (2008-04-30)
Page 8

Linux Guide taskit GmbH
3. Mounting MMC or SD-cards
An MMC- or SD-card can be used to save larger amounts of data.
Before you can mount a card you have to create a directory as mountpoint: mkdir /data .
To map a card mounted in the MMC slot to a FAT file system, use the following command:
mount -t vfat /dev/mmc/blk0/part1 /data
If an ext2 file system is on the MMC card, the command is:
mount -t ext2 /dev/mmc/blk0/part1 /data
Nowadays some vendors deliver their cards without any partition. These cards can then be
mounted by accessing the entire disc:
mount -t ext2 /dev/mmc/disc/part1 /data
When using MMC/SD-card have in mind that the driver doesn't support hotplugging. As a
result it is necessary that the SD/MMC-card you want to use, has to be inserted before the
operating system boots up. SD/MMC-cards inserted after the boot process, won't be
detected.
If an MMC/SD-card was inserted before the boot process and mounted, it can be removed
after unmounting: umount /data. After that it is not possible to insert the same, or any
other card, again.
If it is essential for you to have a removable mass storage device, the best solution is to
use an USB memory stick. It can be inserted after the boot process and mounted (mount /
dev/sda1 /data). After unmounting (unmount /data) it can be removed and another USBstick can be inserted.
Page 8 of 65 Version 1.26 (2008-04-30)
Page 9

Linux Guide taskit GmbH
4. Using the bootloader „U-Boot“
U-Boot is an open-source boot loader for embedded systems. U-Boot is well-documented,
customizable, and loaded with functions. The U-Boot boot loader has been ported to more
than 100 platforms. Wolfgang Denk (www.denx.de) maintains this project at
www.sourceforge.de. The README in the U-Boot source code contains very detailed
documentation of U-Boot.
Before you can start customizing the bootloader you will have to know the flash addresses
of the installed software and flash partition sizes belonging to your product. These
informations can be found in the appendix (Memory map).
4.1. Setting up a TFTP server under Linux
To transfer customized firmware a protocol for transferring data without the use of the
operating system is needed.
The TFTP (Trivial File Transfer Protocol) implemented in the bootloader U-Boot is used for
simple transfer of a Linux kernel image or a root file system image.
A corresponding TFTP server must be set up on the development system for this purpose.
Use apt-get to install the required tftpd demon under Debian: apt-get install tftpd .
Usually tftpd is not started directly, but rather via the inetd Internet demon. An entry for
TFTP must be on hand in the inetd configuration file after installation. Under Debian, the
line tftp dgram udp wait nobody /usr/sbin/tcpd /usr/sbin/in.tftpd /tftpboot is
automatically entered in the configuration file /etc/inetd.conf during packet installation.
The server is given the base directory with /tftpboot. If no argument is given at start-up,
the server uses /tftpboot as the base directory. This directory must exist, and must be
readable by all users.
mkdir /tftpboot
chmod 777 /tftpboot
4.2. Description of the bootprocess
After resetting or turning on the power supply, an internal boot loader is started on the
AT91RM9200. It searches the peripherals for a bootable program, in the following order:
1. Dataflash on NPCS0
2. EEPROM on TWI
3. 8-bit memory on NSC0
A bootable program can be identified by the eight exception vectors at the beginning of the
program. If no valid sector sequence is found, the internal uploader is started. The
uploader initializes the serial debug port and loads a program via DBGU for USART0 or
using DFU (Device Firmware Upgrade) for USB into internal SRAM. It then starts the
newly-loaded program.
If a valid vector sequence is found, the code is likewise loaded into the internal SRAM.
(Information about the code length is stored in the sixth vector.) Then the remap command
is carried out, and jumps to the first address of the internal SRAM.
Page 9 of 65 Version 1.26 (2008-04-30)
Page 10

Linux Guide taskit GmbH
The parallel flash is connected to NSC0 and is used as the boot medium.
In the first phase of the boot process the Atmel controller starts the bootloader U-Boot.
The U-Boot start code loads the boot loader at address 21 F00 000 (SDRAM).
U-Boot then initializes the memory.
In the second phase of the boot process the bootloader boots the Linux image found in
flash memory.
The Linux image is decompressed to SDRAM. At last the root filesystem image is
decompressed by Linux and stored in SDRAM.
You can interrupt the boot process by pressing any key during the first phase of the boot
process (within 3 seconds). Then the U-Boot command line appears.
4.3. Reading and writing memory and flash memory
The AT91 data bus for memory is 32-bit and for flash 16-bit wide. Therefore, we
recommend using all variable memory commands with the .l, .w or .b option (long word,
word or byte). Otherwise, side effects cannot be ruled out.
Example:
cmp - memory compare
cmp [.l, .w, .b] Addr1 Addr2 count
You can check the contents of two memory ranges with the cmp command. Extensions
can be used to determine the size of the memory access:
cmp.l -> 32-bit long word (default), .w ->16-bit word or .b -> 8-bit byte.
The comparison runs until the number of units indicated by count have been compared, or
until the first difference is found. The size of the memory compared is calculated by count *
(l,w,b).
All commands that read memory can be used for both flash and SDRAM. Commands that
modify memory (with the exception of cp, which recognizes flash regions on its own) can
be used only for SDRAM and are inappropriate for directly writing flash memory.
Please note, when performing memory write operations, that the area containing the UBoot code is not modified; this will generally crash the system.
Before executing write operations on the flash memory you must ensure that the
corresponding memory range has already been erased, using the erase command
(described below). Note also that the memory area used for U-Boot and the environment
variables is protected against accidental write operations. You can turn this write
protection off and on using the protect command.
A complete list of all U-Boot commands can be found at the end of this document (chapter
U-Boot commands).
4.4. Scripts with U-Boot
Some environment variables are used by U-Boot if they are set, such as IP parameters.
Page 10 of 65 Version 1.26 (2008-04-30)
Page 11

Linux Guide taskit GmbH
On the other hand, some are set by U-Boot, such as filesize and fileaddr when
downloading a file.
Printenv outputs the current contents of the environment variables.
To show specific variables, you can add their names as arguments.
printenv [name[ name[ ...]]]
During runtime, changes to variables or new variables are stored in RAM and not saved
permanently in flash memory. Saving is done explicitly with the saveenv command.
saveenv
Sets the environment variable name to the value value. If the variable already exists, its
current value is overwritten; if it does not yet exist, it is created. If no value is given, the
variable is erased (if it exists).
setenv name value
setenv name
The run command runs the environment variable name as if it were a command. This
makes it possible to store commands in environment variables and create simple boot
scripts.
run name
Using the run command, which makes it possible to run saved variables as a command
sequence, you can create simple scripts to automate regularly occurring processes. In UBoot, the characters $() are used to reference variables, ; is for creating command
sequences and \ is the escape character.
U-Boot generally interprets numerical arguments as hex values. In other words, 10000000
is 0x1000 0000 Hex.
For example: U-Boot> echo $(filesize)
U-Boot> 171a4
Entering this command outputs the contents of the filesize environment variable. The
same command without parentheses would be interpreted as a simple string:
U-Boot> echo $filesize
U-Boot> $filesize
If the $ character from the first example is marked with the escape character, the argument
is also interpreted as a string:
U-Boot> echo \$(filesize)
U-Boot> $(filesize)
Similarly, you can use a semicolon to indicate a sequence of commands:
U-Boot> echo $(filesize); echo Hello
U-Boot> 171a4
U-Boot> Hello
Escape the semicolon with the backslash escape character, and the argument will be
interpreted as a string:
Page 11 of 65 Version 1.26 (2008-04-30)
Page 12

Linux Guide taskit GmbH
U-Boot> echo $(filesize)\; echo Hello
U-Boot> 171a4; echo Hello
A list of all U-Boot environment variables can be found at the end of this document
(chapter U-Boot environment variables).
4.5. Creating a bootscript
To demonstrate U-Boot's scripting capabilities, we will now describe the construction of a
boot script step by step.
This script loads a RAM-disk image from the network via TFTP and starts a kernel found in
flash memory with the appropriate boot arguments for size and RAM-disk address.
The following tasks must be carried out: The RAM-disk image needs to be loaded from the
network via TFTP, the boot arguments need to be set, and the kernel needs to be booted.
The assumption is made that the following prerequisites have been satisfied: a bootloader
and kernel images are stored in flash memory at the correct address and the network
environment is configured correctly.
In the first step, the boot arguments are divided into logical sections and the environment
variable basicargs, which contains the static boot arguments, is defined.
U-Boot> setenv basicargs console=ttyS0,115200 mem=64M root=/dev/ram rw
U-Boot> printenv basicargs
U-Boot> basicargs=console=ttyS0,115200 mem=64M root=/dev/ram rw
Then the MTD (memory technology devices) partitions for the flash unit are defined in
another variable: mtdparts.
Be sure to note the backslash escape character (\) in front of the semicolon, which
prevents the partitioning of the dataflash from being interpreted as a command.
U-Boot> setenv mtdparts mtdparts=physmap_flash.0:384k(boot)ro,
1664k(linux)ro,3072k(initrd)ro,10240(cfg),-(custom)
U-Boot> printenv mtdparts
mtdparts=mtdparts=phys_mapped_flash:384k(boot)ro,1664k(linux)ro,
3072k(initrd) ro,1024(cfg),-(custom)
The size and address of the initrd can only be determined later, when the current image
has been loaded from the network.
The address of the kernel is now stored in a variable and the environment variable
bootcmd is created. bootcmd is automatically called by the boot/bootd command.
U-Boot> setenv kerneladdr 10060000
U-Boot> setenv bootcmd run ramboot
U-Boot> printenv kerneladdr bootcmd
kerneladdr=10060000
bootcmd=run ramboot
In the variable ramboot, we will specify the actual command sequence necessary for
booting the kernel.
U-Boot> setenv ramboot tftpboot 21400000 initrd.bin\;setenv bootargs
Page 12 of 65 Version 1.26 (2008-04-30)
Page 13

Linux Guide taskit GmbH
\$(basicargs) initrd=0x\$(fileaddr),0x\$(filesize) \$(mtdparts)\;bootm
\$(kerneladdr)
U-Boot> printenv ramboot
ramboot=tftpboot 21400000 initrd.bin;setenv bootargs $(basicargs)
initrd=0x$(fileaddr),0x$(filesize) $(mtdparts);bootm $(kerneladdr)
Once again, note the escape characters before all special characters. Later, when
ramboot is run, the variable names will be replaced with their contents. Here, however,
when setting the variables, they need to be interpreted as strings.
The boot script is now almost done, but the new entries need to be saved by calling
saveenv; otherwise everything needs to be entered again after the next boot.
U-Boot> saveenv
Saving Environment to Flash...
Un-Protected 1 sectors
Erasing Flash...flash_erase: first: 2 last: 2
. done
Erased 1 sectors
Writing to Flash... done
Protected 1 sectors
Now we can test the script:
U-Boot> boot
TFTP from server 192.168.2.238; our IP address is 192.168.2.171
Filename 'initrd.bin'.
Load address: 0x21100000
Loading:###################################################
#############################
done
Bytes transferred = 1478664 (169008 hex)
## Booting image at 10060000 ...
Image Name: uImage
Image Type: ARM Linux Kernel Image (uncompressed)
Data Size: 739208 Bytes = 721.9 kB
Load Address: 21000000
Entry Point: 21000000
Verifying Checksum ... OK
OK
Starting kernel ...
Uncompressing
Linux...................................... done, booting the kernel.
...
Kernel command line: console=ttyS0,115200 mem=64M root=/dev/ram rw
initrd=0x21000000,0x169008 mtdparts=physmap_flash.0:384k(boot)ro,
1664k(linux)ro,3072k(initrd)ro,10240k(cfg),-(custom)
Page 13 of 65 Version 1.26 (2008-04-30)
Page 14

Linux Guide taskit GmbH
4.6. Updating U-Boot
To load a new version of U-Boot, you just need to interrupt the boot process of U-Boot and
use the U-Boot running in SDRAM to re-load the U-Boot flash memory area.
Since the U-Boot flash range is write-protected, you must first remove the write protection.
Then load the new image from the network via TFTP and copy it to flash.
The original U-Boot images can be found on the starterkit-CD in the directory /tftpboot:
u-boot.bin contains the bootloader
u-boot.img contains the bootloader inclusive all environment variables excepting
the MAC address, this address is worldwide unique and should be
written down before updating U-Boot
U-Boot> tftpboot 21000000 u-boot.bin
TFTP from server 192.168.2.238; our IP address is 192.168.2.171
Filename 'u-boot.bin'.
Load address: 0x21000000
Loading: ###################
done
Bytes transferred = 94632 (171a8 hex)
U-Boot> protect off 10000000 1005FFFF
Un-Protected 3 sectors
U-Boot> erase 10000000 1005FFFF
flash_erase: first: 0 last: 2
Erased 3 sectors
U-Boot> cp.b 21000000 10000000 171a8
Copy to Flash... done
U-Boot> protect on 10000000 1005FFFF
Protected 9 sectors
U-Boot> reset
Page 14 of 65 Version 1.26 (2008-04-30)
Page 15

Linux Guide taskit GmbH
5. Compiling and debugging applications
5.1. Setting up a development system
The development system described here assumes that your device is connected to a
separate development computer, using either Ethernet or a serial cable. All transfers
between the two systems occur exclusively over this connection.
The development system does not have any particular hardware demands; a standard PC
is in most cases sufficient. To operate a graphical interface under Linux, a minimum of
64MB RAM and a corresponding graphic card are necessary.
A Linux workstation is normally used as a development computer for an embedded Linux
device. A network card and serial interface are required for the connection
As a basis for such a host system, taskit recommends and supports the freely available
Debian Linux distribution for development. Debian stands out for its stability and good
packet management. Both the current stable version „woody“ and the forthcoming „sarge“
version may be used. Several ways to acquire Debian are described at
http://www.debian.org/distrib/. With a broadband Internet connection, you can download
the current installation CD images using the jigdo tool or a BitTorrent client. The procedure
for using jigdo is described at http://www.debian.org/CD/jigdo-cd/. The first of the seven
CDs in the distribution is sufficient for installing a basic system.
If the development computer has a network connection, additional packages can be
installed over the network. For complete installation instructions for the x86 architecture,
see http://www.debian.org/releases/stable/i386/install.
The following descriptions relate to such a Debian system.
You could also run a Linux system in a virtual environment using a virtual machine such as
VMWare or VirtualPC. This solution, however, severely limits performance and usability.
If the development PC uses Windows 2000 or XP, you can use the cross-platform tool
chain under the Cygwin environment (http://www.cygwin.com/).
Taskit will not grant support for installing and developing on the Microsoft Windows
platform.
5.1.1. Installing the toolchain on Debian
A toolchain for cross compiling is the most important element of the development system.
Precompiled binaries for the i386 architecture are on the starterkit CD.
In the /toolchain directory on the started-kit CD an installation script can be found, this
can only be done by the user root:
cd /dev/cdrom/toolchain
./install_toolchain.sh.
Now the toolchain with GCC 3.4.2 and glibc 2.2.5 is installed.
Additionally you can also install the softfloat toolchain which is much faster when working
with floating point numbers. It has is own install_toolchain.sh script and can be found on
Page 15 of 65 Version 1.26 (2008-04-30)
Page 16

Linux Guide taskit GmbH
in the folder \toolchain\gcc-3.4.1-glibc-2.3.3 of the starter-kit CD.
The compilation of a tool chain itself is labour intensive and will not be described here. The
toolchain was made with Crosstools, which simplifies the compilation considerable. Have a
look at http://kegel.com/crosstool/ for further information.
After the installation, corresponding version of binutils, gcc and c++ are available for
crosscompiling. Type ls /usr/bin | grep arm-linux to get a list of all available tools.
5.2. Mounting the working directory
After installing the tool chain, you can compile your own software for the arm processor. In
the early stages of development, it is convenient to mount the working directory on the
development system with NFS (network file system), in order to make changes available
quickly.
Installation of the NFS-server:
apt-get install nfs-common nfs-kernel-server
If an NFS server is already set up on the development system, you only need to add one
line to the /etc/exports file:
/develop *.local.domain(ro).
This line exports, for example, the /develop directory for all clients on the local domain with
read access. If this folder does not exist it has to be created:
mkdir /develop
chmod 777 /develop
The exported directory can then be mapped to a directory on the ARM-board with the
mount command.
mkdir /mnt/develop
mount -t nfs -o nolock nfs_servername:/develop /mnt/develop
5.3. Compiling the application sample
In the /examples directory on the starterkit-CD you will find the example1.c file, which
contains C sourcecode for a simple program for entering and printing text. For editing, first
copy the file to the /develop directory on the development computer. Then you can use the
cross-compiler to compile example1.c:
arm-linux-3.4.2-gcc -Wall example1.c -o example1 .
5.4. Starting the sample
If the execution rights for the newly created binary are set correctly, the program can now
be called:
cd /mnt/develop
./example1
Page 16 of 65 Version 1.26 (2008-04-30)
Page 17

Linux Guide taskit GmbH
5.5. Debugging the sample
The GNU debugger (GDB) is one of the most important debugging tools for Linux. To
debug an embedded system, set up a gdb server with the gdb package. The gdbserver
itself is a small application that carries out commands from the gdb, which runs on the
development system. You will find the gdbserver in the Linux starter kit's root file system,
in the /usr/bin directory. Before debugging a program, you must compile it with the
appropriate flags (-g or -ggdb for more information).
cd /develop
arm-linux-3.4.2-gcc -g example1.c -o example1_debug
If you include in debugging information, the binary created is much larger. As long as you
have the original version with the debugging information on the development system,
however, you can simply copy the smaller, stripped-down version to the target system.
You can strip down the debugger using the arm-linux-strip tool.
For remote debugging, you can set up communication between the gdbserver on the taskit
device and the gdb on the development system either over a serial null modem cable or
over a TCP/IP connection. The connection via TCP/IP is described below. First you need
to start the gdbserver on the taskit device, and then create the connection from the gdb on
the development computer:
gdbserver development_computer_ip:2345 example1_debug
The development computer is entered as host. As port, choose any available port. All
command line parameters for the program (in this case, led is an integer indicating the
number of repetitions) must be given in this call. Then you can start the gdb on the other
system and create the connection to your taskit device:
arm-linux-gdb example1_debug
(GDB) target remote_ip:2345
Now you are ready to start debugging with the usual gdb commands.
5.6. Downsizing the binary
After compiling the example the filesize of the binary can be noticeable reduce by
removing unneeded informations generated by the compiler as well as debug informations
(debugging wont be possible any more):
arm-linux-3.4.2-strip example1
Page 17 of 65 Version 1.26 (2008-04-30)
Page 18

Linux Guide taskit GmbH
6. Compiling a new linux kernel
If you work with Embedded Linux regularly, you will often face the need to create your own
kernel. In most cases, this involves integrating new drivers, e.g. for USB devices, or
additional file systems. Because memory space is limited on an embedded board, it does
not make sense to set up a large number of drivers to start with (as is common for desktop
PCs) unless you know for sure that you actually need them.
The kernel binaries and sources delivered with your product are made up of a standard
kernel with ARM patches and some AT91-specific patches or drivers.
The process for creating your own kernel is broken down into three steps – configuring,
compiling and installing.
6.1. Configuring the kernel
The source codes for the Linux kernel are on the starterkit-CD in the tarred GZIP archive
linux.tgz. The kernel sources are configured in delivery form. You just need to append the
drivers you want to use or deselect the drivers that you don't need.
Before you can configure the kernel the tarred archive has to be extracted to your
development folder:
cd /develop
tar -xzvf starterkit-CD/linux.tgz
Before you can change the kernel configuration and compile your new kernel, you will
have to setup the kernel for your product:
ARCH=arm make PRODUCT_defconfig
Note: PRODUCT specifies the name of your product (the precise command for your
product can be found in the appendix “Product specific kernel settings”).
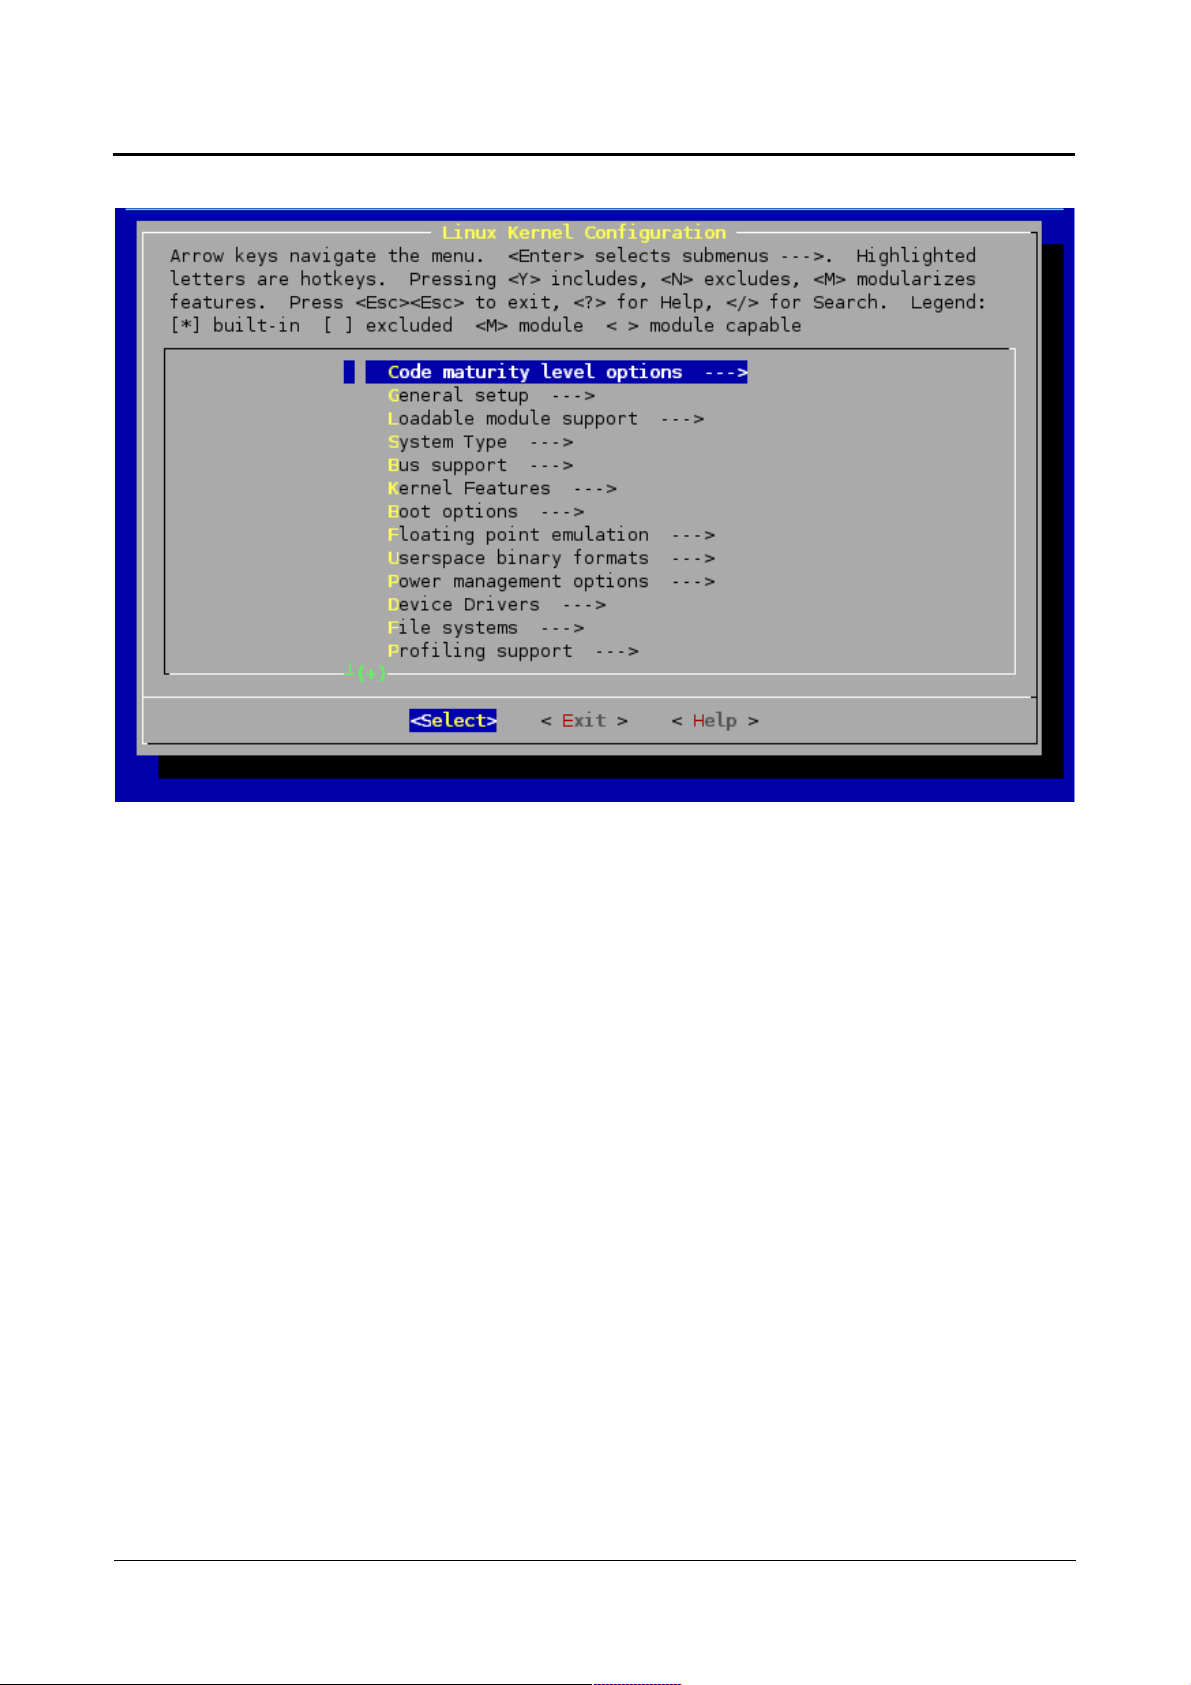
Now the kernel is configured for your product which factory settings. Various tools can be
used to change the kernel configuration; the most well-known is menuconfig.
Menuconfig is a Text User Interface (TUI), it offers a text-based interface, which allows for
easy configuration and can also be used in terminal emulation mode. In order to use it you
have to install the curses development package:
apt-get install ncurses-dev .
After that you can start the kernelconfiguration by typing:
ARCH=arm make menuconfig.
Page 18 of 65 Version 1.26 (2008-04-30)
Page 19
Linux Guide taskit GmbH
The options can now be selected or deselected in the individual levels. The basic selection
consists of „empty“, „*“, „M“. Empty means that the driver will not be compiled with the
kernel. * means that the driver will be included in the kernel binary. M means that the
driver is configured as a module; in other words, it can be dynamically activated and
deactivated at runtime. When you have set the configuration as you like, finish the process
with Exit and Save. The kernel is now ready to compile.
The corresponding options for cross-compilation are already entered in the makefile.
6.2. Compiling the kernel
Compiling is simple: ARCH=arm CROSS_COMPILE=arm-linux-3.4.2- make zImage
With “CROSS_COMPILE=arm-linux-3.4.2-” you “tell” the makefile to use the compiler
from the cross-compiler toolchain of the starterkit-CD.
If the compilation runs without errors, the compiled image is saved in arch/arm/boot.
If you configured drivers as modules, you still need to create these:
ARCH=arm CROSS_COMPILE=arm-linux-3.4.2- make modules .
The kernel makefile provides a target for installing the modules – modules_install. By
default, the modules are installed in the /lib/modules directory. For cross-environment
development, the modules must be installed in a different directory. The example gives a
module directory within the Linux source folder. When entering the path to the module
directory, ensure that no relative paths are given; since the script goes through the kernel
directories, relative paths can change.
ARCH=arm make INSTALL_MOD_PATH=/develop/linux/modules modules_install
The modules are now copied to the /develop/linux/modules/lib/modules/modules/2.x.xx/
Page 19 of 65 Version 1.26 (2008-04-30)
Page 20

Linux Guide taskit GmbH
directory.
6.3. Preparing the kernel
To install the new kernel on the taskit device, you now need to prepare the zipped kernel
image for use by U-Boot. This is done using the mkimage tool. Mkimage is also included
in the /scripts directory on the starter-kit CD.
Enter the following 3 lines as one line separated by a space character:
mkimage -A arm -T kernel -O linux -C none
-a 21000000 -e 21000000 -n plinux
-d arch/arm/boot/zImage uImage
Result:
Image Name: plinux
Created: Tue Dec 14 19:12:23 2004
Image Type: ARM Linux Kernel Image (uncompressed)
Data Size: 738972 Bytes = 721.65 kB = 0.70 MB
Load Address: 0x21000000
Entry Point: 0x21000000
This script packs a 64 Kb header around the zipped image. This gives U-Boot important
information for booting the kernel correctly.
Before you can install the kernel you need to copy the uImage into the tftp directory:
cp uImage /tftpboot
You can also carry out this process by running the simple shell script install_linux.sh,
which you will find in the /scripts directory on the starterkit CD.
6.4. Installing the kernel
Finally, load the finished image in U-Boot, program it into flash memory and start it:
U-Boot> erase 10060000 101FFFFF
U-Boot> tftpboot 21000000 uImage
-> TFTP from server 192.168.2.238; our IP address is 192.168.2.171
Filename 'uImage'.
Load address: 0x21000000
Loading: ###################################################
##########################################################
###############
done
Bytes transferred = 739036 (b46dc hex)
The last step is to copy the kernelimage into flash. To do that the copy-command needs
the filesize of the kernelimage. The filesize is displayed after the transfer from the remote
PC (marked red) and is also stored in the environment variable filesize.
U-Boot> cp.b 21000000 10060000 $(filesize)
-> Copy to Flash... done
U-Boot> boot
Page 20 of 65 Version 1.26 (2008-04-30)
Page 21

Linux Guide taskit GmbH
Note: Keep in mind that the kernel image can not be bigger than the size of the
corresponding flash disk partition (see appendix). In case it should be bigger you have to
change the flash disk partition sizes (physmap_flash.0) and reinstall the root and config
partition. But this is only necessary in rare cases.
During development, you can also start the image directly from RAM without copying it to
flash memory: bootm 21000000.
If you have created drivers as modules, install the modules now. Unfortunately, you cannot
avoid creating a new root file system (for further information see chapter “Creating a new
root filesystem”).
cp -a /develop/linux/modules/* /develop/rootfs/
/develop/mkfsimage.sh
cp /develop/images/initrd.bin /tftpboot
6.5. Resetting to the original state
If the kernel has been configured incorrectly and no longer functions, the delivery state can
be reinstated as long as no changes have been made to the source code itself.
In the root directory of the kernel enter the following lines:
ARCH=arm make PRODUCT_defconfig
The original configuration is now reinstated.
Entering ARCH=arm CROSS_COMPILE=arm-linux-3.4.2- make zImage generates the
same kernel that was programmed in flash memory at the time of delivery.
At last repeat steps tree and four to install the kernel.
If you want to install the original kernel image, you can take the file “uImage-PRODUCT”
from the folder “/images” of the starterkit-cd.
Page 21 of 65 Version 1.26 (2008-04-30)
Page 22

Linux Guide taskit GmbH
7. Creating a new root filesystem
7.1. Overview
The root filesystem is the place where system applications and libraries are stored. It is
loaded from the flash disk and decompressed to an ram disk during the boot process.
Thus all changes in the root filesystem will be lost after the next reboot. In case there is the
need to save files to flash memory (i.e.: log files) you will have to create and modify them
on the root filesystem and copy them to the config partition at the end. This approach is
dispositional because the ramdisk it is very fast and flash write cycles are limited.
When creating a new root filesystem image you have to keep in mind that it can not be
bigger than the flash disk partition used for the root filesystem (the default size can be
taken from the appendix). If it is bigger than the corresponding flash disk partition you will
overwrite other partitions during the copy process.
The first steps when creating your own root file system are: creating a directory tree
according to the File Hierarchy Standard (FHS), copying the cross-compiled C system
libraries glibc or uclibc to the new file system, copying the kernel modules and creating
device files (a.k.a. device nodes) under /dev. These steps are not covered here.
The root file system installed on the flash and found on the starterkit CD as tarred archive
can serve as a starting point for your own customized root file system.
Busybox and the MTD utilities are already integrated in these root file systems; recompiling and re-installing is only necessary if the configuration needs to be changed.
In the end, we will describe creating an image of the changed root file system, booting it
and copying it to flash memory.
7.2. Installing the busybox
The busybox contains the most important standard Linux commands in one binary, so that
they do not need to be compiled individually for the target system.
You can download the newest version of the Busybox packages from the project website
(www.BusyBox.net) and unpack it to the /develop/sysapps/ directory or use version from
the starter-kit CD.
To unpack it from the starterkit-CD enter the following lines into the terminal:
cd /tmp
cp /dev/cdrom/sysapps.tgz /tmp (where /dev/cdrom is the starterkit-CD)
tar -xzvf sysapps.tar
mv sysapps/ /develop
It is also necessary to extract the rootfs.tgz(root file system) from the starterkit-CD:
cp /dev/cdrom/rootfs.tgz /tmp
tar -xzvf rootfs.tgz
mv rootfs/ /develop
Page 22 of 65 Version 1.26 (2008-04-30)
Page 23

Linux Guide taskit GmbH
Then go to the busybox directory: cd /develop/sysapps/busybox-1.00 .
You can configure the make options using a graphical interface by entering:
make menuconfig
You can select individual commands and features here.
Enter the path to the cross-compiler under „Build options1“ (normally /usr/bin ). You also
need to enter the path to the root file system ( /develop/rootfs in this example) under
„Installation options“.
Finish by compiling and installing:
make dep
make
make install
The functionality of the TinyLogin package has been integrated into newer versions of
Busybox. If you select these functions (e.g., passwd etc.) in the configuration, the compiled
Busybox binary must have setuid root permissions in order for these applets to work
correctly.
chmod 4755 /develop/rootfs/bin/busybox
As an alternative, you can install TinyLogin separately and leave out the section
Login/Password Management Utilities in the Busybox configuration.
7.3. Installing the MTD-utilities
The MTD (memory technology devices) utilities are required for partitioning, copying and
erasing the flash memory.
To be able to install the MTD utilities on the target system, you need the compression
library zlib.
Copy zlib from the software CD and unpack it:
cp /dev/cdrom/build-tools.tgz /tmp (where /dev/cdrom is the starterkit-CD)
tar -xzvf build-tools.tar
mv /tmp/build-tools /develop
Then go to the directory and set it up to compile:
cd /develop/build-tools/zlib-1.2.1/
CC=arm-linux-3.4.2-gcc LDSHARED=“arm-linux-3.4.2-gcc -shared“
./configure –shared
The variable CC sets the cross-compiler and zlib is compiled as a dynamic library by
setting LDSHARED.
Next, compile zlib and install it in the directory indicated by prefix:
make
make prefix=/usr/arm-linux/lib install
After the library has been installed, you can copy it to the target system:
cd /usr/arm-linux/lib
cp -d libz.so* /develop/rootfs/lib
Now you can install the MTD utilities (skip these steps if you have already installed the
busybox before):
cp /dev/cdrom/sysapps.tgz /tmp
tar -xzvf sysapps.tar
Page 23 of 65 Version 1.26 (2008-04-30)
Page 24

Linux Guide taskit GmbH
mv /tmp/sysapps /develop
After that go to the util directory: cd /develop/sysapps/mtd/util
Edit the makefile here. It is important to set the environment variable
CROSS_COMPILE=arm-linux-3.4.2- for indicating the cross-compiler and DESTDIR,
which gives the installation directory and must point to the directory with the root file
system for the target system (in our example, /develop/rootfs).
Now type make to compile the MTD-utils.
7.4. Creating the initial ramdisk image
The easiest way to make a root file system available to the kernel when booting is to use
an initial RAM disk (initrd). This initrd contains a compressed root file system which is
decompressed by the kernel and saved in a RAM disk. Then it can be mounted by the
kernel as the root file system.
A description follows for creating an initrd image with an ext2 file system on a development
computer.
Pre-requisite: a corresponding root directory with content needs to have been created
beforehand.
We assume in this example that a /develop directory exists, containing the root file system
directory /develop/rootfs.
First, create a new directory for the image to be generated:
cd /develop
mkdir images
In the same directory, create the folder initrd, in which the image is be mounted:
mkdir /initrd
Now create a blank 8MiB file system image, which will take on the root file system later,
and store it in the newly created images directory:
dd if=/dev/zero of=images/initrd.img bs=1k count=8192
Using /dev/zero initializes the image with nulls to start with, which leads to higher
compression rates later.
Note: If you want to change the size of the 8MiB root filesystem image you also have to
change the size of the initial ramdisk in the kernel by changing the value 'Device Drivers-
>Block Devices->Ram disk support->Default RAM disk size' with menuconfig.
After initialising the file system image, add a file system to the image and mount it. Then
write the contents of the root file system to the RAM disk and, finally, remove it from the
file system with umount. Root permissions are required for these steps.
su -m
/sbin/mke2fs -F -v -m0 images/initrd.img
mount -o loop images/initrd.img initrd/
cp -av rootfs/* initrd/
umount initrd/
exit
Page 24 of 65 Version 1.26 (2008-04-30)
Page 25

Linux Guide taskit GmbH
Next, compress the image containing the root file system and set the correct access rights:
gzip -9 < images/initrd.img > images/initrd.bin
chmod 644 images/initrd.bin
The parameter -9 tells gzip to use the highest level of compression.
You can also carry out this process by running the simple shell script mkfsimage.sh, found
in the folder scripts on the starterkit-CD:
cd /develop
cp /dev/cdrom/scripts/mkfsimage.sh /develop
./mkfsimage.sh
Now you can transfer the initrd.bin image to the flash of the taskit board and configure the
boot loader, in order to give the kernel the appropriate boot parameter for using the initrd.
7.5. Testing the new root filesystem
Before copying the image to flash memory, you should test whether it will be booted
properly, without errors.
The initrd created in the previous step must first be transferred from the development
computer to your device. You can use TFTP to do this.
If a TFTP server is running on the development system, move the compressed initrd.bin
image file to the /tftpboot directory.
All further steps are undertaken on the taskit device by means of a terminal program. After
start-up and pressing a key within 3 seconds, the system shows the U-Boot prompt.
Now we can make use of the bootscript we have created in chapter “Creating a
bootscript”:
run ramboot
7.6. Installing the new root filesystem permanently
If the kernel boots without any problems, you can reset the board and copy the root file
system image again via TFTP and write it to the flash memory.
Use the tftpboot command to load the initrd.bin from the server and write it to RAM:
U-Boot> tftpboot 20000000 initrd.bin
After the TFTP transfer, the variable filesize contains the size of the image, this is needed
for copying the file to flash memory.
Now copy the image to flash memory.
First erase the target flash memory range. The start and end addresses must point to
exactly the beginning and end of a flash-sector:
U-Boot> erase 10200000 104FFFFF
After clearing the memory, you can write the file system image to the flash memory.
Note: If the initrd is bigger then the flash partition that is used for storing it, the you will
overwrite other flash partitions (i.e.: /config in our example).
U-Boot> cp.b 20000000 10200000 0x$(filesize) .
Page 25 of 65 Version 1.26 (2008-04-30)
Page 26

Linux Guide taskit GmbH
8. Creating a new user data partition
8.1. Overview
As you can see in chapter the appendix the biggest part of the flash disk is used for a
JFFS2 partition. The Journalling Flash File System version 2 or JFFS2 is a log-structured
file system for use in flash memory devices. Unlike the ext2 filesystem, used for the root
filesystem, with JFFS2 it is possible to create and modify files that are stored directly onto
the flash disk.
This partition is mounted as the directory /config during the boot process and is used to
store your applications as well as the file rc.local.
The file rc.local is executed by the linux kernel after the boot process to start services like
DHCP and telnet. Furthermore it is possible to modify rc.local in that way that your
application is started automatically after the boot process by inserting the following line:
/config/YourApplication
Because write / erase cycles on flash devices are limited, your application should not use
the flash disk to store data that is changed or deleted very often during application runtime
(i.e. temporary files, log files). Rather your application should use the ramdisk for such
operations and copy the needed files to the flash partition in large time intervals or when
the application has finished its work.
8.2. Creating a new JFFS2 image
The default contents of the original jffs2 partition con be found on the starterkit-cd. Simply
copy the folder /config. Then copy your own files to this folder.
After that you can create the image file:
mkfs.jffs2 -e 128 -d ./config -o jffs2.bin
Thean copy it to your /tftpboot folder and install it using U-Boot:
tftpboot 20000000 jffs2.bin
erase 10XXXXXX 10XXXXXX
cp.b 20000000 10XXXXXX $(filesize)
8.3. Archiving the JFFS2 partition
In case installing and configuring your application is very complex it may be useful to have
a backup of the whole partition so that it can be restored quickly when deleting it
accidental.
Making an exact copy of the JFFS2 partition is very simple. First you just have to create an
new directory on the development system to store the archives and export it:
mkdir /develop/backup
chmod 777 /develop/backup
insert the line '/develop/backup *(rw)' into /etc/exports
Then mount it on the taskit device and copy the whole JFFS2 partition (this is the 4th flash
partition: /dev/mtd/3) by directly accessing the mtd flash device. To save the archive on the
development system using the filename 'archive2007.jffs2' you have to enter the following
Page 26 of 65 Version 1.26 (2008-04-30)
Page 27

Linux Guide taskit GmbH
line in the bash shell:
mount -t nfs -o nolock development_system_ip:/develop/backup /mnt
cat /dev/mtd/3 > /mnt/archive2007.jffs2
umount /mnt
8.4. Restoring the JFFS2 partition
Enter the following line on the linux shell to restore the above created archive (the flash will
automatically be deleted before copying):
flashcp -v /mnt/archive2007.jffs2 /dev/mtd/3
Note: See that the copied archive is not bigger the the flash partition it is copied to. In the
case the copy process will fail.
8.5. Resetting to the original state
In case you accidentally deleted you JFFS2 partition you can reset it to the delivery state.
First copy the image file jffs2.bin from /images directory on the starterkit-CD to your
tftpboot directory.
All further steps are undertaken on the taskit deixce by means of a terminal program. After
start-up and pressing a key within 3 seconds, the system shows the U-Boot prompt.
Then enter the following lines:
tftpboot 20000000 jffs2.bin
erase 10XXXXXX 10XXXXXX
cp.b 20000000 10XXXXXX $(filesize)
Page 27 of 65 Version 1.26 (2008-04-30)
Page 28

Linux Guide taskit GmbH
9. The input driver
9.1. Overview
The input drivers control each input device build in or connected to your product. This
includes the touch panel, the matrix keyboard, a PS/2 keyboard, the rotary knob and an
infrared remote control.
To find out which drivers are available for your product, you will have to read the chapter
“Driversupport” in the appendix.
The driver consists of several parts, one for each input device.
All drivers are integrated in the kernel and started at boottime except the driver for the
rotary knob. This driver is compiled as module and started manually if needed.
The matrix keyboard module and the infrared remote control module additionally have a
keymap which can be altered from user space through ioctl functions.
Furthermore it is possible to define different keymaps (layer) at the same time, that gives
the possibility to change the keymap during application runtime by pressing the remap key
that has to de assigned therefore.
The main module also includes a keymap which is called keyarray. This used to clone
mobile phone like keys, where one key can have several characters that are accessed by
pressing one key several times. By pressing a key several times it cycles through an array
of characters until another key is pressed or a timeout occurs.
A list of all constants and structures of the input driver can be found in the appendix (input
driver reference).
9.2. Un- / installing the drivers
When linux has completed booting all drivers are already started except the driver for the
rotary-knob. This driver can be started and stopped manually.
If you now want to activate or deactivate the drivers that are compiled into the kernel, you
have to change the kernel configuration and then create and install the new kernel.
After starting the kernel's “menuconfig”, navigate to “device drivers -> Input device support
-> Miscellaneous devices” and activate (press SPACE until a '*' appears) “Portux/MoLux
Input Drivers”.
To activate a driver, press SPACE until a * appears in the brackets.
To deactivate a driver, by press SPACE until the brackets are empty.
Detailed informations about settings for your product can be found in the appendix
(Chapter: Product specific kernel settings).
Quit “menuconfig” and save the new kernel configuration and create the new kernel image
(see chapter: “Compiling a new kernel”).
To start the driver for the rotary-knob enter the following line on the linux prompt:
Page 28 of 65 Version 1.26 (2008-04-30)
Page 29

Linux Guide taskit GmbH
insmod /config/panelcard-knob.ko
To stop the driver enter:
rmmod panelcard-knob.ko
You can also compile the driver into the kernel, so that it is started automatically, by
changing the entry “Panel-Card Starterkit knob driver” from 'M' (compiled as module) to '*'.
9.3. Customizing the keymap of the matrix keyboard
A whole list of assignable keys like KEY_B in the first example can be found in the Linux
kernel header /include/linux/input.h of the Linux sources.
The macros and constants to modify the functioning of the input driver can be found on the
software CD in the input driver header portuxinput.h.
You need to include the portuxinput.h every time an application has to modify the keymaps
of functions of the input driver. For example if you create your application in the /develop
directory on the development system you will have to copy it from the starterkit-CD:
cd /develop
mkdir include
cp /dev/cdrom/inputdriver/*.h /develop/include.
Then you will have to include it in your application:
#include “/develop/include/portuxinput.h”
To customize the keymap of the matrix keyboard you have to open the input device ( /dev/
portuxinput ), change the content of the keymap struct and write it to the input device.
Every change in the keymap will be lost after the next reboot, so you have to include the
sourcecode for changing the keymap in your application or compile it as an extra tool that
is executed before you start you application.
Example 1: This code changes the third key in the first column of the matrixkeyboard to 'b':
/* This sample can be found on the starterkit cd:
/dev/cdrom/examples/input/matrixsample1.c */
#include <sys/ioctl.h>
#include <stdio.h>
#include <sys/types.h>
#include <sys/stat.h>
#include <fcntl.h>
#include <linux/input.h>
#include "/develop/inputdriver/portuxinput.h" // input driver header
int main(void)
{
int fd = open("/dev/portuxinput", O_RDWR);
struct matrixentry entry = {
.x = 0, // key at column 1
.y = 2, // key at row 3
.layer = 0, // first layer
Page 29 of 65 Version 1.26 (2008-04-30)
Page 30

Linux Guide taskit GmbH
.value = {
.flags = 0,
.value = KEY_B // assign key 'b' (small b)
}
};
if(ioctl(fd, PORTUXMATRIX_IOC_SETKEY, &entry))
perror("Error changing key!");
return 0;
}
Compiling: arm-linux-3.4.2-gcc -Wall matrixsample1.c -o matrixsample1
Example 2: To change the whole keymap and assign the key '(' (shifted '9') to every key
you have to code:
/* This sample can be found on the starter-kit cd:
/dev/cdrom/examples/input/matrixsample2.c */
...
matrixmap map;
int x, y;
int fd = open("/dev/portuxinput", O_RDWR);
for(x = 0; x < PORTUXMATRIX_MAX_X; x++)
for(y = 0; y < PORTUXMATRIX_MAX_Y; y++) {
// assign a shifted '9' -> '(' to the key
map[0][y][x].flags = PORTUXINPUT_MASK_LSHIFT;
map[0][y][x].value = KEY_9;
}
if(ioctl(fd, PORTUXMATRIX_IOC_SETKEYMAP, &map))
perror("Error changing keymap!");
Example 3: Change all keymaps(layer) and assign the character 'A' to every key of the first
layer and 'B' to the second layer then assign the function for switching the
keymaps to the first key (0x0) on every layer:
/* This sample can be found on the starter-kit cd:
/dev/cdrom/examples/input/matrixsample3.c */
...
matrixmap map;
int x, y, layer;
int fd = open("/dev/portuxinput", O_RDWR);
// create 2 keymaps
// PORTUXMATRIX_MAX_LAYER = 2; defined in portuxinput.h
for(layer = 0; layer < PORTUXNIPUT_MAX_LAYER; layer++) {
for(x = 0; x < PORTUXMATRIX_MAX_X; x++) {
Page 30 of 65 Version 1.26 (2008-04-30)
Page 31

Linux Guide taskit GmbH
for(y = 0; y < PORTUXMATRIX_MAX_Y; y++) {
map[layer][y][x].flags = PORTUXINPUT_MASK_LSHIFT;
if(layer == 0) // if is first layer assign 'A'
map[layer][y][x].value = KEY_A;
else
map[layer][y][x].value = KEY_B;
}
}
// assign the key for switching the keymap to the first key
map[layer][0][0].flags = PORTUXINPUT_MASK_SETKEYMAP;
if( layer < PORTUXMATRIX_MAX_LAYER – 1)
// switch to next keymap
map[layer][0][0].value = layer + 1;
else
// key on the last keymap switches to the first keymap
map[layer][0][0].value = 0;
}
if(ioctl(fd, PORTUXMATRIX_IOC_SETKEYMAP, &map))
perror("Error changing keymap!");
Example 4: Configure the keymap to clone mobile phone like keys. If you press a key on
the matrixkeyboard several times it cycles through several characters (a->s>d->f->g->h->j->k->l). This function can also be used for IR remote controllers.
The maximum number of characters that can be assigned to a key is 16
(PORTUX_MAX_KEYARRAYELEMENTS), and the maximum number of keys
that can be used with a keyarray is 10 (PORTUX_MAX_KEYARRAYS) as
defined in portuxinput.h.
/* This sample can be found on the starter-kit cd:
/dev/cdrom/examples/input/matrixsample4.c */
// note: if you don't want to use all 16 characters then the last
// character has to be 0 terminated
int arrayNR;
int charNR;
keyarray characters;
matrixmap map;
int fd = open("/dev/portuxinput", O_RDWR);
for(arrayNR = 0; arrayNR < PORTUX_MAX_KEYARRAYS; arrayNR++) {
for(charNR=0; charNR < PORTUX_MAX_KEYARRAYELEMENTS; charNR++)
{
// Note: PORTUX_MAX_KEYARRAYELEMENTS = 16 ~ 0 .. 15
characters[arrayNR][charNR].flags = 0;
characters[arrayNR][charNR].value = KEY_A + charNR;
}
// 0-termination of keyarray elements if needed
if(characterNR < PORTUX_MAX_KEYARRAYELEMENTS - 1) {
characters[arrayNR][characterNR + 1].flags = 0;
characters[arrayNR][characterNR + 1].value = 0;
Page 31 of 65 Version 1.26 (2008-04-30)
Page 32

Linux Guide taskit GmbH
}
}
// inform the input driver about the new keyarray
if(ioctl(fd, PORTUXINPUT_IOC_SETKEYARRAY, &characters)) {
perror("Error changing keyarray!");
return 1;
}
// assign the keyarray to the keys on row 1
for(arrayNR = 0; arrayNR < PORTUX_MAX_KEYARRAYS; arrayNR++) {
map[0][0][arrayNR].flags = PORTUXINPUT_MASK_KEYARRAY;
map[0][0][arrayNR].value = arrayNR;
}
if(ioctl(fd, PORTUXMATRIX_IOC_SETKEYMAP, &map))
perror("Error changing keyarray!");
By default the keyarray function is configured to display a selected character after a
timeout or after pressing another key (PORTUXINPUT_KEYARRAY_MODE_BLIND).
But it is also possible to configure the keyarray function in that way that it delivers a
backspace before every keypress (except the first keypress) in order to delete the last
character (PORTUXINPUT_KEYARRAY_MODE_BACKSPACE).
Example 5: Changing the keyarray function mode from mode blind to mode backspace:
/* This sample can be found on the starter-kit cd:
/dev/cdrom/examples/input/matrixsample5.c */
int fd = open("/dev/portuxinput", O_RDWR);
if(ioctl(fd, PORTUXINPUT_IOC_SETKEYARRAYMODE, \
PORTUXINPUT_KEYARRAY_MODE_BACKSPACE))
perror("Error changing keyarray mode.");
9.4. Customizing the keymap of the infrared interface (optional)
To customize the keymap of the IR remote control you have to open the portuxinput device
( /dev/misc/portuxinput ), change the content of the keymap struct and write it to the input
device.
Every change in the keymap will be lost after the next reboot, so you have to include the
sourcecode for changing the keymap in your application or compile it as an extra tool that
is executed before you start you application.
The maximum number of IR-command codes is 256 (PORTUXIR_MAX_COMMANDCODES).
Example: Change all keymaps and assign the character 'a' to every key then assign the
function to switch the keymaps to the first key (0x0):
/* This sample can be found on the starterkit cd:
/dev/cdrom/examples/input/irsample1.c */
Page 32 of 65 Version 1.26 (2008-04-30)
Page 33

Linux Guide taskit GmbH
irmap map;
int IRcmd, mapNR;
int fd = open("/dev/portuxinput", O_RDWR);
// create the keymaps
for(mapNR = 0; mapNR < PORTUXIR_MAX_LAYER; mapNR++) {
// assign key 'a' to every key of the ir controller
for(IRcmd = 0; IRcmd < PORTUXIR_MAX_COMMANDCODES; IRcmd++)
map[mapNR][IRcmd].flags = 0; // no modifier
map[mapNR][IRcmd].value = KEY_A; // 'a'
}
// assign the key for switching the keymap to the first key
map[mapNR][0].flags = PORTUXINPUT_MASK_SETKEYMAP;
if(mapNR < PORTUXIR_MAX_LAYER – 1)
// switch to next keymap
map[mapNR][0].value = mapNR + 1;
else
// the key of the last keymap switches to the first
map[mapNR][0].value = 0;
}
if(ioctl(fd, PORTUXIR_IOC_SETKEYMAP, &map))
perror("Error changing keymap!");
9.5. Getting the input
If you are using the Nano-X Window System or Trolltechs Qtopia Core the PS/2
keyboard, the matrix keyboard and the IR remote controller will be detected as input
device automatically. If you are not using libraries that automatically detect these input
devices, you will have to by-pass the them as STDIN to your application to get the input:
./yourApplication < /dev/tty1
Now you can use the getchar or scanf function to read the input:
/* This sample can be found on the starter-kit cd:
/dev/cdrom/examples/input/inputsample1.c */
char c;
printf("\nPlease press any key and confirm with enter (OKAY):");
c = getchar();
printf("\nInput:%c = %i\n", c, (int)c);
Note: To confirm the input it is necessary to press ENTER / RETURN on linux, so it is
required to have assigned a key with that function. On the matrix keyboard by default the
green key: OKAY is assigned to that function.
9.6. Using the touchscreen
Page 33 of 65 Version 1.26 (2008-04-30)
Page 34

Linux Guide taskit GmbH
The optional touchscreen can be used as pointer like a pc mouse in graphical applications.
To build applications that use the touchscreen as input device you can use the class
libraries of the Nano-X Window System or Qtopia Core from Trolltech.
The Nano-X Window System will detect the touchscreen as a standard input device
automatically.
When using Qtopia Core you will have to set an environment variable that is recognized by
the Qtopia application:
export QWS_MOUSE_PROTO=LinuxTp:/dev/input/ts1
If QWS_MOUSE_PROTO is not defined Qtopia Core will try to detect an inputdevice
automatically. This will fail and crash the system.
If you don't want to use a touchscreen in your Qtopia application you will have to pass the
command line parameter -nomouse.
9.6.1. Calibrating the touchscreen
If you are using the touchscreen and the pointer does not follow you finger correctly you
can calibrate it.
To adjust touchscreen coordinates to display coordinates the program TouchTool can be
used. This tool can calibrate the touchscreen, save the measured data and reload saved
calibration data.
The TouchTool sources con be found on the starterkit-CD: /inputdriver.
To start the calibration enter: /config/TouchTool -c.
During the calibration process you will have to move your finger to the upper, lower, left
and right side of the visible screen.
A 10 second countdown, indicating the end of the calibration process, is displayed on the
terminal. This counter is restarted every time you touch the touchscreen.
The calibration values are stored in the eeprom of the touchscreen controller and can be
loaded using the TouchTool: /config/TouchTool -l.
Page 34 of 65 Version 1.26 (2008-04-30)
Page 35

Linux Guide taskit GmbH
9.7. Using the knob
The rotary knob on the Panel-Card starterkit board can be used as input device after the
driver has been loaded. The driver module is located in the /config folder.
To start the driver automatically at boot time, add the following line to /config/rc.local:
insmod /config/modules/panelcard-knob.ko
To check whether the driver is loaded or not type the following line: lsmod
To remove the driver enter: rmmod panelcard-knob
To install the driver enter: insmod /config/modules/panelcard-knob.ko
If you are using Trollech's class library Qtopia Core or the Nano-X Window System the
rotary knob will be detected as input device automatically. If you are not using libraries that
automatically detect these input devices, you will have to by-pass the them as STDIN to
your application to get the input:
./yourApplication < /dev/tty1
The following input events (keys) will be posted to the linux event system:
● the key left (KEY_LEFT) is posted when turning the knob against clockwise
direction
● the key right (KEY_RIGHT) is posted when turning the knob in clockwise direction
● the key enter (KEY_ENTER, KEY_RETURN) is posted when the knob is pressed
down
Page 35 of 65 Version 1.26 (2008-04-30)
Page 36

Linux Guide taskit GmbH
10. The display
10.1. Un- / Installing the driver
By default the driver for the display device is compiled into the linux kernel.
To activate or deactivate the driver you have to recompile and install the linux kernel.
The reconfiguration of the kernel can be done with menuconfig. After starting menuconfig
the display driver can be found at: Device Drivers -> Graphics support. There you can
activate or deactivate the display driver and backlight.
For details see appendix chapter “Product specific kernel settings”.
The recompilation process of the linux kernel is described in chapter “Compiling a new
Linux kernel”.
10.2. Starting the driver
Because the driver is compiled into the kernel it is automatically started during the boot
process.
10.2. Text based applications
The easiest way to use the display for your text based applications, is to activate the
framebuffer console in the kernel configuration (Device Drivers->Graphics Support>Console Display Driver Support->Frammbufferconsole Support).
Then you only have to by-pass the standard text output (STDOUT) and / or the standard
error output (STDERR) to the display.
By-pass the STDOUT: ./YourApplication >/dev/tty1.
By-pass the STDERR: ./YourApplication 2>/dev/tty1.
Example 1: Printing 'Hello World' to the display (error messages are also displayed there).
echo Hello World >/dev/tty1 2>/dev/tty1
Example 2: Starting an application that gets input from a matrixkeyboard (or PS/2
keyboard or IR remote controller) and prints text and errors to the display
./YourApplication </dev/tty1 >/dev/tty1 2>/dev/tty1
10.3. Graphical applications
To use the display for graphical applications you can directly read and write into the
framebuffer of the display.
For example to take a screenshot of the display and store it in /config enter:
cat /dev/fb0 > /config/ScreenShot
Then you can copy it back to the framebuffer:
Page 36 of 65 Version 1.26 (2008-04-30)
Page 37

Linux Guide taskit GmbH
cp /config/ScreenShot /dev/fb0
Another approach to create graphical applications is to use the open source Nano-X
Window System or Trolltech's Qtopia Core. These class libraries will automatically detect
the display and use it.
The Nano-X Window System is installed in the root filesystem. To start your Nano-X
application you have to start the Nano-X-server first and then your Nano-X application:
Nano-X &
./YourApplication
To know more about creating applications with the Nano-X Window System refer to the
project homepage www.MicroWindows.org. There you can download the newest version
of Nano-X Window System as well as the API-documentation and tutorials.
You can also use Trolltech's (www.trolltech.com) platform independent class library QT.
Accurately you will need the Qtopia Core libraries that are designed for ARM-processors
with framebuffer devices. This library includes different display styles and other useful
classes for creating graphical applications.
Because of incompatibilities, Qtopia only works properly on displays with 8-bit color depth.
But keep in mind that graphical Qtopia applications will need at least 5 megabytes of disk
space whereas Nano-X applications including the Nano-X server need less than one
megabyte.
You can download an evaluation Version from http://www.trolltech.com/products/qtopia.
API-documentation and tutorials can be found at http://doc.trolltech.com/.
Page 37 of 65 Version 1.26 (2008-04-30)
Page 38

Linux Guide taskit GmbH
11. Appendix
11.1. Memory map
11.1.1. Portux 920t EU + SW, Portux-MiniPC, Portux Panel-PC, PanelCard, MoLUX and Stamp
First of all you need to know that there are 2 main memory regions:
● the 16 MiB onboard Flash is mapped to address 0x10000000 – 0x10FFFFFF
● the optional 64 MiB Flash is mapped to address 0x10000000 – 0x13FFFFFF
● the 64 MiB onboard SDRAM is mapped to address 0x20000000 – 0x23FFFFFF
Further on you need to know the memory addresses of the OS, the root filesystem and
the bootloader including the used environment variables that are stored on the onboard
flash.
To ensure not to accidentally overwrite or delete the installed software and to know where
free space is available take a look at the following table:
Bootloader with environment variables 0x10000000 - 0x1005FFFF
Linux kernel image (uImage) 0x10060000 - 0x101FFFFF
Ramdisk image with root filesystem
(initrd.bin)
10 MB JFFS2 for user data (/config) 0x10500000 - 0x10EFFFFF
User partition 0x10F00000 - 0x1XXXXXXX
Table 1: Memory addresses of installed software
0x10200000 - 0x104FFFFF
Page 38 of 65 Version 1.26 (2008-04-30)
Page 39

Linux Guide taskit GmbH
11.2. Driversupport
The following articles show which drivers are availabe for your product.
11.2.1. Portux Panel-PC
● Displaydriver
● Matrix keyboard driver
● Touch panel driver
● PS/2 Keyboard driver
11.2.2. Panel-Card
● Displaydriver
● Rotary knob driver
11.2.3. MoLUX
● Displaydriver
● Matrix keyboard driver
Page 39 of 65 Version 1.26 (2008-04-30)
Page 40

Linux Guide taskit GmbH
11.3. U-Boot environment variables
A description of all important environment variables used by U-Boot follows.
11.3.1. Environment variables for Portux 920t EU + SW, Portux-MiniPC,
Portux Panel-PC and Stamp
basicargs contains the static boot arguments
default: console=ttyS0,115200 mem=64M root=/dev/ram rw
baudrate defines the baudrate of the serial interface
default: 115200
bootargs parameters / settings passed to the kernel when booting
default: \$(basicargs) initrd=0x\$(fileaddr),0x\$(filesize)
\$(mtdparts)\;bootm \$(kerneladdr)
bootcmd is automatically called by the boot/bootd command (which can be executed
manually or is executed automatically on start- up)
default: run flashboot
bootdelay time in seconds to interrupt the boot process / before bootd is carried out
default: 3
ethaddr unique Ethernet MAC address
sample: 00:50:D2:FA:B0:01
flashboot command sequence necessary for booting the kernel; loading the
root filesystem from onboard flash memory
default: cp.b $(initrdaddr) $(inaddr) $(insize);setenv bootargs $(basicargs)
initrd=0x$(inaddr),0x$(insize) $(mtdparts);bootm $(kerneladdr)
kerneladdr address of the linux kernel image
default: 10060000
initrdaddr address of the linux root filesystem image
default: 10200000
ipaddr IP address used by U-Boot
sample: 192.168.4.240
inaddr destination address of the initial ramdisk with root filesystem
default: 21400000
insize size of the initial ramdisk with root filesystem
sample: 2113C3
mtdparts the MTD partitions for the flash unit are defined here
default: mtdparts=physmap_flash.0:384k(boot),1664k(linux),3072k(initrd),
10240k(cfg),-(custom)
stdin standard input interface
default: serial
stdout standard output interface
Page 40 of 65 Version 1.26 (2008-04-30)
Page 41

Linux Guide taskit GmbH
default: serial
stderr standard error output interface
default: serial
serverip IP address of the TFTP server
sample: 192.168.4.238
flash_type installed flash (used by script for linux flash tool configuration)
default: N_type
old value: M_type
11.3.2. Environment variables for Panel-Card and MoLUX
basicargs contains the static boot arguments
default: console=ttyS0,115200 mem=32M root=/dev/ram rw
baudrate defines the baudrate of the serial interface
default: 115200
bootargs parameters / settings passed to the kernel when booting
default: $(basicargs) initrd=0x$(inaddr),0x$(insize) $(mtdparts)
bootcmd is automatically called by the boot/bootd command (which can be executed
manually or is executed automatically on start- up)
default: run flashboot
bootdelay time in seconds to interrupt the boot process / before bootd is carried out
default: 3
ethaddr unique Ethernet MAC address
sample: 00:50:D2:FA:B0:01
flashboot command sequence necessary for booting the kernel; loading the
root filesystem from onboard flash memory
default: cp.b $(initrdaddr) $(inaddr) $(insize);setenv bootargs $(basicargs)
initrd=0x$(inaddr),0x$(insize) $(mtdparts);bootm $(kerneladdr)
kerneladdr address of the linux kernel image
default: 10060000
initrdaddr address of the linux root filesystem image
default: 10200000
ipaddr IP address used by U-Boot
sample: 192.168.4.240
inaddr destination address of the initial ramdisk with root filesystem
default: 21400000
insize size of the initial ramdisk with root filesystem
sample: 282EA0
Page 41 of 65 Version 1.26 (2008-04-30)
Page 42

Linux Guide taskit GmbH
mtdparts the MTD partitions for the flash unit are defined here
default: mtdparts=physmap_flash.0:384k(boot),1664k(linux),3072k(initrd),
10240k(cfg),-(custom)
stdin standard input interface
default: serial
stdout standard output interface
default: serial
stderr standard error output interface
default: serial
serverip IP address of the TFTP server
sample: 192.168.4.238
flash_type installed flash (used by script for linux flash tool configuration)
default: N_type
old value: M_type
lcd type of installed display
default: EDT
Page 42 of 65 Version 1.26 (2008-04-30)
Page 43

Linux Guide taskit GmbH
11.4. Product specific kernel settings
11.4.1. Portux 920t EU + SW, Portux-MiniPC
General kernel configuration
The default kernel configuration is loaded by entering:
ARCH=arm make portux920t_defconfig
This configuration has to be loaded at least one time after decompressing and compiling
the kernel sources from the starterkit-CD.
11.4.2. Portux Panel-PC
General kernel configuration
The default kernel configuration is loaded by entering:
ARCH=arm make portuxpanelpc_defconfig
This configuration has to be loaded at least one time after decompressing and compiling
the kernel sources from the starterkit-CD.
Input device(s)
To change the input driver configuration start menuconfig and go to:
device drivers -> Input device support -> Miscellaneous devices
To activate the input drivers activate (press SPACE until a '*' appears) the entry
“Portux/MoLux Input Drivers” and a list of available drivers appears.
Then:
● activate the entry “Touch panel component” to enable the driver for the touch panel
● activate the entry “Matrix keyboard component” to enable the driver for the matrix
keyboard
● activate the entry “PS/2 keyboard support” to enable the driver for the PS/2
keyboard
11.4.3. Panel-Card
General kernel configuration
The default kernel configuration is loaded by entering:
ARCH=arm make panelcard_defconfig
This configuration has to be loaded at least one time after decompressing and compiling
the kernel sources from the starterkit-CD.
Configure display driver
To change the backlight configuration start menuconfig and go to:
Page 43 of 65 Version 1.26 (2008-04-30)
Page 44

Linux Guide taskit GmbH
Device drivers -> Graphics support
To enable the driver activate the entry “AT91/AT32 LCD Controller support”.
To disable the driver deactivate the entry “AT91/AT32 LCD Controller support”.
Configure backlight
To change the backlight configuration start menuconfig and go to:
Device drivers -> Graphics support
To enable the backlight activate the entry “taskit Panel-Card Backlight Driver”.
To disable the backlight deactivate the entry “taskit Panel-Card Backlight Driver”.
Input device(s)
To change the input driver configuration start menuconfig and go to:
device drivers -> Input device support -> Miscellaneous devices
To compile the rotary knob driver as module set the enty “Panel-Card Starterkit knob
driver” to 'M'. To compile the driver into the kernel (started automatically) set the entry to
'*'. To deactivate the driver set the entry to ' ' (empty).
11.4.4. MoLUX
General kernel configuration
The default kernel configuration is loaded by entering:
ARCH=arm make molux_defconfig
This configuration has to be loaded at least one time after decompressing and compiling
the kernel sources from the starterkit-CD.
Configure display driver
To change the backlight configuration start menuconfig and go to:
Device drivers -> Graphics support
To enable the backlight activate the entry “AT91/AT32 LCD Controller support”.
To disable the backlight deactivate the entry “AT91/AT32 LCD Controller support”.
Configure backlight
To change the backlight configuration start menuconfig and go to:
Device drivers -> Graphics support
To enable the backlight activate the entry “taskit Panel-Card Backlight Driver”.
To disable the backlight deactivate the entry “taskit Panel-Card Backlight Driver”.
Input device(s)
To change the input driver configuration start menuconfig and go to:
device drivers -> Input device support -> Miscellaneous devices
Page 44 of 65 Version 1.26 (2008-04-30)
Page 45

Linux Guide taskit GmbH
To activate the input drivers activate (press SPACE until a '*' appears) the entry
“Portux/MoLux Input Drivers” and a list of available drivers appears.
Then:
● activate the entry “Matrix keyboard component” to enable the driver for the matrix
keyboard
11.4.5. Stamp
General kernel configuration
The default kernel configuration is loaded by entering:
ARCH=arm make stamp_defconfig
This configuration has to be loaded at least one time after decompressing and compiling
the kernel sources from the starterkit-CD.
Page 45 of 65 Version 1.26 (2008-04-30)
Page 46

Linux Guide taskit GmbH
11.5. Input driver reference
11.5.1. struct portuxinputevent
Name
struct portuxinputevent— describes an input event
Synopsis
struct portuxinputevent {
unsigned short flags;
unsigned int value;
};
Members
flags - some additional flags to change the handling of the event
value - distance of a mouse movement or one of the key/button values, that can be
reported to the input system, refer to include/linux/input.h for more information
Description
This structure is used by portuxinput_report_event to report events to the input system.
With flags member you can decide, how value is treated.
11.5.2. struct matrixentry
Name
struct matrixentry— used in PORTUXMATRIX_IOC_GETKEY and
PORTUXMATRIX_IOC_SETKEY ioctl
Synopsis
struct matrixentry {
unsigned char x;
unsigned char y;
unsigned char layer;
struct portuxinputevent value;
};
Members
x - column on the matrix keyboard
y - row on the matrix keyboard
layer - number of the layer which the event value ought to happen in
value - the event that should happen, if key in (x,y) is pressed
11.5.3. struct irentry
Name
struct irentry— used in PORTUXIR_IOC_GETKEY and PORTUXIR_IOC_SETKEY ioctl
Page 46 of 65 Version 1.26 (2008-04-30)
Page 47

Linux Guide taskit GmbH
Synopsis
struct irentry {
unsigned char code;
struct portuxinputevent value;
};
Members
code - code for which the event value ought to happen
value - event that ought to happen
11.5.4. struct calibration
Name
struct calibration— used in PORTUXTOUCH_IOC_CALIBRATIONSTATUS to monitor
touch panel calibration
Synopsis
struct calibration {
unsigned short minx;
unsigned short maxx;
unsigned short miny;
unsigned short maxy;
unsigned char active;
unsigned char timeout;
unsigned char remaining;
};
Members
minx - current minimum x value
maxx - current maximum x value
miny - current minimum y value
maxy - current maximum y value
active - shows if calibration is currently executed
timeout - the timeout used
remaining - number of seconds until calibration is finished
11.5.5. struct eeprom_t
Name
struct eeprom_t — used in PORTUXINPUT_IOC_WRITEEEPROM and
PORTUXINPUT_IOC_READEEPROM to store data and EEPROM address.
Synopsis
struct calibration {
unsigned short address;
unsigned char data;
};
Page 47 of 65 Version 1.26 (2008-04-30)
Page 48

Linux Guide taskit GmbH
Members
address – EEPROM address for read/write operation
data – received data or data to store
11.5.6. Defines / Constants
These constants define the maximum size of the arrays used by the io-controll functions.
They can be modified in the portuxinput.h but then you have to recompile the modules.
Constants for the matrix keyboard
PORTUXMATRIX_MAX_X 8: the maximum of 8 rows can be used
PORTUXMATRIX_MAX_Y 8: the maximum of 8 columns can be used
PORTUXMATRIX_MAX_LAYER 2: 2 different keymaps can be created
Constants for the IR-remote controller
PORTUXIR_MAX_LAYER 2: 2 different keymaps can be created
PORTUXIR_MAX_COMMANDCODES 256: 256 different IR-scancodes can be used
Constants for the PS/2 and matrix keyboard keyarray function
PORTUX_MAX_KEYARRAYS 10: 10 keyarrays can be created
PORTUX_MAX_KEYARRAYELEMENTS 16: every keyarray can have 16 keys
(characters)
Flags for portuxinputevent
PORTUXINPUT_MASK_SETKEYMAP: Switches to the layer stored in value.
PORTUXINPUT_MASK_SETKEYMAPRET: Switches to the layer stored in value only for
the next key press. After that it returns to the last used layer.
PORTUXINPUT_MASK_KEYARRAY: Simulates keys like on mobile phones where one
key cycles through a number of keys. Value determines which array is used.
PORTUXINPUT_MASK_REPEAT: Normally, one key press generates more than one
event. All events after the first are repeated ones. This flag determines, if they will be
processed. In most cases you do not want this behaviour, so you will not set this flag. (An
possible exception is mouse movement.)
PORTUXINPUT_MASK_MOUSEMOVE: If this flag is set, value is not treated as a key but
Page 48 of 65 Version 1.26 (2008-04-30)
Page 49

Linux Guide taskit GmbH
as a relative movement of the mouse cursor. The next two flags describe the direction.
They should not be used, if this flag is not set. If this flag and all of the above are not set,
than value is treated as a key/button code.
PORTUXINPUT_MASK_REL_X: Mouse movement in x direction
PORTUXINPUT_MASK_REL_Y: Mouse movement in y direction
PORTUXINPUT_MASK_LSHIFT: Left shift key is simulated while sending the key event.
PORTUXINPUT_MASK_RSHIFT: Right shift key is simulated while sending the key event
PORTUXINPUT_MASK_LALT: Left alt key is simulated while sending the key event.
PORTUXINPUT_MASK_RALT: Right alt key is simulated while sending the key event.
PORTUXINPUT_MASK_LCTRL: Left ctrl key is simulated while sending the key event.
PORTUXINPUT_MASK_RCTRL: Right ctrl key is simulated while sending the key event.
11.5.7. Ioctl functions
Every module except for portuxkbd provides ioctl functions to change its settings or
execute commands. This section describes the usage of these functions. Ioctl functions
where no argument is mentioned ignore it. These functions will return -1 on failure and the
specific error is reported via the global variable errno as ioctl functions of all normal device
files would do.
ioctl functions provided by the main module portuxinput:
Ioctl function description
PORTUXINPUT_IOC_SETKEYARRAYM
ODE
Sets the mode, how the mobile phone like keys work.
There are three modes to be passed as a char.
PORTUXINPUT_KEYARRAY_MODE_BLIND - a key
press is only delivered to the input system if a timeout
occurs.
PORTUXINPUT_KEYARRAY_MODE_BACKSPACE
- every key is delivered to the input system, but
before every one except the first a backspace is send
to delete the last key.
PORTUXINPUT_KEYARRAY_MODE_EVERY - like
PORTUXINPUT_KEYARRAY_MODE_BACKSPACE,
but without backspaces
PORTUXINPUT_IOC_SETKEYARRAY
Sets the key array map. It takes a pointer as an
argument defined as typedef struct portuxinputevent
keyarray[PORTUX_MAX_KEYARRAYS]
[PORTUX_MAX_KEYARRAYELEMENTS]. So you
can define 10 key arrays, where each consists of at
most 16 entries. If not all 16 entries are used, the
Page 49 of 65 Version 1.26 (2008-04-30)
Page 50

Linux Guide taskit GmbH
PORTUXINPUT_IOC_WRITEEEPROM
array must be null terminated (value=0).
This function requires a pointer of type struct
eeprom_t as argument and stores one byte at the
selected address in input controller's EEPROM.
Note : The EEPROM's size is 1024 bytes where the
last 16 bytes are used by the calibration tool of
touchpad (TouchTool) to store calibration data.
PORTUXINPUT_IOC_READEEPROM
Reads one byte from input controller's EEPROM.
This function needs a pointer of type struct eeprom_t
to determine the address and to store data after read.
ioctl functions provided by the portuxmatrix module:
Ioctl function description
PORTUXMATRIX_IOC_SETKEY
PORTUXMATRIX_IOC_GETKEY
PORTUXMATRIX_IOC_SETKEYMAP
It sets one entry in the matrix keyboard keymap. It
takes a pointer to struct matrixentry as the
argument. All members of the struct have to be
set before invoking the ioctl.
It retrieves one entry from the matrix keyboard
keymap. It takes a pointer to struct matrixentry as
the argument. The members x, y and layer have
to be set before invoking the ioctl. The result is
stored in value.
It sets the complete keymap. It takes a pointer to
matrixmap as the argument, which is defined as
typedef struct portuxinputevent
matrixmap[PORTUXMATRIX_MAX_LAYER]
[PORTUXMATRIX_MAX_Y]
[PORTUXMATRIX_MAX_X].
PORTUXMATRIX_IOC_SETLAYER
PORTUXMATRIX_IOC_SETMAXLAYER
Set the current keymap layer. Argument of type
unsigned char must me smaller than or equal to
the maximum layer number.
Set the maximum keymap layer number.
Argument of type unsigned char must me smaller
than or equal to PORTUXMATRIX_MAX_LAYER
ioctl functions provided by the portuxtouch module
Ioctl function description
PORTUXTOUCH_IOC_CALIBRATESTART
PORTUXTOUCH_IOC_CALIBRATEFINISH
It starts the calibration process. It can be
stopped
PORTUXTOUCH_IOC_CALIBRATEFINISH
and
PORTUXTOUCH_IOC_CALIBRATIONABORT
It stops an already running calibration process
and stores the determined calibration values.
Page 50 of 65 Version 1.26 (2008-04-30)
Page 51

Linux Guide taskit GmbH
PORTUXTOUCH_IOC_CALIBRATEABORT
PORTUXTOUCH_IOC_CALIBRATE
PORTUXTOUCH_IOC_CALIBRATIONSTATUS
It stops an already running calibration process
and but discards the current calibration values.
It starts a self finishing calibration process. It
takes an int as an argument which determines
the timeout in seconds.
That means that when you stopped touching
the touch panel it waits as many seconds as
given for new input from the touch panel until it
finally stops calibration. At the start of the
calibration, the minimum and maximum values
initialized to only reflect the exact centre. When
the calibration finishes, they are only stored, if
all of them have changed.
With this function you can determine the current
minimum and maximum values during normal
calibration and additionally the remaining time
during the self finishing calibration. It takes a
pointer to struct calibration as an argument.
ioctl functions provided by the portuxir module
Ioctl function description
PORTUXIR_IOC_SETKEY
PORTUXIR_IOC_GETKEY
PORTUXIR_IOC_SETKEYMAP
PORTUXIR_IOC_SETFILTER
PORTUXIR_IOC_SETLAYER
It sets one entry in the IR remote control keymap.
It takes a pointer to struct irentry as an argument.
All members of the struct have to be set before
invoking the ioctl.
It sets one entry in the IR remote control keymap.
It takes a pointer to struct irentry as an argument.
The member code must be set before invoking
the ioctl.
It sets the complete keymap. It takes a pointer to
irmap as the argument, which is defined as
typedef struct portuxinputevent
irmap[PORTUXIR_MAX_LAYER]
[PORTUXIR_MAX_COMMANDCODES].
Each IR remote control does not only send a
command code but additionally a device code.
With this ioctl you can set the device code, which
is the only accepted one or set, that every device
code is accepted. This ioctl takes an integer as
the argument which has to be between 0x00 and
0xff as the acceptable code or 0x100 to accept all
codes.
Set the current keymap layer. Argument of type
unsigned char must me smaller than or equal to
the maximum layer number.
PORTUXIR_IOC_SETMAXLAYER
Set the maximum keymap layer number.
Argument of type unsigned char must be smaller
than or equal to PORTUXIR_MAX_LAYER
Page 51 of 65 Version 1.26 (2008-04-30)
Page 52

Linux Guide taskit GmbH
11.6. U-Boot commands
U-Boot generally interprets numerical arguments as hex values. In other words, 10000000
is 0x10000000 Hex.
U-Boot has commands to
1. read and write memory and flash memory,
2. load programs and files via the serial interface or Ethernet,
3. start programs and boot Linux, and
4. set environment variables, as well as
5. additional commands.
As an overview of the available commands, here is the output of the U-Boot help
command:
? - alias for 'help'
base - print or set address offset
boot - boot default, i.e., run 'bootcmd'
bootd - boot default, i.e., run 'bootcmd'
bootm - boot application image from memory
bootp - boot image via network using BootP/TFTP protocol
cmp - memory compare
coninfo - print console devices and information
cp - memory copy
crc32 - checksum calculation
dhcp - invoke DHCP client to obtain IP/boot params
echo - echo args to console
erase - erase FLASH memory
flinfo - print FLASH memory information
go - start application at address 'addr'
help - print online help
imls - list all images found in flash
itest - return true/false on integer compare
loadb - load binary file over serial line (kermit mode)
loop - infinite loop on address range
md - memory display
mm - memory modify (auto-incrementing)
mtest - simple RAM test
mw - memory write (fill)
nfs - boot image via network using NFS protocol
nm - memory modify (constant address)
printenv - print environment variables
protect - enable or disable FLASH write protection
rarpboot - boot image via network using RARP/TFTP protocol
reset - Perform RESET of the CPU
run - run commands in an environment variable
saveenv - save environment variables to persistent storage
Page 52 of 65 Version 1.26 (2008-04-30)
Page 53

Linux Guide taskit GmbH
setenv - set environment variables
tftpboot - boot image via network using TFTP protocol
version - print monitor version
11.6.1. Read and write memory and flash memory
cmp - memory compare
cmp [.l, .w, .b] Addr1 Addr2 count
You can check the contents of two memory ranges with cmp. You can use extensions to
determine the size of the memory access: cmp.l -> 32-bit long word (default), .w ->16-bit
word or .b -> 8-bit byte. The comparison runs until the number of units indicated by count
have been compared, or until the first difference is found. The size of the memory
compared is calculated by count * (l,w,b)
For example:
A comparison of the U-Boot image in flash with an identical image in the SDRAM. The
image in SDRAM is manipulated with an offset of 6 and compared anew:
U-Boot> cmp.w 10000000 20000000 100
Total of 256 halfwords were the same
U-Boot> mm.w 20000006
20000006: e59f ? aabb
20000008: f014 ? .
U-Boot> cmp.w 10000000 20000000 100
halfword at 0x10000006 (0xe59f) != halfword at 0x20000006 (0xaabb)
Total of 3 halfwords were the same
cp - memory copy
cp [.b, .w, .l] source target count
Copies count bytes (.b) or words (.w) from source to target
For example:
Copying the U-Boot image from address 20000000 to address 21000000 of SDRAM:
U-Boot> cp.b 20000000 21000000 171a4
md - memory display
md [.b, .w, .l] address [count]
Displays count bytes (words) starting at address in hexadecimal, with an ASCII
interpretation.
For example:
U-Boot> md.w 10000000 20
10000000: 0012 ea00 f014 e59f f014 e59f f014 e59f ................
10000010: f014 e59f f014 e59f f014 e59f f014 e59f ................
10000020: 0140 21f0 01a0 21f0 0200 21f0 0260 21f0 @..!...!...!`..!
Page 53 of 65 Version 1.26 (2008-04-30)
Page 54

Linux Guide taskit GmbH
10000030: 02c0 21f0 0320 21f0 0380 21f0 beef dead ...! ..!...!....
base - print or set address offset
base [base address]
Outputs or sets the current base address. Offsets for all memory commands are calculated
from the base address. This option can be helpful when you need to access a certain
memory region repeatedly.
For example:
U-Boot> base
Base Address: 0x00000000
U-Boot> md 40 4
00000040: 21f00000 21f00000 21f171a4 21f1b85c ...!...!.q.!\..!
U-Boot> base 20800000
Base Address: 0x20800000
U-Boot> md 40 4
20800040: 33cc316c 52ccbbdc 73ccb3c6 7bcc269e l1.3...R...s.&.{
mm - memory modify (auto-incrementing)
md [.b, .w, .l] address
This command enables interactive modification of memory addresses. It shows the
address and its contents, and waits for user input. If you enter a hexadecimal number, this
value will be written to the corresponding memory address and the next address will
display. If you simply press the Enter key, no change is stored and the next address
displays. If you enter an invalid hexadecimal value (such as q), the command ends.
This command cannot be used to modify flash memory!
For example: Modifying SDRAM memory:
U-Boot> md 20000000
20000000: eeffeeff aabbf014 e59ff014 e59ff014 ................
U-Boot> mm.b 20000000
20000000: ff ? ab
20000001: ee ? ef
20000002: ff ? cd
20000003: ee ? ab
20000004: 14 ?
20000005: f0 ?
20000006: bb ? ef
20000007: aa ? cd
20000008: 14 ? q
U-Boot> md 20000000
20000000: abcdefab cdeff014 e59ff014 e59ff014 ................
mw - memory write (fill)
mw [.b, .w, .l] address value [count]
Writes value for count bytes (words) starting at address. You can use this command to
Page 54 of 65 Version 1.26 (2008-04-30)
Page 55

Linux Guide taskit GmbH
initialize a memory range with a value.
This command cannot be used to modify flash memory!
For example: Writing 0xff ten times to SDRAM address 20 000 000:
U-Boot> md 20000000
20000000: abcdefab cdeff014 e59ff014 e59ff014 ................
20000010: e59ff014 e59ff014 e59ff014 e59ff014 ................
U-Boot> mw.b 20000000 ff 10
U-Boot> md 20000000 20
20000000: ffffffff ffffffff ffffffff ffffffff ................
20000010: e59ff014 e59ff014 e59ff014 e59ff014 ................
mtest - simple RAM test
mtest [start [end [pattern]]]
This simple RAM test writes to memory. The test was designed only for RAM memory, and
fails if used for flash or ROM memory. The system will crash if this test is run on the
memory range containing the U-Boot code, stack or heap (internal SRAM or SDRAM from
0x21 f00 000 to 21 ffffff).
For example: Testing the SDRAM from 20 000 000 to 20 100 000:
U-Boot> mtest 20000000 20100000
Pattern 0000000A Writing... Reading...
nm - memory modify (constant address)
nm [.b, .w, .l] address
The nm command writes different data records to the same address, interactively.
For example:
U-Boot> nm.b 20000000
20000000: 0a ? aa
20000000: aa ? bb
20000000: bb ? q
loop - infinite loop on address range
loop [.b, .w, .l] address count
The loop command reads in the contents of a memory range (from address to address +
count) in an endless loop. It is intended as a special memory test, since it tries to read out
the memory as quickly as possible.
This command does not end; it can be stopped only by a reset!
For example:
U-Boot> loop.b 20000000 10
crc32 - checksum calculation
crc32 addr1 count [addr2]
Page 55 of 65 Version 1.26 (2008-04-30)
Page 56

Linux Guide taskit GmbH
The crc32 command calculates the check sum for a memory range (from addr1 to
addr1+count). You can optionally indicate addr2 to save the calculated check sum there.
For example:
U-Boot> crc32 21000000 100 20000000
CRC32 for 21000000 ... 210000ff ==> e8d6cfbc
U-Boot> md 20000000 10
20000000: e8d6cfbc 0000000b 0000000c 0000000d ................
flinfo - print FLASH memory information
flinfo (fli for short)
Outputs information about the known flash module. flinfo outputs the start addresses of all
sectors, as well as information about write protection on individual sectors.
For example:
U-Boot> fli
DataFlash:AT45DB321
Nb pages: 8192
Page Size: 528
Size= 4325376 bytes
Logical address: 0xC0000000
Area 0: C0000000 to C0007FFF (RO)
Area 1: C0008000 to C001FFFF (RO)
Area 2: C0020000 to C0027FFF
Area 3: C0028000 to C041FFFF
Bank # 1: AMD Chip: LV320B 32 Mbit
Size: 4 MB in 71 Sectors
Sector Start Addresses:
10000000 (RO) 10002000 (RO) 10004000 (RO) 10006000 (RO) 10008000 (RO)
1000A000 (RO) 1000C000 (RO) 1000E000 (RO) 10010000 (RO) 10020000 (RO)
10030000 10040000 10050000 10060000 10070000
. . .
103A0000 103B0000 103C0000 103D0000 103E0000
103F0000
imls - list all images found in flash
imls
Lists all images stored in flash memory.
For example:
U-Boot> imls
Image at 10030000:
Image Name: plinux
Image Type: ARM Linux Kernel Image (uncompressed)
Data Size: 739208 Bytes = 721.9 kB
Load Address: 21000000
Entry Point: 21000000
Verifying Checksum ... OK
Page 56 of 65 Version 1.26 (2008-04-30)
Page 57

Linux Guide taskit GmbH
protect - enable or disable FLASH write protection
protect on|off addr1 addr2
protect on|off all
Use the protect command to protect individual flash sectors from unintentional write
accesses. This is purely a software protection on the U-Boot level. The protection prevents
the cp and erase commands from being carried out on the correspondingly marked
sectors. This protection is easy to remove and other programs (e.g. Linux) know nothing
about this „protection“ and will erase the corresponding range. In U-Boot, the range used
for U-Boot and its environment variables is write protected. You can request a list of writeprotected sectors using the flinfo command.
Example 1:
Display the standard configuration, remove all write protection, set write protection for all
sectors.
U-Boot> flinfo
Bank # 1: AMD Chip: LV320B 32 Mbit
Size: 4 MB in 71 Sectors
Sector Start Addresses:
10000000 (RO) 10002000 (RO) 10004000 (RO) 10006000 (RO) 10008000 (RO)
1000A000 (RO) 1000C000 (RO) 1000E000 (RO) 10010000 (RO) 10020000 (RO)
10030000 10040000 10050000 10060000 10070000
. . .
103A0000 103B0000 103C0000 103D0000 103E0000
103F0000
U-Boot> protect off all
Un-Protect Flash Bank # 1
U-Boot> flinfo
Bank # 1: AMD Chip: LV320B 32 Mbit
Size: 4 MB in 71 Sectors
Sector Start Addresses:
10000000 10002000 10004000 10006000 10008000
1000A000 1000C000 1000E000 10010000 10020000
10030000 10040000 10050000 10060000 10070000
. . .
103A0000 103B0000 103C0000 103D0000 103E0000
103F0000
U-Boot> protect on all
Protect Flash Bank # 1
U-Boot> flinfo
Bank # 1: AMD Chip: LV320B 32 Mbit
Size: 4 MB in 71 Sectors
Sector Start Addresses:
10000000 (RO) 10002000 (RO) 10004000 (RO) 10006000 (RO) 10008000 (RO)
1000A000 (RO) 1000C000 (RO) 1000E000 (RO) 10010000 (RO) 10020000 (RO)
10030000 (RO) 10040000 (RO) 10050000 (RO) 10060000 (RO) 10070000 (RO)
. . .
103A0000 (RO) 103B0000 (RO) 103C0000 (RO) 103D0000 (RO) 103E0000 (RO)
103F0000 (RO)
Example 2:
Page 57 of 65 Version 1.26 (2008-04-30)
Page 58

Linux Guide taskit GmbH
Address-based removal of write protection, recreation of starting configuration. When
using address-based protect commands, please note that the beginning and ending
address are exactly on the sector border.
U-Boot> protect off 10000000 103fffff
Un-Protected 71 sectors
U-Boot> flinfo
Bank # 1: AMD Chip: LV320B 32 Mbit
Size: 4 MB in 71 Sectors
Sector Start Addresses:
10000000 10002000 10004000 10006000 10008000
1000A000 1000C000 1000E000 10010000 10020000
10030000 10040000 10050000 10060000 10070000
. . .
103A0000 103B0000 103C0000 103D0000 103E0000
103F0000
U-Boot> protect on 10000000 1002ffff
Protected 10 sectors
U-Boot> flinfo
Bank # 1: AMD Chip: LV320B 32 Mbit
Sector Start Addresses:
Size: 4 MB in 71 Sectors
10000000 (RO) 10002000 (RO) 10004000 (RO) 10006000 (RO) 10008000 (RO)
1000A000 (RO) 1000C000 (RO) 1000E000 (RO) 10010000 (RO) 10020000 (RO)
10030000 10040000 10050000 10060000 10070000
. . .
103A0000 103B0000 103C0000 103D0000 103E0000
103F0000
erase - erase FLASH memory
erase addr1 addr2
erase all
You can delete flash sectors using the erase command. Write-protected sectors are not
erased. As with the protect command, the sector borders must be observed exactly. Call
erase all to erase all known flash modules.
For example: Deleting the 3rd MB of the flash module
U-Boot> erase 10200000 102FFFFF
flash_erase: first: 39 last: 54
Erased 16 sectors
11.6.2. Load programs and files via the serial interface or Ethernet
The commands bootp, dhcp and rarpboot all work according to an identical principal.
They attempt to get valid IP parameters via the corresponding protocol (DHCP, BOOTP or
RARP), in order to load a specified file from the network to an address, using TFTP.
tftpboot and nfs expect that the IP parameters are already set; loadb loads a file via the
serial interface using Kermit. In order to be able to use the commands for dynamic address
assignment, the DHCP server must be configured properly in the network in order to
deliver the IP address of the TFTP server, for example. If no specific IP address is
returned, the DHCP server sends its own IP address instead. Here is a host statement for
Page 58 of 65 Version 1.26 (2008-04-30)
Page 59

Linux Guide taskit GmbH
the ISC DHCP server, version 3.0.1rc9:
host taskit
{
hardware ethernet 00:50:C2:3A:B0:01;
fixed-address 192.168.2.171;
next-server 192.168.2.238; //Address of TFTP server
filename u-boot.bin;
}
dhcp - invoke DHCP client to obtain IP/boot params
dhcp
Loads an image via BOOTP. The name of the image to be loaded must be entered either
in the environment variable bootfile or in the DHCPD server configuration. The address to
load to must be set in the environment variable loadaddr; otherwise, the default load
address is used (21 000 000).
For example:
U-Boot> dhcp
BOOTP broadcast 1
DHCP client bound to address 192.168.2.171
TFTP from server 192.168.2.238; our IP address is 192.168.2.171
Filename 'u-boot.bin'.
Load address: 0x21000000
Loading: ###################
done
Bytes transferred = 94628 (171a4 hex)
nfs - boot image via network using NFS protocol
nfs [addr] [serverip:filename]
Loads a file from the network via NFS. The IP parameters must already be set.
For example:
U-Boot> nfs 21000000 192.168.2.238:/develop/u-boot.bin
File transfer via NFS from server 192.168.2.238; our IP address is
192.168.2.171
Filename '/develop/u-boot.bin'.
Load address: 0x21000000
Loading: ###################
done
Bytes transferred = 94628 (171a4 hex)
rarpboot- boot image via network using RARP/TFTP protocol
rarpboot [addr] [filename]
Sets an IP address via RARP and loads the specified file from the network. If no address
is indicated, the load address is taken from the loadaddr environment variable. If no
filename is entered, the filename is taken from the bootfile environment variable.
Page 59 of 65 Version 1.26 (2008-04-30)
Page 60

Linux Guide taskit GmbH
For example:
U-Boot> rarpboot 21000000 u-boot.bin
RARP broadcast 1
TFTP from server 192.168.2.238; our IP address is 192.168.2.239
Filename 'u-boot.bin'.
Load address: 0x21000000
Loading: ###################
done
Bytes transferred = 94628 (171a4 hex)
tftpboot- boot image via network using TFTP protocol
tftpboot [addr] [filename]
Loads a file from the network via TFTP. The IP parameters must already be set.
For example:
U-Boot> tftpboot 21000000 u-boot.bin
TFTP from server 192.168.2.238; our IP address is 192.168.2.239
Filename 'u-boot.bin'.
Load address: 0x21000000
Loading: ###################
done
Bytes transferred = 94628 (171a4 hex)
bootp - boot image via network using BootP/TFTP protocol
bootp [addr] [filename]
Loads an image using BOOTP. The name of the image to be loaded must be specified
either in the bootfile environment variable or in the configuration of the DHCPD server.
The loading address must be set in the loadaddr environment variable or the default
loading address (21 000 000) will be used.
For example:
U-Boot> bootp 21000000 u-boot.bin
BOOTP broadcast 1
DHCP client bound to address 192.168.2.171
TFTP from server 192.168.2.238; our IP address is 192.168.2.171
Filename 'u-boot.bin'.
Load address: 0x21000000
Loading: ###################
done
Bytes transferred = 94628 (171a4 hex)
loadb - load binary file over serial line (kermit mode)
loadb [addr] [baud]
Loads a file over the serial interface to the address addr. Kermit is the protocol used, and
it can be served by various clients (Windows: HyperTerminal, VTerm; Linux: cKermit)
Page 60 of 65 Version 1.26 (2008-04-30)
Page 61

Linux Guide taskit GmbH
For example:
U-Boot> loadb 21000000 115200
## Ready for binary (kermit) download to 0x21000000 at 115200 bps...
## Total Size = 0x000171a4 = 94628 Bytes
## Start Addr = 0x21000000
11.6.3. Start programs and boot Linux
boot - boot default, i.e., run 'bootcmd'
bootd - boot default, i.e., run 'bootcmd'
boot
bootd
Both commands run the boot script stored in the bootcmd environment variable. See
chapter 3.5. for information about creating scripts.
For example:
U-Boot> boot
## Booting image at 10030000 ...
Image Name: plinux
Image Type: ARM Linux Kernel Image (uncompressed)
Data Size: 739208 Bytes = 721.9 kB
Load Address: 21000000
Entry Point: 21000000
Verifying Checksum ... OK
OK
Starting kernel ...
bootm - boot application image from memory
bootm addr
Loads an image stored at the address addr. The image must have a U-Boot header. To
create a U-Boot header, see Chapter 5.3.
For example:
U-Boot> bootm 10030000
## Booting image at 10030000 ...
Image Name: plinux
Image Type: ARM Linux Kernel Image (uncompressed)
Data Size: 739208 Bytes = 721.9 kB
Load Address: 21000000
Entry Point: 21000000
Verifying Checksum ... OK
OK
Starting kernel ...
go - start application at address 'addr'
go addr
Page 61 of 65 Version 1.26 (2008-04-30)
Page 62

Linux Guide taskit GmbH
Starts an application stored at address addr. This command is not suitable for starting
from Linux, since r0, r1 and r2 are not set. It is designed for stand-alone applications
written specifically for the AT91RM9200.
For example:
U-Boot> go 21100000
## Starting application at 0x21100000 ...
11.6.4. Set environment variables
printenv- print environment variables
printenv [name[ name[ ...]]]
printenv outputs the current contents of the environment variables. To show specific
variables, you can add their names as arguments.
Example 1: Outputting all environment variables
U-Boot> printenv
bootdelay=3
baudrate=115200
ethaddr=00:50:C2:3A:B0:01
basicargs=console=ttyS0,115200 mem=64M root=/dev/ram rw
kerneladdr=10030000
. . .
ipaddr=192.168.2.171
serverip=192.168.2.238
Environment size: 552/65532 bytes
Example 2: Outputting two variables
U-Boot> printenv netmask ipaddr
netmask=255.255.255.0
ipaddr=192.168.2.171
saveenv - save environment variables to persistent storage
saveenv
During runtime, changes to variables or new variables are stored in RAM and not saved
permanently in flash memory. Saving is done explicitly with the saveenv command.
For example:
U-Boot> saveenv
Saving Environment to Flash...
Un-Protected 1 sectors
Erasing Flash...flash_erase: first: 9 last: 9
. done
Erased 1 sectors
Writing to Flash... done
Protected 1 sectors
Page 62 of 65 Version 1.26 (2008-04-30)
Page 63

Linux Guide taskit GmbH
setenv - set environment variables
setenv name value
setenv name
Sets the environment variable name to the value value. If the variable already exists, its
current value is overwritten; if it does not yet exist, it is created. If no value is given, the
variable is erased (if it exists).
For example: Setting and deleting a new variable
U-Boot> printenv test
## Error: "test" not defined
U-Boot> setenv test Hello
U-Boot> printenv test
test=Hello
U-Boot> setenv test
U-Boot> printenv test
## Error: "test" not defined
run - run commands in an environment variable
run name
The run command runs the environment variable name as if it were a command. This
makes it possible to store commands in environment variables and create simple boot
scripts.
For example:
U-Boot> printenv ramcmd
ramcmd=setenv bootargs $(basicargs) initrd=0x$(fileaddr),0x$(filesize)
$(mtdparts);bootm $(kerneladdr)
U-Boot> run ramcmd
## Booting image at 10030000 ...
Image Name: plinux
Image Type: ARM Linux Kernel Image (uncompressed)
Data Size: 739208 Bytes = 721.9 kB
Load Address: 21000000
Entry Point: 21000000
Verifying Checksum ... OK
OK
Starting kernel ...
11.6.5. Additional commands
reset - Perform RESET of the CPU
reset
Resets the CPU
coninfo - print console devices and information
Page 63 of 65 Version 1.26 (2008-04-30)
Page 64

Linux Guide taskit GmbH
coninfo
Outputs informations about the current console.
For example:
U-Boot> coninfo
List of available devices:
serial 80000003 SIO stdin stdout stderr
version - print monitor version
Indicates the U-Boot version being used
For example:
U-Boot> version
U-Boot 1.1.2 (Nov 30 2004 - 12:03:10)
itest - return true/false on integer compare
itest[.b,.w,.l,.s] [*]arg1 op [*]arg2
Returns true/false when comparing two integers. You can specify the data size with .b
(byte), .w (word) or .l (long word). .s defines a string in arg1 or arg2. arg1 or arg2 are the
arguments to be compared. If the optional * is set, the argument is interpreted as address
containing the content to be compared. The operator op is one of the following: == > >= <
<=. itest gives no output to the console.
For example: Comparing the contents of the address 20 000 000 with 0xFFFF
U-Boot> itest.w *20000000 == 0xffff
echo - echo args to console
echo arg
Output the argument arg to the console
For example:
U-Boot> echo Hello
Hello
help - print online help
help
Outputs the help listing (see the beginning of this chapter)
Page 64 of 65 Version 1.26 (2008-04-30)
Page 65

Linux Guide taskit GmbH
11.7. Important linux shell commands
List files
ls [-la]
Find a file
find -type f -name “filename”
Copy a file
cp /source/file.ext /target
Delete a file
rm /folder/file.name
Move a file
mv /source/file.ext /target
Rename a file
mv /file.ext /newname.ext
Create a directory
mkdir /myDir
Delete a directory
rmdir /myDir
Start an application or script
./applicationname
Decompress a .PK file
gunzip filename.pk
Get files from .TAR archive
tar xvf filename.tar
Create a text file
cat > file.txt
this is a test
CTRL + d (finish), CTRL + c (cancel)
Get ethernet configuration
ifconfig eth0 [eth1; eth2 ... ]
Configure ethernet
ifconfig eth0 192.168.100.10
Show shared folders
showmount -e
List running processes
ps
Stop a process
kill 123
List modules
lsmod
Start module (driver)
insmod xxx
Stop module (driver)
rmmod xxx
Page 65 of 65 Version 1.26 (2008-04-30)
 Loading...