

Page 1
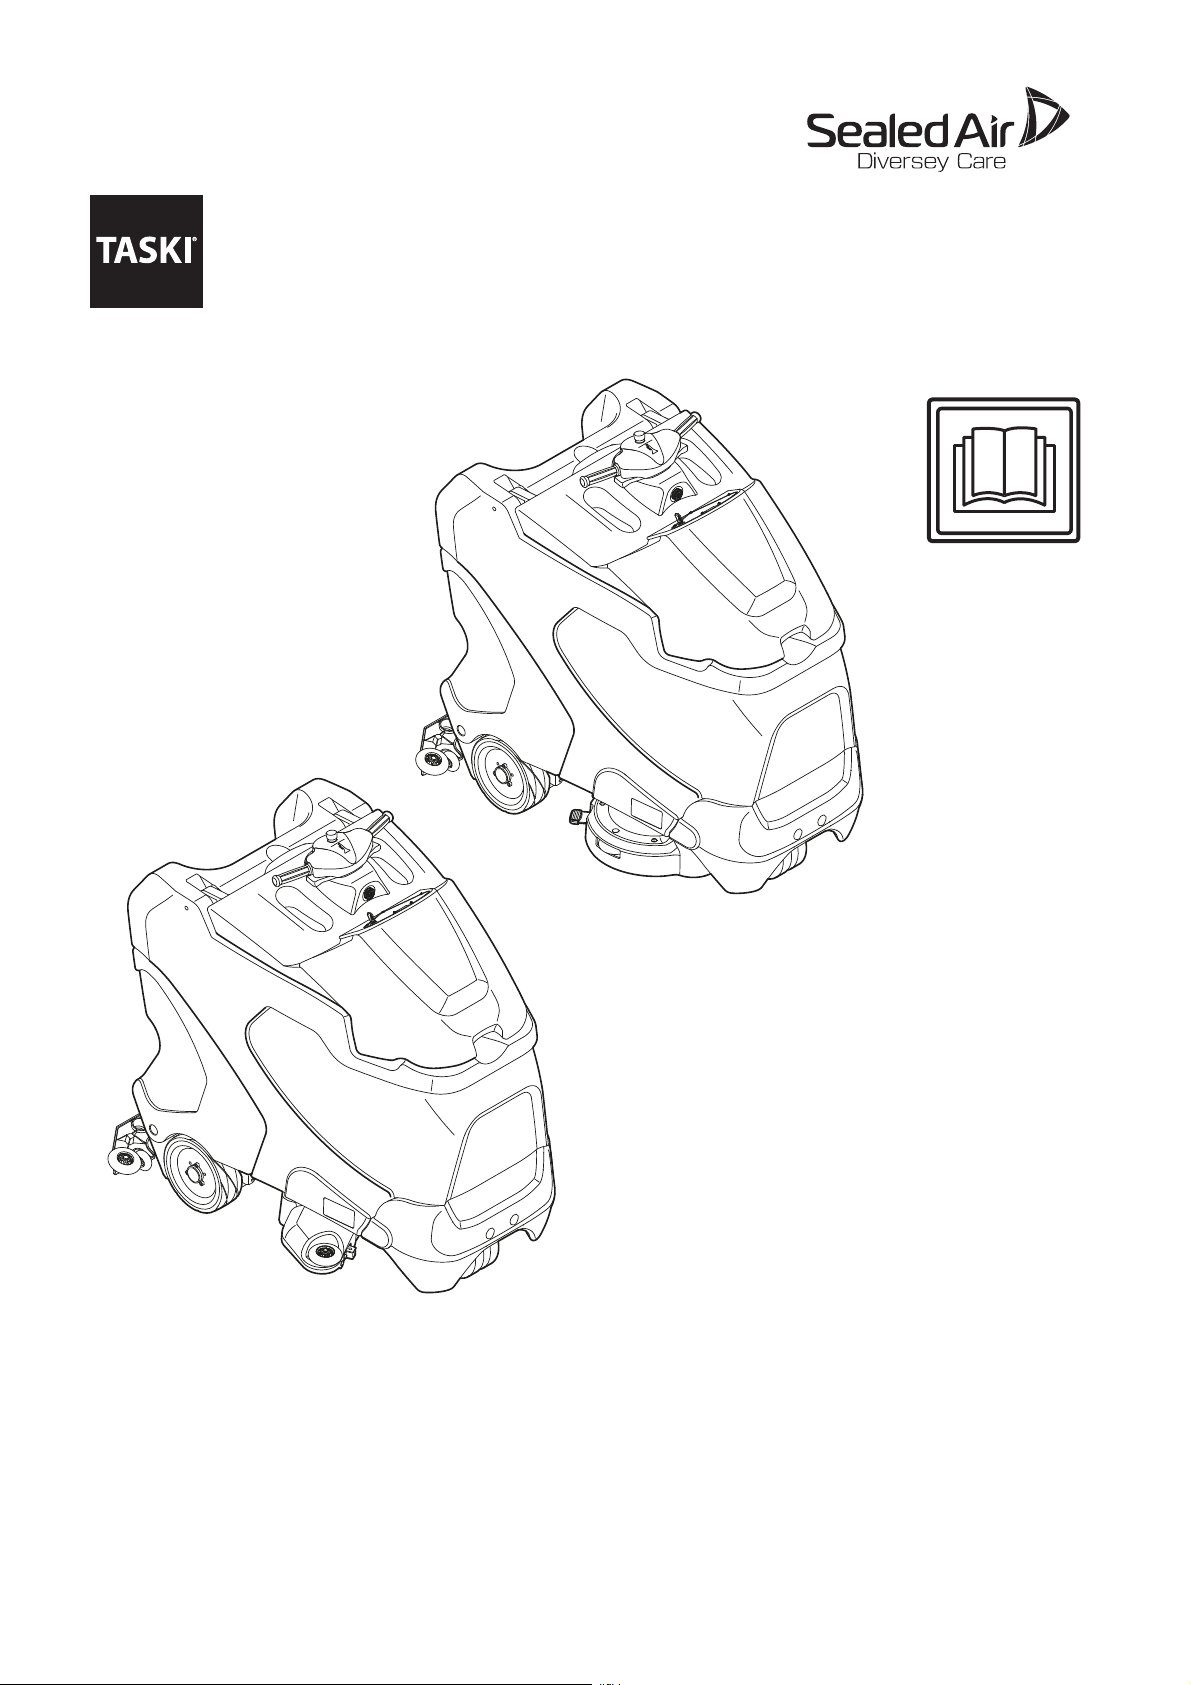
swingo XP-R / XP-M
V001 / 12091-14 1423
*12091-14*
I25 I24 I23 I22 I21 I20 I19 I18 I17 I16 tr sv sl pt pl no nl it fr fi es en de da cz
Page 2
ЕО декларация за съответствие
Prohlášení o shodě EU
EU Vaatimustenmukaisuusvakuutus EUkonformitetserklæringen
Déclaration de conformité UE
Deklaracji zgodności EU AB Uygunluk Beyanı
EU-overensstemmelseserklæring EU izjava o sukladnosti Declaração de Conformidade da UE
EG-Konformitätserklärung EK-megfelelőségi nyilatkozat Declaraţie de conformitate
Δήλωση συμμόρφωσης ΕΚ
EU Declaration of Conformity
Dichiarazione di Conformità UE
EK atbilstības deklarācija
Заявление о соответствии
стандартам ЕС
EÜ vastavusdeklaratsioon EB atitikties deklaracija EU-konformitetsförklaringen
Declaración de Conformidad UE EU-conformiteitsverklaring
Product:
Model:
Serial Number:
Trademark:
Декларираме, че посочените по-горе модели
BG
са произведени съгласно следните директиви
и стандарти. При изменение на продукта,
което не е съгласувано с нас, тази декларация
губи своята валидност.
Tímto prohlašujeme, že výše uvedené modely
CZ
byly vyrobeny ve shodě s následujícími
směrnicemi a normami. V případě změny
výrobku, která nebyla námi odsouhlasena,ztrácí
toto prohlášení svou platnost.
Hermed erklærer vi, at ovenstående modeller er
DA
blevet fremstillet i henhold til følgende
retningslinjer og standarder. I tilfælde af
ændringer af produktet, som vi ikke har
godkendt, bortfalder gyldigheden af denne
erklæring.
Hiermit erklären wir, dass die oben erwähnten
DE
Modelle gemäß den folgenden Richtlinien und
Normen hergestellt wurden. Bei einer nicht mit
uns abgestimmten Änderung des Produktes
verliert diese Erklärung ihre Gültigkeit.
Με την παρούσα δηλώνουμε ότι τα παραπάνω
EL
αναφερόμενα μοντέλα έχουν κατασκευαστεί
σύμφωνα με τις ακόλουθες Οδηγίες και τα
ακόλουθα πρότυπα. Σε περίπτωση
τροποποίησης του προϊόντος χωρίς τη
Type:
Scrubber drier for commercial use
swingo XP-R/XP-M
COXPR.1 | COXPR.2 | COXPR.1X | COXPR.2X
Refer to the rating label on the machine
Produced by
Diversey Europe Operations B.V., De Boelelaan 32, NL - 1083 HJ Amsterdam
Nous déclarons par la présente que les modèles
FR
susmentionnés ont été fabriqués selon les
directives et normes suivantes. Cette déclaration
perd sa validité si le produit est modifié sans
notre consentement.
Ovime izjavljujemo da smo gore navedene
HR
modele proizveli prema sljedećim direktivama i
normama. U slučaju neovlaštene izmjene
proizvoda prestaje valjanost ove izjave.
Ezennel kijelentjük, hogy a fent említett modellek
HU
az alábbi előírásoknak és szabványoknak
megfelelően készülnek. Amennyiben olyan
módosítás történik a terméken, amelyet
előzetesen nem egyeztettek velünk, akkor a jelen
nyilatkozat érvényét veszti.
Con la presente dichiariamo che i modelli citati
IT
sopra sono stati realizzati conformemente alle
seguenti norme e direttive. In caso di modifica
del prodotto senza la nostra autorizzazione,
questa dichiarazione non sarà più valida.
Ar šo apliecinām, ka iepriekš minētie modeļi ir
LV
izgatavoti atbilstoši šādām direktīvām un
normatīviem. Ja tiek veikta ar mums nesaskaņota
izstrādājuma izmainīšana, šī deklarācija nav
derīga.
Izjava EU o skladnosti
Por este meio declaramos que os modelos acima
PT
mencionados foram fabricados de acordo com as
seguintes directivas e normas. Em caso de uma
alteração do produto que não tenha sido
autorizada por nós, esta declaração perde a sua
validade.
Prin prezenta declarăm că modelele menţionate
RO
mai sus, sunt produse în conformitate cu
următoarele directive şi norme. La o modificare a
produsului care nu a fost aprobată de noi în
prealabil, această declaraţie îşi pierde
valabilitatea.
Настоящим мы заявляем, что указанные выше
RU
модели изготовлены в соответствии с
требованиями следующих Директив и
стандартов. В случае несогласованного с нами
изменения изделия настоящее заявление
становится недействительным.
Izjavljamo, da so bili zgoraj navedeni modeli
SL
izdelani v skladu z navedenimi smernicami in
normami. V primeru spremembe izdelka, ki ni bila
potrjena z naše s strani, ta izjava ni več veljavna.
Týmto vyhlasujeme, že uvedené modely boli
SK
vyrobené v zhode s nasledujúcimi smernicami a
normami. V prípade zmeny výrobku, ktorá s nami
nebola konzultovaná, stráca toto vyhlásenie svoju
platnosť.
συγκατάθεσή μας, η παρούσα δήλωση θα
καταστεί άκυρη.
Käesolevaga kinnitame, et ülalpool nimetatud
ET
mudelid on toodetud vastavuses järgmiste
direktiivide ja standarditega. Käesolev kinnitus
kaotab kehtivuse, kui toodet muudetakse meiega
kooskõlastamata.
We herewith declare that the aforementioned
EN
models were manufactured in accordance with
the following guidelines and standards. In the
event of a product amendment which was not
cleared by us, this declaration shall no longer be
valid.
Por la presente, declaramos que los modelos
ES
arriba indicados fueron fabricados conforme a las
siguientes directivas y normas. En caso de
realizar una modificación no autorizada por
nosotros, esta declaración pierde su validez.
Täten vakuutamme, että yllä mainitut mallit on
FI
valmistettu seuraavien direktiivien ja normien
mukaisesti. Mikäli tuotetta muutetaan ilman
meidän antamaa lupaa, tämä ilmoitus lakkaa
olemasta voimassa.
Pareiškiame, kad minėti modeliai buvo pagaminti
LT
vadovaujantis nurodytomis direktyvomis ir
standartais. Ši deklaracija netenka galios, jei
gaminys pakeičiamas nesuderinus jo pakeitimų
su mumis.
Hiermee verklaren we dat de hierboven vermelde
NL
modellen in overeenstemming met de volgende
richtlijnen en normen worden vervaardigd. In
geval van een niet met ons overeengekomen
wijziging van het product, verliest deze verklaring
haar geldigheid.
Vi erklærer herved at de ovennevnte modellene
NO
er produsert iht. følgende retningslinjer og
standarder. Ved endringer av produkter som ikke
er godkjent fra oss, bortfaller denne erklæringen.
Niniejszym deklarujemy, że wyżej wymienione
PL
modele zostały wyprodukowane zgodnie z niżej
wymienionymi dyrektywami i normami. W
przypadku dokonania nieuzgodnionych z nami
zmian w produkcie niniejsza deklaracja traci
Härmed förklarar vi att ovan nämnda modell
SV
uppfyller följande riktlinjer och normer. Vid av oss
ej godkända ändringar på produkten upphör denna
förklaring att gälla.
Yukarıda belirtilen modellerin aşağıdaki
TR
yönergelere ve standartlara uygun olduğunu
beyan ederiz. Üründe yapılan herhangi bir
değişiklik bu beyanı geçersiz kılar.
Ovim putem izjavljujemo da su gore navedeni
YU
modeli proizvedeni u skladu sa sledećim
smernicama i standardima. U slučaju izmena na
proizvodu koje nisu dogovorene s nama, ova
izjava ne važi.
ważność.
1
ES vyhlásenie o zhode
Izjava o usaglašenosti sa
standardima EU
Page 3
Applicable EU Directives:
A
Έ
Directive 2006/42/EC | Directive 2004/108/EC
Harmonised standards applied:
EN 60335-1 / EN 60335-2-72 / EN 62233 / EN 55014-1 / EN 55014-2 / EN 61000-3-2 / EN 61000-3-3 /
Предприети са вътрешни мерки, за да се
BG
гарантира, че продуктите винаги съответстват
на изискванията на най-новите регламенти на
ЕС и стандартите, които са действащи в
момента.
Byla přijata interní opatření, jejichž cílem je
CZ
zabezpečit, aby výrobky vždy odpovídaly
požadavkům nejnovějších pravidel EU a norem,
které jsou v současnosti používány.
Der skal træffes interne foranstaltninger for at
DA
sikre, at produktet altid lever op til kravene i de
nyeste EU-direktiver og de gældende standarder.
Es wurden interne Massnahmen ergriffen, um
DE
sicherzustellen, dass die Produkte in jedem Fall
den Anforderungen der aktuellen EU-Vorschriften
sowie den aktuell geltenden Normen
entsprechen.
χουν ληφθεί εσωτερικά μέτρα, προκειμένου να
EL
διασφαλιστεί ότι τα προϊόντα θα πληρούν πάντα
τις απαιτήσεις των πιο πρόσφατων Κανονισμών
της ΕΕ και των εφαρμοζόμενων προτύπων.
Selleks, et alati tagada toodete vastavus
ET
uusimate ELi määruste ja praegu kehtivate
standarditega, on võetud sisemeetmeid.
Internal measures have been taken to ensure
EN
that the products always correspond to the
requirements of the latest EU Regulations and
the standards that are currently in use.
Se han adoptado medidas internas para
ES
garantizar que los productos siempre cumplen
con los requisitos de los últimos reglamentos de
la UE y las normas que se aplican actualmente.
Sisäisiä ohjeita ja toimenpiteitä on noudatettu
FI
sen varmistamiseksi, että tuote vastaa aina
viimeisimpien EU-asetusten vaatimuksia ja
voimassaolevia standardeja.
Des mesures internes ont été prises pour
FR
garantir que les produits répondent toujours aux
exigences des règlements les plus récents de
l’UE et aux normes actuellement en vigueur.
Poduzete su interne mjere koje osiguravaju da
HR
proizvodi uvijek ispunjavaju zahtjeve najnovijih
propisa i trenutno važećih normi EU-a.
vállalaton belül megtettük a megfelelő
HU
intézkedéseket, hogy a termékek minden
esetben megfeleljenek a legújabb uniós
előírásoknak és az aktuálisan használatban lévő
szabványoknak.
Sono state prese misure interne per assicurare
IT
che i prodotti siano sempre conformi ai requisiti
degli ultimi regolamenti UE e agli standard
attualmente vigenti.
Izstrādājumu pastāvīga atbilstība jaunāko EK
LV
normatīvu un spēkā esošo standartu prasībām
tiek nodrošināta, veicot iekšējos pasākumus.
Buvo imtasi vidaus priemonių siekiant užtikrinti,
LT
kad gaminiai visuomet atitiktų naujausių ES
reglamentų ir šiuo metu taikomų standartų
reikalavimus.
Er werden interne maatregelen genomen om te
NL
verzekeren dat de producten steeds in
overeenstemming zijn met de vereisten van de
laatste EU-verordeningen en de normen die
momenteel in gebruik zijn.
Det har blitt implementert interne tiltak for å sikre
NO
at produktet alltid er i samsvar med kravene til de
nyeste EU-bestemmelsene og standardene som
brukes til enhver tid.
Podjęto wewnętrzne działania w celu
PL
zagwarantowania, że produkty będą zawsze
spełniać wymagania aktualnie obowiązujących
przepisów unijnych i norm.
Foram tomadas medidas internas para assegurar
PT
que os produtos cumprem sempre os requisitos
dos mais recentes regulamentos da UE e os
padrões actualmente em vigor.
S-au luat măsuri interne pentru a asigura faptul că
RO
produsele corespund întotdeauna cerinţelor
ultimelor directive UE şi normelor în vigoare.
Внутренние меры приняты с целью
RU
обеспечения постоянного соответствия
изделий требованиям последних директив ЕС и
применяющихся в настоящее время
стандартов.
S sprejetimi notranjimi ukrepi zagotavljamo, da so
SL
izdelki vedno v skladu s predpisi EU in trenutno
veljavnimi standardi.
Prijali sa interné opatrenia, ktorých cieľom je
SK
zabezpečiť, aby výrobky vždy zodpovedali
požiadavkám najnovších pravidiel EÚ a noriem
používaných v súčasnosti.
Interna åtgärder har vidtagits för att försäkra att
SV
produkterna alltid uppfyller kraven i de senaste
EU-bestämmelserna och de aktuella
standardmåtten.
Ürünün daima son AB Yönergeleri ve yürürlükteki
TR
standartların gerekliliklerine uygun olması için
dahili önlemler alınmıştır.
Preduzete su interne mere da se obezbedi da
YU
proizvodi uvek odgovaraju zahtevima najnovijih
propisa EU i standardima koji su trenutno u
upotrebi.
Authorized signatory: Responsible for documentation:
Angelo Sabatino
Mgr Regulatory Affairs
Diversey Switzerland Services GmbH
Eschlikonerstrasse
9542 Münchwilen - Switzerlad
Dr Stephan Dalton
Vice President R&D
Utrecht ,dated 27.08.2014
The signatories act on behalf of company management and with full power of attorney.
2
Page 4
Translation of the original instructions of use
t
CAUTION!
Always read the instructions for
use and the safety instructions
before using the machine for the
first time.
The instructions for use must be kept
safe and ready to hand so that you can
refer to them at any time.
Legend
Caution:
This sign designates important information. Failure to follow these instructions
may result in danger to persons and/or extensive damage to property!
Attention:
This sign designates important information. Failure to follow these instructions
may result in faults and damage to property!
Notice:
This sign designates important information
regarding the efficient use of the product.
Failure to follow these instructions may result in faults!
It includes instructions for work steps which you
must carry out in order.
Content
Safety instructions . . . . . . . . . . . . . . . . . . . . . . . . . . . . . . . . . 81
Structural layout . . . . . . . . . . . . . . . . . . . . . . . . . . . . . . . . . . . 84
Batteries. . . . . . . . . . . . . . . . . . . . . . . . . . . . . . . . . . . . . . . . . . 85
Prior to commissioning . . . . . . . . . . . . . . . . . . . . . . . . . . . . . 86
Beginning work with the machine . . . . . . . . . . . . . . . . . . . . . 88
End of operation . . . . . . . . . . . . . . . . . . . . . . . . . . . . . . . . . . . 90
Service, maintenance and care . . . . . . . . . . . . . . . . . . . . . . . 92
Malfunctions . . . . . . . . . . . . . . . . . . . . . . . . . . . . . . . . . . . . . . 93
Error Codes . . . . . . . . . . . . . . . . . . . . . . . . . . . . . . . . . . . . . . . 94
Transport . . . . . . . . . . . . . . . . . . . . . . . . . . . . . . . . . . . . . . . . . 95
Disposal . . . . . . . . . . . . . . . . . . . . . . . . . . . . . . . . . . . . . . . . . . 95
Technical information. . . . . . . . . . . . . . . . . . . . . . . . . . . . . . . 94
Accessories . . . . . . . . . . . . . . . . . . . . . . . . . . . . . . . . . . . . . . . 94
Machine dimensions. . . . . . . . . . . . . . . . . . . . . . . . . . . . . . . . 95
Intended use
The machine is intended for commercial use (e.g. in hotels,
schools, hospitals, factories, shopping centers, offices, etc.).
Subject to the strict compliance with the instructions of use,
these machines are used for the wet cleaning of hard flooring.
These machines are exclusively designed for use in interior
zones.
Attention:
The machine must not be used for polishing, oiling, the application of wax, carpet
cleaning or dust removal. The wet cleaning of parquet and laminate flooring with
this machine is at your own risk.
Caution:
Any modifications to the machine which
have not been authorized by Diversey will
nullify the safety signs and CE conformity.
Using the machine for purposes other than
the intended purpose can cause injuries to
persons, and damage to the machine and
the working environment. Such cases will
usually result in the termination of any warranty and possible guarantee claims.
Safety instructions
Due to their design and construction, TASKI machines comply
with the relevant essential health and safety requirements of
the EC directives; they therefore carry the CE sign.
Caution:
The machine may only be used by persons who are adequately trained for the
use of the machine or who have provided
proof of their skills regarding the use of the
machine and who are explicitly commissioned to use the machine.
Caution:
Persons who are not in a position to operate the machine in a safe manner due to
their physical, sensory or mental skills or
due to their lack of experience or knowledge may neither use nor be commissioned to use the machine.
Keep children away from the machine.
Caution:
Do not use the machine in rooms where
explosive or highly combustible substances (e.g. gas, solvents, heating fuel, dust,
etc.) are stored or processed.
These substances could be ignited by the
electrical or mechanical components of
the machine.
81
Page 5
Caution:
Do not use the machine for the vacuum
cleaning of poisonous, harmful, caustic or
irritating substances (e.g. dangerous dust,
etc.). The filter system does not adequately filter out these kinds of substances.
Possible impacts on the health of the user
or third persons cannot be ruled out.
Caution:
Do not use the machine in rooms with high
electromagnetic interference (electric
smog).
Caution:
Pay attention to the local situation as well
as to other third persons and children!
Near blind spots such as doors or curves
in particular, it is important to reduce
speed.
Attention:
In order to avoid any unauthorized use of
the machine, it must be kept in a locked
room with the operating key removed before leaving the machine.
Attention:
Operate and keep the machine in a dry
and low-dust environment at temperatures
between +10 and +35 degrees only.
Attention:
Only authorized experts who are familiar
with all safety instructions relevant for this
machine are allowed to repair mechanical
or electrical machine parts.
Attention:
In case of foam or liquid leakage from the
machine, the suction unit must be
switched off immediately.
Caution:
Do not transport other persons and objects
with this machine.
Caution:
In case of malfunction or defect or after
collisions or toppling over, the machine
must be inspected by an authorized expert
before restarting. The same applies if the
machine was left outdoors, immersed in
water or subjected to moisture.
Caution:
The machine must be stopped
immediately in case of damage to safetyrelevant parts such as brush covers,
power cords or covers which allow access
to live parts.
Caution:
The machine must be switched off and the
key must be removed for any work carried
out on the machine.
Caution:
This machine is able to overcome temporary inclines of up to 8%. Downward movements must always be carried out in "turtle
mode".
Attention:
Only use brushes which are specified in
these instructions for use in the Accessories chapter or which have been recommended by a TASKI consultant. Any other
brushes might impair the safety and functions of the machine.
Attention:
National regulations for personal protection and accident prevention as well as the
manufacturer's instructions for the use of
detergents must be consistently observed.
Attention:
Use this machine with suitable batteries
and approved chargers only.
Noise emission and vibrations:
TASKI machines and devices are
designed such that health risks caused by
noise emissions or vibrations can be ruled
out according to the current state of
science.
See the Technical Information on
page 94.
Caution:
When parking the machine on slopes, it
must be secured against rolling. Failure to
do so may result in injuries to persons and
damage to the machine and equipment.
82
I25 I24 I23 I22 I21 I20 I19 I18 I17 I16 tr sv sl pt pl no nl it fr fi es en de da cz
Page 6
Cleaning products
Notice:
TASKI machines are designed in such a
way that optimal cleaning results can be
achieved if TASKI cleaning products are
used.
Other cleaning products may cause malfunctions and damage to the machine or
the environment.
Therefore, we recommend the exclusive
use of TASKI cleaning products.
Faults caused by inappropriate cleaning
products are not covered by the guarantee.
Please contact your Diversey service partner for further information.
Further documents
Notice:
Download of the current, signed CE Declarations of Conformity at the following link:
www.espares.diversey.com/manuals
Notice:
The electric diagram of this machine is
provided in the spare parts list.
Please contact your customer service for
further information.
83
Page 7
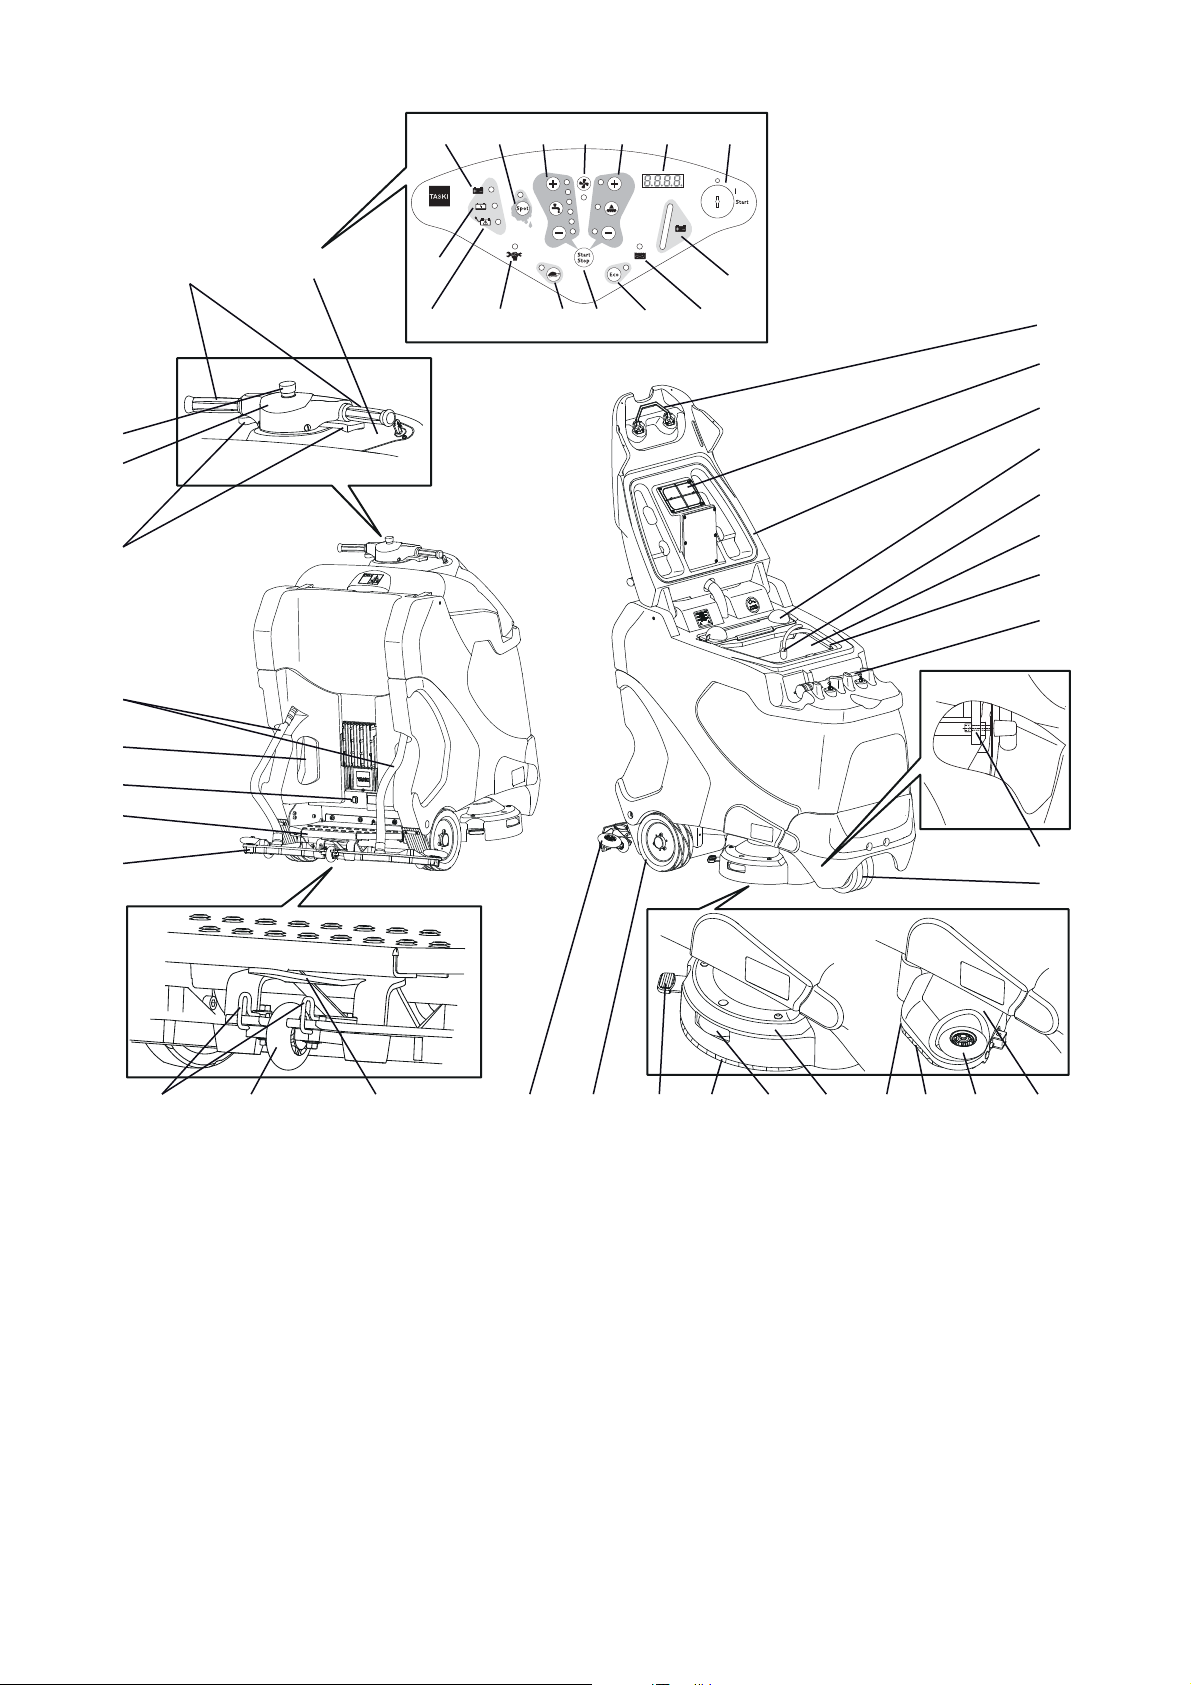
Structural layout
3
4
6
7
8
9
10
11 12 14 15 1716 20 21 22 23
24
26
27
28
29
30
31
32
25
18 1913
5
1
33
2
XP-R XP-M
35
34
36 37 38 39 40
424344464748 45
41
1 in the control panel
2 Driving handles
3 Emergency stop
4 Horn
5 Driving switch
6 Suction hose
7 Main cord for internal battery charger
8 Electronic parking brake
9 Tread with safety switch
10 Squeegee
11 Squeegee position lock
12 Squeegee support wheel
13 Squeegee holder
14 Squeegee deflecting roller
15 Drive wheel
16 Brush release XP-R
17 Brush
18 Brush unit deflecting roller XP-R
19 Brush unit XP-R
20 Brush release XP-M
21 Micro rotary brush
22 Brush unit deflecting roller XP-M
23 Brush unit XP-M
24 Swivel caster
25 Battery compartment release
26 Drain hose
27 Fresh water tank (Flextank)
28 Recovery tank
29 Pump and intake filter
30 Dirt sieve
31 Tank lid
32 Suction filter
33 Tank lid release
34 Battery display loading
35 Battery/PSU fault display
36 Service display
37 Slow approach button (ON/OFF)
38 Program button (start / stop)
39 ECO mode button (ON/OFF)
40 Recovery tank full display
41 Battery level indicator
42 Key switch
43 Display
44 Brush drive button (ON/OFF), brush pressure button (+/-)
45 Suction unit button (ON/OFF)
46 Cleaning solution supply button (ON/OFF), volume button (+/-)
47 Spot mode button (ON/OFF)
48 Battery display loaded
84
I25 I24 I23 I22 I21 I20 I19 I18 I17 I16 tr sv sl pt pl no nl it fr fi es en de da cz
Page 8
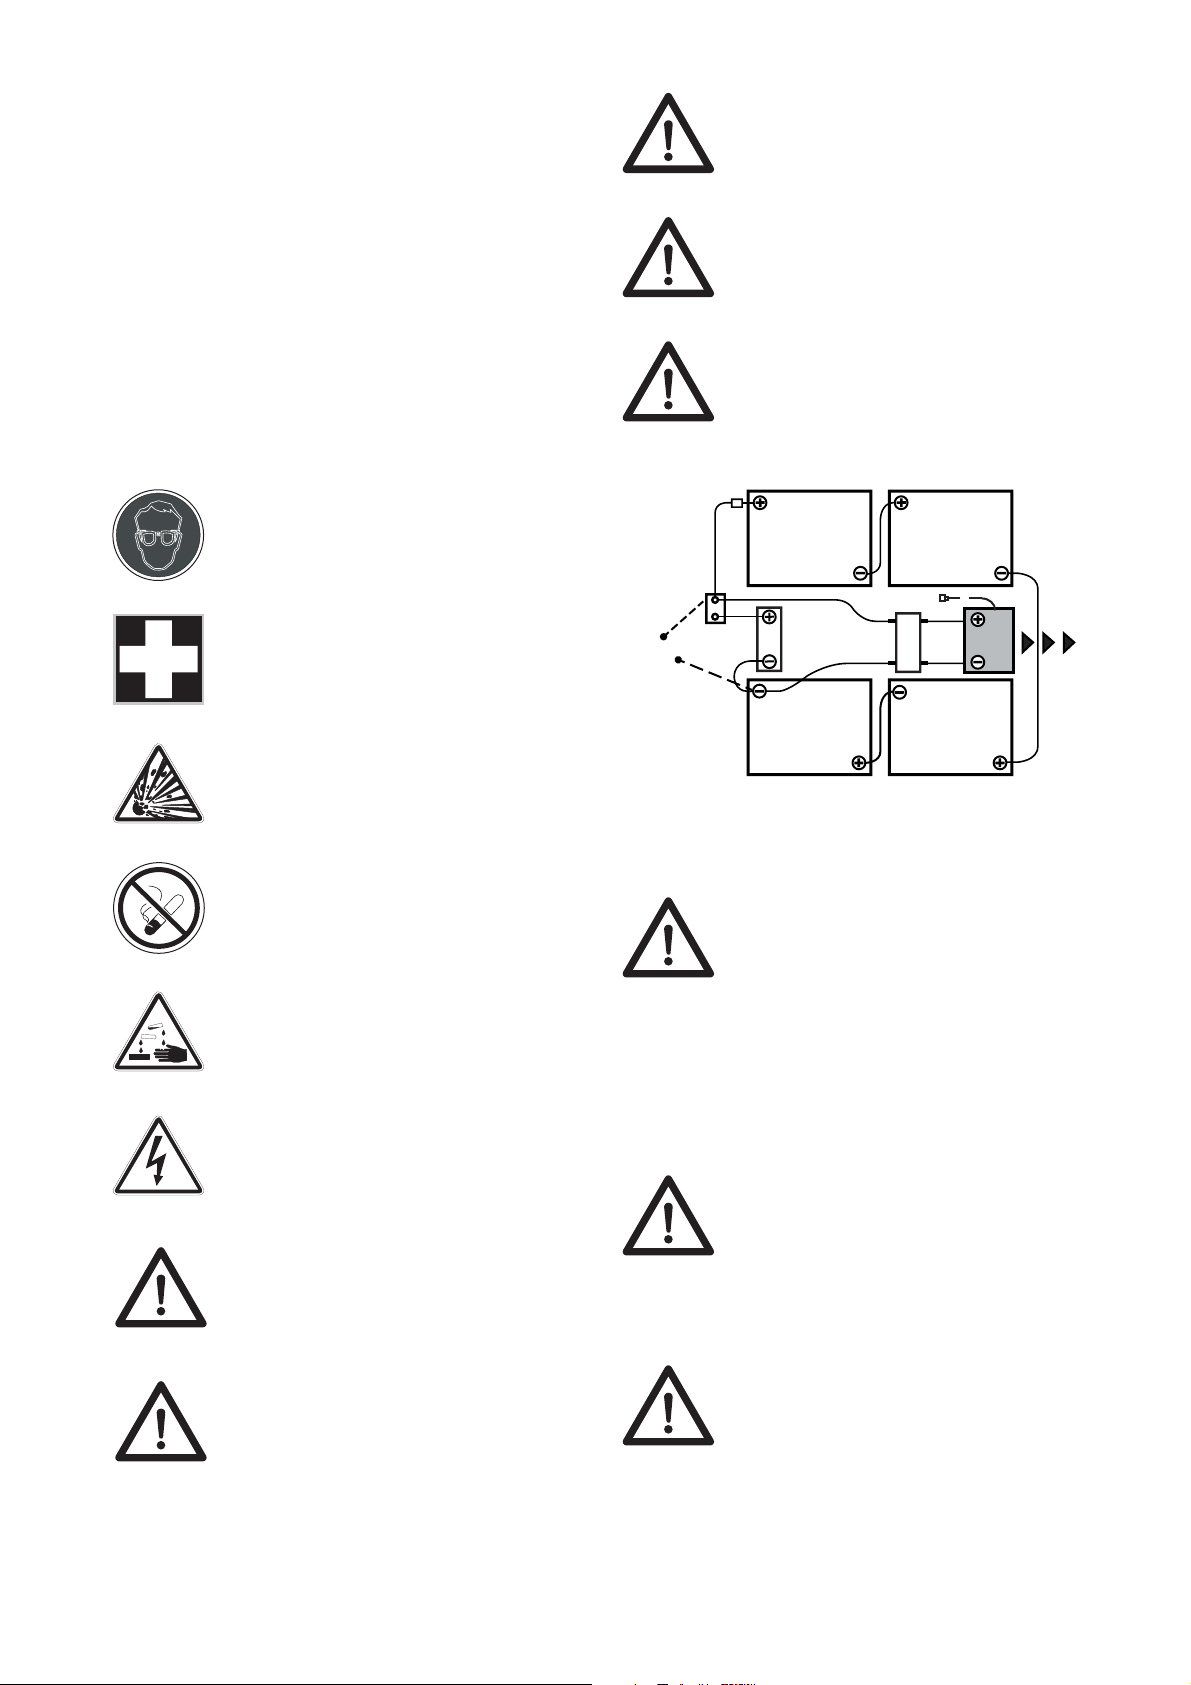
Batteries
6 V 6 V
red
6 V 6 V
Charger
Relay
black
Power Board
Charging plug
Connector
Permissible batteries
Traction batteries are required for the use of this machine (no
starter or device batteries). We recommend the use of pure
traction batteries. Only these batteries guarantee a long service life.
Traction batteries are produced as open (wet-cell) batteries or
as maintenance-free (VRLA) batteries. (Gel and AGM). For
each model and for many manufacturers, the machine must
be adequately adjusted.
Each battery has a different service life and performance.
The machine must be programmed after the batteries have
been inserted or if the battery type and/or the manufacturer
have been changed as well as prior to starting the machine.
Incorrect adjustment may result in early battery failure.
Safety measures to be taken when handling the batteries
• Batteries contain acid. Always wear safety
goggles for the maintenance, installation
and removal of wet-cell batteries.
• Rinse acid splashes in your eyes or on your
skin with plenty of clear water.
Then immediately consult a doctor.
Wash your clothes with water.
Attention:
The operating instructions provided by the
battery manufacturer must also be
observed.
Attention:
Provide adequate ventilation when
charging the battery.
Attention:
Always disconnect the batteries from the
machine before starting maintenance
work.
Battery connection diagram
85
• Explosive gas is generated during battery
charging. Keep away from open fire or
glowing embers.
• Do not smoke!
• Danger of acid burns!
• Attention! The battery poles are always energized. Therefore do not deposit any objects on the batteries!
Attention:
Keep batteries clean and dry. Immediately
wipe off leaking acid or water (wet-cell batteries).
Wear protective gloves for this purpose.
Attention:
Batteries may only be installed by service
agencies or experts approved by Diversey; they must be installed in compliance with the connection diagram.
Installation and/or connection errors may
result in severe injury, explosion and major
damage to the machine and the environment.
Charging procedure with external battery charger
Each battery type and/or battery manufacturer requires
different charging characteristics.
Attention:
Incorrect charging characteristics or the
use of inappropriate chargers results in
early failure or the quick destruction of the
batteries.
Optionally available on-board chargers are adapted to the battery size and contain several charging characteristics which
are adjusted ex works or by a TASKI service technician for
recommended batteries.
This regulation also applies to the use of stationary (external)
chargers.
Attention:
Permanent short-term use with subsequent battery charging may cause longterm damage to the batteries. Standard
value: At least approx. 20% of the available capacity should be used up before recharging the battery.
Attention:
In order to achieve their max. possible service life, traction batteries must undergo
the complete charging cycle (12-16 hours)
twice a week.
Page 9
Attention:
Before decommissioning the machine for
a longer period, the batteries must undergo a complete charging cycle. After completion, the charger is disconnected from
the machine and/or mains.
Batteries gradually discharge. Depending
on the type of battery, they must be recharged after 3-6 months.
Before recommissioning, the batteries
should undergo another complete
charging cycle.
Charging procedure with external charger
• Connect the external battery charger with the battery
isolating plug of the machine.
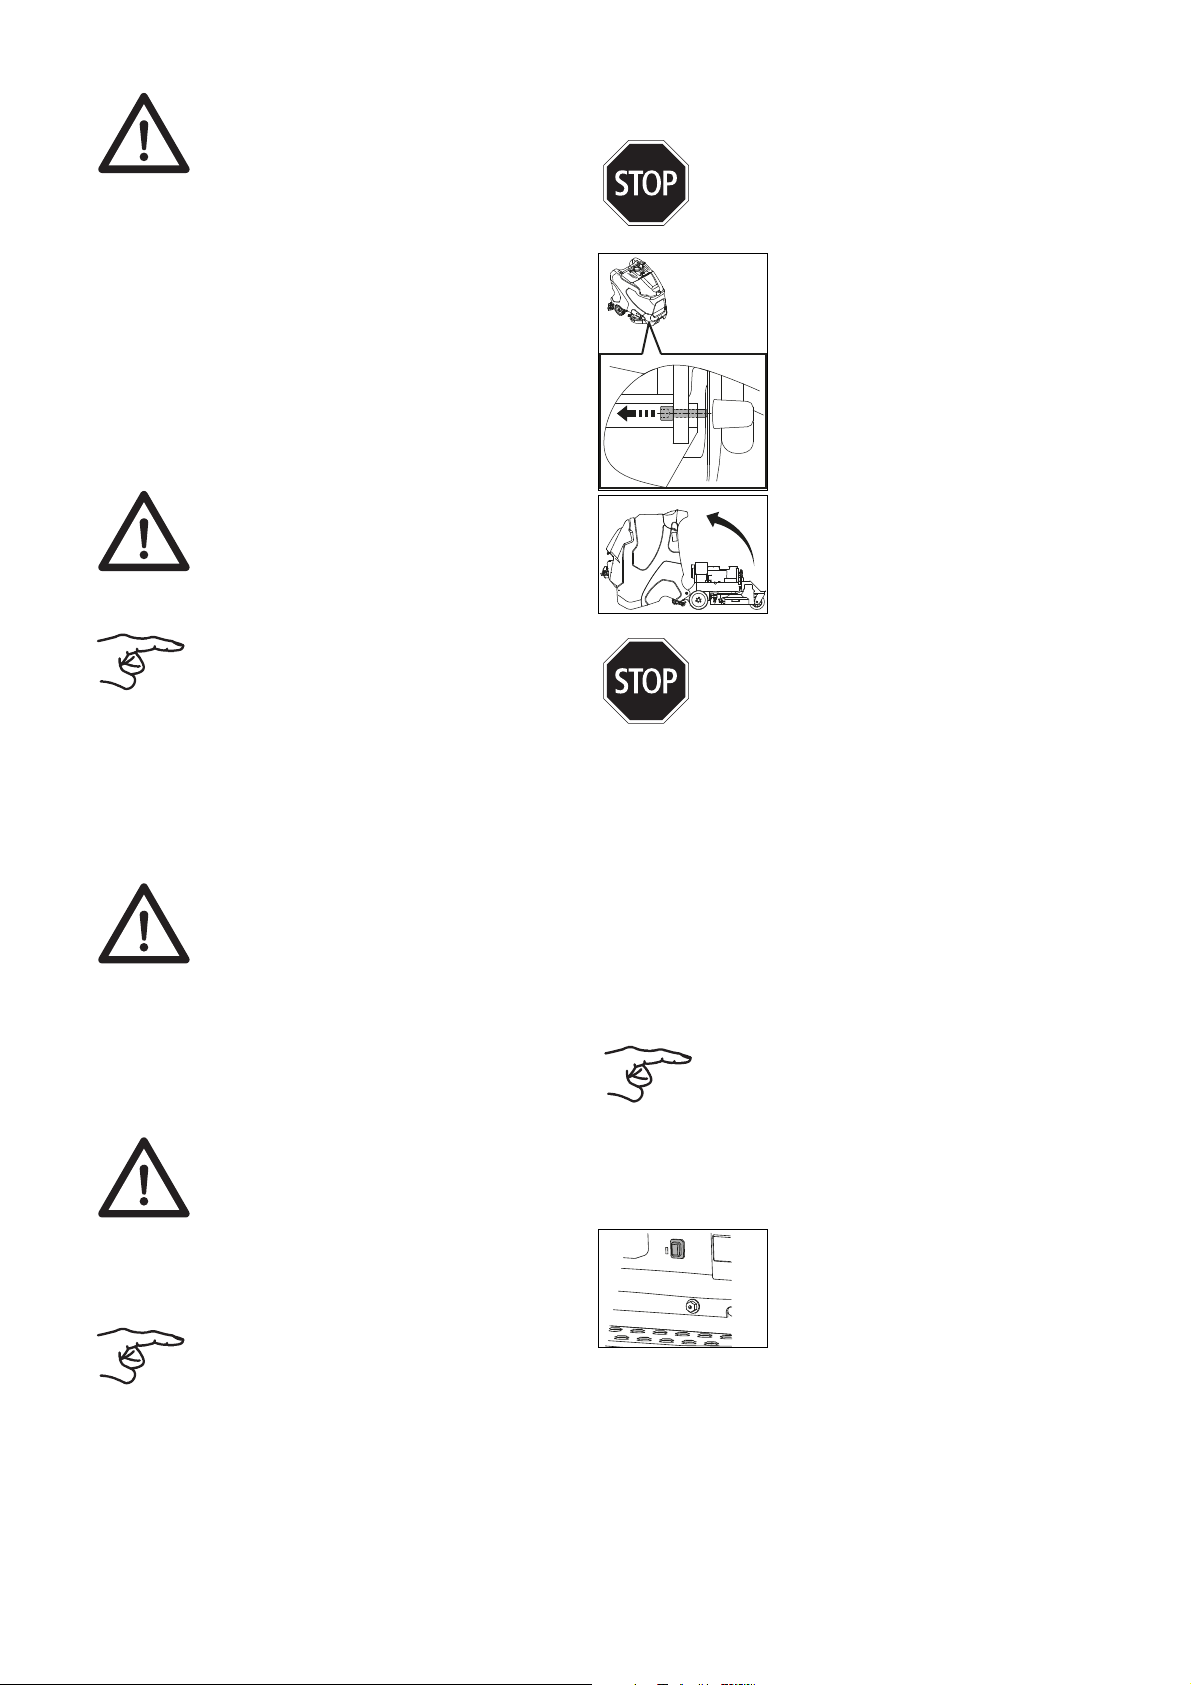
Open battery compartment for maintenance
• The machine must be switched off.
Caution:
Before opening the battery compartment
make sure that both tank areas are empty.
• At the bottom left on the front side of
the machine you will find the battery
compartment release.
• Undo the socket screw.
Attention:
A proper connection must be ensured. Insert the plug to the limit stop.
Notice:
All machine functions are deactivated
during charging.
Charging procedure with (optional) on-board charger
• The machine must be switched off.
• Take the power cord and connect it with a socket (with slow
fuse).
After charging
Attention:
Switch off the charger before
disconnecting it from the batteries.
Disconnecting the charger while it is still
switched on may result in an explosion in
the battery compartment.
• Stow away the power cord for (optional) on-board chargers
in the provided compartment.
• Store the charging cable in a dry place where it is protected
against damage.
• Carefully tilt the tank backwards until
it is lying on the floor.
Caution:
After maintenance, carefully bring the tank
back to its initial position and screw in the
socket screw.
Prior to commissioning
Parking brake
Activation:
• The electronic system automatically deactivates the
parking brake as soon as the driving switch is operated.
When the machine is standing still the parking brake is
always activated. This is regardless of whether the
machine is switched on or off.
Release:
Notice:
The running board must be occupied.
Attention:
Charging cables transfer high currents. Do
not use the charger if there are any signs
of damage to the plug, cable or device
connection.
Maintenance and care of open (wet-cell) batteries
Notice:
The care of maintenance-free batteries is
basically restricted to compliance with the
correct charging processes.
• The parking brake is automatically released by operating
the driving switch.
Emergency stop:
• If the steering or voltage supply fails,
the parking brake can be released by
hand. The release button must be
used for this purpose. It is located
above the running board.
86
I25 I24 I23 I22 I21 I20 I19 I18 I17 I16 tr sv sl pt pl no nl it fr fi es en de da cz
Page 10
Relocation drive
click
1
1
2
2
The direction of travel is controlled by the handle bar and the
speed by the driving switches. The speed is continuously
regulated.
When the driving switch is released, the machine is
decelerated until it stops and the parking brake is activated.
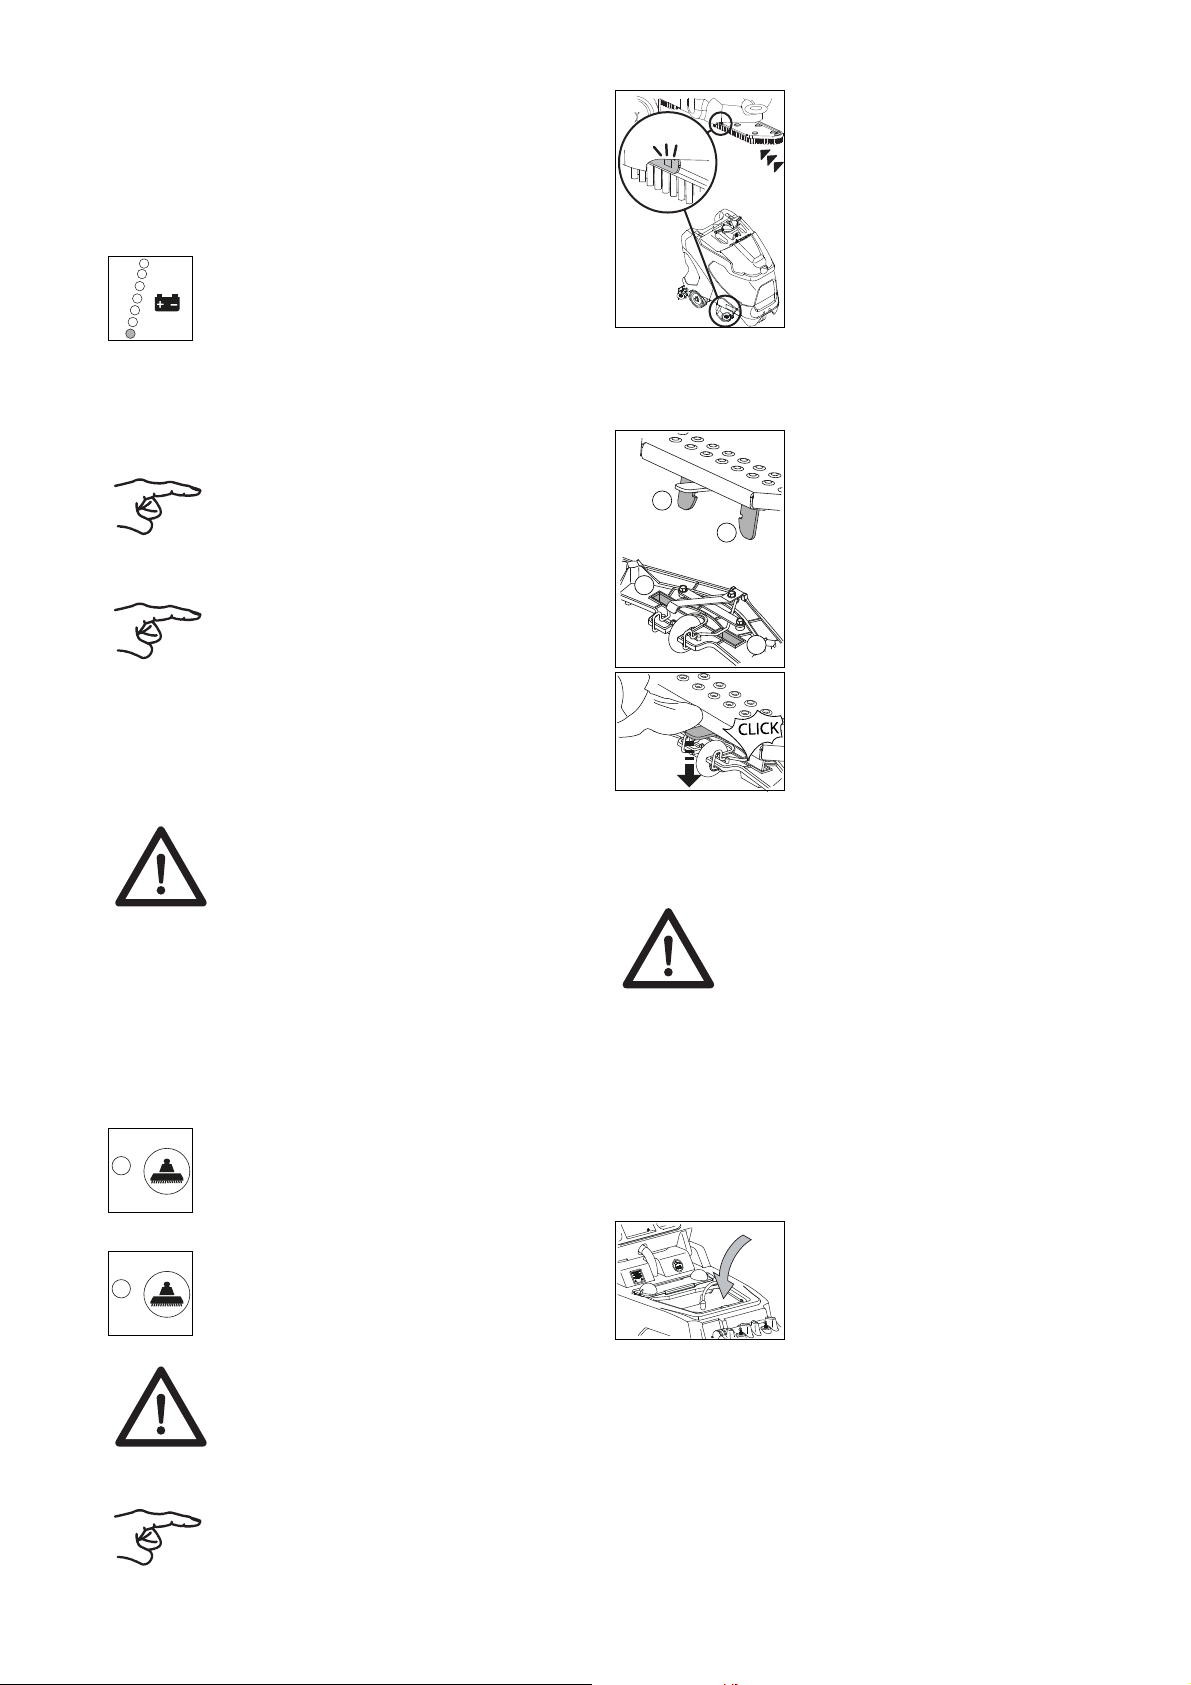
• Switch on the machine (key switch).
The display lights up briefly.
The battery level indicator notifies you that
the machine is ready for operation.
(In case of malfunctions, please see
page 93).
XP-M
• Push the brush up and insert it until it
engages.
• To move forward simply push the driving
switches forward.
• To move backwards push the driving
switches backward.
Notice:
The speed is electronically reduced for
cornering.
Notice:
The squeegee is automatically lifted and
the cleaning solution supply is interrupted
for reversing during operating mode.
Brush installation
Check:
• that the brush does not fall below the red marking (bristles)
or 1cm of bristle length.
• the pad for wear and cleanliness before use.
Attention:
Do not use brushes which have reached
their wear limit.
The wear limit is indicated by the length of
the red bristle.
Do not use pads which are worn out or
dirty. Use original TASKI brushes only.
Failure to observe these instructions may
result in inadequate cleaning results or
even floor damage.
XP-R
• Position the brushes under the brush unit.
• Press the Brush drive ON/OFF button.
The brush unit is automatically lowered,
centers the brushes and stops.
• Stand on the running board.
• Press the Brush drive ON/OFF button.
The brushes are engaged and the brush unit
is lifted.
Squeegee assembly
• The machine must be switched off.
• Put the squeegee under the squeegee suspension.
• Position the squeegee under the
shackles of the squeegee holder (1)
so that they fit into the recesses of
the squeegee (2).
• Press down the squeegee holder
until the squeegee engages.
• Firmly attach both suction hoses to the sockets of the
squeegee.
Filling the fresh water tank
Attention:
Max. permissible water temperature
60 °C/140 °F.
Diversey recommends using cold water
since hot water will adjust to the floor
temperature as soon as it is in contact with
the floor. Thus there are no advantages to
using of hot water.
• The machine must be switched off.
• Open the tank lid.
• Put the fresh water tank (Flextank) onto the provided
fixture.
• Take the dosing cup from the fresh water tank (Flextank).
• Fill water into the fresh water tank
(Flextank).
The upper red marking indicates the
max. permissible filling level.
Attention:
Check whether the brushes are engaged.
Notice:
The brush drive is activated by pressing
the driving switch.
87
Page 11
Dosing:
Beginning work with the machine
Attention:
Wear gloves, goggles and appropriate
(protective) working clothes when
handling chemical products!
Notice:
Use chemical products recommended by
Diversey only and always observe the
product information.
Attention:
The use of inappropriate products (e.g.
products containing chlorine or acid) may
damage or destroy the machine.
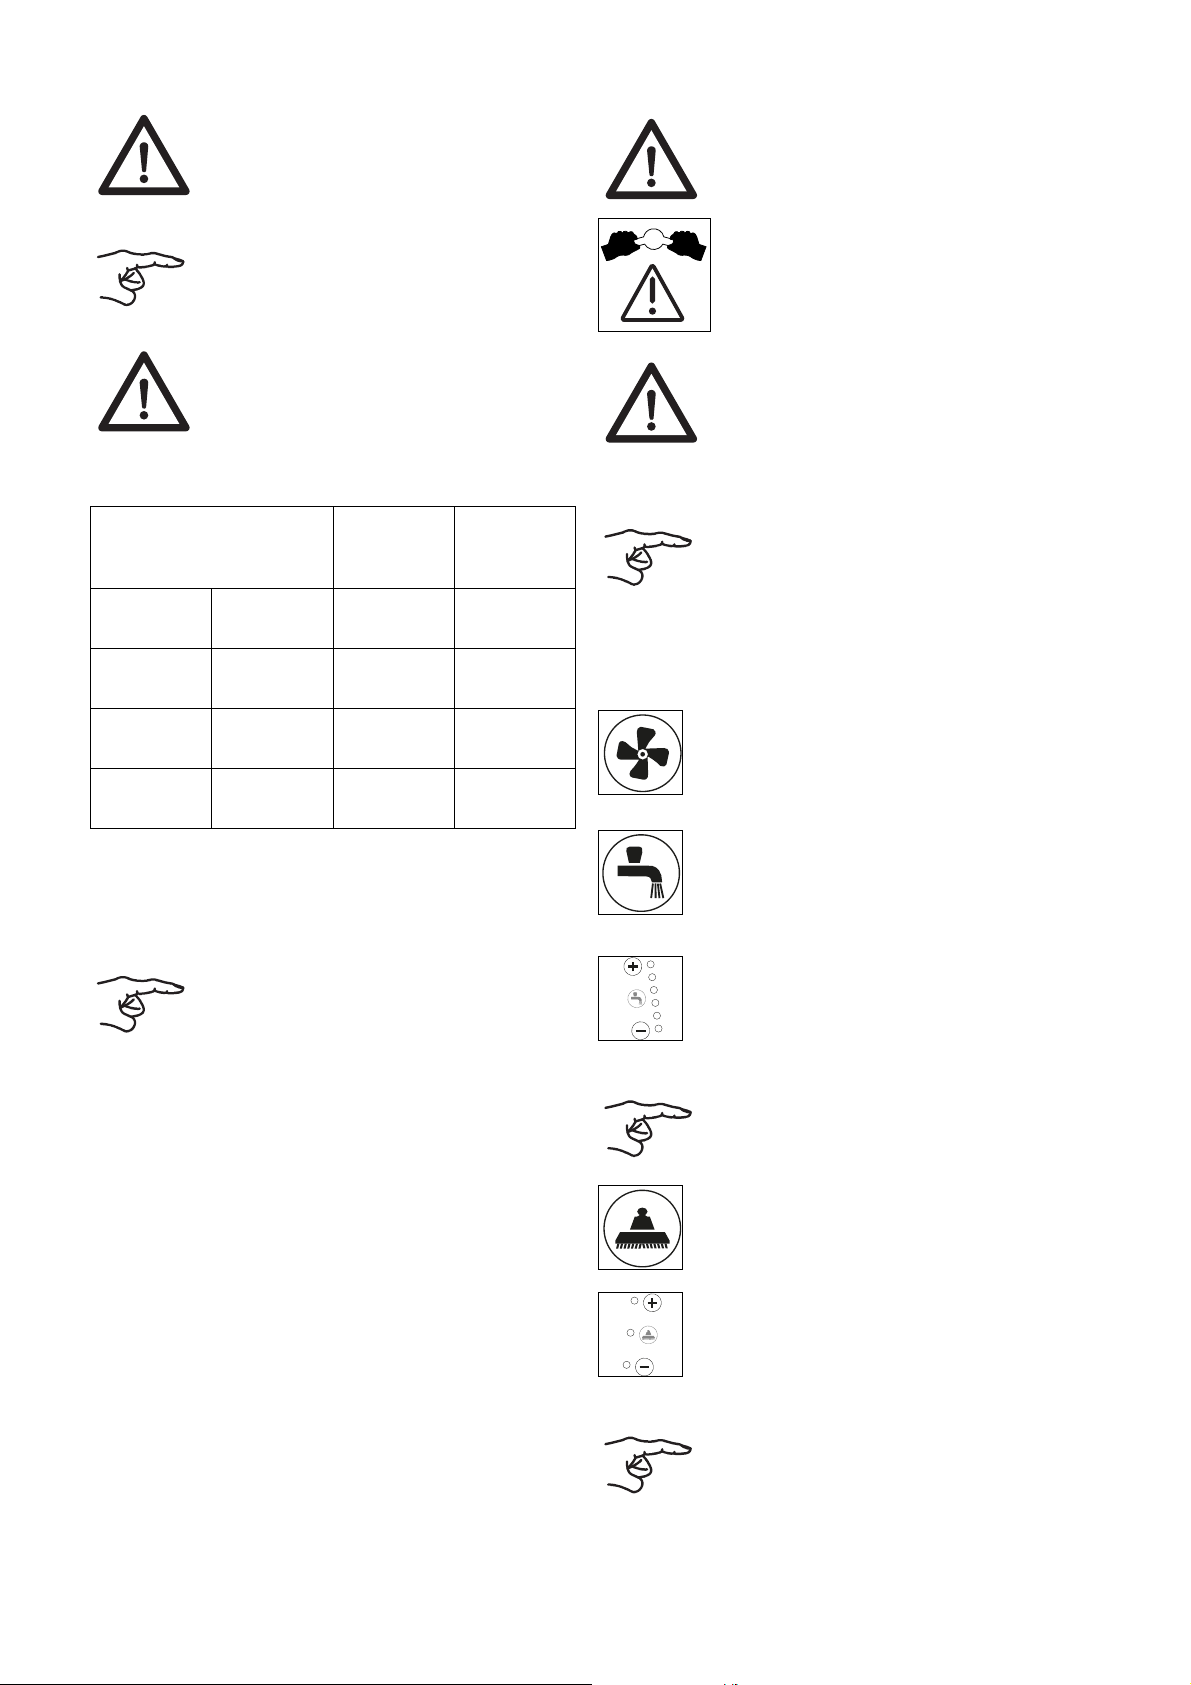
Dosing examples:
Information on the packing
of the product
0.5% 50ml for 10l
of water
1% 100ml for 10l
of water
2% 200ml for 10l
of water
3% 300 ml for 10l
of water
• Fill the appropriate product into the dosing cup and pour
the content into the fresh water tank (Flextank). Repeat the
procedure until the required dosage is reached.
• The dosing cup remains in the Flextank after dosage.
Tank
capacity
113l 0.5l
113l 1.1l
113l 2.2l
113l 3.3l
Product
volume per
tank filling
Notice:
TASKI offers an automatic dosage feature
as an option; It is possible to mount it additionally. Please contact your customer service.
Attention:
Always wear slip-resistant shoes and
appropriate working clothes when working
with this machine!
• When operating the machine, always place
both hands on the driving handle to ensure a
safe operation of the machine.
Attention:
Start familiarization with the machine by
making your first driving attempts in a free
area.
• Stand on the running board.
Notice:
Check whether the emergency stop button
is released.
• Switch on the machine (key switch).
The display lights up briefly.
Manual program start
• Press the Suction unit ON/OFF
button.
The display lights up, the suction motor
starts and the squeegee is automatically
lowered to the operating position.
• Press the Cleaning solution supply ON/OFF
button.
The display lights up.
The cleaning solution supply is started when
the brushes rotate.
• Select the desired dosage by pressing the +/
- buttons from level
1-6.
Notice:
To protect the environment, you should
calculate the lowest level which is
sufficient for good cleaning results.
• Press the Brush drive ON/OFF button.
The display lights up, the brush unit is lowered and the engaging process starts automatically.
• Select the desired brush pressure by
pressing the +/- buttons from level 1-3.
Notice:
Always calculate and select the lowest level which is sufficient for good cleaning results. Thus you will optimize power
consumption and increase the service life
of the machine.
88
I25 I24 I23 I22 I21 I20 I19 I18 I17 I16 tr sv sl pt pl no nl it fr fi es en de da cz
Page 12
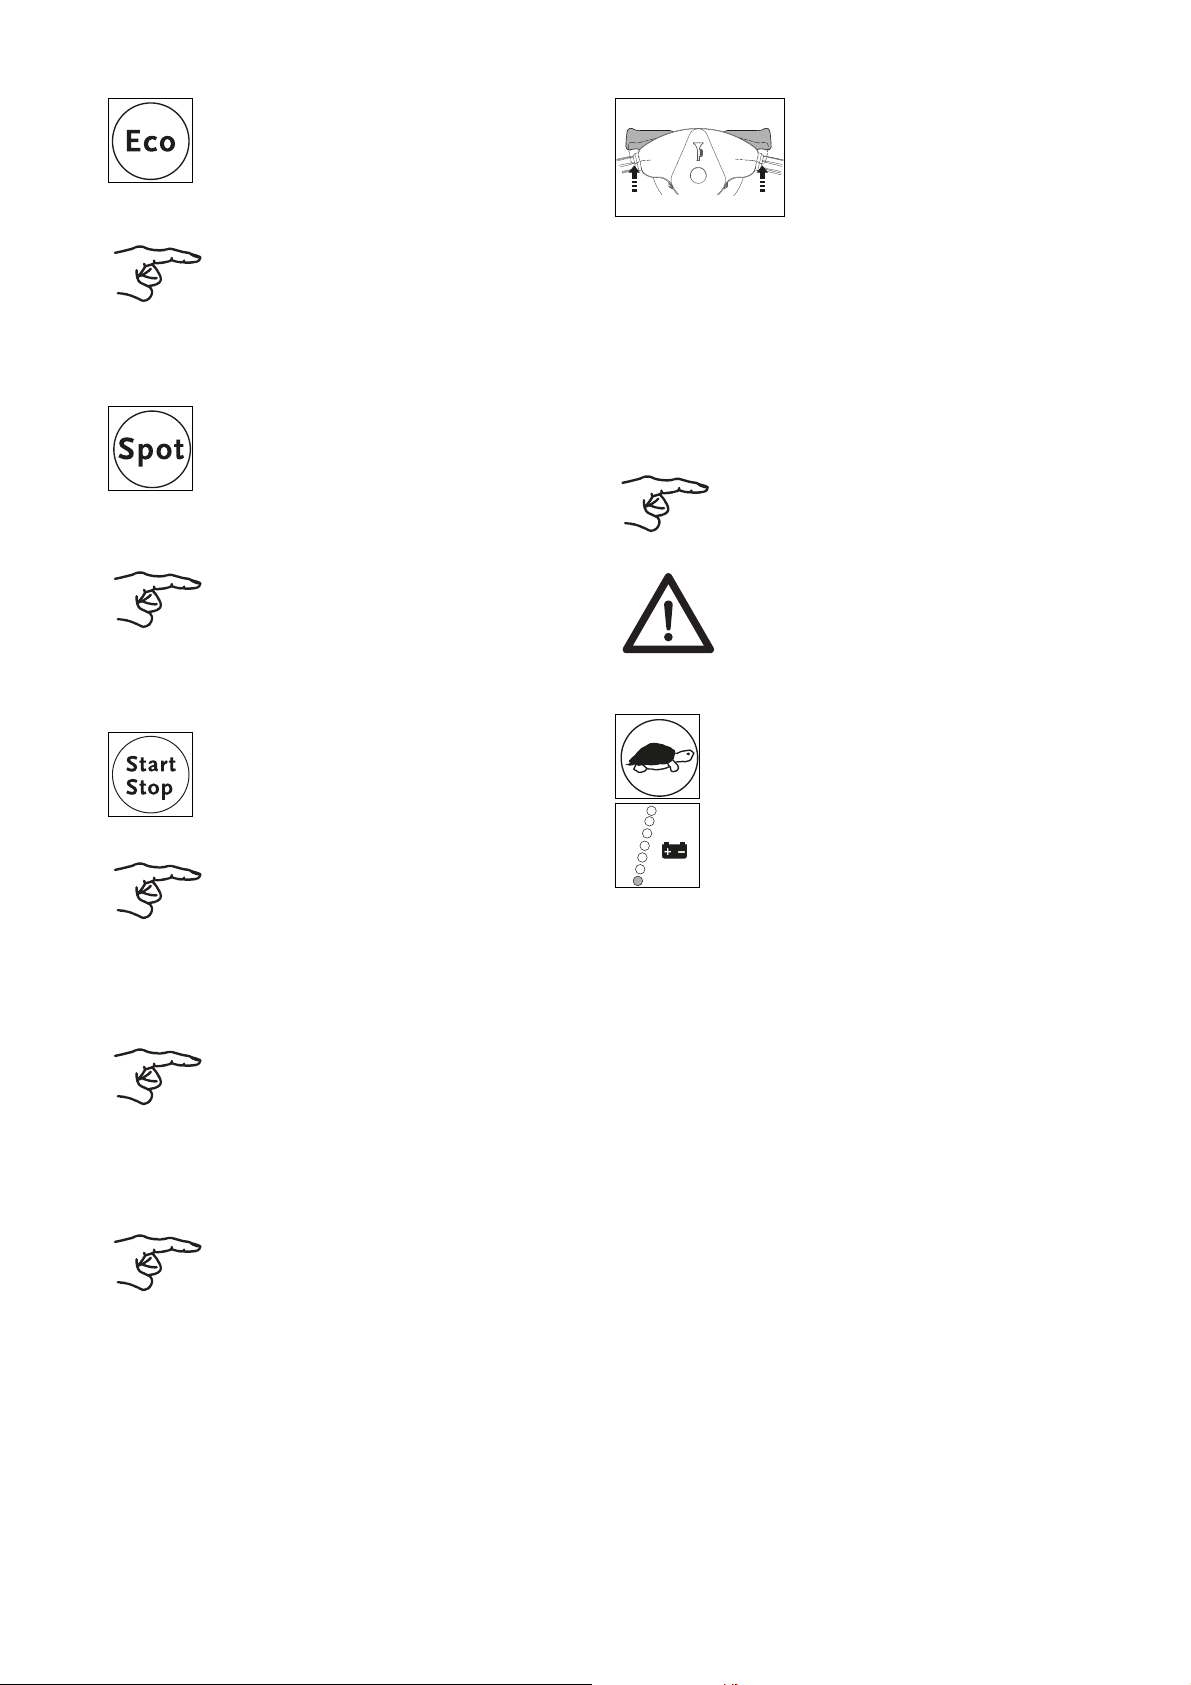
ECO mode
• The ECO mode is activated by pressing the
ECO mode ON/OFF button.
This reduces the speed of the suction motor.
Set the dosage of the cleaning solution to
level 2 and the brush pressure to level 1.
Notice:
If necessary, the cleaning solution and
brush pressure can be manually adjusted
in ECO mode.
The ECO mode is suitable for smoother
floors without joints.
Spot mode
• The spot mode is activated by pressing the
spot mode ON/OFF button.
By doing so, the slow approach is activated
for 90 seconds, the dosage of the cleaning
solution is set to level 6 and the brush pressure is set to level 3.
Notice:
If necessary, the cleaning solution and
brush pressure can be manually adjusted
in spot mode.
The spot mode is suitable for heavily
soiled floors.
Starting the machine using the program button
• By pressing the program button for the next
operation start or work step, all machine
functions are started on the basis of the
functional values last used.
Notice:
The corresponding function is deleted by
pressing any function button.
The suction motor is still on for a specified
time in order to reduce dripping. The display flashes until the suction motor is
switched off.
Notice:
The preset values can be adjusted at any
time during operation.
The values preset when switching off the
machine are stored and will be
automatically activated when restarting
the machine.
Notice:
Pressing the program button when the
cleaning process is finished will start an
optimized program for the end of operation.
See instructions on page 90 in the "Automatic process" chapter.
Settings and activated functions are
saved.
Cleaning start
• If the machine is switched on and the
operator is standing on the running
board, the machine starts moving as
soon as the driving switches are operated. If selected, the brush unit is
started and the cleaning solvent supply is open.
The speed is controlled by the position of the driving switches.
When the driving switches are released, the machine is automatically
decelerated until it stops and the
parking brake is activated.
The cleaning solvent supply is
closed, and the brush unit is stopped
with some delay.
Notice:
The supply volume of the cleaning solution
is adjusted to the corresponding working
speed. (IntelliFlow)
Attention:
When working in heavily furnished or narrow zones, the slow approach ON/OFF
button must be pressed. (Display lights up)
The maximum working speed is reduced,
and thus so is the risk of accidents.
• Pressing this button once more will
override this restriction, and the
display disappears.
If the red display on the battery level
indicator lights up, you must drive the
scrubber dryer to the battery charger.
Battery capacity - end of operational readiness
The battery level indicator provides information on the available operating time.
• Once the red display starts flashing, there are still approx.
10 minutes left for any remaining work.
• After this period, the brush unit and – 30 seconds later –
the squeegee are lifted. The red display switches to continuous light.
• Now 10 more minutes remain for driving the machine to the
charging station. Then the machine is automatically
switched off.
• To restart the machine, the batteries must be charged for
several hours until the minimum level has been reached.
89
Page 13
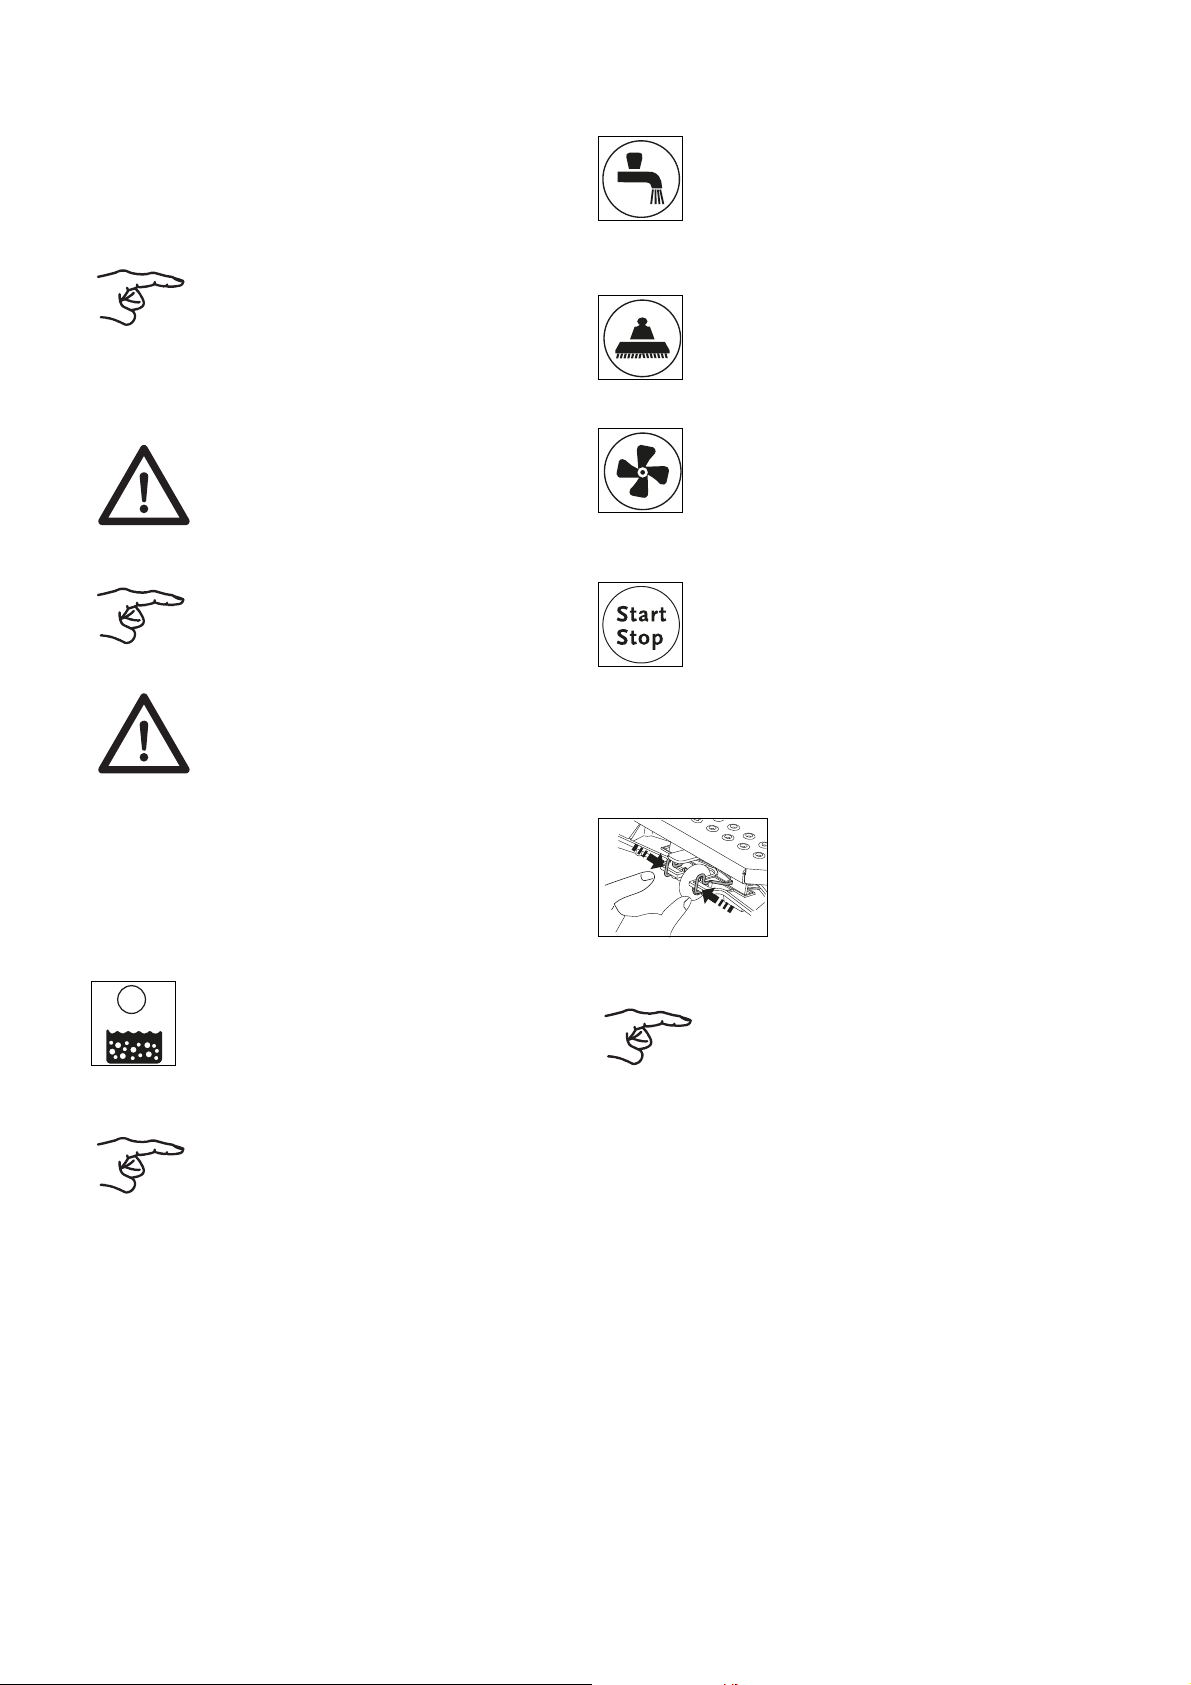
Cleaning method
Direct working method:
Scrubbing and suction in one work step.
Indirect working method:
Applying the cleaning solution, scrubbing and suction in several work steps.
Notice:
The machine guiding might be impaired in
case of special combinations of flooring/
contamination and cleaning product.
This effect can be reduced by special
wheel options.
Replenishing cleaning solvent
Attention:
The flooring may be damaged when
working without cleaning solution.
End of operation
Manual process
• Press the Cleaning solution ON/OFF
button.
The cleaning solution supply is stopped.
• Drive on for some meters so that the brushes keep on
rotating for a short time to avoid dripping.
Very important for TASKI contact pads!
• Press the Brush drive ON/OFF button.
The display lights up and the brush unit is
stopped and lifted.
• Drive on for a few meters in order to absorb the remaining
drain water.
• Press the Suction unit ON/OFF
button.
The display lights up and the squeegee is
automatically lifted.
The suction motor is still on for 15 seconds.
Notice:
A rattling noise from the pump indicates an
empty fresh water tank (Flextank).
Attention:
The pump must never run dry for an
extended period.
• The machine must be switched off.
• Open the tank lid.
• Fill water into the fresh water tank (Flextank), see page 87.
• Add the cleaning product using the dosing cup.
• Close the tank lid.
Draining dirty water
Recovery tank full display:
• If the Recovery tank display lights up, the
cleaning program is interrupted, the squeegee is lifted and the suction unit is switched
off.
• Drain the recovery tank, see page 91.
Notice:
In case of frothing in the tank, the recovery
tank display also lights up.
Automatic process
• Press the Program start/stop button.
The cleaning solution supply is stopped.
The brush unit is stopped and lifted.
After 30 seconds, the squeegee is lifted.
The suction motor is still on for 15 seconds
until it is automatically switched off.
Removing and cleaning the squeegee
• The machine must be switched off.
• Remove both suction hoses from the squeegee nozzles.
• Compress the position locks. The
squeegee is released and can be removed from the squeegee holder.
• Clean the squeegee under running water using a brush.
Notice:
Only cleaned and intact blades ensure optimal suction results!
• Drain the recovery tank, see page 91.
90
I25 I24 I23 I22 I21 I20 I19 I18 I17 I16 tr sv sl pt pl no nl it fr fi es en de da cz
Page 14
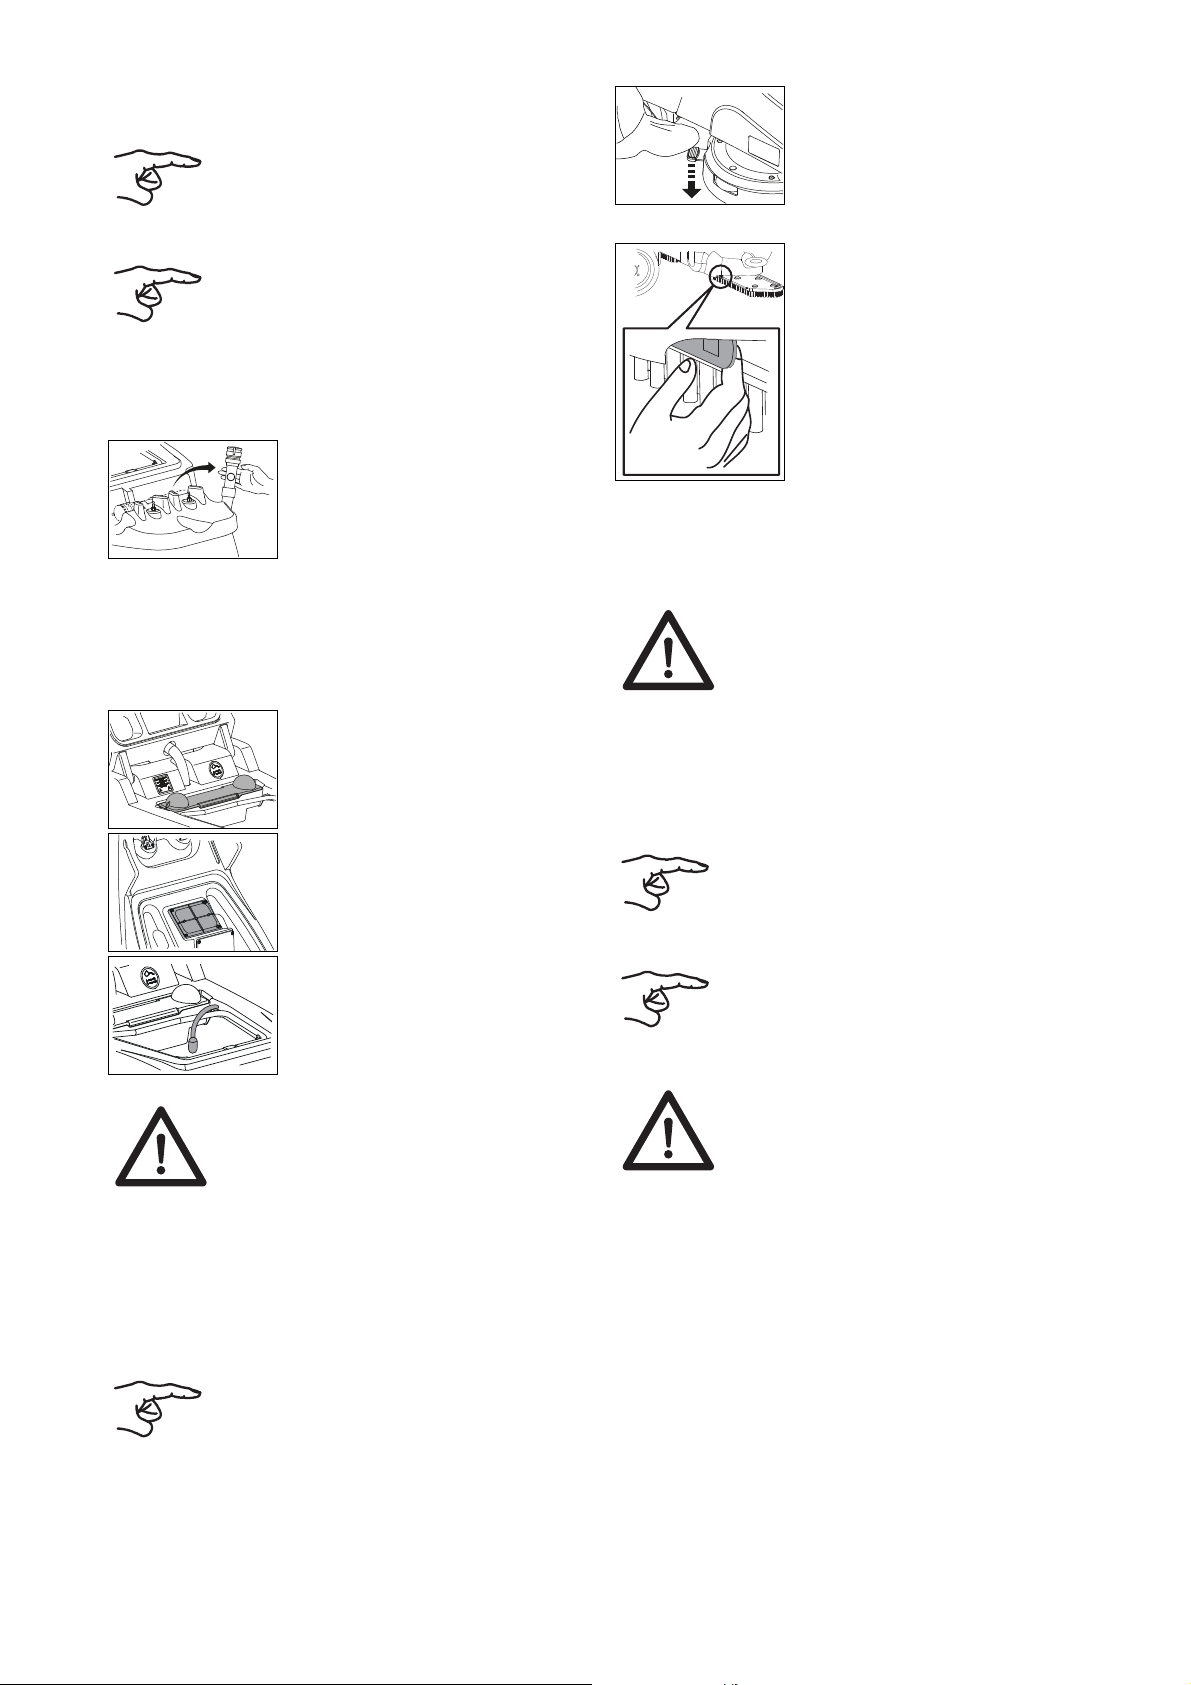
Draining and cleaning the recovery and fresh water tank
1
(Flextank)
Notice:
Drain water or cleaning solution must be
disposed of in compliance with the
national regulations.
Notice:
When draining the recovery tank, the regulations of the detergent supplier regarding personal protective equipment must be
observed.
• The machine must be switched off.
Proceed as follows:
• Open the tank lid.
• Remove the drain water hose from
the holder.
• Put the drain hose into the drainage.
• Squeeze the neck (1) of the drain
hose.
• Pull the lid off the drain hose and
drain the recovery tank.
• Lift the fresh water tank (Flextank), put it into the recovery
tank at the lowest point and discharge it.
• Remove the empty fresh water tank (Flextank) from the recovery tank and thoroughly rinse it with clean water.
• Thoroughly rinse the recovery tank with clean water.
• Remove the solids filter (yellow) and
thoroughly drain and rinse it under
running water.
XP-R
• Press the brush release with your
foot.
XP-M
• Pull the locking lever.
• Remove the brushes and clean them under running water.
Cleaning the machine
• The machine must be switched off.
Attention:
Never clean the machine with a high-pressure cleaner or water jet.
Water ingress in the machine may cause
considerable damage to the mechanical or
electrical parts.
• Wipe the machine with a moist cloth.
• Take out the suction filter (yellow)
and remove the dirt with a cloth or a
soft brush.
• Take out the intake filter and remove
the dirt with a cloth or a soft brush.
Attention:
Clogged suction filters may impair the suction performance.
Clogged intake filters may reduce the
amount of cleaning solution.
• Mount the dirt sieve (yellow), the fresh water tank
(Flextank), suction filter and intake filter.
• Put the drain hose into the holder.
Removing and cleaning the brush
Notice:
Clean the brush whenever cleaning work
is completed.
Storing / parking the machine (not in operation)
Notice:
The machine must be switched off and the
key must be removed.
Notice:
Store the machine with a lifted squeegee,
lifted brush and open tank lid. Thus, the
tank can dry, and the generation of mold
and unpleasant odors is prevented.
Attention:
Never store the machine with discharged
batteries. Otherwise, the batteries will be
damaged beyond repair.
• The machine must be switched off.
91
Page 15
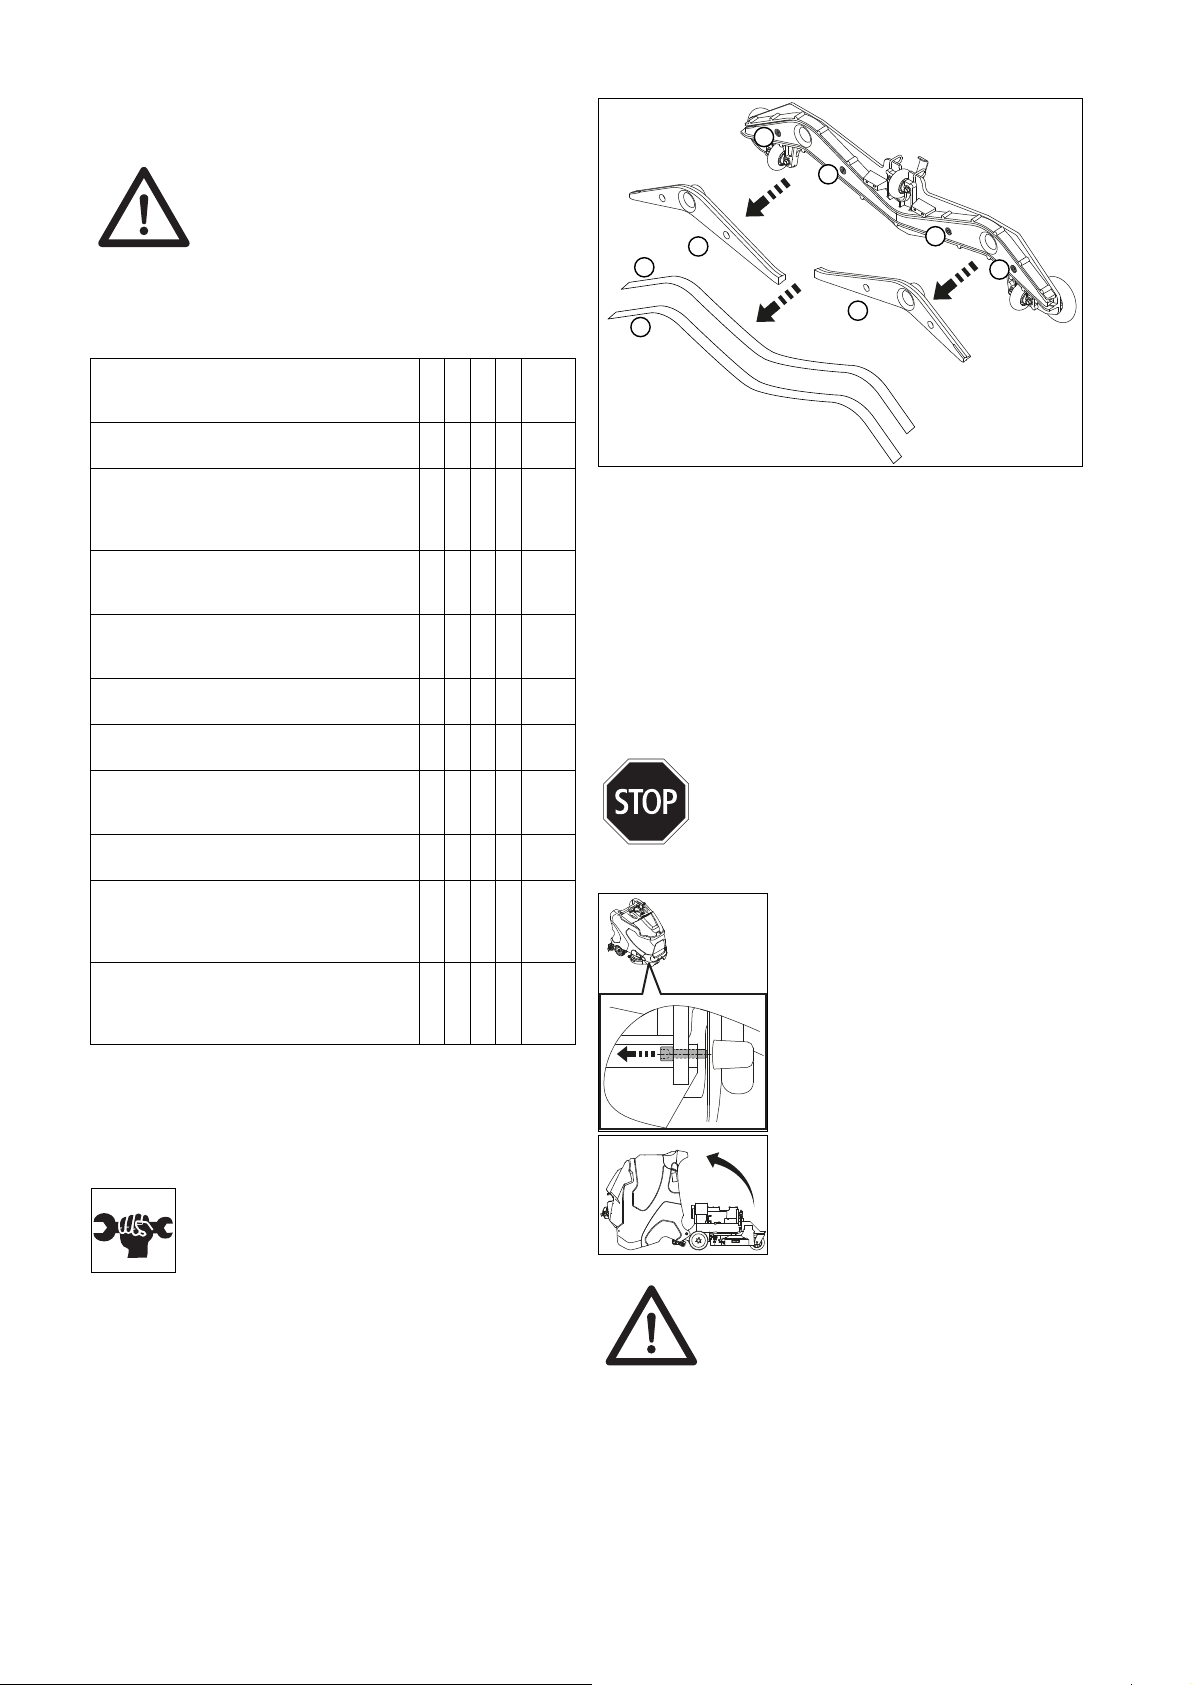
Service, maintenance and care
1
2
5
7
6
8
3
4
The maintenance of the machine is the prerequisite for
impeccable operation and a long service life.
Attention:
Use original TASKI parts only; otherwise,
any warranty and liability claims will
expire.
Legend:
= each time cleaning is completed, = every week,
= every month, ⊗ = service lamp
Blade replacement
Activity
Loading batteries ● 85
Replenishing distilled water (wet-cell
batteries). Observe the service sheet of
the battery supplier!
Draining and cleaning the recovery and
fresh water tank
Check the intake and suction filter for
contaminations and clean them
Clean all yellow marked parts ●
Clean the brushes ● 91
Clean the squeegee, check the blades
for wear and change them, if necessary
Clean the machine with a moist cloth ● 91
Clean the seals of the tank lid, check
them for cracks and replace them, if
necessary
Maintenance and service program
carried out by Diversey service
technicians
● 86
● 91
●
● 90
●
⊗
●
Page
• Undo the four socket screws (1, 2, 3, 4).
• Separate the squeegee body from the squeegee core
(5, 6).
• Remove the blades (7, 8).
• Clean the squeegee body and both squeegee cores under
running water.
• Mount the "turned" or new blades onto the squeegee core.
• Reinsert the squeegee core into the squeegee body.
• Retighten the four socket screws.
Fuse replacement
• The machine must be switched off.
Caution:
Before opening the battery compartment
make sure that both tank areas are empty.
• Disconnect the battery from the machine.
• On the bottom left front side of the
machines you will find the battery
compartment release.
• Undo the socket screw.
Service intervals
TASKI machines are high-quality machines which have been
checked for safety in the factory and by authorized inspectors.
Electrical and mechanical parts are subject to wear and aging
after a longer period of use.
• In order to maintain operational safety and
readiness for use, the machine must be serviced whenever the maintenance indicator
lights up (factory setting is 650 working
hours) or at least once a year.
In case of extraordinary use and/or insufficient
maintenance, shorter intervals are required.
Service center
Please always indicate the type and number of the machine
whenever you contact us for order placing or in case of malfunctions.
The required data are provided on the nameplate of your machine. The address of your closest Diversey service partner is
provided on the last page of this manual.
• Carefully tilt the tank backwards until
it is lying on the floor.
Attention:
Use fuses with the specified value only!
Incorrect fuses may damage the machine.
92
I25 I24 I23 I22 I21 I20 I19 I18 I17 I16 tr sv sl pt pl no nl it fr fi es en de da cz
Page 16
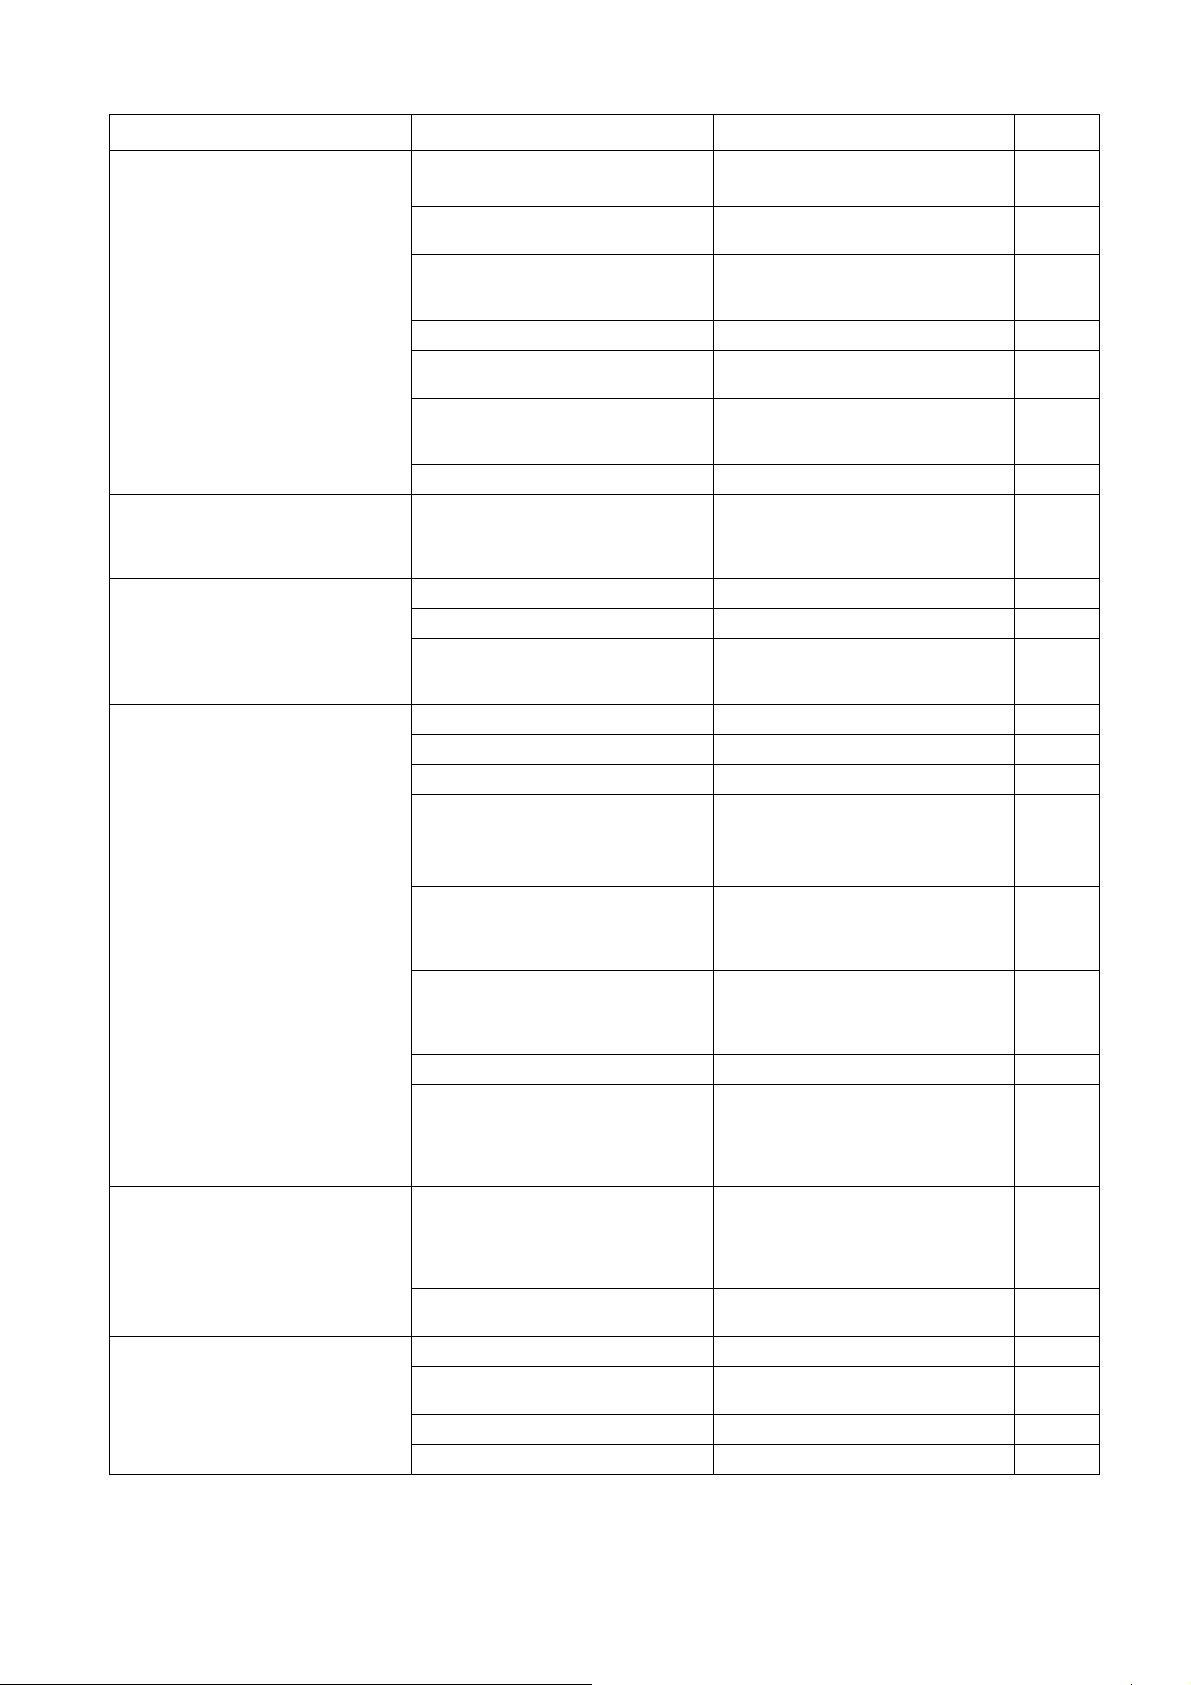
Malfunctions
Malfunction Possible causes Troubleshooting Page
Machine is switched off
• Turn the key
84
Machine without function cannot be
switched on.
Brush unit or suction unit cannot be
turned off
Brush does not rotate
Emergency switch is pressed
Main fuse is defective
Error code on the display • Contact your service partner 94
Immobilizer activated or fault in the
controls
Battery discharged or defective, Battery charger defective
Batteries defective • Contact your service partner
Error in the electronic system or
in the control panel
Brush drive switched off • Press Brush button 84
Main fuse is defective • Replace fuse 92
Motor rotates, brush does not
Suction not switched on • Press suction unit button 84
ECO button pressed • Switch off ECO button 84
Suction hose not connected • Connect suction hose 87
Squeegee not on the floor
• Connect the battery switch with the
machine
• Check/replace fuse
• Contact your service partner
• Stand on the running board.
• Load batteries
• Contact your service partner
• Stop the machine by pressing the
emergency stop button
• Contact your service partner
• Drive belt broken
• Contact your service partner
• Check squeegee suspension for
functionality
84
92
86
84
87
Poor suction performance
Floor remains wet
Drain water is not
absorbed
Suction unit switches off
Insufficient cleaning solvent supply
• Replace blades
Blades worn out
Hose or squeegee clogged (e.g.
pieces of wood, remnants)
Suction filter clogged • Remove any foreign matter 84
Suction unit indicator lights up but
vacuum cleaner is not running
Recovery tank full
Recovery tank contaminated
Cleaning solvent tank empty • Check cleaning solvent tank 90
Cleaning solvent volume set too low
Cleaning solvent button switched off • Press cleaning solvent button 84
Clean intake • Filter
• Remove any foreign matter
• Check fuse and replace it, if nec-
essary
• Fuse is OK, contact your service
partner
• Drain recovery tank
• Check battery monitoring
• Check fuse
• Check recovery tank and clean it, if
necessary
• Adjust cleaning solvent volume
with +/- buttons
92
92
90
91
84
93
Page 17
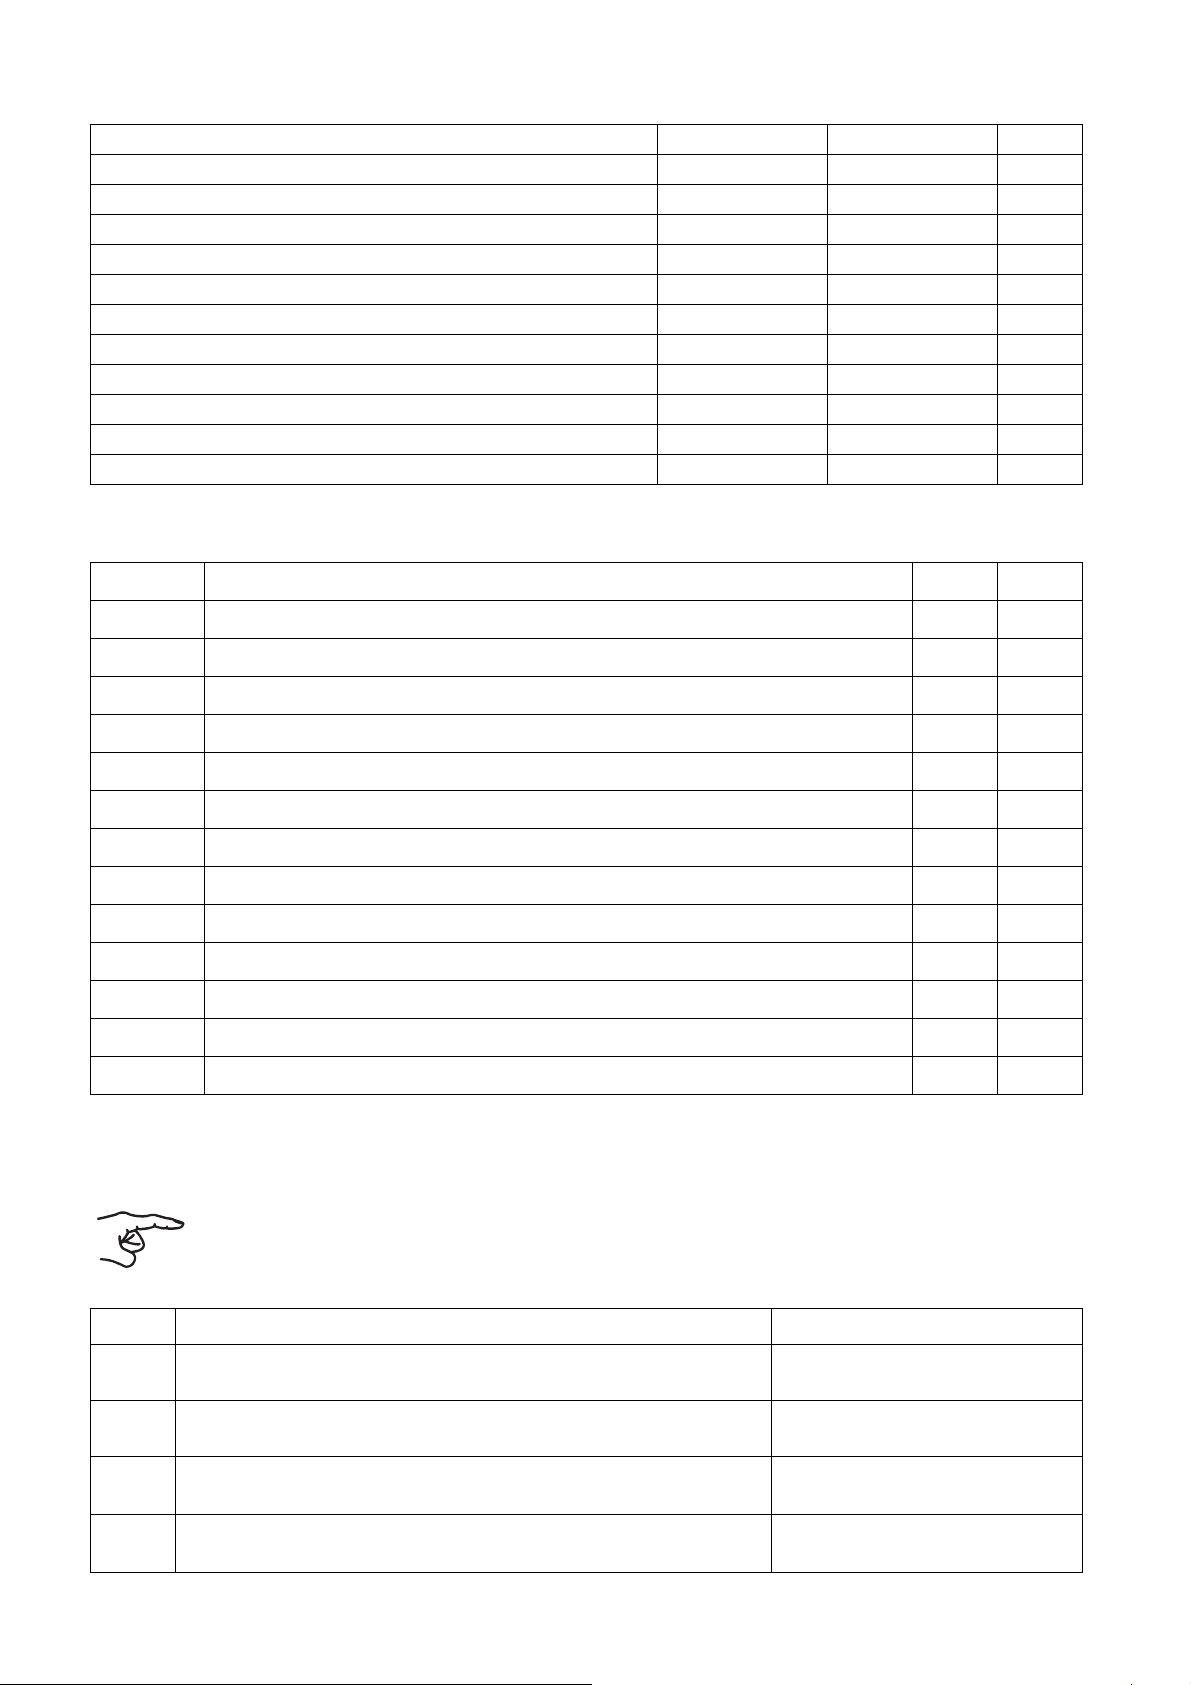
Technical information
Machine XP-R XP-M
Working width 75 75 cm
Squeegee width 95 95 cm
Dimensions (LxWxH) 131 x 95 x 130 131 x 95 x 130 cm
Maximum weight of operational machine 452 438 kg
Rated voltage 24V 24V DC
Rated power, nominal 1150 1100 W
Fresh water tank, nominal 113 113 l
Weighted sound pressure level L
according to ISO 11201 69 69 dB(A)
pA
Weighted effective acceleration value according to ISO 5349-1 <2.5 <2.5 m/s2
Splash water guard IPX3 IPX3
Protection class II II
Accessories
No. Item XP-R XP-M
7514650 Scrubbing brush, nylon, soft, 45cm 2x
7515725 Scrubbing brush, nylon, hard, 45cm 2x
7515726 Scrubbing brush, nylon, abrasive, 45cm 2x
7514648 Pad drive harpoon grip, 45 cm 2x
7522220 Pad drive harpoon grip, 38 cm 2x
7522221 Scrubbing brush, nylon, 38cm (standard) 2x
7522222 Scrubbing brush, washed concrete, 38 cm 2x
7522223 Scrubbing brush, abrasive, 38 cm 2x
7523342 Scrubbing brush, water saving, 38 cm 2x
4131268 Protection profile x x
4126922 Flash light set xx
7516242 IntelliDose swingo XP x x
8502830 Filling hose with universal coupling x x
Error Codes
Error codes are indicated on the display.
Notice:
Switch the machine off and on again
whenever an error code occurs.
Error codes might be remedied by switching the machine off and on.
Code Description Remedy
E 020 Battery in deep discharge
The battery voltage fell below 20.5V.
E 041 The current difference between the brush motors is higher than 50% for 15 sec.
The brush unit is lifted.
E 048 Short circuit detection or overload condition (e.g. blocked wheels or brushes).
Traction motor, brush motor or suction motor is switched off.
E 051 Incorrect parameters
The parameter checksum is incorrect.
Machine requires complete charging cycle.
Contact your service partner
Switch off the machine and let it cool down.
Contact your service partner
Contact your service partner
Contact your service partner
94
I25 I24 I23 I22 I21 I20 I19 I18 I17 I16 tr sv sl pt pl no nl it fr fi es en de da cz
Page 18
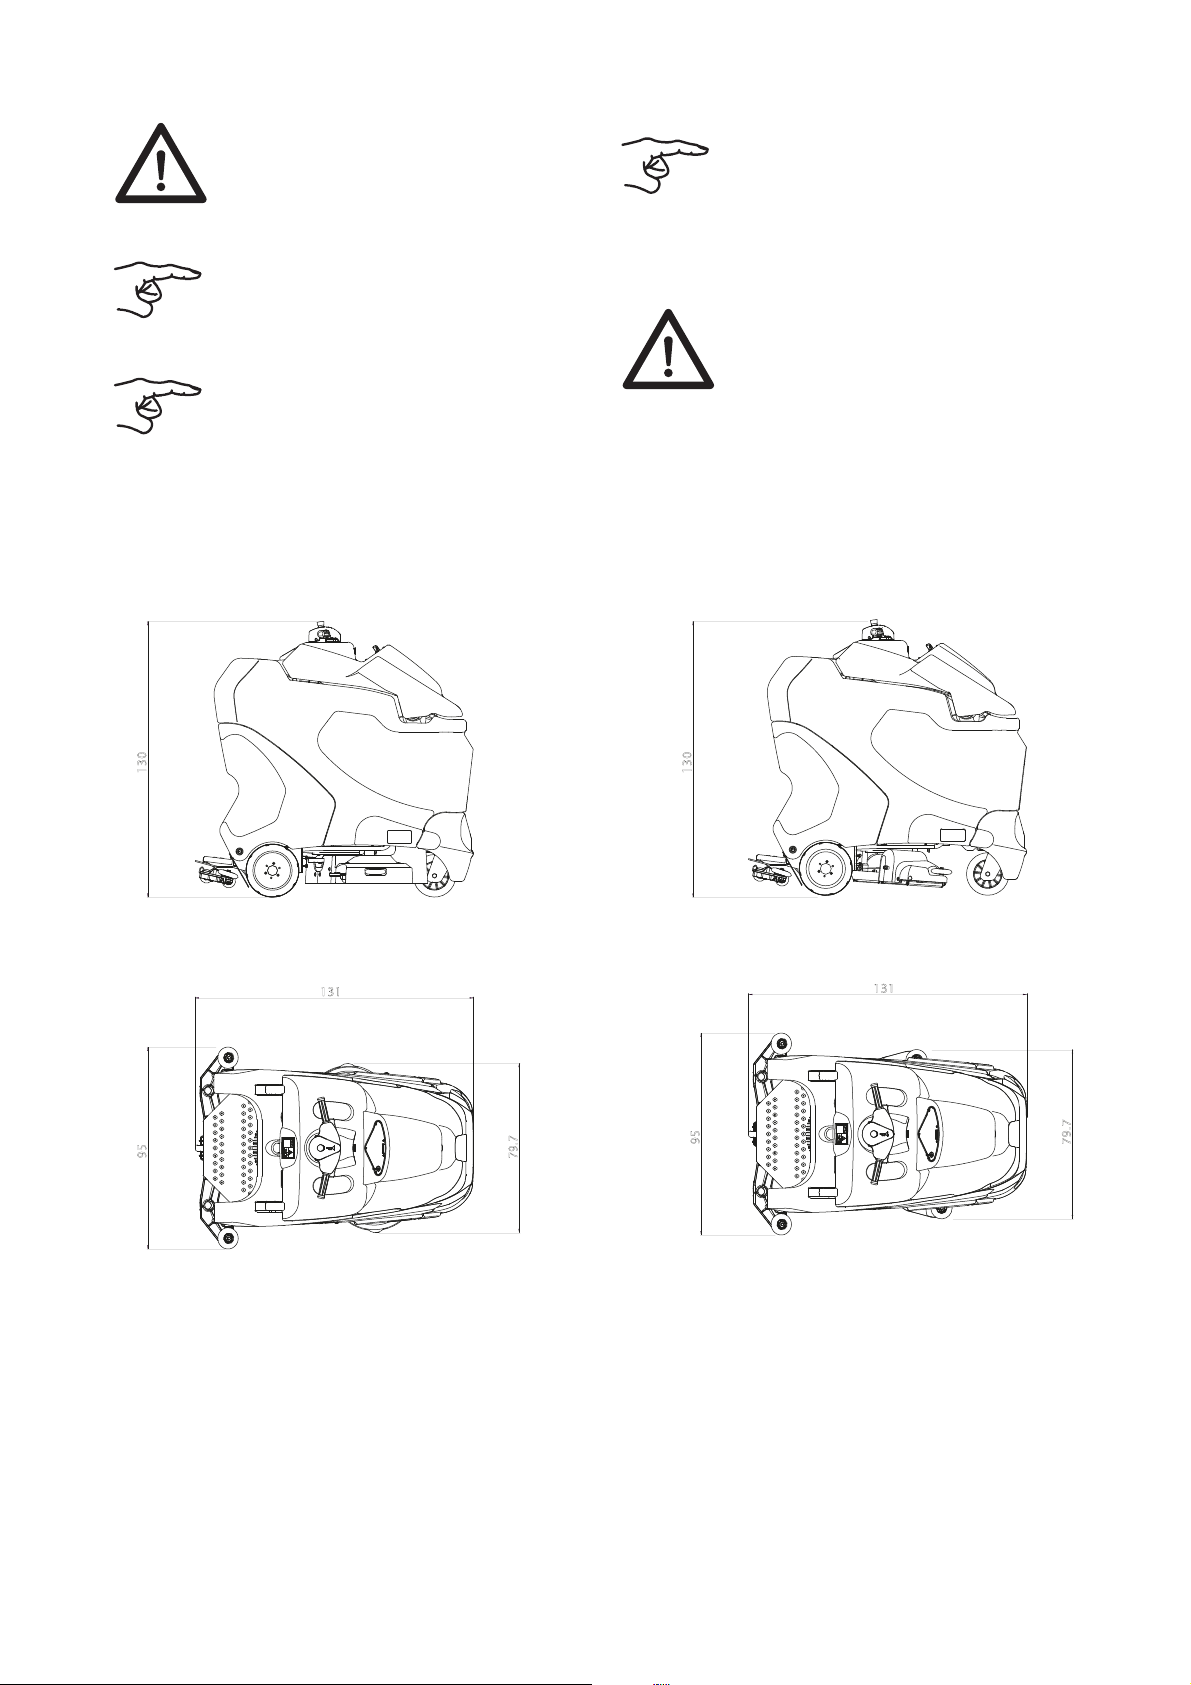
Transport Disposal
130
130
95
79.7
131
79.7
95
131
XP-R XP-M
Attention:
This machine may only be lifted using
lifting gear (e.g. hoist, loading ramp, etc.).
Notice:
Transport the machine in upright position.
Notice:
Make sure that the machine is tied down
and secured in the transportation vehicle.
Machine dimensions
Dimensions are in centimeters!
Notice:
After withdrawal from service, the machine
and accessory parts must be adequately
disposed of in compliance with the national regulations. Please contact your
Diversey service partner for help.
Batteries
Attention:
Remove all batteries from the machine
prior to disposal.
Used batteries must be disposed of in an
environmentally friendly way in compliance with the EC directive 2006/66/EC.
95
 Loading...