

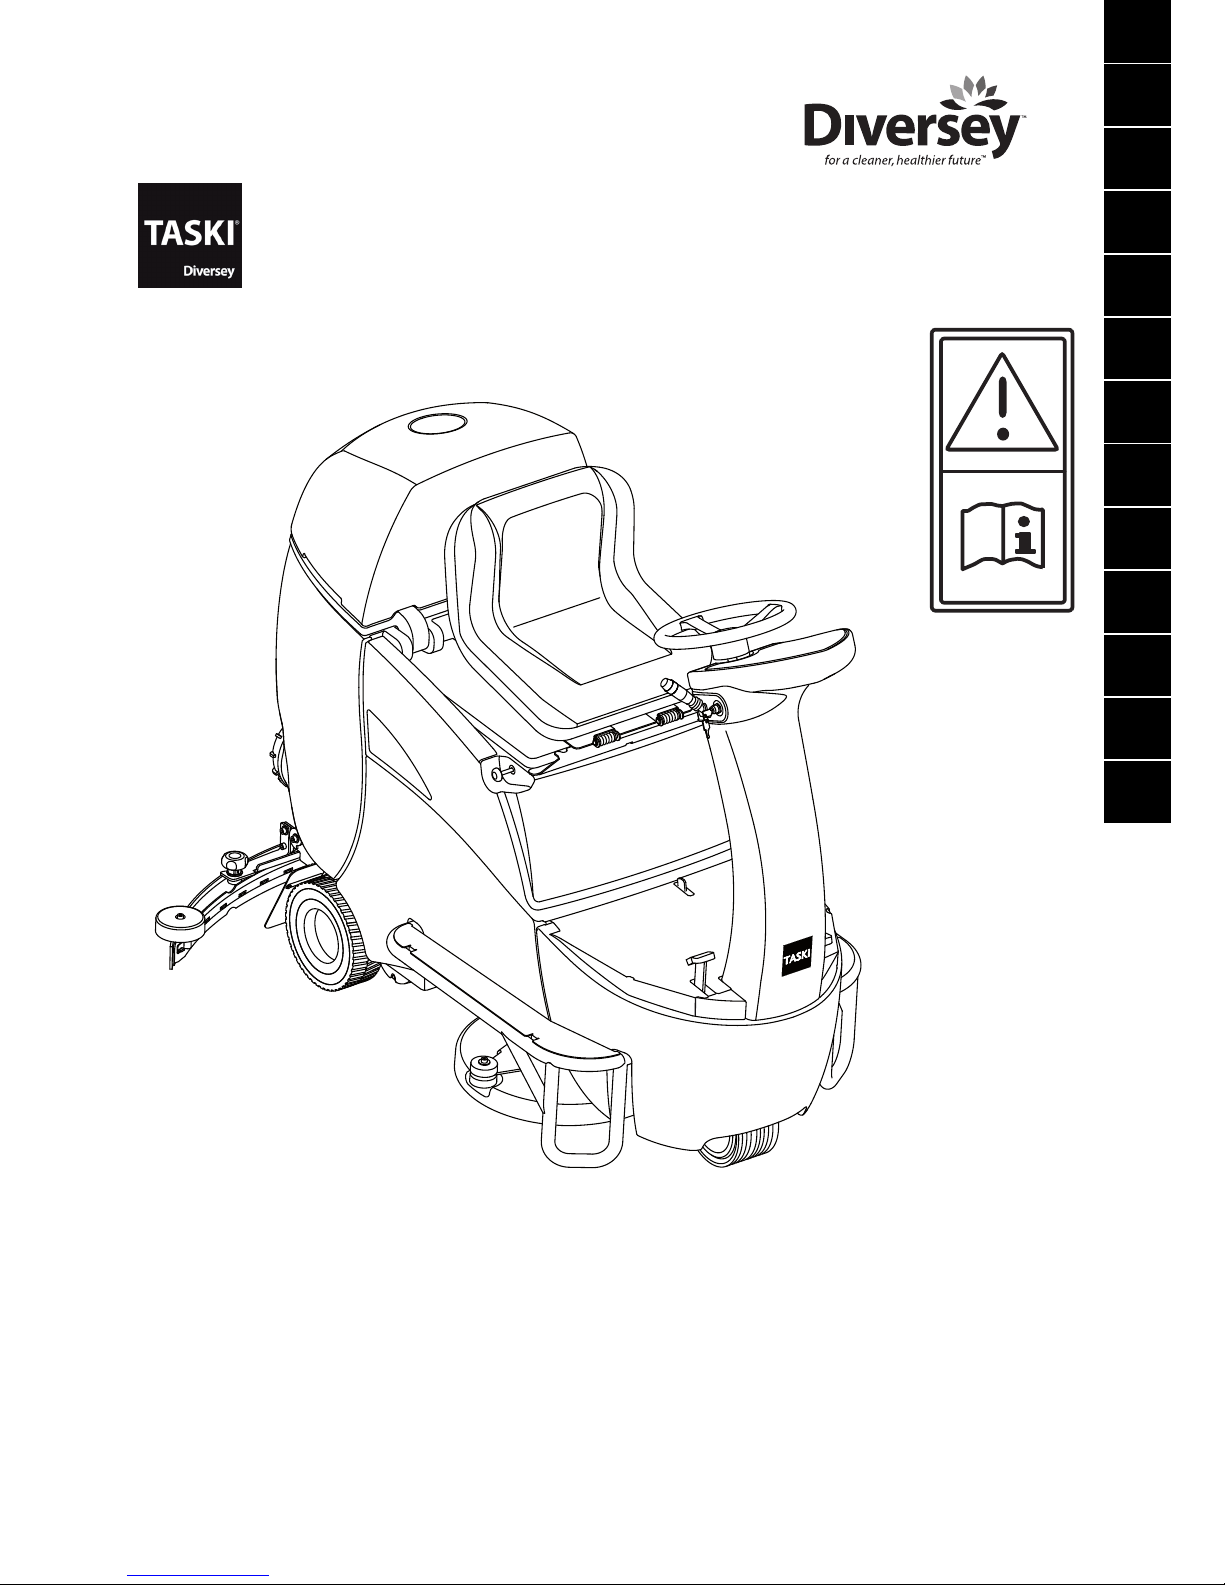
swingo 2500/3500
V006 / 12089-04 1005
I25 I24 I23 I22 I21 I20 I19 I18 tr th sl se tr sv pt pl no nl it fr fi es en de cz
*12089-04*
22
Translation of the original Instructions of Use
Symbols
Intended use of machinery
TASKI swingo 2500/3500 are scrubber dryers that have been designed for
commercial use (for example, in hotels, schools, hospitals, factories, shopping
centres, offices, etc.).
Under strict observation of the instructions of use, it can be used for the wet
cleaning of hard floor coverings.
These machines are exclusively designed for indoor use only.
Content
Safety instructions . . . . . . . . . . . . . . . . . . . . . . . . . . . . . . . . . . . . . . . . 22
Translation of the original EC Declaration of Conformity . . . . . . . . . 23
Overview. . . . . . . . . . . . . . . . . . . . . . . . . . . . . . . . . . . . . . . . . . . . . . . . . 24
Preparation for operation/Operation . . . . . . . . . . . . . . . . . . . . . . . . . . 25
Beginning work . . . . . . . . . . . . . . . . . . . . . . . . . . . . . . . . . . . . . . . . . . . 26
End of operation . . . . . . . . . . . . . . . . . . . . . . . . . . . . . . . . . . . . . . . . . . 27
Service, maintenance and care . . . . . . . . . . . . . . . . . . . . . . . . . . . . . . 29
Squeegee setting for the swingo 3500 . . . . . . . . . . . . . . . . . . . . . . . . 30
Malfunctions. . . . . . . . . . . . . . . . . . . . . . . . . . . . . . . . . . . . . . . . . . . . . . 30
Technical data . . . . . . . . . . . . . . . . . . . . . . . . . . . . . . . . . . . . . . . . . . . . 31
Accessories . . . . . . . . . . . . . . . . . . . . . . . . . . . . . . . . . . . . . . . . . . . . . . 31
Transport . . . . . . . . . . . . . . . . . . . . . . . . . . . . . . . . . . . . . . . . . . . . . . . . 31
Disposal . . . . . . . . . . . . . . . . . . . . . . . . . . . . . . . . . . . . . . . . . . . . . . . . . 31
Safety instructions
Due to their design and construction, TASKI machines comply with health and
safety requirements of the EC guidelines and therefore carry the CE sign.ATTENTION!
Before the first start-up, it is essential that
you carefully read the instructions of use
and the safety notes.
Keep the instructions of use in an easily
accessible place so that they can be consulted
at any time.
Indicates important information, which, if not complied with, could
endanger people and / or cause severe damage!
Non-observance of this information can lead to malfunctions and
property damage!
Indicates important information about economical use. Nonobservance of this information could lead to malfunctions!
Marks work steps that you must carry out in turn.
Caution:
These machines must not be used for polishing, the application of
wax, cleaning carpets or the vacuuming up of dust.
The wet cleaning of parquet and laminate floors with this machine
is carried out at your own risk.
Changes to the machines that have not been authorised by
Diversey will lead to the cancellation of the Safety Marks and the
CE conformity.
Any use of the machines contrary to their intended purpose can
lead to injuries to persons and damage to the machine and to the
working environment.
In such cases, any claims under the guarantee and warranty
claims will normally become invalid.
STOP
t
STOP
This appliance may not be safely used by persons (including
children) with reduced physical, sensory or mental capabilities or
who lack experience and knowledge, unless they are supervised
or instructed by a responsible person!
Children should be supervised to ensure that they do not play with
the appliance.
Do not use the machine in rooms where explosive and flammable
substances (e.g. petrol, thinners, heating oil, solvents, etc.) are
stored or processed. The electrical or mechanical components of
the machine could lead to ignition of these materials.
Do not use this machine to vacuum toxic, poisonous, caustic or
irritating substances (e.g. hazardous dusts, etc.). The filter
system will not adequately retain these kinds of materials. A
possible impairment of the health of the user and of third parties
cannot be excluded.
The machine may only be used by persons who have been
suitably instructed in its use.
While operating the machine, take note of the surrounding area
and pay particular attention to third parties and children!
The machine is designed to carry one person, no second person
may be transported!
In case of damage to parts that could affect safety, such as the
tool cover, power supply cord or covers that prevent access to
current-carrying parts, the operation of the machine must be
stopped immediately!
In the case of a malfunction or a defect in the machine (such as
the jamming of the gas pedal), or if the machine is dropped or
damaged in some other way, the machine must be thoroughly
checked by a TASKI specialist before being put back into service
again. The same applies if the machine is left out in the open, or
if any parts of the machine become immersed in water or are
exposed to dampness.
Caution:
Repairs to mechanical or electrical parts of the machine must only
be undertaken by customer service workshops or experts
authorised by Diversey, who are experienced in all relevant safety
regulations.
Caution:
This machine is only intended for use in dry areas, and must not
be used or stored in the open air or under damp conditions.
Caution:
Pay attention to the accident prevention regulations!
Caution:
Switch off the suction unit immediately if foam or liquid escape
from the machine!
See page 30 for further procedure .
Caution:
Only use the tools that are defined in these instructions of use
under Accessories or that have been recommended by the TASKI
specialist (page 31), as other tools could impair the safety of the
machine.
Caution:
The protection of persons is based on the special national
regulations and the information from the detergent producer!
Caution:
This machine may not be operated without batteries!
STOP
STOP
STOP
STOP
STOP
STOP
STOP
STOP
23
I25 I24 I23 I22 I21 I20 I19 I18 tr th sl se tr sv pt pl no nl it fr fi es en de cz
Important! Switch the machine off when you:
• e.g. carry out cleaning or maintenance work, or convert the machine to
another function
• store it in a suitable room to avoid any unauthorised use of the unit
• leave it standing without supervision
You should also remove the key from the key switch and prevent the machine
from rolling away (for example, by activating the parking brake).
Store the machine in a dry, dust-free room with a corrosion-free atmosphere.
The temperature must not fall below +10 °C or exceed +35 °C. Low
temperatures, damp and dust can significantly reduce the service life of the
electrical components.
Translation of the original EC Declaration of Conformity
We hereby declare that the product described below conforms to the relevant
safety- and health-related requirements of the appropriate EU Directive in both
its basic design and construction and in the version marketed by us.
If any modifications are carried out on the product that have not been agreed
with us, this declaration will no longer be valid.
Applicable EC Directives:
Directive 2006/42/EC of the European Parliament and of the Council dated
17th May 2006 regarding machines and for the modification of Directive
95/16/EC (new version)
Directive 2004/108/EC of the European Parliament and of the Council dated
15th December 2004 for the harmonisation of the legal regulations of the
Member States regarding electro-magnetic compatibility and for the annulment
of Directive 89/336/EEC
Harmonised standards applied:
EN 60 335-1/ EN 60 335-1+A11/ EN 60 335-1+A12/ EN 60 335-1+A13/
EN 60 335-2-72:2 009/EN 62 233/
EN 55 014-1:2007/ EN 55 014-2+A1/EN 61 000-3-2:2006/
EN 61 000-3-3:1995+A1:2001+A2:2005
It is ensured through internal measures that series-production units conform at
all times to the requirements of current EU Directives and relevant standards
The signatories act on behalf of company management and with full power of
attorney.
Caution:
The batteries may only be charged using a battery charger that
has been tested to the latest state-of-the-art according to
EN 60335-2-29!
Only use the machine on level floors or on gradients of 13%
or less.
This symbol on the machine indicates that it is not suitable for use
on surfaces with large gradients or slopes.
The tank hood must be closed when moving or driving the
machine.
Noise emissions and vibrations:
TASKI machines and units have been designed so that any
danger to health through the noise emitted or through vibrations
can be excluded according to the current state of knowledge.
Refer to the technical information on page 31.
13%
Designation: Automatic machine for the treatment of floors for
commercial purposes.
Product: scrubber dryer
Model: swingo 2500/3500
Model: CO2500 (24VDC/20000W)
CO3500 (24VDC/20000W)
Serial number: Refer to the rating plate on the machine
Trademark:
Manufacturer: Diversey, 9542 Münchwilen - Switzerland
Responsible for documentation:
Stephan Engler
Diversey Europe B.V. Utrecht
Münchwilen branch
CH-9542 Münchwilen
Münchwilen, dated 01.03.2010
Dipl. Ing. (FH) D.Windmeisser
Dipl. Ing. (FH) P. König
Technical Director
Value Chain Director
Floor Care Equipment
Floor Care Equipment
24
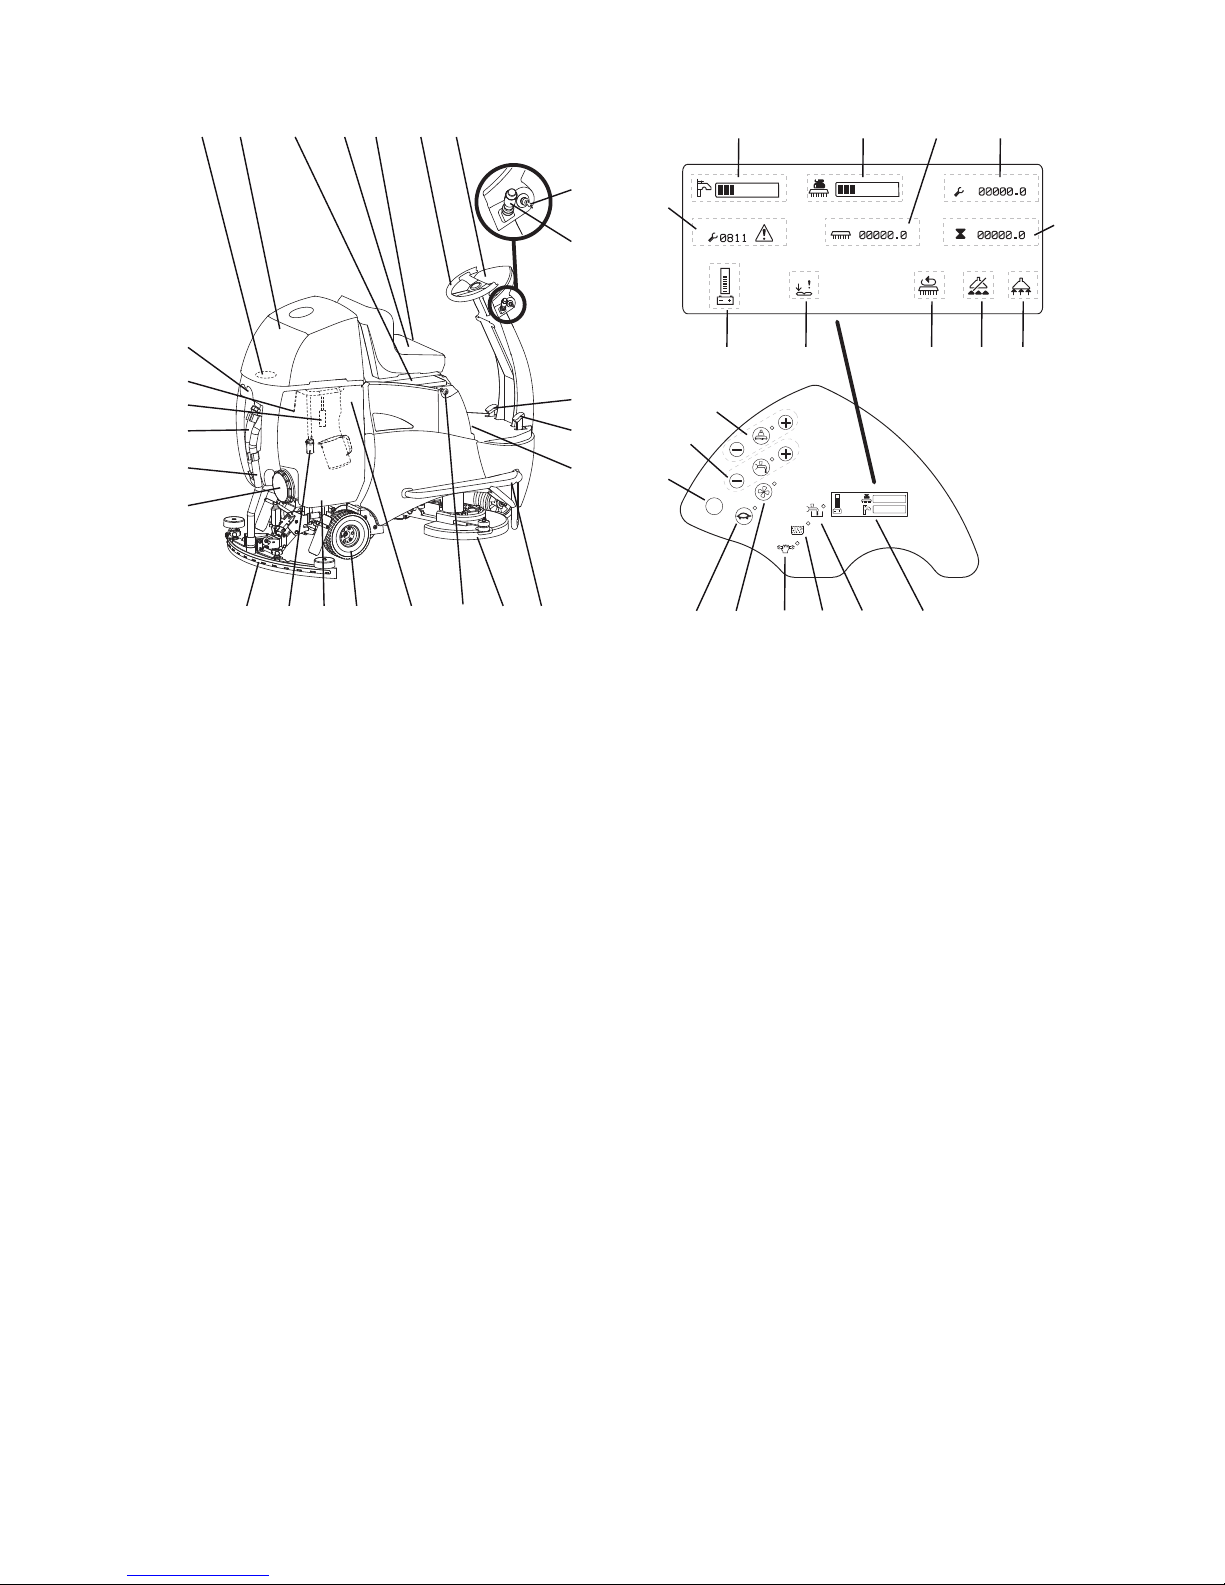
Overview
1 Tube holder
2 Full recovery tank probe
3 Recycling filter (optional)
4 Drainage hose
5 Suction hose
6 Tank lid
7 Squeegee
8 Solution supply pipe and filter
9 Recovery tank
10 Rear wheel steering unit
11 Solution tank (bag-in-tank) with dosing aid
12 Battery disconnection socket
13 Brush unit
14 Metal bumper
15 Parking brake
16 Drive pedal
17 Brake pedal
18 Drive / reverse lever and horn
19 Keyswitch
20 Control panel
21 Steering wheel
22 Driver seat with adjustment lever
23 Driver seat with safety contact
24 Battery cover (main fuse and battery plug)
25 Tank hood
26 Suction filter
27 Brush button ( +/- for pressure)
28 Solution button ( +/- for quantity)
29 Display control button
30 Slow speed button
31 Suction unit button
32 Service indicator
33 Recovery tank full indicator
34 Empty cleaning solution indicator
35 Display screen when turning on
36 Suction aggregate on
37 Suction aggregate off (recovery tank full)
38 Tool aggregate on
39 Pedal error indicator
40 Battery indicator
41 Hour counter
42 Service hour counter
43 Tool aggregate hour counter
44 Brush pressure display
45 Solution level display
46 Error code
1
2
3
4
5
6
78
9 10 13
14
15
16
17
18
19
20
2122
23
242526
11 12
Display
36
42434445
41
37383940
28
27
29
30 31 32 33 34 35
46

25
I25 I24 I23 I22 I21 I20 I19 I18 tr th sl se tr sv pt pl no nl it fr fi es en de cz
Preparation for operation/Operation
Batteries
Safety measures when working with batteries:
Recharging procedure using an external battery charger (traction block
batteries and rechargeable batteries)
After completing the charging and with immediate use:
Maintenance of batteries (wet batteries)
Daily, after charging:
Monthly after charging:
Preparation for use after charging:
Closing battery compartment:
Parking brake
Locking:
Unlocking:
Adjust the seat
Driving
The driving direction and speed can be controlled with the steering wheel and
drive pedal, the speed is easily adjusted with varying amounts of pressure to the
pedal.
Attaching tools
Check:
• that the brushes are not below the red marking and that the bristle length is
no less than 1 cm.
• the pad for wear before using.
• Protective goggles must be worn when working on the
batteries.
• Do not subject batteries to an open flame or heat as there is a
danger of explosion from the electolytic gas present in the
cells!
• No smoking!
• Danger of chemical burns!
Caution:
The battery must always be clean and dry. Do not place any
metallic objects on the battery.
Caution:
Batteries may only be installed or dismounted by customer
service personnel or specialists approved by Diversey who are
aware of all the safety regulations that apply here!
Caution:
Please follow the instructions of use for your battery charger!
Caution:
Battery compartment must be open during charging.
Caution:
When maintenance of batteries takes place, they must be
disconnected from the machine!
• Pull out the key and apply the parking brake (refer to page 25).
• Push the driver seat forward so that it rests on the steering wheel, and open
the battery cover.
• Disconnect the battery from the machine using the battery disconnection
socket.
• Connect the battery plug with the external battery charger.
• Switch off the battery charger.
• Disconnect the battery charger.
• Connect the battery to the machine with the battery disconnection socket.
• Fold back the driver's seat.
• Measure the acidity in 3 or 4 cells.
It should be approx 30°.
The battery is discharged when the acidity reduces to approx. 18°.
• Please note the measurements into the battery booklet.
• Please check the electrolyte, and if needed, fill it with distilled or desalinated
water up to 10mm above the separators.
• Measure the acidity in every cell.
• Please note the measurements into the battery booklet.
•Check:
-Connectors, cables, cable attachments and that the poles are screwed in
tightly.
• Reconnect the battery plug to the machine.
• Re-cover the battery compartment and return the driver seat into its normal
position.
• First press down the brake pedal (1) and then
the parking brake (2).
Release the brake pedal, and the machine is
locked.
• Press the brake pedal fully down.
The machine is unlocked.
• Pull out the key and apply the parking brake (refer to page 25).
• Pull the lever on the left side of the driver's seat
and slide to the desired position.
• Push the lever back in, once the seat has been
corrected.
Check the seat locking device!
• Unlock the parking brake (refer to page 25).
• Unlock the parking brake (refer to page 25).
• Switch on the keyswitch.
The display lights up.
The battery indicator displays that the machine is
ready for operation
(in case of malfunction, refer to page 30).
• Choose the driving direction by using the drive /
reverse lever.
• Drive the machine to its destination and then release the drive pedal.
• Pull out the key and apply the parking brake (refer to page 25).
Working with worn out, damaged and or wrong tools, could result
in possible damage to floors or their protective layers.
1
2

26
Attach squeegee
swingo 2500
swingo 3500
Filling the solution tank
Dosage:
Only use chemical products recommended by the manufacturer.
The max. filling level in the tank corresponds to the quantity of the dosing aid.
Dosing examples (The concentration is product dependent)
Beginning work
• Raise the tool up to the clutch.
• Turn the left tool anti-clockwise and the right
tool clockwise into the brush unit.
You will feel the tools locate into place, at which
point they are coupled with the unit.
• Pull out the key and apply the parking brake (refer to page 25).
• Hold the squeegee with both hands, and
position it so that the squeegee holding clips (1)
fit into the squeegee cutouts ((2).
• Push the squeegee upwards until you hear the
locking bracker (3) latch into place
• Plug the two suction hoses into the squeegee.
• Loosen the fixation knobs on the squeegee.
• Assemble the squeegee and tighten the fixation
knobs.
• Attach the suction hose to the squeegee.
Caution:
Maximum permissible water temperature 60 °C/140 °F.
• Pull out the key and apply the parking brake (refer to page 25).
• Push the driver seat forward so that it rests on the steering wheel, and open
the tank hood.
• Take the dosing aid out of the solution tank (Flextank).
• Fill the solution btank (Flextank) with water.
The red line on the inside rim of the bag
indicates maximum filling level.
1
1
2
2
3
Caution:
Wear protective gloves, goggles and the corresponding
(protective) work clothing when handling chemical products!
Caution:
Using other chemicals (e.g. chemicals containing solvents,
chlorine, hydrochloric acid and hydrofluoric acid) can damage or
destroy the machine.
Instructions on the product’s
packaging
Tank capacity The volume per
tank filling
0.5% 50 ml to 10 l
water
95l 475ml = 0.475l
1% 100ml to 10 l
water
95l 950ml = 0,95l
2% 200 ml to 10
lwater
95l 1900ml = 1,90l
3% 500 ml to 10 l
water
95l 4750ml = 4,75l
• Add the product measured with the dosing aid to the water in the solution
tank (Flextank).
• Replace the dosing aid back in the tank.
• Close the tank hood and pull the drivers seat back into position.
Caution:
Always wear non-slip shoes and appropriate work clothing while
working with this machine!
• Switch on the keyswitch.
The display lights up.
The cleaning settings last used will be saved and reloaded until
you change them.
• Unlock the parking brake (refer to age 25).
• Press the suction unit button.
The indicators light up.
• Press the solution button.
The indicators light up.
• Choose the desired amount of solution with +/(min. level 1/ max. level 7) .
• Press the brush unit button.
The display lights up.
• Choose the brush pressure by using the +/buttons (min. level 1 /max. level 4).
• Choose the driving direction by using the drive /
reverse lever.
Caution:
Take the turning radius into account!

27
I25 I24 I23 I22 I21 I20 I19 I18 tr th sl se tr sv pt pl no nl it fr fi es en de cz
If no bar display lights up in the battery indicator:
• after 10 min. the tool aggregate and the squeegee will be lifted off the
ground.
• the suction unit then turns itself off after a further 10 sec.
• you then have 10 min. left to get the machine to the battery charger before
the machine turns itself off.
Recycling filter (optional)
Cleaning method
Direct method:
Scrubbing and vacuuming in one pass.
Indirect working method:
Apply the cleaning solution first (only scrubbing), afterwards scrubbing and
vacuuming.
The cleaning methods are described in detail in the ”Method Card”. You can
obtain this from your TASKI partner.
Refilling the solution tank
Solution tank empty indicator:
Drain recovery tank
Recovery tank full indicator
End of operation
Drain the recovery tank / solution tank
The disposal of the soiled water or the cleaning solution must be carried out in
accordance with the appropriate national regulations.
Proceed as follows for both tanks:
• By gently pressing the drive pedal, the machine
is set into motion.
The tools start to turn and the solution is fed
through the centre.
• Press the Slow run button if you are working in
narrow or difficult environments.
The indicator lights up and the drive speed is
reduced.
If none of the bars in the battery indicator have lit
up, drive the machine to the battery charging
unit.
Caution:
The recycling system is not to be used in areas with high hygienic
demand e.g. hospitals, food-processing companies, kitchens, etc.
The recycling system is recommended for low to medium
congested areas only.
• Pull out the key and apply the parking brake (refer to page 25).
• Push the driver seat forward so that it rests on the steering wheel, and open
the tank hood.
• Pull the recycling filter out of the solution tank (Flextank).
• Place the recycling filter into the recovery tank.
Caution:
Maximum permissible water temperature 60°C/140°F.
Under certain circumstances, the driving of the machine can be
impaired by a special combination of surface/soiling and cleaning
product.
This effect can be reduced by special wheel options.
Caution:
Do not clean without solution, as it could cause floor damage.
• When the cleaning solution tank empty indicator
lights up, it is also accompanied by a tone.
Solution tank is empty.
• Pull out the key and apply the parking brake (refer to page 25).
• Refill the machine, see page 26.
• Once the tank is filled, the solution tank empty
indicator continues to stay lit.
• Drive the machine to a desired destination.
• Press the suction unit button.
The display lights up.
• Press the solution button.
The display lights up.
• Press the brush unit button.
The display lights up.
• Slowly press the drive pedal (approx. 5 sec.).
The solution tank empy indicator will thereby be
reset.
• When the recovery tank full indicator lights up,
the squeegee will rise and the suction unit turns
off.
• Drain the recovery tank, see below.
• Stop the flow of solution.
• Drive a few metres further to avoid subsequent dripping.
Very important when using contact pads!
• Press the brush unit button.
The tools will be stopped.
The tool holder rises up.
• Drive on a few metres further in order to pick up the remaining dirty water.
• Now switch off the suction unit.
The squeegee rises and the suction unit keeps
on running for approximately 10 seconds.
• Drive to the drainage location.
Always drain and clean the recovery tank every time you use the
machine.
If the soiled water is allowed to stand, unpleasant smells and the
deposition of the dirt will take place after a few hours.
Caution:
Follow the national regulations and the information provided by
the detergent manufacturer regarding the protection of persons
when draining the tank.
• Pull out the key and apply the parking brake (refer to page 25).
• Remove the drain hose from its holder.
Hold the hose pointing upwards with the opening at the height of
the edge of the tank. Open the red lid and slowly lower the end of
the hose to the drain.
• Lift the solution tank (Flextank) and lay it into the recovery tank.
Cleaning solution is drained into recovery tank to then be removed.
• Remove the empty solution tank (Flextank) from the recovery tank.

28
Recovery tank draining pump (optional)
Emptying at a higher lever (e.g. sink):
Clean the recovery tank / solution tank
Recycling filter (optional):
Removing and cleaning the tools
Removing and cleaning the squeegee
swingo 2500
swingo 3500
Cleaning the machine
Storage / parking of machine (machine is idle)
Never store the machine with the tank hood closed.
• Pull out the key and apply the parking brake (refer to page 25).
• Place the draining hose into a sink or bucket.
• Press the recovery tank draining pump button.
The tank will be emptied up to the standpipe, some water will remain.
• Pull out the key and apply the parking brake (refer to page 25).
• Push the driver seat forward so that it rests on the steering wheel, and open
the tank hood.
• Unscrew the tank lid (page 24).
• Clean the recovery tank thoroughly with water.
• Screw the tank lid on with both hands.
• Thoroughly rinse out the solution tank (Flextank) with clean water.
• Remount the solution tank (Flextank) into its place.
• Remove any dirt from the full recovery tank probe.
• Brush the suction filter with a soft brush to remove fluff.
• Take out the recycling filter after every use and clean.
Caution:
Clogged filters reduce the flow of the cleaning solution. As a
consequence you may damage the floor coating.
• Place the recycling filter back in the solution tank (Flextank).
• Pull out the key and apply the parking brake (refer to page 25).
• Lift the tool lightly.
• Turn the left tool clockwise and the right tool
anti-clockwise from the brush unit until they
uncouple.
• Clean the tools with water.
• Pull out the key and apply the parking brake (see page 25).
• Pull the two suction hoses from the squeegee support.
• Press the locking springs together. The
squeegee will thereby be released and can be
removed.
• Clean the squeegee under running water using a brush.
• Hang the squeegee on the tube/hose holder.
• Remove the suction hose from the squeegee.
• Loosen the fixation knobs on the squeegee.
• Dismount the squeegee.
• Clean the squeegee under running water using a brush.
• Hang the squeegee on the tube/hose holder.
Only clean and intact blades will achieve an optimal result!
• Pull out the key and apply the parking brake (refer to page 25).
Caution:
Never clean the machine with high water pressure or a water
hose.
The ingress of water into the machine might cause considerable
damage to mechanical or electrical parts.
• Wipe down the machine with a damp cloth.
We recommend that you disconnect the battery from the machine
using the battery disconnection socket when storing / parking the
machine and when charging the battery.
• Pull out the key and apply the parking brake (refer to page 25).
• Push the driver seat forward so that it rests on the steering wheel, and open
the tank hood.
• Rest the tank hood on the metal support.
The ventilation support keeps the tank cover
slightly open. In this way, the tank is kept dry
and therefore reduces the formation of
unpleasant smells and mould.
Caution:
Never store the machine for longe period with a discharged
battery. The battery could be damaged by this, and may no longer
be functional.

29
I25 I24 I23 I22 I21 I20 I19 I18 tr th sl se tr sv pt pl no nl it fr fi es en de cz
Service, maintenance and care
The correct maintenance of the machine is a precondition for error-free
operation and a long service life.
Service intervals
TASKI machines are high quality machines that have been checked for safety
at the factory by authorised inspectors. Electrical and mechanical components
are subject to wear and/or ageing after longer periods of use.
Service centre
Should you contact us due to a malfunction or for placing an order, please
always state the type, description and the serial number of your machine.
You can find this information on the name plate of your machine, and the
address of your nearest TASKI partner can be found on the last page of this
manual.
Blade change on the swingo 3500
Blade on the inner radius.
Blade on the outer radius
Replacing fuses
Replacing main fuse:
Caution:
Only TASKI branded spare parts must be used, otherwise
warrenties and liabilities will be omitted!
Symbols:
◊ = After use, ◊◊ = every week, ◊◊◊ = every month, ⊗ = Service light
Activity ◊◊◊◊◊◊⊗ page
Recharge batteries
25
Refill distilled water (wet batteries).
Please follow the manufacturers instructions of
use booklet for these batteries!
25
Drain and clean the recovery tank
27
Clean the suction filter
30
Clean the recycling filter (optional)
28
Check solution supply pipe and filter and clean if
necessary
24
Drain and clean the solution tank (Flextank) using
fresh water
27
Clean the tools
28
Clean squeegee, check whether the blades are
worn and replace if necessary
28
Clean the machine with a damp cloth
28
Clean the full recovery tank probe and check that
it is functioning properly
Clean seal of the tank hood, check for cracks and
replace if necessary.
Maintenance programs by TASKI service made by
TASKI technician
• In order to ensure operational reliability and
availability for use, the service must be carried
out when the service indicatior lights up (factory
setting 650 working hours) or at least once a
year.
Shorter intervals may be necessary under rough or extreme working
conditions and/or in case of insufficient maintenance.
• Place the clean squeegee unit with the outer radius face down on a solid
surface e.g. table, floor.
• Press one hand onto the squeegee body by the hose connector.
• Grasp the blade with your thumb and forefinger in the middle of the arch and
pull strongly until the metal band clicks open and the blade is released from
the squeegee body.
• Release the metal strap and pull the blade off the squeegee body.
• Clean squeegee (body, metal straps and blades) with a brush under running
water.
• Mount the ‘‘turned‘‘ or the new blade on the squeegee body, so the ridges
point outwards.
• Hook the metal strap into place (Check position of mounting slots) and press
the centre of it until it clicks into place and presses the blade onto the
squeegee body.(Risk of injury)
• Turn the squeegee upside down by placing it on its suction hose connector
and the bumper wheels.
• Release the fixation screw of the blade holder using a screwdriver (Allen
screw).
• Release the metal band and pull the blade off the squeegee body.
• Clean squeegee (body, metal straps and blades) with a brush under running
water.
• Mount the ‘‘turned‘‘ or the new blade onto the squeegee body.
• Hook the metal strap into place (check position of mounting slots) and fix it
with the screwdriver until the blade is pressed onto the squeegee body.
• The shape of the blades allow them to be used on all sides before needing
replacement.
• Pull out the key and apply the parking brake (refer to page 25).
• Push the driver seat forward so that it rests on the steering wheel, and open
the battery cover.
• Disconnect the battery from the machine using the battery disconnection
mechanism.
Caution:
Use fuses with the correct value only!
Wrong fuses can cause damage to the machine.
• Loosen insulating nut (19mm spanner) of battery pole.
• Remove red insulating nut and detach the
battery charger leads.
• Remove and replace main fuse.
Fuse ratings: co 2500/3500
Main fuse 125A (Pudenz)
• Mount battery charger leads onto the battery pole and mount the insulating
nut of battery pole.
• Reconnect the battery plug to the machine.
• Re-cover the battery compartment and return
the driver seat into its normal position.

30
Squeegee setting for the swingo 3500
If you experience an uneven suction result, the settings of the squeegee should
be corrected. Proceed as follows to do this:
Before carrying out the adjustment, check that:
• the blades are not damaged (replace).
• the suction unit is not damaged.
Height setting (Fig. A)
• Lower the squeegee.
• Pull out the key and apply the parking brake (refer to page 25).
• Unscrew the hexagonal nut.
• Turn the Allen screw left or right.
The distance between the floor and the running wheel (with the blades standing
vertically) must be between 1-3 mm.
• Retighten the hexagonal nut.
• Check the result during the cleaning and refer to angle of inclination (Fig B).
Angle of inclination(Fig. B)
• Switch of the brush drive and the suction unit.
• Pull out the key and apply the parking brake (refer to page 25).
• Unscrew the Allen screws (nos. 1 to 4) on the suction unit adjustment (half a
turn).
• Insert a screw driver into the slot in the cam and hold it in position while
unscrewing the Allen screw No.5.
• Only change the angle of inclination in small steps using the cam.
• Keep the screwdriver in this position while tightening the cylindrical screws
numbers 1 to 5.
• Check the result and correct it again if necessary.
Malfunctions
A correct angle has been achieved when the tip
of the rear blade (x) is distributed over the
complete width of the suction unit.
B
1
2
4
3
5
x
x
1
2
4
3
5
A
Malfunction Possible causes Troubleshooting page
Machine does not
run
Maschine switched off
• Switch on the
keyswitch
24
Battery plug ^
disconnected
• Reconnect the battery
plug to the machine
24
Main fuse defect
• Check/replace the fuse
29
Error code on display
• Call your service
partner
Machine does not
move
Immobiliser
• Sit on the driver seat
Drive pedal activated
when switching on
• Make sure no pressure
is being applied to the
drive pedal, and turn
the keyswitch again
Parking brake on
• Release the parking
brake
25
Batteries not sufficiently charged
Batteries discharged
• Charge batteries
25
Charger or connecting cable defective
• Call your service
partner
Battery defect
• Call your service
partner
Wrong charger type
for batteries
• Check and if
necessary replace
Not able to switch
off brush or suction unit
Relay defective
• Stop the machine
using the battery
disconnection socket
• Call your service
partner
24
Brush does not
turn
Brush drive switched
off
• Press the brush unit
button
24
Main fuse defect
•Replace fuse
29
Motor runs but not
tool
• Drive belt torn
• Call your service
partner
Poor vacuum
performance
Floor remains
wet
Soiled solution
not picked up
Suction unit not
activated
• Press the suction unit
button
24
Suction hose not
connected
• Connect suction hose
26
Squeegee not on the
floor
• Clean the squeegee
• Check that the
squeegee suspension
is functioning correctly
27
Worn blades
• Replace blades
29
Hose or nozzle
blocked (e.g. by pieces of wood or residual
material)
• Remove the blockage
Suction filter blocked
• Remove the blockage
24
Indicator lights up but
suction unit does not
work
• Check fuse and
replace if necessary
• If the fuse is not
defective, call for
technical assistance
29
Squeegee pressure
incorrect
• Re-adjust
30
Suction unit
switched off
Recovery tank full
• Empty the recovery
tank
• Check the battery
indicator
• Check the fuses
27
Full recovery tank
probe soiled
• Check the probe, and
clean if necessary
28

31
I25 I24 I23 I22 I21 I20 I19 I18 tr th sl se tr sv pt pl no nl it fr fi es en de cz
Technical data
Accessories
Transport
• Disconnect the battery from the machine using the battery disconnection
socket.
Transport the machine in an upright position.
Make sure that the machine is securely fastened within the transportation
vehicle and is secured against tipping over.
Refer to page 31 for the dimensions and weights.
Disposal
When it has reached the end of its operational life, the machine and its
accessories must be disposed of according to the national regulations. Your
TASKI partner can support you with proper disposal upon notification.
Batteries
The batteries must be removed from the machine before being disposed of
properly.
Used batteries must be disposed of in an environmentally appropriate way in
accordance with the EU guidelines 2006/66/EEC.
Insufficient outflow of cleaning
solution
Solution tank empty
• Refill the solution tank
27
Cleaning solution
quantity too low
• Choose the volume of
cleaning solution with
the +/- button
24
Solution dosing control switched off
• Press the solution
button
24
Machine CO2500 CO3500
type
Theoretical performance area
operating width x drive speed (7.5) x
1000
5250 6375 m2/h
Brush width 70 85 cm
Squeegee width 95 108 cm
Solution tank / recovery tank 95 95 l
Machine weight / when ready for
operation(max.)
273/633 276/636 kg
Rated voltage 24V 24V dc
Tools 2 x 35 2 x 43 cm
Brush speed 150 150 min-1
Brush pressure 52-74 60-102 kg
Dimensions (L x W x H) 169x78x137 169x91x137 cm
Rated power 2000 2000 W
Noise emission level according to
EN 60704-1
<70 <70 dB(A)
Total vibration value of hand-arm
vibration to ISO 5349
<0.5 <0.5 m /s2
Splash water protection IPX3 IPX3
Protection class III III
Nr. Article CO2500 CO3500
8501120 Driving disc Instalok 35cm 2X
8501080 Scrubbing brush 35cm nylon 2X
8501060 Scrubbing brush for washed
concrete 35cm
2X
8502750 Scrubbing brush abrasive 35cm 2X
8501130 Driving disc Instalok 43cm 2X
8501100 Scrubbing brush 43cm nylon 2X
8501090 Scrubbing brush for washed
concrete 43cm
2X
8502760 Scrubbing brush abrasive 43cm 2X
8502830 Filling hose with universal water
coupling
XX
7508029 Drainage pump X X
Different pads
(Polyester brown, blue, red, and
contact pad)
XX
Malfunction Possible causes Troubleshooting page
Caution:
This machine may only be lifted using a lifting aid, such as a lifting
platform for transportation!
 Loading...