

combimat
1400,1500,1600,1700,1800
ATTENTION!
Do not use the machine, before you have read and understood the
instructions of use.
Keep the instructions of use carefully in an easily accessible place so that they
can be referred to at any time.
Instructions of use

2
Content
Safety instructions . . . . . . . . . . . . . . . . . . . . . . . . . . . . . . . . . . . . . . . . . . . . . . 3
Overview. . . . . . . . . . . . . . . . . . . . . . . . . . . . . . . . . . . . . . . . . . . . . . . . . . . . . . 5
Machine installation. . . . . . . . . . . . . . . . . . . . . . . . . . . . . . . . . . . . . . . . . . . . . 9
Beginning work. . . . . . . . . . . . . . . . . . . . . . . . . . . . . . . . . . . . . . . . . . . . . . . . . 13
End of operation. . . . . . . . . . . . . . . . . . . . . . . . . . . . . . . . . . . . . . . . . . . . . . . . 15
Finishing work . . . . . . . . . . . . . . . . . . . . . . . . . . . . . . . . . . . . . . . . . . . . . . . . . 17
Service, maintenance and care . . . . . . . . . . . . . . . . . . . . . . . . . . . . . . . . . . . . 25
Malfunctions. . . . . . . . . . . . . . . . . . . . . . . . . . . . . . . . . . . . . . . . . . . . . . . . . . . 33
Technical data . . . . . . . . . . . . . . . . . . . . . . . . . . . . . . . . . . . . . . . . . . . . . . . . . 36
Accessories. . . . . . . . . . . . . . . . . . . . . . . . . . . . . . . . . . . . . . . . . . . . . . . . . . . . 38
Recommended chemicals . . . . . . . . . . . . . . . . . . . . . . . . . . . . . . . . . . . . . . . . 39
Transport . . . . . . . . . . . . . . . . . . . . . . . . . . . . . . . . . . . . . . . . . . . . . . . . . . . . . 40
Disposal . . . . . . . . . . . . . . . . . . . . . . . . . . . . . . . . . . . . . . . . . . . . . . . . . . . . . . 40
Index . . . . . . . . . . . . . . . . . . . . . . . . . . . . . . . . . . . . . . . . . . . . . . . . . . . . . . . . . 41
EU Declaration of Conformity . . . . . . . . . . . . . . . . . . . . . . . . . . . . . . . . . . . . . 42
Symbols
Intended use of machinery
The scrubber dryer is used to clean hard floor surfaces according to these
instructions of use.
The machine is suitable for floor cleaning applications in industrial and commercial
areas such as hotels, schools, hospitals, factories, shopping centres, offices etc.
Marks all instructions which are relevant for safety.
Gives helpful information.
Action points.
t
3
Safety instructions
Due to their design and construction, TASKI machines comply with health and
safety requirements of the EC guidelines and therefore carry the CE sign.
Generally adhere to the accident prevention regulations!
By non-observance the manufacturer will not be held liable.
This machine may only be used by persons who have been properly trained to do so.
In order to avoid unauthorised use of the machine, the main switch key must always
be removed and/or the machine must always be stored in an appropriate room.
Regularly check the electrical cabling for damage or ageing.
Repairs to electrical components may only be carried out by authorised TASKI
customer service workshops or experts who are experienced in all aspects of the
relevant security and safety regulations.
While operating the machine, take note of the surrounding area and pay particular
attention to third parties and children.
Only use tools (brushes, pad drives) which are stipulated of the instructions of use.
Use only tools the TASKI-technical specialist recommend (Page 38).
The use of other tools may impair the machine`s safety and or cause damage to
machine.
Turn off the machine before:
• cleaning it
• converting to another function (e.g. changing tool)
• carrying out maintenance
• replacing wear and tear parts
• leaving machine unattended
To do so, pull out the main key and stop the machine from rolling away (e.g. by
fixing a wedge).
Caution:
Do not operate the machine if it is not in a faultless condition, and ensure
its maintenance by expert personnel!
Only use the machine on level floors or inclines of maximum 2%.
This symbol on the machine indicates that it is not suitable for use on surfaces
with greater inclines.
2%

4
Do not use the machine in rooms where explosive and flammable substances (e.g.
petrol, paint thinners, heating oil, solvents, etc.) are stored or processed.
The machine`s electrical parts or mechanical components could lead to the ignition of
these substances.
Do not use this machine to vacuum toxic, poisonous, caustic or irritating
substances (e.g. acids, alkalis, hazardous dusts, etc.).
The filter system cannot retain such substances sufficiently. This might negatively affect
the health of the user and third parties.
This machine is not suitable for outside use.
Should foam or liquid leak from the machine, follow the instructions below:
Check that the level probe is functioning correctly (page 33).
Remove the cause of the malfunction before continuing operation.
Close the machine hood and the tank cover/dosing cup, before you move the
machine.
Store the machine in a dry, dust-free room with a corrosion-free atmosphere. The
temperature should not fall below +10 °C, and not exceed +35 °C. Low
temperatures, moisture and dust can greatly reduce the life on the rechargeable
batteries and the electronics.
5
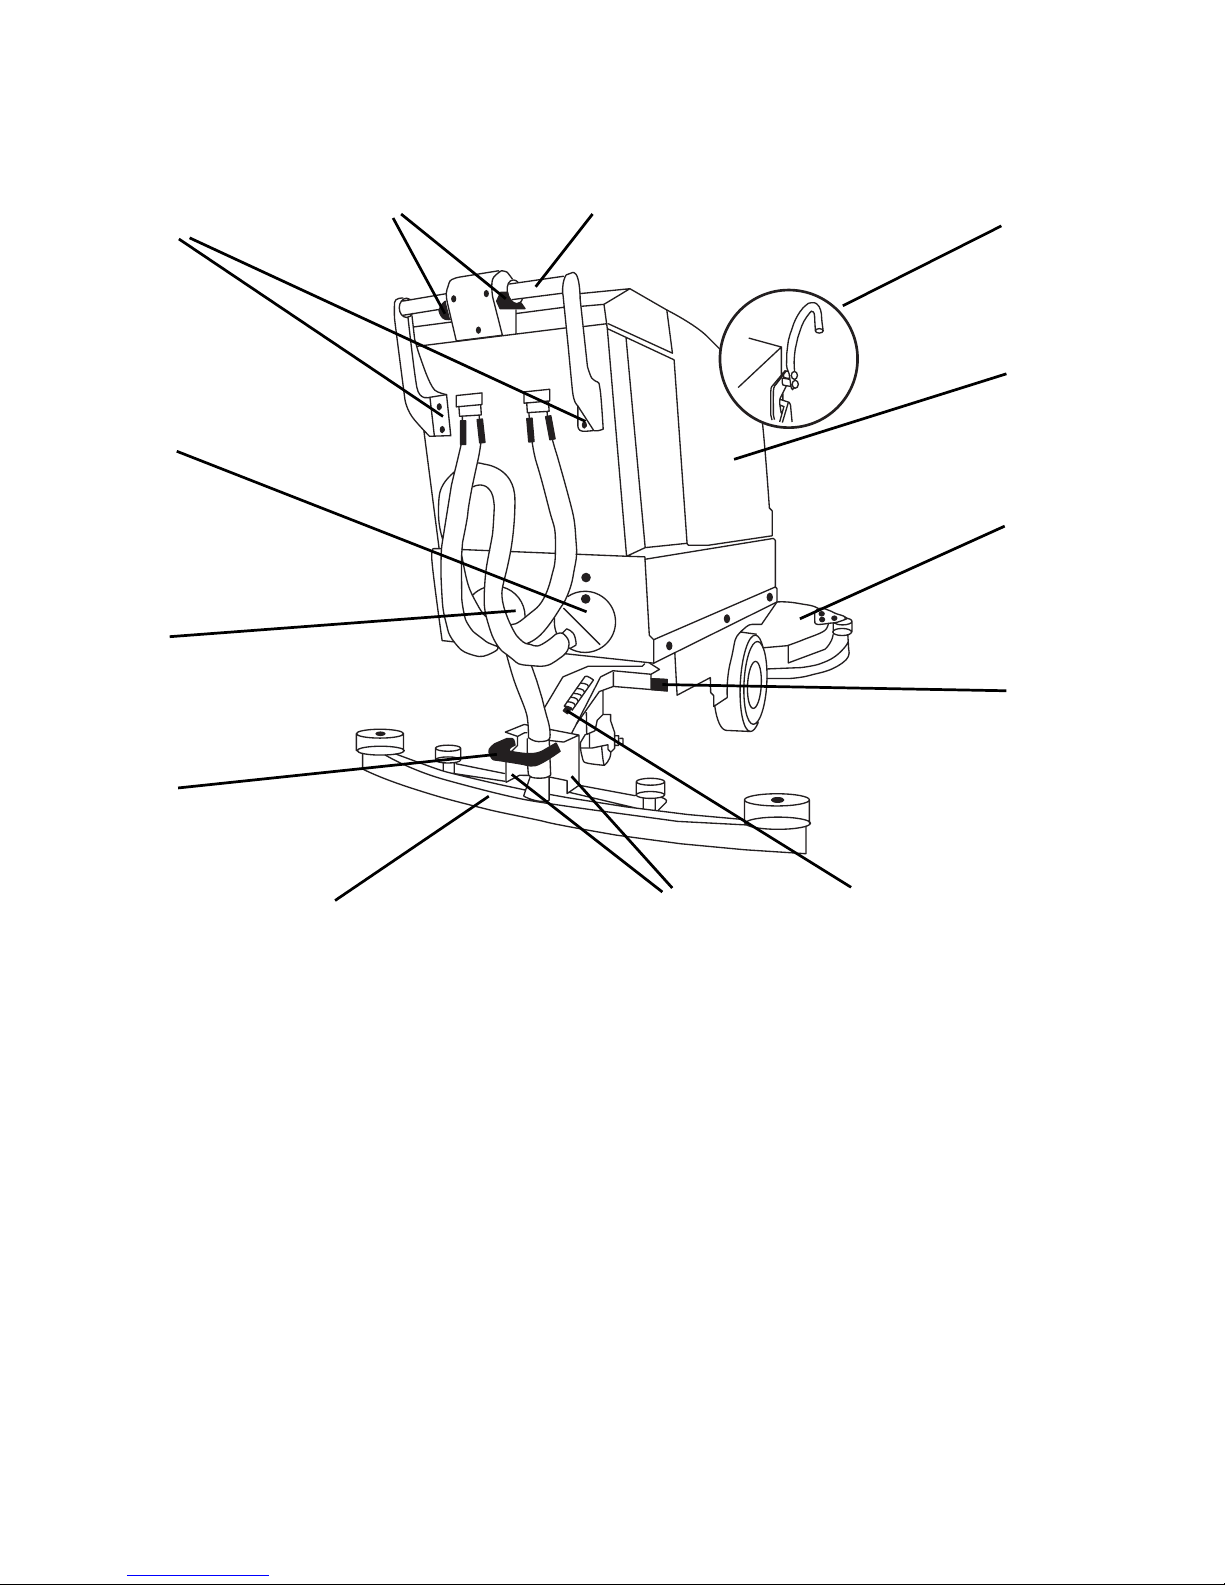
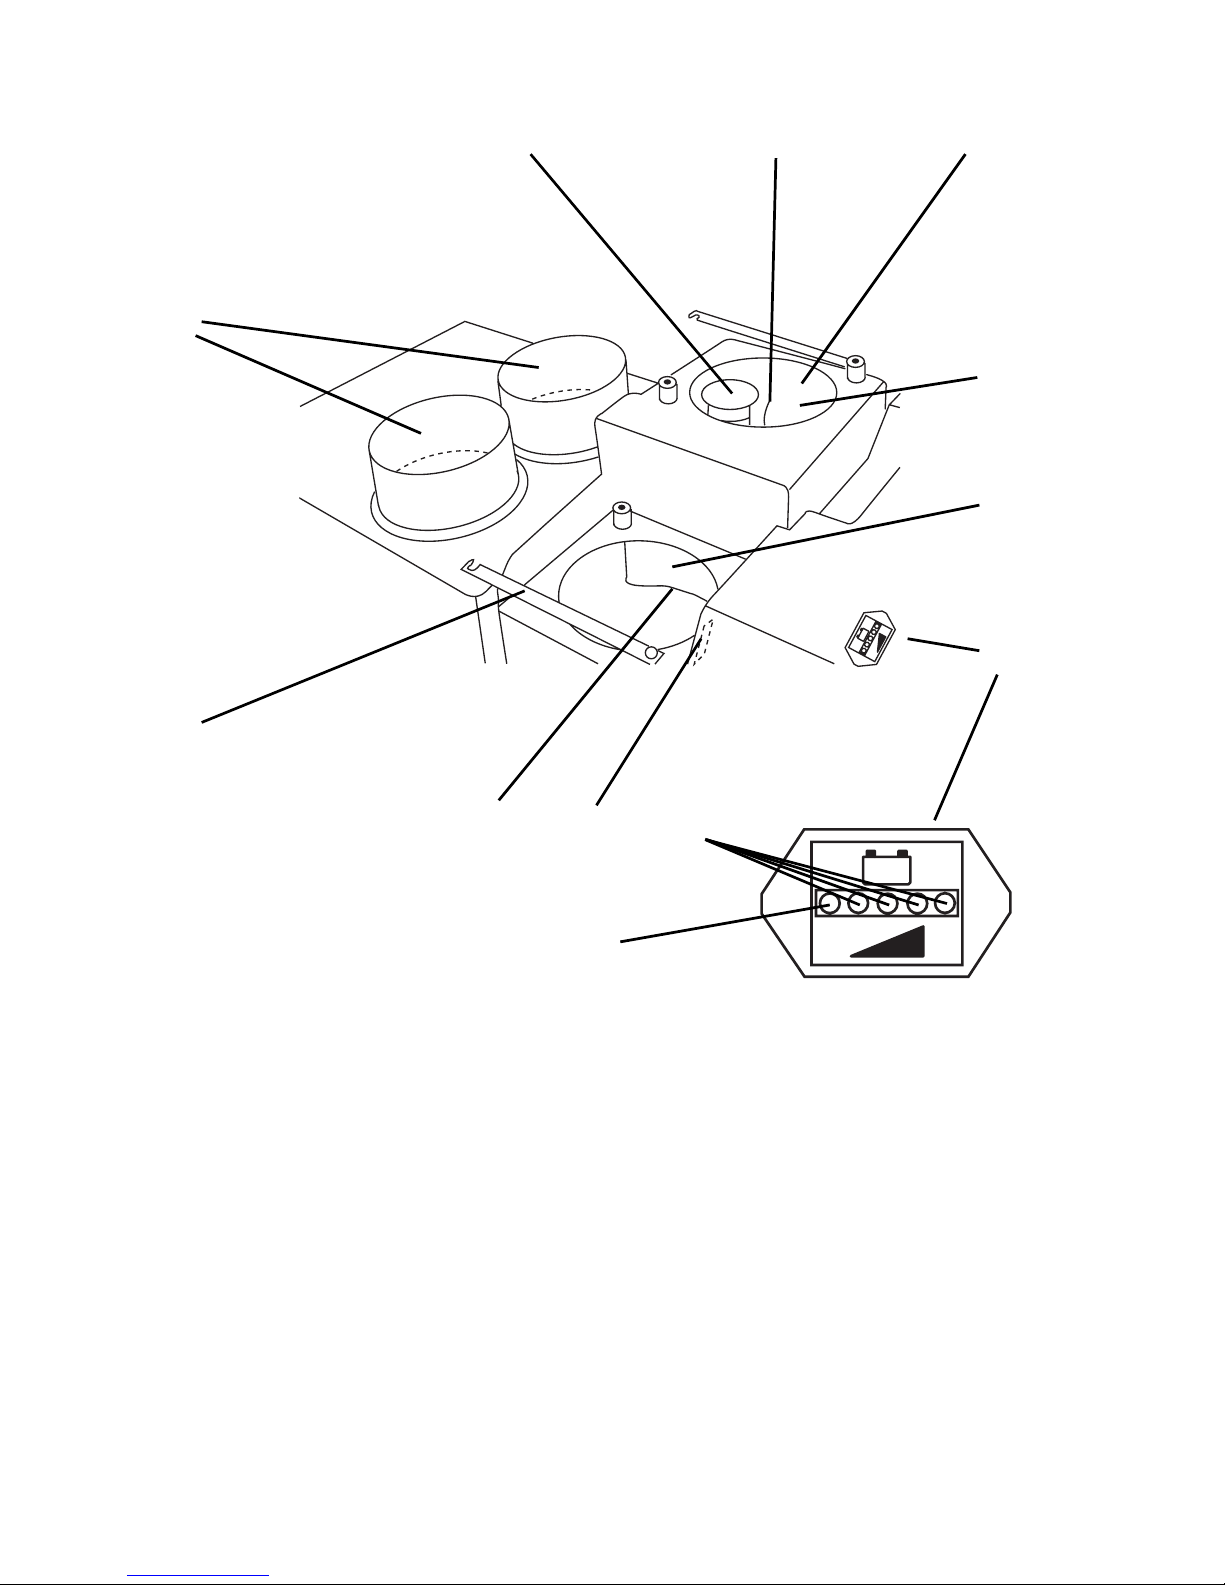
Overview
1 Height adjustment for handle height
2 Recovery tank maintenance opening
(red mark)
3 Cleaning solution tank opening
maintenance
4 Squeegee lowering device
5 Squeegee
6 Squeegee adjustment
7 Squeegee pressure adjustment
8 Lever for reversing the air flow
(only co 15/1700)
9 Brush unit
10 Machine hood
11 Lever brush unit
(only co 14/16/1800)
12 Machine handle
13 Speed control
1
2
3
8
9
10
11
567
4
13 12
6
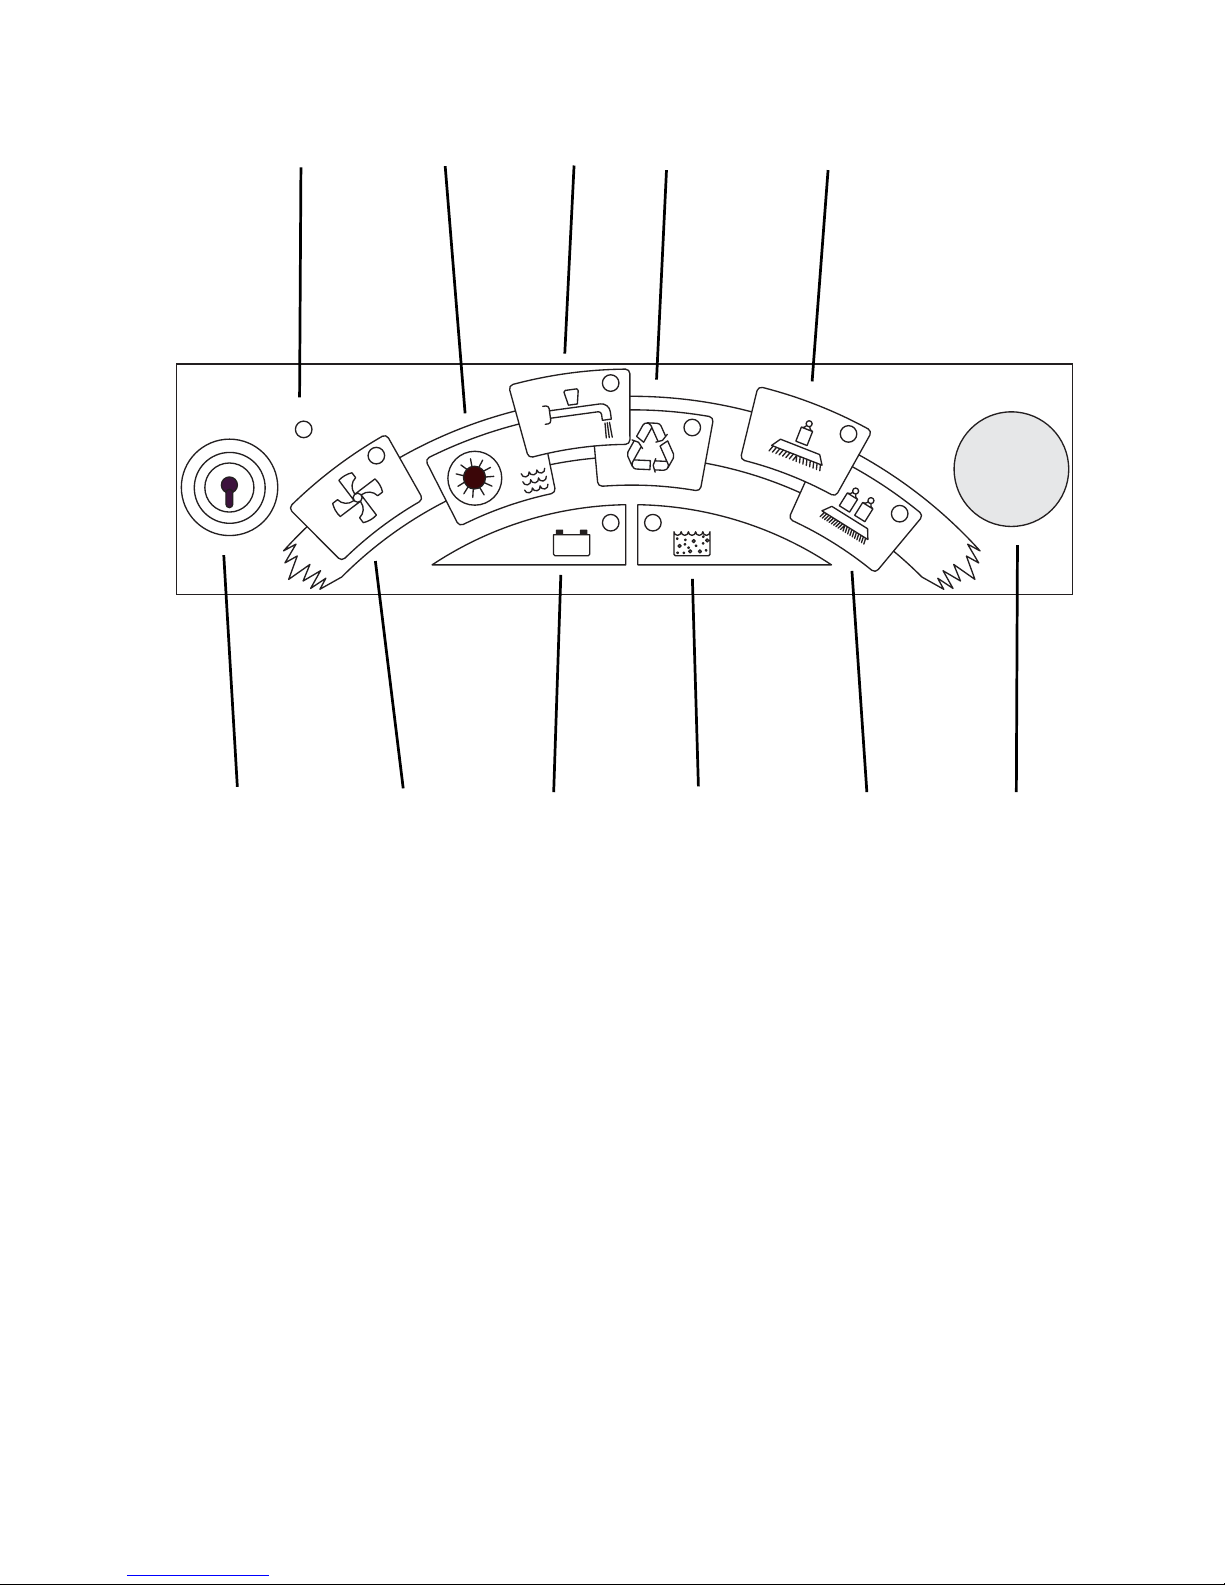
14 Main switch (key)
15 Vacuum on/off
16 Battery indicator (discharge)
17 Recovery tank full indicator
18 Brush pressure level 2 button
(only co 15/1700)
19 Emergency stop button (option: co
1400/1600/1800)
20 Brush pressure level 1 button
(only co 1500/1700)
21 Recycling programm button (option:
co 14/16/1800)
22 Solution dosing control
23 Cleaning solution dosing control
24 Indicator main switch
-
-
+
+
5
5
4
4
3
3
1
1
1
2
6
4
5
3
14 15 16 17 18 19
2021222324
7
25 Tank cover/dosing cup 0,5-1%
26 Tank cover closing
27 Max. filling level
28 Hours counter
29 Charge state display ready (green)
30 Charge state display unloaded (red)
31 Option: Battery vacantness display
32 Solution tank
33 Recovery tank
34 Recycling filter (2 piece) inside tank
35 Level probe (full recovery tank)
36 Suction air filter
-
-
+
+
25
26
27 28
31
35 34
33
32
36
-
-
+
+
29
30
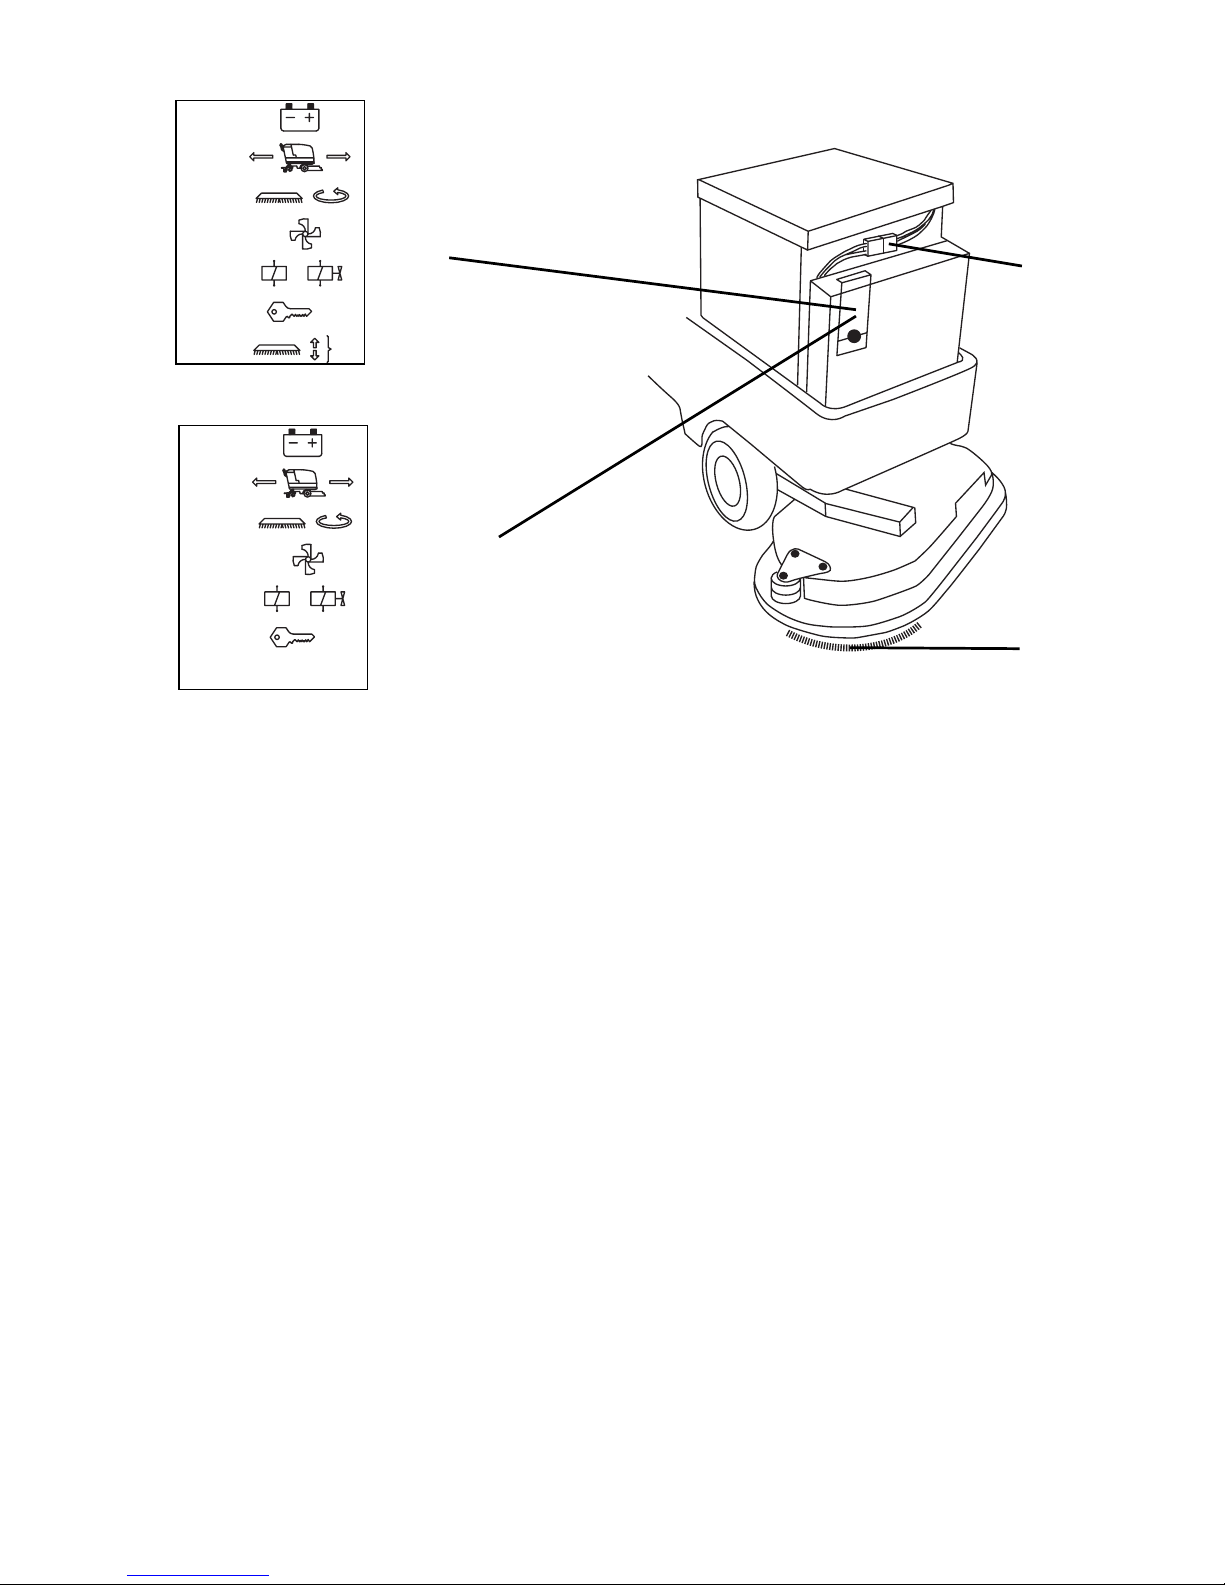
8
37 Fuses co 1500/1700
38 Fuses co 1400/1600/1800
39 Battery plug / socket
40 Tools (brush, pad drive, etc.)
39
F5
F5
F6
F6
F4
F4
F3
F3
F2
F2
F1
F1
F5
F5
F7/F8
F7/F8
F6
F6
F4
F4
F3
F3
F2
F2
F1
F1
37 (co 1500/1700)
38 (co 1400/1600/1800)
40
9
Machine installation
The machine is delivered ready for use. The set of batteries installed and connected
by your TASKI service partner is, however, not fully charged.
Get ready to drive
Before using the machine for the first time, charge it for at least 24 hours,
in order to ensure that you can use the batteries full capacity.
Charging batteries see page 30.
t Switch off charger.
Caution:
Please read the instruction of use of the battery charger carefully!
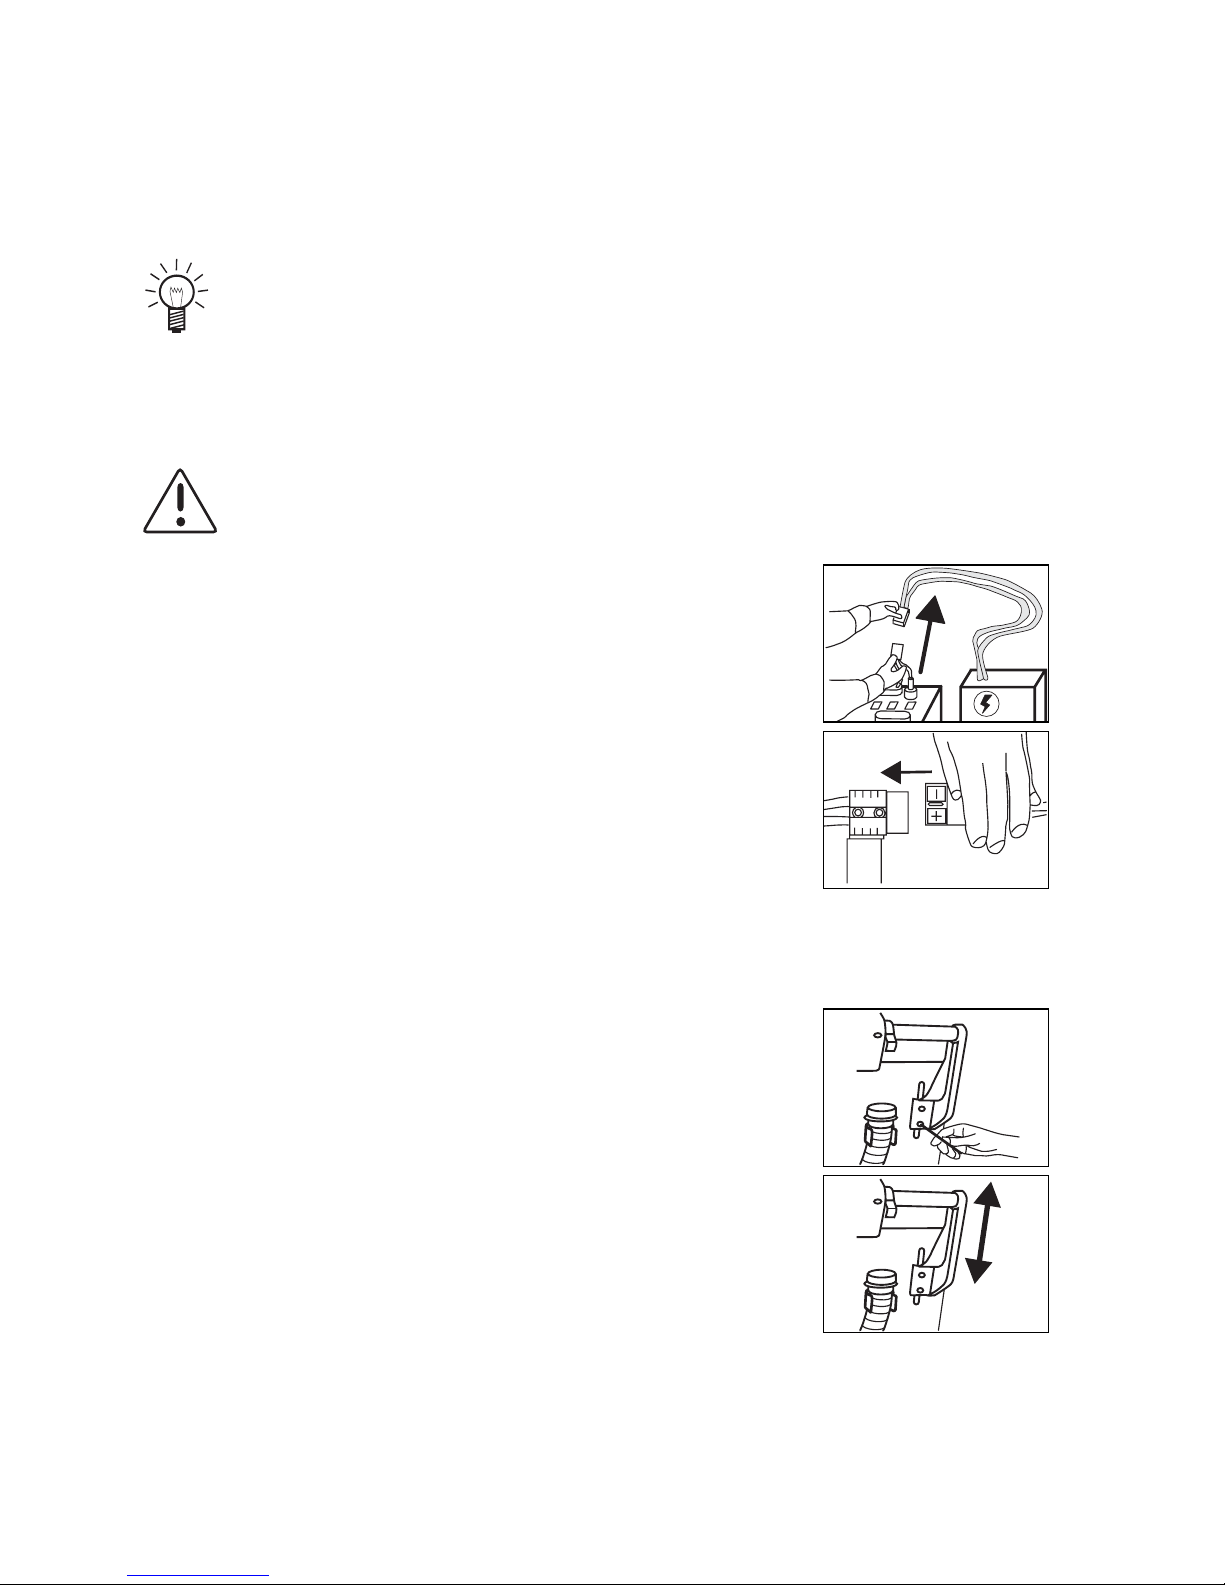
t Disconnect the charger plug.
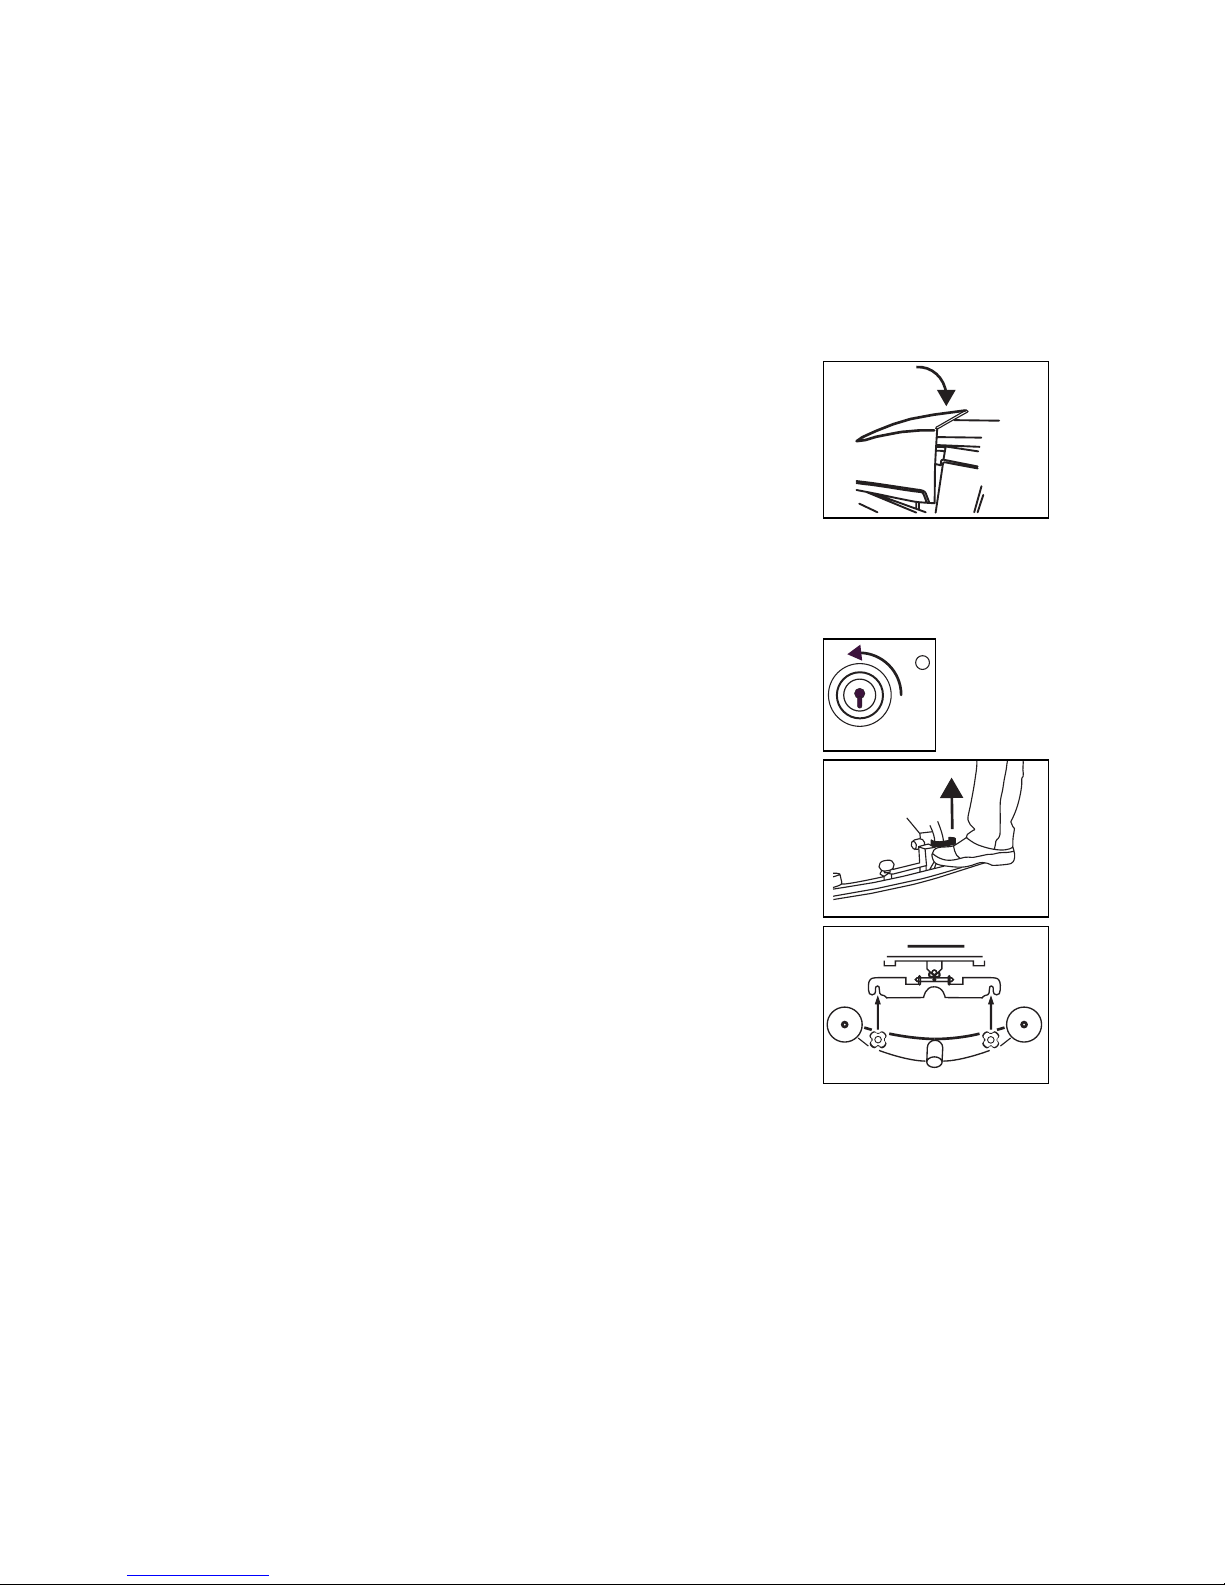
t Return tank in position for charging.
t Unscrew the hexagon socket in order to adjust the
leading grip.
t Put the machine handle in a comfortable position.
t Srew the hexagon socket again.
10
Transport
The control of drive and the speed can be controlled on the machine handle and the
speed control. The speed is stepless variable.
Fill the tank
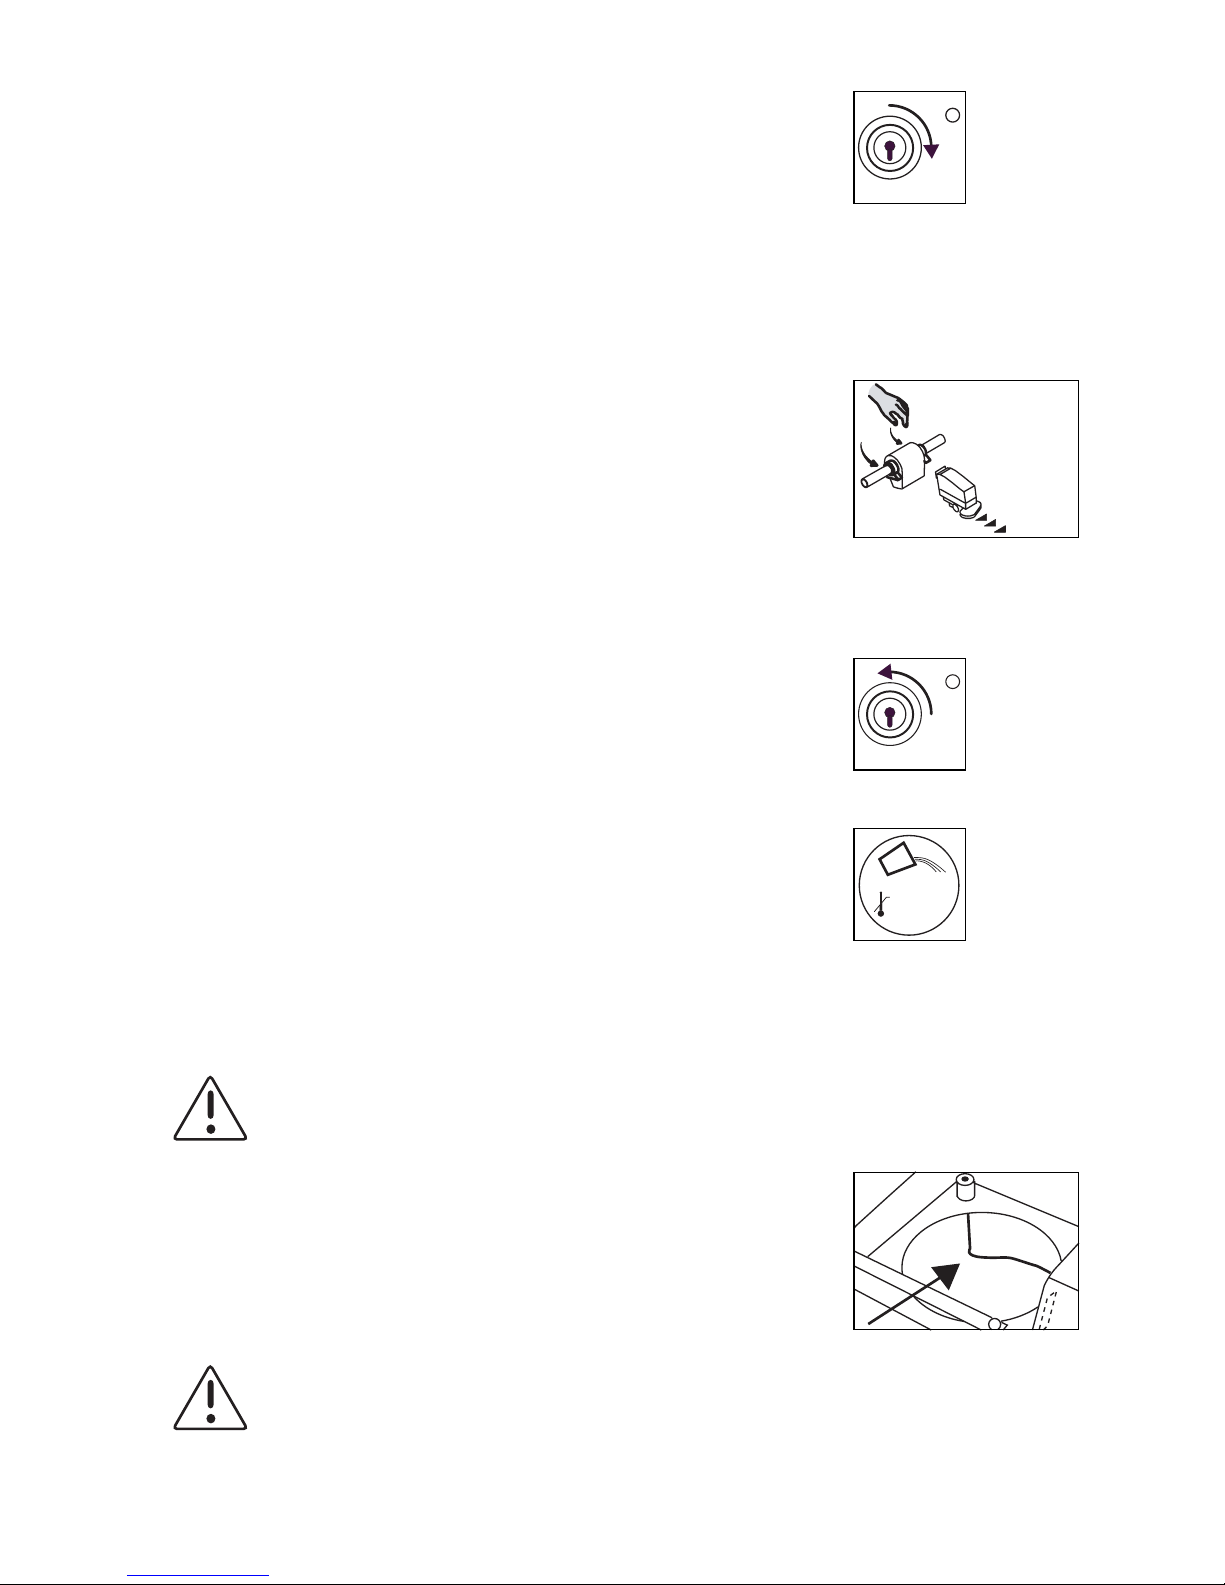
t Turn the machine on (main switch).
The indicators light up.
By lightly pressing the speed control in the direction of
drive, the machine is set in motion. Letting the speed
control go stops the machine.
t Turn off the machine (main switch).
t Open the machine hood.
This symbol indicates the solution tank.
t Remove the tank cover closing.
t Open the tank cover/dosing cup.
Caution:
Maximum permissible water temperature 60 °C/140 F.
t Fill water into the solution tank.
The check mark indicates the max. fill level (page 7).
Caution:
The solution should contain no solvents, chlorine, hydrochloric acid or
hydrofluoric acid, since these would damage or destroy the machine.
max.60˚C
max.140˚F
11
Only use the recommended chemicals of page 39.
The correct dosage is recommended on the product's packaging and on the "TASKI
Product Information Sheet".
Attach squeegee
t Pour the measured product with the tank cover/dosing
cup in the solution tank.
t Close the tank with the tank cover and lock it.
t Close the machine hood.
t Turn off the machine (main switch).
t Lift the squeegee lever with the foot.
t Loosen the fixation knobs on the squeegee.
t Assemble the squeegee and tighten the fixation knobs.
The washers must be positioned above the suction nozzle
support.
t Attach the suction hose (squeegee) to the connector.

12
Fixing tools
Option brush button (co 1500/1700):
Option lever brush unit (co 1400/1600/1800):
t Turn the machine on (main switch).
The indicators light up.
Caution:
Danger of injury due to sharp objects
Wear cloves to protect your hands from injurys!
t To lift the brush unit press the button:
t or:
t To lift the brush unit, press the brush lever down, turn
it to the right and push it up until the end of the guide,
than turn it left to snap in.
t Turn off the machine (main switch).
t Position the tool below the brush unit.
t Turn the left tool clockwise and the right tool counter
clockwise into the lock.
This locks the tool into place.
13
Beginning work
Begin cleaning operation
Option brush button (co 1500/1700):
t Turn the machine on (main switch).
The indicators light up.
t Press down the squeegee lowering device.
t Press the vacuum button.
The indicators light up.
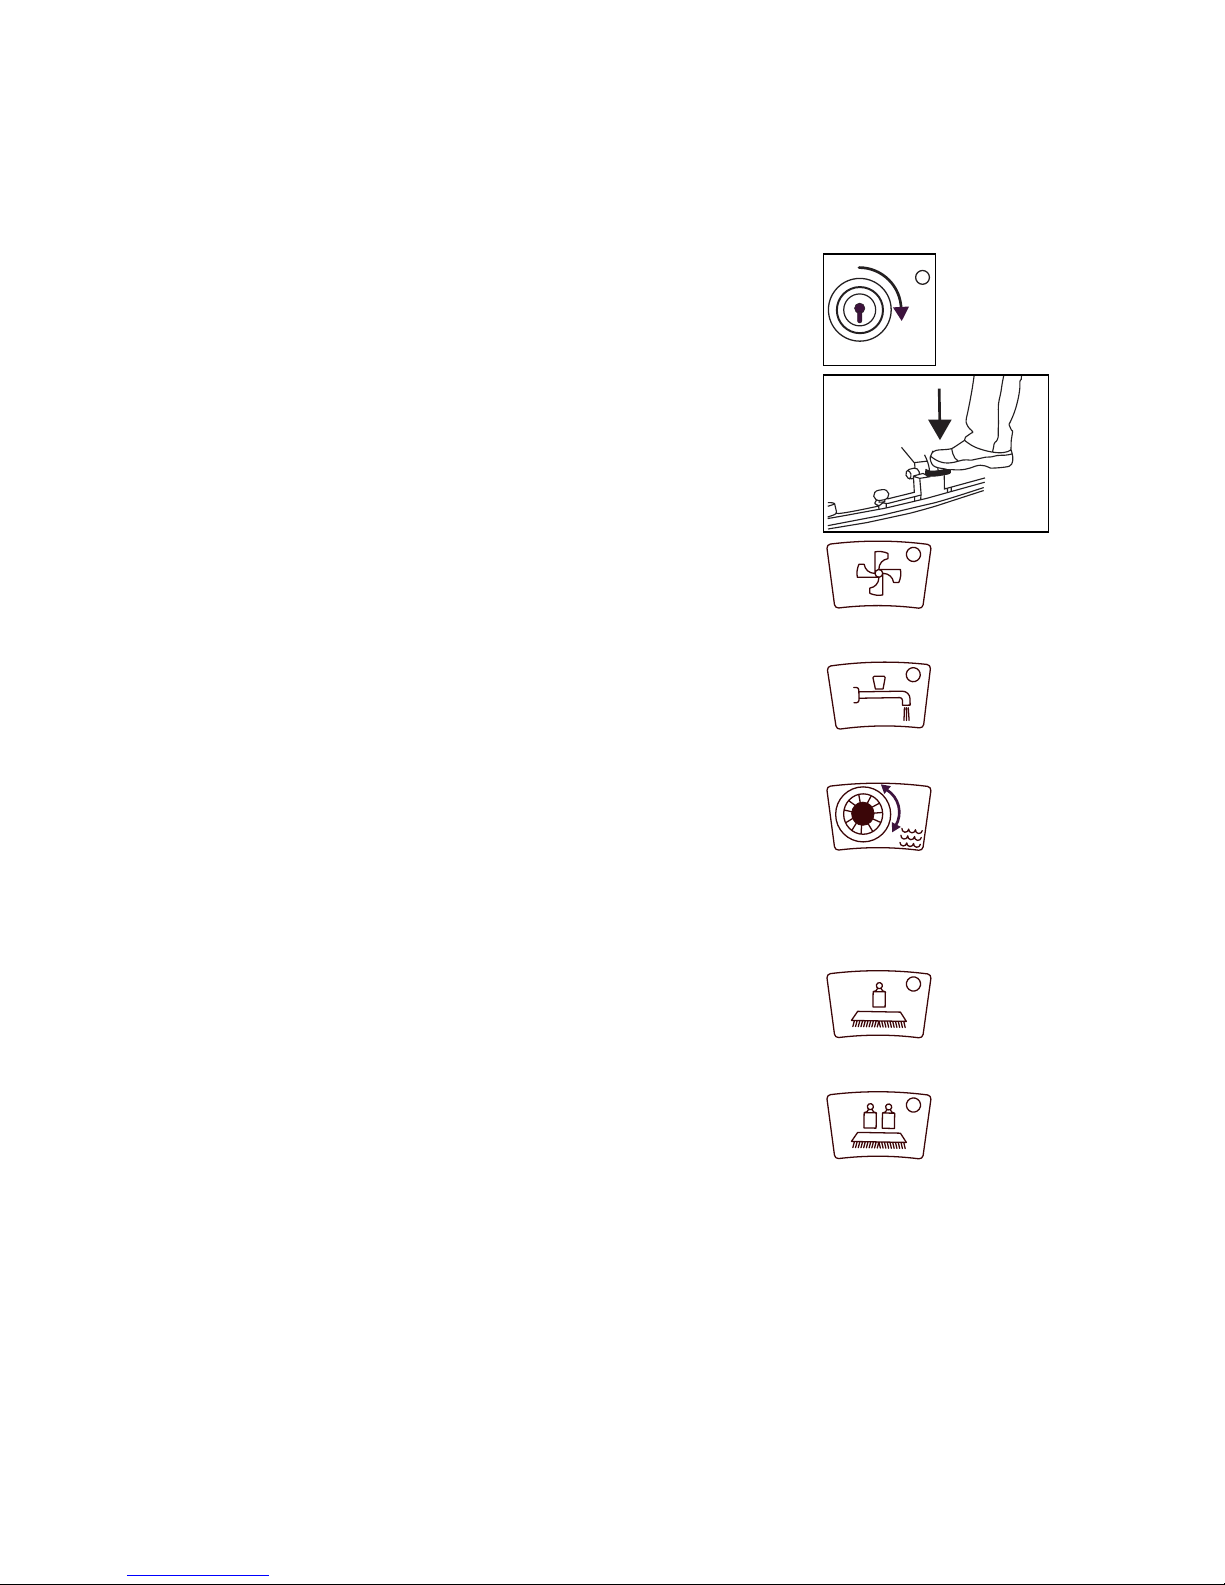
t Press the solution button.
The indicators light up.
t Choose the amount of solution (min./max. 1-6).
t To lower the brush unit press the button:
The indicators light up.
t or:
The indicators light up.
1
2
6
4
5
3
14
Option lever brush unit (co 1400/1600/1800):
Recycling mode (Option co 1400/1600/1800)
t Unlock the brush unit lever by treading on the lowering
lever and slowly lower the unit.
t By gently pressing the speed control in driving
direction, the machine is set in to motion.
The tools start to turn and the solution is fed through the
middle of the tool.
If the battery control is blinking, stop cleaning and drive
back to the battery charger.
Caution:
The recycling system is not to use in areas with high hygienic demand e.g.
Hospitals, Food-processing companies, Kitchens, etc.
The recycling system is recommended for low till middle congested areas only.
t Press the Recycling button Recycling only, when no
solution is available anymore.
Indicators light up.
t Continue the cleaning operation.
-
+

15
Cleaning method
Direct method:
Scrubbing and Vacuuming in one pass.
Indirect working method:
Scrubbing and vacuuming in several passes.
Cleaning methods are described in detail in the "Method Card". You can obtain
"Method Cards" from your TASKI partner or representative.
Refilling the solution tank
When the tools are no longer sufficiently fed by the solution, the tank containing the
solution is empty.
End of operation
After cleaning
Caution:
Do not clean without solution, as it could cause floor damage.
t Stop cleaning.
t Empty or refill the machine again (page
10/19).
t Stop the flow of solution.
t Drive a further few metres to avoid subsequent
,,dripping’’.
Very important when using contact pads!

16
Option brush button (co 1500/1700):
Option lever brush unit (co 1400/1600/1800):
t To lift the brush unit press the button:
t or:
t To lift the brush unit, press the brush lever down, turn
it to the right and push it up until the end of the guide,
than turn it left to snap in.
t Drive on a few metres further in order to pick up the
remaining waste water.
t Lift the squeegee lever with the foot.
t Only now switch off the vacuum unit.
t Turn off the machine (main switch).
Empty and clean the recovery tank after every time you use the machine.
If soiled solution remains in the tank for long periods „an unpleasant smell“
develops.

17
Finishing work
Emptying soiled recovery tank
Recovered soiled solution must be disposed of according to national regulations.
Option co 1500/1700:
Emptying on a higher altidude or speed up the emptying process:
t Turn off the machine (main switch).
t Take hose (red cap) off its fittings.
t Unscrew red cap.
Open the cap at the height of the handle and lower the hose end slowly to
pour out the soiled solution.
t Conduct the emptying hose to a drain sink or a bucket.
t Empty the recovery tank as described above.
Caution:
Make sure, the tank cover has been secured!
t Turn the machine on (main switch).
The indicators light up.
t Push the lever forward out flow of soiled water
(page 5).
Caution:
Please follow the decal information!
Top air switch lever.

18
Cleaning the recovery tank
t Switch on the vacuum motor only now.
The indicators light up.
The soiled water is now pressed out of the recovery tank.
t Switch off the vacuum unit as soon the tank is empty.
Caution:
Now pull back the lever into the work position (page 5).
t Turn off the machine (main switch).
t Empty the recovery tank (Page 17).
t Open the machine hood.
t Remove the tank cover closing.
t Take off the tank cover/dosing cup.
t Remove the of the maintenance opening lid (page 5).
t Clean the recovery tank thoroughly.
Caution:
Danger of injury due to sharp objects
Wear cloves to protect your hands from injurys!

19
Emptying solution
Disposal of solution must by in accordance with the national regulations.
t Take off the air suction filter and clean it if necessary
(page 7).
t After the tank is emptied and rinsed, close the tank.
t Once the tank is empty, put back the red cap and refix
the hose to its fittings.
t Turn off the machine (main switch).
t Remove the tank cover closing.
t Take off the tank cover/dosing cup.
t Take off the hose (blue cap) from its fittings.
t Unscrew the blue cap.
Open the cap at the height of the handle and lower the hose end slowly to
pour out the soiled solution.
t Conduct the emptying hose to a drain sink or a bucket.

20
Clean the cleaning solution filter
Disposal of solution must by in accordance with the national regulations.
t Turn off the machine (main switch).
t Empty the solution tank (Page 19).
t Remove the of the maintenance opening lid (page 5).
t Open the tank cover/dosing cup.
t Take off the solution filter after each cleaning operation.
t Rinse the filter under running water.
If needed, descale the filter with a 10% lime scale soluble.
t Rinse the solution tank with plenty of fresh water.
t Refit the solution filter.
t Close the maintenance opening.

21
Cleaning recycling filter co 1500/1700 (option: co 1400/1600/1800)
Caution:
The recycling system is not to use in areas with high hygienic demand e.g.
Hospitals, Food-processing companies, Kitchens, etc.
The recycling system is recommended for low till middle congested areas only.
t Turn off the machine (main switch).
t Empty the recovery tank (Page 17).
t Remove the tank cover closing.
t Take off the tank cover/dosing cup.
t Remove the recycling filter of the recovery tank.
t Rinse the recycling standpipe of the filter thoroughly.
Caution:
Danger of injury due to sharp objects
Wear cloves to protect your hands from injurys!
t Remove the security filter of the recycling standpipe and
clean it.
t Reassemble both filters to the recycling tube.
Caution:
Clogged filters reduce the flow of the cleaning solution. As a consequence
you may damage the floor coating.

22
Cleaning the tools
Option brush button (co 1500/1700):
Option lever brush unit (co 1400/1600/1800):
t Turn the machine on (main switch).
The indicators light up.
t To lift the brush unit press the button:
t or:
t To lift the brush unit, press the brush lever down, turn
it to the right and push it up until the end of the guide,
than turn it left to snap in.
t Turn off the machine (main switch).
Caution:
Danger of injury due to sharp objects
Wear cloves to protect your hands from injurys!
t Lift the tool lightly.
t Turn the left tool counter clockwise and the right tool
clockwise out the lock.
t Clean the tools under running water.

23
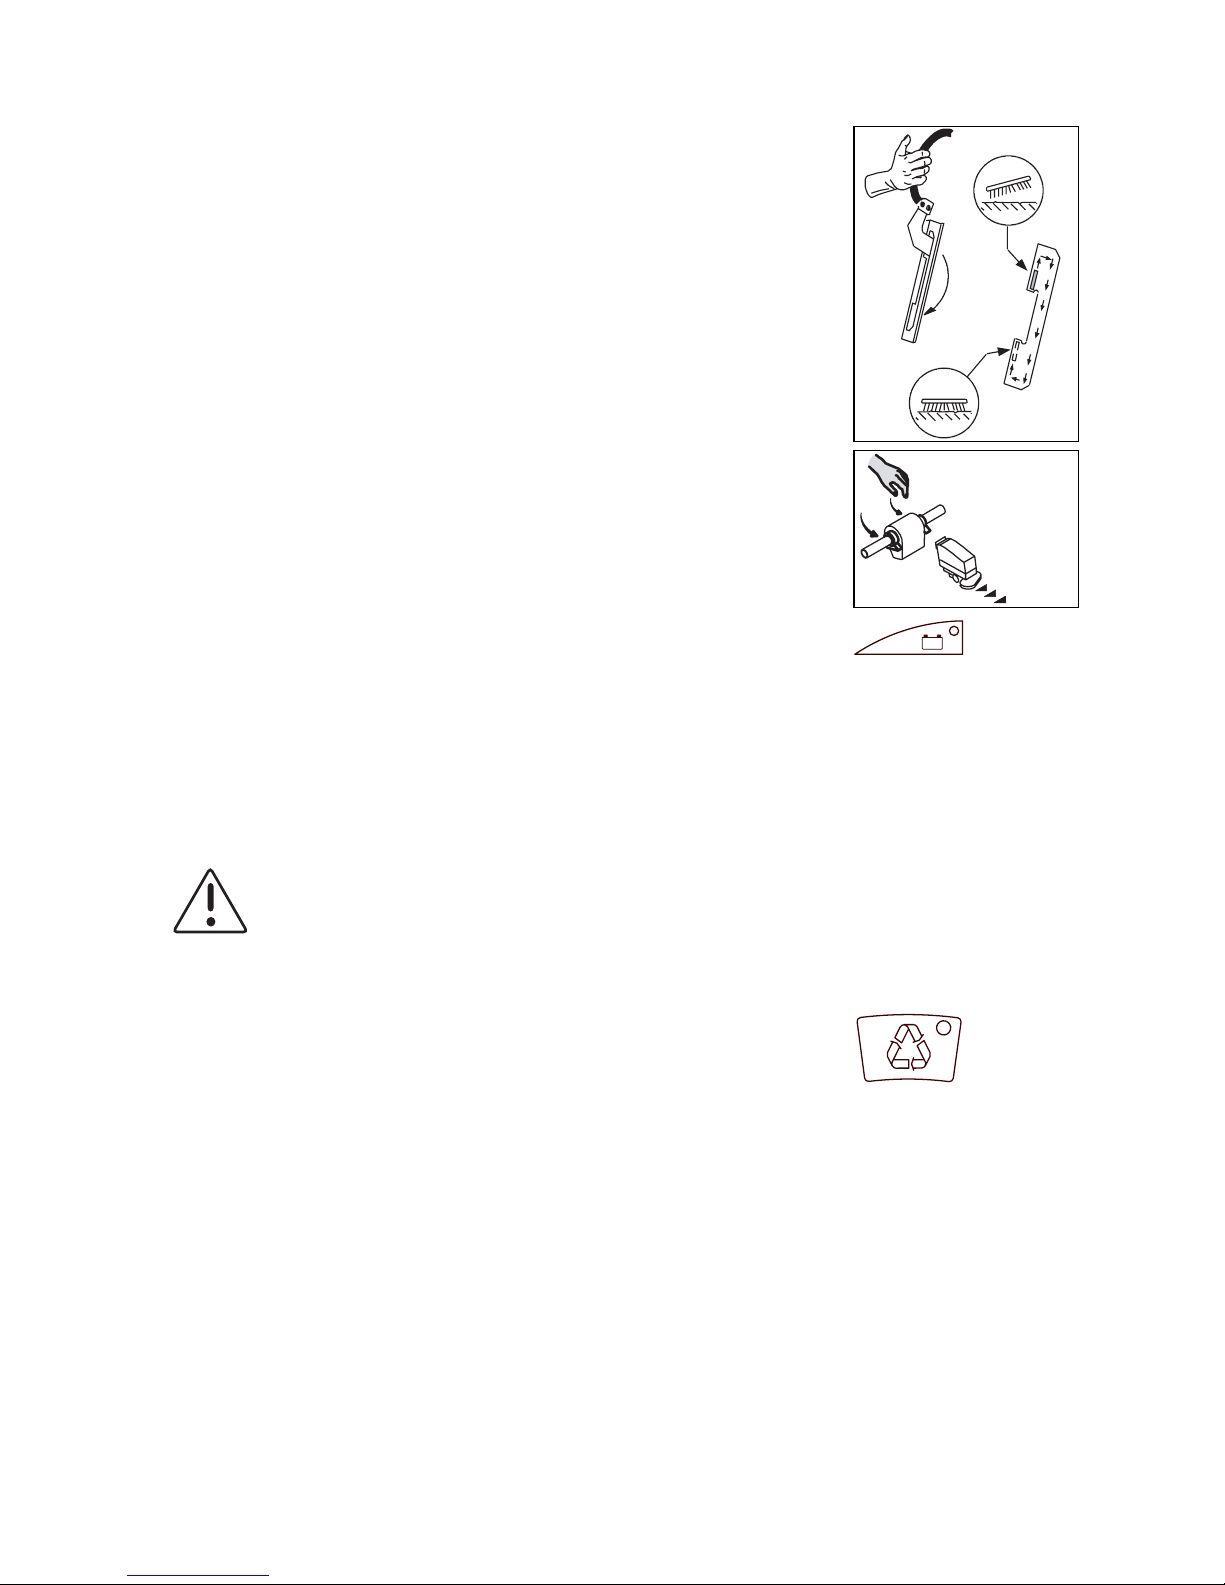
Removing and cleaning the squeegee
t Turn off the machine (main switch).
t Lift the squeegee lever with the foot.
t Remove the suction hose.
t Loosen the fixation knobs on the squeegee.
t Disassemble the squeegee.
t Clean the squeegee under running water with a brush.
Caution:
Danger of injury due to sharp objects
Wear cloves to protect your hands from injurys!
t Assemble the squeegee and tighten the fixation knobs.
Clean blades produce streak-free results!

24
Cleaning the machine
Charging batteries
Charging process page 30.
Store the machine
Never store the machines with closed tanks.
In this way the tank can dry out. Unpleasant smells and the occurrence of mould will be
reduced.
t Turn off the machine (main switch).
t Wipe down the machine with a moist cloth.
Caution:
Never clean the machine with a high water pressure or a water hose.
The ingress of water into the machine might cause considerable damage to
mechanical or electrical parts.
t Turn off the machine (main switch).
t Open the machine hood.
t Put the tank covers above the tanks.
t Close the hood until it lies on the tank covers.
The tank cover/dosing cup holds the hood slightly open.

25
Service, maintenance and care
Service intervals
TASKI machines are build to the highest quality standards . This is supported by
internationally regonized quality control procedures. Electrical and mechanical
parts are subject to wear or aging if used for long periods of time.
Only original TASKI spare parts must be used. Otherwise safety operational
readiness may be impaired.
Service centre
Should you contact us due to a malfunction or for placing an order, please always
state the type, description and the serial number of your machine.
This information can be found of the rating plate on your machine.
On the last page of these instructions of use, you can find the address of your
nearest TASKI partner.
Maintenance
Repairs to mechanical or electrical parts of the machine must only be undertaken
by JohnsonDiversey authorised customer service workshops or experts who are
experienced in all relevant safety regulations.
t To maintain functional safety and operational readiness, a service must be
carried out after 500 working hours or at least once a year.
Under rough or special conditions and / or insufficient maintenance, shorter
clearences are needed.
Caution:
During repairs or during replacement of parts, the machine must be
disconnected from the batteries and the power supply!
Caution:
Only original spare parts must be used, otherwise Warranties and
liabilities will be omitted!

26
The machine's maintenance is a pre-condition for trouble-free running and a long
life.
Symbols:
◊ = After use, ◊◊ = Every week, ◊◊◊ = Every month,⊗ = Service intervals
Activity ◊ ◊◊ ◊◊◊ ⊗ page
Recharge batteries 30
Refill distilled water (wet batteries) Please adhere the monitoring booklet! 32
Drain and clean the recovery tank 17
Clean suction air filter 18
Cleaning recycling machine 21
Check the solution filter and clean or descale it if necessary 20
Empty solution tank and rinse with fresh water 19
Cleaning tools (brush, pad drive, etc.) 22
Clean squeegee, check whether the blades are worn and replace if
necessary
23
Wipe down the machine with a moist cloth 24
Clean the tank covers, check the seal for cracks and replace it, if necessary
Check that the brush unit tool fittings sit correctly and check for wear.
Replace if necessary
Maintenance programs by TASKI service made by TASKI technician

27
Squeegee adjustment
If the squeegee drys unevenly drys on a level floor the squeegee must to be
adjusted.
Insufficient suction result on the outer end of the squeegee:
Insufficient suction result on the middle part of the squeegee:
t Turn off the machine (main switch).
t Loose the hexagon bolt (6 mm spanner) of the
squeegee adjustment.
t Adjust the squeegee according to the drawing on the
right side.
t Adjust according to the drawing on the right side:
t Adjust according to the drawing on the right side:
A
A
A
A

28
Squeegee pressure adjustment
If by modifying the above mentioned screws, no success is achieved, please see the
following description.
Replace fuses
t Turn off the machine (main switch).
t Adjust according to the drawing on the right side:
t Adjust according to the drawing on the right side:
t Turn off the machine (main switch).
t Open the machine hood (ca.45°), then take off the
hood.
A
A
A
A

29
Replace fuses F1 to F4:
Replace fuses F5 to F7:
t Disconnect battery plug with external battery charger.
Caution:
Use fuses with the correct value only!
False fuses can cause damages on the machine.
t Loosen the knurled nut and remove cover.
t Replace fuses F1 to F4, loosen the nuts with a key and
remove the defective fuse.
t Lay the fuse between the U-disc and securely screw-in
the fuse.
t Then replace the cover on the holder.
F1 - F4 Fuse ratings: co 1400/1500/1600/1700/1800
F1= 80A Main fuse
F2= 30A Drive motor
F3= 30A Brush motor
F4= 30A Vacuum motor
t Pull the cover from the holder.
t Replace fuses F5 to F7, pull the defective fuse from the
holder.
t Insert the new fuse in the holder and check for proper
and secure positioning.
t Then replace the cover on the holder.
F5 - F7 Fuse ratings: co 1400/1500/1600/1700/1800
F5= 5A Valve and relays KM2 + KM3
F6= 5A Elektronic + KM1
F7= 25A Brush lift (only co 1500/1700)

30
Safety automation of Brush lift F8:
Recharge batteries
Regularly check the electrical cabling for damage or ageing.
Please follow the instructions of the battery manufacturer.
t Press this button to reset the breakdown on the brush
lowering.
F8 Fuse ratings: co 1400/1500/1600/1700/1800
F8= Safety automation Brush lowering
(only co 1500/1700)
t Check whether the machine is turned off by turning of
ignition key.
t Open the machine hood.
Caution:
Battery compartment must be open during charging.
t Open the battery cover.
t Disconnect battery plug with external battery charger.
t Connect battery plug with the external battery charger.

31
Charge state display (optional)
The charge state display shows the current battery charge state.
After end of charching:
When the charging process is complete, the green indicator
lights up.
The charge state displays show you the operating readiness
of the machine.
If the red LED is highlighted, the batteries must be
recharged.
If the red LED flashes, the machine can be used for another
minutes only.
Safety measures when working with batteries
Never come near the batterie, with open flames or glowing objects since
this could cause an explosion due to the oxyhydrogen gas within the
batteries!
The battery surface must always be clean and dry. Do not place any metal
objects on the batteries.
Attention sulphuric acid! Caustic. Do not ingest. Avoid skin and eye
contact. Always wear eye protection when working with batteries.
t Switch off charger.
t Disconnect the charger plug.
-
-
+
+
-
-
+
+
-
-
+
+
-
+

32
Maintenance of batteries (only wet batteries)
Please follow the instructions of the battery manufacturer.
Daily, after charging:
Monthly, after charging:
Preparation for use after charging:
Closing battery compartment:
t Measure the acidity in 3 or 4 cells.
It should be approx. 30° Bé.
The batteries are discharged when the acidity is reduced to
approx. 18° Bé.
t Please enlist the measurements into the booklet.
t Please check the electrolyte, and if needed, fill it with
distilled or desalinated water up to 10mm above the
separators.
t Measure the acidity in every cell.
t Please enlist the measurements into the booklet.
t Check:
-Connectors, cable, cable connections and the poles are
screwed-in tightly.
t Return tank in position for charging.
t Close the battery cover.
t Close the machine hood.

33
Malfunctions
Malfunction Possible causes Troubleshooting page
Machine does not run
Main switch switched
off
t or main switch (key)
6
Activated emergency
stop button (option:
co1400/1600/1800)
t Release the emergency stop button
by turning it in direction the arrows
show. Afterwards turn the main
switch on and
off
6
Battery – machine is
disconnected
t Connect the battery plug with the
machine
8
Batteries discharged
t Charging batteries
30
Fuses F1 or F2 defective
t Replace fuses
28
Main switch on: The
battery control lamp
starts to flash (After 10
min. the machine
switches off
automatically!)
t Recharge the battery
30
Machine dos not move Immobiliser is activated
t Bring speed control to neutral
position
5
Batteries not or not
sufficiently charged
Charger or connecting
cable defective
t Call for technical service
On t he las t page of these instructions of
use
Mains supply was
switched off overnight
t Ensure power supply at night
Batteries defective
t Call for technical service
On t he las t page of these instructions of
use
Wrong charger type for
batteries
t Clarify and, if necessary, replace
Brush does not turn
Fuses F3 defective
t Replace fuses
28
Motor runs but not tool
t Drive belt torn
t Call for technical service
On t he las t page of these instructions of
use
Poor vacuum
performance
Floor remains wet
Soiled solution not
picked up
Hose or nozzle blocked
(e.g. by pieces of wood,
fabric)
t Remove the blockage

34
Poor vacuum
performance
Floor remains wet
Soiled solution not
picked up
Squeegee not on the
floor
t Clean the squeegee
t Check that the squeegee up/down
mechanism is functioning correctly
Worn blades
t Replace blades
Suction air filter
clogged
t Knock the suction air filter (e.g. into
a bucket) and rinse it under running
water
18
Suction hose not
connected
t Suction hose connect
11
Vacuum motor not
activated
t Vacuum motor switch on
6
Indicator is lightning
but vacuum motor does
not work
t Check fuse F4 vacuum motor and
replace if necessary
t If the fuse is not defective, call for
technical service
On the last page of these instructions of
use
28
Tank cover/dosing cup
does not seal properly
t Check seal and positioning
Recovery tank draining
hose cap not tight or
missing
t Tighten hose cap or replace
Squeegee pressure
incorrect
t Readjust
27
Squeegee pressure
adjustment incorrect
t Readjust or adjust
28
Lever for reversing the
air flow in wrong
position
t Put the lever for reversing the air flow
in the right position
17
Vacuum switched off
Recovery tank full
t Empty recovery tank
t Check the fuses
t Check the battery indicator
Probe soiled
t Check or cleaning the level probe
(page 7)
Malfunction Possible causes Troubleshooting page

35
Insufficient outflow of
cleaning solution.
Cleaning solution tank
empty
t Check the cleaning solution tank and
fill if necessary
Cleaning solution filter
blocked
t Clean the cleaning solution filter
20
Deficiency in quantity
chosen
t Choose the volume of solution with
the control knob (min./max. 1-6)
6
Solution dosing control
switched off
t Solution dosing control switched on
6
Cleaning solutionconveying pipe is
clogged
t Remove the blockage
Malfunction Possible causes Troubleshooting page

36
Technical data
Typ 1400 1500 1600
Theoretical performance area operation
width x drive speed (4) x 1000
2750 2750 3500 m2/h
Working width 550 550 700 mm
Squeegee width 850 850 990 mm
Cleaning solution tank / recovery tank 85 85 85 l
Machine speed forward / backwards 5/3 5/3 5/3 km/h
Machine weight / for operation (max.) 151/396 151/396 155/430 kg
Rated voltage 24V 24V 24V dc
Tools 2 x 280 2 x 280 2 x 350 mm
Brush rpm 197 195 152 min-1
Brush pressure 34 31/43 42 kg
Dimensions (L x W x H) 141 x 59 141 x 59 156 x 77 x 100 mm
Rated power 1300 1300 1500 W
Splash water protection IPX3 IPX3 IPX3
Assessed sound level LPA according to
EN 60704-1
<70 <70 <70 dB(A)
The assessed effective acceleration value
according to ISO 5349
0.141 0.141 0.141 m /s2
Electrical protection class III III III
CSD (Cleaning Solution Dosing) yes yes yes
Recycling option yes option

37
Typ 1700 1800
Theoretical performance area operation
width x drive speed (4) x 1000
3500 4250 m2/h
Working width 700 850 mm
Squeegee width 990 1150 mm
Cleaning solution tank / recovery tank 85 85 l
Machine speed forward / backwards 5/3 5/3 km/h
Machine weight / for operation (max.) 155/430 157/480 kg
Rated voltage 24V 24V dc
Tools 2 x 350 2 x 430 mm
Brush rpm 150 133 min-1
Brush pressure 42/61 60 kg
Dimensions (L x W x H) 156 x 77 169 x 90 x 100 mm
Rated power 1500 1700 W
Splash water protection IPX3 IPX3
Assessed sound level LPA according to
EN 60704-1
<70 <70 dB(A)
The assessed effective acceleration value
according to ISO 5349
0.184 0.184 m /s2
Electrical protection class III III
CSD (Cleaning Solution Dosing) yes yes
Recycling yes option

38
Accessories
Article 1400 1500 1600 1700 1800
Scrubbing brush for washed concret
28cm
XX
Scrubbing brush 28cm nylon XX
Scrubbing brush abrasive 28cm XX
Driving disc Instalok 28cm XX
Scrubbing brush for washed concret
35cm
XX
Scrubbing brush 35cm nylon XX
Scrubbing brush abrasive 35cm XX
Driving disc Instalok 35cm XX
Scrubbing brush for washed concret
43cm
X
Scrubbing brush 43cm nylon X
Scrubbing brush abrasive 43cm X
Driving disc Instalok 43cm X
Filling hose with universal water
coupling
XXXXX
Chassis protection XXXXX
For specific applications, there are
different tyre equipments available
XXXXX
Different pads (Polyester brown, blue,
red, fibre pad and contact pad)
XXXXX

39
Recommended chemicals
Please use the recommended TASKI chemical products only.
Dosage:
The mark „Max“ indicates the max. filling level of the tank cover/dosing cup (page 7).
Dosing examples (The concentration is product dependent)
Caution:
Using other chemicals (e.g. chemicals containing solvents, chlorine,
hydrochloric acid and hydrofluoric acid) can damage or destroy the
machine.
Instructions on the product’s packaging Tank
capacity
The volume per tank
filling
1% 100ml to 10l water 85l 850ml = 0,85l
2% 200ml to 10l water 85l 1700ml = 1,70l
3% 300ml on 10l water 85l 2550ml = 2,55l

40
Transport
Transport the machine in upright position or disassemble the batteries for
transportation.
Make sure that the machine is tightly secured in the transportation vehicle so that
the batteries cannot fall over in any way.
Disposal
When placed out of service, the machine and its accessories must be disposed of
according to the national regulations. Your TASKI partner can support you with
proper disposal upon notification.
Batteries
The batteries must be removed from the machine before being disposed of
properly.
Used batteries must be disposed of in an environmentally appropriate way
according to EU guidelines 91/157/EEC.
t Open the battery cover.
t Disconnect battery plug with external battery charger.
t Close the machine hood.

41
Index
A
Accessories . . . . . . . . . . . . . . . . . . . . . . . . . . . . . . . . . .38
After cleaning
. . . . . . . . . . . . . . . . . . . . . . . . . . . . . . . . .15
Attach squeegee
. . . . . . . . . . . . . . . . . . . . . . . . . . . . . .11
B
Batteries . . . . . . . . . . . . . . . . . . . . . . . . . . . . . . . . . . . . .40
Battery indicator (discharge)
. . . . . . . . . . . . . . . . . . . . .6
Battery plug / socket
. . . . . . . . . . . . . . . . . . . . . . . . . . . .8
Battery vacantness display
. . . . . . . . . . . . . . . . . . . . . . .7
Begin cleaning operation
. . . . . . . . . . . . . . . . . . . . . . .13
Beginning work
. . . . . . . . . . . . . . . . . . . . . . . . . . . . . . .13
Brush pressure level 1 button (only co 1500/1700)
. . . .6
Brush pressure level 2 button (only co 15/1700)
. . . . . .6
Brush unit
. . . . . . . . . . . . . . . . . . . . . . . . . . . . . . . . . . . .5
C
Charge state display (optional) . . . . . . . . . . . . . . . . . . .31
Charge state display ready (green)
. . . . . . . . . . . . . . . . .7
Charge state display unloaded (red)
. . . . . . . . . . . . . . .7
Charging batteries
. . . . . . . . . . . . . . . . . . . . . . . . . 24, 30
Clean the cleaning solution filter
. . . . . . . . . . . . . . . . .20
Cleaning method
. . . . . . . . . . . . . . . . . . . . . . . . . . . . . .15
Cleaning recycling filter co 1500/1700
. . . . . . . . . . . . .21
Cleaning solution dosing control
. . . . . . . . . . . . . . . . . .6
Cleaning solution tank opening maintenance
. . . . . . . .5
Cleaning the machine
. . . . . . . . . . . . . . . . . . . . . . . . . .24
Cleaning the recovery tank
. . . . . . . . . . . . . . . . . . . . . .18
Cleaning the tools
. . . . . . . . . . . . . . . . . . . . . . . . . . . . .22
Content
. . . . . . . . . . . . . . . . . . . . . . . . . . . . . . . . . . . . . .2
D
Declaration of Conformity . . . . . . . . . . . . . . . . . . . . . .42
Direct method
. . . . . . . . . . . . . . . . . . . . . . . . . . . . . . . .15
Disposal
. . . . . . . . . . . . . . . . . . . . . . . . . . . . . . . . . . . . .40
Dosage
. . . . . . . . . . . . . . . . . . . . . . . . . . . . . . . . . . . . . .39
E
Emergency stop button . . . . . . . . . . . . . . . . . . . . . . . . . .6
Emptying soiled recovery tank
. . . . . . . . . . . . . . . . . . .17
Emptying solution
. . . . . . . . . . . . . . . . . . . . . . . . . . . . .19
End of operation
. . . . . . . . . . . . . . . . . . . . . . . . . . . . . .15
F
Fill the tank . . . . . . . . . . . . . . . . . . . . . . . . . . . . . . . . . .10
Finishing work
. . . . . . . . . . . . . . . . . . . . . . . . . . . . . . . .17
Fixing tools
. . . . . . . . . . . . . . . . . . . . . . . . . . . . . . . . . .12
Fuses co 1400/1600/1800
. . . . . . . . . . . . . . . . . . . . . . . .8
Fuses co 1500/1700
. . . . . . . . . . . . . . . . . . . . . . . . . . . .8
G
Get ready to drive . . . . . . . . . . . . . . . . . . . . . . . . . . . . . .9
H
Height adjustment for handle height . . . . . . . . . . . . . . .5
Hours counter
. . . . . . . . . . . . . . . . . . . . . . . . . . . . . . . . .7
I
Index . . . . . . . . . . . . . . . . . . . . . . . . . . . . . . . . . . . . . . .41
Indicator main switch
. . . . . . . . . . . . . . . . . . . . . . . . . . .6
Indirect working method
. . . . . . . . . . . . . . . . . . . . . . . .15
Insufficient suction result
. . . . . . . . . . . . . . . . . . . . . . .27
Intended use of machinery
. . . . . . . . . . . . . . . . . . . . . . . 2
L
Level probe . . . . . . . . . . . . . . . . . . . . . . . . . . . . . . . . . . . 7
Lever brush unit (only co 14/16/1800)
. . . . . . . . . . . . . 5
Lever for reversing the air flow (only co 15/1700)
. . . . . 5
M
Machine handle . . . . . . . . . . . . . . . . . . . . . . . . . . . . . . . 5
Machine hood
. . . . . . . . . . . . . . . . . . . . . . . . . . . . . . . . . 5
Machine installation
. . . . . . . . . . . . . . . . . . . . . . . . . . . . 9
Main switch (key)
. . . . . . . . . . . . . . . . . . . . . . . . . . . . . . 6
Maintenance
. . . . . . . . . . . . . . . . . . . . . . . . . . . . . . . . . 25
Maintenance of batteries (only wet batteries)
. . . . . . . 32
Malfunction
. . . . . . . . . . . . . . . . . . . . . . . . . . . . . . . . . . 33
Max. filling level
. . . . . . . . . . . . . . . . . . . . . . . . . . . . . . . 7
O
Overview . . . . . . . . . . . . . . . . . . . . . . . . . . . . . . . . . . . . . 5
R
Recommended chemicals . . . . . . . . . . . . . . . . . . . . . . 39
Recovery tank
. . . . . . . . . . . . . . . . . . . . . . . . . . . . . . . . . 7
Recovery tank full indicator
. . . . . . . . . . . . . . . . . . . . . . 6
Recovery tank maintenance opening (red mark)
. . . . . 5
Recycling filter
. . . . . . . . . . . . . . . . . . . . . . . . . . . . . . . . . 7
Recycling mode (Option co 1400/1600/1800)
. . . . . .14
Recycling programm
. . . . . . . . . . . . . . . . . . . . . . . . . . . . 6
Refilling the solution tank
. . . . . . . . . . . . . . . . . . . . . . . 15
Removing and cleaning the squeegee
. . . . . . . . . . . . . 23
Replace fuses
. . . . . . . . . . . . . . . . . . . . . . . . . . . . . . . . 28
S
Safety instructions . . . . . . . . . . . . . . . . . . . . . . . . . . . . . 3
Service
. . . . . . . . . . . . . . . . . . . . . . . . . . . . . . . . . . . . . . 25
Service centre
. . . . . . . . . . . . . . . . . . . . . . . . . . . . . . . . 25
Service intervals
. . . . . . . . . . . . . . . . . . . . . . . . . . . . . . 25
Service, maintenance and care
. . . . . . . . . . . . . . . . . . . 25
Solution dosing control
. . . . . . . . . . . . . . . . . . . . . . . . . 6
Solution tank
. . . . . . . . . . . . . . . . . . . . . . . . . . . . . . . . . . 7
Speed control
. . . . . . . . . . . . . . . . . . . . . . . . . . . . . . . . . 5
Squeegee
. . . . . . . . . . . . . . . . . . . . . . . . . . . . . . . . . . . . . 5
Squeegee adjustment
. . . . . . . . . . . . . . . . . . . . . . . 5, 27
Squeegee lowering device
. . . . . . . . . . . . . . . . . . . . . . . 5
Squeegee pressure adjustment
. . . . . . . . . . . . . . . 5, 28
Store the machine
. . . . . . . . . . . . . . . . . . . . . . . . . . . . . 24
Suction air filter
. . . . . . . . . . . . . . . . . . . . . . . . . . . . . . . . 7
Symbol solution tank
. . . . . . . . . . . . . . . . . . . . . . . . . . 10
Symbols
. . . . . . . . . . . . . . . . . . . . . . . . . . . . . . . . . . . . . . 2
T
Tank cover closing . . . . . . . . . . . . . . . . . . . . . . . . . . . . . 7
Tank cover/dosing cup
. . . . . . . . . . . . . . . . . . . . . . . . . . 7
Technical data
. . . . . . . . . . . . . . . . . . . . . . . . . . . . . . . . 36
Tools (brush, pad drive, etc.)
. . . . . . . . . . . . . . . . . . . . . 8
Transport
. . . . . . . . . . . . . . . . . . . . . . . . . . . . . . . . . . . . 40
V
Vacuum on/off . . . . . . . . . . . . . . . . . . . . . . . . . . . . . . . . 6

42
EU Declaration of Conformity
We
JohnsonDiversey Switzerland
CH-9542 Münchwilen
hereby declare that the product described below both in this basic design and construction
and in the version marketed by us conforms to the relevant safety- and health-related
requirements of the appropriate EU Directive.
This declaration shall cease to be valid if modifications are made to the product without our
approval.
Applicable EU Directives:
Machinery Directive (98/37/EEC) in version 98/79/EEC
EMC (Electro Magnetic Compatibility) (89/336/EEC) in version 98/13/EEC
Harmonised standards applied:
EN 60 335-1;94/EN 60 335-1-A1;96/EN 60 335-1-A2;00/EN 60 335-1-A11;95/
EN 60 335-1-A12;96/EN 60 335-1-A13;98/EN 60 335-1-A14;98/EN 60 335-1-A15;00/
EN 60 335-1-A16;01/ EN 60 335-2-72;98/ EN 60 335-2-72-A1;00/ EN 55014-1;00/
EN 61 000-4-2;95/ EN 61 000-4-2-A1;98/ EN 61 000-4-2-A2;01/EN 61 000-4-3;96/
EN 61 000-4-3-A1;98/ EN 61 000-4-3-A2;01
It is ensured through internal measures that series-production units conform at all times to
the requirements of current EU Directives and relevant standards
The signatories act on behalf of company management and with full power of attorney.
Product: scrubber dryer
Name: combimat 1400/1500/1600/1700/1800
Model: co 1400/1600/1800 - co 1700/1800
Technical Data: 24Vdc
1300/1500/1700W - 1300/1500W
Dipl. Ing. (FH) D.Windmeisser Dipl. Ing. (FH) P. König

43
AT JohnsonDiversey
Austria Trading GmbH
Guglgasse 7-9
1030 Wien
Tel (43) 1 605 57 0
Fax (43) 1 605 57 1908
BE JohnsonDiversey
Haachtsesteenweg 672
1910 Kampenhout
Tel (32) 16 617 802
Fax (32) 16 605 395
CH JohnsonDiversey
Eschlikonerstrasse
9542 Münchwilen
Tel (41) 71 969 27 27
Fax (41) 71 969 22 53
CZ JohnsonDiversey
Ceska republika, s.r.o
K Hájum 2
155 00 Praha 5 - Stodulky
Tel (420) 296 357 460
Fax (420) 296 357 112
DE JohnsonDiversey
Deutschland
GmbH & Co. OHG
Mallaustrasse 50-56
68219 Mannheim
Tel (49) 621 875 73 73
Fax (49) 621 875 73 11
DK JohnsonDiversey
10, Teglbuen
2990 Nivaa
Tel (45) 70 10 66 11
Fax (45) 70 10 66 10
ES JohnsonDiversey S.A.
C/San Gabriel 43-45
08950 Esplugues de
LIobregat
Tel (34) 93 474 98 73
Fax (34) 93 474 98 07
FI JohnsonDiversey
Valuraudankuja 3
00700 Helsinki
Tel (358) 20 747 42 00
Fax (358) 20 747 42 01
FR JohnsonDiversey
(France) SAS.
9/11, avenue du Val de
Fontenay
94133 Fontenay sous
Bois Cédex
Tel (33) 1 45 14 76 76
Fax (33) 1 45 14 77 99
GB JohnsonDiversey
Weston Favell Centre
NN3 8PD Northampton
Tel (44) 1604 405 311
M (44) 796 76 94 383
GR JohnsonDiversey
5 Chimaras St
15125 Marousi
Tel (30) 210 638 59 00
Fax (30) 210 638 59 01
HU JohnsonDiversey
Magyarország Kft.
Puskás Tivadar u. 6.
2040 Budaörs
Tel (36) 23 509 100
Fax (36) 23 501 700
IE JohnsonDiversey Ltd.
Ballyfermot office
Westlink industrial estate
Kylemore road
Dublin 10
Tel (353) 1 626 11 82
Fax (353) 1 626 20 13
IT JohnsonDiversey S.p.A.
Via Meucci 40
20128 Milano
Tel (39) 02 25 80 32 33
Fax (39) 02 25 92 255
MT Forestals (Appliances)
Ltd.
The Strand
SLM 07 Sliema
Tel (356) 21 344 700-7
Fax (356) 21 344 709
NL JohnsonDiversey B.V.
Maarssenbroeksedijk 2
P.O. Box: 40441
3504 AE Utrecht
Tel (31) 30 247 69 11
Fax (31) 30 247 63 17
NO Lileborg Storforbrukere
Postbooks 4236 - Nydalen
0401 Oslo
Tel (47) 22 89 50 00
Fax (47) 22 89 50 80
PL JohnsonDiversey Polska
Sp. z.o.o.
Al. St. Zjednoczonych 61A
04-028 Warsaw
Tel (48) 22 516 30 00
Fax (48) 22 516 30 01

V010 / 12086-40 0601
PT JohnsonDiversey
Z. Ind. Abrunheira
2714-505 Sintra
Tel (351) 2 191 57 000
Fax (351) 2 192 50 615
RO JohnsonDiversey
Romania s.r.l.
Baneasa Business Center,
Etaj 5
Sos. Bucuresti - Ploiesti
17-21
Sector 1, Bucaresti
Tel (40) 21 233 3894
Fax (40) 21 233 3896
RU JohnsonDiversey
Zvenigorodskaya 2-aya
ul.,13, bld. 15
123022 Moscow
Tel (7) 095 970 17 97
Fax (7) 095 970 17 98
SE JohnsonDiversey AB
Liljeholmsvägen 18
Box 47313
10074 Stockholm
Tel (46) 877 99 300
Fax (46) 877 99 399
SI JohnsonDiversey d.o.o.
Trzaska cesta 37a
2000 Maribor
Tel (386) 2 320 7000
Fax (386) 2 320 7071
SK JohnsonDiversey
Slovensko s.r.o
Trnavska cesta 33
831 04 Bratislave
Tel (421) 2 4445 4895
Fax (421) 2 4445 4896
TR JohnsonDiversey
Degirmenyolu caddesi
Huzur
Hoca sokak No: 84
Unilever Binasi Kat: 18
34572 Icerenköy /
ISTANBUL
Tel (90) 216 57 86 400
Fax (90) 216 57 86 401
*12086-40*
 Loading...