


ITEM # 123845
MODEL # 25073
RE
AD YOUR OPERATOR’S MANUAL COMPLETELY AND CAREFULLY BEFORE
ATTEMPTING
TO SET UP OR OPERATE YOUR NEW POWER TOOL. ALL OPERATORS OF THIS
EQUIPMENT SHOULD READ AND UNDERSTAND ALL SAFETY RULES PRINTED ON THE MACHINE
AND IN THIS OPERATOR’S MANUAL BEFORE USE.
CAUTION - FOR YOUR SAFETY
NOTICE: On the nameplate of your machine you will find MFG date code of your unit.
Please record these numbers on this manual cover for future service reference.
MFG. DATE : ________ PURCHASE DATE: _________
Questions,
problems, missing parts? Before returning to your retailer, call our customer
service department at 1-866-456-8934, 8:00 a.m.-6:00 p.m., EST, Monday-Thursday,
8:00 a.m.-5:00 p.m.,
EST, Friday.
PRINTED IN CHINA
20in. 12A Lawn Mower
TM

TABLE OF CONTENTS
Product Specifications………................................................................................................................……….....…2
Safety Information……………………....................................................................................................................…3
Know your lawn mower…………….................................................................................................................…......6
Assembling your lawn mower………........................................................................................................................7
Operating your lawn mower……......................................................................................……................................14
Service……………………………….......................................................................................................………........18
Troubleshooting……………………….......................................................................................................……........19
Warranty…………………………..…….......................................................................................................…..........20
Replacement parts list……………….….......................................................................................................…........21
PRODUCT SPECIFICATIONS
20 IN. ELECTRIC LAWN MOWER
Item No..................................................................................................................................................................123845
Motor .................................................................................................................................................
No-
load speed..................................................................................................................................................3600 RPM
Cutting path................................................................................................................................................................20 in.
Height adjustments...................................................................................................................................1 1/2 in.-3 3/4 in.
Weight
.........................................................................................................................................................49 lbs(22.3 kg)
120 V AC 60Hz 12A
2

SAFETY INFORMATION
Please read and understand this entire manual before attempting to assemble, operate or install the
product. These safety instructions are not meant to cover every possible condition that could occur. If
you have any questions regarding the product please call customer service at 1-866-456-8934, 8:00 a.m.6:00
p.m., EST, Monday-Thursday,
8:00 a.m.- 5:00
p.m., EST, Friday.
READ ALL INSTRUCTIONS!
WARNING: This symbol points out important safety instructions, which if not
followed, could endanger the personal safety and/or property of yourself and others.
Read
and follow all instructions in this manual before attempting to operate this
machine.
DANGER: This machine was built to be operated according to the rules for safe
operation
on
amputating hands and feet and throwing objects. Failure to observe the following safety
instruction
When using electric lawnmowers, basic safety precautions should always be followed
to reduce the risk of fire, electric shock, and personal injury.
Failure to comply with these instructions may result in personal injury.
in this manual. As with any type of power equipment, carelessness or error
the part of the operator can result in serious injury. This machine is capable of
s could result in serious injury or death.
GENERAL OPERATION
1. Read, understand, and follow all instructions on the machine and in the manual before
attempting to assemble and operate.
2. Keep this manual in a safe place for future and regular reference. Be familiar with all controls
and their proper operation. Know how to stop the machine and disengage the controls
quickly.
3. Avoid Dangerous Environment - Don’t use lawn mowers in damp or wet locations.
4. Don’t Use In Rain.
5. Keep Children Away - All visitors should be kept a safe distance from work area.
6.
Dress Properly - Do not wear loose clothing or jewelry. They can be caught in moving parts.
Use of rubber gloves and footwear is recommended when working outdoors.
Use Safety Glasses - Always use face or dust mask if operation is dusty.
7.
8. Use Right Appliance - Do not use lawn mower for any job except that for which it is intended.
9. Ground Fault Circuit Interrupter (GFCI) protection should be provided on the circuit(s) or outlet(s)
to
be used for the lawn mower. Receptacles are available having built-in GFCI protection and
may be used for this measure of safety.
10. Don’t Force Lawn Mower - It will do the job better and safer at the rate for which it was designed.
11. Don’t Overreach - Keep proper footing and balance at all times.
12. Stay Alert - Watch what you are doing. Use common sense. Do not operate lawn mower when
you are tired.
13.
Disconnect Lawn Mower - Disconnect the lawn mower from the power supply when not in use,
before
servicing, when changing accessories such as blades, and the like.
3

SAFETY INFORMATION
Store Idle Lawn Mower Indoors - When not in use, lawn mower should be stored in an indoor
14.
dry
and locked-up place - out of reach of children.
Maintain Lawn Mower With Care - Keep cutting edges sharp and clean for best and safest
15.
petformance. Follow instructions for lubricating and changing accessories. Inspect lawn mower
periodically and if damaged, have it repaired by an authorized service facility. Inspect
cord
extensio
n cords periodically and replace if damaged. Keep handles dry, clean, and free from oil
and grease.
16. Keep guards in place and in working order.
Keep blades sharp.
17.
18
. Keep hands and feet away from cutting area.
19. Objects struck by the lawn mower blade can cause severe injuries to persons. The lawn should
always be carefully examined and cleared of all objects prior to each mowing.
If lawn mower strikes a foreign object, follow these steps:
20.
Stop lawn mower. Release the switch.
Unplug power cord. Inspect for damage.
Repair any damage before restarting and operating the lawn mower.
identical replacement blades only.
Use
.
22
4

SAFETY INFORMATION
Double insulated lawn mower
This mower is “DOUBLE INSULATED”
1. Replacement Parts: When servicing use only identical replacement parts.
Polarized Appliance Connections: To reduce the risk of electric shock, this appliance has a
2.
polarized plug (one blade is wider than the other) and will require the use of a polarized
extension cord. The appliance plug will fit into a polarized extension cord only one way. If the
plug does not fit fully into the extension cord, reverse the plug. If the plug still does not fit, obtain
a correct polarized extension cord. A polarized extension cord will require the use of a polarized
wall outlet. This plug will fit into the polarized wall outlet only one way. If the plug does not fit
fully into the wall outlet, reverse the plug. If the plug still does not fit, contact a qualified
electrician to install the proper wall outlet. Do not change the equipment plug, extension cord
receptacle, or extension cord plug in any way.
Extension Cord
1. Warning - To prevent electric shock use only with an extension cord suitable for outdoor use,
as SW-A, SOW-A, STW-A, STOW-A, SJW-A, SJOW-A, SJTW-A, or SJTOW-A.
such
2. Make sure your extension cord set is in good condition. When using an extension cord, be sure to
use one heavy enough to carry the current your product will draw. For lengths less than 50 feet,
No. ~ AWG extension cord should be used. An undersized cord will cause a drop in line voltage
resultin
depending on cord length and nameplate ampere rating. If in doubt, use the next heavier gage.
The smaller the gage number the heavier the cord.) To reduce the likelihood of disconnection of
lawn mower cord from the cord set during operating:
g in loss of power and overheating. (NOTE: Table 49.1 shows the correct size to use
MINIMUM GAUGE FOR EXTENSION CORD
Don’t Abuse Cord - Never pull lawn mower by cord or yank it to disconnect from receptacle. Keep cord
from heat, oil, and sharp edges.
5

KNOW YOUR LAWN MOWER
Power switch assembly
Up
per handle
handle
Lower
Height adjustment
lever
Grass catcher bag
Side discharge cover
Motor
Side discharge
ho
using
chute
Wheels
Re
d this operator's manual and safety rules before operating your lawn mower.
a
Compar
lo
e the illustration in Fig. 4 to your lawn mower in order to familiarize yourself with the
cation of various controls and adjustments. Save this manual for future reference.
Fig.4
ATTACHING EXTENSION CORD TO MOWER
The cord restraint is located on the back of the upper handle, and when used properly, helps to
t the motor/blade control assembly and extension.
protec
6

ASSEMBLING YOUR LAWN MOWER
7
Parts List:
Mulch plug
Grass catcher bag
Side discharge chute
Not
e: Carefully remove the parts from the box. • Inspect the parts carefully to make sure no breakage or
damag
e occurred during shipping. • Do not discard the packing material until all parts are examined. • If any
par
ts are damaged or missing, please call 1-866-456-8934 for assistance.
Assembling the handle
1. Remove any packing material which may be between the upper and lower handles for shipping purposes.
2. Pull up and back on the upper handle to raise the handle into the operating position. Make certain the
lower handle is seated securely into the handle mounting bracket (see Fig. 1).
3. Align the holes (3) between the upper handle (1) and lower (3) handles. Insert the bolts (4) and tighten
them with the wing nuts (5) provided.
4. Secure the lower handle to the bracket with the bolt (6) in each side (Fig. 2).
WARNING: Never operate the mower without the proper components and safety
devic
es in place and
working. Never operate the mower with damaged
safety devic
es.
Failure to
do so can result in personal injury.
Fig.1
Fig.2
3
4
5
1
6
6
2
ASSEMBLING YOUR LAWN MOWER
8
INSTALLING THE GRASS CATCHER BAG
1. UNPLUG THE POWER CORD, AND WAIT
FOR BLADE TO COME TO A COMPLETE STOP.
2. Lift the chute cover (1).
3. While holding up the cover (1), place the grass catcher bag hanger hooks (2) into the opening on the chute
cover (1) to allow the hanger hooks to attach to the rod (4) which secures the chute cover.
1
2

ASSEMBLING YOUR LAWN MOWER
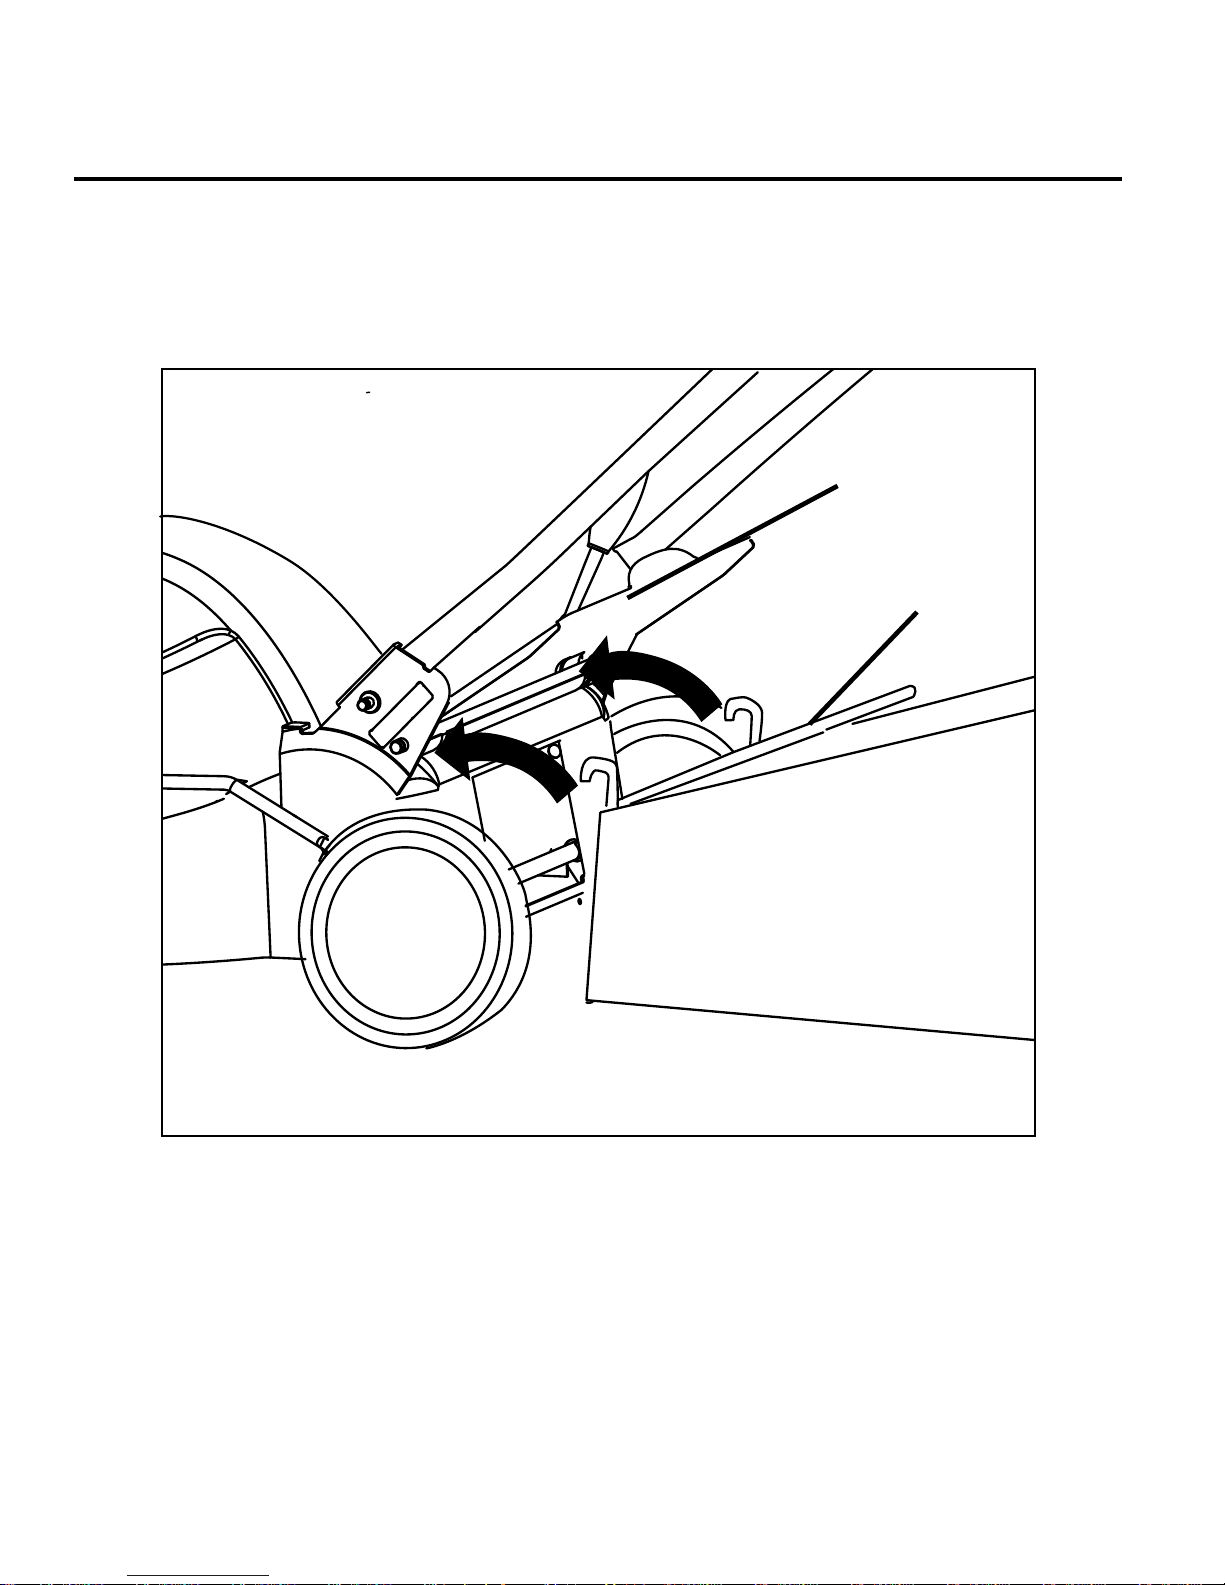
INSTALL THE SIDE DISCHARGE CHUTE
This mower has 3 different functions - mulch, side
than mulch, perform these steps.
discharge, and rear bag.
you wish to discharge the
If
ings rather
clipp
1. UNPLUG THE POWER CORD, AND WAIT
To pull open the mulch cover (1), align
2.
te (2) as shown.
and slide the discharge
Position the chute until the chute hooks are
3.
chu
FOR BLADE TO COME TO A COMPLETE STOP.
the
discharge chute arrows with the positioning
ped under the deck hooks and release the
trap
1
arrows on the mower deck
and mulch plug.
chute
1
2
2
9
ASSEMBLING YOUR LAWN MOWER
2
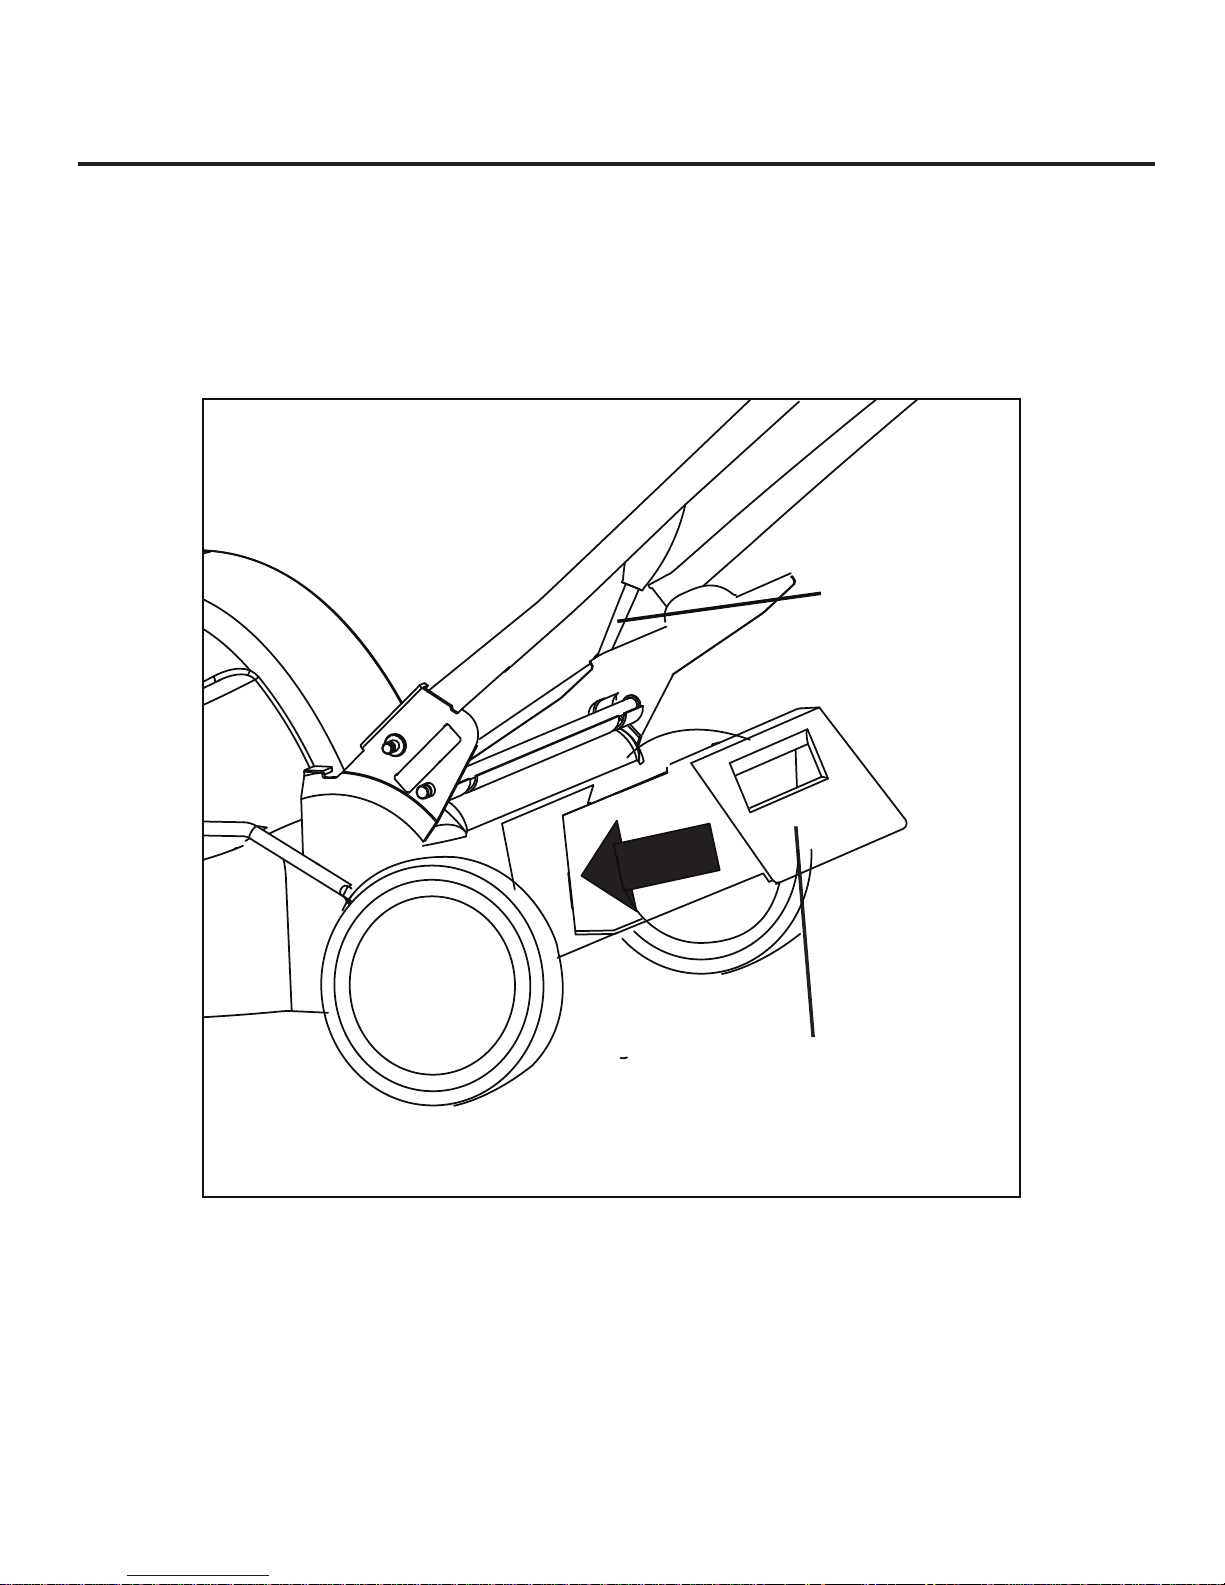
INSTALLATION OR REMOVAL OF THE MULCH PLUG
1. UNPLUG THE POWER CORD, AND WAIT FOR BLADE TO COME TO A COMPLETE STOP.
2. To remove the mulch plug lift the chute cover (1) and pull out on the handle.
3. The mulch plug (2) is inserted on an angle so it will require some force when removing.
1
10
ASSEMBLING YOUR LAWN MOWER
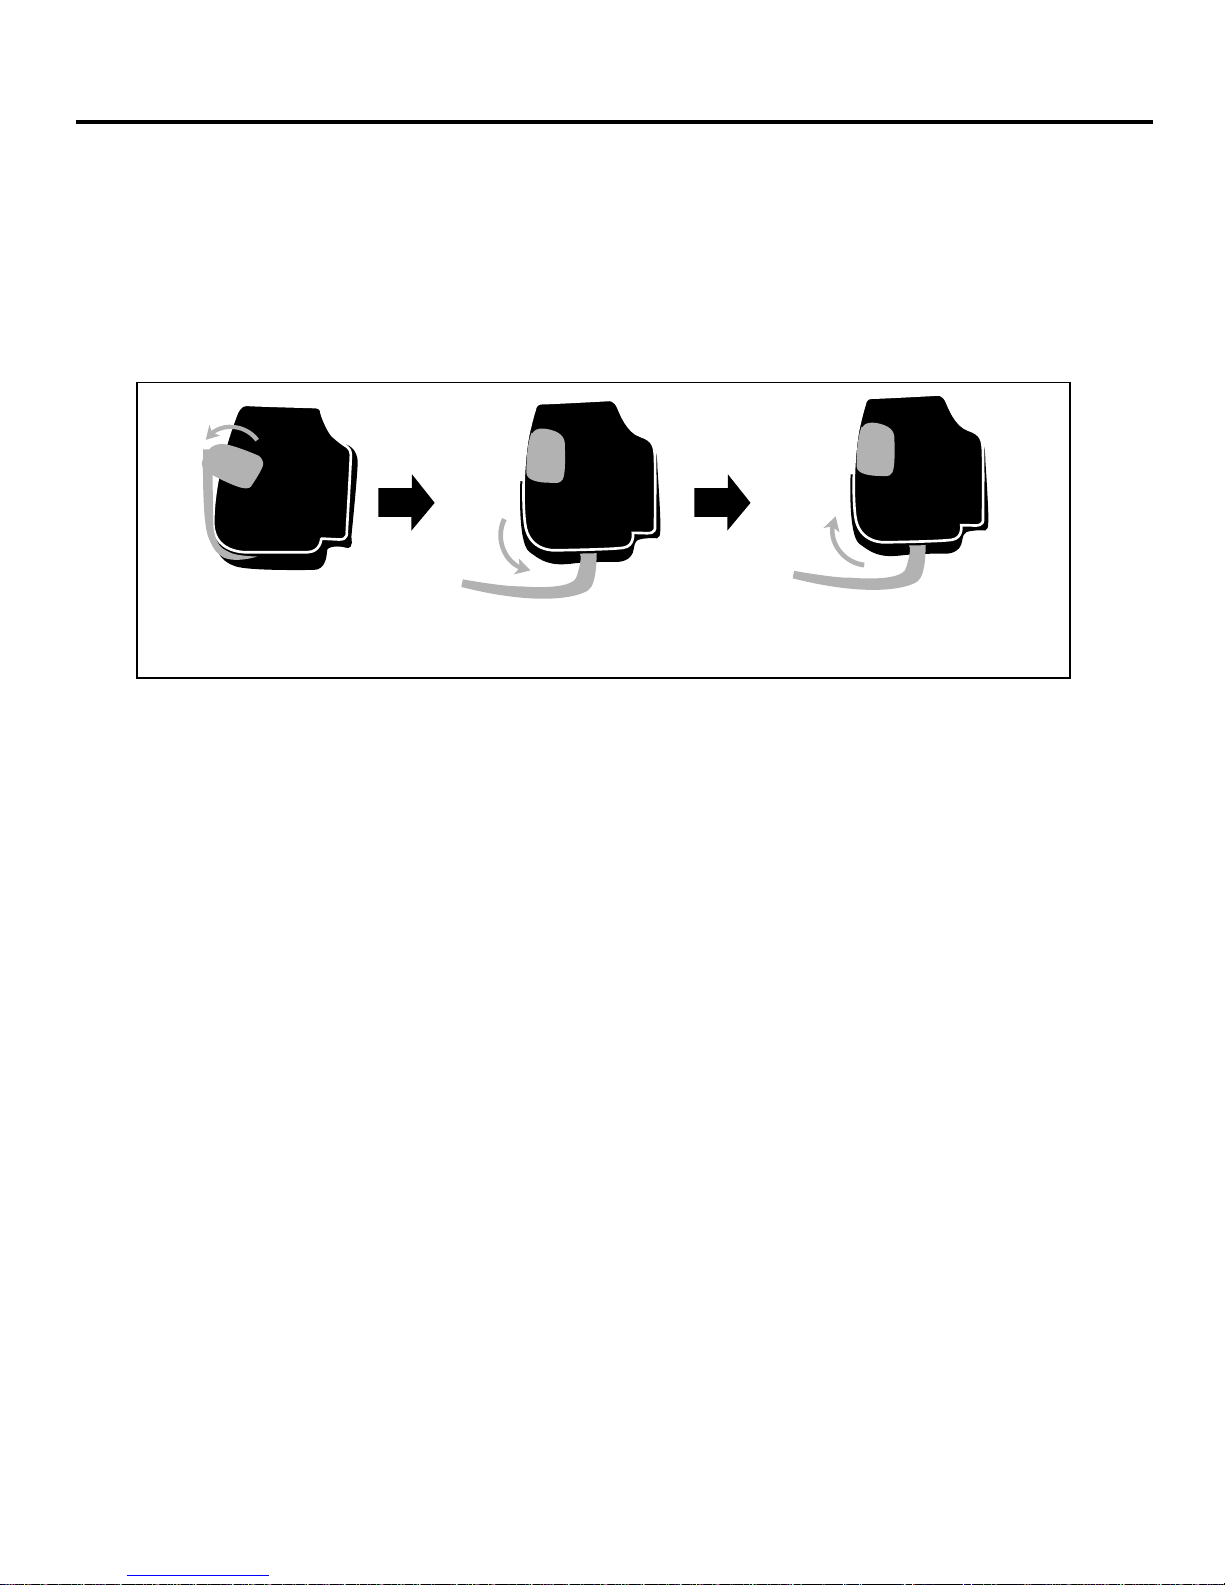
SWITCH USE
Your mower is equipped with a switch. To operate the switch, insert your finger into the opening
push the lever out so that you can grasp it with your other handle. Pull the lever back to turn the unit on
and
hold it against the mower handle to keep it running. To turn the mower off, just release the lever.
and
Caution:
never attempt to override the operation of this switch.
1. Push the safety tab out
to expose the lever.
2. Pull the lever up
to start the mower.
3. Release the lever to stop
the mower.
11

ASSEMBLING YOUR LAWN MOWER
ADJUST THE CUTTING HEIGHT
1. Simply depress the lever (1) towards the wheel and move to desired position. This sets all wheels to the same
position.
2. To raise the height, pull the height adjustment lever from the current stop position towards the back of the mower.
3. To lower the height, pull the height adjustment lever from the current stop position towards the front of the mower.
HIGH
1
LOW
12

ASSEMBLING YOUR LAWN MOWER
ADJUST THE UPPER HANDLE HEIGHT
1. Loosen the upper handle knob.
Adjust the handle to the most comfortable of the
2.
3. Tighten the upper handle knob as tight as you can.
3 positions.
13

OPERATING YOUR LAWN MOWER
SLOPE GAUGE
WARNING: Slopes area major factor related to slip andfall accidentsthat can result in severe injury. Operation
on slopes requires extra caution. If you feel uneasy on a slope, do not mow it. Foryour safety,use the slope gauge
included as partof this manualto measureslopesbefore operating this unit ona sloped or hilly area.
1. Mow across theface of slopes;never upand down. Exerciseextremecaution when changingdirection on slopes.
2. Watch for holes, ruts, rocks,hidden objects or bumps that maycause you to slip or trip. Tall grasscan hide
obstacles.
3. Always be sureof your footing.If you feel you arelosing your balance, release the blade/motor control handle
immediately, and the blade will stop rotatingwithin 3 seconds.
4. Do not mowneardrop-offs, ditchesor embankments;you could lose your footing or balance.
5. Do not mow slopesgreaterthan 15 °as shownon theslope gauge.
6. Do not mow wet ordamp grass. Unstable footing could cause slipping.
WARNING:
Donotmowoninclines witha slopeinexcessof15° orariseofapproximately2-1/2/.every10/.
Operatemoweracrossthefaceofslopes,neverupordownslopes.
Use this pageasaguidetodetermineslopes whereyoumaynotoperatesafely.
MOWING TIPS
NOTE: A sharp blade will greatly increase the performance of your mower, especially in high grass conditions. Be
sure to check the blade and sharpen it at least once a year as outlined in the Maintenance section.
Makesurethelawnis clearofstones,sticks,wires,or other objectsthatcoulddamagethe bladesor motor. Such objects
couldbe thrownby the mower inany directionand cause seriouspersonal injury to theoperatorand others.
To preventelectric shock,do not operate the mower in dampor wet conditions.
Never mow in circles; alwaystravelback and forth across the lawn.
When cutting thick grass, reduce walking speed to allow for a more effective cut and a proper discharge of the
clippings. For a healthy lawn, always cut off one-third or less of the total length of the grass. The
average lawn should be approximately 1 ½ – 2” during cool months, and over 2” during hot months. If there is
growth,thelawnshouldbe cutin the fall.
14

OPERATING YOUR LAWN MOWER
MULCHING TIPS
NOTE: ALWAYS INSPECT AREA WHERE MOWER IS TO BE USED AND REMOVE ALL STONES, STICKS, WIRE,
BONES AN
1. Release switch to turn mower OFF when crossing any graveled area(stones can be thrown by the blade).
2. Set mower at highest cutting height when mowing in rough ground or in tall weed.
3. For effective mulching, do not cut wet grass, as it tends to stick to the underside of the deck preventing proper mulching of
gra
lawn. If mowing has been delayed and the grass has been allowed to grow in excess of 4”, mow twice to reduce the grass
heigh
4.
Walk at a good, steady pace. Overlap your rows. Don’t let the grass get too tall. If the grass gets too long start at the highest cutting
po
D OTHER DEBRIS WHICH MIGHT BE THROWN THE ROTATING BLADE.
ss clippings. New or thick grass may require a narrower cut. The ground speed should be adjusted to the condition of the
t to 3 3/4” maximum.
sition and work down to the desired cutting height.
WARNING: If you strike a foreign object, stop the motor by releasing the power switch.
15

OPERATING YOUR LAWN MOWER
CUTTING BLADE REPLACEMENT
WARNING: Always protect hands by wearing heavy gloves and/or wrapping cutting edges with rags or
other materials when performing any blade maintenance.
1.
RELEASE SWITCH LEVER TO TURN MOWER OFF AND WAIT FOR THE BLADE TO STOP.
2. While wearing leather padded gloves, wedge a block of wood between the blade and mower deck to prevent the
blade from turning when the nut is being removed.
3. Using a 15mm socket with a torque wrench, loosen the blade nut (1) and remove the blade (4). To loosen the nut turn
"CLOCKWISE" and to tighten turn "COUNTER-CLOCKWISE" (This is a reverse rotation nut)
4. Remove blade nut (1), square washer (2), insulator washer (3), and blade.
5. To re-assemble, first position the blade with the cutting edges to wards the ground. Assemble the blade nut,
uare washer, insulator washer as showing Using a 15mm socket with a torque wrench turn the blade
sq
nut "COUNTER-CLOCKWISE” to secure the blade.
3
Tighten
Loosen
1
2
4
NOTE: Makecertain to replacethe partsin the exact order in which they were removed. When installing the cutting blade,
make sure it is installed with the curved ends pointing towards the mower deck and not towards the ground. Refer to
the schematic breakdown on page 21 of this manual.
16

OPERATING YOUR LAWN MOWER
CLEAN THE MOWER
WARNING: To reduce the risk of electric shock,do notexpose the mowerto water.
The underside of mower deck should be cleaned after each use as grass clippings, leaves, dirt and other
debri
s will accumulatecausing rustand corrosion.
Remove any buildup of grass and leaves on oraroundthe motor cover (do notuse water). Wipe the mower clean with a
dry clothoccasionally.
If debrisbuildup ontheunderside of theunit while using,stopthe motor and disconnect it fromthe powersupply.
Tiltthe
mower forward, or on its side, and scrape it clean with anappropriatetool.
STORAGE
The following stepsshouldbe taken to preparethe lawn mowerfor storage.
Makecertainthe power cord is disconnected.
Cleanmoweras instructed in previous section.
Inspect and replace/sharpen blade,if required.Refer to theMaintenance section.
Storemowerin a dry,cleanarea.Do notstorenextto corrosive materials,suchas fertilizer and
rocksalt.
Wipeextensioncordto removeanyforeignsubstancessuchas oil or stains.Replace extension
cordif cutor damagedin anyway.
Windcord in a seriesof equal loops topreventit from tangling.
Storemower indoors,ina cool,dry place,out of thereachofchildren.Do not cover lawn mower
witha solid plasticsheet.Plastic coverings trap moisturearoundthe mower causingcorrosion.
The handle may be folded away completely for storage.
Loosen the handknobson thesidesof thehandle,and fold the upper handledown.
Remove the hair-pin clips,pull outwards on eachside ofthe lower handle,and lift the sides of the
lower handle past the edges of the handle mounting brackets. Fold the lower handle forward.
Make sure not to bend or kink the power cord.
17

SERVICE
1. When servicing the lawn mower, use only identical replacementparts listed inthis manual. Use
2. Before cleaning, repairing, or inspecting, make certain the blade and all moving parts have
3. Follow instructions for lubricating and changing accessories.
4. Inspect lawn mower cord and extension cords periodically and replace immediately, if
5. Keep handles dry, clean and free from oil and grease.
6. To reduce a fire hazard, keep the motor free of grass, leaves and debris build-up.
7. Check the blade and motor mounting bolts at frequent intervals for proper tightness. Also,
8. Maintain your mower with care. Keep mower blade sharp and clean for best and safe
9. Keep all nuts, bolts, and screws tight to be sure the equipment is in safe working condition.
10. Never tamper with safety devices. Check their proper operation regularly.
11. After striking a foreign object, stop the motor and disconnect the power cord. Thoroughly
12. Lawn mower components are subject to wear and damage, which could expose moving parts
13. When not in use, store lawn mower indoors in a dry area, locked-up and/or out of the reach of
of parts, which do not meet the original equipment specifications, may lead to improper
performance and compromise safety.
stopped. Disconnect the power cord when not in use to prevent accidental start-ups.
damaged. The cord should be repaired by an authorized service facility only.
visually inspect blade for damage (e.g., bent, cracked, and worn).
performance. Mower blades are sharp and can cut, wrap the blades or wear gloves and use
extra caution when servicing them.
inspect the mower for any damage. Repair the damage before operating the mower.
or allow objects to be thrown. As a safety precaution, frequently check components and
replace those that show signs of wear or damage.
children.
18

TROUBLESHOOTING
Problem Possible Cause(s) Solution
Mowernot starting.
Handle not in position.
Mowercutting
grass unevenly.
Extensioncord not connected
to the mower plug.
Reconnect the cord and using
the cord restraint keep the cord
closeto the motor/bladecontrol.
Motor/blade controlswitch
defective.
Extensioncord not connected
to power source.
Replace motor/blade control
switch.
Connect the extension cord to a
live120 VAC 60 Hz receptacle.
Carriagebolts. Adjust the height of the
handle and make sure that the
carriage bolts are seated
properly.
Tighten knobs.
Lawnis roughor uneven.
Cuttingheightnotset properly.
Movethe wheels to a higher
position.
All wheels must be placed in the
same cutting height for
mower tocut evenly.
the
Mower not mulching
properly.
Hardto push.
Mower vibratingat
higherspeed.
Wetgrassclippingssticktothe
undersideof thedeck.
Highgrass or cutting height
to
o low.
Rearof mower housing and
blade draggingin heavy
grass.
Bentmotorshaft.
Wornor damaged blade.
Waituntil the grass dries before
mowing.
Raisecutting height.
Stopthe motor,disconnect the
powersource and inspectfor
damage.
Replace blade.
Repair before restarting. If
vibrationpersists, takeit toa
service centeror call the toll free
helpline forfurther assistance.
19

LIMITED TWO-YEAR WARRANTY
The manufacturer warranties to the original purchaser that each new product and service part is free from defects in
material and workmanship and agrees to repair or replace under this warranty any defective product or part as follows
from the original date of purchase.
2 —Year Limited Warranty
THIS WARRANTY IS NOT TRANSFERABLE AND DOES NOT COVER:
Products sold damaged or incomplete, sold “as is”, sold reconditioned or used as rental equipment.
Delivery, installation or normal adjustments explained in the owner’s manual.
Damage or liability caused by shipping, improper handling, improper installation, incorrect voltage or improper wiring,
improper maintenance, improper modification, or the use of accessories and /or attachments not specifically recommended.
Repairs necessary because of operator abuse or negligence, or the failure to install, operate, maintain and store the product
according to the instructions in the owner’s manual.
Damage caused by cold, heat, rain, excessive humidity, corrosive environments and materials, or other contaminants.
Expendable items that become worn during normal use.
Cosmetic defects that do not interfere with tool functionality.
Freight costs from customer to vendor.
ANY INCIDENTAL, INDIRECT OR CONSEQUENTIAL LOSS, DAMAGE, OR EXPENSE THAT MAY RESULT FROM ANY
DEFECT, FAILURE OR MALFUNCTION OF THE PRODUCT.
Some states do not allow the exclusion or limitations on how long an implied warranty lasts, so the above limitations may
not apply to you.
WARRANTY REPLACEMENT PARTS are available by calling the toll free number, 1-866-456-8934, 8:00am – 6:00pm EST,
Monday-Thursday, 8:00 a.m.-5:00 p.m., EST, Friday.
20

21
REPLACEMENT PARTS LIST

22
REPLACEMENT PARTSLIST
Item No.
Part No.
Qty
Description
1 3220435
4
2 31101227
1
2-1 34101227
1
2-2 3420235
1
3 3220404
1
4 3690135
1
5 3331035
1
6 3610138
1
7 34104222
1
8 3220537
3
9 31301227
1
10 3220439
4
11 3220575
4
12 31101222
1
13 3320237
2
14 34201222
2
15 3331638
4
16 32901227
4
17 34104227
4
18 3330639-2
1
19 34111227
1
20 3340137-2
1
21 34202222
2
22 3320639
2
23 3221637
4
24 33301222
1
25 3220737
4
26 3320238
1
27 3410237
1
28 3331238-1
1
29 3410535
1
30 3331435
1
31 3221037
1
32 925106
32-1 3220511
2
32-2 3221237
2
32-3 3330490
2
32-4 3420138-1
1
33
33-1 3290506
2
33-2 3330438-1
1
33-3 3320138-1
1
Machine screw - T.F 20"
Motor cover assy. w/labels
Motor cover only - TF
Motor cover seal - TF
Electrical bridge screw
Electrical bridge KBPC2504
Electrical bridge heat sync
12A motor assembly
Front bumper
Lock Nut M6
20"Mower deck - Task Force
Nut M5
Machine Screw M5 x 10
20"front wheel axle assy.
Front wheel spacer
7"Front wheel
Washer for wheels
Wheel attaching cir-clip
Task Force wheel center cap
Link bar for 20"Mower
Label bracket for link bar
Spring for height link bar
10"Rear wheel
Rear wheel spacer
Bolt for rear wheel brackets
Rear L.wheel bracket
Nut for rear wheel brackets
Motor fan spacer - sleeve
Motor fan - fits 18 & 20 inch
20"Mower blade
Blade insulator - lock plate
Spacer for blade nut
Blade fastening Nut
Rubber trailing shield assy.
Machine Screw M4 x 12
Self-locking nut M4
Clamp - holds trailing shield
20"Rubber trailing shield
Rear cover assembly
E-Clip - for rear gate bar
Rear cover
Rear metal cover rod

23
REPLACEMENT PARTS LIST
Item No. Part No. Qty
Description
33-4 3340138 1
33-5 3422139 2
34 3410238 1
35 31102222 1
36 3220137 3
37 33302222 1
38 1
38-1 33401222 1
38-2 3290506 1
38-3 31103222 1
38-4 34110227 1
39 3411135 2
40 31104227 1
40-1 3331338 1
40-2 34902227 1
41 33302227 1
42 31102227 1
42-1 33301227 1
42-2 34901227 1
43 31103227 1
44 3410835 4
45 3220436 2
46 925123 1
46-1 3220136 2
46-2 3330637 1
46-3 3220537 2
46-4 3320338 1
46-5 3340237 1
46-6 3410338 1
47 3410438 1
48 3410137 1
49 3221137 2
50 3410403 1
51 3220105 2
52 3410290-1 1
53 3331437 1
54 3690137 1
55 3220511 1
56 3220850 2
57 3220951 2
58 3220439 2
59 3290105 1
60 3290706 1
Rear metal gate spring
rubber washer
Mulch plug for 20"Mower
20" rear wheel axle
Bolt
Rear R.wheel height adj. bracket
Height adjustment handle assy.
Height adjustment spring
E-Clip
Height adjustment threaded bar
Height adjustment shifter handle
Cord guide
Grass bag assembly
Grass bag frame
Task Force Grass Bag
20"Lower handle assembly
20"Upperhandle assembly
20"Upper handle (bar only)
Foam grip for upper handle
Power switch assembly
Knob for handle bars
Bolt (Used for knob on handles)
Side discharge door assembly
Bolt for side discharge bracket
Side discharge door bracket
Lock nut - for side discharge door
Pin - for side discharge door
Spring - for side discharge door
Side discharge door with label
Side discharge chute
Cable clamp base
Machine Screw
Cable clamp top
Self tapping screw for wire loom
Rectifier support bracket - plastic
Rectifier heat sync.
Rectifier and bracket assy.
Machine Screw
Machine Screw
Self tapping screw ST 5X16-C
Lock nut - used with rectifier plate
Nut - used with rectifier plate
Washer - used with rectifier plate
 Loading...