

Page 1

ITEM / ARTICLE / ARTICULO # 248906
MODEL / MODELE / MODELO #24053
RE
AD YOUR OPERATOR’S MANUAL COMPLETELY AND CAREFULLY BEFORE
ATTEMPTING
TO SET UP OR OPERATE YOUR NEW POWER TOOL. ALL OPERATORS OF THIS
EQUIPMEN
T SHOULD READ AND UNDERSTAND ALL SAFETY RULES PRINTED ON THE MACHINE
AND IN THIS OPERATOR’S MANUAL BEFORE USE.
CAUTION - FOR YOUR SAFETY
NOTICE: On the nameplate of your machine you will find MFG date code of your unit.
Please record these numbers on this manual cover for future service reference.
MFG. DATE : ________ PURCHASE DATE: _________
Questions,
problems, missing parts? Before returning to your retailer, call our customer
service department at 1-800-444-6742, 8:00 a.m.-6:00 p.m., EST, Monday-Thursday.
8:00 a.m.-5:00 p.m.,
EST, Friday.
PRINTED IN CHINA
7.2V CORDLESS SHEAR
TM
Page 2

TABLE OF CONTENTS
………
PRODUCT SPECIFICATIONS
SAFETY INFORMATION
PACKAGE CONTENTS
………………………………………………………………………………….…………..…………………3
………………………………………………………………………………….…………..…………………7
KNOW YOUR 7.2V CORDLESS SHEAR
OPERATING INSTRUCTIONS
THE BATTERY CHARGER
MAINTENANCE
…………………………………………………………………………………………….…………..…………………10
……………
………………………………………………………………….…………..…………………2
…………………………………………………………….…………..…………………8
………………………………………………………………………….…………..…………………8
……………………………………………………………….…………..…………………10
ENVIRONMENTALLY SAFE BATTERY DISPOSAL
LIMITED TWO-YEAR WARRANTY
PARTS LIST
……………………………………………………………………………………………….…………..…………………12
…………………………………………………………………….…………..…………………11
……………………………………………….…………..…………………11
PRODUCT SPECIFICATIONS
7.2 V CORDLESS SHEAR
Type.......................................... Cordless, battery-operated
Motor ........................................ 7.2 V
Cutting capacity........................3/8 in (9.5 mm)
Speed .......................................
Weight.......................................
900 SPM(No load)
2 bls. 10 oz (1.28 kg)
BATTERY CHARGER
Type.......................................... Nickel-cadmium
rechargeable
Output voltage ........................... 7.2 V DC
Charging time ............................
Input...................................... 120 V AC 60Hz
Output...................................... 9 V DC
Output amperage....................... 0.3 A
2
6-
8 hours
Page 3

SAFETY INFORMATION
CAUTION
WARNING
DANGER
Please read and understand this entire manual before attempting to assemble, operate or install the
produ
ct. These safety instructions are not meant to cover every possible condition that could occur. If
you have any questions regarding the product please call customer service at 1-877-444-6742, 8:00 a.m.6:00
p.m., EST, Monday-Thursday.
8:00 a.m.- 5:00
p.m., EST, Friday.
Safety Signals
The purpose of safety signal statements and symbols is to attract your attention to possible danger. Read them
carefully to understand and practice proper accident prevention.
Signals an EXTREME hazard.
Failure to obey a safety DANGER signal WILL result in serious injury or death to yourself or to others.
Always follow the safety precautions to reduce the risk of fire, electric shock, and personal injury.
Signals a serious hazard.
Failure to obey a safety WARNING signal CAN result in serious injury to yourself and to others. Always
follow the safety precautions to reduce the risk of fire, electric shock, and personal injury.
Signals a moderate hazard.
Failure to obey a safety CAUTION signal MAY result in property damage or personal injury to yourself or to others.
Always follow the safety precautions to reduce the risk of fire, electric shock, and personal injury.
IMPORTANT! Signals special mechanical information.
NOTE: Signals additional important general information.
Safety Tool Symbols
IMPORTANT! Some of the following symbols may be used on your tool. Please study them and learn their meaning.
Proper interpretation of these symbols will allow you to operate the tool better and safer.
SYMBOL NAME EXPLANATION
V Volt Potential voltage
A Amperes Current
Hz Hertz Frequency (cycles per
second)
n
0
.../min Movements Revolutions, strokes, surface
No load speed Rotational speed at no load
per minute speed, orbits, etc. per minute
SYMBOL NAME EXPLANATION
~
- - - Direct current Type or a characteristic of
Alternating Type or a characteristic of
current current
current
Class II Designates double insulation
Ni-Cad Battery Designates that this tool is in
Recycling accordance with Ni-Cad
battery recycling program
3
Page 4

SAFETY INFORMATION
WARNING
READ AND UNDERSTAND ALL INSTRUCTIONS. Failureto follow all instructions listed below may result inelectric shock, fire
and/or serious personal injury.
Work Area
• Keep your work area clean and well lit.
• Do not operate power tools in explosive atmospheres, such as in the presence of flammable liquids, gases, ordust. Power tools
create sparks which may ignite the dust or fumes.
• Keep bystanders, children, and visitors away while operating a power tool. Distractions can cause you to lose control.
Electrical Safety
• A battery-operated tool with integral batteries or a separate battery pack must be recharged only with the specified charger for
the battery. A charger that may be suitable for one type of battery may create a risk of fire when used with another battery.
• Use a battery-operated tool only with specified battery pack. Use of any other batteries may create a risk of fire.
Personal Safety
• Stay alert, watch what you are doing, and use common sense when operating a power tool. Do not use tool while tired or under
the influence of drugs, alcohol, or medication. Amoment of inattention while operating power tools mayresult in serious personal
injury.
• Dress properly. Do not wear loose clothing or jewelry.Contain long hair. Keep your hair, clothing, and gloves away from moving
parts. Loose clothes, jewelry, or long hair can be caught in moving parts.
• Avoid accidental start-ups. Make sure the switch is in the locked or off position before inserting battery pack. Carrying tools with
your finger on the switch or inserting the battery pack into a tool with the switch on invites accidents.
• Remove adjusting keys or wrenches before turning thetool on. A wrench or key that is left attached to a rotating part of the tool
may result in personal injury.
• Do not overreach. Keep proper footing and balance at alltimes. Proper footing and balance enable better control ofthe tool in
unexpected situations.
ALWAYS WEAR EYE PROTECTION.
Agrass trimmer can throw foreign objects intoyour eyes which could cause permanent eye damage.
ALWAYS wear safety goggles (not glasses). capitalize, ordinary eyeglases have only impact-resistant lenses...
they are NOT safety goggles.
Tool Use and Care
• Do not use tool if switch does not turn it on or off. A tool that can not be controlled with the switch is dangerous and must be
repaired.
• Disconnect battery pack from tool or place the switch inthe locked or off position before making any adjustments, changing
accessories, or storing the tool. Such preventive safety measures reduce the risk of starting the tool accidentally.
• Store idle tools out of reach of children and other untrained persons. Tools are dangerous in the hands of untrained users.
• When battery pack is not in use, keep it away from other metal objects like: paper clips, coins, keys, nails, screws,or other
small metal objects that can make a connection from one terminal to another. Shorting the battery terminals together may
cause sparks, burns, or a fire.
• Check for misalignment or binding of moving parts, breakage of parts, and any other condition that may affect the tool’s
operation. If damaged, have the tool serviced before using. Many accidents are caused by poorly maintained tools.
• Use only accessories that are recommended by the manufacturer for your tool. Accessories that maybe suitable for one tool
may create a risk of injury when used on another tool.
Service
•Tool service must be performed only by qualified repair personnel. Service or maintenance performed by unqualified personnel
may result in a risk of injury.
•When servicing a tool, use only identical replacement parts. Follow instructions in the Maintenance section of this manual. Use
of unauthorized parts or failure to follow Maintenance Instructions may create a risk of shock or injury.
4
Page 5

SAFETY INFORMATION
For ALLGarden Tools
•Avoid dangerous environment. Don’t use tool in damp or wet locations.
•Don’t use in rain.
•Keep by standers and children away while operating.
•Dress properly. Do not wear loose clothing or jewellery.They can be caught in moving parts. Use of rubber gloves and
substantial footwear is recommended when working outdoors.
•Avoid unintentional start-ups.
•Don’t grasp the exposed cutting line when picking up or holding the tool.
•Don’t force the tool. It will do the job better and with less likelihood of a risk of injury at the rate for which it was designed.
•Don’t over reach. Keep proper footing and balance at all times.
•When not in use, tool should be stored indoors in dry, high, or a locked-up place-out of reach of children.
•Maintain tool with care. Keep cutting line clean for best performance and to reduce the risk of injury.
•Keep guards in place and in working order.
•Keep hands and feet away from cutting line.
•Always use eye protection.
For Shear
•Always inspect the workarea before starting the tool. Removeany stones, sticks, debris or objects thatcould come in
contact with the grass shears.
•Do notoperate if any air openings are blocked. Keep airopenings free of dust, lint, hair, and anything that mayreduce
airflow.
•During operation, make sure there are no otherpersonsor animals within a radius of 10’(3 m). Stopusing the tool while
people, especially children, or pets are nearby.
•Allow the tool to come to a complete stop before touching the blades. The blades are sharp and may cause injury.
WARNING
• Make sure the switch is OFF when clearing jammed material.Remove or disconnect the battery before servicing, cleaning,
or removing material from the grass shears.
• DO NOT operate the grass shears when you are tired or your visibility is limited. Do not use the grass shears at night or
inreduced light.
For Battery Pack and Charger
To avoid serious injury, risk of fire, explosion and danger of electric shock or electrocution:
• DO NOT probe the charger with conductive materials. The charging terminals hold 120 V.
• If the battery pack case is cracked or damaged, DO NOT insert into the charger. Replace the battery pack.
• DO NOT charge these battery packs with any other type of charger.
• Charge only the shear battery pack provided.
• DO NOT allow liquid inside the charger.
• DO NOT try to use the charger for any other purpose than what is presented in this manual.
WARNING
If the battery fluid gets in your eyes, flush immediately with clean water for at least 15 minutes. Get immediate medical
attention. Do not charge the battery pack inrain or in wet conditions. Do not immerse the tool, battery pack, or charger
in water or other liquid.
• Do not allow the battery pack or charger to over heat. If they are warm, allow them to cool down. Recharge only at room
temperature.
• Do not cover the ventilation slots on the top of the charger. Do not set the charger on a soft surface. Keep the ventilation
slots of the charger clear.
• Do not allow small metal items or material such as steel wool, aluminum foil, or other foreign particles into the charger
cavity.
• Unplug the charger before cleaning and when there is no battery pack in the cavity.
• Do not place the battery charger or the battery pack inthe sun or in a warm environment. Keep at normal room
temperature.
• Do not try to connect two chargers together.
• The battery pack cells may develop a small leak under extreme usage or temperature conditions. If the outer seal is
broken and the leakage gets on your skin:
– Use soap and water to wash immediately.
– Neutralize with lemon juice, vinegar, or other mild acid.
5
Page 6

SAFETY INFORMATION
WARNING
READ AND UNDERSTAND ALL INSTRUCTIONS.Failure to follow safety rules listed below may result inelectric
shock, fire, and/or personal injury:
• Do not abuse the cord. Never use the cord to carry the tool. Never pull on the cord to remove the plug from the power
outlet. Keep cords away from heat, oil, sharp edges, or moving parts. Replace damaged cords immediately. They may create
a fire. Do not use.
• Do not place the charger where the power cord might be stepped on, tripped on, or subjected to damage.
• Abattery-operated tool with integral batteries or a separate battery pack must be recharged only with the specified charger
for the battery. A charger that may be suitable for one type of battery may create a risk of fire when used with another
battery.
• Use a battery-operated tool only with the specifically designated battery pack. Use of any other batteries may create a risk
of fire.
Grounding (Fig. A)
In the event of a malfunction or breakdown, grounding provides the path of least resistance for electric current, and reduces
the risk of electric shock.
This battery charger is double insulated and has atwo-prong polarized plug (one blade is wider than the other). This plug
will fit into a polarized outlet only one way. If the plug does not fit fully in the outlet, reverse the plug. If it still does not fit,
contact a qualified electrician to install the proper outlet. DO NOT change the plug in any way. IN ALL cases make sure the
outlet is properly grounded. If you are not sure, have a certified electrician check the power outlet.
Fig. A
Fig. B
Properly
erly
Prop
Grounded
grounded
Outlet
outlet
2-prong
2 Prong
polarized plug
Polarized Plug
Extension Cords (Fig. B)
Do not use an extension cord for the charger unless absolutely necessary. If you use an extension cord make sure the
cord is in good condition.
Use one heavy enough to carry the current your charger will draw. An under sized extension cord will cause a dropin line
voltage resulting in loss of power and over heating.The table below shows the correct size of extension cordto use,
depending on cord length and the charger's ampere rating listed on the nameplate. If in doubt, use the next heavier gauge.
The smaller the gauge number is, the heavier the cord.
Make sure your extension cord is properly wired and in good condition. Always replace a damaged cord or have it repaired
by a qualified electrician. Protect your extension cord from sharp objects, excessive heat and damp or wet areas.
Use a separate electric circuit for your tools. Never use any other voltage or power source than common household 120 V
electrical power. The circuit must not beless than a #12 wire and should be protected with a 15 Atime lag fuse. Before
connecting the charger to the power line, make sure the electric current is rated the same as the current stamped on the
charger nameplate.To reduce the risk of disconnection of charger cordfrom the extension cord during operation make a
knot(Fig. B).
Minimum Gauge for Extension Cords (AWG)
using 120 V only)
n
(whe
Ampere Rating Total Length of Cord in Feet (meters)
More Than Not More Than 25' (7.6 m) 50' (15 m) 100' (30.4 m) 150' (45.7 m)
0 6 18 16 16 14
6 10 18 16 14 12
10 12 16 16 14 12
12 16 14 12 Not Recommended
6
Page 7

PACKAGE CONTENTS
WARNING
By purchasing a battery-powered tool you have helped reduce the pollution level of our environment.
Please check the contents of the carton below. Examineall the parts before using the cordless Shear and battery charger.
To reduce the risk of fire, electric shock, and personal injury:
• Read all instructions before using this tool. Basic safety precautions should always be followed.
• Please keep these instructions safe for later use. The safety rules must be followed to avoid injury when using
the Shear .
(A) Blade Sheath
(B) Shear
(C) Handle
(E) Wheels
(D) Battery charger
7
Page 8
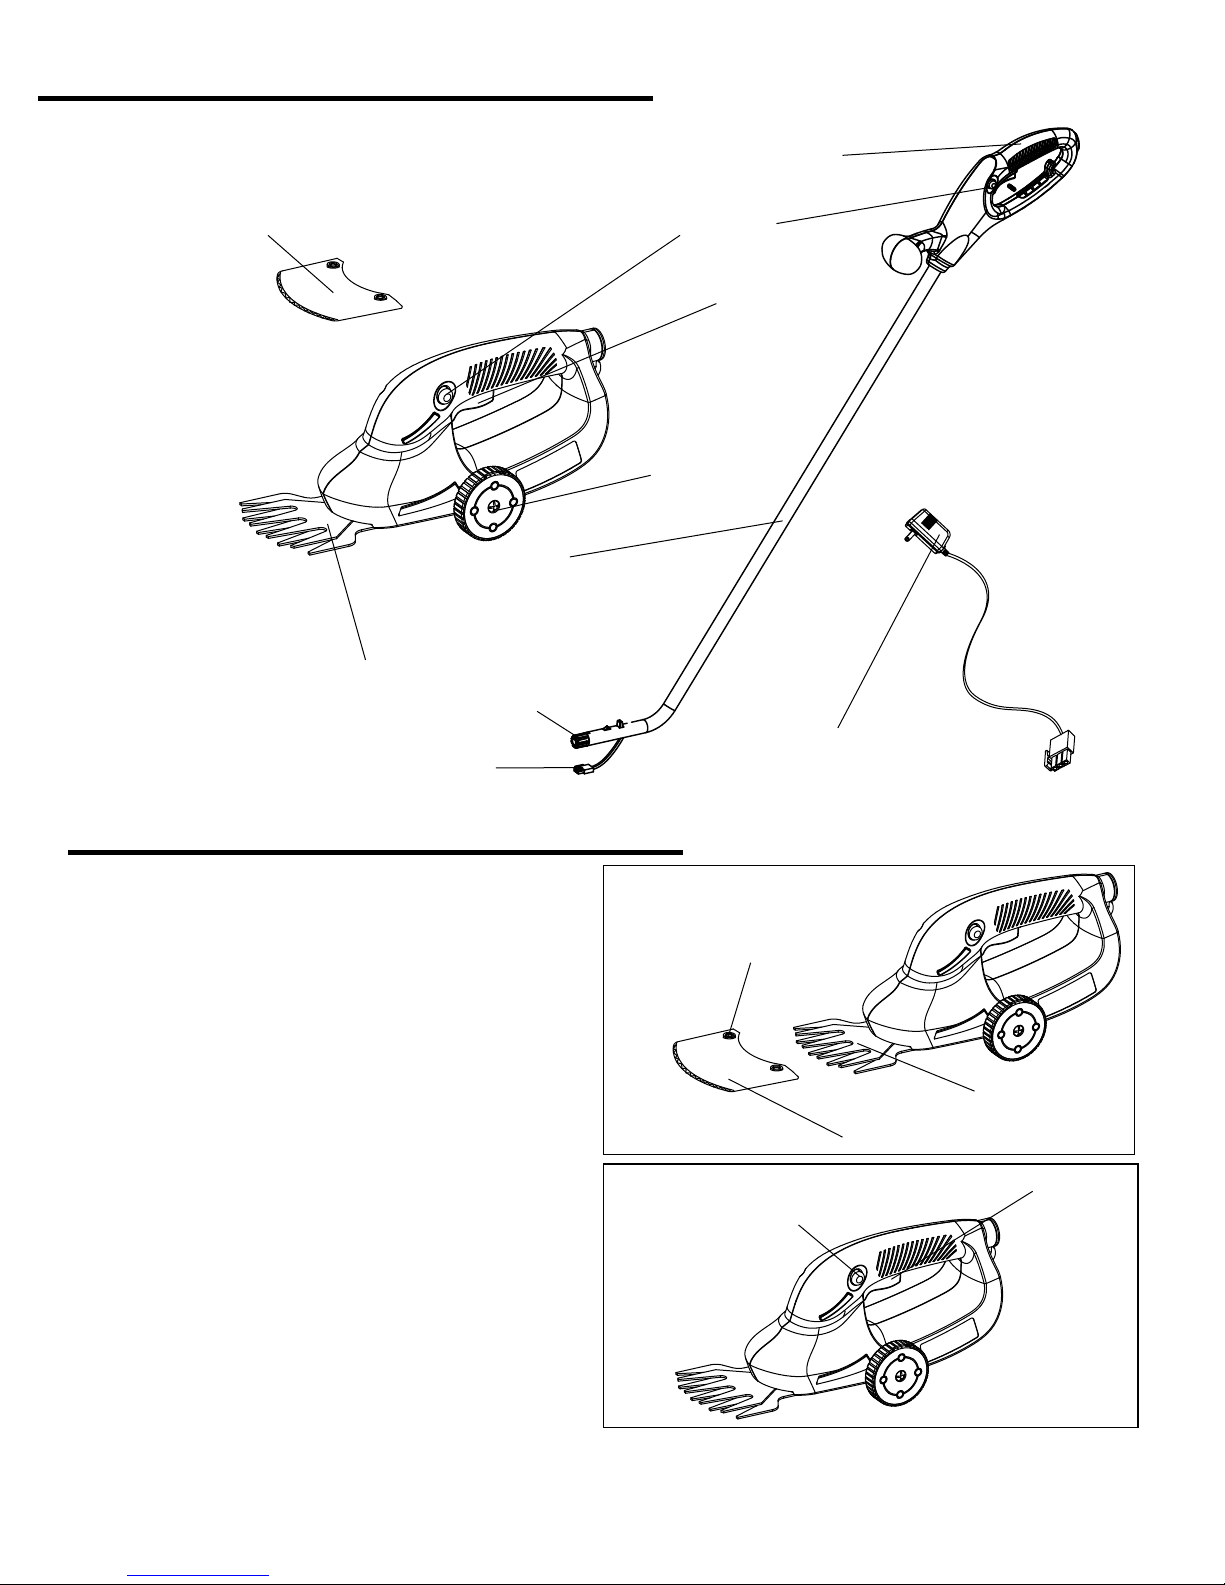
KNOW YOUR 7.2V CORDLESS SHEAR
Handle
Blade Sheath
Cutting blade
Connector
Plug
Pole
Lock-
off button
Trigger switch
Wheels
Battery charger
OPERATING INSTRUCTIONS
Blade Sheath
Install the blade sheath (Fig. 1):
1. Align the blade sheath (2) with the cutting blades (1) on
the shear.
2. Slide the blade sheath (2) over the blades, then insert
two button (3).
3. To remove the sheath, pull out two button (3) and slide
the blade sheath.
Power Switches (Fig. 2)
shear has a Lock-off button (2) and a trigger
The
switch (1). Both must be used to operate the shear:
Place one hand on the the handle and depress the lock
1.
ON/OFF button to the right (2).
2.
Squeeze the trigger switch (1) to turn on the shear.
3.
Release the trigger switch to turn off the shear.
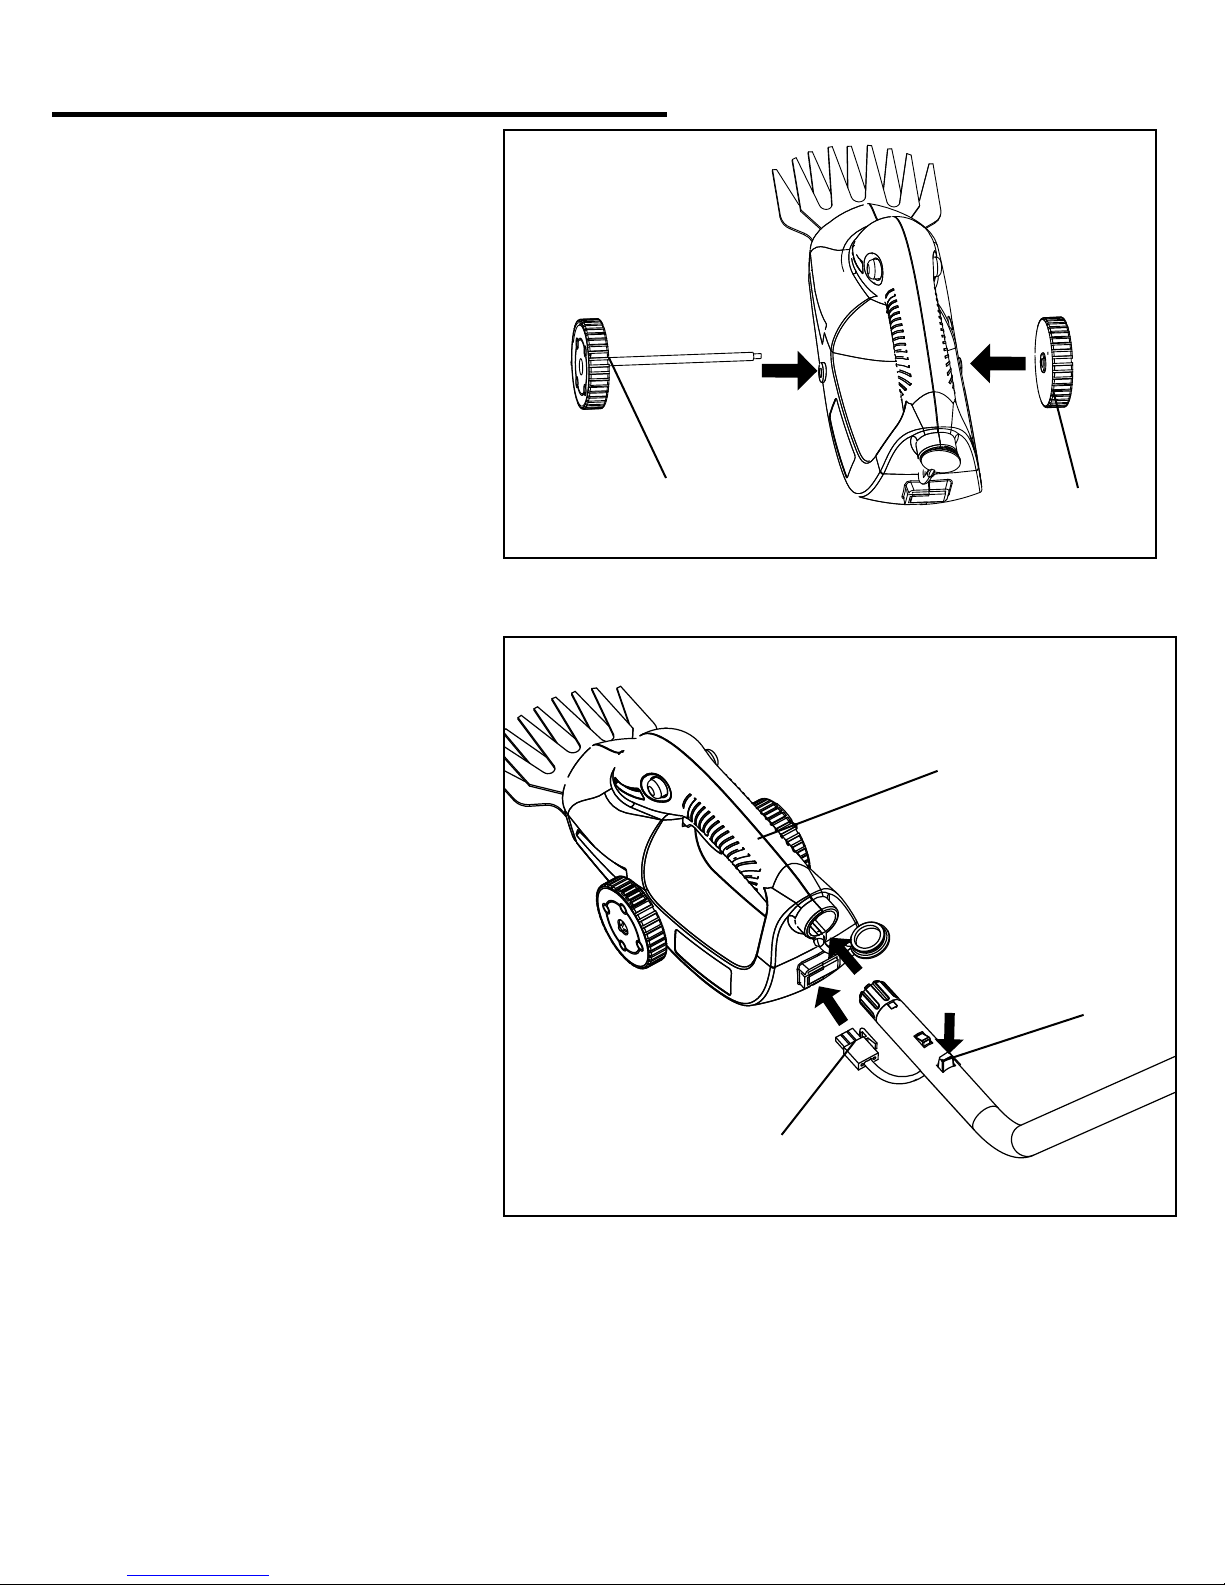
Install wheels
1. Screw wheel into shear body as shown.
Fig. 1
Fig. 2
3
1
2
1
2
8
Page 9
OPERATING INSTRUCTIONS
INSTALL WHEELS
1. Thread wheels and the shaft (1) in to grass
shear body.
2. Screw with another wheel (2).
Fig. (3)
EXTENSION HANDLE
1. Install the handle.
2. Press the lock button (2) and push the handle
firmly into the shear (1).
3. Install the extension handle power
connection (3).
Fig. (4)
1
2
1
Press
2
3
9
Page 10

THE BATTERY CHARGER
Charging Procedure (Fig. 5)
The Shear is not shipped fully charged. The Shear requires charging before using the for the first time.
The charger requires no adjustment or settings.
1. Plug the charger into an AC power outlet.
2. Insert the charger plug into the shear, makingsure the
plug is fully seated into the shear.
3.Charge for 8 hours.
Checking the Charge
If the battery pack does not charge properly:
• Check the current at the power outlet with another tool.
Make sure that the outlet is not turned off.
• Check that the charger contacts have not been shorted
by debris or foreign material.
• If the surrounding air temperature is not normal room
temperature, move the charger and Shear to a
location where the temperature is between 65 - 75˚F
(18 - 24˚C).
Charger Maintenance
• Keep the charger clean and clear of debris. Do not allow foreign material into the recessed cavity or on the contacts.
• Wipe with a dry cloth to clean. Do not use solvents, water, or placein wet conditions.
• Always unplug the charger when there is no battery packinit.
• Give the battery a full charge before placing in storage. Do not recharge a fully charged battery pack or when warm.
Overchargingshortens the battery life.
• Recharge the Shear anytime you notice there is less power. Never let the batteries become completely discharged.
• Keep the charger stored at normal room temperature. Do not store it in excessive heat. Do not use in direct sunlight.
Always recharge in a room temperature of 50 - 104˚F(10 - 40˚C). If the battery pack is hot, let it cool down before
recharging.
Fig. 5
MAINTENANCE
WARNING
To avoid personal injury and risk of fire and electric shock, always remove the battery pack before adjusting, inspecting,
or cleaning.
Cleaning
1. Brush or blow dust and debris out of the air vents using compressed air or a vacuum. Keep them free of obstructions.
Do not spray, wash, or immerse in water.
2. Wipe off the housing and plastic components with amoist soft cloth.
CAUTION
Do not use strong solvents or detergents on the plastic housing or plastic components. Certain household cleaners may
damage and may also cause a shock hazard.
9
Page 11

ENVIRONMENTALLY SAFE BATTERY DISPOSAL
The following toxic and corrosive materials are in the batteries used in this battery pack:
Cadmium, a toxic material.
WARNING
All toxic materials must be disposed of in a specified manner to prevent contamination of the environment. Before
disposing of damaged or worn out nickelcadmium battery packs, contact your local waste disposal agency, or the
local Environmental Protection Agency for information and specific instructions. Take the batteries to a local
recycling and/or disposal centre, certified for cadmium disposal.
WARNING
If the battery pack cracks or breaks, with or without leaks, do not recharge it and do not use. Dispose of it and
replace with a new battery pack. DO NOT ATTEMPT TO REPAIR IT! To avoid injury and risk of fire, explosion, or
electric shock, and to avoid damage to the environment:
• Cover the battery's terminals with heavy-duty adhesive tape.
• DO NOT attempt to remove or destroy any of the battery pack components.
• DO NOT attempt to open the battery pack.
• If a leak develops, the released electrolytes are corrosive and toxic. DO NOT get the solution in the eyes or on
skin, and do not swallow it.
• DO NOT place these batteries in your regular household trash.
• DO NOT incinerate.
• DO NOT place them where they will become part of any waste landfill or municipal solid waste stream.
• Take them to a certified recycling or disposal center.
LIMITED TWO-YEAR WARRANTY
The manufacturer warrants to the original purchaser that each new product and service part is free from defects in
material and workmanship and agrees to repair or replace under this warranty any defective product or part as follows
from the original date of purchase.
2 —Year Limited Warranty
THIS WARRANTY IS NOT TRANSFERABLE AND DOES NOT COVER:
Products sold damaged or incomplete, sold “as is”, sold reconditioned or used as rental equipment.
Delivery, installation or normal adjustments explained in the owner’s manual.
Damage or liability caused by shipping, improper handling, improper installation, incorrect voltage or improper wiring,
improper maintenance, improper modification, or the use of accessories and /or attachments not specifically recommended.
Repairs necessary because of operator abuse or negligence, or the failure to install, operate, maintain and store the product
according to the instructions in the owner’s manual.
Damage caused by cold, heat, rain, excessive humidity, corrosive environments and materials, or other contaminants.
Expendable items that become worn during normal use.
Cosmetic defects that do not interfere with tool functionality.
Freight costs from customer to vendor.
ANY INCIDENTAL, INDIRECT OR CONSEQUENTIAL LOSS, DAMAGE, OR EXPENSE THAT MAY RESULT FROM ANY
DEFECT, FAILURE OR MALFUNCTION OF THE PRODUCT.
Some states do not allow the exclusion or limitations on how long an implied warranty lasts, so the above limitations may
not apply to you……
WARRANTY REPLACEMENT PARTS are available by calling the toll free number, 1-800-444-6742, 8:00am – 6:00pm EST,
Monday through Thursday, 8:00am – 5:00pm EST, Friday.
11
Page 12

Item Name
blade cover
pin
blade
cover
nut
wheel
right shell
nut
spring
button
switch
spring
pole pin
shell tie-in
pole groupware
right handle
handle button spring
handle button spring
trigger switch
louck off button
trigger switch board
switch board
insulated line
battery
pole tie-in
motor
left shell
middle cover
axle
washer
rubber cover
charger
rubber stem
Name
1
11
2
3
4
5
6
7
8
9
10
11
12
13
14
15
16
17
18
19
20
21
22
23
24
25
26
27
38
29
30
31
32
33
1
2
1
2
2
2
1
6
1
1
1
1
1
1
1
1
2
4
4
2
1
1
1
16
1
1
1
1
1
1
1
1
1
Qty
Item
Qty
REPLACEMENT PARTS LIST
 Loading...