

Page 1
i
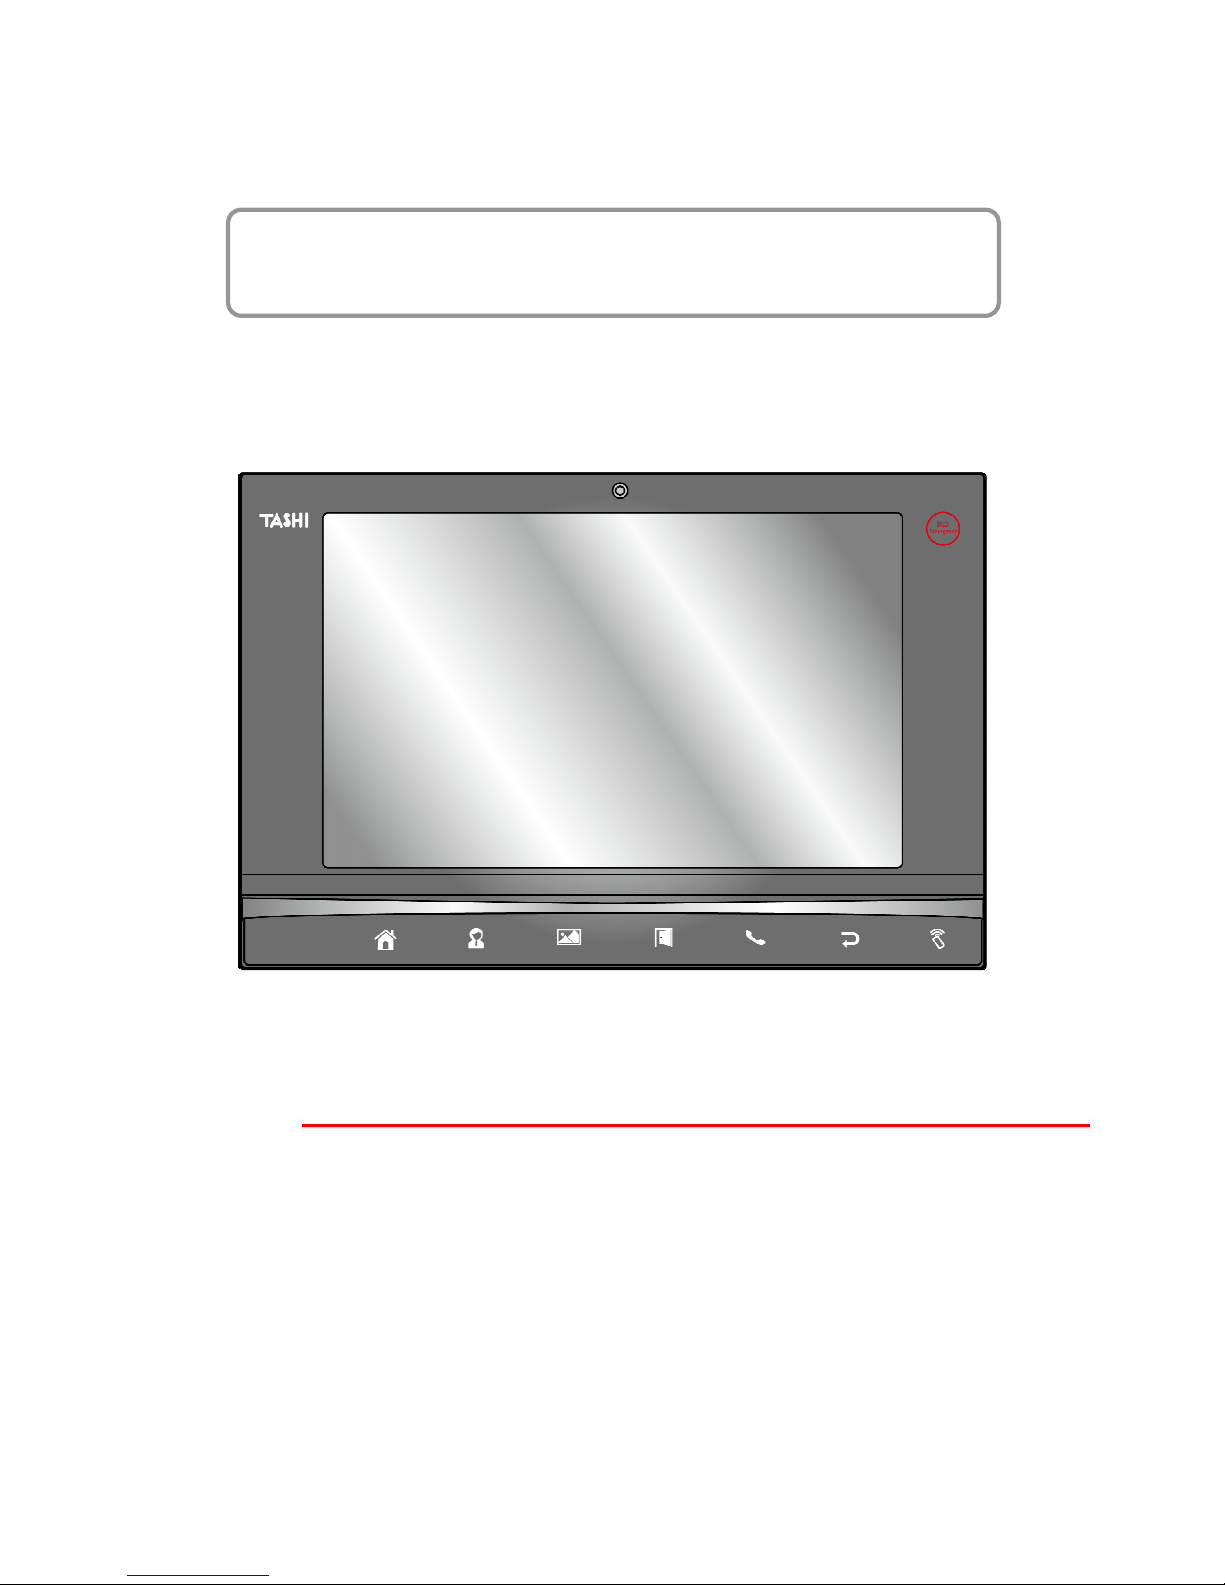
Multi-Function Versatile Controller
- MT880 -
User’s Manual
Version 1.0
Page 2
i
About This Manual
Preface
This manual explains how to install, operate and maintain the MT880 Multi-Function Versatile
Controller.
No part of this publication may be reproduced or used in any form, or by any electrical or
mechanical means, without permission in writing from the manufacturer, which includes
photocopying, recording, or information storage and retrieval systems. The material in this
manual is subject to change without notice.
© Copyright 2013 unitech Electronics Co., Ltd. All rights reserved.
Unitech global website address: http:\\www.unitech-adc.com
Microsoft, Windows and ActiveSync are either registered trademarks
or trademarks of Microsoft Corporation. Other product names
mentioned in this manual may be trademarks or registered
trademarks of their respective companies and are hereby
acknowledged.
Regulatory Compliance Statements
FCC Warning Statement
This equipment has been tested and found to comply with the limits for a Class B digital device,
pursuant to part 15 of the FCC rules. These limits are designed to provide reasonable
protection against harmful interference in a residential installation.
This equipment generates, uses and can radiate radio frequency energy and, if not installed
and used in accordance with the instructions, may cause harmful interference to radio
communications. However, there is no guarantee that interference will not occur in a particular
installation. If this equipment does cause harmful interference to radio or television reception,
which can be determined by turning the equipment off and on, the user is encouraged to try to
correct the interference by one or more of the following:
Relocate the receiving antenna.
Increase the separation between the equipment and receiver.
Connect the equipment into an outlet on a circuit that is different from the receiver.
Consult the distributor or an experienced radio/television technician for help.
1. This Transmitter must not cohabitate or operate in conjunction with any other antenna(s)
or transmitter(s).
2. This equipment complies with FCC RF radiation exposure limits set forth for an
uncontrolled environment. To maintain compliance with FCC RF exposure compliance
requirements, avoid direct contact to the transmitting antenna during transmission.
3. Any changes or modifications (including the antennas) made to this device that are not
expressly approved by the manufacturer may void the user’s authority to operate the
equipment.
Page 3

ii
Canadian Compliance Statement
This Class A Digital apparatus meets all requirements of the Canadian Interference-Causing
Equipment Regulations.
Cet appareil numérique de la classe A respecte les exigences du Règlement sur le matériel
broilleur du Canada.
European Conformity Statement
Declaration of Conformity with Regard to the R&TTE 1999/5/EC and EMC 89/336/ EEC
directives.
RoHS Statement
This device conforms to RoHS (Restriction of Hazardous
Substances) European Union regulations that set maximum
concentration limits on hazardous materials used in electrical and
electronic equipment.
Taiwan NCC Warning Statement
交通部電信總局低功率電波輻射性電機管理辦法 (930322)
根據交通部低功率管理辦法規定:
第十二條 經型式認證合格之低功率射頻電機,非經許可,公司、商號或使用者均不得擅自變更
頻率、加大功率或變更原設計之特性及功能。
第十四條 低功率射頻電機之使用不得影響飛航安全及幹擾合法通信;經發現有干擾現象時,應
立即停用,並改善至無幹擾時方得繼續使用。前項合法通信,指依電信法規定作業之無線電通信。
低功率射頻電機須忍受合法通信或工業、科學及醫療用電波輻射性電機設備之干擾。
Warranty
The following items are covered under Unitech Limited Warranty:
MT880 Multi-Function Versatile Controller – 1-year limited warranty.
Cables – three-month limited warranty.
Page 4

iii
Table of Contents
PREFACE ................................................................................................................................... I
Regulatory Compliance Statements ......................................................................................... i
ABOUT THIS MANUAL .............................................................................................................. I
Warranty .................................................................................................................................. ii
CHAPTER 1 ............................................................................................................................... 1
Introducing the MT880 ............................................................................................................ 1
Tour of the MT880 ................................................................................................................... 1
GETTING STARTED .................................................................................................................. 1
Front View ........................................................................................................................... 2
Bottom View ........................................................................................................................ 3
Rear View ............................................................................................................................ 3
Setting up the MT880 ............................................................................................................. 3
Connecting Power ............................................................................................................... 3
Powering On the MT880 ..................................................................................................... 3
Using the MT880 for the First Time ......................................................................................... 4
Using the Touch-screen ...................................................................................................... 4
Setting the Date and Time ................................................................................................... 4
CHAPTER 2 ............................................................................................................................... 5
On-screen virtual Keyboard ................................................................................................ 5
BASIC OPERATION .................................................................................................................. 5
RFID Reader (Option) ............................................................................................................. 6
RFID Card Verification ........................................................................................................ 6
Audio Input/Output .................................................................................................................. 7
Built-in Camera (Option) ......................................................................................................... 8
Tools/Utilities/Applications....................................................................................................... 9
Warm Boot .......................................................................................................................... 9
Cold Boot .......................................................................................................................... 10
Registry Backup ................................................................................................................ 11
Func 9 ............................................................................................................................... 12
Server Manager ................................................................................................................ 12
MifareDemo ...................................................................................................................... 18
Page 5

iv
CameraDemo .................................................................................................................... 19
WavTest ............................................................................................................................ 21
Screen Rotation ................................................................................................................ 22
Calibration ......................................................................................................................... 23
Net .................................................................................................................................... 24
Windows CE Remote Management .................................................................................. 25
CHAPTER 3 ............................................................................................................................. 28
USB Port ............................................................................................................................... 28
DATA COMMUNICATION ........................................................................................................ 28
Establishing a Wi-Fi Connection ........................................................................................... 29
IP Address Setup .................................................................................................................. 29
Obtaining an IP Address via DHCP Server........................................................................ 29
Specifying an IP Address .................................................................................................. 30
CHAPTER 4 ............................................................................................................................. 31
Adjusting the Backlight ......................................................................................................... 31
POWER AND HARDWARE ..................................................................................................... 31
Hardware Reset .................................................................................................................... 32
Performing a Software Reset ................................................................................................ 32
Performing a Warm Boot ................................................................................................... 32
Performing a Cold Boot ..................................................................................................... 33
Terminal Block ...................................................................................................................... 33
Relay Connector ................................................................................................................... 34
APPENDIX A ........................................................................................................................... 35
SYSTEM SPECIFICATION ...................................................................................................... 35
APPENDIX B ........................................................................................................................... 36
WORLDWIDE SUPPORT ........................................................................................................ 36
Page 6
1
Getting Started
Chapter 1
Introducing the MT880
The MT880 is a versatile fixed-mount TASHI (Time & Attendance, Access Control, Surveillance,
Home Automation and Intercom) Controller. This multi-functional device offers a RFID reader
(option), a microphone, and an audio speaker. It runs on a Windows CE 6.0 operating system,
which provides a variety of applications that benefit numerous industries.
Features
Internal System
TI OMAP DM3730 with DSP 1GHz
Processor
Microsoft Windows CE 6.0
Memory
512M bytes DDR SDRAM
512M bytes NAND Flash
Display
10.1” inches color TFT-LCD touch
screen
1280 x 800 resolution
Multimedia
Speaker Audio Output
Microphone Audio Input
RFID Reader (Optional)
3 in 1 (ISO 14443A/B & ISO 15693) +
NFC
Communication
RS485
USB 2.0 Host
Ethernet 10/100Base-T
WiFi 802.11 b/g/n (Optional)
User Interface
6 Hard Buttons
Touch-screen
Software Programming Tools
C#, VB.NET, C++
TASHI Middleware
SIP and IP-CAM server/client SDK
supporting
ModBus SDK supporting
Elfin utility
Camera (Optional)
2.0 megapixel CMOS camera
Tour of the MT880
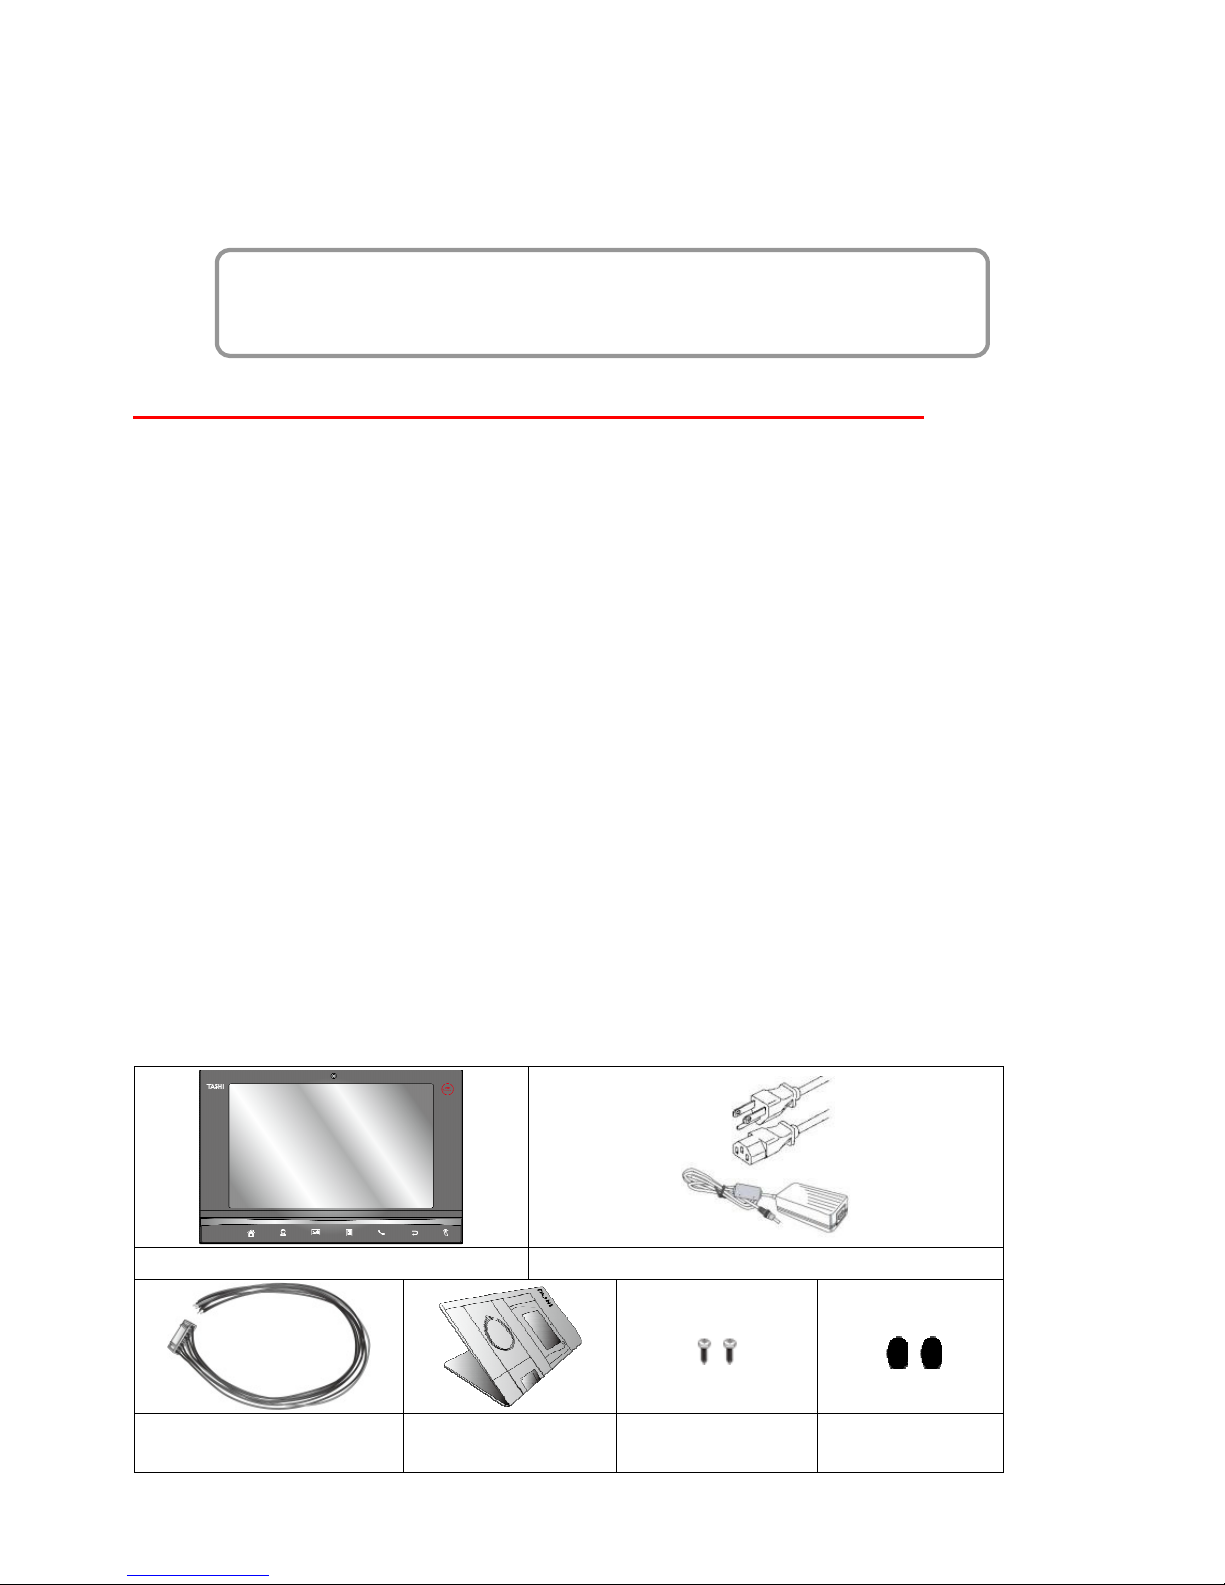
Please make sure the following contents are in the MT880 box. If anything appears missing or
damaged, please contact a Unitech representative.
MT880
Power Adapter / Power cord (option)
Power & communication
cable (8 pins)
QRG paper note
Phillips head screw
(2 pcs)
Screw cover
(2 pcs)
Page 7
2
NOTE: The MT880’s display is shipped with a transparent protection film that has been pasted
onto the surface of touch panel of the MT880 for protecting the top cover and touch
panel. Before using the MT880, tear out the protective film.
If MT880 is provided with RFID reader, you will see the RFID reader logo on the
front panel of MT880.
DO NOT wipe the MT880 with any chemical cleansing agent! We recommend the
usage of clean water or soft cloth for display panel/eyeglasses to clean the machine.
The following sections describe the main components and features of the MT880.
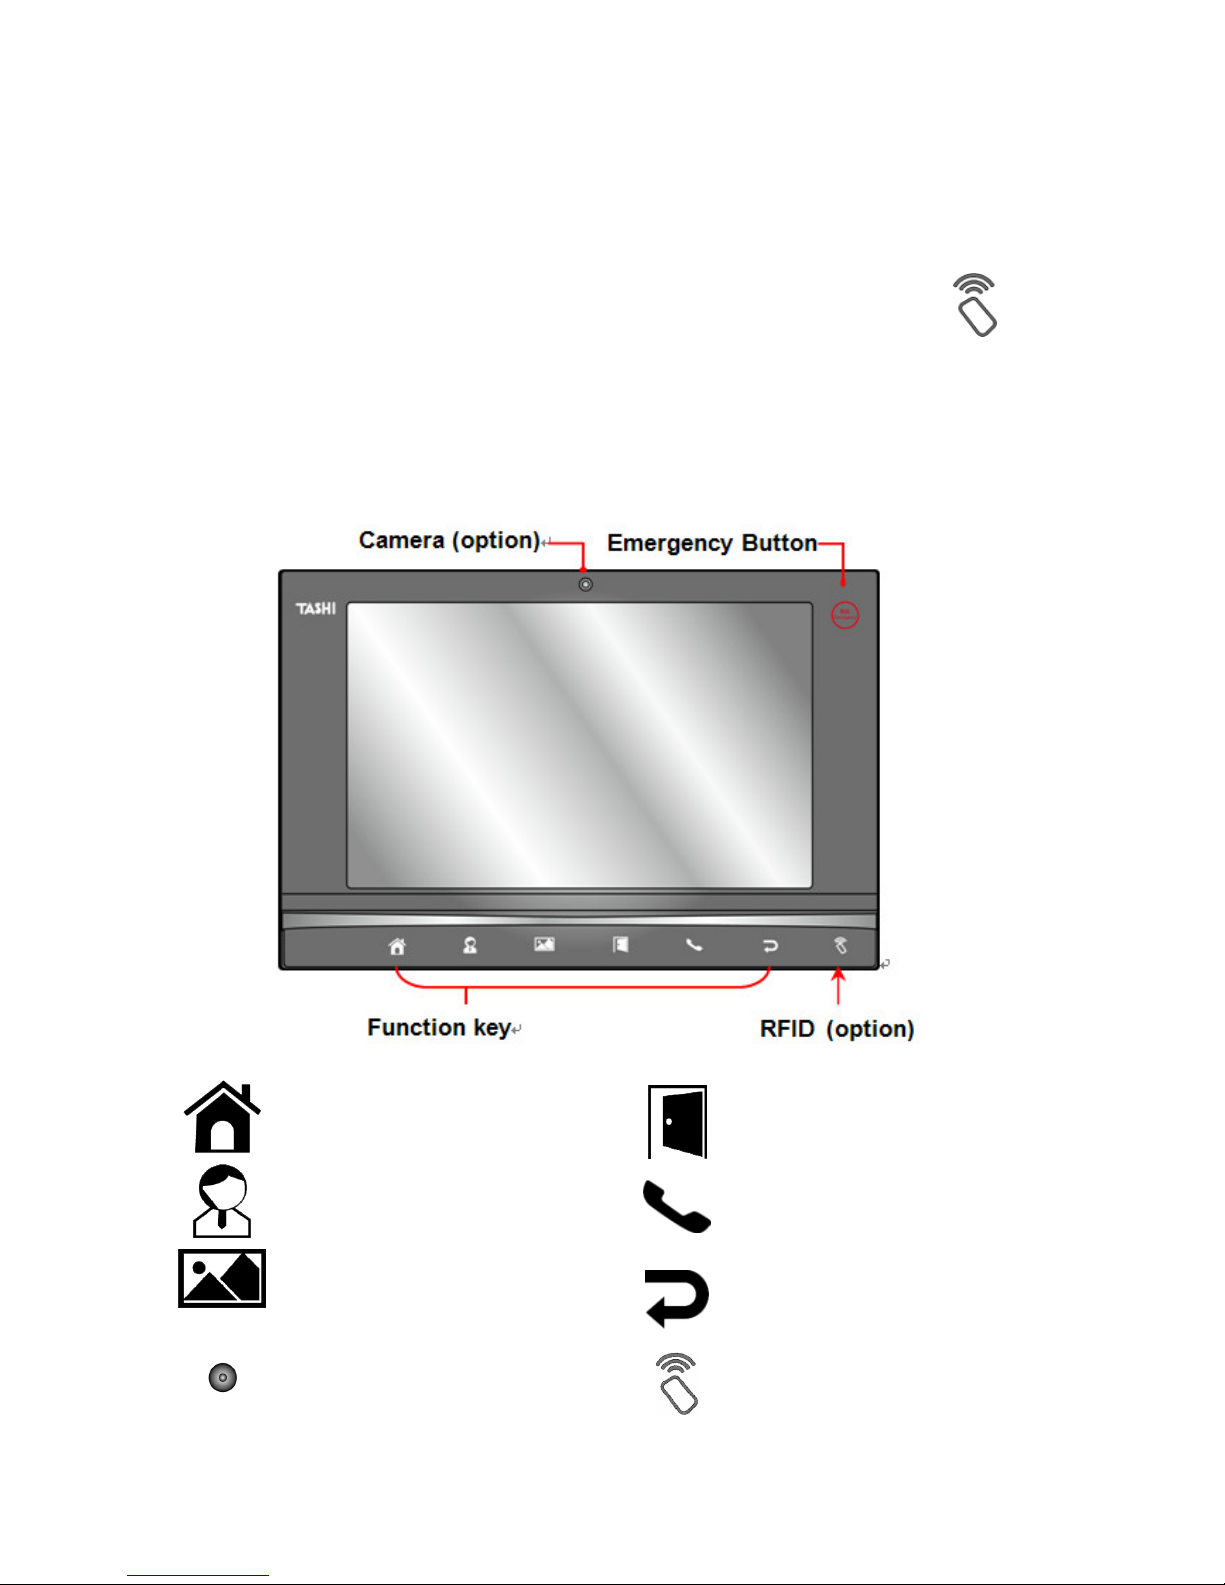
Front View
Function button for Back to
home page
Function button for Door
opening
Function button for Call to
administrator
Function button for Calling
Function button for Digital
frame
Function button for Back to
previous screen
Camera (Option)
Function button for RFID
(Option)
Page 8
3
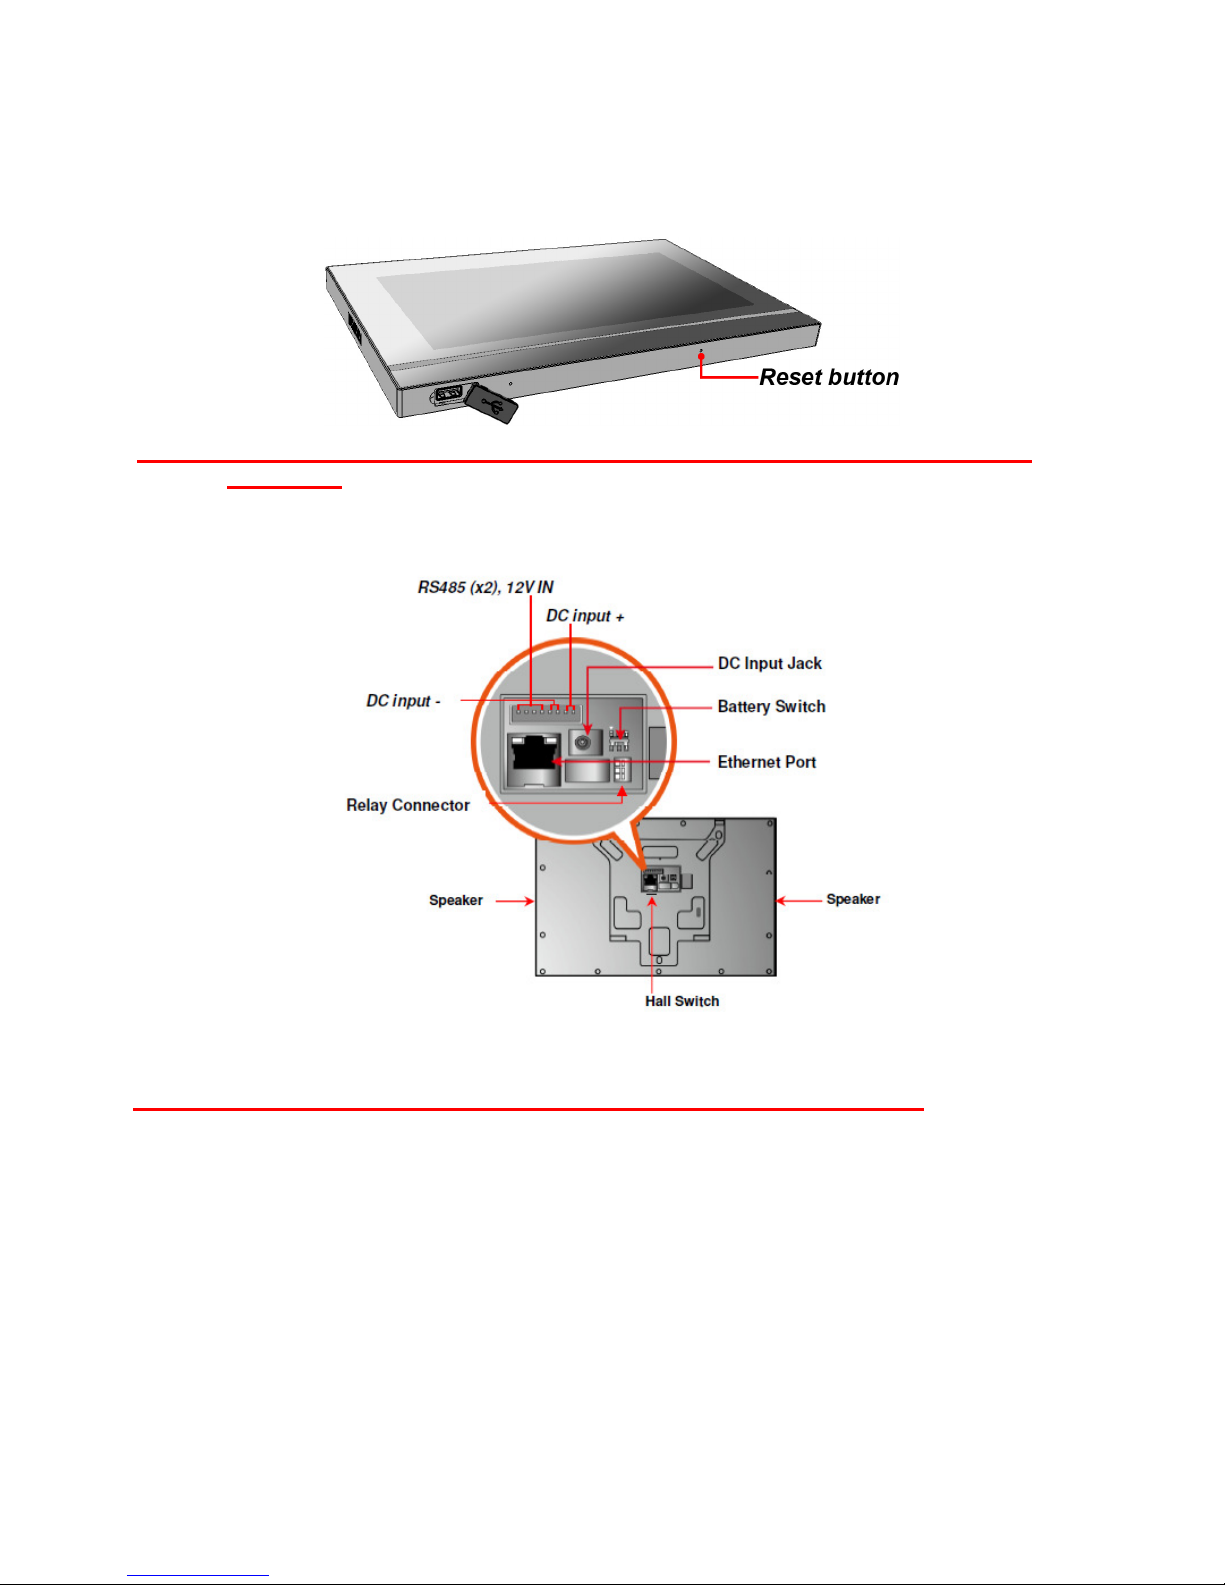
Bottom View
CATION: ALWAYS CLOSE THE RUBBER CAP PROPERLY to ensure the USB port is
watertight.
Rear View
Setting up the MT880
Connecting Power
Connect power to the MT880 through the following instruction: Plug the Power Adapter Cable
into the MT880’s DC input jack and then connect the other end of the Power Adapter into an
electrical outlet.
Powering On the MT880
The MT880 automatically powers on when the Power Adapter plugs into an external power
source. The MT880 welcome screen appears.
Page 9
4
Using the MT880 for the First Time
Using the Touch-screen
1. Tap the screen to choose a menu option.
2. Double tap to open programs.
3. Use the Windows CE Keyboard to type letters or numbers into a data field or on a form.
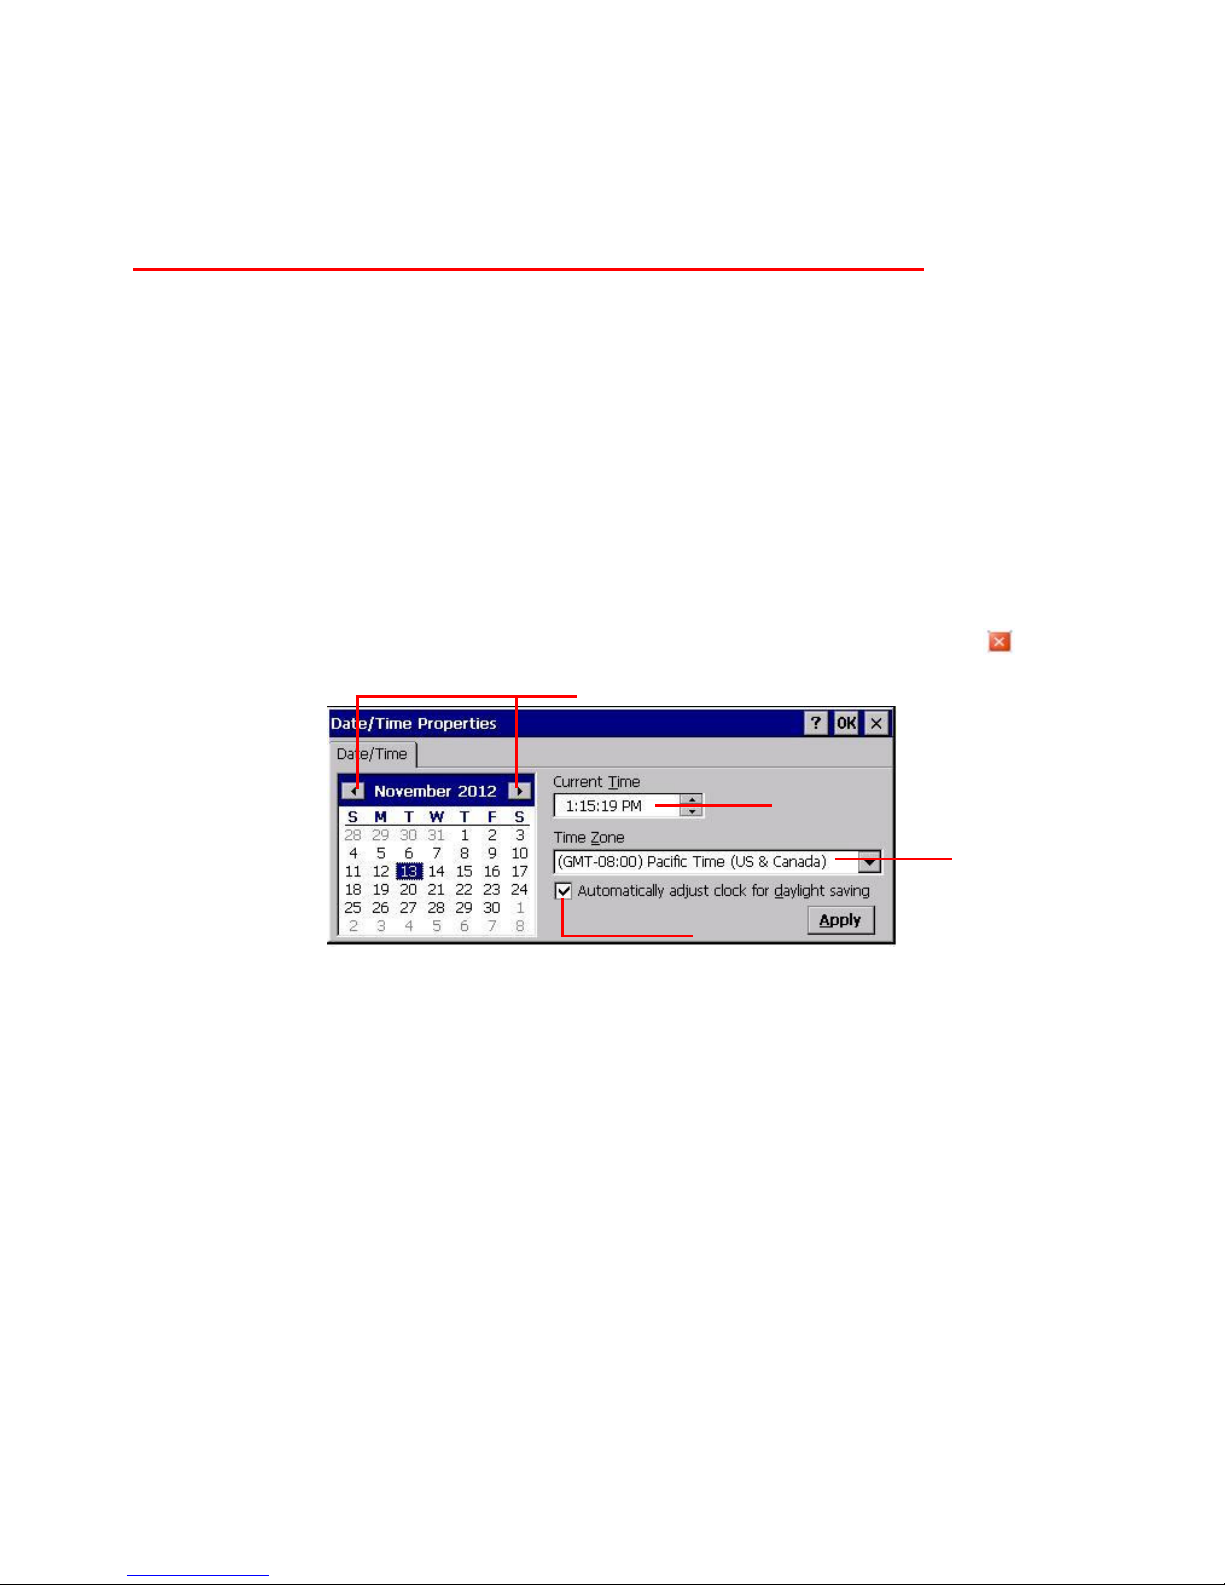
Setting the Date and Time
In the Date/Time Properties window, touch the screen to select the current date/time, time zone
and daylight saving time option.
Tap the Left or Right arrows to scroll through the desired year and month, or directly tap
the year or month to change the setting.
Tap on the Hr/Min/Sec AM/PM to input the Hr/Min/Sec to set the time.
Tap the arrow and set the correct time zone from the drop-down menu.
Check the box to enable Windows to automatically adjust for day-light saving time.
Tap Apply to save the settings and exit the Date/Time Properties dialog, or tap to exit
without saving.
Date Setting
Time Setting
Time Zone Setting
Daylight Saving
Page 10
5
Basic Operation
Chapter 2
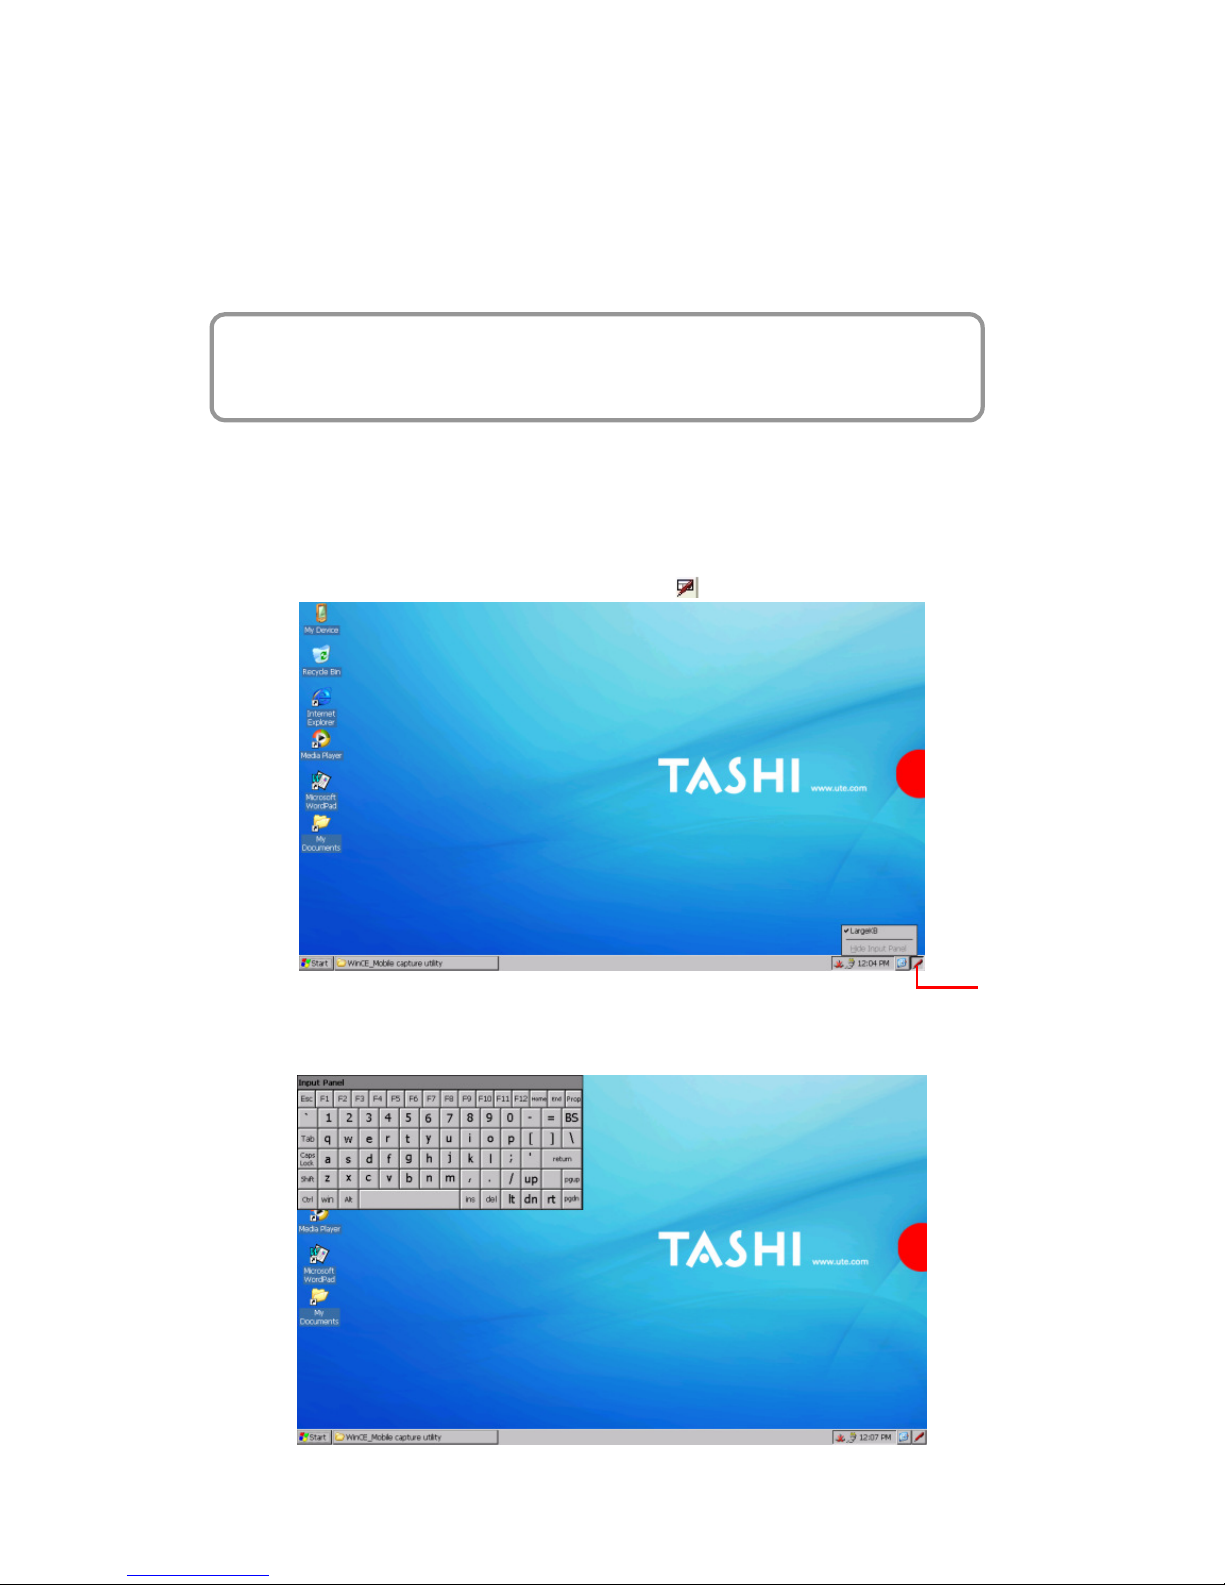
On-screen virtual Keyboard
Windows CE features on-screen virtual keyboard that simulates all functions and behaviors of
physical PC keyboard.
To launch the on-screen virtual keyboard, please tap LargeKB.
Entering Characters
Entering alphabetic and numeric characters on the MT880 is the same as character input on a
standard PC keyboard. Tap the onscreen button corresponding to the desired character.
Keyboard Icon
Page 11
6
Moving the Keyboard
Tap the title bar and drag the keyboard to a desired location.
Closing the Keyboard
Tap the keyboard icon Hide Input Panel to close the Windows CE keyboard.
RFID Reader (Optional)
If the MT880 is with built-in RFID reader, you will see the RFID reader logo on the front
panel of MT880. The MT880 features a standard RFID reader, which is compatible with
13.56MHz MiFare cards.
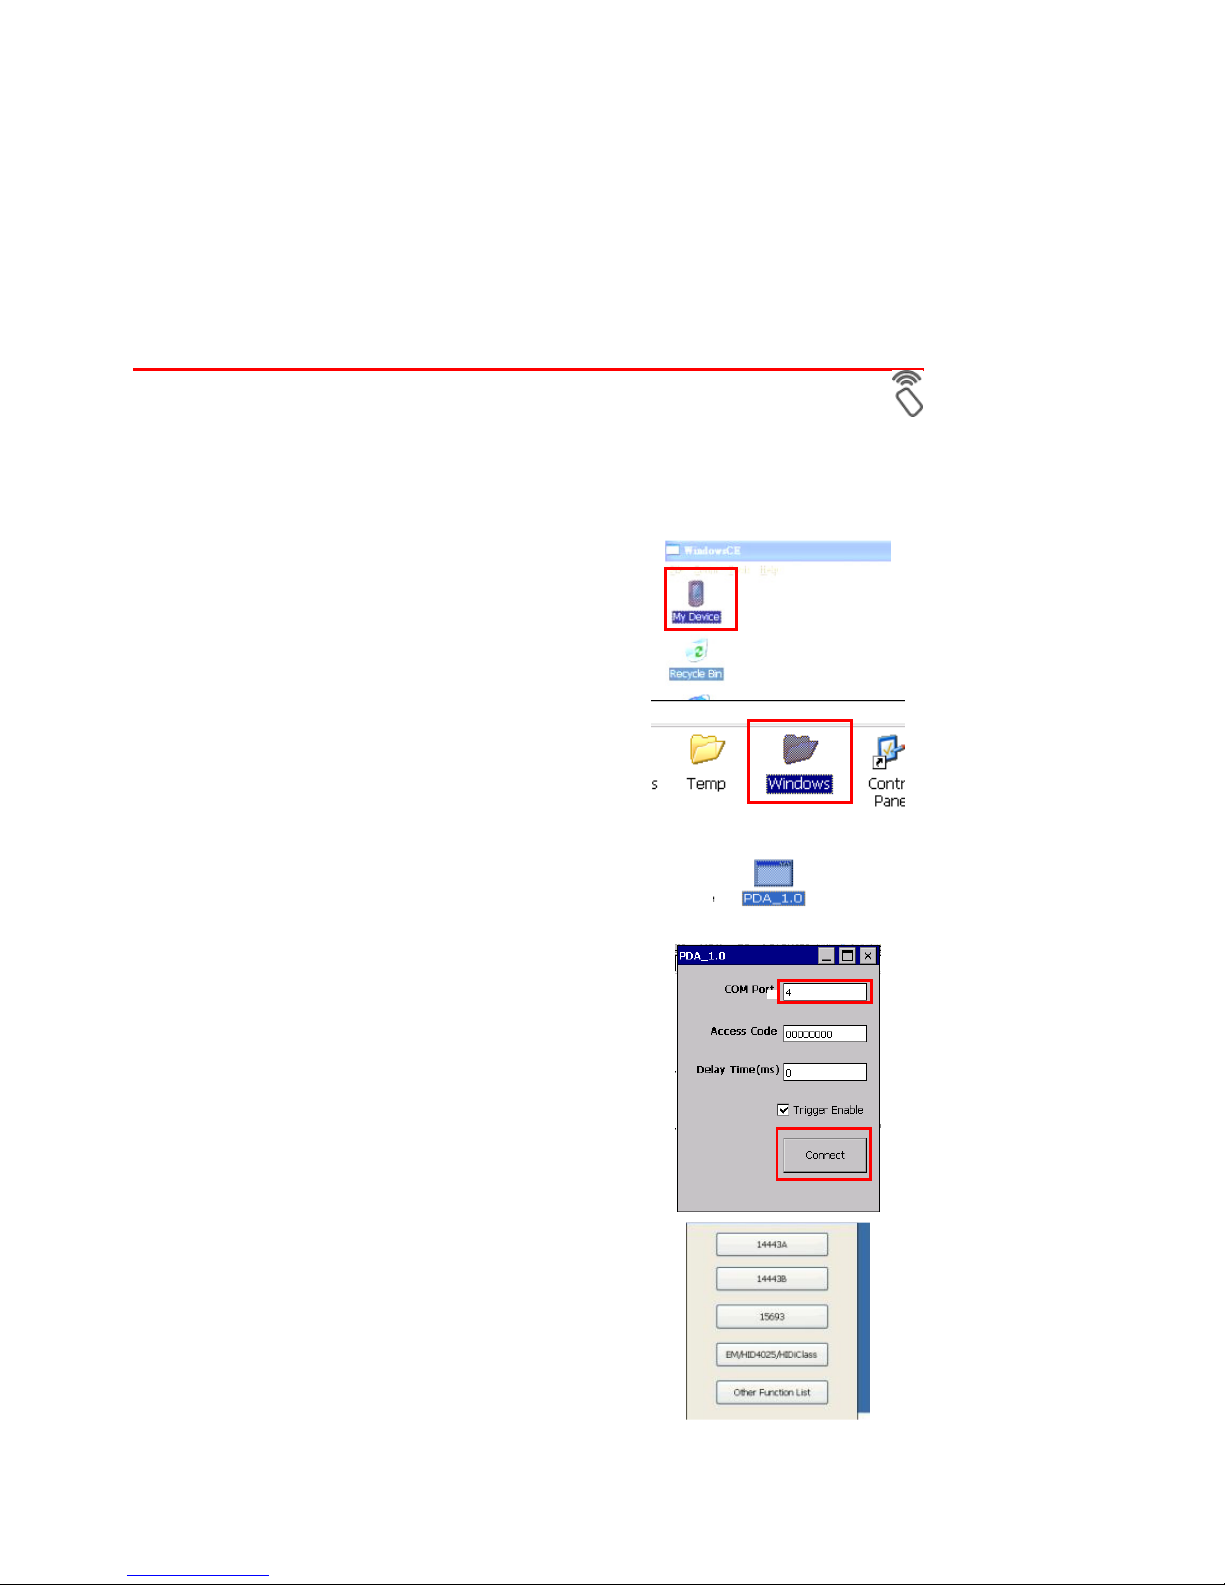
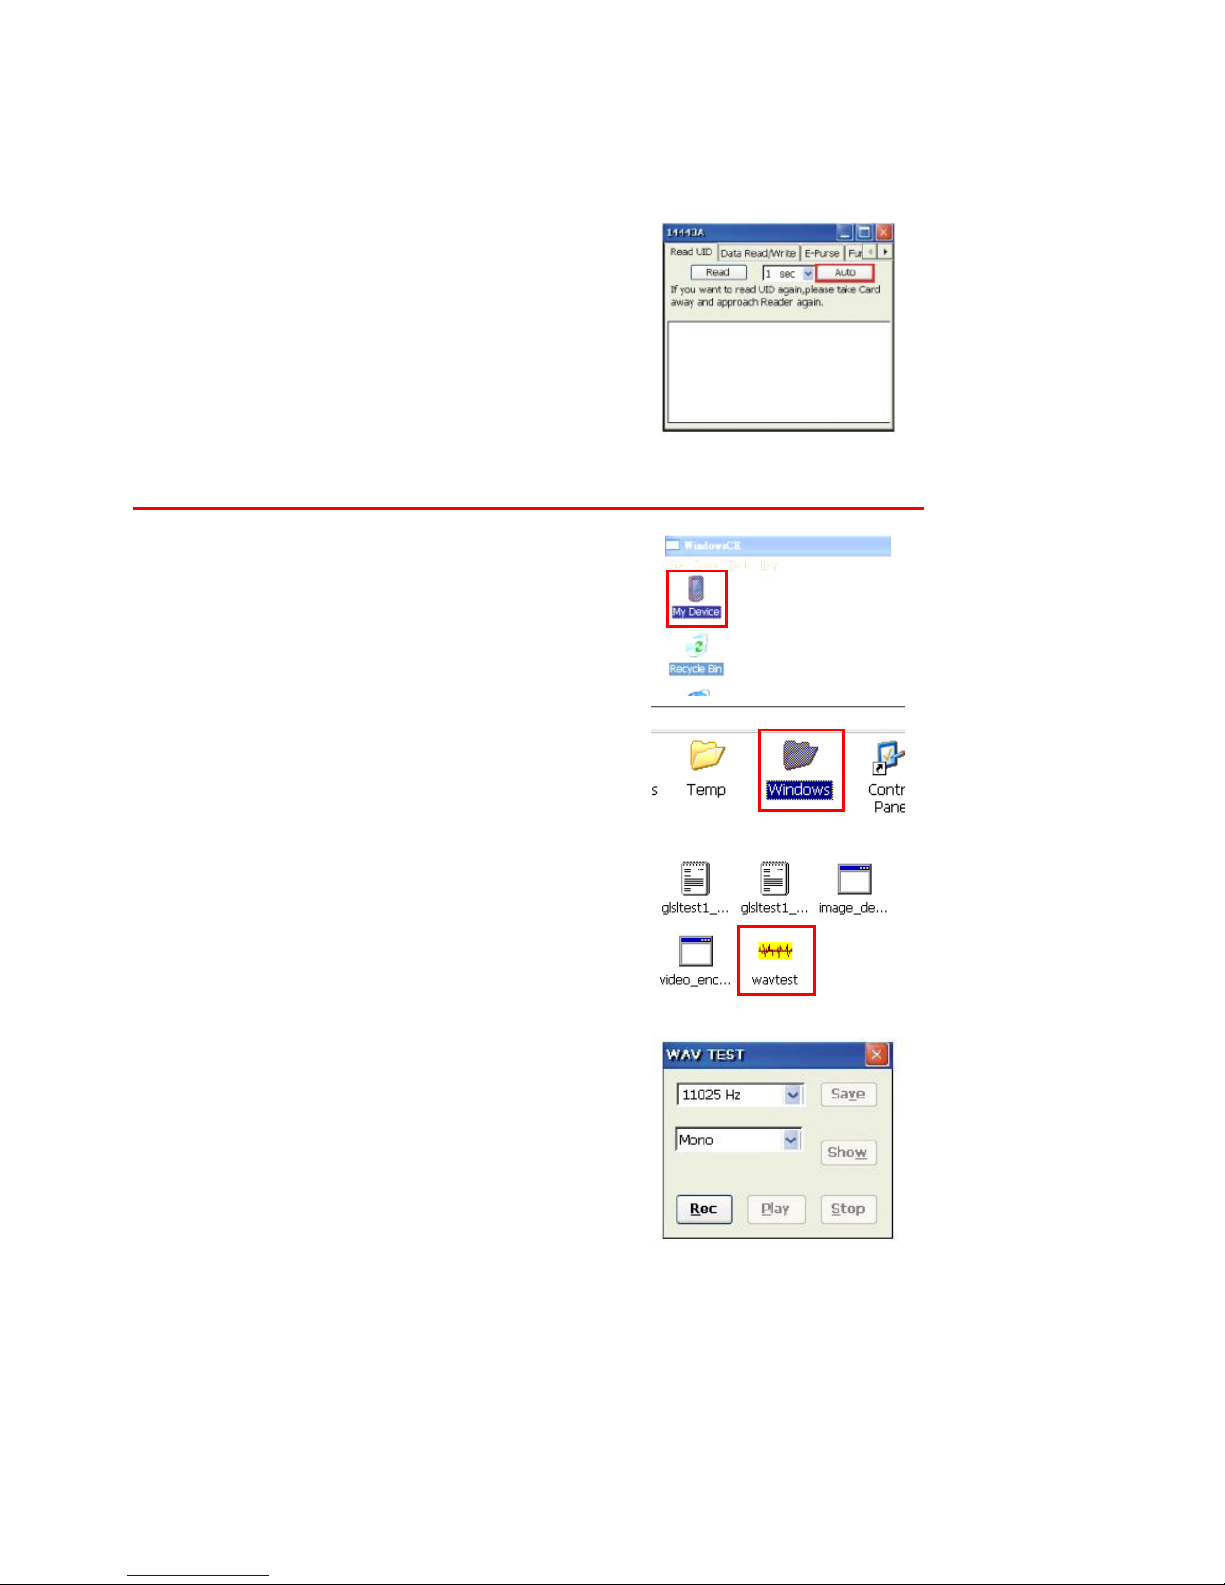
RFID Card Verification
The MT880 has built-in demo programs that allow RFID card verifications.
1. Double-tap the My Device icon on the
Windows CE desktop.
2. Tap Windows.
3. Double-tap PDA_1.0 to open the demo
program.
4. Set the COM Port: field at 4. Tap Connect.
5. Choose a card type to activate the demo
test program.
Page 12
7
6. Tap Auto and bring the RFID card close to
the sensor. The code will display
on the field
below.
7. Tap Stop to end the reading.
Audio Input/Output
An audio demo program will test the audio input (recording) and output (playback).
1. Double tap My Device on the Windows CE
desktop.
2. Double-tap Windows.
3. Double-tap wavtest to open the demo
program.
4. Do one of the following:
-- Tap Rec to record the voice.
-- Tap Stop to finish recording.
-- Tap Play to listen to the recording.
Page 13
8
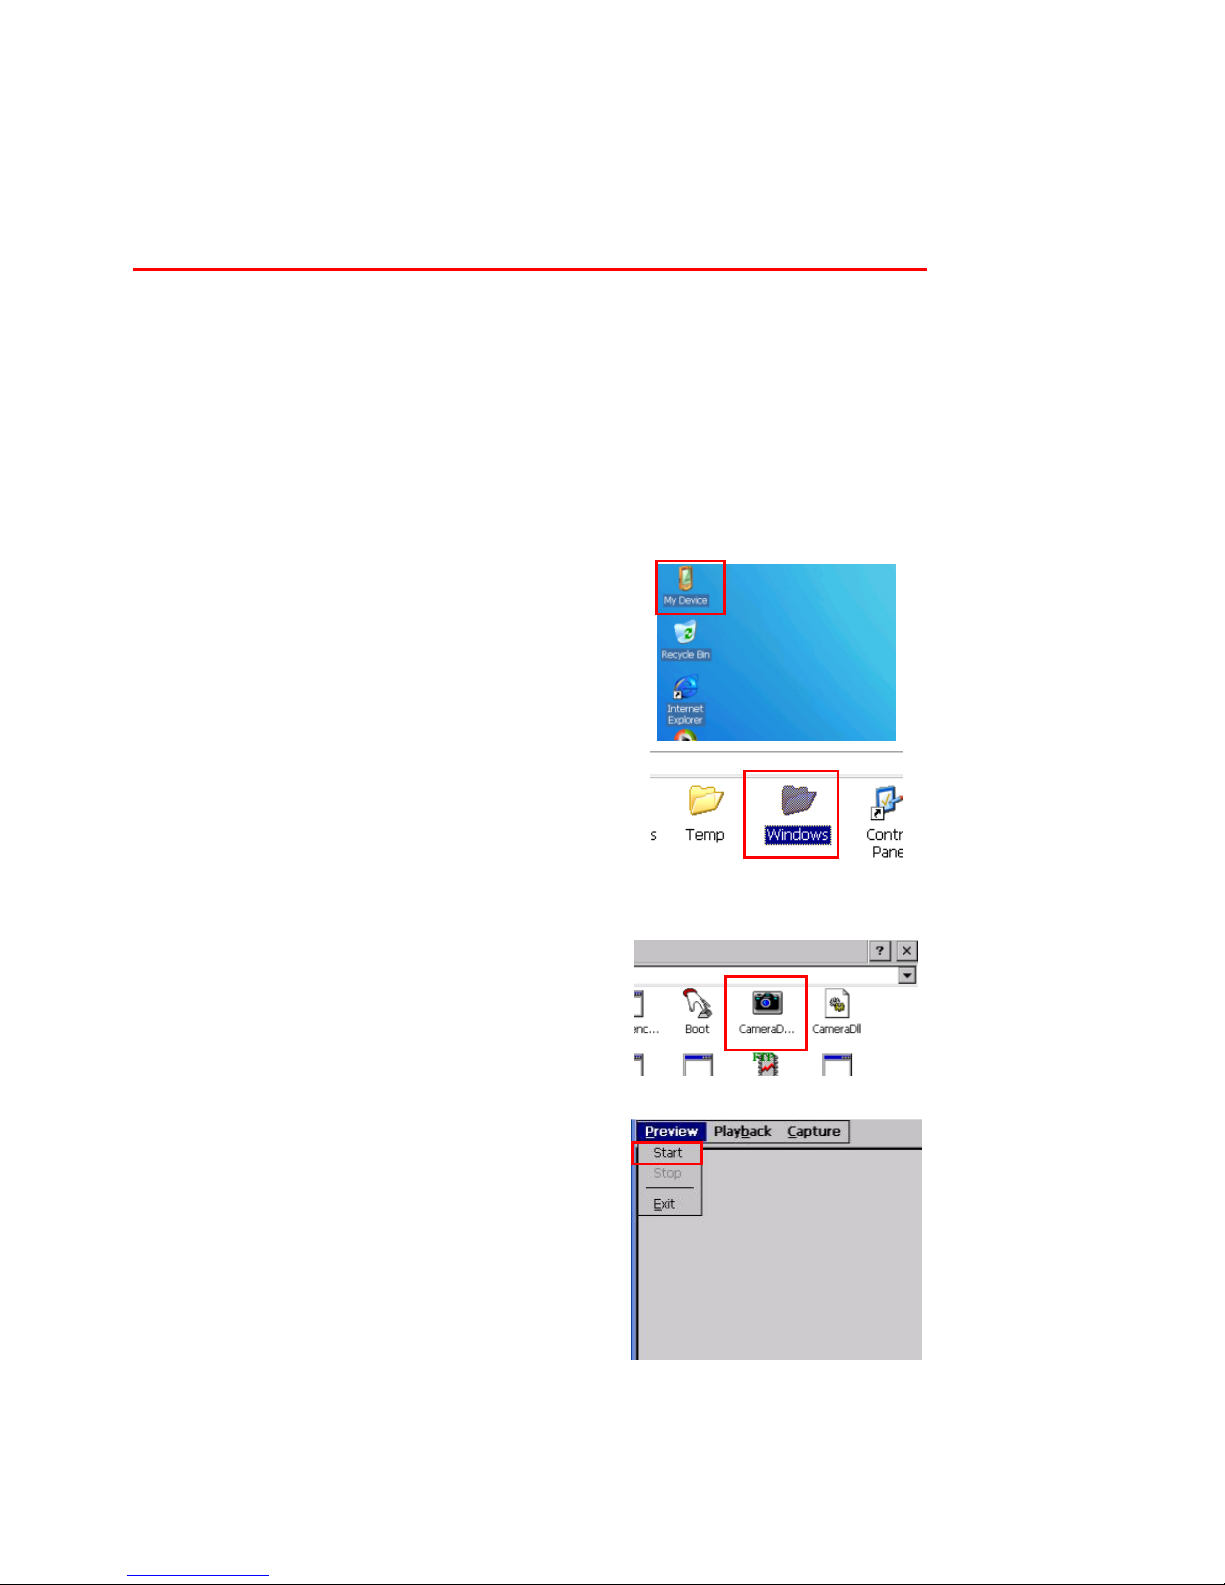
Built-in Camera (Optional)
The MT880 has a built-in 2.0 megapixel camera which provides the following extra
functionality:
Enables users to capture still pictures when a card is being read
Checks attendant time with a photo image
Records video continuously
Functions as an audio/video intercom
Additionally, facial recognition can be incorporated using third party software.
The MT880 has a demo program that enables users to capture a still picture with a card
number and time stamp when a card is read.
To start the camera demo:
1. Double-tap the My Device icon on the
Windows CE desktop.
2. Double-tap the Windows folder.
3. Double-tap CameraDemo to open the
program. The testing program is displayed.
4. Tap Preview → Start.
A continuous image is displayed enabling users to capture and playback video.
Page 14
9
Tools/Utilities/Applications
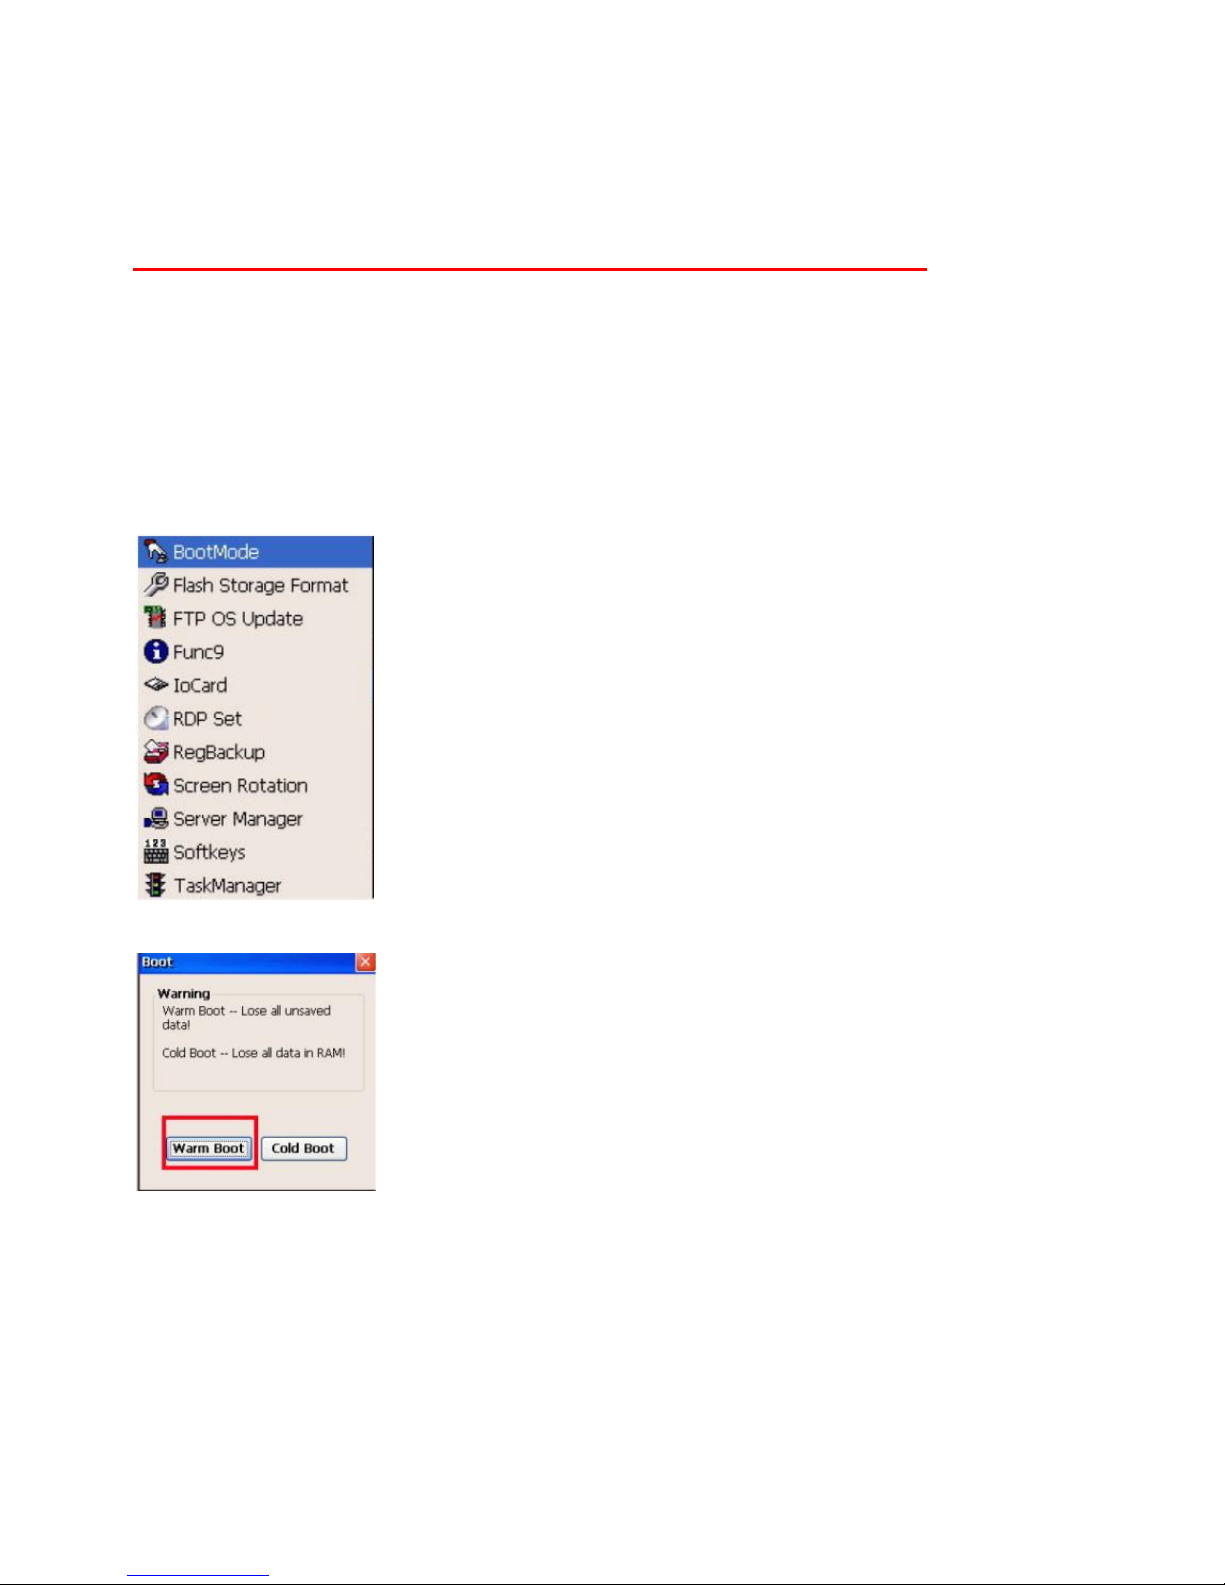
Path: Start Menu/Programs/Utilities/Boot Mode
This tool allows you to perform warm boot or cold boot.
Warm Boot
1. Select Start Menu -> Programs -> Utilities -> Bootmode
2. Tap “Warm Boot”. The system will be warm started.
Page 15
10
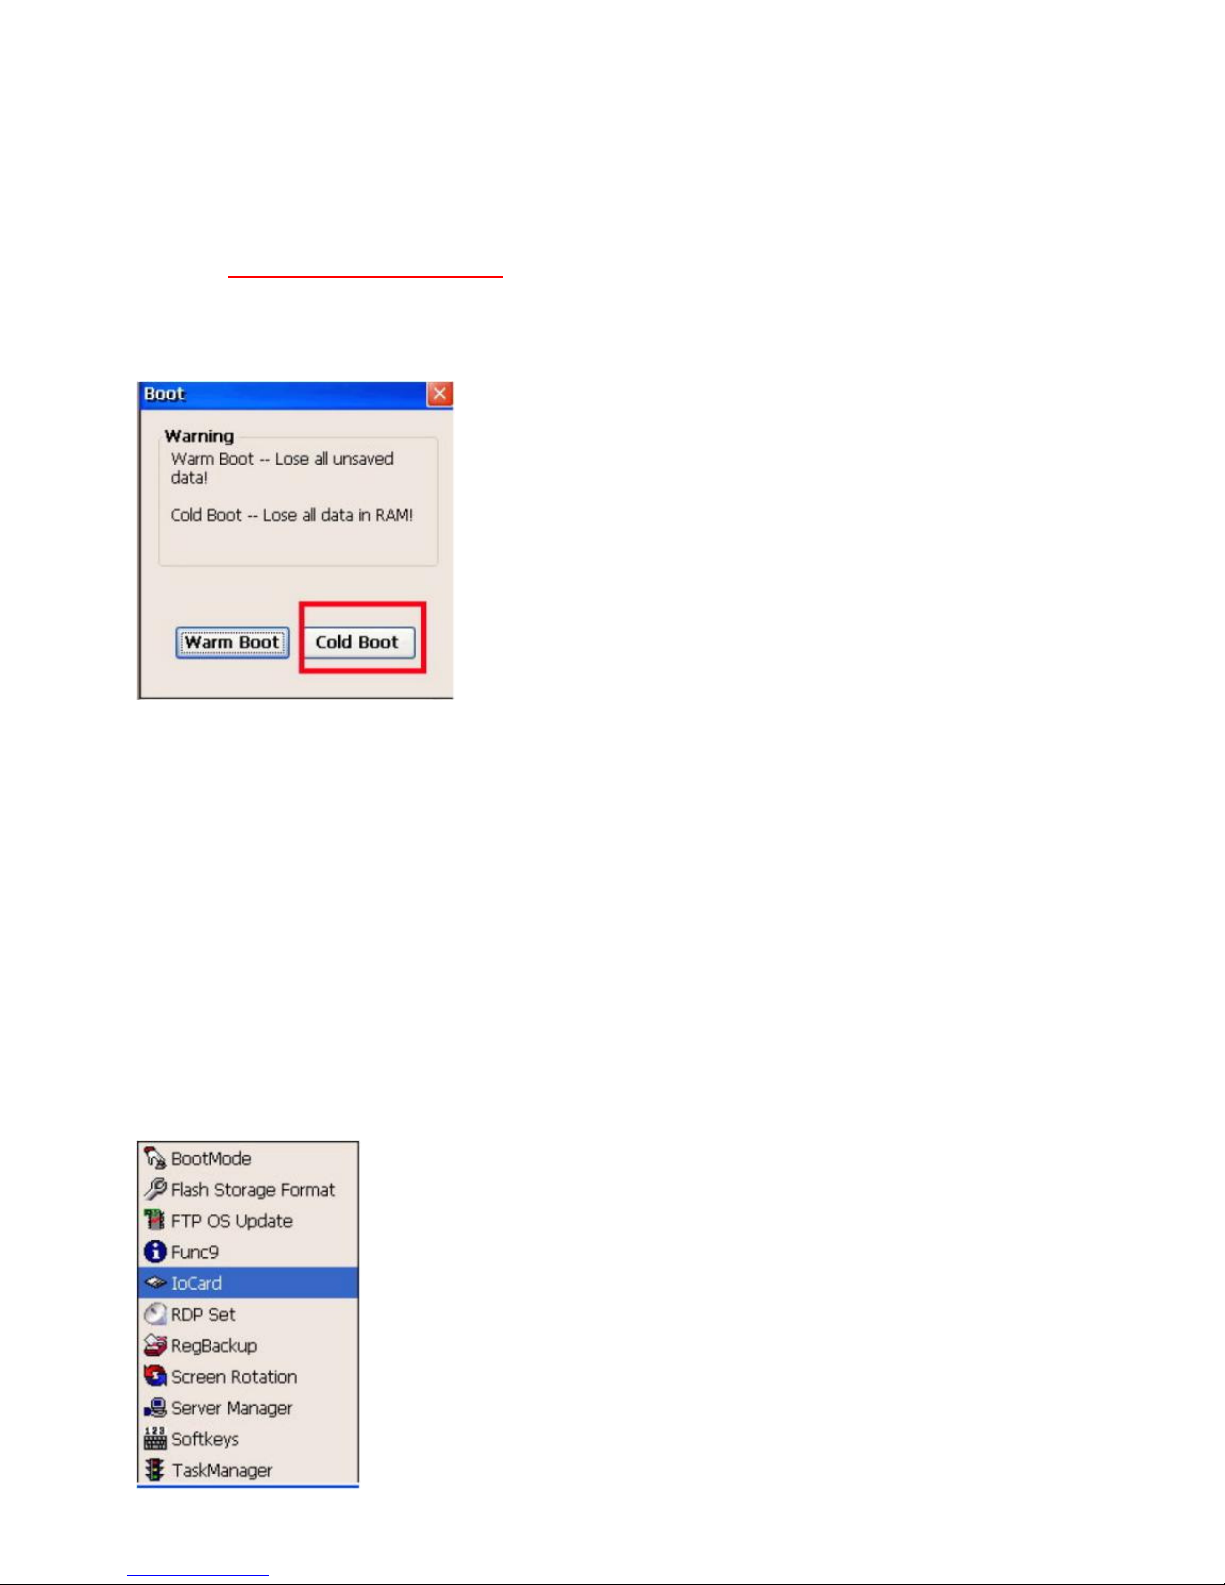
Cold Boot
Caution: Backup your data first!
1. Tap “BootMode”, and Tap “Cold Boot”. Then confirm the choice by selecting
YES when program asked to reconfirm the command.
2. The terminal will be cold started.
3. Calibrate the screen according to the instruction displayed, and tap the screen
anywhere again once the calibration is completed to continue.
4. Set the date and time, press OK.
2.2 I/O Card Control
Path: Start Menu/Programs/Utilities/IO Card
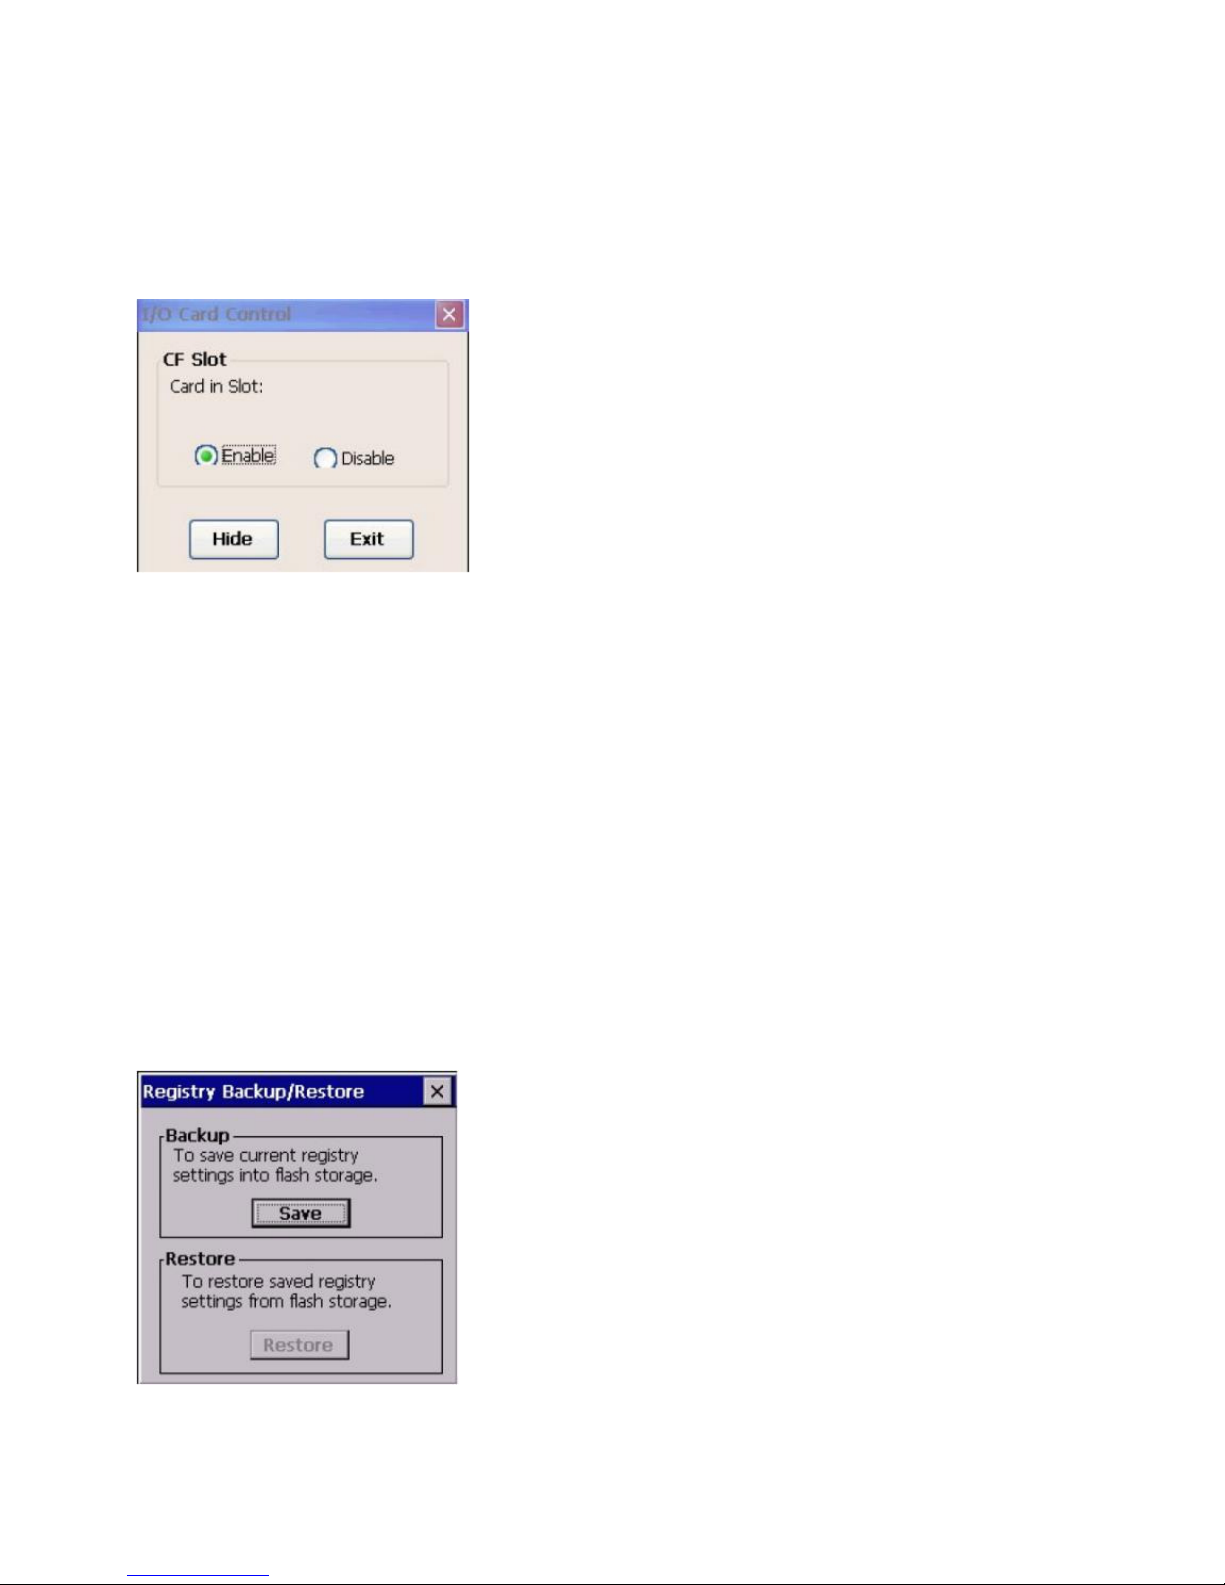
This tool allows you enable or disable CF slot whenever it is necessary. Once you
disable the slot, the card in that slot will not work until you enable the slot again.
1. Select Start Menu ->Programs -> Utilities -> IO Card
Page 16
11
2. You may choose to enable or disable the card from this tool. Once you selected
disable, the card will no longer be detected unless it is enabled again. Tap “Enable”
to enable the card.
3. Tap “Hide” to hide I/O Card Control window.
4. Tap “Exit” to exit I/O card control.
The setting is kept after suspend and power on, however, after warm start/cold start,
the setting will be resumed to default value (which is “Enable”)
Registry Backup
Path: Start Menu/Programs/Utilities/RegBackup
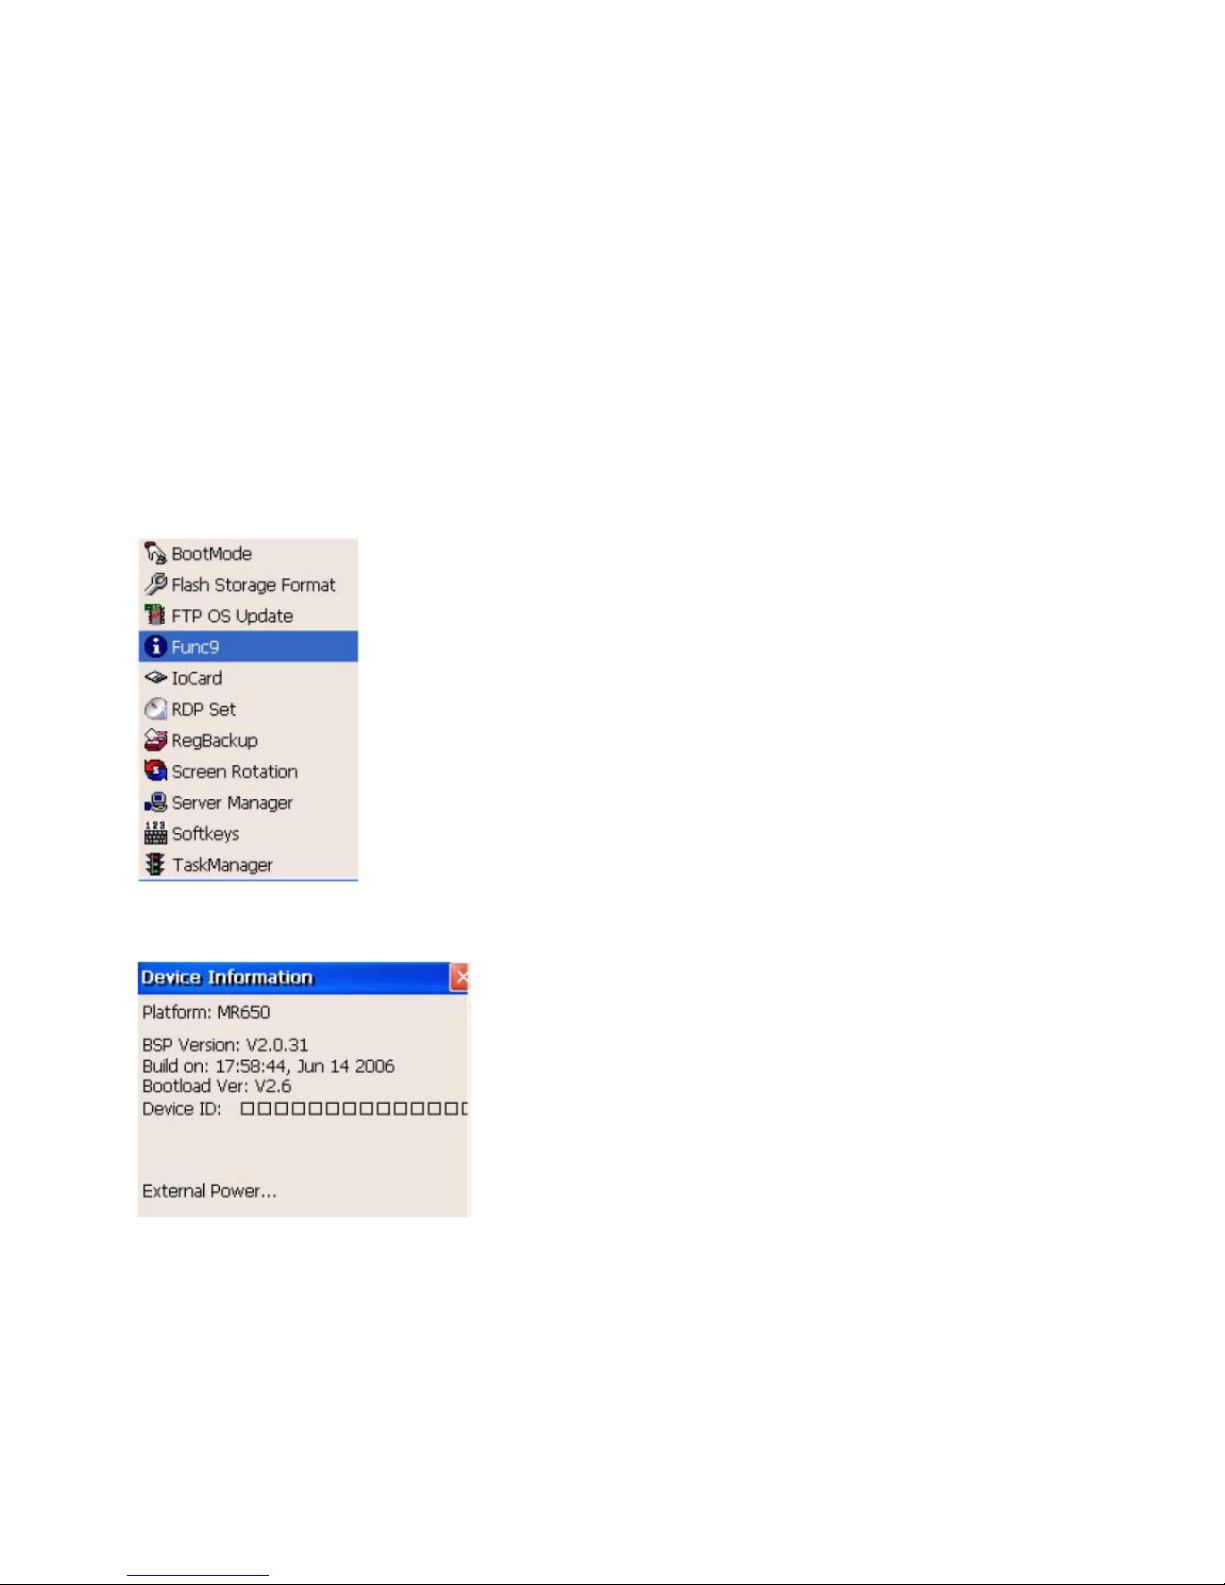
This tool allows you to save the current registry or reset to factory default.
1. Select Start Menu -> Programs -> Utilities -> RegBackup.
2. Tap “Save” to save current registry settings.
Page 17
12
3. Or tap “Restore” to reset registry to factory default. Terminal will be warm started.
(Note that “Restore” button is grey out if the registry setting was not saved before)
Func 9
Path: Start Menu/Programs/Utilities/Func9
This tool displays the general information of the terminal such as platform, firmware
version, device ID etc.
1. Select Start Menu -> Programs -> Utilities -> Func9
2. Device information is shown as below:
Server Manager
Path: Start Menu/Programs/Utilities/ServerManager
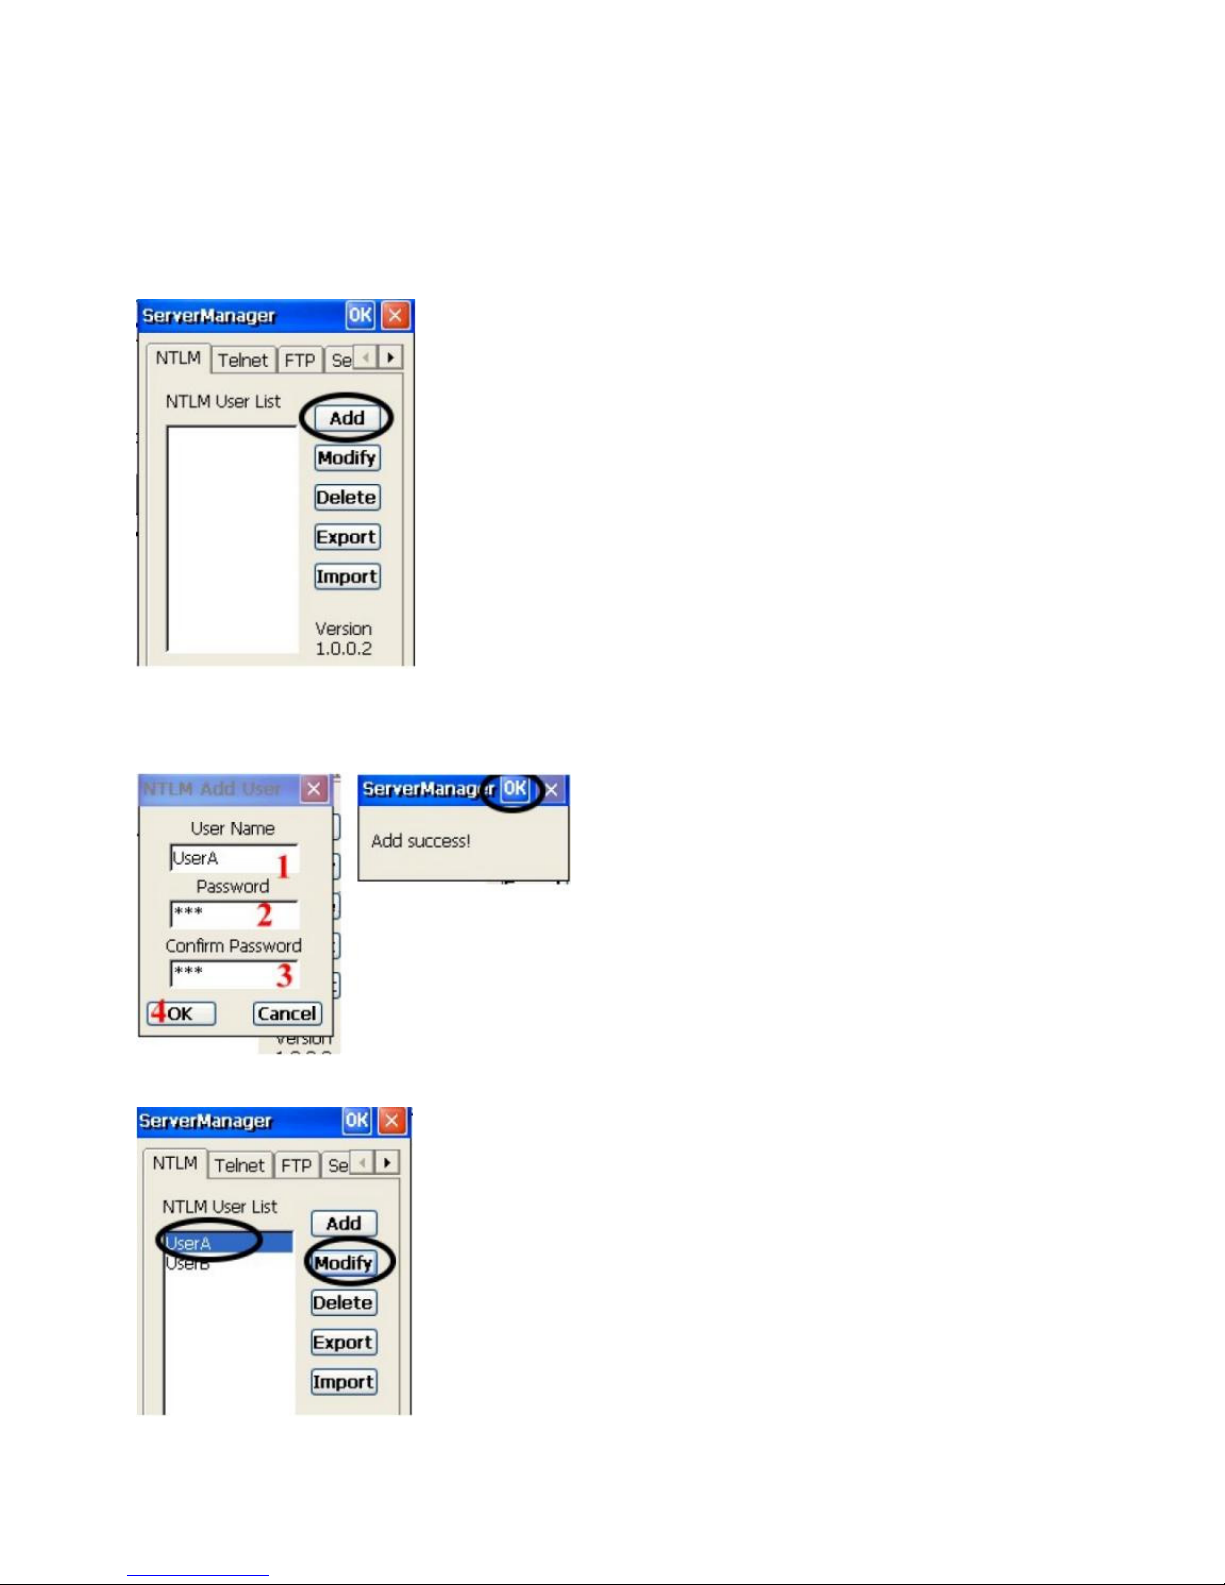
Server Manager is a tool for the user to manager the NTLM (Windows NT LAN
Manager) users, FTP users and telnet users.
Page 18
13
1. Select Start Menu -> Programs -> Utilities -> Server Manager.
2. On “NTLM” tab, tap “Add” to add a new user.
3. Key in the user name and password. Tap OK. Add Success. Tap OK.
4. To modify a user’s password, select the user and tap “Modify”.
Page 19
14
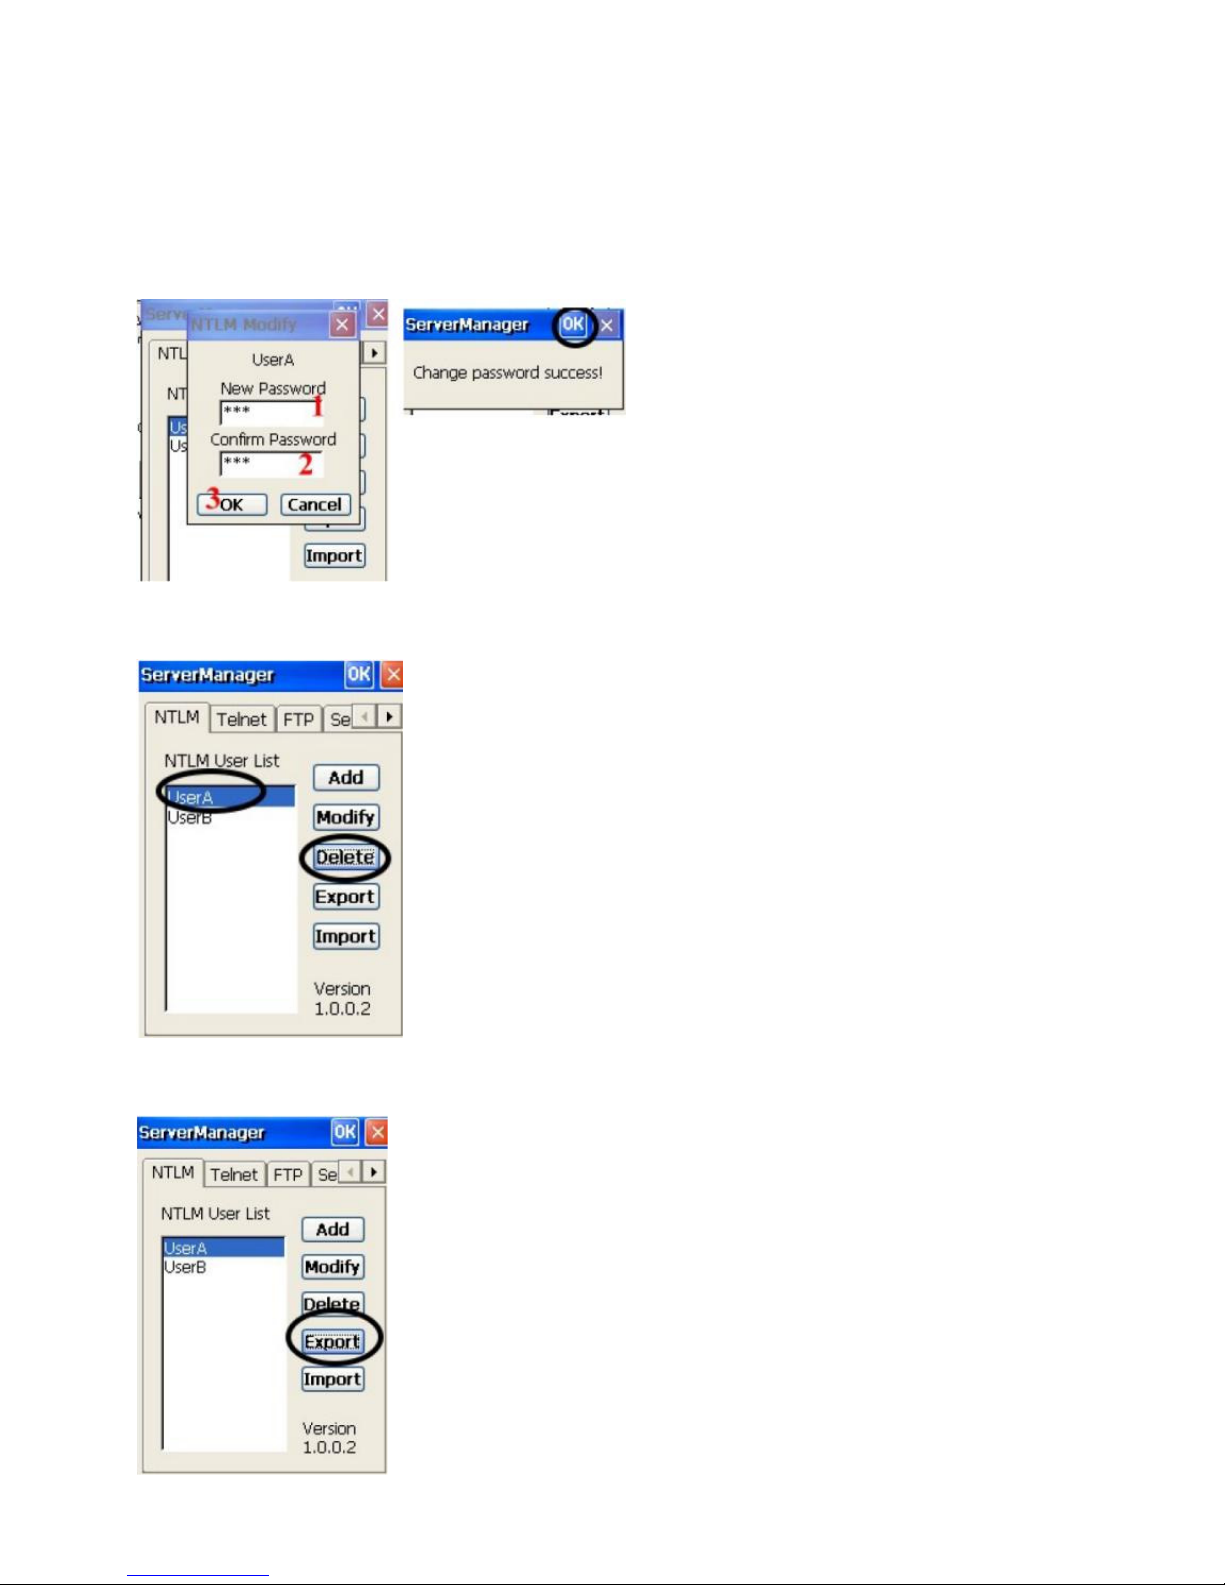
5. Enter the new password and confirm password. Tap OK. Change password success.
Tap OK.
6. To delete a user, select the user you want to delete, tap “Delete”.
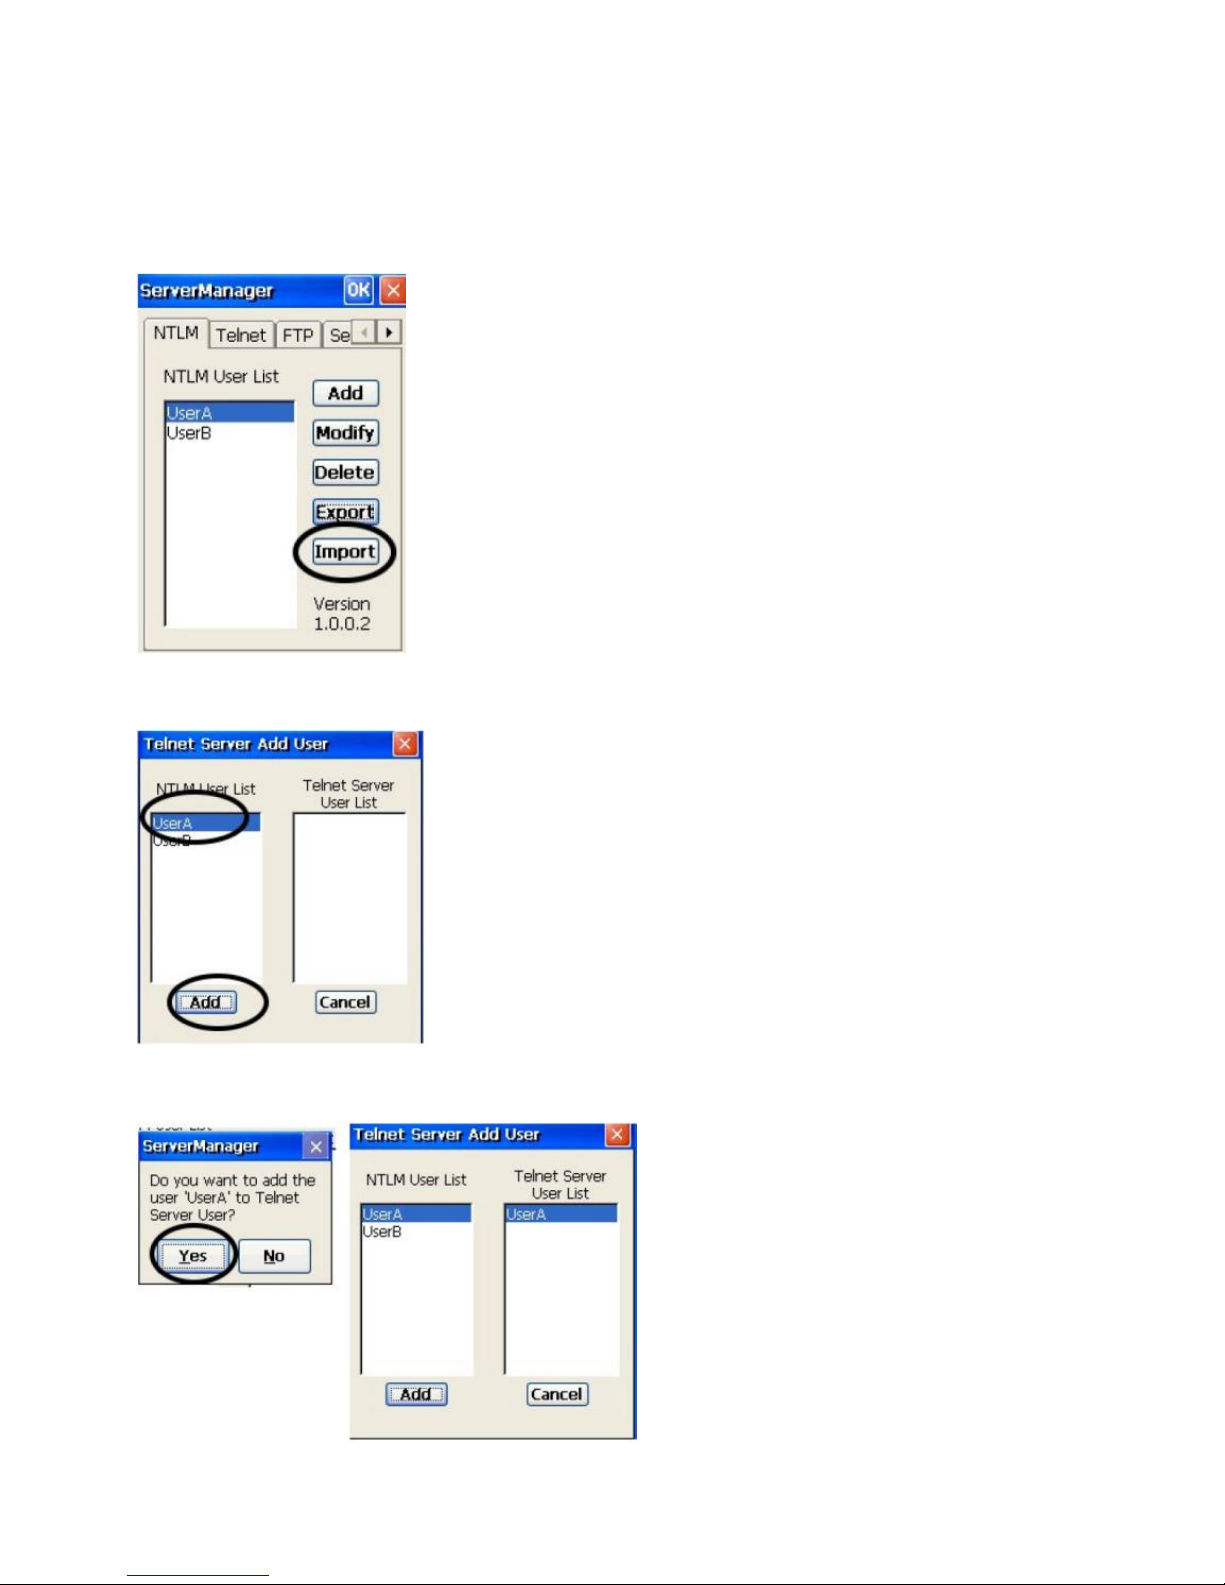
7. Tap “Export”. The user can backup SSID, WEP, all server users and this server’s
settings to \Flash Storage.
Page 20
15
8. Tap “Import” to restore all settings.
9. Under “Telnet” tab, tap “Add”. Add the telnet user from NTLM. Select the user and
tap “Add”.
10. Do you want to add user X to the telnet server? Tap “Yes”.
Page 21
16
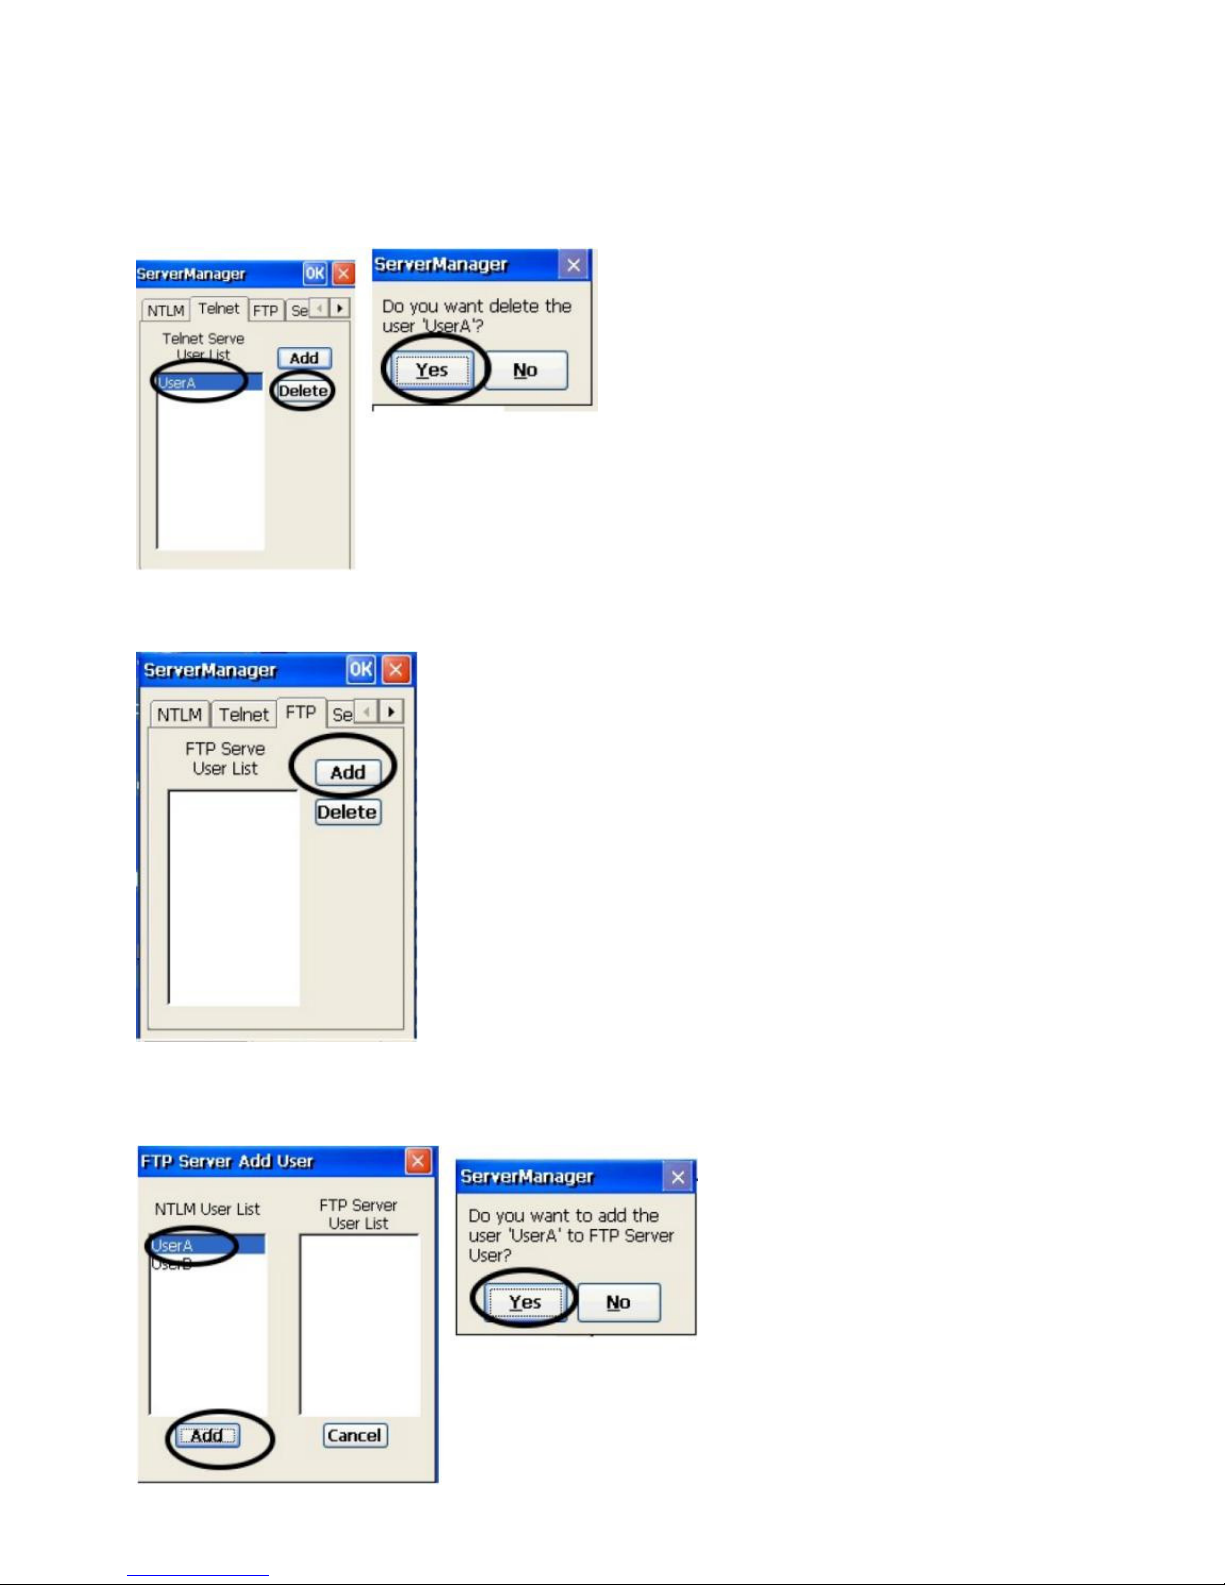
11. To delete telnet user, select the user and tap “Delete”. Do you want to delete the
user X? Tap “Yes”
12. Under “FTP” tab, tap “Add” to add ftp user.
13. Select the user and tap “Add”. Do you want to add user “X” to FTP server User?
Tap “Yes”.
Page 22
17
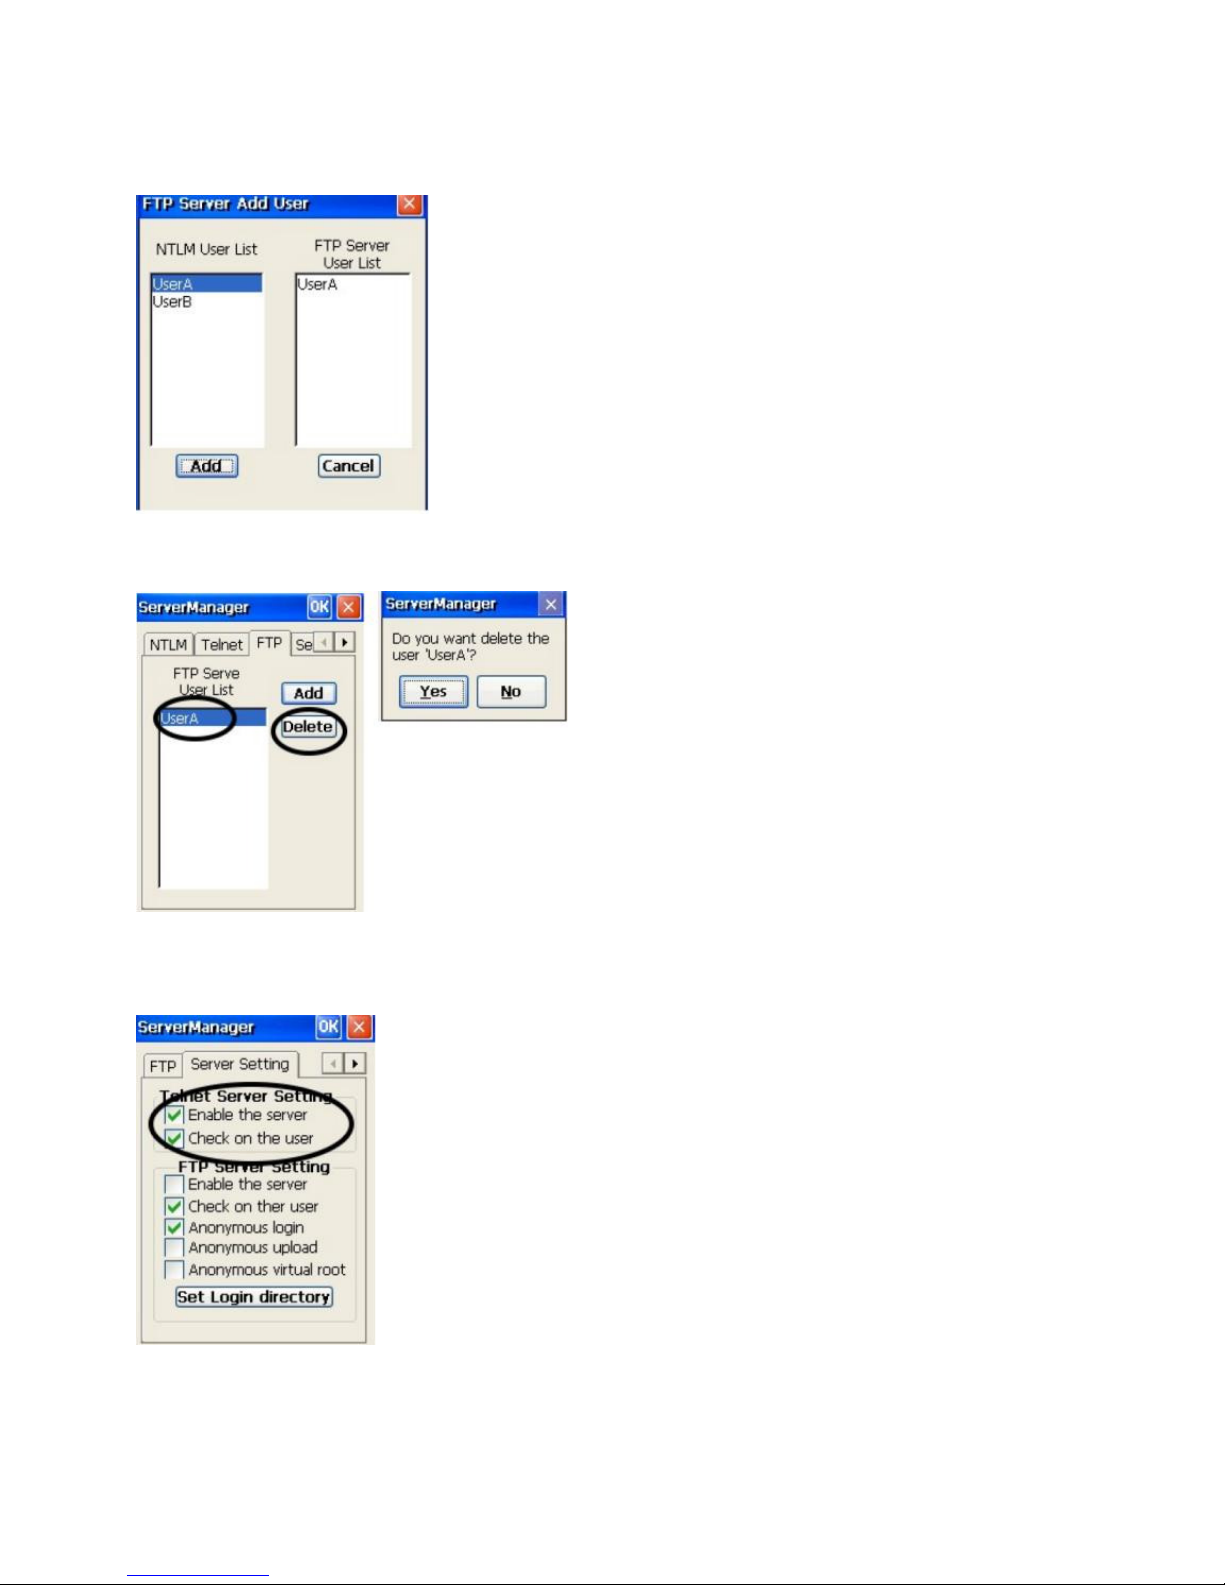
14. To delete ftp user, select the user and tap “Delete”. Do you want to delete the user
X? Tap “Yes”.
15. Under “Server setting”tab, for telnet server setting, enable/disable server.
Page 23
18
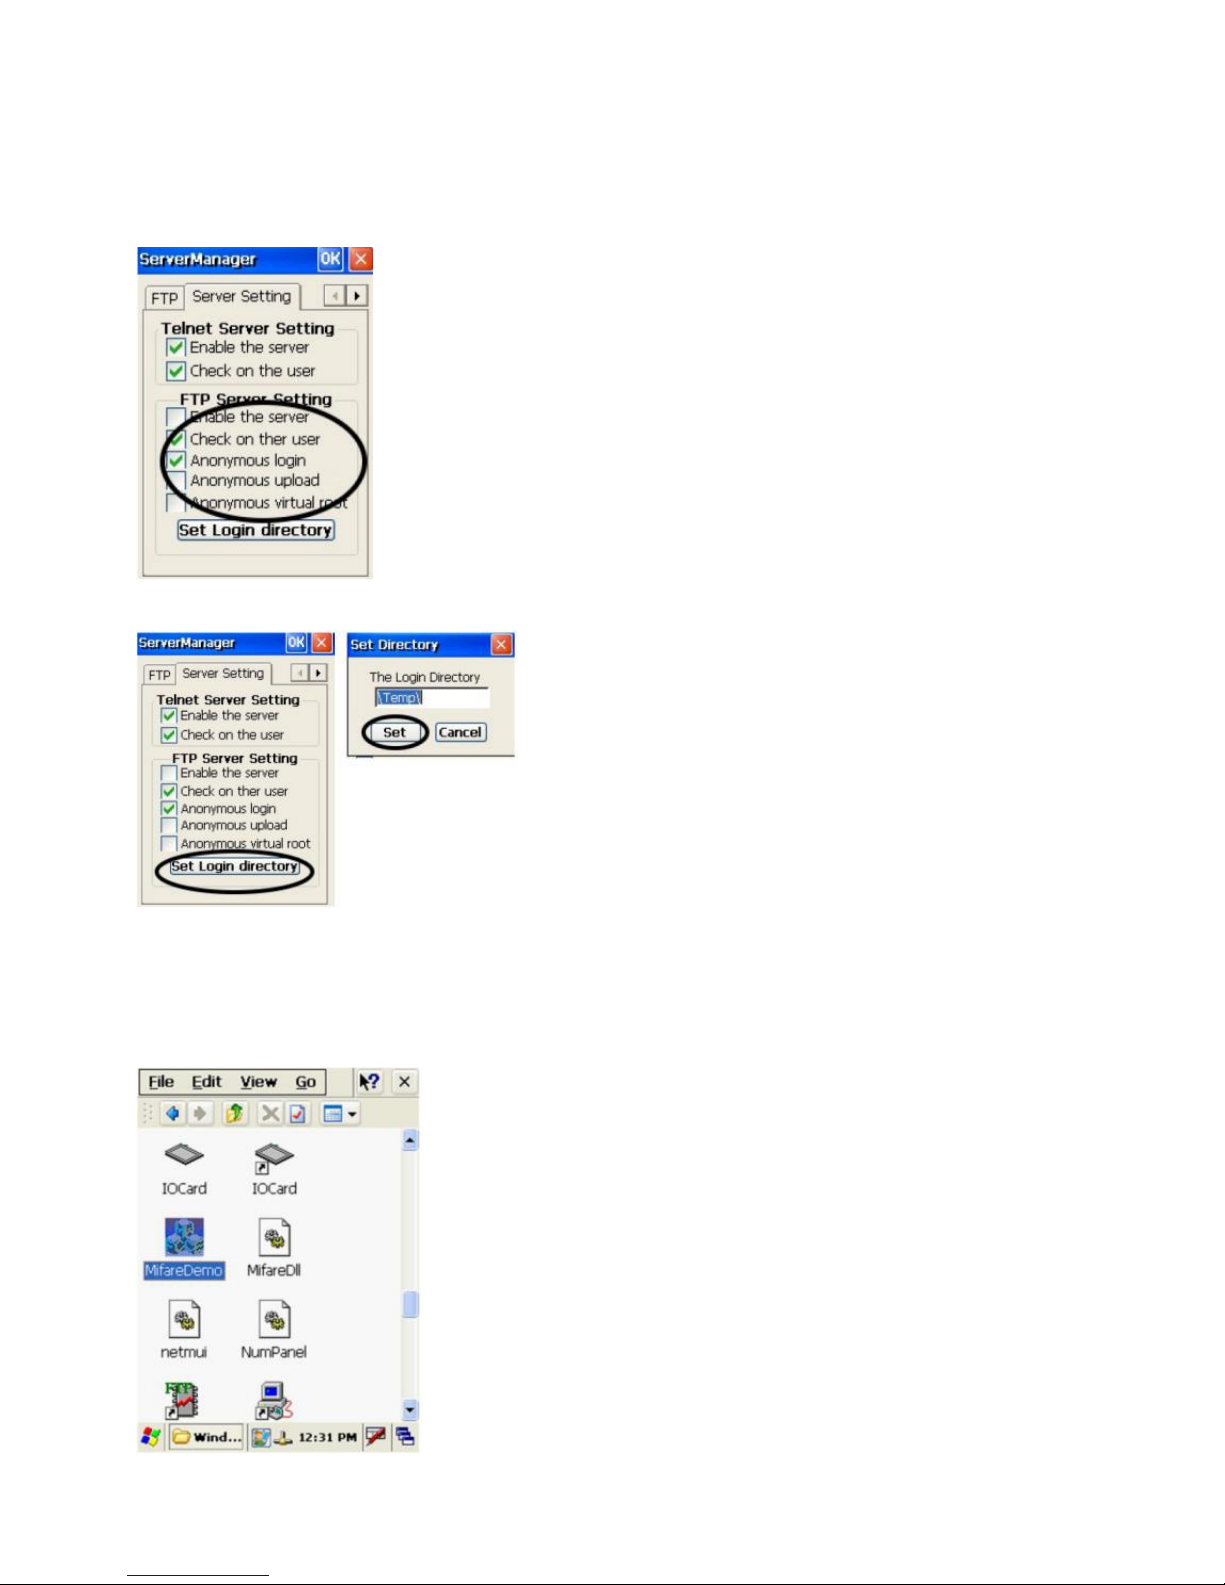
16. For FTP server setting, enable/disable server and define anonymous login.
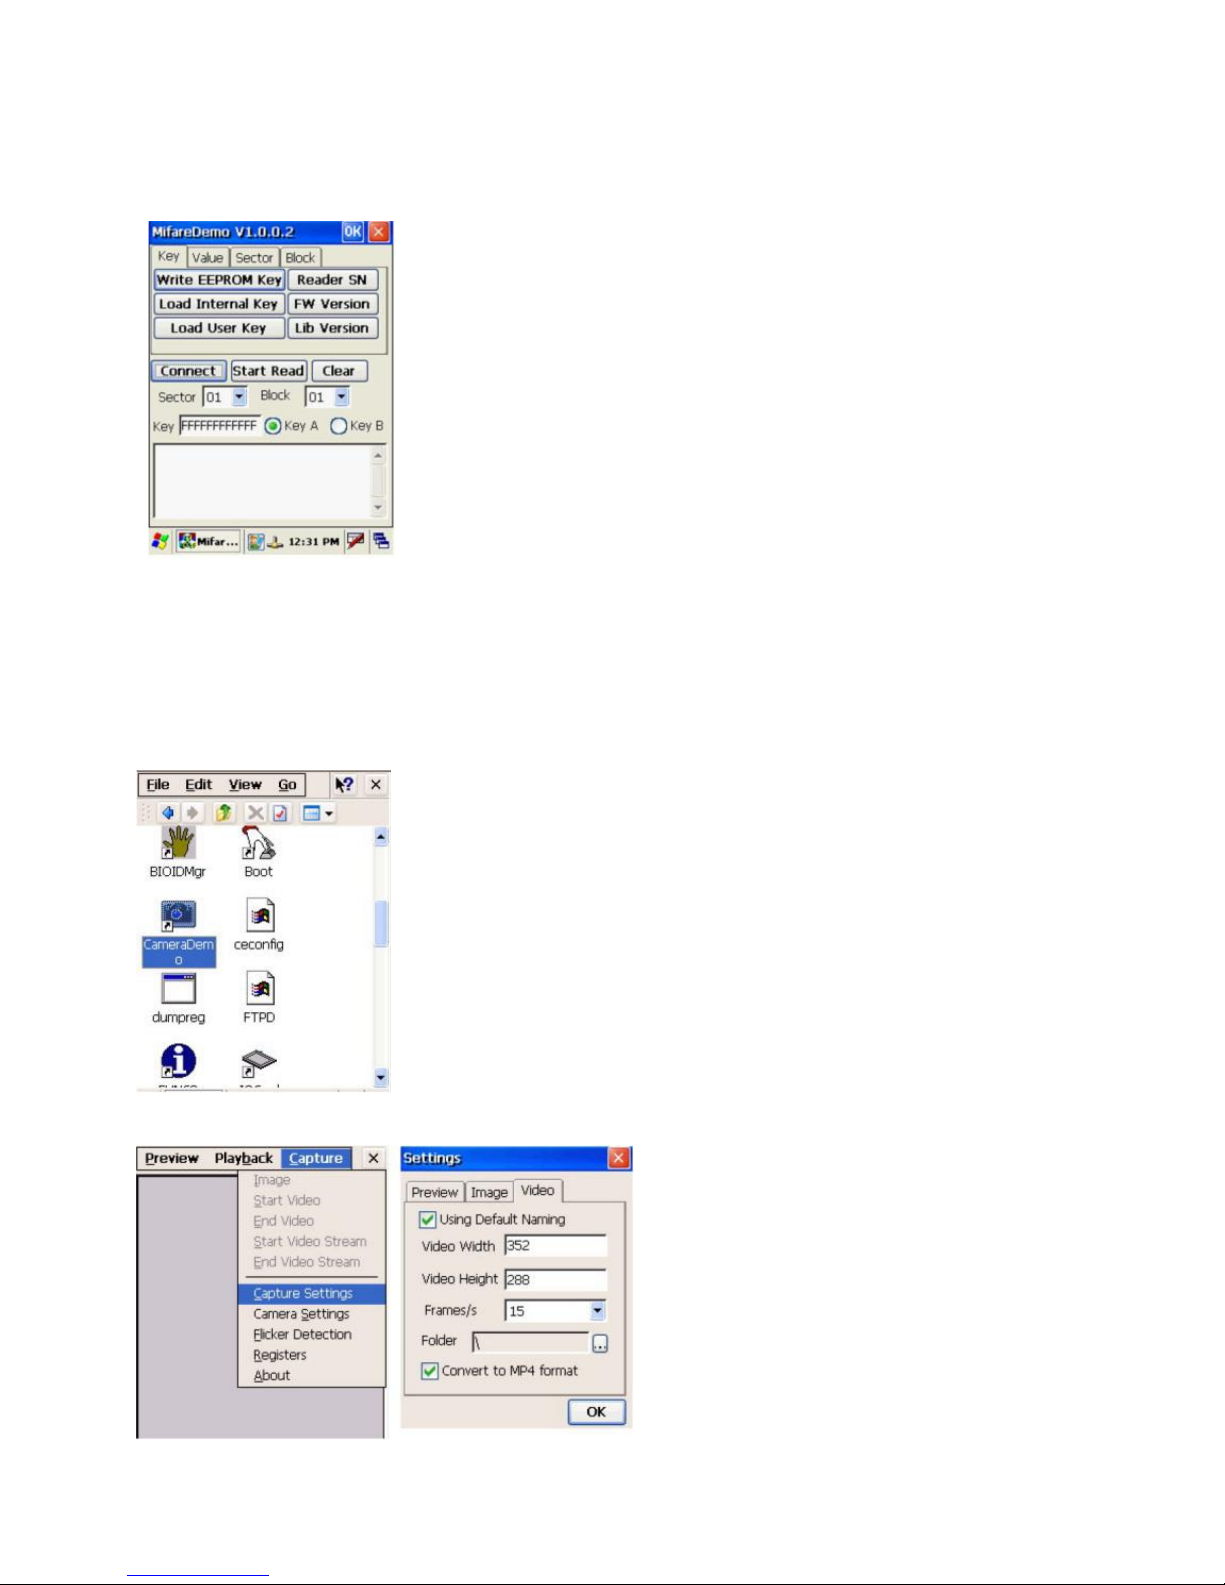
17. Tap “Set Login Directory”. Define the login directory (Default is /Temp), tap “Set.
MifareDemo
This feature allows you to make Mifare card verification.
Path: /My Device/Windows/MifareDemo.exe
1. Double tap “MifareDemo”.
Page 24
19
2. Under “Key”, select “Connect” to activate the program.
3. Tap “Start Read” and bring the Mifare card close to the sensor. The code will be
read and displayed on the following field.
4. Tap “Stop Read” to end reading.
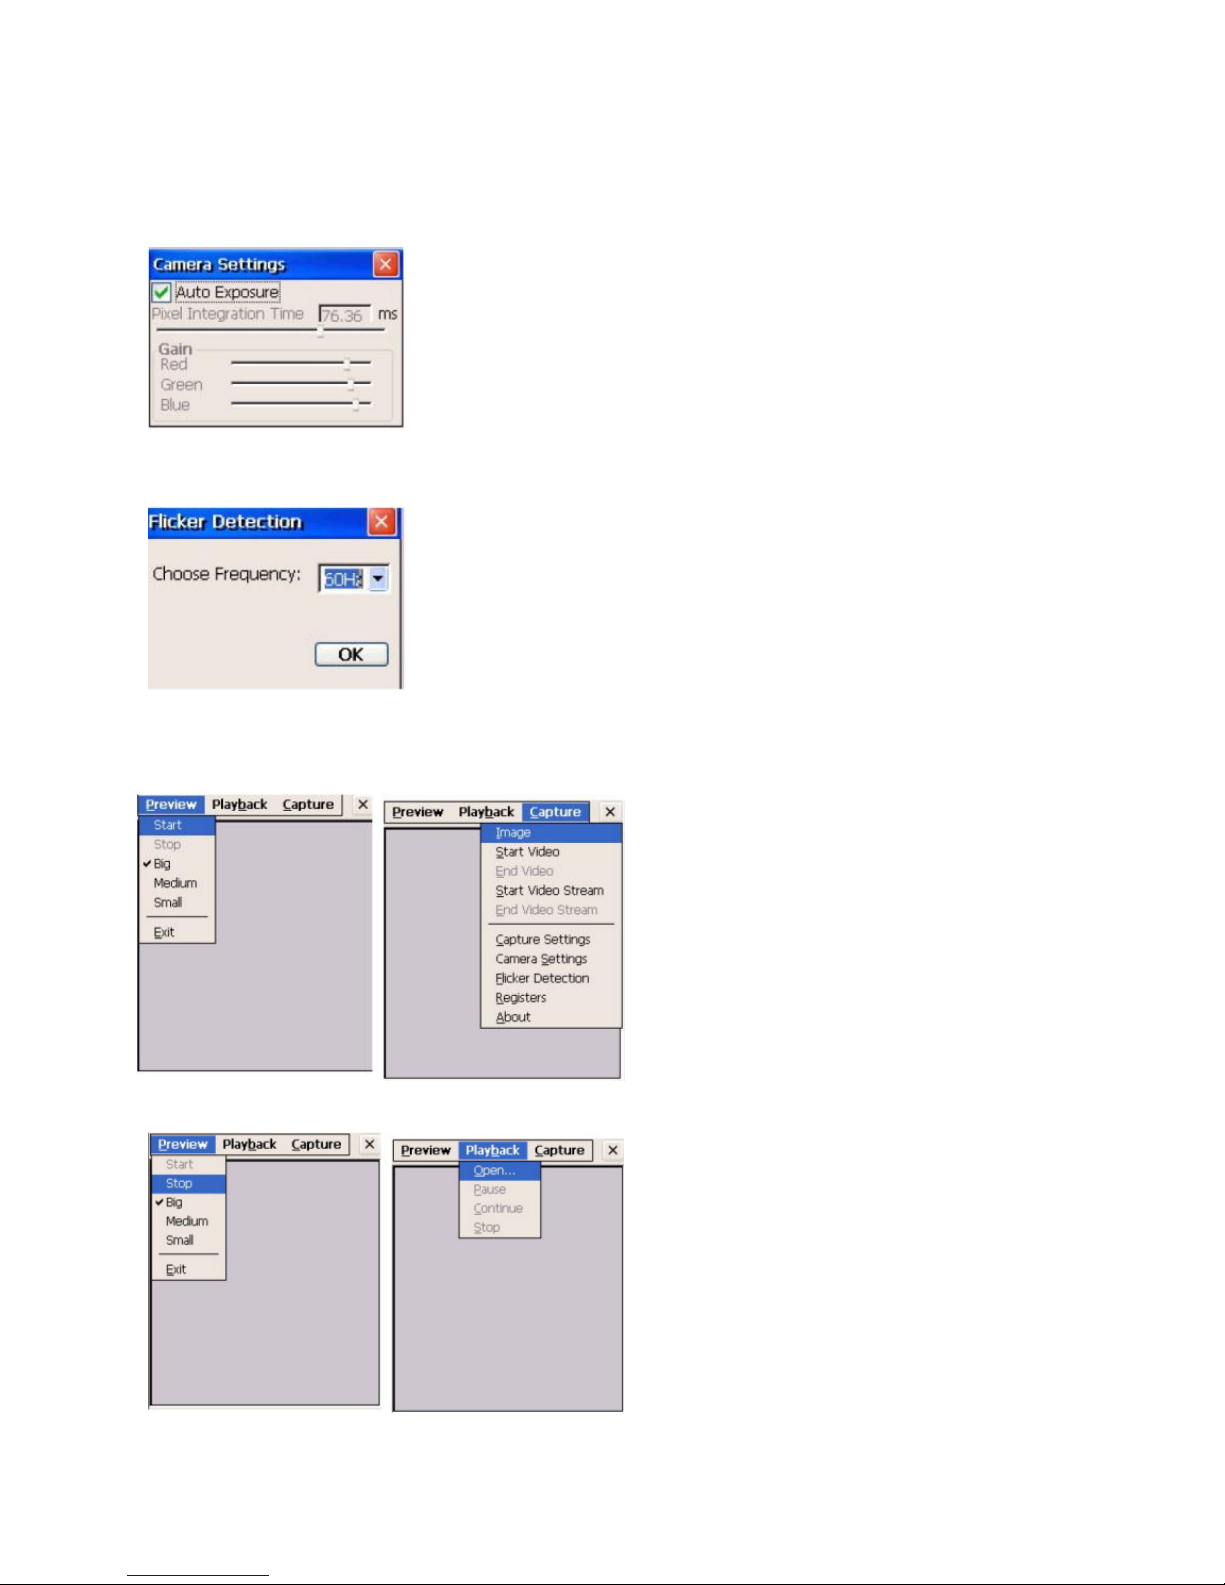
CameraDemo
This utility allows image capture and video streaming.
Path: /My Device/Windows/CameraDemo.exe
1. Double tap “CameraDemo”.
2. Under “Capture”, select “Capture Settings”. Define image and video dimension
and storage folder, then tap “OK”.
Page 25
20
3. Under “Capture”, select “Camera Settings”. Define the pixel integration time.
4. Under “Capture”, select “Flicker Detection”. Select the frequency.
5. Under “Preview”, select “Start”. Your image will be focused. Under “Capture”,
select “image”.
6. Under “Preview”, select “Stop”. Under “Playback”, select “Open”. Select the
image file that was captured.
7. Tap “Preview/Exit” to close.
Page 26
21
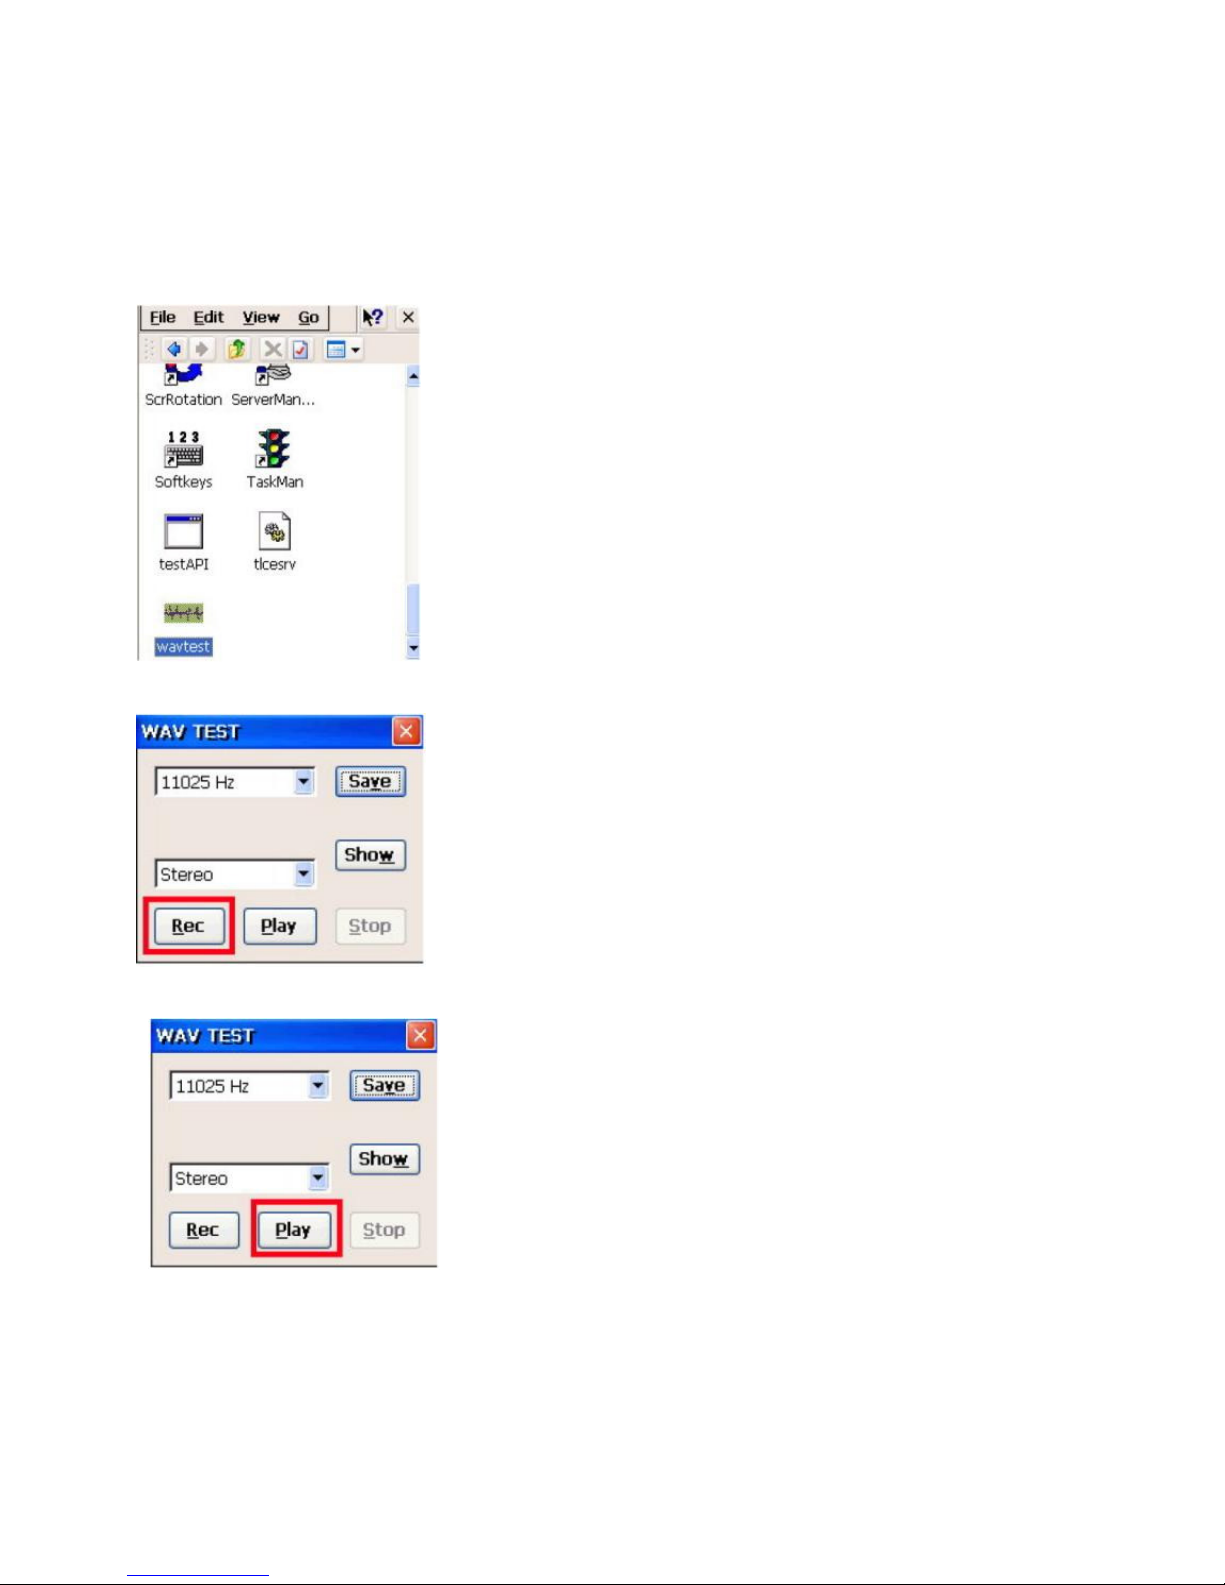
WavTest
Path: /My Device/WavTest
This tool is to test the audio recording and display.
1. Double tap “WavTest”.
2. Change to “Stereo”. Tap “Rec”. Talk near to the microphone port of MT880.
3. Tap “Stop” to stop recording. Tap “Play” to play the audio you just recorded.
4. Tap “Save” to save this audio as a wav file.
Page 27
22
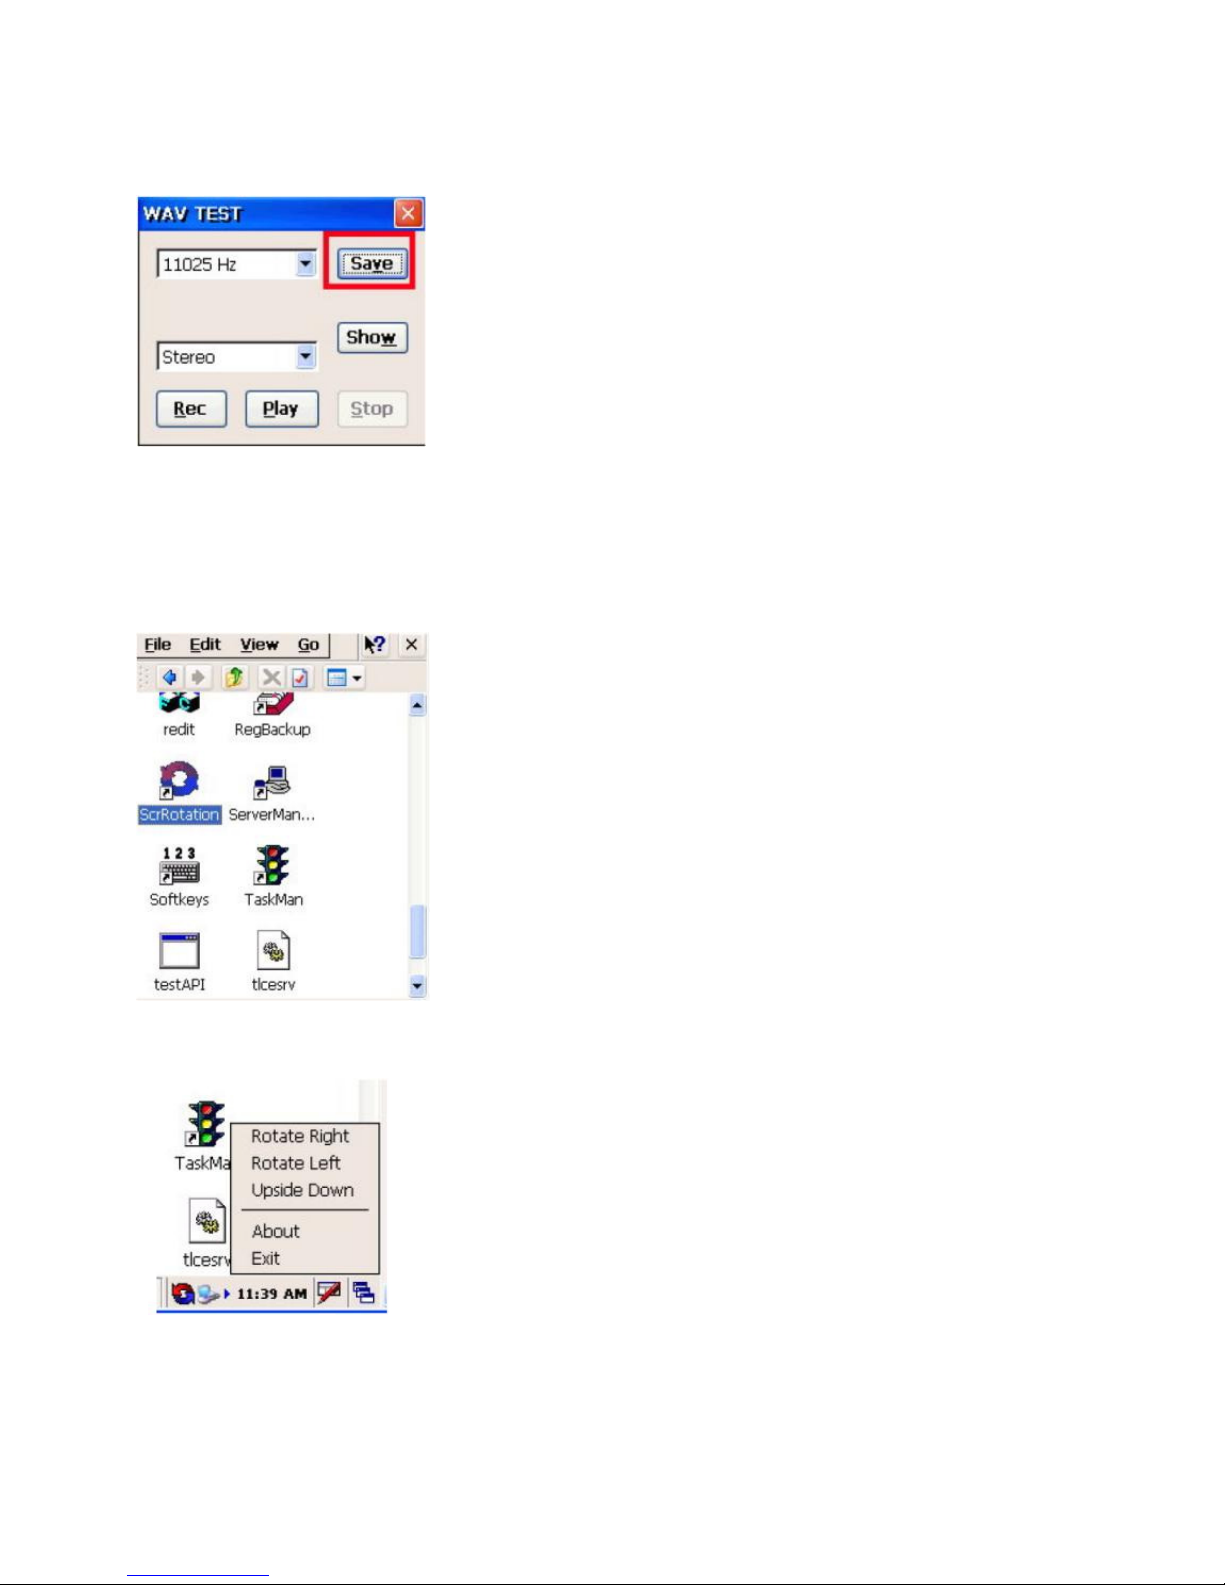
Screen Rotation
Path: /My Device/Windows/ScrRotation.exe
Screen Rotation allows the users to rotate the screen of terminal to the right, to the left
or upside down.
1. Double tap “ScrRotation.exe”.
2. The screen rotation icon will appear on the taskbar. Tap the icon to select the option
from the menu.
3. Tap “Rotate Right”. The screen is rotated to the right.
4. Tap “Rotate Left”. The screen is rotated to the left.
5. Tap “Upside Down”. The screen is flipped 180° vertically.
6. Tap “About”. The version of screen rotation is shown.
7. Tap “Exit”. Screen rotation icon is disappeared.
Page 28
23
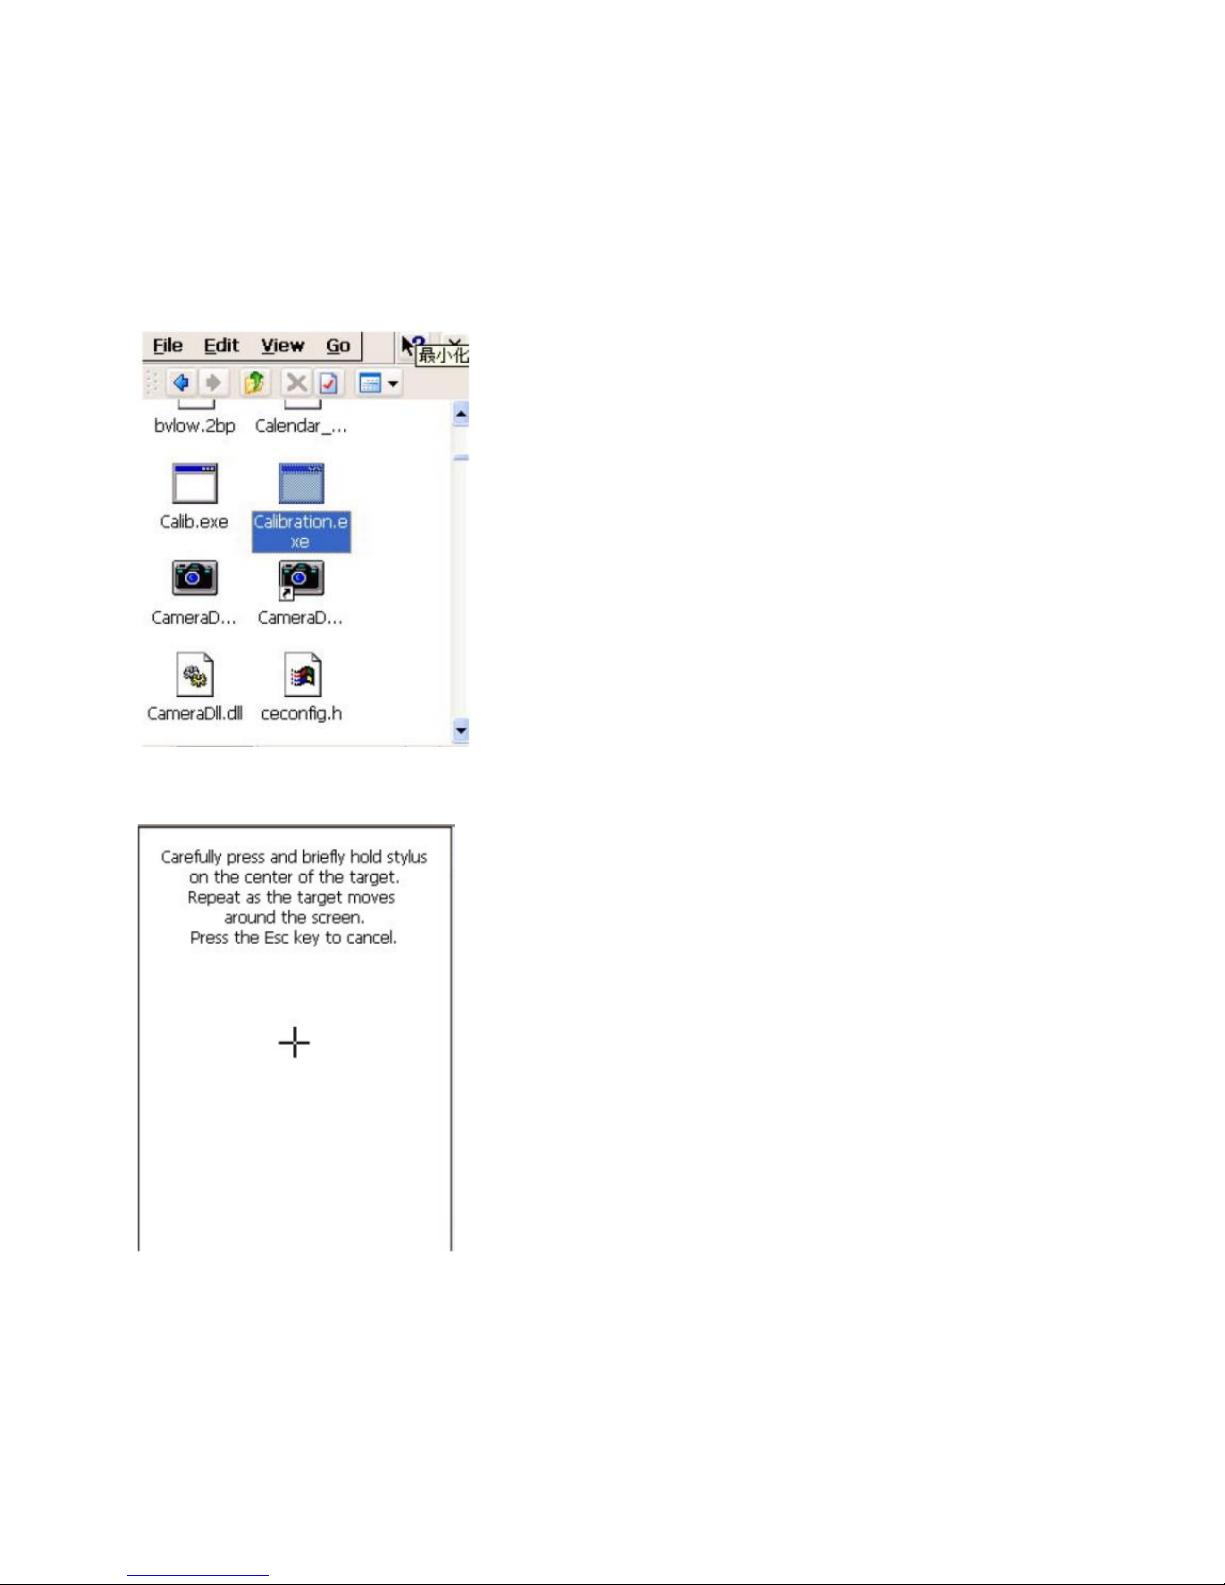
Calibration
This tool allows you to do calibration while the original screen calibration is no longer accurate.
Path:/My Device/Windows/Calibration.exe
1. Double tap “Calibration”.
2. Use the stylus to touch the “+” (Center, Top left, Bottom left, Bottom right, Top
right), then press “Enter” key.
Page 29
24
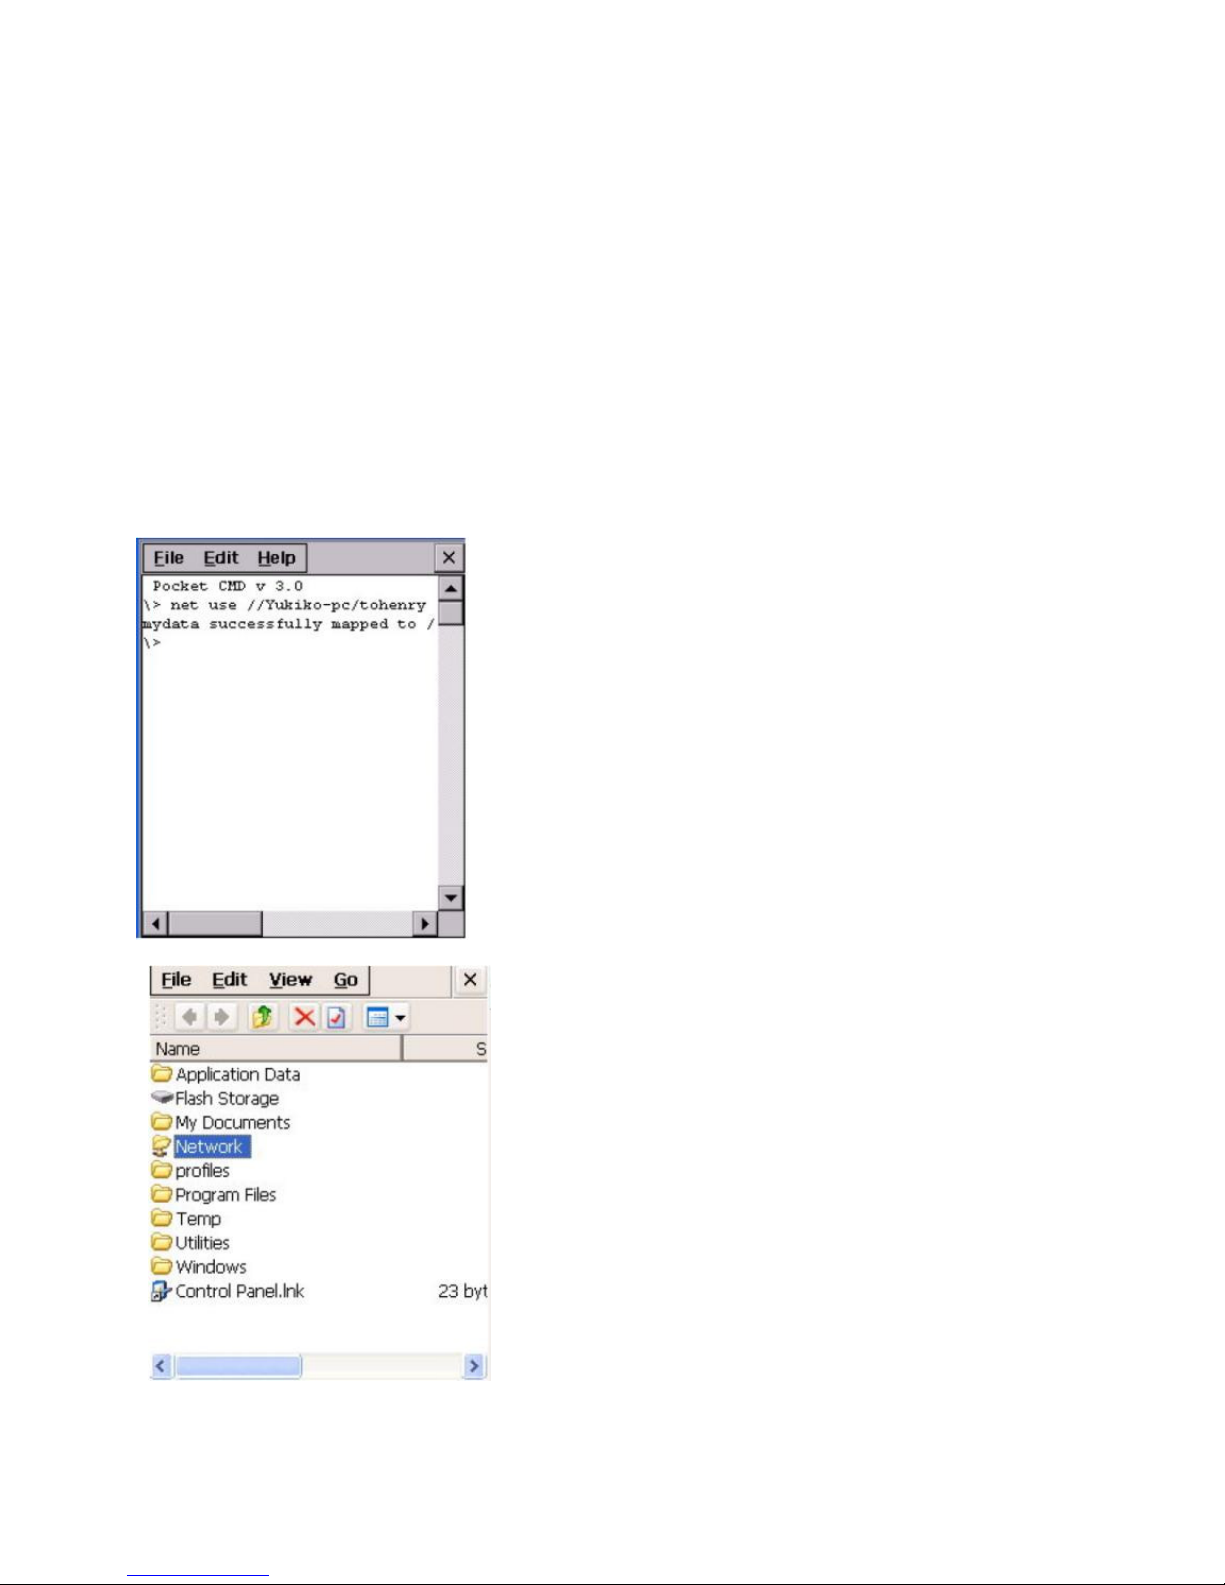
Net
Path: My Device/Windows/Net.exe
This is a MS Dos command that allows you to share data/files with any computer in the
network. (Your terminal must connect to network)
1. On your PC/notebook, share a folder to the network.
2. Execute MS DOS prompt command.
3. On the DOS prompt, type the command:
Net Use //<PC’s Name>/<Shared Folder Name> <Terminal folder’s name>
For Terminal folder’s name, you can specify any name you like.
4. In “My Device”, tap “Network”. You will see a terminal folder.
Page 30
25
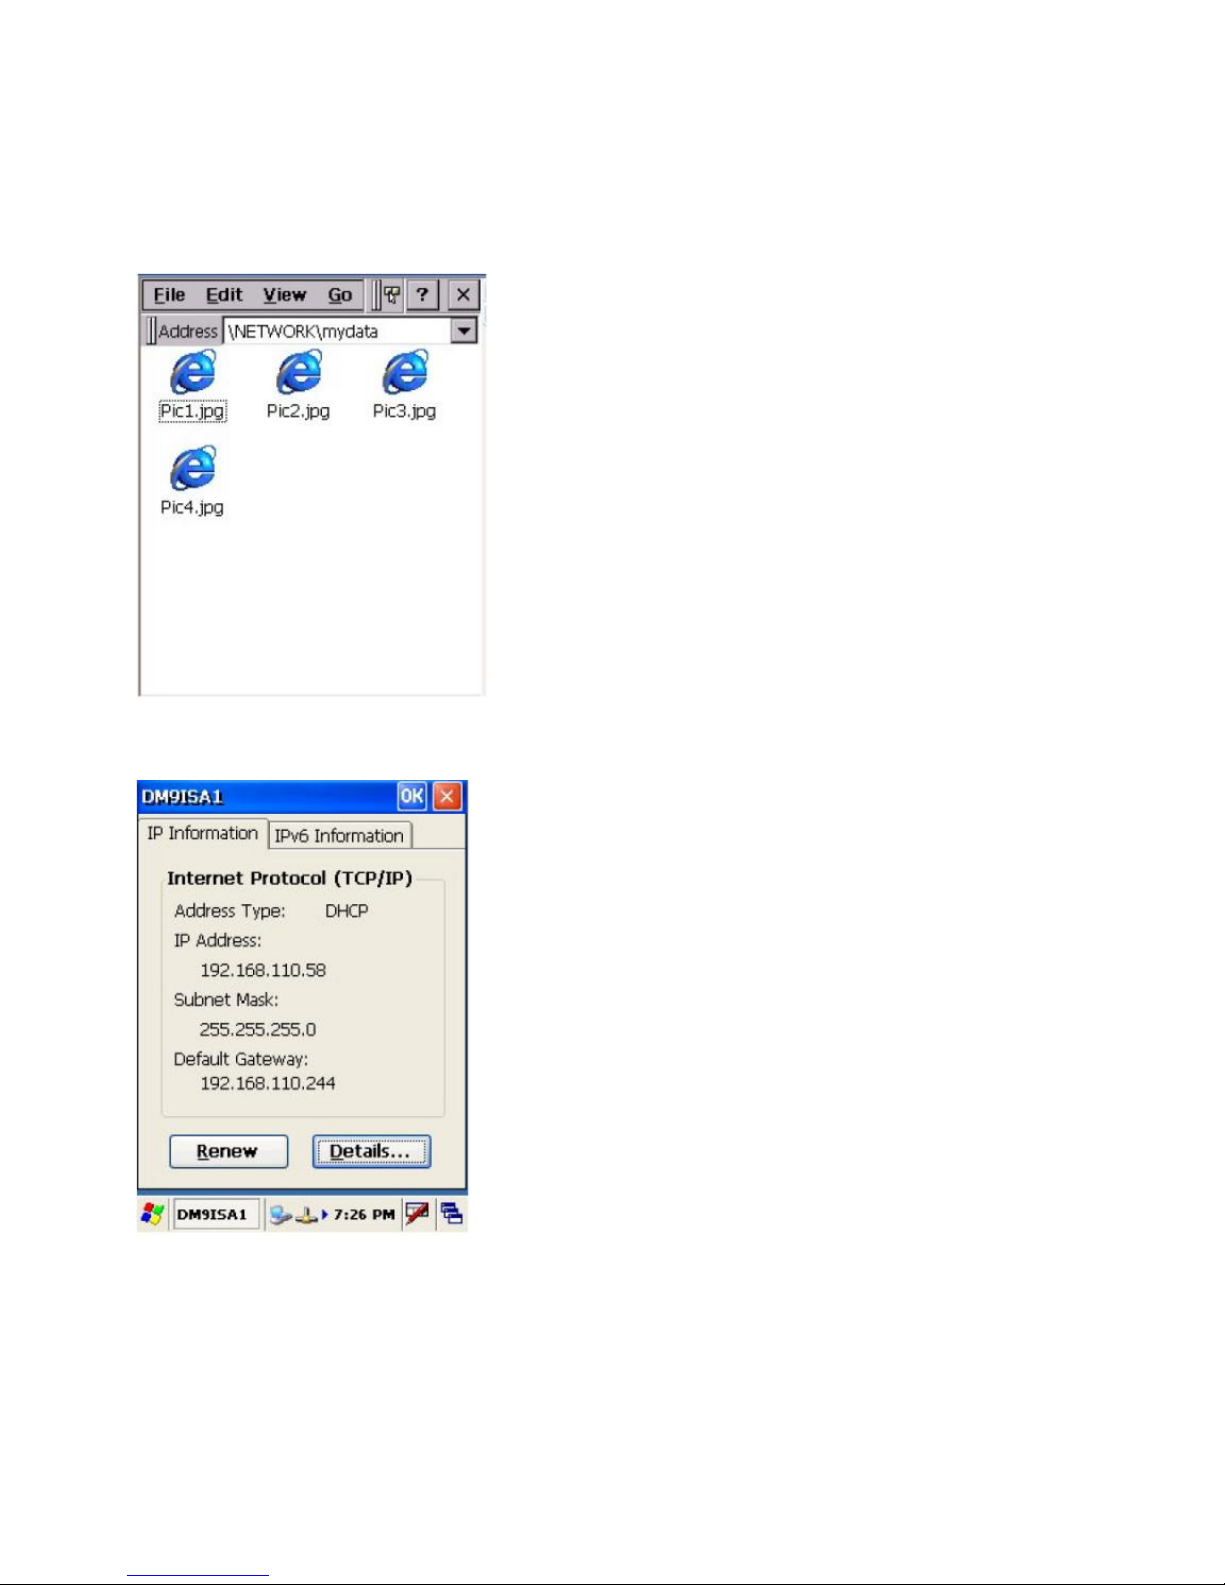
5. Open the folder. You will see the files in the folder. The content is the same as the
shared folder in your PC/notebook.
Windows CE Remote Management
1. Connect LAN cable to MT880.
2. Check IP address of MT880.
3. Input IP address of MT880 in the browser’s address bar.
4.Enter “admin” as default password and verify the password again.
Page 31
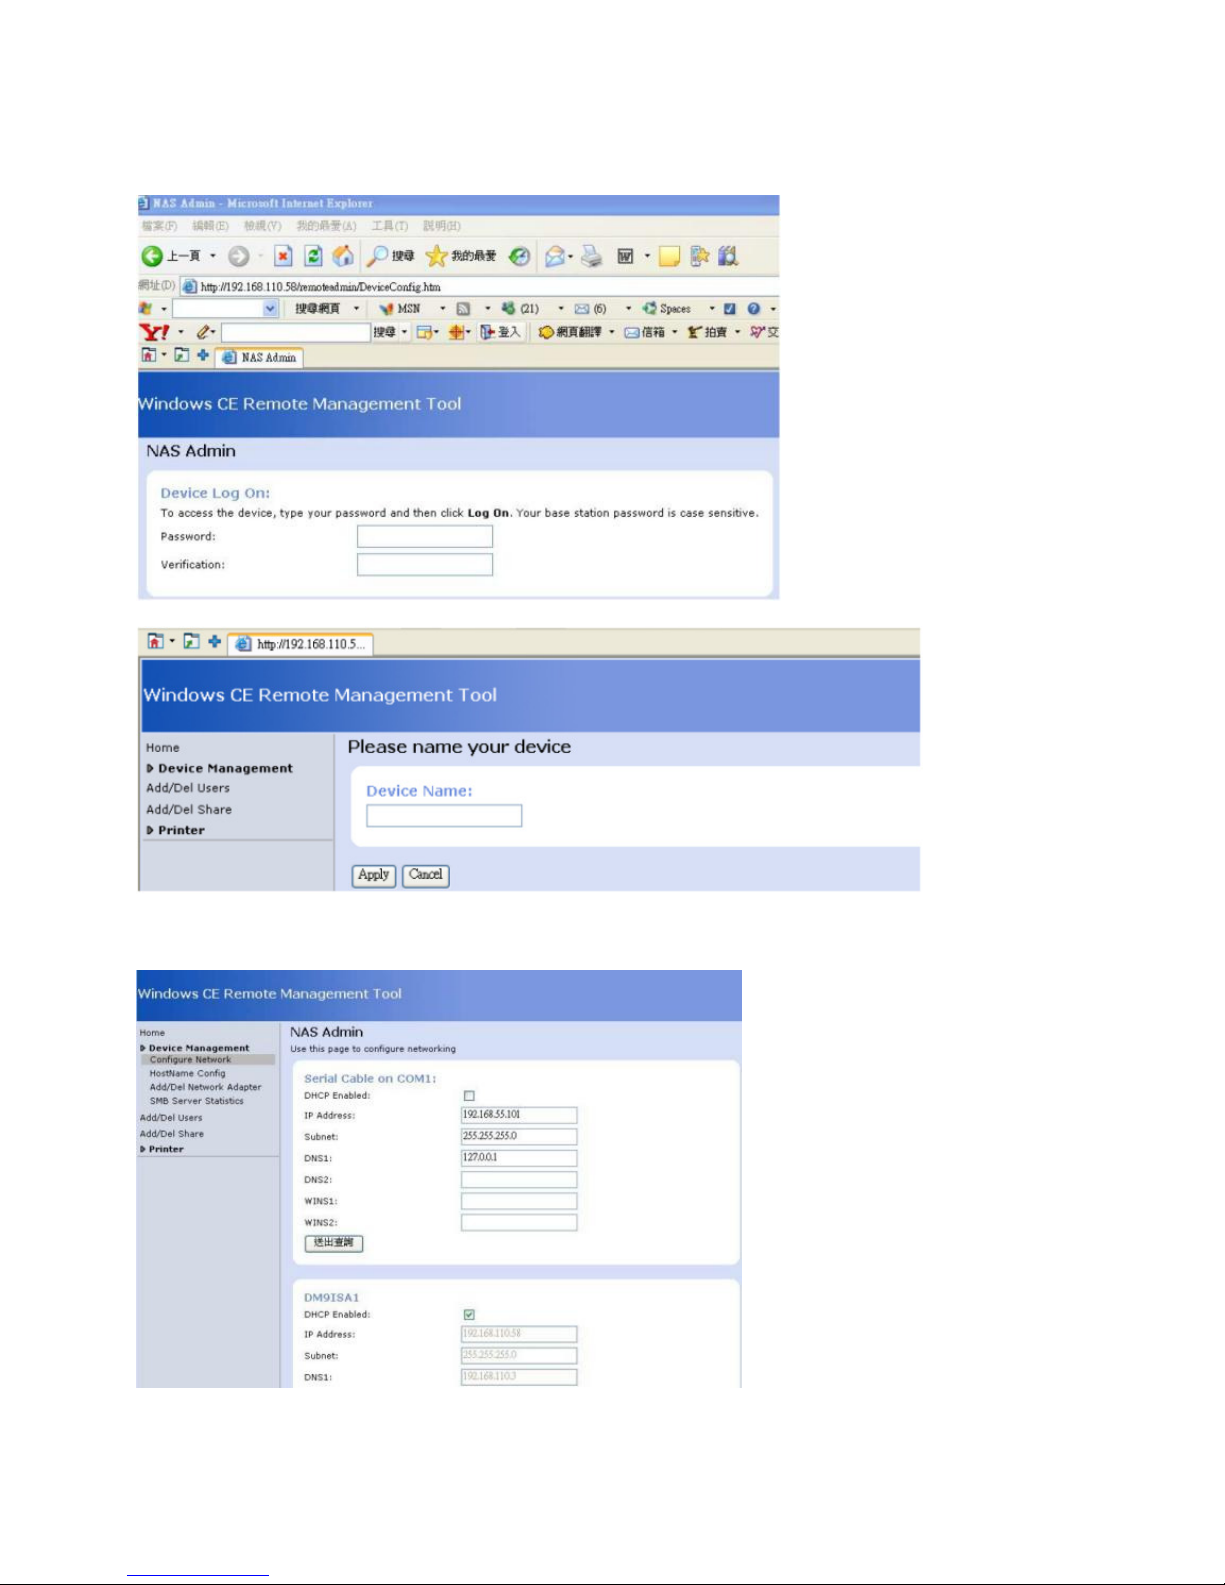
26
5.Please input Device Name you want and press “Apply”.
6. The Windows CE Remote Management Tool interface.
Device Management – Configure Network
Page 32
27
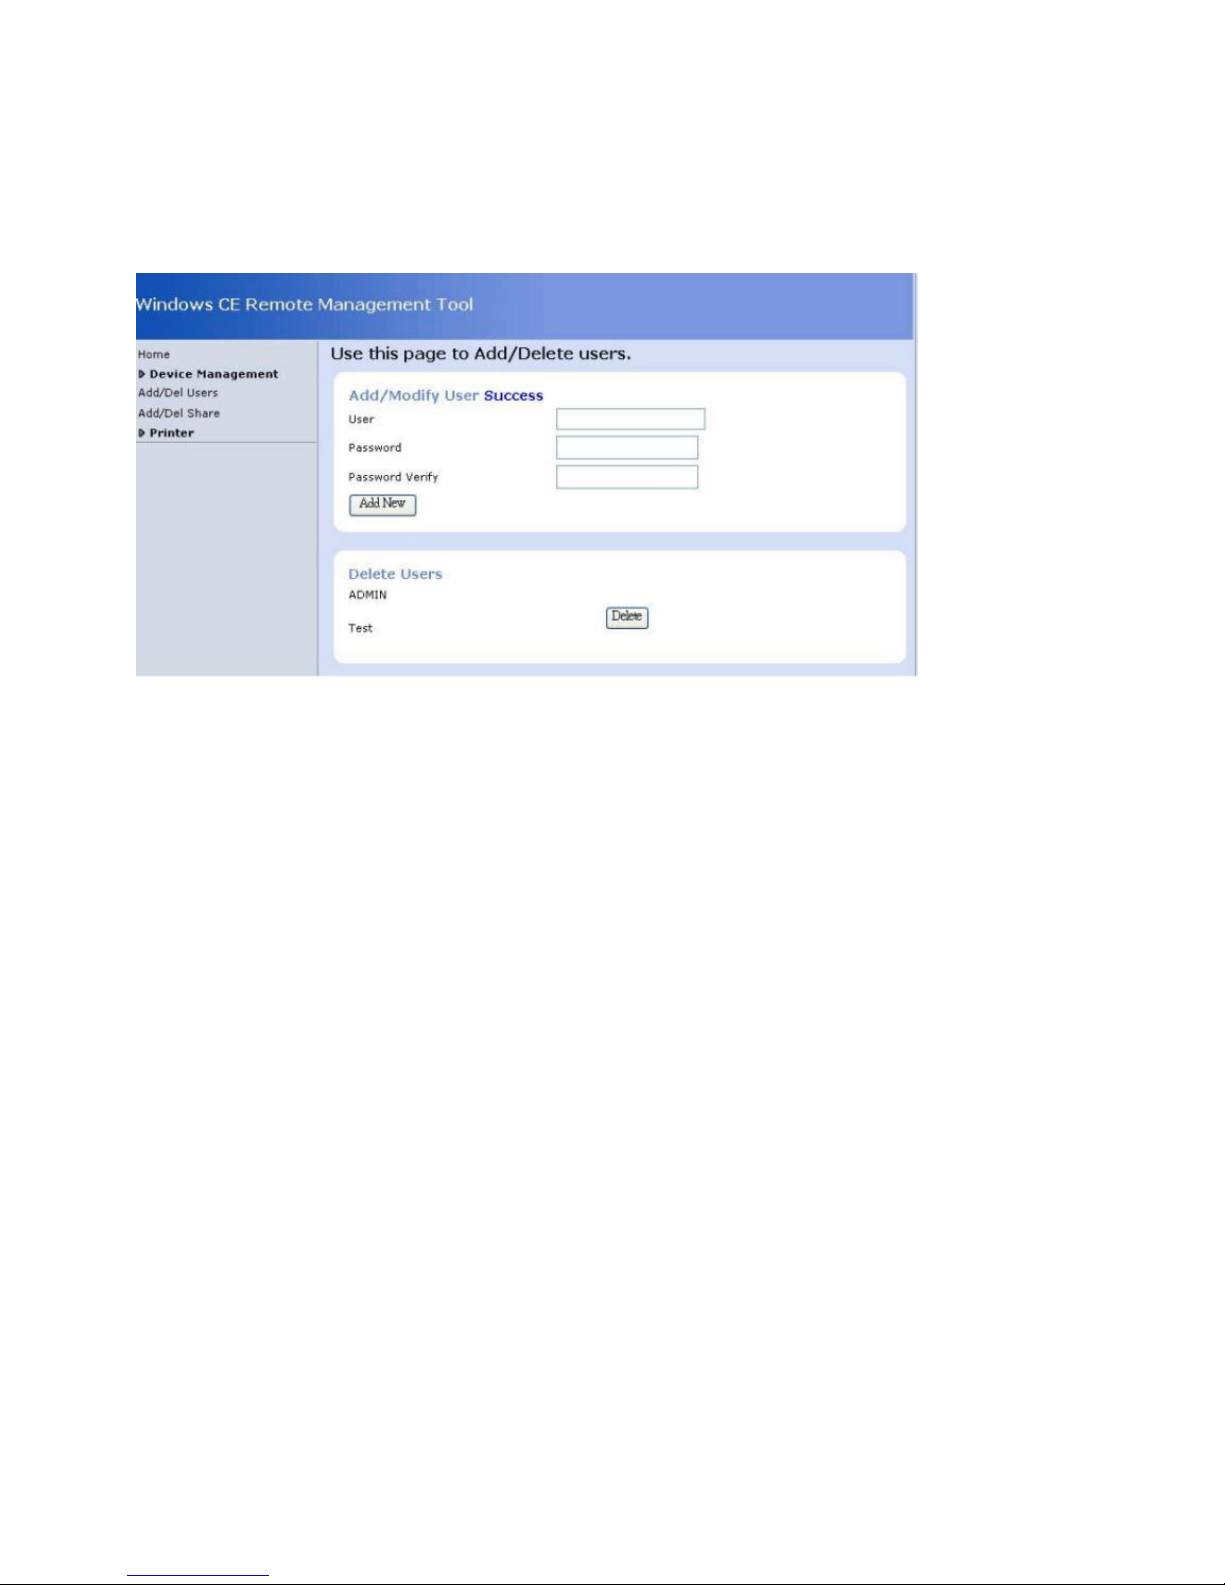
7. Click “Add/Del Users” to Add/Delete users.
You can add or delete any user, except Admin. After enter “Add New”, you can see your new
user under “Delete Users”
8. Click“Add/Del Network Adapter”. Select the adapter and click “Submit Query”.
9. Click “Add/Del Shares”, define a name for the folder of terminal that you want to
share.
10. Click “Permission”. Select “Allow” or “Deny” for the user’s access right. Click
“Update”. Click “Done”.
11. On the browser’s URL, enter \\<Device Name>\<folder name>. All the data of the
shared folder of the device are shown and they are ready to be shared.
12. To remove any shared folder, click “Remove”.
Page 33
28
Data Communication
Chapter 3
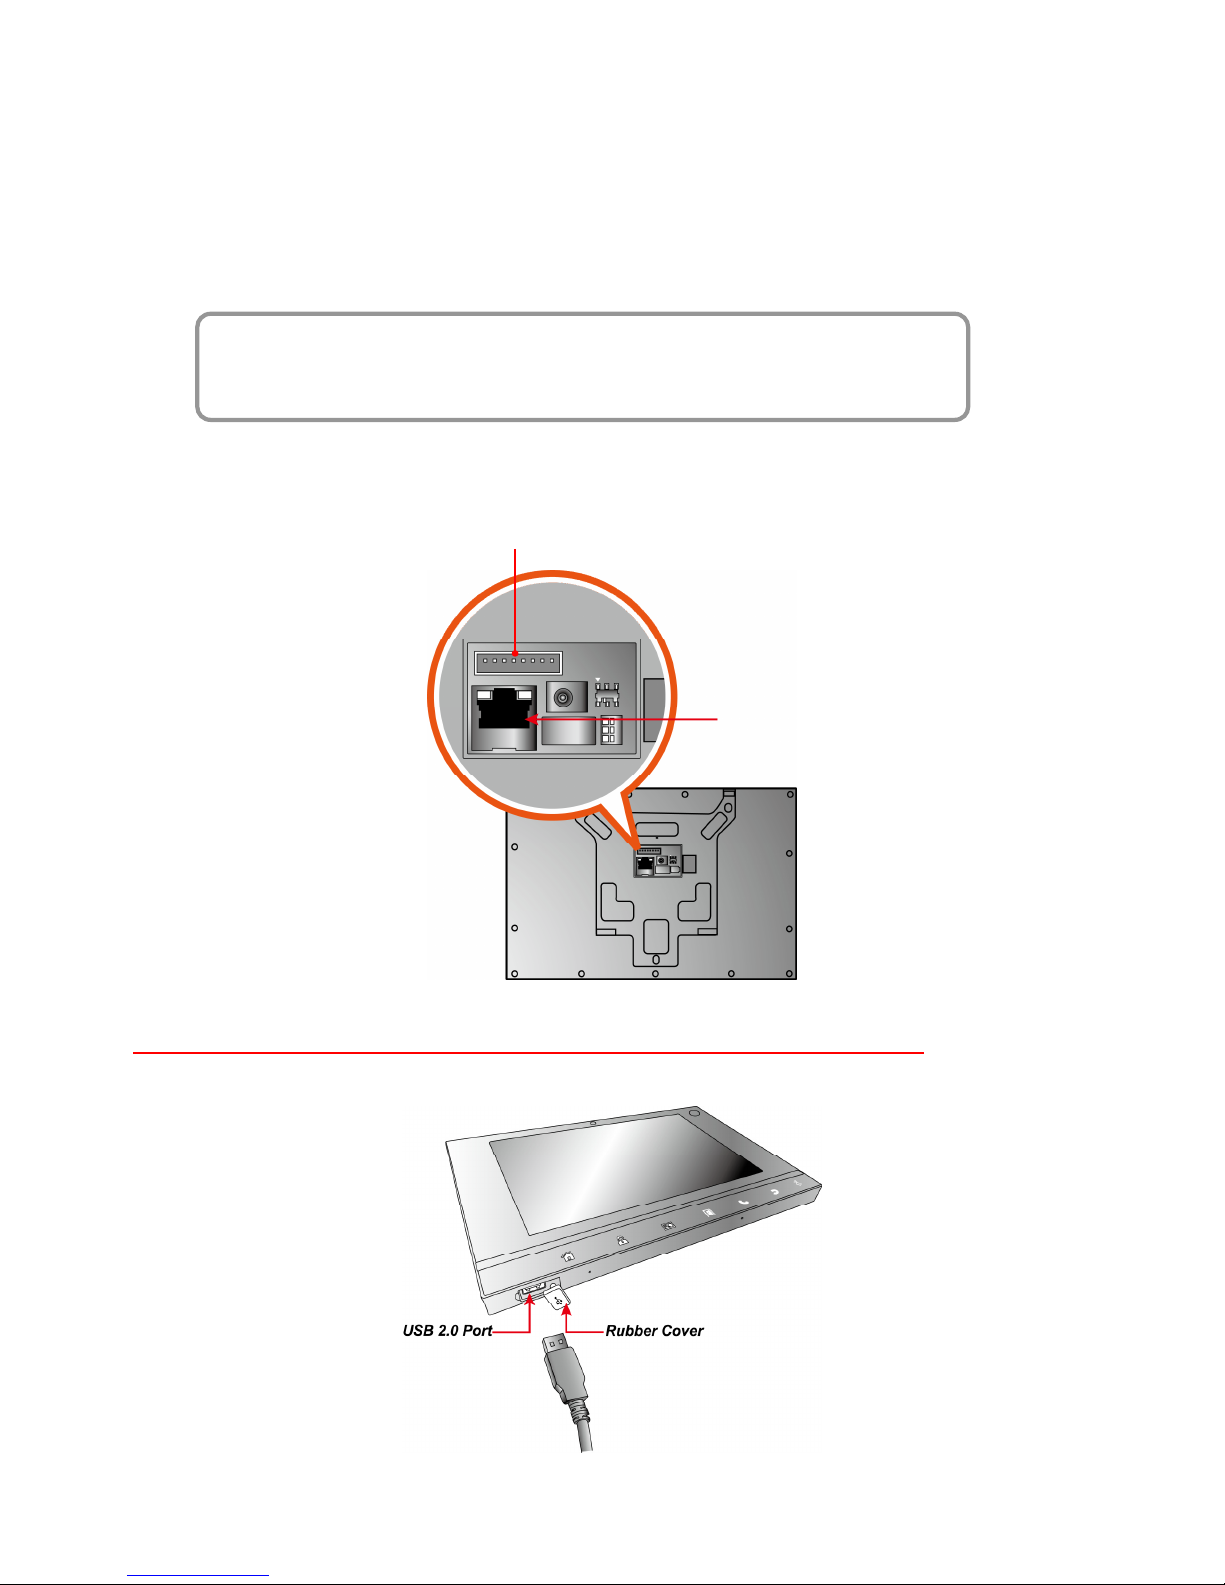
The MT880 can link to a host computer for data communication via USB, RS485 or Ethernet
cables.
USB Port
Connect a USB cable to the MT880’s USB host port, and connect the other end to a USB
peripheral, such as a: Keyboard, mouse, memory card or HID compliant device.
RS485
Ethernet Port
Page 34
29
Establishing a Wi-Fi Connection (Wi-Fi Optional)
The MT880 supports wireless communication with a built-in Wi-Fi card for 802.11b/g/n WLAN.
It is possible to use the WiFi Utility to set up or modify the Wi-Fi settings through the following
steps:
NOTE: Wi-Fi access requires a separate service contract through a wireless service provider.
Contact a wireless service provider for more information.
Unitech terminals come with built-in RF facility. This chapter guides you through the RF setting.
1. Tap the wireless network icon as a shortcut on the desktop.
2. Move to Wireless Information, and tap Add New or double tap a
preferred network.
3. Enter a Network Name (SSID) and a Network Key. For the detailed
instruction on wireless network encryption setting, please visit Microsoft
website. Then, tap OK.
4. The network icon appears on the taskbar when the RF is connected.
IP Address Setup
The MT880 automatically detects WLAN module during the first installation. Set the IP address
through one of the following methods:
Obtaining an IP Address via Dynamic Host Configuration Protocol (DHCP) Server.
Specifying an IP Address.
Obtaining an IP Address via DHCP Server
Make sure a DHCP server is available in the LAN environment before trying to obtain the IP
address through a DHCP server.
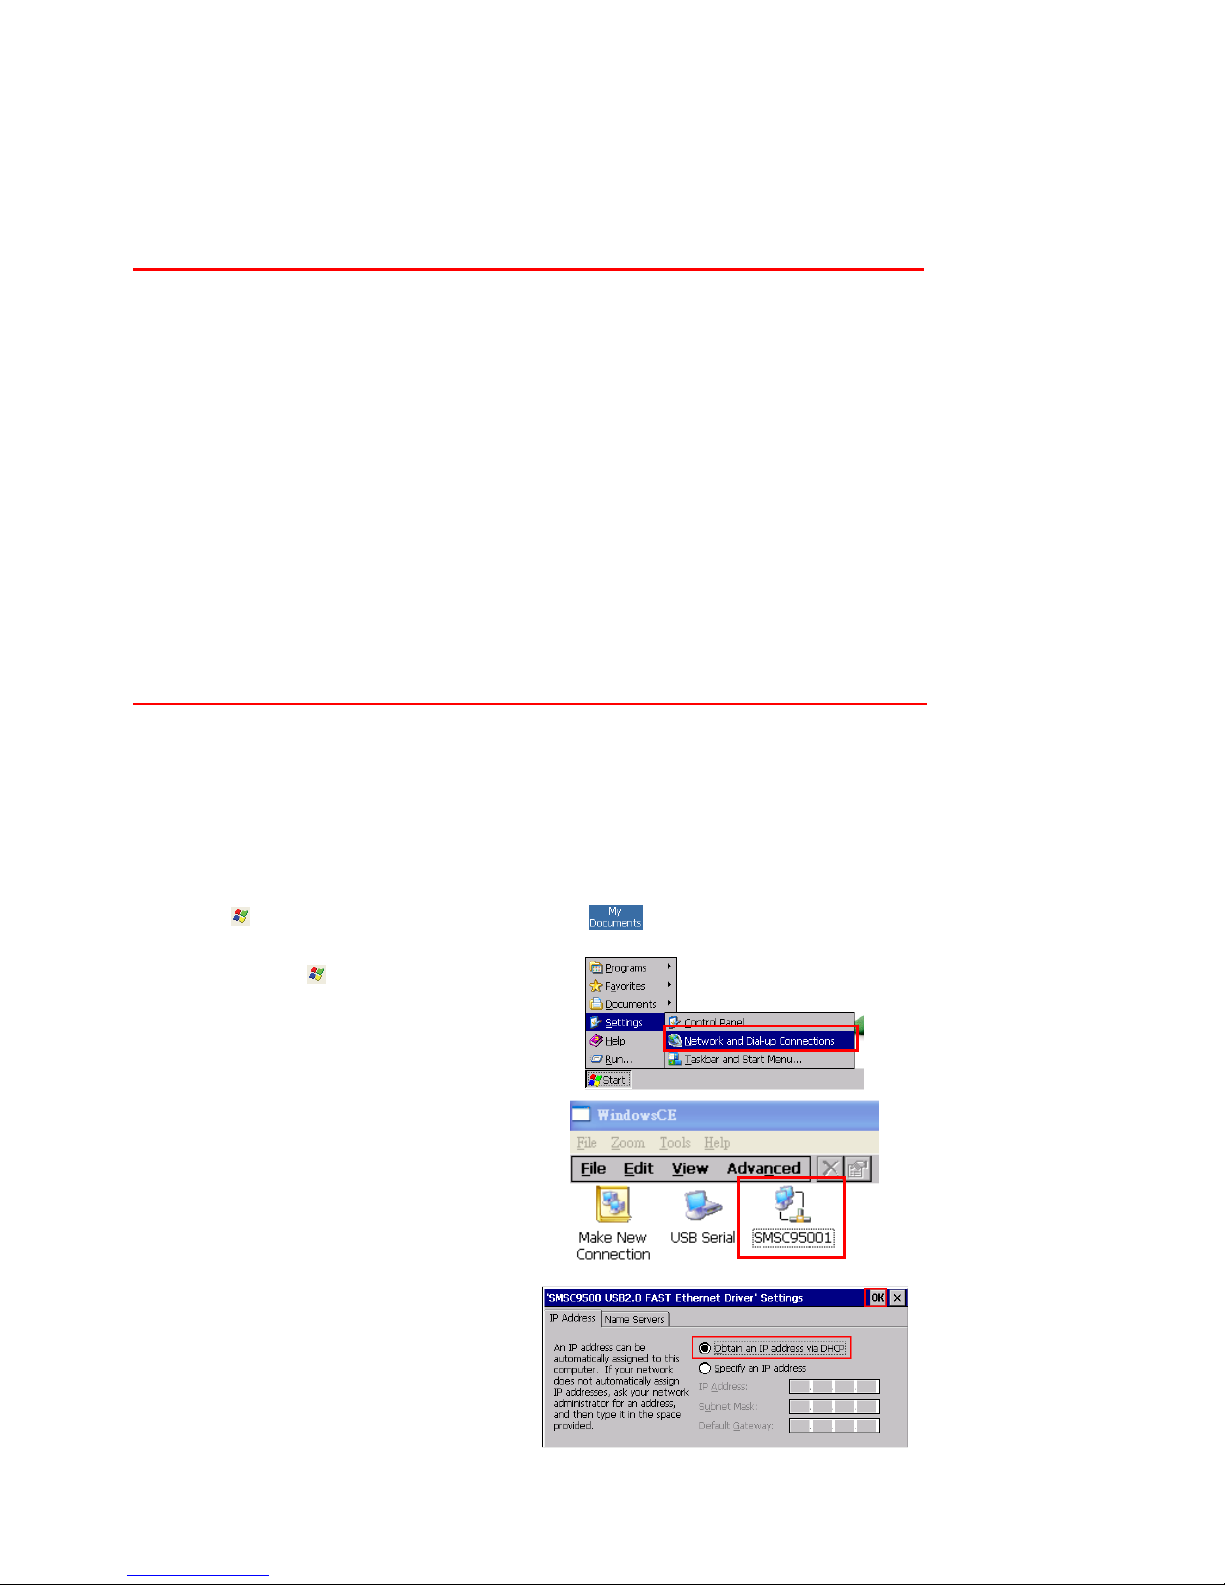
1. Tap Start → Settings →
Network and Dial-up Connections.
NOTE: Tap Start → Settings
→ Control Panel → double-tap
Network and Dial-up Connections.
2. Double-tap SMSC95001.
3. Tap the radio button next to
Obtain an IP address via DHCP
and then tap OK.
Page 35
30
Specifying an IP Address
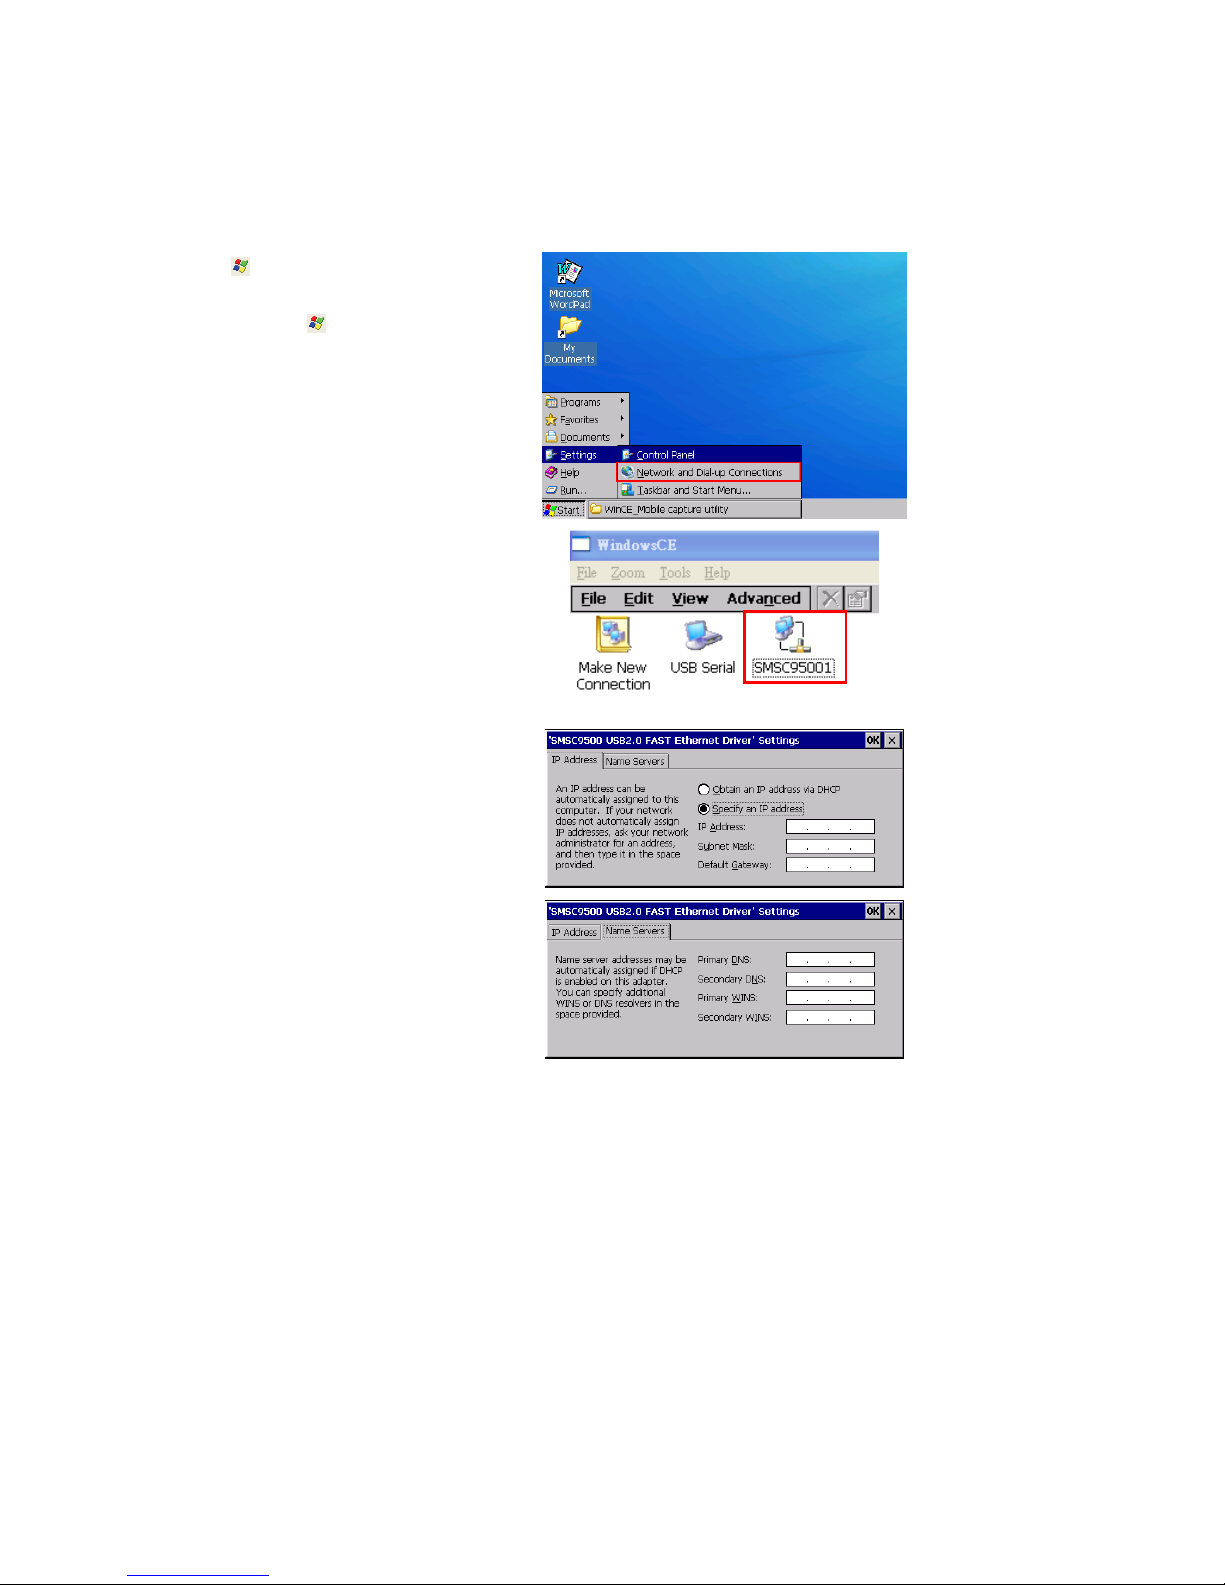
If no DHCP server is available, assign an IP address to each MT880 through the following:
1. Tap Start → Settings →
Network and Dial-up Connections.
NOTE: Tap Start → Settings
→ Control Panel → double tap
Network and Dial-up Connections.
2. Double-tap SMSC95001.
3. Tap the radio button next to
Specify an IP address. Input the
proper IP address, Subnet Mask
and Default Gateway.
4. In the Name Servers tab, input
the proper Primary DNS:,
Secondary DNS:, Primary WINS:
and Secondary WINS:. Tap OK.
NOTE: To avoid conflict with the Local Area Network environment, consult an MIS department
for the correct Transmission Control Protocol / Internet Protocol setting.
Page 36
31
Power and Hardware
Chapter 4
The MT880 must work with external power. In this case, connect the MT880 to
the AC outlet with the power adapter.
Adjusting the Backlight
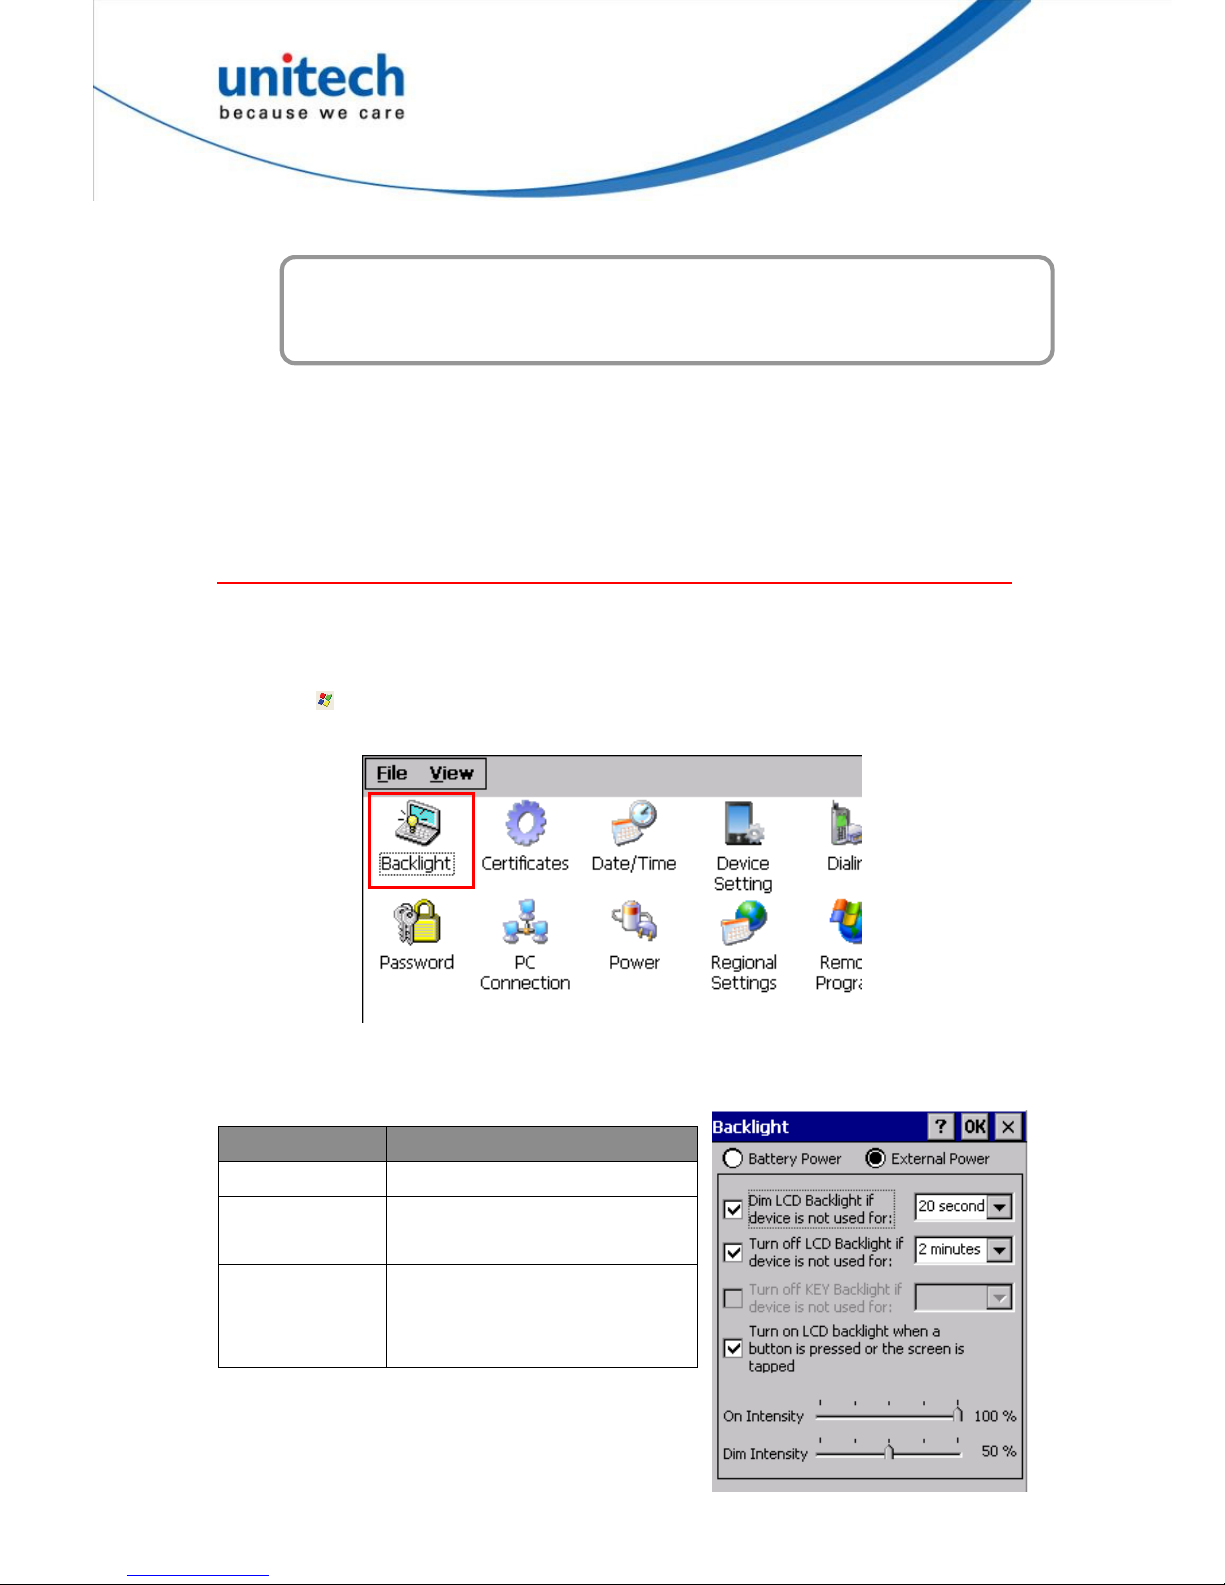
Adjust the backlight screen settings through the following steps:
NOTE: The MT880 screen contrast has been preset by Unitech for optimum
performance.
1. Tap Start → Settings → Control Panel → double-tap Backlight to
adjust the screen brightness.
2. The color display’s backlight can be customized for the Battery Power
and External Power conditions. Set the backlight behavior and drag the
On Intensity and Dim Intensity sliders to the desired levels.
Field Description
Dim Backlight Minutes until the backlight dims.
Turn Off Backlight Minutes until the backlight turns
automatically off.
Turn on Backlight The backlight turns on when a
button is pressed, or the
touch-screen is tapped.
Page 37
32
Hardware Reset
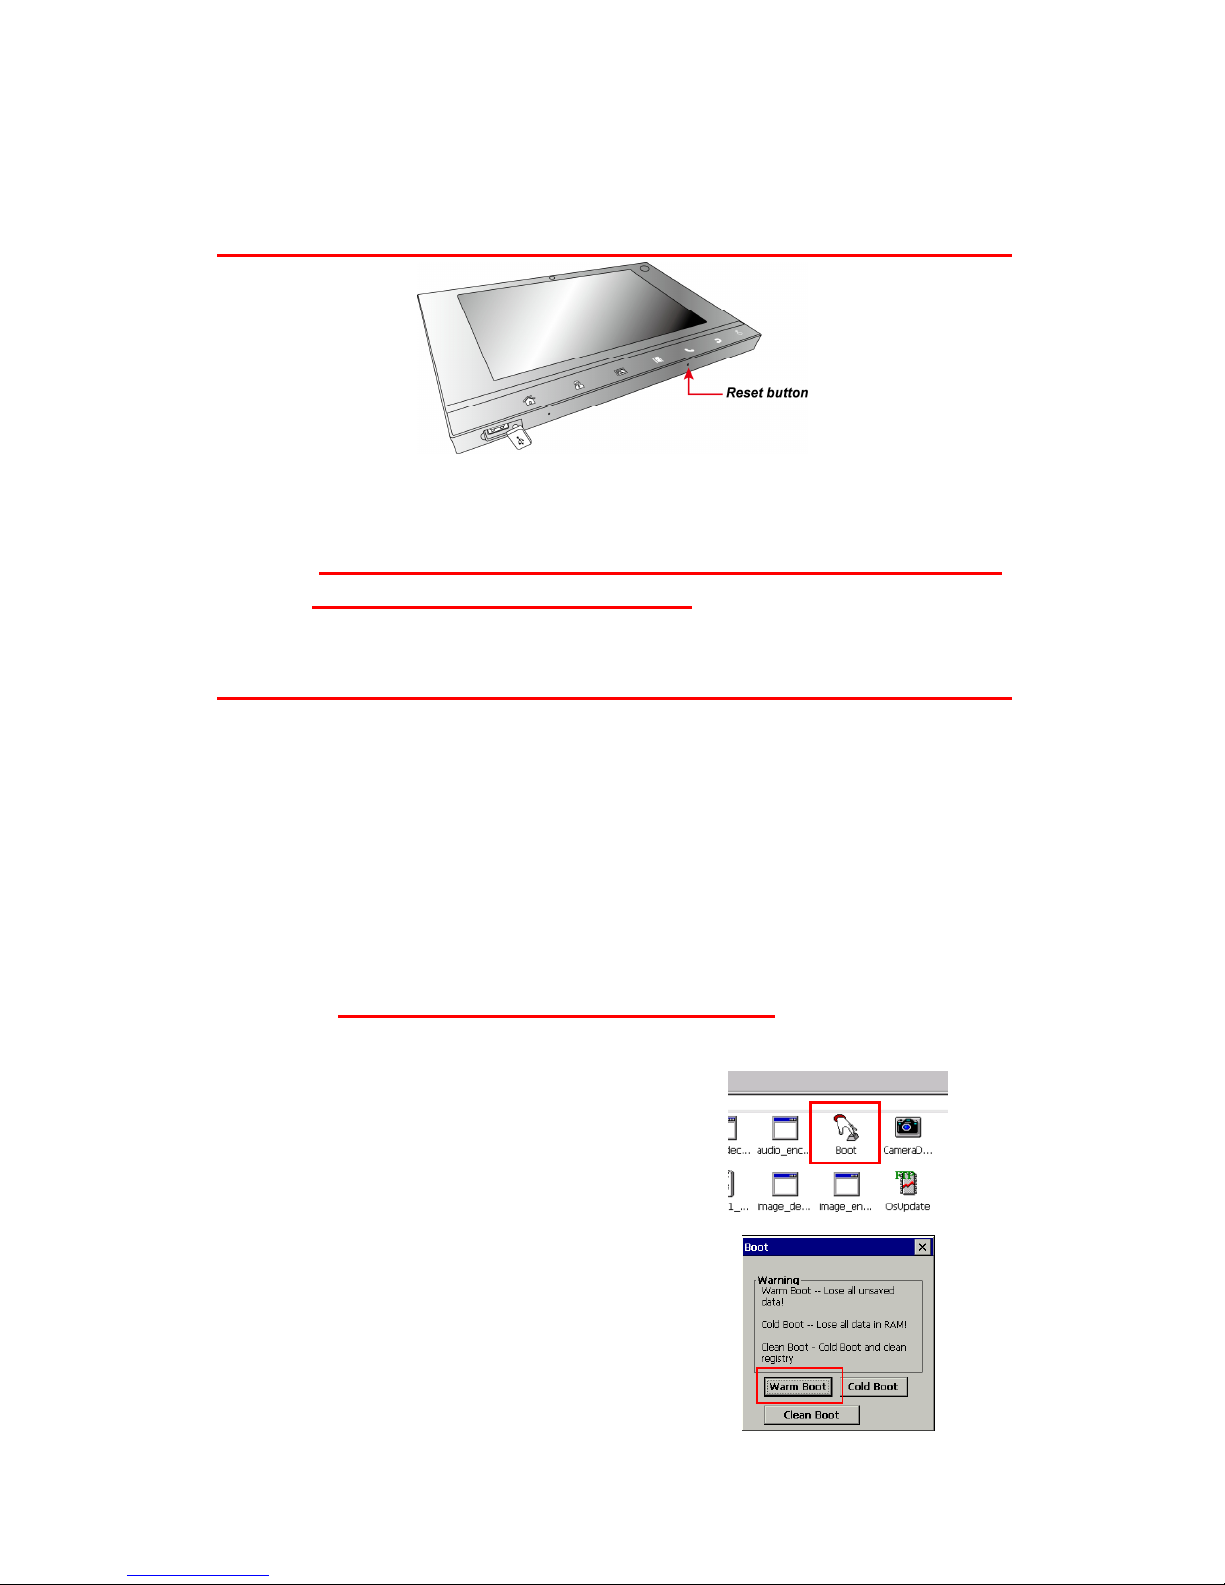
To perform a hardware reset, press the Hardware Reset button with a stylus
or a sharp object.
Caution: If you perform the hardware reset, there is a possibility that the
settings you have done will be lost!
Performing a Software Reset
Perform a reset if the MT880 is frozen (i.e., the device no longer responds to
pressing buttons on/or the touch-screen).
Performing a Warm Boot
A Warm Boot is used to reset or reboot the device without losing data stored
in RAM memory. Perform a Warm Boot in any of the following situations:
The MT880 fails to respond.
After installing software applications.
After making changes to certain system settings (i.e. SD card).
CAUTION! A Warm Start will erase all unsaved data.
From Windows CE
1. Tap My Device → Windows → Boot.
2. Tap Warm Boot.
Page 38
33
Performing a Cold Boot
A Cold Boot will erase all added data and programs, but it will restore the
device to the default factory settings. However, data and application programs
stored in the Flash Storage will not be deleted.
Always perform a Warm Boot before attempting to use a Cold Boot to correct
a problem. Data previously synchronized to the computer can be restored.
Perform a Cold Boot by using the BootMode utility in the operating system.
Perform a cold boot in the following situations:
Reset the operating system.
Restore the MT880 back to factory settings.
Reset the MT880 after a boot loader, keyboard and kernel upgrade.
CAUTION! A cold boot will erase all data and installed applications in
RAM memory.
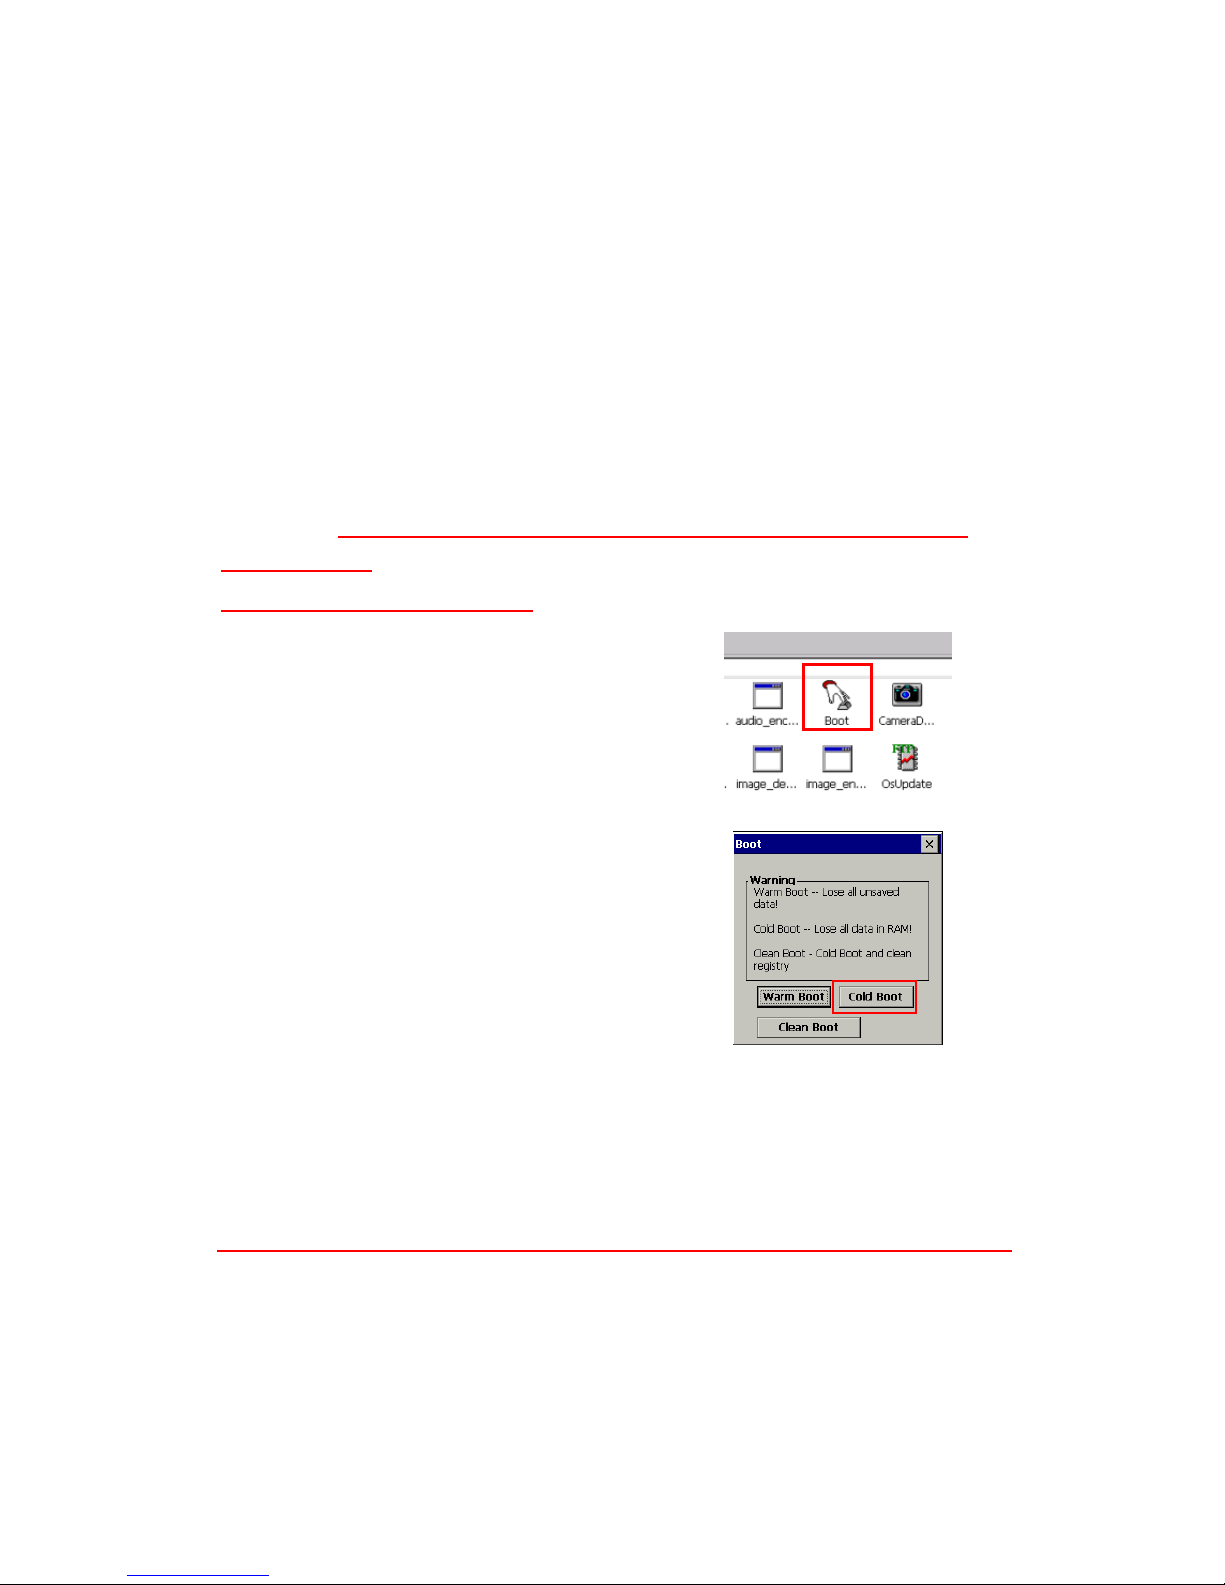
Method 1: From Windows CE
1. Tap My Device → Windows → Boot.
2. Tap Cold Boot.
Method 2: From Hardware
Pull out the power cable and then plug the cable into the DC input jack to cold
boot
Terminal Block
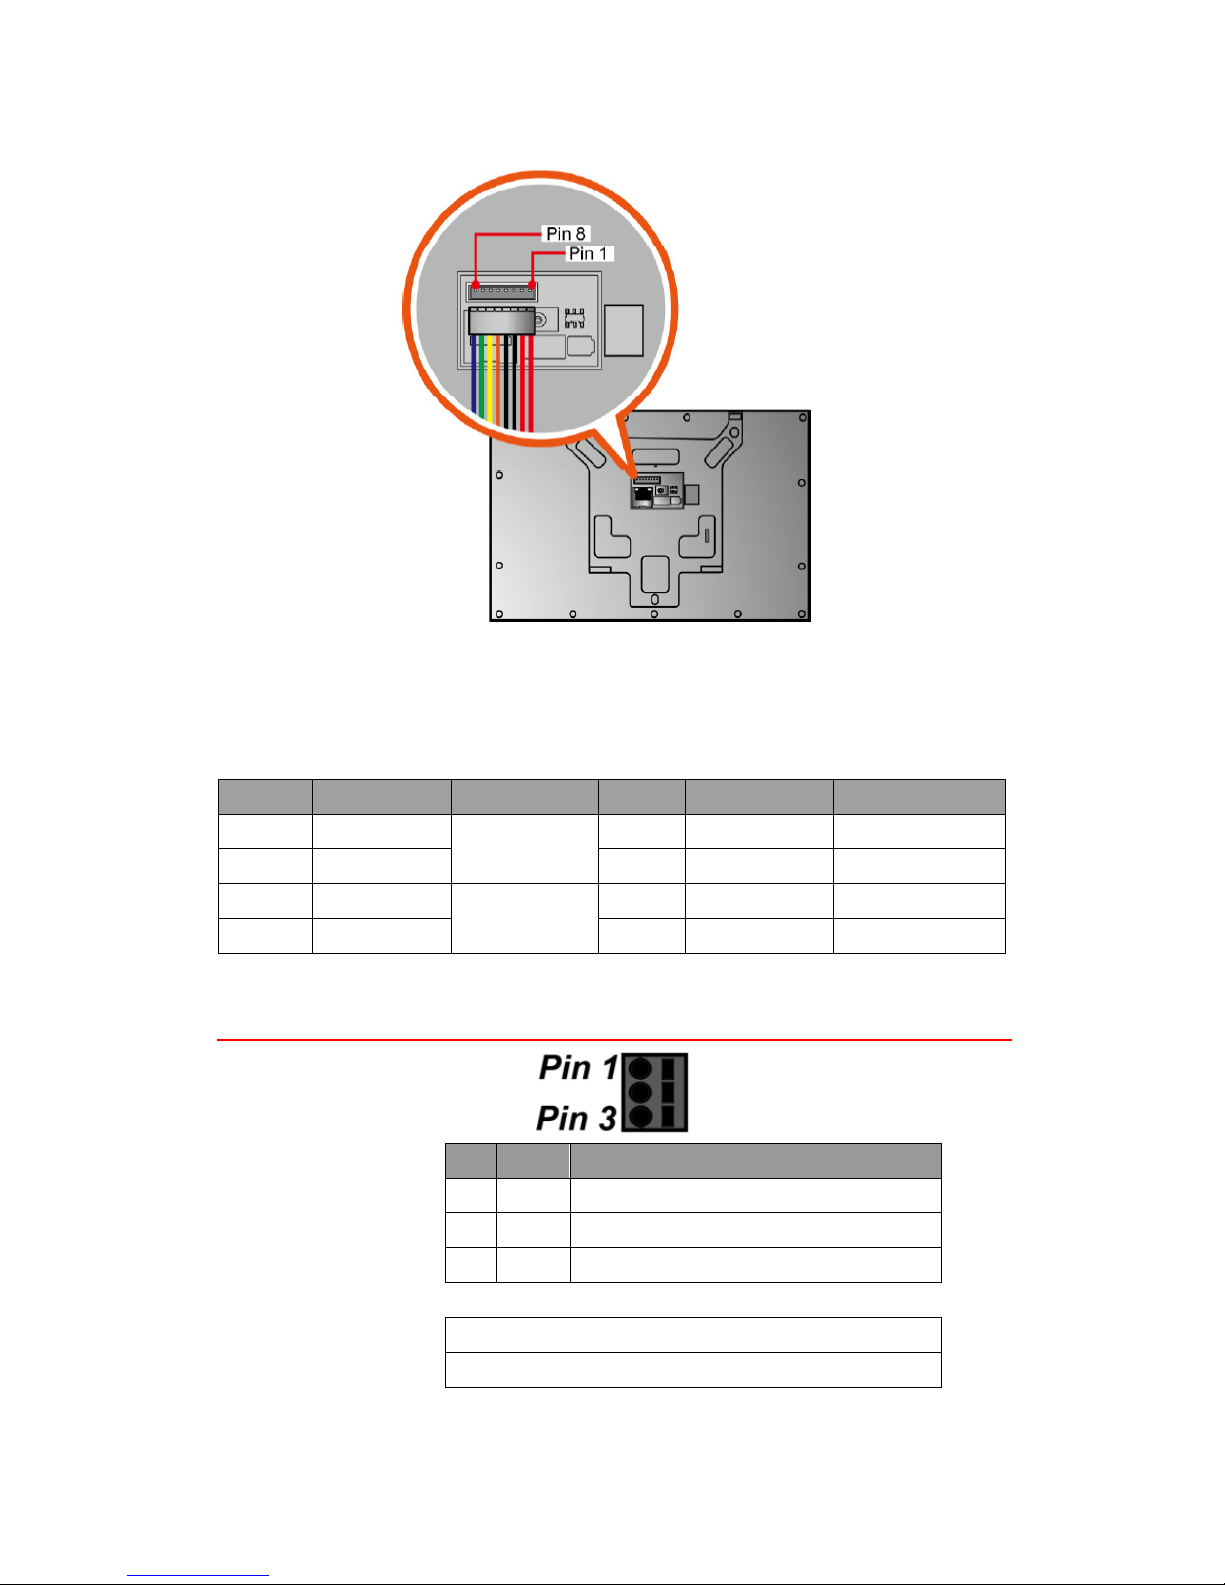
The MT880 provides one 8-pin terminal block plugs for input/output signals.
With reference to the illustrative figures below, Insert the terminal block plugs
into the terminal block sockets on the rear side of the MT880.
Page 39
34
Terminal Block Pin Assignment
Pin Wire Color
Name Pin Wire Color
Name
1
Red
VIN-12V
5
Orange RS485_1+
2
Red
6
Yellow RS485_1-
3
Black
GND
7
Green RS485_2+
4
Black
8
Blue RS485_2-
Relay Connector
Pin Name
Description
1
C Relay 1 Common
2
NC Relay 1 Normal Close
3
NO Relay 1 Normal Open
Relay Output
RL – CTRL = High R (C & NO Linked
RL – CTRL = Low R (C & NO Linked
Page 40
35
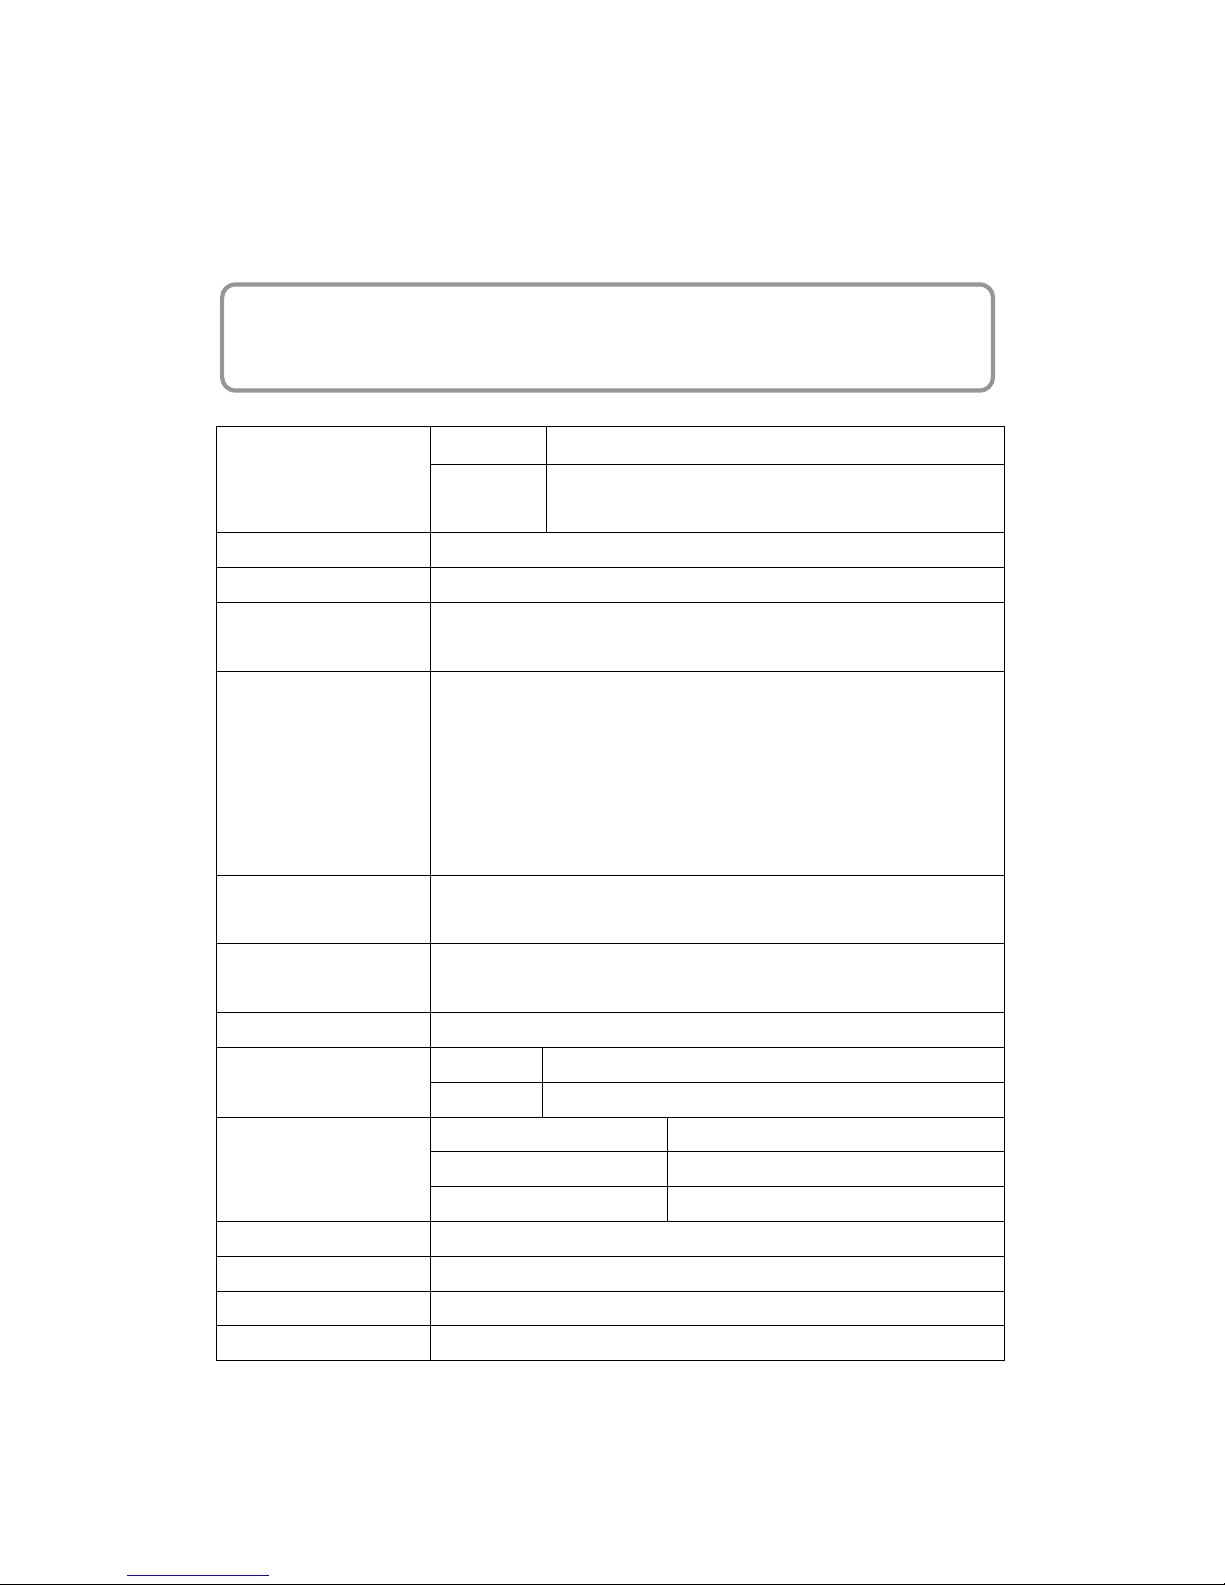
System Specification
Appendix A
Processor/Memory
CPU
TI OMAP DM3730 with DSP 1GHz Processor
Memory
SDRAM: 512 MB
NAND Flash: 512 MB
OS Microsoft Windows CE 6.0 Professional Plus
Button Six function buttons
Display
10 inches color (1280 x 800) Pixels
Backlight Touch-screen, TFT-LCD
Communication
1 X RJ45 with POE (DC12V/1A, IEEE802.3af Compliant)
RS485 Support (Option RS485+, RS485-) baud rate at 15200 bps
or lower
*RS485
USB v2.0 Host
Supports 802.11b/g/n (optional)
Multimedia
Audio output: 2W speaker
Microphone audio input
TASHI Middleware
ModBus SDK supporting
Elfin utility
Power Source External Power (DC12V/2A)
Enclosure
Weight 576 g.
Dimension 142mm (L) X 231mm (W) X 18mm(H)
Environmental
Operating temperature -10oC ~ 50oC
Storage temperature -20oC ~ 70oC
Relative Humidity 10% – 95%
Certification CE, FCC, NCC, CCC, BSMI and RoHS compliant
Programming VoIP/V2oIP
RFID Reader (Optional) MiFare 13.56MHz (ISO 14443A / ISO 14443-4B / ISO 15693 / NFC)
Camera (Optional) 2.0 megapixel CMOS camera
Page 41
36
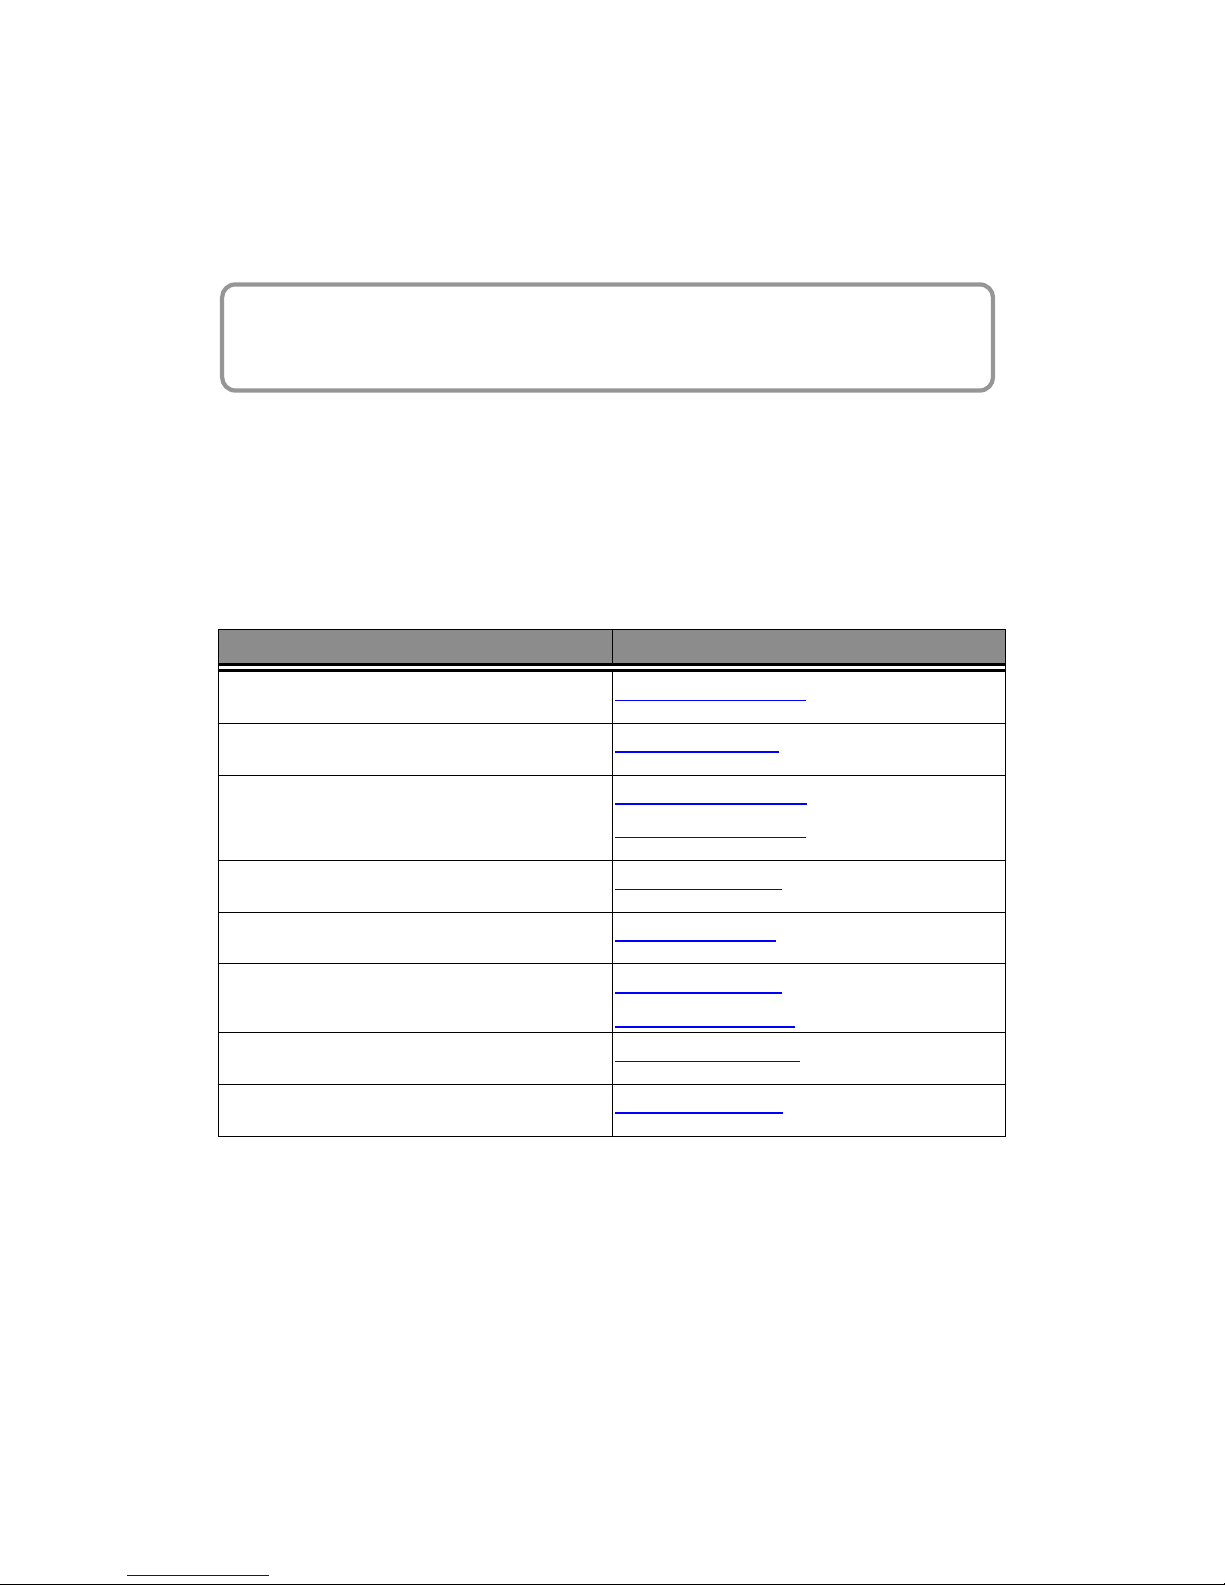
Worldwide Support
Appendix B
At unitech, we have a professional support team to answer your questions or
any related technical issues. If the equipment problem occurs, you may
contact our regional services representatives to get the quick response. We
have six regional services centers, and choose your region to get our quick
support and their contact information can be found in our websites provided
as below.
Region Web Site
Global Operation Center http://www.ute.com
Unitech Taiwan http://tw.ute.com
Unitech Asia Pacific & Middle
http://apac.ute.com
http://india.ute.com
Unitech China http://cn.ute.com
Unitech Japan http://jp.ute.com
Unitech America
http://us.ute.com
http://can.ute.com
Unitech Latin America http://latin.ute.com
Unitech Europe http://eu.ute.com
 Loading...