

Page 1
Trail Camera Instruction Manual
02-18
Model #: 119270CW/119271CW
(en FRANÇAIS p. 20)
Page 2

2
IMPORTANT NOTE
Congratulations on your purchase of one of the best
trail cameras on the market! Please refer to the notes
below and the instructions in this manual to ensure that
you are completely satised with this product.
If your Tasco® Trail Camera does not seem to be
functioning properly or if you are having photo/video
quality issues, please check the Troubleshooting/
FAQ section on pages 13-16.
Problems are often due to something simple that was
overlooked, or require only changing one setting to
solve.
If your problem continues after trying the solutions in
the Troubleshooting/FAQ section, please call Tasco
Customer Service at (800) 423-3537. In Canada, call
(800) 361-5702.
Tasco recommends using 8 Energizer® Lithium AA batteries
in this trail camera to obtain maximum battery life.
Do not mix old and new batteries.
Do not mix battery types-use ALL lithium or ALL alkaline.
Rechargeable batteries are NOT recommended.
Tasco recommends using SanDisk® SD and SDHC Cards (up
to 32GB capacity) in this Tasco trail camera.
Page 3

3
INTRODUCTION
About the Tasco Trail Camera
Your new Tasco
®
Trail Camera is a digital scouting camera.
It can be triggered by any movement of live animals in a
location, detected by a highly sensitive Passive Infra-Red
(PIR) motion sensor, and then take high quality photos (6MP
or 8MP resolution, depending on model), or video clips (720p,
10 seconds length).
The Tasco Trail Camera consumes very little power (< 0.5mA) in
a stand-by (surveillance) state. This means it can deliver up to
six months stand-by operation time when the device is powered
by eight AA alkaline batteries, and up to twelve months utilizing
eight lithium AA batteries (30 images per day, 15 w/ash). Once
motion in the monitored area is detected, the digital camera unit
will be triggered at once (typically less than 1 second) and then
automatically take photos or videos (your choice). The Tasco
Trail Camera is equipped with built-in infrared (IR) LEDs that
function as a ash, so that it delivers clear photos or videos (in
black & white) even in the dark, and it can take color photos
or videos under sufcient daylight. The Tasco Trail Camera is
designed for outdoor use and is water resistant.
PARTS and CONTROLS
Release the two latches on the right side of the camera and
swing the front cover over to the left to access the controls. A
3-way power/mode switch is used to select the main operating
modes: OFF, AIM, and ON (Fig. 1).
When the power switch is set to the AIM middle position, the
camera is in Setup Mode. The AIM position can also be used
to verify the area the camera will monitor. The LCD Display
will show the camera’s current settings in Setup Mode. The
Up, Down and OK keys are used to set the date and time
(to be imprinted on each photo/video), change the interval or
“detection delay” time between images while an animal remains
in range of the camera’s sensor, select Photo or Video capture
mode, set a camera ID number for your reference, and format
the SD card (erase all les). Once you setup the camera, switch
it to ON for normal operation.
Page 4
4
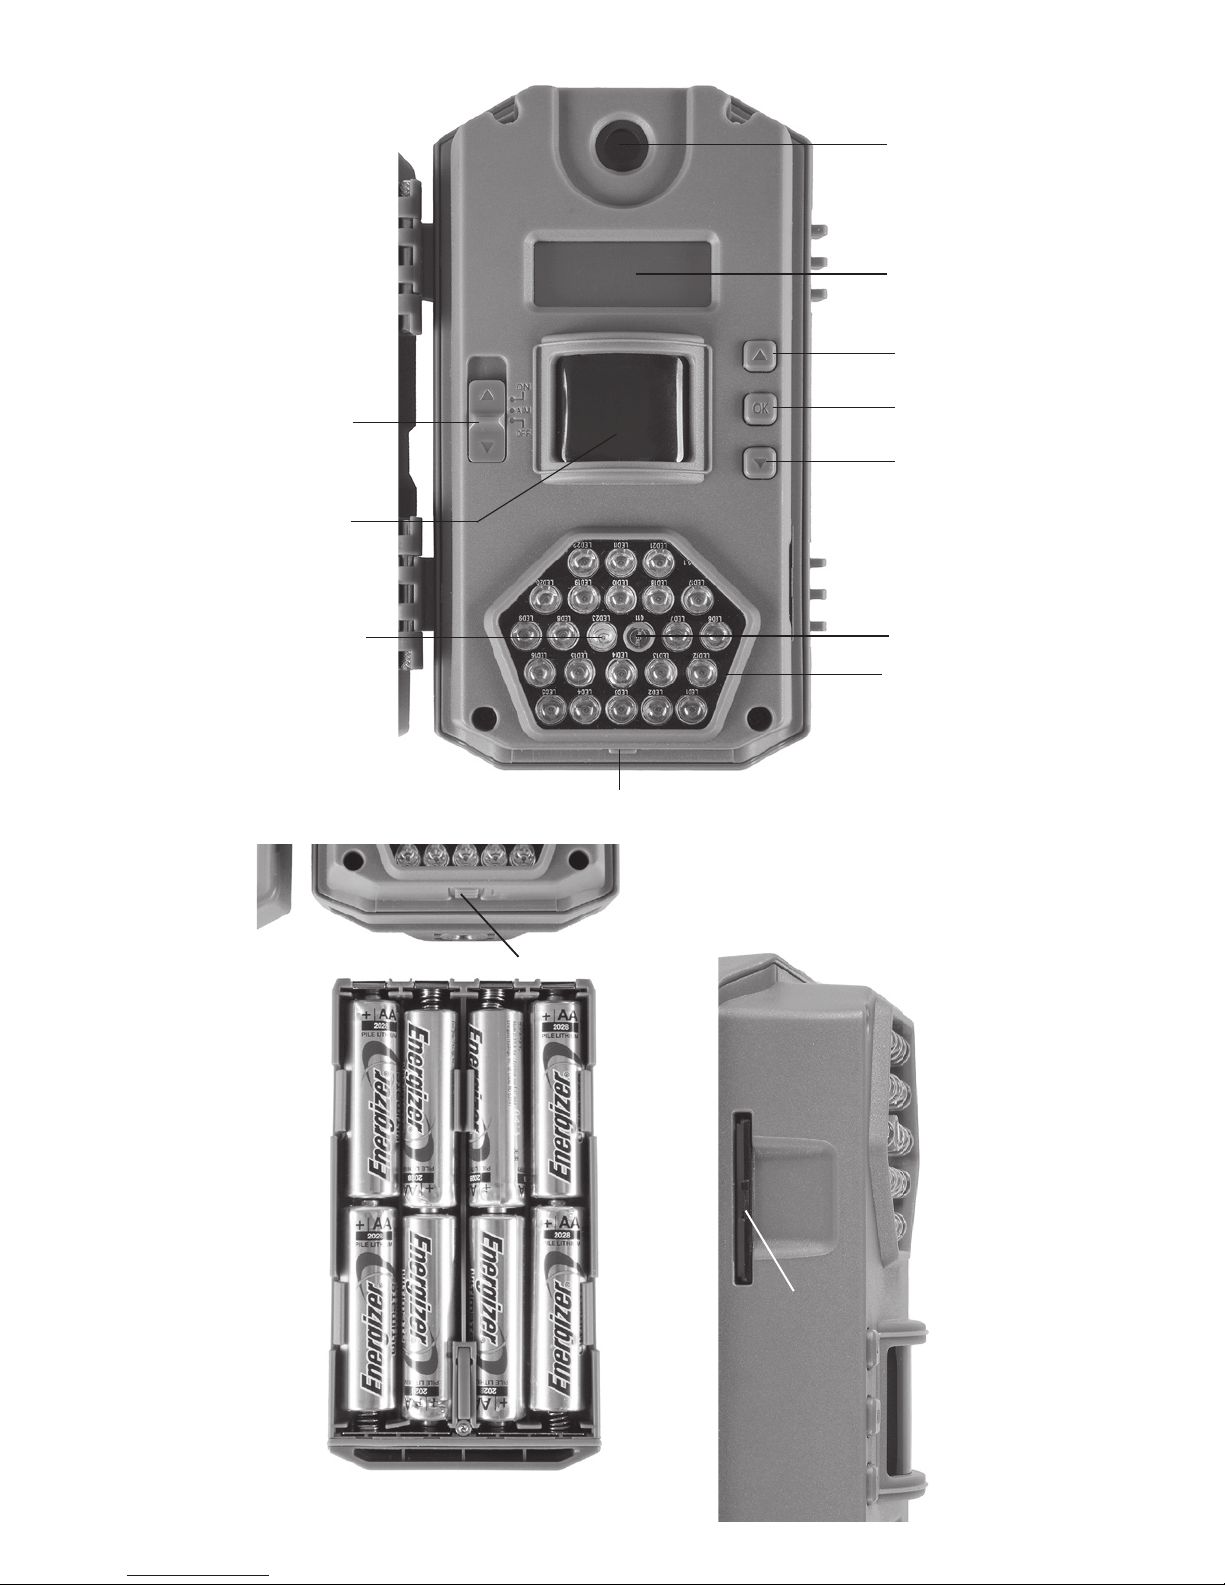
AIM/Status
LED
Light
Sensor
Power/
Mode
Switch
(ON/AIM/OFF)
PIR
Sensor
Battery Tray Eject Button
Lens
LCD
Display
IR Flash
LED Array
“Up” Key
“OK” Key
“Down”
Key
Fig. 1
Eject Button
Fig. 2
Card Slot
Fig. 3
Page 5

5
INSTALLING BATTERIES and SD CARD
Before you begin to use your Tasco Trail Camera, you will rst
need to install a set of batteries and insert an SD card. Although
that may only take you a minute, there are some important
notes about both batteries and SD cards you should be aware
of, so please take the time to read the following directions
and cautions:
Loading Batteries
Press the Battery Tray Eject Button to release the battery
tray and pull it out for loading (Fig. 2). Switch the camera’s
power OFF when loading/unloading batteries. Be sure to insert
each battery so its polarity (+/- direction) matches the polarity
indications at the bottom of the battery tray. The camera is
capable of operating with only 4 batteries installed if necessary,
but a full set of 8 batteries should normally be used to ensure
the longest operating time. Tasco recommends using eight new
lithium AA (Energizer
®
brand) or alkaline AA batteries. NiMh
Rechargeable batteries can also be used, but they might have
a shorter life span due to their reduced efciency over time and
at low temperature.
Inserting the SD Card
The Tasco Trail Camera uses a standard SD (Secure Digital)
memory card to save your photos (.jpg format) or videos (.avi
format). SD and SDHC (High Capacity) class 4 or higher speed
cards, up to a maximum 32GB are supported.
• Make sure that the write-protect switch on the side of the
card is “off” (NOT in the “Lock” position). With the power
switch in the OFF position, insert the SD card in the slot
on the lower right side of the camera (Fig. 3) until it clicks
in place. If the wrong side of the card is facing up, you
will not be able to insert it without force-there is only one
correct way to insert cards.
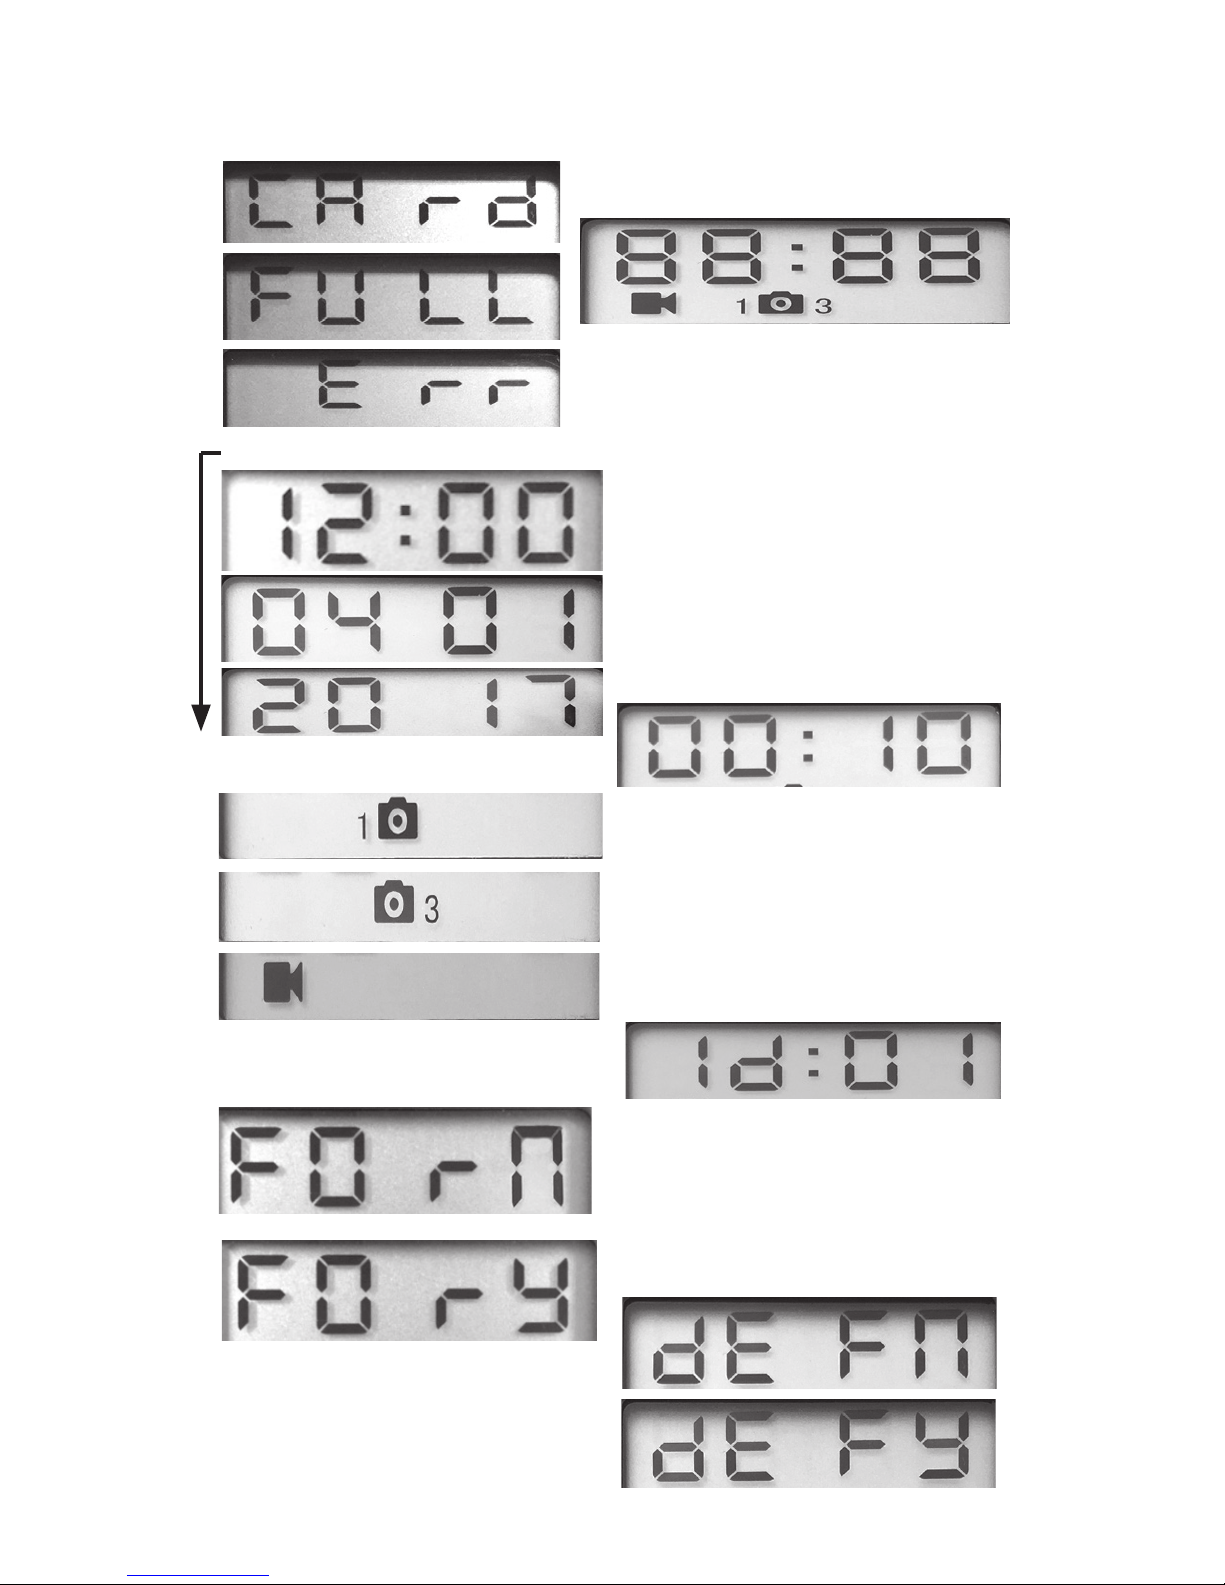
• If the SD card is not inserted correctly, or no card is in
the slot, “C A r d” will appear on the LCD Display, and the
camera will not operate (Fig. 4, next page). Other card
status display messages: “F U L L” indicates the card’s
memory is full, with no remaining room to store les (see
below). “E r r” means there is a card reading error (try a
different SD card).
Page 6

6
• Formatting the SD card before using it for the rst time
is recommended, especially when a card has been used
in other devices. This can be done using the camera’s
“Format” function (pg. 8, “SD Card Format”). Make sure
you have backed up (saved to your computer) any
les you want to keep on a previously used card, as
formatting erases ALL les.
• To take out the SD card, just gently push in the card (do
not try to pull it out without pushing in rst). The card is
released from the slot and ready to be removed when you
hear the click. Be sure the camera’s power is switched
OFF before removing or inserting SD cards.
SETUP MODE
Once batteries are installed and an SD card is inserted, you’re
ready to go into the Setup Mode to get the camera ready to use,
with all options set to your preferences. While this can be done
in the eld (no computer or internet access is needed), most
users will likely want to setup the camera at home, in advance.
There are only a few settings to make, so the process is quick
and easy. To start setting up your Tasco Trail Camera:
1. To enter Setup Mode, move the Power Switch to the
middle (AIM) position (Fig. 1). The display will come on
and show the initial Setup screen (Fig. 5). Note: Don’t
worry if you notice the STATUS LED ashing during the
Setup process-this is normal, as the AIM position of the
switch has a second function that will be covered later in
this manual.
2. Press the OK key to begin. When the display ashes, you
can use the UP and DOWN keys to change the setting of
the currently selected option or item.
3. When you nish changing a setting (or leaving it set “as
is”), press OK to lock in the setting and move on to the
next option/item. If there is a setting that you don’t need or
want to change from the default or current setting, simply
press OK to conrm and skip to the next item/option.
Once you go through the Setup Mode items and change
a few settings, you’ll quickly see how this works.
Page 7
7
Fig. 4
Fig. 5
Fig. 6
Fig. 7
Fig. 8
Fig. 9
Fig. 10
Fig. 11
SETUP MODE
Page 8

8
Setting Time and Date (Fig. 6)
After the Initial Setup screen, the next few display screens will
allow you to set the current time and date, so the time/date
stamp imprinted on all your photos and videos will be accurate
when captured by the camera. To change the Time and Date to
be current, starting at the default “12 : 00” screen (see Fig. 6):
1. Press OK and use UP/DOWN to set the hour (24 hr/
military time format). Press OK to conrm.
2. Use UP/DOWN to set the minute. Press OK to conrm.
3. Use UP/DOWN to set the month. Press OK to conrm.
4. Use UP/DOWN to set the date. Press OK to conrm.
5. Use UP/DOWN to set the year. Press OK to conrm and
move on to the next Setup item, Interval Time.
Setting Interval (Detection Delay) Time (Fig. 7)
The Interval or Detection Delay option lets you set the time
between captured images when an animal remains within the
camera’s sensor range after it is rst detected and the camera
is triggered. Use UP/DOWN to select 5 sec (display shows
“00:05”), 15 sec (default value), 30 sec, 1 min (display shows
“01:00”) or 5 min. Press OK after setting.
Setting Capture Mode (1 photo, 3 photos, or video) (Fig. 8)
Use UP/DOWN to select your preferred image capture mode:
Single Photo per trigger (display shows 1 + a still camera icon),
Rapid Sequence of 3 Photos per trigger (display shows a still
camera icon + 3) or Video Clips that are 10 seconds long at
720p resolution (display shows a movie camera icon). Press
OK after setting.
Setting Camera ID# (if using multiple cameras) (Fig. 9)
Use UP/DOWN to select a reference ID# (from “01” to “99”) for
this camera, which will be imprinted on all photos/videos along
with the time & date. If you are only using a single camera to
monitor an area, simply leave it set to the default “Id : 01”. Set a
second camera that will be used in a group of multiple cameras
to “02”, etc. Press OK after setting.
SD Card Format (delete all les) (Fig. 10)
The display will show “FOrN” (see Fig. 11). CAUTION: be sure
Page 9
9
to backup and save any/all les you want to keep rst, as
formatting will clear the card completely of all les-they will
then be difcult or impossible to recover from the card.
If you are sure you want to format a previously used card, use
UP/DOWN to change the “N” after “FOr_” to “Y” (Yes), then
press OK to conrm and delete all les from the card.
Restore Default Settings (initialize camera setup) (Fig. 11)
The display will show “dEFN” (see Fig. 12). To return the
Interval, Capture Mode, and Camera ID# to their original,
“factory default” settings, use UP/DOWN to change the “N”
after “dEF_” to “Y” (Yes), then press OK to conrm. Note: your
time and date settings and camera ID# will not be changed
from their current settings to the original defaults, and your SD
card will not be formatted. Only the Interval and Capture Mode
settings will be restored to their defaults.
MOUNTING AND AIMING THE CAMERA
Mounting
After setting the camera’s time/date and other options to your
preferences, you’re ready to take it outside and begin capturing
images of animals in the area you want to monitor. When
setting up the Tasco Trail Camera for scouting game or other
outdoor applications, you must be sure to mount it in place
correctly and securely. We recommend mounting the Tasco
Trail Camera on a sturdy tree with a diameter of about 6 inches.
To get the optimal picture quality, the
tree should be about 16-17 ft. away
from the place to be monitored, with
the camera placed at a height of 2.5-
3.5 ft. Also, keep in mind that you will
get the best results at night when the
subject is within the ideal ash range,
no farther than 40 ft. and no closer
than 10 ft. from the camera.
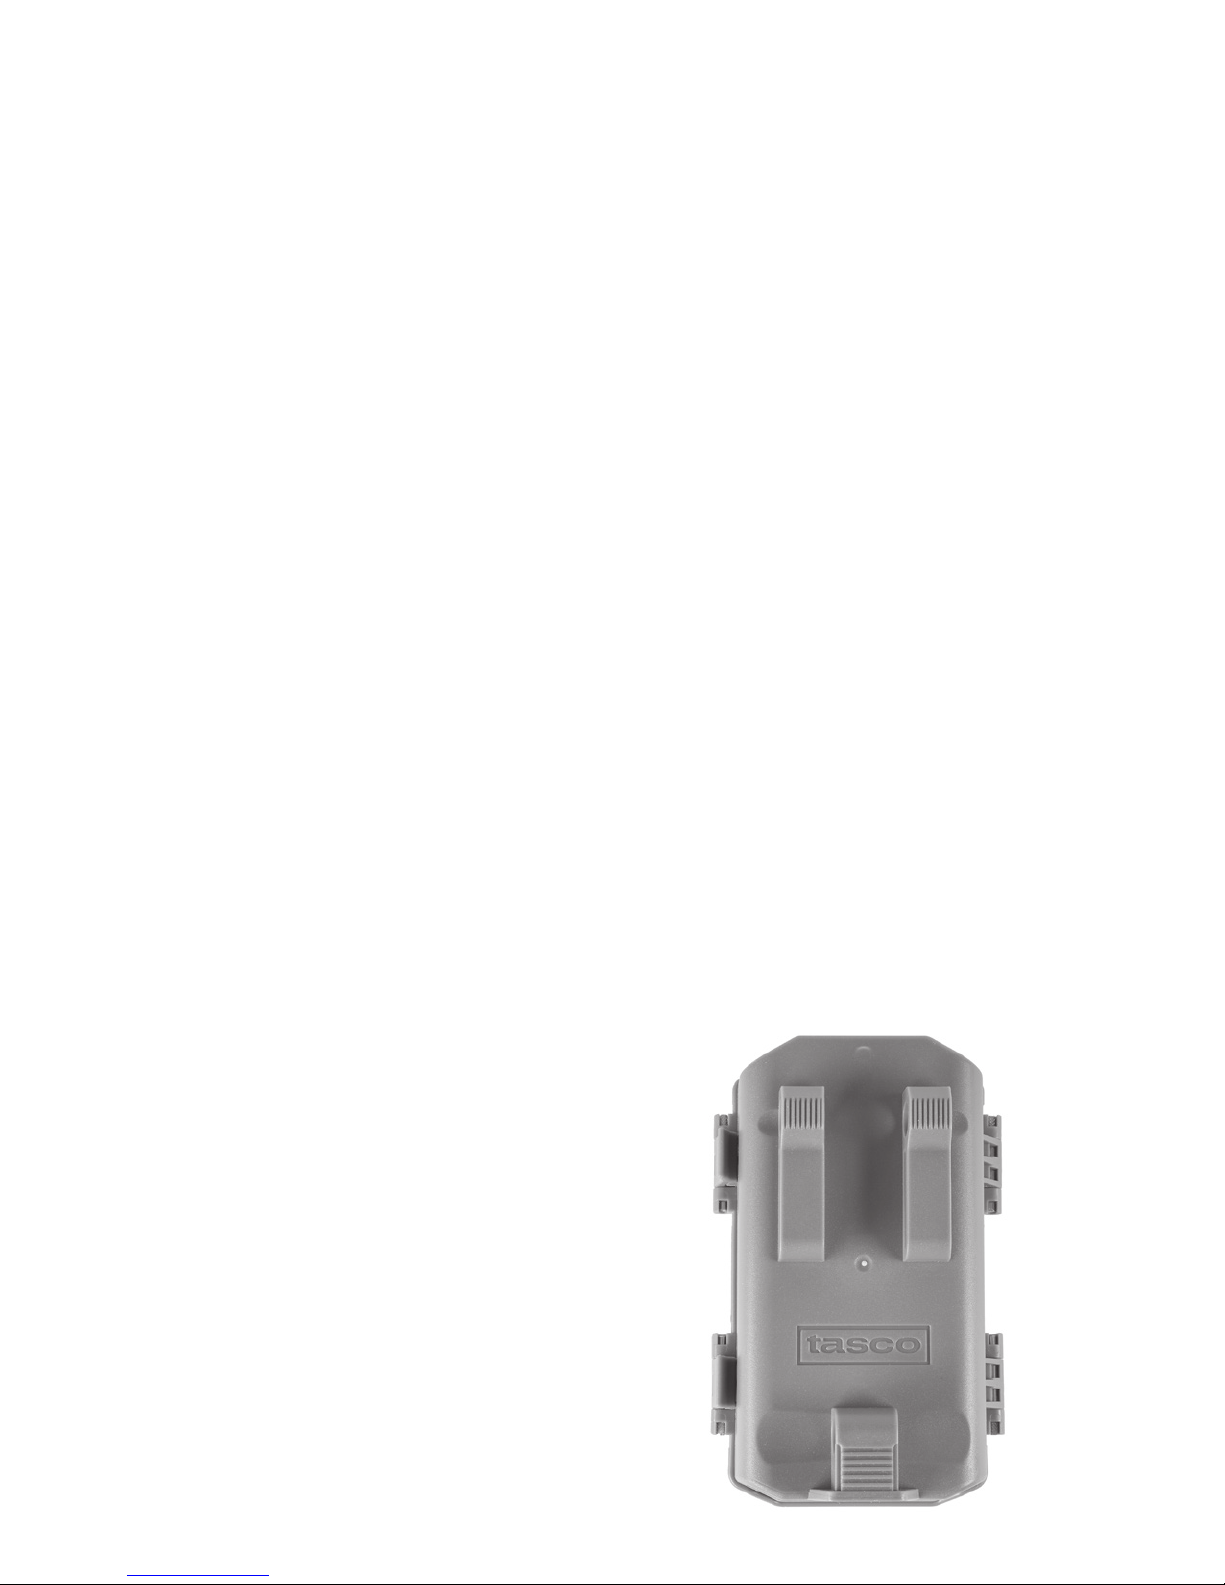
There are two ways to mount the
Tasco Trail Camera: using the
provided adjustable web belt, or the
tripod socket.
Fig. 12
Page 10

10
Using the adjustable web belt: Push one end of the belt
through the two brackets on the back of the Tasco Trail
Camera (Fig. 12). Thread the end of the strap through the
buckle. Fasten the belt securely around the tree trunk by
pulling the end of the strap rmly so there is no slack left.
Note: it is not possible to use a cable lock (in the upper part of
the bracket) and the web belt at the same time.
Using the tripod socket: The camera is equipped with a
socket at the bottom end to enable mounting on a tripod or
other mounting accessories that use a standard1/4-20 thread.
Sensing Angle and Distance Test
To test whether the Tasco Trail Camera can effectively monitor
the area you choose, this test is recommended to check the
sensing angle and monitoring distance of the Tasco Trail
Camera. To perform the test:
• Switch the camera’s Power Switch to AIM. You can
ignore the Setup display, no need to change any settings
(provided you already set the time/date and other Setup
Mode options in advance).
• Make movements in front of the camera at several
positions within the area where you expect the game or
subjects to be. Try different distances and angles from
the camera.
• If the AIM/Status LED (Fig. 1) blinks, it indicates that
position can be sensed. If it does not blink, that position is
outside of the sensing area.
The results of your testing will help you nd the best placement
when mounting and aiming the Tasco Trail Camera. The vertical
height away from the ground for placing the device should vary
with the animal size appropriately. In general, 3 to 6 feet is
preferred.
You can avoid potential false triggers due to temperature and
motion disturbances in front of the camera by not aiming it at a
heat source or nearby tree branches and brush (especially on
windy days).
Switching ON the Camera
Once you move the Power Switch to ON, the AIM/Status LED
will blink for several seconds. This gives you time to close
and lock the front cover of the Tasco Trail Camera and then
walk away. During this time, the AIM/Status LED will blink
Page 11

11
continuously. After it stops blinking, the PIR sensor is active,
and any motion that is detected by it will trigger the capture of
photos or videos as programmed in Setup Mode. Be sure you
have read the camera Setup Mode section. Please note, the
PIR is strongly sensitive to ambient temperature. The greater
the temperature difference between the environment and your
subject, the farther the possible sensing distance.
Before leaving the camera unattended, please check for the
following:
• Are the batteries inserted with correct polarity and is their
power level sufcient?
• Does the SD card have sufcient available space and is
its write-protection (lock) switch off?
• Is the Power switch in the ON position? (do not leave it
set to AIM).
SAVING/VIEWING THE FILES ON YOUR COMPUTER
After you have setup, mounted and activated your Tasco Trail
Camera, you will of course be eager to return later and review
the images it has captured for you. The best way to do this is
to switch the camera OFF and remove the SD card so you
can take it home to download and review your photos/videos at
leisure. To continue using the camera, simply insert another SD
card (format it rst in the Setup Mode menu if necessary, after
making sure you have backed up any les you want to keep
that are left on a previously used card) and switch the camera
back ON. The time/date and other settings made in Setup Mode
will remain unchanged as long as the batteries remain in the
camera and provide adequate power for it to operate.
Downloading and Reviewing Files From the SD Card
Insert the SD card you removed from your
camera into the SD card slot of your computer
if it has one, or the SD slot of a USB card reader
accessory (follow the directions provided by the
manufacturer). Depending on the computer’s
operating system, the SD card’s icon and name
will then be visible on your desktop, under
“Devices with Removable Storage” in “My
Computer” or in a list of drives and connected
devices. Double click the SD card or card
reader’s icon to open it and view the le names
Fig. 13
Page 12

12
(you may need to open an additional folder or two within the
rst level). Note: some computers and operating systems may
automatically launch a pop-up window that lets you view or
save the photos/videos on the card soon after it’s inserted.
Alternatively, you can connect a compatible USB cable (not
included) to the USB port on the right side of the camera (Fig.
13) to your computer-this is less convenient as it requires
removing the camera from the tree. The camera then effectively
becomes an SD card reader (USB “mass storage device”)
and can be used as described above. If the SD card is not
recognized by the computer after 30 seconds (with the card in
the camera), try switching the camera to ON or using a different
USB port on the computer (not an unpowered USB hub). Note:
the mini plug jack next to the USB port is for factory service and
diagnostic usage only. Do not connect any device to it.
Each new image or video will be numbered incrementally in
order of the time it was captured. For example, you will see le
names such as “00000001.JPG” or “00000001.AVI”. Through
the le format sufx you can distinguish whether the le is a
still photo (with sufx .jpg) or a video (with sufx .avi). Your
computer should have the option of allowing you to view the
les as preview images instead of le names/types (Windows:
More Options>Small to Large Icons, Mac: View>as Icons).
Double clicking any individual le will let you view the photo or
video full screen within whatever application is associated with
that le format.
Select any/all les you want to backup and drag or copy/paste
them to your computer’s hard drive wherever you normally keep
photos and videos. You may want to create a new folder named
“Tasco Trail Cam” or another specic title to keep them separate
from family photos, etc. Once the card’s les have been backed
up, you can delete any that you decide not to keep.
The same card can then be returned to your Tasco Trail Camera
for future use. Use the format feature in Setup Mode to erase
the entire card if you want to have its full capacity available to
store as many images as possible before it becomes full and
you need to go through this remove > download > backup >
format > reuse process again. Using higher capacity cards and/
or swapping out multiple cards will allow you to do this less
frequently.
Page 13

13
TROUBLESHOOTING / FAQ
Camera takes continuous images of no subject
A camera has what is known as a “false trigger” if the PIR sensor
thinks that there is motion and heat in front of the camera lens
when there is no subject in the image. These “False Triggers”
are the result of placing the camera in an environment where
there is motion associated with tree branches creating motion
in front of the camera or an area where there is high heat in the
foreground and any motion from wind could set off the camera.
Setting a camera up over water is also a potential cause for this
issue. To remedy this situation:
1. Try moving the camera to an area that does not have any
of these issues or remove potential obstacles near the
lens if possible.
2. If the camera continues to take images when there is no
subject in them, test the camera by placing it in an inside
environment and aiming at a location where there is no
motion.
3. If the camera continues to take images with no subject,
then there is probably an electronic component issue. If
this is the case, please contact Tasco customer service to
send the camera back for repair.
Battery life is shorter than expected
1. Battery life will vary with operating temperature and the
number of images taken over time. Typically, the Tasco
Trail Camera will be able to capture several thousand
images before the batteries die.
2. Check to make sure you have used new alkaline or
lithium batteries. Tasco recommends using a full set of
8 Energizer® Lithium AA batteries to obtain maximum
battery life.
3. Make sure that the power switch was turned to the ON
position and that the camera was not left switched to AIM
(Setup mode) while in the eld.
4. Make sure that you are using a good quality name brand
SD card in your camera. Tasco recommends SanDisk®
brand SD Cards up to 32GB. Our experience indicates
that poor quality SD cards can sometimes reduce your
Tasco Trail Camera battery life.
Page 14

14
Camera stops taking images or won’t take images
1. Please make sure that the SD card is not full. If the card is
full (display indicates “FULL”, the camera will stop taking
images.
2. Check the batteries to make sure that they are new
alkaline or lithium AA batteries. See note above about
short battery life.
3. Make sure that the Power/Mode Switch is in the ON
position and not set to OFF or AIM.
4. Make sure that you are using a good quality SD card in
your camera. Tasco recommends SanDisk
®
SD Cards up
to 32GB.
5. If the SD card has its write protect switch in the lock
position, the camera will not take images.
6. If you have used an SD card in another device before
inserting it in your Tasco Trail Camera, you might want
to try formatting the card using the “Format” option in
Setup Mode (pg. 8). Make sure you have backed up any
important les rst, as formatting will erase all previous
les. In some cases, other devices may change the
formatting of the SD card so that it will not work properly
with the Tasco Trail Camera.
Camera won’t power up
1. Make sure that you have installed all batteries in the
battery compartment, lling all battery spaces with no
“gaps”. Note-the camera may be operated with only 4
batteries if necessary, but they will need to be changed
more frequently.
2. Tasco recommends using a full set of 8 Energizer
®
Lithium AA batteries.
3. Make sure that the batteries are installed correctly,
observing proper polarity. Always place the negative (at)
end of each battery in contact with the spring side of its
slot inside the camera.
4. After moving the switch from “OFF” to “AIM” or “ON”,
make sure that the switch is correctly in position to ensure
the proper mode (avoid positions “between” two modes).
5. Do not move the switch directly from “ON” to “AIM”always move the switch all the way down to “OFF” rst,
then back up to “AIM”.
Page 15

15
Still Photo and/or Video Quality Problems
1. Night photos or videos appear too dark
a) Check the battery indicator icon to see if battery power
is full. The ash will stop operating near the end of the
battery life.
b) You will get the best results when the subject is
within the ideal ash range, no farther than 40 feet from
the camera. Subjects may appear too dark at greater
distances.
c) Please note that when the camera is set for a rapid
sequence (burst) or 3 Photos, or with very short Interval
settings, some images may appear darker than others
due to the quick response and rapid retriggering of the
camera, allowing less time for the ash to fully recharge
before ring again.
2. Daytime photos or videos appear too dark
a) Make sure that the camera is not aimed at the sun or
other light sources during the day, as this may cause the
auto exposure to produce darker results.
3. Night photos or videos appear too bright
a) You will get the best results when the subject is
within the ideal ash range, no closer than 10’ (3m) from
the camera. Subjects may appear too light at closer
distances.
4. Daytime photos or videos appear too bright/dark
a) Make sure that the camera is not aimed at the sun or
other light sources during the day.
5. Red, green or blue color cast
a) Under certain lighting conditions, the sensor can
become confused resulting in poor color images.
b). If this is seen on a consistent basis, then the sensor
may need servicing. Please contact Tasco customer
service.
7. Video clips are too short/end prematurely
a) Check to make sure that the SD card is not full (display
reads FULL).
b) Make sure that the camera has good batteries in it.
c) Maximum length of videos is 10 seconds per clip to
help ensure long battery life.
Date/Time Stamp on images is not correct
1. Make sure that you set the current time/date in Setup
Page 16

16
Mode (pg. 8).
2. Check that the batteries still have adequate power levels.
Always replace all batteries at the same time.
Photos Do Not Capture Subject of Interest
1. Try to set your camera up in an area where there is not a
heat source in the camera’s line of sight.
2. In some cases, setting the camera near water will make
the camera take images with no subject in them. Try
aiming the camera over ground.
3. Try to avoid setting the camera up on small trees that are
prone to being moved by strong winds.
4. Remove any limbs which are right in front of the camera
lens.
AIM/Status LED Flashes/Doesn’t Flash
1. When the camera’s Power Switch is set to AIM (Setup
Mode), an AIM/Status LED on the front of the camera will
ash when it senses motion. This is for setup purposes
only and will help the user position and aim the camera
to check the area of detection/coverage.
2. During use, the LED will not ash when the camera takes
an image. This is to help keep the camera hidden from
game.
LCD Screen Issues
1. LCD screen powers on but no text is present.
a) After moving the Power Switch from OFF to AIM or
ON” make sure that the switch is correctly in position to
ensure the proper mode (avoid positions “between” two
modes).
b) Do not move the switch directly from ON to AIM-
always move the switch all the way down to OFF rst,
then back up to AIM.
Camera won’t retain settings
Make sure that you have been saving the changes to any
settings that you made while in Setup Mode, by pressing
the OK key after changing the setting. If you don’t save
your new setting after changing it, the camera will
continue to use the original default setting for that item/
option.
Page 17

17
Model Number 119270CW / 119271CW
Image Sensor Type/
Resolution
CMOS, 2 million pixels
Image ResolutionPhoto Mode
6MP (119270CW) or 8MP (119271CW) *
Lens Angular Field of View 47 degrees (+/- 2 degrees)
PIR Sensor Yes, auto sensitivity
Trigger Speed (photo) 1.0 second
Trigger Speed (video) <3.0 seconds
Interval Time 5s, 15s (default), 30s, 1m, 5m
Number of IR LED 22 LEDs, 23-850nm Low Glow
Max IR Flash Range 40 feet (850nm)
Storage
SD/SDHC Card, up to 32 GB Capacity, Class
4 or higher
Status/AIM Indicator LED Yes
Video Resolution 720p (1280x720)
Video Clip Time 10 seconds ea.
File Format JPEG (photos) /AVI (videos)
Date/Time/ID Imprint Yes
Exposure Auto
White Balance Auto
Power Supply 4 or 8 AA cell batteries (alkaline or lithium)
Power Consumption <200ma (<650ma w/LED ash)
Water Resistant Yes, rated IP54
Operating Temperature -10
o
C ~ 60oC
Storage Temperature -20
o
C ~ 80oC
TECHNICAL SPECIFICATIONS
*6MP/8MP resolution via software interpolation
Page 18

18
Your Tasco product is warranted to be free of defects in materials and
workmanship for one year after the date of purchase. In the event of a
defect under this warranty, we will, at our option, repair or replace the
product, provided that you return the product postage prepaid. This
warranty does not cover damages caused by misuse, improper handling,
installation, or maintenance provided by someone other than a Tasco
Authorized Service Department.
Any return made under this warranty must be accompanied by the items
listed below:
1. A check/money order in the amount of $10.00 to cover the cost of
postage and handling.
2. Name, address and daytime phone # for product return.
3. An explanation of the defect.
4. Copy of your dated proof of purchase.
5. Do not send in accessories (batteries, SD cards, cables), only the
product for repair.
Product should be well packed in a sturdy outside shipping carton to
prevent damage in transit, and shipped to the address listed below:
IN U.S.A. Send To: IN CANADA Send To:
Tasco Tasco
Attn.: Repairs Attn.: Repairs
9200 Cody 140 Great Gulf Drive, Unit # B
Overland Park, Kansas 66214 Vaughan, Ontario L4K 5W5
For products purchased outside the United States or Canada please
contact your local dealer for applicable warranty information.
In Europe you may also contact Tasco at: Tasco Germany GmbH
European Service Centre
Mathias-Brüggen-Str. 80
D-50827 Köln
GERMANY
Tel: +49 221 995568-0
Fax: +49 221 995568-20
This warranty gives you specic legal rights.
You may have other rights which vary from country to country.
©2018 B.O.P
ONE YEAR LIMITED WARRANTY
Page 19

19
FCC Compliance Statement
This equipment has been tested and found to comply with the limits for
a Class B digital device, pursuant to part 15 of the FCC Rules. These
limits are designed to provide reasonable protection against harmful
interference in a residential installation.
Operation is subject to the following two conditions: (1) This device may
not cause harmful interference, and (2) this device must accept any
interference received, including interference that may cause undesired
operation.
This equipment generates, uses and can radiate radio frequency energy
and, if not installed and used in accordance with the instructions, may
cause harmful interference to radio communications. However, there is
no guarantee that interference will not occur in a particular installation.
If this equipment does cause harmful interference to radio or television
reception, which can be determined by turning the equipment off and on,
the user is encouraged to try to correct the interference by one or more of
the following measures:
• Reorient or relocate the receiving antenna.
• Increase the separation between the equipment and receiver.
• Connect the equipment into an outlet on a circuit different from that
to which the receiver is connected.
• Consult the dealer or an experienced radio/TV technician for help.
The device does not contain any user-serviceable parts. Repairs should
only be made by an Authorized Bushnell repair center. Unauthorized
repairs or modications could result in permanent damage to the
equipment, and will void your warranty and your authority to operate this
device under Part 15 regulations.
The shielded interface cable which is provided must be used with the
equipment in order to comply with the limits for a digital device pursuant to
Subpart B of Part 15 of FCC Rules.
Page 20

20
REMARQUE IMPORTANTE
Félicitations pour votre achat de l’une des meilleures
caméras de sentiers sur le marché! Veuillez vous reporter
aux notes ci-dessous et aux instructions du présent manuel
pour vous assurer d’être entièrement satisfait de ce produit.
Si votre caméra de sentiers Tasco® ne semble pas
fonctionner correctement ou si vous rencontrez des
problèmes de qualité photo ou vidéo, veuillez consulter
la section Dépannage / FAQ aux pages 33 à 38.
Les problèmes sont souvent causés par un simple détail
qui a été négligé, ou ne nécessitent que la modication
d’un paramètre pour être résolus.
Si votre problème persiste après avoir essayé les
solutions présentées dans la section Dépannage / FAQ,
veuillez appeler le service à la clientèle de Tasco au
(800) 423-3537. Au Canada, composez le (800) 361-5702.
Tasco recommande d’utiliser un jeu complet de 8 piles
Energizer® AA au lithium dans cette caméra de sentiers pour
obtenir une autonomie maximale.
Ne mélangez pas les piles usées et les piles neuves.
Ne mélangez pas les types de piles: utilisez des piles TOUTES
au lithium ou TOUTES alcalines.
Les piles rechargeables ne sont PAS recommandées.
Tasco recommande d’utiliser des cartes SD et SDHC de
SanDisk® (jusqu’à 32Go de capacité) dans cette caméra de
sentiers Tasco.
Page 21

21
INTRODUCTION
À propos de la caméra de sentiers Tasco
Votre nouvelle caméra de sentiers Tasco
®
est une caméra
de reconnaissance numérique. Elle se déclenche par tout
mouvement d’animaux vivants dans un emplacement, détecté
par un capteur de mouvement passif à infrarouge (PIR)
hautement sensible, et prend des photos de haute qualité
(résolution de 6 MP ou 8 MP, selon le modèle) ou des clips vidéo
(720p, d’une longueur de 10 secondes).
La caméra de sentiers Tasco consomme très peu d’énergie
(<0,5 mA) en état de veille (surveillance). Cela signie qu’elle peut
demeurer en veille jusqu’à six mois lorsque l’appareil est alimenté
par huit piles alcalines AA, et jusqu’à douze mois en utilisant huit
piles AA au lithium (30 images par jour, 15 avec ash). Une fois
qu’un mouvement dans la zone surveillée est détecté, l’appareil
photo numérique se déclenche immédiatement (généralement
en moins de 1 seconde), puis prend automatiquement des
photos ou des vidéos (selon votre choix). La caméra de sentiers
Tasco est munie de voyants infrarouges (IR) DEL intégrés qui
fonctionnent comme un ash, de sorte qu’elle livre des photos
ou des vidéos claires (en noir et blanc) même dans l’obscurité, et
peut prendre des photos couleur ou des vidéos à la lumière du
jour. La caméra de sentiers Tasco est conçue pour une utilisation
à l’extérieur et elle résiste à l’eau.
PIÈCES et COMMANDES
Relâchez les deux loquets situés sur le côté droit de la caméra
et faites pivoter le capot avant vers la gauche pour accéder aux
commandes. Un commutateur d’alimentation / mode à 3 voies est
utilisé pour sélectionner les principaux modes de fonctionnement :
OFF (éteint), AIM (objectif) et ON (en marche) (Fig.1).
Lorsque l’interrupteur d’alimentation est réglé sur la position centrale
AIM, la caméra est en mode Conguration. La position AIM peut
également être utilisée pour vérier la zone surveillée par la caméra.
L’écran ACL afche les paramètres actuels de la caméra en mode
Conguration. Les boutons Up (haut), Down (bas) et OK sont utilisés
pour régler la date et l’heure (à imprimer sur chaque photo / vidéo),
changer l’intervalle ou le délai de détection entre les images pendant
qu’un animal reste à portée du capteur de la caméra, sélectionner le
mode photo ou vidéo, régler un numéro d’identication de caméra
pour votre référence, et formater la carte SD (effacer tous les chiers).
Une fois que vous avez conguré la caméra, repositionnez le bouton
à ON pour un fonctionnement normal.
Page 22

22
Indicateur DEL
« AIM/Status »
Capteur de
luminosité
Interrupteur
d’alimentation /
Mode
(ON/AIM/OFF)
Capteur
passif
à infrarouge
(PIR)
Bouton d’éjection du compartiment à piles
Objectif
Écran
LCD
Flash IR
DEL en réseau
Bouton « Haut »
Bouton « OK »
Bouton « Bas »
Fig. 1
Bouton d’éjection
Fig. 2
Fente pour
carte
Fig. 3
Page 23

23
INSTALLATION DES PILES et de la CARTE SD
Avant de commencer à utiliser votre caméra de sentiers Tasco, vous
devez installer un jeu de piles et insérer une carte SD. Même si cela
ne vous prendra qu’une minute, il y a quelques notes importantes
à propos des batteries et des cartes SD que vous devriez connaître,
alors prenez le temps de lire les instructions et mises en garde
suivantes:
Mise en place des piles
Appuyez sur le Bouton d’éjection du compartiment à batteries
pour libérer le plateau et le retirer pour le chargement (Fig. 2).
Placez l’interrupteur de la caméra à OFF lors du chargement ou
déchargement des piles. Veillez à insérer chaque pile de manière
à ce que sa polarité (direction +/–) corresponde aux indications de
polarité situées au fond du plateau. La caméra peut fonctionner
avec seulement 4 piles si nécessaire, mais un jeu complet de
8 piles devrait normalement être utilisé pour assurer une plus
longue durée de fonctionnement. Tasco recommande d’utiliser huit
nouvelles piles AA au lithium (de marque Energizer
®
) ou alcalines
AA. Les piles rechargeables NiMH peuvent aussi être utilisées,
mais elles pourraient avoir une durée de vie plus courte en raison
de leur efcacité réduite au l du temps et à basse température.
Insertion de la carte SD
La caméra de sentiers Tasco utilise une carte mémoire SD
(Secure Digital) standard pour enregistrer vos photos (format .jpg)
ou vidéos (format .avi). Les cartes SD et SDHC (Haute capacité)
de vitesse de classe 4 ou supérieure, jusqu’à un maximum de
32 Go sont prises en charge.
• Assurez-vous que l’onglet de protection contre l’écriture,
situé sur le côté de la carte, est en position « OFF »
(PAS sur la position « Lock »). Avec l’interrupteur d’alimentation
en position OFF, insérez la carte SD dans la fente du côté
inférieur droit de la caméra (Fig. 3) jusqu’à ce qu’elle clique
en place. Si le mauvais côté de la carte est face vers le haut,
vous ne serez pas en mesure de l’insérer sans forcer – il n’y
a qu’une seule façon correcte d’insérer les cartes.
• Si la carte SD n’est pas insérée correctement, ou
si aucune carte n’est dans la fente, le mot « CArd »
apparaîtra sur l’écran LCD, et la caméra ne fonctionnera
pas (Fig.4, page suivante). Autres messages d’afchage
de l’état de la carte : « FULL » indique que la mémoire de
Page 24

24
• la carte est pleine, sans espace pour stocker les chiers
(voir ci-dessous). « ERR » signie qu’il y a une erreur de
lecture de la carte (essayez une différente carte SD).
• Il est recommandé de formater la carte SD avant de l’utiliser
pour la première fois, en particulier si elle a déjà été utilisée
sur d’autres appareils. Cela peut être fait en utilisant
la fonction « Format » de l’appareil photo (p.27, «Format de
carte SD»). Assurez-vous d’avoir une copie (sauvegardée
sur votre ordinateur) des chiers existants sur une carte
et que vous souhaitez conserver, car le formatage efface
TOUS les chiers.
• Pour retirer la carte SD, poussez-la doucement sur la
carte (n’essayez pas de la retirer sans l’enfoncer d’abord).
La carte est libérée de la fente et prête à être retirée lorsque
vous entendez un clic. Assurez-vous que l’interrupteur
d’alimentation de la caméra est en position OFF avant de
retirer ou d’insérer une carte SD.
MODE CONFIGURATION (« SETUP »)
Une fois les piles installées et une carte SD insérée, vous êtes
prêt à passer en mode Conguration pour que l’appareil photo soit
prêt à utiliser, toutes les options correspondant à vos préférences.
Bien que cela puisse être fait sur le terrain (aucun ordinateur ou
accès Internet n’est nécessaire), la plupart des utilisateurs préfèrent
congurer la caméra à l’avance, à la maison. Il y a seulement
quelques paramètres à régler, donc le processus est rapide et facile.
Pour commencer à congurer votre caméra de sentiers Tasco :
1. Pour accéder au mode Conguration, placez l’interrupteur
d’alimentation à la position AIM (OBJECTIF) (Fig. 1).
L’écran s’allume et afche l’écran de conguration initial
(Fig. 5). Remarque : Ne vous inquiétez pas si vous
remarquez que le TÉMOIN LUMINEUX clignote pendant
le processus d’installation – c’est normal, car la position
AIM de l’interrupteur a une deuxième fonction qui sera
traitée plus loin dans ce manuel.
2. Appuyez sur OK pour commencer. Lorsque l’écran
clignote, utilisez les touches UP (haut) et DOWN (bas)
pour modier le réglage de l’option ou de l’élément
actuellement sélectionné.
3. Lorsque vous avez ni de modier un paramètre
(ou de le laisser tel quel), appuyez sur OK pour verrouiller
Page 25

25
Fig. 4
Fig. 5
Fig. 6
Fig. 7
Fig. 8
Fig. 9
Fig. 10
Fig. 11
MODE CONFIGURATION (« SETUP »)
Page 26

26
1. le réglage et passer à l’option ou l’élément suivant. S’il
y a un paramètre dont vous n’avez pas besoin ou que vous
souhaitez modier par rapport au paramètre par défaut
ou actuel, appuyez simplement sur OK pour conrmer
et passer à l’élément ou l’option suivante. Une fois que
vous aurez parcouru les éléments du mode Conguration
et modié quelques paramètres, vous verrez rapidement
comment cela fonctionne.
Réglage de l’heure et de la date (Fig. 6)
Après l’écran de conguration initiale, les quelques écrans
d’afchage suivants vous permettront de régler l’heure et la
date actuelles, de sorte que l’horodatage imprimé sur toutes vos
photos et vidéos captées par la caméra sera précis. Pour mettre
à jour l’heure et la date, en commençant à l’écran par défaut
« 12 : 00 » (voir Fig.6) :
1. Appuyez sur OK et utilisez UP/DOWN (HAUT / BAS)
pour régler l’heure (format 24 heures ou militaire).
Appuyer sur « OK » pour conrmer.
2. Utilisez UP/DOWN (HAUT / BAS) pour régler les
minutes. Appuyer sur « OK » pour conrmer.
3. Utilisez UP/DOWN (HAUT / BAS) pour régler le mois.
Appuyer sur « OK » pour conrmer.
4. Utilisez UP/DOWN (HAUT / BAS) pour régler le jour.
Appuyer sur « OK » pour conrmer.
5. Utilisez UP/DOWN (HAUT / BAS) pour régler l’année.
Appuyez sur OK pour conrmer et passer à l’élément de
conguration suivant : Interval Time.
Réglage de l’intervalle (délai de détection) (Fig. 7)
L’option Intervalle ou Délai de détection vous permet de dénir
le délai entre les images captées lorsqu’un animal reste dans
la plage du capteur de l’appareil photo après sa première
détection et le déclenchement de la caméra. Utilisez le bouton
UP/DOWN (HAUT / BAS) pour sélectionner 5 secondes
(l’afchage indique « 00:05 »), 15 sec (valeur par défaut),
30 sec, 1 min (l’afchage indique « 01:00 ») ou 5 min. Appuyez
sur OK après le réglage.
Page 27

27
Réglage du mode Capture (1 photo, 3 photos ou vidéo) (Fig. 8)
Utilisez UP/DOWN (HAUT / BAS) pour sélectionner votre mode
de capture d’image préféré : Photo unique par déclenchement
(l’afchage montre 1 + une icône d’appareil photo), Séquence
rapide de 3 photos par déclenchement (l’afchage montre une icône
d’appareil photo + 3) ou Clips vidéos qui durent 10 secondes à une
résolution de 720p (l’afchage montre une icône de caméra vidéo).
Appuyez sur OK après le réglage.
Réglage du numéro d’identication de la caméra
(si vous utilisez plusieurs caméras) (Fig. 9)
Utilisez UP/DOWN (HAUT / BAS) pour sélectionner un numéro
d’identication de référence (à partir de « 01 » à « 99 ») pour
cette caméra, qui sera imprimé sur toutes les photos ou vidéos,
avec l’heure et la date. Si vous n’utilisez qu’une seule caméra
pour surveiller une zone, laissez l’identité par défaut «: 01 ».
Réglez une seconde caméra qui sera utilisée dans un groupe
de plusieurs à « 02 », etc. Appuyez sur OKaprès le réglage.
Formatage de la carte SD (supprime tous les chiers) (Fig. 10)
L’écran afchera « FOrN » (voir Fig.11). ATTENTION : assurez-
vous de sauvegarder et d’enregistrer, en totalité ou en partie, les
chiers que vous souhaitez conserver, car le formatage effacera
complètement tous les chiers enregistrés sur la carte; il sera alors
difcile, voire impossible, de les récupérer à partir de la carte.
Si vous êtes certain de vouloir formater une carte précédemment
utilisée, appuyez sur les touches HAUT / BAS pour changer
le « N » après « FOr_ » à « Y » (Oui), puis appuyez sur OK pour
conrmer et supprimer tous les chiers de la carte.
Rétablir les paramètres par défaut
(initialiser la conguration de la caméra) (Fig. 11)
L’écran afchera « dEFN » (voir Fig.12). Pour rétablir l’intervalle,
le mode de capture et le numéro d’identication de la caméra aux
paramètres d’origine par défaut, utilisez les touches HAUT / BAS
pour changer le « N » après « dEF_ » à « Y » (Oui), puis appuyez
sur OK pour conrmer. Remarque : les paramètres de l’heure et
de la date ainsi que le numéro d’identication de la caméra ne
seront pas rétablis aux paramètres par défaut, et votre carte SD
ne sera pas formatée. Seuls les paramètres Intervalle et Mode
de capture seront restaurés à leurs valeurs par défaut.
Page 28

28
MONTER ET DIRIGER LA CAMÉRA
Montage
Après avoir réglé l’heure et la date de la caméra et d’autres
options selon vos préférences, vous êtes prêt à l’emporter
à l’extérieur et à commencer la capture d’images d’animaux dans
la zone que vous souhaitez surveiller. Lors de la conguration de
la caméra de sentiers Tasco pour la reconnaissance de gibier ou
pour d’autres applications extérieures, vous devez vous assurer
de la monter correctement et en toute sécurité. Nous vous
recommandons de monter la caméra
de sentiers Tasco sur un arbre robuste
d’un diamètre d’environ 6 pouces.
Pour obtenir une qualité d’image
optimale, l’arbre doit être à environ 16
ou 17 pieds de distance de l’endroit à
surveiller, avec la caméra placée à une
hauteur de 2,5 à 3,5 pieds. N’oubliez
pas non plus que vous obtiendrez les
meilleurs résultats la nuit, lorsque le
sujet se trouve dans le rayon idéal,
soit entre 10 pi et 40 pi de la caméra.
Il y a deux façons de monter la caméra
de sentiers Tasco : en utilisant soit la
sangle réglable fournie, soit la douille
de trépied.
En utilisant la sangle réglable : Poussez une extrémité de la
sangle à travers les deux supports situés à l’arrière de la caméra
de sentiers Tasco (Fig.12). Enler l’extrémité de la sangle dans la
boucle. Fixez solidement la ceinture autour du tronc de l’arbre en
tirant fermement sur l’extrémité de la sangle pour qu’il n’y ait plus
de jeu. Remarque : il n’est pas possible d’utiliser un verrou de câble
(dans la partie supérieure du support) et la sangle simultanément.
En utilisant la douille de trépied : La caméra est munie d’une
douille à l’extrémité inférieure pour permettre le montage sur
un trépied ou d’autres accessoires de montage au letage
standard 1/4-20.
Fig. 12
Page 29

29
Test d’angle de détection et de distance
An de tester si la caméra de sentiers Tasco peut surveiller
efcacement la zone que vous choisissez, le test suivant permettra
de vérier l’angle de détection et la distance de surveillance de
la caméra de sentiers Tasco. Pour effectuer le test :
• Positionnez l’interrupteur d’alimentation de la caméra
sur AIM. Vous pouvez ignorer l’écran de conguration,
pas besoin de modier les paramètres (à condition que
vous ayez déjà déni l’heure, la date et les autres options
du mode Conguration).
• Faites des mouvements devant la caméra à plusieurs
endroits dans la zone où vous prévoyez voir le gibier ou
les sujets. Essayez différentes distances et des angles
variés à partir de la caméra.
• Si l’indicateur DEL « AIM / Status » (Fig.1) clignote, cela
indique que la position peut être détectée. S’il ne clignote
pas, cette position est hors de la zone de détection.
Les résultats de vos tests vous aideront à trouver le meilleur
emplacement lors du montage et de la visée de la caméra de
sentiers Tasco. La hauteur verticale à partir du sol pour placer
l’appareil variera en fonction de la taille de l’animal. En général,
une hauteur de 3 à 6 pieds est préférée.
Vous pouvez éviter les faux déclenchements potentiels
causés par la température et le mouvement devant la caméra
en ne le dirigeant pas sur une source de chaleur ou sur des
branches d’arbres et des broussailles à proximité de l’appareil
(particulièrement les jours venteux).
Mise en marche de la caméra
Lorsque vous positionnez l’interrupteur d’alimentation à ON,
le voyant DEL « AIM/Status » clignote pendant plusieurs
secondes. Cela vous donne le temps de fermer et de verrouiller
le panneau avant de la caméra de sentiers Tasco puis de vous
éloigner. Pendant ce temps, le voyant DEL « AIM/Status »
continuera à clignoter. Après qu’il cesse de clignoter, le capteur
PIR est activé et tout mouvement détecté déclenche la
capture de photos ou de vidéos tel que programmé dans le
mode Conguration. Assurez-vous d’avoir lu la section Mode
Conguration de la caméra. Veuillez noter que le PIR est
fortement sensible à la température ambiante. Plus l’écart
de température entre l’environnement et votre sujet est grand,
plus la distance de détection possible est grande.
Page 30

30
Avant de laisser la caméra sans surveillance, vériez les éléments
suivants :
• Les piles sont-elles insérées en respectant la polarité
et leur niveau de puissance est-il sufsant?
• La carte SD dispose-t-elle d’un espace disponible sufsant
et sa protection d’écriture (verrouillage) est-elle désactivée?
• L’interrupteur d’alimentation est-il en position ON?
(Ne le laissez pas sur AIM).
SAUVEGARDER OU VISUALISER LES FICHIERS
SUR VOTRE ORDINATEUR
Après avoir conguré, monté et activé votre caméra de sentiers
Tasco, vous aurez bien sûr envie de revenir plus tard et de revoir les
images qu’elle a captées pour vous. Le meilleur moyen de le faire
est d’éteindre la caméra et de retirer la carte SD pour l’emporter
à la maison, la télécharger et visionner à loisir vos photos ou vos
vidéos. Pour continuer à utiliser la caméra, insérez simplement une
autre carte SD (si nécessaire, formatez-la d’abord à partir du menu
du mode Conguration, après vous être assuré d’avoir sauvegardé
tous les chiers que vous souhaitez conserver et qui sont restés
sur une carte précédemment utilisée) et rallumez la caméra en
plaçant l’interrupteur à ON. L’heure, la date et les autres réglages
effectués en mode Conguration resteront inchangés tant que
les piles resteront dans la caméra et fourniront une alimentation
sufsante pour la faire fonctionner.
Page 31

31
Téléchargement et visionnement de chiers à partir
de la carte SD
Insérez la carte SD que vous avez retirée de
votre caméra dans la fente de carte SD de votre
ordinateur s’il en a une, ou dans la fente SD d’un
lecteur de carte USB (suivez les instructions
fournies par le fabricant). Selon le système
d’exploitation de l’ordinateur, l’icône et le nom
de la carte SD seront alors visibles sur votre
bureau, sous « Périphériques avec stockage
amovible » sous « Poste de travail » ou dans une
liste de lecteurs et de périphériques connectés.
Double-cliquez sur l’icône de la carte SD ou du
lecteur de carte pour l’ouvrir et afcher les noms
de chiers (vous devrez peut-être ouvrir un ou plusieurs dossiers
supplémentaires à l’intérieur du premier niveau). Remarque :
certains ordinateurs et systèmes d’exploitation peuvent lancer
automatiquement une fenêtre contextuelle qui vous permet
d’afcher ou de sauvegarder les photos ou vidéos enregistrées sur
la carte peu après son insertion.
Vous pouvez également connecter un câble USB compatible
(non compris) au port USB situé sur le côté droit de la caméra
(Fig. 13) à votre ordinateur – c’est moins pratique, car cela
nécessite de retirer la caméra de l’arbre. La caméra devient
alors un lecteur de carte SD (« périphérique de stockage de
masse » USB) et peut être utilisée comme décrit ci-dessus. Si la
carte SD n’est pas reconnue par l’ordinateur après 30 secondes
(avec la carte toujours dans la caméra), essayez de mettre la
caméra en marche en plaçant l’interrupteur à ON ou utilisez un
port USB différent sur l’ordinateur (pas un concentrateur USB
non alimenté). Remarque : la prise mini-jack située à côté du
port USB est réservée au service en usine et à des ns de
diagnostic uniquement. Ne connectez aucun appareil à celui-ci.
Fig. 13
Page 32

32
Chaque nouvelle image ou vidéo sera numérotée de façon
incrémentielle dans l’ordre chronologique de sa capture.
Par exemple, vous verrez des noms de chiers tels que
« 00000001.JPG » ou « 00000001.AVI ». Grâce au sufxe de
format de chier, vous pouvez distinguer si le chier est une
photo (sufxe .jpg) ou une vidéo (sufxe .avi). Votre ordinateur
devrait avoir l’option de vous permettre d’afcher les chiers sous
forme d’images de prévisualisation plutôt que de noms et types
de chiers (Windows : Plus d’options> petites à grandes icônes;
Mac : Afchage> sous forme d’icônes). Double-cliquer sur un
chier individuel vous permettra de voir la photo ou la vidéo en
mode plein écran dans n’importe quelle application associée à ce
format de chier.
Sélectionnez un chier ou tous les chiers que vous souhaitez
sauvegarder et faites-les glisser (ou copiez / collez-les) sur le
disque dur de votre ordinateur où vous gardez normalement
vos photos et vos vidéos. Vous pouvez créer un nouveau
dossier nommé « Caméra de sentiers Tasco » ou un autre titre
spécique pour les séparer des photos de famille, etc. Une fois
les chiers de la carte sauvegardés, vous pouvez supprimer
ceux que vous décidez de ne pas conserver.
La même carte peut ensuite être retournée à votre caméra
de sentiers Tasco pour une utilisation ultérieure. Utilisez la
fonction de formatage en mode Conguration pour effacer
tout le contenu de la carte si vous souhaitez disposer de toute
sa capacité pour stocker autant d’images que possible avant
qu’elle ne soit pleine et que vous deviez passer par le processus
supprimer> télécharger> sauvegarder> formater> réutiliser
à nouveau. L’utilisation de cartes de plus grande capacité ou
l’échange de plusieurs cartes vous permettra d’avoir à le faire
moins fréquemment.
Page 33

33
La caméra prend des images continues sans sujet
Une caméra a ce qu’on appelle un « faux déclenchement »
lorsque le capteur PIR semble détecter du mouvement et de
la chaleur devant l’objectif de la caméra alors qu’il n’y a aucun
sujet dans le cadre. Ces « faux déclencheurs » sont le résultat
du positionnement de la caméra dans un environnement où il
y a un mouvement associé à des branches d’arbres devant la
caméra; une forte chaleur en avant-plan ou un coup de vent
peuvent également déclencher la caméra. Installer une caméra
au-dessus de l’eau peut aussi être une cause potentielle de
ce problème. Pour remédier à cette situation :
1. Essayez de déplacer la caméra dans une zone qui
ne présente aucun de ces problèmes ou éliminez les
éventuels obstacles à proximité de l’objectif, si possible.
2. Si la caméra continue à prendre des photos lorsqu’il n’y a pas
de sujets, testez-la en la plaçant dans un environnement
intérieur et en visant un endroit où il n’y a pas de mouvement.
3. Si la caméra continue de prendre des photos sans
sujets, il y a probablement un problème de composants
électroniques. Si tel est le cas, veuillez communiquer
avec le service à la clientèle de Tasco pour retourner
la caméra et la faire réparer.
La durée de vie des piles est plus courte que prévue
1. La durée de vie de la pile varie en fonction de la
température de fonctionnement et du nombre d’images
prises sur une période donnée. Généralement, la caméra
de sentiers Tasco est capable de capter plusieurs milliers
d’images avant que les piles soient déchargées.
2. Vériez que vous avez bien utilisé des piles alcalines ou
au lithium neuves. Tasco recommande d’utiliser un jeu
complet de 8 piles Energizer® au lithium AA dans cette
caméra de sentiers pour obtenir une autonomie maximale.
3. Assurez-vous que l’interrupteur d’alimentation est
à la position ON et que la caméra ne soit pas demeurée
sur AIM (mode Conguration) sur le terrain.
4. Assurez-vous d’utiliser une carte SD reconnue et de
bonne qualité dans votre caméra. Tasco recommande
les cartes SD de marque SanDisk® jusqu’à 32Go. Notre
expérience a démontré que les cartes SD de mauvaise.
DÉPANNAGE / FAQ
Page 34

34
La caméra prend des images continues sans sujet
Une caméra a ce qu’on appelle un « faux déclenchement »
lorsque le capteur PIR semble détecter du mouvement et de
la chaleur devant l’objectif de la caméra alors qu’il n’y a aucun
sujet dans le cadre. Ces « faux déclencheurs » sont le résultat
du positionnement de la caméra dans un environnement où il
y a un mouvement associé à des branches d’arbres devant la
caméra; une forte chaleur en avant-plan ou un coup de vent
peuvent également déclencher la caméra. Installer une caméra
au-dessus de l’eau peut aussi être une cause potentielle de ce
problème. Pour remédier à cette situation :
1. Essayez de déplacer la caméra dans une zone qui
ne présente aucun de ces problèmes ou éliminez les
éventuels obstacles à proximité de l’objectif, si possible.
2. Si la caméra continue à prendre des photos lorsqu’il n’y a pas
de sujets, testez-la en la plaçant dans un environnement
intérieur et en visant un endroit où il n’y a pas de mouvement.
3. Si la caméra continue de prendre des photos sans
sujets, il y a probablement un problème de composants
électroniques. Si tel est le cas, veuillez communiquer avec
le service à la clientèle de Tasco pour retourner la caméra
et la faire réparer.
La durée de vie des piles est plus courte que prévue
1. La durée de vie de la pile varie en fonction de la
température de fonctionnement et du nombre d’images
prises sur une période donnée. Généralement, la caméra
de sentiers Tasco est capable de capter plusieurs milliers
d’images avant que les piles soient déchargées.
2. Vériez que vous avez bien utilisé des piles alcalines ou
au lithium neuves. Tasco recommande d’utiliser un jeu
complet de 8 piles Energizer® au lithium AA dans cette
caméra de sentiers pour obtenir une autonomie maximale.
3. Assurez-vous que l’interrupteur d’alimentation est
à la position ON et que la caméra ne soit pas demeurée
sur AIM (mode Conguration) sur le terrain.
4. Assurez-vous d’utiliser une carte SD reconnue et de
bonne qualité dans votre caméra. Tasco recommande
les cartes SD de marque SanDisk® jusqu’à 32Go. Notre
expérience a démontré que les cartes SD de mauvaise
qualité peuvent parfois réduire la durée de vie de la pile
de la caméra de sentiers Tasco.
Page 35

35
La caméra cesse de prendre des images ou n’en prend pas
1. Assurez-vous que la carte SD n’est pas pleine. Si elle est
pleine (l’afchage indique « FULL », la caméra cesse de
prendre des photos.
2. Vériez les piles pour vous assurer que ce sont des piles AA
alcalines ou au lithium neuves. Voir la remarque ci-dessus
concernant la durée de vie de la pile.
3. Assurez-vous que l’interrupteur d’alimentation / mode est
à ON et non réglé sur OFF ou AIM.
4. Assurez-vous d’utiliser une carte SD de bonne qualité dans
votre caméra. Tasco recommande les cartes SD SanDisk
®
jusqu’à 32 Go.
5. Si l’interrupteur de protection d’écriture de la carte SD
est en position verrouillée, la caméra ne prendra pas de
photos.
6. Si vous avez utilisé une carte SD dans un autre appareil
avant de l’insérer dans votre caméra de sentiers Tasco, vous
voudrez peut-être tenter de la formater en utilisant l’option
« Format » dans le mode Conguration (p. 27). Assurezvous d’avoir d’abord sauvegardé tous les chiers importants,
car le formatage effacera tous les anciens chiers. Dans
certains cas, d’autres périphériques peuvent modier le
formatage de la carte SD de sorte qu’elle ne fonctionnera
pas correctement avec la caméra de sentiers Tasco.
La caméra ne s’allume pas
1. Assurez-vous d’avoir installé toutes les piles dans le
compartiment des piles, en remplissant tous les espaces et
en ne laissant aucun « écart ». Remarque : la caméra peut
fonctionner avec seulement 4 piles si nécessaire, mais elles
devront être changées plus fréquemment.
2. Tasco recommande d’utiliser un jeu complet de 8 piles
Energizer
®
AA au lithium.
3. Assurez-vous que les piles sont installées correctement,
en respectant la polarité. Placez toujours l’extrémité
négative (plate) de chaque pile sur le ressort situé dans
son réceptacle, à l’intérieur de la caméra.
4. Après avoir déplacé l’interrupteur de « OFF » à « AIM »
ou « ON », assurez-vous qu’il est correctement positionné
pour assurer le bon mode (éviter les positions « entre »
deux modes).
5. Ne déplacez pas l’interrupteur directement de « ON »
à « AIM » – déplacez toujours l’interrupteur à « OFF »
d’abord, puis à « AIM ».
Page 36

36
Problèmes de qualité des photos ou des vidéos
1. Les photos ou les vidéos de nuit sont trop sombres
a) Vériez l’icône de l’indicateur de pile pour voir si la pile
est chargée. Le ash cessera de fonctionner vers la n de
la durée de vie des piles.
b) Vous obtiendrez de meilleurs résultats lorsque le sujet
se trouve dans le rayon idéal du ash, soit un maximum
de 40 pieds de la caméra. Les sujets pourraient paraître
trop sombres s’ils sont plus éloignés.
c) Veuillez noter que lorsque la caméra est réglée sur
une séquence rapide (rafale) ou sur 3 photos, ou avec
des réglages d’intervalle très courts, certaines images
peuvent paraître plus sombres que d’autres en raison de
la réponse et du redéclenchement rapides de l’appareil,
laissant ainsi moins de temps au ash pour se recharger
complètement avant le prochain déclenchement.
2. Les photos ou les vidéos de jour paraissent trop sombres
a) Assurez-vous que la caméra n’est pas orientée vers le
soleil ou d’autres sources lumineuses pendant la journée,
car cela pourrait causer une surexposition et donner des
résultats plus sombres.
3. Les photos ou les vidéos de nuit paraissent trop claires
a) Vous obtiendrez de meilleurs résultats lorsque le sujet
se trouve à l’intérieur du rayon idéal du ash, soit pas
plus de 10 pi (3 m) de la caméra. Les sujets pourraient
paraître trop clairs s’ils sont plus rapprochés.
4. Les photos ou les vidéos de jour paraissent trop claires
ou trop sombres
a) Assurez-vous que la caméra n’est pas orientée vers le
soleil ou d’autres sources de lumière pendant la journée.
5. Dominance de couleur rouge, verte ou bleue
a) Sous certaines conditions d’éclairage, le capteur peut
devenir confus et produire des images de couleurs moins
précises.
b). Si cela se produit de façon constante, le capteur pourrait
avoir besoin d’être réparé. Veuillez communiquer avec le
service à la clientèle de Tasco.
Page 37

37
6. Les clips vidéo sont trop courts ou prennent n prématurément
a) Assurez-vous que la carte SD n’est pas pleine
(l’afchage indique FULL).
b) Assurez-vous que la caméra soit munie de bonnes piles.
c) La durée maximale des vidéos est de 10 secondes par
clip pour assurer une longue durée de vie des piles.
La date et l’heure sur les images ne sont pas correctes
1. Assurez-vous d’avoir réglé l’heure et la date dans le
mode Conguration (p.26).
2. Vériez que les piles ont toujours un niveau de puissance
adéquat. Remplacez toujours toutes les piles en même
temps.
Les photos ne captent pas le sujet d’intérêt
1. Essayez d’installer votre caméra dans un endroit où il n’y
a pas de source de chaleur dans la ligne de visée de la
caméra.
2. Dans certains cas, l’installation de l’appareil près de l’eau
risque de lui faire prendre des photos sans sujets. Essayez
de diriger l’objectif de la caméra au-dessus du sol.
3. Si possible, évitez de placer la caméra sur de petits arbres
susceptibles d’être secoués par des vents violents.
4. Retirez les branches qui se trouvent juste devant l’objectif
de la caméra.
Le voyant DEL « AIM / Status » clignote ou ne clignote pas
1. Lorsque le commutateur d’alimentation de la caméra est
réglé sur AIM (dans le mode Conguration), le voyant DEL
« AIM / Status » situé à l’avant de la caméra clignote lorsqu’il
détecte un mouvement. Ceci est uniquement à des ns de
conguration et aidera l’utilisateur à positionner et diriger la
caméra pour vérier la zone de détection et de couverture.
2. Lors de l’utilisation, le voyant DEL ne clignote pas
pendant que la caméra prend une image. C’est pour
aider à garder la caméra à l’abri du regard de la proie.
Page 38

38
Problèmes d’écran ACL
1. L’écran LCD s’allume mais aucun texte n’est afché.
a) Après avoir déplacé l’interrupteur d’alimentation
de OFF à AIM ou ON, assurez-vous qu’il est
correctement positionné pour assurer le bon mode
(éviter les positions « entre » deux modes).
b) Ne déplacez pas l’interrupteur directement de ON
à AIM – déplacez-le toujours à OFF d’abord, puis le
remonter à AIM.
La caméra ne retient pas ses réglages
Assurez-vous d’avoir bien sauvegardé les modications
apportées aux paramètres que vous avez dénis en mode
Conguration, en appuyant sur OK après avoir modié le
réglage. Si vous ne sauvegardez pas votre nouveau réglage
après l’avoir modié, la caméra continuera d’utiliser le
réglage original par défaut pour cet élément ou cette option.
Page 39

39
Numéro de modèle 119270CW / 119271CW
Type de capteur d’image/
Résolution
CMOS, 2millions de pixels
Résolution de l’image –
Mode photo
6MP (119270CW) ou 8MP (119271CW) *
Champ de vision angulaire
de la lentille
47degrés (+/– 2degrés)
Capteur passif
àinfrarouge(PIR)
Oui, sensibilité automatique
Temps de réaction du
déclencheur (photo)
1,0seconde
Temps de réaction du
déclencheur (vidéo)
<3,0secondes
Intervalle de déclenchement 5s, 15s (par défaut), 30s, 1min, 5min
Nombre de DEL àinfrarouge 22DEL, faible luminescence 23 à 850nm
Rayon de ash IR max 40pieds (850nm)
Stockage
Carte SD/SDHC, capacité jusqu’à 32Go, Classe
4ou supérieure
Indicateur DEL
«Status/AIM»
Oui
Résolution de la vidéo 720p (1280x720)
Durée du clip vidéo 10secondes ch.
Format de chier JPEG (photos) / AVI (vidéos)
Impression Date /
Heure / ID
Oui
Exposition Auto
Équilibre des blancs Auto
Alimentation 4ou 8piles AA (alcalines ou au lithium)
Consommation d’énergie <200mA (<650mA avec ash DEL)
Résistant à l’eau Oui, classé IP54
Température de
fonctionnement
-10
°
C ~ 60°C
Température derangement -20
°
C ~ 80°C
SPÉCIFICATIONS TECHNIQUES
*Résolution 6 MP ou 8 MP par interpolation logicielle
Page 40

40
GARANTIE LIMITÉE D’UN AN
Votre produit Tasco est garanti être exempt de défauts de matériaux et de
fabrication pendant un an après la date d’achat. Advenant un défaut sous
cette garantie, nous réparerons ou remplacerons le produit, à notre discrétion,
à condition que vous retourniez le produit affranchi. Cette garantie ne couvre
pas les dommages causés par une mauvaise utilisation, une mauvaise
manipulation, une installation ou une maintenance effectuée par quelqu’un
autre qu’un service après-vente Tasco autorisé.
Tout retour effectué sous cette garantie doit être accompagné des éléments
énumérés ci-dessous :
1. Un chèque ou mandat-poste de 10,00 $ pour couvrir les frais
d’affranchissement et de manutention.
2. Nom, adresse et numéro de téléphone de jour pour le retour du produit.
3. Une explication du défaut.
4. Une copie de votre preuve d’achat datée.
5. N’envoyez pas d’accessoires (piles, cartes SD, câbles), seulement le
produit à réparer.
Le produit doit être bien emballé dans un carton d’expédition extérieur robuste
an d’éviter tout dommage pendant le transport et expédié à l’adresse indiquée
ci-dessous :
AUX ÉTATS-UNIS Envoyer à : AU CANADA Envoyer à :
Tasco Tasco
Att. : Réparations Att : Réparations
9200 Cody 140 Great Gulf Drive, unité B
Overland Park, Kansas 66214 Vaughan (Ontario) L4K 5W5
Pour les produits achetés hors des États-Unis ou du Canada, veuillez contacter
votre revendeur local pour les renseignements de garantie applicables.
En Europe, vous pouvez également contacter Tasco à l’adresse suivante :
Tasco Germany GmbH
Centre de service européen
Mathias-Brüggen-Str. 80
D-50827 Cologne
ALLEMAGNE
Tél. : +49 221 995568-0
Télécopieur : +49 221 995568-20
Cette garantie vous accorde des droits juridiques particuliers.
Vous avez peut-être d’autres droits qui peuvent
varier d’un pays à un autre.
© 2018 B.O.P
Page 41

41
FCC Compliance Statement
This equipment has been tested and found to comply with the limits for
a Class B digital device, pursuant to part 15 of the FCC Rules. These
limits are designed to provide reasonable protection against harmful
interference in a residential installation.
Operation is subject to the following two conditions: (1) This device may
not cause harmful interference, and (2) this device must accept any
interference received, including interference that may cause undesired
operation.
This equipment generates, uses and can radiate radio frequency energy
and, if not installed and used in accordance with the instructions, may
cause harmful interference to radio communications. However, there is
no guarantee that interference will not occur in a particular installation.
If this equipment does cause harmful interference to radio or television
reception, which can be determined by turning the equipment off and on,
the user is encouraged to try to correct the interference by one or more of
the following measures:
• Reorient or relocate the receiving antenna.
• Increase the separation between the equipment and receiver.
• Connect the equipment into an outlet on a circuit different from that
to which the receiver is connected.
• Consult the dealer or an experienced radio/TV technician for help.
The device does not contain any user-serviceable parts. Repairs should
only be made by an Authorized Bushnell repair center. Unauthorized
repairs or modications could result in permanent damage to the
equipment, and will void your warranty and your authority to operate this
device under Part 15 regulations.
The shielded interface cable which is provided must be used with the
equipment in order to comply with the limits for a digital device pursuant to
Subpart B of Part 15 of FCC Rules.
Page 42

42
Page 43

43
Page 44

©2018 B.O.P.
For further questions or additional information please contact:
TASCO
9200 Cody
Overland Park, KS 66214
1-800-423-3537
www.tasco.com
 Loading...